


robnbill
-
Posts
841 -
Joined
-
Last visited
Content Type
Profiles
Forums
Gallery
Events
Everything posted by robnbill
-

Brig Eagle by robnbill - 1:48
robnbill replied to robnbill's topic in - Build logs for subjects built 1801 - 1850
Sorry. I have had a number of non-shipbuilding issues that over took my build. However, the build is still underway I just have been neglecting updates. Currently I am working on a detailed rigging plan. I should have that completed fairly soon. Once that is completed, I will start constructing the ropes and fittings. At that point I will also be ready to add and update on the build. -
Regarding to stain or not, I have found on my Eagle I am using white maple, walnut, cherry, and the occasional piece of boxwood. i found covering everything with coating of a light stain, puts all the wood into the same color pallet and unifies the look of the woods while still allowing the beauty of the various woods to show through.
-
One other thought on resources, I found it was handy to have a searchable set of Mastini's English/Italian Dictionary. So I bought on Amazon and downloaded it to the Kindle on my iPad. It came in handy when I ran across a term in the instructions (Usually in the tables). I found that once I had that, and became comfortable in the style Mamoli used, the instructions were fairly good. I did not follow them in lockstep since there a number of changes I wanted to make to my model based upon research, or I felt it was something I wanted to put off installing until a later point in the build. For the latter, I would mark the bottom of the page so I remembered to come back to it. Their rigging was great once I figured out how to interpret them. I wrote up a guide on how to interpret them if you are interested, It is here - Mamoli Rigging.
- 67 replies
-
- 1
-

-
- rattlesnake
- mamoli
- (and 1 more)
-
Hey Julie, this is looking great. One trick I learned from others on the forum is to use a combination of wood glue and CA when attaching strips. The CA can be placed along the strip in several spots with the wood glue in between. This allows the CA to hold the strip while the wood glue cures. Another thing you can do is to use CA and your bending iron. The CA will adhere almost immediately with the application of heat. However, if you get it too hot, it will burn off.
-
Dave, if you look at the 1:00 mark on this video you will see that cabinet from the front side. Captain's Cabin
- 742 replies
-
- 5
-
-
- constitution
- frigate
- (and 1 more)
-
Recommendations For A Good Milling Machine
robnbill replied to Thistle17's topic in Modeling tools and Workshop Equipment
It does look exactly like it. I know it, like all Grizzly machines is made in China. Now I just have to learn to use it as well as you do! -
Recommendations For A Good Milling Machine
robnbill replied to Thistle17's topic in Modeling tools and Workshop Equipment
I would just add a couple of data points. As Keith mentioned, weight is an asset with a mill. However for me there are also weight limitations since I have to get any tool into my basement workshop. That said, a used Bridgeport would be fantastic but I would never be able to get it into my shop. A micro mill is benchtop mounted but I need the bench space and would not want to lift the mill on and off the bench as I need it. Secondly, larger units can mill smaller pieces, but the opposite is not true. Micro mills will never be able to mill using larger bits. However, micromills such as the Sherline or Proxxon mills are very accurate on small scales, they just don't have the power of scope to mill larger pieces. A long XY table is great providing it has the rigidity to hold longer pieces and you have the space for the table to shift out on either side of the mill. I went with the Grizzly G0759. It can be converted to CNC but doesn't come that way. It was small enough that I could get it into my shop and still weighty enough to mill what I would be building. Before I would look at a CNC conversion, I would recommend a good Digital Read Out (DRO). The DRO will allow you to be very accurate but there is a cool factor to having a CNC mill. Lastly, the cost of accessories can double the cost of your mill. Of course you can buy these as you need them, but most mills will require a substantial outlay in accessory cost before you will be able to use them. -
You are doing a great job with this. One thing I found very useful when building my Mamoli Constitution was to use my phone to take pictures of the instructions. Then I would use my iPad or iPhone to enlarge them as needed. This saved paper and could be put to immediate use. Once through a step the photos could be discarded. Mastini's book is an excellent reference for Italian boat terminology.
- 67 replies
-
- 1
-
-
- rattlesnake
- mamoli
- (and 1 more)
-
You are doing a great job with the joinery. I have a couple of suggestions you might want to look at. First is to try to align your frame sections with the wood grain. This makes the strongest frame. This minimizes the grain running across the short section of the frame (as shown in the second frame from the top in your last photo). This is never perfect, but was the technique used by the builders. Second, I found it good insurance to glue the frames up on top of the template. This insures the frames do not get sprung one way or the other during glue up.
-
Thanks Chuck. I will be trying this technique if I ever actually finish my Eagle.
- 1,048 replies
-
- 4
-
-
- cheerful
- Syren Ship Model Company
- (and 1 more)
-
This is looking great Chuck. I do was hoping you could give a few more details on how you printed the flag. Was the tissue paper designed for Ink Jet or were you able to rig it? The process start to finish would be a great addition to our data since sooner or later we all run into making flags to fit our models. Bill
- 1,048 replies
-
- 5
-
-
- cheerful
- Syren Ship Model Company
- (and 1 more)
-
More clamps, I must buy more clamps!!! 10 on the way.
-
There is no record of exactly what boats were on the Constitution at any given time. There were many different ones on the ship at various times and they all tended to have a short shelf life. During a battles, these tended to get damaged pretty quickly so they were replaced. I recommend you scan through the various literatures that are available from the AOS to the US Navy archives. Then just choose a number and styles and sizes that represent those that could have been on it at any time. If it is to scale and was on the ship, no one is going to fault you for choosing one type over the other.
- 6 replies
-
- 2
-
-
- mamoli
- constitution
- (and 1 more)
-
Brig Eagle by robnbill - 1:48
robnbill replied to robnbill's topic in - Build logs for subjects built 1801 - 1850
Thanks all. Elijah, the sheaves in the masts themselves were used to raise the mast sections up to where they were mounted. Each mast section had to fit through the cross tree of the mast below. It is a really neat process how they rigged the ships with out needing cranes to do it. -
Masting and Rigging Spreadsheet Danny Vadas
robnbill replied to John Allen's topic in Masting, rigging and sails
With Excel 2011 for the Mac it will not work. I can finally get it to open, but none of the buttons will work. Again, I think it is using ActiveX and that is not supported. -
One trick I used on my Connie was to drill a small hole in the end of the mast and glue in the snipped off end of a needle. I had to do this on the Connie because the blocks I had glued into the hull still allowed for a bit of slop. The small needle point was enough to keep the foot in place while the rigging was put in place.
-
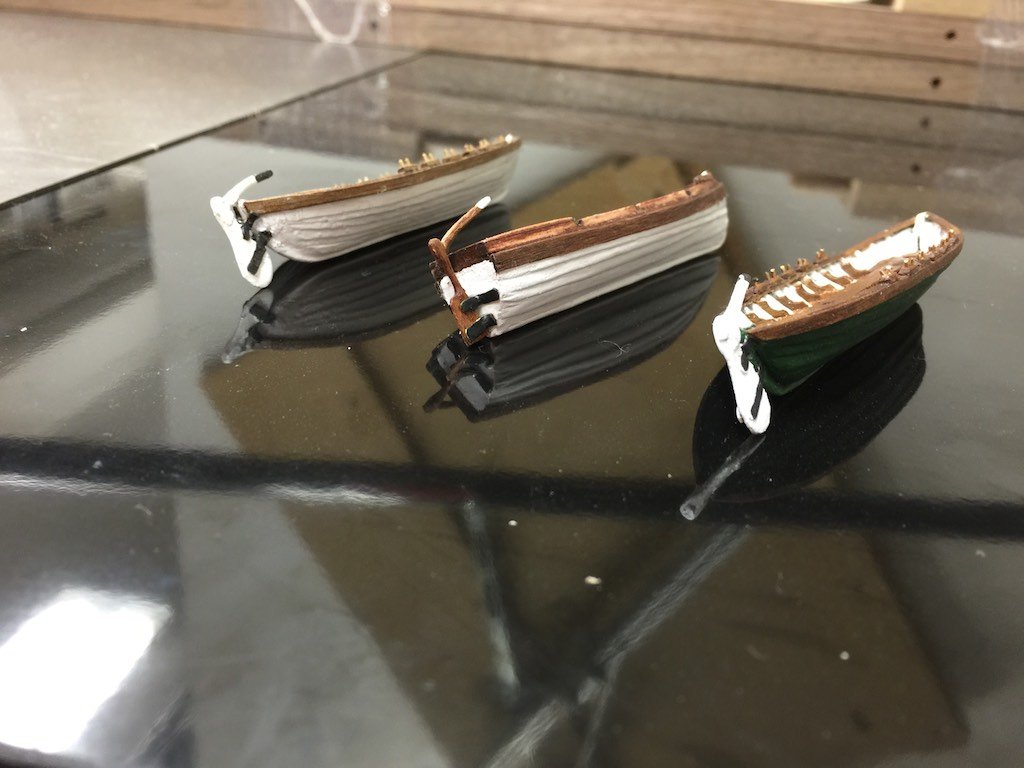
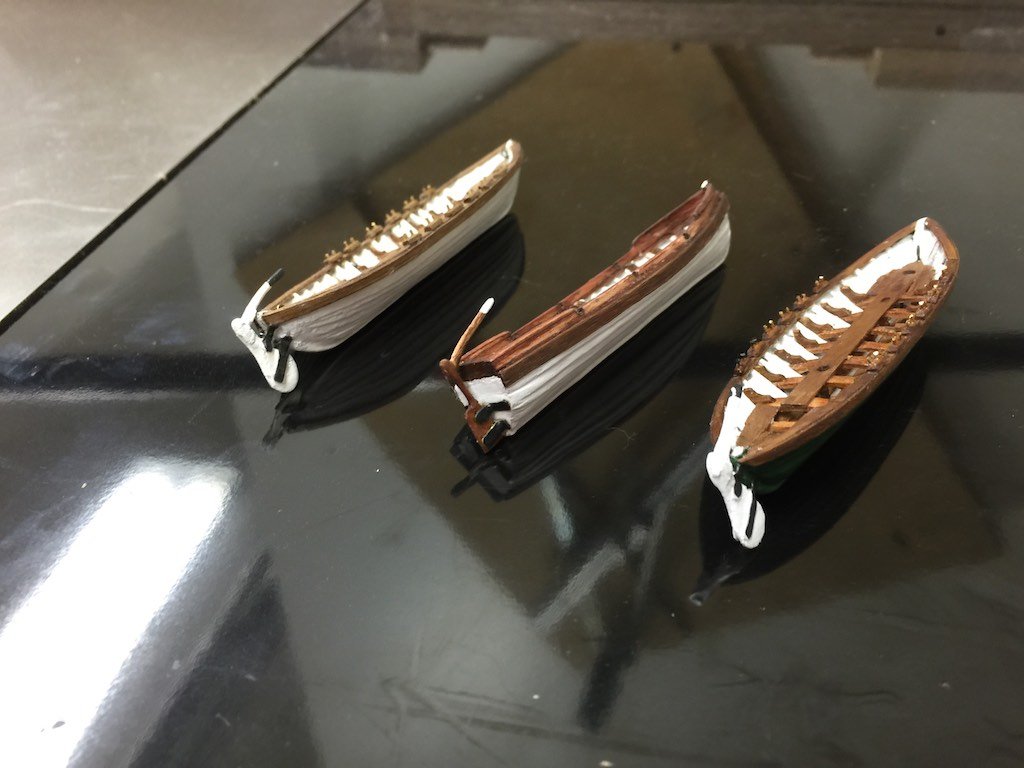
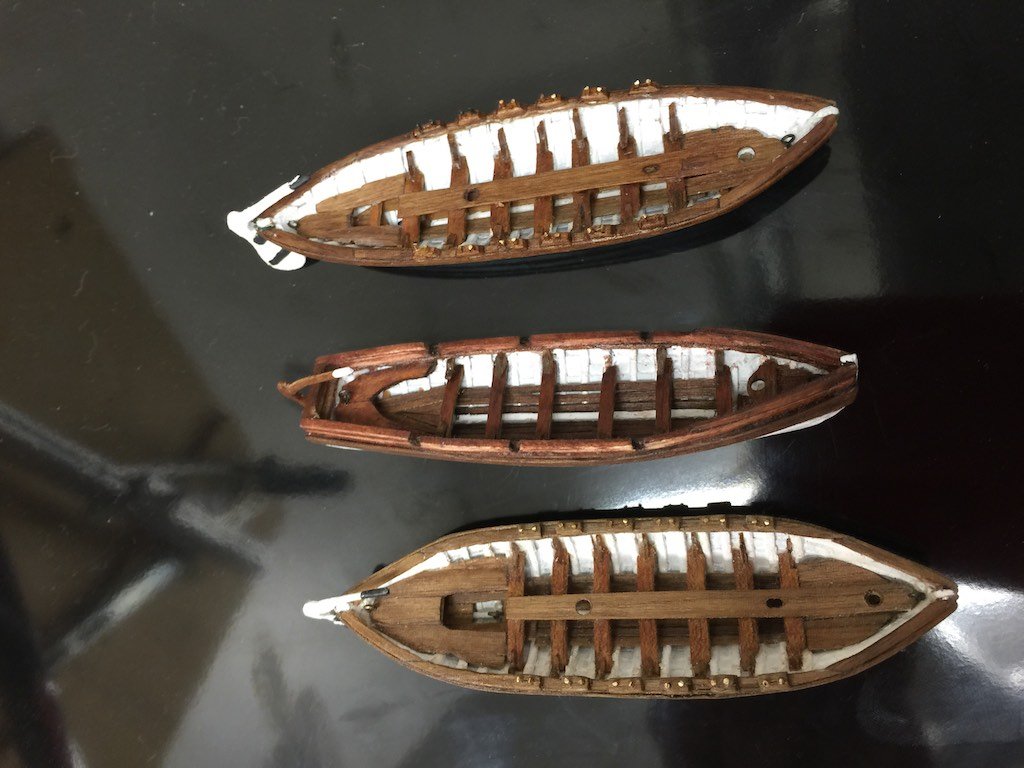
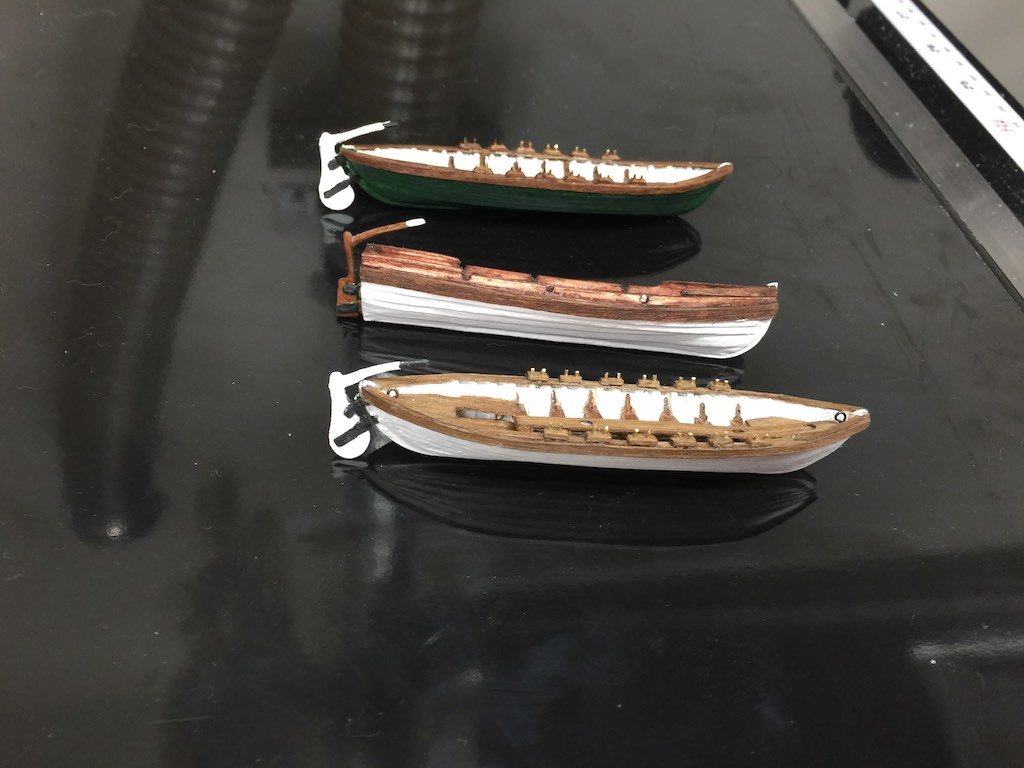
I found the Mamoli ship's boats to be terrible. If you worked hard enough you could get something out of it, but I decided it was less work to build the ship's boats from scratch. There are many examples on how to do this in build logs here. You probably already have enough scrap from your ship to do it. They are a fun mini-project. Worst case is you find you don't like them and buy one from Model Expo or another vendor. You still would carry additional skills with you. Give them scratch building them a try. they really are a great small project. Here are some of mine for my Mamoli Constitution.
- 6 replies
-
- 3
-
-
- mamoli
- constitution
- (and 1 more)
-
Masting and Rigging Spreadsheet Danny Vadas
robnbill replied to John Allen's topic in Masting, rigging and sails
I have never been able to open this with macros. I think ActiveX is used in this version of Excel and is no longer supported. By turning off Macros, telling Excel to open and repair and disabling macros, and opening in read only mode, it will open - sort of - but will not work. -
I have found inlaying them slightly does several things, if fitting tightly to the base of the brackets, it looks great and second, it provides a tiny bit of more support overcoming the slight slop of the screw through the bracket, and lastly, it also allows you to add epoxy under the bracket attaching the bracket to the base.
-
Great job with the masts and hoops. For my 2 cents, I would include the boom and rest on the foremast. They would use that to hold the sail outwards of the main mast sails. Without it, they would not fill downwind. I think not staining the mast between the doublings is great. there are so many details rigged in that area that they tend to get lost in the black. On the other hand, the black also contrasts with the tan of running lines that would be there as well. So it is up to you. I left my Eagle's light colored. Keep up the work. Your attention to detail and getting it right is what will make your final ship special.
-
Lon, when you are sizing the case the general rule is there should be 2" of space all around the ship. You can see the dimensions I used for both my Connie and the case. You will need to adjust the size accordingly since your scale is larger. I also was concerned by line of sight. So I did some calculations using the CAD program to insure that the ship's tops would not be hidden when an adult was standing a few feet from the ship.If it was too low it would have been. So the bottom of the case was adjusted up for that. Constitution Size 39 x 28 x 14 Case interior dimension 43 x 30 x 18
- 335 replies
-
- 1
-
-
- Constitution
- Mamoli
- (and 3 more)
-
Thanks Lon. I PM'ed you with the file.
-
Also, not to second guess you, but I believe that the AOS has the crows feet shown on it. You are correct in the assumption that it could have. I think it almost certainly had them when it left the yards. However, the early 1800's saw the demise of the use of them. So you could go ether way. They look cool and were certainly part of the ship. Whether they were still on board by the period you are targeting is anyone's guess.
- 1,348 replies
-
- 2
-
-
- constitution
- model shipways
- (and 1 more)