robnbill
-
Posts
841 -
Joined
-
Last visited
Content Type
Profiles
Forums
Gallery
Events
Everything posted by robnbill
-
 I drilled all the holes in the rails on both sides to add the hammock cranes to the railing. I need to get these done before I obstruct them with the shrouds. I installed the hammock frames on the port side and have almost completed the netting on the same side. The starboard has the lines run through the frames but no netting yet. Once the nets were installed and the glue fired, I rubbed the beeswax and turpentine mixture into the netting. I also installed the same netting on the main masts fighting platform's handrail. I also cleaned up and reviewed my workbook on rigging sizes for the Connie. I am going to use the rigging sizes called out during the 1927 restoration. During the last major restoration the lines were converted to polypropylene and the line diameters changed. For instance in 1927 the main mast lower shrouds were 12" in diameter. These are now 10" diameter shrouds. Since the 1812 configuration was Hemp, the 1927 diameters are probably the better ones to use.
 -
I too have been using the same bending iron as Mark and have had it for a very long time. I use it along side all of the other methods listed here. It really depends on what I am trying to do. You can get a very smooth bend in the wood using it and as bogeygolpher mentioned you can quickly get your planks attached to the hull without having to pin them. I also find it useful in setting something that it difficult to clamp. A small amount of CA and hit the strip with the iron. It is not a perfect solution to everything. You can also overheat the wood, burn it, or burn the CA enough to keep it from adhering so it is certainly not a perfect one size fit's all solution. I have found alongside all the other methods, it is a good tool to have in the arsenal. Can you do without it, certainly, but you might find you do like using it.
-
I need to install the hammock cranes before the shrouding obstructs them. The Mamoli plans would shave had me install them mush earlier. The frames in the kit had a bar connecting the uprights across the top. The Connie's frames do not. SO I used my nippers and cut them off and ground them flush with my rotary tool. Then drilled the holes out with a 1mm drill. This seemed the correct size based on the uncleaned holes. I pulled off a length of the thread the plans called out for and used India Ink to dye both the netting and thread black. I counted the frames supplied in the kit and there are 51. I need at most 48 to complete the frames. The termination of the frames - at least forward, is on a board. So this will reduce the numbers by at least two unless I glue the board directly to a frame. I hope to drill and install the frames into the rails next. I also have been holding off adding the ship's boat davits off the galleries. The stern davits were installed a long time ago. I still may just fit them to the ship and not install them since they are obstructive.
-
On the Connie, I painted the hull before I stained her deck or added any deck furniture. The question you have to ask yourself is will I be able to do this later. I the answer is no, then you need to do it before moving on. Since the deck was stained, and the ceilings painted before I put deck fittings on, I took care of painting/staining them as I put them on. Lastly, I have gone through and touched up nicks and nits as I need to.
-
Where to find 28 gauge black wire?
robnbill replied to David Spindle's topic in Masting, rigging and sails
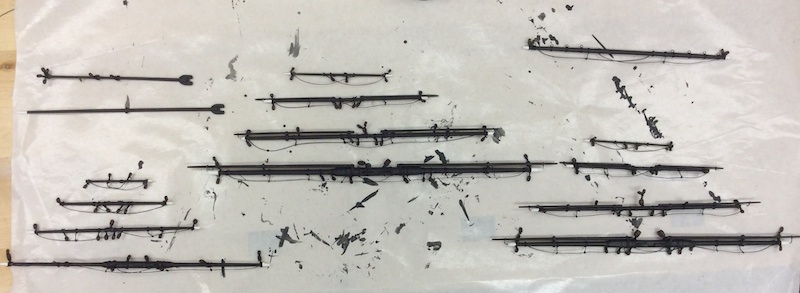
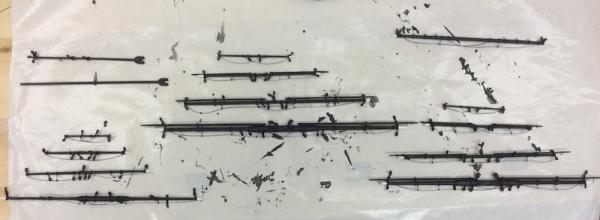
Here is a photo of my rigged spars for the Constitution. This is the Mamoli kit 1:93 scale. These were taken on the paper I painted them on so there is a lot of back splatter but this is the only one I have of them together. These were done with the black thread method.
-
Where to find 28 gauge black wire?
robnbill replied to David Spindle's topic in Masting, rigging and sails
For an alternative to wire, I used black thread and CA to stiffen it. For the stirrups I knotted the end of the thread around a headless small finishing nail. Then I hit the knot with CA. After snipping the end of the thread off this gave m a great stirrup with an eye to thread the foot ropes through. Then I took the black thread stiffened it with a small amount of CA and threaded it through. Once wrapped in place another small amount of CA and it was complete. You could use alternative glues for stiffening and attaching, but for the eye, I would stick to CA. I copied this technique from another modeler on the web - so I can't take credit for it, but it worked well for me. Anyway, this worked for me. -
I completed serving the lower fore mast shrouds. I fully served the forward most shroud on each side. I started attaching the shrouds to the lower mast. I find the middle of the shroud and if I did my serving correctly, the served portion is even on both sides. There is some leeway in the length so I can adjust a mall amount. Since I did not see anything addressing exactly how much should be served, I ended up serving 2 ¼ inches down each side. thread the aft side shroud though the mast, then tie it off fairly close to the mast then serve the two together for about ¾". Once attached, I tape it to the bottom of the mast so it is out of the way as I attach the next set and work my way through. I used a steel guitar string to create 4 deadeye jigs. Hopefully these will be enough to allow me to set up a number of shrouds in tandem. I am doing all of the shroud work that I can before the mast get's stepped and they get attached to the ship. I will probably attach the upper shrouds as well prior to stepping. THen I will see if I want to attach the spars to the mast prior to stepping it. My goal is to do as much as I can before it is on the ship without overstepping my experience and having to redo it all once it gets stepped. Since I will be using Bentinck shrouds for the forward and Main Masts, I added 4 rings in the waterways 2 each side, just forward of the masts and with enough clearance to not impede the Cannons. I have a couple of questions on serving. 1) Is this enough or too much for each of the non-forward shrouds. 2) Does the forward most upper shroud get served? When I reviewed the AOS, it looked as if they did not.
-
When I was building the hull out on my Mamoli Connie I had to make the decision to paint of not. The Mamoli kit was built such that the wood could be left in the natural state and it would look great. In fact the Mamoli photos all show the ship unpainted. However to me personally, it would not look like the Connie. She is a black ship with a white stripe down the gun ports. Even that is up for discussions since there is evidence the strip was also yellow at one point. Just like the British warships of the day. So while the wood looked great, I just liked the look of the Connie painted. It would have been much easier for me to just clear coat the wood since I clear coat after painting anyway. It was not a matter of covering the wood as it was making it look like I wanted it. That said, my next project will be a scratch built admiralty model of the Brig Eagle. I plan (at least right now) on only light stain and clear coating this model. There will still be some details that will require paint such as the cannon etc.
-
how to paint like this?
robnbill replied to luesey's topic in Painting, finishing and weathering products and techniques
As Popeye2sea stated, find a very small high quality brush set, then practice. The great news, is this is just paint. Wood is very forgiving. When I painted my Connie's hull I used a combination of airbrush for the large areas and detailed brushes and magnifying glasses for the bow and stern details. Early on I would paint the what details on, then have to come back and touch up with black where I overpainted. Not once but through several iterations. The details became sharper and cleaner with each iteration. I also found that this was giving me the experience to begin to get it right the first time as I learned how to handle the brushes, load the proper amount of correctly thinned paint, and techniques for applying it to the hull. I still am in awe for those that can do details like the Le Soleil Royal shown above. Henry did a fantastic job on it. I just wanted to give you a perspective from someone who just went through his first learning curve on painting details like this. -
raster to vector conversion
robnbill replied to captainbob's topic in CAD and 3D Modelling/Drafting Plans with Software
Sorry to be late jumping in on this. I just went through this since I am getting prepared to work on plans for the US Brig Eagle. There is a website called VetcorMagic.com. You can go on their site and upload your drawing for free to see how it does. You can do up to two downloads free. After that there is a subscription fee of $8 bucks a month with any time cancellation. You can try it and see if you like what it does before you have to commit to the subscription. I have been please so far and have vectorized probably a dozen or so drawings. Anyway, if you are still looking to do this you can go out and se if it does what you are looking for. -
Thanks Craig. Mort's directions are great and that is what I followed. Now that my spars are all done, I plan on working the foremast first. After looking at all the rigging, AND the advice to do as much as possible off the ship I realized that it is not all or nothing. Like you, this is also my first attempt at a complex rigging so what I decided to do was rig the shrouds on the foremast and work from there. I have also put on as many blocks and rings as I have identified. What I have not done is spool the lines through the blocks as some modlers have done. I am afraid that I would either end up with too much, or not enough line, or have the blocks rigged left when they should be right etc. If I find that my current approach is too restricting, I will change my strategy. Hopefully by then I will have enough experience that I can support the change of strategy. Also, there are three books that I use to augment the Mamoli plans that Mort reccomended. First is the "The 44-Gun Frigate USS Constitution, "Old Ironsides" (Anatomy of the Ship)", the second is "Rigging Period Ship Models: A Step-by-Step Guide to the Intracacies of Square-Rig" and lastly is "Ship Modeling Simplified", by Frank Mastini. The latter has a nautical Italian to English dictionary which I have found to be better than looking up words on Google. I rarely start another step in the model without reviewing all of these as well as tapping into Mort and the rest of MSW. Have you started a build log? That is a great way to get feedback and let the rest of us learn from you! Bill
-
Just a quick update to let everyone know I have not dropped this build off the face of the earth. I have been making a bit of progress. Currently my time in front of Connie is limited by my rotator cuff issues - I am working on that. In the mean time, I get downy to the Connie sporadically. I decided to use the beeswax/turpentine mixture to wax the shrouds. I decided on the wax turpentine mixture since this allowed the wax to fully saturate the shroud rather than just wax on the outside. I saw where some use an incandescent blurb to melt the wax into the shroud but I think this allows me a bit more control over the amount and consistancy of the wax that gets into the rigging. I have cut the shrouds for the lower foremast and stained them using India Ink. I tried a number of different stains from dark brown to India Ink and liked the latter best. I also ran a test of the serving machine and worked that process out. Originally I was going to use a black fly toying line for serving. However, I found that not only could I not see the serving, I could not see it underneath a magnifying glass. The line was too tiny. So I went with a small diameter thread (I think it is #100). Anyway, with the thread the serving is just enough without adding bulk to the shroud. I did not see it anywhere, so I judged that 4 inches of serving for the center of the shroud would be enough for wrapping around the mast. I still plan on fully serving the forward most shrouds on each set. I have started serving the shrouds. Once I have done a few, I will serve the forward most shrouds. I wanted to work out the feel for these before I did something that would be really visible. Anyway, that is the update on the Connie. On another note, I have decided to pursue building the Brig Eagle. I obtained the raw information, i.e. the book, the dissertation, the practicum and the overall ship's plans, to allow me to start working on the lofting plans. Once I am a bit more along, I will start a build log for that. It will be a scratch built PoF build in a fully rigged admiralty style. I have started a personal log to capture everything and will put everything on the on-line log when I get further along with the plans. Thanks for following my logs. When building with wood, it was easy to see I need to take photos and update the log. When working on the rigging, I forget that I need to do this. I promise to update more consistently as I go along with the rigging.
- 335 replies
-
- 3
-

-
- Constitution
- Mamoli
- (and 3 more)
-
One thing you guys might also want to look at it the VectorMagic site. I used it to take jpg files and vectorize them so I could import them into a CAD program. Not perfect, but it works pretty well. There is a $7 per month subscription fee to do more than download two drawings, but testing it out and getting the first two are free. The subscription is cancelable at anytime so it is month to month. So far, I have liked it and think it allowed me to pull in drawings that would have taken me a long time to redraw in CAD. Then I can focus on the lofting plans etc. Bill
-
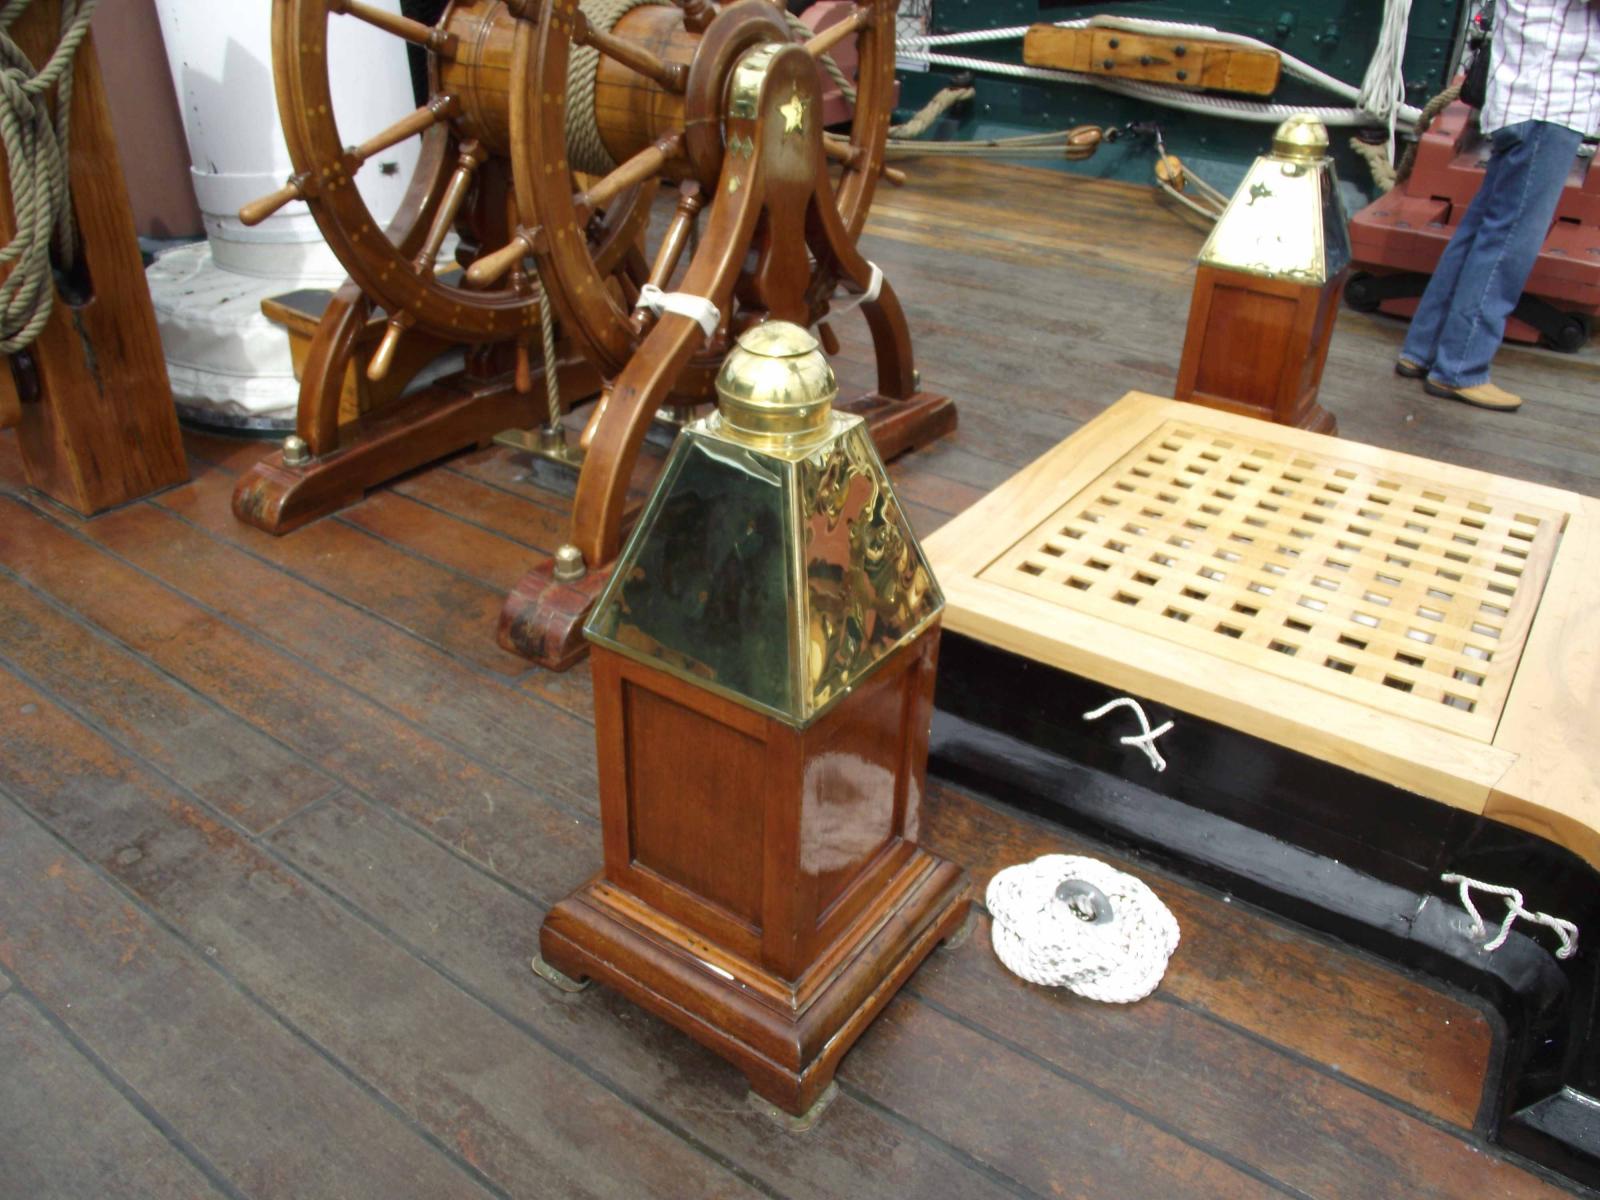
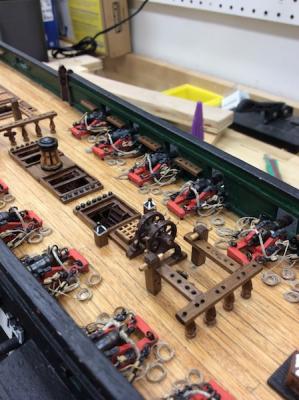
If it makes you feel any better neither did the Mamoli plans. I used photos, and if I recall the AOS to carve mine. Then to put the round tops on them I drill small holes in the top point and glued small ball bearings. Here is a photo of mine as well as a few from the Connie today. The only change I would have made to my construction of them was I aded the ball bearings as an after thought since they did not look correct just coming to a point. So I drilled progressively larger wholes (starting very small) until I had the landing size I wanted of the bearing to be glued onto. In retrospect, it would have been much easier to have drilled the hole before a sanded down the points. It would have also given me a point to sand to that would be very easy to see if it was favoring one plane over another as I sanded it down. Anyway - just my two cents. Bill

-
Thanks Henry. I had found those. It helped me make my decision on how I was going to rig.
-
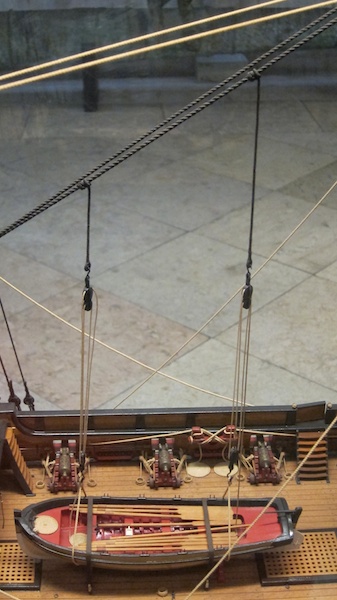
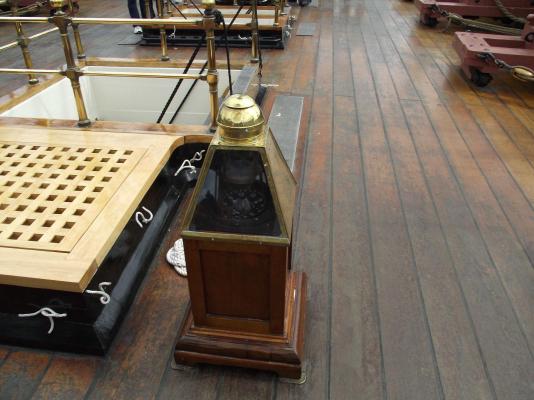
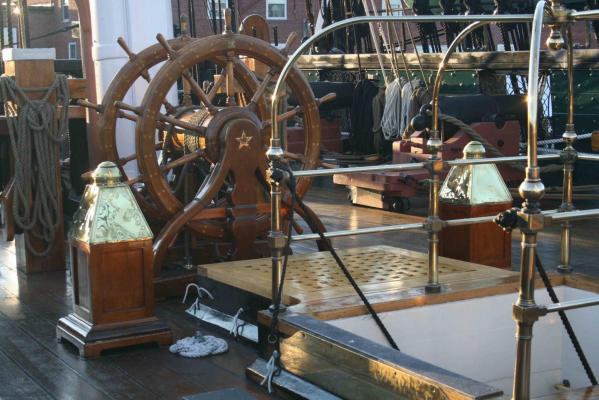
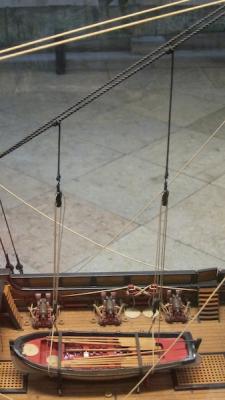
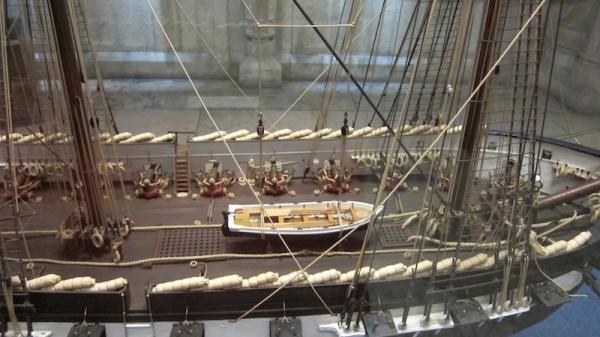
FYI, I took these photos in the Maritime Museum in Lisbon a few weeks ago. I thought you might like to see it since they had the ship's boats rigged similarly - One in the process of being lifted. Why did you decide to position the ship's boat facing aft rather than forward?

- 732 replies
-
- 1
-
-
- constitution
- model shipways
- (and 1 more)
-
Hi Jay, I hope you had a relaxing vacation. While you were away, I looked at this in much detail. The way the Connie is currently rigged seems like a combination of "Best Practices" The futtock shrouds are carried down to a futtock stave. Together they are lashed to the lower shrouds. There are a few catharpins running between the shrouds. However, in addition, lines are also running from each of the stave from each shroud down to the ring of the Bentnick Shroud.. This is just on the Fore and Main. The photos I find of the mizzen do not show this. The question then becomes was this a configuration which would have been possible, or probable during the 1812 action. The history of the Bentnick shroud goes back to the 1700's when it was invented by William Bentnick. These were introduced into the British Navy in the late 1700s. Since Joshua Humphery's and Captain Hull, would know of these practices, it would be entirely possible for them to be in the Connie's configuration during the battle. I was able to find these in the rigging plans from a 1906 Navy Plan. Initially the shrouds were used to relieve pressure on the shrouds during heavy weather. However, during battle these would also assist in retaining the upper masts as the lower shrouds were damaged during a battle. So given that the technology was widespread prior to the Connie being built and that her class was an amalgam of best practices in the design, I think it was entirely possible that the configuration then being much as we see today on the Connie. So that is how I plan on building her.
- 732 replies
-
- 1
-
-
- constitution
- model shipways
- (and 1 more)
-
I purchased a can of Tamiya White Primer from our local model shop. That seemed to work pretty well. My biggest concerns were 1) differing types of wood, 2) mix of metal, wood, epoxy, etc, that all had to prime to a consistent level. I was happy the way the paint performed. The main paints used on the ship were from Model Expo. They had a set specifically for the Connie. I had not issues mixing the two brands. I never mixed colors, but I would use the Tamiya thinner to ad to the Model Expo paint for air brushing, or to thin it enough to brush it on small spots. I also used Tamiya from some specially colors I needed to make the gangway boards look like wood instead of the metal they wee supplied in. Bill
- 335 replies
-
- 1
-
-
- Constitution
- Mamoli
- (and 3 more)
-
Thanks Tim. The reason I asked is when I looked at the Petersson's book on period ship model rigging, he showed multiple catharpins. Granted, the Connie wasn't rigged exactly like all other ships, but I thought I would ask since the AOS diagram could have obscured the multiple pins the way it was shown.
-
I have a question regarding this since I am about to rig this area. In the AOS I could not tell if there was just one catharpin going between the futtocks or one per shroud. My thought is just one running just aft of the mast, but perhaps someone could clarify this for me.
-
Thanks Mort. I have been reviewing the AOS and Period Rigging as well as the Mamoli plans. I am sure as I delve into it I will have numerous questions. I know I feel much better knowing I have everyone's assistance should I get into a jam. I plan on starting on the bow and working my way aft. I have already made some changes to the Mamoli rigging plans based upon the AOS and Peterssens books.
- 335 replies
-
- 1
-
-
- Constitution
- Mamoli
- (and 3 more)
-
So I completed the spars today! Now on to the rigging. Sorry the photos did not come out better but I arranged them on the butcher paper that I used to paint them on. Starting top right is the Spirit Sail Spar, below that are the forward mast Spars. The main mast spars are the set in the middle. The left most set are the mizzen mast with the two spanker spars above them.
- 335 replies
-
- 3
-
-
- Constitution
- Mamoli
- (and 3 more)
-
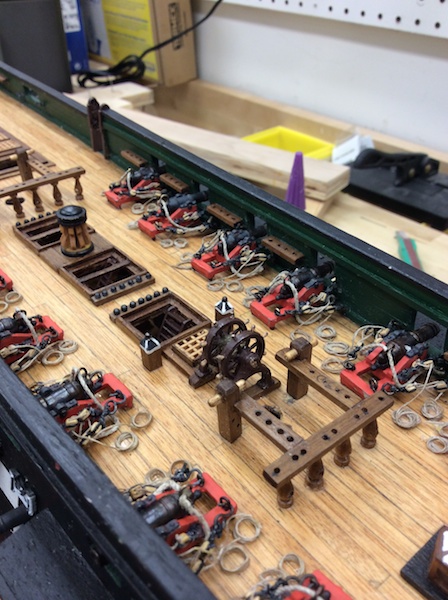
I am building the Mamoli USS Constitution. I just completed the spars and will be starting the rigging. I have bashed the kit a bit. The cannons were not fully rigged so I ordered blocks and line from Chuck to do that. I also had to solder rings onto each of the cannon barrels for the breech lines. I also decided not to use the ship's boats supplied in the kit but chose to build my own plank on frame instead. The wood has been good although my kit is over 20 years old. One of the things I found I had to do, probably because of the age of the wood, is to coat the wood with CA if I were trying to make cannon ball racks, or belaying pin racks. The walnut is very brittle. Otherwise the wood would just split. Even going very slowly from a small size bit to larger. Since I chose to paint the ship, the types of wood did not matter as much. However, I do like the color the Tanganyika stained to for the decking. I should have discarded the metal parts to the stern galleries. They ended up cracking when shaping them to fit the stern. The radius in the gallery inserts were not the same even between the two, much less with the model's lines. SO I ended up using more epoxy than I should have to make them work. I have had to spend quite a bit of time trying to see if something needed me to build it or if it was supplied in the kit. I have not always been able to ascertain from the instructions what is supplied and what is left for me to build. An example of this is the capstan. What I found in the kit was just a spindle. So I pulled out my AOS and built the interior parts to go with it. Much later I found the small pieces for the capstan that were supplied, but mixed in with other parts. Since the instructions were not clear, I did not know to keep digging through the parts. Overall, I found that I end up using this board, or other sources to decide how to build something since as it has been previously mentioned, the instructions are almost nil and sometimes are misleading. Since you already have a lot of experience building models, you should not have any problem with a Mamoli kit. Just go in with your eyes open and knowing you will end up bashing the kit or building it using the instructions as a suggested method, but be ready to fill in the details from your experience.
-
Thanks. I am looking forward to it. It is just new so I don't have anything to go by. I enjoyed rigging the cannons. I am sure I will have questions as I move on.
-
Today I completed the installation of the blocks on all of the spars with the exception of the 4 blocks that I still need to attach to the end of the gaff spar. I will do that then paint them all tomorrow. This will complete this stage of the construction. Other than the rigging, I still have to install the port and starboard ship's boat davits as well as the hammock cranes. I have left these off intentionally until I complete the rigging, or most of the rigging so they will not get in the way. I still need to address the order I rig in. My current thinking is do the upper shrouds, then start on the bow spirit and work my way aft. Any thoughts? This is new territory for me.