HOLIDAY DONATION DRIVE - SUPPORT MSW - DO YOUR PART TO KEEP THIS GREAT FORUM GOING! (Only 36 donations so far out of 49,000 members - C'mon guys!)
×


robnbill
-
Posts
841 -
Joined
-
Last visited
Content Type
Profiles
Forums
Gallery
Events
Everything posted by robnbill
-
 Thanks guys. I am enjoying the ship. The encouraging words are very nice to hear from all of you. I am humbled every time I look at the work done here. It is an inspiration. I am still a long way from finishing this, but it is rewarding everyday.
 -
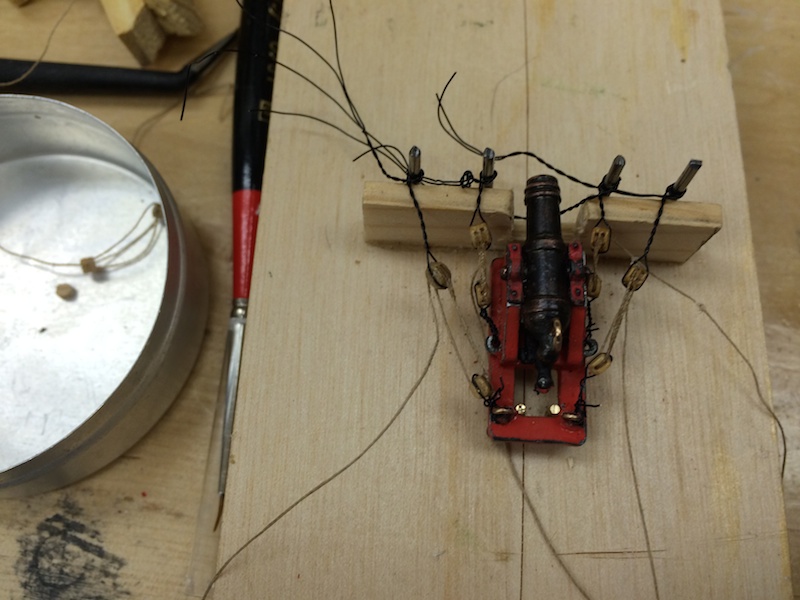
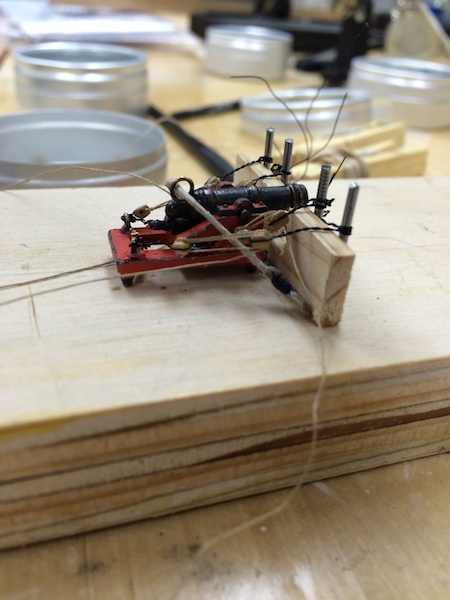
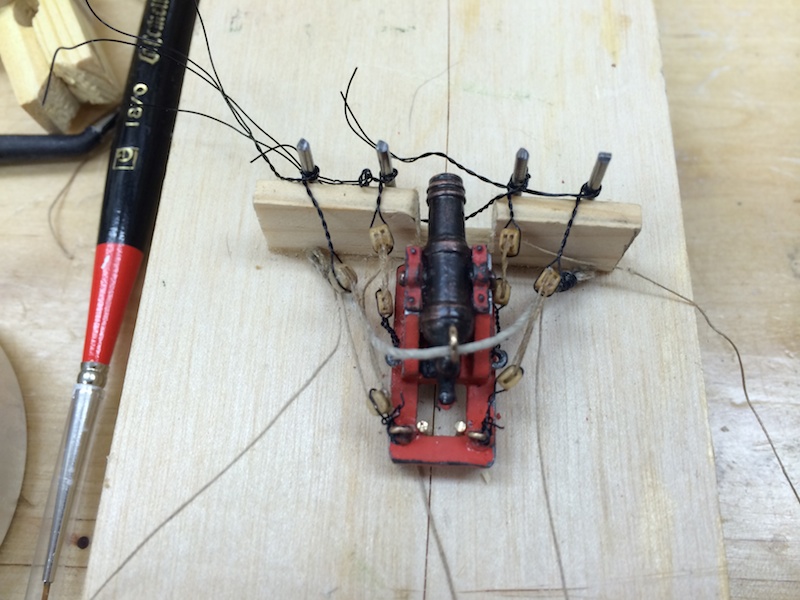
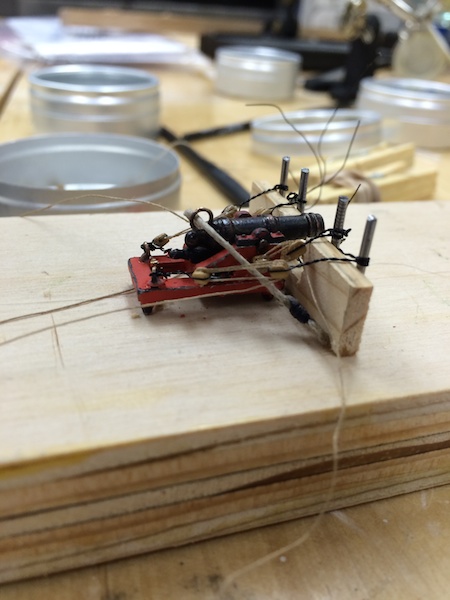
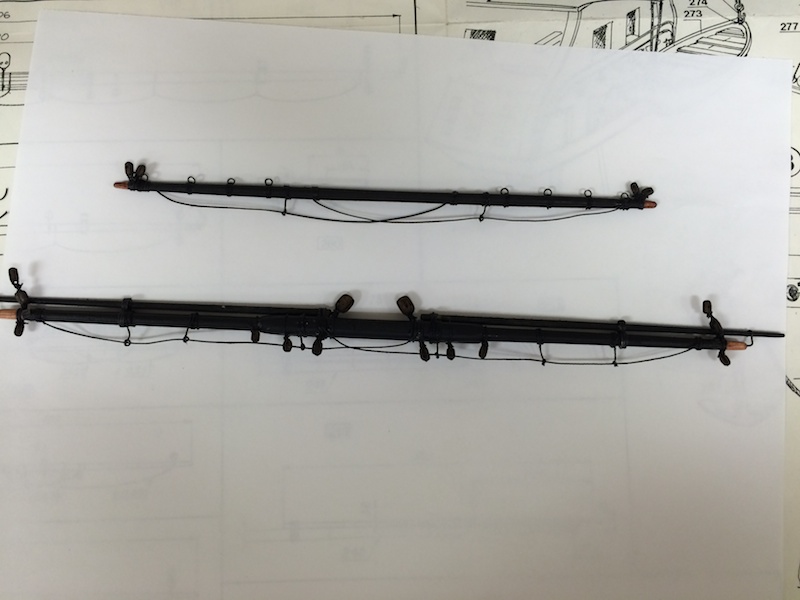
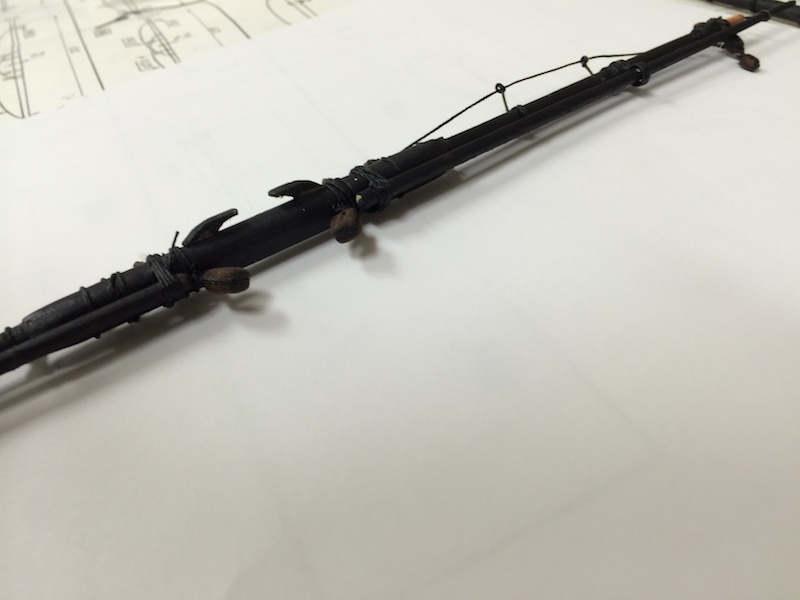
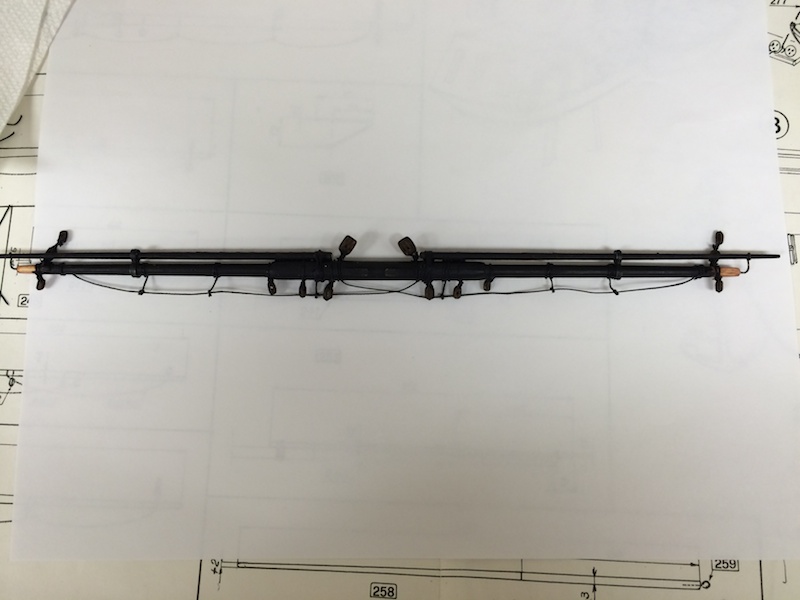
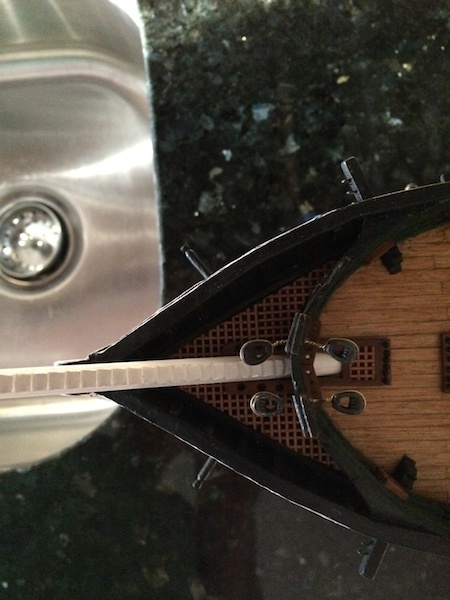
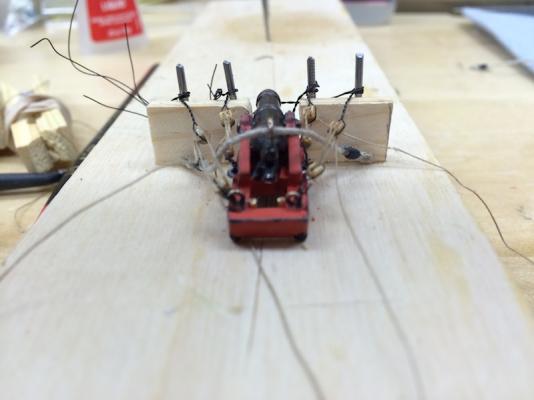
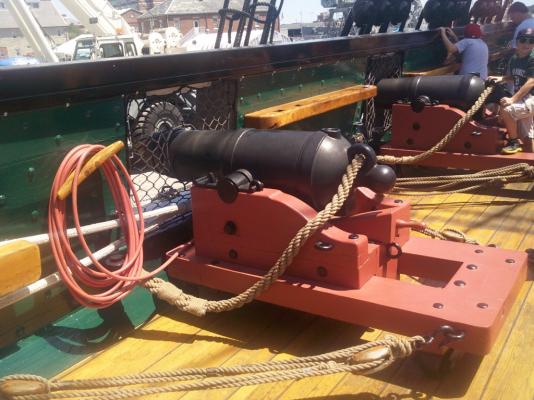
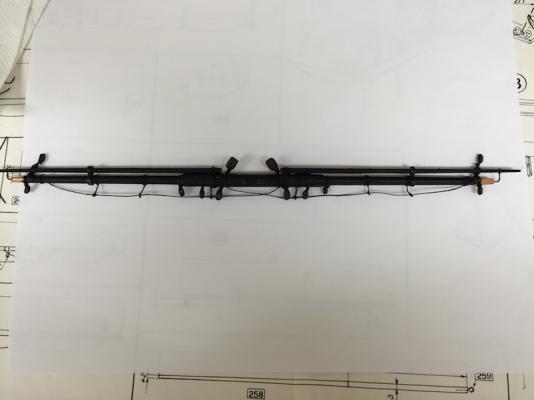
Success. I was able to rig my first cannon today! It took many starts and restarts before I came up with a method for stringing the blocks. First I wire the blocks with 32 gauge black wire. This is touched very lightly with CA as it rounds the block. Then I put the blocks in thinned clothes hangers. Then wax the thread. I found that supergluing the thread makes it too large to go through the holes. I then take a small drill and go through the holes to make sure the CA did not migrate into them. I thread the blocks then wire them to the cannon. I use the jig to position the blocks and to do a last check for the threading. Since there is a right and left version of each block I need to check them. Once all is well, I take a final tension on all the blocks and run a thin coat of CA to lock the rigging in place. Tomorrow I will add the rings to the rigging, touch up the paint (and paint the capsquares black, then install it on the ship. Since I have three sets of rigging on each side I will also need to drill a third hole on each side of the cannon ports. This will be half way up the port and will be for the innermost blocks. I will also need to address making the breeching block look like it is laying naturally. The photos below show the cannon in the jig. The two brass ends seen at the end of the cannon and just inside the frame are part of the jig I made to hold the cannon in place while I worked on the blocks. The bulkhead ends of the blocks will be at different heights when attached to the rings on the ship. Also the breeching line has not been waxed in this photo so is still very fuzzy. That will be fixed tomorrow before installation. The final location of the blocks in relation to the bulkhead will be done after I touch up the cannon tomorrow. I will also need to flake the lines so they lay neatly coiled on the deck beside the cannon. It is not pretty yet, but it is a start that I can work with. I also want to look at a combination of wire rope. Currently I am using wire for both ends seizing. I think I like the way rope would look directly attached to the cannon. So I will try that out tomorrow, that way I can do a nice seizing on the line. If that works I will use rope for the cannon end of the block and wire for the bulkhead. Bill


- 335 replies
-
- 8
-

-
- Constitution
- Mamoli
- (and 3 more)
-
And it explains why the waterways are raised and not addressed like a traditional scupper.
-
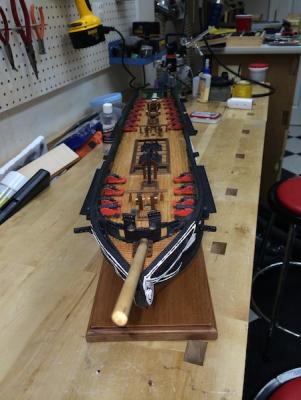
I spent the day working on the canons. After playing with the rigging last night I was not satisfied with my cannons. The spar deck cannons should have had a ring on the breech end of the barrel for the breeching rope to run through. This was not on any of the cannons. I made some small rings and used sliver solder to solder them to the cannon. This had a bit of a learning curve but I only melted on cannon. Luckily I had two extra in the kit. Prior to soldering them I put them in a bath of acetone to remove the old paint. Then I used a wire brush in my Foredom tool to remove the remaining paint and prep it for the soldering. I also put the all the cannon carriages into the acetone to take off all of the paint and remove the CA so I could redo them all. After completing the soldering of the rings I used the wire brush again to clean the barrels then immediately put it in the blackening solution. After 30 seconds, I would remove the barrel, wash it in water, then dry it. Then I buffed each of the barrels. This showed the areas that did not get blackened well. I put it back in the solution for about 20 seconds then repeated the cycle until the barrels were smoothly blackened after buffing. Once the barrels were all completed, I started on the carriages with the wire brush. After disassembling and removing all the paint, I sorted the parts into those that were perfect and those that were broken in some fashion. The main issue was many of the lower carriage frames were missing one of the rings. There were almost half like this so it had to be addressed. I decided to completely remove both rings from all of them. Then I used a diamond burr to completely remove all cast marks since I had not before. I decided to add the ring. I think it will look better than stringing the blocks through the hole directly. Then I reassembled the lower carriages (minus the barrels and capsquares , then repainted them all. I also used a flattened brass wire to make two more of the capsquares that were missing. Tomorrow, if all goes well, I will start working on the cannon rigging. Once I get a few under my belt, then I can return to the spars.
-
Years ago, probably close to 25, I was in Boston and toured the Constitution. If memory recalls correctly, the sailor who was giving the tour pointed out the coamings on the gun deck and remarked that sometimes they would flood the gun deck with water (not much) and throw sand down. This was for traction. Now that being said, I would assume that if the ship is pitching back and forth due to waves or broadsides, much water would be impractical. So I do not have a definitive source, but a memory of the tour. I did find a mention in the book "The Constitution Vs The Guerriere: Frigates during the War of 1812" by Mark Lardas, that in preparation for battle "The guns were cast loose from the ship's bulwarks, where they were normally secured, and made ready for action. Tampions were removed from the muzzles and sponge tubs filled with sea water, so that guns could be swabbed out after each round was fired, dousing the remaining embers before a fresh charge was inserted. To improve sailors' footing on decks that might soon be running with blood, the decks were wetted and sprinkled with sand." My assumption was the wetting is what the sailor was talking about. This water was pumped into the gun deck prior to sanding. Bill
-
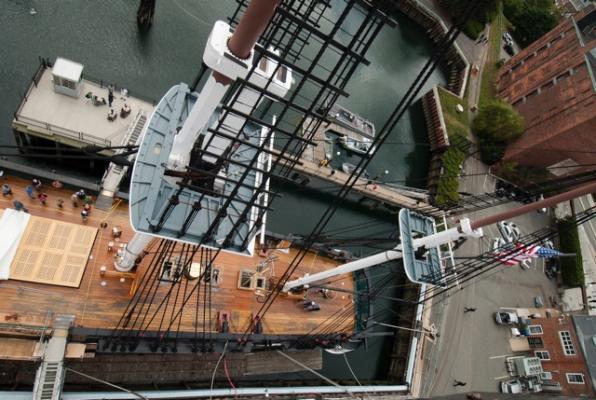
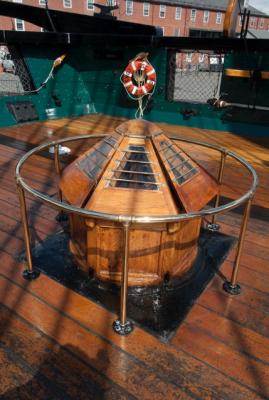
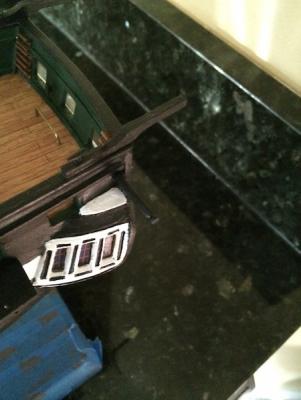
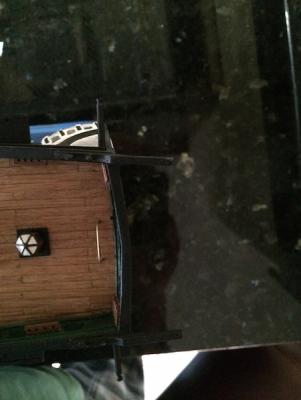
Here are two photos showing the stern. I cannot find any in my collection for the bow, but you can see the waterway at least from a distance in both of these. Hopefully this will help.
-
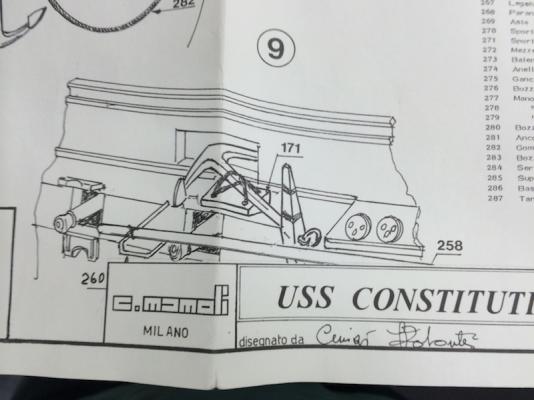
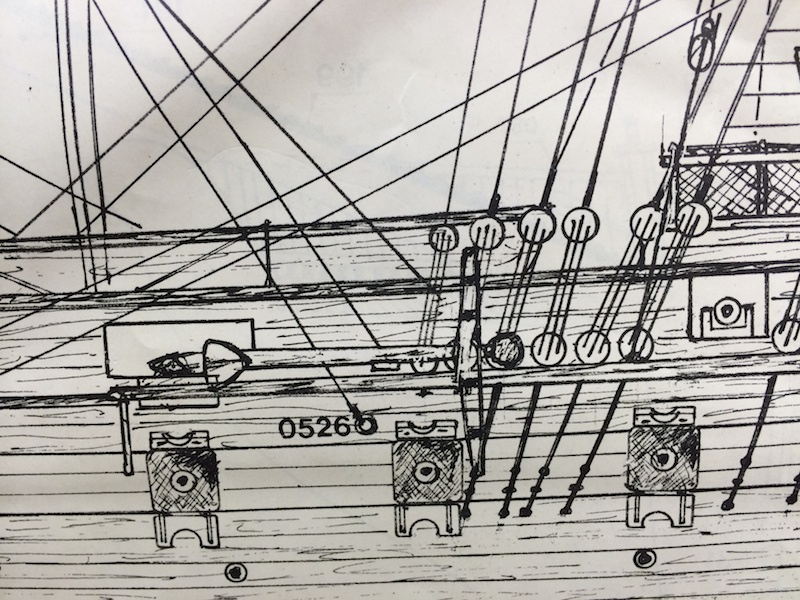
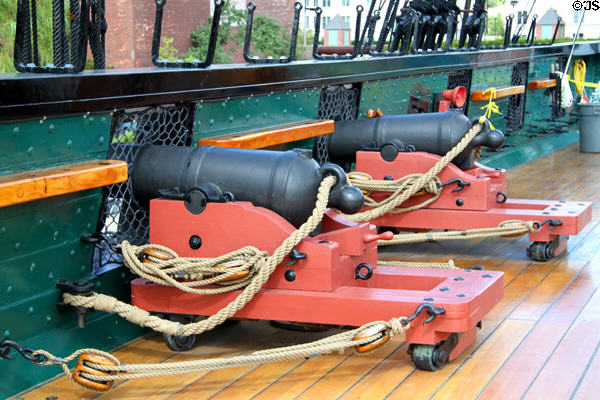
I have a midships plan shown the shape of the waterway lock strake. I also have a shot of one of the cannon that shows the lock strake behind it. My understanding of the water control on the ships was it was designed to allow the officers to flood the decks with a few inches of water during a battle to keep fires down as the sparks flew from the cannons. This was accomplished by pumping water up from the bilges. As a result, the ship does not have the traditional scuppers that you see running the lengths of most ships to take the water away and overboard. There are drains, but they are in specific locations (the holes are below the gun deck) and access through pipes from the drains above. I hope this helps. Bill Midship Section.pdf
-
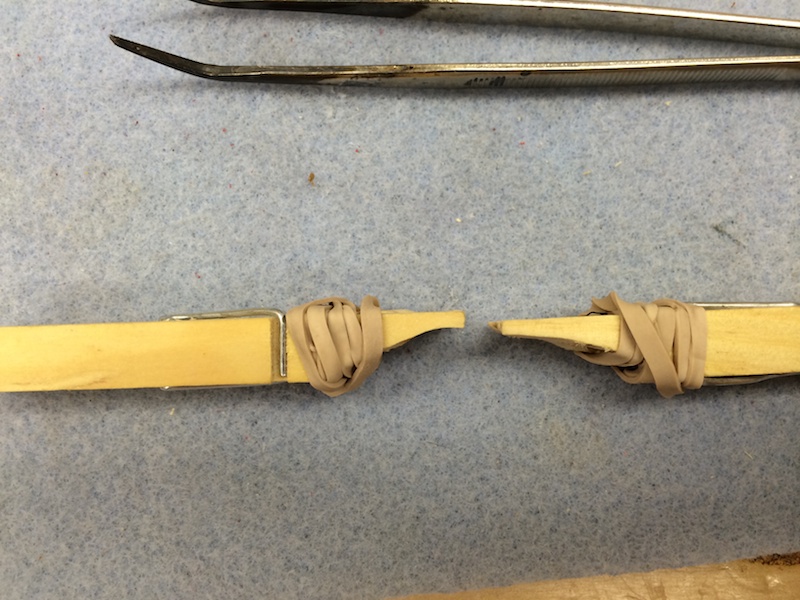
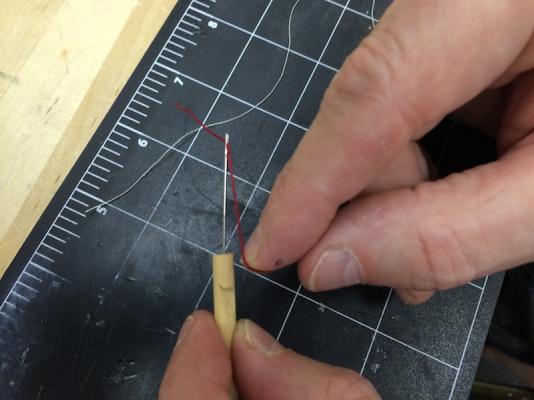
FYI, I found that if you wrap the seizing line slightly above the end of the dowel it makes it easier to remove from the notch.
-
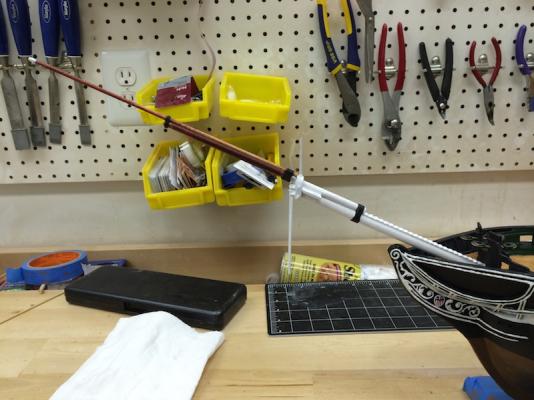
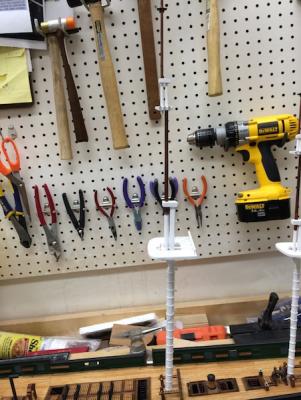
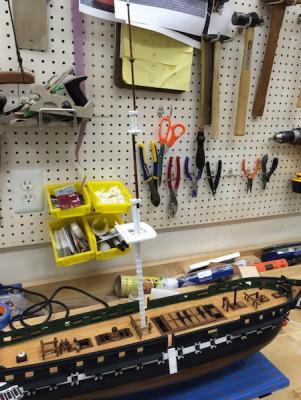
Today I continued to work on the Fore Mast Spars. I completed all of them except the top one. I will complete it tomorrow. I created a new tool to help me seize the blocks. This is speeding up and improving my seizing capabilities. I have posted about this took under the tools forum. Hopefully I have not recreated the wheel, but it works great for me. I also visited the local fabrics store today and bought more thread. Now that I have small enough thread, I can start working on rigging the cannon blocks. Bill
-
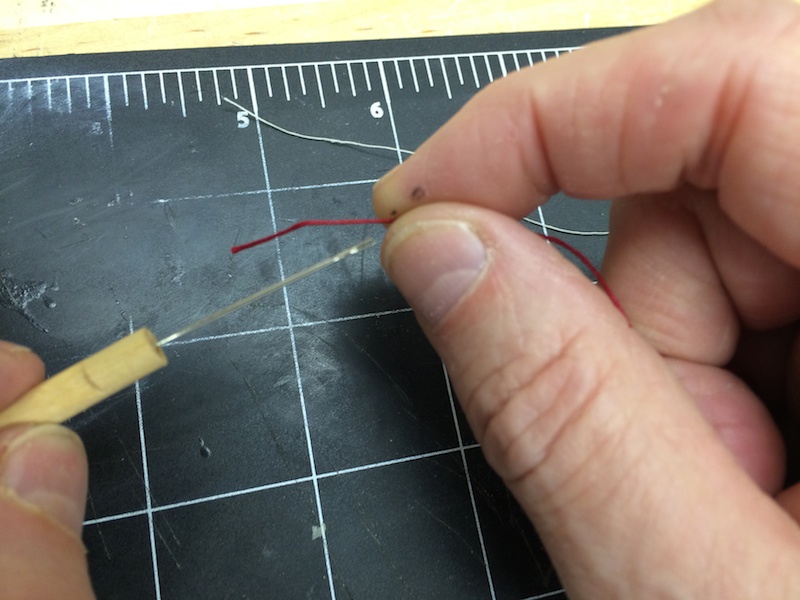
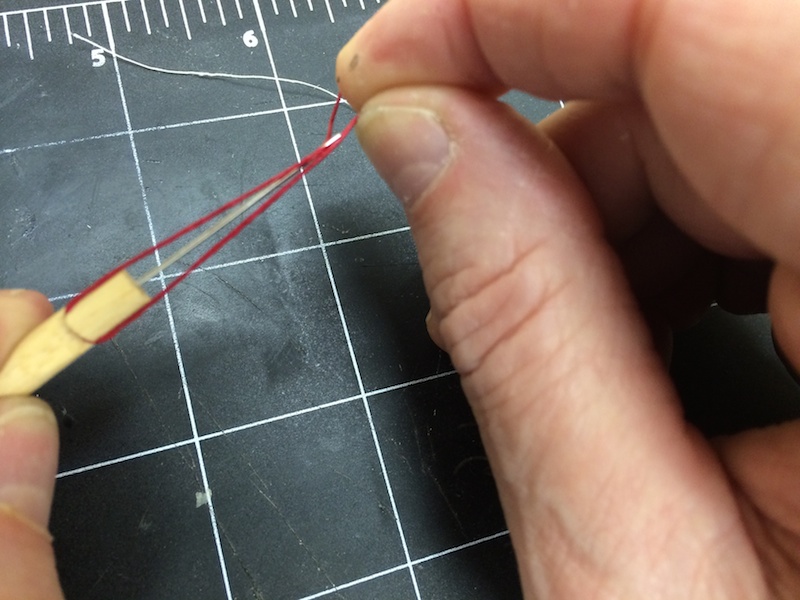
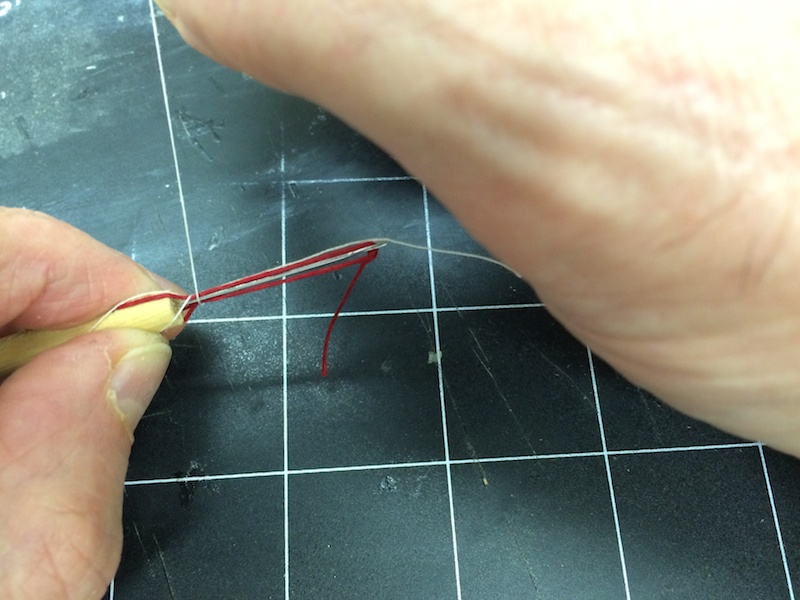
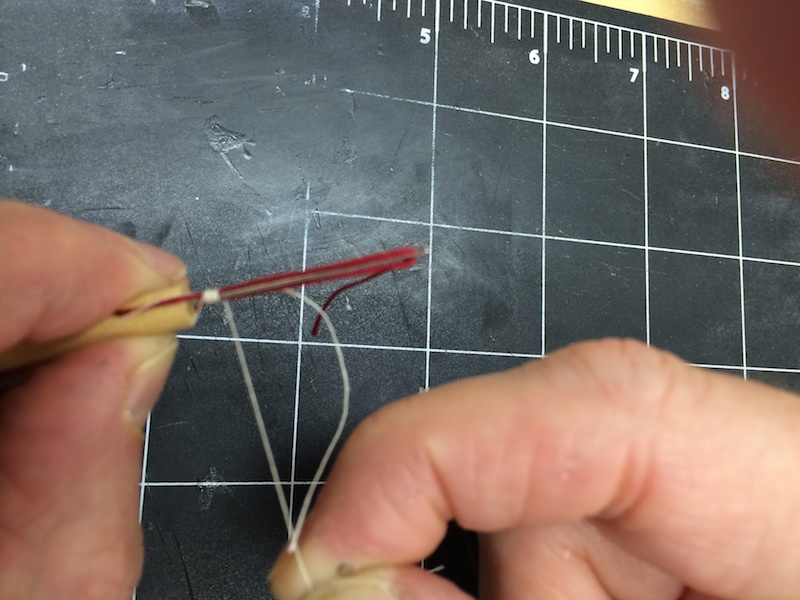
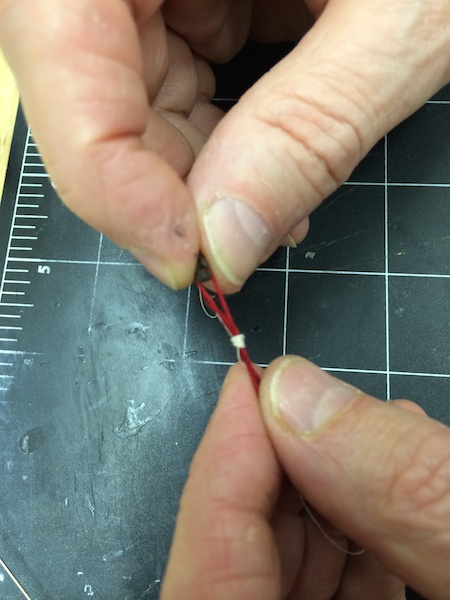
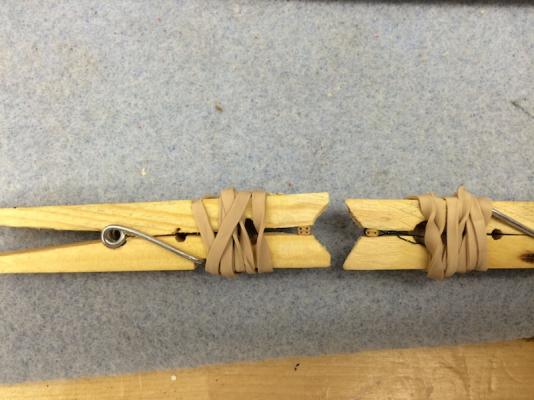
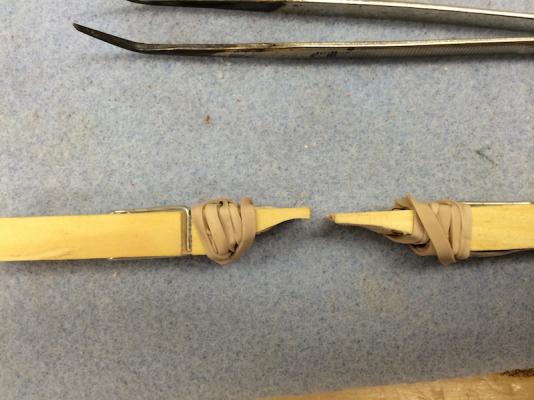
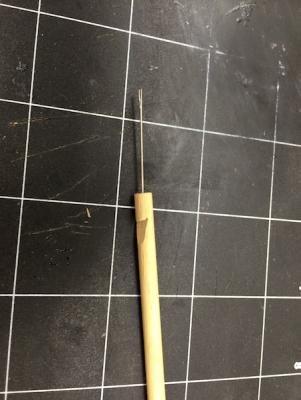
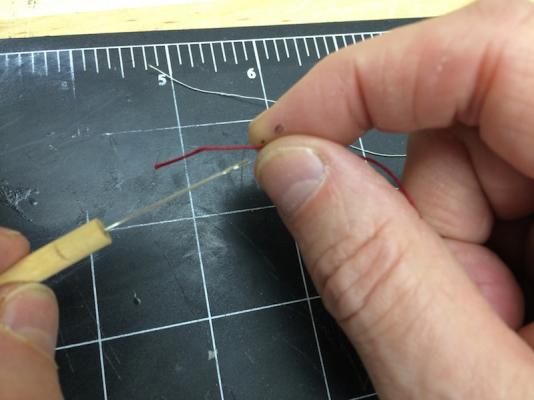
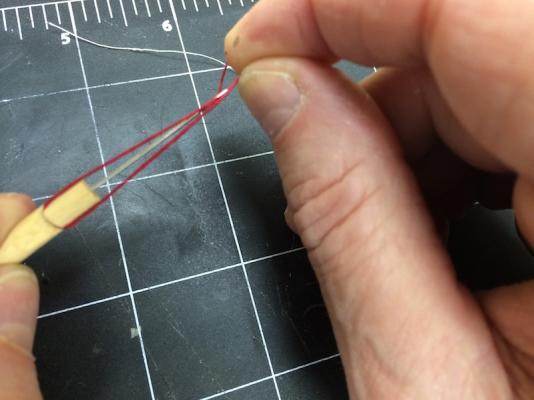
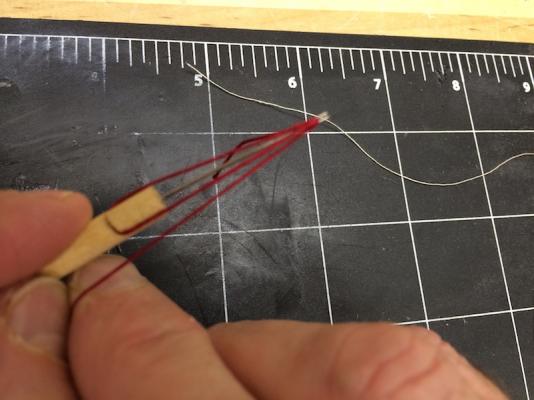
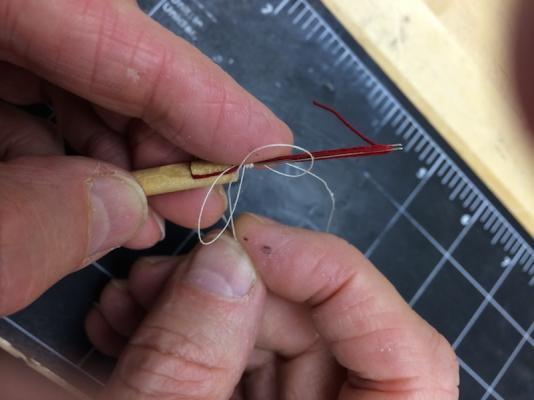
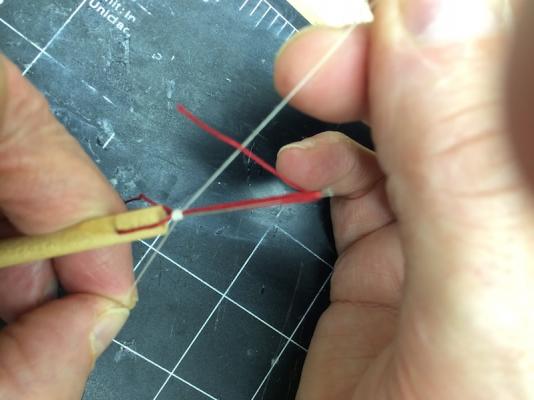
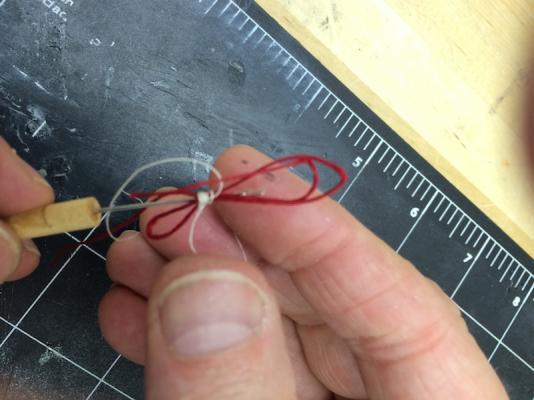
I am new to ship building so I am learning a great deal as I go a long. Thanks to all the members here and Mort Stoll who has taken an interest in assisting me when I get stuck. I ran across a great video done by Jay (Modeler12) building on a thread by Bender (click here for the thread) on how they seize lines. It is great. However, they are a bit more talented than I am in handling the delicate lines. I was struggling to get the seizing to be consistent. I found the end I was wrapping around would move and create chaos in my seizing operation. I decided to try my hand at tool making and came up with a seizing tool that builds on what Jay does and helps me create the consistent seizing I was looking for. Perhaps it might help some of you. Perhaps it has already been done and I have recreated the wheel. Anyway, here is what I did. For the photos below I used a red thread for the line to be seized and a tan thread for the seizing/whipping line. 1) Cut the end off a needle and glue it into a small dowel. 2) Cut a notch in the handle below the open U in the needle. 3) Put the rope to be seized through the end of the needle, around the notch, back up through the needle and back to the notch. This creates the loop. 4) Take the seizing line and put it through the needle and down around the notch, 5) Hold the dowel around the notch to keep the threads secure 6) Wrap the seizing around the needle 7) Insert the end of the line through the seizing loop and tighten the knot, 8) Slide the completed knot off the needle 9) Insert the block in the loop 10) Place the block in the hemostats holding the loop around the block 11) Slide the seizing up to the block 12) Cinch the seized line on the spar. The link to Jay's excellent video of the whole operation is here. http://modelshipworld.com/index.php?/topic/4657-a-video-about-attaching-blocks-to-spars-and-masts/?hl=%2Battaching+%2Bblocks Bill


-
Thanks Mort! I do have a question. The plans show the blocks up and down. Thanks is the way I built them. They are tight to the spars. Should they be more side to side?
-
I completed the Spirit Sail and Fore mast Lower Spars. I added the additional cleats to the fore mast that were not included in the Mamoli kit. I decided to use a small finishing nail to tie the stirrup line to create the hole. I tied it, super glued it and removed the nail then attached the stirrup to the spar. This allowed me to thread the horse through. I rubbed superglue over the thread prior to threading it to give it some body.
- 335 replies
-
- 2
-
-
- Constitution
- Mamoli
- (and 3 more)
-
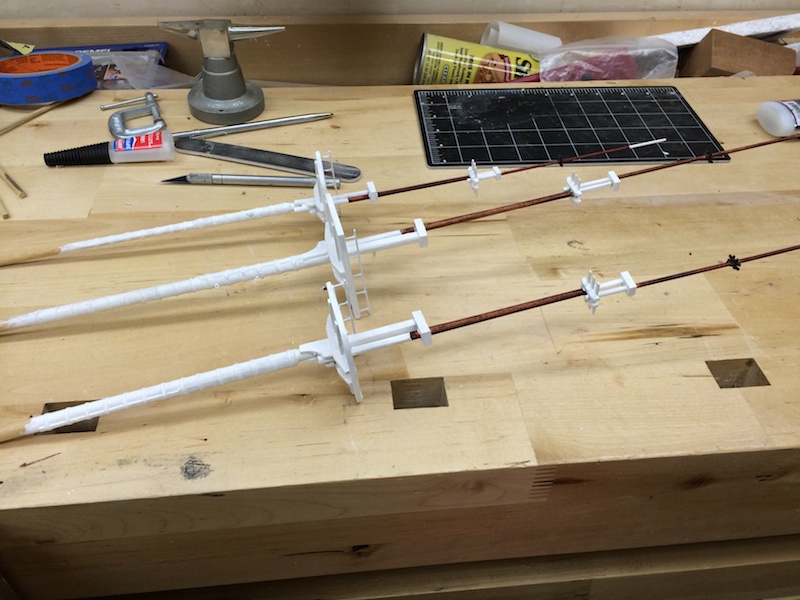
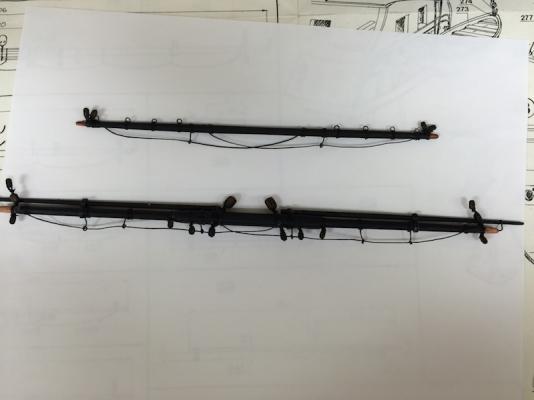
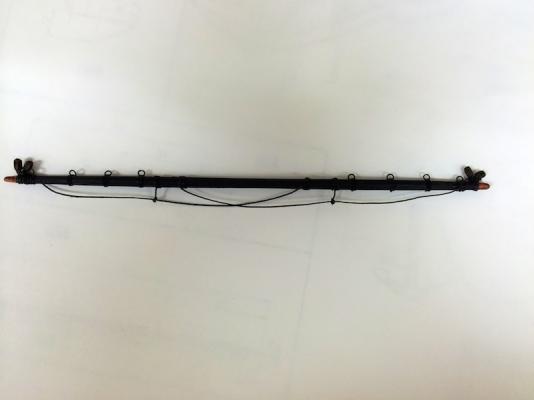
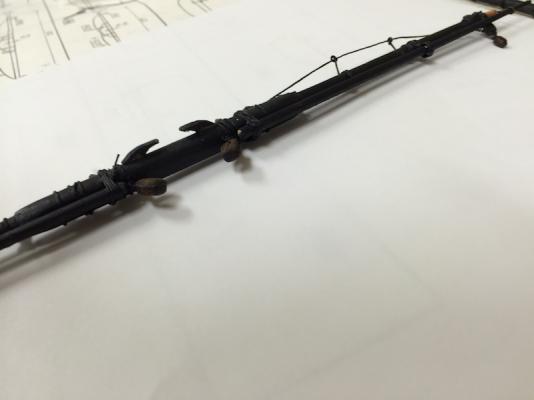
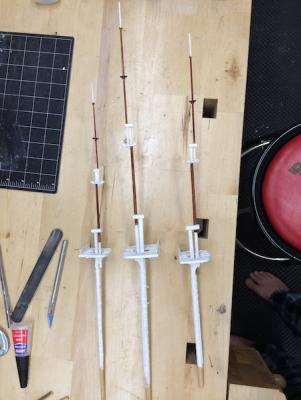
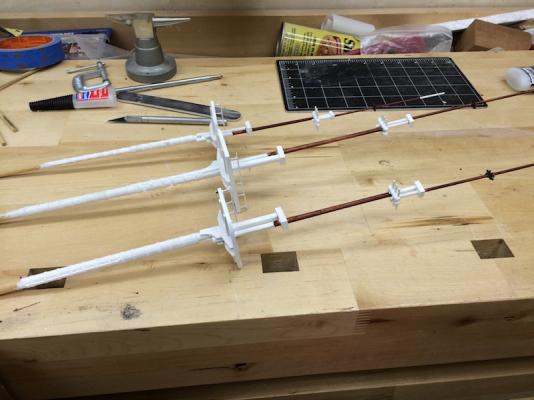
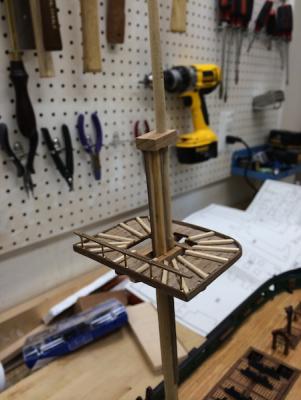
For the last couple of days, I have been retooling for the spars as well as performing some maintenance tasks in preparation for rigging. I spent a number of quality hours with the plans going over the spar rigging and identifying each of the fittings, blocks, pins etc that each would require. This also showed that I was short in the kit the necessary doweling needed to complete the spars. I made a quick trip to Lowes and procured more dowels than I will need. These in Oak and Poplar. I also will be using these in working on the Oars I plan to make for the ships's boats. I was able to turn the first two spars yesterday. I am starting at the bow and working aft, so I started with the Bow Spirit spar. Then the Lower Fore Spar. Both are turned and painted. The Bow Spar has the first blocks attached. The Lower Fore Spar also has the center rub boards attached. I used the "S" method that Modeler12's video showed to attach the blocks to the spar. That worked well. Now I plan on working on the rope walks. Since we are in the midst of a snow storm here in the metro DC area, I hope to get more spar work done since it is a perfect day to hole up in my shop with occasional forays out to snow blow the drive and sidewalks.
-
I know i am coming late to the party, but when you perform a fresh cut on wood, even if it has already been stable, it can start warping again since new wood is exposed to moisture. The lamination techniques discussed above certainly work well on furniture size wood and theoretically on mailer model sizes, however, since the warping is due to the wood taking in moisture through the grain's pores, the manner these react on such a small scale may prove to be different than in normal furniture size pieces. If you think of wood as being made up of tiny straws, the straws remain the same size as you work on smaller and smaller pieces, but the ratio of the size of the straw to the finished piece grows enormously. So the impact of added moisture can also grow.
-
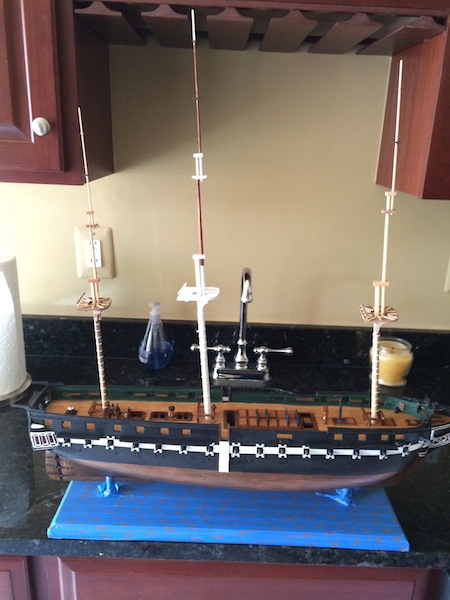
Today I worked on the Spanker Mast. This required some bashing since the Mamoli Plans shows the top of the mast ending in mid-air below the fighting platform. The spanker should terminate into the platform. I also made 9 brass hoops/sail hanks to put on the mast and used black patina to stain them dark. The kit was missing the two brass rings it called for at the main deck and the lower spanker boom. I made these out of card stock. This completes the masts. I finished the day by installing the 4 boomkins. This completes the hull with the exception of the deck cannon and hammock racks. Next I will start on the spars. I am still waiting on a backorder of cannon balls to fill all the racks on deck.

-
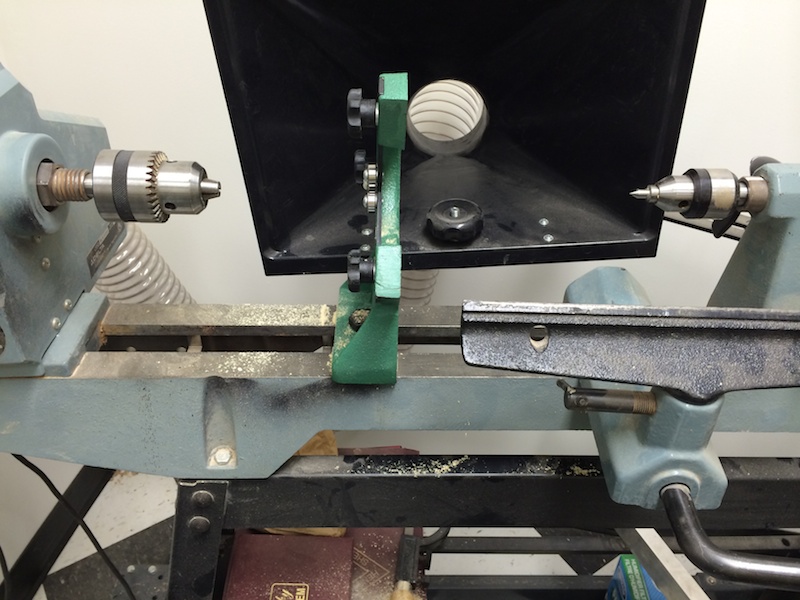
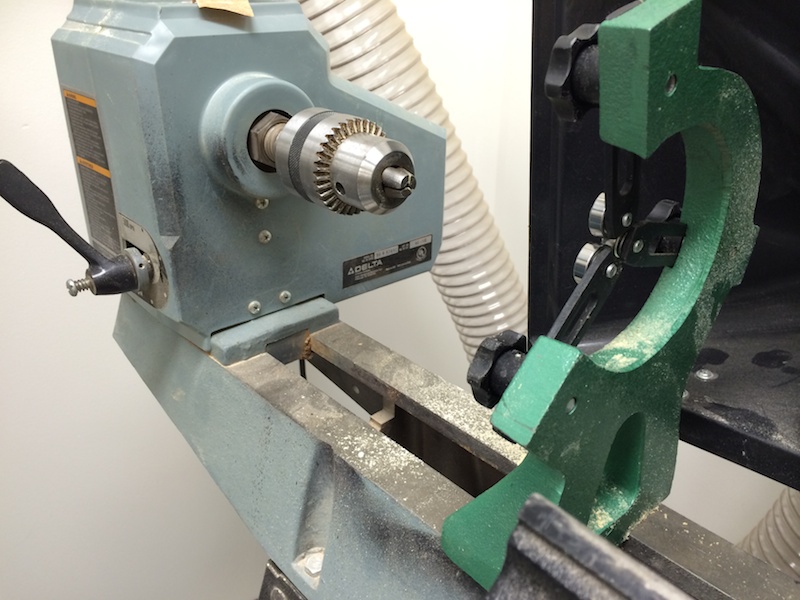
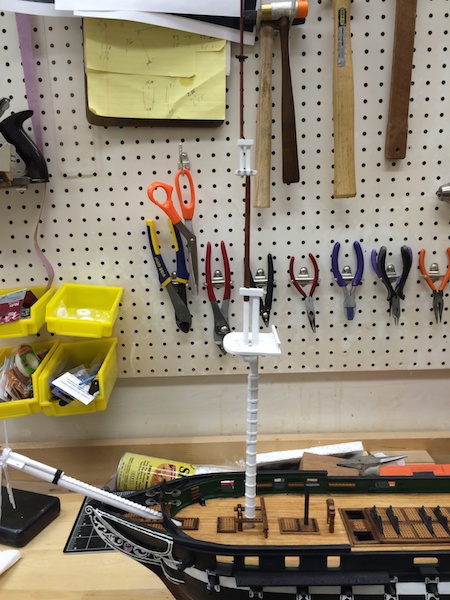
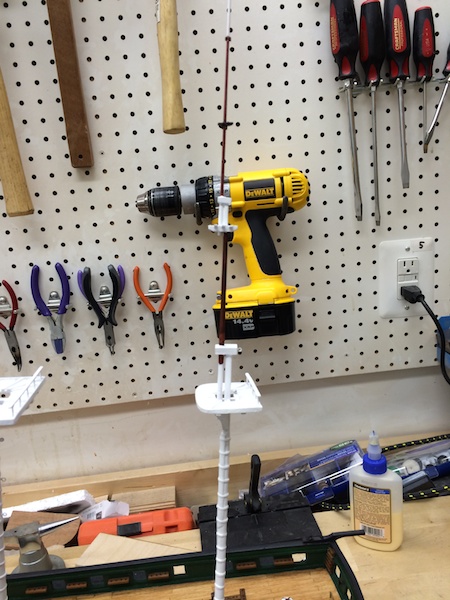
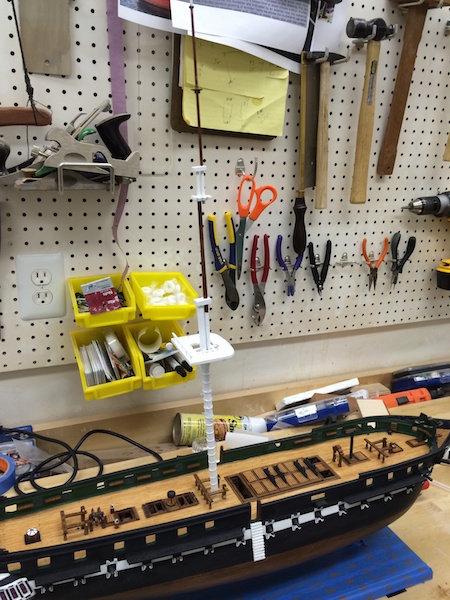
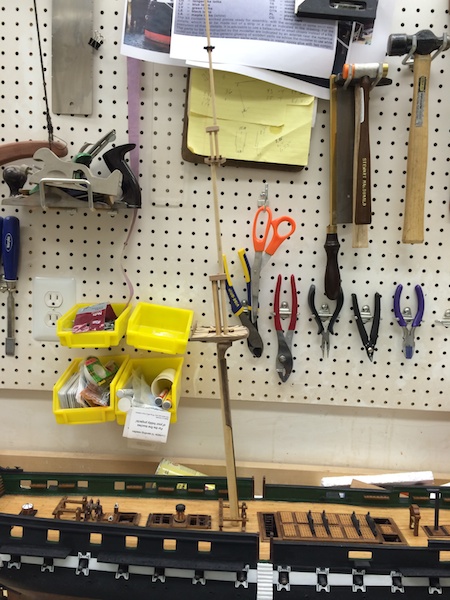
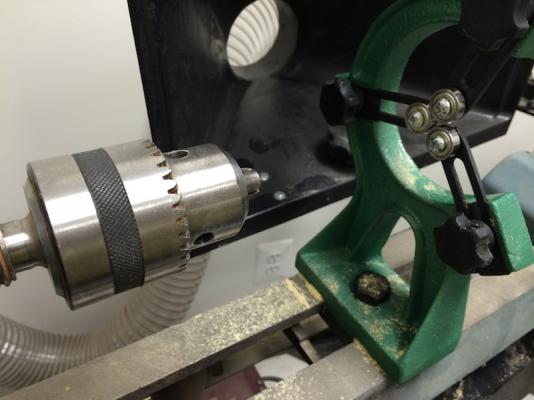
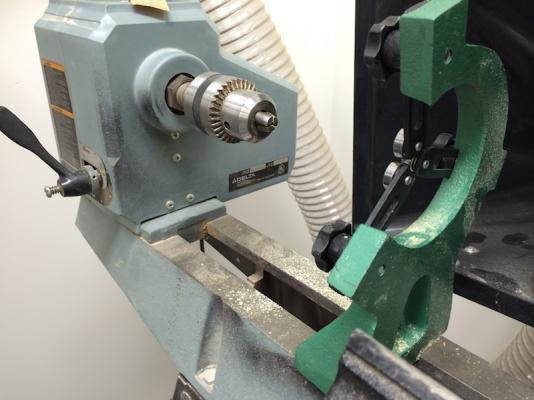
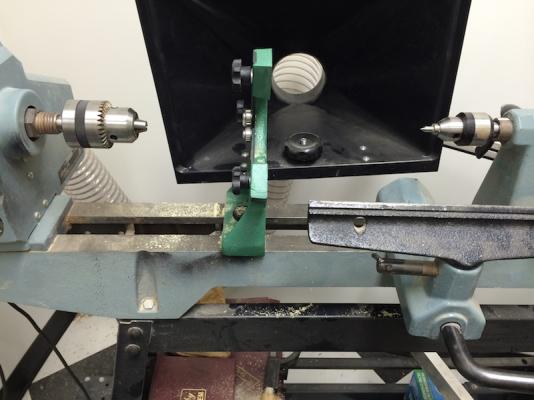
I have had a full size Delta wood Lathe for many years. I have never used it to turn items a small as those required for a ship but felt it should work. I thought I would share the setup I did for the lathe. It works very well. While I have not completed the turning for the Constitution, I have turned everything from the mast at 8mm down to the dolphin strikers at 1.5mm. So I am comfortable with the set up. The chuck on my drill press is the same Morse Taper 2 as that on my Drill Press making the chuck usable in either machine. I installed the chuck in my headstock and the smallest live tailstock I had. I also purchased a spindle support from Grizzly. This mounts on the lathe bed between the stocks and allows the spindle to be supported to keep it from flying out of center. This allows turning longer pieces without the tailstock. Since the small spars do not have enough size to mount in the tailstock, this set up allows them to still be turned safely. For very small short items such as the dolphin strikers, just inserting them into the headstock chuck is sufficient since they will be supported by your fingers as you sand them down. For larger masts, where there is a step down, I am able to use a very sharp parting tool to remove the necessary wood. I start at the end and get to the diameter I need. Usually I will turn the piece down with the parting tool until it is nearly there then finish the last tapering with sand paper. Once I have achieved the correct dimension, I will use the tool to remove the wood down to the step in point on the mast. since I already have an area the proper dimension, this is done by eye. Again, once I am close, I check it with my calipers then complete the task with sand paper. For the larger masts, I use 80 grit to remove wood and refine the tapers. For smaller aprs, such as the dolphin striker, the 80 grit would be too rough, I use 320 grit to produce the correct taper. Of course safety is a concern. When using sandpaper on the spindles use caution to keep the paper from being caught in the headstock. The same precautions you would always use should be followed with safety glasses and dust control. I cut the sandpaper down to pieces about 2" by 4". This allows me to keep them out of the spinning stocks and still have enough to adequately perform the job. So hopefully this helps anyone looking to use a full size lathe in shipbuilding. Bill

-
- 1
-
-
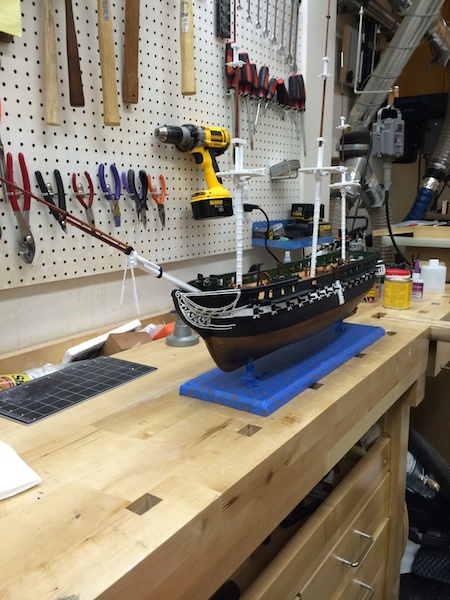
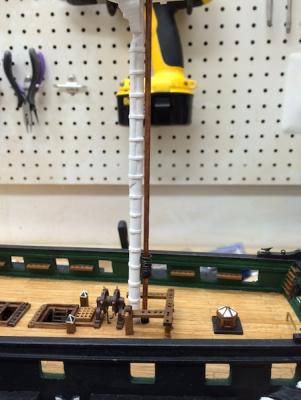
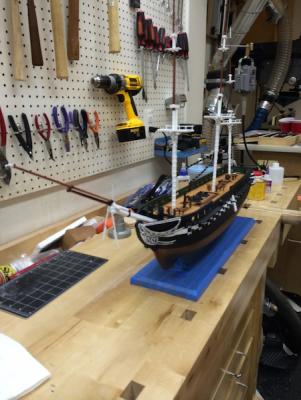
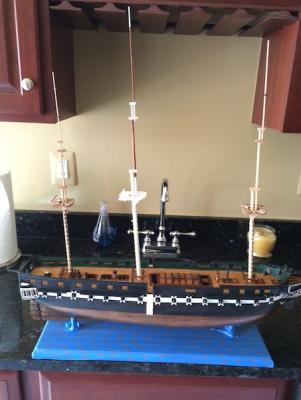
I spent the first bit of the morning working on redoing a connection in the mizzen mast. During the glue up yesterday, the joint slipped and resulted in the mast being ¼ inch shorter. I used a syringe to place small amounts of acetone directly on the joints involved then worked the joints with a #11 Xacto knife. This worked and I was able to break the joint with the pieces intact and re-glue it correctly. Next I spent time turning the pieces for the bow spirit. The Dolphin Strikers proved to be the most challenging on the turn and required much more finesse. I broke the first two attempts which snapped off at the chuck. I ended up using 320 grit wet dry and very gently was able to get the spars down to the correct size. I was not sure of how to make the bow spirit steps. I have seen a number of different approaches some better than others. I took a strip of 1x5 strip, marked off lines ever 4mm's. Then I used a diamond burr (small cylindrical) to carve grooves across the strip then deepened them with the burr and later with a file. To keep the steps sharp, I coated them with thin CA prior to the final shaping with the file. By this afternoon I was able to assemble the parts and return to the previous masts for recoating of paint. I was also able to get the bow spirit coated with two coats of paint. The masts in the photos below are just sitting in their sockets. I have not affixed them yet. They do seem to do well there though! BIll


- 335 replies
-
- 2
-
-
- Constitution
- Mamoli
- (and 3 more)
-
Today I abandoned making the mast banding out of brass and used card stock instead. This proved much easier as well as looked nicer. I was able to complete the assembly of the Fore and Mizzen masts today. The kit was missing two of the mast caps so I fabricated them. The masts look pretty good. I have put on the first coat of paint and will recoat them tomorrow. I will also start working on the bow spirit tomorrow. I have attached photos of the masts as well as the lathe set up I am using. I have a full size lathe so I purchased a spindle support from Grizzly. This is working very well with the masts. I am looking forward to the spars. On another note, I received the additional blocks from Chuck (Syren Ship Model Co). They look fabulous! Now I have to rig my cannons! Bill

- 335 replies
-
- 3
-
-
- Constitution
- Mamoli
- (and 3 more)
-
I have a mast! Today I spent the day trying to develop a technique that would allow me to create and affix hoops to the lower mast. I flattened 22-gauge brass wire using a small hammer and the small anvil. Then wrapped it and shaped it using the round nose jewelers needle nose. The difficulty came with getting it to stick long enough to be able to wrap it and place it exactly where it needed to be. Finally I used the bending iron to set the superglue. Then I went back to each hoop and pressed it to the mast with the iron. This worked well. I added the two rings to the lower part of the mast, and then coated the mast with two coats of paint. Now I am ready to proceed with the next mast.
- 335 replies
-
- 1
-
-
- Constitution
- Mamoli
- (and 3 more)
-
I was able to do the first clear coat today. This made the entire model flat. The Tamiya paint that I used to the metal fittings had some gloss to it. This took that off. I still plan on doing some fine sanding on the hull tomorrow and recoating. There are still some areas where I brushed that look slightly different than the areas I airbrushed on the hull. I started working on the masting by constructing the main mast first. This was the first time I have used the set up on my lathe. Since it is a full size lathe, I added a spindle support bracket from Grizzly. This worked very well. It allowed me to use the turning tools on the larger pieces and sandpaper on the smaller top mast. This allowed me to quickly reach the desired shapes and sizes. I fit and glued each of the sections together and dry fit them all together. This allowed me to set the main mast (as a trial) and check the rake and fit. While it raked back a bit more than required, it was not out of the parameters so I can adjust it easily to reach the desired rake. The one thing I could not find anywhere was the size of the transverse planks for the middle tree. I used the AOS to see what it should be and made it accordingly. I did not arc them. However, I may look at adding that tomorrow. It should be easy to glue additional wood to the bars and shape them into the gentle arcs. It was nice to see the ship with a mast even if it is temporary. I will correct the trees tomorrow then paint the main. Then I will start working on the Fore and Mizzen masts. Bill

- 335 replies
-
- 1
-
-
- Constitution
- Mamoli
- (and 3 more)
-
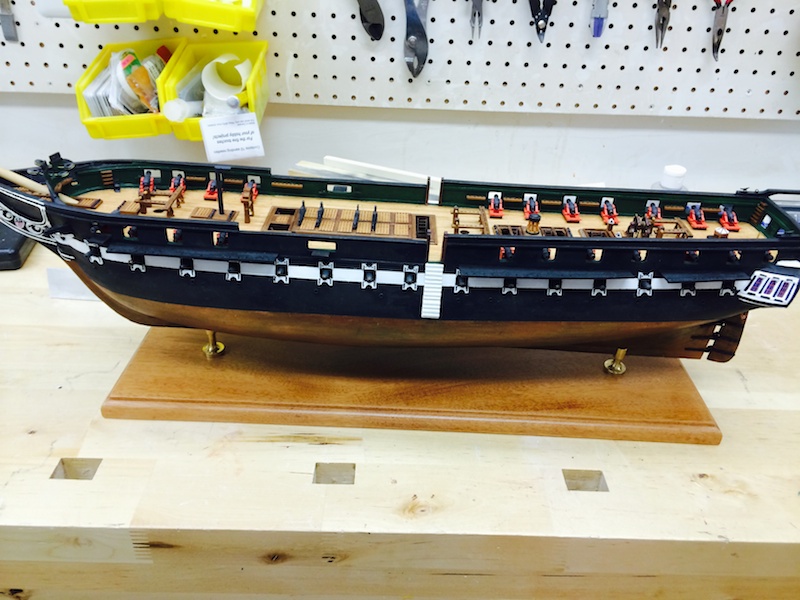
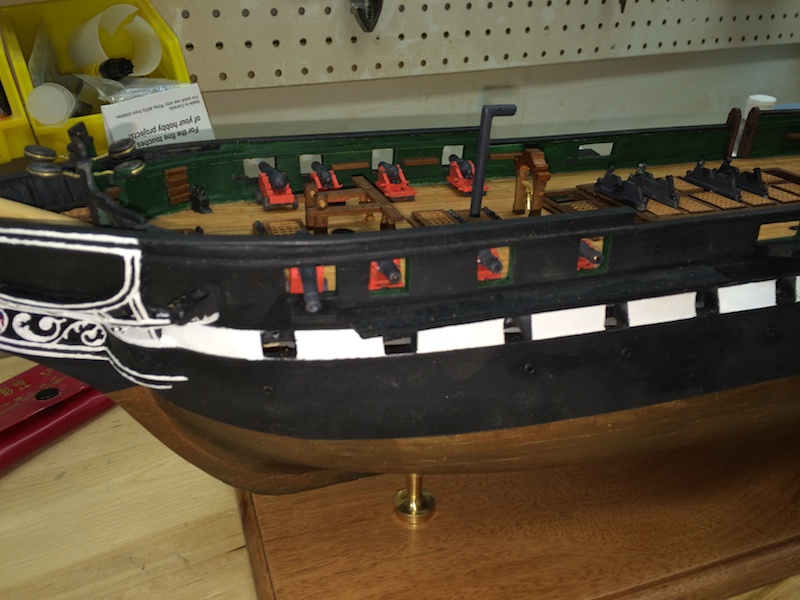
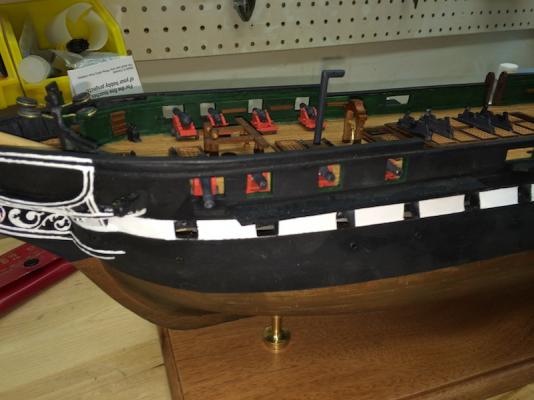
I painted the hinges on the gun ports and installed them along with the lower cannons today. I will have to do something on the cannons finish. I painted them several days ago and they still peeled. So touch up tomorrow. After installation, I temporarily placed the deck cannons on the deck and for the first time, the Constitution had the full set of armament on it! Yeah! So tomorrow, I will do some final touch up in preparation for the clear coat. In the meantime, I have to set up for turning the masts and spars. Bill
- 335 replies
-
- 4
-
-
- Constitution
- Mamoli
- (and 3 more)
-
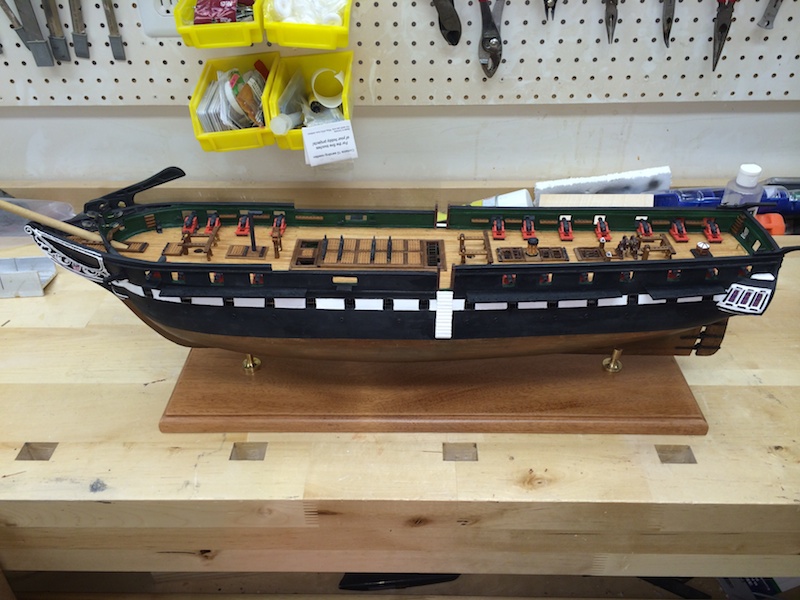
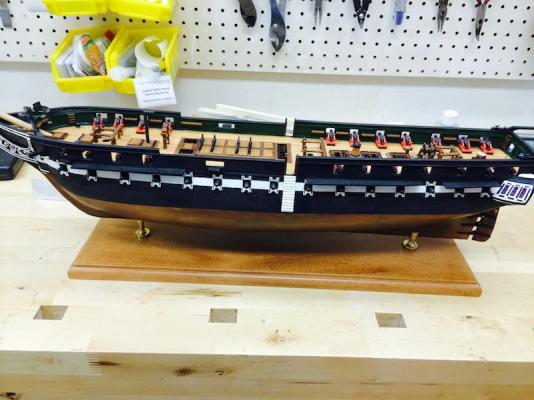
I leveled the hull today. I ground down the pedestals until it was level. I completed the installation of the chain boards, then touched up the painting all around. I painted the internal stairs brown. They look better than with just the stain. Since these are a soft light wood, they just did not look finished with just stain. I added the side ladders. I assembled and retouched the cannon getting them ready for the rigging. I am still missing 8 cannon balls, but they are on back order. They will be easy to install once I get them. I still want to spray the hull with a matt clear coat before I put the cannon on. This should even out any differences in gloss and make everything flat. I plan on working on the lower gun ports next. I will have them open. Then I will spray the hull with the clear coat and move on to the rigging. My plan is to rig the cannon, then put the hammock racks on the rails. Then I will start with the masting. Overall I am pleased with the progress. I see differences everyday. Bill


- 335 replies
-
- 6
-
-
- Constitution
- Mamoli
- (and 3 more)
-
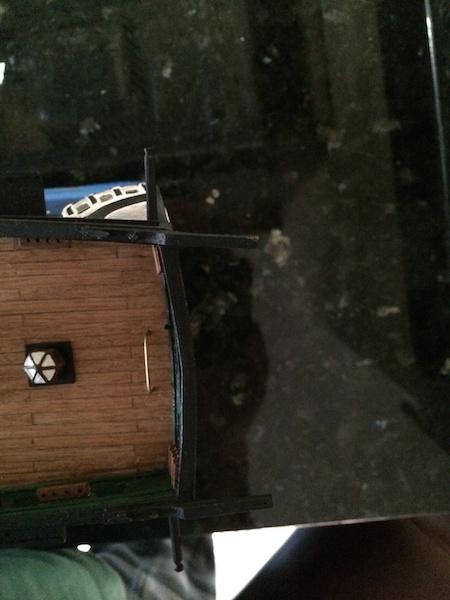
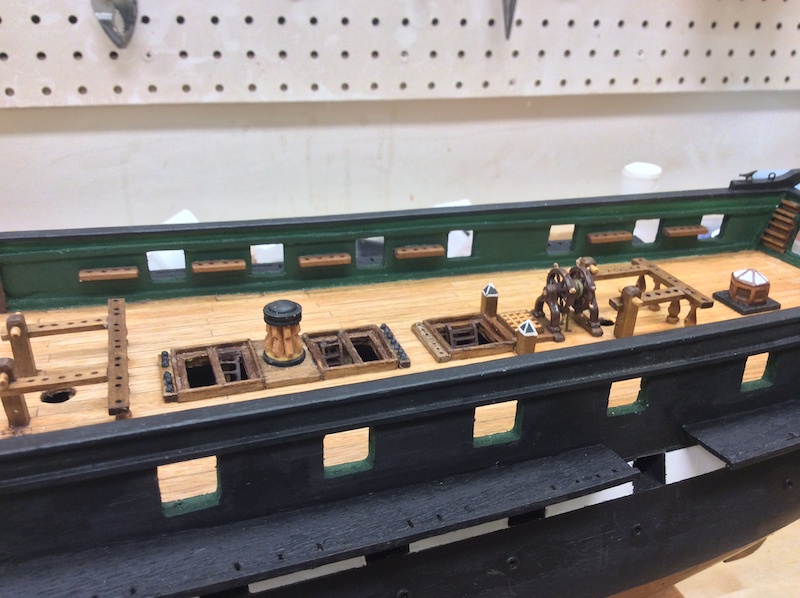
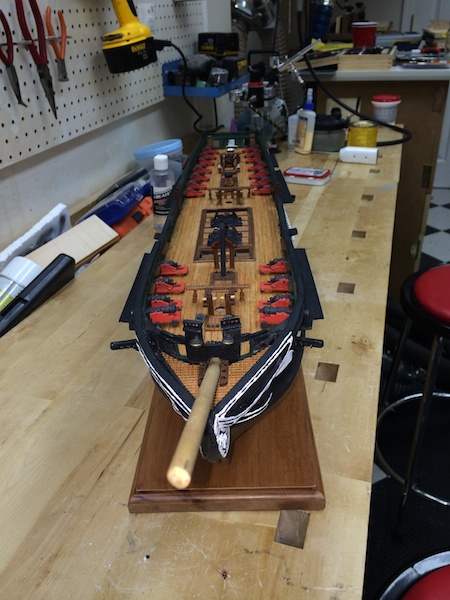
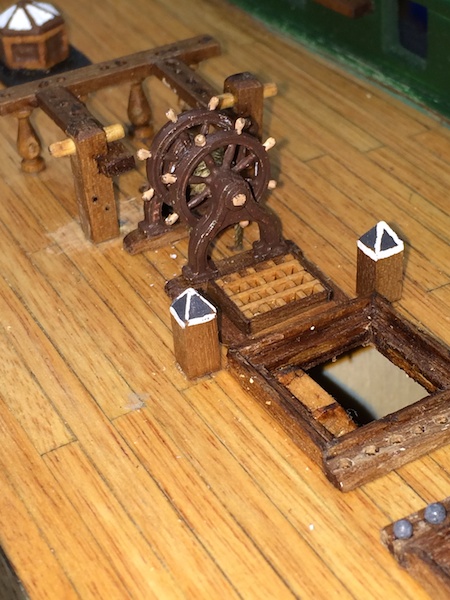
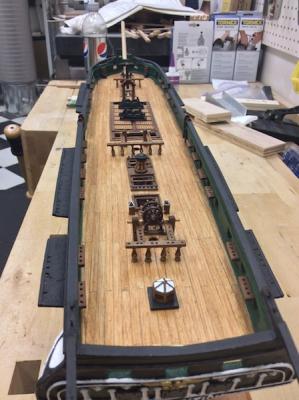
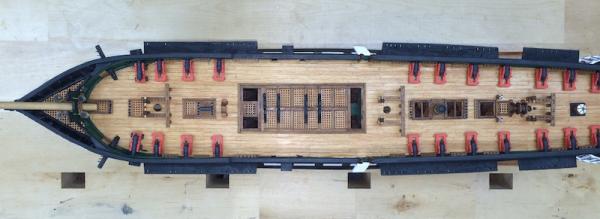
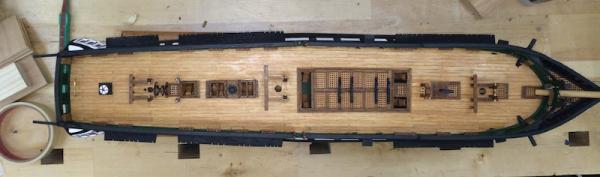
I completed the deck furniture today. I went off plan for a couple of areas. First the plan showed a pastil green skylight just forward of the ship's wheel. None of the books or other modelers had this. It has a hatch, so I used a small piece of left over grating and framed in a hatch. There were no binnacles in the plan. So I built two and pined them to the deck just forward of the wheel. The wheel in the kit was mostly metal with the center hub having two small wooden rings to make the cylinder. The holes in the wheels were not the correct size so I drilled these out. I put the wheel together last night so it was set this morning. I painted it a darker brown and added tan to the handle spokes and the center of the hubs where the star is on the ship. I shaped the stern davits and glued them into place. I added the chain boards to each side. I did not add the outboard strip since I will need to be able to put the chains in before I add them. After consulting with Mort Stoll, I found out the ship's kit did not include the blocks to rig the cannon. I really want to rig the cannon. So I ordered 100 ea 2.5 single and double blocks (Syren Ship Model Co) as well as a roll of brass wire so I can make the rings and hooks. I know Chuck shipped the blocks today. In the meantime, I plan on starting tapering and assembling the masts. I ordered a dowel support for my lathe. It is a full size lathe so it will be interesting trying to turn the small spindles. I did do the first section of the bow spirit and it seemed to work out well. Attached is a photo taken from above showing the layout of the deck furniture. The extra black blocks on the side are real just the square holes in the workbench underneath. I still need to figure out a way to level the ship form side to side on the pedestals. I did get the taller pedestal installed today so the ship sits pretty level fore to aft. I ran out of the kit supplied cannonballs today. The additional ones are back ordered and hopefully will be in soon.


- 335 replies
-
- 4
-
-
- Constitution
- Mamoli
- (and 3 more)
-
Does anyone know where I might could buy some of these? I am in need of a few (3 or 4) and the smallest I can find on-line is 8mm. Bill
-
It is the position for the secondary anchor storage.