

Mark Pearse
-
Posts
698 -
Joined
-
Last visited
Reputation Activity
-

 Mark Pearse got a reaction from KeithAug in Ranger type yacht by Mark Pearse - 1:12 - SMALL
I started the outer stem & keel piece, that goes from the deck at the bow around to the keel. I decided to glue laminate it in one piece, partly because - as with the glued planks replicating strip planking - this is more akin to the way the actual yacht was constructed, as a timber / epoxy composite construction.
I had some sheets of Sapele from something & even the 1.75mm (maybe 1/16th) thick wasn't happy doing the curve, with heating. I had some 2.5 thick strips of Huon Pine, & they were happy to do it, with a bit of heat from the hot air gun. I'd rather a harder timber, but oil based enamel paint is quite tough.
I came across some tiny fine brass nails that I had bought & didn't use on a model, & decided to try using them to ensure the laminating is a close fit to the hull shape. Partly because the timber needs a finished thickness of 5mm, & with 2 @ 2.5mm there wasn't much adjustment possible. Anyway, it looks to have worked well, & hopefully hasn't been glued to the hull... I left about 1mm of nail sticking out, so I can pull them out.
It worked nicely:
Except for 2 (where a little more oomf was need to hold the timber in), the nail heads are left projecting a little to aid removal:
Here's where you can see how well this worked - no gaps! Helped by the general pliability of Huon.
thanks
-
 Mark Pearse got a reaction from mtaylor in Ranger type yacht by Mark Pearse - 1:12 - SMALL
I've started on the keel. The shape is not complex, so it can be modelled pretty easily. For stability & strength I decided to make it from horizontal strips of timber, dowelled with brass. The timber is a nice straight-grained piece of Huon Pine. The keel is not a difficult shape: it fairs with the hull, but essentially it appears to be even from there down to the bottom of the keel.
This is the keel side on. The yellow bands will be done in strips of timber.
The strips, in plan:
The timber pieces cut to shape, plus the 1/8th brass rod:
Stacked & trimmed, & sitting on the hull. It doesn't look quite right, but it will. The hull has more sanding to get it down to the right size, I have left that to assist get the fairing with the keel right.
thanks all
-
 Mark Pearse got a reaction from Bedford in Ranger type yacht by Mark Pearse - 1:12 - SMALL
I started the outer stem & keel piece, that goes from the deck at the bow around to the keel. I decided to glue laminate it in one piece, partly because - as with the glued planks replicating strip planking - this is more akin to the way the actual yacht was constructed, as a timber / epoxy composite construction.
I had some sheets of Sapele from something & even the 1.75mm (maybe 1/16th) thick wasn't happy doing the curve, with heating. I had some 2.5 thick strips of Huon Pine, & they were happy to do it, with a bit of heat from the hot air gun. I'd rather a harder timber, but oil based enamel paint is quite tough.
I came across some tiny fine brass nails that I had bought & didn't use on a model, & decided to try using them to ensure the laminating is a close fit to the hull shape. Partly because the timber needs a finished thickness of 5mm, & with 2 @ 2.5mm there wasn't much adjustment possible. Anyway, it looks to have worked well, & hopefully hasn't been glued to the hull... I left about 1mm of nail sticking out, so I can pull them out.
It worked nicely:
Except for 2 (where a little more oomf was need to hold the timber in), the nail heads are left projecting a little to aid removal:
Here's where you can see how well this worked - no gaps! Helped by the general pliability of Huon.
thanks
-
 Mark Pearse reacted to Jim Lad in Ranger type yacht by Mark Pearse - 1:12 - SMALL
Lovely work with your wood bending, Mark!
John
-
Mark Pearse reacted to druxey in Ranger type yacht by Mark Pearse - 1:12 - SMALL
That looks really nice, Mark. Those small brass nails were called panel pins in England, I believe. I have a stash of them that used to be my father's.
-
Mark Pearse got a reaction from mtaylor in The San Marco mosaic ship c. 1150 by Louie da fly - 1:75
Hi Steven,
I hope you don't mind my adding to the discussion, but I don't agree that this is an error - if the shrouds were on the leeward side then they won't have a lot of load on them. A helmsman could intentionally sail an angle to de-load a shroud so it can be worked on.
-
 Mark Pearse got a reaction from MAGIC's Craig in Ranger type yacht by Mark Pearse - 1:12 - SMALL
I've started on the keel. The shape is not complex, so it can be modelled pretty easily. For stability & strength I decided to make it from horizontal strips of timber, dowelled with brass. The timber is a nice straight-grained piece of Huon Pine. The keel is not a difficult shape: it fairs with the hull, but essentially it appears to be even from there down to the bottom of the keel.
This is the keel side on. The yellow bands will be done in strips of timber.
The strips, in plan:
The timber pieces cut to shape, plus the 1/8th brass rod:
Stacked & trimmed, & sitting on the hull. It doesn't look quite right, but it will. The hull has more sanding to get it down to the right size, I have left that to assist get the fairing with the keel right.
thanks all
-
Mark Pearse got a reaction from MAGIC's Craig in Ranger type yacht by Mark Pearse - 1:12 - SMALL
The planking is finished & I've spent a few hours sanding. This planking method (strip planking at scale) was visually messy, so it's very nice to see the hull lines start to become more visible. Although the nature of strip planks (being parallel sided), the planking lines throw the optics of the shape off a bit, as the line of the planks towards the keel don't bear much relation to the hull shape....the planking just follows the ones above with no tapering.
The stern photos show the excess hull near the transom - that planking needs to be cut away - as the hull has the sweep down from the upper deck to the height of the transom. Photo below shows that gently curved line of that transition.
I'll do a bit more sanding & then start on the keel & outer stem pieces. Also the infill piece that will turn the square cutaway at the stern into the curved propeller cutaway.
They are a fat boat.....
plus this for comparison:
thanks
-
Mark Pearse got a reaction from MAGIC's Craig in Ranger type yacht by Mark Pearse - 1:12 - SMALL
I started the outer stem & keel piece, that goes from the deck at the bow around to the keel. I decided to glue laminate it in one piece, partly because - as with the glued planks replicating strip planking - this is more akin to the way the actual yacht was constructed, as a timber / epoxy composite construction.
I had some sheets of Sapele from something & even the 1.75mm (maybe 1/16th) thick wasn't happy doing the curve, with heating. I had some 2.5 thick strips of Huon Pine, & they were happy to do it, with a bit of heat from the hot air gun. I'd rather a harder timber, but oil based enamel paint is quite tough.
I came across some tiny fine brass nails that I had bought & didn't use on a model, & decided to try using them to ensure the laminating is a close fit to the hull shape. Partly because the timber needs a finished thickness of 5mm, & with 2 @ 2.5mm there wasn't much adjustment possible. Anyway, it looks to have worked well, & hopefully hasn't been glued to the hull... I left about 1mm of nail sticking out, so I can pull them out.
It worked nicely:
Except for 2 (where a little more oomf was need to hold the timber in), the nail heads are left projecting a little to aid removal:
Here's where you can see how well this worked - no gaps! Helped by the general pliability of Huon.
thanks
-
 Mark Pearse got a reaction from Roger Pellett in Ranger type yacht by Mark Pearse - 1:12 - SMALL
I started the outer stem & keel piece, that goes from the deck at the bow around to the keel. I decided to glue laminate it in one piece, partly because - as with the glued planks replicating strip planking - this is more akin to the way the actual yacht was constructed, as a timber / epoxy composite construction.
I had some sheets of Sapele from something & even the 1.75mm (maybe 1/16th) thick wasn't happy doing the curve, with heating. I had some 2.5 thick strips of Huon Pine, & they were happy to do it, with a bit of heat from the hot air gun. I'd rather a harder timber, but oil based enamel paint is quite tough.
I came across some tiny fine brass nails that I had bought & didn't use on a model, & decided to try using them to ensure the laminating is a close fit to the hull shape. Partly because the timber needs a finished thickness of 5mm, & with 2 @ 2.5mm there wasn't much adjustment possible. Anyway, it looks to have worked well, & hopefully hasn't been glued to the hull... I left about 1mm of nail sticking out, so I can pull them out.
It worked nicely:
Except for 2 (where a little more oomf was need to hold the timber in), the nail heads are left projecting a little to aid removal:
Here's where you can see how well this worked - no gaps! Helped by the general pliability of Huon.
thanks
-
 Mark Pearse got a reaction from CiscoH in Ranger type yacht by Mark Pearse - 1:12 - SMALL
I started the outer stem & keel piece, that goes from the deck at the bow around to the keel. I decided to glue laminate it in one piece, partly because - as with the glued planks replicating strip planking - this is more akin to the way the actual yacht was constructed, as a timber / epoxy composite construction.
I had some sheets of Sapele from something & even the 1.75mm (maybe 1/16th) thick wasn't happy doing the curve, with heating. I had some 2.5 thick strips of Huon Pine, & they were happy to do it, with a bit of heat from the hot air gun. I'd rather a harder timber, but oil based enamel paint is quite tough.
I came across some tiny fine brass nails that I had bought & didn't use on a model, & decided to try using them to ensure the laminating is a close fit to the hull shape. Partly because the timber needs a finished thickness of 5mm, & with 2 @ 2.5mm there wasn't much adjustment possible. Anyway, it looks to have worked well, & hopefully hasn't been glued to the hull... I left about 1mm of nail sticking out, so I can pull them out.
It worked nicely:
Except for 2 (where a little more oomf was need to hold the timber in), the nail heads are left projecting a little to aid removal:
Here's where you can see how well this worked - no gaps! Helped by the general pliability of Huon.
thanks
-
Mark Pearse got a reaction from CiscoH in Ranger type yacht by Mark Pearse - 1:12 - SMALL
I've started on the keel. The shape is not complex, so it can be modelled pretty easily. For stability & strength I decided to make it from horizontal strips of timber, dowelled with brass. The timber is a nice straight-grained piece of Huon Pine. The keel is not a difficult shape: it fairs with the hull, but essentially it appears to be even from there down to the bottom of the keel.
This is the keel side on. The yellow bands will be done in strips of timber.
The strips, in plan:
The timber pieces cut to shape, plus the 1/8th brass rod:
Stacked & trimmed, & sitting on the hull. It doesn't look quite right, but it will. The hull has more sanding to get it down to the right size, I have left that to assist get the fairing with the keel right.
thanks all
-
Mark Pearse got a reaction from CiscoH in Ranger type yacht by Mark Pearse - 1:12 - SMALL
The planking is finished & I've spent a few hours sanding. This planking method (strip planking at scale) was visually messy, so it's very nice to see the hull lines start to become more visible. Although the nature of strip planks (being parallel sided), the planking lines throw the optics of the shape off a bit, as the line of the planks towards the keel don't bear much relation to the hull shape....the planking just follows the ones above with no tapering.
The stern photos show the excess hull near the transom - that planking needs to be cut away - as the hull has the sweep down from the upper deck to the height of the transom. Photo below shows that gently curved line of that transition.
I'll do a bit more sanding & then start on the keel & outer stem pieces. Also the infill piece that will turn the square cutaway at the stern into the curved propeller cutaway.
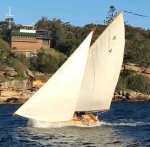
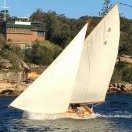
They are a fat boat.....
plus this for comparison:
thanks
-
Mark Pearse got a reaction from CiscoH in Ranger type yacht by Mark Pearse - 1:12 - SMALL
The model has been progressing, but the planking is pretty slow, but it is getting there. The simpler nature of a 'strip plank' style hull does reduce the technical difficulties a lot, but balanced by the relatively narrow planks. And the previous planked model was using Huan Pine, which is very supple, this is Basswood / Limewood & it's much stiffer.
The lovely lines are appearing, although it's not so visible in the model yet - the scallops from the gunwale line around the cockpit hasn't been cut yet .... & it's probably normal anyway.
This one shows the technique: bulldog clip clamps to hold the planks to the moulds & rubber bands to assist pull the planks down to the previous plank. The gunwale scallop at the stern is marked approximately in pencil & will be cut after the model is fully planked & removed from the building frame.
I'm starting to use the heat gun to put some pre-twist into the planks.
The epoxy is messy, but all will be forgotten once the sanding starts, but for now another few weeks of a plank or two per day.
thanks
-
 Mark Pearse got a reaction from druxey in Ranger type yacht by Mark Pearse - 1:12 - SMALL
I started the outer stem & keel piece, that goes from the deck at the bow around to the keel. I decided to glue laminate it in one piece, partly because - as with the glued planks replicating strip planking - this is more akin to the way the actual yacht was constructed, as a timber / epoxy composite construction.
I had some sheets of Sapele from something & even the 1.75mm (maybe 1/16th) thick wasn't happy doing the curve, with heating. I had some 2.5 thick strips of Huon Pine, & they were happy to do it, with a bit of heat from the hot air gun. I'd rather a harder timber, but oil based enamel paint is quite tough.
I came across some tiny fine brass nails that I had bought & didn't use on a model, & decided to try using them to ensure the laminating is a close fit to the hull shape. Partly because the timber needs a finished thickness of 5mm, & with 2 @ 2.5mm there wasn't much adjustment possible. Anyway, it looks to have worked well, & hopefully hasn't been glued to the hull... I left about 1mm of nail sticking out, so I can pull them out.
It worked nicely:
Except for 2 (where a little more oomf was need to hold the timber in), the nail heads are left projecting a little to aid removal:
Here's where you can see how well this worked - no gaps! Helped by the general pliability of Huon.
thanks
-
 Mark Pearse got a reaction from Jack12477 in Ranger type yacht by Mark Pearse - 1:12 - SMALL
I started the outer stem & keel piece, that goes from the deck at the bow around to the keel. I decided to glue laminate it in one piece, partly because - as with the glued planks replicating strip planking - this is more akin to the way the actual yacht was constructed, as a timber / epoxy composite construction.
I had some sheets of Sapele from something & even the 1.75mm (maybe 1/16th) thick wasn't happy doing the curve, with heating. I had some 2.5 thick strips of Huon Pine, & they were happy to do it, with a bit of heat from the hot air gun. I'd rather a harder timber, but oil based enamel paint is quite tough.
I came across some tiny fine brass nails that I had bought & didn't use on a model, & decided to try using them to ensure the laminating is a close fit to the hull shape. Partly because the timber needs a finished thickness of 5mm, & with 2 @ 2.5mm there wasn't much adjustment possible. Anyway, it looks to have worked well, & hopefully hasn't been glued to the hull... I left about 1mm of nail sticking out, so I can pull them out.
It worked nicely:
Except for 2 (where a little more oomf was need to hold the timber in), the nail heads are left projecting a little to aid removal:
Here's where you can see how well this worked - no gaps! Helped by the general pliability of Huon.
thanks
-
Mark Pearse reacted to Louie da fly in The San Marco mosaic ship c. 1150 by Louie da fly - 1:75
Thanks Roger. That's my opinion entirely. A lot of this is educated guesswork based on (extremely!) inadequate source material. Of course we can't be sure it's all correct, but a lot of the fun is in the investigation of source material and speculation as to how it could be done, given the pictorial evidence (often affected by artistic licence), the archaeological evidence (often frustratingly incomplete) and the practicalities of sailing a wooden vessel.
And if later evidence proves one of the guesses wrong, one still has the satisfaction of having done the best one could with the information that was available at the time.
So, on to current progress. Shrouds and halyards in place, but only the foremast shrouds have been finalised.
I really do need to clear my workdesk before I take photos!
I made new silkspan sails - I wasn't happy with the first iteration. This time I made them oversize and folded the edges over instead of gluing strips of silkspan to the edges. The cross was painted on with Tamiya acrylic paint. I needed two coats for the "face" side and one for the other side. Considerably happier with the second version.
And I've added the blocks to the yards - for the tacks at the lower ends and the vangs at the upper.
Druxey, if I might pick your brains - how did you attach the bolt ropes to your silkspan sails (they look particularly good)? And the robands?
Steven
-
Mark Pearse reacted to Bedford in Ranger type yacht by Mark Pearse - 1:12 - SMALL
I love that last shot, beautiful planking.
More use of Huon Pine, lovely stuff!
-
Mark Pearse reacted to Jim Lad in Ranger type yacht by Mark Pearse - 1:12 - SMALL
Nice to see her progressing, Mark.
John
-
Mark Pearse got a reaction from druxey in Ranger type yacht by Mark Pearse - 1:12 - SMALL
I've started on the keel. The shape is not complex, so it can be modelled pretty easily. For stability & strength I decided to make it from horizontal strips of timber, dowelled with brass. The timber is a nice straight-grained piece of Huon Pine. The keel is not a difficult shape: it fairs with the hull, but essentially it appears to be even from there down to the bottom of the keel.
This is the keel side on. The yellow bands will be done in strips of timber.
The strips, in plan:
The timber pieces cut to shape, plus the 1/8th brass rod:
Stacked & trimmed, & sitting on the hull. It doesn't look quite right, but it will. The hull has more sanding to get it down to the right size, I have left that to assist get the fairing with the keel right.
thanks all
-
Mark Pearse got a reaction from Roger Pellett in Ranger type yacht by Mark Pearse - 1:12 - SMALL
I've started on the keel. The shape is not complex, so it can be modelled pretty easily. For stability & strength I decided to make it from horizontal strips of timber, dowelled with brass. The timber is a nice straight-grained piece of Huon Pine. The keel is not a difficult shape: it fairs with the hull, but essentially it appears to be even from there down to the bottom of the keel.
This is the keel side on. The yellow bands will be done in strips of timber.
The strips, in plan:
The timber pieces cut to shape, plus the 1/8th brass rod:
Stacked & trimmed, & sitting on the hull. It doesn't look quite right, but it will. The hull has more sanding to get it down to the right size, I have left that to assist get the fairing with the keel right.
thanks all
-
Mark Pearse got a reaction from Bedford in Ranger type yacht by Mark Pearse - 1:12 - SMALL
I've started on the keel. The shape is not complex, so it can be modelled pretty easily. For stability & strength I decided to make it from horizontal strips of timber, dowelled with brass. The timber is a nice straight-grained piece of Huon Pine. The keel is not a difficult shape: it fairs with the hull, but essentially it appears to be even from there down to the bottom of the keel.
This is the keel side on. The yellow bands will be done in strips of timber.
The strips, in plan:
The timber pieces cut to shape, plus the 1/8th brass rod:
Stacked & trimmed, & sitting on the hull. It doesn't look quite right, but it will. The hull has more sanding to get it down to the right size, I have left that to assist get the fairing with the keel right.
thanks all
-
 Mark Pearse got a reaction from dvm27 in Ranger type yacht by Mark Pearse - 1:12 - SMALL
I've started on the keel. The shape is not complex, so it can be modelled pretty easily. For stability & strength I decided to make it from horizontal strips of timber, dowelled with brass. The timber is a nice straight-grained piece of Huon Pine. The keel is not a difficult shape: it fairs with the hull, but essentially it appears to be even from there down to the bottom of the keel.
This is the keel side on. The yellow bands will be done in strips of timber.
The strips, in plan:
The timber pieces cut to shape, plus the 1/8th brass rod:
Stacked & trimmed, & sitting on the hull. It doesn't look quite right, but it will. The hull has more sanding to get it down to the right size, I have left that to assist get the fairing with the keel right.
thanks all
-
Mark Pearse got a reaction from KeithAug in Ranger type yacht by Mark Pearse - 1:12 - SMALL
I've started on the keel. The shape is not complex, so it can be modelled pretty easily. For stability & strength I decided to make it from horizontal strips of timber, dowelled with brass. The timber is a nice straight-grained piece of Huon Pine. The keel is not a difficult shape: it fairs with the hull, but essentially it appears to be even from there down to the bottom of the keel.
This is the keel side on. The yellow bands will be done in strips of timber.
The strips, in plan:
The timber pieces cut to shape, plus the 1/8th brass rod:
Stacked & trimmed, & sitting on the hull. It doesn't look quite right, but it will. The hull has more sanding to get it down to the right size, I have left that to assist get the fairing with the keel right.
thanks all
-
 Mark Pearse got a reaction from Javelin in Ranger type yacht by Mark Pearse - 1:12 - SMALL
The planking is finished & I've spent a few hours sanding. This planking method (strip planking at scale) was visually messy, so it's very nice to see the hull lines start to become more visible. Although the nature of strip planks (being parallel sided), the planking lines throw the optics of the shape off a bit, as the line of the planks towards the keel don't bear much relation to the hull shape....the planking just follows the ones above with no tapering.
The stern photos show the excess hull near the transom - that planking needs to be cut away - as the hull has the sweep down from the upper deck to the height of the transom. Photo below shows that gently curved line of that transition.
I'll do a bit more sanding & then start on the keel & outer stem pieces. Also the infill piece that will turn the square cutaway at the stern into the curved propeller cutaway.
They are a fat boat.....
plus this for comparison:
thanks