Jörgen
-
Posts
243 -
Joined
-
Last visited
Content Type
Profiles
Forums
Gallery
Events
Everything posted by Jörgen
-
 Looks good Pucko. I think it is worth to wait now until bowparts and other visual parts starts to arrive so some planning can be made how to do things. I don't like the instructions at all for how they want to build the ship.
- 305 replies
-
- 3
-

-
- deagostini
- vasa
- (and 1 more)
-
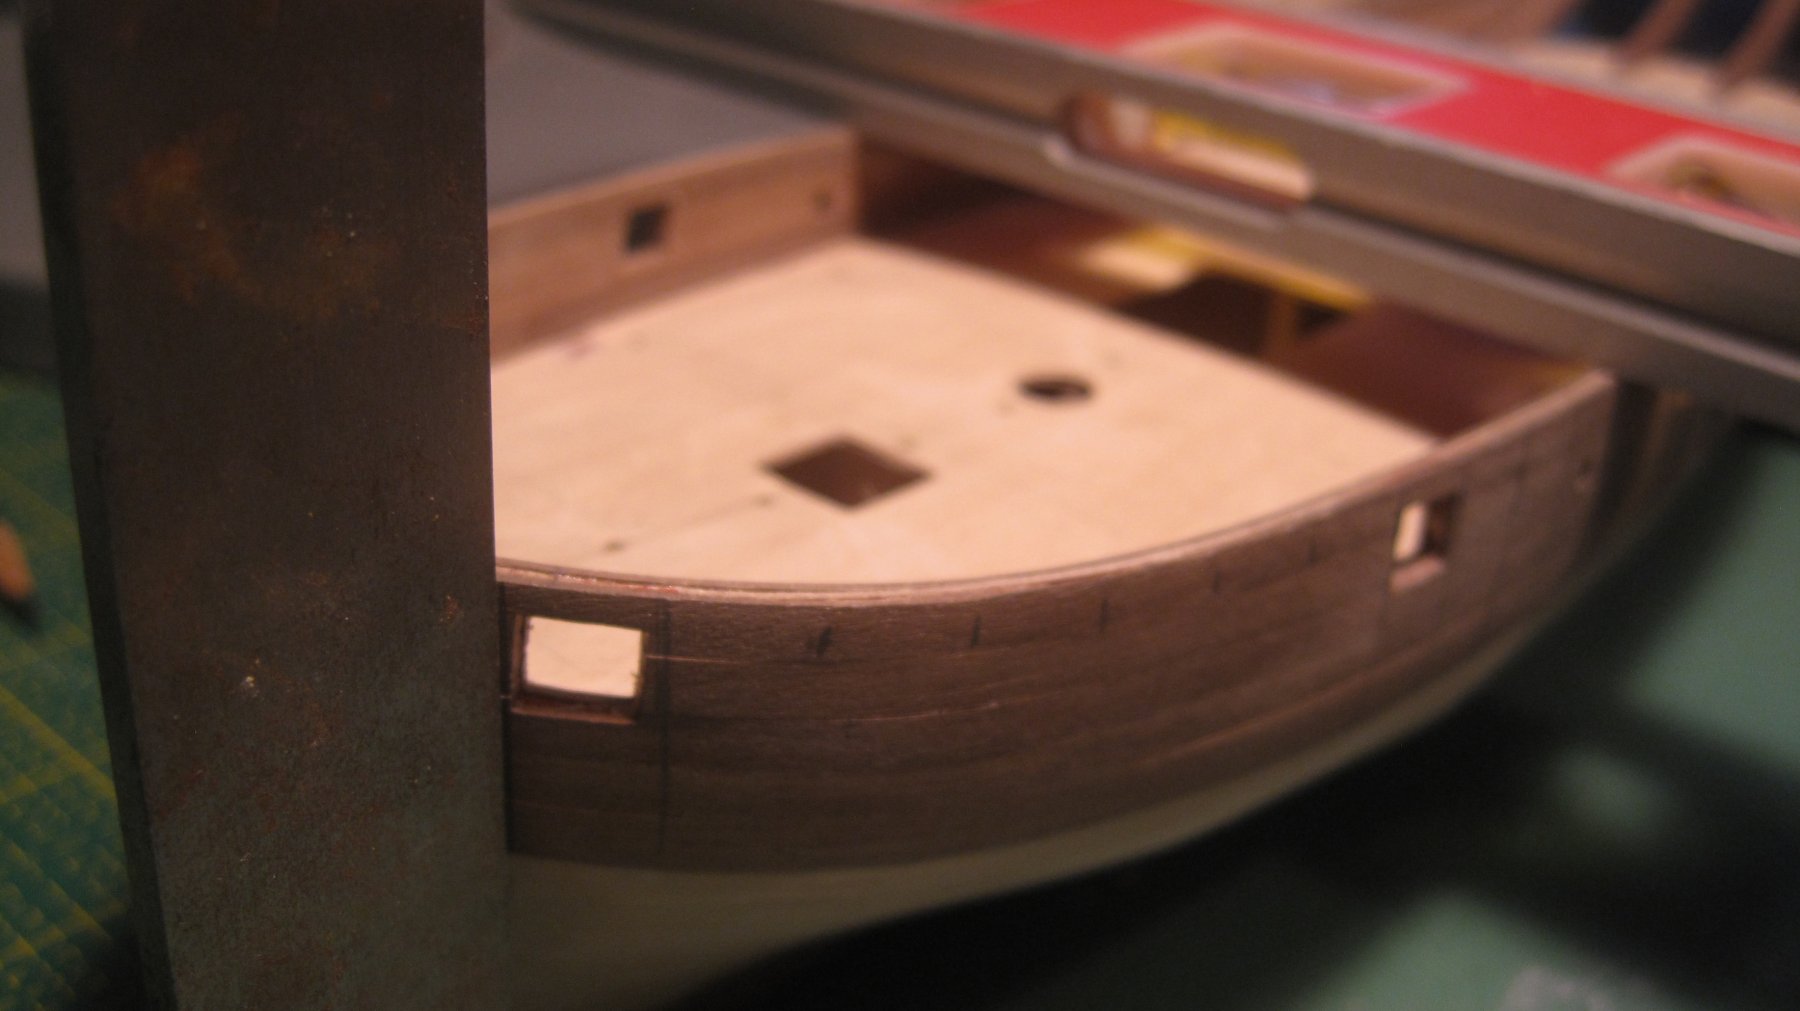
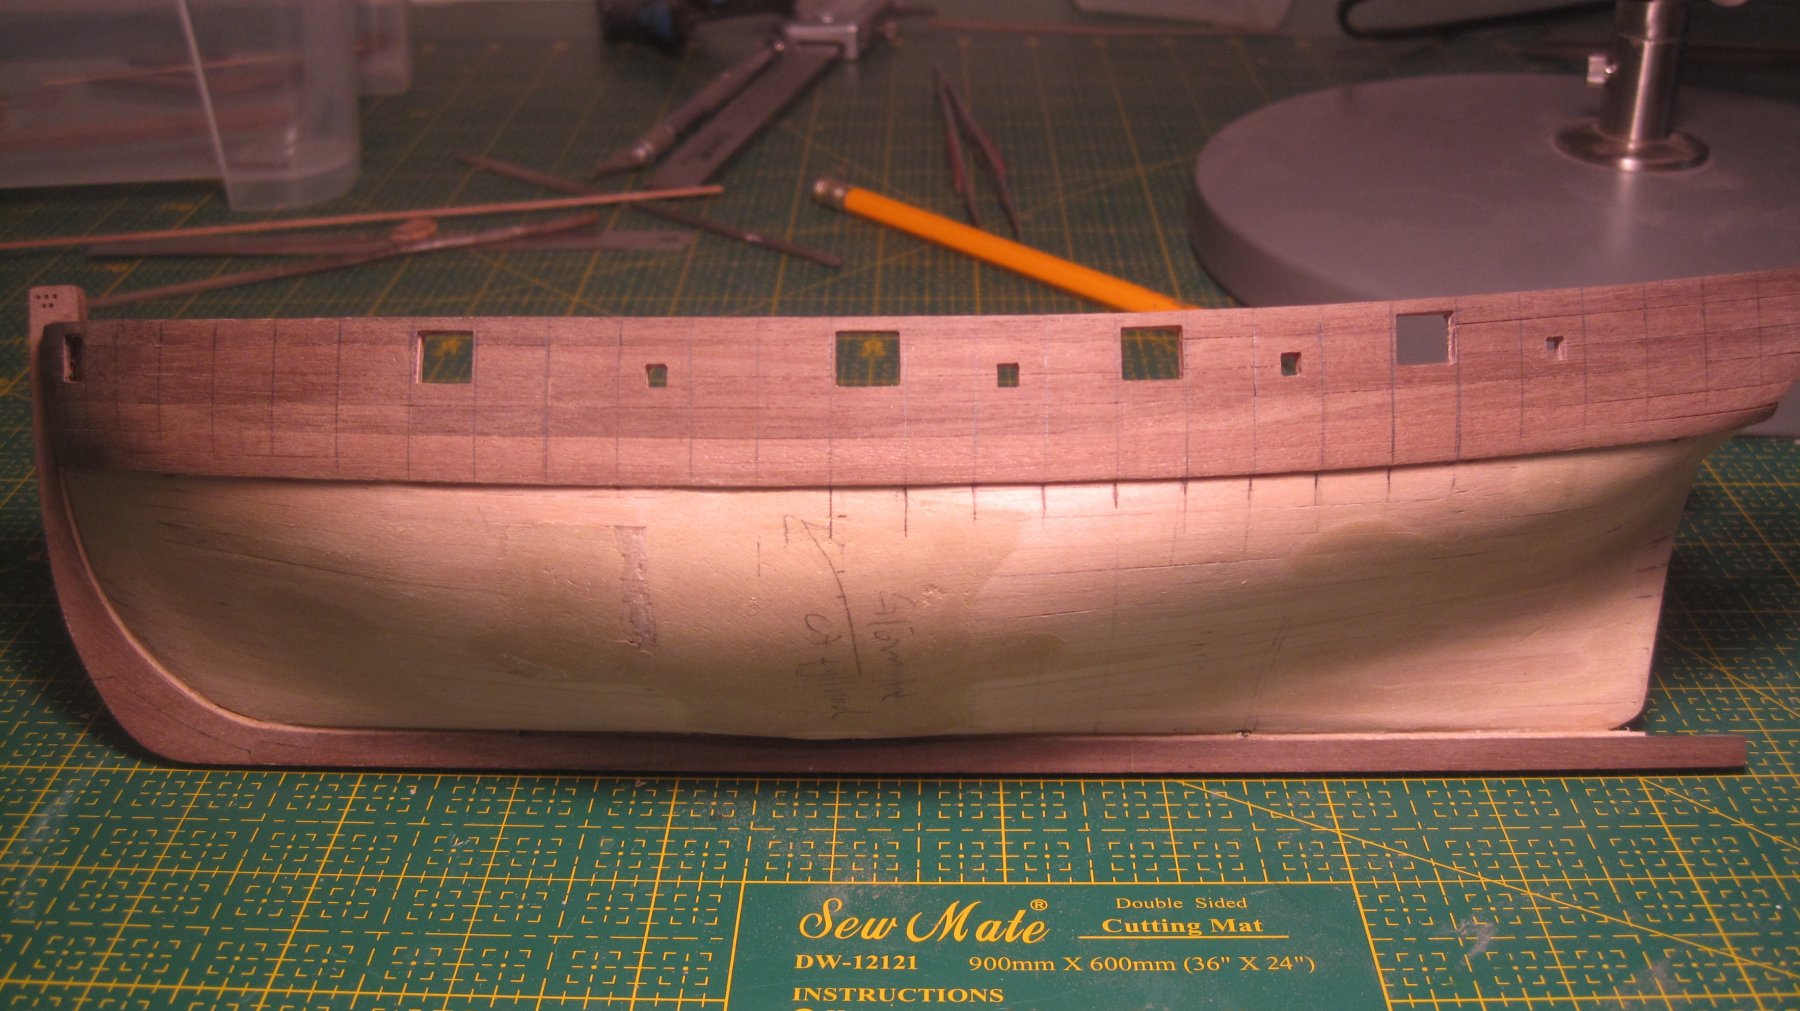
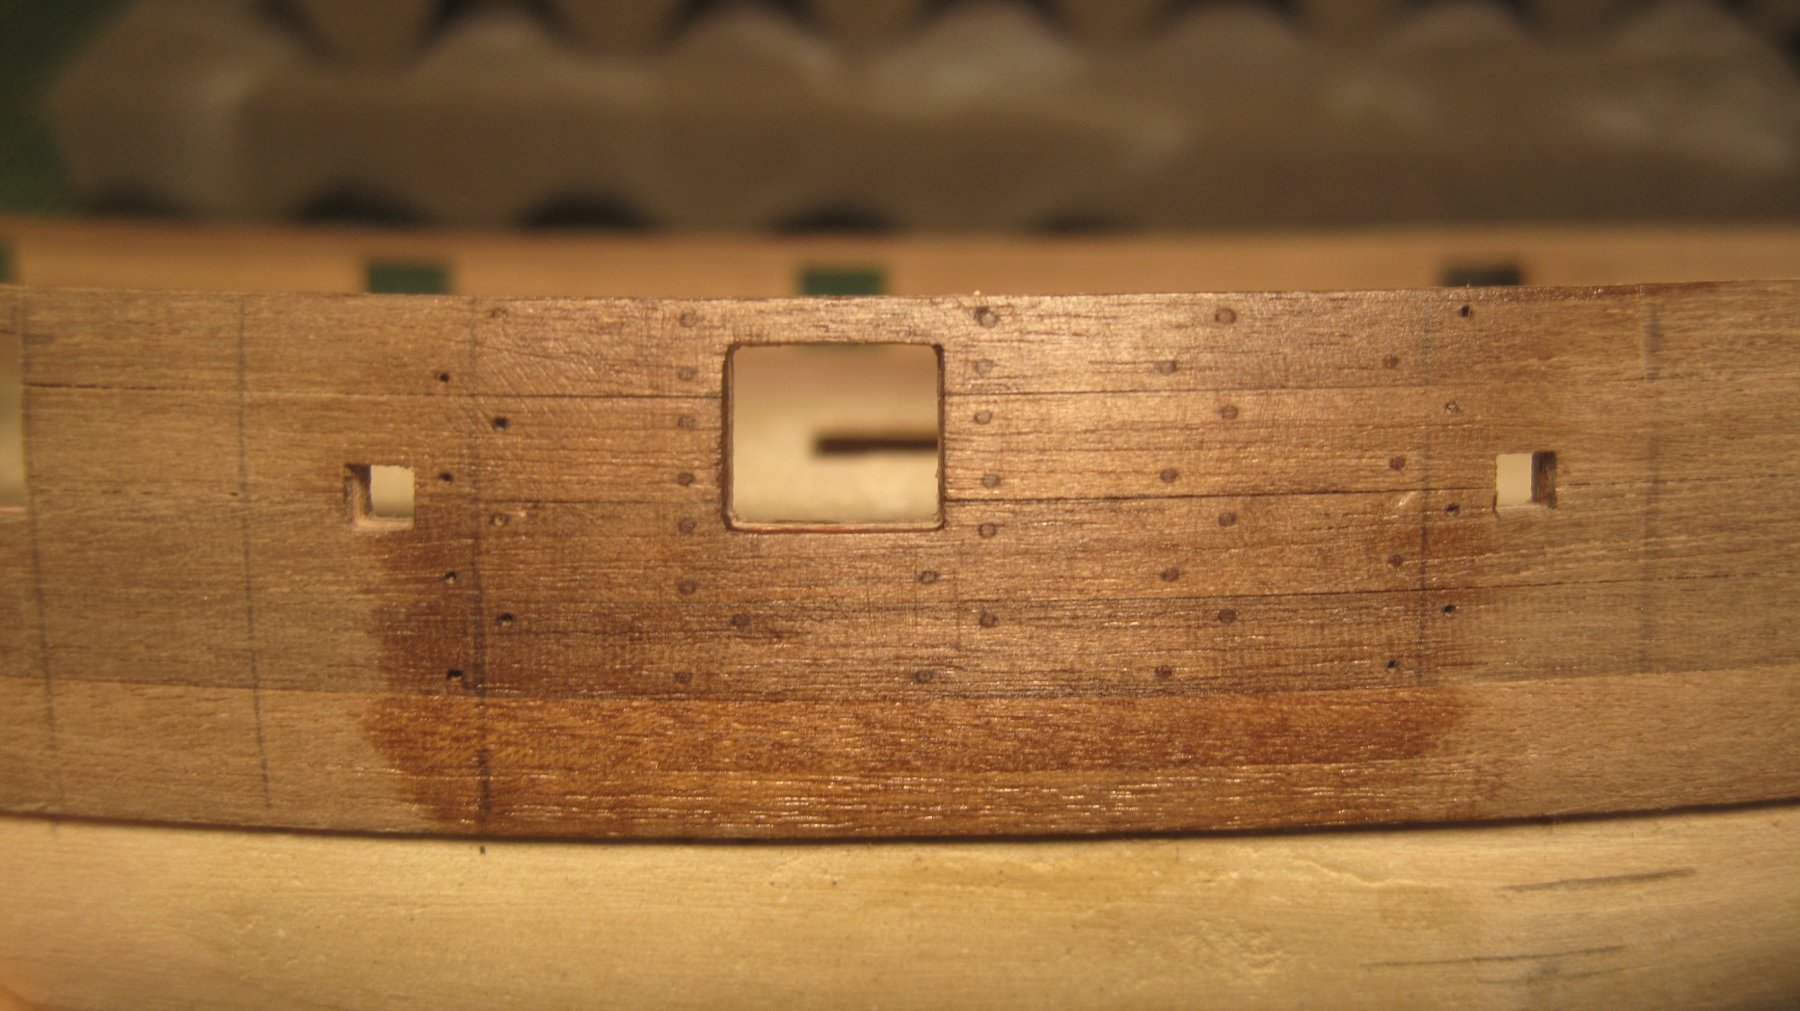
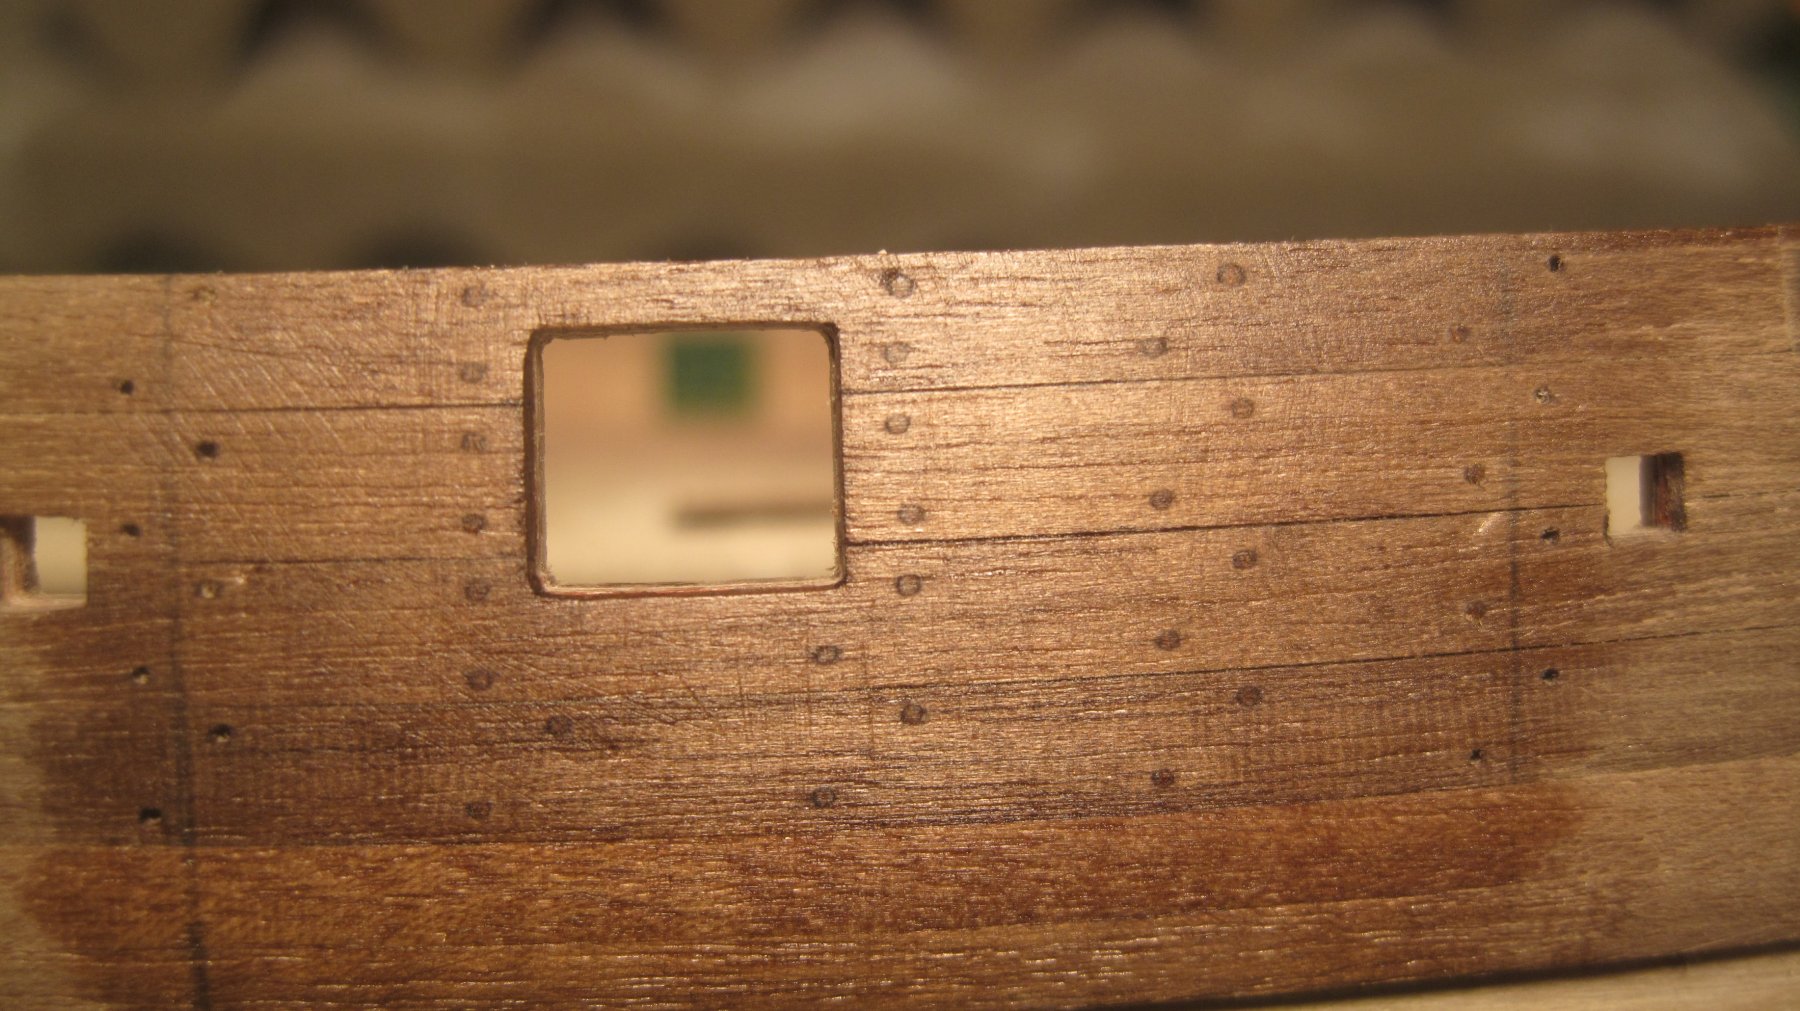
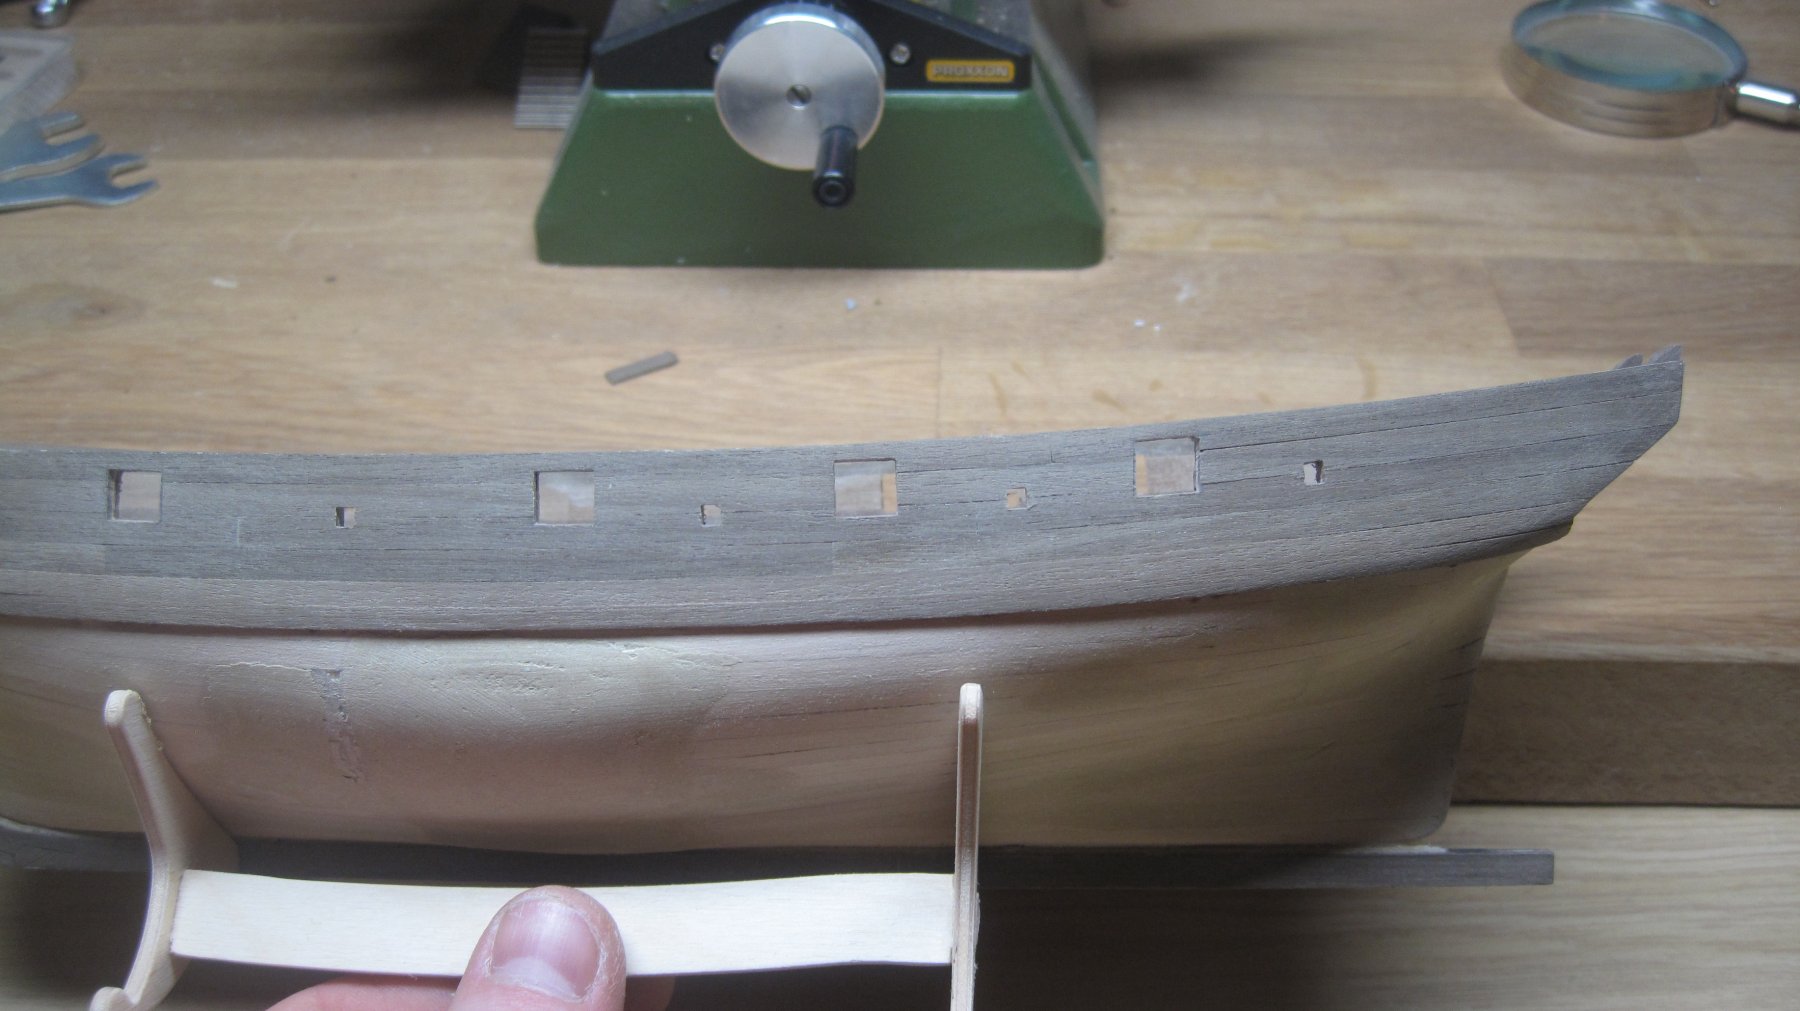
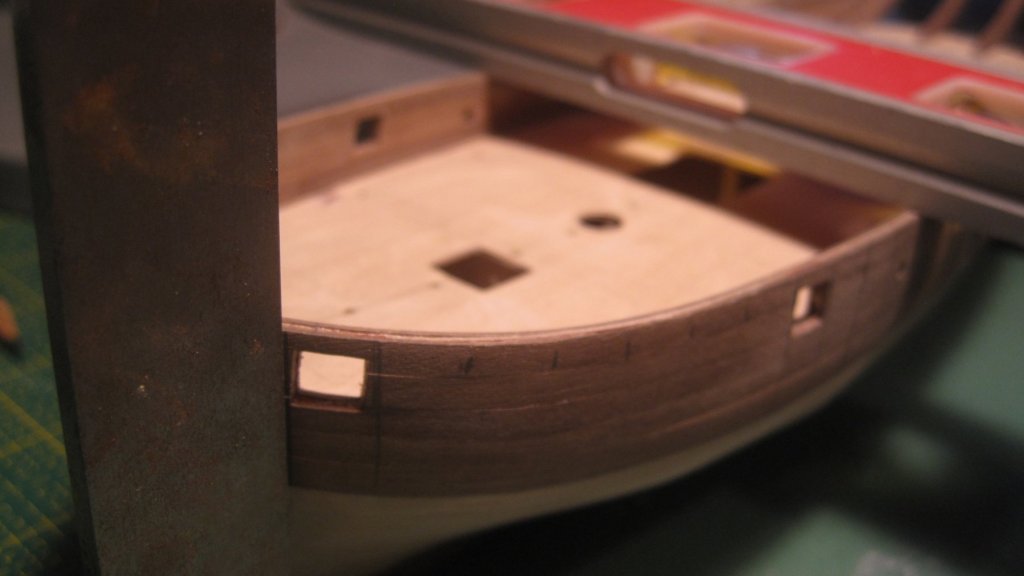
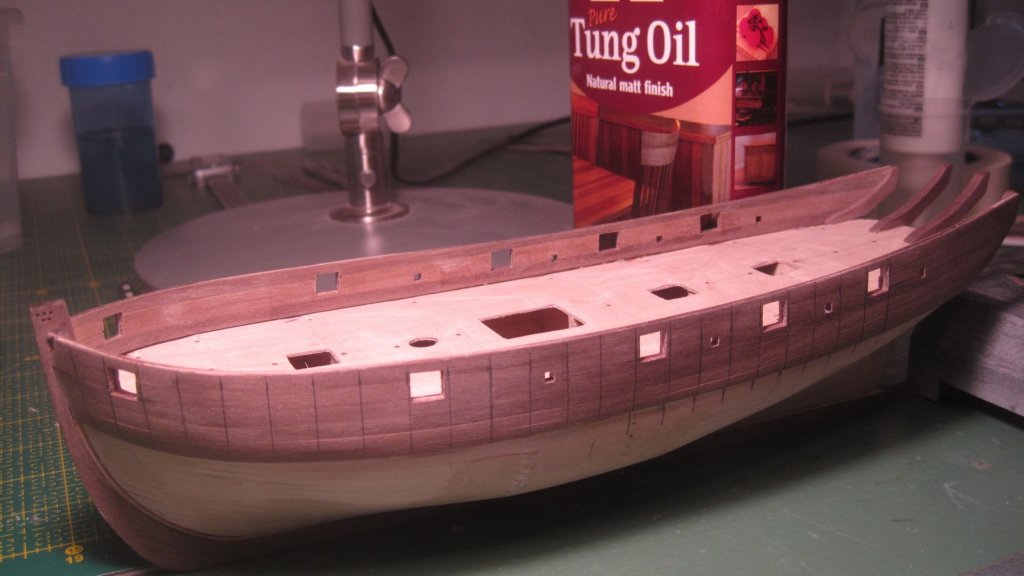
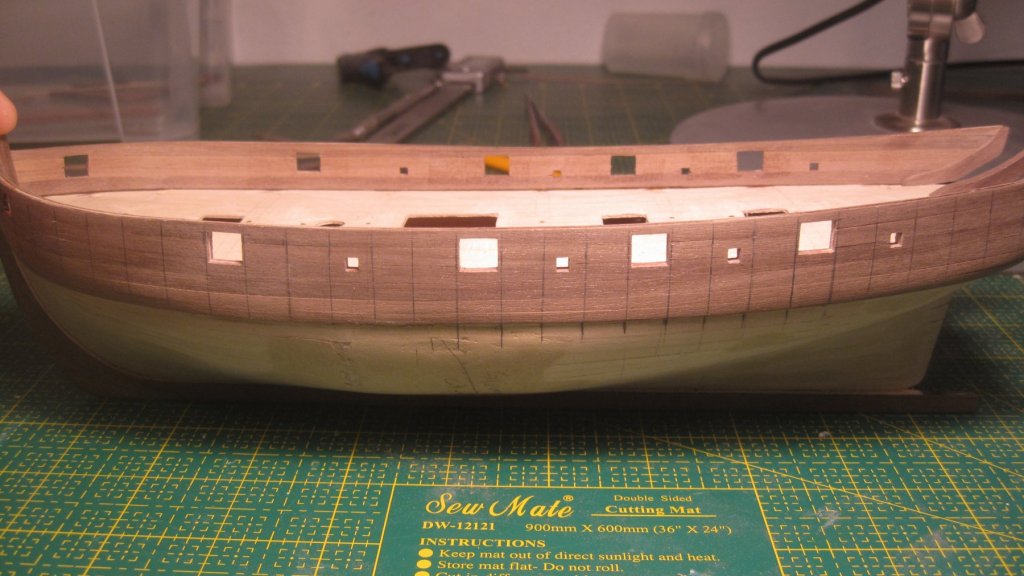
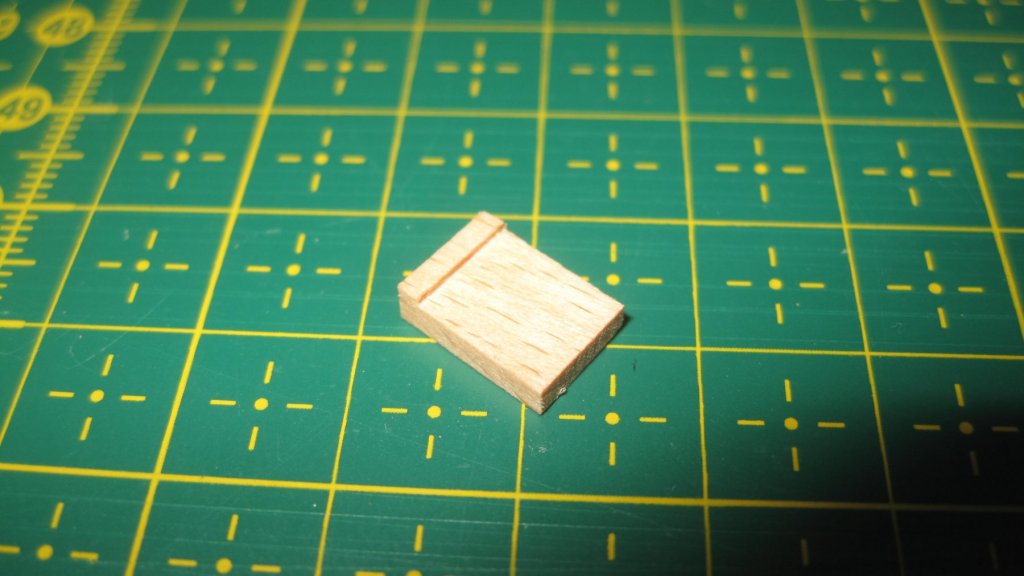
Hello, here is another update. After have make the decision how to make the gun port openings I had to make straight lines 90 degrees to the keel. I put up this simple "jig" to do it and I am happy with the result. I followed the drawings in AOTS Alert to ger the spacing between the frames and this was 10 mm. I manage to get a nice spacing in total from the bow to the stern. I then reshaped the portholes and I am very happy with the result. For me the holes now just feels better. They are slightly bigger but later there will be sills in them. Here is the photos of it. After this I tried some tree nailing and realized how big job this will be.... The holes are drilled with 0.5 mm drill and the tree plugs are done with the 22 hole in Byrnes Draw plate (have never understand these odd measurements ). The material for the tree plugg is the planking material that was supplied with the kit. I am more than happy with the result and the colors match each other. Here is the result with some tung oil added. This was all for now because I really need to go to bed. This change of time to summer time last night has make me to a zombie...


-
I read a lot at the moment in your build log for sherbourne and comparing your first attempt on gun carriages and these on triton... Well, small statement that there is a quite big increase in skill☺️ That is a nice aspect of ship modeling. Almost all think a ship model is beautiful. It is much harder to get them say the same for a tank or aircraft...
- 132 replies
-
- 3
-
-
- triton cross-section
- cross-section
- (and 1 more)
-
You are welcome Rick. I think my kit will be a hybrid between Sherbourne and Cheerful since I actually more follow Cheerful instructions. Maybe I name the ship just as "Cutter".
-
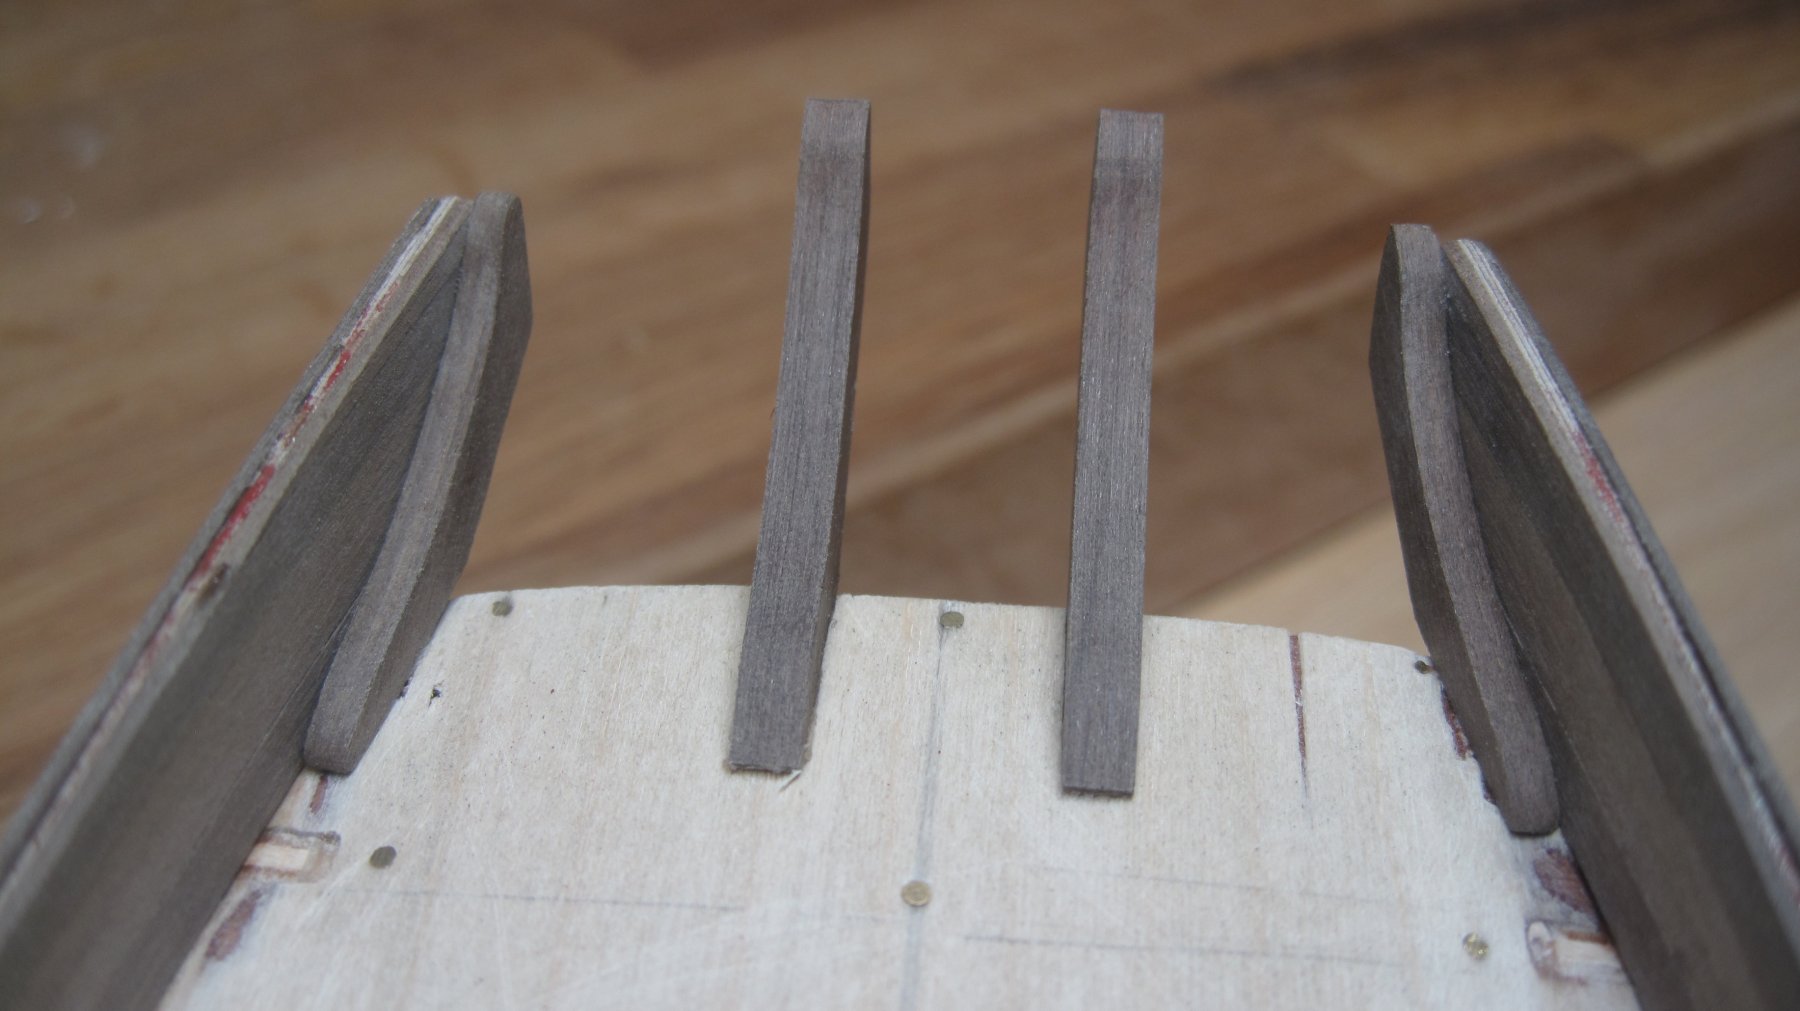
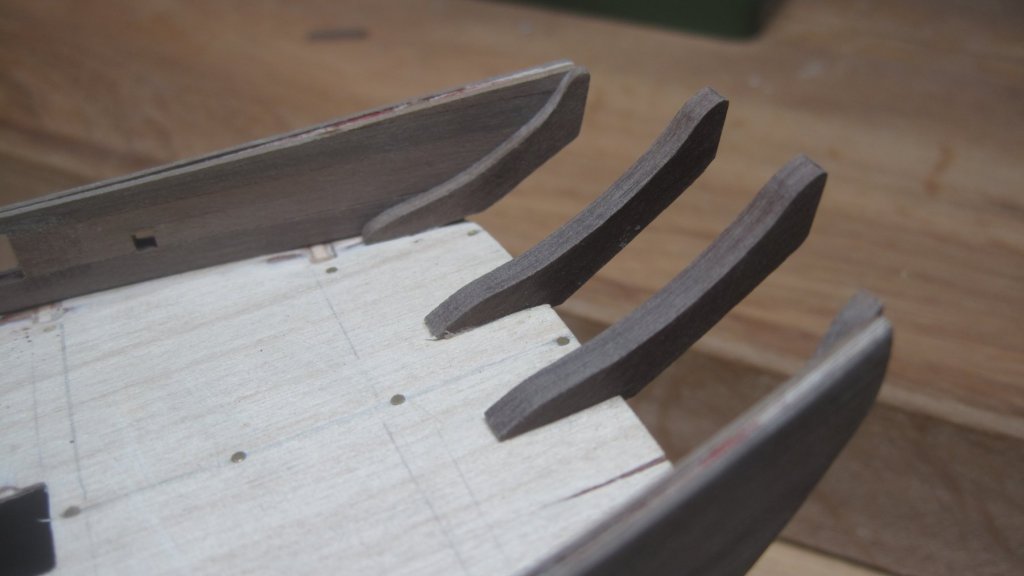
Tony, tonight I found the long and interesting discussion about Gun port lids on Sherbourne (actually by accident on google..) you and others had some years ago. really interesting. This evening i reshaped one of the gun port openings to diamond form with the sides 90 degrees to the keel (the right gun port). For me it looks much better so I will go for it. This will also apply to the small square sweep holes. I will also most probably use lids for the gun ports and this is because I like it and I want to learn to do it before Vasa. I will also do covers for the sweep holes because it feels wrong to have gun port lids when there is other openings without covers. For this I will use AOTS Granado as a guide. I also manage to start to work at the stern. I used the milling machine to redo the stern frames in massive Walnut. I just can't stand plywood were the edges are visual..even if it will be painted. I think to put in 1 tree nail in each of the center ones just to make them stronger. I must be crazy but I really find it relaxing to do tree nails with my draw plate...... Sorry about the light in the photos. I have two working stations with two different lamps. The white lamps make the photos boring with no color and the yellow lamps gives too much color....must try to find a way to make this better. I also attach one photo on my building place if anyone is interested.


-
Seems that you have got the door frames and they are in plywood. So it is here the replacement starts (and ofc the gun carriages also)
- 305 replies
-
- 3
-
-
- deagostini
- vasa
- (and 1 more)
-
I forgot to mention this. My gun ports are in higher positioning than the ones in the pre-cut plywood. When I had planked the outer side I used the top of the planks to positioning the gun ports. In this case they follow the natural bending of the outer sides planking. And it is this bending I mean the deck also should follow.

-
Yes, have checked there logs (and will use many ideas there) . When I lock at the original drawing (the bad one on internet..) so feel I that the outer shape and planking on my kit looks correct, but it seems that the deck positioning on the Sherbourne kit is wrong (too low at the bow) and it is this that cause the height problem of the gun ports. Chucks Cheerful has the diamond shaped ports and that was what I paid attention to yesterday so I started to think.... If the ports are not diamond shaped so will the tree nailing look weird around the ports since the frames are vertical. It will be tree nailing on the hull and no paint. I will only use red (inner planking) and black (on the whale and upper rail) paint on this model. I will use Chucks instructions on the hull planking. Preparing for it at the moment.
-
Hello again Have started my Sherbourne again after some time. Now I have a question about the shape of the gun ports. Shouldn't the gun ports follow the lines I have put in the photo instead of be square to the upper rail? I have already cut them open so if I must change, they have to be little bit bigger. I thinking of use covers for the gun ports, but if I change the form, can they still be operated if the opening is a diamond form? And also the tree nailing. Shouldn't they also follow the line (90 degrees from the keel)?
-
Vasa by Jörgen - DeAgostini - 1:65
Jörgen replied to Jörgen's topic in - Kit build logs for subjects built from 1501 - 1750
I agree with you "save money know because the ship is expensive" and just in a couple years you look on it and regret that you didn't bought the planking upgrade... It will be a upgrade. and about the "expensive kit" I think our hobby actually is quite cheap. I have a friend that build and fly jet RC planes.....and if you have a car, motorbike, boat etc., that is more expensive! I don't think I will fill with balsa since some filler easily fix any problems on the first planking. And I use the first planking to learn:). On my Endeavour I actually overworked the first planking.- 50 replies
-
- 2
-
-
- vasa
- deagostini
- (and 1 more)
-
Vasa by Jörgen - DeAgostini - 1:65
Jörgen replied to Jörgen's topic in - Kit build logs for subjects built from 1501 - 1750
I will use the supported wood as first layer but I most probably will replace the second layer (If DeAgostini don't surprise with really good wood...). The ship is already expensive but I think it deserves better wood (even of the cost). It will probably be Castello boxwood or swiss pear. Havn't seen these wood In real life so can't decide on the colour. But I want the colour to be similar to the oak colour on the 1:10 vasa. And I want to build with quality wood. I have replaced the wood on my Sherbourne with better Walnut and it is so much more fun to build. I must also find were to buy it. Sad the shipping rate is so expensive from the states.- 50 replies
-
- 1
-
-
- vasa
- deagostini
- (and 1 more)
-
I totally agree with you😊. It is actually quite interesting about these "free spots" where you can sit down and build. I have mine on working evenings when the children are sleeping or on Saturday, Sunday mornings (2h) when the children are at Russian school or in Russian church (my wife are from Russia and it is important for us that they speak Russian as a mother language and get the culture from there). However, the interesting thing is the question I always got on work and that is "how do you have time over to sit down and build?" The anwere is easy. I very seldom just sit down and look at that thing that is called TV screen.... Some of the people that ask are in same family situation as me but they "burn" there free time in front of Netflix and etc....
-
Don't worry Tony I must build Sherborne first since there is a lot of skills I want to learn and use on vasa. But sometimes it is low progress since I like to build plastic kits also. And then ofc the life with 3 girls at home. Wife, and two small at 2.5 and 5 years old. That take some time also... I am about to cut out the gun ports and I will post a update when they are finished.
-
Vasa by Jörgen - DeAgostini - 1:65
Jörgen replied to Jörgen's topic in - Kit build logs for subjects built from 1501 - 1750
Thank you Mr Pucko and no, I have not got the March shipment yet. Have to paint figures and continue on my Sherbourne while waiting. Danny, I am not so much thinking on the rigging instructions since I probable will use Vasa 2 for that if it arrives in near future (i hope..). This is Freds Hockers answer on he issue: "Hej Jörgen, The current status is the same as it was about a year ago. I have text and illustrations ready t go, but the Swedish state system requires expenditures this large (layout, printing and distribution) to go out for tender, and our tendering department has been having a problem formulating the terms. I had the latest in a long series of meetings on this last week, not sure when this will move forward. Once the tender is out (April???), it will take about three months to complete the bidding process to select a publisher, and then about six months to produce the book. I will let everyone know once we have a publisher. At least on this schedule, the book should be out before the DeAgostini kit gets to the rigging stage! Fred" Hubac, I don´t know anything about the carving on the 1:10 Vasa but use this link and register. Then can you ask Fred Hocker about it http://warshipvasa.freeforums.net/ -
Vasa by Jörgen - DeAgostini - 1:65
Jörgen replied to Jörgen's topic in - Kit build logs for subjects built from 1501 - 1750
Hello WoW goblin eddie😊 So far it is a very good kit. I also have billing vasa so I can compare the details and they don't play in the same league. Highly recommended. -
Vasa by Jörgen - DeAgostini - 1:65
Jörgen replied to Jörgen's topic in - Kit build logs for subjects built from 1501 - 1750
Thank you Hubac 😊. I have that book and I also just bought the Vasa 1. The DeAgostini paint instructions is not so good in my opinion so I follow the photos on the 1:10 Vasa model. An even better place to find photos is here: https://digitaltmuseum.se/search/?context=photograph&aq=text%3A"vasa"%2C"modell" owner%3A"S-SMM-VM"&o=0&n=224 -
Vasa by Jörgen - DeAgostini - 1:65
Jörgen replied to Jörgen's topic in - Kit build logs for subjects built from 1501 - 1750
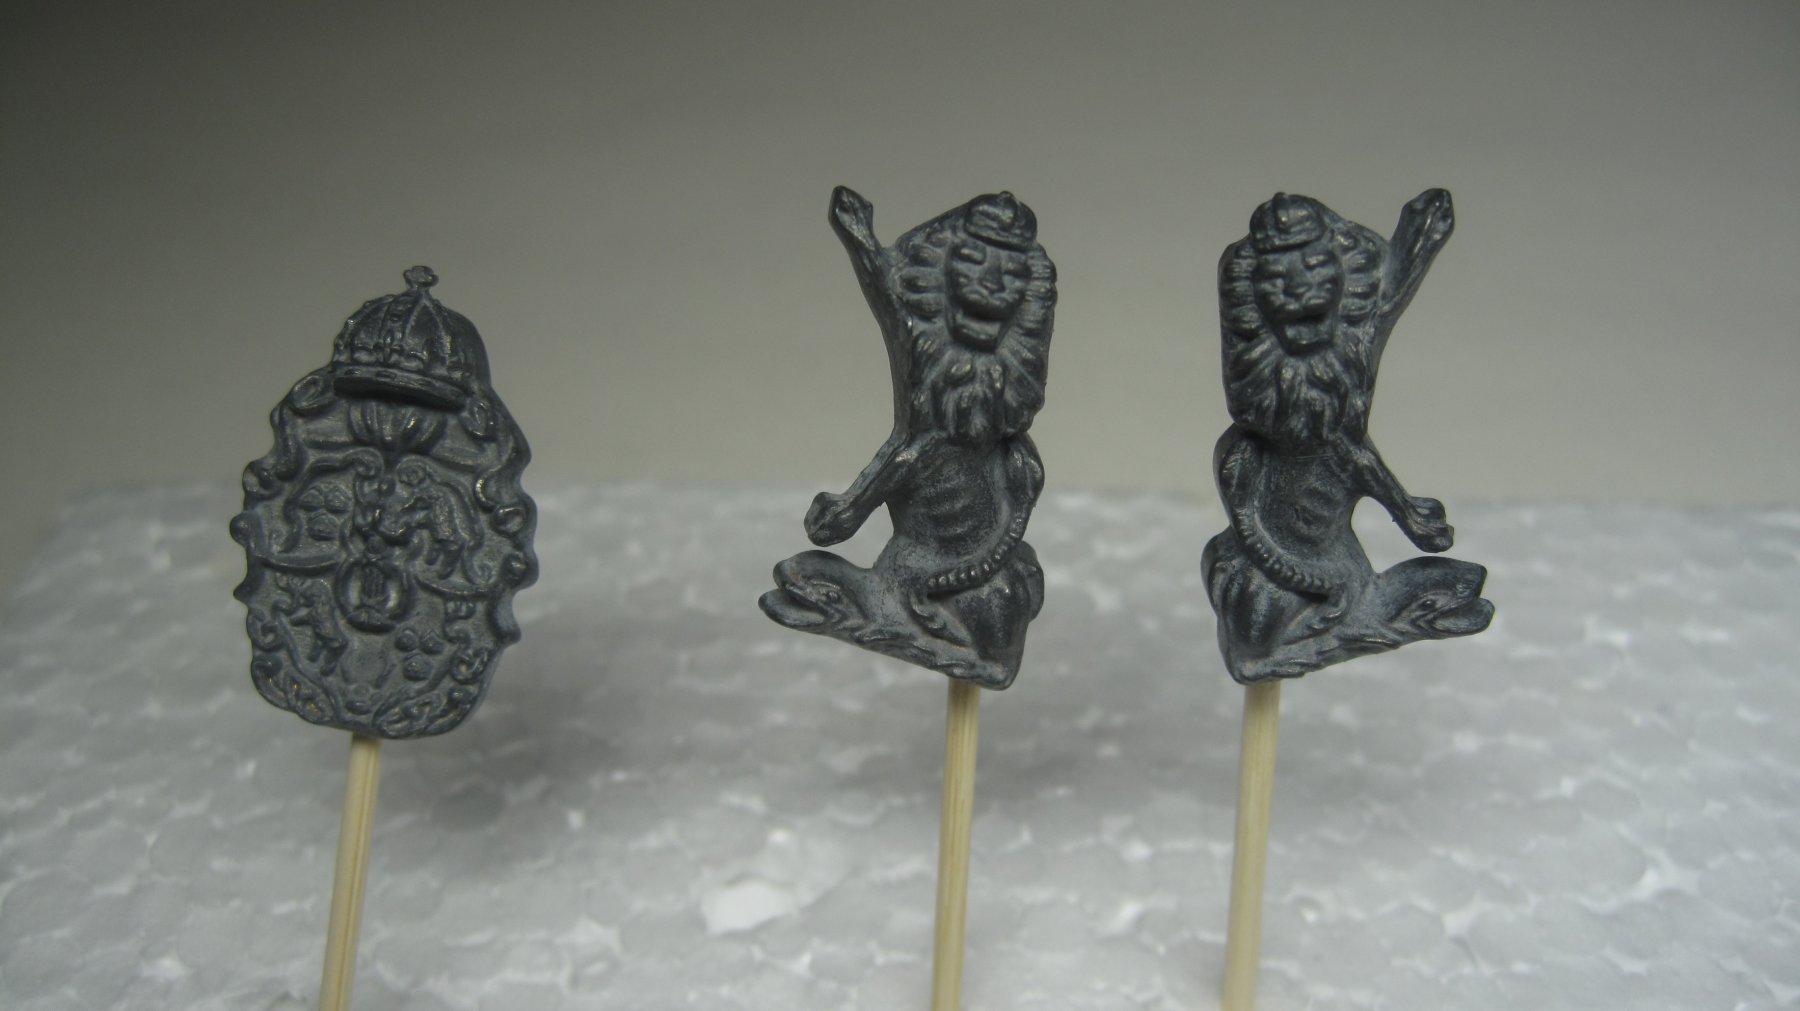
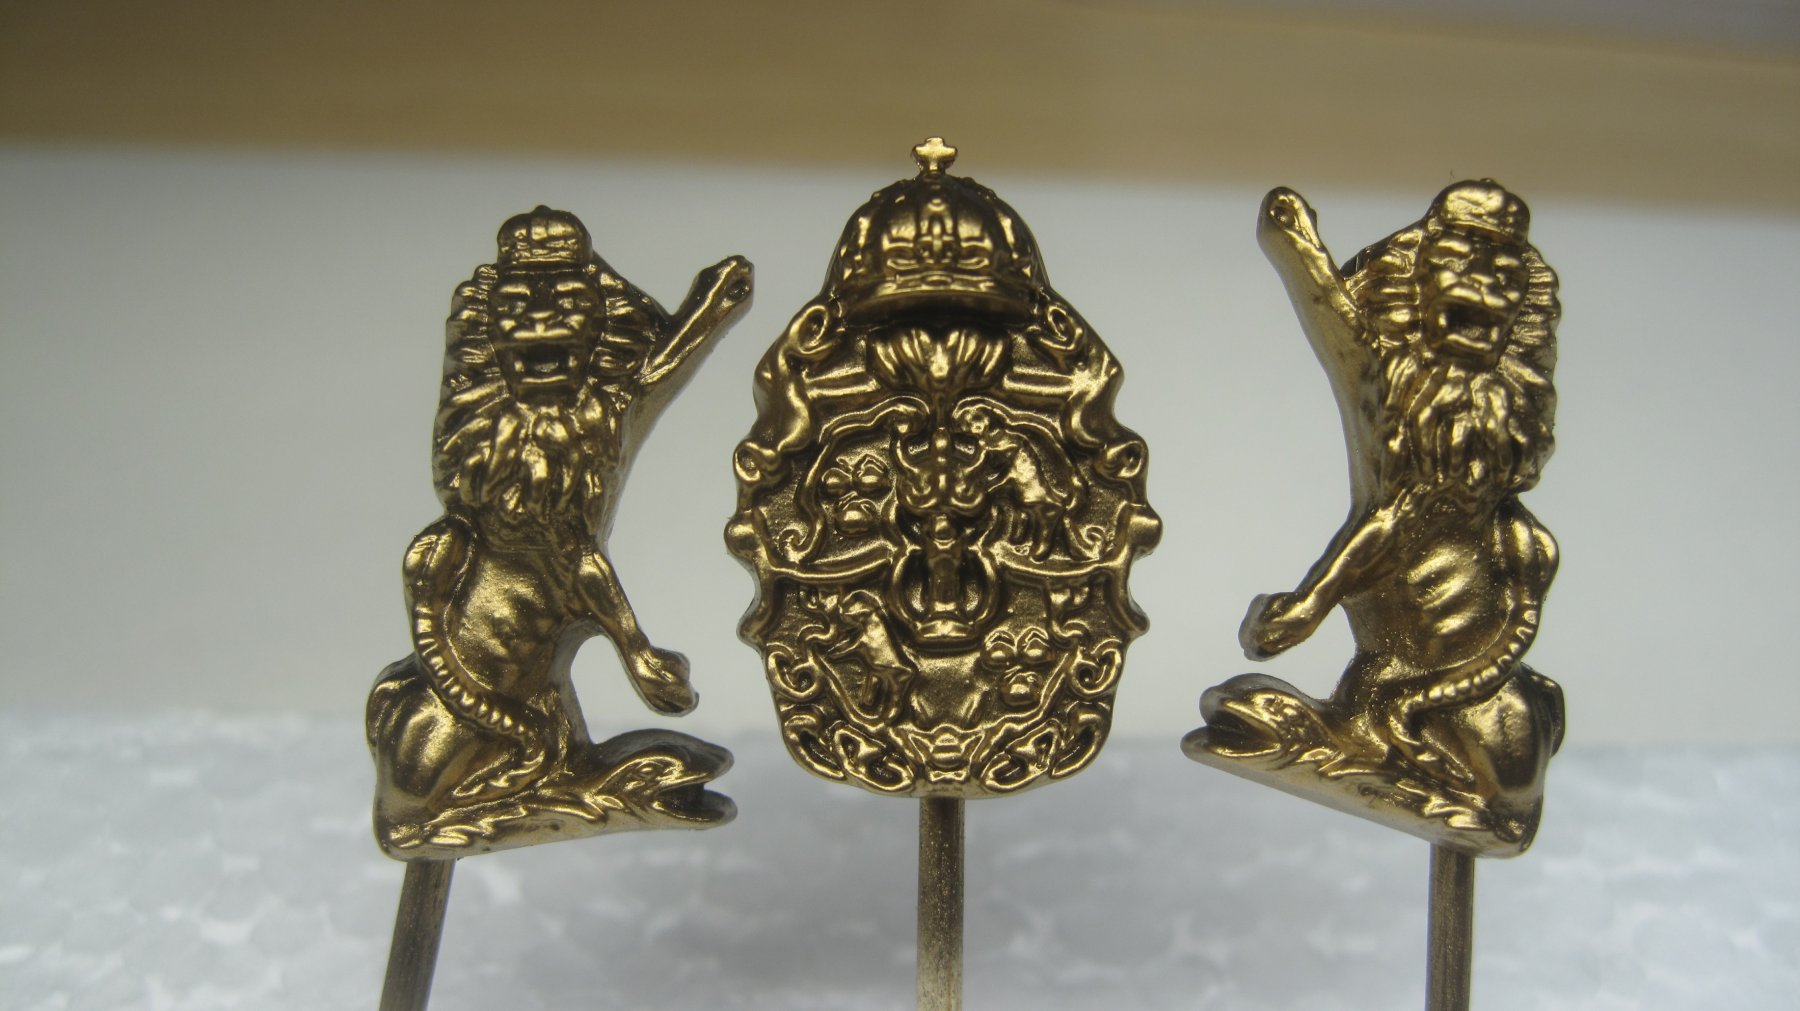
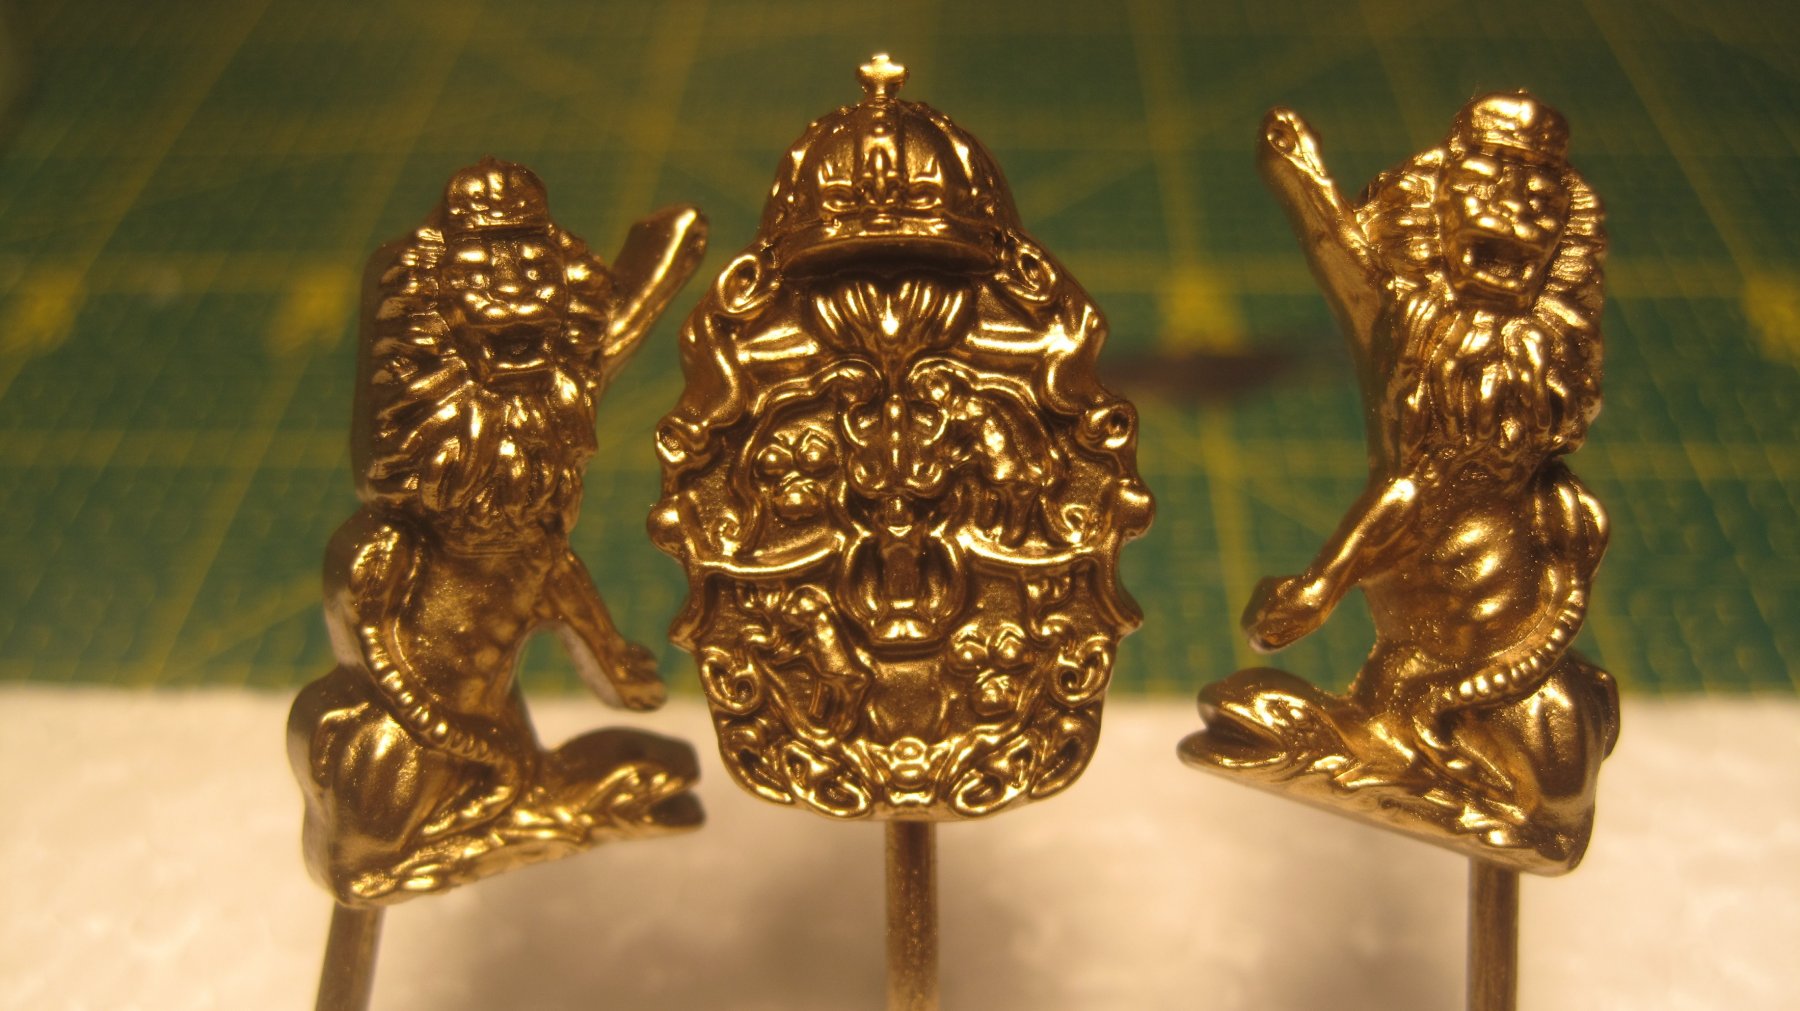
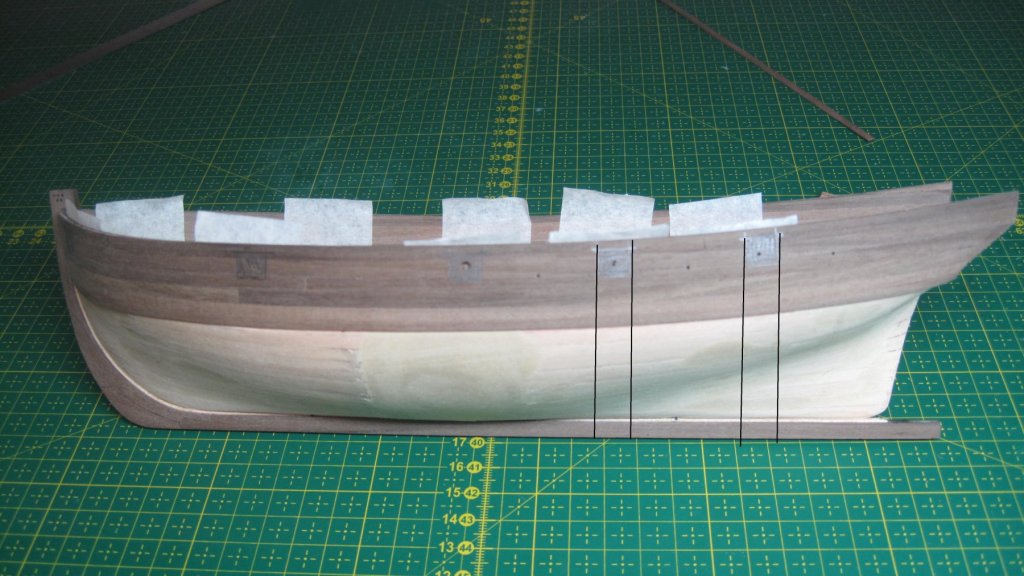
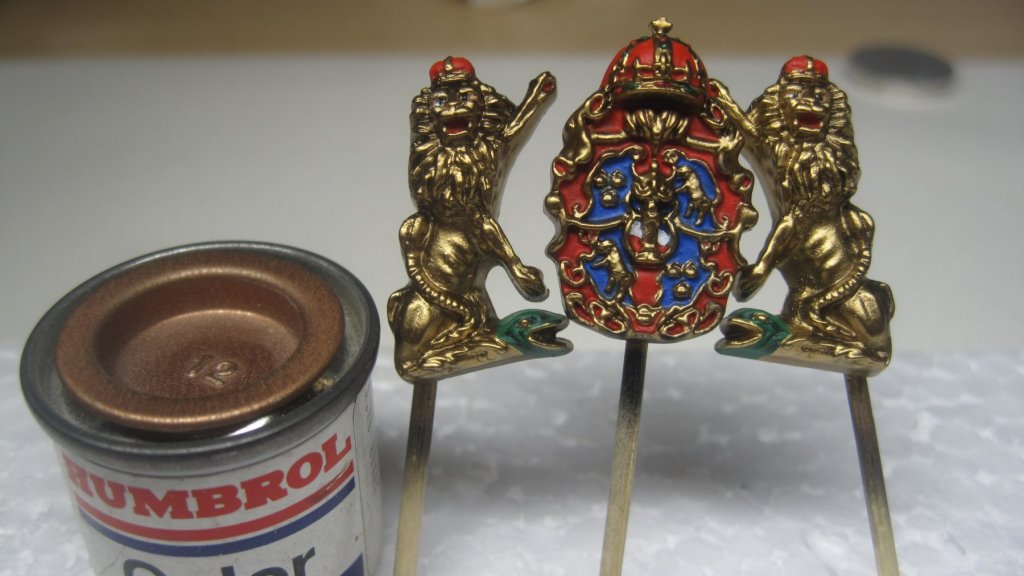
Hello again Here is the finished national coat of arm. I am really happy about it and I think it better than the first one I did. And here is a idea how the real size is. Really difficult to paint all the small details. This is how far I am on the ship itself. I must give the advise to other people that might to build this ship and this is to wait to glue all the frames to the gun supports until all of the parts for the upper false deck has arrived. I ended up in a situation were the frames didn't fit the precuts in the false decks. So I had to bend the frames lose and refit them. Now must I wait for other deck parts to arrive so over to paint more figures.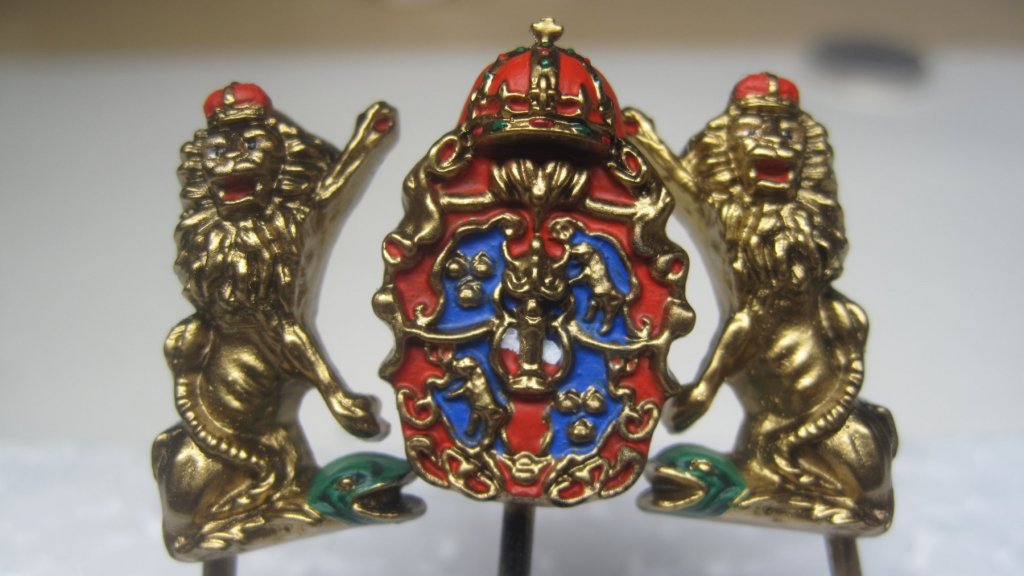
- 50 replies
-
- 4
-
-
- vasa
- deagostini
- (and 1 more)
-
Vasa by Jörgen - DeAgostini - 1:65
Jörgen replied to Jörgen's topic in - Kit build logs for subjects built from 1501 - 1750
I think the gold will be brighter but I think you lose the deep and the "mirror" effect. But I haven't tryed it. I didn't know that about red base for gold leaf. Interesting -
Vasa by Jörgen - DeAgostini - 1:65
Jörgen replied to Jörgen's topic in - Kit build logs for subjects built from 1501 - 1750
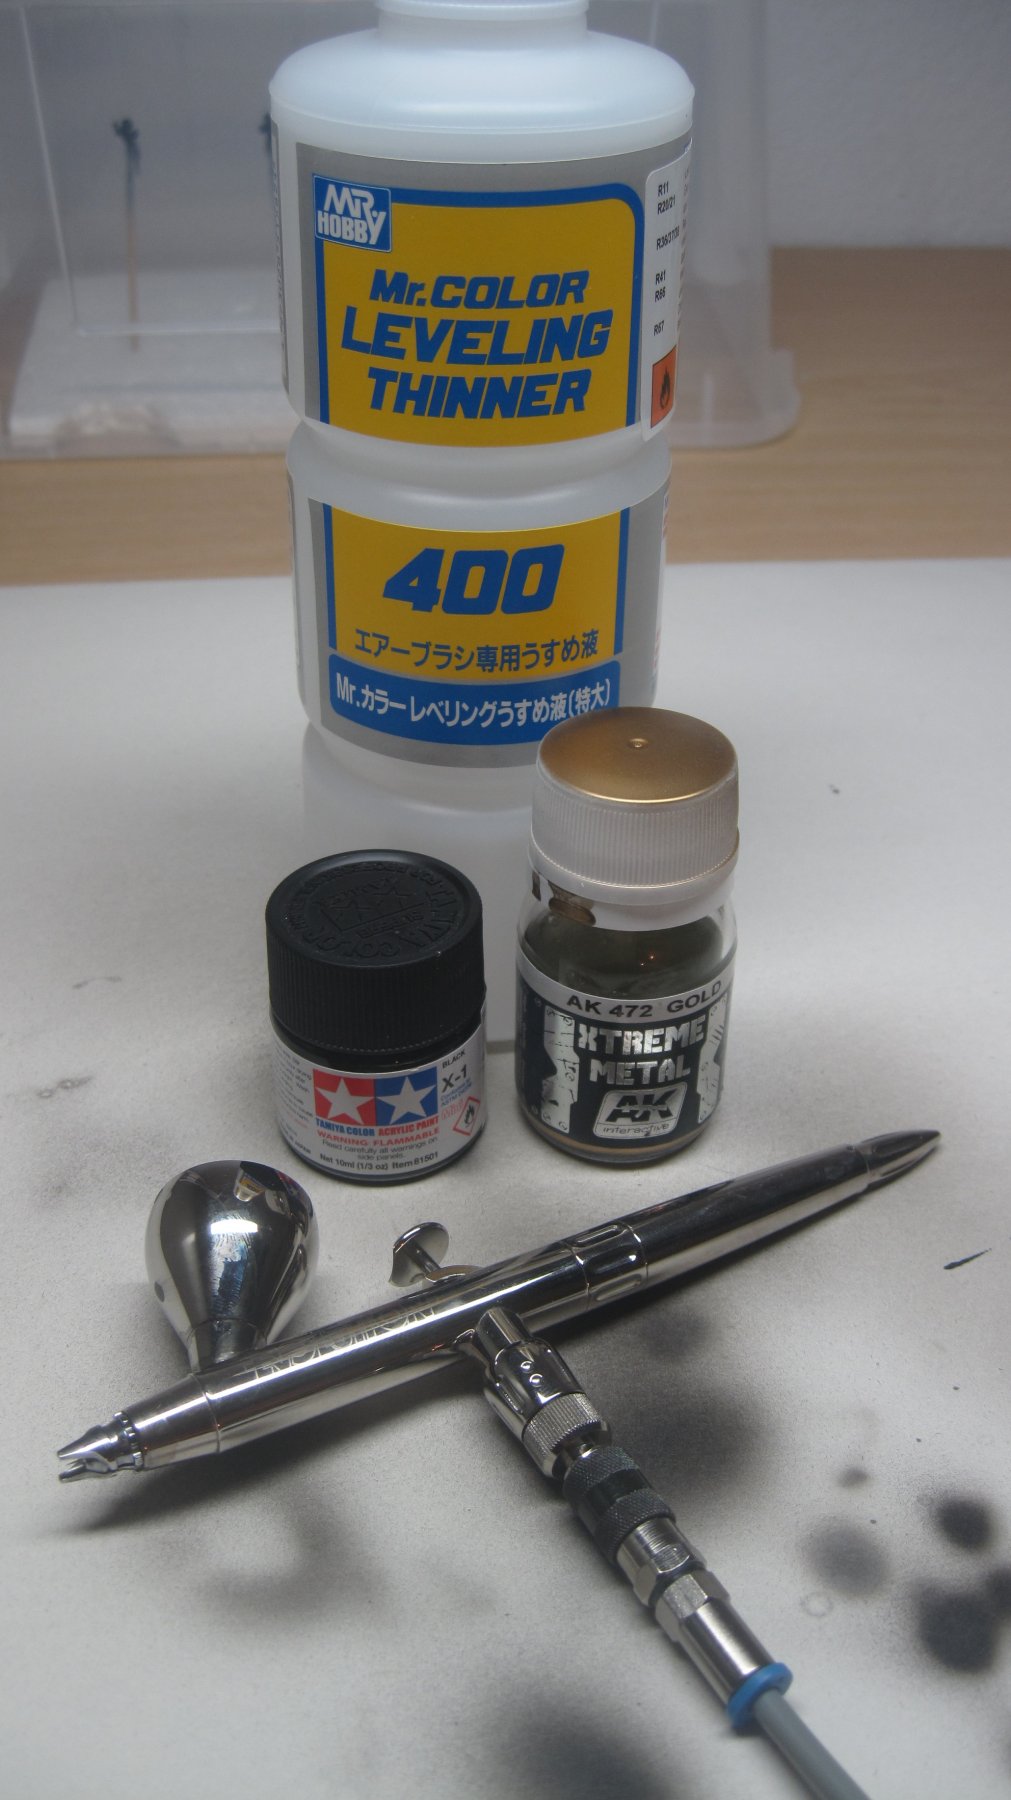
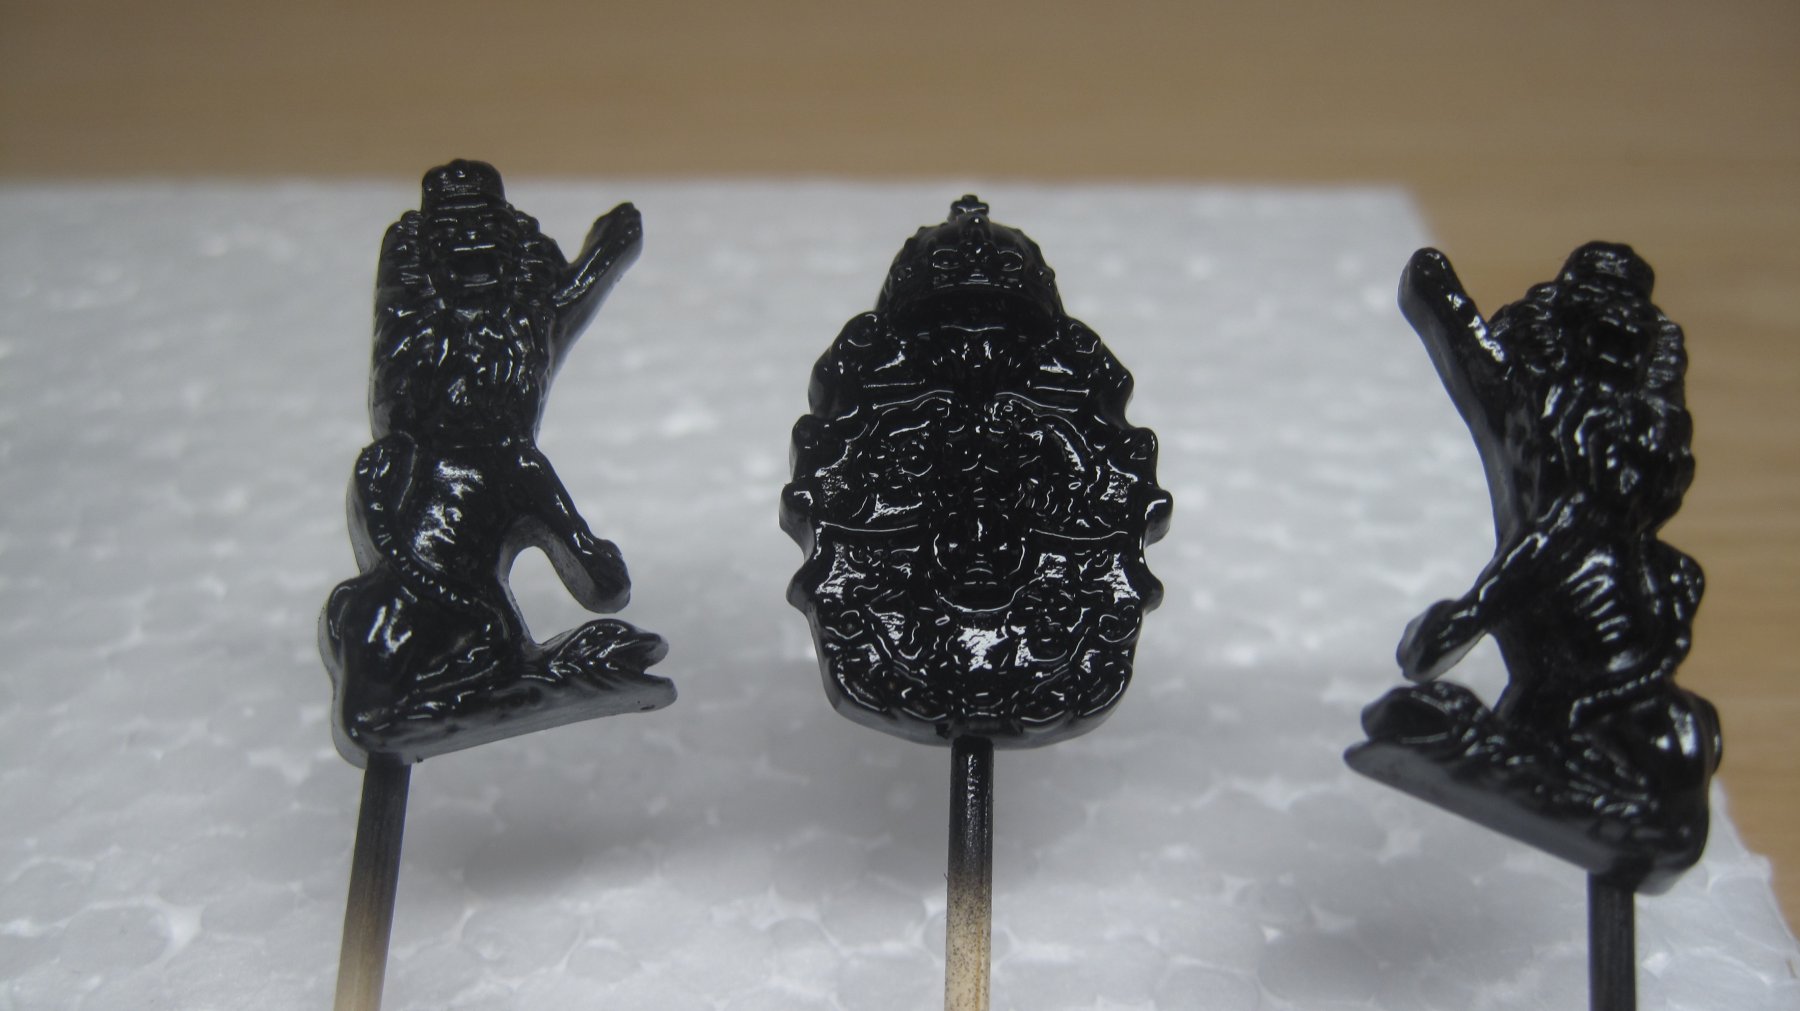
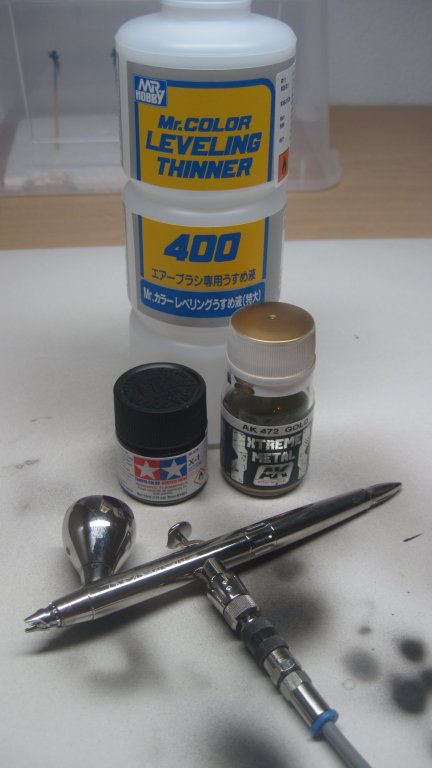
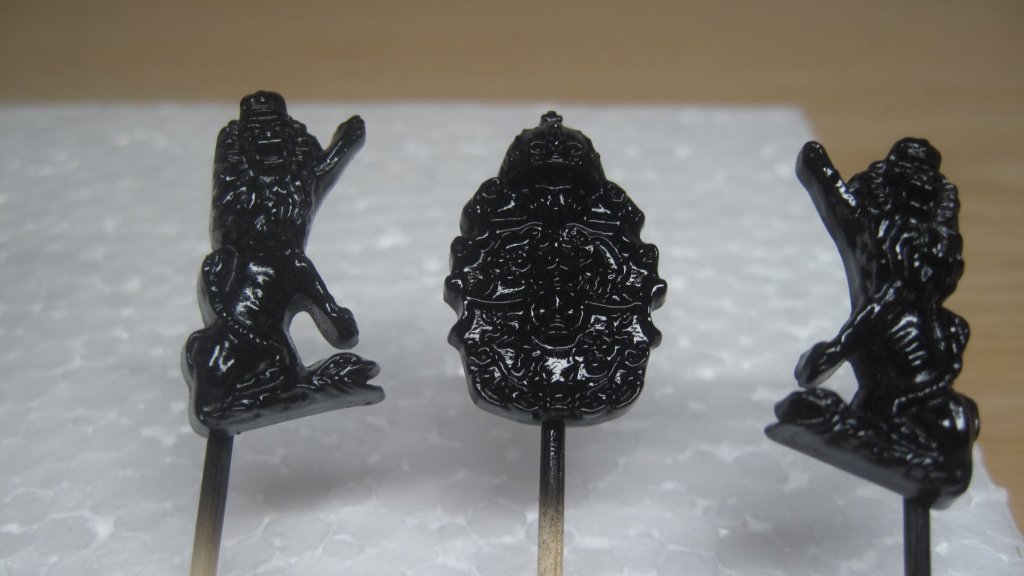
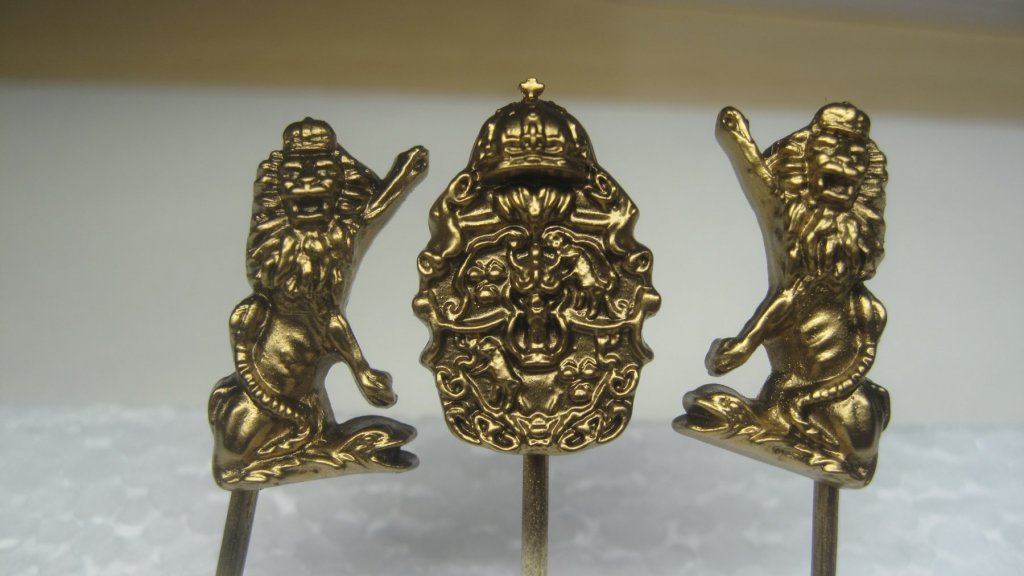
This morning I repainted the lions and the weapon shield. After cleaning of the paints from the parts they looked like this I use Tamiya X1 Black mixed with Mr Leveling thinner and the mix is around 40/60. The gold paint is AK interactive extreme metal gold (directly from bottle) and all is applied by my Harder & Stenbeck Revolution Silver Line with 0.2 needle. The X1 black and MR thinner result in a very nice gloss black coat and this will have a mirror effect on the gold. The gold is sprayed on and I must say that this paint is very good to use and is way more forgiving to use than Alclad II. Here is the result in white light and in yellow light I am really happy with the result and I think it is a improvement over the old painting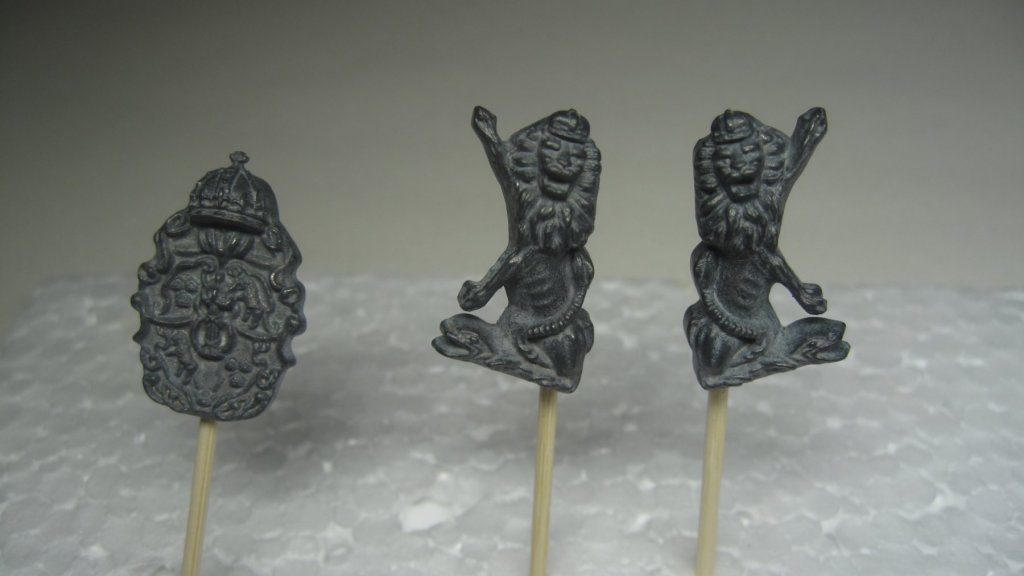

- 50 replies
-
- 6
-
-
- vasa
- deagostini
- (and 1 more)
-
Vasa by Jörgen - DeAgostini - 1:65
Jörgen replied to Jörgen's topic in - Kit build logs for subjects built from 1501 - 1750
109 cm long and 86 cm high. More or less same size as HMS Vanguard from Victory Models or HMS Diana from Caldercraft. -
Vasa by Jörgen - DeAgostini - 1:65
Jörgen replied to Jörgen's topic in - Kit build logs for subjects built from 1501 - 1750
Yes- 50 replies
-
- 1
-
-
- vasa
- deagostini
- (and 1 more)
-
Vasa by Jörgen - DeAgostini - 1:65
Jörgen replied to Jörgen's topic in - Kit build logs for subjects built from 1501 - 1750
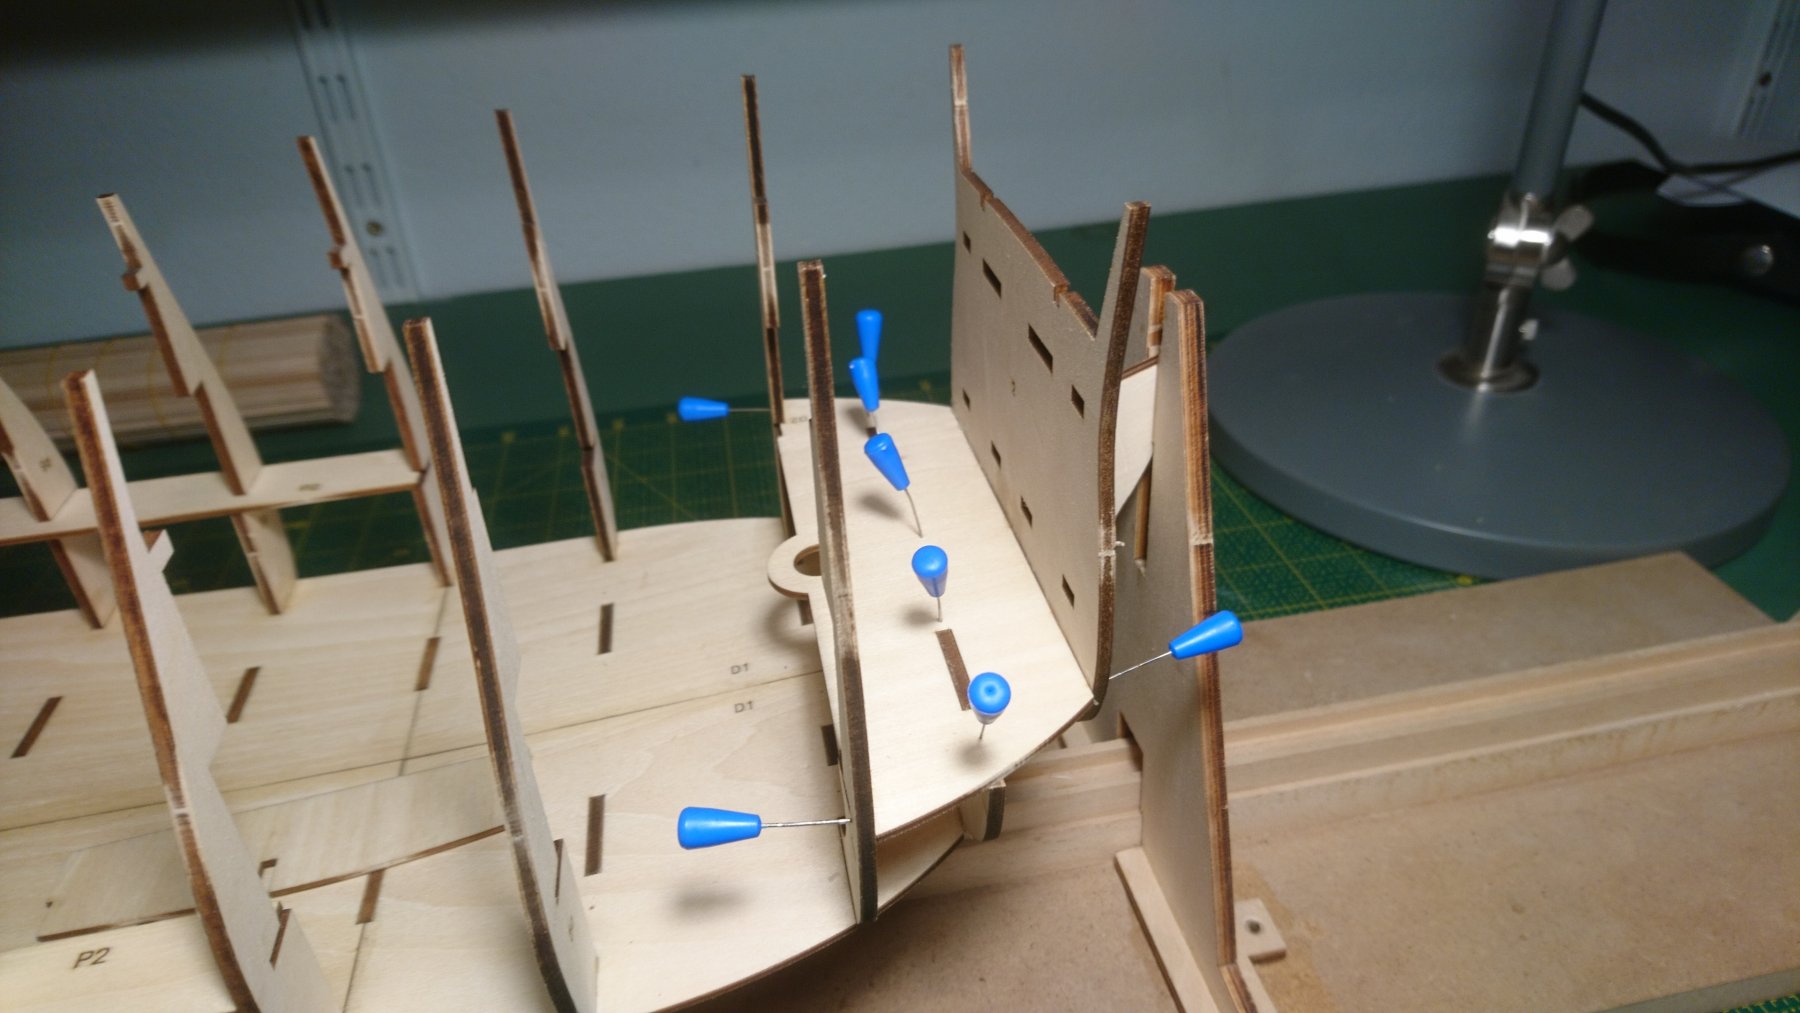
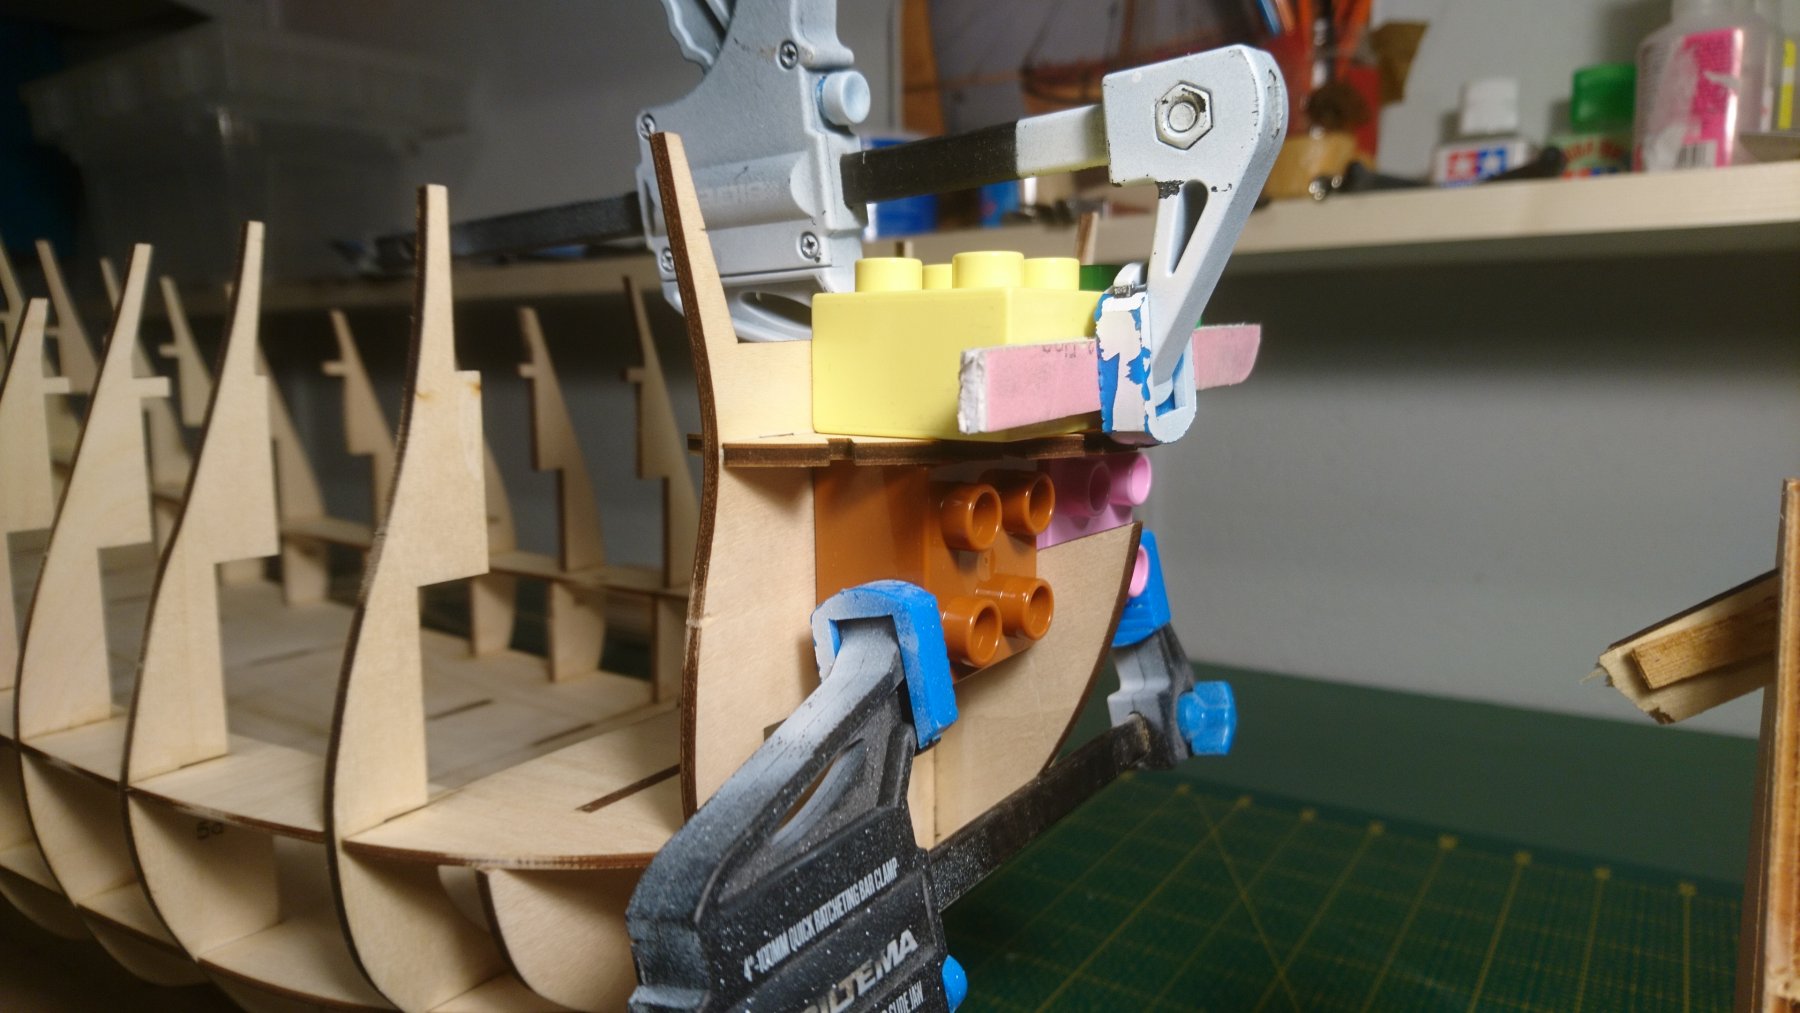
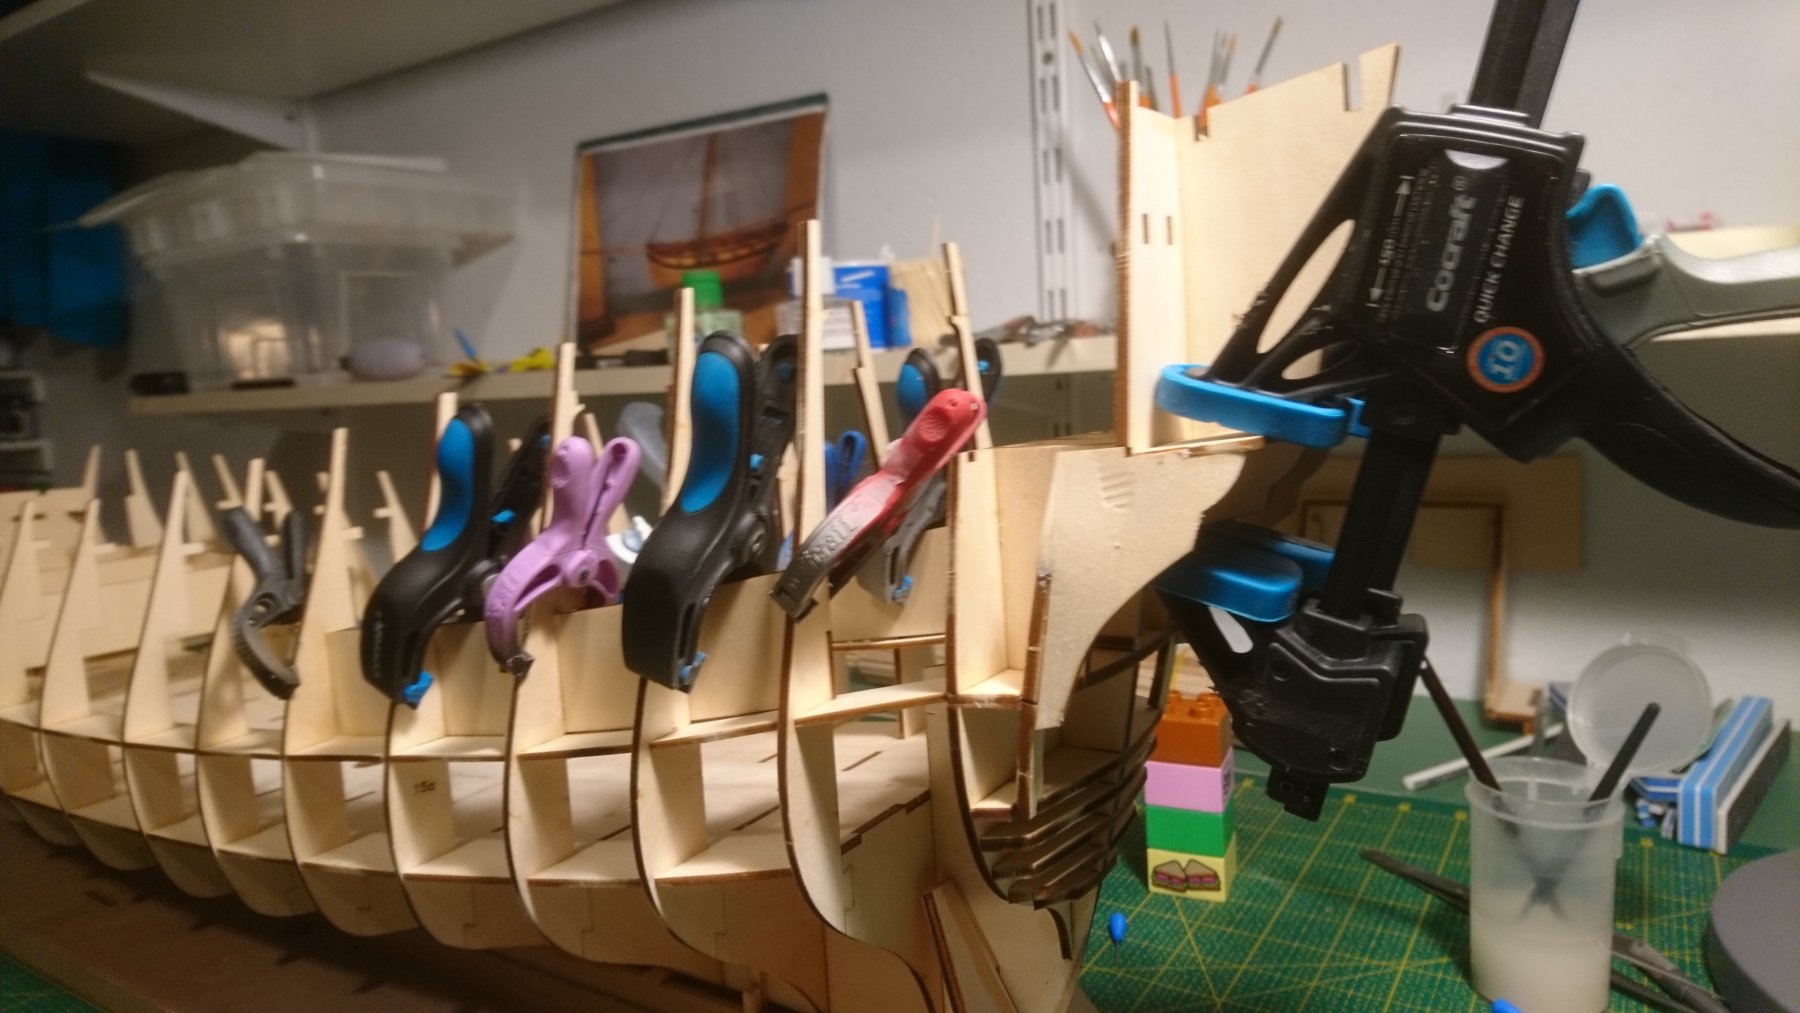
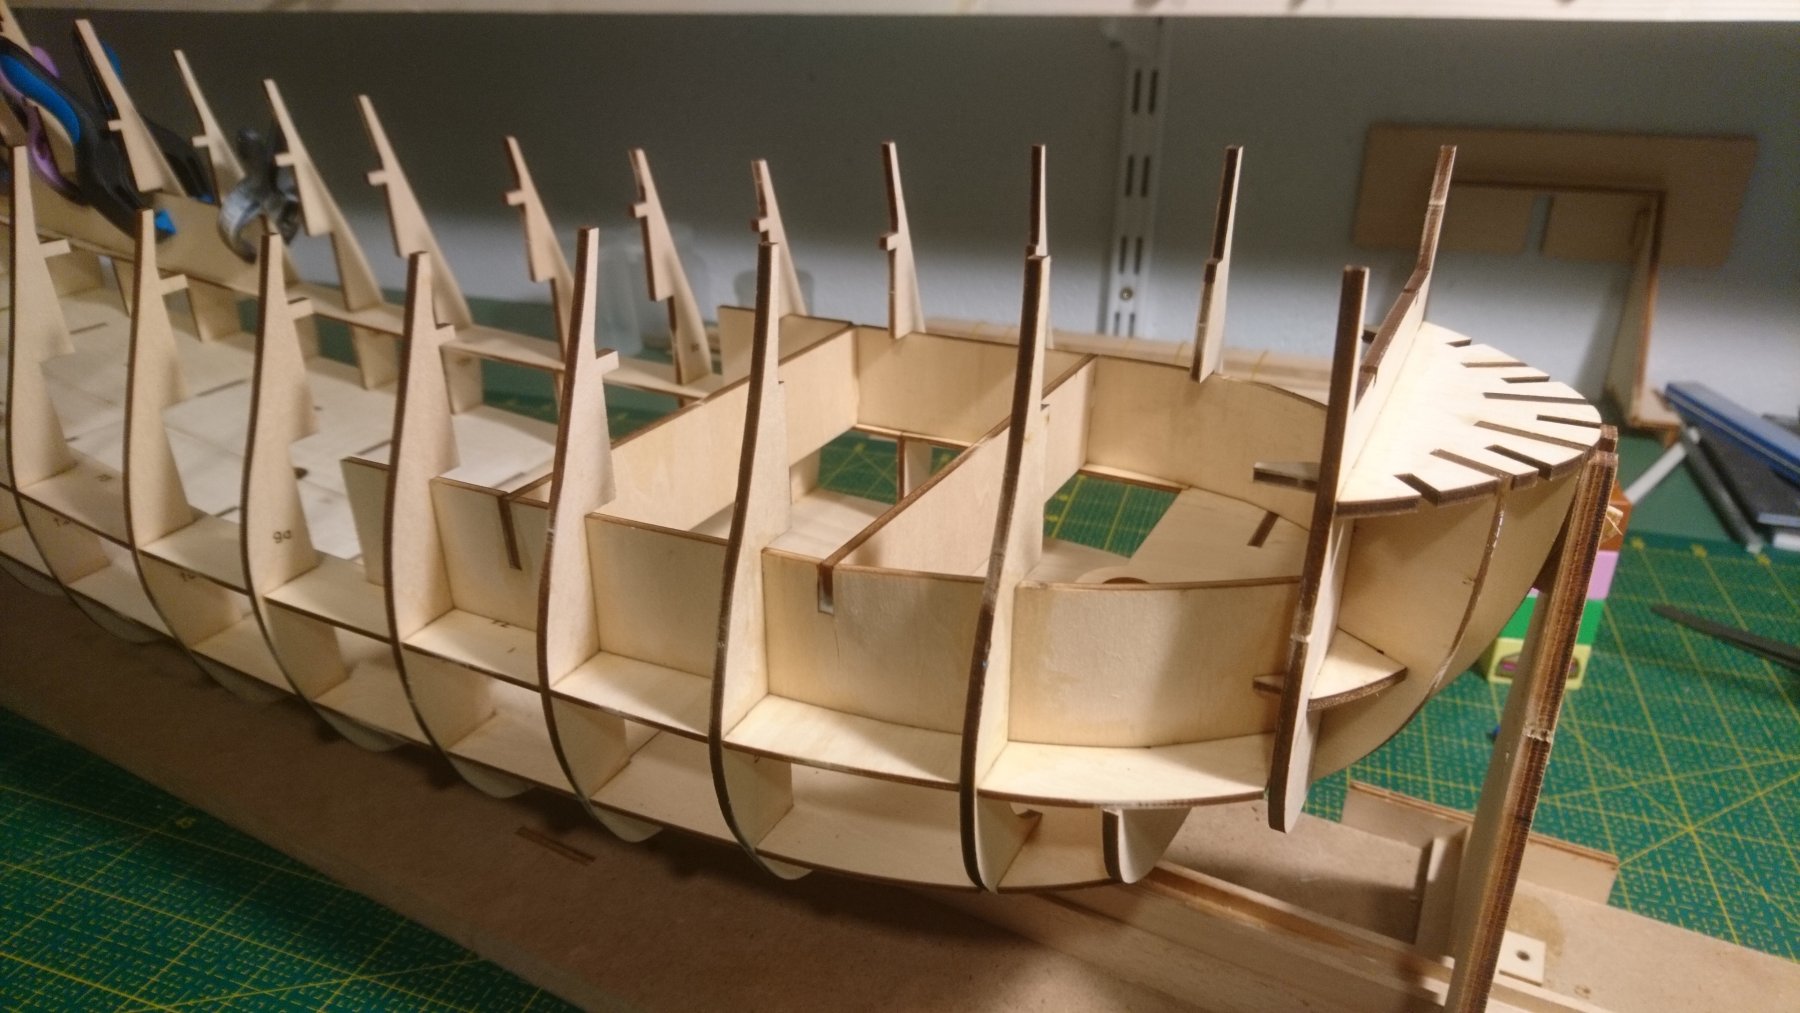
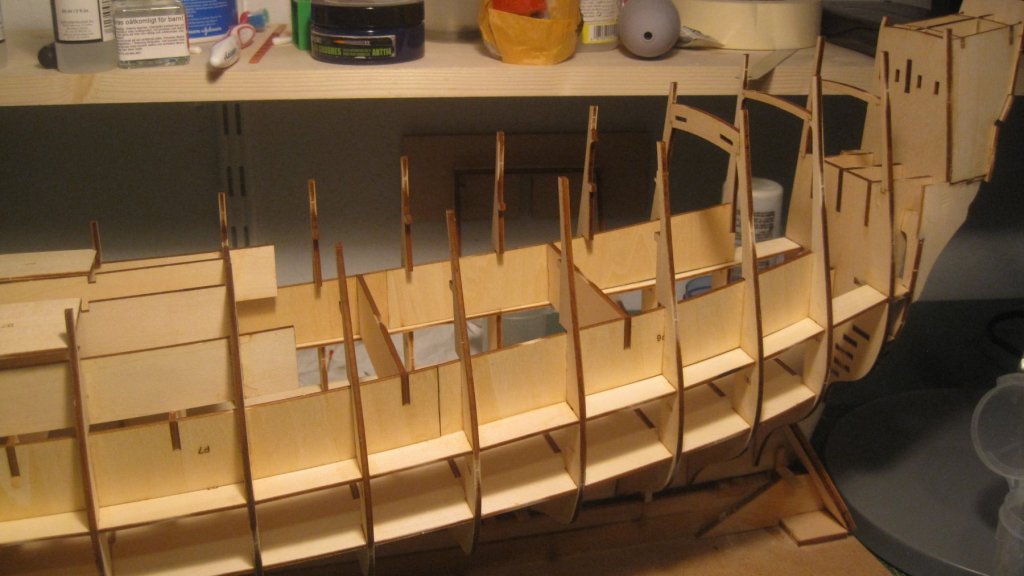
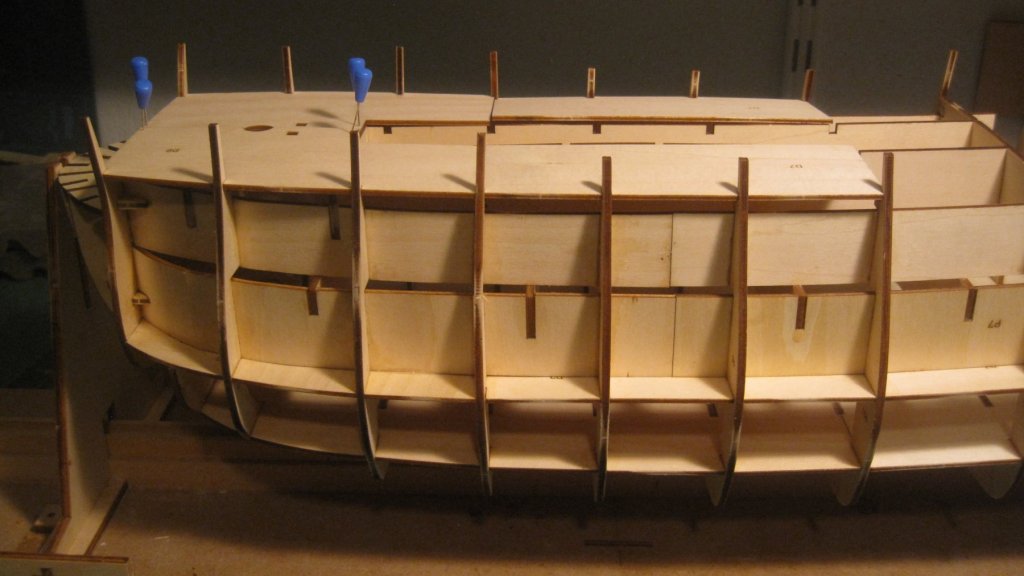
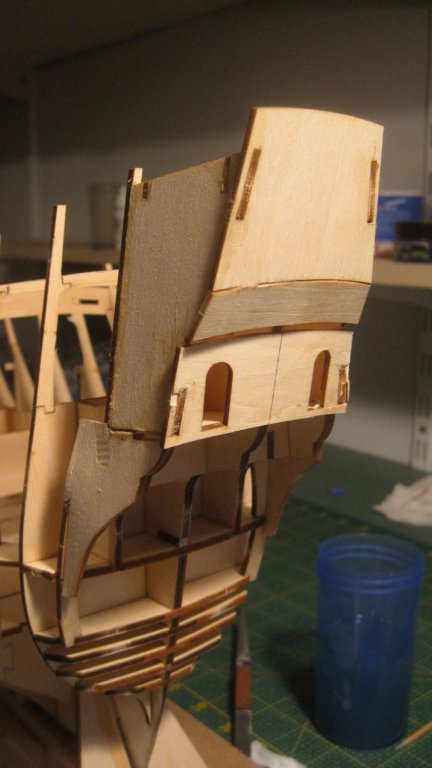
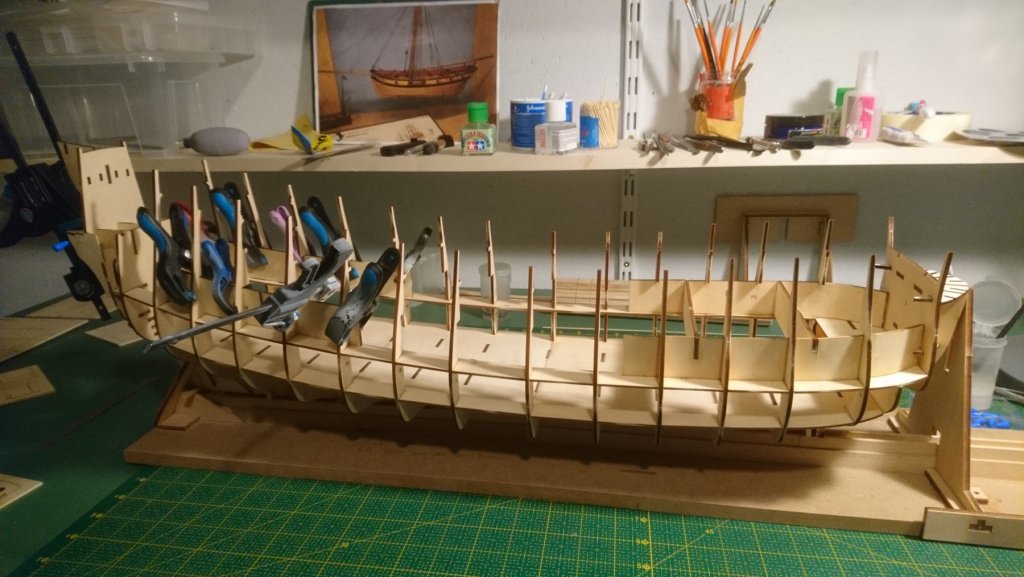
Hello A small update on the build. Continue the main structure work with some parts every evening. Not so much to show actually, only a lot of plywood parts, but I am really enjoying it. So far the fit of the parts are perfect. I also think it is much easier to not to follow the order in the instructions. Just put in on a build stand, get the false keel straight and take it from there. So start the build when you have received around 20 packages. The Lego again. So useful. Some force is needed to glues these part at the stern together (the clamps at the right). It is supposed to be like that so its no bad fitting. The most challenging so far was to bend these thick plywood sheets for gun supports. But a plank bender did the work quite well. And this is how it looked yesterday. Lot of plywood and more will come.


- 50 replies
-
- 6
-
-
- vasa
- deagostini
- (and 1 more)
-
Very nice build! I will follow. May I ask were you bought the wood? I am looking for replacement wood for my vasa and it is expensive to get it from USA.
- 120 replies
-
- 3
-
-
- mercury
- victory models
- (and 1 more)
-
Nice work Pucko! Can't wait until how it looks sanded. I will catch up on you but you will always be one delivery in front of me I was thinking, the simulated floor for the battery deck, wouldn't there actually be gratings instead? I don't have the real vasa plans yet but I will check it. But maybe nothing is to be seen anyway. And also what do you think about the long guns that has arrived so far in the kit? For me the muzzle breaks looks very funny. I compare them to the Claytons fantastic work for the Vasa 1:10. https://sites.google.com/site/clayton707/1-10-scale-vasa-artillery
- 305 replies
-
- 5
-
-
- deagostini
- vasa
- (and 1 more)