HOLIDAY DONATION DRIVE - SUPPORT MSW - DO YOUR PART TO KEEP THIS GREAT FORUM GOING! (Only 24 donations so far out of 49,000 members - C'mon guys!)
×


dcicero
-
Posts
267 -
Joined
-
Last visited
Content Type
Profiles
Forums
Gallery
Events
Everything posted by dcicero
-
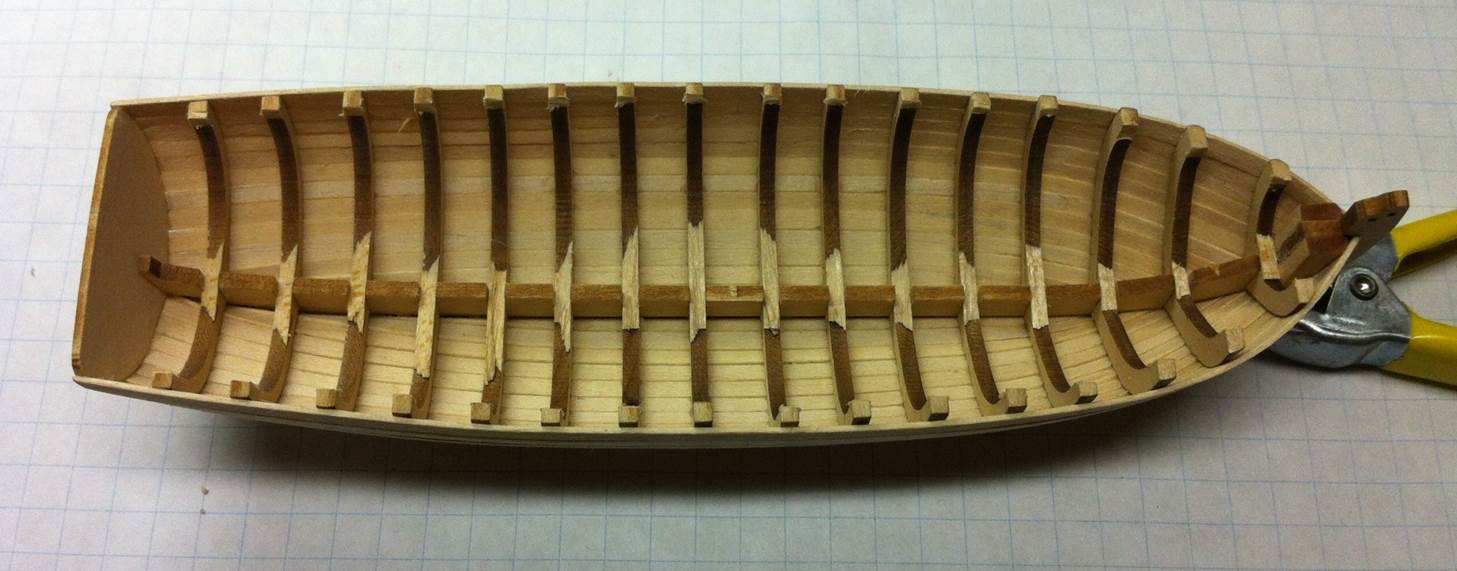
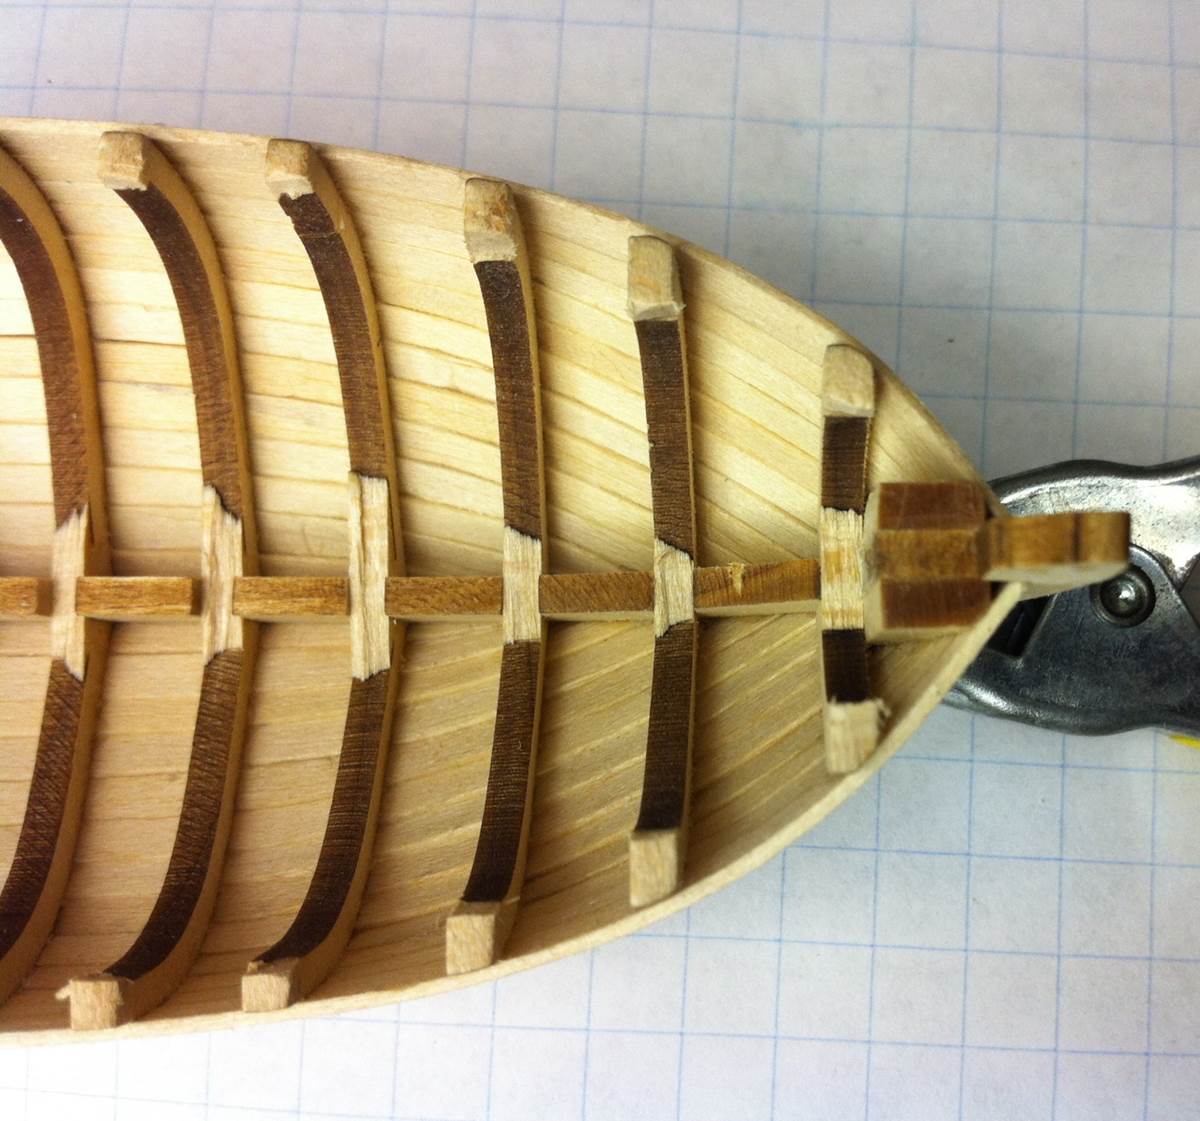
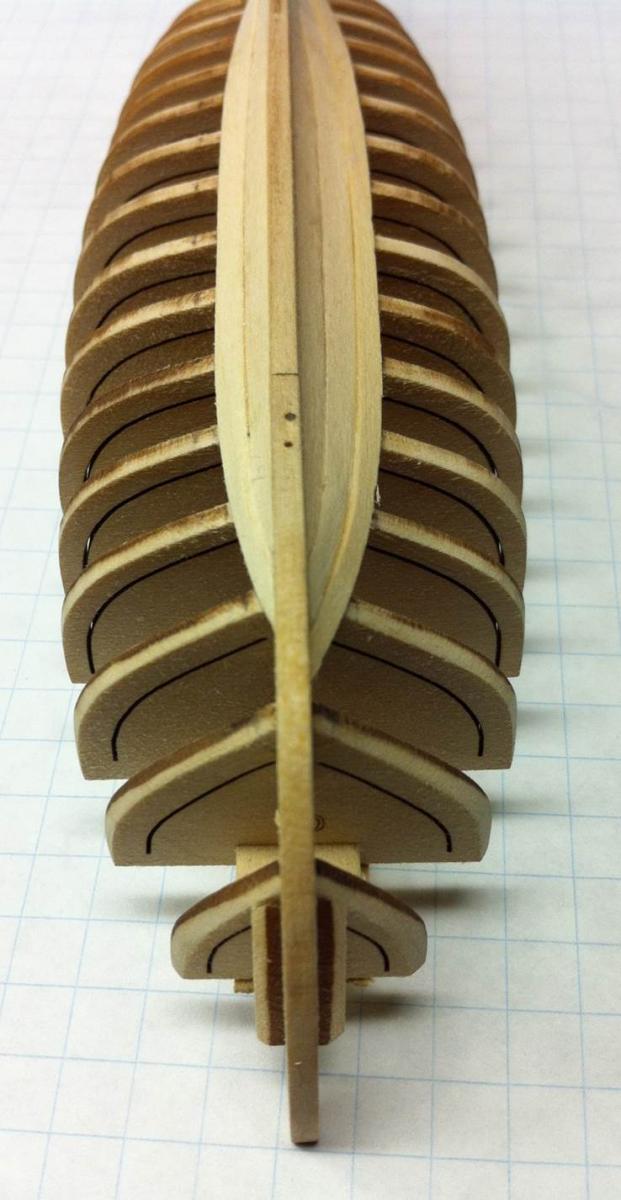
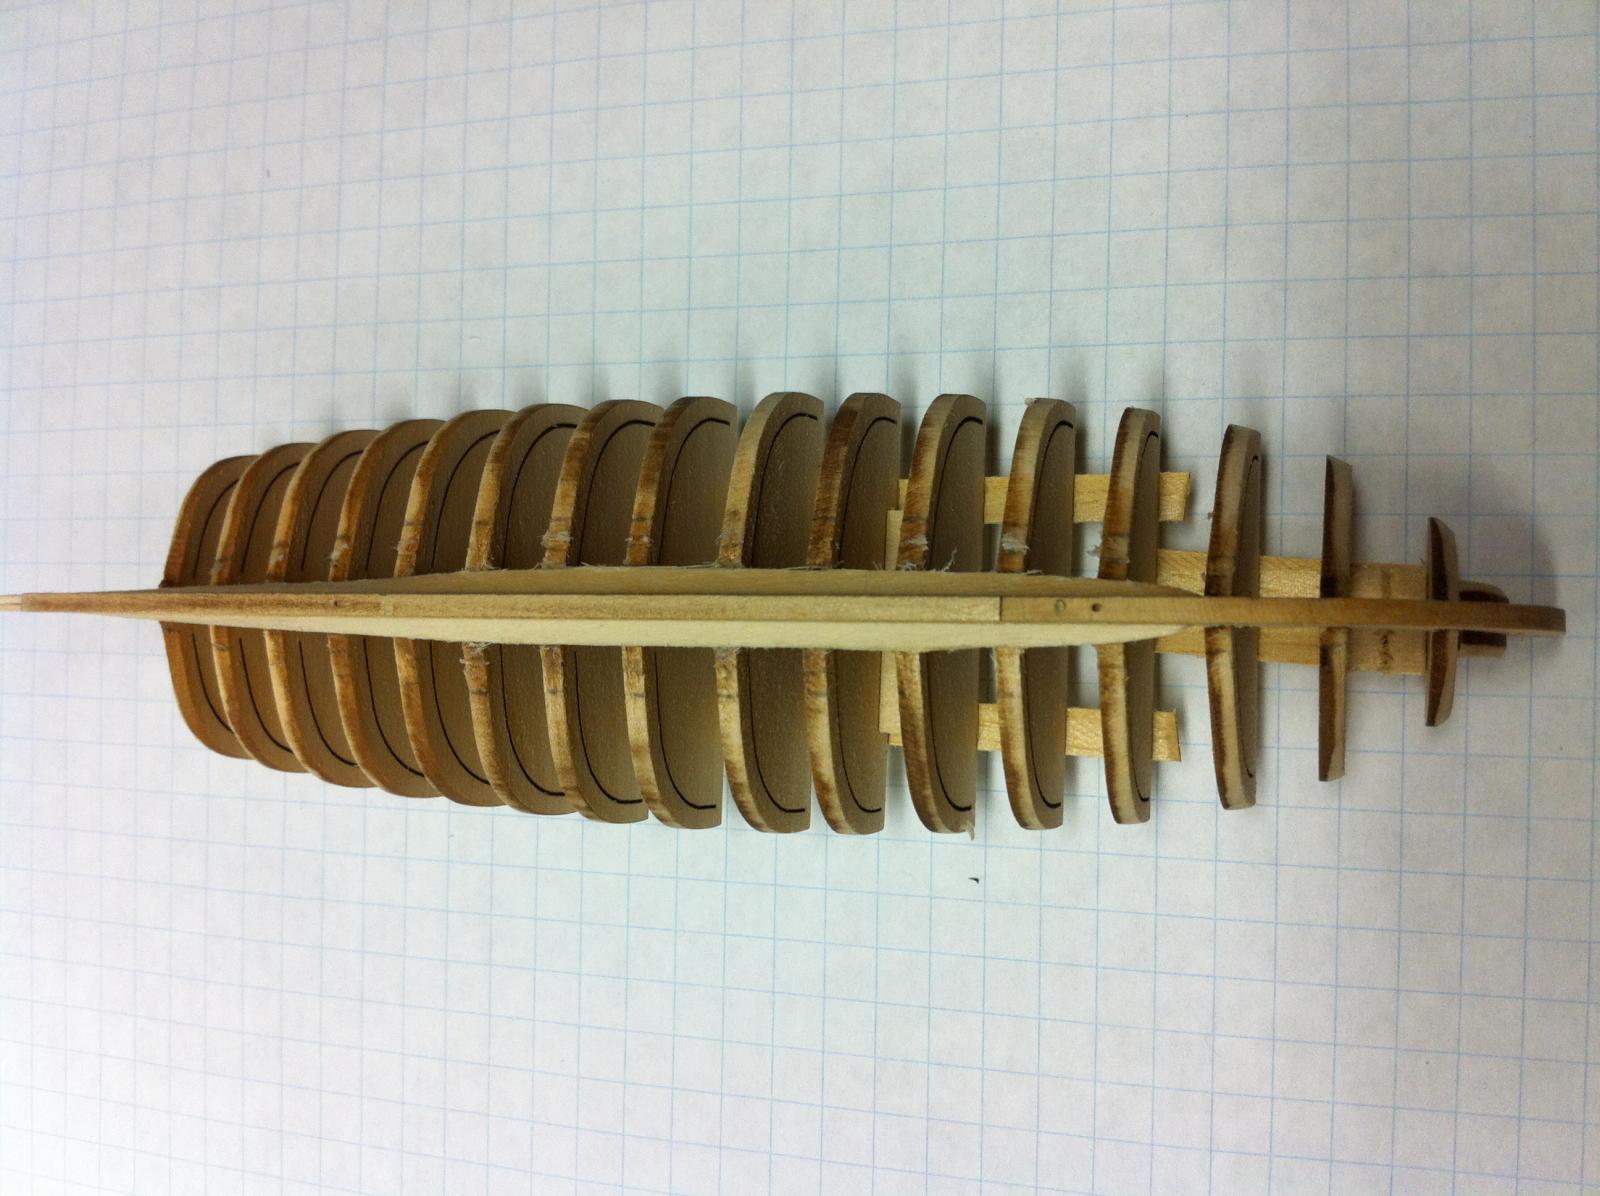
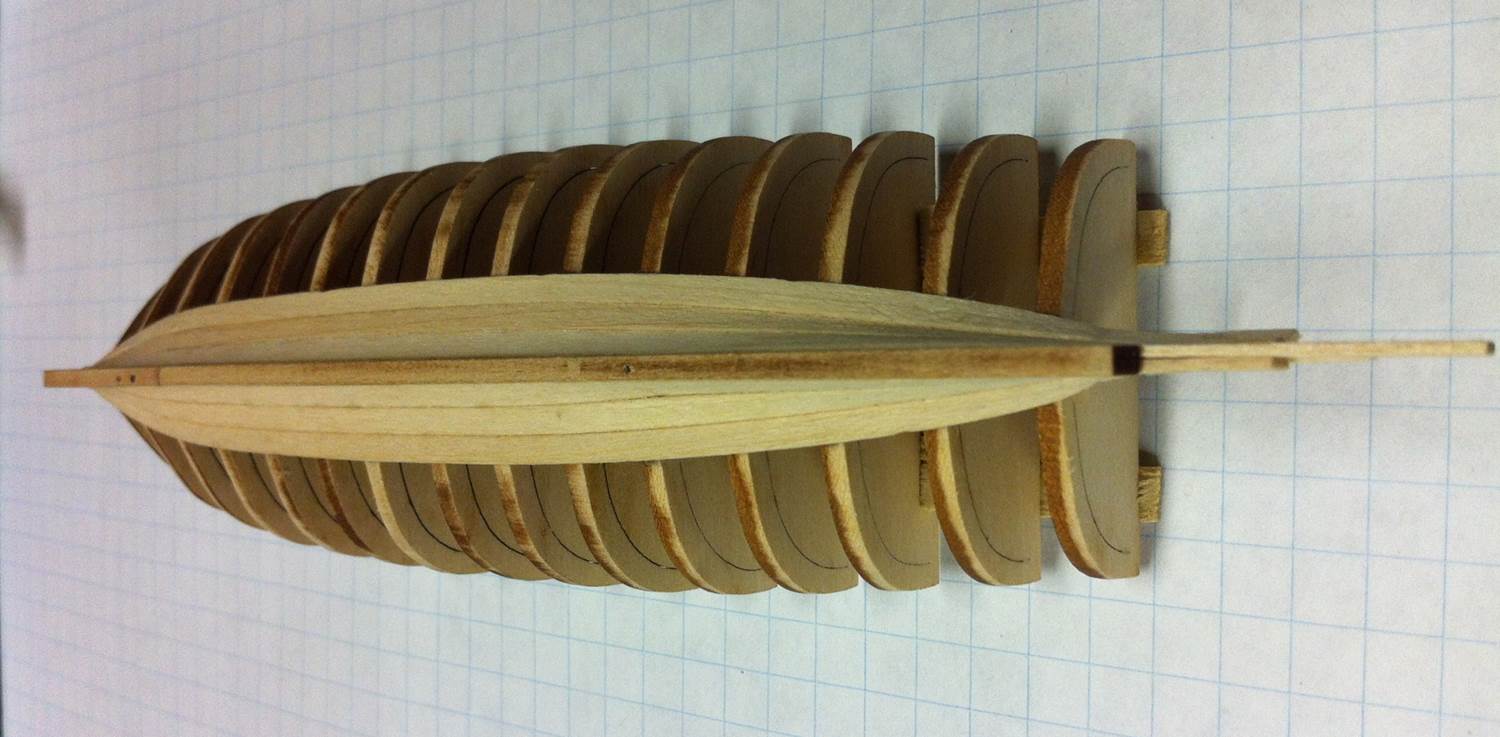
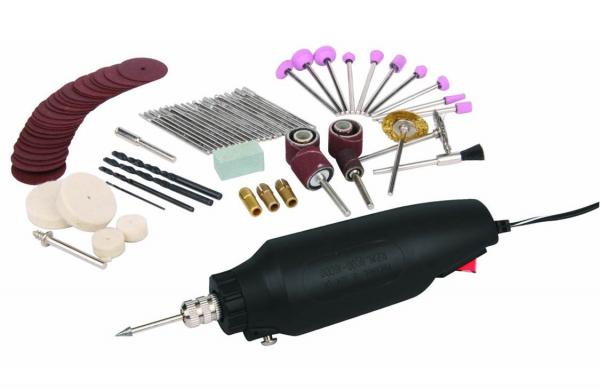
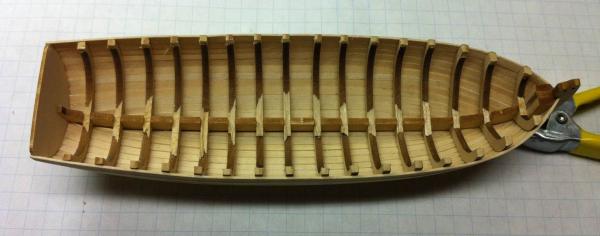
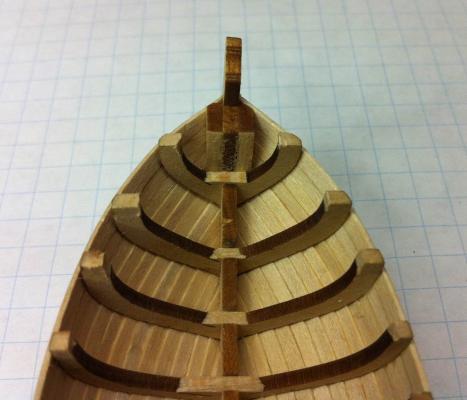
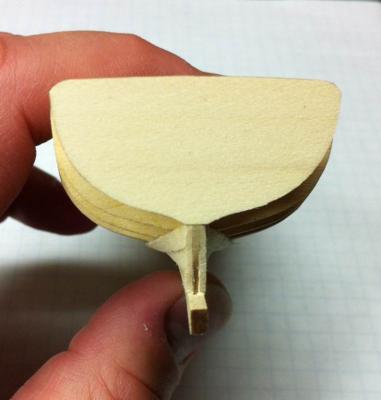
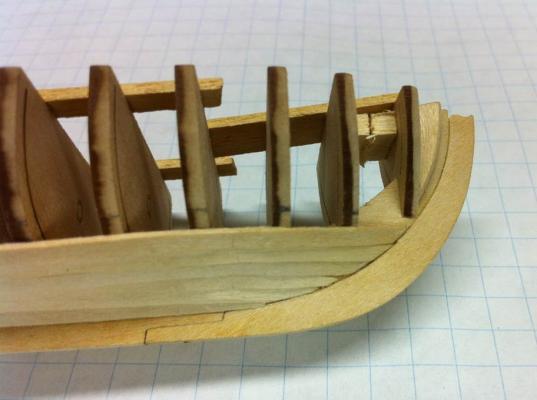
With the planking job complete, it was time to remove the bulkheads. Taking yet another cue from BobF, I bought a small rotary tool from Harbor Freight Tools. (Part Number #97626) This tool retails for $10.49, which is pretty cheap, all things considered, but, with a coupon -- and for those unfamiliar with Harbor Freight Tools, they send out a lot of coupons -- I wound up paying about $9.00, including tax for it. That's a great price, but you do get what you pay for. There's no comparison between this tool and my Dremel. The fit of the chuck isn't as good. The motor is clearly not as good because there's some play when it starts running. That said, it does the job. There's a store near here, in Geneva, IL, called American Science and Surplus that carries all kinds of weird stuff: electronic components, telescopes, pencil erasers shaped like brains... You've got to go there to believe what they have. If you have a minute, check it out here: http://www.sciplus.com/ I found a foot pedal speed control there for just $17.50. This is a heavy duty thing, but it works really well with the rotary tool. (Here's a link, if you're curious: http://www.sciplus.com/p/FOOT-PEDAL-SPEED-CONTROL-120-VAC_43485) So I was about to start removing the bulkheads. I looked over Bob's build log again. I consulted Chuck's instructions. I went at the first bulkhead slowly, using the edge of a flat file. It took forever. And the bulkhead did seem to move around quite a lot, so I stabilized it as best I could. Finally, the bulkhead came out. That was it for that night's work. Next night, I did the same thing, but this time, part of the frame snapped off. Like Chuck says in the instructions, make sure those frames are secured to the top two planks. Mine weren't and I snapped the top part of the frame off getting the bulkhead out. I glued it back in. Work ended for that night. On night three, I was starting to get a little frustrated with the whole process. A big part of the reason the end of the frame snapped off was the slow -- and not very efficient -- cutting of the tabs on the top of the bulkhead. I'll fix this, I thought. I'll violate all the rules. I'll disregard the guidance of all the guys who know more than me! I'll do something that all the evidence says will turn out badly. Yeah. That's the ticket. I fired up the rotary tool... Gotta say, it worked just fine. That little tool, although a little wobbly, when coupled with the speed control, is pretty handy for this kind of thing. It cut right through the basswood bulkheads, fast, and without the wobbling that caused the top of the frame to snap off. I did the rest of the frames in one sitting. Now that the bulkheads are out, I do need to make sure they're all secured to the top two planks. My thought is to shim them, where necessary, and add more glue. There are some gaps there, but they're so small I couldn't even get a decent picture of them. Should be a pretty simple thing to get them shored up. Anyone got any guidance about how to do that? And then it's off to fairing all those frames and making the little hull look like a boat. Dan


- 175 replies
-
- 1
-

-
- 18th century longboat
- model shipways
- (and 1 more)
-
Again, thanks very much! I've passed all this information along to Taggart and have done a little googling around to see what I can find. I'm betting the presentation is going to be pretty good! Dan
-
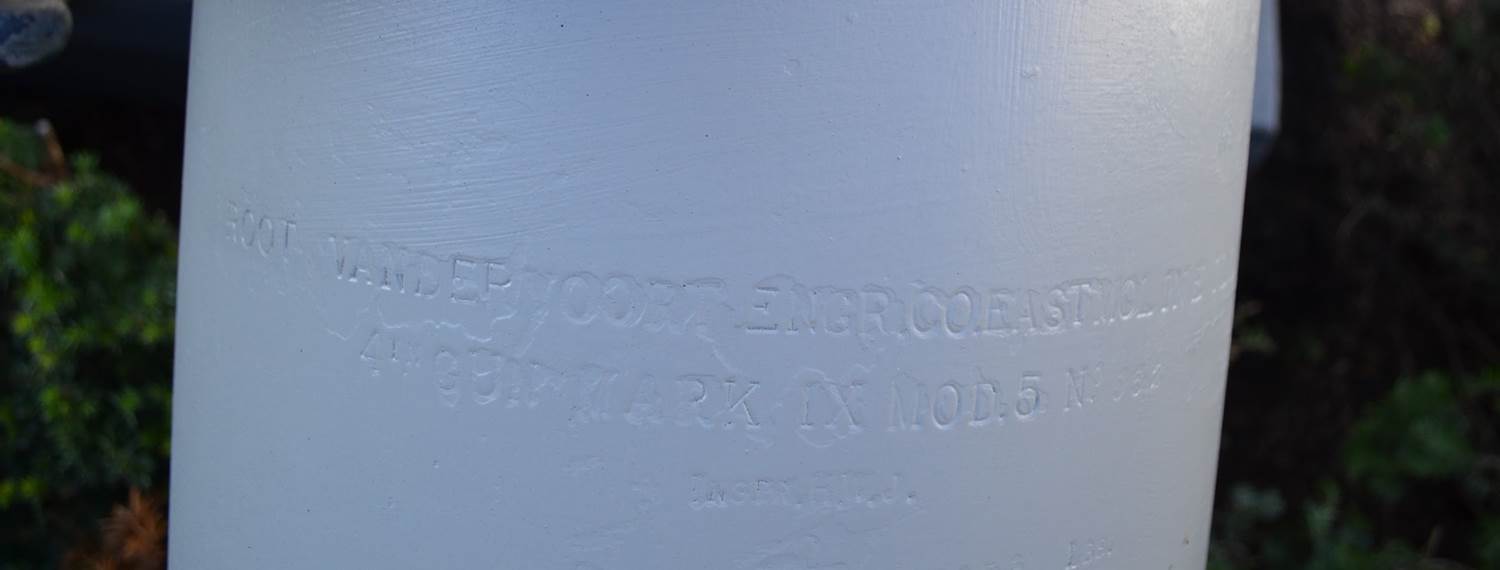
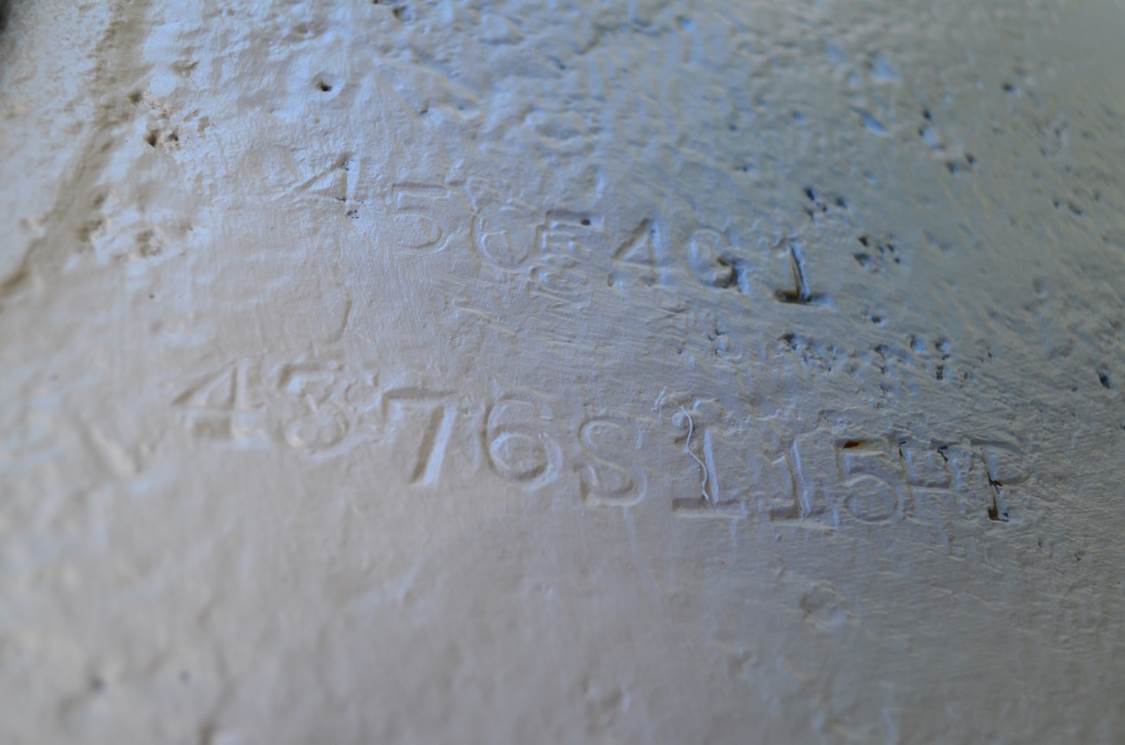
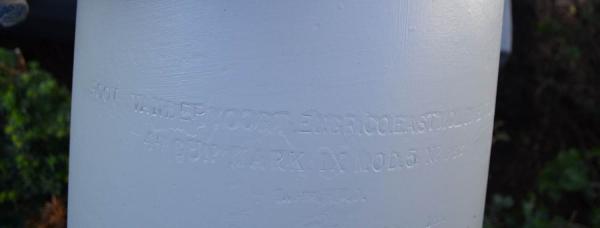
Gentlemen, I got a little bit more information from Taggart Lohman, the Eagle Scout. Here are two pictures of markings on the gun barrel. Taggart's going to make his presentation to the VFW on Sunday. He really appreciated the help you all gave him. I think it surprised him that this amount of information is out there and that people know how to find it! I know these markings are indistinct, but do they provide any additional information about what this gun is? Dan

-
That's very true! That meeting is a great motivator. I don't want to show up with no progress to report. Now I just need to get the newsletter pulled together... Dan
-
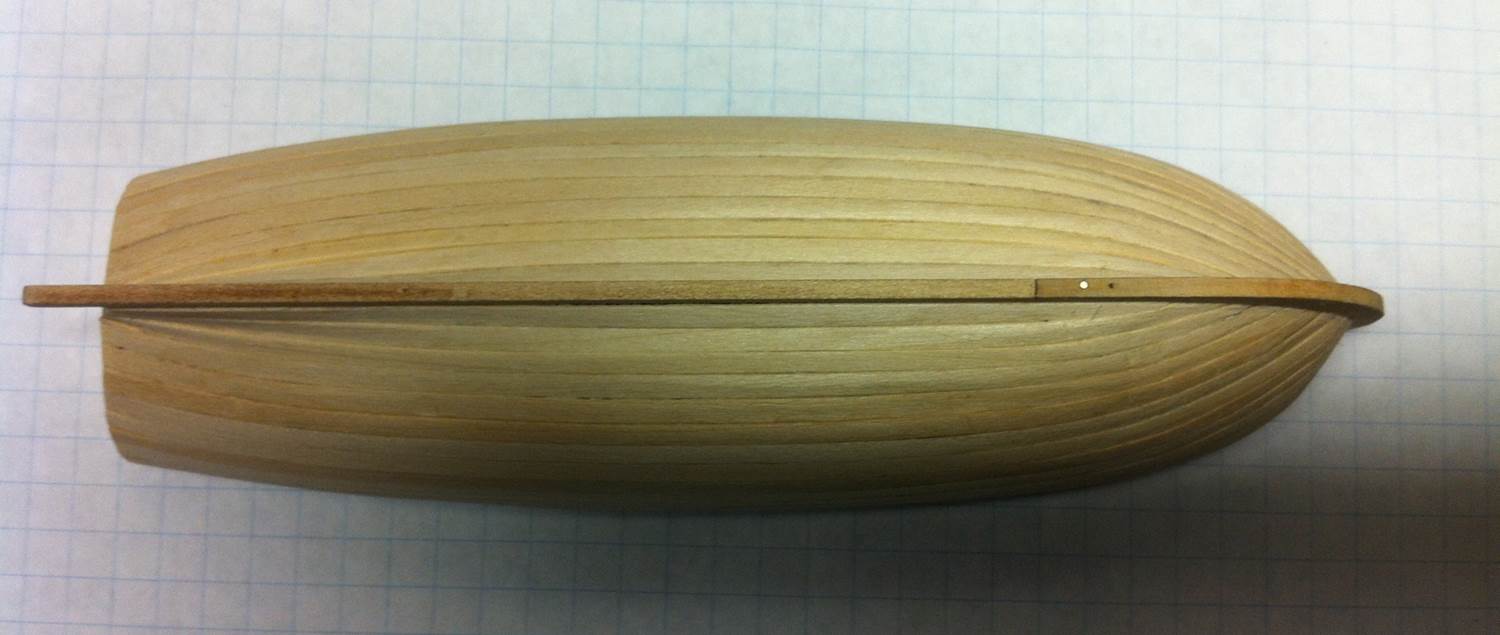
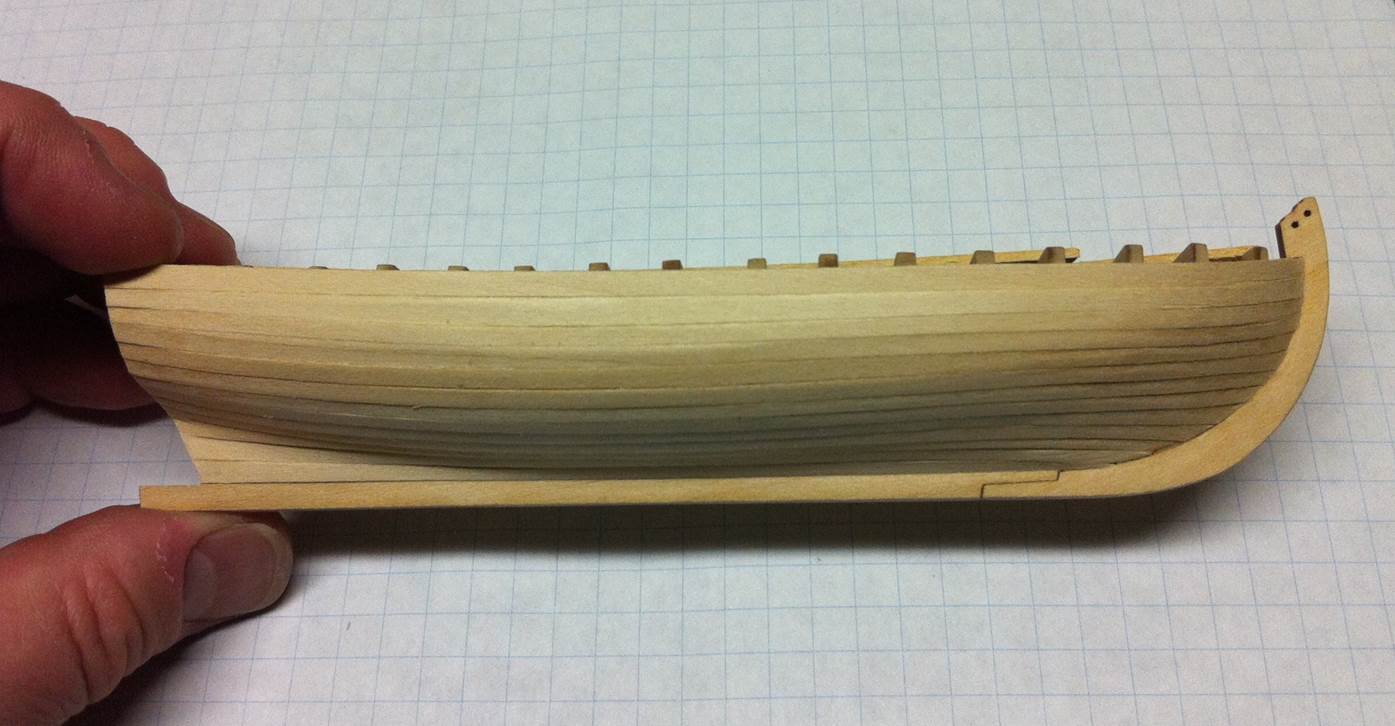
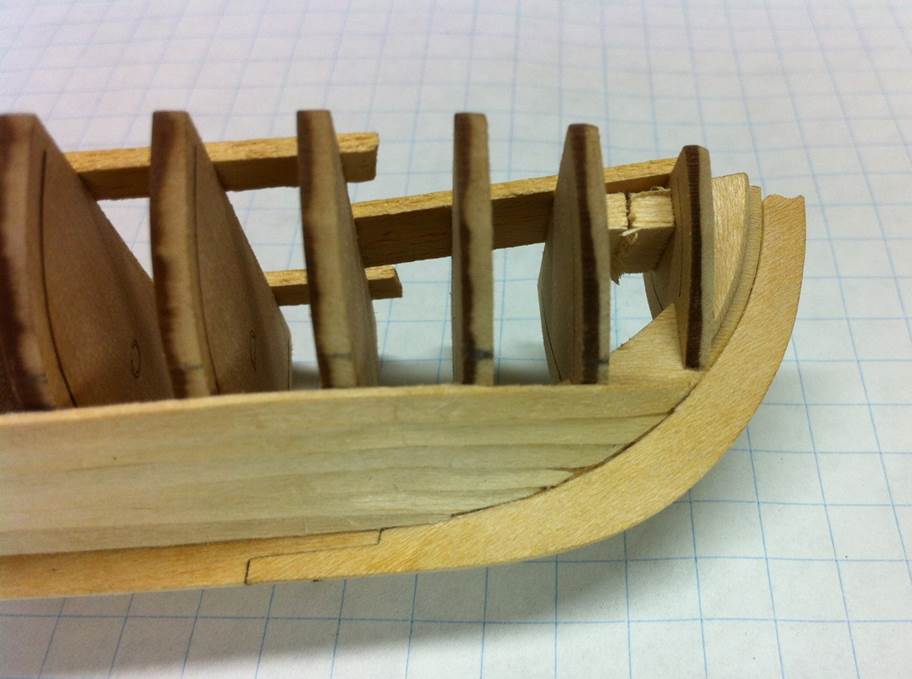
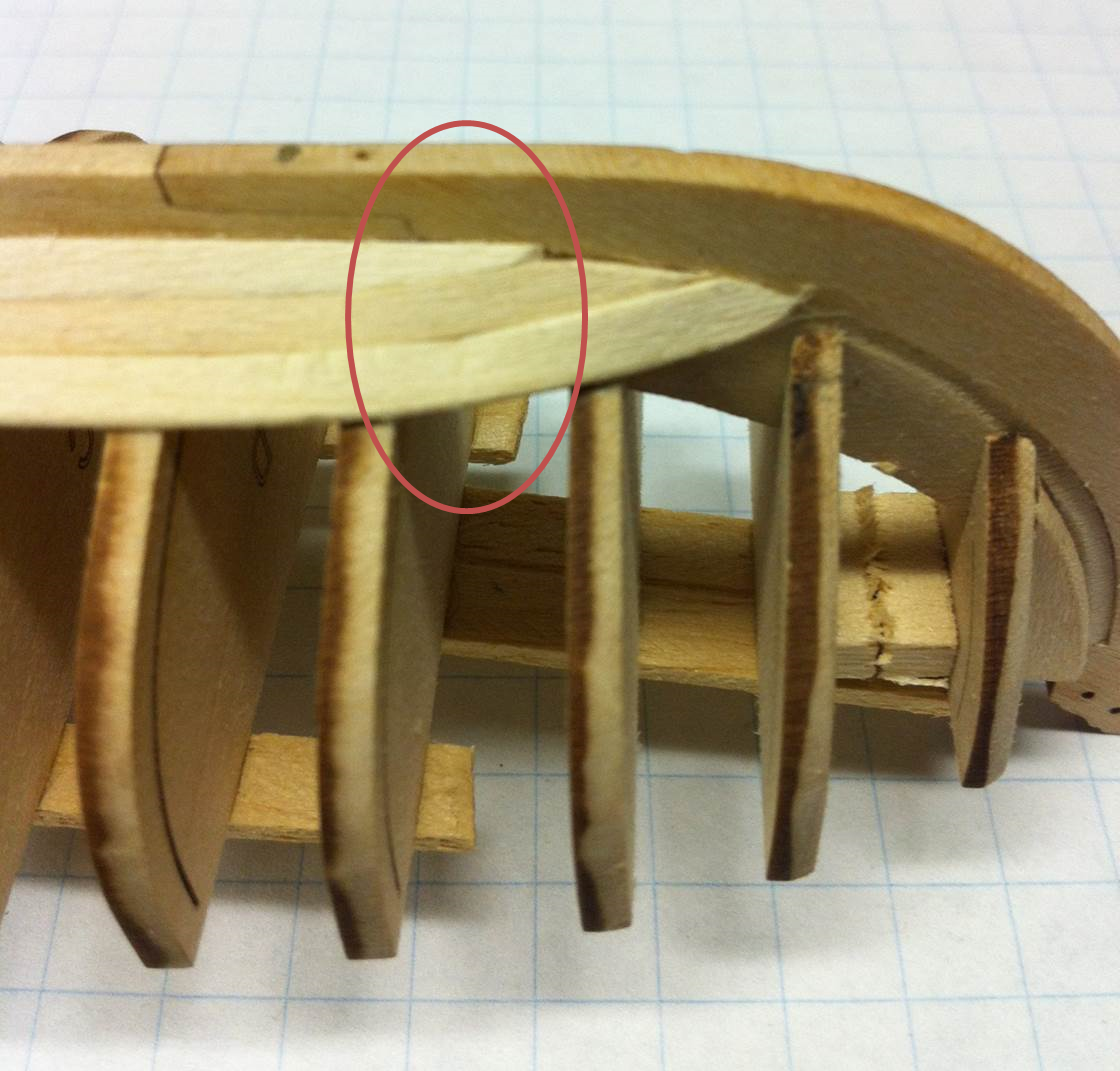
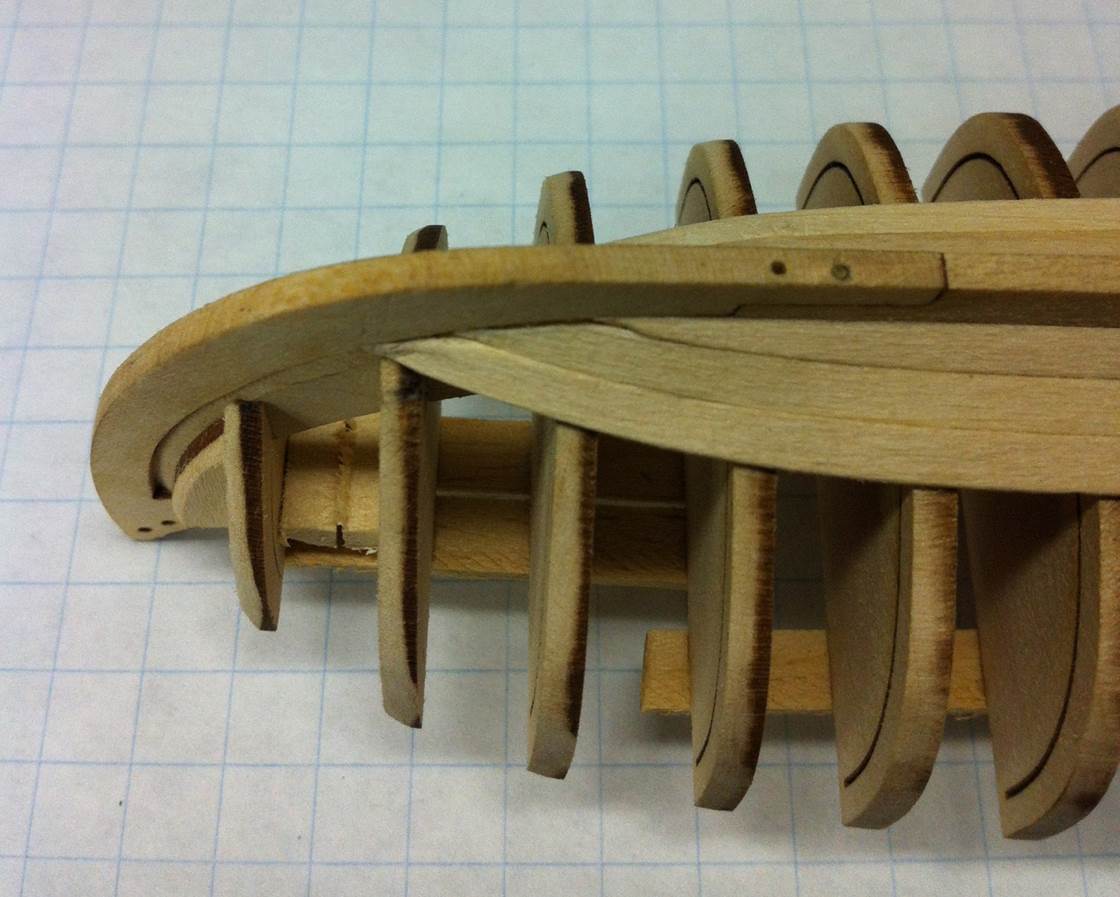
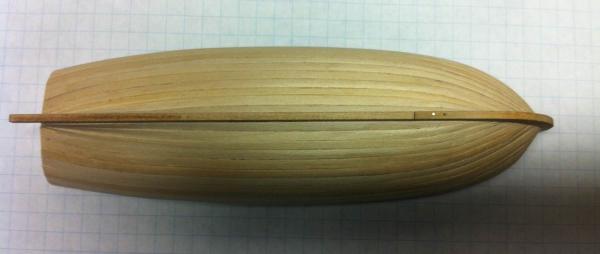
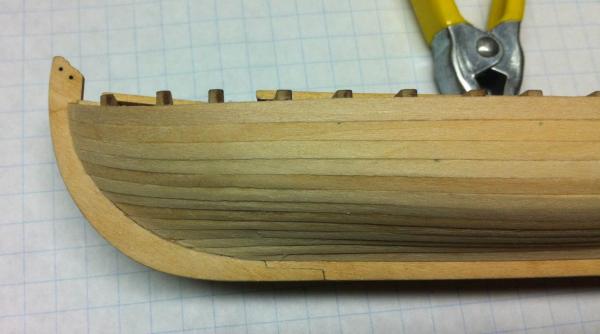
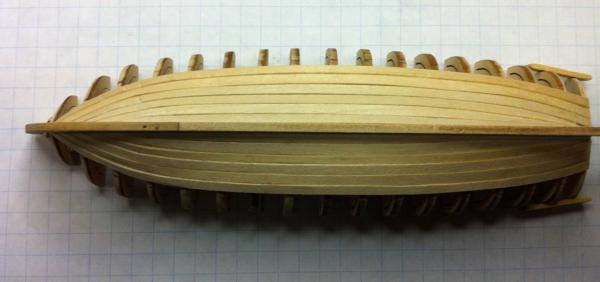
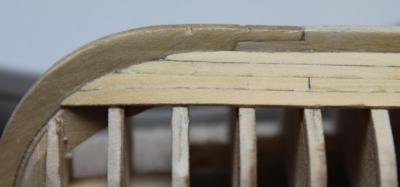
It's taken a while, but the hull is planked! As I mentioned above, after those initial four planks are in place, the process does go more smoothly. I've learned that the second attempt is always better than the first, when it comes to these kinds of projects. As I finished the planking off, I considered just chucking the whole thing, getting another kit and starting over. If I were to do this again, I think the result would be much better. That said, I'm happy with this result. A few posts back, I mentioned the tiny gap between the rabbel and the third plank. Here it is, compared with the rest of the planks. It's very small and I think I'll fill it in with a little putty. One thing I would definitely do differently were I to do this again is to be more careful about beveling the planks as I went along. I was very concerned about the joints at the bow and stern, but less so about the longtitudinal joint between adjacent planks. That has made more sanding necessary, but then I didn't want to sand too much because then the hull just becomes completely featureless. On to bigger and better things! Dan

- 175 replies
-
- 2
-
-
- 18th century longboat
- model shipways
- (and 1 more)
-
Thanks, Jay! This is just great stuff and will help a great deal. I continue to be amazed by the amount of knowledge possessed by the people here on Model Ship World. And thanks for your service. There aren't a lot of people who'd sign up for that EOD job, I'm sure, but someone's got to do it! Dan
-
Wayne, this is tremendous! Thanks for posting. I downloaded the reference and I'll bet I can find some additional information. Believe it or not, the Goss Printing Press Company still exists. They're Goss International now. The company's been bought and sold a few times. I dropped them an email to see if they had any information. I'm also planning to talk with the research librarian at the local library. There's probably some information out there about moving the gun from the park to the VFW hall and about putting the gun in place in the park. There are a couple of really big naval guns still in the park, so there was probably a ceremony of some kind when they were put there and that would have been reported in the Aurora Beacon-News. Dan
-
All: A friend's son is working on his Eagle Scout project. He contacted a local VFW hall and asked if he could clean up the gun outside the post. Here's a picture. There's a nameplate on the gun which identifies the carriage as a 4" carriage, Mark XII, Mod 1. It was built by the Goss Printing Press Company of Chicago, IL in 1918. The gun was moved to the VFW hall a long time ago from a park in Aurora, IL. No one has any information about it. The project is finished now. The base was cleaned and painted. The old paint was scraped off and the gun repainted. All the brass has been shined. All the weeds have been removed, new flower beds cut in and mulch laid down. The gun looks much better than it did. To finish the project off, the new Eagle Scout is going to make a presentation to the VFW Post. I'd like to help him put in some information about the gun itself. Anyone got any ideas what this gun is? Where might it have been used? (I'm thinking it might have been a coast defense gun.) Dan
-
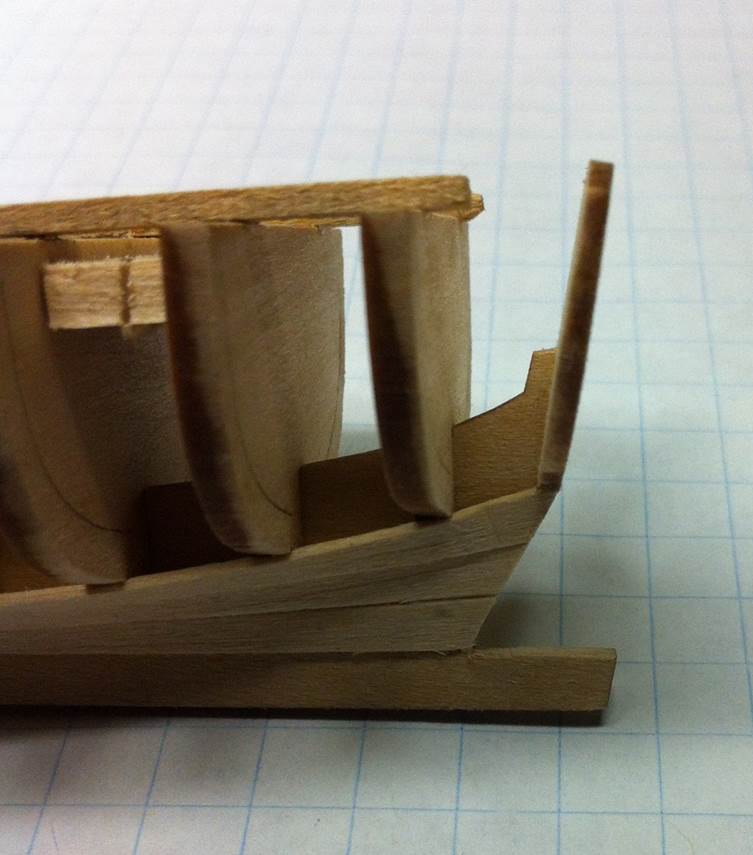
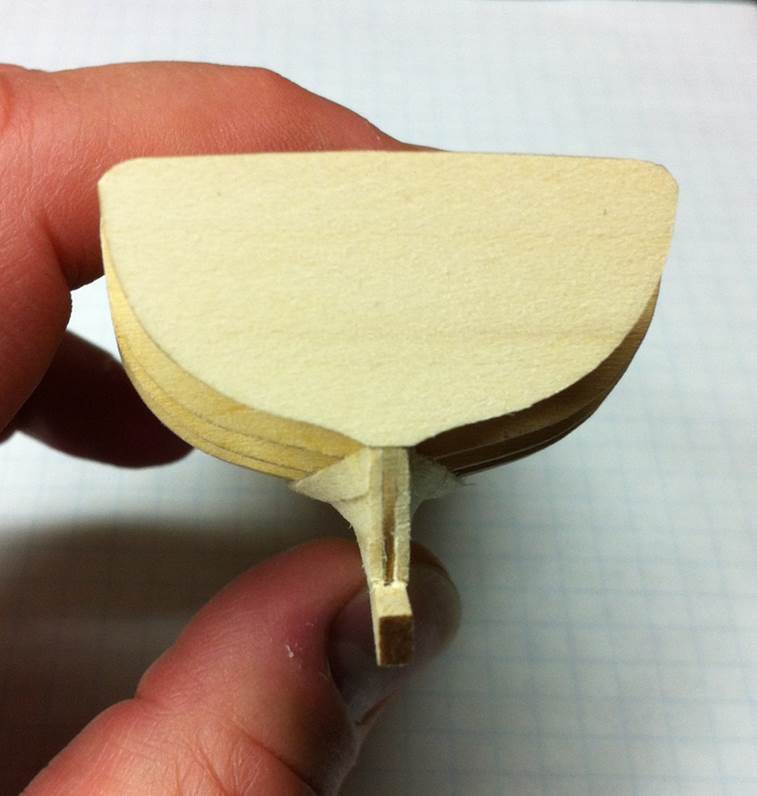
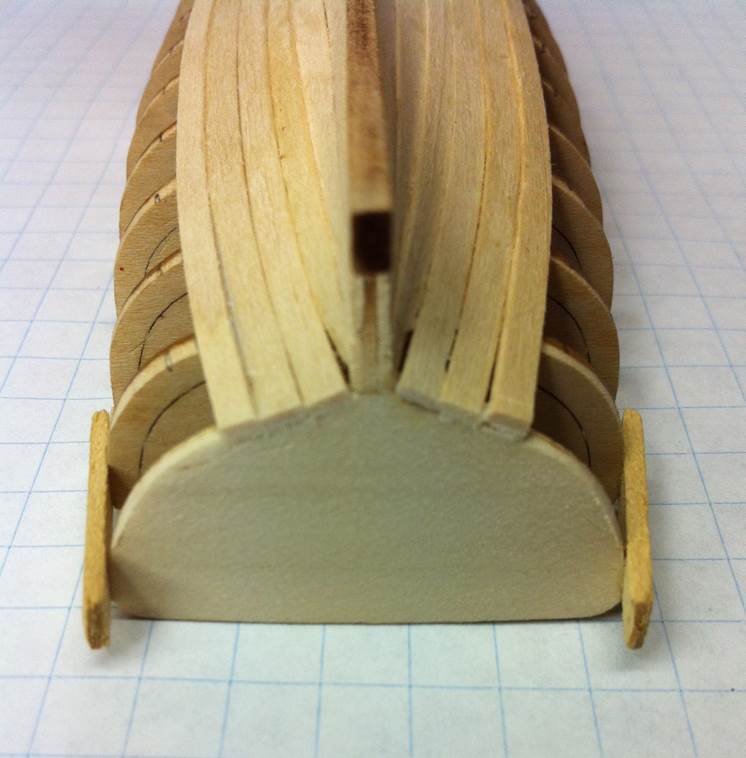
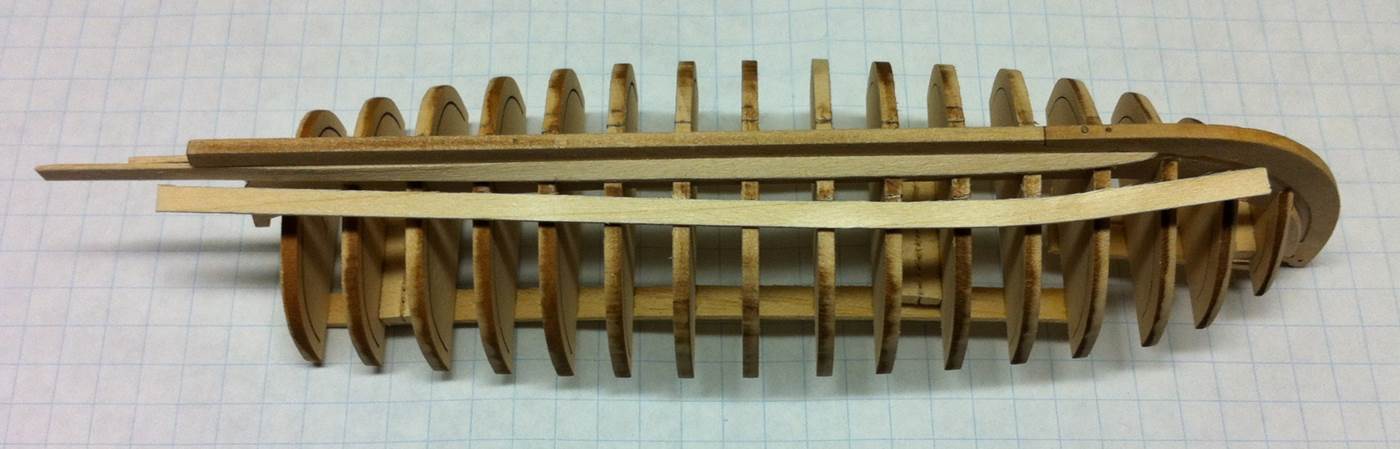
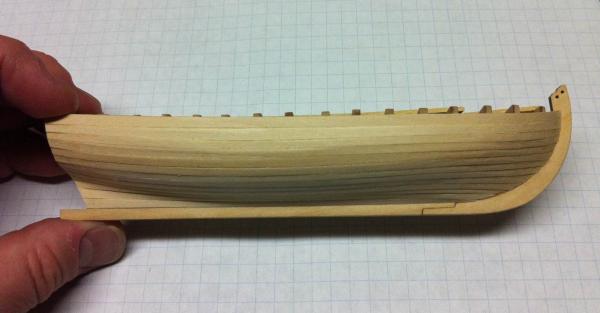
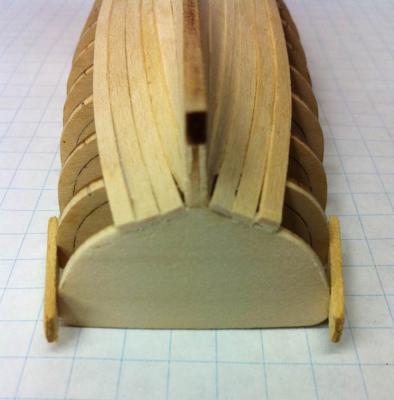
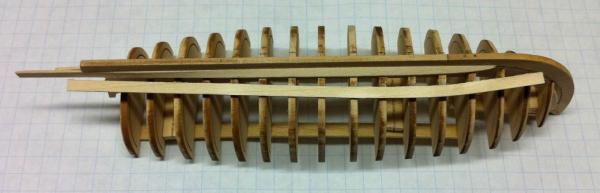
Although it's been a while since I posted an update, I have made some progress on the Long Boat. First, I installed the transom. As everyone has said, there isn't much of an attachment area, so reinforcing it with some scrap wood is pretty much a necessity. Here are a couple of pictures taken before those reinforcing strips were installed. Echoing, again, what a lot of people have noted, after installing those first four planks, things get a little easier. The bends on the planks are a little less severe. There's more room to work. And the transom is held in place by those planks. Here's a view of planks five and six in place. There are some tiny gaps between the planks close to the stern post. I'l going to fill those with some wood slivers when the planking job is done. I haven't sanded anything yet, figuring its best to wait until all the planks are in place before doing that. The bow turned out a lot better than I had anticipated. A little experience goes a long way in this case. (And listening to experience helps too. Thanks, BobF!) I've been using the Magic Tape method, putting a piece of tape on the model, stem to stern, and tracing the outline with a pencil. (Note: Don't use a pen. The ink comes off on the plank!) Take the tape and stick it to a piece of card stock. Cut the template out and fit it against the model again, just to check its fit. I've taken to trimming the plank down to its greatest width before bending it. Just seems to work better that way and saves time later. Get the plank wet. (No more microwave ovens for me!) And it'll bend to conform to the template without buckling (mostly). Let it dry and then do it again. Seems like two trips to the template will do it. Once the plank is bent fore and aft -- to conform to the sheer of the hull -- wet it again. It doesn't take much water at this point. Bend it athwartships to make the bend around the bow. That can take a little time to get it right, but it's not difficult at all. Finally, the tricky part is carving the angle in the end of the plank to conform with the rabbet. I take it slow on this, sanding very lightly to get the correct angle and bending the plank a little bit as I go along. When gluing it, I really press it into the rabbet ... and that, of course, is how I snapped off the stem! (Everyone warned me. I thought I could avoid it. I saved the little piece and will glue it back on later...) And here's how the boat looks from the side and bottom. I've got a few more planks installed since I took these pictures. I'm very pleased with how they went on and how the model looks. I was a little nervous, when these pictures were taken, that the planks looked wavy. Now that I have a couple more in place after these, it's apparent that that was an optical illusion. Those planks bending around the turn of the bilge and conforming with the sheer of the hull ... there are a lot of angles involved in all that. I think I have another four or five planks to go. Got to say, this planking job is pretty tedious and time consuming. I'm confident the result will be worth it, but I'd really like to be through this part of the construction! Dan

- 175 replies
-
- 1
-
-
- 18th century longboat
- model shipways
- (and 1 more)
-
That looks really good, Bob. Dan
-
Real quick update... The weekend was busy and I had very little time to work on the Long Boat. I did manage to clean up the after ends of the planks. It's important to do, I now realize, because doing this kind of work with the transom in place would be tricky indeed. Dan


-
Very nice model, Maury. Dan
-
Yep! A whole lot happier! Dan
-
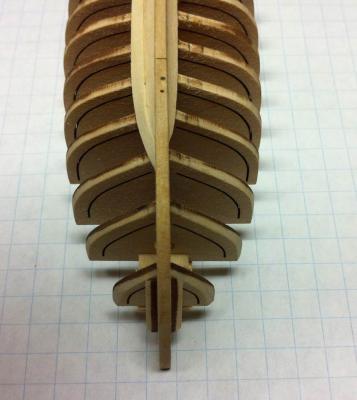
Thanks, Bob! A little more progress was made last night. I got the third strake in place on the port side. I actually had to do it twice because I got another little gap like I got on the starboard side. I'm convinced this was caused by the wet glue swelling the plank. There was no gap when I fitted the plank into the rabbet, but when the glue dried, there it was. On the second attempt, I benefitted from the plank having been in place for a while and the bend being well established. I really jammed the plank into the rabbet, too. The port side looks a little better than the starboard. So now you can see both sides of the boat. The strakes lined up nicely athwartships. And I was very pleased that everything came together at the stern. Both sides lined up at the notch where the transom will be installed. As you can see, I have to trim the ends off the planks. I'm back to where I was last week Sunday, but I'm much happier with the result. From what everyone's been saying, the rest of the strakes should be a little easier to fit than these first three ... and I'm looking forward to that. Dan
-
Small progress over the weekend. I decided to just goof around with a plank that was pretty well destroyed, trying to get the bend right without ruining another plank in the process. As I worked, I found that that ruined plank wasn't quite as ruined as I thought. I made it a little narrower than the broad strake below it. I think the broad strake is a little wider than it should be at the bow, so, in the end, everything worked out. I'm going to have to see if I can replicate this plank on the other side of the boat. Just as Bob says, wetting the plank is enough to soften it and allow it to bend more easily and I was just bending the plank around my thumb after a while, avoiding the bottle-cap-and-hair-dryer technique shown in the instructions. (The hair dryer was needed elsewhere. I used my heat gun, which is capable of reducing one of those little plastic clamps to a pool of polymeric goo in short order!) The reason I narrowed the plank was to avoid buckling, which had happened with the wider ones I'd tried. In the picture, there is a gap between the plank and the rabbet. That's real, but it's really small. When I lightly sanded the whole thing, all the little gaps disappeared. I might have to fill a tiny bit on the end, but nothing major. Progress continues! Dan
- 175 replies
-
- 1
-
-
- 18th century longboat
- model shipways
- (and 1 more)
-
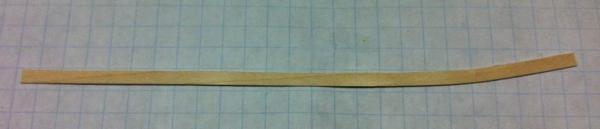
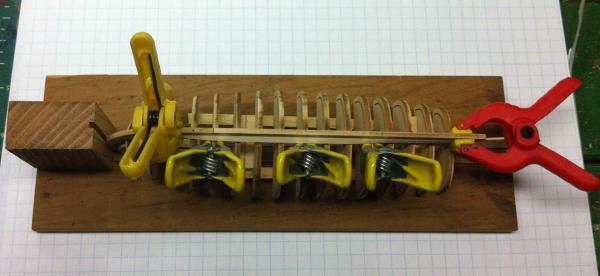
From the Two Steps Forward, One Step Back school of ship modeling, here's another update! Just getting the plank wet and clamping it to my glass plate, I edge-bent the broad strake. I left it sit overnight to dry and here's the result. Then I started sanding and carving. I found that the end of the strake fit a lot better into the keel rabbet. And I did two bends: the edge bend in the photos above and a bend around the curve of the hull. That bend was pretty subtle, but it made a big difference in how the plank fit. I'll add, too, that some of the edge bend went out of the plank when I wet it again to form the bend around the bow. Don't know how to minimize that. So here's the broad strake fitted to the rabbet and the garboard strake. When gluing the strake in place, I concentrated on the bow. I held it in place while the glue set, avoiding the use of clamps altogether. When it was almost dry, I put some clamps in place on the frames to just hold it in place. That avoided marring the surface of the plank with a clamp. On my last attempt, there was a low spot between two of the frames. I know now why. The forward end of the garboard strake is a little low. Fitting the broads strake so that it lined up perfectly made that strake a little low too and formed the low spot. I let the broad strake lie where it's supposed to be this time, so there's a very, very slight difference in height at that point between those two strakes, but that will sand out, I'm confident. Had I done what I did last time, that dent would have needed filling. I only applied glue to the first six or so frames and the edge of the plank that far back. The bend around the stern still needs to be done. I think I'll be in good shape just wetting the after end of the plank, bending it around the stern and clamping it in place. I've made a lot of sawdust out of basswood planks... I think I'm going to have to order another bundle of them from ModelExpo because I doubt I'm going to be able to finish the planking with what came in the kit. There was plenty there to allow for mistakes, but not quite enough to allow for my mistakes! Dan

- 175 replies
-
- 2
-
-
- 18th century longboat
- model shipways
- (and 1 more)
-
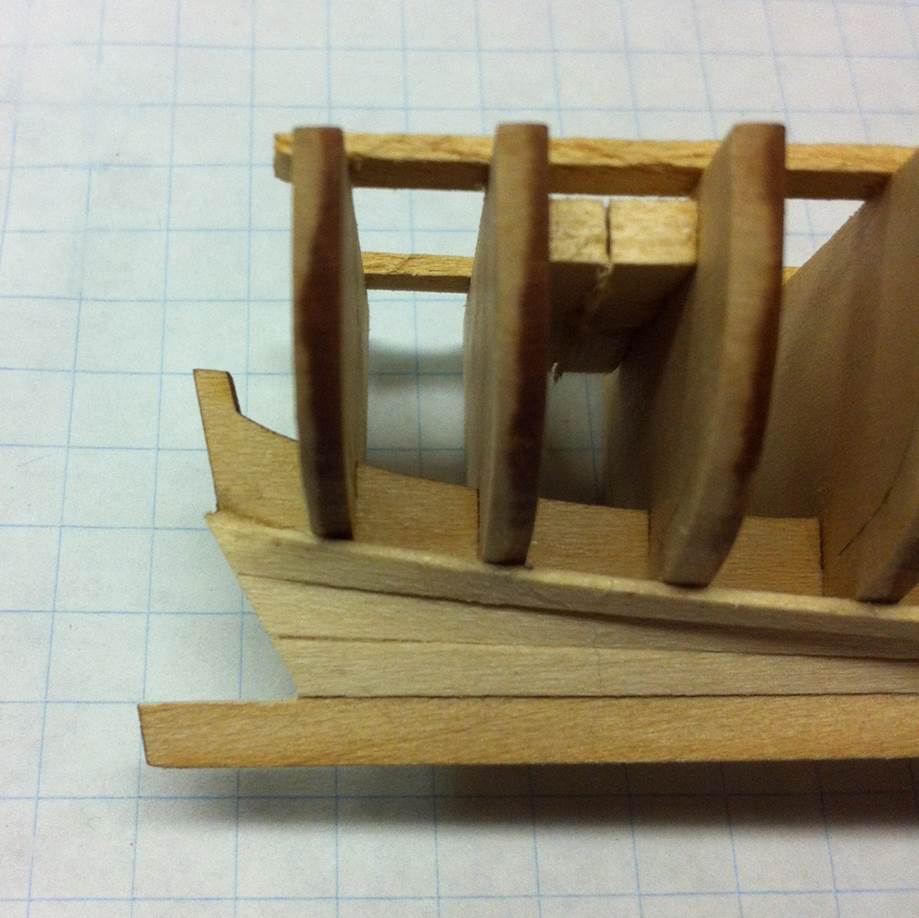
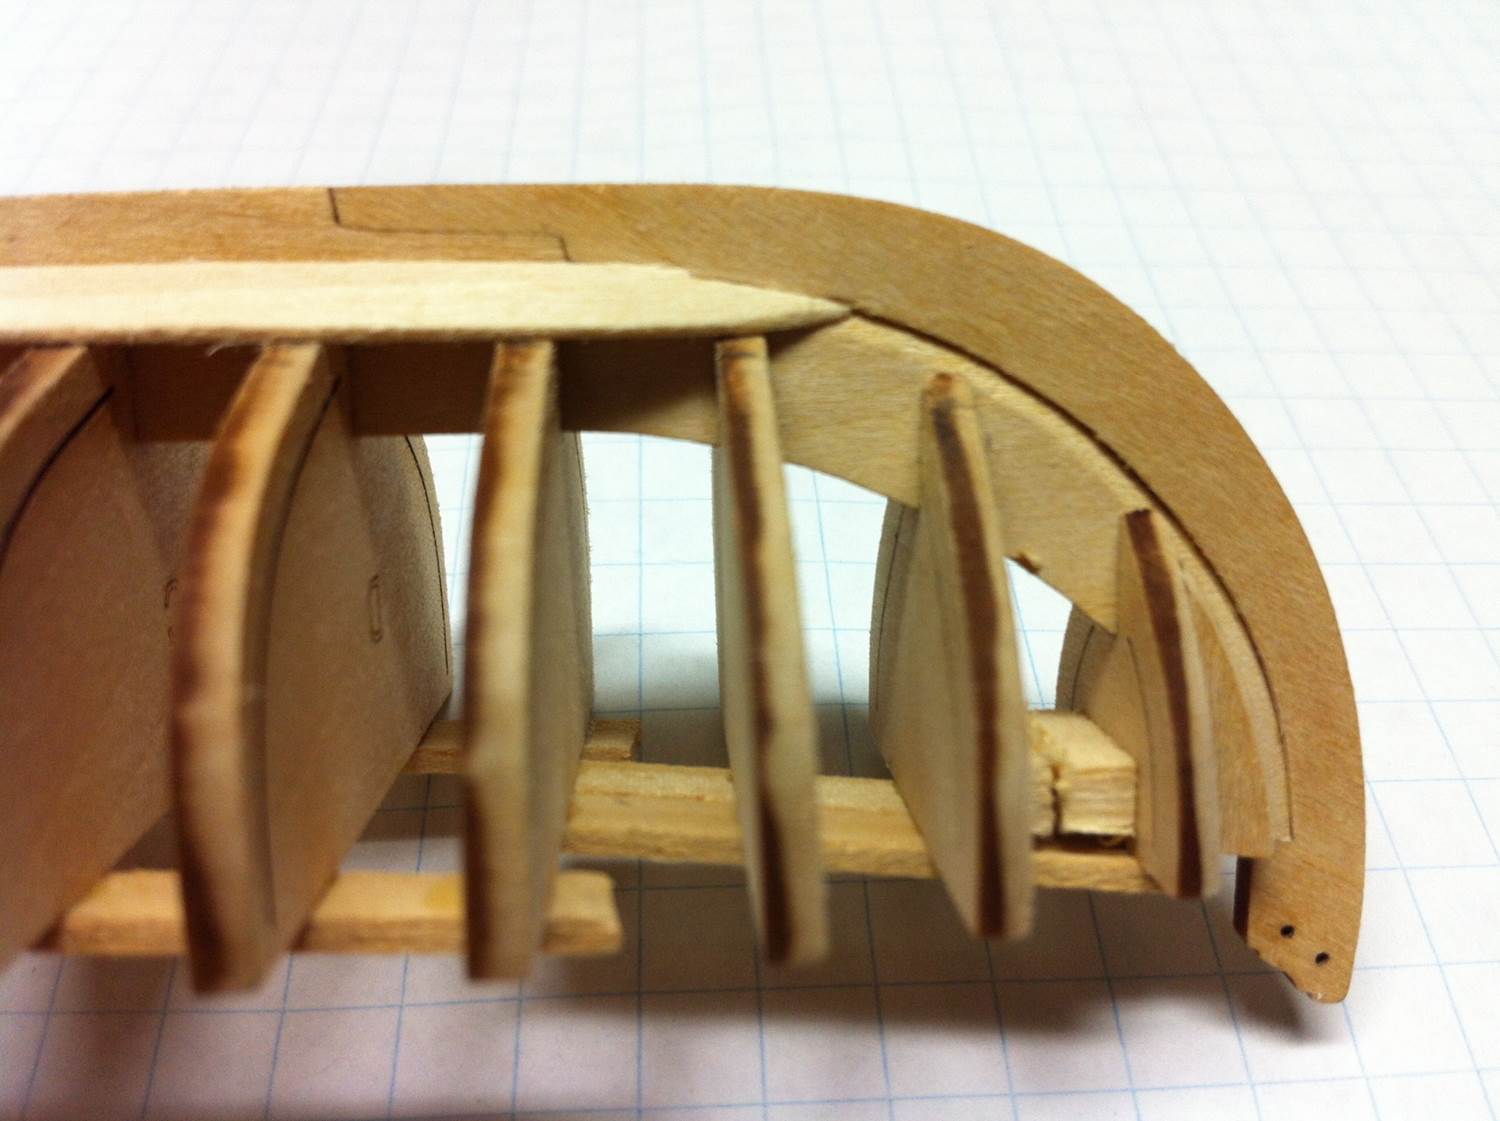
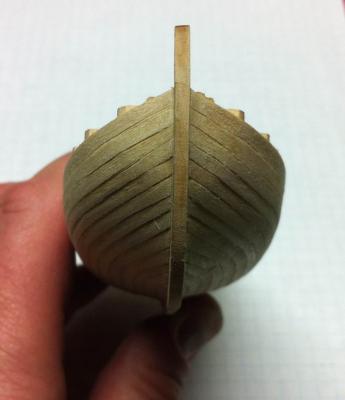
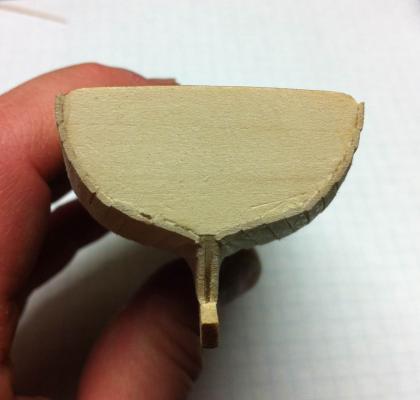
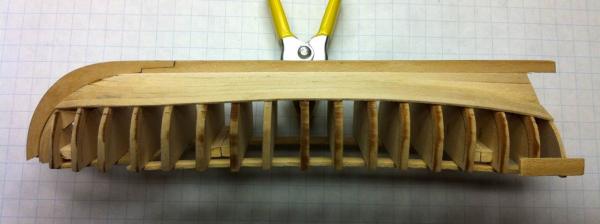
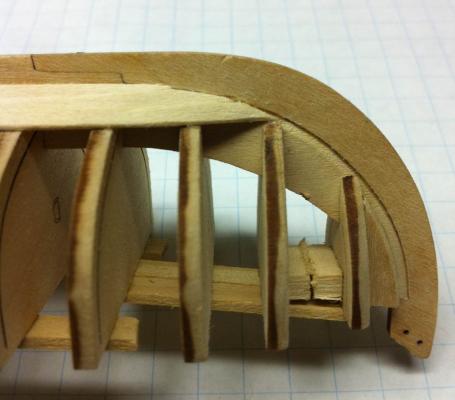
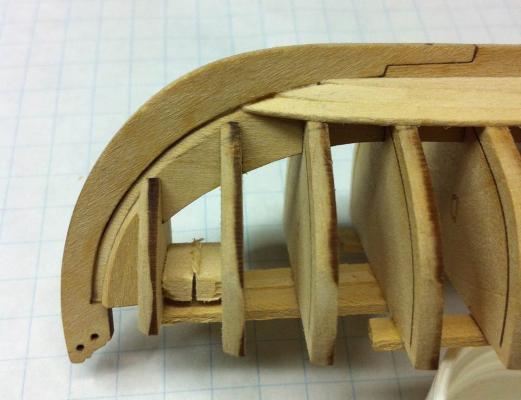
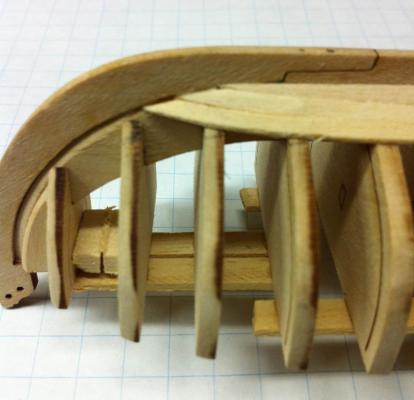
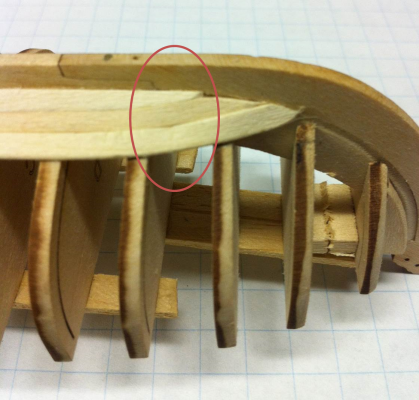
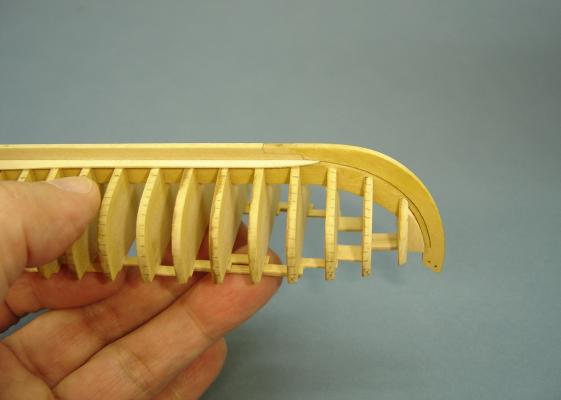
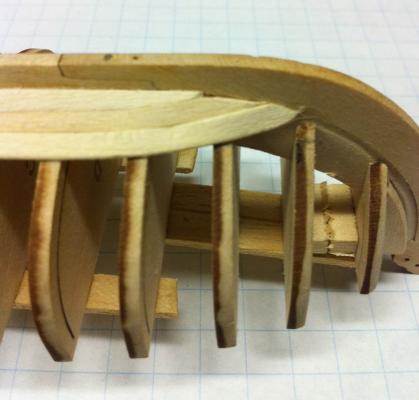
Time for another update... Toni and Bob had a look at my Long Boat at Saturday's meeting of The Nautical Research and Model Ship Society of Chicago and provided some great guidance. Here's the thing. The last two strakes are distorted at the bow, as you can see here. If I were to continue planking, that distortion would just get worse and the end product wouldn't be to my liking. Just my personality, but that's the kind of thing that would bother me to my grave, so I made the decision to do some deconstruction. That started on Sunday. Because I'd secured the planks with white glue -- good call in retrospect -- wetting the joints softened the glue and allowed me to remove them without too much trouble. To be sure, there was some clean-up needed, but, in the end, everything worked out fine. Looking at Toni and Bob's garboard strake, they look a lot like mine. (Toni recommended I cut the garboard back some more. I'm thinking I can just thin it a little bit to reduce the amount the next planks need to curve.) Now it's time to give it another try. Here are a few things I'm going to do differently: Just wet the planks rather than cook them. I know heating them in the microwave makes them as pliable as noodles, but the consensus was that it's overkill for what I'm trying to achieve. Take the edge bending slowly. After one bend, mine would snap back into shape. Bob tells me it can take a couple of attempts before the plank keeps the desired shape. Carve the plank to fit. I was under the impression that I could just bend the planks into shape. Now I know I have to do both: bend and carve to get the plank into the proper form. Just hold the plank in place while adhering it to the frames. I was using too much clamp pressure and deforming the planks. I think this will help avoid the problems I had before with putting big divots in the planks. Let's see how this works!


- 175 replies
-
- 3
-
-
- 18th century longboat
- model shipways
- (and 1 more)
-
I see what you mean, Toni. Your garboard strake runs true, fore and aft instead of curving like mine does, which forced me to bend the other planks around it. I think the only way to address this is to remove those three strakes and start again. I'd rather not, but I want to be happy with the result -- because I'm going to have to look at it for a long time -- and replacing just these few strakes isn't, in the grand scheme of things, a big deal. Dan
-
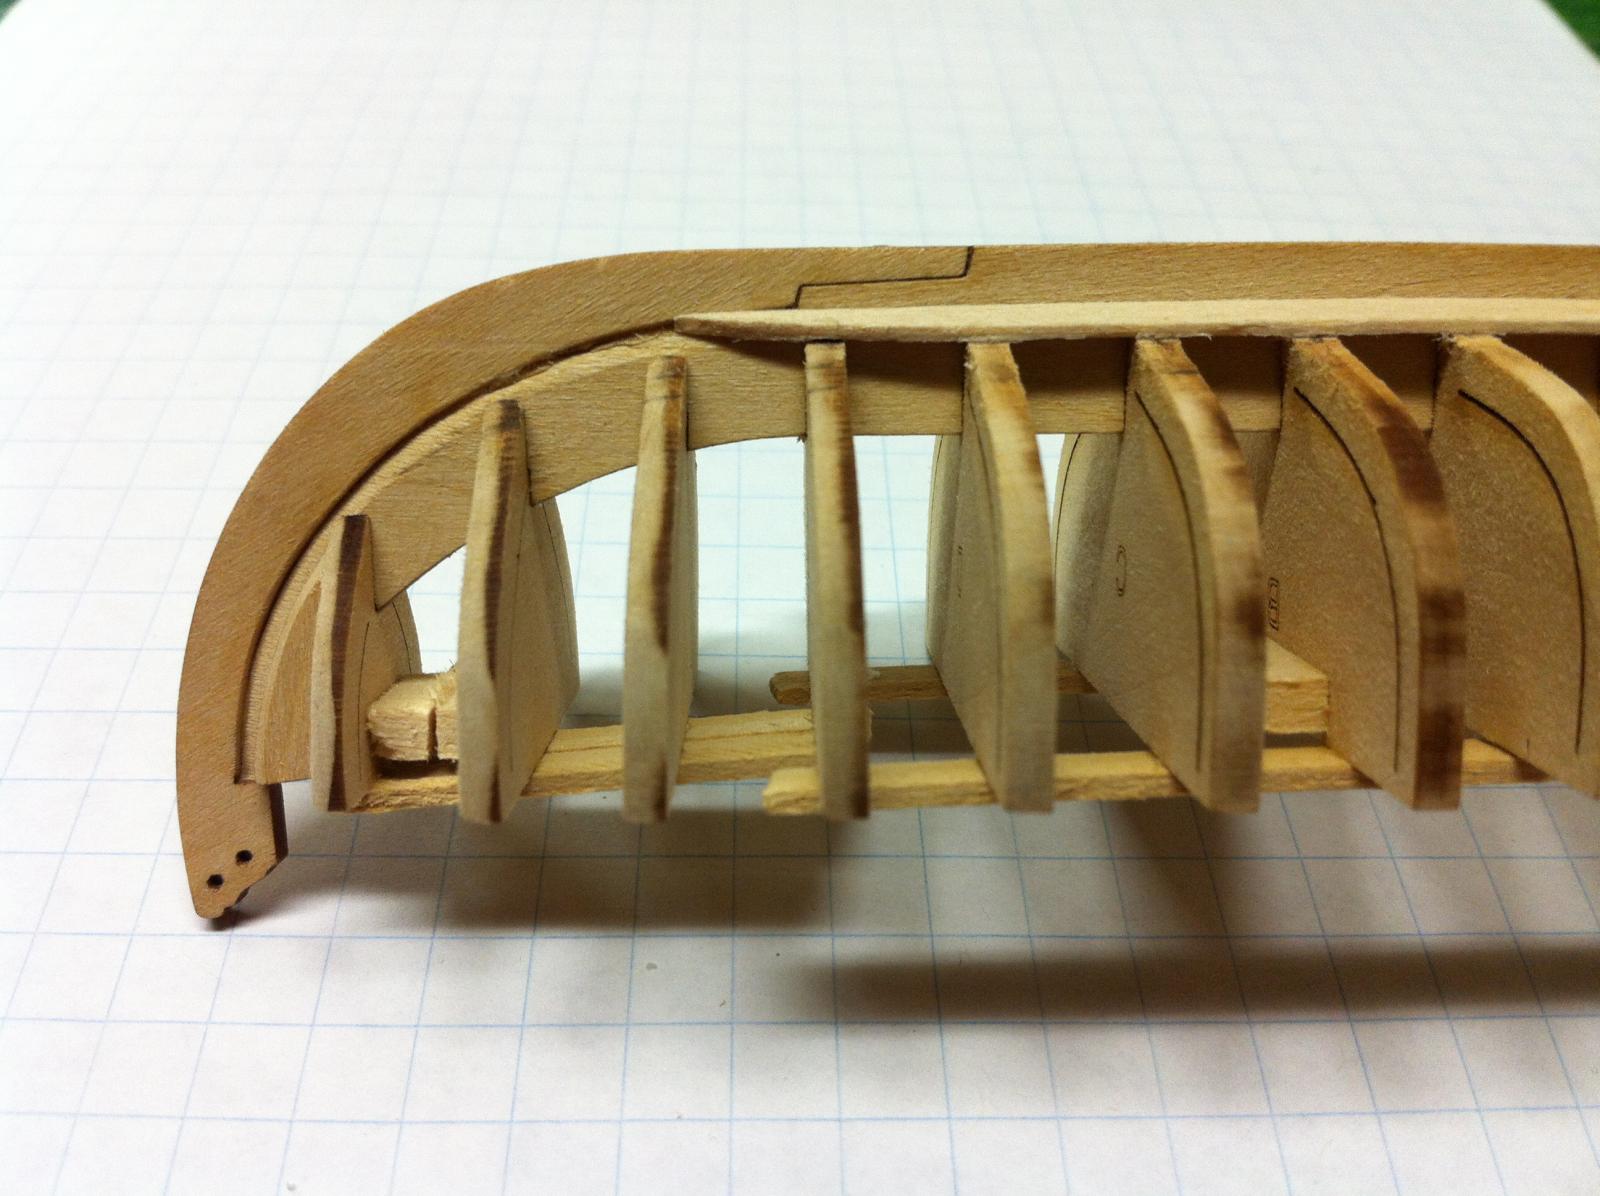
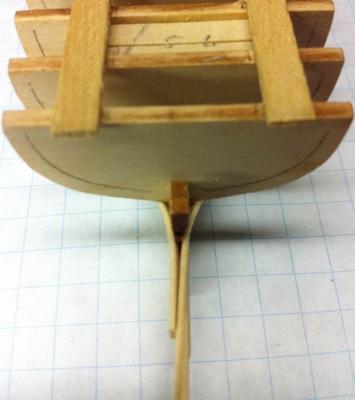
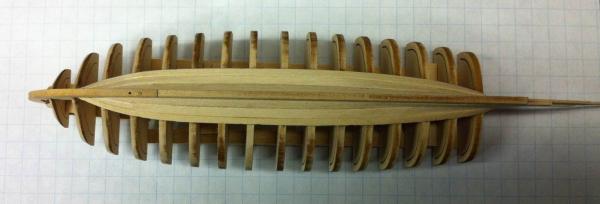
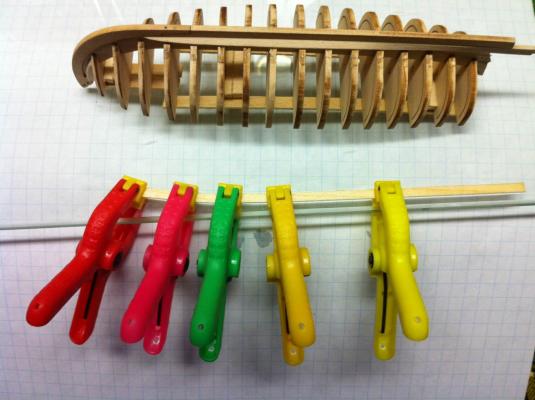
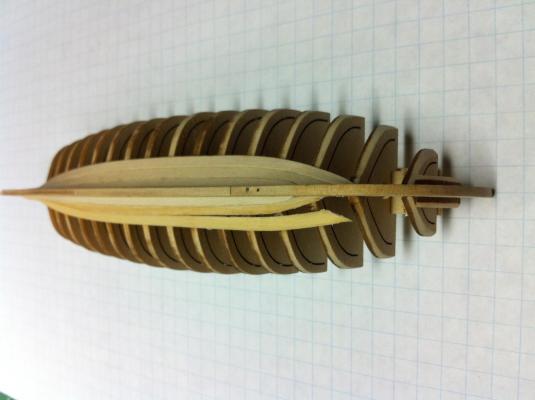
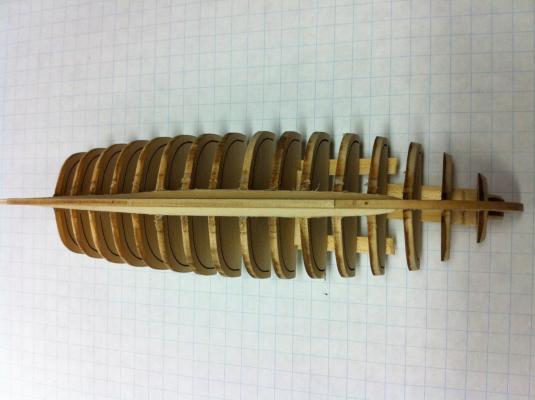
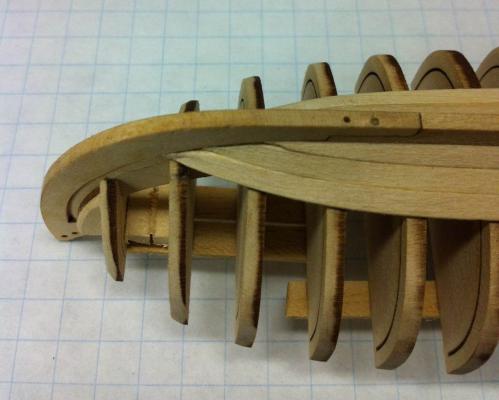
Time for another quick update... I've got three planks installed on both sides of the model. As you can see, I still need to trim the after ends of the planks off. That'll happen next. If I wait, it will become more difficult with the transom in place. To fit these planks, I've come around to the method of getting them close to the final shape first, sanding them roughly to the right width with my disk sander and then finishing the sanding using a sanding stick. Finally, I cut the tapered end to fit in the rabbet. Then I get them wet, put them in the microwave and bend them on to the model, securing them with clamps. When the plank dries, I remove it. Here you can see the extreme bends in a plank after being fitted to the model. Then I apply glue and put the clamps back in place. It takes no pressure at all to hold the plank in place at that point. It just lays right where it belongs. I'm happy with the final result, but concerned that I'm going to have to do more sanding and filling than I had hoped. At the bow, there is no way I've found to avoid crushing the end of the plank. I think it will work out alright, but it'd be nice if I'd found a way to avoid that. I also put a dent in one of the planks, getting it to align with the plank next to it. I'm wondering, if I just wet it a little, if it will expand and get rid of the dent... So there it is! Time to do some trimming and install the transom. Dan

-
Just stunning! Dan
-
Jerry: Your Constellation is looking great. I'm following your progress with great interest! And your wargame collection -- visible in the background of several of your pictures -- looks great too. Lots of overlap with my collection. Dan
- 553 replies
-
- 1
-
-
- sloop of war
- constellation
- (and 3 more)
-
I remember getting to this point too. Drilling the hold for the rudder post had me scratching my head for a long time! Ended up drilling one hole down from the deck and one hole up from the stern post and hoping they met in the middle. (Worked like a charm, by the way.) Your model's looking great! Dan
-
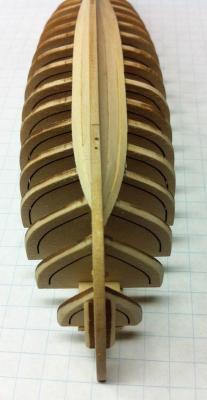
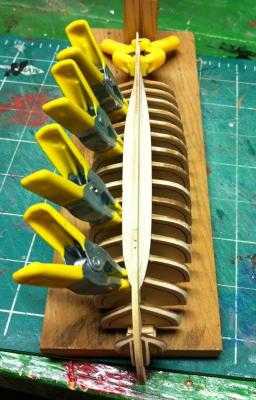
The garboard strakes are in place! Here's a quick shot of the starboard garboard strake held in place with some clamps. I used Maury's technique to bend the planks. I put the shaped planks in a wet paper towel and put them in the microwave at high power for two minutes. The first time I did this, I was a little apprehensive, but it worked out really well. The plank softens up and can easily be bent into place. Here's the biggest benefit I've noted using this technique. The plank can be held in place as shown in the photo without any "horsing." I left it as shown overnight and, in the morning removed the clamps. Nothing moved. I pulled the plank off, applied some white glue to the mating surfaces and put the clamps back on. When the glue dried, the plank was securely in place with no distorting force on the model. That's really cool. One thing I learned was to be judicious with the pressure put on these planks. As everyone here has noted, basswood is very soft and it's easy to dent it. There are a couple of little dents in the planks, but they're so small I doubt they'll be noticed and once the whole hull is faired, I think they'll disappear. Only time will tell on that. Dan
-
Parallel to the waterline would be correct. Think of it this way, if it was perpendicular to the mast, anyone standing on it would constantly be sliding aft. Here's how I got that angle right. Step the mast as it will be on the finished model and mount the platform such that it can tilt a little. Make sure the model is sitting level and then use a level on the platform to set it parallel to the waterline. It'll look great. Dan
-
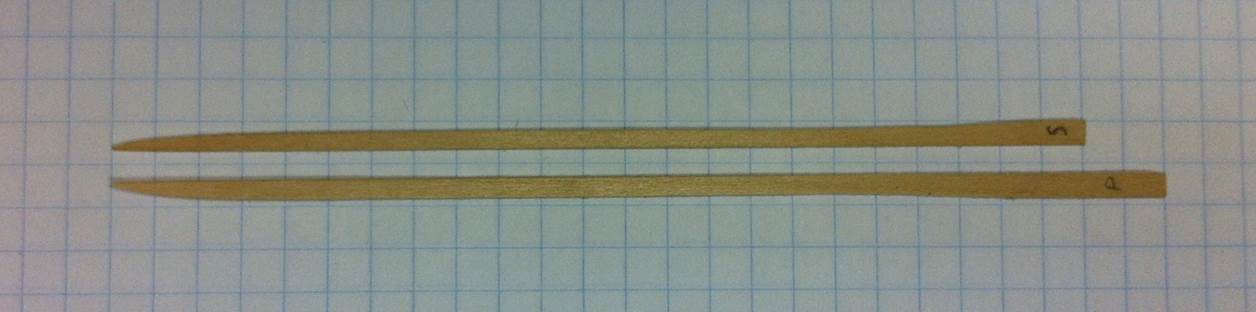
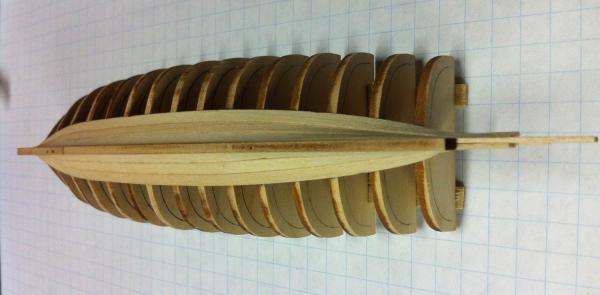
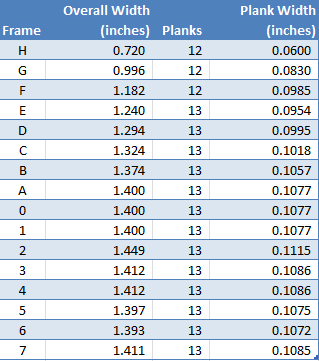
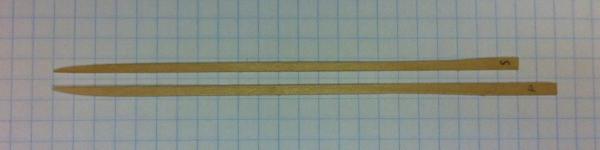
And here's the corrected table. I think it's interesting how consistent the widths are from Frame A aft. You can see my progress on the two garboard strakes here. The starboard one took me two building sessions to complete. The port one? I worked on it while the kids were running around. Took maybe an hour, total. Seems like that happens a lot. The first time you work through a problem like this, it takes forever and the results are just okay. The second time, it goes a lot faster and the results are better. The moral of the story? Like the Nike ads used to say: Just Do It. Dan
- 175 replies
-
- 1
-
-
- 18th century longboat
- model shipways
- (and 1 more)