


Moonbug
-
Posts
963 -
Joined
-
Last visited
Reputation Activity
-

 Moonbug got a reaction from riverboat in Santa Maria by Moonbug - FINISHED - Artesania Latina - Bashed
The main mast of course houses the crow’s nest. The crow’s nest supplied is a solid wall, poorly molded version. At first I started rebuilding the entire thing from scratch, then realized that I could probably just refit the one supplied.
I measured and marked, then drilled out holes in the sides. A lot of sanding later I ended up with something that I liked and that was quite a bit more accurate.
The base of the crow’s nest is simply four mitre’d 5mm walnut pieces that are rounded and fitted to size. The entire thing sits on your typical criss-cross structure that will also provide a base for the topmast. Getting these pieces to all tie together nicely required a fair amount of clamps.
The important aspect of the topmast is the rounded sanding at the base to ensure it fits snug against the main mast while still accommodating the double sheave block after it is tied together. The final steps are to stain and/or tung oil the pieces to make them meld together while still showing the details with different grains of wood.
The final aspect for the masts is the sheave block added to the top of the masts.
-
Moonbug got a reaction from riverboat in Santa Maria by Moonbug - FINISHED - Artesania Latina - Bashed
The sheave block for the Mizzen is made from a piece of walnut, drilled and filed to create an opening. The opening is filled with the circular “pulley” cut from a leftover walnut dowel. The piece is sanded down to fit, placed into the block’s opening, and secured with a brass rod through the center of the entire piece. The sheave block is then secured to the top of the mizzen and fore masts with glue and a pin.
After the masts are built, the touchy part comes into play. Holes must be drilled into the decks. Obviously this is an awfully nerve-wracking step. Any mistakes here are nearly irreparable and would be very difficult to mask. Each hole is initially drilled with a very small bit at a very high speed to minimize tearing the delicate wood of the deck. The holes are widened incrementally using larger bits until it gets close to the desired diameter. The holes are then finalized with a high grit sand paper to achieve as tight a fit as possible.
The masts are NOT secured in place yet, but are dry-fitted. -
 Moonbug got a reaction from johnwie in White glue or contact glue for deck planking?
I use the same as Russ. I purchased a standard size container of carpenter's glue, and so far it has lasted for two builds and sets relatively quickly.
- Bug
-
 Moonbug got a reaction from zoly99sask in Santa Maria by Moonbug - FINISHED - Artesania Latina - Bashed
I began work on the hatch cover for the main deck. I started with an excess piece of plywood cut into a square. This gave me some stability for the initial framing. Without the plywood, it's very easy for the frame to become out of squre while trying to glue the corners together. However... because the plywood adds an extra half milimeter to the bottom, it won't sit flush on the deck. Therefore after the hatch is completed, the plywood will need to be sanded completely off.
The edges are but at perfect 45 degree angles using a mitre saw. After the initial framing is made with 3mm pieces of walnut, I added a second layer of frame using the same 3mm pieces but lined up on their SIDE against the first frame.
After the edges are sanded and rounded a bit, it gives the entire hatch a nice three dimensional look. The hatch "doors" are created using 5mm strips of walnut cut to size. I've used three on each side, then separated the doors with a narrower 2 mm strip. This will give a good impression where the doors come together.
Since it's terribly difficult to keep something so thin but wide stable, I first glued each of the doors using three strips of walnut. Then I glue and clamp the two doors to the center piece and keep it all stable by laying flat piece of excess wood along the top and clamping that also.
After it dries, the doors are sanded smooth and a "notch" it filed down the center to give the impression where the doors come together.
Ultimately, the details are added. After trying to cut the hinges from brass proved too difficult, I instead used thick, black construction paper panted over with matte black. Holes are drilled and nails added and blackened. The handles are small brass eyelets also blackened. Finally, Columbus' inventory for the Nina actually shows a chain and lock for the hold, so I thought it perfectly conceivable that the same would be included on the Santa Maria. The small brass chain is blackened and the lock created from a folded strip of brass and a half brass ring. Then a small hole is drilled simulating the keyhole.
-
 Moonbug got a reaction from avsjerome2003 in Santa Maria by Moonbug - FINISHED - Artesania Latina - Bashed
Planking the decks of the ship is one of the most important areas of the build. The deck is usually the first thing people notice, and any inaccuracies or mistakes are going to be picked out immediately.
The Santa Maria has a number of decks, three of which will be visible on the completed ship model. While I'm planking the hull, I also started work on planking the smallest of these decks, the fore deck. This will give me an opportunity to experiment with which pattern, color, and methods I want to use for the entire ship. If the smaller deck doesn't turn out the way I like, I can sand it down and re-do it without too much trouble.
Over the course of history, planks have been nailed down a wide variety of ways and there is no current documentation to display exactly how planks were placed in the 1400's. Therefore, I have researched as much as possible, and have determined what I consider the most likely planking pattern for the Santa Maria.
This drawing is from "Historic Ship Models" by Wolfram ZuMondfeld.
Based on what research I could find, plank boards from this era were almost always made from oak, and in the 1400's they would have almost certainly been about 12" wide with each plank approximately 12' long. Based on this, my guess is that a "three butt shift" would have been the probably pattern. This means that three planks would have separated each "butt" or where the two planks come together.
First, I measured and drew out the proposed pattern on the false deck. The ship's scale is 1/65, so if each plank was 12' long on the original, it needs to be about 42mm on my model.
I then cut each plank and glue it down over the top of the drawn pattern. After gluing each plank down, I used a .5mm mechanical pencil to mark the trenails. The "tree nails" were small dowels used in place of what would presently be nails. This pattern was the likely trenail schematic for deck planks that were wider than 11 inches. My original plan was to drill tiny holes then fill them in, but I discovered that poking the hole with the mechanical pencil then breaking off a tiny bit of the lead into the hole worked very well.
Once all the planks were laid, the deck is bordered with walnut. I sanded the deck thoroughly with 600 grain sandpaper and stained it with "weathered oak" color stain. When the stain dries it will require another sanding. To maintain the aged look of the deck, I will sand more toward the center of the deck where the sailors would have had more opportunity to scrub, while the edges that collected water and didn't receive as much attention would remain a little more worn and darkened.
There is much more work to be done on the foredeck including stanchions, railings, and a carved head beam that was used to ram other ships. More to come on the foredeck...
-
 Moonbug got a reaction from augie in Santa Maria by Moonbug - FINISHED - Artesania Latina - Bashed
Thanks Anja, I've posted them here:
http://modelshipworld.com/index.php?/topic/6305-el-galeon/?p=183190
Thanks Eamonn - I'll get to work!
-
 Moonbug got a reaction from egkb in Santa Maria by Moonbug - FINISHED - Artesania Latina - Bashed
Thanks Anja, I've posted them here:
http://modelshipworld.com/index.php?/topic/6305-el-galeon/?p=183190
Thanks Eamonn - I'll get to work!
-
Moonbug got a reaction from egkb in Santa Maria by Moonbug - FINISHED - Artesania Latina - Bashed
Hey everyone - I know I've been absent. During a recent business trip to Orlando, I rented a car and drove to St. Augustine. One of the reasons (aside from the fact it's my birthplace) was to visit the "El Galleon" harbored in port there.
Although the ship is quite modernized (it sails regularly and is used for tours) and probably doesn't serve super well for reference, I did take a fair amount of photos, etc. I muddled around the site, and can't find where I should post them all.
Suggestions?
-
 Moonbug got a reaction from NAZGÛL in Santa Maria by Moonbug - FINISHED - Artesania Latina - Bashed
Jastrzab - you're absolutely right. I quite often find myself having to choose which reference to use/follow. I also try to make a point of mentioning that most of what I've done is speculation.
- Bug
-
 Moonbug reacted to Sjors in Santa Maria by Moonbug - FINISHED - Artesania Latina - Bashed
I'll be waiting for updates Bug .......
-
 Moonbug got a reaction from popeye the sailor in Santa Maria by Moonbug - FINISHED - Artesania Latina - Bashed
Thanks Kinnikki! I hope to get back to work on her soon!
- Bug
-
 Moonbug got a reaction from Sjors in Santa Maria by Moonbug - FINISHED - Artesania Latina - Bashed
Thanks Kinnikki! I hope to get back to work on her soon!
- Bug
-
 Moonbug got a reaction from Dee_Dee in Santa Maria by Moonbug - FINISHED - Artesania Latina - Bashed
Hey Daniel,
Great questions. First - as a PR guy by trade I'll make sure that I let the kids know that most of what I say regarding those issues is subjective and my opinion based on what limited "actual' documentation exists.
That said - I go with somewhere in between. As much as that sounds like a copout, there are a couple of things that we do know for sure - ONE - he WAS a brave discover. Just the amount of faith and bravery that it took to make that (and any) kind of journey on the relatively rudimentary ships of the time was amazing. That will surely come across when they get an opportunity to see the build and understand the amount of people that were crammed on board as well as what it took to sail her.
TWO - there was at least on some level treatment toward the natives that is (particularly now) considered inappropriate and perhaps even inhuman. There are a couple of factors here - the most significant being the overall philosophies / viewpoints of the time. There really was pretty widespread discrimination based on one's race / culture / standing etc. But right or wrong, it was NORMAL for the time. There are thousands of examples throughout history of behaviors, whether by individuals or cultures, that were perfectly normal but now considered completely jacked.
THREE - history is skewed. And often dramatically. When you go back 500-600 years, the only perspective you have is one generated by the very small minority that could read and write. Those accounts were almost always skewed by, among other things, ego and self promotion. So who's to say what really happened?
Either way, it should indeed prompt an interesting discussion. All I hope to get out of it is an increased interest in history, as well as (hopefully) a willingness to look at events with an open mind while gaining enough information to formulate their own viewpoints.
- Bug
-
Moonbug got a reaction from egkb in Santa Maria by Moonbug - FINISHED - Artesania Latina - Bashed
Jastrzab - you're absolutely right. I quite often find myself having to choose which reference to use/follow. I also try to make a point of mentioning that most of what I've done is speculation.
- Bug
-
 Moonbug got a reaction from marktime in Santa Maria by Moonbug - FINISHED - Artesania Latina - Bashed
Jastrzab - you're absolutely right. I quite often find myself having to choose which reference to use/follow. I also try to make a point of mentioning that most of what I've done is speculation.
- Bug
-
Moonbug reacted to jastrząb in Santa Maria by Moonbug - FINISHED - Artesania Latina - Bashed
Analising the pics the location is visible (I have compared to my AoS). The capstan should be located there, hovever, like mentioned before - Santa Maria is like a ghost ship. We can only compare her to the ships of those times...
-
Moonbug got a reaction from zoly99sask in Santa Maria by Moonbug - FINISHED - Artesania Latina - Bashed
Hi Kinnikki,
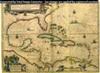
Thanks for stopping by! I based my capstan location on reference from Xavier Pastor's book "The Ships of Christopher Columbus." I located it just below the quarterdeck and just a few feet in. There is also this reference that I found from an unknown Russian source that locates it in a similar position (See the red arrow).
Hope that helps!
-
Moonbug got a reaction from Sjors in HMS Agamemnon by Sjors - FINISHED - Caldercraft/Jotika - 1:64
I'm not trying as hard as Sherry - I'm totally jealous!
- Bug
-
Moonbug got a reaction from NAZGÛL in Wasan 1628 by Nazgul - FINISHED - Billing Boats Vasa 1:75
Great work, I agree on the great coloring. Nice!
- Bug
-
 Moonbug got a reaction from newbuilder101 in HMS Agamemnon by Sjors - FINISHED - Caldercraft/Jotika - 1:64
I'm not trying as hard as Sherry - I'm totally jealous!
- Bug
-
 Moonbug got a reaction from canoe21 in Santa Maria by Moonbug - FINISHED - Artesania Latina - Bashed
Hi Kinnikki,
Thanks for stopping by! I based my capstan location on reference from Xavier Pastor's book "The Ships of Christopher Columbus." I located it just below the quarterdeck and just a few feet in. There is also this reference that I found from an unknown Russian source that locates it in a similar position (See the red arrow).
Hope that helps!
-
Moonbug got a reaction from NAZGÛL in Santa Maria by Moonbug - FINISHED - Artesania Latina - Bashed
It took a while, but I finally got the cleats, rails, and sheaves in place.
-
 Moonbug got a reaction from Bindy in USS Constitution by CaptainSteve - Model Shipways - 1:76.8 scale
Bindy - That should be EVERY day's lesson. ~
- Bug
-
Moonbug got a reaction from canoe21 in Santa Maria by Moonbug - FINISHED - Artesania Latina - Bashed
It took a while, but I finally got the cleats, rails, and sheaves in place.
-
 Moonbug got a reaction from CaptainSteve in USS Constitution by CaptainSteve - Model Shipways - 1:76.8 scale
Bindy - That should be EVERY day's lesson. ~
- Bug