

DRW-FJ40
-
Posts
43 -
Joined
-
Last visited
Reputation Activity
-

 DRW-FJ40 got a reaction from GrandpaPhil in Snipe by DRW-FJ40 - FINISHED - Dumas - Small - 4th in my intro to ship modeling
Thank you so much for the kind words! I got the idea for the deck planking from the Dumas Continental kit. It was a great way to cover my mistakes from the initial hull construction! Here are some pictures of the finished hull from the bottom. I may have stated somewhere in the thread already but I use Zpoxy finishing resin which goes on thick & I used multiple coats with wet sanding down to 400 between coats to build up a thick even layer of finish and then the final finish, I wet sanded to 2500 & then went to micromesh polishing pads down to 12,000 grit and then fine polishing compound.
-
DRW-FJ40 got a reaction from GrandpaPhil in Friendship Sloop by DRW-FJ40 - BlueJacket Shipcrafters - Scale 1:12
Well... I'm not breaking any speed build records here but I have made some progress. deck planks on, trimmed & stained. I kept fiddling with the hull finish to the point that you can no longer see the plank lines through the paint... not what I had intended but at this point, I have a fairly decent shape and it has enough slight imperfections so as not to look like a fiberglass hull and not so much that it looks like a botched model.
I had resigned myself to the idea that I'll need to put a new mahogany veneer on the transom so I figured I'd paint the one that's on there and see how I liked that look... and I like it... I think I'm going to keep the paint the same color as the hull.
-
 DRW-FJ40 got a reaction from capnharv2 in Friendship Sloop by DRW-FJ40 - BlueJacket Shipcrafters - Scale 1:12
Well... I'm not breaking any speed build records here but I have made some progress. deck planks on, trimmed & stained. I kept fiddling with the hull finish to the point that you can no longer see the plank lines through the paint... not what I had intended but at this point, I have a fairly decent shape and it has enough slight imperfections so as not to look like a fiberglass hull and not so much that it looks like a botched model.
I had resigned myself to the idea that I'll need to put a new mahogany veneer on the transom so I figured I'd paint the one that's on there and see how I liked that look... and I like it... I think I'm going to keep the paint the same color as the hull.
-
 DRW-FJ40 got a reaction from hexnut in Friendship Sloop by DRW-FJ40 - BlueJacket Shipcrafters - Scale 1:12
Well... I'm not breaking any speed build records here but I have made some progress. deck planks on, trimmed & stained. I kept fiddling with the hull finish to the point that you can no longer see the plank lines through the paint... not what I had intended but at this point, I have a fairly decent shape and it has enough slight imperfections so as not to look like a fiberglass hull and not so much that it looks like a botched model.
I had resigned myself to the idea that I'll need to put a new mahogany veneer on the transom so I figured I'd paint the one that's on there and see how I liked that look... and I like it... I think I'm going to keep the paint the same color as the hull.
-
 DRW-FJ40 got a reaction from GuntherMT in Friendship Sloop by DRW-FJ40 - BlueJacket Shipcrafters - Scale 1:12
I finished the second layer of planking. I wasn't real sure how to handle the transition into the keel and ultimately I just transitioned to a single 1/32" plank and then transitioned to the first layer of planks just past the garboard strake. I did this to keep the width of the keel per the original plans.
I put a coat of primer on which revealed a few areas that still need a bit of work. Mainly that transition around the garboard strake. I'm using model expo paint applied with a brush. On some of my hulls I've gone for a highly polished surface and I didn't want to do that here because I plan to paint it and I want it to look vintage ~1910 & still be able to see some of the plank lines & I think a sprayed and polished paint job would look like a modern fiberglass hull.
Anyways, here is where I'm at & I'll work on a few spots and then start the deck planking. Nice to be moving on to another phase.
-
DRW-FJ40 got a reaction from hexnut in Friendship Sloop by DRW-FJ40 - BlueJacket Shipcrafters - Scale 1:12
I finished the second layer of planking. I wasn't real sure how to handle the transition into the keel and ultimately I just transitioned to a single 1/32" plank and then transitioned to the first layer of planks just past the garboard strake. I did this to keep the width of the keel per the original plans.
I put a coat of primer on which revealed a few areas that still need a bit of work. Mainly that transition around the garboard strake. I'm using model expo paint applied with a brush. On some of my hulls I've gone for a highly polished surface and I didn't want to do that here because I plan to paint it and I want it to look vintage ~1910 & still be able to see some of the plank lines & I think a sprayed and polished paint job would look like a modern fiberglass hull.
Anyways, here is where I'm at & I'll work on a few spots and then start the deck planking. Nice to be moving on to another phase.
-
 DRW-FJ40 got a reaction from skipper1947 in Friendship Sloop by DRW-FJ40 - BlueJacket Shipcrafters - Scale 1:12
I finished the second layer of planking. I wasn't real sure how to handle the transition into the keel and ultimately I just transitioned to a single 1/32" plank and then transitioned to the first layer of planks just past the garboard strake. I did this to keep the width of the keel per the original plans.
I put a coat of primer on which revealed a few areas that still need a bit of work. Mainly that transition around the garboard strake. I'm using model expo paint applied with a brush. On some of my hulls I've gone for a highly polished surface and I didn't want to do that here because I plan to paint it and I want it to look vintage ~1910 & still be able to see some of the plank lines & I think a sprayed and polished paint job would look like a modern fiberglass hull.
Anyways, here is where I'm at & I'll work on a few spots and then start the deck planking. Nice to be moving on to another phase.
-
 DRW-FJ40 got a reaction from captainbob in Friendship Sloop by DRW-FJ40 - BlueJacket Shipcrafters - Scale 1:12
I finished the second layer of planking. I wasn't real sure how to handle the transition into the keel and ultimately I just transitioned to a single 1/32" plank and then transitioned to the first layer of planks just past the garboard strake. I did this to keep the width of the keel per the original plans.
I put a coat of primer on which revealed a few areas that still need a bit of work. Mainly that transition around the garboard strake. I'm using model expo paint applied with a brush. On some of my hulls I've gone for a highly polished surface and I didn't want to do that here because I plan to paint it and I want it to look vintage ~1910 & still be able to see some of the plank lines & I think a sprayed and polished paint job would look like a modern fiberglass hull.
Anyways, here is where I'm at & I'll work on a few spots and then start the deck planking. Nice to be moving on to another phase.
-
 DRW-FJ40 got a reaction from gerty in Friendship Sloop by DRW-FJ40 - BlueJacket Shipcrafters - Scale 1:12
I finished the second layer of planking. I wasn't real sure how to handle the transition into the keel and ultimately I just transitioned to a single 1/32" plank and then transitioned to the first layer of planks just past the garboard strake. I did this to keep the width of the keel per the original plans.
I put a coat of primer on which revealed a few areas that still need a bit of work. Mainly that transition around the garboard strake. I'm using model expo paint applied with a brush. On some of my hulls I've gone for a highly polished surface and I didn't want to do that here because I plan to paint it and I want it to look vintage ~1910 & still be able to see some of the plank lines & I think a sprayed and polished paint job would look like a modern fiberglass hull.
Anyways, here is where I'm at & I'll work on a few spots and then start the deck planking. Nice to be moving on to another phase.
-
 DRW-FJ40 got a reaction from DocBlake in Friendship Sloop by DRW-FJ40 - BlueJacket Shipcrafters - Scale 1:12
I finished the second layer of planking. I wasn't real sure how to handle the transition into the keel and ultimately I just transitioned to a single 1/32" plank and then transitioned to the first layer of planks just past the garboard strake. I did this to keep the width of the keel per the original plans.
I put a coat of primer on which revealed a few areas that still need a bit of work. Mainly that transition around the garboard strake. I'm using model expo paint applied with a brush. On some of my hulls I've gone for a highly polished surface and I didn't want to do that here because I plan to paint it and I want it to look vintage ~1910 & still be able to see some of the plank lines & I think a sprayed and polished paint job would look like a modern fiberglass hull.
Anyways, here is where I'm at & I'll work on a few spots and then start the deck planking. Nice to be moving on to another phase.
-
 DRW-FJ40 got a reaction from ulrich in Friendship Sloop by DRW-FJ40 - BlueJacket Shipcrafters - Scale 1:12
I finished the second layer of planking. I wasn't real sure how to handle the transition into the keel and ultimately I just transitioned to a single 1/32" plank and then transitioned to the first layer of planks just past the garboard strake. I did this to keep the width of the keel per the original plans.
I put a coat of primer on which revealed a few areas that still need a bit of work. Mainly that transition around the garboard strake. I'm using model expo paint applied with a brush. On some of my hulls I've gone for a highly polished surface and I didn't want to do that here because I plan to paint it and I want it to look vintage ~1910 & still be able to see some of the plank lines & I think a sprayed and polished paint job would look like a modern fiberglass hull.
Anyways, here is where I'm at & I'll work on a few spots and then start the deck planking. Nice to be moving on to another phase.
-
DRW-FJ40 got a reaction from ulrich in Friendship Sloop by DRW-FJ40 - BlueJacket Shipcrafters - Scale 1:12
Here is where I'm at with the hull. I had put this project down for a while because I really didn't know how to proceed. I wasn't pleased with the hull shape and didn't want to start over at this point and it wasn't that bad... mainly, some flat spots between bulkheads. So as I said, my intention is to fill the flat spots, create a reasonably decent hull shape and then plank over it.
The challenge now is getting the shape. You can see I've added a few shaped 1/32 pieces of wood in a few areas to build up the worst flat spots. I was reluctant to do this because I knew once I deviated from the framing to get the hull shape I'd have to rely on eye to get it right... I think it will be ok, just taking my time at this point.
-
 DRW-FJ40 got a reaction from cristikc in Friendship Sloop by DRW-FJ40 - BlueJacket Shipcrafters - Scale 1:12
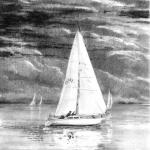
Thought I had a picture of the chris-craft but couldn't find it. This is the lake with 3 of my Midwest kits:
-
DRW-FJ40 got a reaction from cristikc in Friendship Sloop by DRW-FJ40 - BlueJacket Shipcrafters - Scale 1:12
Here is where I'm at with the hull. I had put this project down for a while because I really didn't know how to proceed. I wasn't pleased with the hull shape and didn't want to start over at this point and it wasn't that bad... mainly, some flat spots between bulkheads. So as I said, my intention is to fill the flat spots, create a reasonably decent hull shape and then plank over it.
The challenge now is getting the shape. You can see I've added a few shaped 1/32 pieces of wood in a few areas to build up the worst flat spots. I was reluctant to do this because I knew once I deviated from the framing to get the hull shape I'd have to rely on eye to get it right... I think it will be ok, just taking my time at this point.
-
 DRW-FJ40 got a reaction from JerryTodd in Friendship Sloop by DRW-FJ40 - BlueJacket Shipcrafters - Scale 1:12
Here is where I'm at with the hull. I had put this project down for a while because I really didn't know how to proceed. I wasn't pleased with the hull shape and didn't want to start over at this point and it wasn't that bad... mainly, some flat spots between bulkheads. So as I said, my intention is to fill the flat spots, create a reasonably decent hull shape and then plank over it.
The challenge now is getting the shape. You can see I've added a few shaped 1/32 pieces of wood in a few areas to build up the worst flat spots. I was reluctant to do this because I knew once I deviated from the framing to get the hull shape I'd have to rely on eye to get it right... I think it will be ok, just taking my time at this point.
-
DRW-FJ40 got a reaction from JerryTodd in Friendship Sloop by DRW-FJ40 - BlueJacket Shipcrafters - Scale 1:12
Well... this one sat for a while but I've picked it back up. I'm almost finished with the first layer of planks. The kit only calls for one layer of planks but I'm not real happy with my planking. I had intended to paint the entire hull and thought for a while I would use filler to correct my mistakes but there are some areas that would require a lot & I would have to do a polished paint surface since some of the plank lines would be completely covered with filler. So my plan now is to focus on getting a smooth correct hull shape and then double plank so that when I paint the final hull, I can do an old weathered paint scheme.
How I got the point that I was so unhappy with my hull is due to a number of things. I won't pretend that the bulk of it is due to my own inexperience but I followed the directions to a tee for trimming the planks. In retrospect, I should have used their dimensions as a general guide line and adjusted my plank trimming as I went along. As a result, some of the planks weren't lying as flat as they should & my forcing them to fit made things worse. Also, the bulk heads are pretty far apart compared to some of my others and some of planks developed flat spot between bulkheads. By the time I realized this, I had to make a choice, to bow the next plank a bit and achieve the proper hull shape or line up with the previous plank so that the edges fit against each other smoothly.
At this point I think my best option is fix the flat spots and get a decent smooth shape and then double plank.
-
 DRW-FJ40 got a reaction from Landlubber Mike in Friendship Sloop by DRW-FJ40 - BlueJacket Shipcrafters - Scale 1:12
Here is where I'm at with the hull. I had put this project down for a while because I really didn't know how to proceed. I wasn't pleased with the hull shape and didn't want to start over at this point and it wasn't that bad... mainly, some flat spots between bulkheads. So as I said, my intention is to fill the flat spots, create a reasonably decent hull shape and then plank over it.
The challenge now is getting the shape. You can see I've added a few shaped 1/32 pieces of wood in a few areas to build up the worst flat spots. I was reluctant to do this because I knew once I deviated from the framing to get the hull shape I'd have to rely on eye to get it right... I think it will be ok, just taking my time at this point.
-
DRW-FJ40 got a reaction from Landlubber Mike in Friendship Sloop by DRW-FJ40 - BlueJacket Shipcrafters - Scale 1:12
Before I start, I'll have to say I left my camera at work and could wait to begin. So, the first few steps have been documented after the process rather than during.
Inventory of parts & a little bit of sanding.
The keel is interesting. It's four pieces and then has additional 1/16" laminates on either side. The outer laminates are not the full depth of the keel and form the rabbet line. The core pieces go together first and then the outside laminates.
I've complete that step but need to get some pictures.
-
DRW-FJ40 got a reaction from GuntherMT in Friendship Sloop by DRW-FJ40 - BlueJacket Shipcrafters - Scale 1:12
Here is where I'm at with the hull. I had put this project down for a while because I really didn't know how to proceed. I wasn't pleased with the hull shape and didn't want to start over at this point and it wasn't that bad... mainly, some flat spots between bulkheads. So as I said, my intention is to fill the flat spots, create a reasonably decent hull shape and then plank over it.
The challenge now is getting the shape. You can see I've added a few shaped 1/32 pieces of wood in a few areas to build up the worst flat spots. I was reluctant to do this because I knew once I deviated from the framing to get the hull shape I'd have to rely on eye to get it right... I think it will be ok, just taking my time at this point.
-
DRW-FJ40 got a reaction from DocBlake in Friendship Sloop by DRW-FJ40 - BlueJacket Shipcrafters - Scale 1:12
Here is where I'm at with the hull. I had put this project down for a while because I really didn't know how to proceed. I wasn't pleased with the hull shape and didn't want to start over at this point and it wasn't that bad... mainly, some flat spots between bulkheads. So as I said, my intention is to fill the flat spots, create a reasonably decent hull shape and then plank over it.
The challenge now is getting the shape. You can see I've added a few shaped 1/32 pieces of wood in a few areas to build up the worst flat spots. I was reluctant to do this because I knew once I deviated from the framing to get the hull shape I'd have to rely on eye to get it right... I think it will be ok, just taking my time at this point.
-
DRW-FJ40 got a reaction from GuntherMT in Friendship Sloop by DRW-FJ40 - BlueJacket Shipcrafters - Scale 1:12
Thought I had a picture of the chris-craft but couldn't find it. This is the lake with 3 of my Midwest kits:
-
 DRW-FJ40 got a reaction from capnharv3 in Friendship Sloop by DRW-FJ40 - BlueJacket Shipcrafters - Scale 1:12
Yes, I didn't want to sound critical of the kit because I don't have a lot of experience to compare it to but I've done a few small midwest planked kits and I was pretty meticulous relative to laying out the keel and positioning the bulkheads and I still came up with some discrepancies, and the bulkhead alignment with the false deck was one of them. A more experienced modeler could have made wiser decisions as far as what to curves to hold & what to trim, etc. The fact the the keel slopes and the bulkheads, although parallel to one another, are not perpendicular to the keel makes it challenging as you can't slap a square on it but have to rely on the drawings for that angle.
I enjoy small fishing craft, in fact this is the largest "ship" I've attempted. My others have been canoes, skiffs and a snipe sailboat. It's easy to become enamored with this sloop... an interesting evolution of design at an interesting point in history for Maine and fishing by sail. Along with this kit, I purchased "Lasting Friendships: A Century of Friendship Sloops".
-
DRW-FJ40 got a reaction from skipper1947 in Friendship Sloop by DRW-FJ40 - BlueJacket Shipcrafters - Scale 1:12
Before I start, I'll have to say I left my camera at work and could wait to begin. So, the first few steps have been documented after the process rather than during.
Inventory of parts & a little bit of sanding.
The keel is interesting. It's four pieces and then has additional 1/16" laminates on either side. The outer laminates are not the full depth of the keel and form the rabbet line. The core pieces go together first and then the outside laminates.
I've complete that step but need to get some pictures.
-
 DRW-FJ40 got a reaction from dgbot in 3D Printing - Not Just Yet!
I'm sort of new here but this topic caught my eye. As someone mentioned, material is key for detail. I recently designed a 1950's gas pump and had it printed via shapeways. My conclusions were that you can get that CNC detail with frosted ultra detail plastic and a little elbow grease but... it's plastic and it's expensive. Ultimately it's good for a prototype to "sell" the idea to someone with access to less expensive manufacturing methods. But that cannon would look real good in a material with better detail quality like the "frosted ultra detail"
This is the finished pump model which is 10 scale so about 7.5" tall. The larger pieces are made of "strong white flexible" plastic because it's cheaper and they didn't require the detail. But the pump nozzle & engraved lettering on the face plate are FUD. I experimented with different materials and just couldn't get the detail.
-
 DRW-FJ40 got a reaction from yvesvidal in Friendship Sloop by DRW-FJ40 - BlueJacket Shipcrafters - Scale 1:12
Well... this one sat for a while but I've picked it back up. I'm almost finished with the first layer of planks. The kit only calls for one layer of planks but I'm not real happy with my planking. I had intended to paint the entire hull and thought for a while I would use filler to correct my mistakes but there are some areas that would require a lot & I would have to do a polished paint surface since some of the plank lines would be completely covered with filler. So my plan now is to focus on getting a smooth correct hull shape and then double plank so that when I paint the final hull, I can do an old weathered paint scheme.
How I got the point that I was so unhappy with my hull is due to a number of things. I won't pretend that the bulk of it is due to my own inexperience but I followed the directions to a tee for trimming the planks. In retrospect, I should have used their dimensions as a general guide line and adjusted my plank trimming as I went along. As a result, some of the planks weren't lying as flat as they should & my forcing them to fit made things worse. Also, the bulk heads are pretty far apart compared to some of my others and some of planks developed flat spot between bulkheads. By the time I realized this, I had to make a choice, to bow the next plank a bit and achieve the proper hull shape or line up with the previous plank so that the edges fit against each other smoothly.
At this point I think my best option is fix the flat spots and get a decent smooth shape and then double plank.