
MORE HANDBOOKS ARE ON THEIR WAY! We will let you know when they get here.
×


_SalD_
-
Posts
818 -
Joined
-
Last visited
Reputation Activity
-

 _SalD_ reacted to Jim Lad in US Brig Syren by _SalD_ – FINISHED - 3/16" scale
Sorry I missed your question, Sal. The pintles and gudgeons would most likely have been of bronze.
Below are some photos of wreck artefacts that might be of interest. They are from HMS 'Sirius', wrecked on Norfolk Island in 1790 and the merchant ship 'Sydney Cove', wrecked on Preservation Island in Bass Strait in 1797.
Bronze pintles, gudgeons and spectacle plate from the 'Sirius' on display in the Norfolk Island Museum
Remains of the rudder of the 'Sydney Cove' together with it's pintles and gudgeons at the QVMAG, Launceston
-
 _SalD_ got a reaction from GLakie in US Brig Syren by Robert-J-M - Model Shipways - 1:64 - 18 gun brig
Nice job Robert. I like the idea of the template. I hear you about fingers in front of the lens, I end up deleting half my pictures because of that.
-
_SalD_ reacted to Robert-J-M in US Brig Syren by Robert-J-M - Model Shipways - 1:64 - 18 gun brig
Got done fairing the sides of the transom. Started cautious with the Dremel leaving clearance to the outside of the plank edge but there's a good bit of material to remove so I ended up using the Dremel to a thick pencil line made on the inside of the plank. I had already realized it but the curve of the bulwark is not as pronounced on the port side
as it is on the starboard.
(Got to remember to move my finger out of the way on the iPhone)
I made a mark on the stern post and measured up with calipers to matching plank run points on each side of the transom and the distances matched almost perfectly except at the slight inward turn on the port side. For that last fairing of the bulwarks prior to planking I am going to cut off the outside edges of each of the bulkheads from the sheet they were lasered out of. This should provide a nice template for getting that curve correct and for getting the final run of the planking.
Despite my original bent bulkhead former everything seems to be symmetrical except... the stern gunports. The top of the port port is almost 1/8" further outboard then the starboard one. I believe any issues with these gun ports will be very noticeable from both inside and out so I will lay the template up and rework them as needed.. AGAIN.
-
 _SalD_ got a reaction from Jimz66 in US Brig Syren by _SalD_ – FINISHED - 3/16" scale
George, Augie, Thomas and wq3296 thanks for looking in and the kind words.
Augie thanks for checking on the rudder material from Jim.
wq3296 thanks for the info. I believe the ship builders knew of the adverse reaction between iron and copper in salt water. I would think that if they did use iron fittings on the coppered hull they would probably need to provide some sort of separation between the fitting and copper. I'm not sure about bronze in a salt solution need to do a little more reading.
-
_SalD_ reacted to wq3296 in US Brig Syren by _SalD_ – FINISHED - 3/16" scale
Greetings Sal,
Nice work. Regarding pintles and gudgeons, I expect they were probably castings or wrought iron. If castings, they were probably iron or maybe bronze. I have never heard of cast copper parts because copper is too soft to resist wear. Given the stress pintles and gudgeons were under, I would bet on the iron over bronze. Not sure if builders were aware of galvanic action back then, other than its effects, but bronze and copper would go away very quickly in salt water further weakening stressed parts. Let's see what the "experts" say.
wq3296
-
_SalD_ reacted to augie in US Brig Syren by _SalD_ – FINISHED - 3/16" scale
I've sent an inquiry, via PM, to Jim Ladd. If anyone will know about these rudder straps it is he.
-
_SalD_ reacted to Gahm in US Brig Syren by _SalD_ – FINISHED - 3/16" scale
Your rudder turned out very nicely! And I have no idea concerning the copper versus bronze question
Thomas
-
_SalD_ reacted to augie in US Brig Syren by _SalD_ – FINISHED - 3/16" scale
It all looks good. Interesting question about the copper vs. bronze. Let's see if someone pipes up.
-
_SalD_ reacted to GLakie in US Brig Syren by _SalD_ – FINISHED - 3/16" scale
Your rudder looks great Sal! It's a good method you came up with for fabricating the iron work.
Cheers
-
.thumb.jpeg.fc5d633a7b34428fcf19419a73d56d55.jpeg) _SalD_ got a reaction from EricWilliamMarshall in US Brig Syren by _SalD_ – FINISHED - 3/16" scale
_SalD_ got a reaction from EricWilliamMarshall in US Brig Syren by _SalD_ – FINISHED - 3/16" scale
Richard thanks for the advice, you saved me from breaking some drill bits. I did break one because I guess I wasn't going slow enough, though I thought I was. What I finally did was when lowering the drill bit I would barely touch the surface with the bit until it bit into the copper then very slowly advanced the bit. I found also that even though I scribed a mark at each hole location the bit would still wander somewhat. I used plenty of 3 in 1 oil too. Now I just need to find some tiny nails.
Drilled and all cleaned up Pre-bent the gudgeons to fit the hull.
I would like the thank everyone for all the 'likes' also.
-
 _SalD_ got a reaction from canoe21 in US Brig Syren by _SalD_ – FINISHED - 3/16" scale
Not a big update today. I installed the rudder pretty much as outlined in the instructions. I did add some simulated nails which were sewing pins with very fine shafts cut to length. Next time I think I won't use so many. And in case you’re wondering why the nail heads are dark and not copper in color it’s because this shipyard used bronze nails instead of copper. The bronze being a little stronger than the copper brings me to a question. Would the actual pintles and gudgeons really be made from copper or would they have used bronze? Copper just seems to soft a material to use for parts that would take such a pounding from the constant movement of the ship.
-
 _SalD_ got a reaction from Duanelaker in US Brig Syren by _SalD_ – FINISHED - 3/16" scale
Richard thanks for the advice, you saved me from breaking some drill bits. I did break one because I guess I wasn't going slow enough, though I thought I was. What I finally did was when lowering the drill bit I would barely touch the surface with the bit until it bit into the copper then very slowly advanced the bit. I found also that even though I scribed a mark at each hole location the bit would still wander somewhat. I used plenty of 3 in 1 oil too. Now I just need to find some tiny nails.
Drilled and all cleaned up Pre-bent the gudgeons to fit the hull.
I would like the thank everyone for all the 'likes' also.
-
 _SalD_ got a reaction from jdbradford in US Brig Syren by _SalD_ – FINISHED - 3/16" scale
Not a big update today. I installed the rudder pretty much as outlined in the instructions. I did add some simulated nails which were sewing pins with very fine shafts cut to length. Next time I think I won't use so many. And in case you’re wondering why the nail heads are dark and not copper in color it’s because this shipyard used bronze nails instead of copper. The bronze being a little stronger than the copper brings me to a question. Would the actual pintles and gudgeons really be made from copper or would they have used bronze? Copper just seems to soft a material to use for parts that would take such a pounding from the constant movement of the ship.
-
 _SalD_ got a reaction from JesseLee in US Brig Syren by _SalD_ – FINISHED - 3/16" scale
Not a big update today. I installed the rudder pretty much as outlined in the instructions. I did add some simulated nails which were sewing pins with very fine shafts cut to length. Next time I think I won't use so many. And in case you’re wondering why the nail heads are dark and not copper in color it’s because this shipyard used bronze nails instead of copper. The bronze being a little stronger than the copper brings me to a question. Would the actual pintles and gudgeons really be made from copper or would they have used bronze? Copper just seems to soft a material to use for parts that would take such a pounding from the constant movement of the ship.
-
 _SalD_ got a reaction from rtropp in US Brig Syren by _SalD_ – FINISHED - 3/16" scale
Not a big update today. I installed the rudder pretty much as outlined in the instructions. I did add some simulated nails which were sewing pins with very fine shafts cut to length. Next time I think I won't use so many. And in case you’re wondering why the nail heads are dark and not copper in color it’s because this shipyard used bronze nails instead of copper. The bronze being a little stronger than the copper brings me to a question. Would the actual pintles and gudgeons really be made from copper or would they have used bronze? Copper just seems to soft a material to use for parts that would take such a pounding from the constant movement of the ship.
-
 _SalD_ got a reaction from Ol' Pine Tar in US Brig Syren by _SalD_ – FINISHED - 3/16" scale
Not a big update today. I installed the rudder pretty much as outlined in the instructions. I did add some simulated nails which were sewing pins with very fine shafts cut to length. Next time I think I won't use so many. And in case you’re wondering why the nail heads are dark and not copper in color it’s because this shipyard used bronze nails instead of copper. The bronze being a little stronger than the copper brings me to a question. Would the actual pintles and gudgeons really be made from copper or would they have used bronze? Copper just seems to soft a material to use for parts that would take such a pounding from the constant movement of the ship.
-
 _SalD_ got a reaction from WackoWolf in US Brig Syren by _SalD_ – FINISHED - 3/16" scale
Not a big update today. I installed the rudder pretty much as outlined in the instructions. I did add some simulated nails which were sewing pins with very fine shafts cut to length. Next time I think I won't use so many. And in case you’re wondering why the nail heads are dark and not copper in color it’s because this shipyard used bronze nails instead of copper. The bronze being a little stronger than the copper brings me to a question. Would the actual pintles and gudgeons really be made from copper or would they have used bronze? Copper just seems to soft a material to use for parts that would take such a pounding from the constant movement of the ship.
-
_SalD_ reacted to augie in USF Confederacy by Augie & Moonbug - FINISHED - Model Shipways - 1:64
Time for a small update. In preparation for the quarter deck planking, a series of coamings, hatches, gratings and ladder down to the gun deck have been added. Nothing spectacular, but here are a few photos to show where we are:
Need to do a little tweaking before everything is cemented in place.
Have begun working on the waterways and margin planks. These are being cut from Swiss Pear. Need to finalize some decisions as to how much of the quarter deck will be left open to view the interior. I'm favoring Chuck's suggestion to leave the entire port side open but I think I may add the margins and waterways to that side just to look more 'finished'.
No pressure .......
-
_SalD_ reacted to popeye the sailor in Andrea Gail by popeye the Sailor - FINISHED - 1:20 scale
thanks John......
so anyway......now that I have my mind straight.......it needs to be forward......the counter weight reel is aft. basically, my original idea is good, just that the telemetry is a bit off. to avoid having the termination line hinder on the top bar, the double block needs to be in a more forward position. I was looking at the aft spotlights, doing some touch ups, when the thought came to me......a bracket. two more pieces of the styrene tubing were cut......actually four, but whose counting these were cleaned, sanded square, and cut in half. a couple triangular pieces of styrene was cut from the flat stock strip, I had cut earlier. glued to one half of the tubing.......these were roughed out.
they need to be trimmed and rounded. while they were drying, the other control panel was threaded and made ready to cement into place on the deck. this time I made it a point to hang a clothes pin to the end and let it hang......in order to get the memory out of the thread. there was some serious kinking being on that flat card it comes on.
then, in checking them and finding that they were dry enough, I took the first one and shaped it. a hole was drilled for the eye bolt. I started to work on this one.
the other one is already on the bar by this time.
the other half was cemented in place to complete the bracket. the spotlights will be done in the same manner......I had cut them with a razor blade, so there was no material loss, and no gap would be seen. given a light sanding, it isn't noticeable at all. the eye bolt and double block was fitted in place.
I mentioned those other brackets for the stabilizer booms. I guess you could call them sway bars.....this bar will arrest the boom, to keep it in a equal arc as it is deployed, and prevent sway fore or aft. there is one for the aft side.....it is chain, but it isn't critical........I'll show this later. the forward sway bar does most of the work. the port side is cemented in place.
since I plan to have them deployed, not connected to the yokes, I cut the bars to what I figured was reasonable. I would have had to do some figuring to come up with the correct radius........these will do eye bolts have been added to one end. I'll have to watch how much of this dowel I use........or I'll end up getting more for the buoys
the spotlights were touched up......even added a touch of flat white to the florescent tubes......mixing it around to activate the silver, mixing it together.
after a pair of eye bolts were added to the other end of the bars, they were painted flat white.
when the control panel was dry, it was rigged through the double block.........clamping the clothes pin on again, because I added more to the length of the thread. the sway bar bracket was painted green at this time as well.
it was time to add the clear cello to the spotlights, completing their assembly.
I also thought about the counter weight rigging........this too needed some sort of bracketing to prevent the chain from sagging. taking two of those rings, shown earlier, they were spread out far enough, to clamp on the boom's outer framework at different places. two did the trick.
an eye bolt was added as well for the sway bar attachment. so.......both booms are permanently attached to the model now. how they are deployed is the way she will look. now I need to turn her around and duplicate what I did on the port side. the addition of the double block bracket was a success, there is no more hindrance...the rigging is free.
-
_SalD_ reacted to popeye the sailor in Andrea Gail by popeye the Sailor - FINISHED - 1:20 scale
I'm officially on vacation off to a slow start though.......Tuesday was an errand day, ran a few of those and surveyed the yards......the plow guy did a number on the back yard. it's not my problem.....I should let the landlord handle it, but he'd do a crappy job....that I am sure of ! I can wait on it....there is still a small mound of snow and Ice that needs to go away
I did manage to do a small bit on Andrea, but it was not enough to even mention. yesterday proved to be the better day, I did a lot more the frame work that needs to go under the first part of the trawl rig was where I had left off.....Tuesday was mostly fitting it in place. before I get to it though.......I recall a problem that was mentioned. I believe it was Mobbsie, that pointed out what looked like a small crack in the starboard side stanchion for the fore deck. I took care of it my friend......I didn't forget about it. thanks for pointing it out to me
...now for that piece of framework........ after fitting it, it was touched up with flat white.
it was then cemented in place.
seen in the picture.....is the starboard side stabilizer boom......pinned and cemented in place. the main objective here, is to figure how to rig them, so the lines don't hinder anywhere. this is tough, because the telemetry seems a bit off....and with no real plans to work with, the problem is compounded. going into the collection of older decals I made, I chose the ones that I will use for the control panel face. for the levers, I used some belaying pins, which Billing's supplies in their kits.
dry fitting it in place.......the reel on the bow side will be deployment reel. the one on the aft side will be for the anchor weight {counter weight, would be a better name}.
the pulley {block} assembly for this will need to be high up, but no higher than the top bar. I will use a double and a single block for this assembly. the single block will be located just below the contact point of the yoke, where it rests when not in use. an eye bolt will be located at the tip of the boom for a line to widen the weight distribution of the rigging.
sorry for the background being so busy, here on the table. you may have to look close. the double block.......the dilemma.........where to position it. I can't put it on any of the side frames.......it would be too far aft, and it would want to pull it aftward. there are the guide bars that I need to add later {those other brackets I made}, and that will pull them forward, to align them with the yoke. I decided to put the double block just under the top bar, behind the yoke.
it imitates a peak halyard, to sum it up in a nutshell. I like the way it looks, but the upper line going to the eye bolt, is hindered by the top bar and yoke. I will try something different with the port side, and if it works better, I can adjust the starboard side. I won't need to change where the control panel is.......this is the most logical spot for it.
clearly, the problem is here. looking at it at this point, I may have to relocate the double block to the forward side of this anchor point. we shall see
-
_SalD_ reacted to Robert-J-M in US Brig Syren by Robert-J-M - Model Shipways - 1:64 - 18 gun brig
The regatta was successful and now that's done so now I'm back working on my Syren. I have sanded the bulwarks, not sure how well, they seem a bit rough but we'll see. Starting the next chapter and the transom, of course one frame had to be glued after cutting them free and another split but on the side so not a problem. I decided to put both the A frames on at the same time. It seemed easier to align with both in place and viewing from many angles.
One of the things I continue to struggle with is sanding square the ends of the various pieces of 3/16"x1/4". I've tried sanding against the mitre box, a square and of course just holding it but I usually get it out of square in at lest one plane. Is there some method or trick to make it easier?
Thanks, Robert
-
_SalD_ reacted to Modeler12 in The Kit-Basher's Guide To The Galaxy
Computers: Ha
I was totally impressed with the Friden and Marchant mechanical 'calculators' while in college where I used my good old slide-rule daily. Later I learned about the TI series of 'calculators' and I still use the model 30XA for my daily dose of hands-on arithmetic.
Charts usually leave me cold, so do the proportional dividers, but the 30XA is always at my side.
Age 78.
Then again, I was really interested in the modern navigation tools used on small and large vessels. It was on a small vessel in Hawaii where we spent last week cruising the islands and I got to know the captain on a very personal basis. He and five other crew members are on their 10 day crossing back to Seattle with reported 25 foot waves most of the way. I tried to sign up, but was rejected with a smile.
Because of this web site and building a model sailing ship, I actually knew more about the olden days of sailing than my good friend the captain.
-
_SalD_ reacted to Timbers_B_Shiverin in US Brig Syren by Timbers_B_Shiverin - Model Shipways - Scale 1:64 - First wooden ship build
Still working on Chapter 2 of the Syren build, but I managed to collect a few pics along the way. Figure I ought to share before I get too far behind.
Chapter 2 is about placing the bulkheads, filler blocks and fairing the hull. I had to complicate things a bit because I wanted to add some subtle lighting to the ship - not a disco, just some very gentle lighting. After going through it all, I don't know why I want to do this...
Before I got too far on the bulkheads, I decided to drill some pilot holes for the masts into the bulkhead former. I guess it is easier and more accurate to do this now that latter on when the hull is built up. Looking forward in the instructions, I couldn't find any detail on how the masts get secured. Is it typical to just glue them to the top of the deck?
Here's the former laid out on the plans to set the angle:
Then the former was set up in the Proxxon drill press (the Timber's B Shiverin Shipyard finally made an investment in some tools...) and pilot holes drilled for the masts (1/8" holes I believe). A side benefit of drilling these holes is that it gave me a good reference to layout the deck plan upon.
Pilot holes double-checked versus the plans with some brass rod:
Because I plan to light the ship, I wanted to open up the space under the 2 main deck hatches and the small opening at the stern near the rudder. I hacked away at the formers and fillers, making a pocket that is roughly the same depth as the deck at the companionway. The pocket at the stern was not as deep, maybe only 1/2". I mocked up the hatches and lighting. The view through the hatches is very limited, only a mostly vertical view will reveal anything "below deck", so the walls are painted black.
Laying out the deck plan, using the mast pilot holes for reference:
Hatch locations marked:
All the formers and fillers before assembly:
Everything assembled, with the hatch walls painted black:
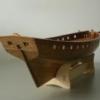
I got pretty bored of making the filler blocks, and somewhere along the way got distracted by trying to practice my carving skills. I have no experience with this and I think I want to eventually try carving the figurehead and quarter badges, so I need to practice. I decided I needed someone to oversee this shipwreck, so this guy was whittled out of a piece of hornbeam (aka blue beech). He ended up pretty rough and I still need a lot more practice before I get to the figure head but you gotta start somewhere.
It gives an interesting sense of scale. I think of the Syren as a fairly small ship but when you compare it to the height of an average man, you realize how big it actually was:
Back on track...
At the companionway, I knew that more of the below deck area would be visible with lighting, so I mocked-up the companionway with balsa, just to see how much would be visible. Based on that, I hacked away the formers and fillers in that area too. The result was that the port side needed to be planked one additional former forward, and one additional former aft of the kits basic shape. This also meant that the planking would extend into the main hatch area.
Companionway mocked-up:
I also decided to plank the bottom of the hatches because they are barely visible (and for some planking practice).
With the basic shapes defined, I needed to work on planking. Again to complicate things, I decided I wanted to use Hornbeam for the decking. I have no experience with other woods besides the Basswood in the kit but the Hornbeam seems much better to work with. It is much harder, and cuts/sands/works well without leaving any fuzz or fibers. It is also a more white/grey-blue shade than the tan of the Basswood. Another reason to use Hornbeam is that I have a source for it - my family's woods, so that means the price is right too. My father had several pieces already cut and dried, so I proceeded to turn those into some planking. Once again, the Timber's B Shiverin Shipyard's limited budget prevents me from getting really nice stuff (I keep looking for someone to place a Byrens table saw on the curb for recycle day but it never seems to happen...) so I had to make due.
Here's a picture of some Hornbeam. The right side is the rough board, the middle shows the more grey heart wood, and the left shows the lighter sap wood. I will be using the sap wood, however, the grey would make for a nice, weathered look.
The plank making process goes like this:
Rough board ripped on the band saw:
I had to make a router table for my Dremel. It was pretty simple to make, and the accuracy is decent as long as I don't try an remove too much material in a single pass, and I replace the sanding drum regularly. I have some ideas for my belt sander but that will have to wait.
Homemade Dremel router table:
The planks are then chopped to a shorter length on my homemade chopper:
Then sanded to final, uniform width (1/8") on this jig:
The planks are then mocked into position, tape applied to the backside, and given another sanding for uniform thickness. Here are the planks for the companionway area, with a couple of sticks of Basswood on top for comparison:
I also decided to treenail the companionway area, mostly for practice. I think the treenails are a little too pronounced, so I will try and tone them down in the future. I did the treenailing before final installation. The treenails and "chalking" used the method described in the instructions.
Here are the plank sections for the hatch areas:
Wow - that's quite a post. Maybe I should try and update more often?
-
_SalD_ got a reaction from canoe21 in US Brig Syren by _SalD_ – FINISHED - 3/16" scale
Richard thanks for the advice, you saved me from breaking some drill bits. I did break one because I guess I wasn't going slow enough, though I thought I was. What I finally did was when lowering the drill bit I would barely touch the surface with the bit until it bit into the copper then very slowly advanced the bit. I found also that even though I scribed a mark at each hole location the bit would still wander somewhat. I used plenty of 3 in 1 oil too. Now I just need to find some tiny nails.
Drilled and all cleaned up Pre-bent the gudgeons to fit the hull.
I would like the thank everyone for all the 'likes' also.
-
 _SalD_ got a reaction from j21896 in US Brig Syren by _SalD_ – FINISHED - 3/16" scale
Richard thanks for the advice, you saved me from breaking some drill bits. I did break one because I guess I wasn't going slow enough, though I thought I was. What I finally did was when lowering the drill bit I would barely touch the surface with the bit until it bit into the copper then very slowly advanced the bit. I found also that even though I scribed a mark at each hole location the bit would still wander somewhat. I used plenty of 3 in 1 oil too. Now I just need to find some tiny nails.
Drilled and all cleaned up Pre-bent the gudgeons to fit the hull.
I would like the thank everyone for all the 'likes' also.