


jcoby
-
Posts
88 -
Joined
-
Last visited
Content Type
Profiles
Forums
Gallery
Events
Posts posted by jcoby
-
-
Tonight I spent a couple hours working on the fore mast.
I started by spending 20 minutes straightening the replacement dowel that MS sent. It was bent in a S-curve that was at least 1/16" in each direction.
I used a set of pliers to burnish the high side while bending the dowel past straight. I ended up with a section that was within 1/32" of true. Close enough. I will be able to pull any remaining curvature out when I add the standing rigging.
After that I added the octagon shape at the base and cut it to the 13-1/2° angle called out in the plans. In the picture the fore mast looks quite a bit more vertical but it's only 2° less than the main mast. The lens on my iPhone makes it look much more than it is. It's not perfectly positioned for the picture either. I will use the standing rigging to set the masts in the proper location when it comes to that point.
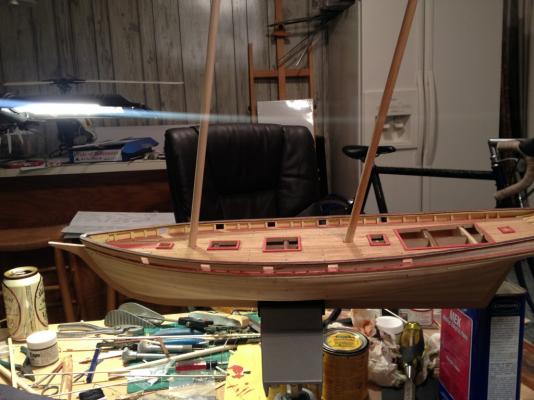
It's time to clean up the workspace I think!
- MarisStella.hr, bhermann, Bill Hime and 3 others
-
 6
6
-
I sailed her a few years ago and was surprised at how high the steering gear box was. The big helm felt awesome as we bore off and she powered up. No squares set but all fore and aft sails were set. We stayed in Baltimore Harbor but the wind was a nice 10-15 knots. Made for an awesome afternoon on the water. She's looking VERY sharp there. Nice and crisp details. Thanks for showing us.
Neat. I have family in Baltimore and they say that the Pride is away more than not.
I just measured the plans and the wheel is 56" in diameter and sits 30.5" off the deck. That does seem quite big!
-
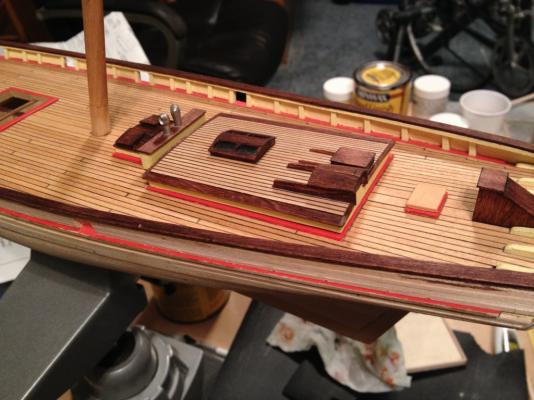
And a picture of all of the deck furniture aft of the main mast set into place. I still need to install the various cleats and eyelets on the rails and stanchions before I install them permanently.
- Bill Hime, Timothy Wood and egkb
-
3
-
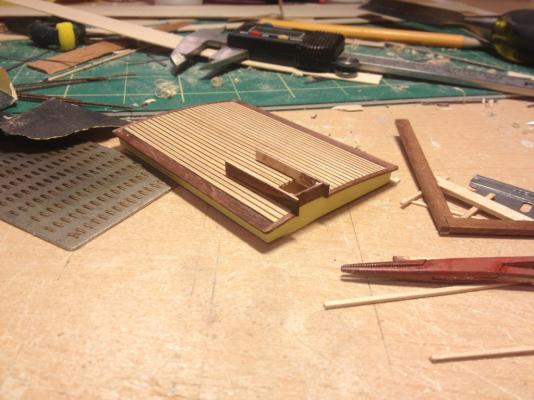
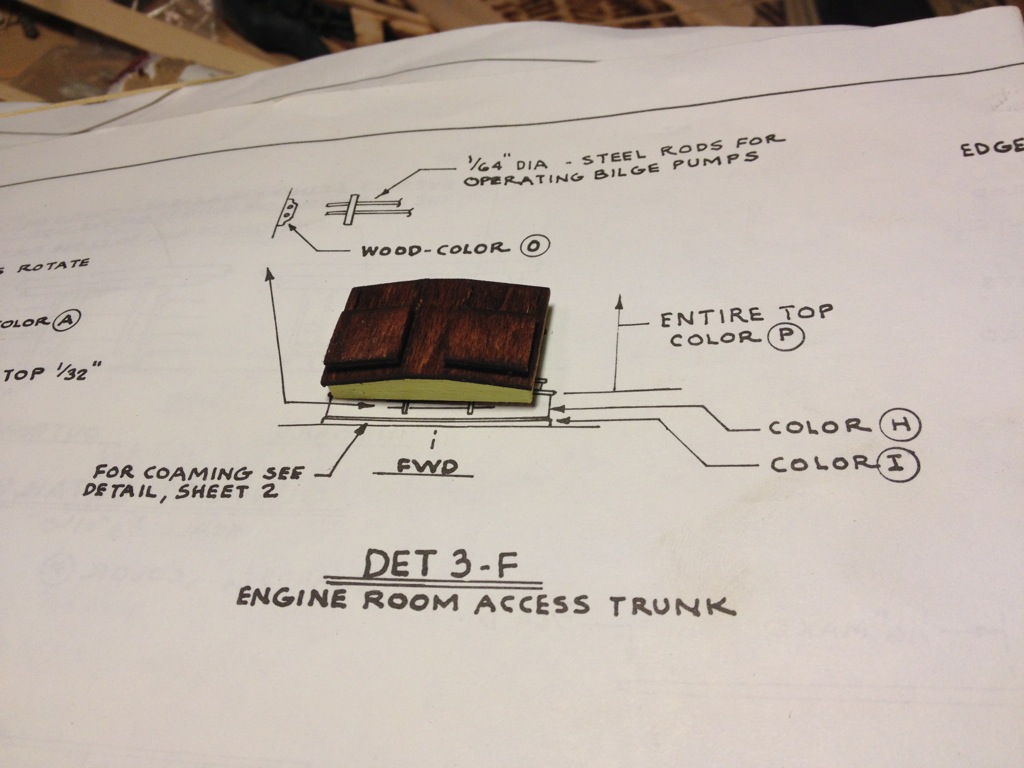
Painted the engine room box sides. Picture shows the difference in size between the frame plan and the detail plan. The detail plan is shown.
Fore-aft they both match. It's only port-stbd that they differ. In the end I don't think it will be noticeable.
Still need to attach the mounts for the pump handles and the handles themselves.

-
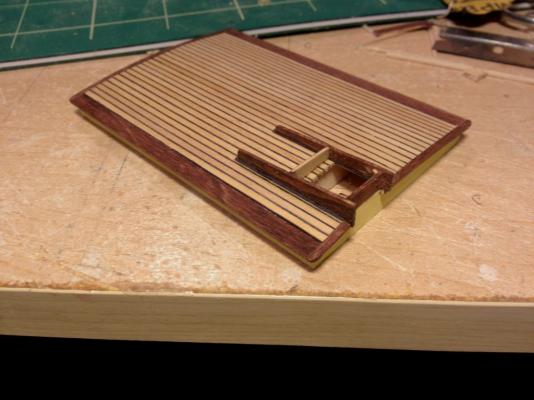
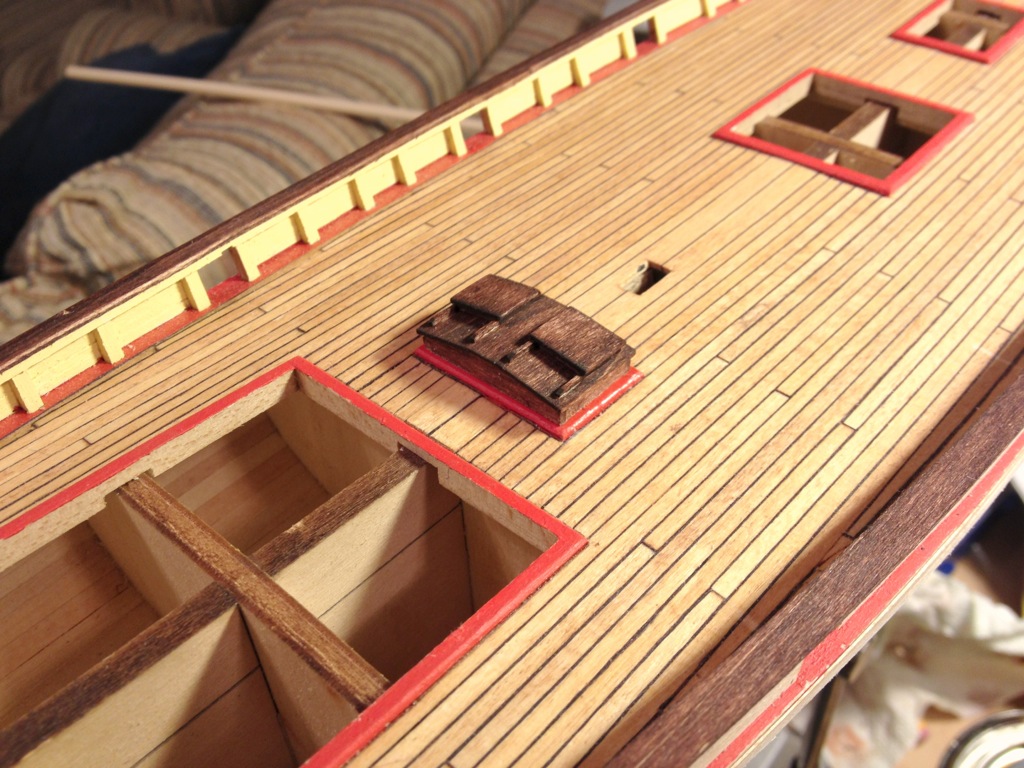
Spent a couple hours last night working on the engine controls.
There is a 3/32" discrepancy between the width shown on the details and the deck plan and the width of the coaming drawn on the frame plan. Since the coamings were installed before the decking there is absolutely no way to widen the coaming at this point so I simply made the part look correct instead of making it to match the plans.
I'm guessing that the frame drawing was measured from the inside of the part instead of the outside. It's exactly 3/32" smaller which is two of the 3/64" strips that the various deck boxes are made from.
I also messed up a little bit and attached the tops before staining. I got some stain on the side of the box so I went ahead and stained the whole thing to avoid having a dark spot bleed through. I will sand and then prime and paint the sides of the box in the cream color today. Going forward I will simply stain the underside of the tops before installing them like I had before.
-
Finished up the after cabin tonight except for the ship's bell. I will install the bell just before rigging so I don't have to worry about knocking it off or bending it.
It's kind of hard to see but the skylight is cut out and I installed a piece of blackened wood covered in packing tape to simulate the glass. I was originally going to use a window from an envelope and let you see into the skylight a bit but that didn't look very good as I made the skylights too close to the frame and there wasn't enough glue area to attach the clear plastic
All that's left for the after cabin is to coat it in wipe on poly and glue it to the deck. It's pretty exciting to see parts being attached to the deck after so much work!

- egkb, Timothy Wood, Mirabell61 and 3 others
-
6
-
I contacted Model Expo for replacements for the 1/8" and 5/16" dowels that came severely bowed. Replacements arrived within a few days. The 1/8" dowel is straight enough but the 5/16" has and S-curve in it with about 1/8" bow on each way. The original 5/16" dowel had about 3/8" bow right in the middle.
The 5/16" dowel is for the fore mast and it's about 15" long. I've been trying to find ways to straighten this dowel out but so far it's winning. I don't have anywhere locally to buy spruce dowel. Only poplar and oak.

The anchor windlass is smaller than what the plans show. I am trying to decide if I want to adjust the pads to fit the windlass or just let the windlass sit on them a little funny.

Alternatively I could attempt building a windlass from scratch. It's pretty intricate though and the mill and lathe that I have are way too big for doing such small work. Once it's all completed I don't think it will be worth the effort.
- Timothy Wood and egkb
-
2
-
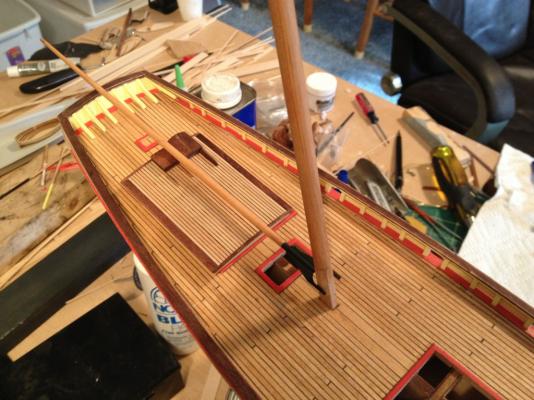
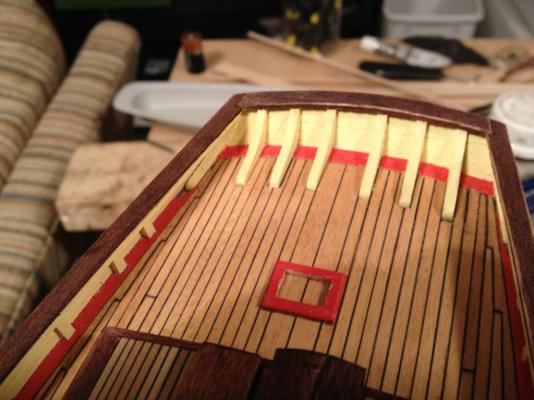
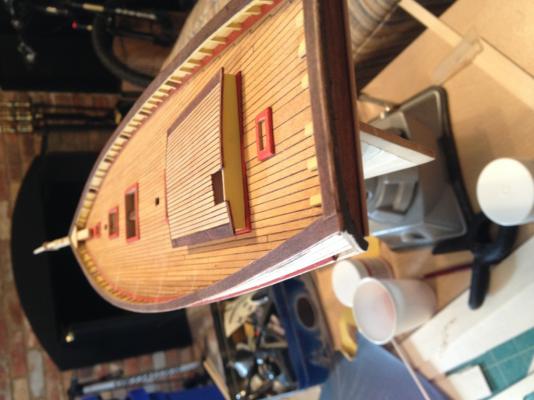
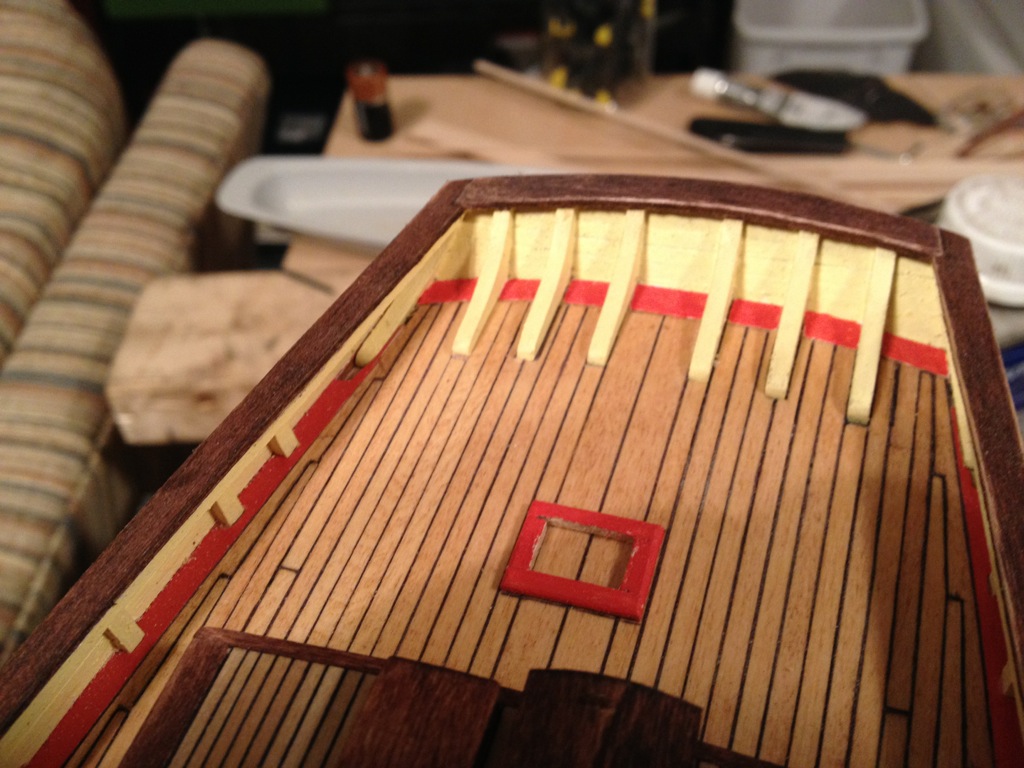
If your nibbing doesn't line up it's either because the planks are not even width across the deck or the planksheer isn't symmetrical or the first planks were not placed exactly in the middle. You will need to use a very fine ruler (1/64" increments) or a set of calipers to see which it is. Because of the sweep of the planksheer even a few thousandths asymmetry can move the location of the nib greatly.
Looking at the picture it appears you started off center. The middle plank is not centered on the mast hole and the planks around the forward most coaming are not even.
If you want the nibs to line up I can think of two options
1) make a wider plank for the starboard side to bring the nib in line with the port. You can also cheat the port nib aft a bit to help split the difference. Over the next course or two you can bring them back into line. To my eye the nibs are more visible than the widths of the planks, especially once all of the deck furniture and rigging is in place.
2) start over and bring everything into symmetry
Maybe some other more experienced members can offer better suggestions.
On other builds I've seen on this forum the anchor rub... thing has always been built up of planks.
-
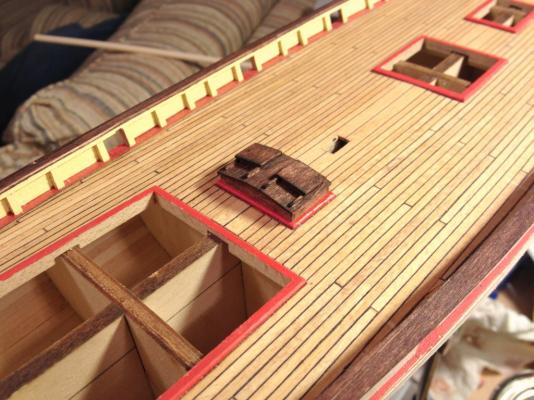
I've decided to start working from the bow aft when detailing the deck. No real reason other than I would like a break from making little boxes.
The cap rail was about 1/8" too long and far too pointy. I thought I could live with it but there is a piece that goes on top of it to guide some lines and it was going to be very difficult to make so it had to be reshaped.

I decided to scarf in a little triangular piece instead of just reshaping the cap rail and adding in a little piece of filler. I have no clue how this section is done on the real ship. I cannot find pictures and it is not detailed on the plans. It's a fairly busy area so I don't think it will draw your eye too much even if it's incorrect.

I also drilled the hawse pipes and started to paint the anchor winch. A couple pieces need to be set into the deck to act as supports for the winch and I'm not totally sure how I want to approach that. I should have set those during the decking process.
-
I spent a lovely afternoon sailing Baltimore Harbor in PRIDE OF BALTIMORE II. We had all fore and aft sails set but not the squares. I was hoping for them as well but that didn't happen. Still, she's a wonderful ship to steer. You can feel her power up as you bear off and she really starts to run. We had about 10-15 knot winds that day so it was beautiful sailing.
Neat. With over 9000 sqft of sail I bet she moves on. It's hard to even find pictures of her under full sail. They seem to rarely set the studding sails. I can imagine it's a ton of work to set all of those sails though.
Here is the original Pride with all sails set.

And Pride II

I'm actually a little conflicted as to whether I want to display her with the studding booms set or not. I feel like they may be a little fragile.
-
Spent a little more time on the main boom. I installed the eyelets. I also decided that the drops from the eyelets were close enough to the 0.008" wire that was needed. It's a little out of scale at 0.015" (about 1" actual size) but they look fine and match the eyelets that are completely out of scale.

The metal cleats supplied with the kit are far too big to use on the boom. So I started making some out of wood that will be more to scale. They are still far too big but not obnoxiously so.

I also lashed the ringtail boom to the main boom but I later realized that all running rigging should be brown instead of black so I will be redoing it.
-
Ken Martin and Scott, thanks guys. I used paper glued to on edge then applied to the model. It takes longer but I like the look. I will plank the whole deck. Haven't installed the gun port hatches yet and with my luck I would loose one in their. Trying to make treenails now haven been able to get the wooden dowels small enough without destroying them. Will try the dremel method tonight.
For what it's worth I did the construction paper caulking as well. I found it much easier to spread a layer of glue on the paper and apply a dozen or so planks to it and then weight it down with a book. After the glue dried I cut one side as close to the plank as I could and the other I left proud by a 1/32" or so. The side I cut flush I didn't worry about nicking the wood at all since it will be hidden. The proud side I just cut as close as I felt comfortable without nicking the wood.
After gluing the planks I took a sharp chisel bevel side down and removed the excess paper. I then took a razor blade and burnished the edge and bent it a bit to make a scraper and scraped the entire deck. I then sanded with 200 and 400 grit paper. It looks pretty messy (the paper gets spread into the pores of the wood) until the final sanding and a wipe but the end result is very clean and even and you don't have to mess with tiny slivers of paper.
-
Added the various cleats and the ringtail boom to the main boom.
I still need to add eye bolts, two more bands, cleats, foot ropes, and the 0.008" wire pins to the boom before it is complete.

Forming those metal bands was a pain. I made a sort of figure 8 and soft soldered it together. Of course the boom grew in size after I painted it so I had to stretch the eyes out in order to get them installed and even then I scraped a bunch of paint up.
I was going to serve the eyes for foot ropes as well but the line that is included with the kit is awful. It is stiff plastic line and it is full of kinks from being wound around the bobbin. I doubt it will hang in any sort of realistic way.
The metal cleats included in the kit are far too big to attach to the boom so I will probably have to either buy some smaller ones or make some out of wood.
- Timothy Wood and Bill Hime
-
2
-
Yesterday seemed to be one of those days when nothing goes right.
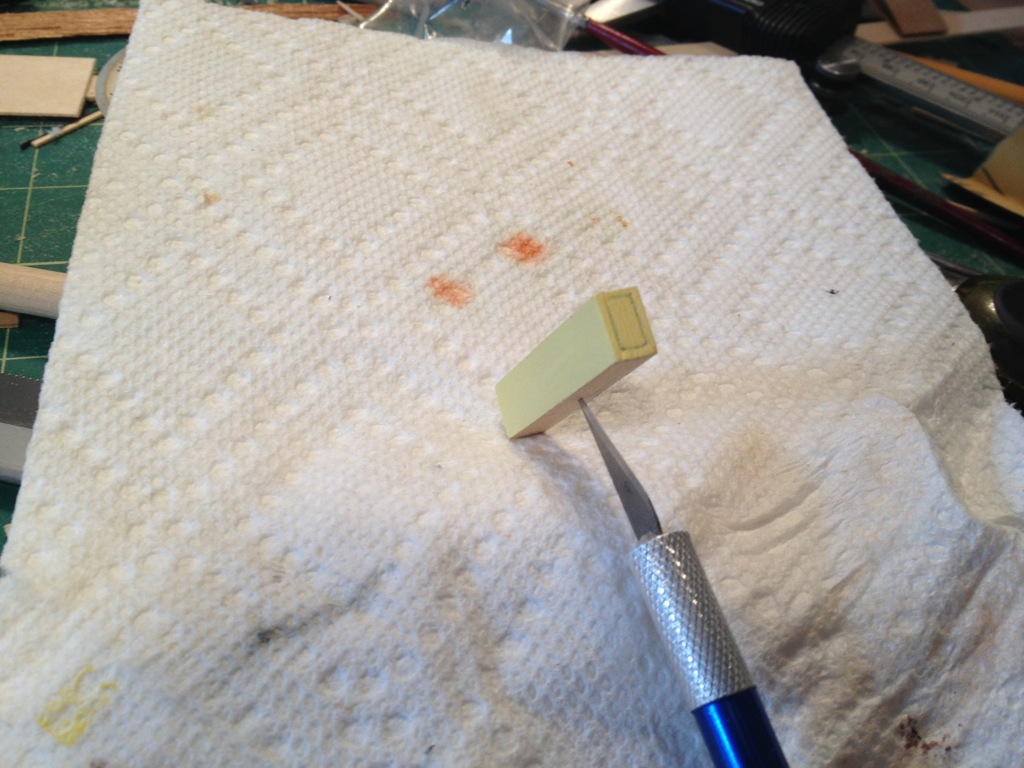
So instead of trying to finish the after cabin skylight and bell I decided to paint the box that goes just fore of the after cabin trunk. It will receive a mahogany top and two vent stacks and will stand on two legs.

I then stained the main mast and painted the main boom. The main boom needs a few more cleats and eyelets added before I can seal it up with wipe-on poly.
Every time I set another piece of the masts I'm amazed at how much sail area she has. There is a ring tail boom that extends out another 3" aft that I still need to make.
On several areas the masts call for 0.008" wires about 3/8" long. I assume they're for belaying or for routing lines. This wire is not included in the kit. I don't know if I can get brass that thin and I'm worried that if I use steel it will rust. Yet another thing I need to figure out before I can mark any one piece of the ship as finished.
-
Harvey,
Thank you! I actually saw that in a sample practicum by Robert Hunt. He said it was a defect in the kit design. After hearing it from two sources, I'll definately make a card stock template with the two bow points together. Then if necessary, I'll cut both ends off and use the new piece to complete it

I think it's only short at the aft end. From what I remember all of the stations for the stanchions are correct. I just measured mine and it's 0.170" short. It honestly isn't very visible once installed and there will be even more stuff covering it once rigging is complete but it's something that would be nice to correct.
The six upright knees aren't supposed to be painted but I didn't figure that out until after I had already installed them.
-
Hi jcoby,
That is one gorgeous build you've got going!
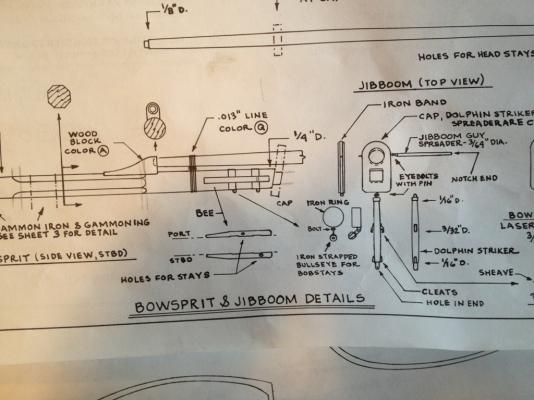
For the dolphin striker and jibboom spreaders, I recommend putting 2 small eyebolts together. Insert the end of one eyebolt in the cap and the end of the other eyebolt into the end of the striker/spreader.
For the iron bands, I would wrap paper, brass or copper sheet/foil around the bowsprit, then drill holes thru it to attach the bullseyes.
Hope that helps.
Thanks,
Harvey
The plans call for eyebolts but I thought it was calling for the pre-made ones that come with the kit. Using those would allow for too much gap and everything would rattle around.
If I make some out of the brass wire stock I can close them up tight and they will be able to handle the compression stress easily. Thanks for the suggestion!
I plan on going to the local hobby store and picking up some brass sheet to make the bands in the next few days.
At this point I'm trying my best to find things to do to avoid building deck furniture. I really do not enjoy building deck furniture. I'm looking forward to rigging.
-
After cabin hatch is complete. The harsh light I use makes it look worse than it does in person. The mahogany stain is too dark but it's consistent across the whole ship. I would definitely use a lighter stain doing it over again. I have some actual mahogany but it's far too coarsely grained to work at scale.
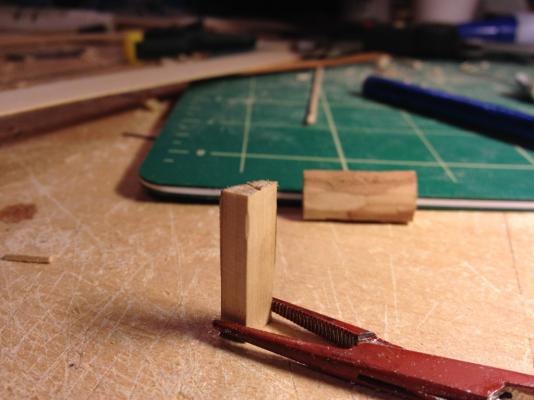
I decided to do a test chamfer with some dogwood. First impressions are that this is a very hard, straight grained, and dense wood that takes a very fine and shiny finish. Also that I am not setup to work with hard woods. Most of my kit is setup for soft woods. Even my super sharp chisel has trouble slicing through the wood but it does so very cleanly.
I will mill up some 1/8" strips on the bandsaw and see if I can get a passable bitt out of it.
- Mirabell61 and Timothy Wood
-
2
-
Thanks for the feedback, and peak into the future
 ! I think I just had an answer to the mast receiving blocks. join two blocks together, drill a hole for the mast. Then cut the block in half, removing enough material from each to account for the thickness of the center keel. Align on each side and glue.
Lol, but that's a way's away. Thank you again, your insight is invaluable to me
:)You might be able to use some newspaper and some thinned wood glue to bond the blocks to a spacer and then drill the hole using a drill press and vice. Apply some isopropyl alcohol to remove the glue and newspaper afterwords.
Getting the hole drilled is half the battle. The other half is getting it lined up with the slot in the false keel at the proper angle. With the slot method you can simply trim or shim side to side to get the mast true. Fore-aft comes for free since the slot in the false keel is already at the right angle.
I guess you could insert the mast into the hole to make sure everything is lined up and then true the top of the block to the deck. Or you could just glue those blocks on however you want and put a tenon on the mast like I did!

Also FWIW I used wood glue on the mast and bow blocks and CA everywhere else. I wanted to get max strength into those blocks since there is absolutely no way to fix them if one comes loose. I also coated each joint of the bulkheads with a fillet of glue.
And I coated the inside of the decked hull with wood glue thinned ~30% to keep the planks from moving around during final sanding. The distance between the bulkheads is a bit far IMO–I would add one or two more bulkheads if I were to revise the plans.
-
That looks exactly like what I had at that step. The bulkheads are hand drawn and the laser cuts are an exact copy of the drawings. Some are off. You will need to add material to several of them. Use strips of planking to get an idea of how the hull is flowing and sand as you go.
Just wait until you try to put together the life boat!

The important thing here is that the reference line you made on the bulkheads matches the line on the false keel and that you fair the bulkheads in the correct direction. The fairing lines on the plans are pretty darn accurate once you get the bulkheads sized so you can be pretty aggressive about removing material. It's far easier to remove it before the bulkheads are installed.
I would also recommend taking the planksheer and placing it on top of the bulkheads for reference. You cannot adjust it and the hull must match the planksheer for everything to look sweet. The planksheer needs to sit outboard of the bulkheads by one wale plank width. (IIRC the wale is made of 1/8" square stock).
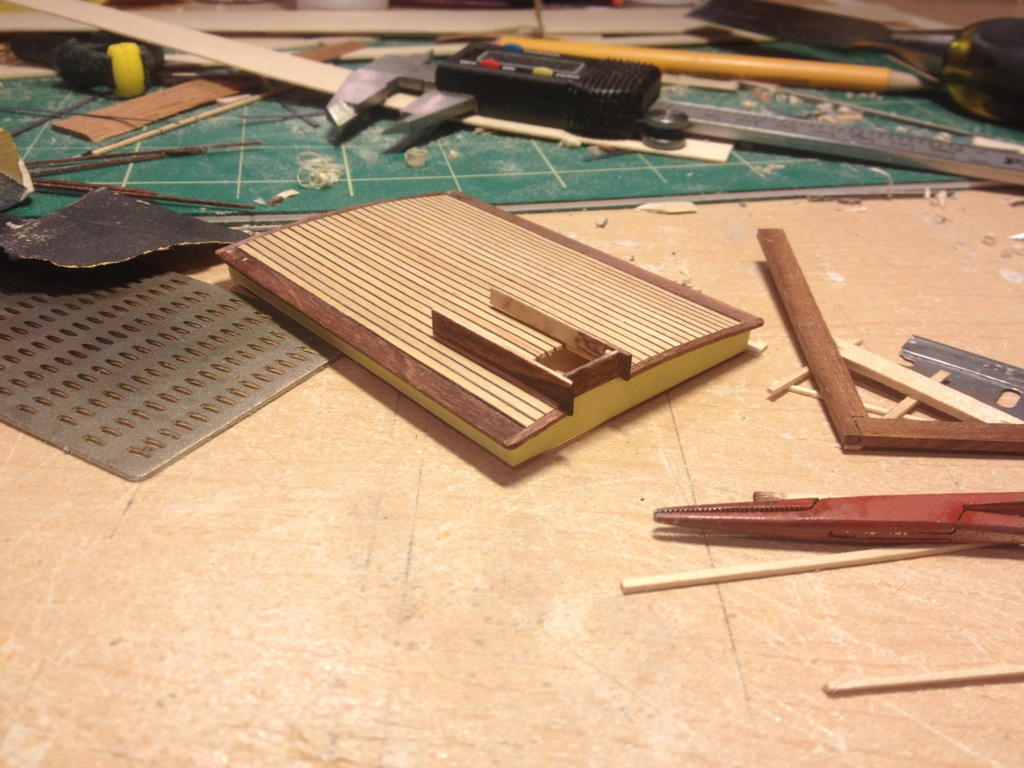
The plans also call for the blocks that the mast goes into be rounded. I thought this was insane. I could not figure out a good way to put an accurate round pocket into a square hole without using a mill so I just left it square and am careful when shaping the masts to get a good fit. You can see the hole for the fore mast and the main mast fitted in the picture below.
- mtaylor, Bill Hime and CaptainSteve
-
3
-
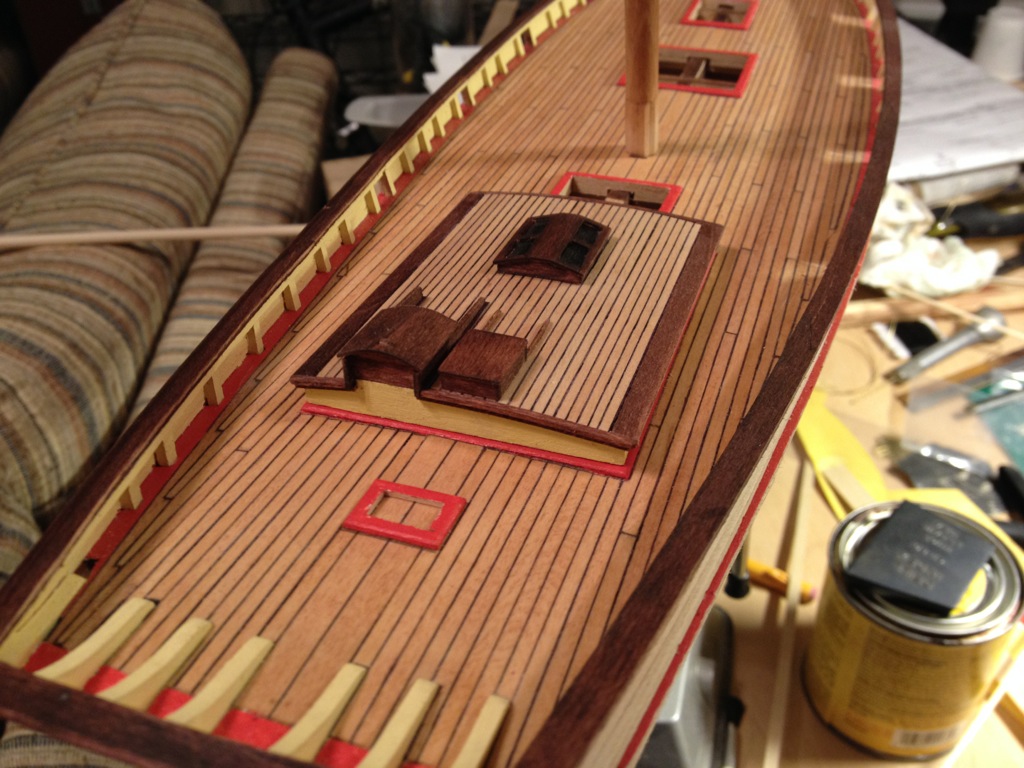
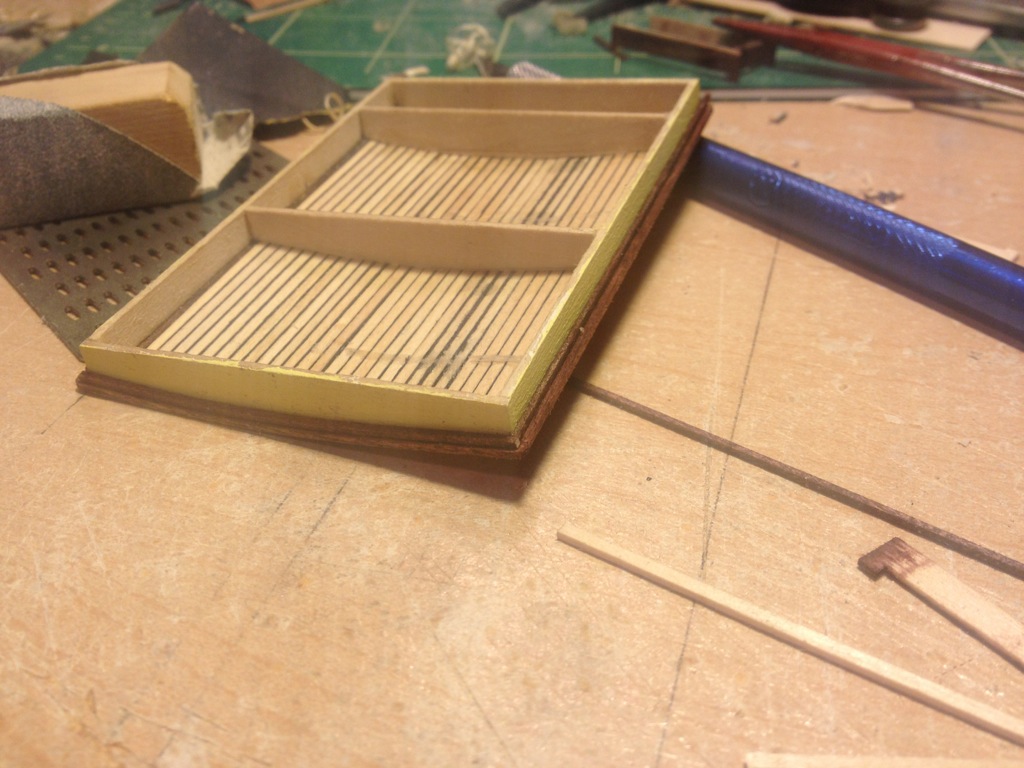
Work continues on the after cabin trunk.
First I built the framing for the hatch. I built it with square pieces and will true them later. Everything got a coat of mahogany stain.
I took the downtime to install the mouldings.

An hour or so later I trued up the hatch frame using a sharp chisel and a sanding block. I cut some black construction paper to act as the padding and glued everything into place. I then installed the fore section of the hatch frame.
The hatch frame is now complete minus some touchup work to the stain and paint.
It is probably too thick to be to scale at 1/32" (2" full size) but I did not want to work with thinner materials on such a delicate part. It doesn't look terribly out of place on the model to my untrained eye.
There are no dimensions or even full drawings of the hatch so I'm sort of just making it look right. I'm within 0.020" wherever I can be on the drawings.
 From here I need to build the sliding top that rides on the rails on the frame. It will be fixed in the closed position although it is tempting to leave it open a bit since I have the opening there already.
 -
Hey jcoby!
I love the build! Nice log too. It's great to have someone else here that's building the Pride. Thanks for forging a path. I saw where you were having problems with Basswood fuzzing out on small details. That's why I'm using woods like Rosewood, Cherry, or Pear for detail parts. They hold sharp edges and are easy to work with chisels and files
I've learned a lot just looking through your log. I'll definitely follow along! Please feel welcome to comment/suggest on my log anytime!
Bill
This is actually the third time I posted the build. The first two had much more detail and I didn't feel like reposting all of that content. I followed your build and will post some pics as you get there. The planksheer and wale stanchions gave me about the most trouble during the build.
The basswood is a bit soft for detail. I may have to grab some harder woods for some of the detail parts. The bitts in particular are making me mad. I've probably put down 4" of chamfers 3/16" at a time on a sample piece and I have yet to get a good sharp chamfer consistently. I've tried scraping, cutting, sanding and I cannot get a consistent chamfer. I have some dogwood that I've been playing with. The grain is tight but it's a bit stringy to work with. I'd love to be able to afford boxwood. I cannot justify it though since I will be staining/painting according to the plans.
However the basswood does OK for the planking especially after a sand to 400. I can't say it's a very attractive wood but it comes out OK. The variation in coloration initially discouraged me but I like it after it's been stained. Gives the deck some "life."
-
Oh, and you might want to add a bit of support behind the forward 5 (or so) bulkheads. A 1/2" block of balsa would be sufficient.
The #3 bulkhead on both sides warped aft about 1/16" from the planking process. It caused no visible problems but it does make the planking spacing a bit off. It won't be visible on mine since I will be painting but if you are going to leave it natural it will be visible.
-
I had the same issues with the bulkheads. I simply soaked some of the included 1/4" basswood in water for 30s and thin CA glued it to the bulkheads as needed. Seems like I had 4-6 that needed this treatment after fairing including a couple at the top. One set of bulkheads needed no sanding at the top.
I had no issues with the false keel matching the plans. There are no references on the plans to make sure they are to scale so it is possible that the printer was out of whack that day or your plans have swollen. The important thing is that the keel matches the false keel and that the bearding line is true.
My plans were accurate enough that I used the planking diagram to mark the hull and ended up within a few thou of what the plans called for.
I also had some warpage to my false keel but not nearly as extreme. When you go to install the first set of planks be sure to true the false keel as you go. It is very very easy to warp it as you glue and it's impossible to fix after you start planking and it will haunt you for the rest of the build.
Having never built a ship before I find that the plans can be a bit vague in places and the instructions are good for the first few pages and then they give up when it comes to the hard details.
-
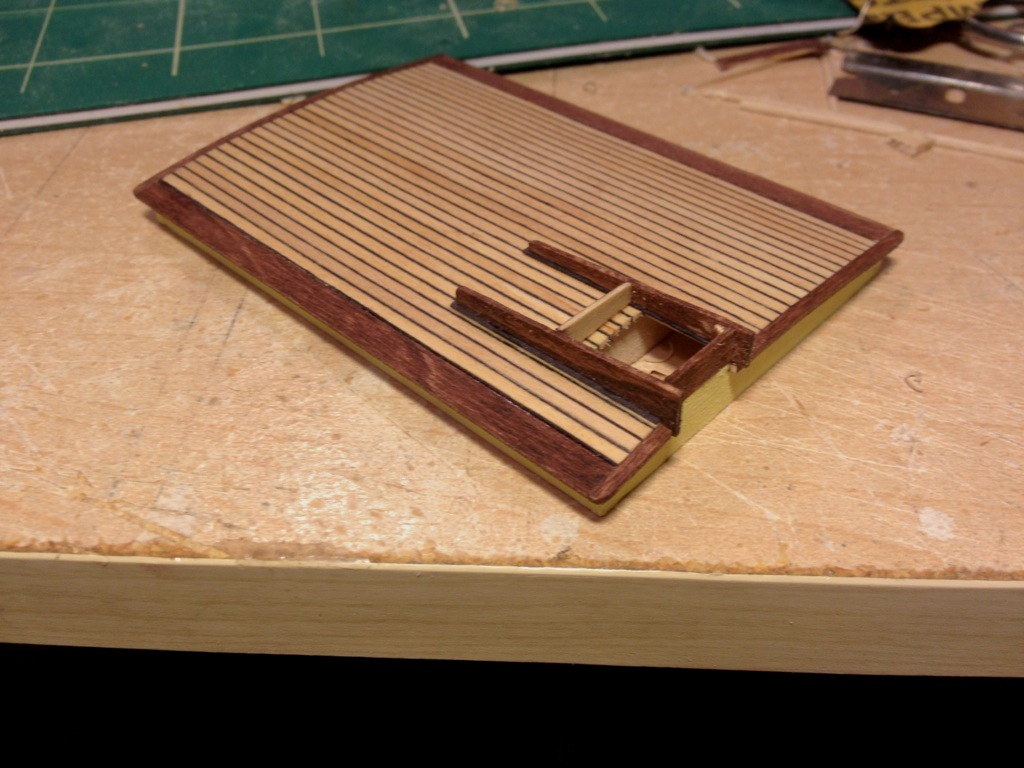
Well it's finally cold enough to get me out of the garage and back into the basement to start again on the Pride.
I resumed working on the after cabin trunk. This thing has been a major pain mostly because I do not really know how ships are built. Many thanks to bhermann for posting pictures.
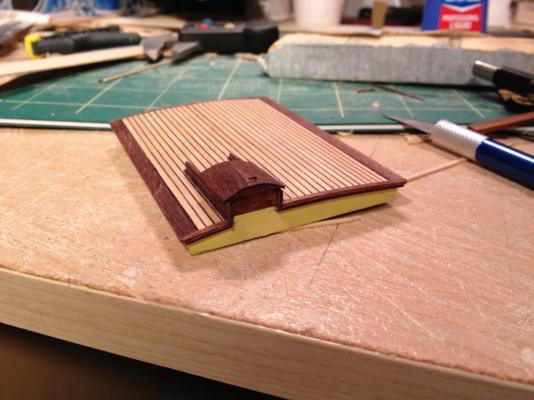
I spent about two hours planking the top of the after cabin only to find out that one side had become about 1/2 strip more narrow than the other. That was far too much for me and would have caused the edge moulding to look very lopsided. So at about 1am I cut it off and went to bed.
I then decided to build the top of the after cabin as a single sheet on top of a piece of wax paper and then set it as a unit. This came out much, much better. It isn't exactly to the plans, I think it's about 0.032" too wide or so but it is fairly pleasing to the eye with an even reveal around the entire perimeter.
I still need to add the hatches and trim but I am happy with the result so far.

I also spent some time reworking the bowsprit cap. The plans call for the jibboom to be 11/64" max at the cap but the hole in the cap was about 1/32 too large. Originally I made the jibboom to match the cap but it looked clunky and out of scale. So I had to remake the cap. I am much happier with the result.

The jib boom still needs a bit more work to get it absolutely straight and true and to thin it out but all in all it has better proportions.

I am struggling with understanding how to do the hardware that holds the dolphin striker and jibboom guy spreader. I will make the iron band out of either construction paper or brass but I have no clue on how to do the eyebolts. These pieces will be under compression so they need to have some rigidity but they also need to move freely. I don't even know how to mount and eye bolt to the spreaders at only 3/64" dia.
I also don't know how to make the iron ring that goes under the bee. The kit doesn't come with brass wide enough to make the iron band nor does it come with bobstays.
Also the forum apparently hates portrait pictures.


Pride of Baltimore II by jcoby - Model Shipways - Scale 1:64
in - Kit build logs for subjects built from 1801 - 1850
Posted
I spent some more time getting the fore mast done. It's complete except for the cleats that go on the octagonal section at the base and completing the trestle tree at the top.
I took a picture of her with all of the masts and booms but it's too blurry to post. It's going to be a tall model when it's done. I don't really know where I'm going to put it.
I also made up some gauges that are the proper 13.5° and 15.5° to set the masts. I'll post pictures of them and how I made them later.
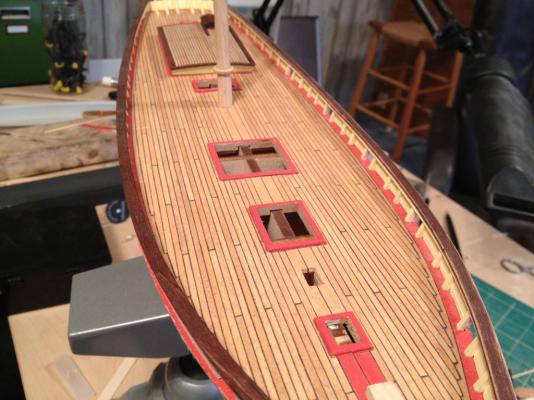
I then moved on to the pin rail and fire extinguisher and bilge pumps. The fire extinguisher are made of bronze. I don't have any paint that simulates old bronze and the gold that is included in the kit doesn't look anything like bronze.
So I decided to switch to plastic model paint (Model Masters and Testors). I put on a coat of gold and then dry brushed on a coat of a dark oxide. The results are a serviceable bronze look. I don't feel like the castings are very good. They seem more like blobs that sort of look like bilge pumps.
I then attached the pumps and fire extinguisher to the deck. It feels good to finally install parts onto the deck permanently! The engine controls box and pin rail are not installed (the engine controls are backwards anyways).
Next up: deck eye bolts, deck cleats, and finishing up the details on the inside of the wale. After that I should be able to start installing the deck furniture.
It feels like I'm finally making some sort of progress again.