


schnu
-
Posts
137 -
Joined
-
Last visited
Reputation Activity
-

 schnu got a reaction from teloo in La Candelaria by schnu - OcCre - bomb vessel - first build
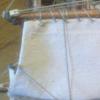
I have finally made it back home. After some thoughts if I should move my workplace to the nuclear disaster shelter or my room, I opted for my room, as the light down there is relatively dim.
(sorry for the bad quality of the image)
Today I couldn`t make any progress, tomorrow the handrails will hopefully be finished and I shall start planning for the cabin, after finding some great but few builds with the interior decorated, I want to give it a plan and am ready to fail/succeed. One question that rests upon my mind is how I shall varnish and stain the hull, any suggestions are welcomed. By the way the Vasa museum was amazing, a real beauty. It was the first time I had to make a queue to enter a museum, it was worth the waiting.
-
 schnu reacted to Littlebob in Halifax 1768 by Littlebob - Constructo
Hi guys here is my next build the Halifax.
I saw this kit on ebay for a very good price, it was new and still sealed so I could not resist. I have a few other reasons for choosing this kit, below.
1. I wanted a ship from the mid to late 1700 period.
2. I wanted a ship with a few more cannons than the Virginia.
3. I wanted a kit that would be a little more detailed.
4. More important than the first 3 reasons, I wanted more rigging.
I have checked the kit everything looks good all accounted for and no damage except a warped false keel. I already like this kit better than the Latina kit, the wood looks pretty good, the instruction appear to be a little better and more important most but not all of the fittings are wood.
I could only post a pick of the box as in the process of correcting the warped keel I snapped it in half oops! to bad I almost had it straight, it has been glued and clamped but I want it to dry over night.
When it dries I will add some ply wood along the break for strength. All comments welcome.
-
schnu reacted to jdbradford in Endeavour J-Class by jdbradford - Amati - 1/80
I finished the decking and at the suggestion of my mentor from NRG, Dave Querin, I built a stand to better hold the model. My Panavise was deforming the wood some.
-
schnu reacted to jdbradford in Endeavour J-Class by jdbradford - Amati - 1/80
I finished the 1st planking and cut excess to the keel. Then I removed the pins holding the planking. Here are a few shots of the boat.
-
schnu reacted to DORIS in ROYAL CAROLINE 1749 by Doris - 1:40 - CARD
Hello dear friends,
thank you warmly for your comments and kind words, I am very pleased and honored reading all the posts you wrote to me. That is a great motivation and feedback for my work.
This week I have started to make shrouds, all ropes are hand plaited on ropewalk and I try to make the rigging in a better way and more realistic than on my previous models.
All the ropes are also improved by weathering and impregnated.
Here you can see the result:
Best regards
Doris
-
schnu reacted to Karleop in Vasa by Karleop - FINISHED – Billing Boats – reviving a poorly built model
Hola a todos!!
After a very occupied weeks I had only made small advances on my Vasa (besides and as you know, the rigging process represents much more work than it seems at first sight). Here a small update:
Additionally, and thanks to Frank who sends me a sketch of the anchor, I modified the plastic one that comes with the Kit
Thanks for watching and the likes,
Saludos, Karl
-
schnu reacted to GTM in Santisima Trinidad by GTM - OcCre - 1:90 - Kit Bashed
..An minor update..
I’m working on some details for the channels, chains and lower deadeyes.
The instructions/drawings are not really revealing anything about this, so I searched the forum/internet for as much detail as possible.
I started with straps for the lower deadeyes and ended up with these:
If you’re interested, I show in another topic in “Wooden Tips and Tricks and Making Jigs” LINK how I made these.
..The ST uses chains to fix the lower deadeyes to the hull..
According to the instructions this is simply done with a “nail”, but this seemed a bit to basic for me..
So again after searching the net I found out that these are normally fixed in place with help of an “preventer”.
I made one, and it looks much better already but I still wasn’t really satisfied.
So I made another version which I think looks better, but is (off course) more difficult and time consuming to make..
Here’s a picture showing all 3 solutions.
.. during blackening of the provided nails i also found out that they are not made of brass/copper ..
.. I think there’s no other way and I have to settle for solution no.3 ..
-
 schnu got a reaction from DORIS in ROYAL CAROLINE 1749 by Doris - 1:40 - CARD
This is just amazing, those details, I don`t even know what to write, just impressive.
-
schnu reacted to Ray in HMS Diana 1794 by Ray - FINISHED - Caldercraft - A 38 gun Heavy Frigate
Tops
The tops have been completed and the rear rails added (I might add netting later) the tops have also had the blocks added as required. I did not like the kit instruction as to making the futtock shroud plates ,that hold the 3mm dead eyes so I upgraded using Amati ones as shown in the photos, which also included brass hooks as well these match the drawing shown in Rigging Period Ship Models.
Fore & mizzen tops
Main top
Top on lower mast
Upgrade futtock plates
-
schnu reacted to Magnus in HMS Pandora
Thank you for the observation. You hit the nail on the head.
If you see him walking for a couple of seconds it is a repitition of just one same cycle done multiple times.
The cycle has a so called backed animation of the coat. A recording of each position of each vertice 30 times in a second! It comes from the organic simulation against a series of repetitive walkcycles. I am using the software "marvelous designer" for this. It creates a mass of data.
Having this backing being done for many of seamless loops would be to costly in terms of computer resources.
Now, having the one cycle, it cannot be granted that the status of the clothing (hundreds if not thousands of vertices) at the beginning of the cycle is exactly the same as at the end of the cycle.
The simulation itself does not reproduce the same status at two different points in time.
The only thing I can do at the moment is having a simulation of a series of cycles and cut out the two points in time that resemble each other as good as possible. There will always be a slight "jumping".
Of course there might be possibilites in the area of morphing but I don't want to dig into this topic ...
-
schnu reacted to Magnus in HMS Pandora
Much progress now. Optimized my workflow, lots of polishing on the textures and a naval sword added. The sword was a real challenge. Modeling and texturing done from scratch. The Inclusion into the animation and non-collision with the coat needed to be solved. Could further be improved but I am satisfied with the result by now. Will see what comes next. A royal marine maybe. Might even be more demanding as they have a lot of fittings at them. Will also have to start creating animations. The current walkcycle is just a test. A very long way to go until my ship model will be populated with officers, marines, midshipmen, boatswains, masters, able seamen, carpenter, cook, purser, ...
link:
http://youtu.be/Y0167QDMckg
-
schnu reacted to adivedog in Dinghy by adivedog - FINISHED - Midwest Products - Small
All done, guess the pirate, stole the fishermans boat to bury his loot.
-
schnu reacted to Desert_Sailor in Endeavour J-Class by jdbradford - Amati - 1/80
Built this several years back
I used double planking with the supplied mahogany veneer for the second layer.
Used a 3 plank overlap pattern with the main plank 10ft long ( in scale).
then some urethane to finish the surface..
-
schnu reacted to jack.aubrey in Le Soleil Royal by jack.aubrey - FINISHED - De Agostini - Scale 1:70
Friday, August 8th, 2014 . .
Soleil Royal Launched. .
Today I did the last activities around the Soleil Royal, and towards evening, I realized that I had really finished the model . .
After 1550 days from the yard opening, back in April 18th, 2010, now I can finally say: "I'm done" this model.
Below are some pictures I publish here but I want to limit myself to only five. I proceeded instead to open in the site "Gallery of completed models" the topic "Soleil Royal, Jack.Aubrey, 1:70, De Agostini"
>>>>> http://modelshipworld.com/index.php/gallery/album/885-soleil-royal-170-by-jackaubrey/ <<<<<
where I will publish all the pictures I shot and that I'll shoot of the finished model in the next few days. These images can be downloaded at the original size.
So with this message, I am going to close this endless building log.
However, I'll continue to follow it in case of further comments/messages that will be inserted in the future. Thank you from now on to all who were involved and who have followed me in this long adventure.
Now I will take a couple of months as a "reflection pause" even if I'm already at work from now with my computer and CAD software to design and plan my next model.
A cordial greeting, Jack.Aubrey.
01 P1090926.jpg
02 P1090909.jpg
03 P1090908.jpg
04 P1090907.jpg
05 P1090906.jpg
-
schnu reacted to Vivian Galad in Red Dragon by Vivian Galad - Artesania Latina - 1:60 - modified
Schnu, she has 49cm / 14cm at it´s widest. I´ll hide the hole using the same strips I used for deck planking - maybe with a clinical eye there´ll be some small wear to indicate something, but all the aft will be under a kind of canvas, so, I think all will be fine . For the batteries and turning on/off the led I made two boxes - one of them will hold the battery, the other will be fixed to the on/off button - to turn on or off you just push or pull the second box - I´ll take some pictures to show it when it´s done.
-
schnu reacted to jdbradford in Endeavour J-Class by jdbradford - Amati - 1/80
I finished the first layer of planking on the bow section, except for sanding and cleanup.
-
schnu reacted to Vivian Galad in Red Dragon by Vivian Galad - Artesania Latina - 1:60 - modified
Joe, my many thanks. Right now I´m almost myself again - just a little bit to get 100%
Rick! Obrigada!!!! (thank you!)
Wolf, really glad I can reach that. As I´m still a noob ship modeler, to have your words and everyone´s is great. Always looking to improve, though
Hey, Nils, I´m getting there! Thank you.
I have been absent cause after trying different methods to darken the metal fittings, I failed. So, as all roads seems to lead to Blacken It, I bought some on e-bay and got to wait it before continuing on my junk. On the meantime I´ve been busy reading ship modeling and ship history books.
After some thought on which new tool to buy, I decided for this one:
Till now I´ve found it to be a great power tool!!
And then, I had a problem with the lighting. Don´t know what happened to the led, but it stopped working. As my cabin needs the light, I was made into oppening a hole on my ship. I know it looks ugly but, it´s for a greater good.
As we learn with our mistakes, now I know I have to be very sure when installing eletronic components. The good part on it it´s that I´ve devised how to turn it on/off and where to put the batteries - must confess I failed in planning that before.
So, the actual general view of my ship:
Hope my Blacken It be here soon!
-
schnu reacted to jdbradford in Endeavour J-Class by jdbradford - Amati - 1/80
!!!Correction to the scale 1:80 is what it should have been. Sorry for the confusion.!!!
Well, I am finally starting my build log. After much help from Richard, Dave, Floyd and others, I have my planking started. I won't post the pictures of the materials as others have already done that, and I am past that point anyway.
I did build the boom and mast to start as per the instructions. As we have seen in the other logs, they are not used at this time in the project anyway. I also have one coat of flat white paint on them. I must say again, the hinge that is nailed to the mast end of the boom was a pain for me.
In the mast drawing, it appears that the measurement listed to the first ring of 188mm is wrong. It is no more than about 20 mm above where the boom hinge is attached. I just used the drawing to lay it out. I also did not get the holes as I would have liked. I need a small drill press and a jig to hold the item in the correct position.
-
schnu reacted to jack.aubrey in Le Soleil Royal by jack.aubrey - FINISHED - De Agostini - Scale 1:70
Thanks WackoWolf, you're very kind with your comments . .
Continuation of my previous message . . Five other new images, from different perspectives, shot the same day of my last message.
01 P1090887.jpg
02 P1090888.jpg
03 P1090890.jpg
04 P1090901.jpg
05 P1090893.jpg
Cheers, Jack.Aubrey.
-
schnu reacted to jack.aubrey in Le Soleil Royal by jack.aubrey - FINISHED - De Agostini - Scale 1:70
Saturday, August 2, 2014
I finished the installation of all the guns on the open decks and, in addition, some other small detail such as casks, more pins and coils of rope.
In particular, I secured the four guns of small caliber (2 on the forecastle and 2 on the intermediate quarterdeck) in a different way. This method was often adopted for the smaller gun pieces when the ship was at sea and not ready for military action. In this way they were less bulky than the traditional method, even if less "safe". In fact, their use was almost always limited to the smaller pieces.
01 P1090883.jpg
Here you can see the last decoration that remained to be fixed at prow: the sort of caryatid with human head and upper body, which legs transformed into a sort of column, fixed between the cathead and the "serpe". It was glued with epoxy glue having realized that the contact points for the bonding were few and rather small. However, with this glue it is attacked rather robustly.
02 P1090884.jpg
Here are shown the eight guns on the "lower" quarterdeck.
Unlike those of the forecastle, here the guns are all of the same size. There are also a couple of barrels, for the moment only glued with the need for additional work.
03 P1090885.jpg
The other two light guns mounted on the "intermediate" quarterdeck. rigged as their two equivalents on the forecastle. In addition, there are two "seats" I think for the exclusive use of the captain/admiral and officers, in this picture you can see only one of them because the second one is hidden by the ladder.
Again, as I have often done in the past, I remember that the color of the blue paintend elements is much altered by the use of the camera flash, in the reality it is much darker than it appears in my photos.
04 P1090886.jpg
The central part of the upper gun deck. Here now there is only to fix the boats: I'm definitely considering to use a pair of pins to secure the support structure of the boats without having to use glue, leaving them removable.
05 P1090889.jpg
More pictures and comments are coming soon. That's all for today, Jack.Aubrey
-
schnu reacted to GTM in Santisima Trinidad by GTM - OcCre - 1:90 - Kit Bashed
Thanks everyone for the feedback, comments and likes, every single one of them is appreciated a lot
After a few weeks of “relaxing” I’m working on the ST again..
I managed to manufacture and install the balusters and rails for the quarterdeck just before my holidays.
"Not exactly" as suggested by the kit, but not so much different either..
.. i added a few extra details to them with the previously mentioned techniques..
So today I started to produce the pin racks.
Instead of the suggested “square look” I decided to give them rounded edges and milled a rabbet in them ..
To fasten them better to the bulwarks I decided to reinforce them with 2 pcs Ø0,8mm brass wire.
After using the same holes as a template for the bulwarks holes, I glued the wire in position and finished off with a 0.8mm treenail.
The result
..
-
 schnu got a reaction from Vivian Galad in La Candelaria by schnu - OcCre - bomb vessel - first build
I am sorry for the lack of progress, I have vaccations and have to take a little brake. On the good side I am going to visit the Vasa museum, , and I am exited about it.
-
 schnu got a reaction from MarisStella.hr in La Candelaria by schnu - OcCre - bomb vessel - first build
I finished the forward part of the handrails; I just have to do some sanding and slight adjustments. Like said befor I had to use nails, as I saw no posibility of using clamps (should I remove the nails, blacken them or let them be?), the tips really helped thank you all.
The handrail on the bottom of the pictured was bent with steam iron (I have no iron bar, but I am thinking of getting one for my next build) and hot water, while the one on top only with boiling water. On the image there is no real difference, but I had to use less force with the iron. First I was a little unsure if it would dammage the woood, but it seems that was not the case. Now I am proceeding with some outer planks on the hull. Those were painted with acrilic colour (not sure if it was the right choice, but now it is too late to change that). I am asking myself if the acrilic colour will be damaged by the heat of the iron, has anyone tryed it? Otherwise I will just use hot water + the clapms which do little cuts in the wood (I forgot their name, sorry). Finally I have noticed that the ship has some issues with the scale. The doors are about 1.3 meters high, which seems very small, the mortar deck is about 1.2m below the main deck, yet there are no stairs/ladder which leads to it (that is not so high, but still if you have to climb down that with mortar amunition...). Is it possible that it was that way? I shall take more measurements to see if something other seems out of scale.
-
schnu reacted to Karleop in Vasa by Karleop - FINISHED – Billing Boats – reviving a poorly built model
Hi there
After a week of working in some remodeling of my house I've barely had time to continue with my Vasa but here you can see that I had already put the bowsprit and some other details.
Thanks for all the likes, Saludos, Karl
-
schnu reacted to JohnB40 in HMS Unicorn by JohnB40 - Corel 1:75 Scale
Hi Ian,,
The picture you asked about is actually one of a few post cards I bought at Bucklers Hard,Hants,which I visited on one of my trips home to Poole in the early 90's. I framed them when I returned to the States. It is well worth a visit if you have never been there,it has a really nice small museum. HMS Agamemnon was built there.
Titled "British Frigate In Pursuit Of French Cutter In The Napoleonic Wars" by Thomas Buttersworth 1868 - 1842
This is one Bucklers Hard Itself,the Shipwrights and families lived in the row houses which were in two rows facing each other across the open area where timber and materials were stored The ways were on the river bank by the 3 small trees. Adams the Master Shipwright lived in the last house by the river.
As for the other models built,I have two left out of the five I have built. Two I gave to good friends (Golden Hind & Swift) and another (Le Hussard) to my neighbor,a doctor as thanks for saving my life a couple of years ago.
The ones I have left are..
Halifax. 1:35 Scale by Robbe..
Armed Launch 1803 1:17 Scale by Panart
My wife is very understanding regarding my decor......The .hanging picture is a framed tea towel (also from B.H. gift store)
I don't know how to add these models to my profile.
Regards John