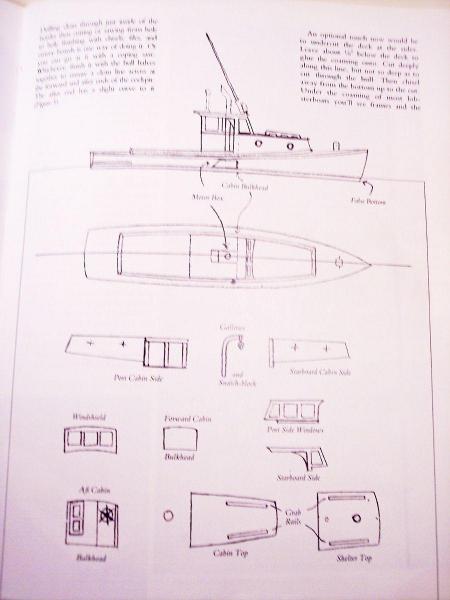
The plans for building this boat are in two issues of "Scale Wood-Craft", Spring and Summer 1986.(1a)
Bottle and preparation
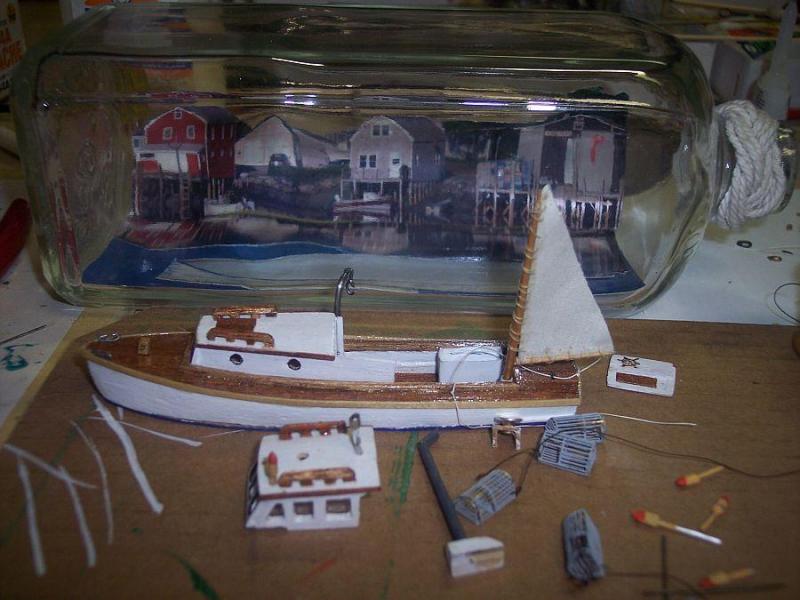
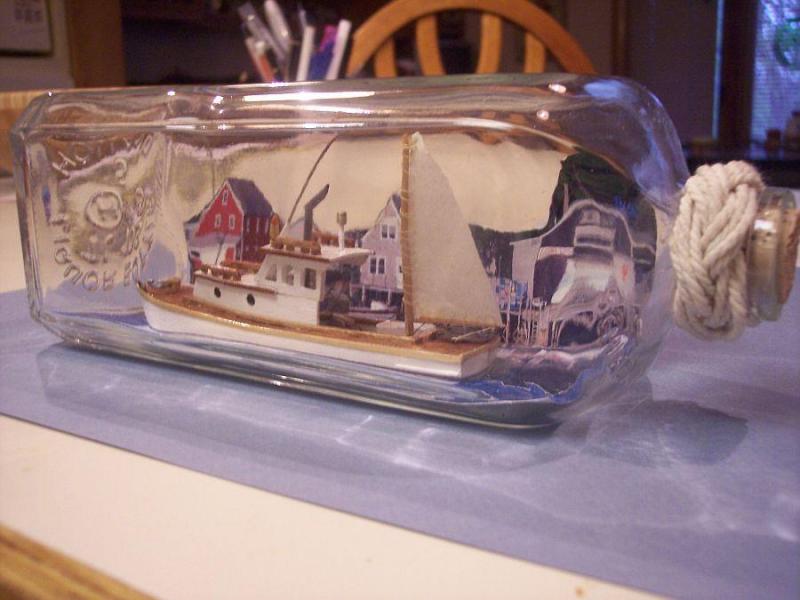
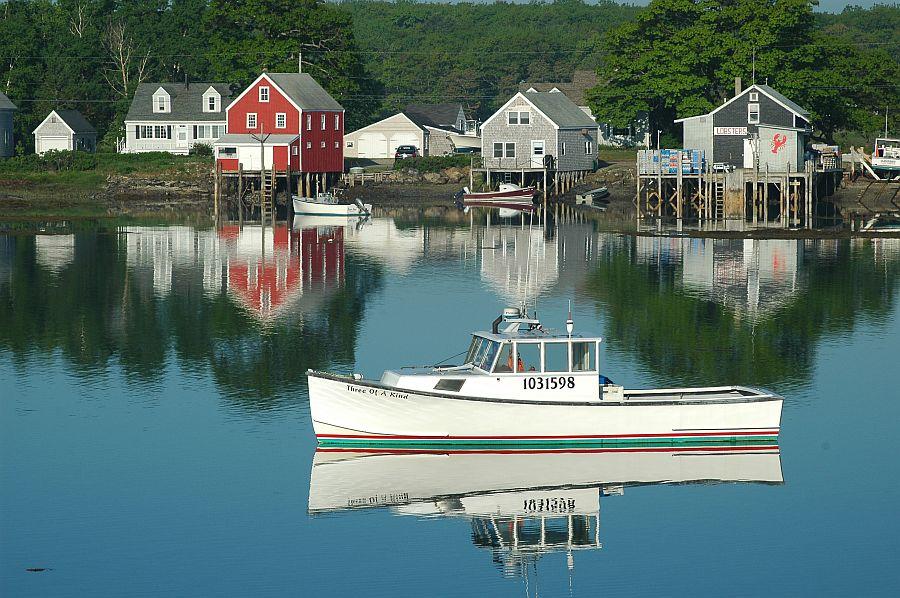
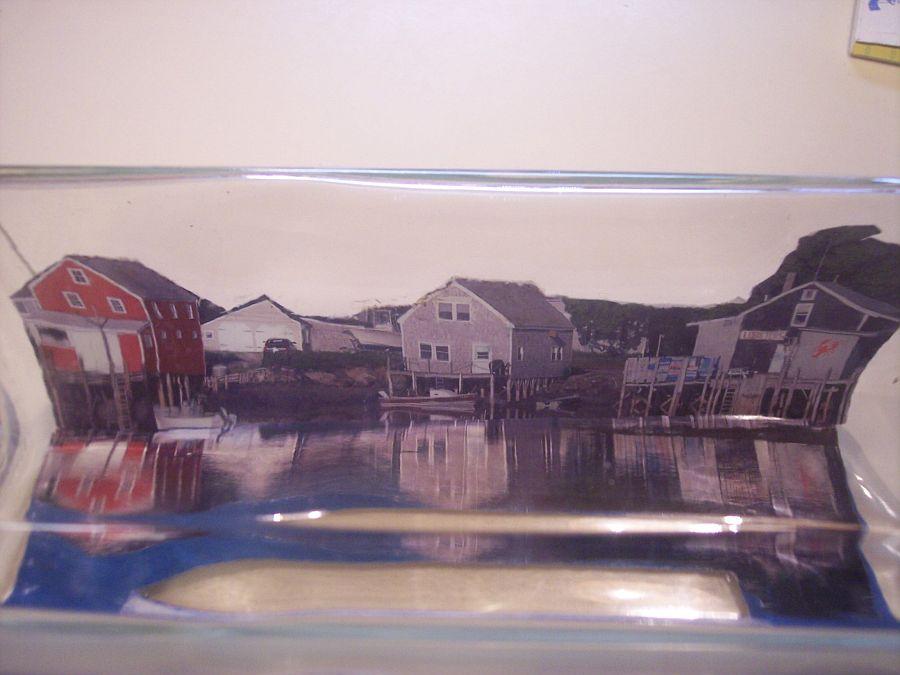
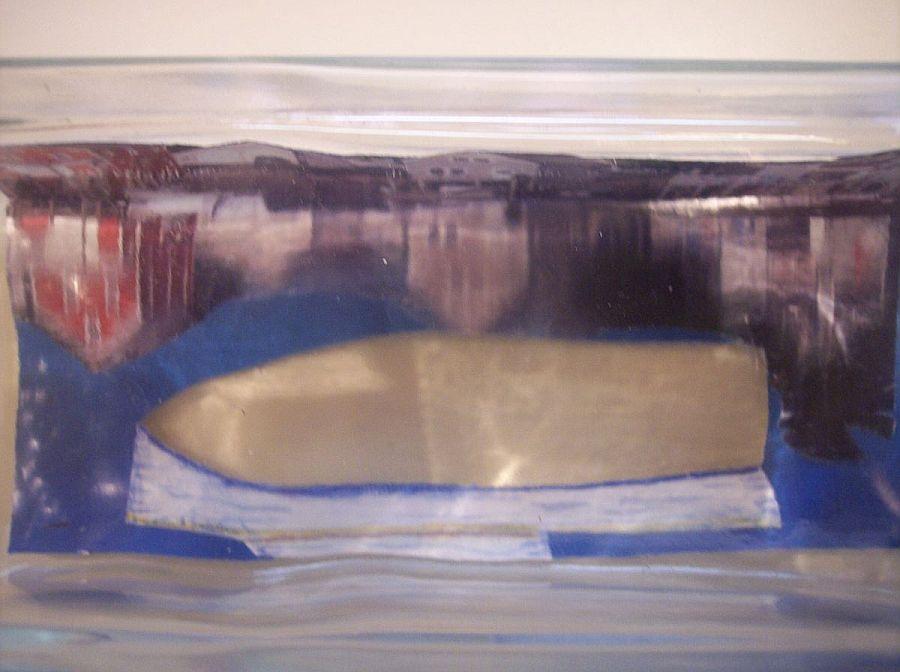
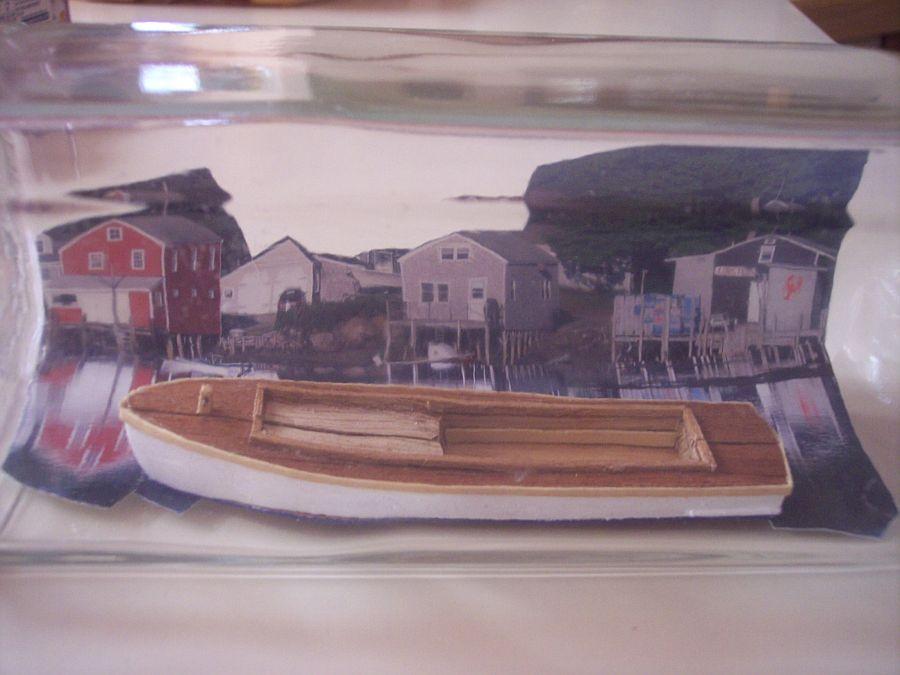
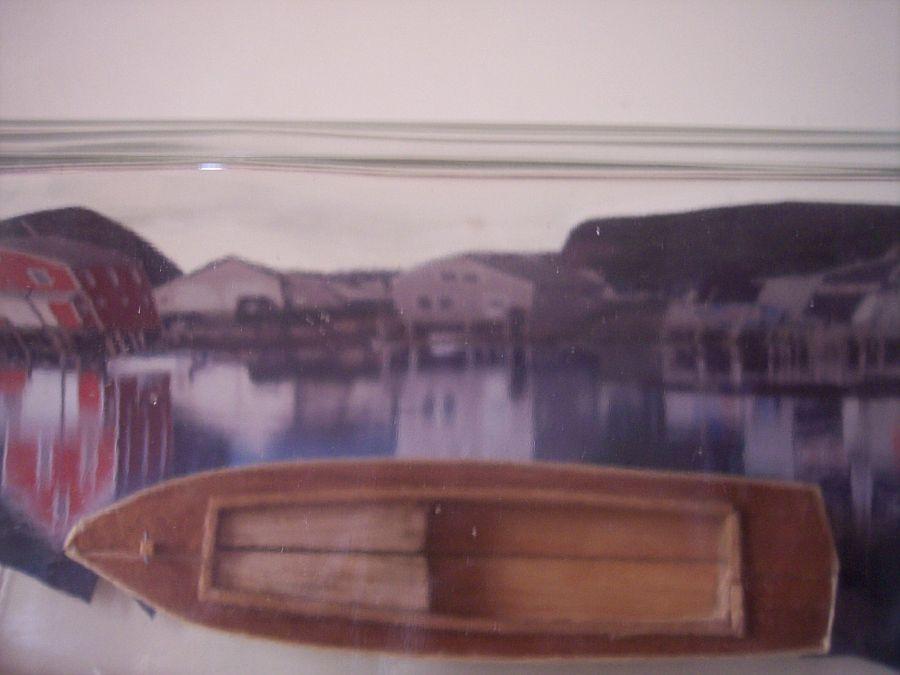
I chose a bottle that is rectangular because I wanted a flat bottom and not much height. I am not going to add a putty "sea" for this ship. The bottle is 750ml, with "Holland Liquor Bottle" on the end. The bottle is 1 1/4" high and end to end 9" long. The opening is 7/8". The one in the plan is ¾". I cut the threaded part of the bottle at the end off because it's ugly and without the threads it looks like an old bottle. In some cases cutting it off also increases the opening ID. I used a diamond cut off wheel, 7/8" dia. I found a picture on line of a boat in a harbor at Cape Porpoise, Maine (7) that is just north of Kennebunkport. I then adjusted the size to fit part of it in the bottle for a background and sea. A Turks Head knot was added to the neck.
Hull
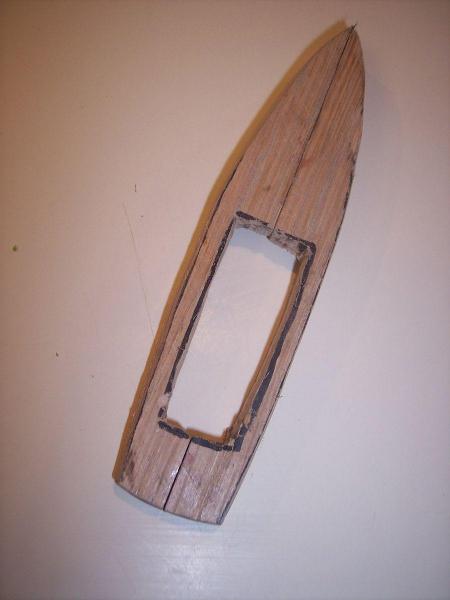
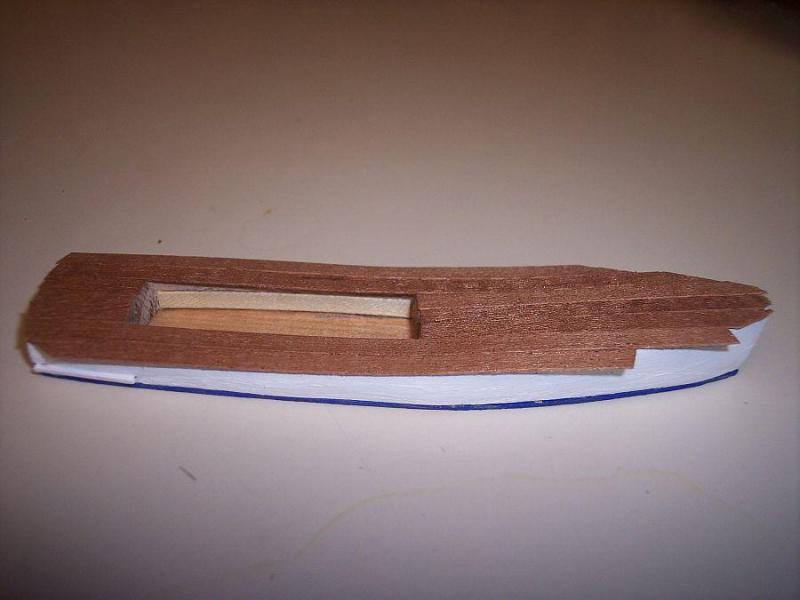
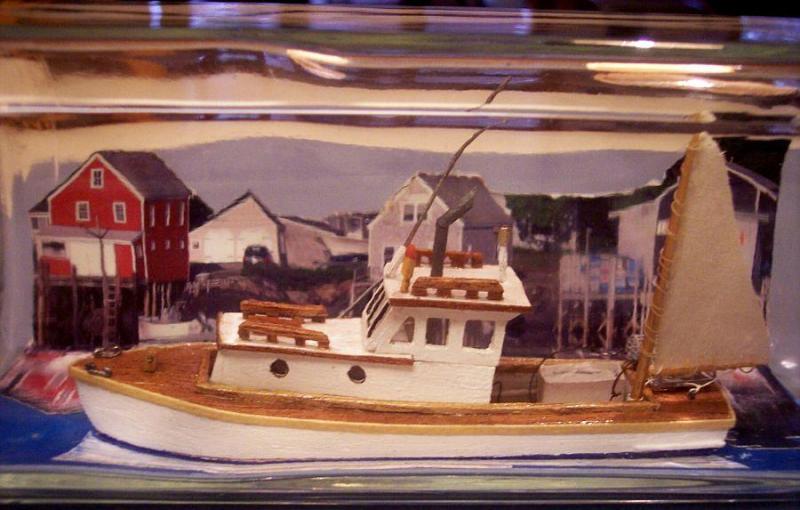
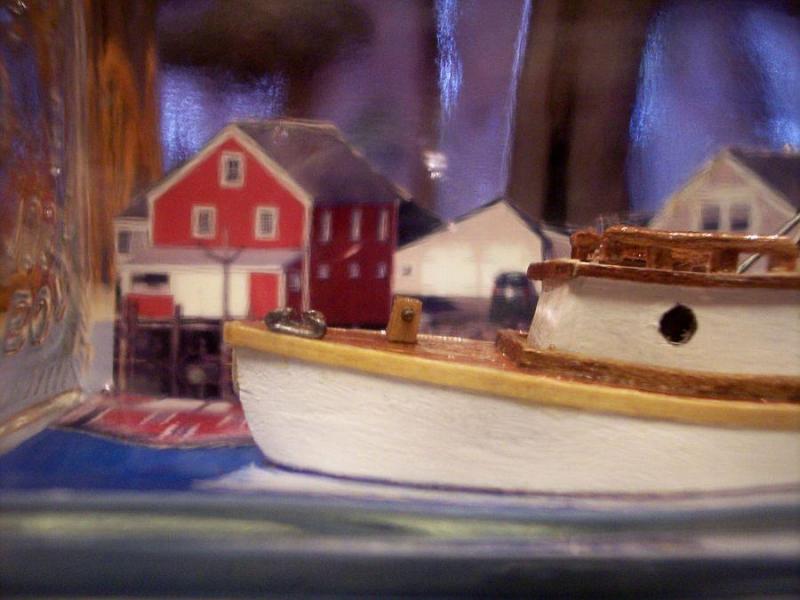
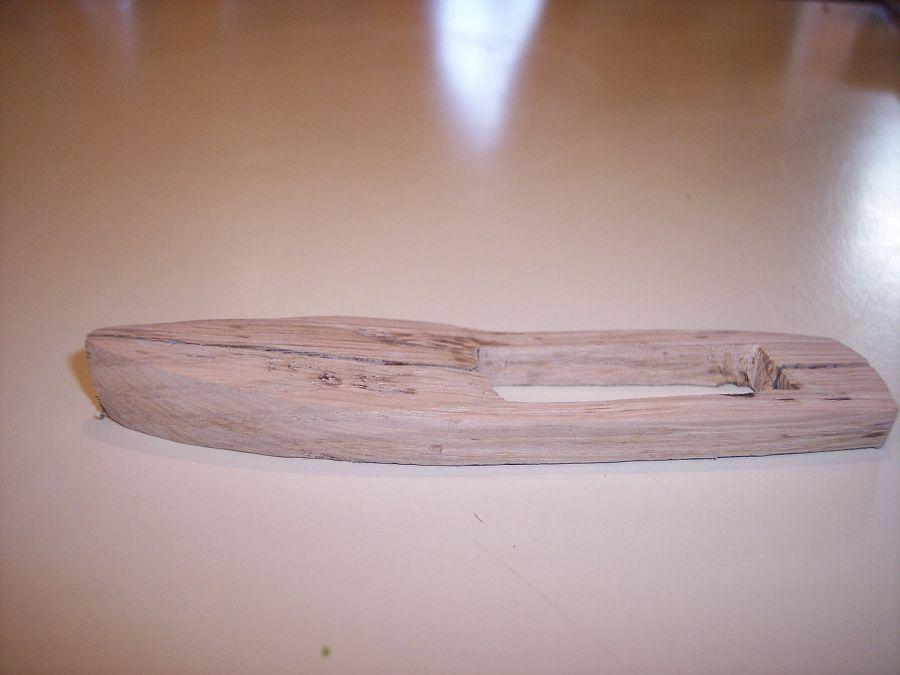
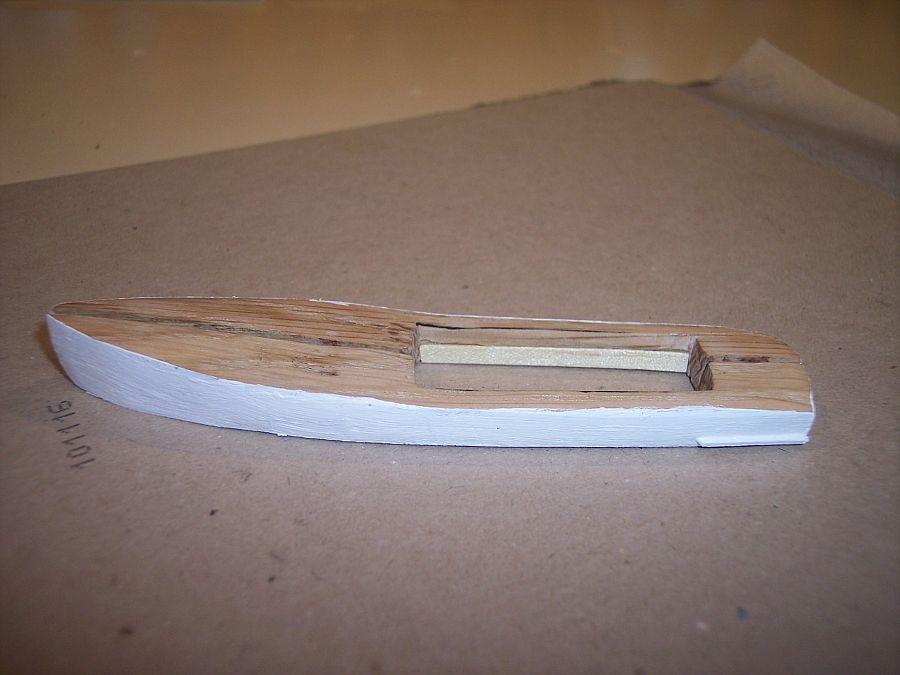
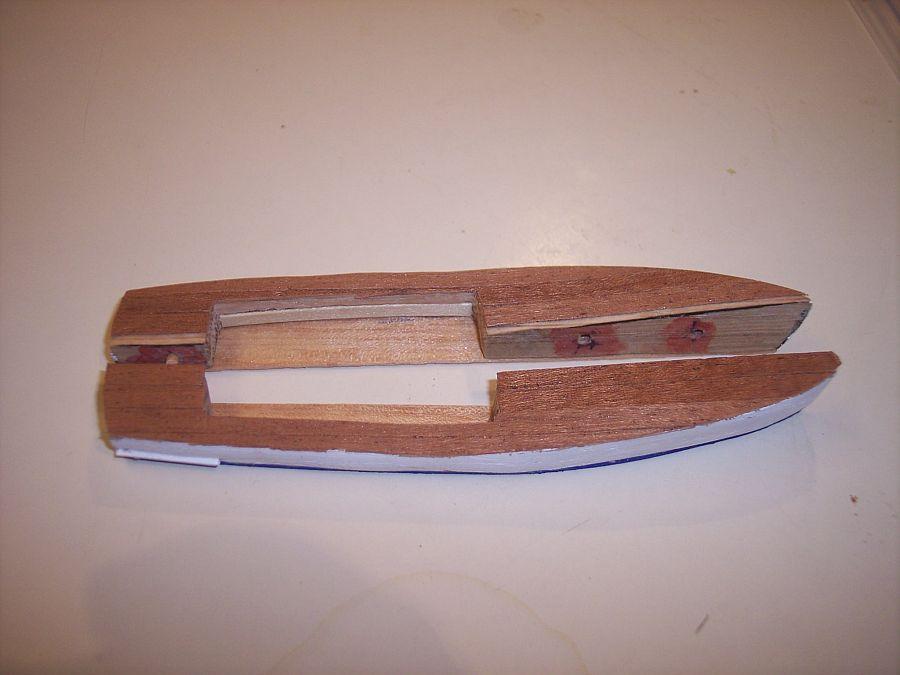
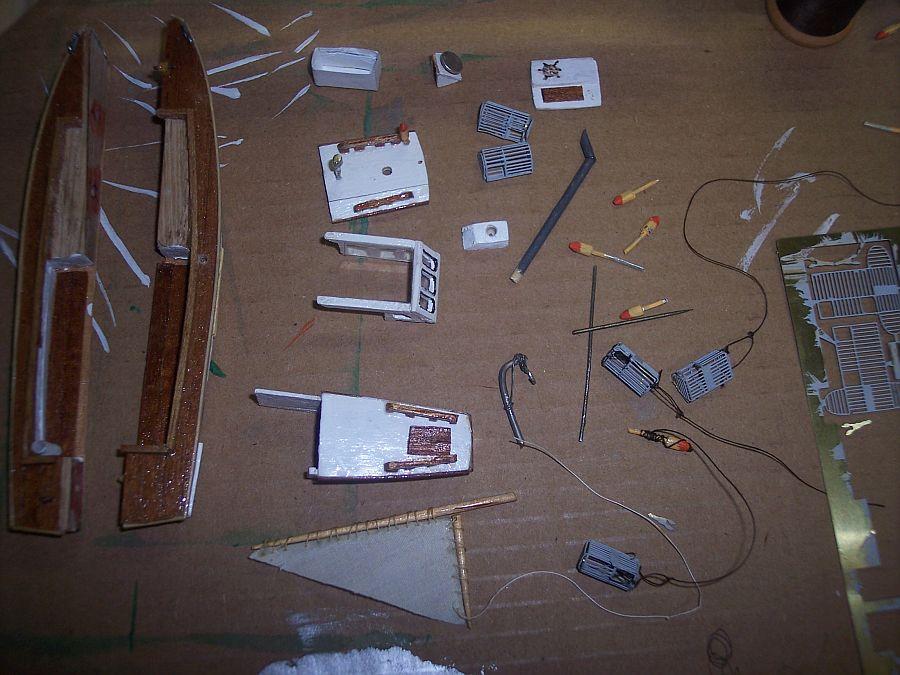
The ship is 5" long. I used a piece of white oak for the hull. The hull is spilt in order to fit it through the neck of the bottle. I cut the hull to size and once I had the two halves roughly shaped (1c) I drilled holes on one side for the dowels to hold the halves together. I drilled 3 holes but used two because it was too tight with three. The holes for the second half were found by painting the holes on the drilled side and mating the halves together to find the location for the other side (3). Once I shaped the hull (2) I added a rear rub rail and painted it white (4). I started cutting out the walls of the rear open cabin area but didn't like the way it came out so I added a bass wood strip to cover it. I then cut the deck piece for the bottom and painted the edge blue for the water line (6). I included a picture of the 30" Midwest model of the Boothbay Lobster boat (1b). I wanted to match the color scheme from this model. I covered the deck with mahogany veneer strips (5) that I had left over from a solid hull model of the Bluenose. I added the veneer so that the veneer hides the split line. You will notice that I added the rub rail along the sheer line. This is clear wood veneer, also left over from the Bluenose build. Using square 1/32 stock I outlined the inside edge of the veneer (called the coaming I believe). If I were to do this over again I would lower the height of the stock. {C}
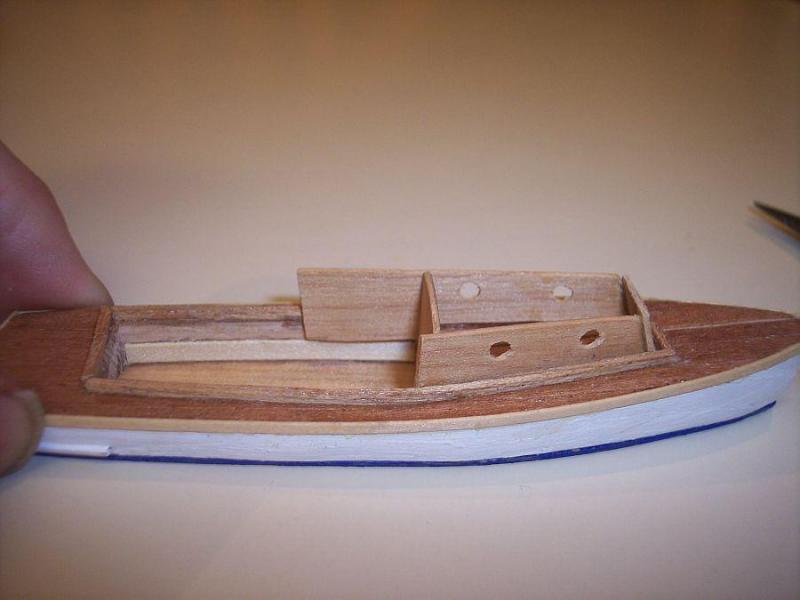
With the hull complete, I placed it in the bottle for location (10 & 11). Now that the ship is located I will piece together the bottom sea buy taking pieces of the blue sea in the photo (8). I will paint a reflection of the lobster boat in the water on the new piece that I will add (9). I added mahogany veneer to the lower deck, clear veneer strips on the hull where the traps are lifted, and varnished all wood surfaces.{C}
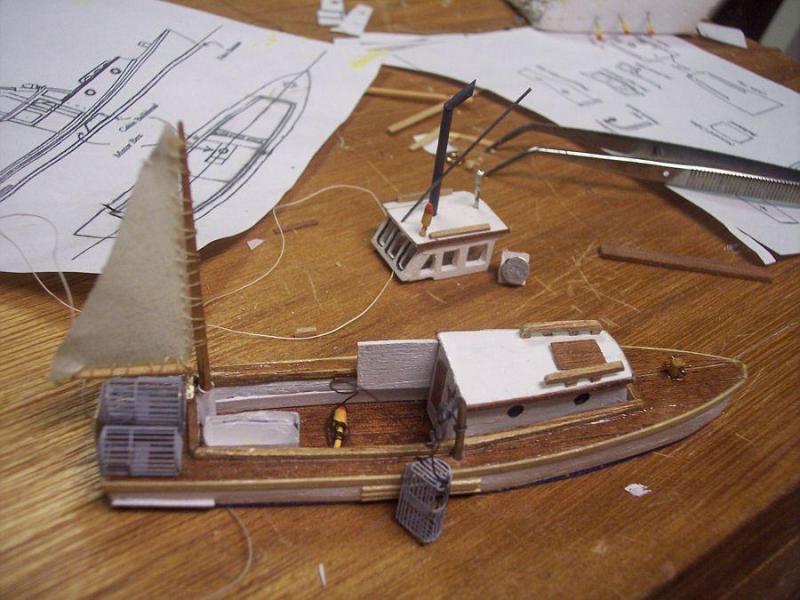
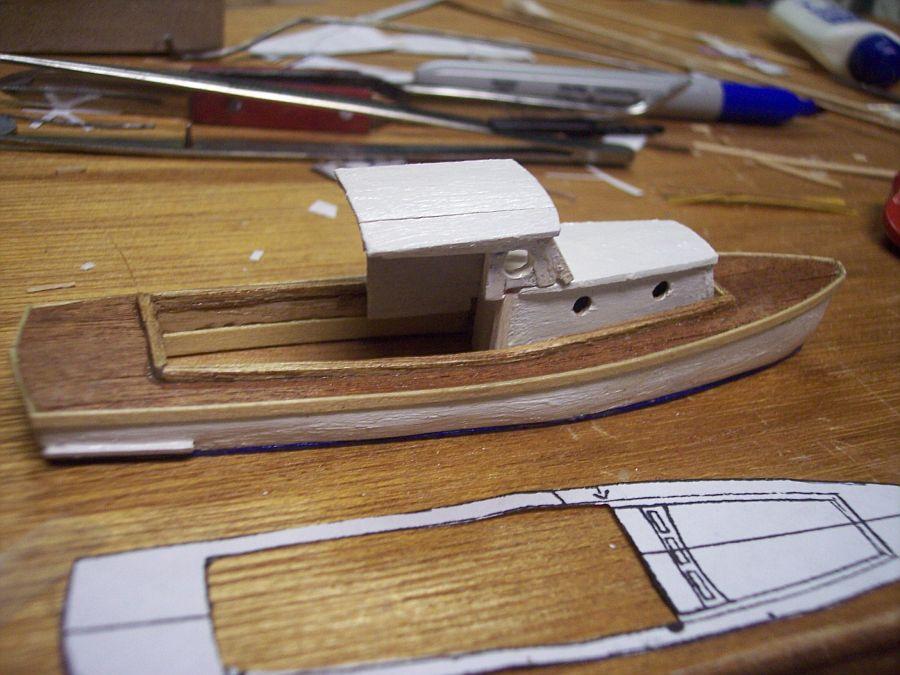
Cabin
The 3 lower cabin pieces are cut to size, portholes drilled and glued together as one piece (12). The plans have each piece going through the bottle separately but he used a 3/4" dia. bottle and mine is 7/8". I test fit the assembly through the bottle neck. The rear part of the cabin bends a bit because of the tight fit. The aft bulkhead for the cabin will go in after the 3 cabin pieces. The 3 upper window pieces I did the same thing. After painting I added acetate windows to the inside of the windows. The top roof piece is too wide for the bottles so I split it on the starboard edge, gluing a piece of paper to the back for a hinge (13)
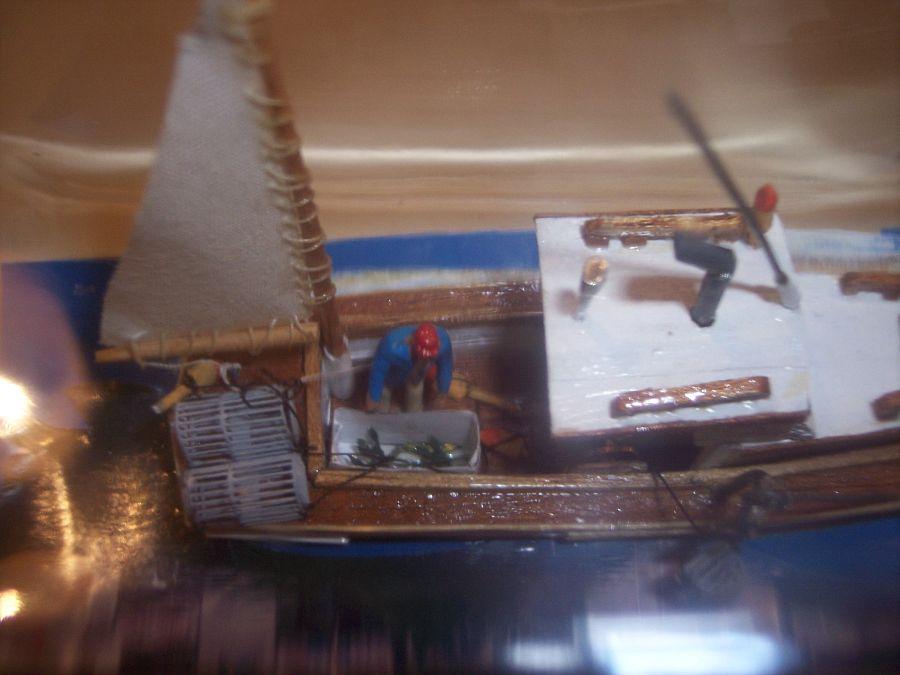
Sail: I plan to add a "sail" to the back of the boat. I saw this on bigger models. It's used to prevent rolling and steadies the boat when it's sitting into the wind. Working from a picture I made a sail using fine cloth and wood dowels (14). I found a plastic tube piece that the dowel mast fit into and glued it to the corner of the aft port side of the lower deck. I had to make sure that the total height included the tube and floor so it would go in the bottle. A wire loop was added to the aft deck for the line.
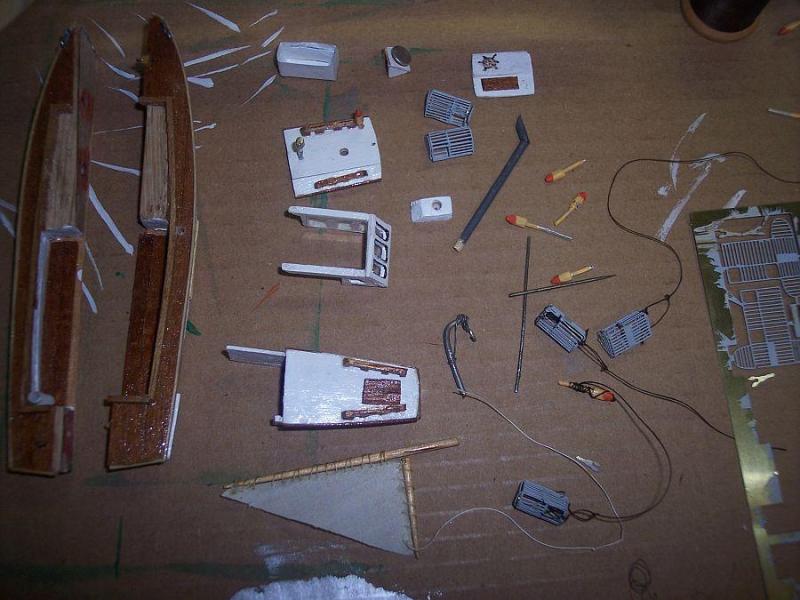
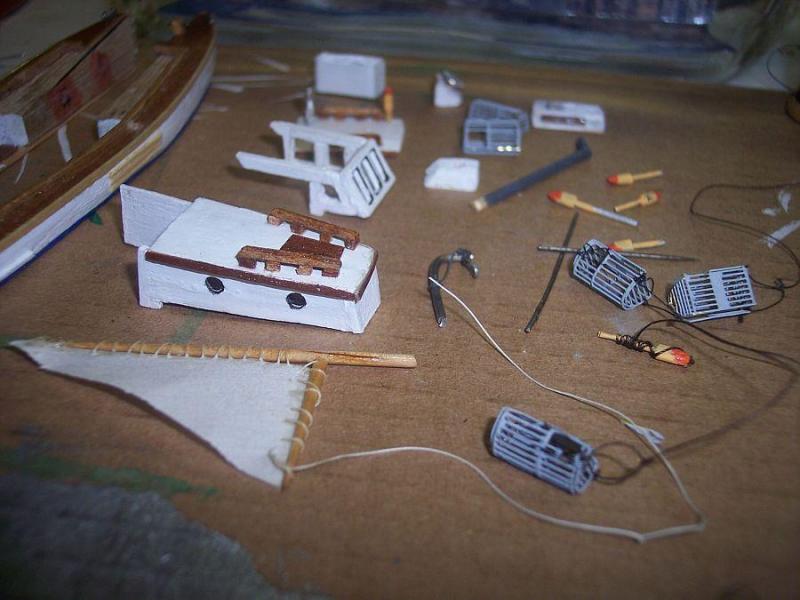
Other parts (14 - 17)
I made the engine cover from balsa with a hole to accept the wood dowel exhaust stack. An oversized hole was added to the roof for the stack. The antenna is wire with a hollow tube at the bottom end. A hole was drilled in the roof. The light on the roof was a buoy with the tip filed off. I added veneer to the edges of the two roofs. The railings were made from mahogany strips. In retrospect I made the railing too thick and high. I added a veneer hatch to the top roof. The lobster tank was made out of paper. The gear for lifting the pots was wire. The chocks (?) on the forward deck were wire bent to shape and filed flat on the bottom. Lobster traps and lobsters are etched brass sheets I bought. They are H.O. scale. It also came with the cast buoys. Because this is a square instead of round diameter bottle, I had to keep in mind that the antenna and mast must fit with less headroom. Also the engine exhaust stack since it goes in through a hole in the roof. When I went to put the exhaust in it almost didn't go. I had to round the end of the stack to get it in.
Assembly in the bottle
First I put in the two hull halves with glue on one side. Using two rods, I squeeze the two halves together in the bottle. I then added glue to the bottom of the bottle and put the hull in place. The lower cabin is next, then the cabin rear bulkhead. Then the upper window assembly was added. I use a long pair of tweezers to place the parts in place. Next is the hinged cabin roof with the rails, light, and buoy attached. Then the antenna was added. Next is the engine box against the rear cabin bulkhead. I put the trap raising "hook" (called a gallows and snatch block) in and then tried to add the support brace that attaches to the hook and the deck. I could not get this in position right so I took it and the hook out and wired and glued the brace to the hook and put it in as one piece. I put a trap on the hook and ran the thread around the "wheel pulley that is used to pull up the trap. I then added the sail. Once in I threaded the line through the eyelet I made on the rear deck. I added the tank, then the traps with the buoys attached. The man and lobsters I added last.


 mtaylor reacted to a post in a topic:
Maine Lobster Boat by Lord Nelson - FINISHED - 1/67 scale - BOTTLE
mtaylor reacted to a post in a topic:
Maine Lobster Boat by Lord Nelson - FINISHED - 1/67 scale - BOTTLE