HOLIDAY DONATION DRIVE - SUPPORT MSW - DO YOUR PART TO KEEP THIS GREAT FORUM GOING! (Only 51 donations so far out of 49,000 members - C'mon guys!)
×


Emelbe
-
Posts
92 -
Joined
-
Last visited
Content Type
Profiles
Forums
Gallery
Events
Everything posted by Emelbe
-
Hi Apollo Know the feeling. Probably the hardest part of modelling is knowing when to walk away and start agin the following day. I've actually got plenty of time now I'm retired but I do try not to over do it. I try not to give myself deadlines, but I think probably another 2 1/2 to 3 months should see the project finished (realistically), which should take me towards Xmas, but we'll see. See how the rigging goes. Cheers Martin
-
Hi Augie Having looked at your builds I'll gladly accept that as praise indeed. Many thanks Cheers Martin
-
Hi Apollo Nice to hear from you, how are you keeping. I don't think I'm a quick builder, it's probably I don't make quite as many mistakes as I used to (either that or I've just got better at hiding them). With regard to the tools I'm planning on buying, to be honest it's more of a promise I made to myself years ago that if I ever had the opportunity I would at least buy myself a decent lathe, I can tinker around for hours on one. As it happens the little windfall was totally unexpected, I didn't even realise there was a pension attached, so I'll take it as a sign (any excuse), big boys toys!!! What am I going to do with them? I've actually got a little yearning to design a model of one of our locally built boats (Jersey has quite a rich maritime history) will need to do the research at the Maritime Museum but it could be quite an interesting project. The masts are straightforward, the bowsprit I tapered with a sharp chisel by hand and rounded it in my old Unimat, a power drill will do the same job (ah, thats why I need the lathe!!!). I'm probably going to do a separate post on the masts at a later date, quite a fun project. I'm just working on the bulwarks and capping rails at the moment, although I say it myself it's really starting to come together now. Cheers Martin
-
Hi Grant Thanks for the post. I can see this is going to cost me more than I thought!!! The Byrnes stuff is definitely tempting me, might have to bite the bullet and send them an e-mail, trouble is if I go for the Table saw I know I'll buy the thickness sander and disc sander as well. The excuse to the boss will be cheaper on shipping of course! I've had a look at the Sherline lathe and mill and to be honest theres not a lot of difference price-wise between the Toolco stuff (they also do several milling machines as well). The main reason I'm looking at Toolco is that the machine is larger and quite robust, and comes equipped with most of the accessories as Standard. The Jurys still out on the milling machine, do I go for Proxxon (the cheaper option) or do I say in for a penny in for a pound and go for something more high spec? It's a bloody minefield out there! Bye the way, thanks for you kind words about the boat (almost forgot about it) Cheers Martin
-
Hi Augie (again) Stunning work, but will it fly? (in joke) Cheers Martin
- 2,191 replies
-
- 4
-

-
- confederacy
- Model Shipways
- (and 1 more)
-
Hi Don How's things? Thanks for the reply. Haven't heard of Sherline before but have looked them up. Nice looking machines and will do a bit more research before making any commitment. The thing that attracted me to the Toolco was the list of standard accessories shipped with the lathe, got 3/4 jaw chucks, fixed and travelling steadies, indexed tool-posts all standard with the machine, the only thing I will probably order with it (if I order it) is the self centring 4 jaw chuck, and revolving centre, and some tools of course. The machine is bigger and has a 26mm spindle bore which is a plus when it comes to masts etc. Still waiting for the final quote but should come in all round around the £1200-£1400 mark GBP, slightly more than I originally wanted to pay but If I get my use out of it it will be worth it. The Jury's still out on the Byrnes stuff, definitely on the wish list but shipping to Jersey may as well be to Outer Mongolia, difficult enough getting UK products shipped. Fortunately I'm not in a rush, so I'll probably enforce a self cooling off period before I get the card out. Why the second thoughts about 'Pegasus'? Not a bad back-up sitting on the shelf. Cheers Martin
-
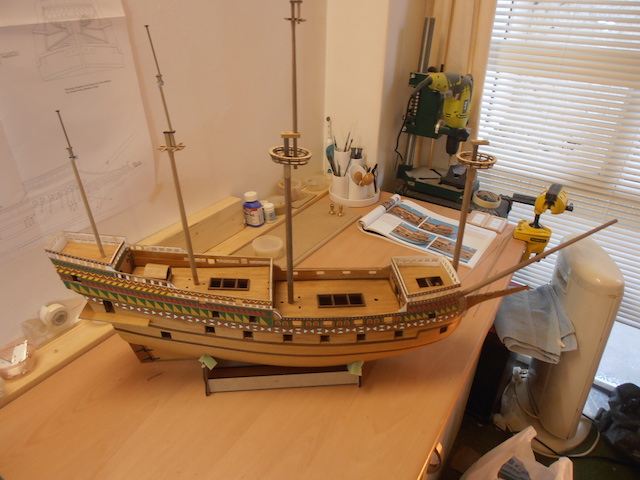
Hi All After a week of unseasonably hot weather in Crete (40 degrees when we left) it’s back to the workshop. Before I went away I managed a day or so working on the masts, mainly because I didn’t want to work on the hull in case I made some mistake I couldn't rectify before the holiday, unfortunately I’m one of those who would have spent the whole week sulking about it. It would have been nice to report I had found a new devious way of stepping the masts, but I haven’t so it was out with a nice sharp chisel and cut the square profiles by hand. The fore-top and main-top went together easily and are ready for spraying. There’s still quite a bit of work to do on shaping the masts and rigging them, but I’ll need to have a study session on the rigging plans first. I’ll talk more on the masts at a later date. Back to the hull, and I decided to plank the bulwarks to hide the dibetou fillers. The main deck bulwark I staggered the planking so I could get a good fit with the bulkheads and just fill in on one plank section, don’t know if the picture explains that properly. Before I applied the ‘precious’ paper patterns (love that name) I finished all the fiddly jobs like lining the gunports, and finish plank the stern, underneath the stern gallery walkway etc. Time to see if all that messing around with setting the whales has paid off and, happily, I can report it has. The decorative patterns went on perfectly, my only criticism is when you cut round openings it leaves the white of the paper showing, will just be a matter of using a coloured felt tip or something to colour them. A word of warning to my friends who are also building this model, the lowermost pattern, No 13 you must split at the stern galley door otherwise it won't be long enough as I found out to my cost, I had to cut the door area out and try to graft it at the bow, there’s no way can you remove the paper once the glue is on. It does actually show it in the manual but it isn’t highlighted, that’s my excuse for missing it! Just waiting on some decent dry weather now so I can spray the whales before fitting, but plenty to be getting on with in the meantime, what to do next? A little aside, I’ve had a windfall, (only a small one), by way of a pension I had completely forgotten about. I’ve decided to get ‘tooled up’ and am looking at some machinery. I’m going to invest in a small table saw, a milling machine and a lathe. The ones I’m looking at is the Proxxon bench saw and milling machine, and the Toolco 1022 lathe. I know a lot you out there recommend the Byrnes Table Saw and I could be swayed, it’s just the shipping that worries me. Any thoughts on the Proxxon stuff, and has anyone had experience with the Toolco lathes? Sorry about the lack of photos, think I need a new camera this one's not holding its charge any more. Cheers Martin
- 133 replies
-
- 16
-
-
Hi Janet I try to spread it thinly and as evenly as possible using a cocktail stick which I sharpen to get into as much of the area as possible. The other thing is to try and make sure the glue spreads along the edge of the plank it butts up against. When you lay the plank push it into position and rub down with a cloth and you should be left with no gaps and no springing when you sand. Just for your info, I think the glue is Loctite which won't stick you fingers, can't check I'm in Crete at the moment. I presume the tissue papers for the decking, I haven't tried that method but may experiment with it at some point. Regards Martin
-
Hi Janet Thanks for the comments. In answer to you questions: Planking was just straight planked, tapering at the bow, the stern needed no work apart from a couple of stealers below the waterline. The main thing before you second plank is to set the lower whale, the instructions say to just pin the plank but in my opinion you need something solid to work to. If you check my log out I've tried to explain how I went about it, if there's anything you not clear about just ask, I'm only too happy to help. When you lay the first plank (second planking), don't try to plank around the bow, just let it fall naturally and end it there, the rest should follow on with little bit of tapering. Keep your nerve and just continue until you're below the waterline and you should have quite a nice lay. You can plank upwards starting at the garboard and any filling in will be below the curve of the hull, well out of sight. The glue I always use for second planking is the slower drying cyano, it just gives a little more time for positioning. The gratings I scrapped as soon as I saw them, I've made my own using the Caldercraft ones, I am leaving a few off so the lower decks can be seen. Hope that will help, but as I said earlier if in doubt, just ask. Regards Martin
-
Hi Juancar Still on the net. Not sure exactly what the problem is without seeing it, but I did need to make a few little adjustments to get the forward bulkheads to sit correctly. The main way of checking is to take any measurements from the plans, these are pretty accurate, and work from there. Another check is the bulkheads should form a 1.5 to 2mm rabbet automatically when in their correct position. Don't forget the forward deck curves with the sheer i.e, forward and aft. and had camber, and it is a pain to fit, would suggest you plank after fitting, bit fiddly for sanding but again you don't see much of it after the forecastle deck is in place. Cheers Martin
-
Hi Apollo, Nigel Many thanks for your kind words, I'm feeling quite humbled. Apollo, with regard to the choice of wood, I would (have) personally stick to the strip provided. The reason I say this is mainly the colour, with a coat of sealer/varnish it turns out a beautiful golden colour, looks much better in the flesh than in the photo's. It makes a nice change from the usual walnut, and the grain patterning is consistent, I did have an experience with my Xebec where I varnished the hull and it looked like it was wearing pyjamas after. It's not difficult planking with the narrower strips, the only real tricky, or should I say time consuming, area is between the whales above and below the gunports (set the whales first and plank in-between), it works out four strips rather than three so you'll need to lose 1mm, or less if you use the narrower planking (3.8mm as opposed to the 4mm used for deck planking). I planked along the whales top and bottom then in-between the last strip I let in using a very sharp chisel held flat against its edge to pear off tiny amounts until they fit without any gaps. They're short lengths so it's not too difficult. Hope that is clear, if not let me know and I'll try and post some photographs which should explain it better than me. Once again guys, thanks for the comments, Cheers Martin
-
Hi Rod, Beautiful build, could be tempted Cheers Martin
-
Hi Yves, Brian Thanks for your comments. Yves, in answer to your question, how would I rate this kit: firstly I don't think it's suitable as a first build, but anyone with a little experience should be able tackle this project comfortably as long as they take their time and study the drawings, manual etc. The design is excellent and well thought out, when I say that it's not 'shake the box and a ship falls out', but the whole sequence of build is logical. The quality of materials and accuracy of cut parts are excellent. My only real criticism is the strip-wood supplied, which according to the instructions, is the wrong size (here I go again, I thought I'd got over that). There are a couple of minor things where I think commercialism has overcome design such as cannon carriages and a lot of fittings are Amati standard, but it's not really that much of an issue. If I were to score out of 10, I would give it an easy 9.5. Would I recommend this kit, definitely. Cheers Martin
-
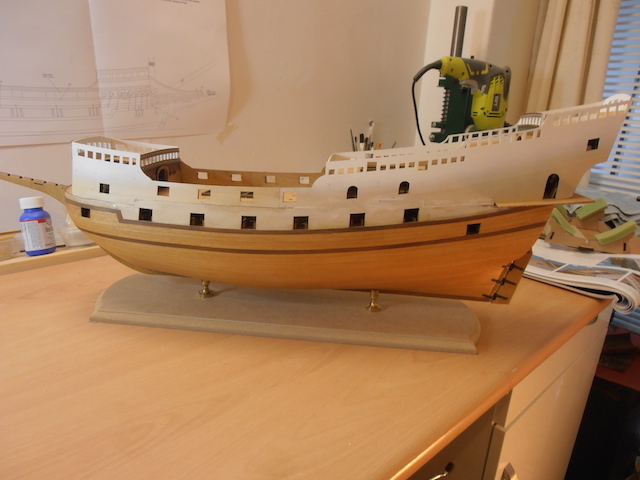
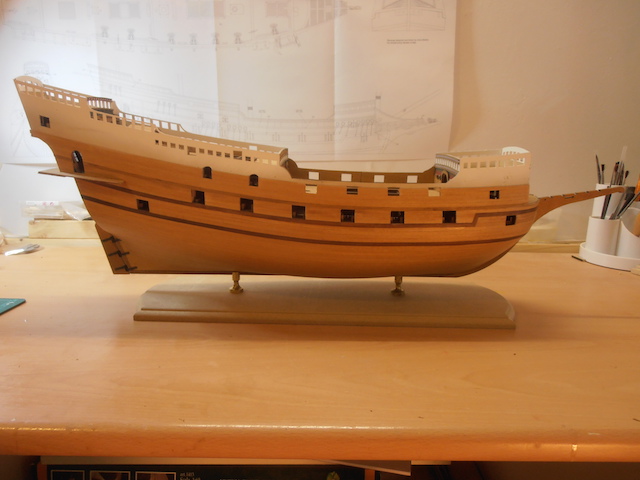
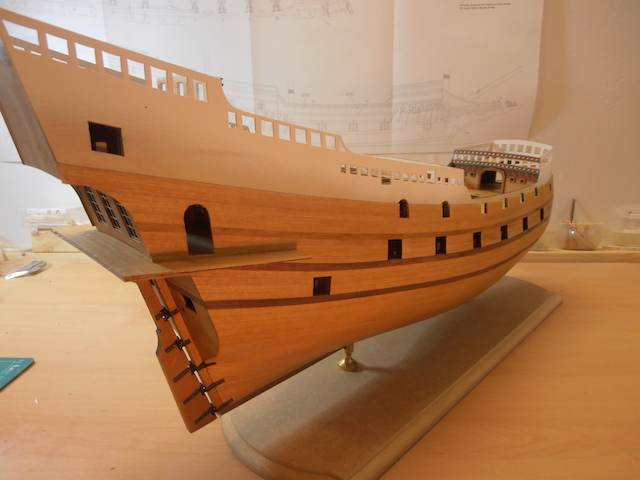
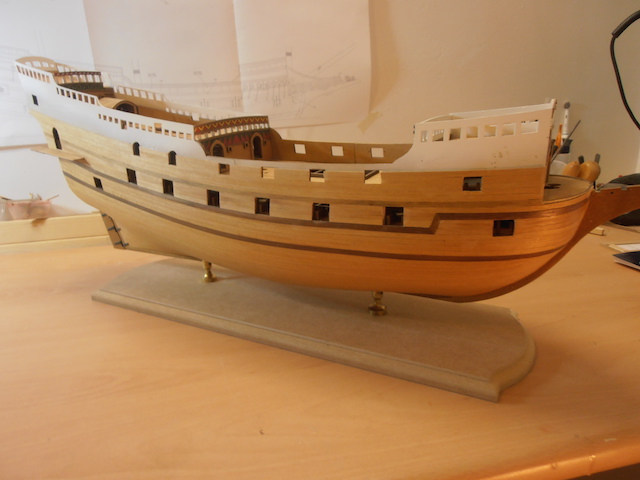
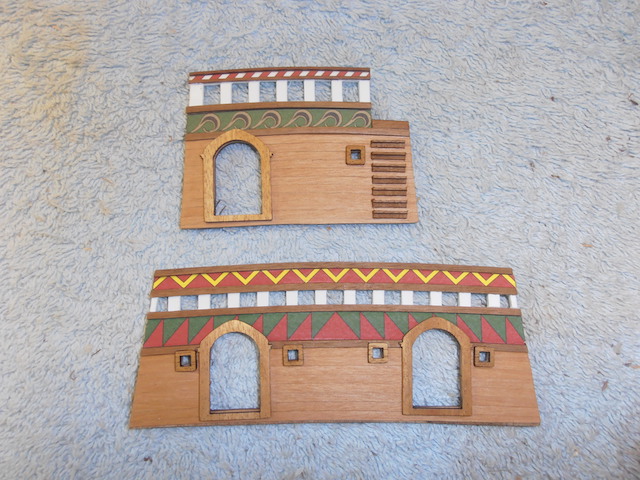
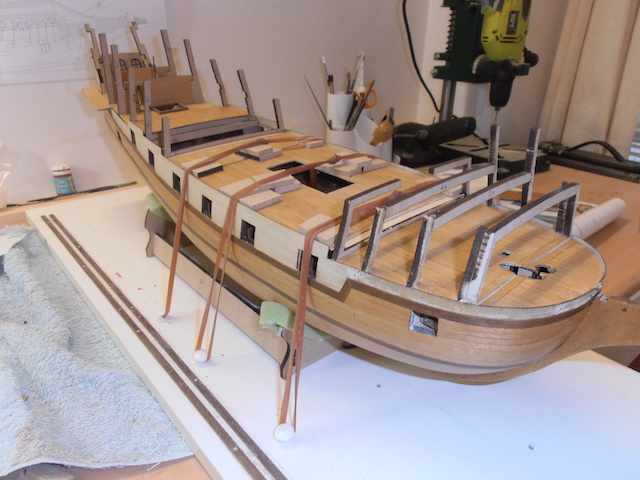
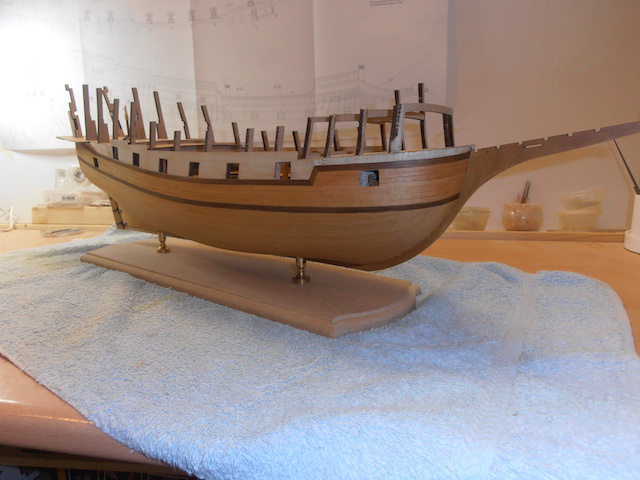
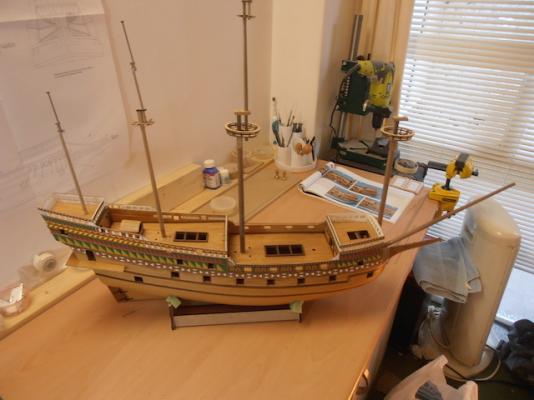
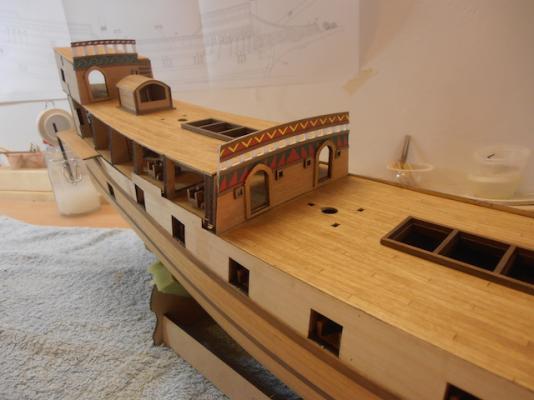
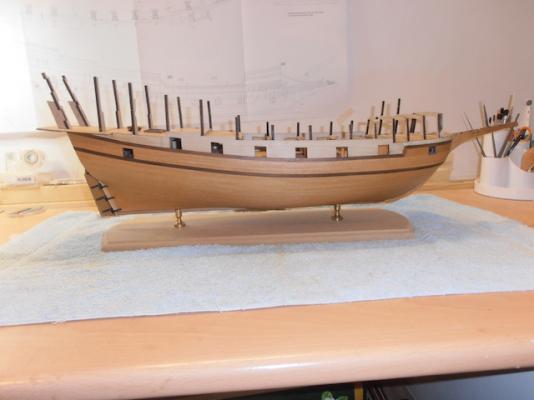
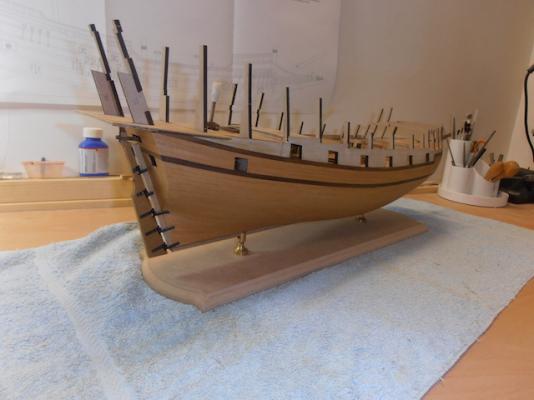
Hi All Latest update coming up! I think progress hasn’t been too bad since the last post, the side panels are fitted and She’s starting to look like a ship at last. Fitting the side panels wasn’t the stressful experience I thought it might have been, they just needed a little trimming here and there to line up properly, whether or not it was the time I spent earlier setting them up of just sheer good luck we’ll never know. Before fitting I sprayed them with a couple of coats of white primer to fill the grain and then finished it off with white acrylic. Just for your information the best acrylic sprays I’ve found are from the Citadel range, they’re the ones who do the Warhammer games and have wonderful names like Chaos Black, Skull White, Vomit Green etc. they go on evenly and dry quickly leaving a nice sheen finish. Once the side panels were in place I fitted the inner bulwarks to strengthen the joint. The bulwarks are made from one piece and are impossible to fit neatly as they are, as they need cutting to both length and height and then slotted to fit over the decorative strips on the bulkheads (if anyone has any ideas how to do this please tell me). The only solution I could come up with was to cut them in half and fit in two parts. It’s no big deal as I’m going to plank them anyway. The whale above the gunports I set in much the same way as the others, using a strip of 4mm walnut lined up with the gunport tops and measurements taken from the plan to make sure it ran parallel to the others. I then planked in-between the whales, which was a little bit fiddly to make sure there were no unsightly gaps. I’m not going to bang on about if there were some 5mm strip it would have been easier, I think I’ve said enough about that (get over it Martin!!!). Planking above the whale is straightforward especially as that will be covered in decoration at a later stage. So, all in all, I think the critical bits have been done now, and to be honest, without too much trauma. Most of the work left on the hull is mainly cosmetic, so hopefully it will be just a case of taking my time and working as neatly as possible. Time-wise, this is week seven since I started so I reckon just under 300 hours (it’s great being retired and the missus still working). I’m not sure if I’ll get chance to post before my holiday, so if not, see you when I get back. Cheers or should I say Yamas (think that's Greek for cheers) Martin


- 133 replies
-
- 16
-
-
Hi Jan, Your quite right when you say a stunning model can be produced straight from the box with plenty of options for super-detailing if you want. My comment regarding laser etching the decks was just a thought, I personally would plank every time. That's why I wondered why they went for it on their Mercury, did Chris design that as well? Cheers Martin
-
Hi Juancar No, thats OK you need to join the two parts first. To be honest, you see very little of that deck so it's a great place to experiment if your unsure how you want to plank. There's no problem fitting this deck after planking so the way I approached it was to start along the centreline and work out, you should find the planks turn out even on both sides due to the accuracy of the laser cutting. Cheers Martin
-
Hi Apollo, Juancar, Just a little thought I had looking at the decks. I'm wondering why Amati didn't go for the laser engraved decks on some of the hidden decking like they have in their Mercury kit? I'm not saying I like the engraved decking but that would have at least given the builder the option to plank or not, there's a lot of work involved with the decks, much of which can't be seen unless you start peering through gunports or hatches. Having said that I still agree they have certainly set the bar for future kits, and it's certainly an enjoyable one to work on, I can't fault the quality of materials etc. I'm just in the middle of cleaning everything up ready for a quick photo session so I can post the latest progress before my holidays, so back soon Cheers Martin
-
Hi Don Thanks for the comments, in truth I was actually surprised how easily the decks went on, must be good quality elastic bands. Does make life a lot easier working off the model though. Looking forward to a weeks break, be nice to see the sun (I hope), better have plenty of Ouzo to calm the planking withdrawal symptoms after the amount I've done over the past few weeks!!!! Cheers Martin
-
Hi Juancar I'm sure you'll enjoy this build, I'd be very interested to see how you progress with it. I'll be putting up another post tomorrow (got to tidy my workbench first) as I've got all the sides on now and most of the finished planking done. Up to this stage, in hindsight, I don't really think I would have done anything differently. The only tricky bit is setting the whales to get the lay of the planks right, but hopefully I've covered that in my log how I went about it. If you need any help just give me a shout, best of luck Cheers Martin
-
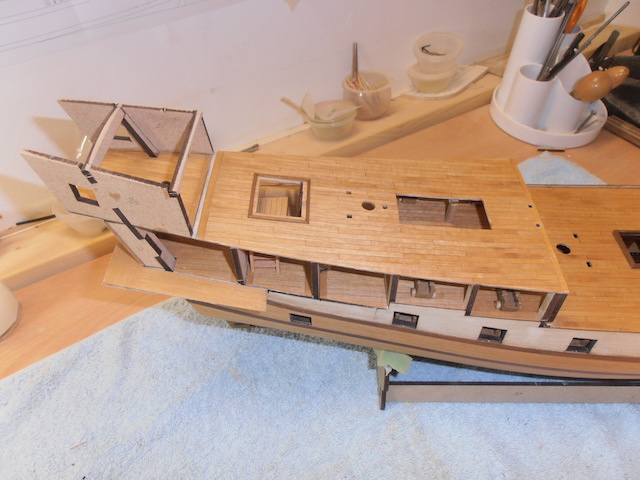
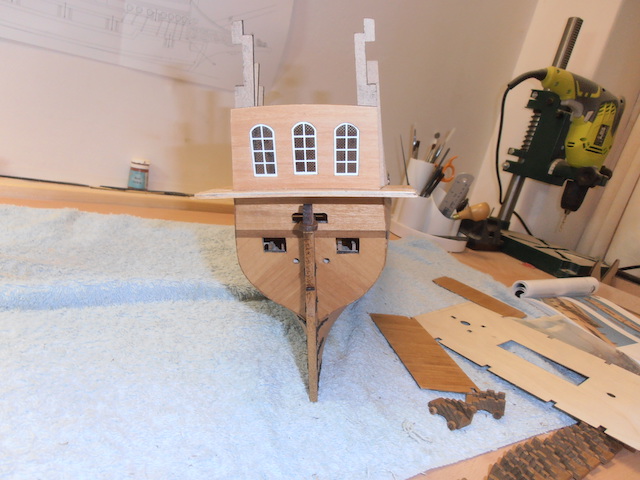
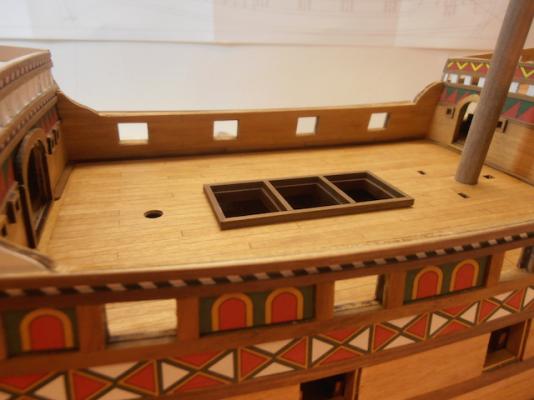
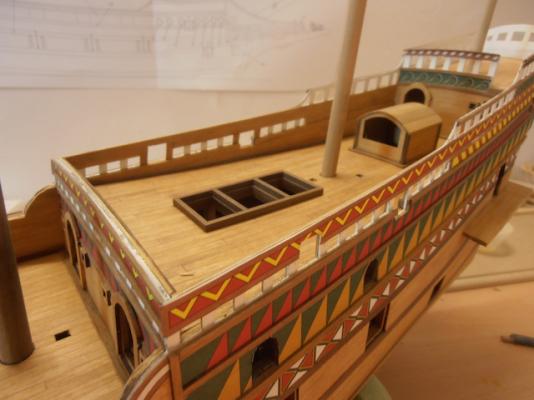
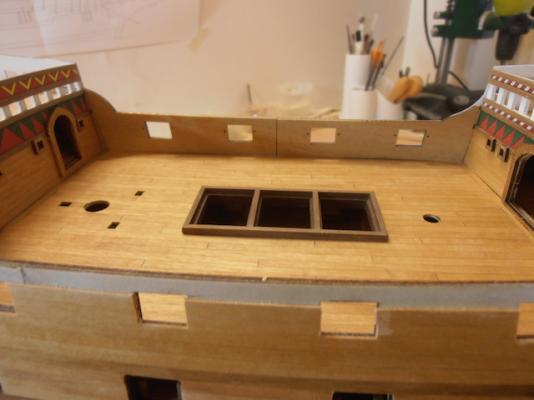
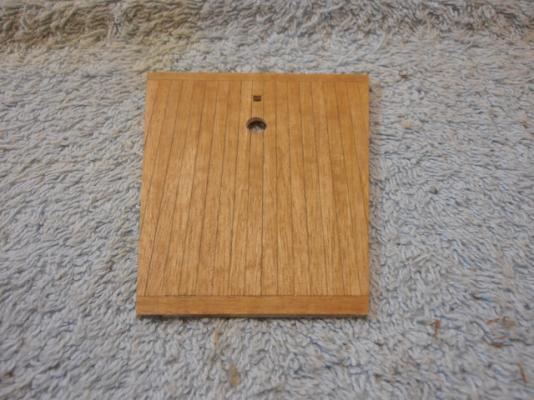
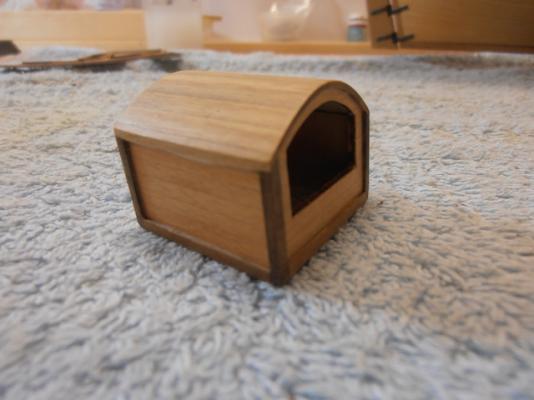
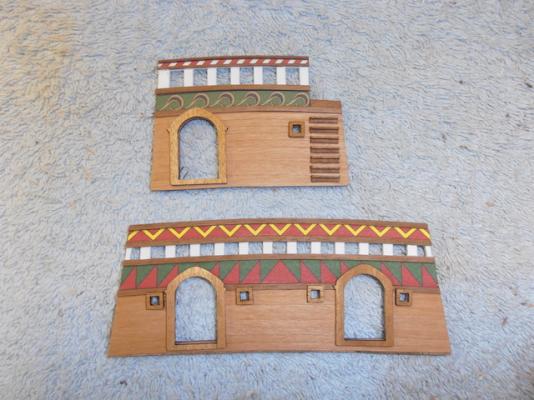
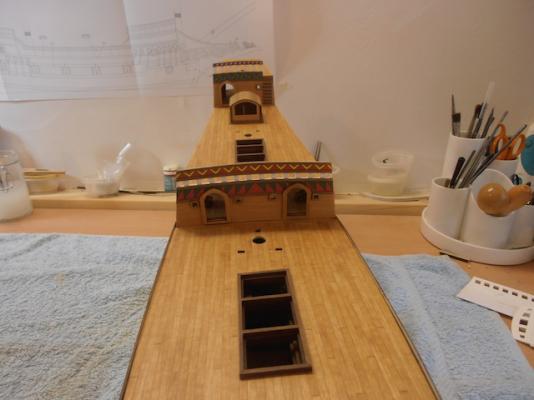
Hi All, Back again with another progress report. I’ve spent the last week working on the Quarter Deck and Poop Deck both of which were planked off model. Before planking the Quarter Deck, I made up the hatch surround and cut away the beam crossing the opening and added two support posts as in the other decks. I was surprised that the poop deck blank provided was made from 2mm MDF, it’s far too rigid to conform to the camber, so I cut a blank from the left over ply sheet and planked that. Now to my favourite part of the build, the deck fittings and bulkheads. The cover for the helmsman I made up pretty much as per instructions apart from adding the curved roof which I made from an off cut of ply before planking, I also planked the walls and added some relief from the ‘L’ shaped walnut included in the kit. The bulkheads I also decided to plank below the decoration, as I said earlier, I’m not too keen on having the dibetou on show as the colour and grain patterns are pretty inconsistent, plus I’m pretty sure it would have been planked anyway. I was pleased the way the paper decoration went on, and, after a coat of matt varnish look pretty good. I haven’t permanently fixed the poop-deck or bulkheads in position yet, I want to add some planks to the rear of the poop side patterns where the openings for the swivel guns are, I know it’s a minor detail, but if I don’t, that little voice in my head says I’ll regret it later. All in all, a very pleasant part of the build, Revenge is starting to come together now, which leaves me a couple of days to work on the Forecastle before the boss begins her pre-holiday stress and panic week, but that’s another story… Cheers Martin

- 133 replies
-
- 15
-
-
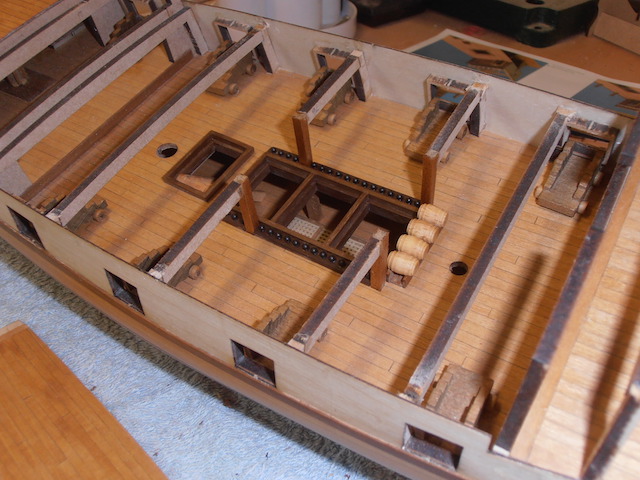
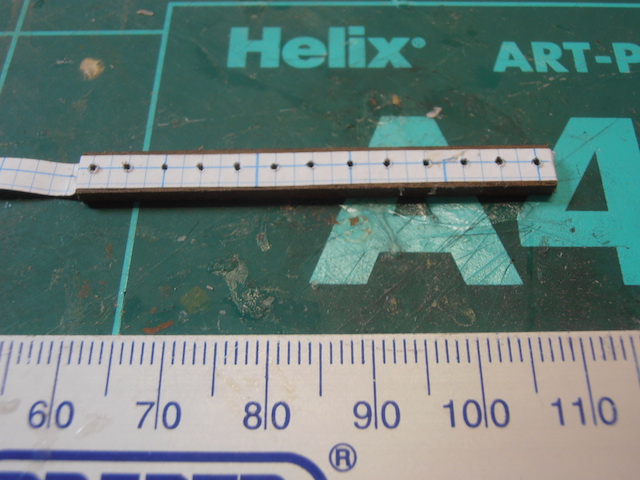
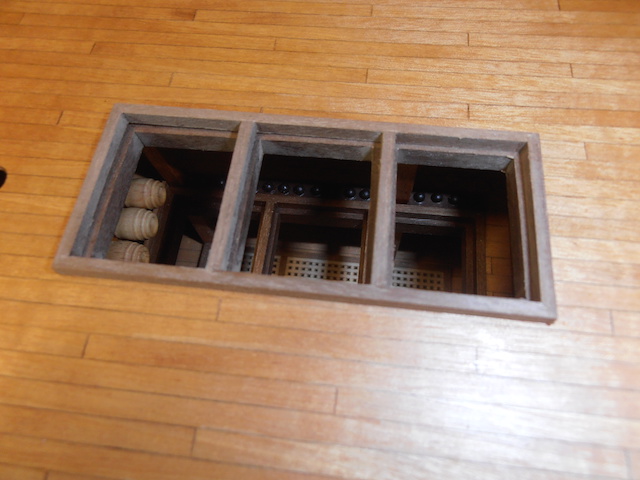
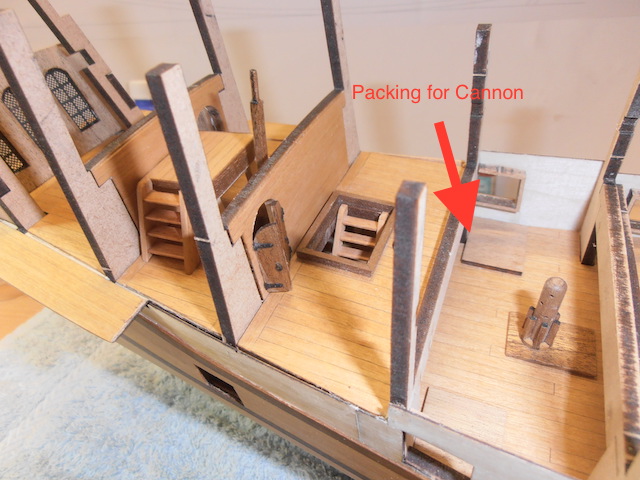
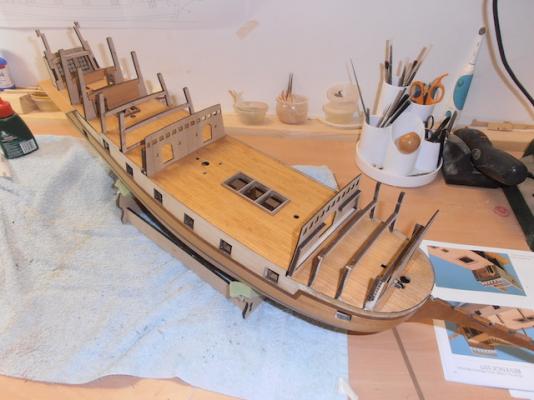
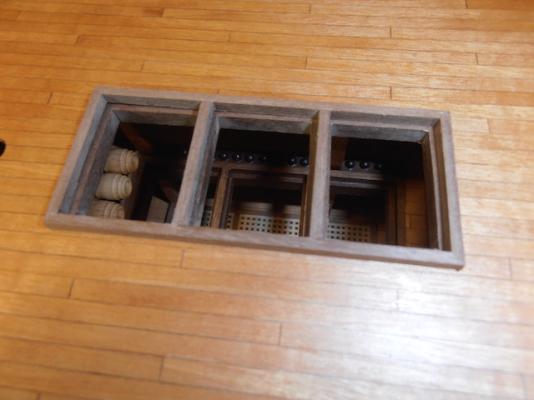
Hi All The main deck was my next step, with one deviation from the manual instructions. The instructions recommend partially planking and fitting before removing the bulkhead tops, but I prefer working off model wherever possible and didn’t see any reason why the deck couldn’t be fully planked at this stage. The manual also recommends removing the bulkhead tops by twisting them with a pair of pliers, but a much easier and cleaner way is to use a pair of snips and clip them off which is easy due to the softness of the MDF. I have to admit I’ve had to reign myself in a bit, I think I’ve reached the stage where psychologically I think all the hard works been done and it’s all downhill from here, but I had to remind myself that there’s a long way to go yet, slow down!!!. It’s a bit of a dangerous stage where one can think nothing can go wrong now and tend to start rushing things, I don’t know whether anyone else has experienced this. Still, another 2 weeks, and it’s a week in Crete for a bit of sunshine, we certainly aren’t getting any here in Jersey! Anyway, enough of me rambling on, back to the build log. I did mention earlier that I intend leaving the grating off the hatches on the main deck so you can look down through the hull, and I thought it could do with a little bit more interest (although you can’t see much). It’s not worth going to the trouble of rigging the guns as you can’t really see them so I thought it might be an idea to make some cannon ball racks to run along the gun deck hatches, and in my opinion they don’t look too bad. If anyone’s interested I’ve put up an image of how I mark them out and keep the holes aligned, just glue some graph paper along the wood and mark with a bradawl before drilling. For some reason Amati have included ten barrels in the kit, they don’t give any indication where to put them, but I thought I could put some of them to use at the end of the hatch and made up a simple rack as stowage, you can probably see better in the picture. I did remember to clean every thing down and blow out all the dust before fitting the deck, it’s a shame really ‘cos theres a lot of work covered up, you can see bits of it now if you look through the gunports etc. but when the models finished I think your in great danger of getting your eye poked out by a yard or mast to see most of it. Although I’m absolutely gagging to start on the fancy bulkheads, I think the logical way to go is to complete all the decks first, so it’s on with the quarter deck and forecastle deck next, then I can think about turning our ‘Plain Jane’ into the ‘Belle of the Ball’.


- 133 replies
-
- 14
-
-
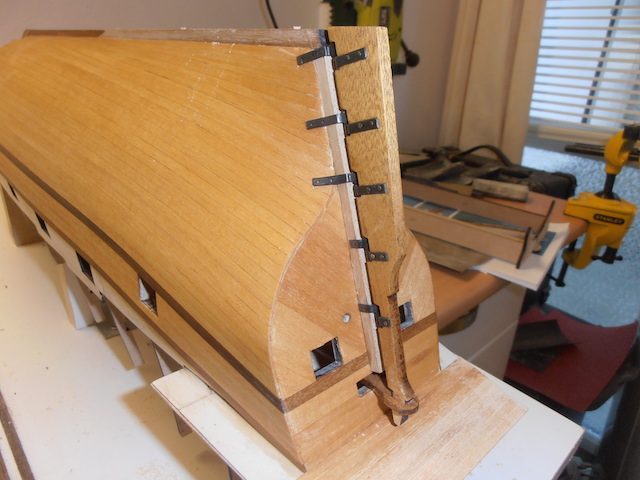
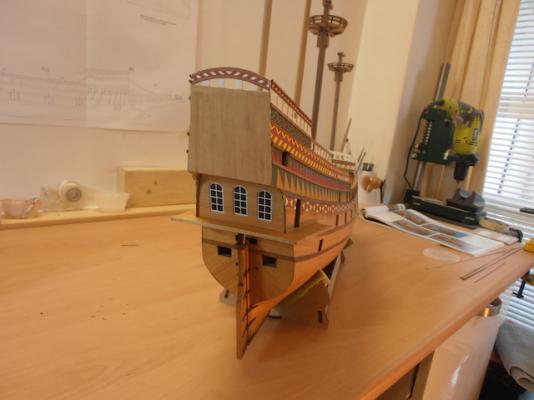
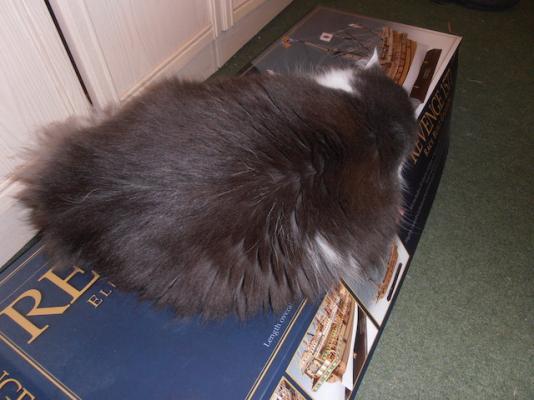
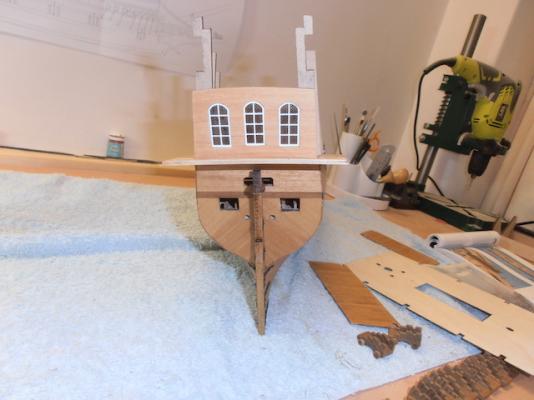
It was my intention to crack on and plank the main deck, but unfortunately ‘The Devil’s Cat’ a.k.a. Pudding had other ideas when she decided to take up residence on my kit (no pun intended) box. It’s not a case of not having the heart to move her, I just don’t have the bottle, so time to think of something else. I decided I’d start work on the stern which involves planking the stern gallery bulkhead and painting the gallery windows, which would normally be straightforward if only I had the eyesight I had twenty years ago. On the prototype the windows are painted all white, but correct me if I’m wrong, but I don’t think they had double glazing in Elizabethan times and window leading was lead coloured. I did a bit of research on Blackening Brass and came up with soaking the parts in white vinegar for a while to clean before putting into the solution which worked well. After blackening I buffed them up with a soft cloth and although I say it myself, looked pretty good, all that’s left now are the frames to paint!!! As it happened painting wasn’t too painful with the aid of a magnifying lamp, the relief on the etchings been pretty good. The stern bulkhead was planked with 0.5 x 3mm strip as I don’t really like the grain on dibetou, it’s OK for smaller areas but the black flecks in the grain can be a bit too much in your face on larger areas in my opinion. I’ve fitted the bits for the helmsman which I made earlier and made up the cannon carriages for the lower decks. Being a hoarder has its advantages (I hate throwing offcuts etc. away),all the bits that push out of the sheet parts I have kept, and there are two very nice pieces of 2mm that fit perfectly to make a platform for the two carriages at the stern rearmost gunports which are pretty low. Next job is to set up the decks and bulwarks to be sure everything lines up properly before planking now I’ve managed to retrieve the parts as the moggy’s gone for dinner, so will update soon.

-
Hi Brian, Apollo, Many thanks for your input and kind words. I think it's safe to say that so far it's unanimous to keep things 'au natural', so who am I to argue, definitely wood. Cheers Martin
-
Hi Nigel Having looked at your excellent work on the Red Dragon I'll take that as recommendation, wood it is! Cheers Martin
-
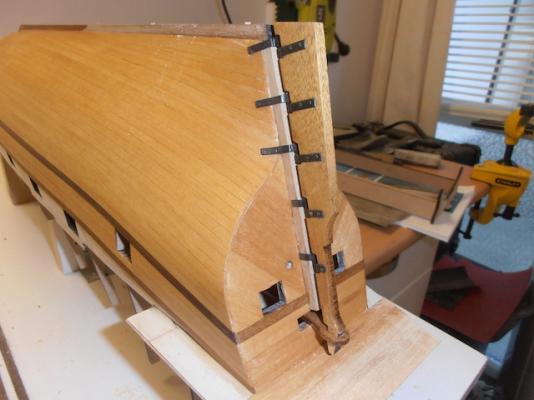
Fitting the rudder is a matter of cutting down a couple of the hinges and drilling the holes for the sternpost, and then shaping them to conform to the hull. The hinges are supplied pre-blackened and look quite nice. Once I’d finished fiddling around with them I dipped them in Birchwood Casey Brass Black to get rid of the shiny bits, I also blackened the brass nails. I’ve not permanently fixed the rudder yet, but it does actually work with the whipstaff. After all I was saying earlier about painting below the waterline, once I’d rubbed down the hull and applied a thin coat of matt varnish I’m not sure at all. I’ve looked at it on its pedestals and to be honest I now think it will look nicer just varnished plain wood. The jury’s out for the time being, any comments would be welcome. In the meantime I think I’ll start on planking the main deck.

- 133 replies
-
- 15
-