HOLIDAY DONATION DRIVE - SUPPORT MSW - DO YOUR PART TO KEEP THIS GREAT FORUM GOING! (89 donations so far out of 49,000 members - C'mon guys!)
×


Emelbe
-
Posts
92 -
Joined
-
Last visited
Content Type
Profiles
Forums
Gallery
Events
Everything posted by Emelbe
-
Hi Rob I think I might have sounded a little bit insensitive, I looked at the pictures before reading that your late father built this. I agree with Eamonn and Jack that your Dad has done some excellent work, and it will be a great keepsake. Best of luck with this project. Regards Martin
- 39 replies
-
- 1
-

-
- royal caroline
- panart
- (and 1 more)
-
Hi Bob Many thanks for your kind words. Cheers Martin
-
Hi Rob Looking forward to watching this one. Looks a really nice kit, had my eye on it for some time. Definitely looking good so far. Cheers Martin
- 39 replies
-
- 1
-
-
- royal caroline
- panart
- (and 1 more)
-
Hi Richard Many thanks for the link, looking forward to watching. Will be interesting as Alderney isn't a million miles from where I live, and diving was my occupation for many years. There was a lot of interesting stuff on a series the BBC did on the Armada not so long ago about how the British had improved their cannons, not sure if it's on youtube yet though. Just checked and it is it's called Armada 12 days to save England, well worth a watch. Many thanks again Cheers Martin
-
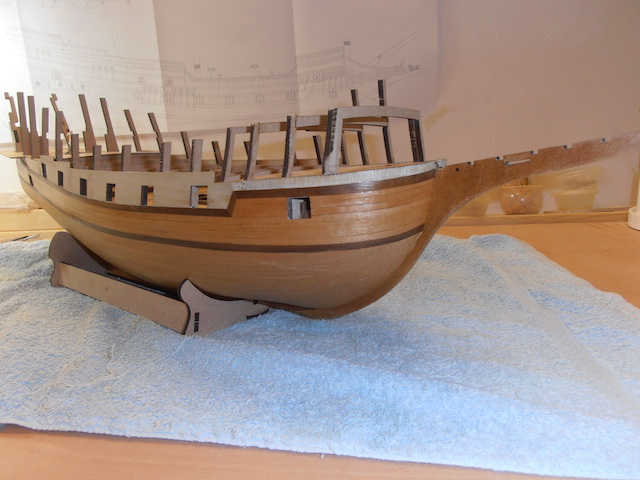
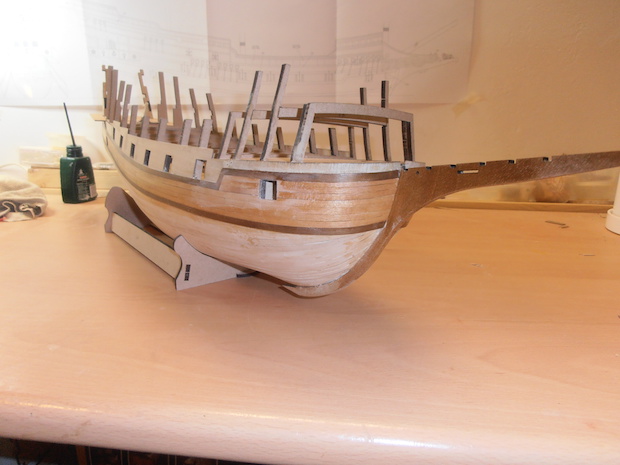
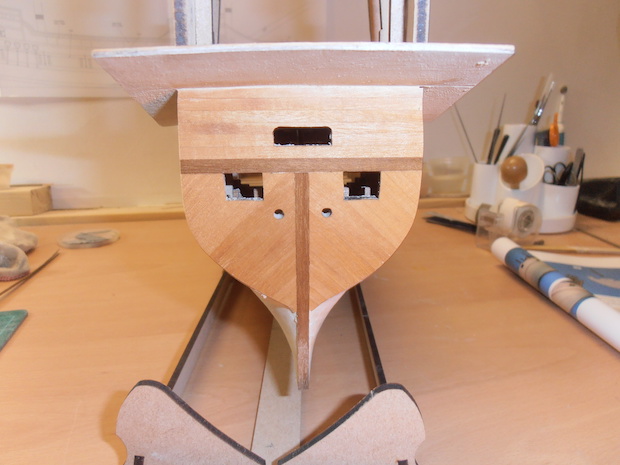
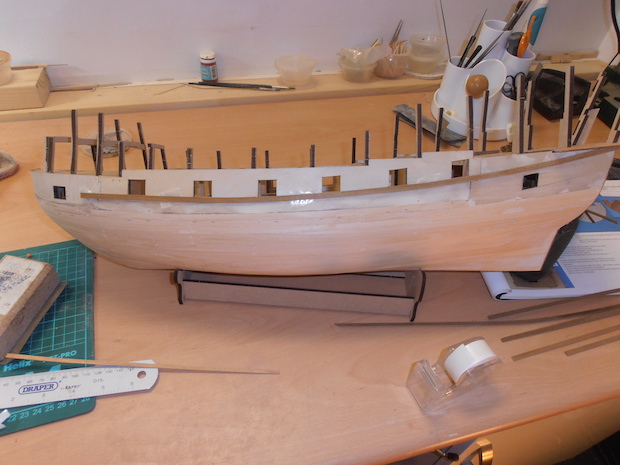
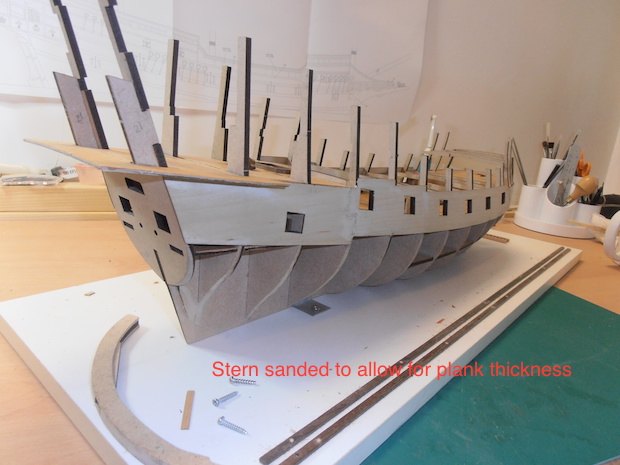
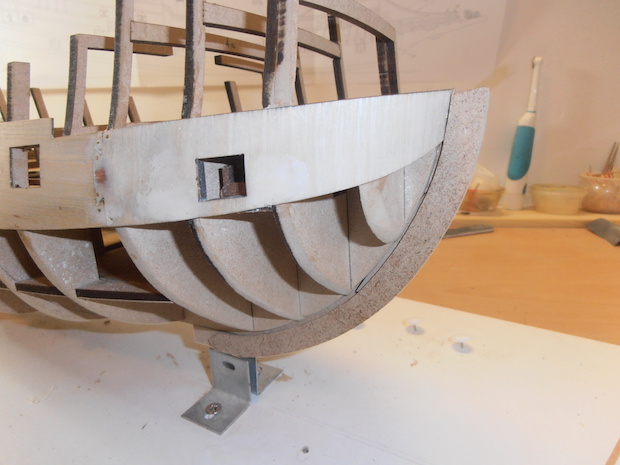
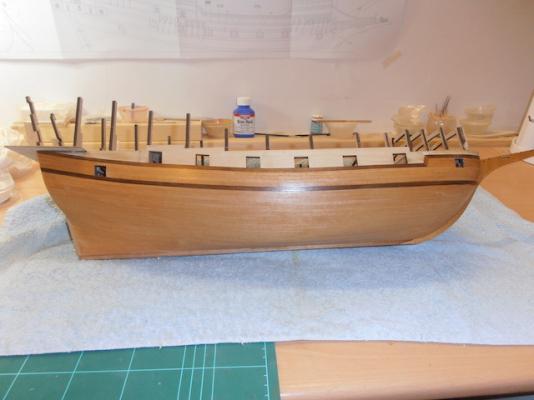
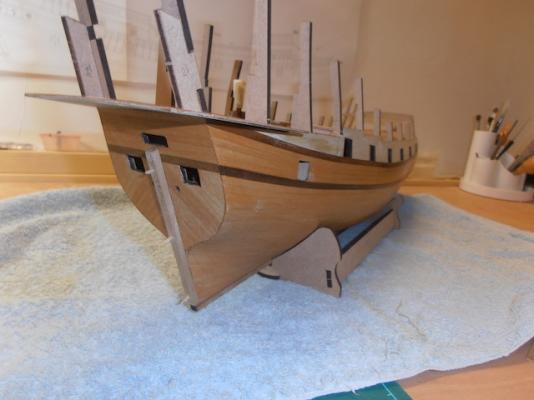
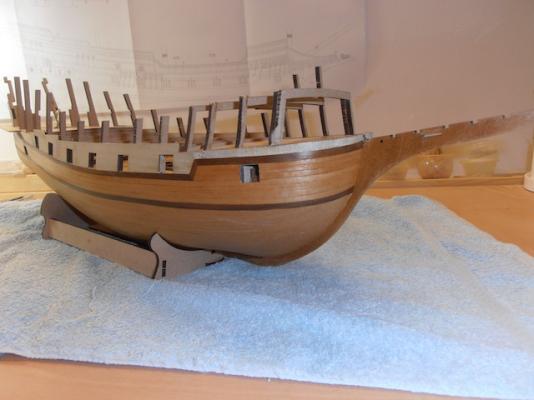
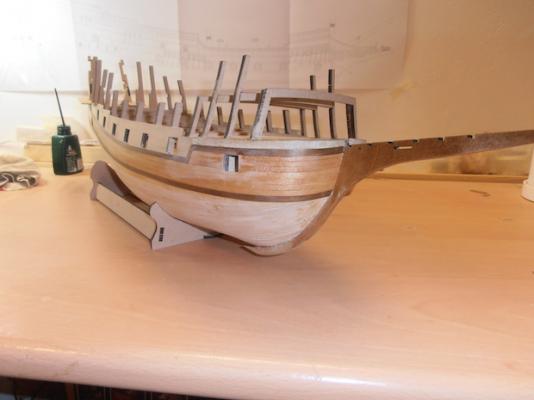
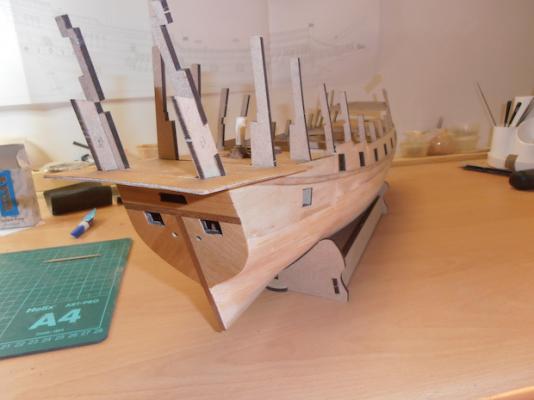
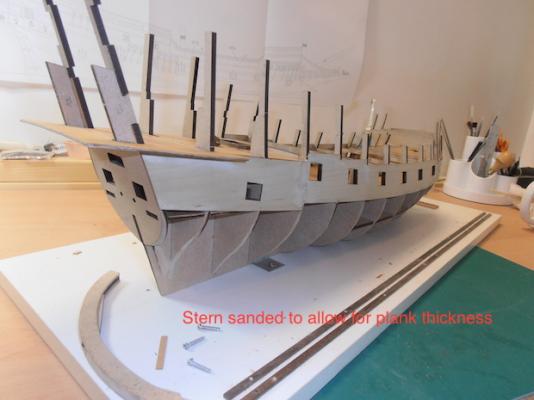
That’s the second planking below the whales completed. I decided to use the 4mm strips intended for the deck, and use the slightly less than 4mm to plank the remainder of the decks (the ones you can see). There is plenty of wood provided as I’ve around 20 strips left after the 2nd planking and the already completed decks. The other bundle of is about the same in number which is more than plenty, and probably enough left over to plank another smaller model. The actual planking itself is fairly straightforward, starting at the lower whale, allow the strips to follow the natural curve at the bow, and then hold your nerve as you plank towards the area below the waterline if you don’t want to add stealers to the visible planks at the stern. The rest is a matter of filling in using the underside of the hull to fit fillers, and adding stealers as necessary. I have temporarily dowelled (good old toothpicks) the sternpost and rear section of the keel so I can remove them to make fairing in the planking in easier. The keel itself is in two sections which join with angled scrarf? joints. To make these joints tight I needed to sand a little off the tips which resulted in the keel being slightly too short by a couple of millimetres, I’ll add a small piece at the end rather than lose width on my sternpost. I was in a bit of a quandary as whether to paint the hull below the waterline or not, but after consultations with the First Lady of the Admiralty, a.k.a. Head of quality Control, and comparisons with similar models on the net, we, (that’s the royal we) decided, aesthetically it would balance the heavy upper decoration out if it were painted, so I have my orders and painted it will be. At the moment the hull has its first coat of sealer ready to be rubbed down and then I’ll matt varnish it before attempting to mark out the waterline, masking, spraying, filling etc. Has anyone any good tips how to avoid the mandatory paint bleed? I think the model has now reached its interesting stage and I’m really looking forward to the remainder of the build now as all the ‘hard’ work is done. My earlier reservations about MDF bulkheads were founded, a couple of tops at the forecastle didn’t survive, but they come off anyway so it’s really no big deal. The next logical job on the hull will be to fit the rudder, I’ve had a quick look at the hinges and they don’t seem too bad, always a good sign, maybe I might not have to make my own for once. Will update as to progress. Cheers Martin


- 133 replies
-
- 16
-
-
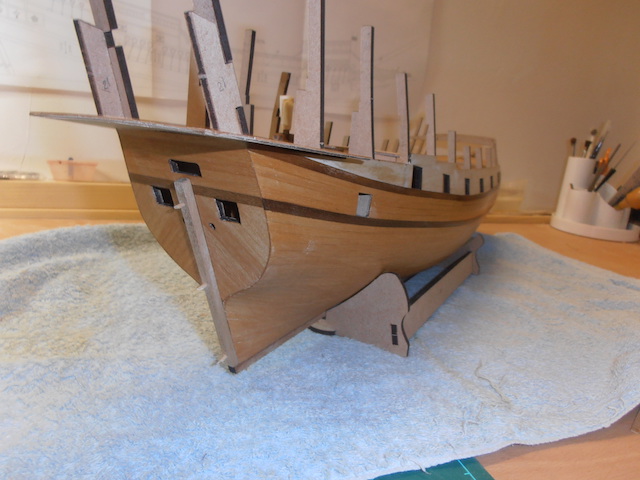
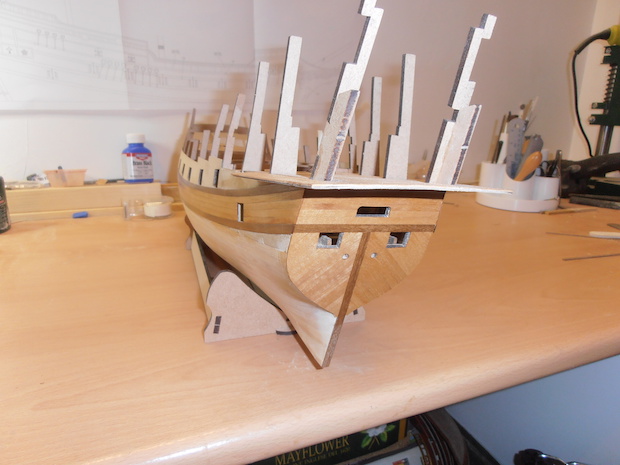
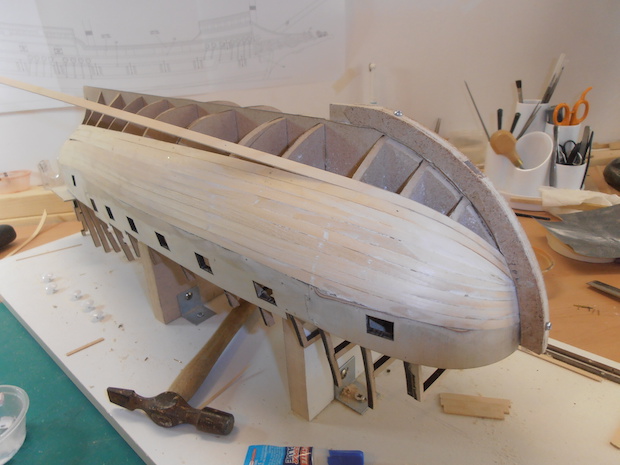
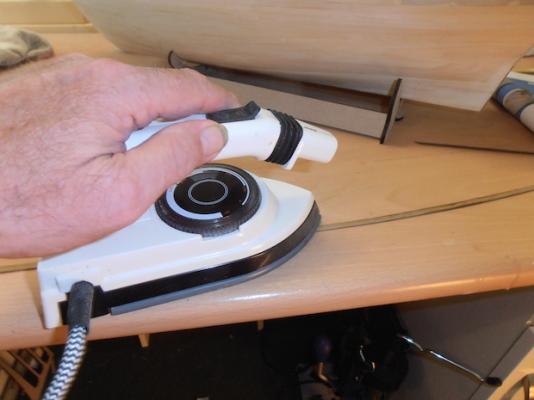
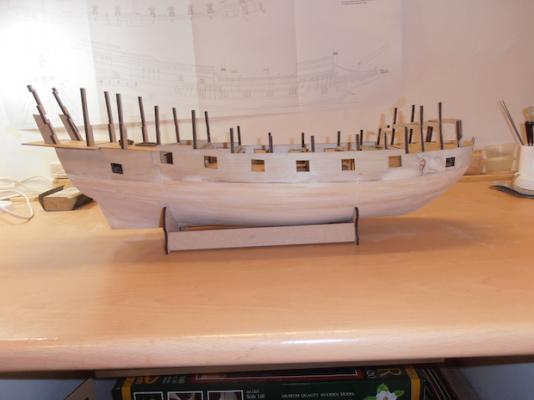
Another quick update. That’s the lower whale position set and planked. I took my time over this job because I felt it was critical to make sure the lay was correct to the lines of the ship. It did get a little tricky the closer I got to the lower whale position as the planks were having to bend way out of their comfort zone and needed quite a bit of gentle persuasion with my steam iron to conform. Don’t want to tempt providence but I think that’s the hardest bit of the planking (around the bow) over with. I didn’t actually intend to put butt joints along the planks but the plank above the lower gunports wasn’t quite long enough at 600mm provided, so I decided to stagger the planks where they looked reasonable. I have sealed the planking with sanding sealer, mainly because it helps stop those nasty annoying little areas of planking which haven’t quite glued springing when sanding. So where next? Do I give myself a little treat and build a bit of deck furniture or something, or is it straight on with planking the lower hull? Let’s go for it!!!!!


- 133 replies
-
- 15
-
-
Hi Tim Very nice!!!! Once upon a time when the eyesight was better and I wasn't so hamfisted I wouldn't have minded a go at a project like that. Looks like I'll have to make do with admiring yours. Cheers Martin
- 144 replies
-
- 2
-
-
- basilone
- BlueJacket Shipcrafters
- (and 2 more)
-
Hi Don It seems the planking issue is across the board, still, if it were easy anyone could do it! Hope you do start a log, I would be interested to see how someone else approaches the build, besides, you can probably learn from my mistakes. Regarding posting photos I found that more difficult than building the model until I got the hang of it. I'm sure you'll have a lot of fun with this model, especially if you are like me and don't believe in sleepless nights and self flagellation as part and parcel of modelling. Best of luck. Cheers Martin
-
Hi Apollo I think the planking issue will remain one of maritimes great mysteries, as I have said earlier it's frustrating rather than crippling. My guess is that they gave the apprentice the wood to cut! Don't let it spoil your enjoyment. With the lower gun deck, you really can't see too much once the upper deck is fitted, and if you intend adding a ships boat, or even the gratings you wont see any. The boss did say why go to the trouble of all that deck planking when most of it will be covered up (typical female logic), so I told her that a model ship is like a beautiful woman, it's the bits you don't see that make them more interesting (my apologies if I sounded sexist). With regard to commercially available boats, I know JoTika have a range of ships boats in 1/64 scale which could be adapted. My own personal feeling is that with all the decoration the hull will be busy enough and probably look better without. That's why I've decided not to treenail anything, it will look like a circus act with measles. I think I might use the thinner strip for the upper deck planking and use the deck planking for the second planking, or at least the visible areas above the waterline. Cheers Martin
-
Hi I don't think it's a problem getting the strip, it's the colour match that worries me, most of the Tanganyca strip I've worked with is a lot lighter and generally used only for decking. As for the width it does say in the manual 5mm for second planking, as I said in my earlier post, it's not the end of the world, just might make planking above the whales a little more difficult. Having said that, I have approached setting the whales a little differently to indicated in the instructions, you'll probably see better when I post next with some pictures. Think that bit is quite critical as it determines the whole run of the planking. Still waiting to see if I get a reply from Amati but I'm not holding my breath. Cheers Martin
-
Hi Apollo Theres a figurehead in my kit, looks like a Griffon (or something like that), I haven't found the castings for the mast bitt assembly though (p75). There's no lantern or boat specified for the model, I'm guessing the reason for the boat omission is the facility to see the lower decks with gratings removed. Regarding the second planking, there's plenty of material in my kit but wrong size, it's exactly the same as the bundle marked deck planking only narrower, it's around 3.8mm (what size is in your kit?, theres supposed to be 120 strips of 1 x 5 x 600mm Tanganyca according to parts list at back of manual). I'm presuming these may be teething troubles associated with the first run of the kit but definitely annoying. I've tried to contact Amati through their website but the messages keep bouncing back, I've also enlisted the help of Cornwall Model Boats to see if they can get some joy, but nothing back from Amati so far. I don't know what you think, but if it were my business and I had just released a new product, I'd be scanning the net for every review, build log or customer feed back and trying to resolve any issues. It's a lovely kit just a shame there are a couple of issues regarding content. I'll keep you informed if I get anywhere regarding my problem, think it's supposed to be called 'customer service'. Cheers Martin
-
Famous last words, “should be straightforward”! Firstly, the manual indicates that the hull second planking should be 5mm strip, in my kit, the supplied strip is 4mm or should I say 3.8mm to be exact. In fact there’s no 5mm strip-wood in the kit full stop, which isn’t very clever as the whales are 5mm wide. Secondly the manual indicates that to set the lower whale you need to measure down from the gunports and pin a strip of 5mm and take the planking from there. Unfortunately, in my opinion, that seems a bit ‘hit and miss’ especially as you have to manipulate the strip to take into account the excess curve at the bow, giving very little control over the lay of the plank. Not a good start! Have to put the thinking cap on and figure out how to do this taking into account the lack of right material, (it’s not getting 5mm strip, it’s the colour match that mainly concerns me). More about that later. Fortunately I did have some 1 x 5 mm walnut left over from a project which I could use to mark the location of the whales and make the actual whales, (the actual ones are glued on at a later stage after painting), and decided it was better to use the run of the gunports as a guide. First job was to plank the stern, the starting point being to lay a strip of the walnut above the gunports as a datum for the termination of the lower whale. The rest is according to the instructions. Following that I steamed the walnut strips to conform to the gunports, and also a shorter piece that would curve around the bow 10 mm above it (the second whale up is staggered). The stern end is fit so that 4 planks - 16mm down it would line up with the stern datum (should really be 15mm, 3 x 5). Everything checks out with the plans so I’m not unduly worried so far, and at least I have something to butt my planks up to when planking down towards the lower whale giving better control (will still take a lot of steaming to lay correctly). My main concern now is, if I can’t get hold of some 5mm strip there will have to be a lot of fiddling around to get the right widths as I plank upwards above the gunports, the whole thing is designed to use 5mm. I have tried to e-mail Amati via their website but everything has bounced back so far, so if anyone knows an address or contact could you let me know please. A bit of a disappointment, it’s not insurmountable but I would have expected better from a kit of this quality. A quick newsflash, I e-mailed Cornwall Model Boats to ask their advice this morning, they have just got back saying they have passed everything on to Amati and to the UK Amati supplier. Watch this space.


-
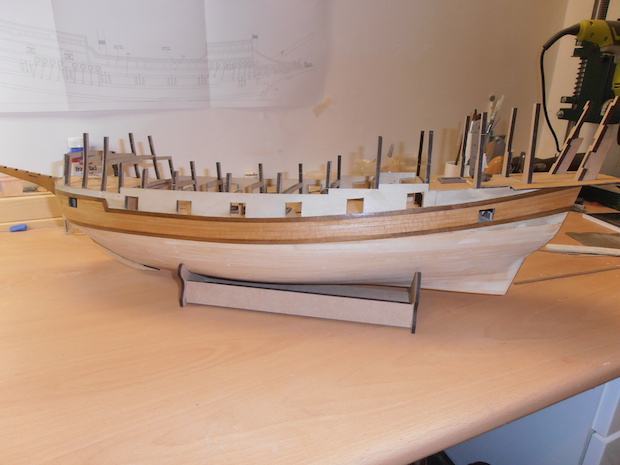
Hi Well, that’s the first planking completed, always a milestone! In honesty it wasn’t really that painful, just the bow to concentrate on as the stern took pretty much care of itself not having any counter to worry about. It’s just a matter of steaming a curve at one end of the plank for about 50-60 mm, I soak the wood at one end for a couple of minutes and use an old travel steam iron to form the curve over a suitable template (the edge of my workbench). I pin the plank in place and use the next one down to mark where to taper it. As long as you let the planks fall naturally along the hull, making sure theres full contact with each bulkhead, there’s no problem. One thing I did make, was a stand for holding the hull upside down for planking and sanding, those upper bulkheads are pretty fragile and I didn’t want any nasty accidents. I did have my reservations regarding MDF but found it made the whole operation easier, you can push dressmakers pin in easily, and also get them out without any problems associated with nails. I use slow drying cyano for the bow and stern and PVA for the rest, running thinned PVA between the planks. I did say earlier that I normally make a start on the masts/yards etc. at this stage, but once I got started planking I kept going. It must have taken around 12 hours or so over three sessions, because I put on an audio book when I started, and finished both around the same time. So where next? According to the manual it’s setting the lower whale position and then on with the second planking downwards. All being well there shouldn’t be any problems there, most of the planking is below the waterline and painted afterwards.


- 133 replies
-
- 10
-
-
Hi Jonny Nice to hear from someone closer to home. I'm actually not Jersey, I'm a true Yorkie born and bred from Leeds, I just happened to come over for a season teaching diving 17 years ago and never bothered leaving. I'm not sure who built the models in the museum, I haven't been there in a while, must take a look. Thanks for your comments, I like the one about neat, you should see the state of my workbench!!! Will let you know if I find out more about the models Cheers Martin
-
Hi Chris Know what you mean, I've had a quick look on the net for Elizabethan ships cannons but not a lot out there. I'm sure if I do more digging something will turn up. Still, it's quite a way off yet, so in the meantime I'm concentrating on getting the hull right, then I can tweak things a necessary. Cheers Martin
-
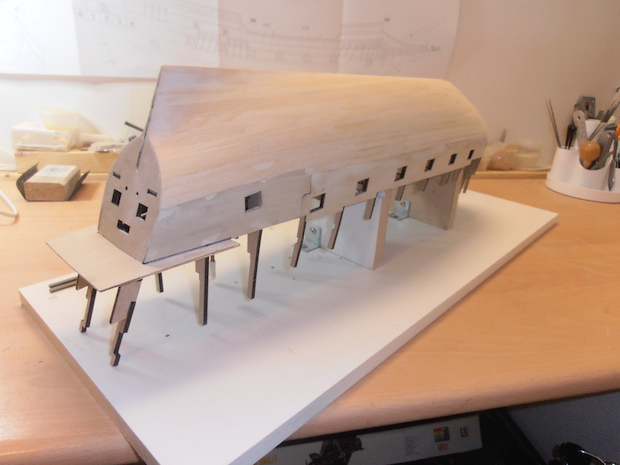
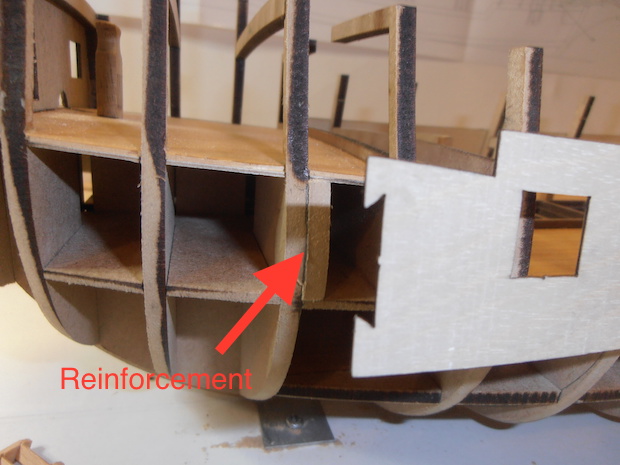
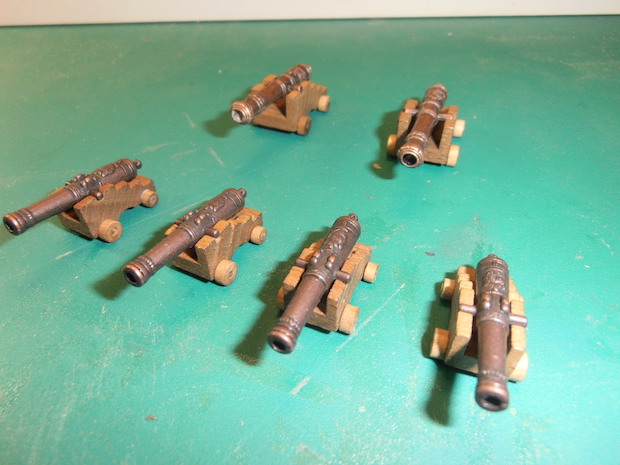
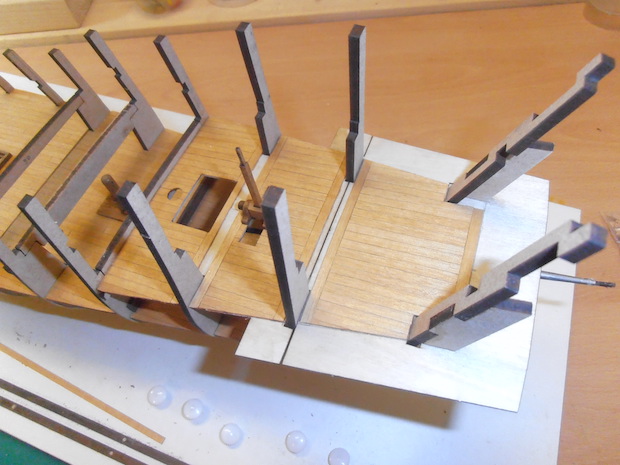
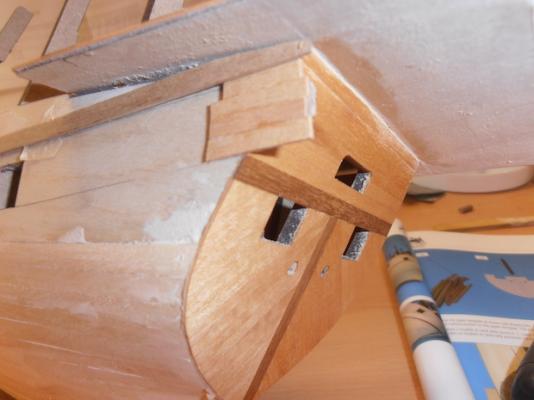
Setting up the side patterns for the planking isn’t particularly difficult, and I think it would take a lot of determination to get it totally wrong, but it’s worth investing quite a bit of time checking and double checking the positioning before glueing. It is also worth reinforcing the bulkheads where the patterns join, MDF isn’t very forgiving to pins and can easily split. Before glueing the patterns I made up the cannon carriages which need to be glued into position first. The carriages are milled from one piece, and don’t look too bad, I’m not sure about their historical accuracy, but they’re certainly good enough for the lower decks. I might do a little bit of research before I fit the ones to the upper deck. Another job is to fit the gunport surrounds which I suppose can be done anytime, but I did say I’m going to try and stick to the manual. All that remains is to screw my planking gizmo to the bow and a-planking we will go. A quick reminder to myself…don’t forget to put Sellotape on the gizmo so it don’t stick!!!! I'll update as planking progresses, I do normally make a start on masts and yards at this stage when I'm all planked out and need some respite, wish me luck Cheers Martin


- 133 replies
-
- 15
-
-
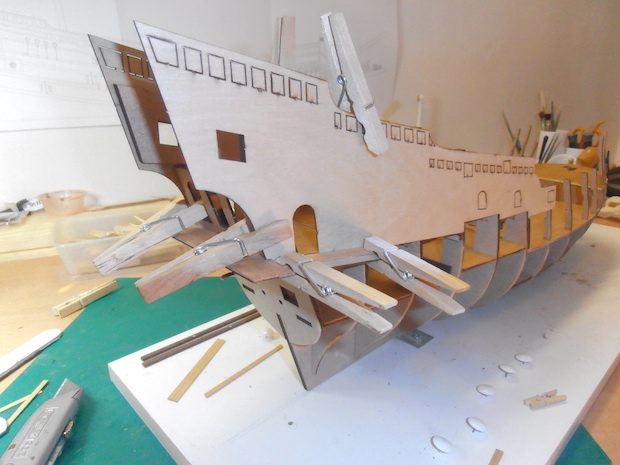
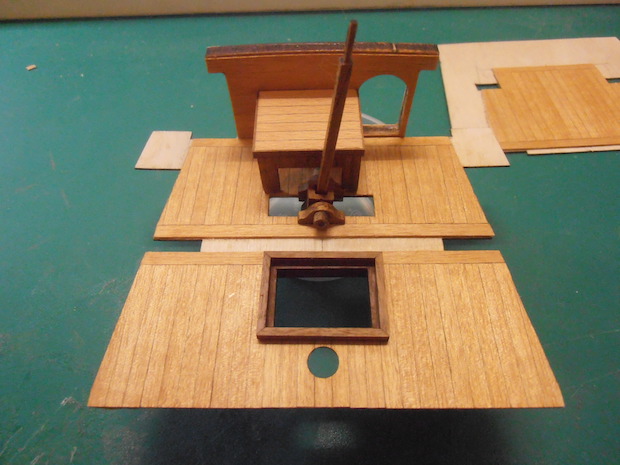
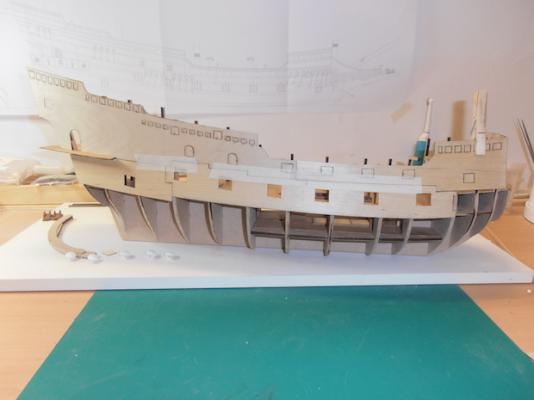
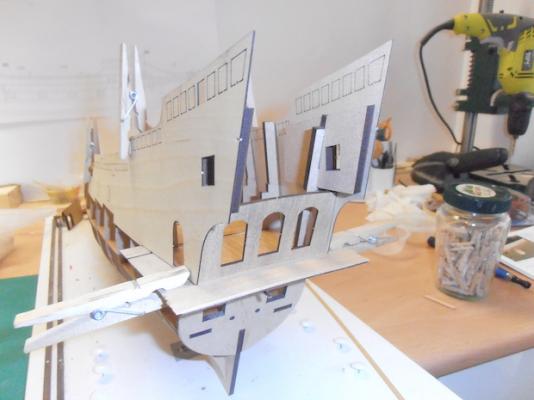
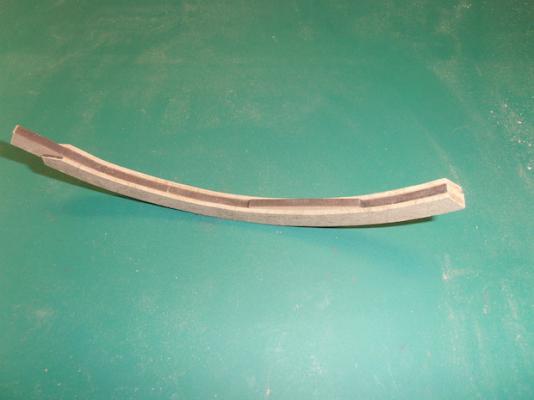
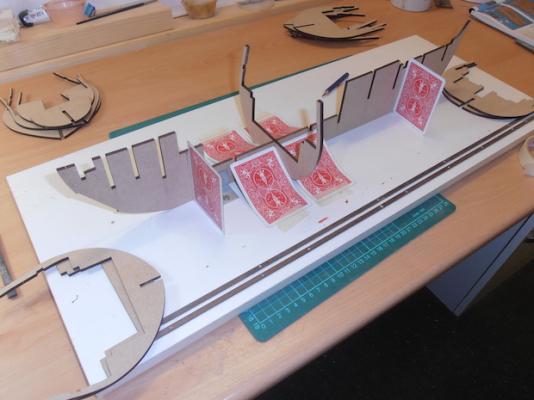
Planking the stern gallery is pretty straightforward, the two side patterns and stern window bulkhead are pinned temporarily in position. Starting with the cross section, the planks are laid butting up to these. One thing I do, rather than pin these parts, is use double sided sticky tape. I hate putting holes in things unnecessarily, and I’m still not sure how confident I am pinning to MDF. The fit of the side patterns looks pretty good, I’m not going to do any minor tweaking at this stage, I’ll worry about that when it comes to setting them up prior to planking (not too far away now). Another small modification I made was to make the four upper deck support posts from wood rather than use the MDF ones. I simply cut off a 4mm strip from one of the dibetou sheets and used that. I’ve also test-fit all the decks and enlarged the hole for the main deck hatch to fit my custom frame. Time to finish sand the bulkhead profiles and set up all the side patterns ready for planking the hull. The whip staff bulkheads and helmsman platform I’ll glue later, there are four doors to fit to them, but I’m waiting for some Birchwood Casey Brass Black to be delivered from Amazon to use on the etched brass fittings. I’ve never used it before so it will be interesting. Just for your interest I reckon I’ve spent around 70 hours so far, doesn’t time fly when your having fun!


- 133 replies
-
- 11
-
-
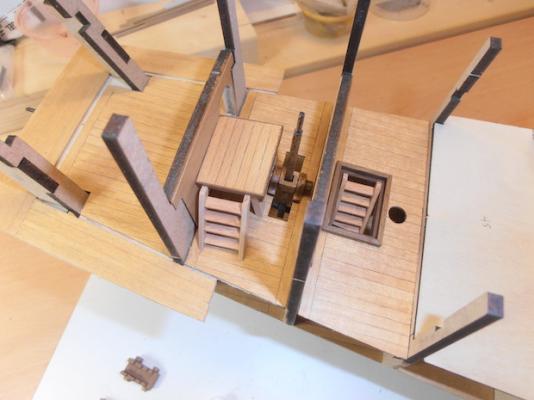
Another update, as much as I would like to crack on, it’s Friday evening, the boss has just come home from work, so what better way to kill a few minutes while she gets ready to go out. I’ve completed the whipstaff assembly and planked the stern lower decking. I’ve also planked the two bulkheads that fit either side of the helmsman’s cabin (or whatever its called). The manual says to just stain these but for the amount of time it takes why not? I’ve also made up the ladder hatch just behind the mizzen mast. The next step is to plank the stern gallery which involves setting up the side patterns so I didn’t really want to start that this evening, tomorrows another day (besides the pub’s calling). Cheers Martin


-
Hi Nigel Thanks for the link, once upon a time I wanted to be a pilot, now I want Chris' job !!!! Cheers Martin
-
Hi Malcolm In answer to your question regarding decks. I think every deck apart from the main gun deck and forecastle lower deck can be planked off the model without any issues of fitting to the model afterwards. The problem I had with the lower gun deck was that it was two parts and no matter how careful you are, may have left a visible join down the centre of the deck. Unfortunately I'm one of these people who's eyes would have been automatically drawn to this every time I looked at the model (can be a bit of a curse sometimes). The forecastle lower deck needs quite a lot of flexing to fit in position and just seemed more practical. It's no real problem, just a bit tight around the bulkheads when sanding. As I said in my last post, it's a really well thought out kit and Chris seems to have gone to great pains to illustrate how he built the model, being a mere mortal who am I to argue. In answer to the last part of the question, it's a definite thumbs up.
-
Hi Yves Thanks for your post. This is definitely a very well thought out kit, it's a pity a lot of information was lost when the site crashed, it would be an education to see how Chris designs his models. What I do like is the fact he build his prototypes with 'no frills', which gives the average modeller confidence that they can achieve what they see on the box, and yet there is still plenty of scope for enhancements for those who want to go the 'extra mile' with their build. Thoroughly enjoying building this, definitely 10/10 so far. Cheers Martin
-
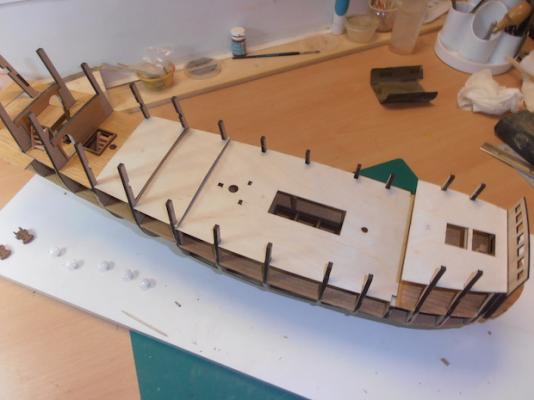
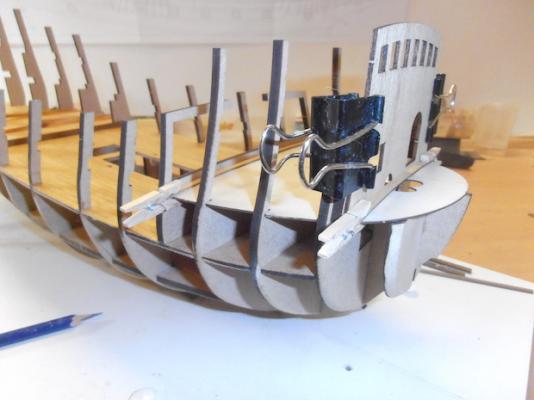
A quick update on progress so far. Started working on the bow which is a matter of setting out ready for planking the deck. Again the manual indicates planking off the model but the deck takes quite a lot of flexing to position, so I decided to plank with the deck fitted. When it came to sanding I did keep an eye on Bulkheads 3 and 4, they are very thin, a disaster waiting to happen. I don’t know if you’ve noticed the mini clothes pegs in the photo, I picked them up in an art shop, I think they’re designed for Xmas cards etc. but they’re brilliant for small work and rigging, I think they’re £4 GBP for about 50. While at this stage I checked the fit of the masts and bowsprit, I don’t want any nasty surprises later. I’ve fitted the deck beams towards the stern, I did notice the two beams nearest the stern were quite a sloppy fit so I had to pack them so they were the right height. The last job was to make up the capstan, the staggered holes were quite tricky, it too me twice as long to set up my Unimat with the dividing head than it did to drill them, i did try to do it by eye but after scrapping a couple thought better of it. So its onwards and upwards figuratively speaking. I’m going to be working on the stern and whip staff assembly. I think this is where things get interesting as it entails setting up the stern galley and side patterns, lots of dry fitting me thinks.

- 133 replies
-
- 14
-
-
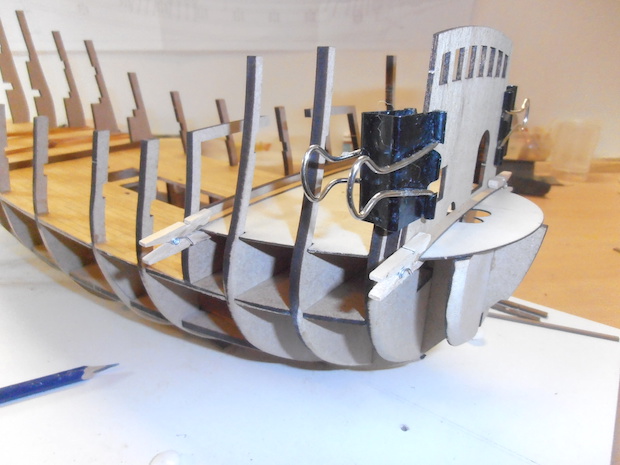
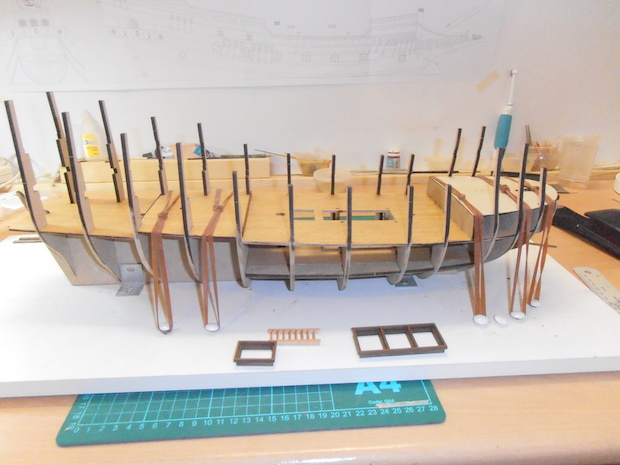
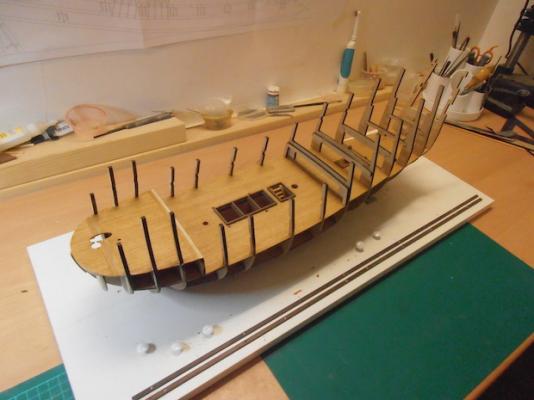
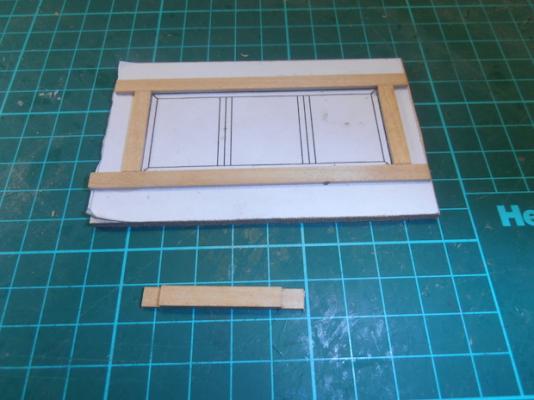
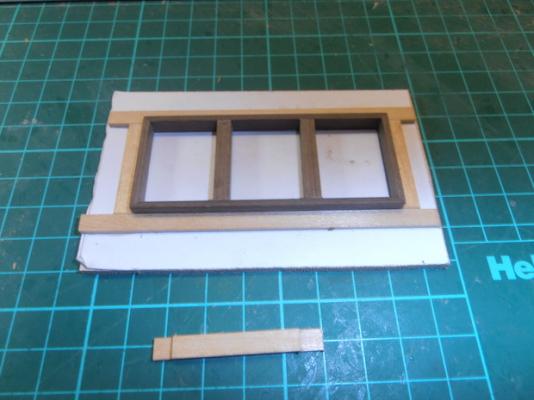
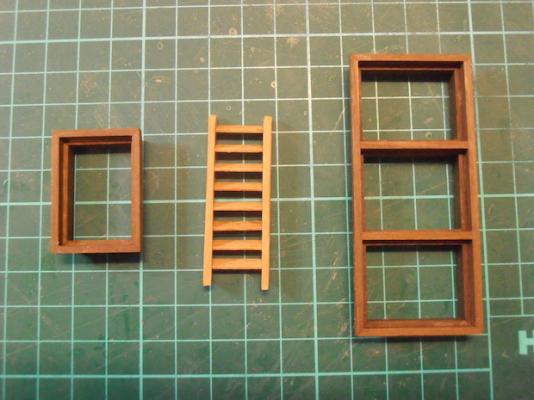
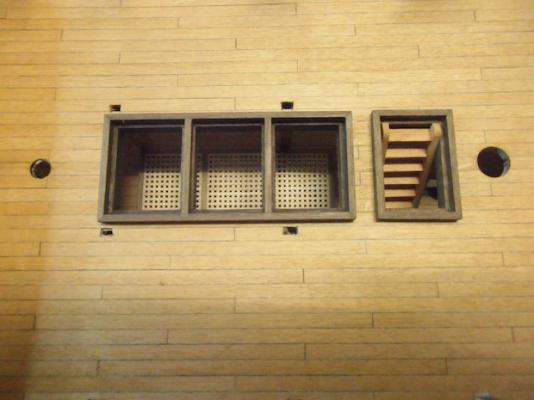
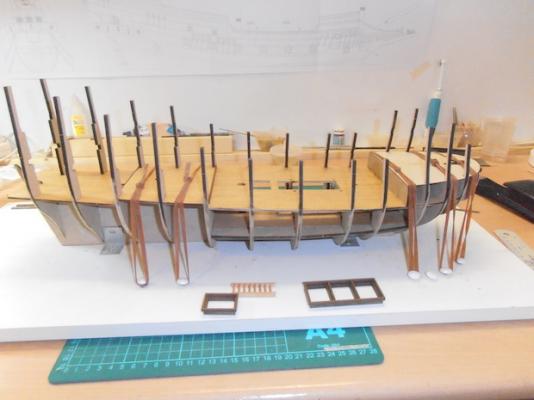
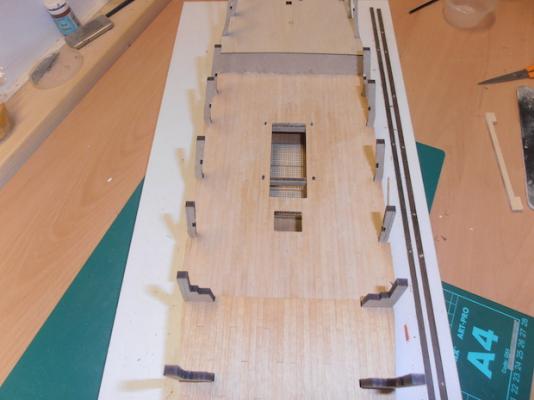
Back again with a quick update. As I mentioned earlier in this log I aren’t really keen on the deck hatches and gratings, so I’ve decided to make my own as I’m leaning towards displaying the hatches without gratings so part of the lower decks can be seen. It’s not a massive job, but I think it’s worthwhile as it (in my opinion) enhances the appearance. To do this I made a simple jig for setting the framing, especially as there is another the same size on the upper deck. To do this I set it out in SketchUp (3D CAD package) and printed it out. I then glued the drawing on to a piece of scrap board and framed around it using some spare strip. It’s just a matter then of building the hatch. Before fitting I removed the beams which cross the opening and I added four support posts, which were a bit fiddly to position. I don't know if you can see them in the photo. The ladders are pre milled and the treads are pre-cut to length, I’m not sure what wood they are but look nice when put together. Next step is to glue the aft decks in place and then start work on the bow. I’ve actually got to page 9 in the manual now, only another 76 to go.
- 133 replies
-
- 19
-
-
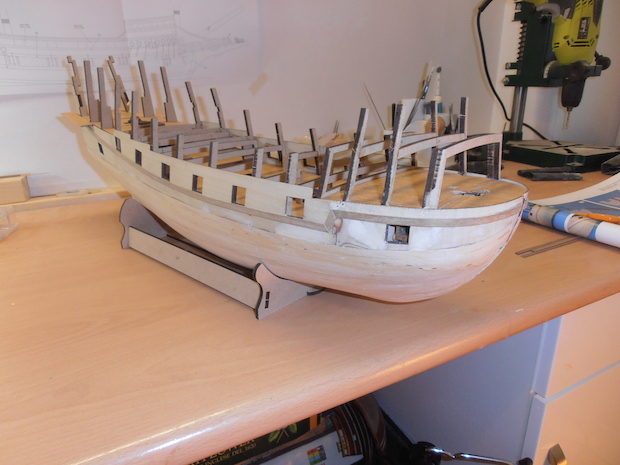
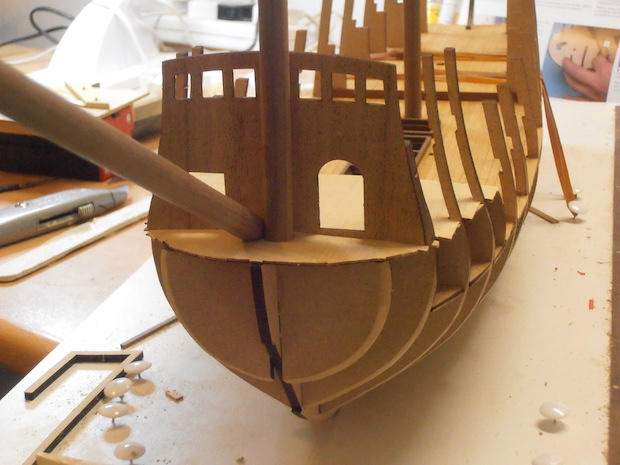
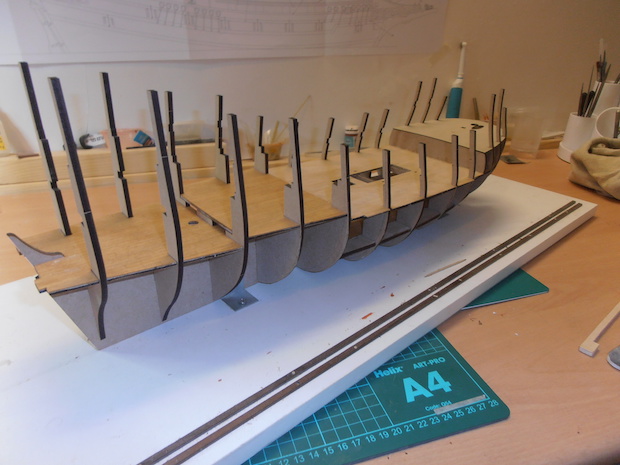
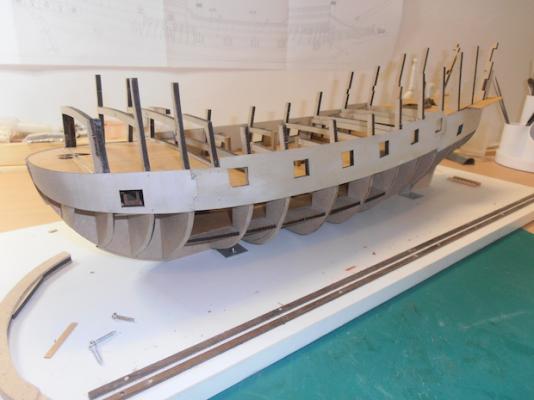
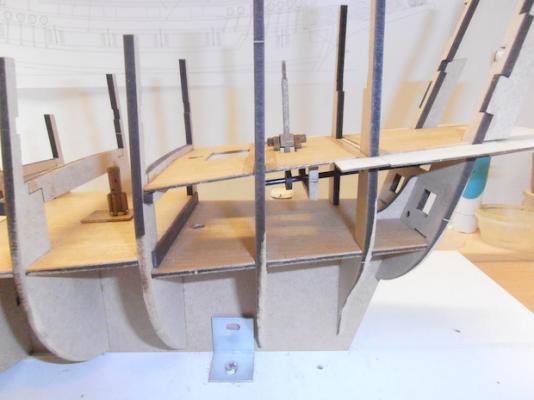
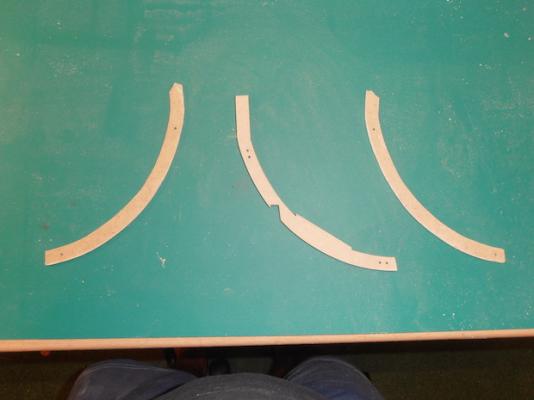
Hi All, Once again many thanks for your comments. I’ve set to work on building the keel and bulkheads. The first job was to check the fit of the bow, and keel pieces which, as expected, were perfect. Another little job was to make an aid for planking the bow, which is simply to cut out the area of the bow from the MDF sheet, glue two pieces either side which slightly overlap the curve of the bow forming a slight lip, which will then be temporarily screwed to the bow to form a rabbet for planking. Hopefully this will cut out the need for using small nails to hold the planks in place. I’ve added a couple of images as a picture tells a thousand words. So it’s on to the trusty old building board, nothing fancy, just a side from an old MDF unit with four ‘L’ brackets. Bye the way, if anyone’s interested the two strips are for holding stripwood while sanding their edges. When fitting bulkheads I always start amidships and work forward and aft checking for square as I go. As I mentioned earlier the whole hull is fairly self aligning so no great problems there. Before I glue the bulkheads in place I roughly profile them using my Dremel.(I’ve yet to fit the three stern ones) The main gun-deck required a little tweaking to sit properly, which I think was due to Frame 4 (from the bow) being too low. Fortunately I spotted this and took a measurement from the drawings and set its height from there. There being a lesson learned, fortunately in time, the manual is so self explanatory I almost forgot the drawings. They’re now pinned up on the wall so I can’t miss them! The gun deck is in two halves and the manual indicates planking off the model and then fitting, but the pictures of the deck in situ show quite a distinct irregularity, for want of a better word, where they are joined once the decks are fitted. I know you can’t see much of the gun-deck once the upper deck is in place, but this would drive me mad (it’s a personal thing). Anyway, for that reason I fitted the gun-deck and then planked it after. Now, I don’t think this has ever happened to me before, the planks ended up absolutely symmetrical about the centre line, this is not a testimony to my planking, but to the accuracy of the laser cut parts included in this kit, I’m not sure if you can see it in the photograph below. So, for the time being I’m all planked out, time for some respite and on with the deck hatch framing and ladders. Cheers Martin

- 133 replies
-
- 12
-