Siggi52
-
Posts
1,156 -
Joined
-
Last visited
Content Type
Profiles
Forums
Gallery
Events
Everything posted by Siggi52
-
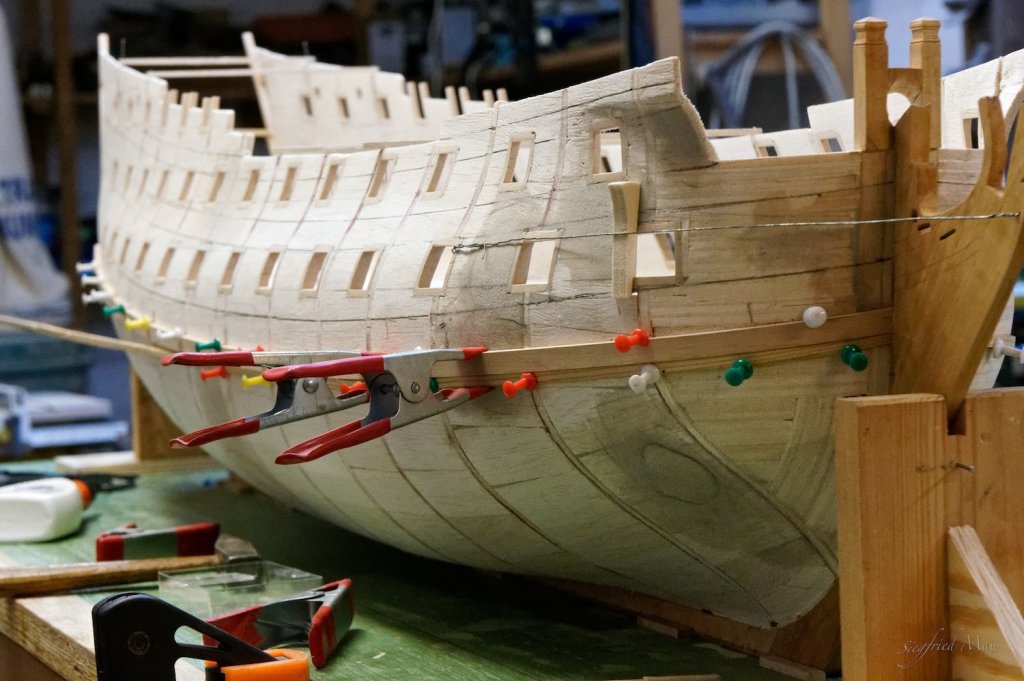
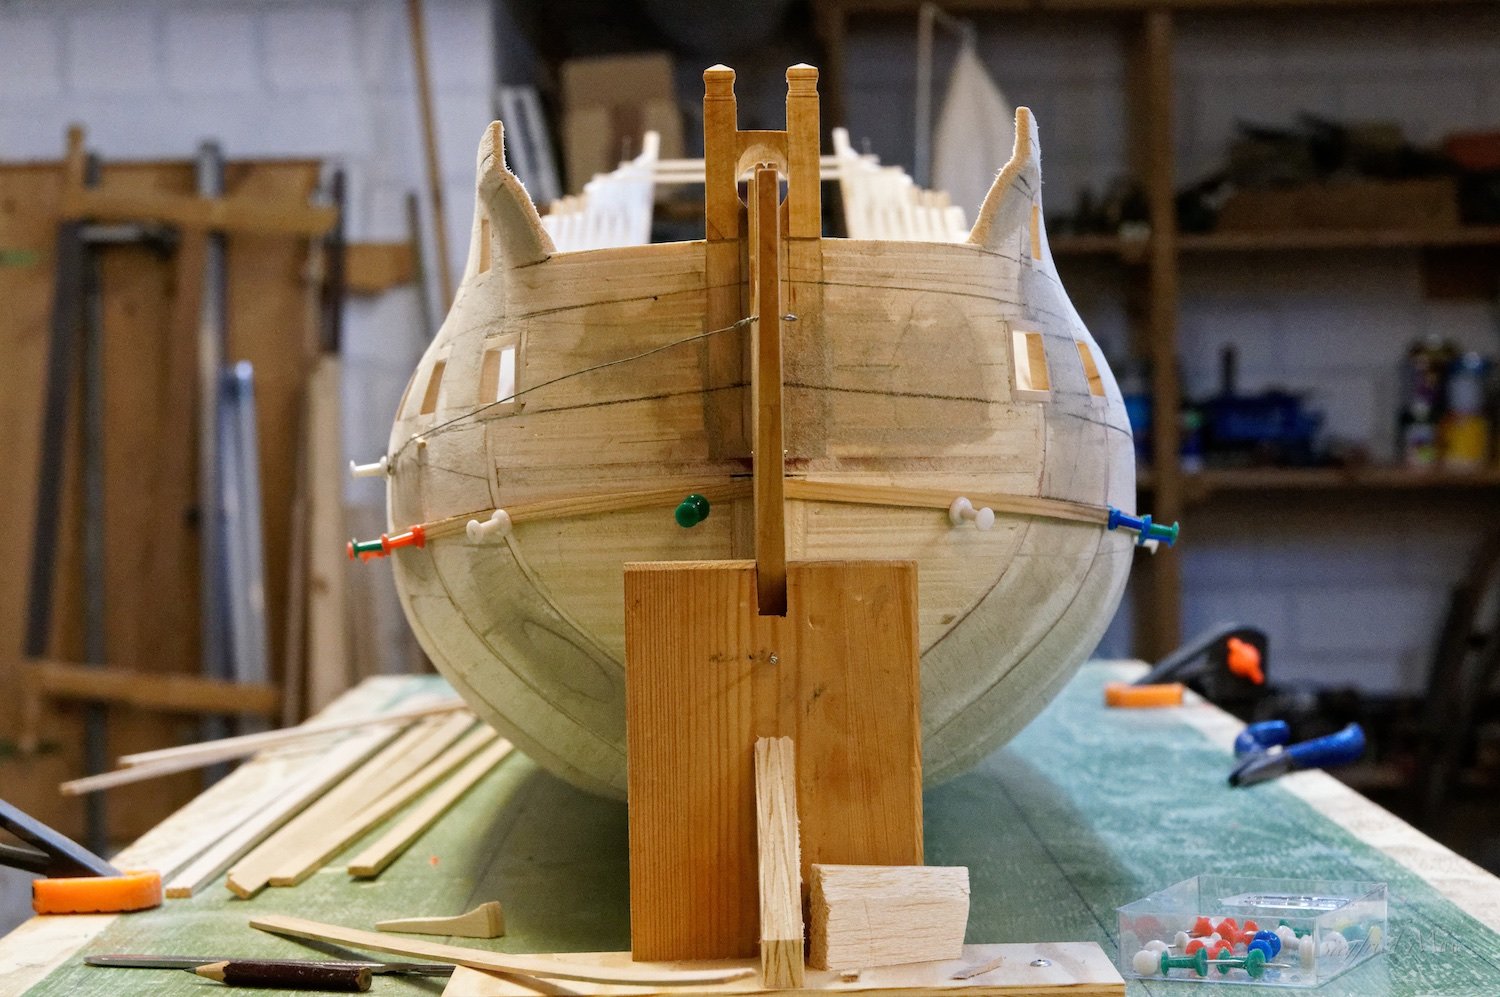
 Hello, and many thanks for your likes. Today I finished the wales. That was harder as first thought and the next days I need to get the notches out of my thumbs, from pressing down these stubborn strakes

-
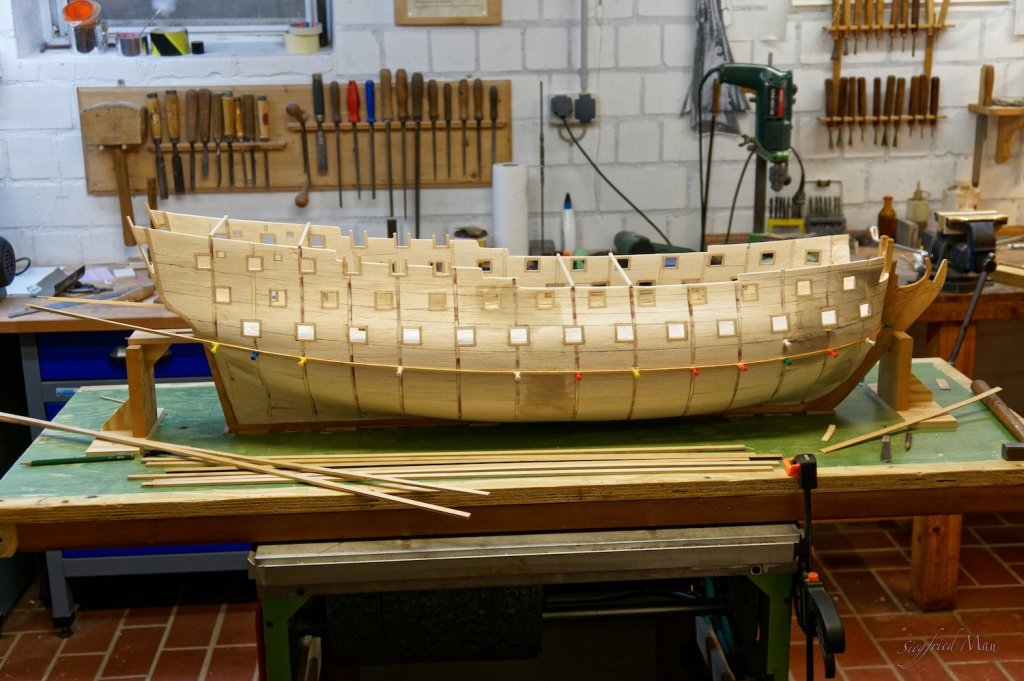
Hello, Paul, if you have strong glasses and sharp knifes, I think you can do it too Leo II is sitting here at my computer desk and would't leave it. Today I'm started with planking. At first the wales. I made the lower strake and half the thick stuff at both sides. I made first the butt and hook joints and glued them together. But if the joints are sanded and painted black, you would hardly see them So far for today. The rest will follow tomorrow.


-
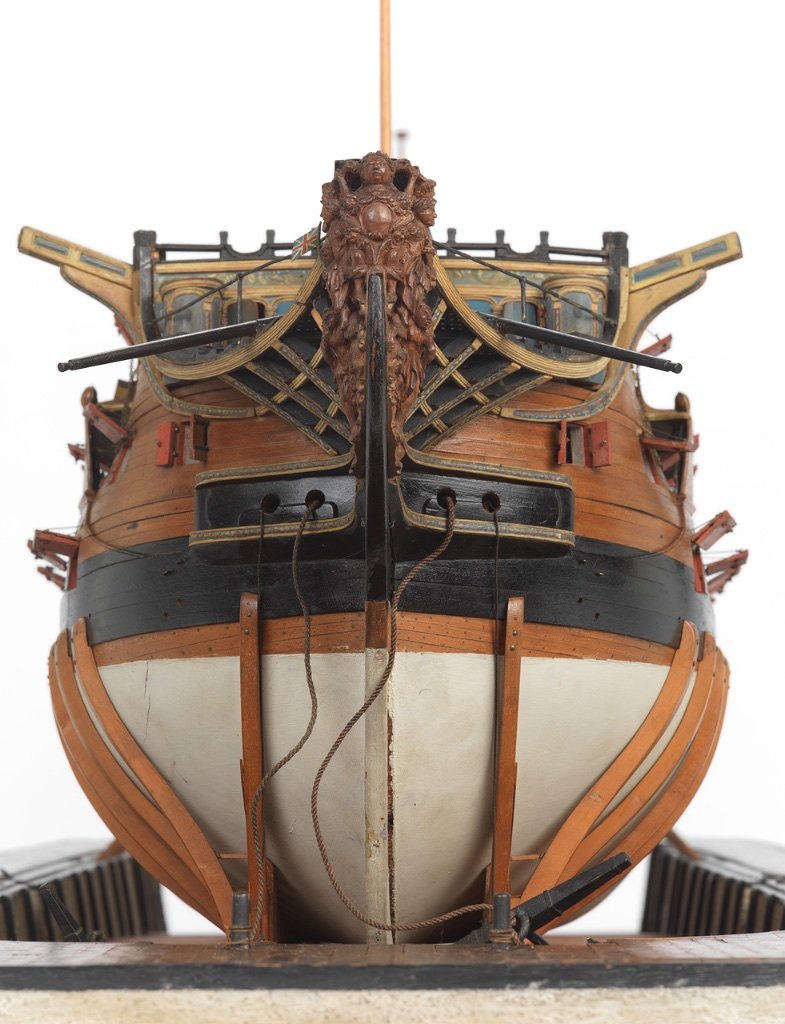
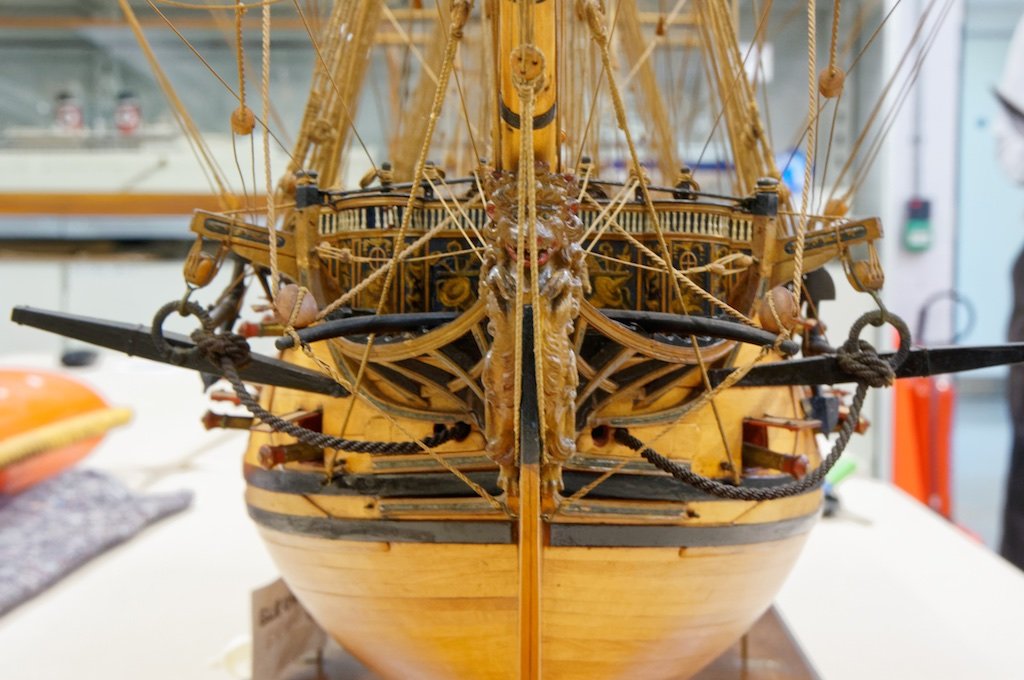
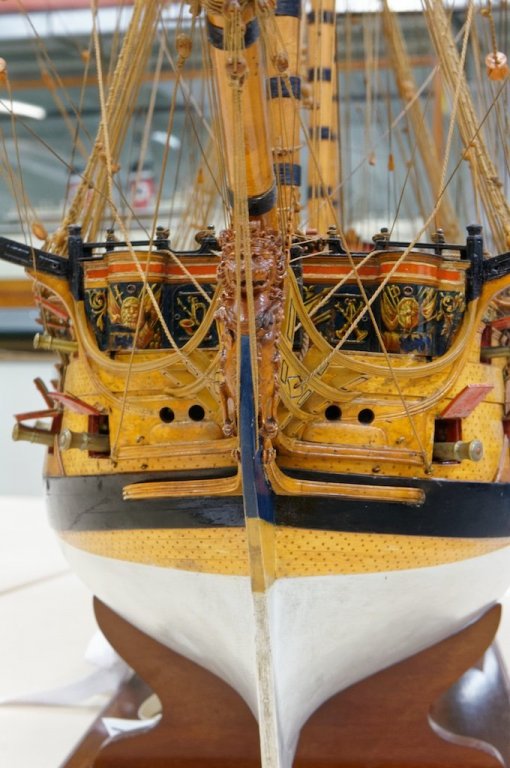
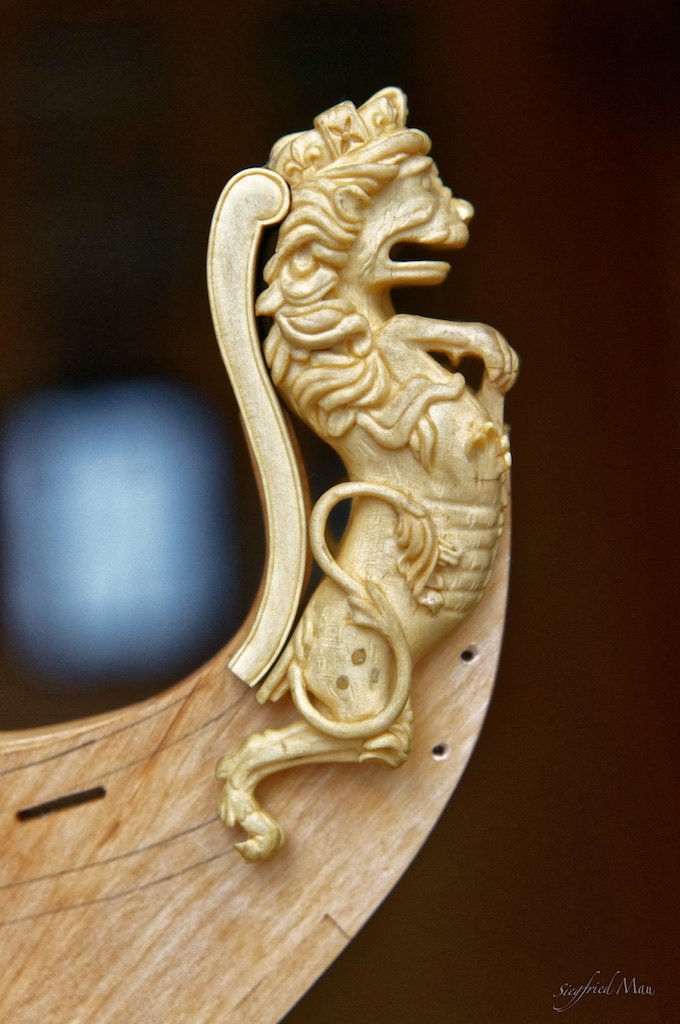
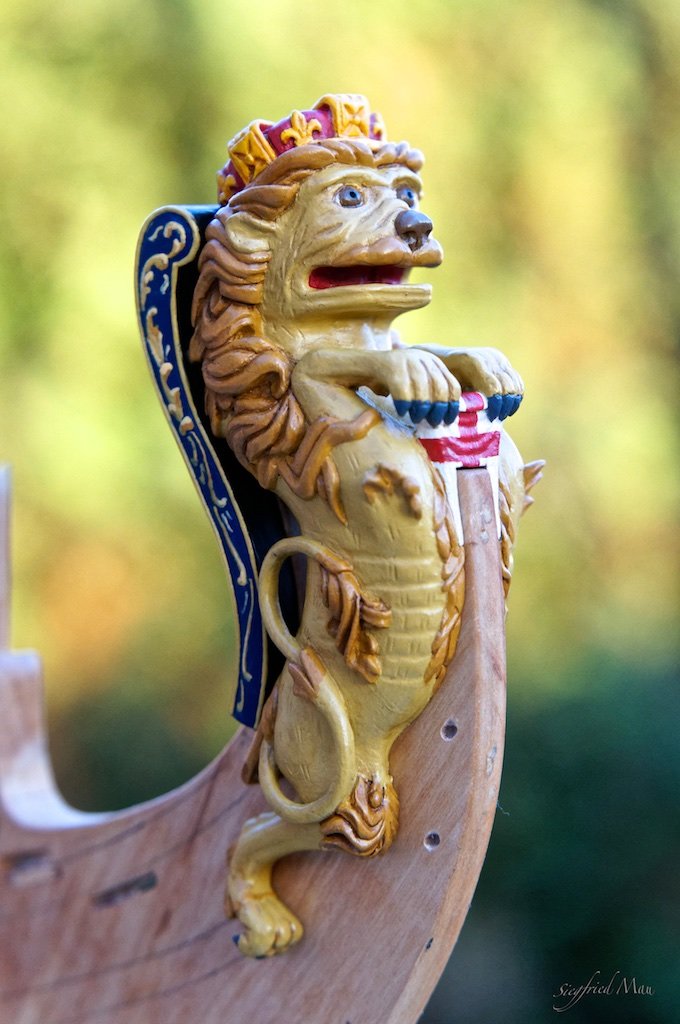
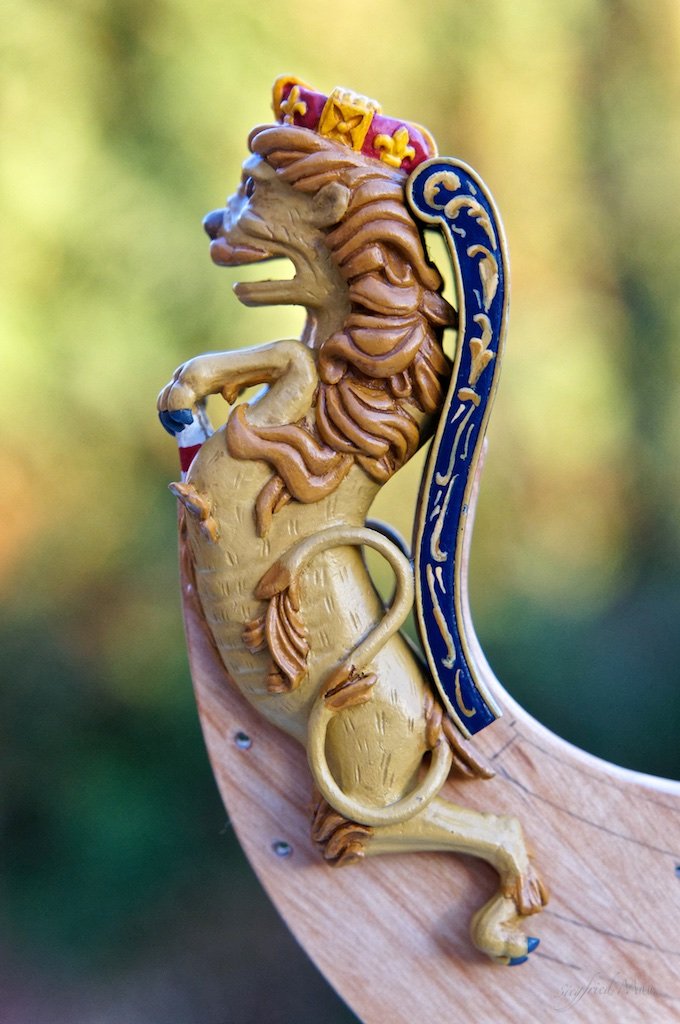
Hello, Mark, I give all, that it will get a good ship. Paul, the lines of the hull are not my work, but I carved the figure head. It takes me 3 weeks to carve this one and 2 month to carve all three versions.
-
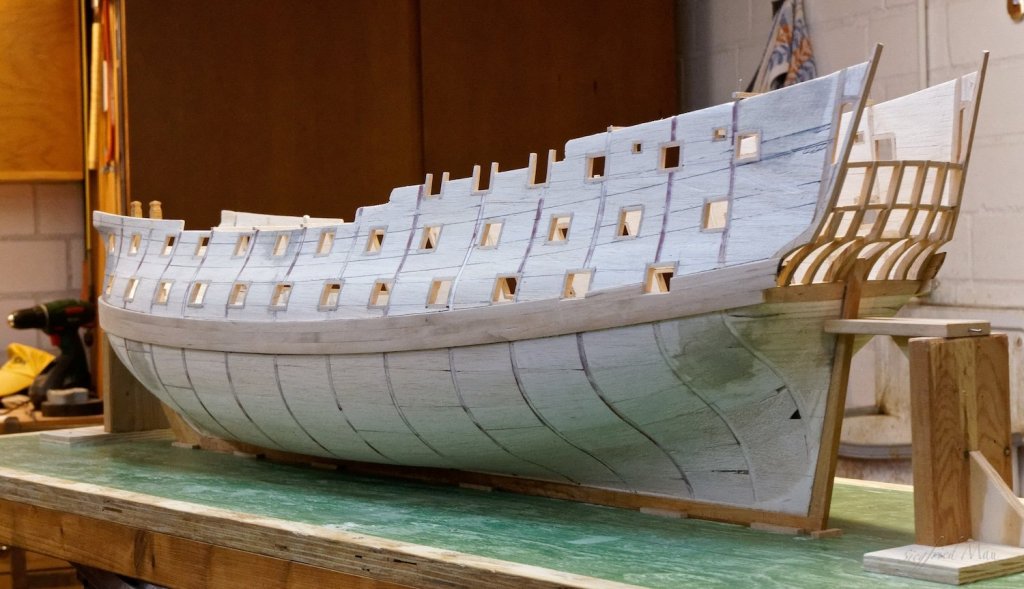
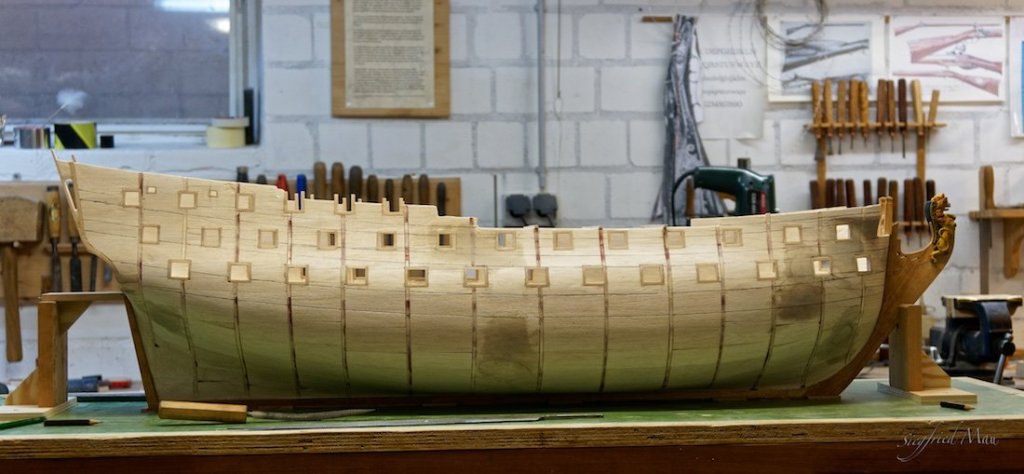
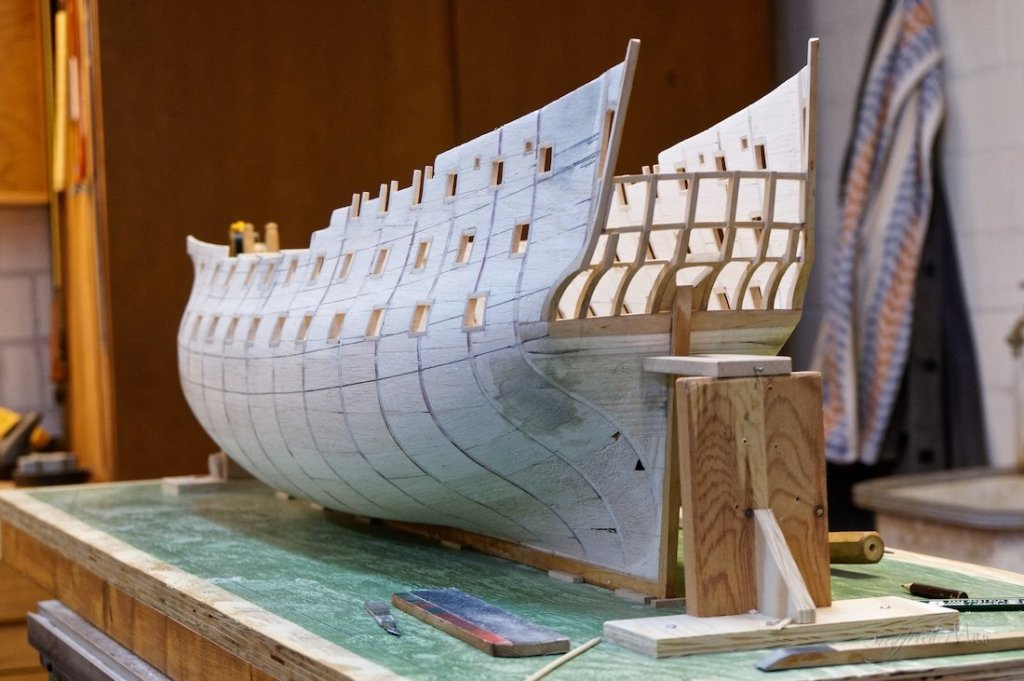
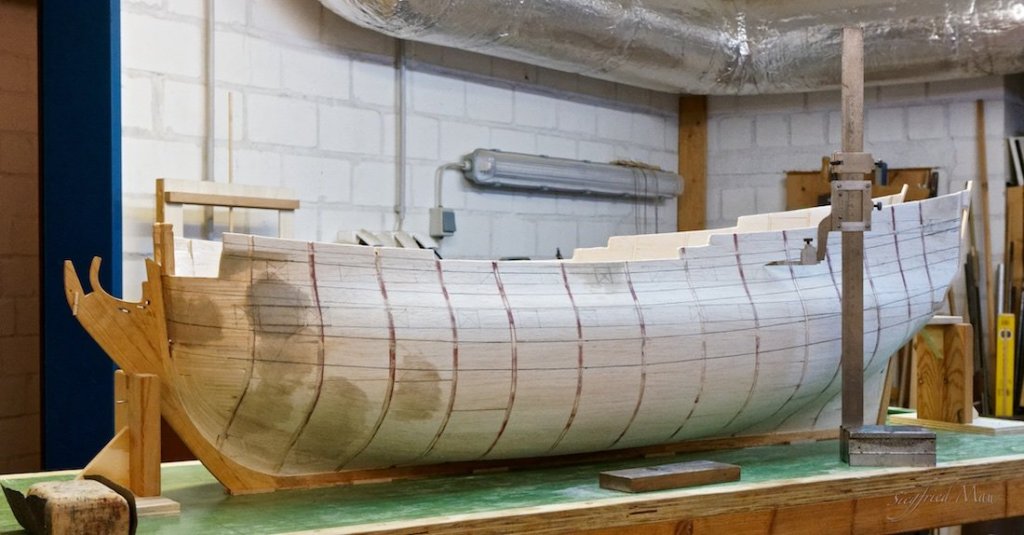
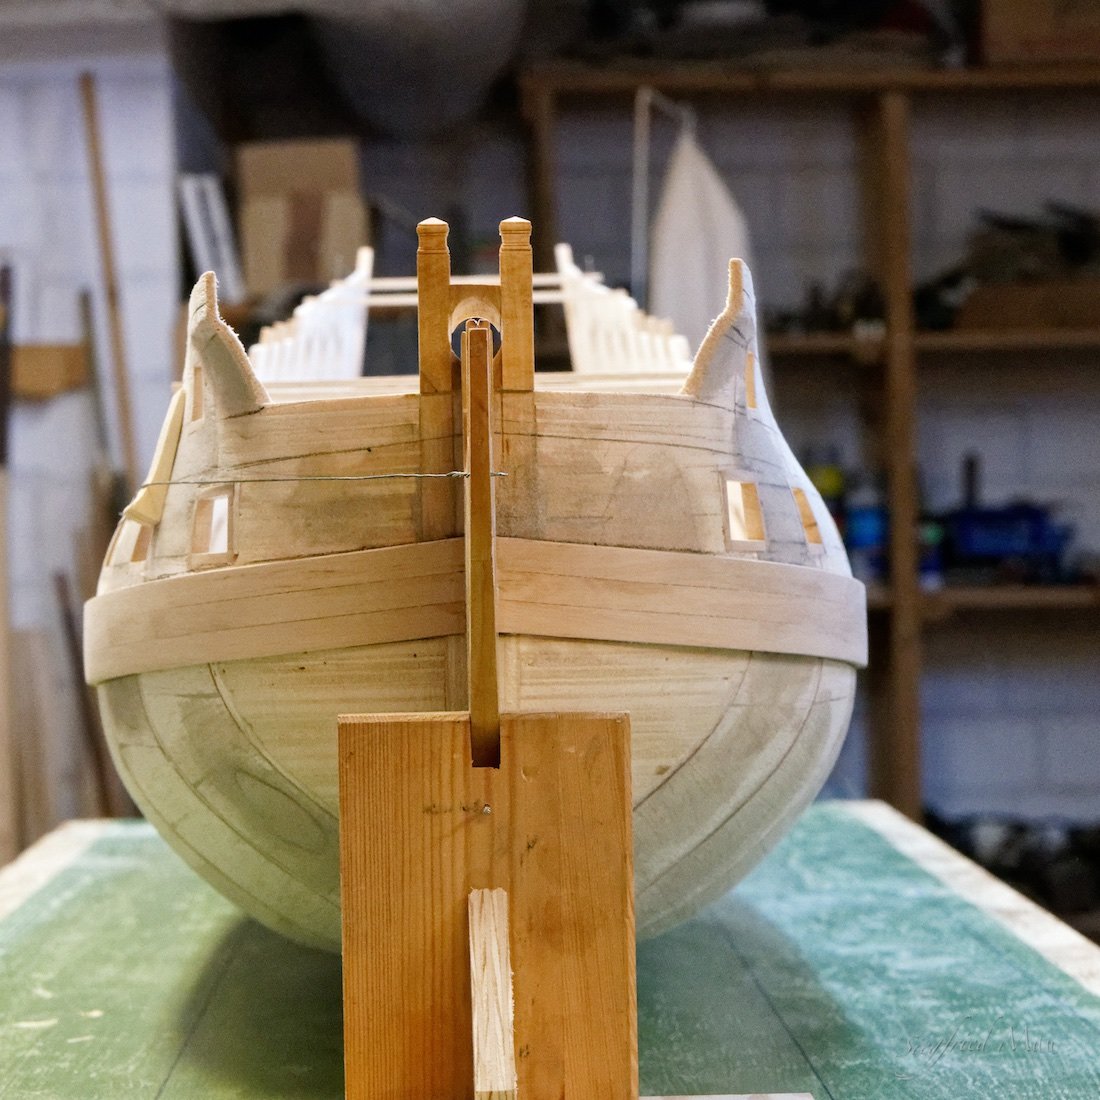
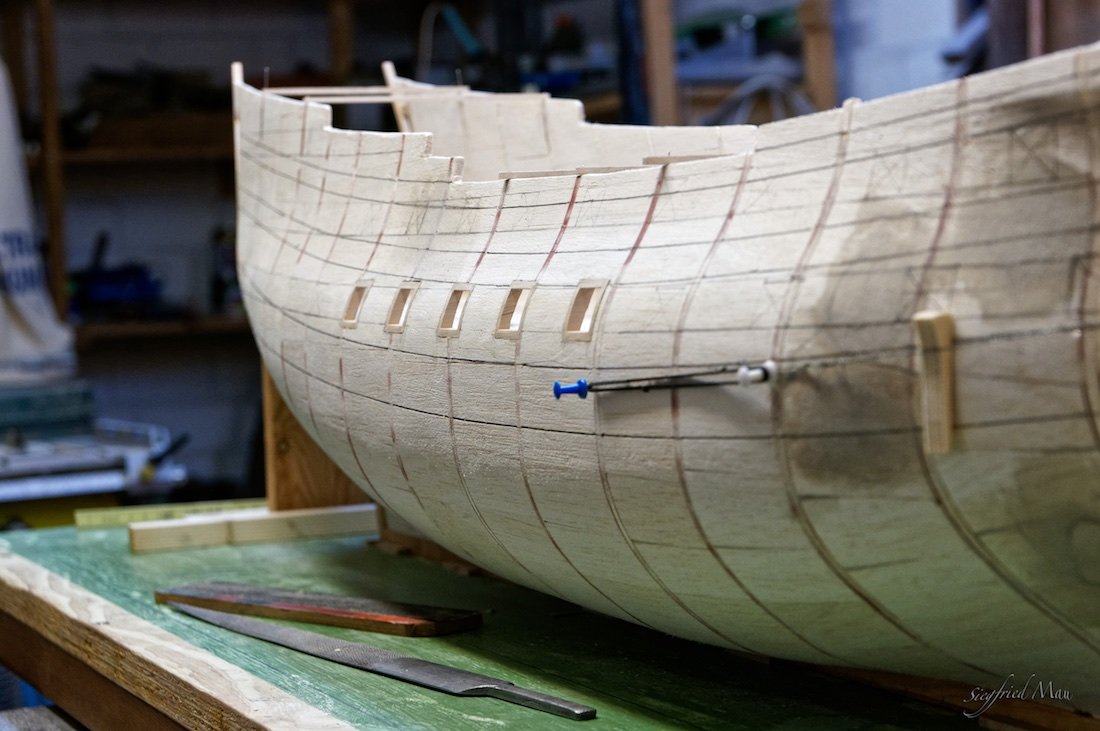
Hello, first I have to say many thanks for your likes, comments and help. Second I have to announce, that the raw hull is mostly ready. Only the inside is not really ready. But that will come after the outside is planked, for a better stability. So the next work is to make the wales and then plank the upper part of the hull.

-
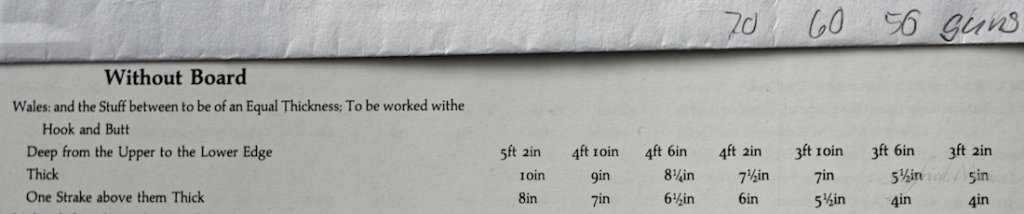
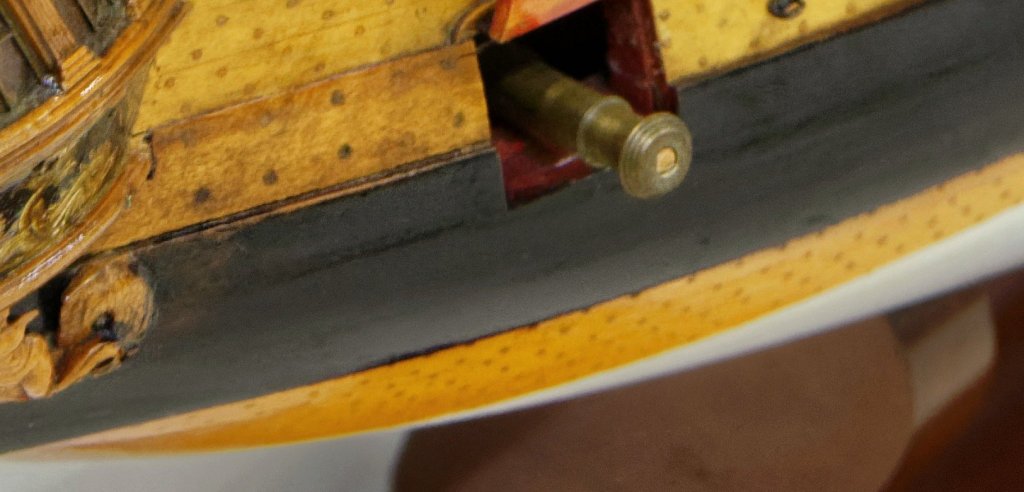
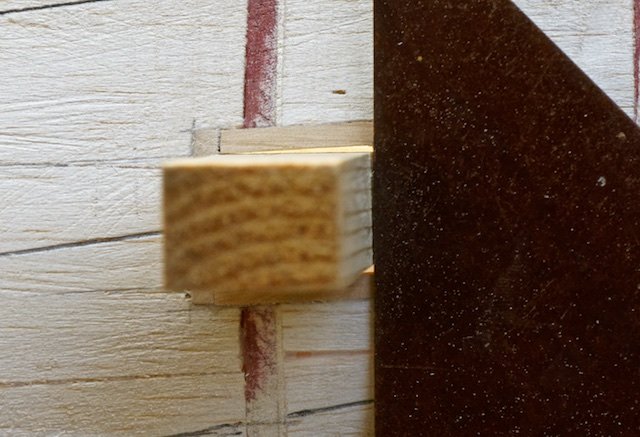
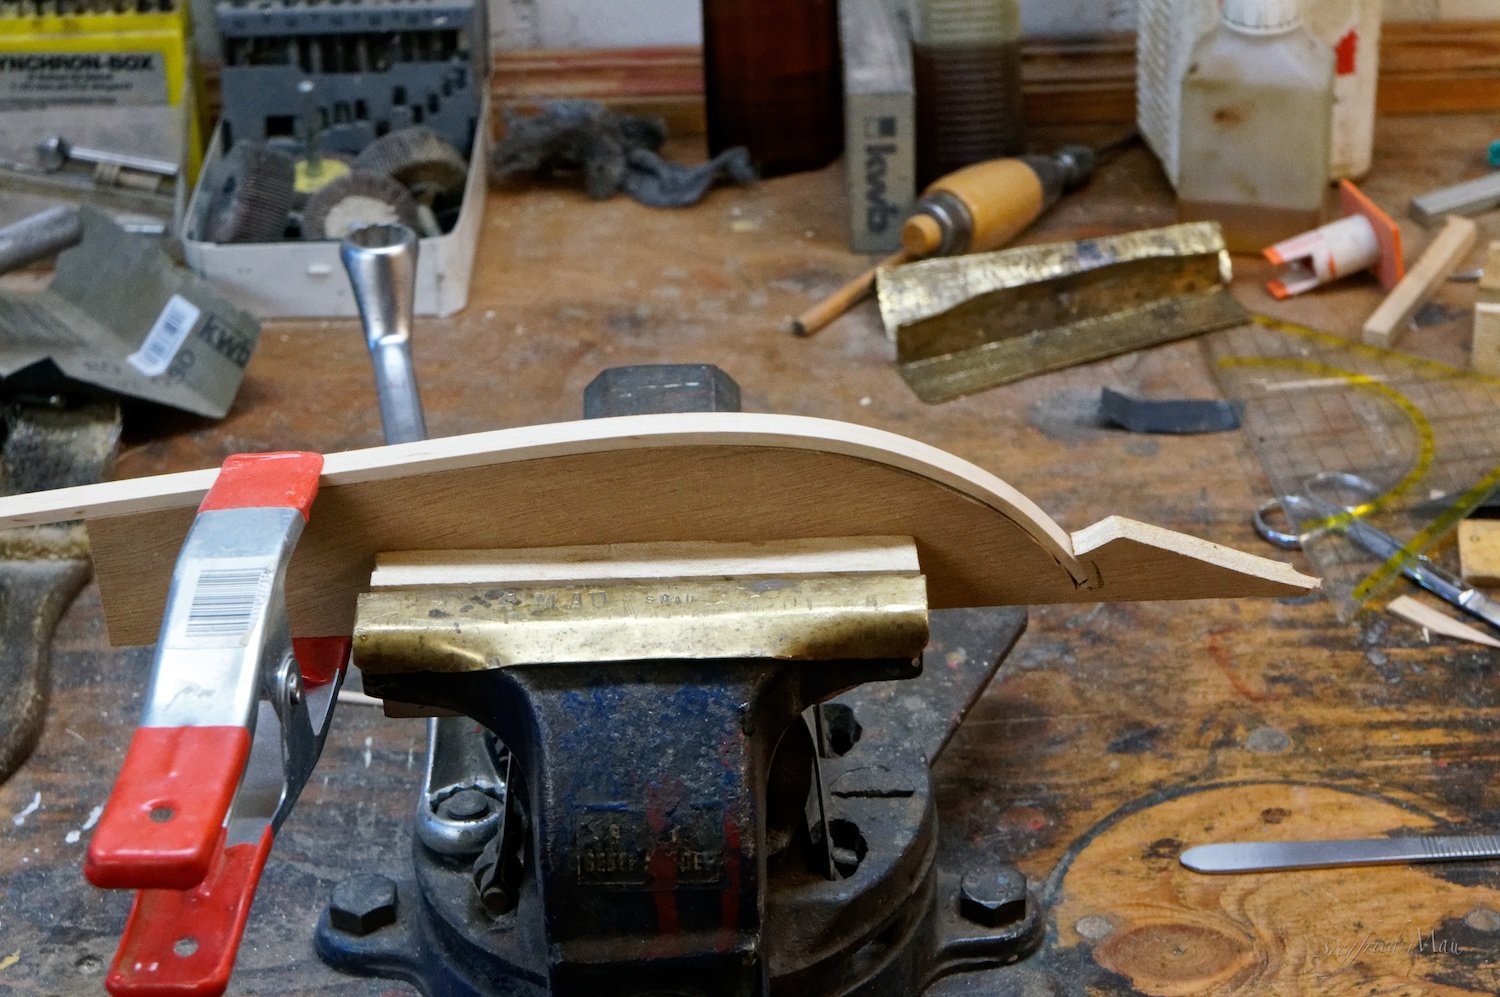
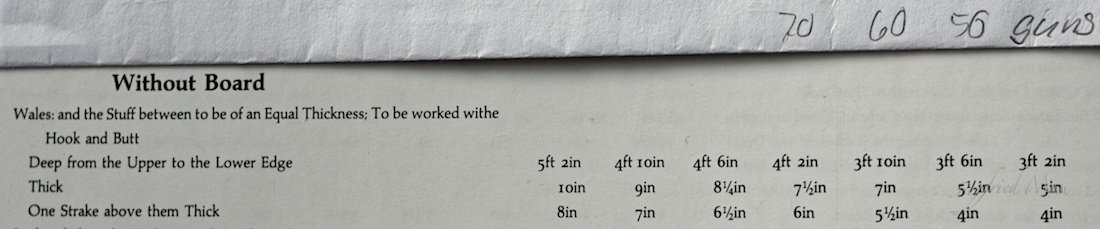
Hi Gary, thank you for taking the time to search through your books for my problem. What you say, is what is in the 1719 establishment written. Even that the middle strake has the same thickness as the two outer strakes. I know from most of the models I have seen, that the middle strake is thinner. But I found now, when I looked for that, two models where the middle strake has the same thickness as the two wales and all three strakes are painted black. http://collections.rmg.co.uk/collections/objects/66385.html Kent 1725 http://collections.rmg.co.uk/collections/objects/66395.html Ipswich 1730 That brings me to the question, should I build it the same way? If they build the wales with all three strakes of the same thickness, then they painted all strakes black. If they build the middle strake thinner, they paint only the two wales black. Not the middle strake. Interesting in this case is also, that they build the upper wales, in the models Kent and Ipswich, with a thinner middle strake. In the list of establishment is nothing mentioned as for the "lower" wales. Only the breadth from the upper to the lower edge, 2ft 4in (for all three strakes), wrought all of a thickness to 4in. I would say that means, that they have also an even thickness. That showed us, that every shipyard has it's own way of building and they did't follow the list of establishment strictly.
-
Hello Johann, it's a really great model you have build
-
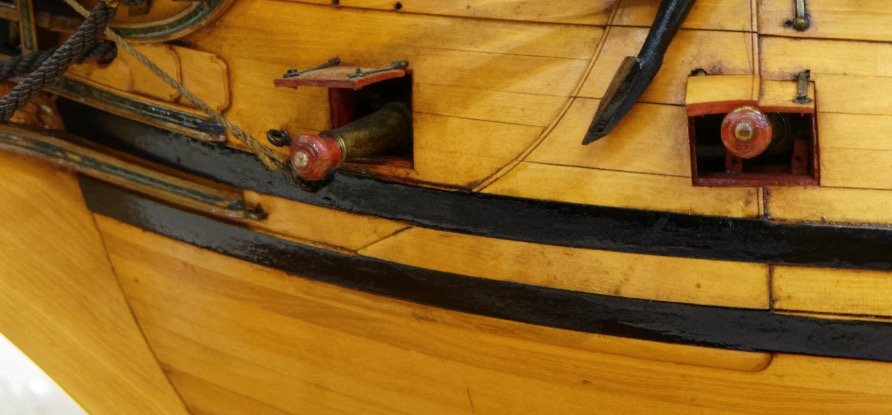
Hi Mark, many thanks for taking the time for answering. My ship has a single broad wale of three strakes. As Druxsey mentioned above. I tried to say that in my post, but my english At the models you would't see any joints, they build the strakes from stem to stern in one piece. What I would like to demonstrate with the pictures is, that the strakes running straight and only three of them, so that you could't build the anchor stock or top and butt. That was my plan and Druxey confirmed that. The only thing was the butt and hook. There I will take the No 3.
-
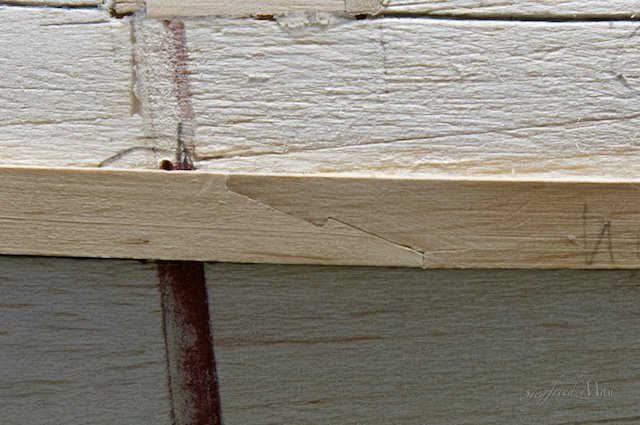
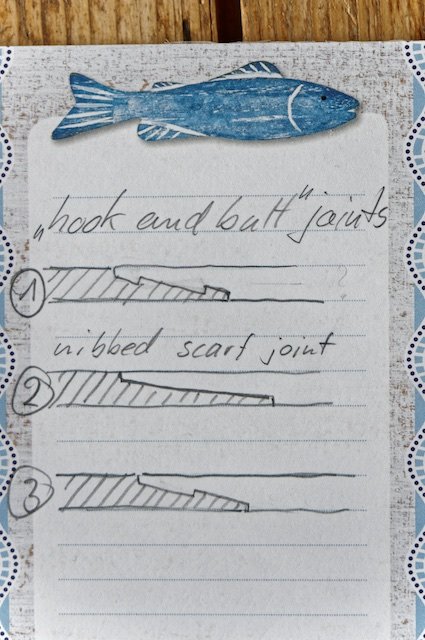
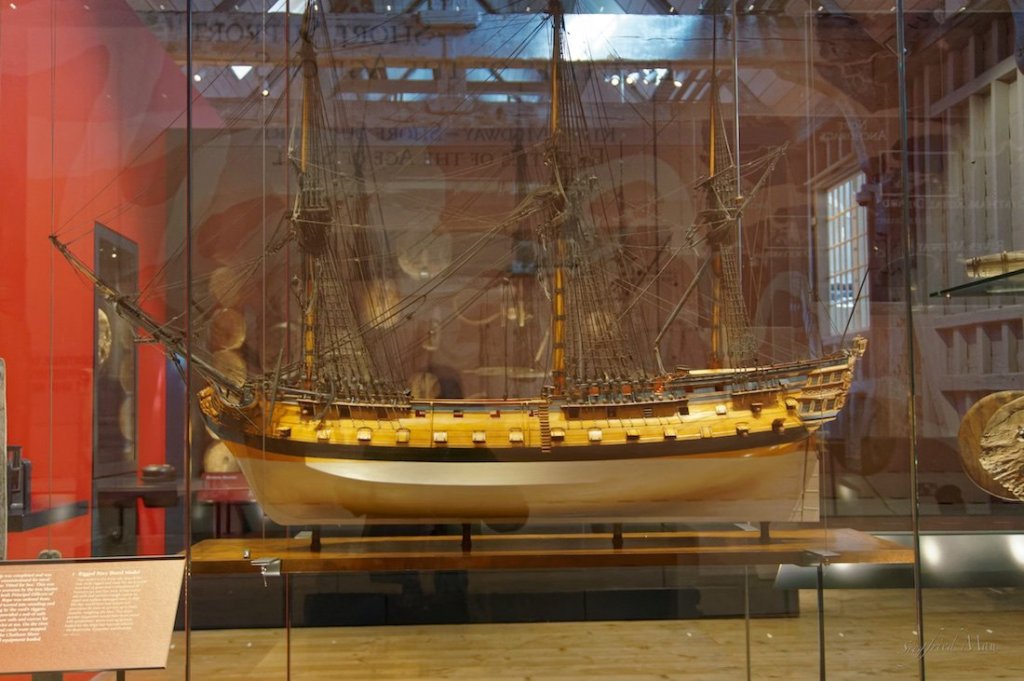
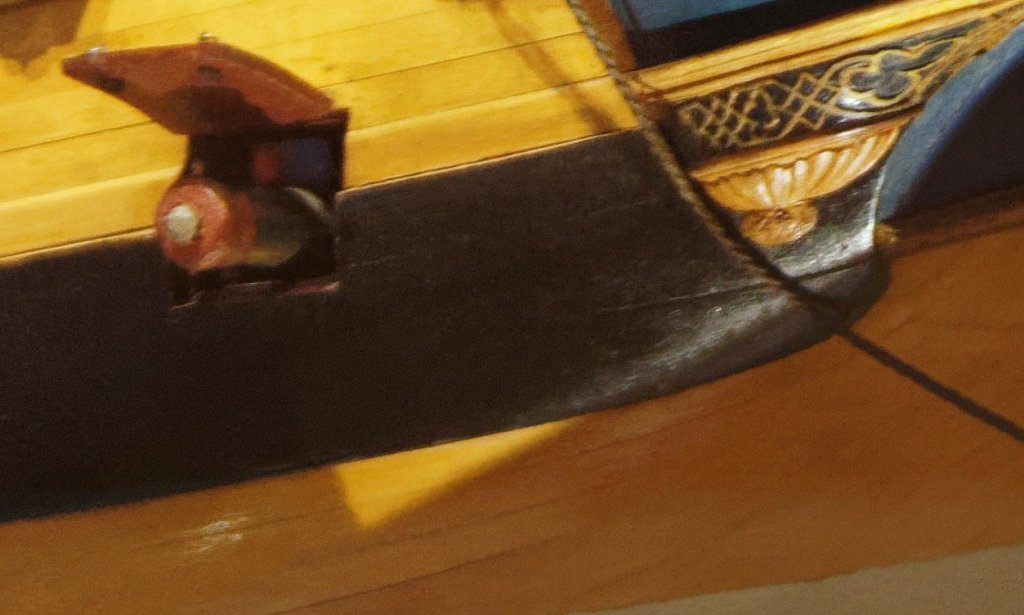
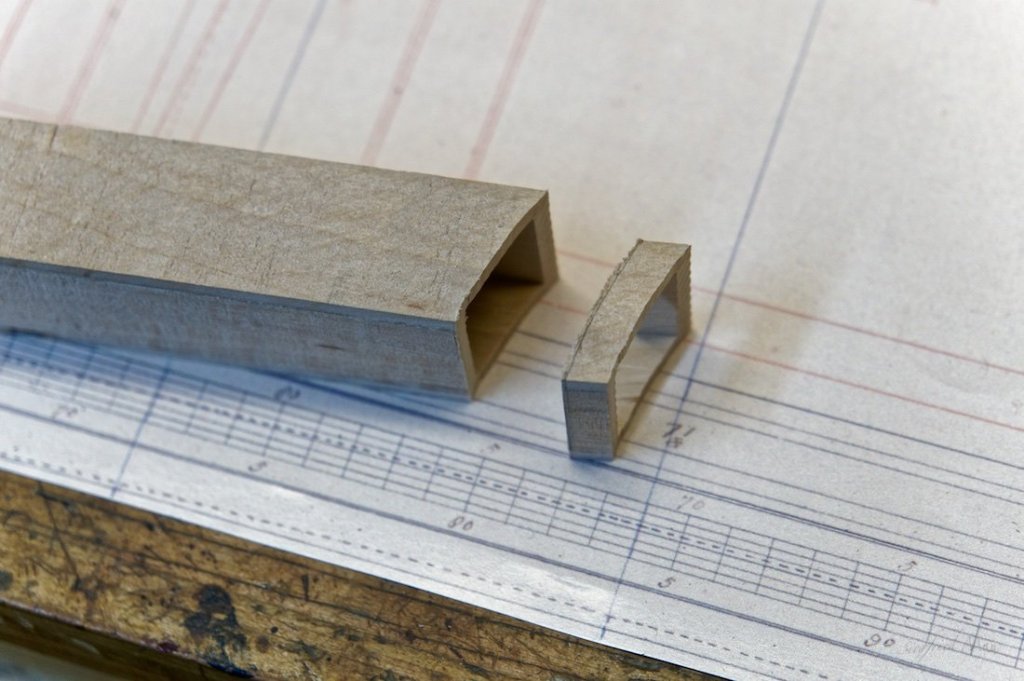
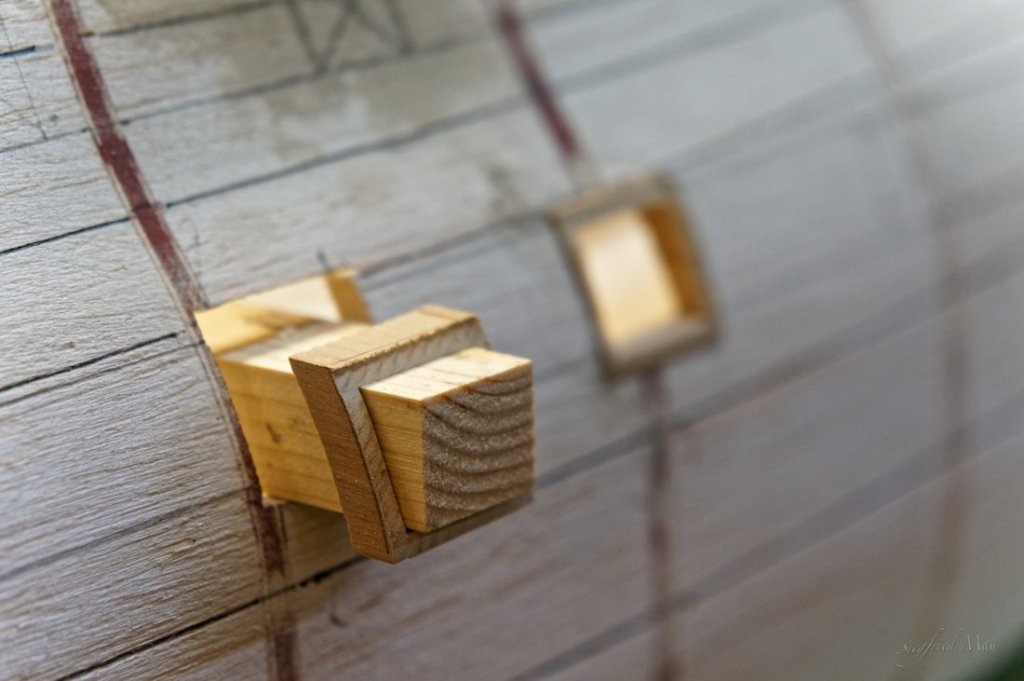
Now to my problem. It's not really a problem, but something that is not clear. The 1745 establishment did't say nothing about wales, so I went to the 1719 establishment. I copied this out of Goodwins book English Man of War, page 256. The wales at this time had 2 strakes with a strake between them. And these strakes are connected with butt and hook joins. What also is curios, that the stuff between has the same thickness then the wales. As I know they have the same deep, or nearly, but not the same thickness as you could see at the next picture. Now, how did these butt and hook joins look like? I collect some ways, but wich one was used and there are other ways? For my ship the wales where made of 3 strakes. They made I think, only the stuff in the middle to a part of the wales and now with the same thickness. On pictures it is hardly to see, because of a thick layer of paint and reflecting light. But I found two examples. First the Centurion and second an early 74 gunner at the museum in Chatham. Nice yellow colour! These 3 strake could't be connected with the known Anchor Stock or Top and Butt planking. So I think that they where connected, each strake for them self, with a butt and hook connection. What is your belief in this case. Many thanks in advance
-
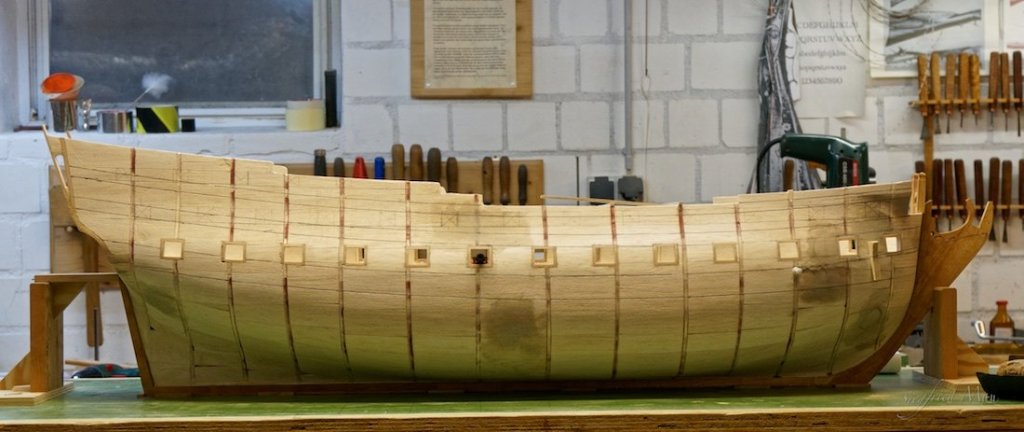
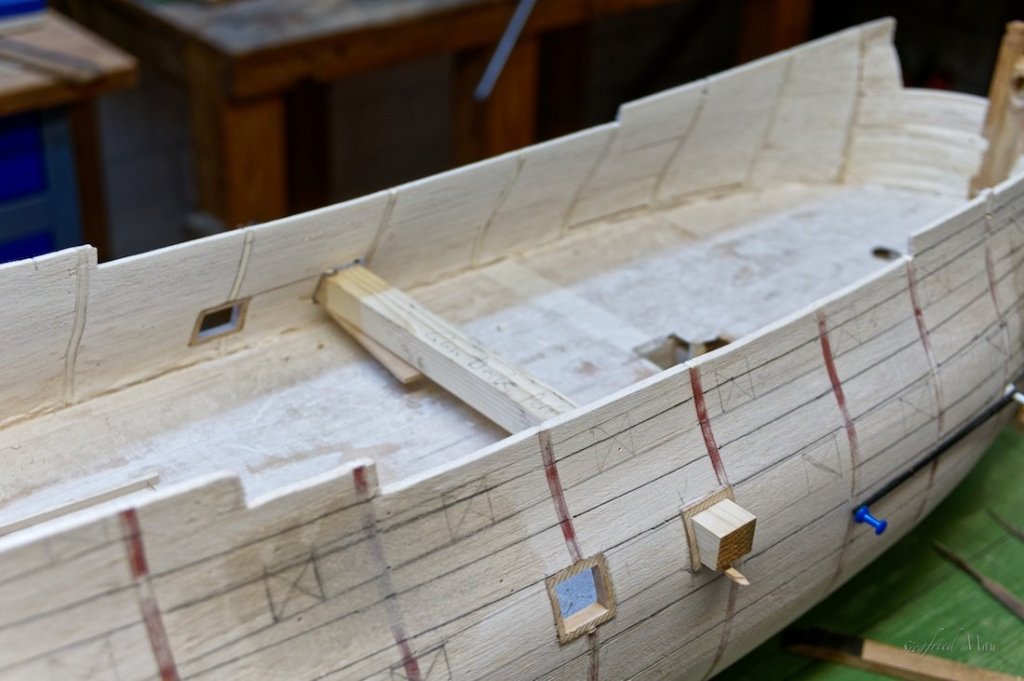
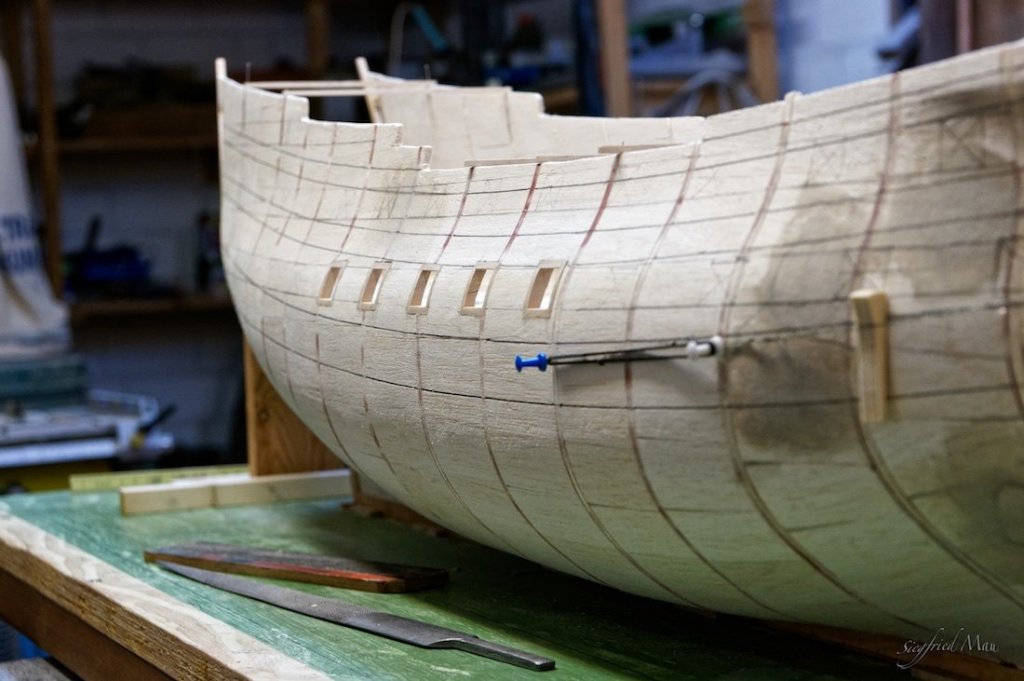
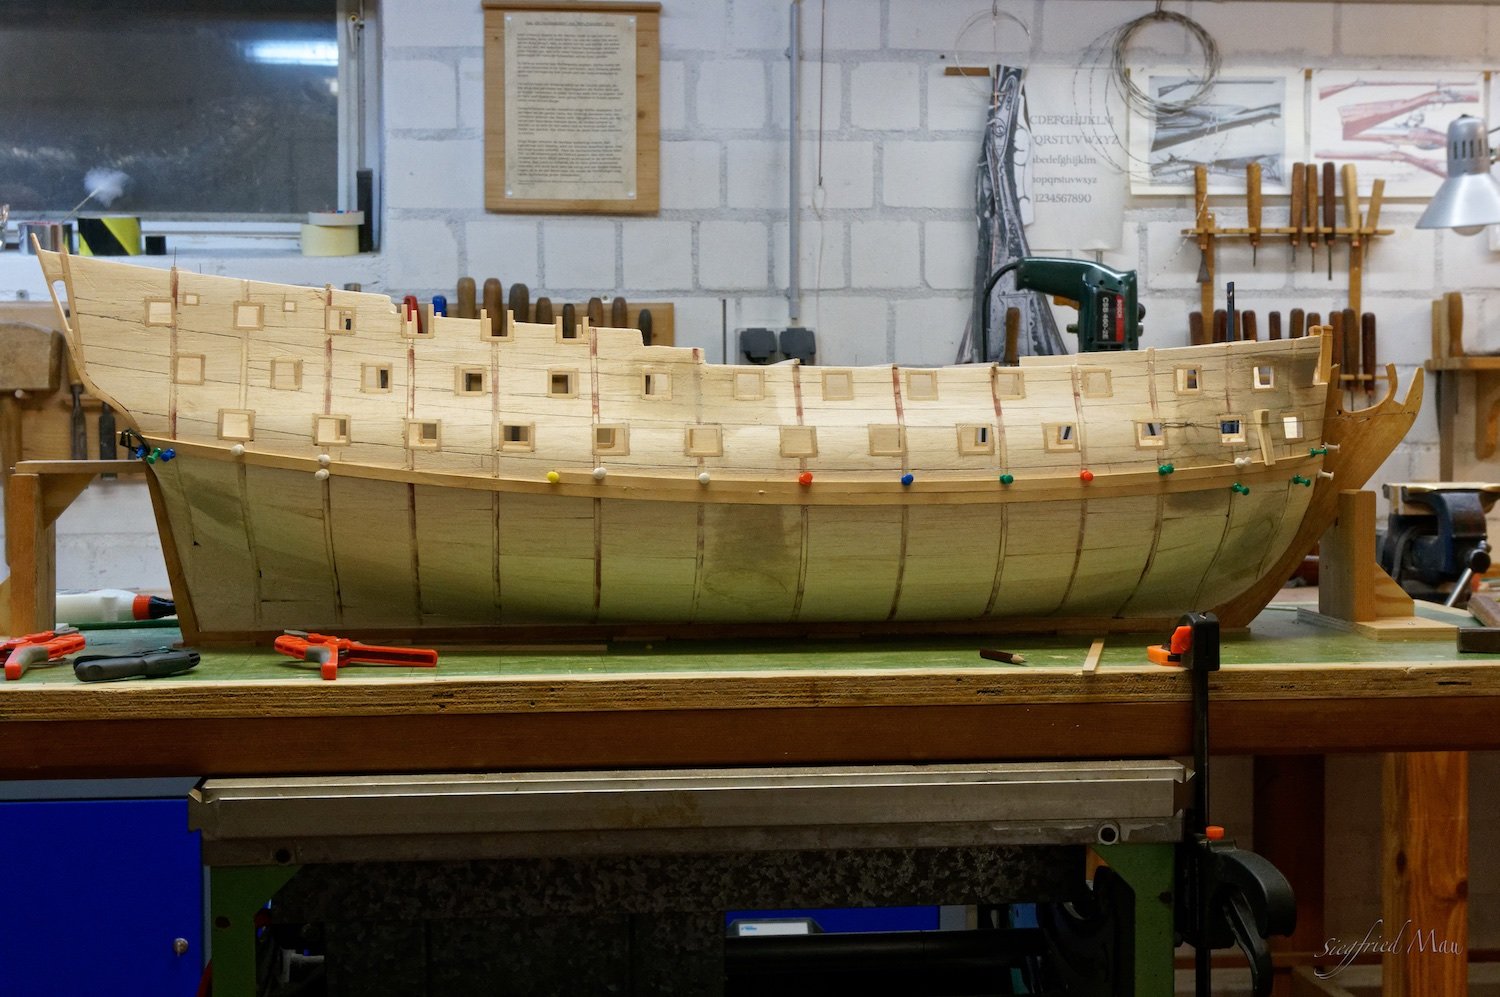
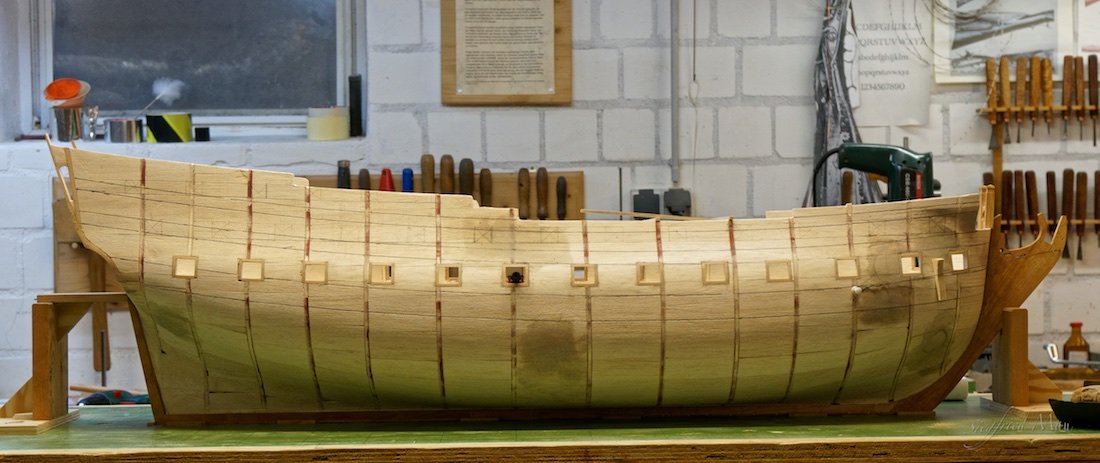
Hello, the gun ports at the gun deck are ready. I don't think that I'm be the creator of this way to install the gun port frames. I think I saw it somewhere. But you could't use it at the whole ship. There where the lines of the decks going upwards, you have to fiddle with the sticks again Here I cut the square piece of wood a little lower and have now a good help for having the port sides upright and aligned athwartship.
-
Hi Gary, you mean the problems that I have with the wales, no that is't the problem. It's a problem with the hook and butt joints. Tomorrow, when I'm ready with the ports at the gun deck, I will post more. I have to prepare something to explain the problem better.
-
Hello Mark, I hope so, at least when I'm ready with the gun ports. May be next week. But before, there is something not clear with the wales.
-
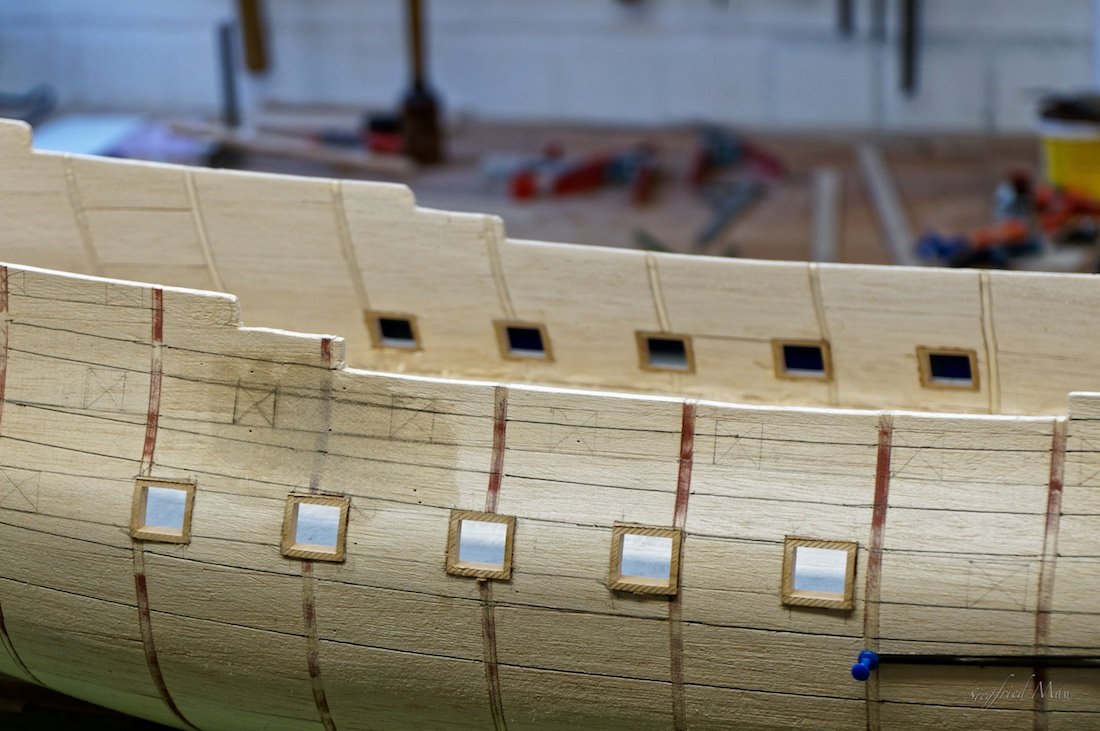
Hello, and many thanks for your likes and comments. Today I finished the first ten gun ports at the Gun deck. These one are not so complicated, but the next will be. The next one I have to do manually for each port. I think I must not to explain the pictures. At the inside I made them nearly flush with the hull, so that I have not so much to file and sand later. At the last picture the outside of the port frames are cleaned up and are flush with the outside of the hull. The next time you will hear not so much from me, because I'm busy doing the rest of the ports.

-
Hello, today only a small update. I located the positions of the Rails, wales and gun ports at the hull.
-
Good morning, many thanks for your nice comments and likes. I'm overwhelmed. To answer some of the questions. Mark, the lion is already in the wood, you must only take all the wood away that did't look like a lion. And for micro carving you need only stronger glasses and smaller tools. Thats all Mike, the lion should look skinny and hungry. But with some lions you are right. The last lion I saw was that Dutch one somewhere here in this forum, but that cat was a caricature of this kind of figure head. That cat did't like water. Brian, the filling pieces are from balsa wood and plywood and I put it between the bulkheads with the help of glue.
-
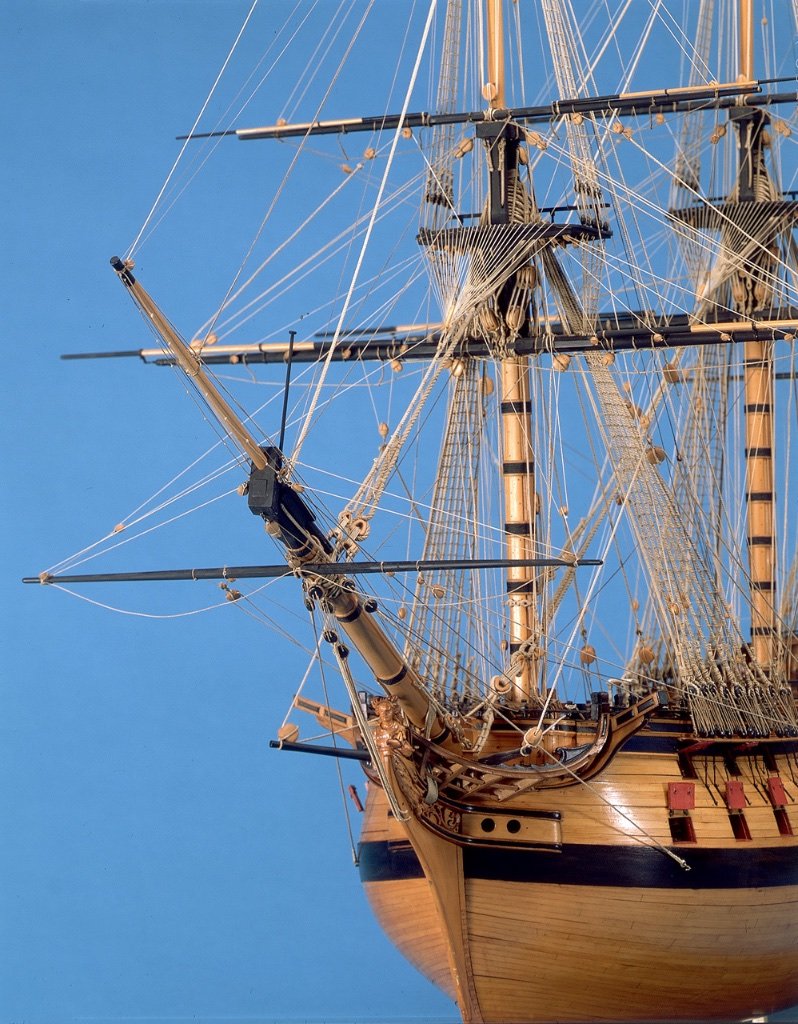
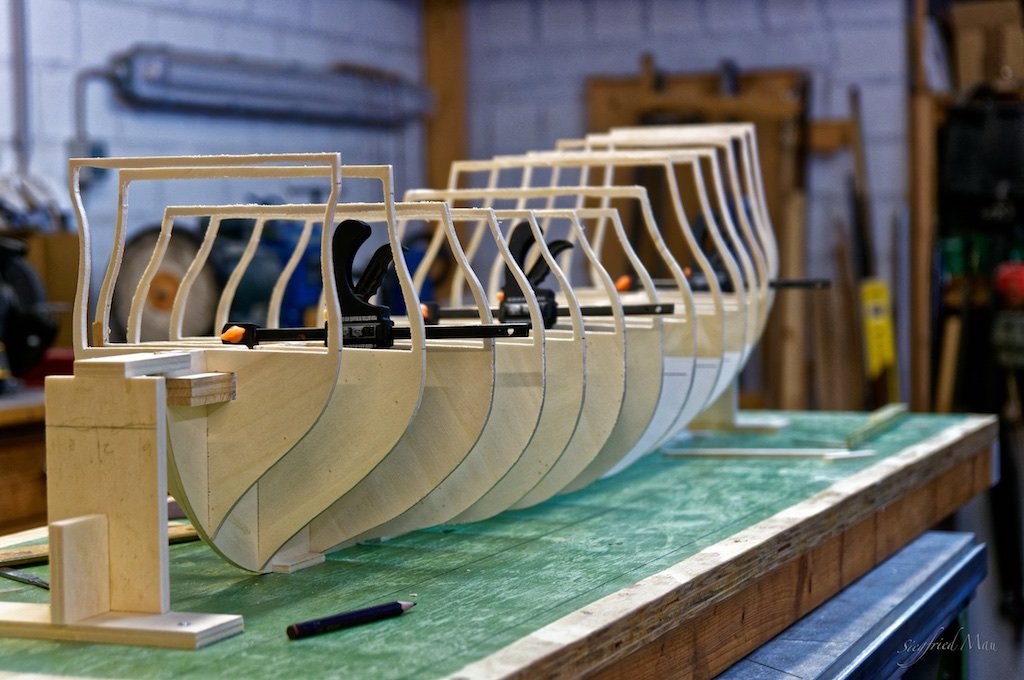
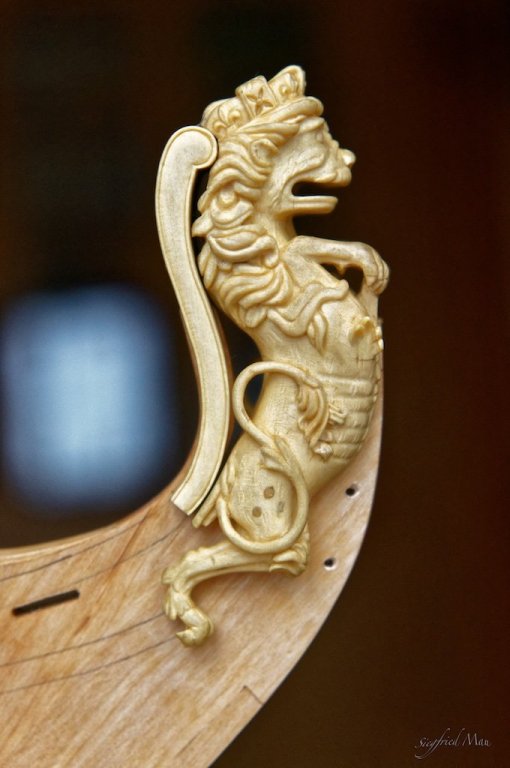
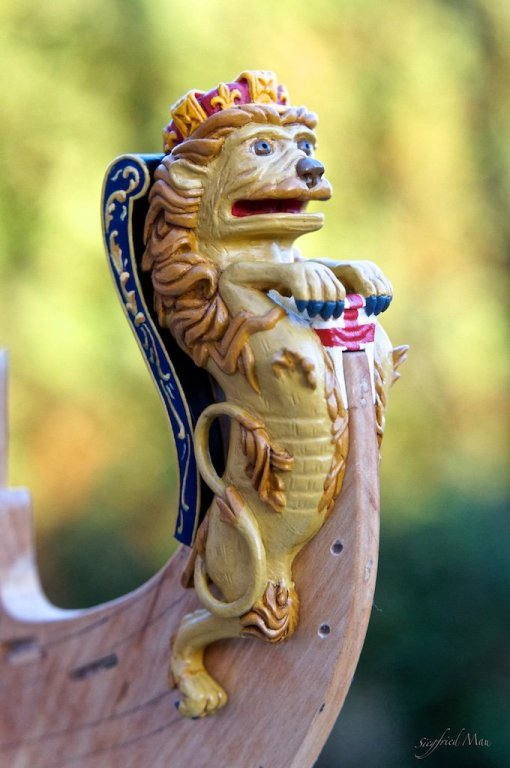
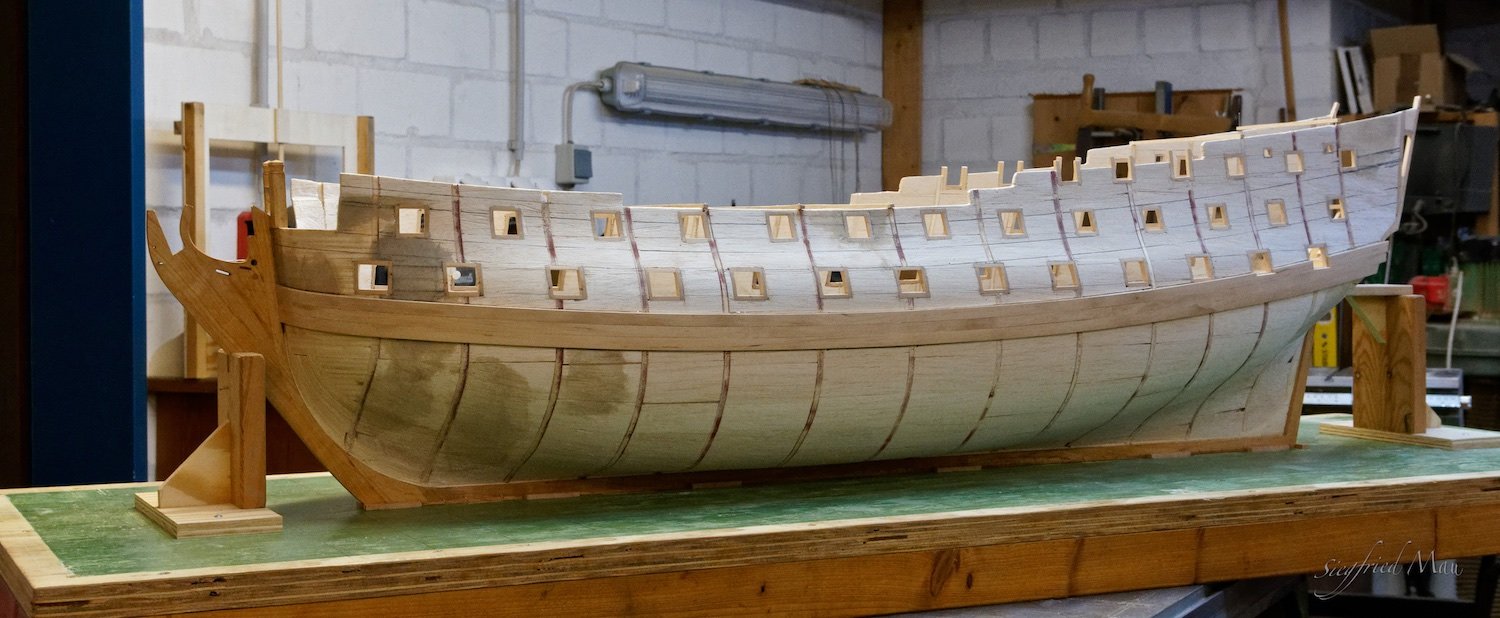
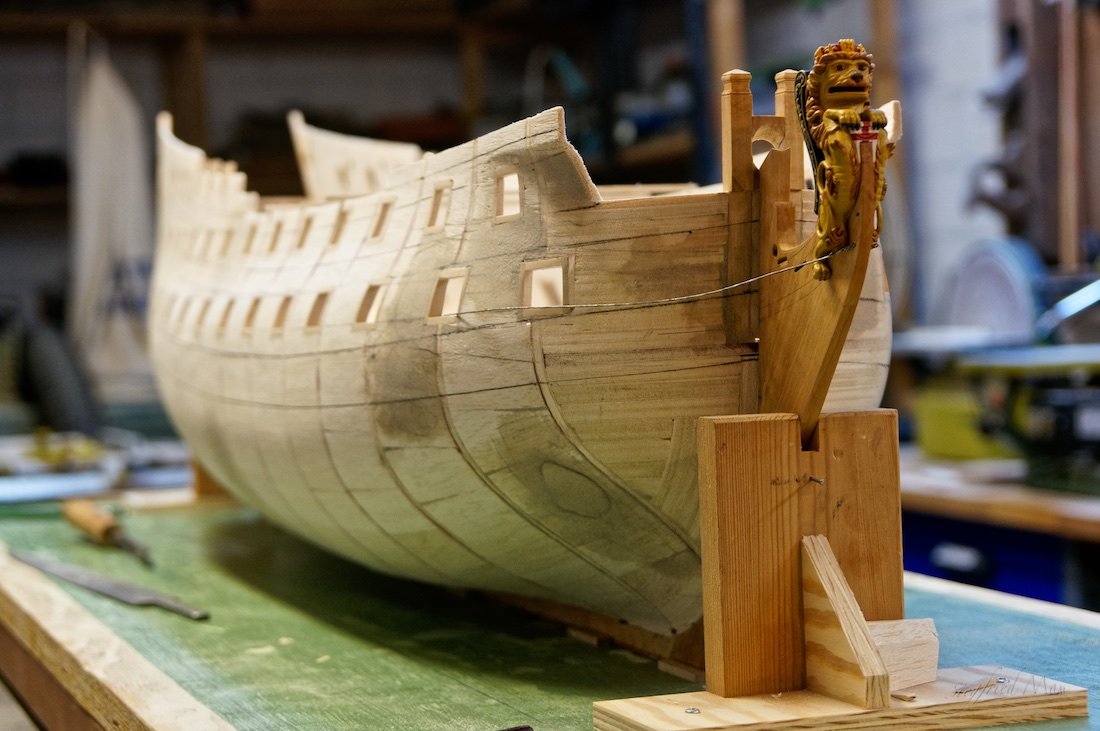
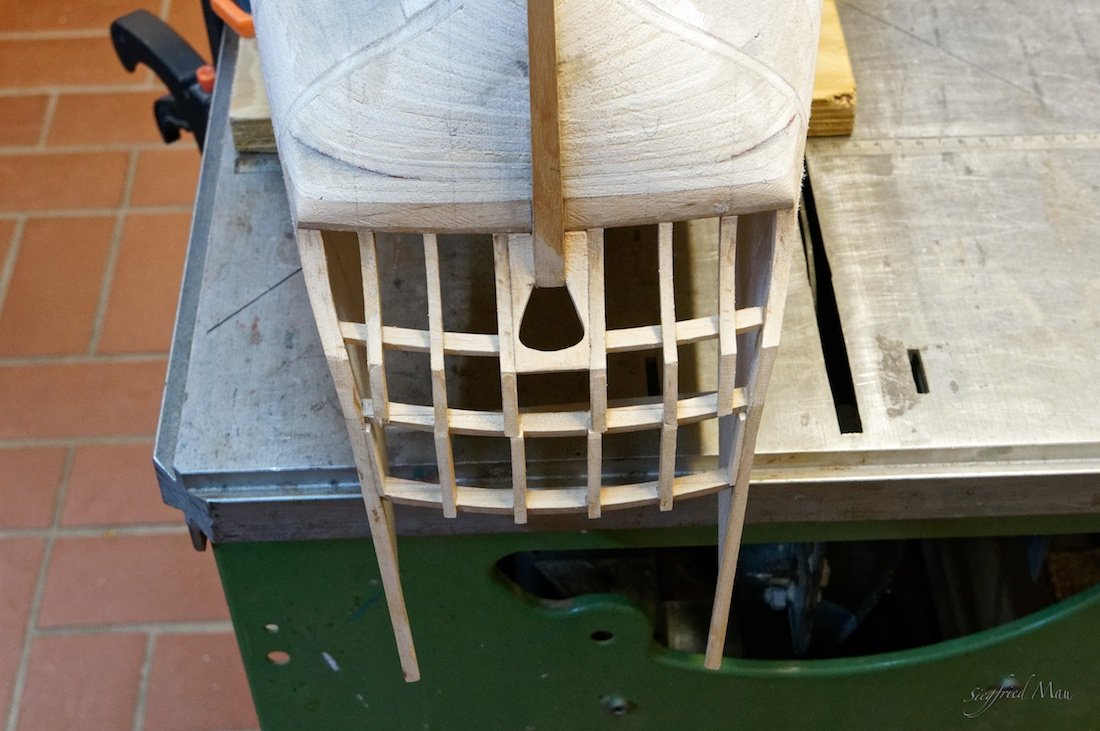
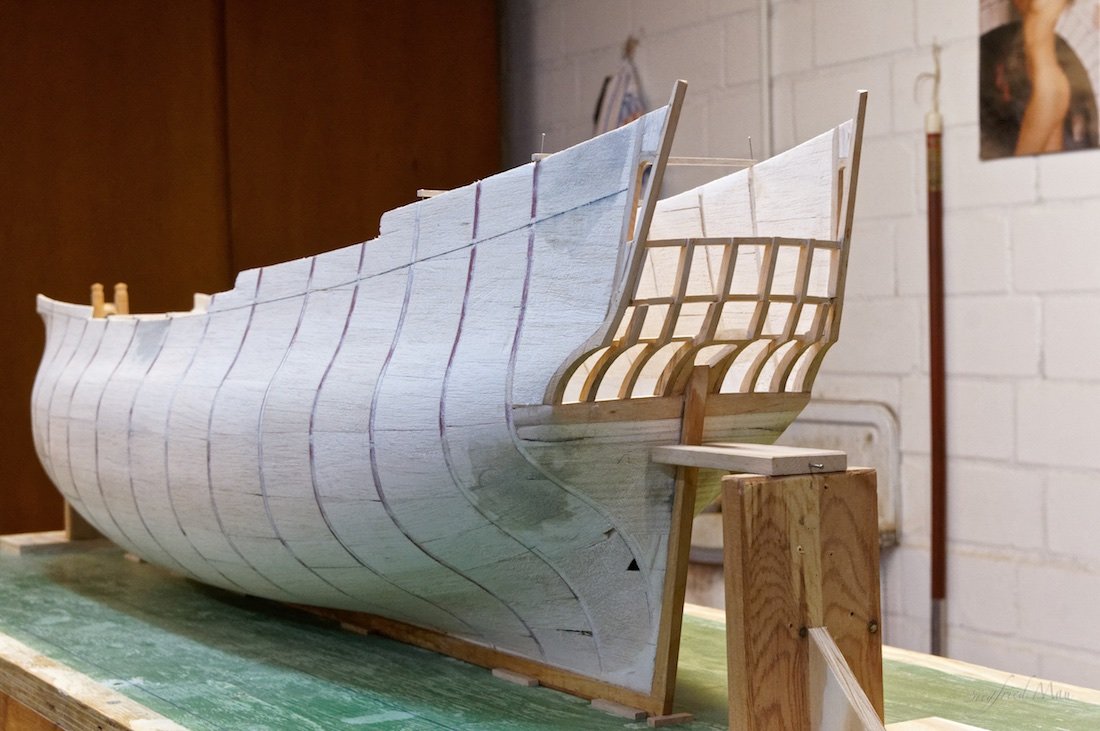
Hello all, after building the Dragon, I'm starting now the blog about building the Tiger from 1747. The Tiger was a 60 gunner after the 1745 establisment. Last year I ordered the plans for the 60 gunners of the 1745 establishment, but learned later that all the 6 ships, build after that plan, where all a little different. So I decided to build the Tiger and that, because it was the only plan that shows also the artwork of the ship. Interessting is also, that they moved the captains cabin sometimes down to the upper deck! There was more space. http://collections.rmg.co.uk/collections.html#!csearch;searchTerm=Tiger_(1747) Here you could see the plans. Then last fall I went to Chatham to see two models of 60 gunners, the Centurion and a unspecified ship (SLR0442 SLR0472). Both ships from the 1730s, but the models are made ca. 1745/47. They will be my reference for the Tiger. And because I had build the Dragon already with frames, I decided to be lazy and build in the bulwark technique. So I started early this year with the hull and that he is. But before I started with the hull, I made the figure head. Just to see if I could do it after pause for a year. And before the questions come, with what did you do the carving, here is most of it to see. Just with hand tools. To the right you see Leo the second. And here is Leo III. From toe to crown hi is 9 cm high, in reality he was 4,5 m high Here Leo did a sit sample. The guy in the background it's me. The next steps would be to close the counter and then made the cannon ports.
.thumb.jpg.331f65790ca602dbad92dc69a9f2da39.jpg)
.thumb.jpg.dfb684e5abe0b5a3fca11a4e0215cb58.jpg)
.thumb.jpg.640df3bfe264a957061329c4456efd03.jpg)
.thumb.jpg.5bfa7631988e87eaca1d5994bc24f6ea.jpg)
.thumb.jpg.947d145288c1868a867f8a7759e111ef.jpg)

.thumb.jpg.a318924fcf9dbb83c24234591d628614.jpg)
.thumb.jpg.4b063e1b89d2ac99826ad32c7e0e4034.jpg)
-
Hello Mark, yes, it will be the whole ship this time. But without rigging and the hull in the bulwark technic. I first thought that a 60 gunner might be not so large as a 70 gunner. Yes, but only a little.
-
Hello Mark, sorry, but I mostly forget to answer you question. I do not like writing in english, speaking is ok, but writing is an other thing. No, last fall there where less models, from our period, in Greenwich on display. But this year they will open a new wing over three floors and then should be there more models then ever on display. Now there are other models on display then four years before. But in the other display's they have some more ships who where'd there four years before. That is an other picture of Balchen's Victory now in Greenwich at display. Greetings, Druxey. To your last post. I fully agree with you about highlighting the joints. I remember the building of the Hermione, when they have caulked the hull, you could hardly see it. Even from a short distance. There was no black line between the planks. The hemp and the tar have mostly the same color then the wood. When I build the Dragon, I diluted some tar with turpentine and wipe the deck, ore what else, lightly with it and wipe of all excess. For me it is then ok. At the moment I'm busy with my new model, a 60 gunner after the 1745 establishment. I think that I will start a blog next month, when I could see that it works what I have build till now
-
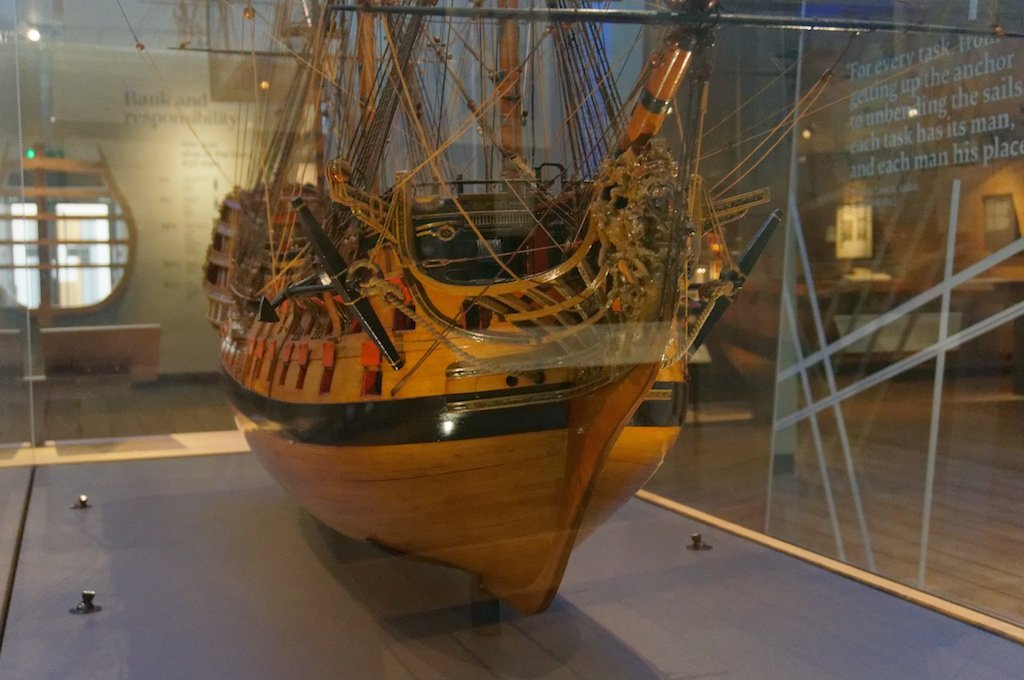
Good morning Mark, it's good to see you back at the work bench. In the question of the double curve of the wales I think that there is no double curve. Also, if you want to see, at the Bellona model. Look also at the upper wales. Here some pictures I made last year in Greenwich and Chatham. First the Centurion of 1732, Model made 1745 then a 60 gunner of 1745 and Balchen's Victory and two pictures from the NMM website, the Victory and Thunderer


-
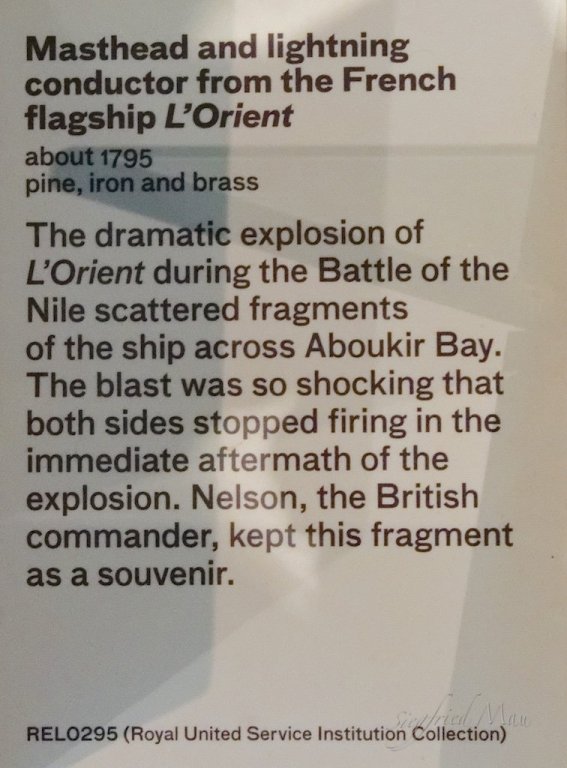
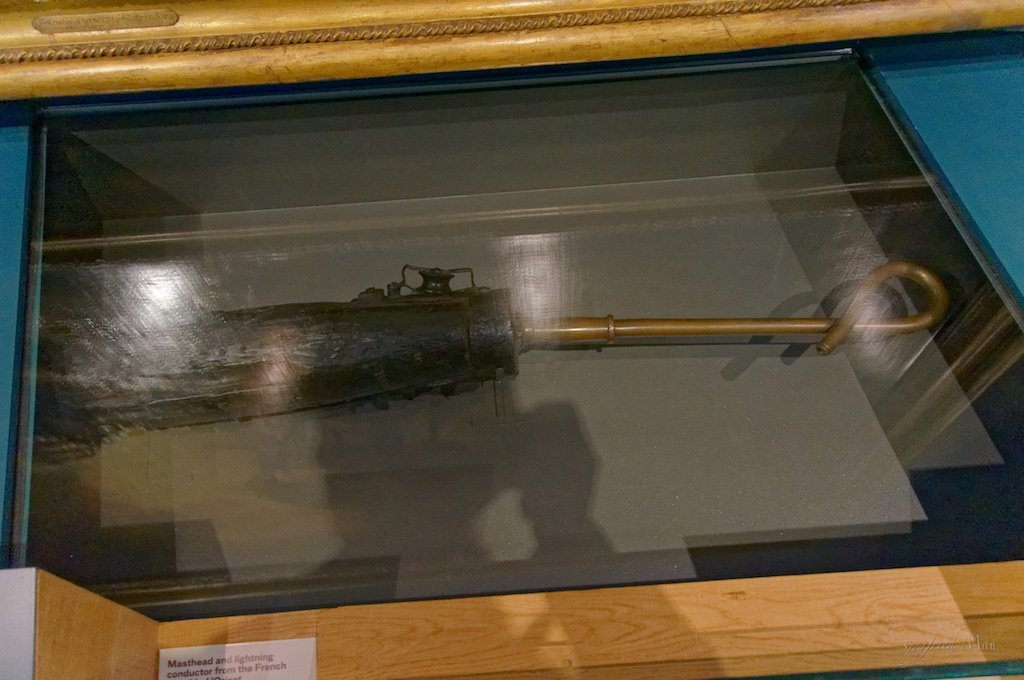
Hello Johann, I'm just back from London and also the NMM. There I found something you may be interested in I don't know how the lightning should enter the conductor Your work is as always extraordinary Regards Siggi
-
Thank you all... Yes Druxey, without the frizzen the gun is not working. I gave it away for weld some material to it. And they lost it. They ordered a new one from the shop in Oklahoma, but these guys are not the fasted at all. I'm waiting now for five month!
-
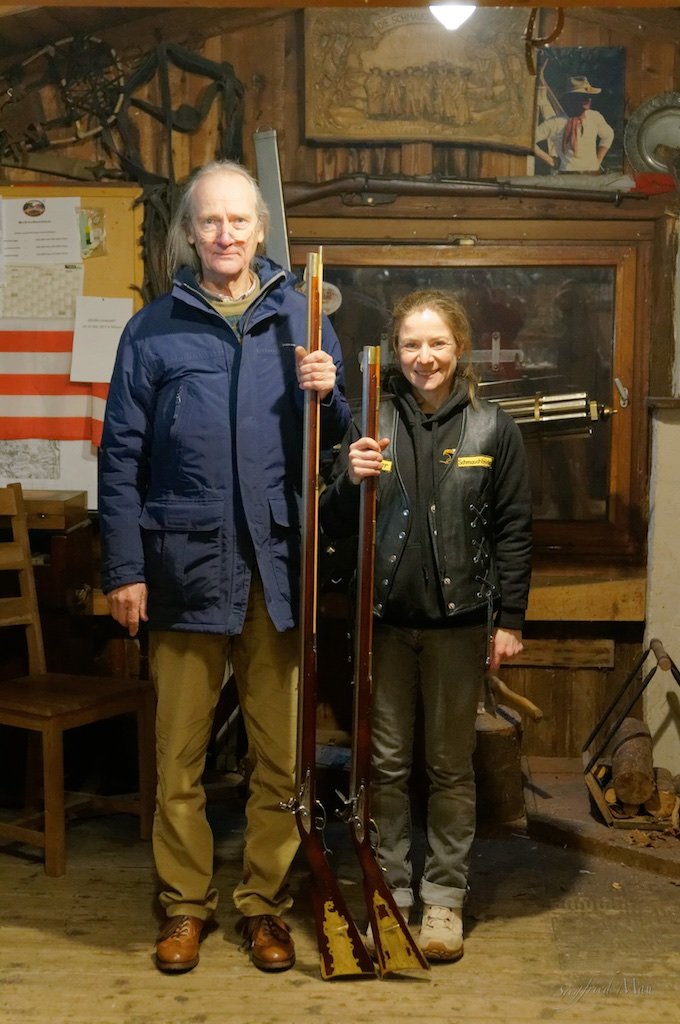
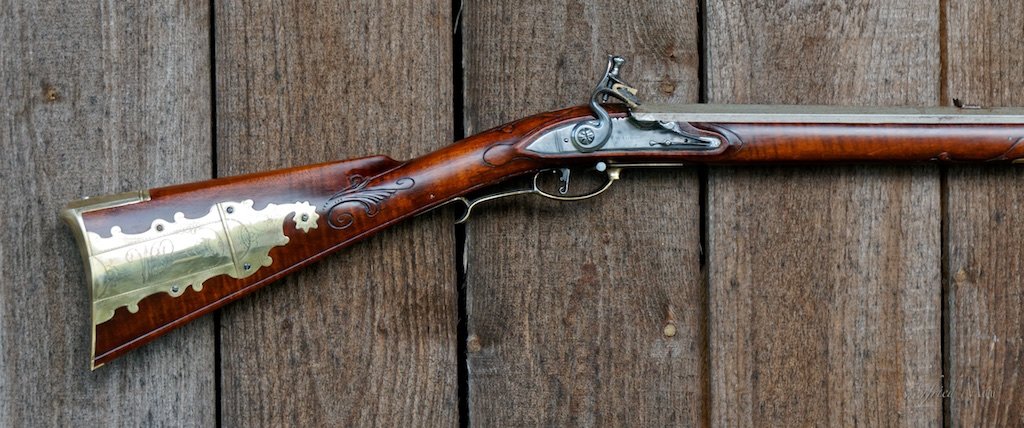
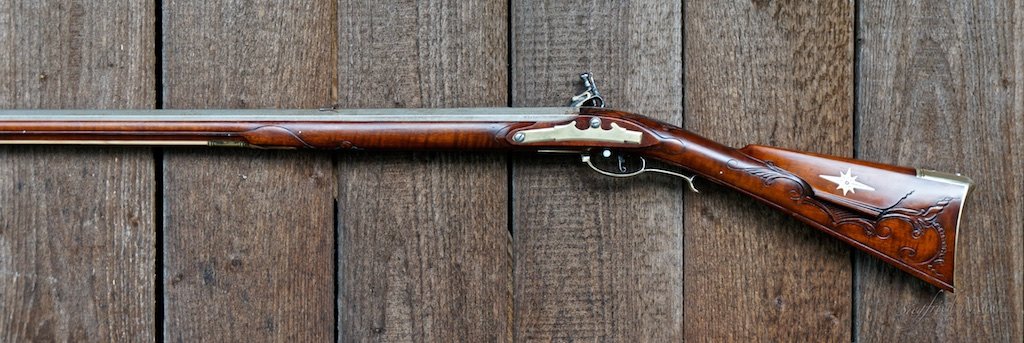
Many thanks for all your nice comments, I really appreciate it. The men of the shipyard are still on vacation. I had been busy building two rifles during the wintertime. The smaller rifle is after a Armstrong rifle and the longer one after a Jacob Ferree rifle. (48 inch barrel!) Here is the frizzen is still missing! At the moment I'm busy in my garden, I did't do very much here the last 4 years. But I think to the end of the year I will be back at the shipyard. Best regards, Siggi

- 453 replies
-
- 13
-

-

-
Many thanks for your nice words and likes. Druxey, I will not build the front part of the Dragon. That part was enough for me. The next time, or the rest of the year, I have to build two rifles and than may be a 60 gunner of the 1745 establishment. But then in a more conventional way.
- 58 replies
-
- 4
-
-
- barge
- ships boat
- (and 1 more)


.jpg.8a0e29136526ca806c73add999fc0aa8.jpg)
.jpg.606550f43960b539cae9cf0d5a7eca92.jpg)
.jpg.cad72503d7ad6b82373726a6259ceecb.jpg)
.jpg.cb663a8cf37a8b02f40300a502f7cdaa.jpg)
.jpg.2b3938b2e8fb2d77697f93f638429a38.jpg)
.jpg.90fb2cab66c50a5adae16a8a28dcb86a.jpg)
.jpg.36b2f45b369684ac718f6b6a304ba1d2.jpg)