
MORE HANDBOOKS ARE ON THEIR WAY! We will let you know when they get here.
×

kees de mol
-
Posts
796 -
Joined
-
Last visited
Reputation Activity
-

 kees de mol reacted to KenW in Providence by KenW - FINISHED - 1:48 - Colonial Sloop
Work on the model continues and a rather slow pace. I’ve cut out the bulkheads and keel former. I should point out that I didn’t cut out the notch for the mast at this time. Also, the bulkheads are over large. The upper portion does not have the space removed down the middle to the deck. I’ll do that once the bulkheads are fitted to the keel former. I want to see how everything looks before cutting off too much wood. Better to be too big than too small. The pieces look O.K. to me so far.
I also fitted the fore-most bulkhead to the keel former and it checks out so far. I made sure the L.W.L. and deck levels line up. Many more bulkheads to go.
-
kees de mol reacted to KeithAug in Germania Nova 1911 by KeithAug - FINISHED - Scale 1:36 - replica of schooner Germania 1908
Thank you Shipman, Druxey, Keith, John, Richard and Pat for your much appreciated comments, and thank you to everyone who has visited and or liked my log.
Shed work has been severely disrupted recently by a influx of house guests, fortunately they have now gone and I can get back to work. I did manage to do a bit of investigation during their stay and also a minuscule amount of manufacturing. So here are the results:-
I did a bit of a review of the bowsprit detail as shown on various photographs. I still needed to make the mast band as per the next photo:-
This band anchors the turnbuckle which tensions the forestay:-
The anchoring lug leans forward.
The turnbuckle detail can be seen in the next photo:-
The stay runs out along the bowsprit and a number of features seem to be interposed between the stay and bowsprit:-
It took some time to understand what these were but eventually I dug up the following photo:-
I think what I am looking at is odd bits of strapping/sailcloth wedged in place to prevent damage to the bowsprit. If anyone has a better interpretation please let me know.
The forestay itself is also a bit of an enigma. In the following photo you can see the stay rounding a sheave before heading skyward:-
In another (I think more recent) photo the forestay seems to be looped around the cranse iron and presumably the turnbuckle has become redundant?????
Anyway I think I am going with the earlier arrangement.
As for the bowsprit hoop it was tuned from 1/2" rod and then drilled with 3 holes before being cut in half and parted it off.
I decided that the lower half of the ring could be omitted (as it can not be seen). This makes assembly simpler.
The forward leaning anchoring lug (mentioned earlier) was turned as a mushroom before being shaved flat on the mill. The off centre hole for attaching the turnbuckle was then drilled.
The lug was then freehand filed to shape and a stem turned for mounting through the bowsprit hoop.
Hopeful this weekend will be more productive but I must take some time to catch up with all your builds.
-
kees de mol reacted to KeithAug in Germania Nova 1911 by KeithAug - FINISHED - Scale 1:36 - replica of schooner Germania 1908
Having made the bowsprit it was time to sort out the bow rails, in particular the the infill between the rail and the bowsprit. From the photo it can be seen that the rails are cut off square at the bow end and that the space between the rail and the bowsprit is filled by an insert. This insert masks the lower half of the bowsprit hoop and the previously made staysail bracket.
I started by shaping and inserting a strengthening piece immediately below the level of the rail. The middle section of this needs to be removed so I partly cut it through with a razor saw to make the later removal easier.
I made a former to ease the creation of the rail infills.
The previously installed capping rails were cut back and the infills were then glued on to the strengthening piece / rails and the middle of the strengthening piece was removed.
I then test fitted the bowsprit.
Then took a couple of general shots:-
-
 kees de mol got a reaction from mtaylor in Wilhelmina VII (KW140) 1914 by kees de mol - Scale 1/25 - Herring Lugger
The thickness is 0.3mm. I bought a couple of rolls last year for very little money. In the Netherlands it's called "Latoen".
I don't know for sure if it's brass or maybe yellow copper
-
.thumb.JPG.4d3261ccae06041fa7cc2933fb43d577.JPG) kees de mol got a reaction from Ondras71 in Wilhelmina VII (KW140) 1914 by kees de mol - Scale 1/25 - Herring Lugger
kees de mol got a reaction from Ondras71 in Wilhelmina VII (KW140) 1914 by kees de mol - Scale 1/25 - Herring Lugger
-
 kees de mol got a reaction from hexnut in Wilhelmina VII (KW140) 1914 by kees de mol - Scale 1/25 - Herring Lugger
Some other parts for the front (bigest) mast and the mast at the bow (Kluiverboom in Dutch)
-
kees de mol got a reaction from hexnut in Wilhelmina VII (KW140) 1914 by kees de mol - Scale 1/25 - Herring Lugger
I've build a wooden clinkerbuild dingy for my herringlugger. Here some pictures how I did it. Don't know if it's the smartest way but it worked out for me. For steambending the wood I've build a woodsteamer from an old rice cooker and soms loose materials.
-
kees de mol got a reaction from hexnut in Wilhelmina VII (KW140) 1914 by kees de mol - Scale 1/25 - Herring Lugger
Building something in metal
-
 kees de mol got a reaction from coxswain in Wilhelmina VII (KW140) 1914 by kees de mol - Scale 1/25 - Herring Lugger
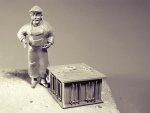
I started building the different hatches. First I cut out the base in the wooden deck an after that I build the border and the hatch. When ready will place the border and the hatch in the wooden deck.
-
kees de mol got a reaction from coxswain in Wilhelmina VII (KW140) 1914 by kees de mol - Scale 1/25 - Herring Lugger
Update: I made openings in the deck for the hatches. The small hatches are for the herringbarrels which are stored in the fishhold. The bigger hatches are for the netstorage
-
 kees de mol got a reaction from Ondras71 in Wilhelmina VII (KW140) 1914 by kees de mol - Scale 1/25 - Herring Lugger
planking of the deck
-
kees de mol got a reaction from coxswain in Wilhelmina VII (KW140) 1914 by kees de mol - Scale 1/25 - Herring Lugger
The work on the herringlugger continues. I started to build a pvc deck in the right shape and started to lay an oak deck.
-
kees de mol got a reaction from hexnut in Wilhelmina VII (KW140) 1914 by kees de mol - Scale 1/25 - Herring Lugger
-
kees de mol reacted to KeithAug in Wilhelmina VII (KW140) 1914 by kees de mol - Scale 1/25 - Herring Lugger
Magnificent tin bashing Kees. Very skilful. What is the thickness of the brass sheet you are working with?
-
 kees de mol got a reaction from Vladimir_Wairoa in Wilhelmina VII (KW140) 1914 by kees de mol - Scale 1/25 - Herring Lugger
-
kees de mol got a reaction from coxswain in Wilhelmina VII (KW140) 1914 by kees de mol - Scale 1/25 - Herring Lugger
Some other parts for the front (bigest) mast and the mast at the bow (Kluiverboom in Dutch)
-
kees de mol got a reaction from Vladimir_Wairoa in Wilhelmina VII (KW140) 1914 by kees de mol - Scale 1/25 - Herring Lugger
I've build a wooden clinkerbuild dingy for my herringlugger. Here some pictures how I did it. Don't know if it's the smartest way but it worked out for me. For steambending the wood I've build a woodsteamer from an old rice cooker and soms loose materials.
-
kees de mol got a reaction from Vladimir_Wairoa in Wilhelmina VII (KW140) 1914 by kees de mol - Scale 1/25 - Herring Lugger
Building something in metal
-
kees de mol got a reaction from mtaylor in Wilhelmina VII (KW140) 1914 by kees de mol - Scale 1/25 - Herring Lugger
Bad habits die hard... 🙉🙈🙊
Thanks for the kind replies and for hitting the like-button. The deck indeed needs some colour and maybe some staining. I will work that out later in the build
Kind regards, Kees
-
kees de mol reacted to michael mott in Wilhelmina VII (KW140) 1914 by kees de mol - Scale 1/25 - Herring Lugger
Nice brass work Kees
Michael
-
 kees de mol got a reaction from Tony Hunt in Wilhelmina VII (KW140) 1914 by kees de mol - Scale 1/25 - Herring Lugger
-
 kees de mol got a reaction from KeithAug in Wilhelmina VII (KW140) 1914 by kees de mol - Scale 1/25 - Herring Lugger
Some other parts for the front (bigest) mast and the mast at the bow (Kluiverboom in Dutch)
-
kees de mol got a reaction from coxswain in Wilhelmina VII (KW140) 1914 by kees de mol - Scale 1/25 - Herring Lugger
-
kees de mol reacted to cog in Wilhelmina VII (KW140) 1914 by kees de mol - Scale 1/25 - Herring Lugger
Wonderful work, as Jan wrote: Life like details. I am very much taken by your brass work. Well done
-
kees de mol reacted to flying_dutchman2 in Wilhelmina VII (KW140) 1914 by kees de mol - Scale 1/25 - Herring Lugger
Kees,
Again, excellent details. I also like the many pictures you upload of a particular project you would be working on.
Marcus