
HOLIDAY DONATION DRIVE - SUPPORT MSW - DO YOUR PART TO KEEP THIS GREAT FORUM GOING! (Only 13 donations so far - C'mon guys!)
×


YankeeD
-
Posts
151 -
Joined
-
Last visited
Content Type
Profiles
Forums
Gallery
Events
Everything posted by YankeeD
-
Well i am finshed with plancking up to the third whale on both sides now. Both sides had the same flaw with wrongly placed gunports which have been corrected now. Below picture does not show the correction yet but the camera (GSM) also has some distortion and the angel differs from the picture below of the starboard side, so it is not as bad as it seems. In the mean time this side has been corrected as well. Now I started working on the gunports and the rabbets. To make the gunports I made a sanding tool, 2 sides sandpaper only. It works great although slow but accurate. It makes it easy for me to make sure the ports are perpendicular (thanks google). All the rabbets are oversized in lenght, so I will make them fit and than protrude them and sand them to follow the hull. Then I will have them fall back about 1.5mm and sand the inside equal to the inside planks. I will not fasten them until I am ready to move up and start on the upper deck. But before starting the upper deck I have to decide how far I will go. Do I install canons or not, only a wooden model or closed gunports???? havn't made my mind up about that yet. Secondly I still have to come up with a good working method to make the gunport hatches. including the dilution to fall into the rabbet. So all in all a lot to do still. Hans.
.thumb.jpg.d9a94962210f6859908f303e1bd380fb.jpg)
.thumb.jpg.da1088fe6d15a112e35c2545e72e1868.jpg)
.thumb.jpg.e248b38601eca5553dd2d2b9be7095ab.jpg)
.thumb.jpg.bea8f16abb953a2f7cd556fcab9c2017.jpg)
.thumb.jpg.56a908730bef2e2822c9d6b6704c0e2d.jpg)
.thumb.jpg.ac61d5ab44eddaef0651a1fc85724bb1.jpg)
.thumb.jpg.180a57715efcb042ac8b3f5cde0606be.jpg)
-
Well about time for another uupdate although not very much has happened. The weather has been very good for weeks in a row now so little progress. But Starboard side I finished up to the 3rd whale. I had to do some correction on 2 gunports. Which is the second time but it was still not ok, I simply dont understand why as I checked tripple times before. here the wrong situation: With the 5th port already a part of an insert for the correction. And here after correction. After sanding it is hard to even see the inserts. I used insert pieces to lower the ports instead of replacing a full plank. I was afraid that removing a whole plank would damage too much. Nest steps are the portside planking and the 3rd whale. Rgds Hans.
.thumb.jpg.ed682a8b3a05535475fe855bccdbe634.jpg)
.thumb.jpg.3a19132118482fb6bbe81c6751bcf7be.jpg)
.thumb.jpg.ea9b297585d3c6ecdeddeedf6739fdab.jpg)
-
I had to do some rework on the Forecastle deck which I already knew but now was the time to do it. The running and lines of the frames were not good. After sanding I had so few thickness left I had to thicken the frames. According to the drawings by Blom the top of the railing of the forecastle deck railing should be a straight line but I will kee a slight curve. Here below the portside has been done, the starboard side still needs to be done, which in the meantime has been done as well The next step will be the planking up to what we call 'het rahout' . And here I have a question. Both Blom and Monfeld mention in general terms about the scarfs/joints of the planks. But this is mainly below the wales. I cannot find anything about the planking joints above the second wale. Looking to Winter's photos you also cannot determine, although it looks like straight joints and this might be the more logical as the many interruptions by the gunports. I think I will use straight/flat joints as it makes life easier.. Any comments/thoughts are welcome.....
.thumb.jpg.a9bc7cd011ee7daf8a62204e51584136.jpg)
.thumb.jpg.ef83a6e6312cb03ec2834346f15c8dbb.jpg)
.thumb.jpg.549548ce0e3f5ca90dad7f2b1400c12b.jpg)
.thumb.jpg.69bb29089812a3ab2a689faf724cf786.jpg)
.thumb.jpg.688d49e981de4f1818bab46849156d3c.jpg)
.thumb.jpg.764a68e5a2760414a120db2c6824c429.jpg)
.thumb.jpg.3998283f7f6477e4ba792fb5d5d2f86b.jpg)
-
Well may I correct you here. there are more people in Europe that read and speak English than German. So I guess that might be true for moddelers as well. So for european kits I would certainly include English as well. But they are very very nice kits!!
- 216 replies
-
- 6
-

-
- masterkorabel
- ships
- (and 3 more)
-
Well another month passed and some holidays in between and a bad eye infection thatkept me from working on the ship. But we still had some progress. I found a discrepancy on the gunports. Both side the same. So I decided to first correct that and then to fix the stern and the missing frames to the stern. After that I intend to start the hull planking upwards. I know the white line of the (Rahout??) is not correct but its on purpose to get the correct lining for the frames. Once the frames are ok I will return to the correct line. Have a nice weekend all.
.thumb.jpg.31acb4fda2b1e5ba79ef5b9d18417639.jpg)
.thumb.jpg.3c4ddea0d68770f785ddc91c201dcf86.jpg)
.thumb.jpg.e54b91c1f1ec14194d80989ebc8c8674.jpg)
-
Thanks all!!! She is upright again, but I am really having a hard time on deciding how/what/where to continue??? I want to redo the rudder, so for that it might be handier to turn her upside down again... and I also want to make the bow nicer as it has some dents from doing the planking... Fixing the stern and the frames stille missing and then continue the planking upwards before building the next deck..... Gunports... Hard decisions....
.thumb.jpg.ad9618ac343cc480e039a48795608cc9.jpg)
-
will you ship to NL? zipcode 5672HB? Looking to buy it for my daughters birthday. She is a real puzzle fan. pm or email me when you will ship it.
-
Promised to be back when the planking on the portside was finished, I have finished, pffffff. The pictures are going back in time of the last stages. Tomorrow I can sand it all and then turn her up again. Wondering what the next stage will be???? I have noi clue, when she is upside again I will see and decide.
.thumb.jpg.66c9a9f4137ab12192cc5ce220f957f6.jpg)
.thumb.jpg.b38006c5d0121b5b63bc4c1fc3fa363a.jpg)
.thumb.jpg.900937665b9096d7bd7b79c25e8cde0b.jpg)
.thumb.jpg.8d287279bc87dfa6dfeef172012c3c6b.jpg)
.thumb.jpg.4ae359f219b2617fda7e081b1648581d.jpg)
.thumb.jpg.270d859bfa1fc7c9ec9de78edfdef9cb.jpg)
.thumb.jpg.4bf4aafafa20ea71c52881dd1477d503.jpg)
.thumb.jpg.8dff48e9640309eb68f70aad262597af.jpg)
-
Just been reading in from the start, what a nice build!! and some interesting methods used. I will (however late) join in and take a seat..
- 692 replies
-
- 6
-
-
- eagle of algier
- chebec
- (and 2 more)
-
Well couldn't resist a short intermediate update. About halfway closing the portside.
.thumb.jpg.e0f06d561cdbacf1714b145e47bfb0fc.jpg)
.thumb.jpg.5f18a5f86be273f81729a5ef3d8d17c2.jpg)
.thumb.jpg.5552ba3e7025a2e5aa8a54cd372def4b.jpg)
-
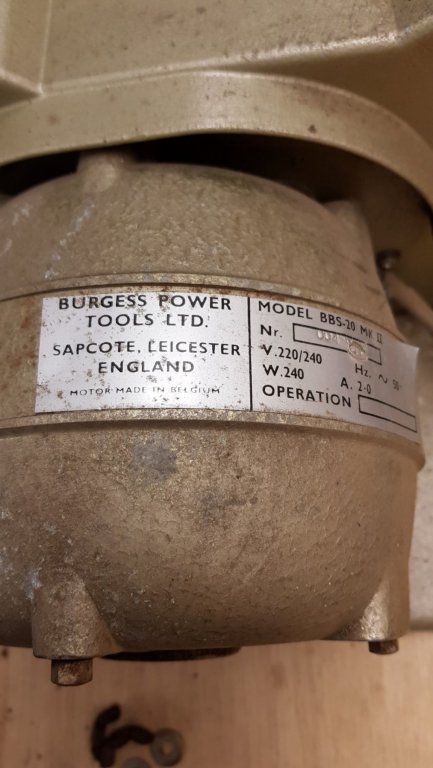
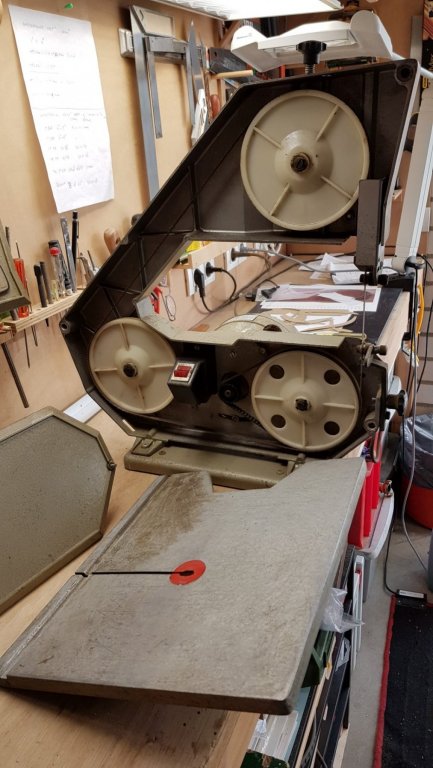
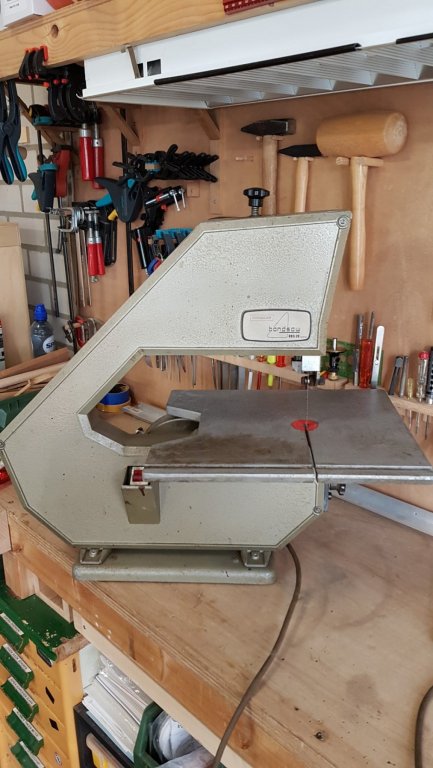
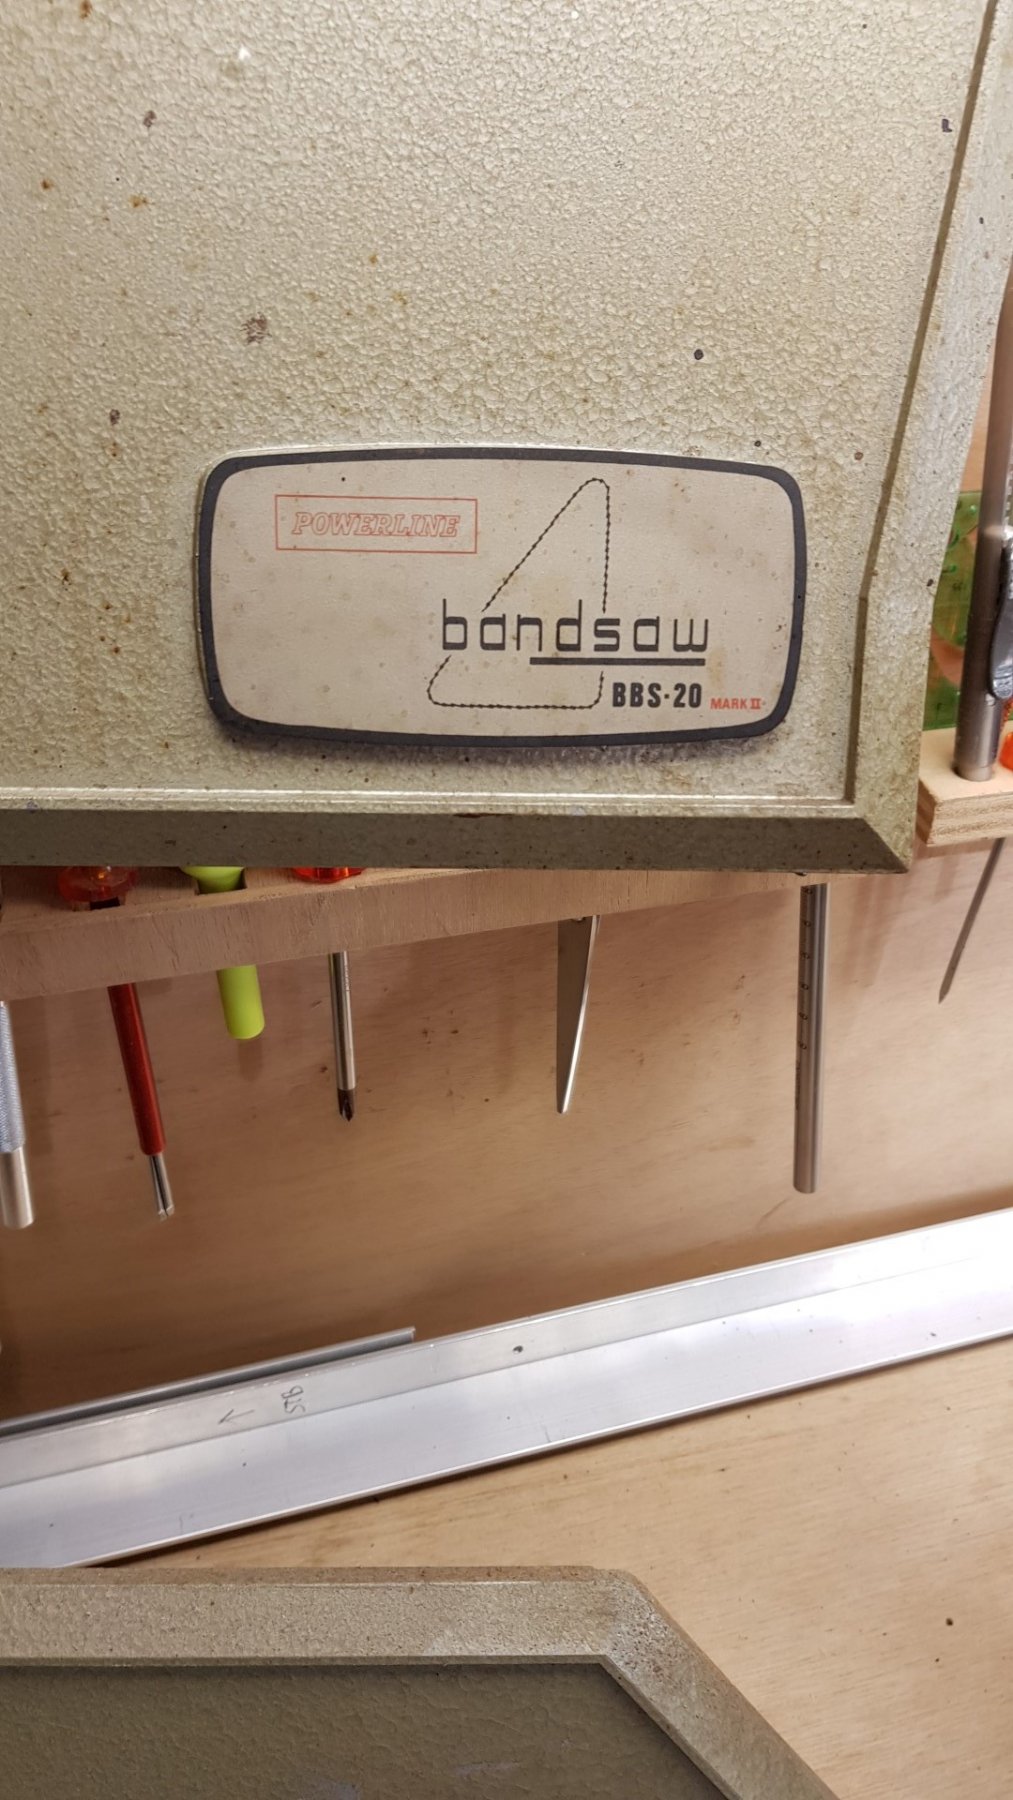
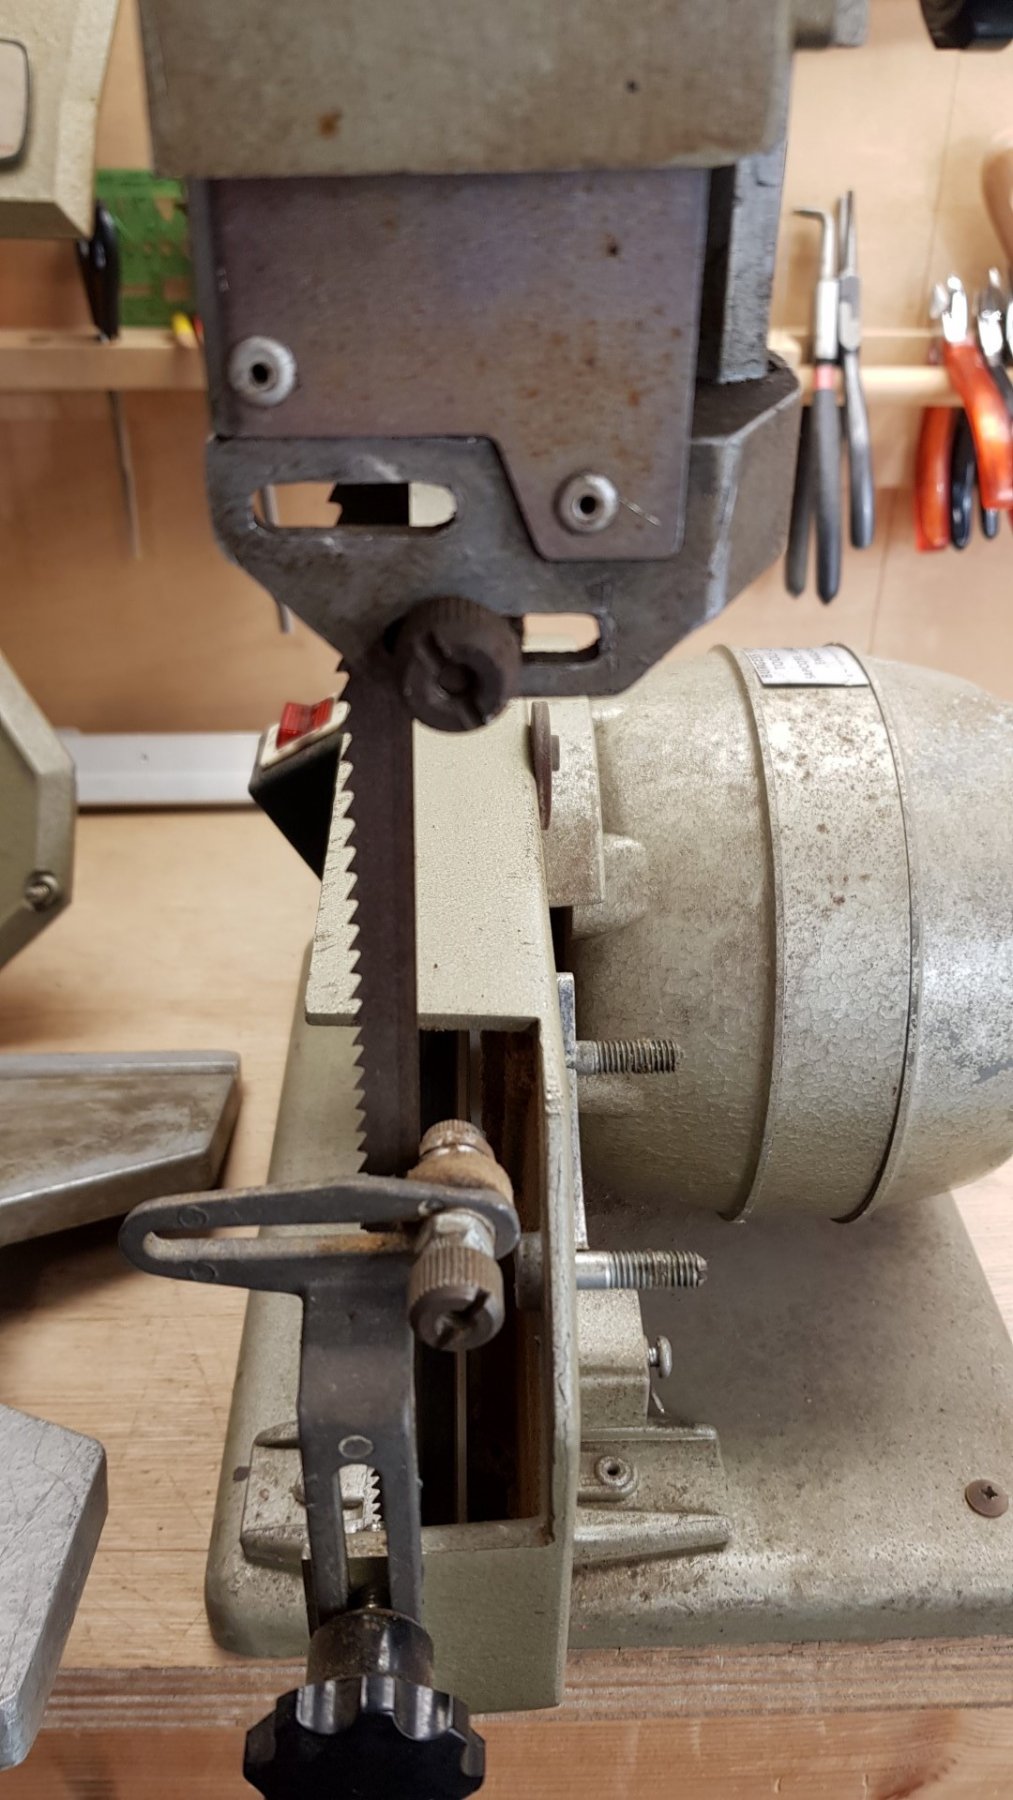
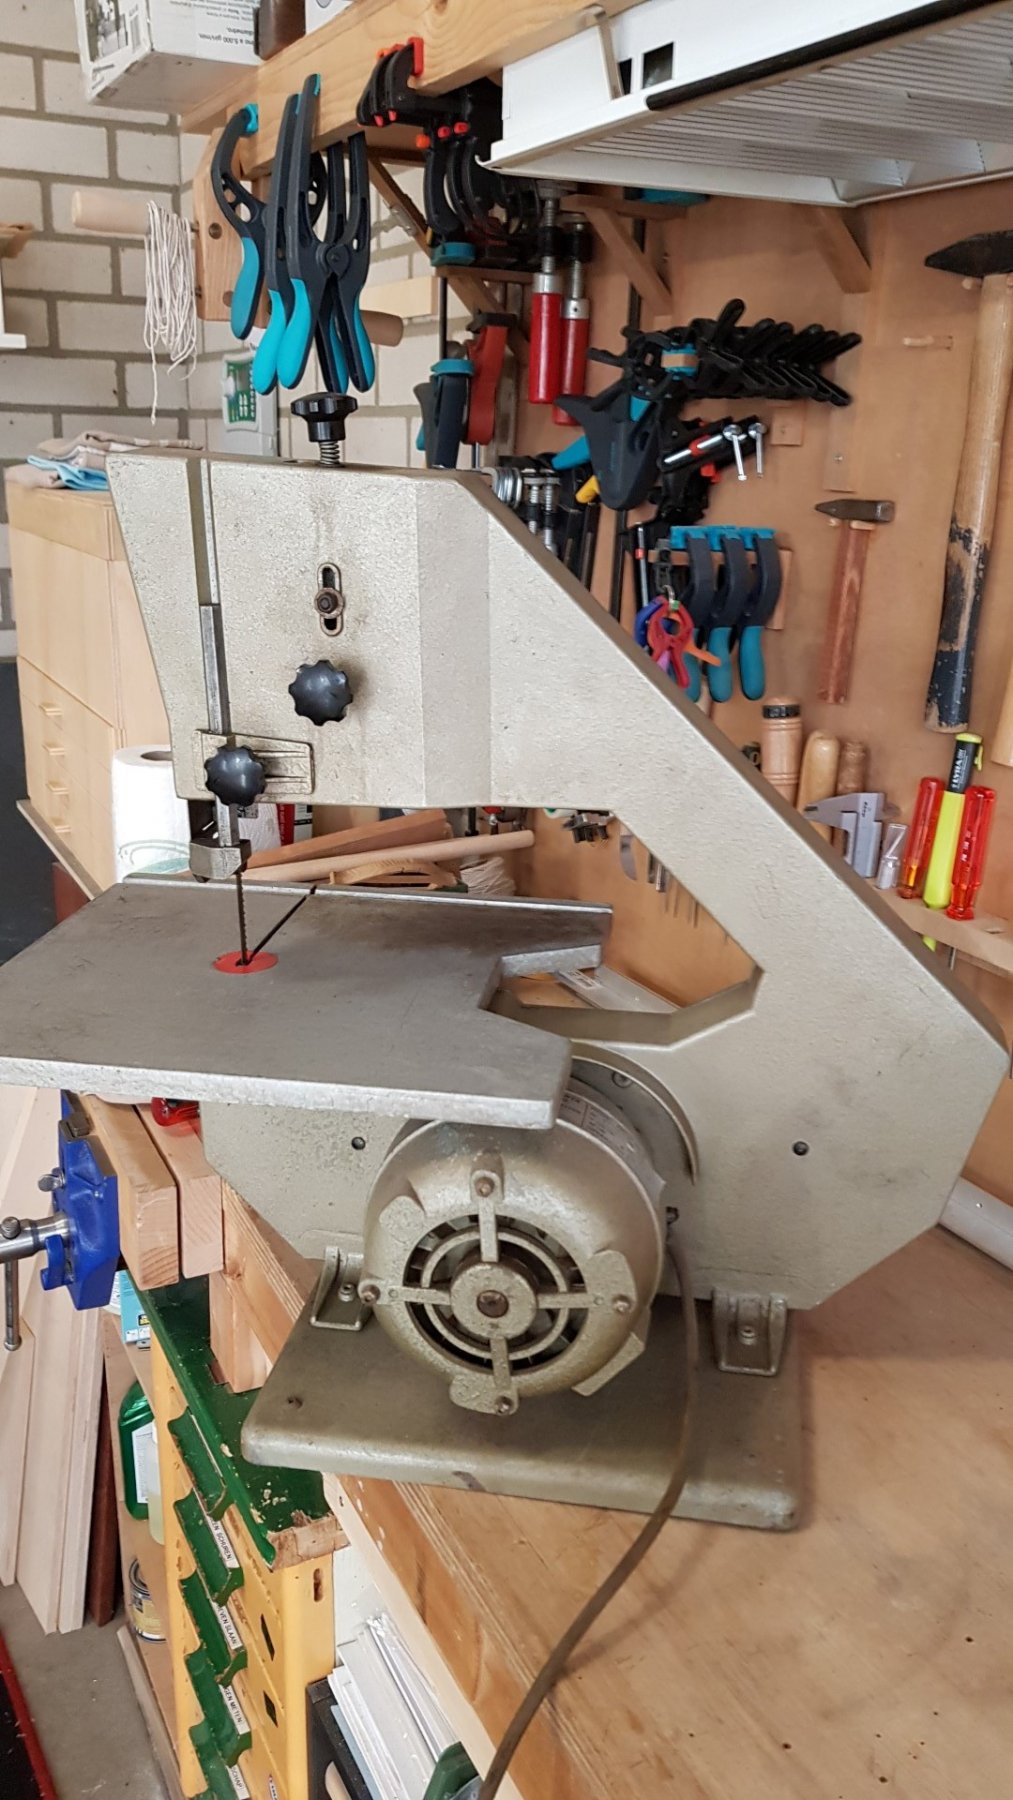
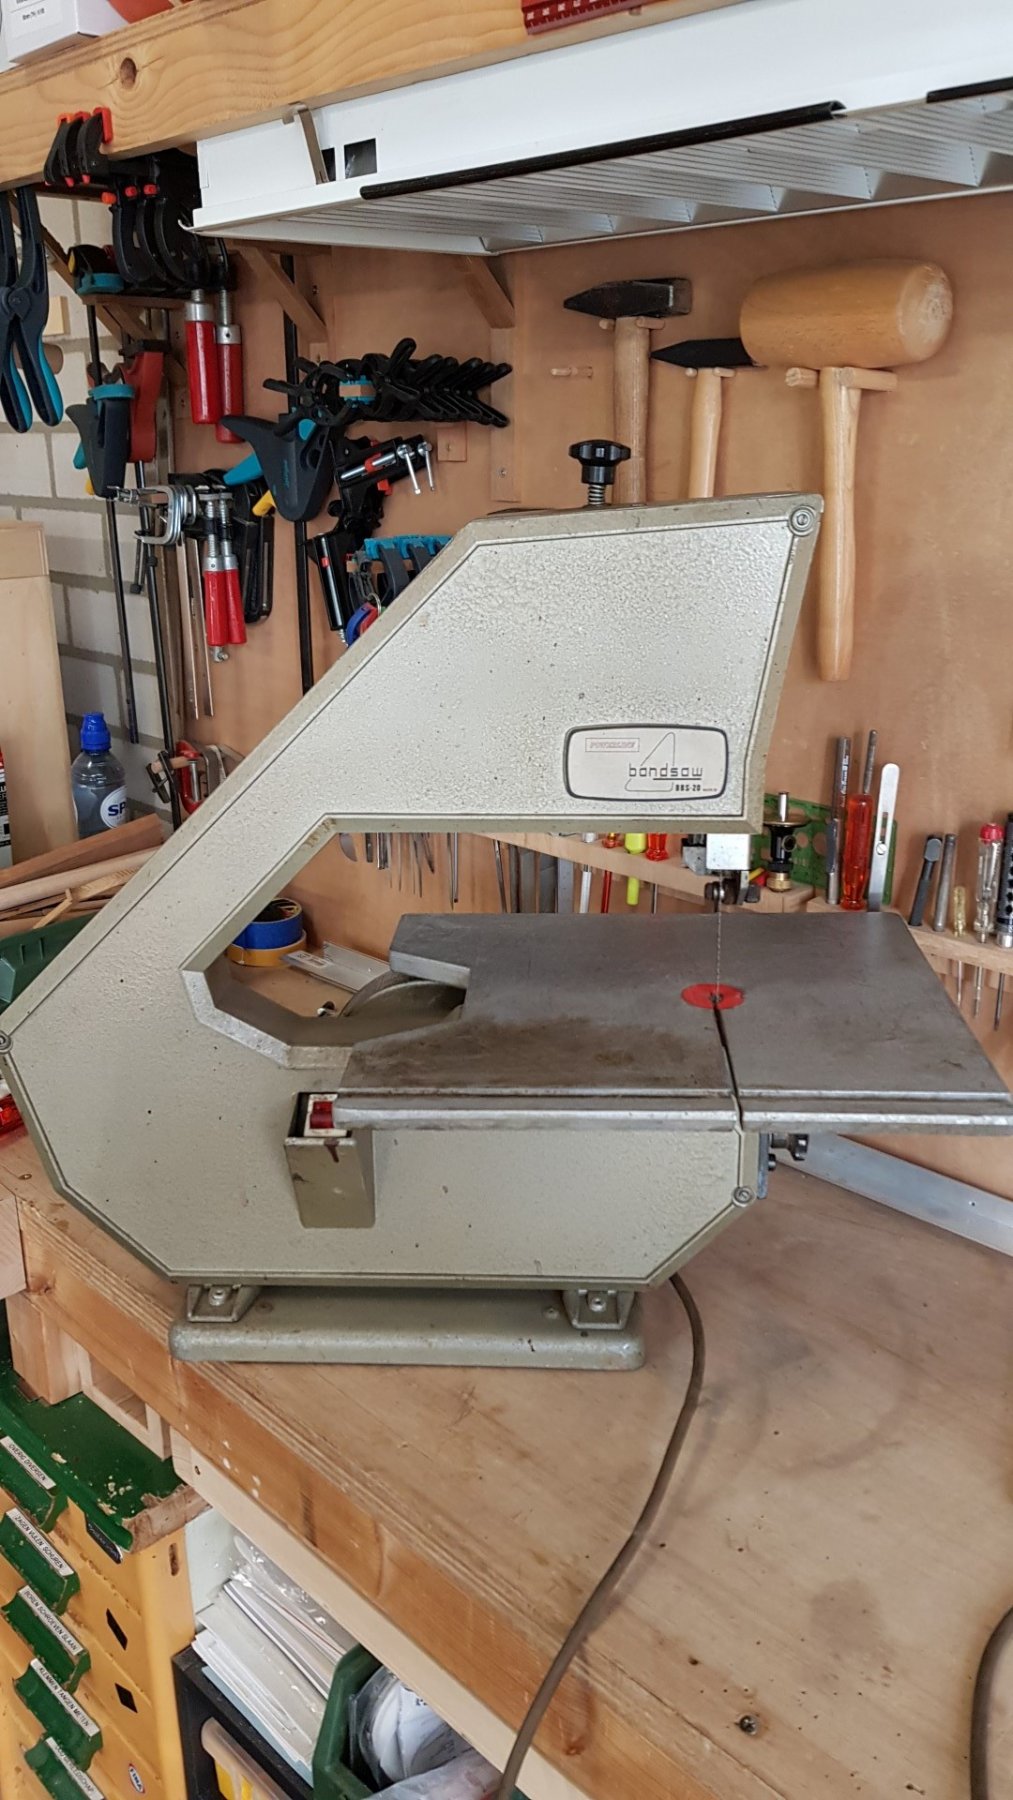
Not sure this is the right place (being a modellers world) but I thought I might give it a try. I have a Burgess (labeled powerline but it is a Burgess as Burgess went up into powerline) bandsaw type BBS20 MKII for sale. It is in working condition (video available on request) but it will need cleaning/restoration. It misses the two plastic front blade guidance rollers. The rear blade roller guides are working ok. No accesories. It comes as shown. I guess this will only be interested for UK as the saw was sold there mostly. I am asking 65euro but fair bids are welcome. pm or email me if there are question.


- 1 reply
-
- 1
-
-
Just a very short update to let know that I haven't gone... Haven't done anything since last october. No lust, other projects, holidays, etc etc. So the ship went up the attic untill I found it was time again. And it was! I also decided that I will close the ship and not leave anything open, hence I have to close the plancking on the portside now. Up for another tedious job, but it is no else. I want to get it done so as to turn the ship upright and again and that I can continue the build up again. Just 1 pick of the first planck of this year :)... I will post again when this side is closed as well. Have fun building. Hans.
.thumb.jpg.4af4f3bf98ff1f2f768478ba8b20cb45.jpg)
-
Well its been some time so here another update. The STB side of the hull planking beneath the first whale has been closed. As said earlier, its a tedious work but I am very happy!! It really starts to look like a ship :). I put the present state into the sun to get some non-TL light pictures. It gives a whole other dimension. During the planking I started to doubt if I should not leave the port side as it is so you could see how it was build, but I decided against it. I did not like the view. So I am up for another tedious part of weeks planking.... This shows while still hanging upside down but just finished. I am happy with the looks of the bow. This picture is from before the first sanding. Also the aft looks good, some points needs some work but overal its satisfying. (and for the sharp eyes, yes I am going to redo the rudder, I already stripped it partly. I did the rudder much too early as I now find out. Same with the bow. In the planking you still damage the keel and the bow. But I already have an idea how I can rework them later..... So it will be for quite some time before you will hear from me again. as there are some holidays on its way and I doubt if I can finish port side planking before end of this year.... we will see...... regards, Hans...
.thumb.jpg.54aa039432a43bdb635a3277b93abff5.jpg)
.thumb.jpg.beb689700b842d17969b2a670c97e13d.jpg)
.thumb.jpg.f2d40b50d1f89b5e4ad4a9c84a0f95ee.jpg)
.thumb.jpg.22ca06ad29c4f42a14a202fa767a1626.jpg)
.thumb.jpg.cca97267fe8de216dd0e65b46b7803c7.jpg)
.thumb.jpg.a3decca8b0aa2af2580b4f3e389e2b98.jpg)
-
As it has been june since my last update I could not resist. Work progress is steady but slow with the plancking. Specially on the bow part each piece takes a lot of time..... First setting it out on carton, transferring it to wood. First sawing it roughly then sanding it to size. 10-15 minutes in water and clamming it in place. then having it dried (mostly and best overnight) gluing it in place. Which due to some of the forces (curving and tordation) also must take overnight. As I am working on both sides simultaneously, I can do max about 3 to 4 pieces per day. But looking at the result I am satisfied. Forget the small openings, I can rework them later as also I need some overall sanding when finished. It is not as nice and smooth as I could do with for example pearwood, but I am happy with how it looks. I guess that in those they weren't as good looking as we think they might have been. I let the picture speak for themself. The last one is the status per yesterday.
.thumb.jpg.1eb6b92effd15f32aebd92dd781cee00.jpg)
.thumb.jpg.a6f4974700ecb6d2f997a3ce2c65b424.jpg)
.thumb.jpg.47c2e44aae87573ccf90330232cb7f15.jpg)
.thumb.jpg.81445b95409dcca7a0a3ffee2cc27a14.jpg)
.thumb.jpg.203ff50cf5b30946715709e7e71e240f.jpg)
.thumb.jpg.7b6c7ea9a5dc78bfea6653b113252bf5.jpg)
.thumb.jpg.2869b71021a4e0389a5ac9886987199e.jpg)
-
Thanks Nils. I still think its very corse and rough and not so nice and polished as I see some other builds. But then again in those days I guess it was more rough as we feel it should be maybe... rgds Hans
-
I finished both sides 1st and 2nd whale and inbetween plank and started on the hull planking towards the keel for which I turned the ship unside down again. I foud a nice see through.... I will equally work and continue both sides hullplanking untill ready. I stopped using nails and found a way to secure the planks without nails. I will do the nails later. I found the nails and positions were getting rather disturbed from position. So not nice and regular. By doing them later all at once I can do that nice and regular.
.thumb.jpg.f7839aa848920c0faeeed2d8f603e8e2.jpg)
.thumb.jpg.ebe15feafaed739a805751d9ed838b66.jpg)
.thumb.jpg.6b59cb082360478e791014ffa547649f.jpg)
.thumb.jpg.2ac50aa6b1e87401fccb81b4eaddda64.jpg)
.thumb.jpg.65dbe534aff1f69ce4ada68e70c15c1a.jpg)
-
In the mean time I finished all the inserts for the gunports. As to be sure, before I start working on the outside hullplanking and the wales I checked the hull and sanded it a little more to be sure the curves are right. Next steps were the first wale which in all is the second wale. After that I added 10mm hull plank under which the first wale comes. The running of the first wale I mounted deviates (only in the beginning) from the drawing but as it looks good on the ship I let it be. No idea how the difference came to be. I checked the line/curve several times. I will now finish this starboard sides first and second wale and then up to the port side. Over night I clamp wet planks in a very simple but for me effective way. The are a little oversized so I can also sand them into the curvatures. T
.thumb.jpg.bfeae9271286892e1b58cb1ba019e839.jpg)
.thumb.jpg.05536c703dc560d6a8df22d6290620ca.jpg)
.thumb.jpg.8888d89cd07b1540ff3354ac1943cd31.jpg)
.thumb.jpg.51aea1f5b0877e1bc23784e2d47974bb.jpg)
.thumb.jpg.4e0c1fade8ca92982d46c54fcbdbb73d.jpg)
.thumb.jpg.6528a906edd98fffed43a460f68dd192.jpg)
.thumb.jpg.7ce58fb4c6ee4233cd30464f03b61a88.jpg)
.thumb.jpg.db74f24faaf6974d486ae4a71b7fe38f.jpg)
.thumb.jpg.fc786ee056acbcf8573437c7da553839.jpg)
.thumb.jpg.07ca5984ba27057369b39ed30a902dcf.jpg)
.thumb.jpg.b791f74928e5f8dd645aa06f8e50bbcd.jpg)
.thumb.jpg.ce0c71d1bd8be5474d674ce841570a58.jpg)
-
After a nice holiday, we went to see Taiwan and Japan, I thought it time for another update. Not much happened as we were away quite some weeks. I finished the inside hull planking from the main gun deck and on one side I finished the inserts for the gunports for the same deck. Its not actually correct as how they did it (according to Bloms'drawings) but its the best way that works for me. The inside will come flush with the inside hullplanks but the outside will be recessed. I will sand them to the present frames. After that the outside hull planks (about 1.5mm thick )will be mounted leaving a recessed gunport where the gunport lid can be fitted. I do intend to leave them removeable so I can work the outside hull planking against it and leaves me the opportunity to sand the planks flush with the gunport hole in the frames. (I hope this is clearly explained??? ) Once that has been done I can fix them in place. (If anybody has a better idea its welcome). Next steps the gunport inserts for the other side. Its a tedious work. Rgds Hans
.thumb.jpg.4fc727da4eeddaa605e4ad0127cd2d7c.jpg)
.thumb.jpg.4189cdf2dc734215998ed859974a4cf5.jpg)
.thumb.jpg.e699d272041c4bc5da0a589d586a221f.jpg)
.thumb.jpg.ab7ed4002b46be03808261323707115e.jpg)
.thumb.jpg.ea4a4994a18c452b39ccc8800a362a92.jpg)
.thumb.jpg.ad3882e00dfc7c81353711a1565a81f4.jpg)
.thumb.jpg.281a97ad808b9ad92e1344af89b418a1.jpg)
.thumb.jpg.5473c1f9e8c98bf79f60c45994adf95c.jpg)
-
Thats true, you see a lot more and you are free to go as you like. Also know about how you feel about distances in the US. Used to work and travel there for years and have relatives living in Vancouver, but did not know you did it before. So you are used to the traffic and the way of driving. Makes it easier I guess. Well, have a great holiday!!!! Rgds Hans
- 305 replies
-
- 6
-
-
- utrecht
- statenjacht
- (and 1 more)
-
Thats a lot of driving and only 3 weeks and in June?? Take flights on some of the budget airlines that is probably cheaper than the gasoline and the return fee for the hired car for such a trip. Saves you a lot of time, to be spent somewhere else instead in a car on busy roads... (its June remember, summer time. unless you drive through the nights it can get very busy on the roads) just my 5 cnts.. (And by the way, the russian border is not that bad anymore..... unless you purposefully start picturing military objects)
- 305 replies
-
- 6
-
-
- utrecht
- statenjacht
- (and 1 more)
-
You should start selling those 3D printed guns..... I guess I would be your first customer. This sice (1:50) is not commonly available. Very nice build! following it with lots of interest and fun!
-
Well, Its been a while, so time for an update. The build was postponed also a couple of weeks due to another project. I think the pictures are selfexplanatory. There are still doors in the constabels chamber but I decided they will be deleted. Now to continue with the inside hull planking.
.thumb.jpg.2b09e49c40b65671f08b68de226cc55f.jpg)
.thumb.jpg.0f22f5faa0d6fbfd8c27e028f153cada.jpg)
.thumb.jpg.46f4fb7291f36ba611955058de1ef8c3.jpg)
.thumb.jpg.90e5364f97bc48723ae3f76d6ac7f499.jpg)
.thumb.jpg.78d54dec51e9c8fc62f06f9ad2955fb5.jpg)
.thumb.jpg.a01a2407a4ee0df4cb513949e3b6d0c3.jpg)
.thumb.jpg.eb337f33220edc531ba0029d66212255.jpg)
-
Well I had the drawings of Otte Blom (the 7P) printed on an architect paper printer. They are in size, when printed 1 to 1, bigger than A0 (how to convert to feet???). So yes these printers exist and the nice thing about these printers (in fact they are called plotters here) are for what we call "work drawings" the paper does not shrink or expand during printing or afterwards.They are measure and scale fixed, so no distortion. Maybe an idea? Rgds Hans.
-
PRINS WILLEM by juzek
YankeeD replied to juzek's topic in - Build logs for subjects built 1501 - 1750
Dear Juzek, What are the different diameters of the rope you use? I am still in doubt what I will use and as we build about the same scale.... I wonder about this. rgds Hans
.jpg.b621ad3db6c321bf1c3d157d7b653b45.jpg)
.jpg.877944399bdc8b97b2f893ea3c0bde78.jpg)
.jpg.9928be980c243fd8e57e58d49faab5cd.jpg)
.jpg.4e841c573b5349a20799d226d3d36261.jpg)
.jpg.1ee6cd27d161e51d6ff6ed59c0dbd2fe.jpg)
.jpg.907ce2defad9dad47f412b687d3eeb05.jpg)
.jpg.ffb0331f21b67db68ced9b16d68cb376.jpg)
.jpg.3f120985ed3ab2ee32c164f7e47b215e.jpg)
.jpg.ce74fc4b0c91d877150a356d76914e49.jpg)
.jpg.68d37bf9ca95a413e238e6647ad3235d.jpg)
.jpg.78464f8009b4f45990cc0b9c6351821b.jpg)
.jpg.8c5a84f69c987be4945ce6e897821130.jpg)
.jpg.3ad32ebfb12d8e09e7a599c84745315a.jpg)
.jpg.21142144a15dea3ab25c229a5e768dc3.jpg)
.jpg.8c3ebb398369159a7cff5cd01b5a5ff9.jpg)
.jpg.35c452cd7c92942b67f213a830743281.jpg)
.jpg.793e83e7e081a0f5996b408bbf0e5763.jpg)
.jpg.1d78d1da0390c840fcf15a9bbee74970.jpg)
.jpg.2a00e47c419b06ada20e5b0da7422bcb.jpg)
.jpg.af6e258e871f7ac4b1c96483e1ce3bde.jpg)
.jpg.12edbc895cbc54f02ebf24988973ffd3.jpg)
.jpg.5f80227004e6a238cd9b7143173cf079.jpg)
.jpg.fd153a7491d34020323df91f757dc7d2.jpg)
.jpg.c76c694abf538cca1d7abd48193ebb28.jpg)
.jpg.67087dc8674b9652e77911989a2beee8.jpg)
.jpg.8680b599ec8532ffb6f986fd54227c99.jpg)
.jpg.5f8c4eeda7cbab45f7cce1a7687c7b97.jpg)
.jpg.d0084957a9a0bee6efd86506448f9f3b.jpg)
.jpg.cbd33fe09786b4935908a1b057c3680d.jpg)
.jpg.5eb6be92fa86851411e24b97c8b72395.jpg)
.jpg.b04751fc3054e6c24be5cb01479bf466.jpg)
.jpg.e4518598b040b3d129f9dacc22a163bc.jpg)


.jpg.c082f8877e354b5a9827759179e42423.jpg)
.jpg.3c7341f7666deb78906502c006c92105.jpg)
.jpg.d673978d816246bef24b9a97ddf8bddf.jpg)
.jpg.11509230f184de94c7f8b6ba62d256db.jpg)
.jpg.cd76f1309d5b732e1ce1320127d4b3b2.jpg)
.jpg.0dcaf0a2adc9b161cccb70795a4a9a4b.jpg)
.jpg.929f6e4d9822babd6bb7710d27d29fa4.jpg)
.jpg.c8ede5da329d8d9ff145d346283e8639.jpg)
.jpg.f81618cd2b3607ef796b660ead2908ba.jpg)
.jpg.0ab141590bd703ac529a98de89f9eef4.jpg)
.jpg.4b14e4607954de0e246df287f517d9c0.jpg)
.jpg.ecb2ccf6c1057750906534e691cffc35.jpg)
.jpg.12ee65ca92649daafe5122518770afcb.jpg)
.jpg.f0e132b867ad153f6ad74a766ab40fb5.jpg)
.jpg.dc425ba1e8541023c5841aafcf114793.jpg)
.jpg.a93ed9e0a2a4d49ac09f0ff75202f184.jpg)
.jpg.c6ffb505ba11e77821c9cc660ba829b1.jpg)
.jpg.d709d26eecd8cce79ee2066e3f619756.jpg)
.jpg.addcd31f2610d5326123f657c9a22d10.jpg)
.jpg.89db0a80ef732f2556a8b0af69d6caf5.jpg)
.jpg.286fabfc72a57d4aedbfb94e3ab77137.jpg)
.jpg.84833c9c557101e2ef0f128d74e1e0e7.jpg)
.jpg.1e54e462c5eb4f0011683e1ceaadfc31.jpg)
.jpg.9a8d297b8b02fa3fa04f906d3c3d55a7.jpg)
.jpg.30d8d8666bdee026bf3612387f3a9110.jpg)
.jpg.460695785bda2c5ecd243f99c08093f6.jpg)
.jpg.cf10a9fdb3567ac01b5389569bb9c1f9.jpg)
.jpg.fdca0aa067993f553c192d8af2616205.jpg)
.jpg.8e2c32107ad22c5bcc9f1d34ce387f17.jpg)
.jpg.5dafb4b0b6fe10d3a703d2ae3c565e58.jpg)
.jpg.ef7105bd898e8540bfc0dabec901d6ee.jpg)
.jpg.332b58b2cae1f57a1901da571b5b2944.jpg)
.jpg.8b916ccbb64abf43304b8f50a166ac65.jpg)
.jpg.f09db4a1c5504e5cdc25b6b825e284b2.jpg)
.jpg.b8dd4c7b32b767800530b4c05fe2770f.jpg)
.jpg.a238b6c716c8b290b67413f0c047fe61.jpg)
.jpg.91278750b0a35f88abd0d649fed33faa.jpg)
.jpg.30e425d29d089619bfde2f54931f5588.jpg)
.jpg.db7e0ea9ed2512e7945dda6003dc7639.jpg)
.jpg.a1916b83ddfcbf925a40d5a43f4516d7.jpg)
.jpg.0b8f09828c70a17819be383881054f87.jpg)
.jpg.c97dc1b49340cfde828cd8c644b8323f.jpg)
.jpg.19efdcfded92dbd549835d26cb80ce3b.jpg)
.jpg.c675b142b499c21d653197eebdafb40d.jpg)
.jpg.b2d752d0b5308df426d144044e7a64bb.jpg)
.jpg.cdc2dd237e4d795121c3fce74408f586.jpg)