


vossy
-
Posts
591 -
Joined
-
Last visited
Reputation Activity
-

 vossy reacted to drobinson02199 in HMS Fly by drobinson02199 - FINISHED - Victory Models - Scale 1:64 - with upgrade kit
Worked on channels: first picture shows channels with pins in. They are only 1.5mm, so it's delicate drilling.
Second pic shows the channels installed on the ship.
Regards,
David
-
vossy reacted to drobinson02199 in HMS Fly by drobinson02199 - FINISHED - Victory Models - Scale 1:64 - with upgrade kit
Rudder mounted as well as tiller & tiller housing.
Regards,
David
-
vossy reacted to Cathead in Arabia 1856 by Cathead - FINISHED - Scale 1:64 - sidewheel riverboat from the Missouri River, USA
The cylinder timber assemblies are essentially done. Here they are test-placed on the hull, using a dowel to align both sides. In reality there wouldn't be an axle running all the way across, but I have it set up this way at the moment to ensure that both sides are aligned.
Here's a closeup of some details (see photos in the last post for the real thing):
Below is a closeup of the real pillow block (the metal brackets holding the axles to the timbers). I decided I wasn't capable of making an exact replica and went for a reasonable facsimile instead.
To make these, I traced the outlines of multiple blocks in a single sheet of wood, drilled & filed the axle holes, and only then cut each one to length. This made it easier to get the holes aligned properly and lessened the chance of cracking the wood. Then I carefully cut and filed the final shape. Below is a staged photo of the process, from a basic block at bottom left to a screwed-up block at bottom right (got the hole off-center) to four decent ones above.
To make the metal rods holding the different timbers together, I carefully drilled out the holes in sequence, then used blackened metal wire for the rods. I made the little iron face plates (or whatever the right term is) by cutting a strip of styrene most of the way, leaving the end attached to the sheet for ease of handling. I then painted it black, drilled holes along the length, and cut a series of tiny squares centered on each hole:
I then slid these onto the rods, which was tricky between timbers. I positioned them in the middle of each gap, painted the remaining cut surfaces, then applied a dab of CA to each one and slid it down into place:
And here's another view of the test-fit assembly:
The inboard timbers are based on the measurements and photos I took at the museum so are pretty close to accurate. The outboard timbers (the squarish pile at the edge of each guard) are my own design, as I have no information regarding how these were done on Arabia. None of the excavation photos show these timbers intact. I found one drawing in a reference book of a similar style, and it makes sense to me as a design. The inboard timbers have to with stand the back and forth pounding of the cylinders, so have long braces in either direction. The outboard ones just have to hold up the wheel, there's really no back and forth stress there. So I decided a simple design made the most sense. These will be barely visible anyway unless I decide to leave one side of the model open.
I'll probably work on building the engines next, so I can finalize the assembly of this section. When all the machinery is finished I'll be able to lay out the rest of the deck and determine exactly where the superstructure will go, meaning I can determine what portions of the deck to plank and which will be hidden. I had intended to build this as a "closed" model, but doing the detailed work on the cylinder timbers is making me question that and wonder whether to leave one side open. This also affects the level of detail with which I build the paddle wheels. Will they be mostly hidden within the hull, or exposed to view behind open framing? To be lazy/efficient, or obsessive/interesting?
Thanks for reading. Hopefully the build continues to be more interesting as we get into the above-decks work.
-
 vossy got a reaction from lmagna in Mississippi 1870 by vossy - Sergal - 1:50 - Riverboat
hi carl, on my boat I made the middle deck the dining room and on the side are the windows on either side of one long room. they are not individual doors, and hence have no handles. the upper structure I envisage as separate cabins, hence the individual doorways with handles and steps leading up to them.
just my take on things.
cheers
chris
-
vossy reacted to LFNokia in Robert E Lee by LFNokia - FINISHED - Amati - 1:150
Current status update
-
 vossy got a reaction from Martin W in HMS Fly by drobinson02199 - FINISHED - Victory Models - Scale 1:64 - with upgrade kit
fabulous looking boat david! really well done. personally I didn't notice the stern naming until you mentioned it, but now I see it redone it is much better. you are creating a super model here!
cheers
chris
-
 vossy got a reaction from Old Collingwood in HMS Fly by drobinson02199 - FINISHED - Victory Models - Scale 1:64 - with upgrade kit
fabulous looking boat david! really well done. personally I didn't notice the stern naming until you mentioned it, but now I see it redone it is much better. you are creating a super model here!
cheers
chris
-
vossy reacted to drobinson02199 in HMS Fly by drobinson02199 - FINISHED - Victory Models - Scale 1:64 - with upgrade kit
[NOTE: I HAVE REDONE THE STERN PICTURED IN THIS POST. SEE WHY HERE AND THEN REDONE STERN IN NEXT POST]
Finished the stern. "FLY" is not quite centered -- the letters are devilishly small, and the CA gel I use that typically gives me at least 5 sec to slide things into alignment decided to grab right away, so I ended up with the "L" closer to the "F" than I had planned, and that governed spacing to the "Y". Nevertheless, I'm happy with the stern decoration overall, and the green highlights worked well.
Regards,
David
-
vossy reacted to drobinson02199 in HMS Fly by drobinson02199 - FINISHED - Victory Models - Scale 1:64 - with upgrade kit
I worked too hard on the stern gallery to have that off-center lettering spoil it, so I removed everything in that section, repainted, and remounted.
This time I aligned the letters on a piece of paper, and then picked them up with a small piece of painting tape. Added glue, applied the set, and then peeled the tape. That did the trick.
Regards,
David
-
vossy reacted to drobinson02199 in HMS Fly by drobinson02199 - FINISHED - Victory Models - Scale 1:64 - with upgrade kit
First side now finished, with addition of the stern side window and the top rail. I noticed that the stern side windows in the Amati pics and some other build logs are more simply painted, and having now done these with discrete window frames, I can see why. Lots of retouching multiple times.
Now on to the other side, and then the stern fascia.
Regards,
David
-
 vossy got a reaction from thibaultron in Nordsee Krabbenkutter 1900 by popeye the sailor - FINISHED - Authentic Models - 1:48
hope the stairs haven't beat you on the paddle steamer?
chris
-
 vossy got a reaction from Piet in Nordsee Krabbenkutter 1900 by popeye the sailor - FINISHED - Authentic Models - 1:48
hope the stairs haven't beat you on the paddle steamer?
chris
-
 vossy got a reaction from prutser in Mississippi 1870 by vossy - Sergal - 1:50 - Riverboat
Dry fitting of upper vent structure and posts to make sure they align up properly.
Cheers
Chris
-
vossy reacted to drobinson02199 in HMS Fly by drobinson02199 - FINISHED - Victory Models - Scale 1:64 - with upgrade kit
Decoration on first side completed (except for the large stern windows, which I'm painting now). The approach of using the window cutouts on the decorations worked really well and everything lined up.
I also found that the best way to fit the decoration that abuts the curved endings of the top rail is to dry fit the rail and position it with the decoration dry-fitted, to get both right as it's a tight and exacting fit.
Regards,
David
-
 vossy got a reaction from popeye the sailor in Mississippi 1870 by vossy - Sergal - 1:50 - Riverboat
Dry fitting of upper vent structure and posts to make sure they align up properly.
Cheers
Chris
-
vossy got a reaction from popeye the sailor in Mississippi 1870 by vossy - Sergal - 1:50 - Riverboat
Thanks David. The external flooring outside the doors just calls for it to be planked the same as the deck. I just wanted to jazz things up a bit for my high class passengers. I think it will look heaps better when the edging goes on as well as the fancy handrails.
Cheers
Chris
-
vossy got a reaction from popeye the sailor in Mississippi 1870 by vossy - Sergal - 1:50 - Riverboat
Small update.
Front and rear of doors before fitting. A small blob of Blu-Tack stops the door handle from ever slipping out. Drapes are simply cut out of stiffish yellow cardboard.
For the small window in the structure I decided to have curtains instead of fancy drapes. Perhaps a bit out of scale but it looks pretty good irl.
At the front of this structure there is a overhanging veranda which has fancy posts and rails around it. It is also slightly raised from the deck itself. I decided to plank this bit a little bit fancier for the comfort of my passengers.
All structures at this level are only placed and not glued as yet.
Cheers
Chris
-
vossy got a reaction from popeye the sailor in Mississippi 1870 by vossy - Sergal - 1:50 - Riverboat
Hey Dave, thanks for the comments. I have a small (about 1.5cm high) skylight structure, then the pilot house to go on top of this latest cabin structure. So getting there!
Cheers
Chris
-
vossy got a reaction from popeye the sailor in Mississippi 1870 by vossy - Sergal - 1:50 - Riverboat
Hi all, have done and placed the doors in the upper cabin structure. Decided to go with the same color curtains as the lower deck. Still need to do the shutters for each doorway now. Currently the structure is just sitting there.
Have also planked (bar the outer edge) the next deck level. Again this is just sitting on top. No glue.
Cheers
Chris
-
 vossy got a reaction from Omega1234 in Nordsee Krabbenkutter 1900 by popeye the sailor - FINISHED - Authentic Models - 1:48
hope the stairs haven't beat you on the paddle steamer?
chris
-
 vossy got a reaction from Mike Dowling in Nordsee Krabbenkutter 1900 by popeye the sailor - FINISHED - Authentic Models - 1:48
hope the stairs haven't beat you on the paddle steamer?
chris
-
vossy reacted to drobinson02199 in HMS Fly by drobinson02199 - FINISHED - Victory Models - Scale 1:64 - with upgrade kit
The lowest side rails are now in, and I have painted the hull above them, ready for decoration.
I'm going to do this side all the way through first, so I can do the other side (which will be my display side) better if I learn anything unexpected.
Regards,
David
-
vossy reacted to drobinson02199 in HMS Fly by drobinson02199 - FINISHED - Victory Models - Scale 1:64 - with upgrade kit
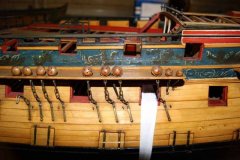
I have started on the side rails. The instructions suggest fixing the lowest rail according to the plan drawings, then attaching the lower row of decorations, then fixing the next rail to the top of those, and so forth.
When I went to the plans and took measurements, I wasn't confident in how they were matching the actual boat, and was concerned that the decorations would not line up properly -- would I miss the window alignment or something further up.
Since the lower row of decorations has cutouts for the tops of the windows, the alignment of the decorations to the windows is really the critical thing. So per the attached picture, I aligned the decorations on the windows and taped them. Now I can install the lower rail up against them, and know that my starting point will work all the way up. Same thing going across the center -- I can align the top of the decoration to a dry-fitted second rail.
Regards,
David
-
vossy got a reaction from Martin W in HMS Fly by drobinson02199 - FINISHED - Victory Models - Scale 1:64 - with upgrade kit
very nice, clean, and crisp david. the red really sets it off well. do you have any sort of sheen level on her? or just keeping it matt?
cheers
chris
-
vossy got a reaction from Martin W in HMS Fly by drobinson02199 - FINISHED - Victory Models - Scale 1:64 - with upgrade kit
super painting, lovely details and colour david.
cheers
chris