
Supplies of the Ship Modeler's Handbook are running out. Get your copy NOW before they are gone! Click on photo to order.
×


IgorSky
-
Posts
1,841 -
Joined
-
Last visited
Reputation Activity
-

 IgorSky got a reaction from GrandpaPhil in Jolie Brise and Fastnet Rock Lighthouse by IgorSky – FINISHED - Scale 1/3000 - BOTTLE
After complete drying of the sea, I inserted the mast with folded front sail into the throat of bottle. Then I expand the front sail and glued its corner to the bowsprit.
-
 IgorSky got a reaction from FriedClams in Jolie Brise and Fastnet Rock Lighthouse by IgorSky – FINISHED - Scale 1/3000 - BOTTLE
I made the sea from two-component colorized silicone. This was my first attempt to use this material. I poured a few drops of the mixture in the bottle and after a few hours, when the mixture was a little dry, I put the hull of the boat in the sea.
-
IgorSky got a reaction from FriedClams in Jolie Brise and Fastnet Rock Lighthouse by IgorSky – FINISHED - Scale 1/3000 - BOTTLE
Lighthouse ... I carved it out of bamboo and colored paint. Then I did the rock from epoksilin. I also cutted out parts of the pedestal from the pieces of pear.
-
IgorSky got a reaction from FriedClams in Jolie Brise and Fastnet Rock Lighthouse by IgorSky – FINISHED - Scale 1/3000 - BOTTLE
The nameplate ... I printed it on a printer, laminated tape and glued to 0.5 mm veneer. Then I made the frame from pear strips 0.5x0.5 mm and handled fine sandpaper.
-
IgorSky got a reaction from FriedClams in Jolie Brise and Fastnet Rock Lighthouse by IgorSky – FINISHED - Scale 1/3000 - BOTTLE
Hi everyones!
First of all I want to thank to Piet. His miniature diorama in some way inspired me to this mini project.
From time to time I have a desire to try their skills in the direction of further miniaturization of shipbuilding in bottles. Here, a short history of one of these small projects.
The flask with strange shapes, reminiscent of a heart with an asymmetrical arrangement of the neck, lying in a drawer of my desk for a long time, but I did not have any specific ideas for using it as a receptacle for the construction of a model in a bottle ... And then ... As always, the idea came unexpectedly - sea, rock, lighthouse, boat.
On this photo this flask is in the center
-
IgorSky got a reaction from FriedClams in Jolie Brise and Fastnet Rock Lighthouse by IgorSky – FINISHED - Scale 1/3000 - BOTTLE
Sail ... I used a piece of colored tissue paper.
-
IgorSky got a reaction from FriedClams in Jolie Brise and Fastnet Rock Lighthouse by IgorSky – FINISHED - Scale 1/3000 - BOTTLE
Mast and boom ... I did the parts of the spar traditionally from bamboo
-
IgorSky got a reaction from FriedClams in Jolie Brise and Fastnet Rock Lighthouse by IgorSky – FINISHED - Scale 1/3000 - BOTTLE
I had handled the sandpaper these parts and in the end I got the boat hull.
-
IgorSky got a reaction from FriedClams in Jolie Brise and Fastnet Rock Lighthouse by IgorSky – FINISHED - Scale 1/3000 - BOTTLE
Then I made a billet for the underwater part of the hull from the two pieces of the red hornbeam.
-
IgorSky got a reaction from FriedClams in Jolie Brise and Fastnet Rock Lighthouse by IgorSky – FINISHED - Scale 1/3000 - BOTTLE
Then I made a water line from a piece of white plastic.
-
IgorSky got a reaction from FriedClams in Jolie Brise and Fastnet Rock Lighthouse by IgorSky – FINISHED - Scale 1/3000 - BOTTLE
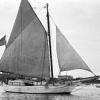
Choosing a boat and lighthouse prototypes came somehow by itself - I like this combination in a long time and I even tried to draw them.
So, I started this project with the building of boat. Based on the size of the interior space, the scale is around 1/3000.
I started to build a boat in almost the same technology as the rest of my models. First I made the deck from several small strips of pear, which I previously whittle away with sandpaper to 0.3 mm. The deck is also the basis for the above-water part of the body. Then I glued the boards of black hornbeam.
-
 IgorSky got a reaction from Dansweeney in Dunbrody by Mahuna - FINISHED - 1:48 - Cross-Section - Irish Famine Ship
WOW! Very good idea! Many thanks for sharing, Frank!
Best Regards
Igor.
-
 IgorSky got a reaction from cog in J-class Yacht by IgorSky - FINISHED - Scale 1/300 - BOTTLE
Hi Bob!
At this time I am prepared more carefully the algorithm of building model in a bottle and drew the scheme for it.
And I remember the main rule - do not rush! In the words of one of the ancient Chinese sages:to hurry - it is to do slow motions without stopping.
But as I said earlier, I felt horror, when I was looking at the slipway with the upper part of the hull and was seeing is this large number of yarns.
-
IgorSky reacted to popeye the sailor in Syborn by popeye the sailor - FINISHED - 1:33 - trawler
yea.......I was rushed with the fish box.......I'm a bit shy along the bulwarks. the gap between is too much......especially if I want to try the ideas I came up with. the alteration starts on the port side......I cut out the section situated between the gallows.
I have these parts........they can be found in just about every Billing's kit. they are supplied as dead eye straps. I don't use them........probably no one else does either. I will use these as the hinges.
the cut out section was extended by adding a wall aft, and extending the wall fore of the box.
more wall parts were being assembled as I was doing this. once these additional walls were dry enough, the cut out section was trimmed to fit and cemented back in place.
this creates a larger 'receiving area'........and the larger opening leads to the 'sort area'. time to begin the starboard side alteration.
quickly copied and quickly done............
the time spent between drying times, was devoted towards making hinges. taking a length of brass rod, the straps were folded, trimmed and bent around the rod. I wasn't measuring........just trying to see how consistent I could be. I'll need to make some shorter though.......at least eight of them should be 16 mm........or less.
when finished with the alterations, I was a lot happier to see this. the sides are in closer proximity to the bulwarks. the 'dump ramps' may fit better. the ramps consist of four planks cemented together, in the same fashion as the box wall parts. here is the box fitted again on the deck.....still more to add to it, which will define the function of the box itself.
there is more.........the installation of the 'fender walls'.........but Gibbs needs to go out. he told me so in so many barks...........I'll be back.
-
IgorSky reacted to Gaetan Bordeleau in Le Fleuron by Gaetan Bordeleau - FINISHED - 1:24
I am having pleasure to try to shoot a perfect picture with a white background. Whe I look at these 3 pictures on the screen, the real color of the model is somewhere between 1 and 2.
Many fluctuating variables must be controlled in 1 shot. In a way, it is exactly like trying to calibrate a motor, each part must be adjusted in relation with his group and everything must turn and produce a good sound and in this case, a good picture.
It is difficult to position the lights to get : a pure white background,
the real color of the model,
no reflections on the model.
I can control each variable separately, but I have difficulties to get a well tuned engine.
The large surface is also a problem about 4 by 8 feet. . A black background is 100 times easier to approach. You can do it with a black curtain or with the flash close to the model.
Theoretically, reflection is easy to control if there is not more than 2 coats of tung oil, accumulation of coats create a thickness in the oil and this dried thickness can be very reflective. The worst finish I could use is a shiny reflective varnish.
Black wales represent a problem. The water based black paint looks fine under the naked eye but when the camera looks at it, she has no mercy. When I look where are the shining spots, some corrections must be brought to correct the problems but it is very delicate and in few cases a very light sanding.
In a summary, the model would need better finish, and the photograph needs some more practice.
I probably did at least 500 pictures of the same model. I did not see the perfect shot yet.
The main thing is that the last picture is better than the first one. This is a good sign which means;
Continue to learn and you will succeed.
-
IgorSky reacted to Mahuna in Dunbrody by Mahuna - FINISHED - 1:48 - Cross-Section - Irish Famine Ship
Part 51 – Belaying Pins
Even though there will be no actual rigging on the Dunbrody sectional model, I think it’s still appropriate to have belaying pins in the model. I like EdT’s method of making belaying pins, as I think it gives me the best chance to make reasonable-looking pins. I followed Ed’s lead, and first drew a belaying pin in CAD – I decided on an 18-inch overall pin length, with a 12-inch shaft. After converting the full-size measurements to 1:48 scale, detailed measurements were used to make the pin-making fixture on the milling machine as described in Ed’s Young America post.
The stock used for the belaying pins is 3/64 round bar. My very first attempt at using the fixture was pretty successful. The following photo shows the first pin – the prototype.
The following photo shows the pin-making fixture, based on Ed’s design.
After making a couple more prototypes it became apparent that some changes needed to be made to achieve a consistent size. The hole that had been bored for the bar was too long, so the handle length varied noticeably from pin to pin. The shafts of the pins were also noticeably different lengths.
To correct the first issue, the hole was blocked off so that the length of the handle was fixed. The second issue was addressed by making a ‘measuring fixture’ for the shaft – really just a piece of wood of the correct thickness with a hole drilled through it.
The new pin is inserted in the hole, the excess shaft length is clipped off, and the remaining shaft length is trimmed to the proper length by filing. The following photo shows the first two pins made with these corrections.
In the photo enlargement it’s apparent that the collar of the pin is a different size between the pins. This resulted from misalignment of the pin after removing the fixture for measurement of the pin and then resetting the fixture (the pin wasn’t inserted into the fixture completely). The variance isn’t apparent in regular viewing, but it’s something that’s easy to watch for and prevent.
The manufacturing process starts by filing the end of the handle to a nice round shape. All steps use different grades of files, starting with coarse (either a grade 0 or 2) then progressing to fine (grade 4) and finishing with an extra fine file (grade 6).
The pin is then inserted in the fixture and the flat is filed down to the correct thickness. A caliper is periodically used to measure the thickness until the correct .025” thick shaft is created. This step takes the most time and uses the coarsest files at the beginning of the step.
The following photo shows the first pins inserted in the pin rail, along with a penny to illustrate the size of the pins.
The first day’s production of belaying pins totaled 11 pins. With more experience I think I’ll be increasing production, but there are still a lot of pins to be produced.
This leads to a question I have: should all of the pin holes in the pin rails be populated with pins?
There will be 8 pins across the two fife rails, and another 8 will be in the Spider Band. Each pin rail on the model has holes for 22 pins (this is from the construction plan, but seems excessive to me), so populating all of the pin holes would result in 60 belaying pins (assuming belaying pins in the unfinished starboard side).
The photos taken on the replica ship show a lot of open holes in the pin rails.
I’d appreciate comments and suggestions on this question – but I’ll continue to make the belaying pins for the next few days (maybe longer). Since this work is very repetitive I’ll probably occasionally interrupt it to work on some other remaining tasks in order to break the monotony.
Thanks everyone!
-
 IgorSky got a reaction from mtaylor in Jolie Brise and Fastnet Rock Lighthouse by IgorSky – FINISHED - Scale 1/3000 - BOTTLE
Thank you, Nils!
This bottle was me for a long time, but I did not know how to use it.
-
IgorSky reacted to Chasseur in Preussen by Chasseur - BOTTLE - barque
Today was a big win for me. I hummed and hawed about purchasing the tool from RP Toolz for $134 CDN funds. I just couldn’t justify paying that kind of dough for punching out small plastic discs. So being the frugal guy that I am I made my own to experiment with? To my pleasant surprise it turned out well. I used a piece of stick pin for my first size of .5 mm or about .020” in diameter and installed it into a piece of wooden doweling.
Then I cut two pieces of thin Plexiglas and pinned them in place with some piano wire. I drilled a .5 mm hole in the middle. I put a couple of pieces of Popsicle sticks underneath and glued them in place. I punched 5 pieces out of 0.10” clear styrene and painted them flat black to represent portholes on the Preussen as a trial. Acrylic paint was used.
Also to my surprise I flipped the discs over and I get a shiny glass looking appearance with the flat black on the backside to show some depth. It’s hard to see in the photograph but it’s there.
Note those dots you see are half a millimetre in diameter. I used my iPad to magnify it so you can make them out. If you look just below the dots you can just make out where I punched them out of the styrene. Look closely … Jeff
-
IgorSky reacted to Omega1234 in Jolie Brise and Fastnet Rock Lighthouse by IgorSky – FINISHED - Scale 1/3000 - BOTTLE
Well, Igor...just when I thought it couldn't possibly get any smaller, you come up with this teeny tiny beauty!!!
A little masterpiece!
Well done.
Cheers
Patrick
-
IgorSky reacted to Mirabell61 in Jolie Brise and Fastnet Rock Lighthouse by IgorSky – FINISHED - Scale 1/3000 - BOTTLE
sweet, sweet, Igor,
what was first, the shaped bottle (flacon), or the idea to find a mini bottle that fits a lighthouse ?
super work !
Nils
-
IgorSky reacted to Mirabell61 in SS Kaiser Wilhelm der Grosse 1897 by Mirabell61 - FINISHED - scale 1:144 - POF - first German four stacker of the Norddeutscher Lloyd line
Hi Bill,
presume you mean the rims of the skylight panel lids....
The rims are made by inserting 2,5 ² mm lead sockets (for conduct wire ends) through the drilled holes in the brass panel, and soldering these to the panel. The German word is "Aderendhuelsen", sorry do`n t know the engl. term. I also used these for all the hull`s portholes
The remaining end at the rearside is then cut off, The skylight ports remain without "glassings"
Nils
-
IgorSky reacted to Mirabell61 in SS Kaiser Wilhelm der Grosse 1897 by Mirabell61 - FINISHED - scale 1:144 - POF - first German four stacker of the Norddeutscher Lloyd line
Update
machine room skylights (dry fit ) nearly complete.....
Nils
-
IgorSky reacted to Mirabell61 in SS Kaiser Wilhelm der Grosse 1897 by Mirabell61 - FINISHED - scale 1:144 - POF - first German four stacker of the Norddeutscher Lloyd line
Update
slowly working in forward direction on the boats deck.......
Last two days made this little intermediate platform with deck-planking and two skylights ( two more lights and three vents also still to get mounted on this).
Am nearly at the position of the 3 rd. funnel....
Nils
-
IgorSky reacted to Mirabell61 in SS Kaiser Wilhelm der Grosse 1897 by Mirabell61 - FINISHED - scale 1:144 - POF - first German four stacker of the Norddeutscher Lloyd line
Update
machine room skylights complete....
Nils
-
IgorSky reacted to NenadM in Cutty Sark by NenadM
Fore hatch - done
I was playing with acrylic to get "weathered" look
And of course, luck of patience and luck of thinking again. I forgot that I have two of them to make, and that both have to be equal or similar color. Now, it will be very dificult to hit right color for another.
Not boring with me