Lt. Biggles
-
Posts
346 -
Joined
-
Last visited
Recent Profile Visitors
1,956 profile views


-
 Ian B reacted to a post in a topic:
De Havilland Tiger Moth and Chipmunk by Lt. Biggles - FINISHED - Airfix - 1/48 - PLASTIC
Ian B reacted to a post in a topic:
De Havilland Tiger Moth and Chipmunk by Lt. Biggles - FINISHED - Airfix - 1/48 - PLASTIC
-
Ian B reacted to a post in a topic:
De Havilland Tiger Moth and Chipmunk by Lt. Biggles - FINISHED - Airfix - 1/48 - PLASTIC
-
 Old Collingwood reacted to a post in a topic:
De Havilland Tiger Moth and Chipmunk by Lt. Biggles - FINISHED - Airfix - 1/48 - PLASTIC
Old Collingwood reacted to a post in a topic:
De Havilland Tiger Moth and Chipmunk by Lt. Biggles - FINISHED - Airfix - 1/48 - PLASTIC
-
Landlubber Mike reacted to a post in a topic:
De Havilland Tiger Moth and Chipmunk by Lt. Biggles - FINISHED - Airfix - 1/48 - PLASTIC
-
Landlubber Mike reacted to a post in a topic:
De Havilland Tiger Moth and Chipmunk by Lt. Biggles - FINISHED - Airfix - 1/48 - PLASTIC
-
king derelict reacted to a post in a topic:
De Havilland Tiger Moth and Chipmunk by Lt. Biggles - FINISHED - Airfix - 1/48 - PLASTIC
-
GrandpaPhil reacted to a post in a topic:
De Havilland Tiger Moth and Chipmunk by Lt. Biggles - FINISHED - Airfix - 1/48 - PLASTIC
-
Jack12477 reacted to a post in a topic:
De Havilland Tiger Moth and Chipmunk by Lt. Biggles - FINISHED - Airfix - 1/48 - PLASTIC
-
yvesvidal reacted to a post in a topic:
De Havilland Tiger Moth and Chipmunk by Lt. Biggles - FINISHED - Airfix - 1/48 - PLASTIC
-
ccoyle reacted to a post in a topic:
De Havilland Tiger Moth and Chipmunk by Lt. Biggles - FINISHED - Airfix - 1/48 - PLASTIC
-
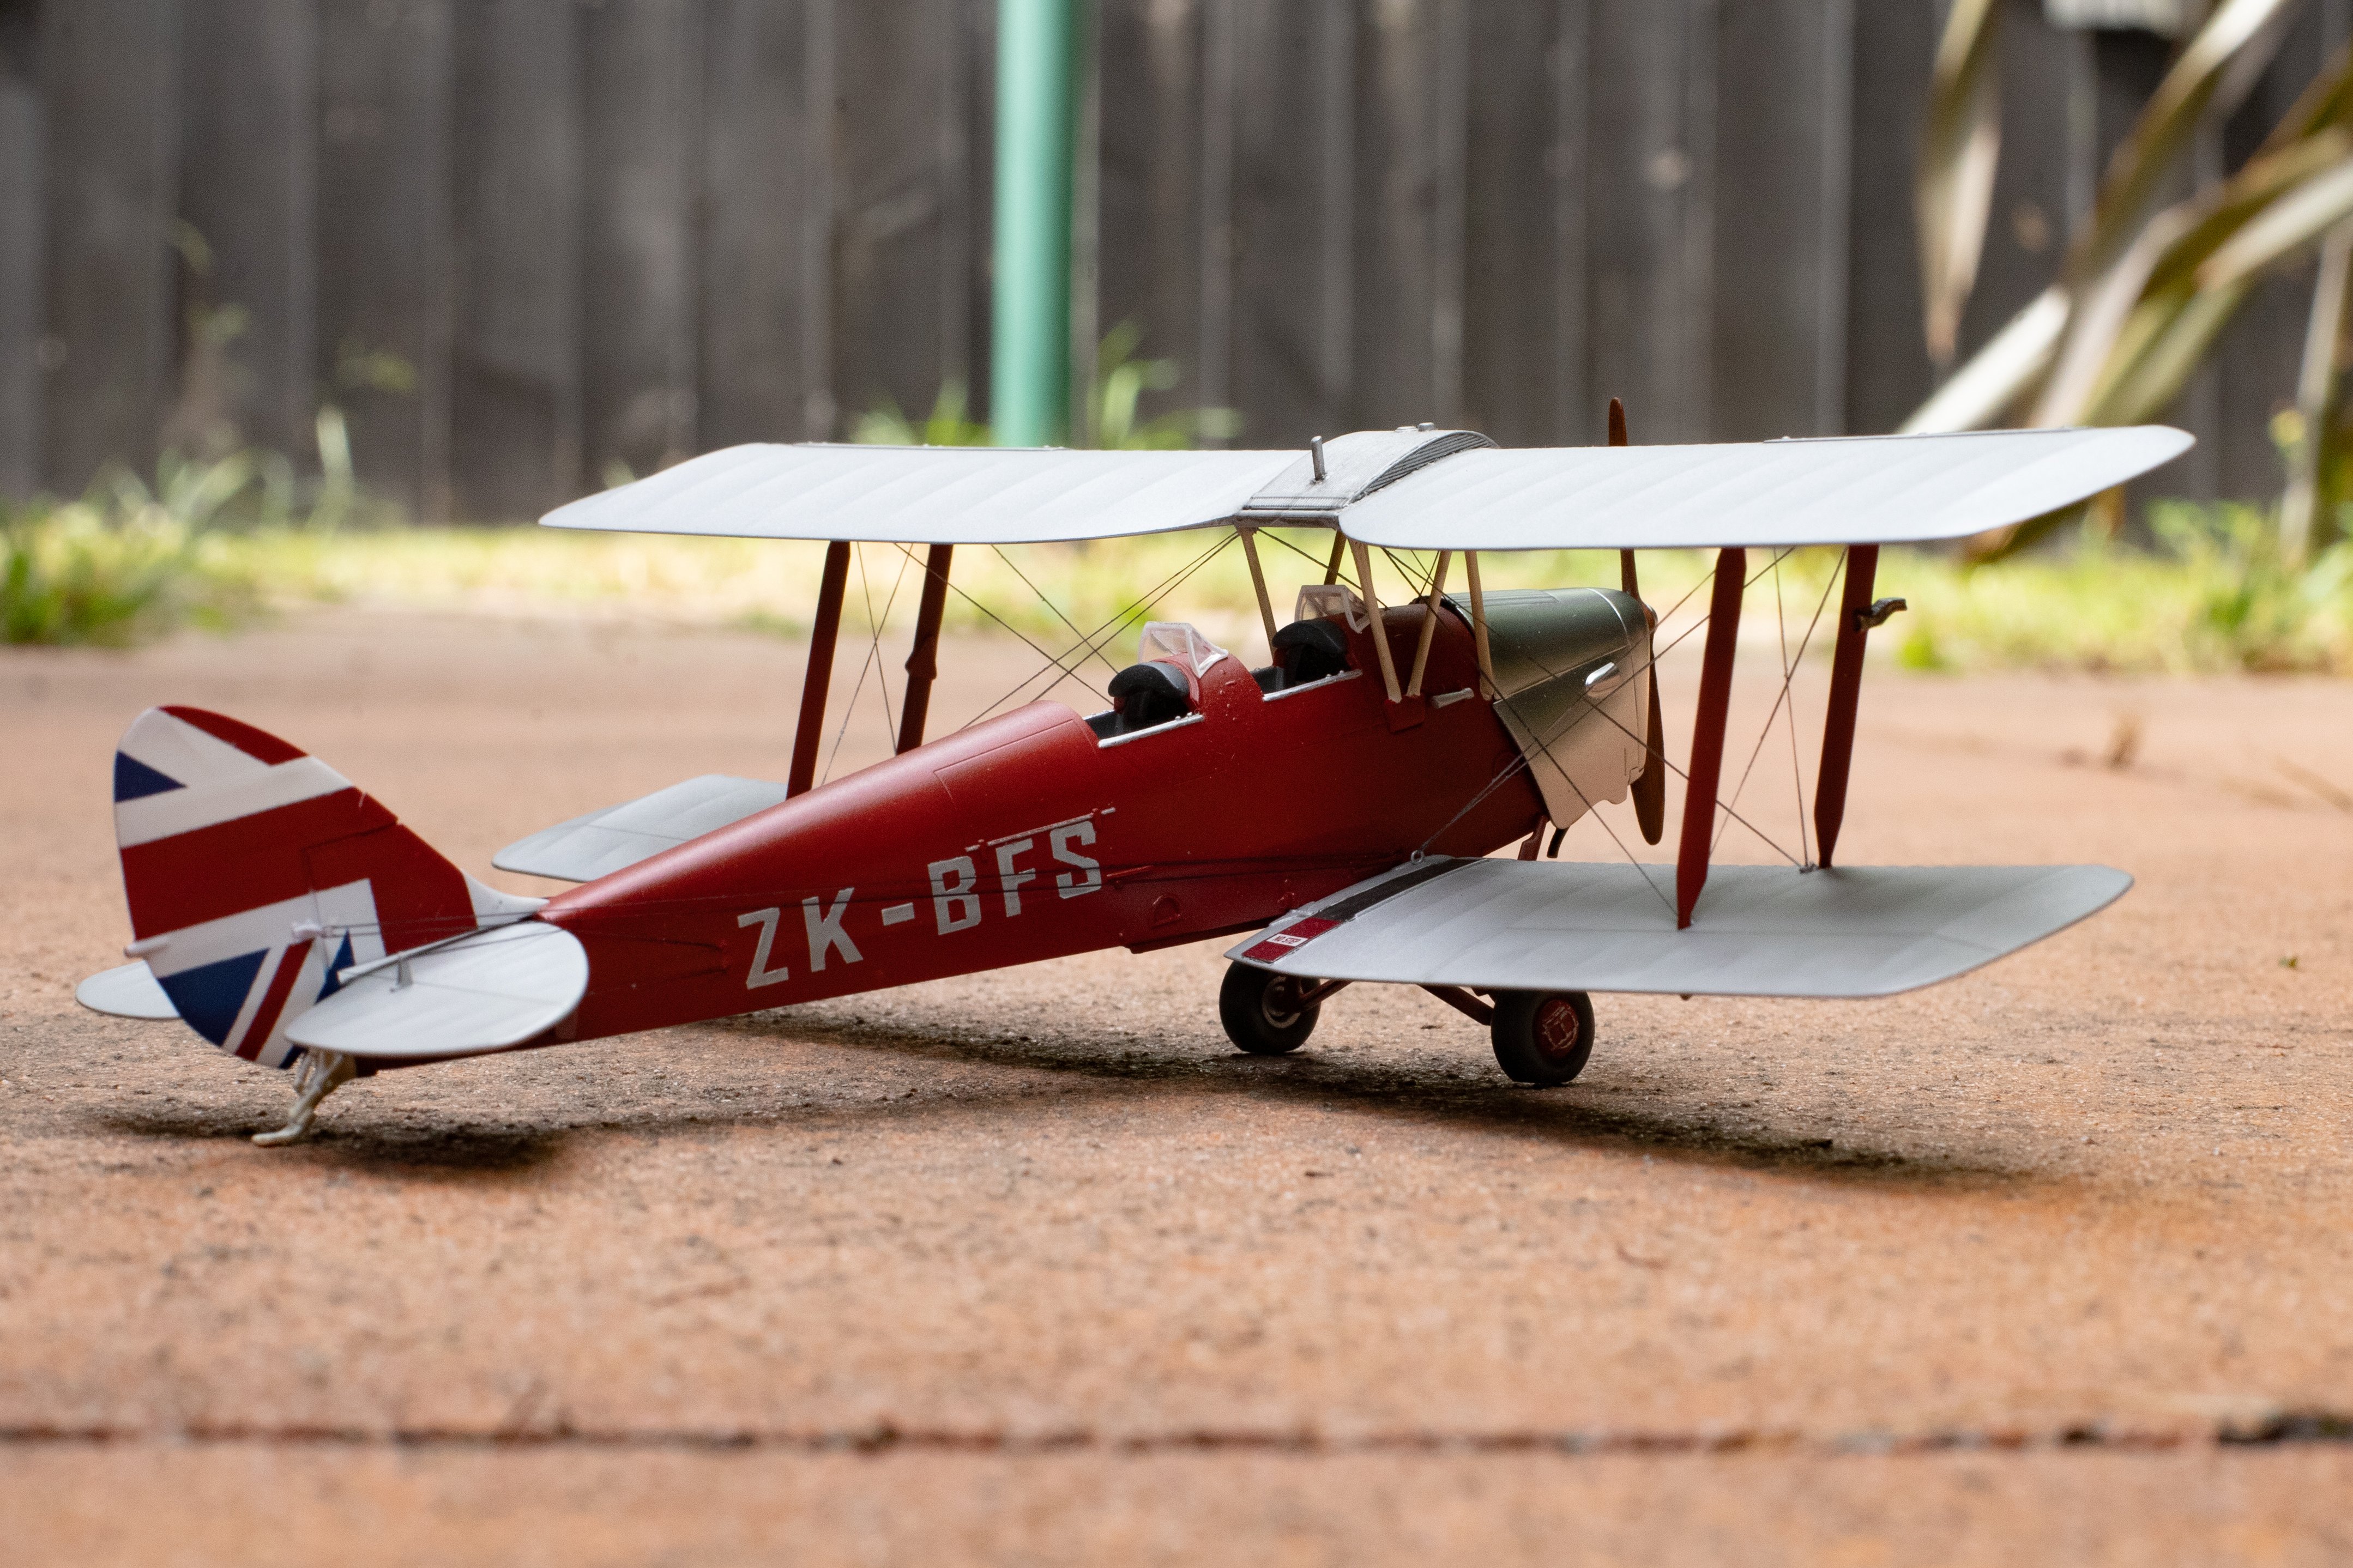
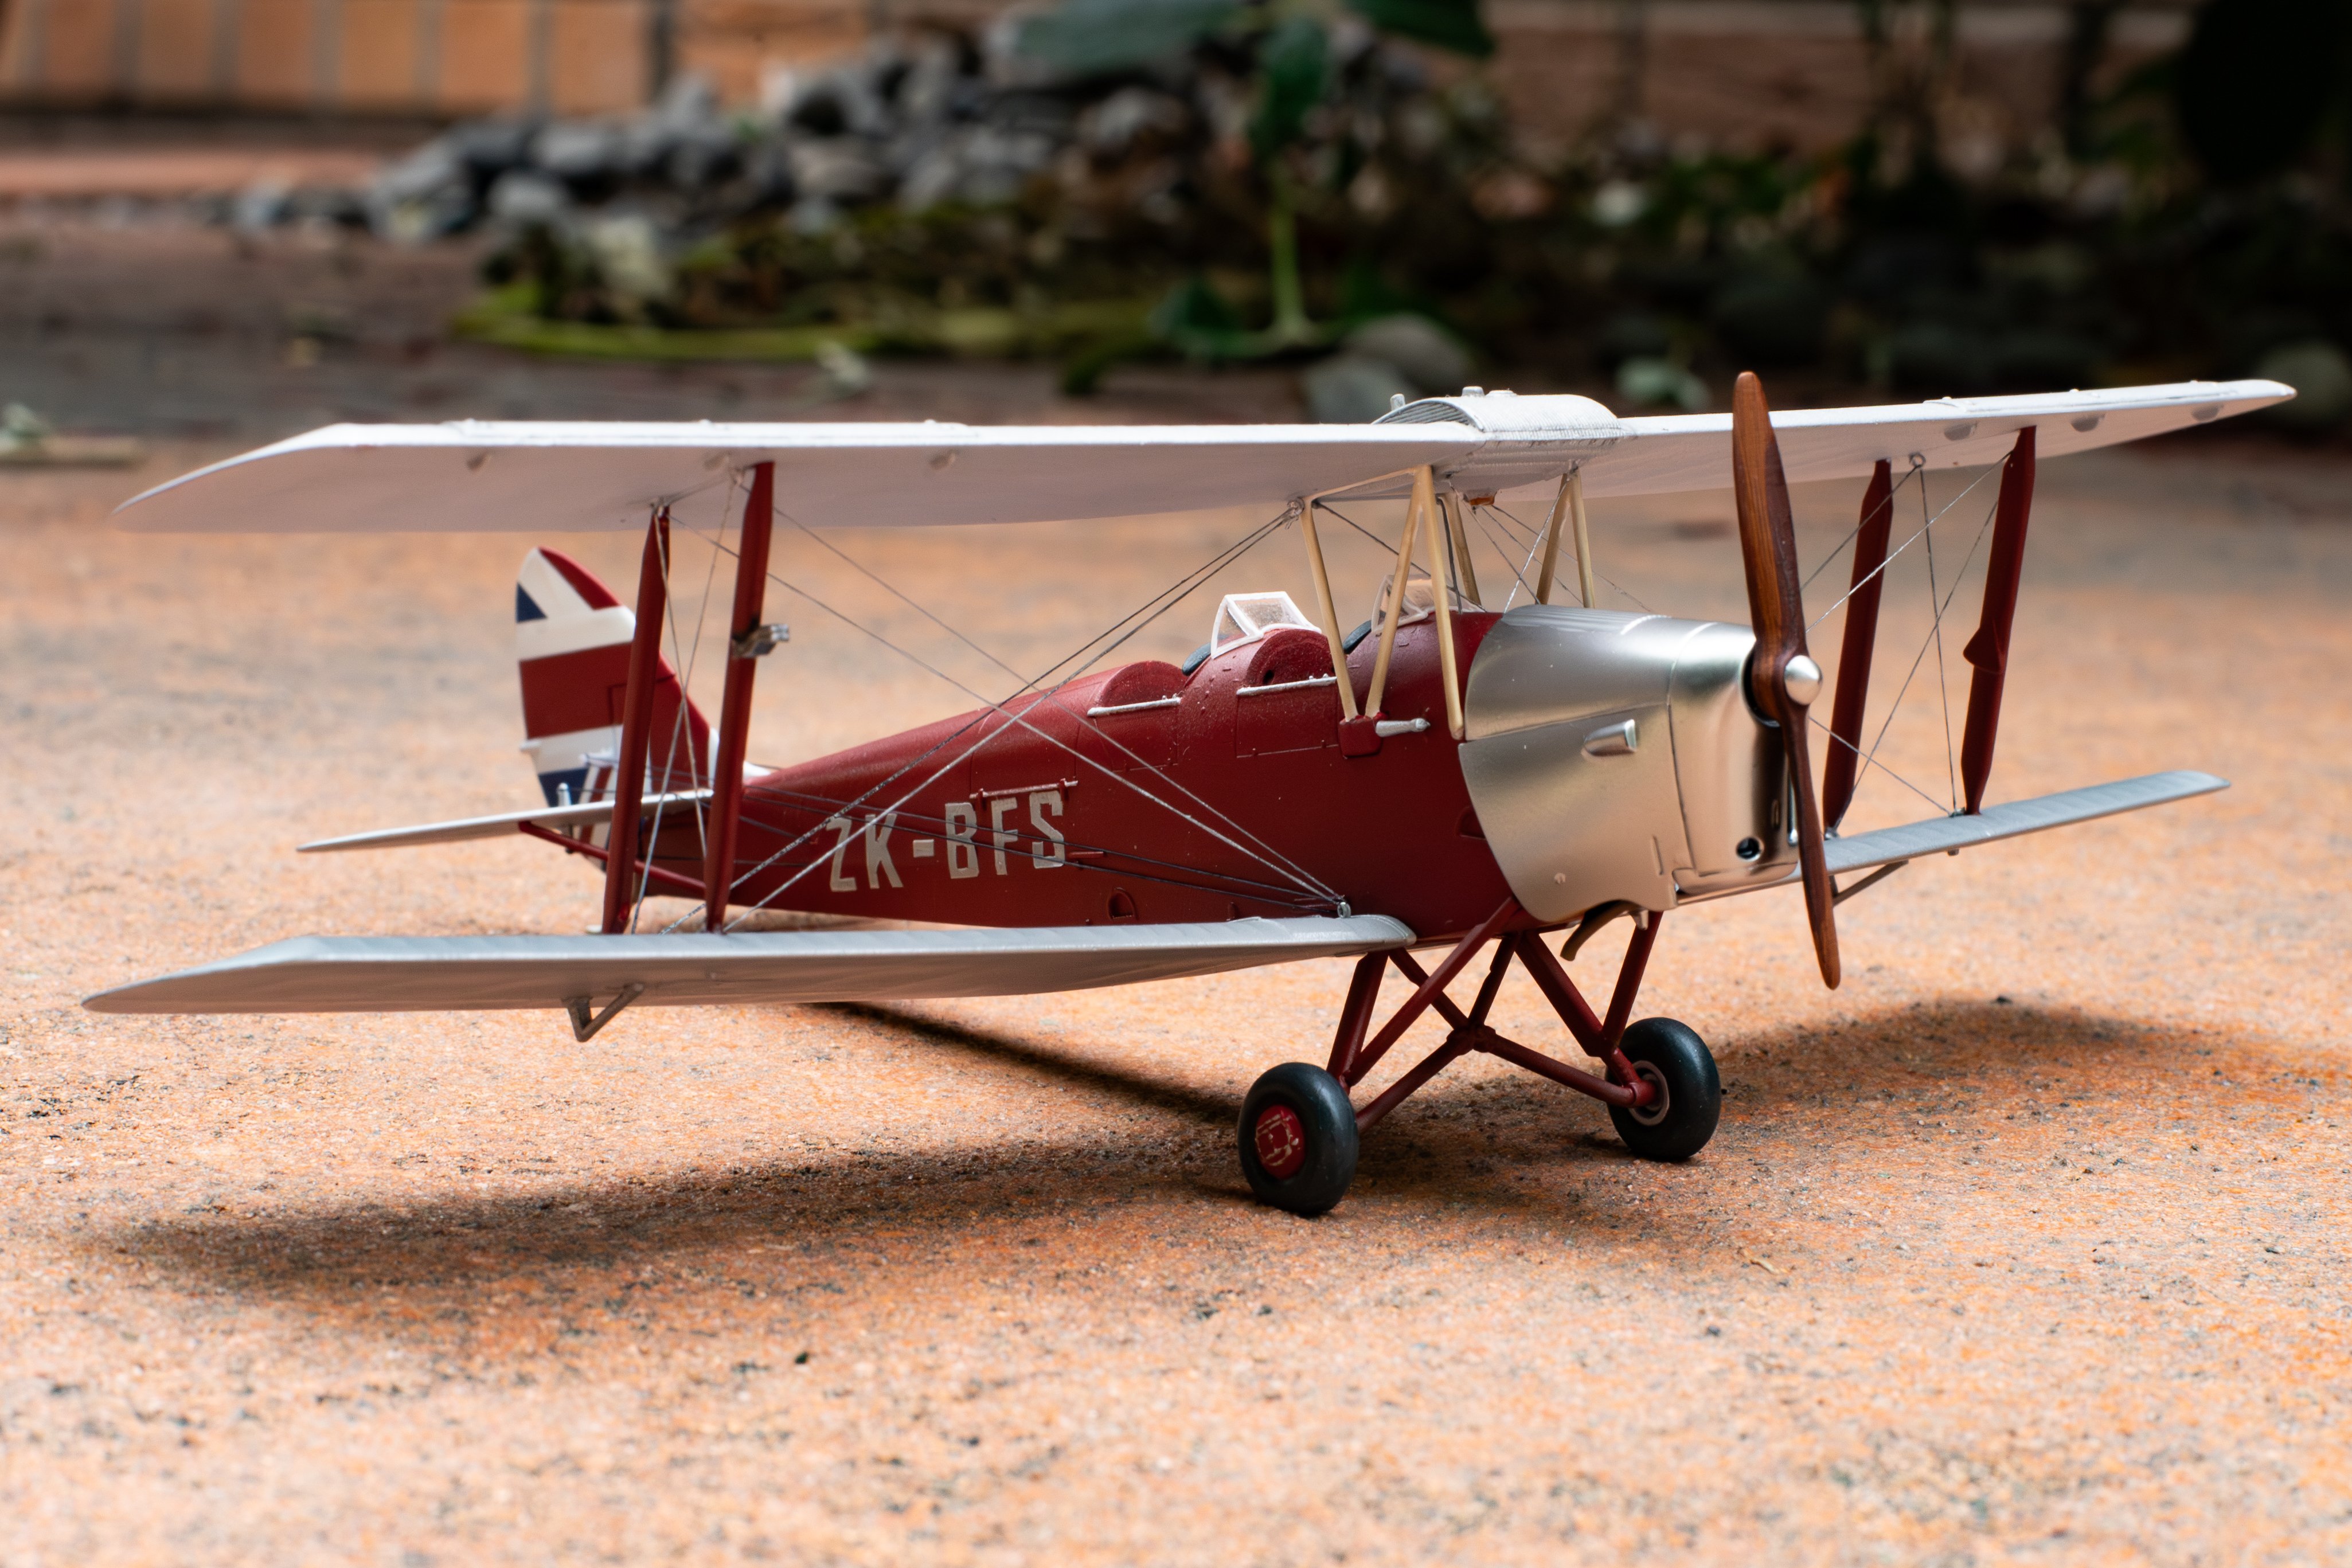
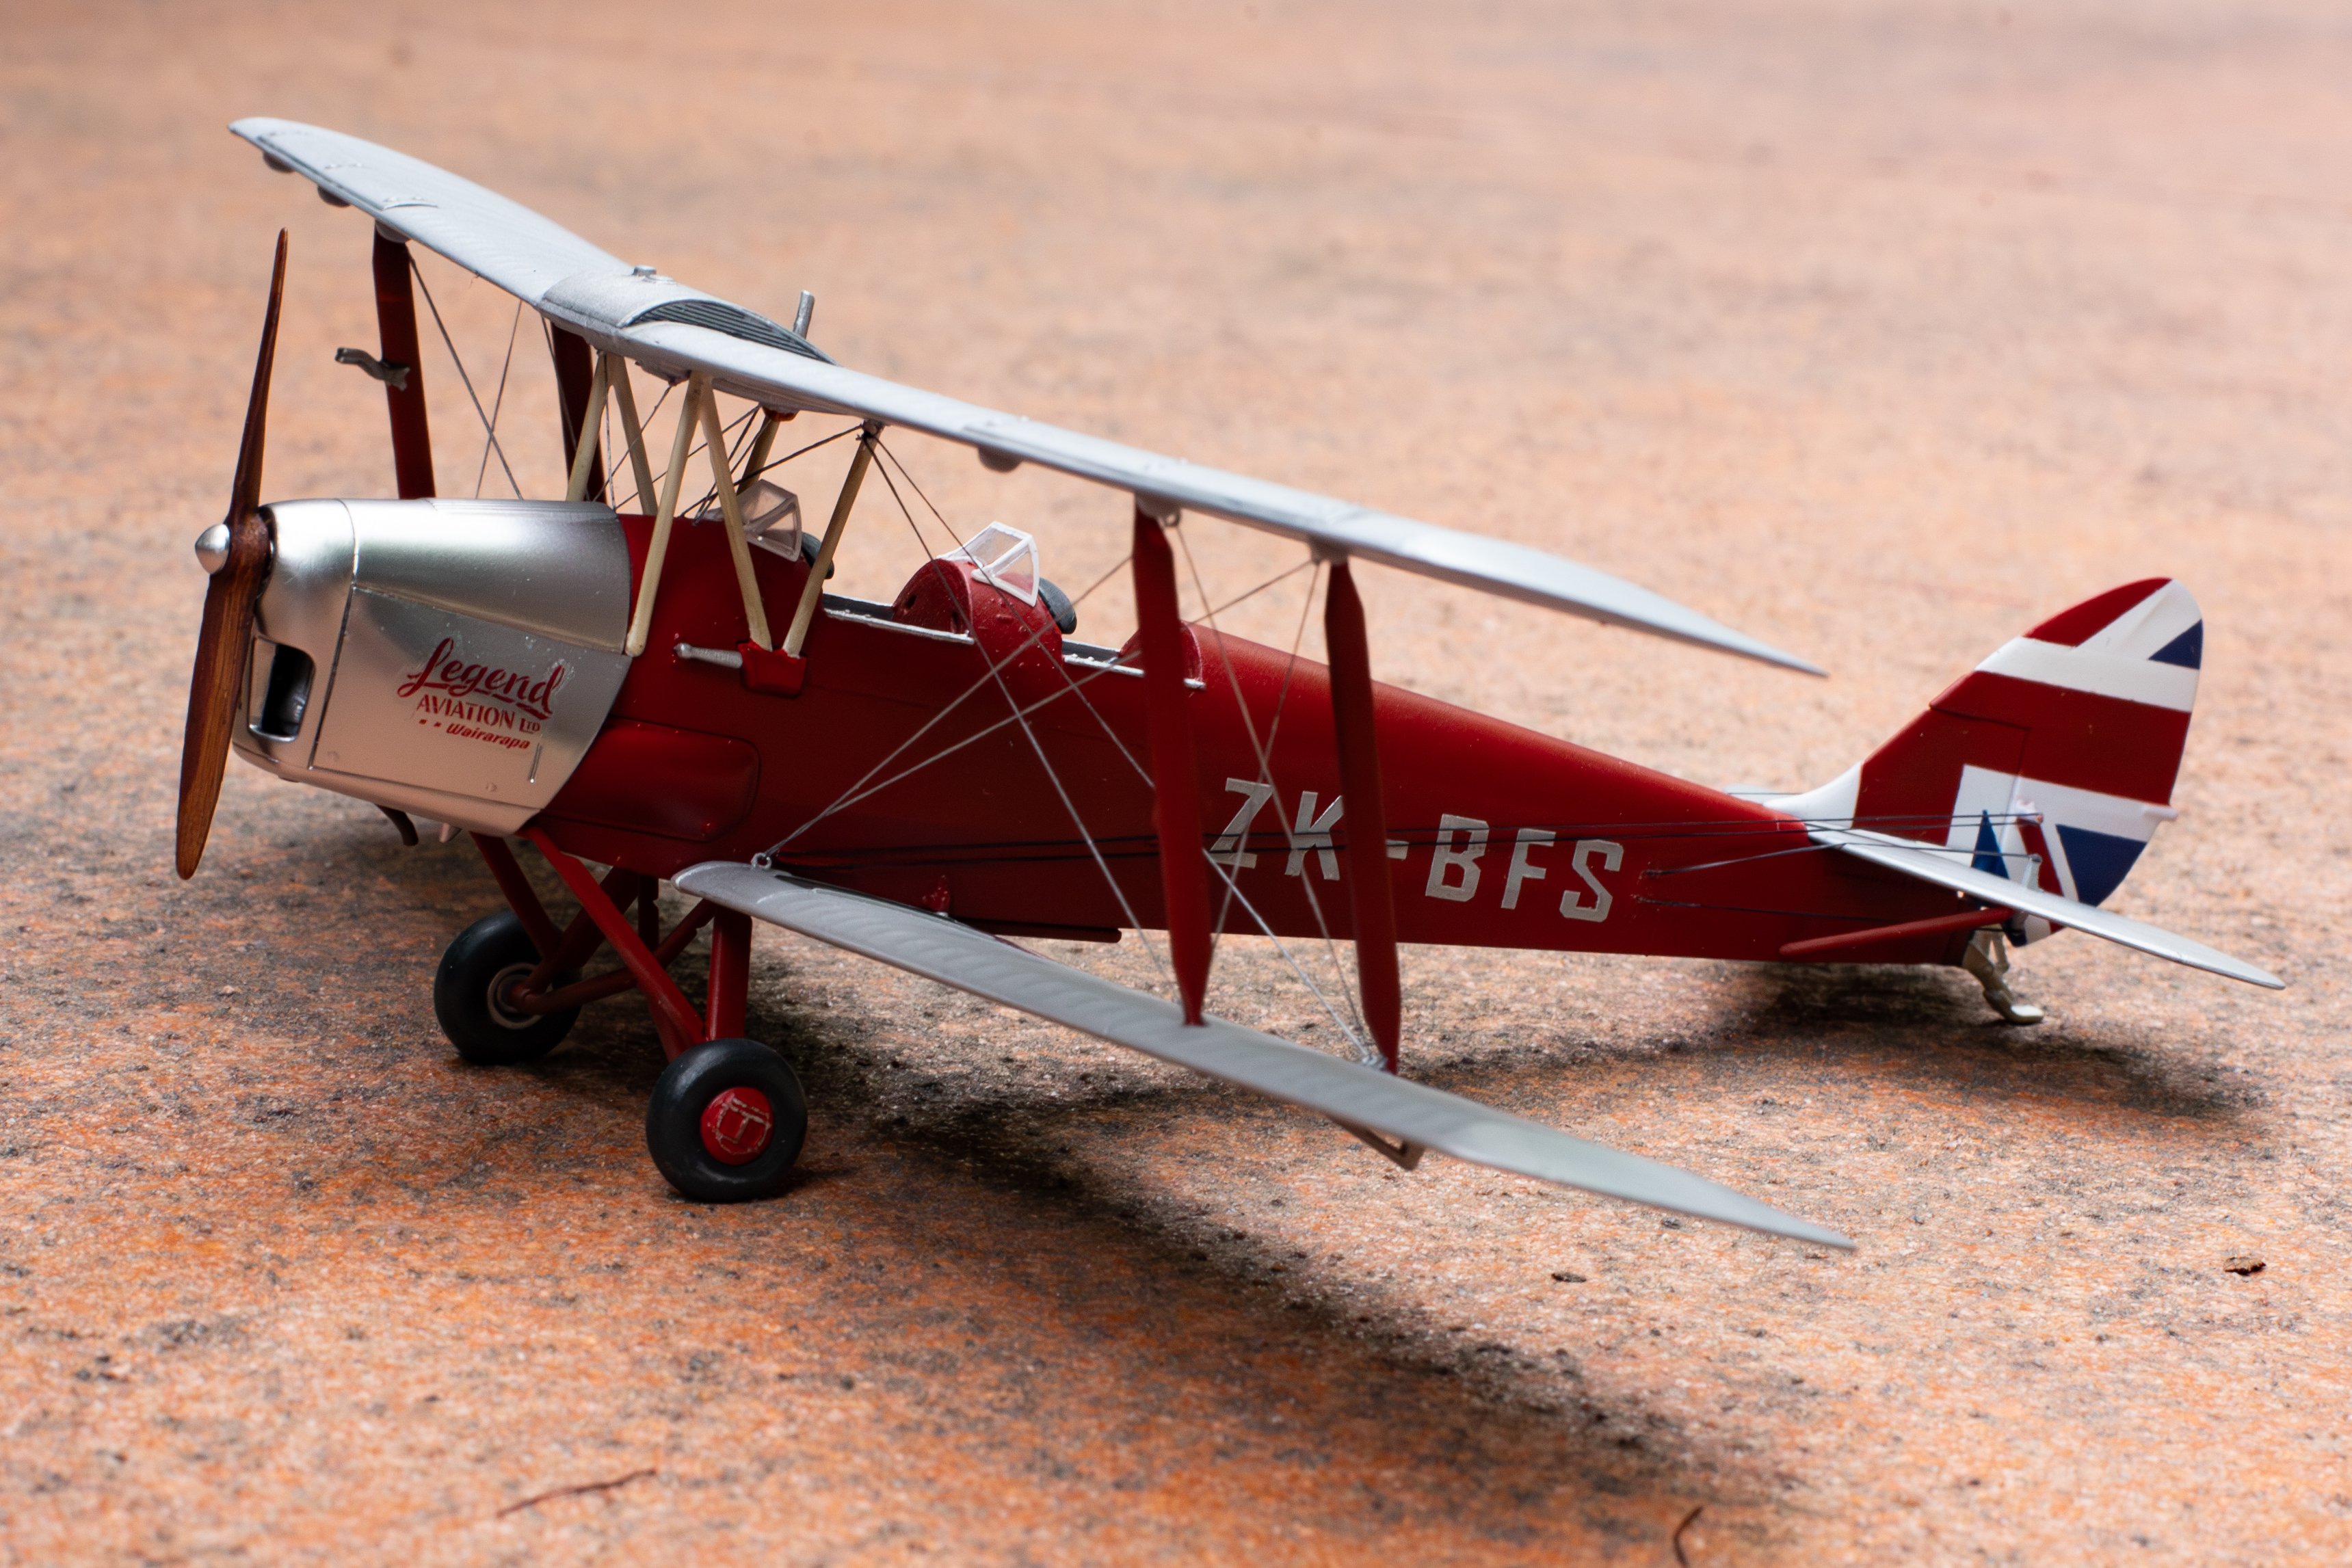
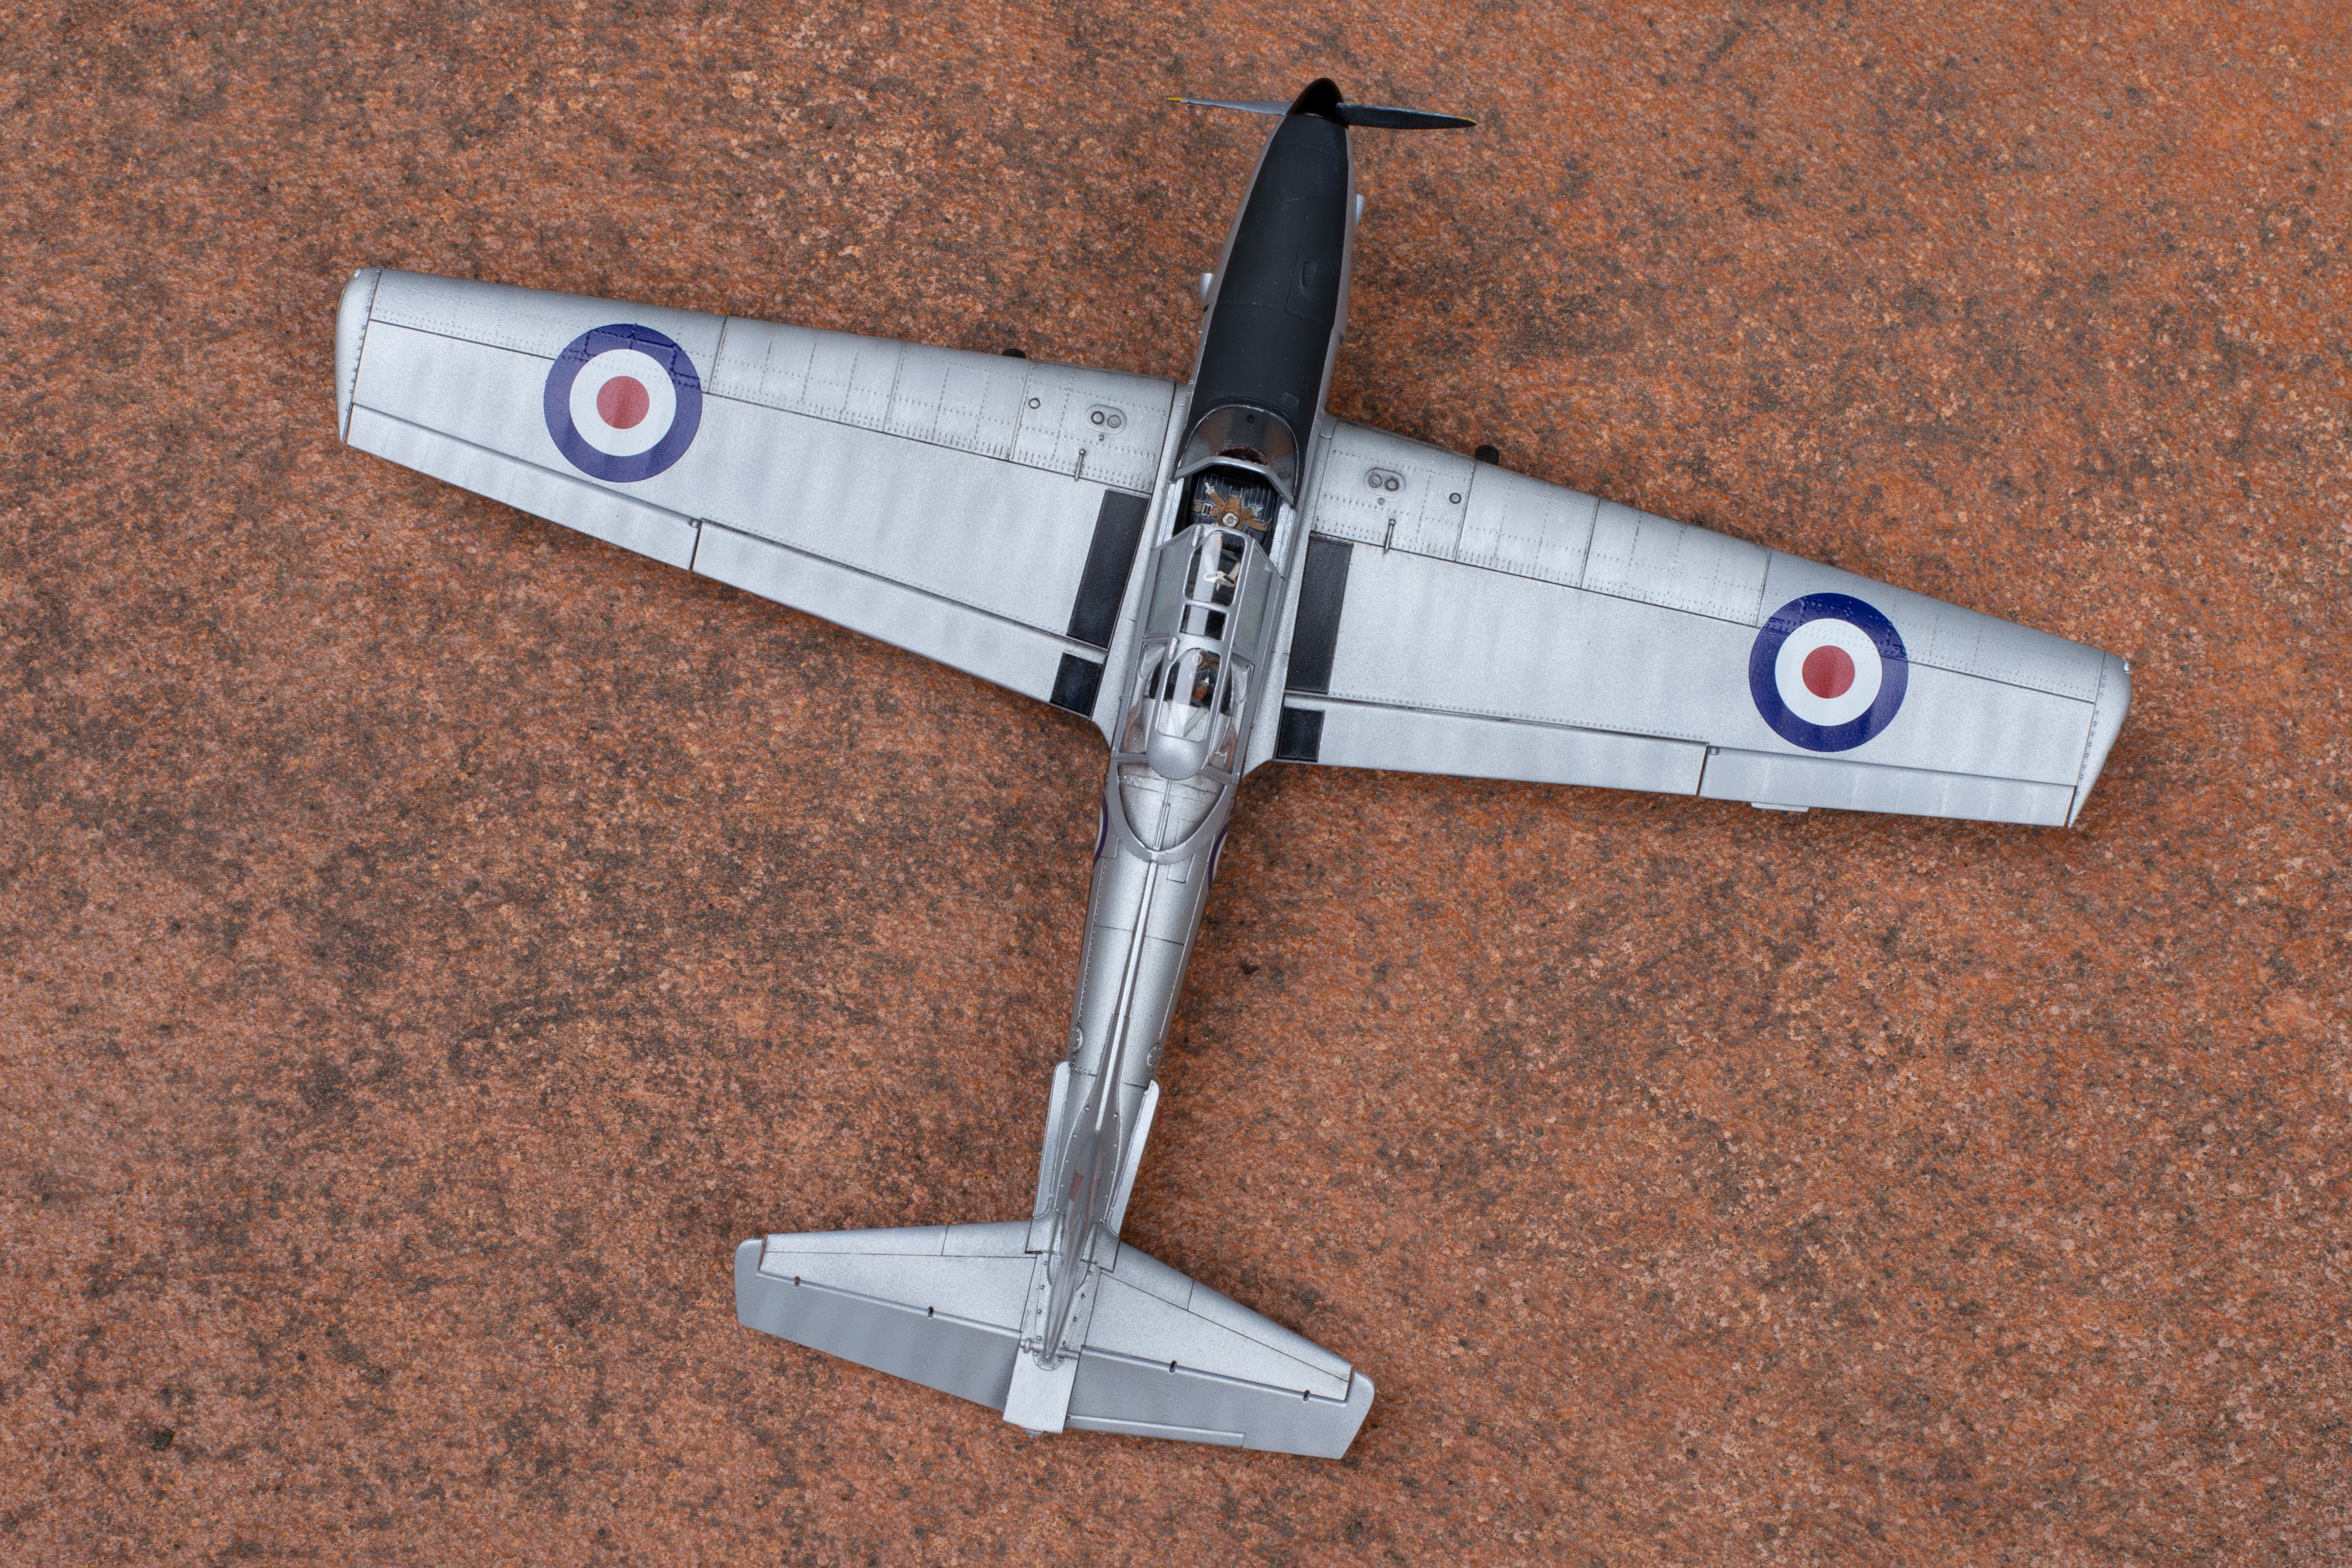
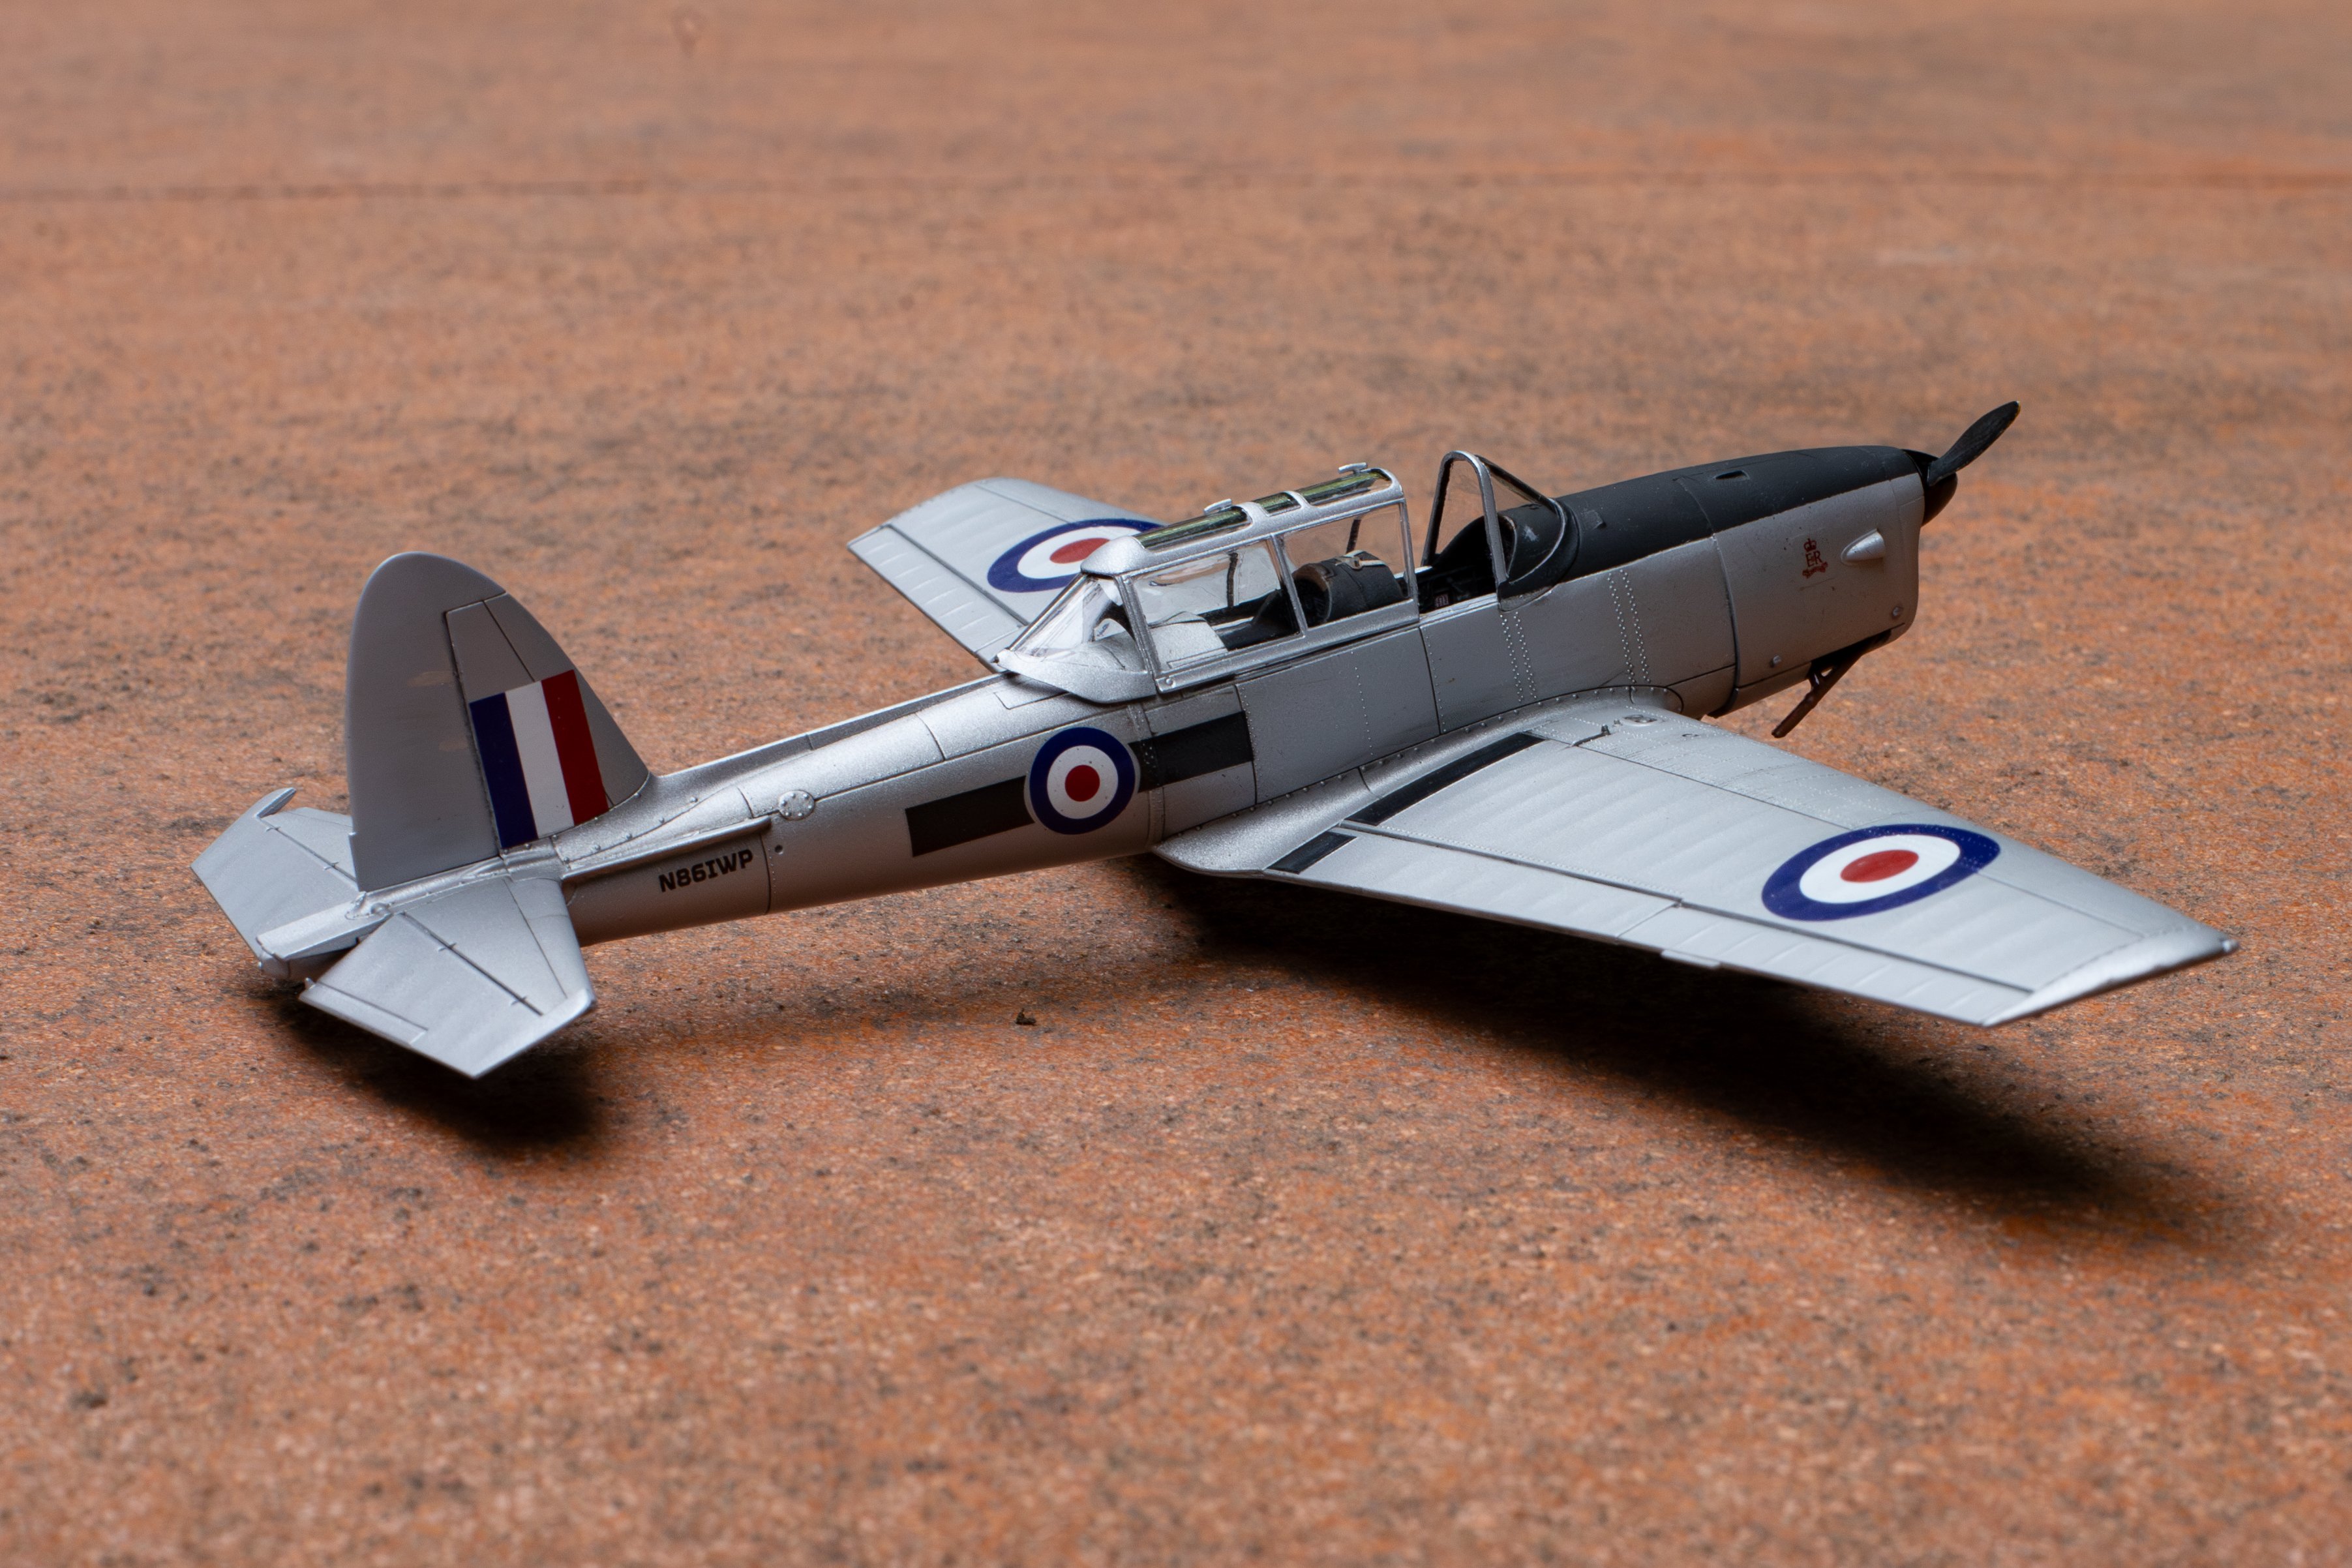
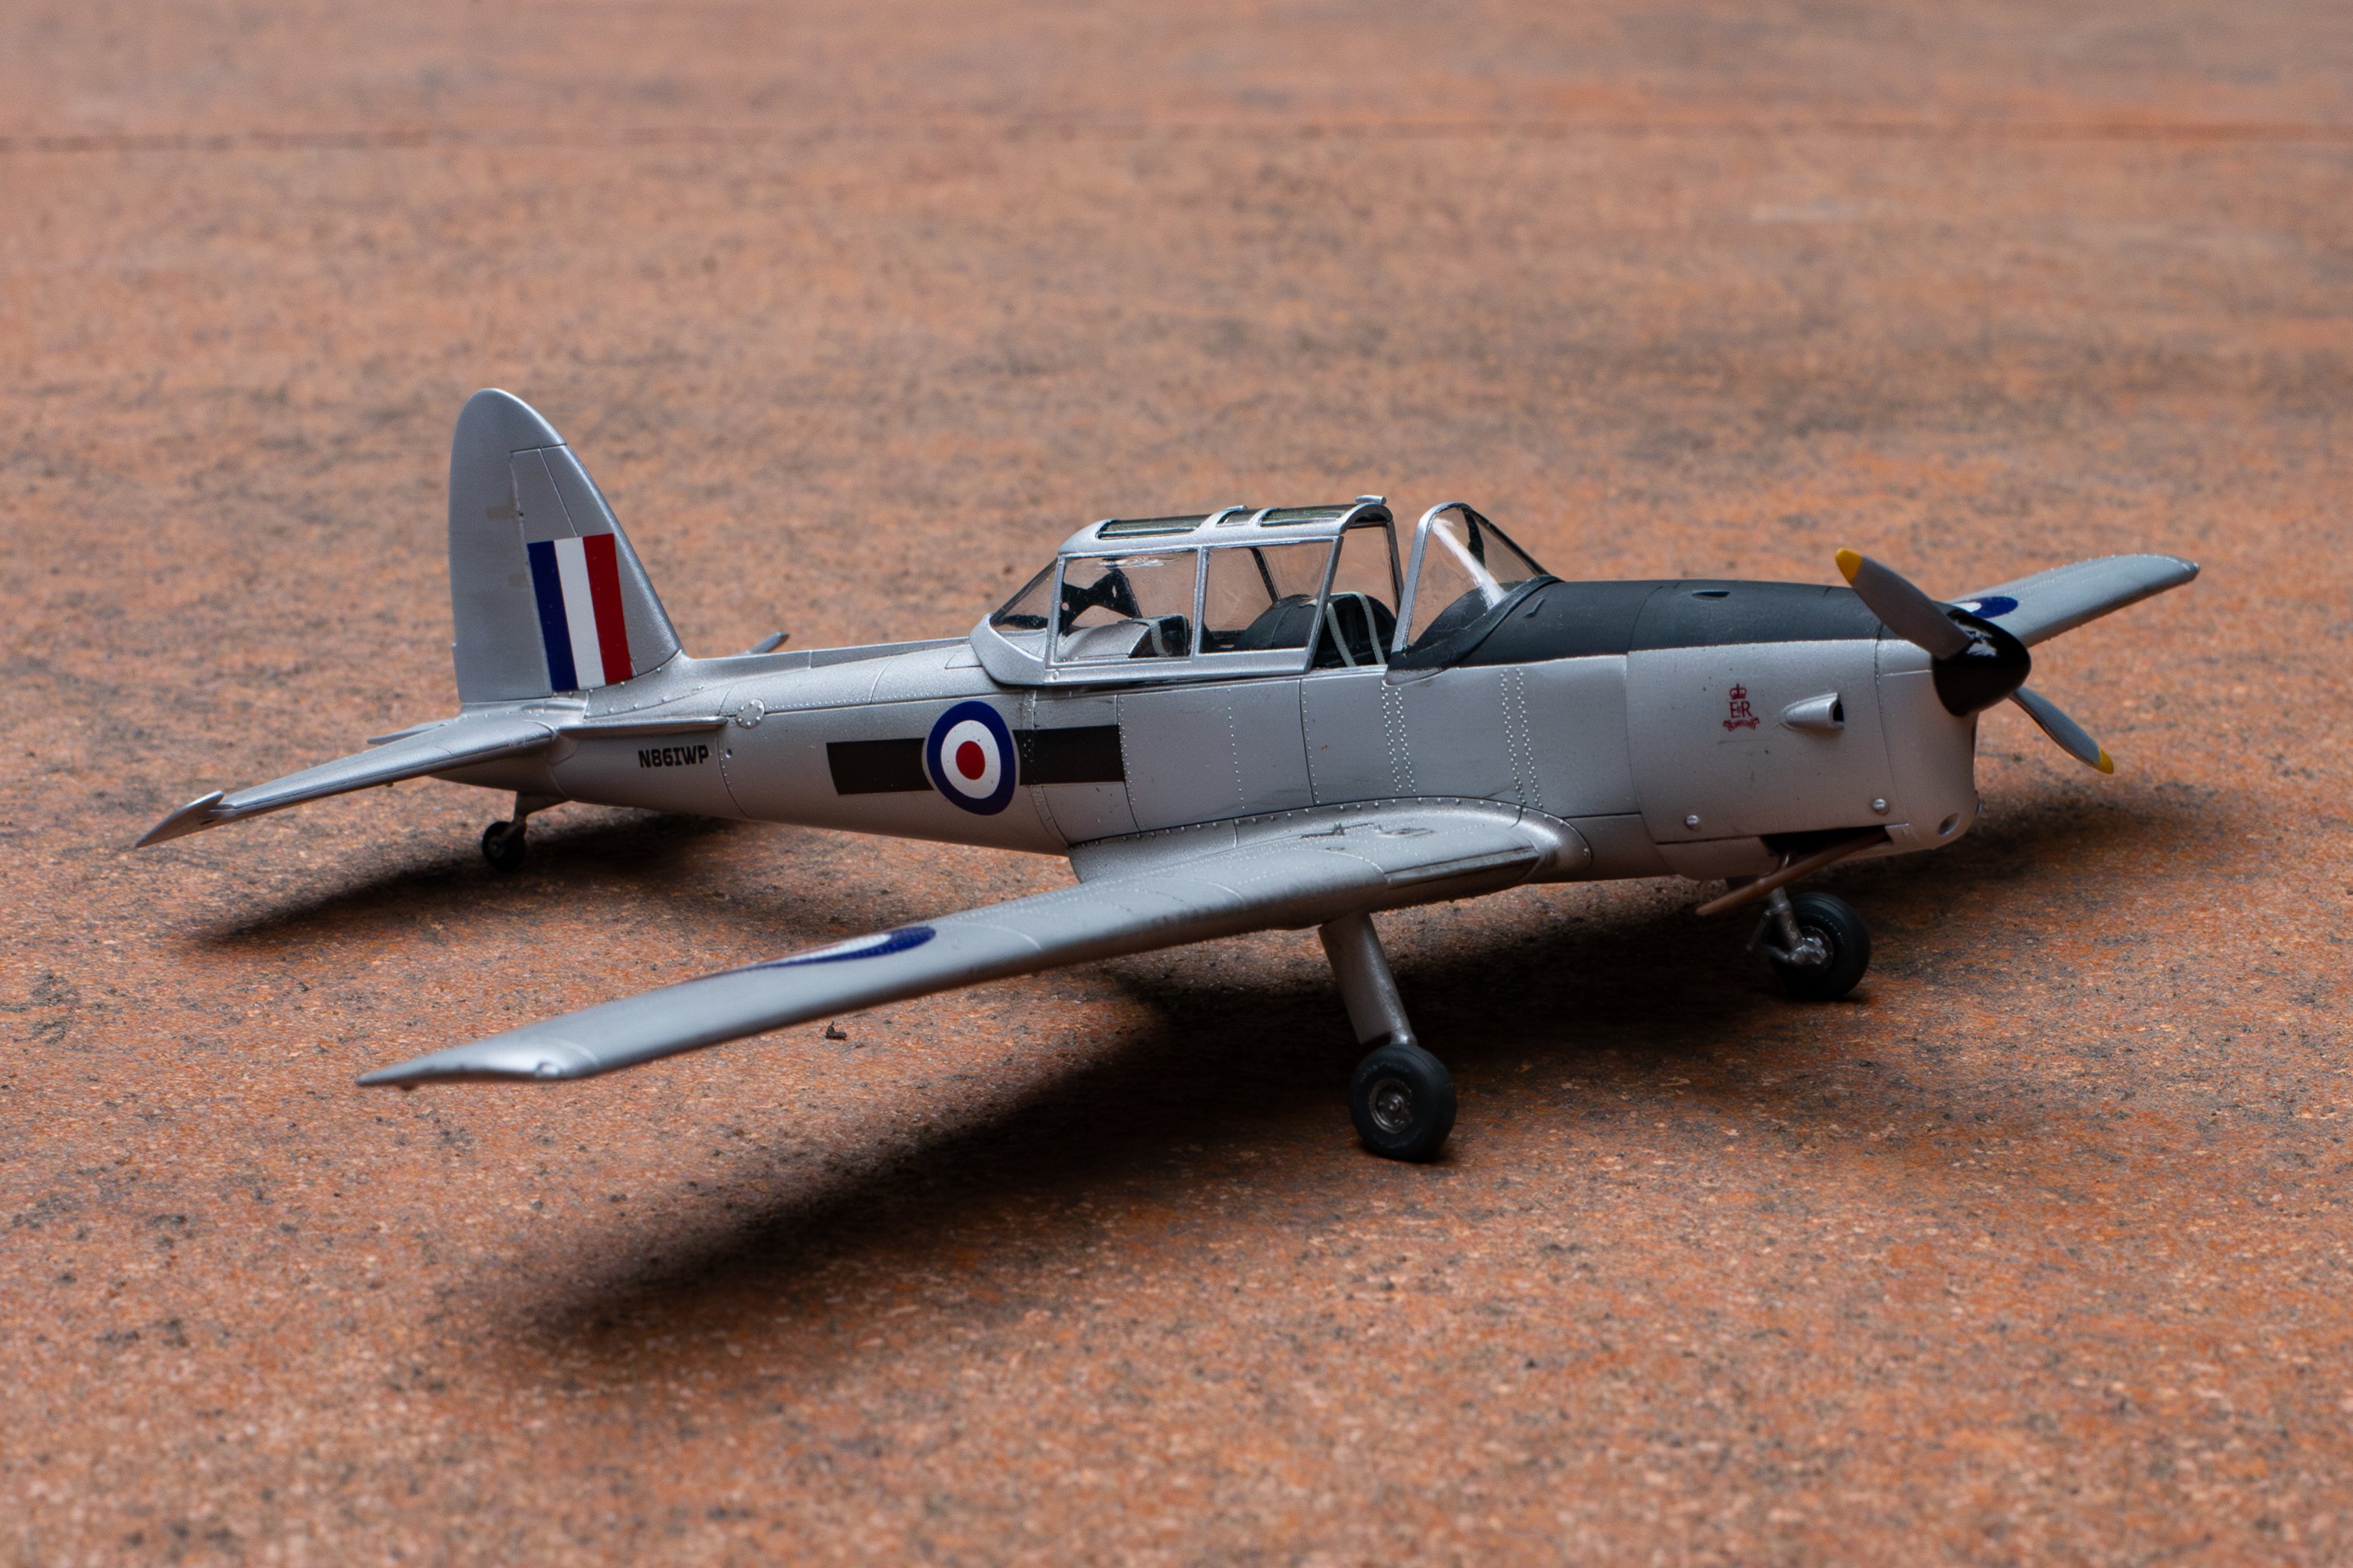
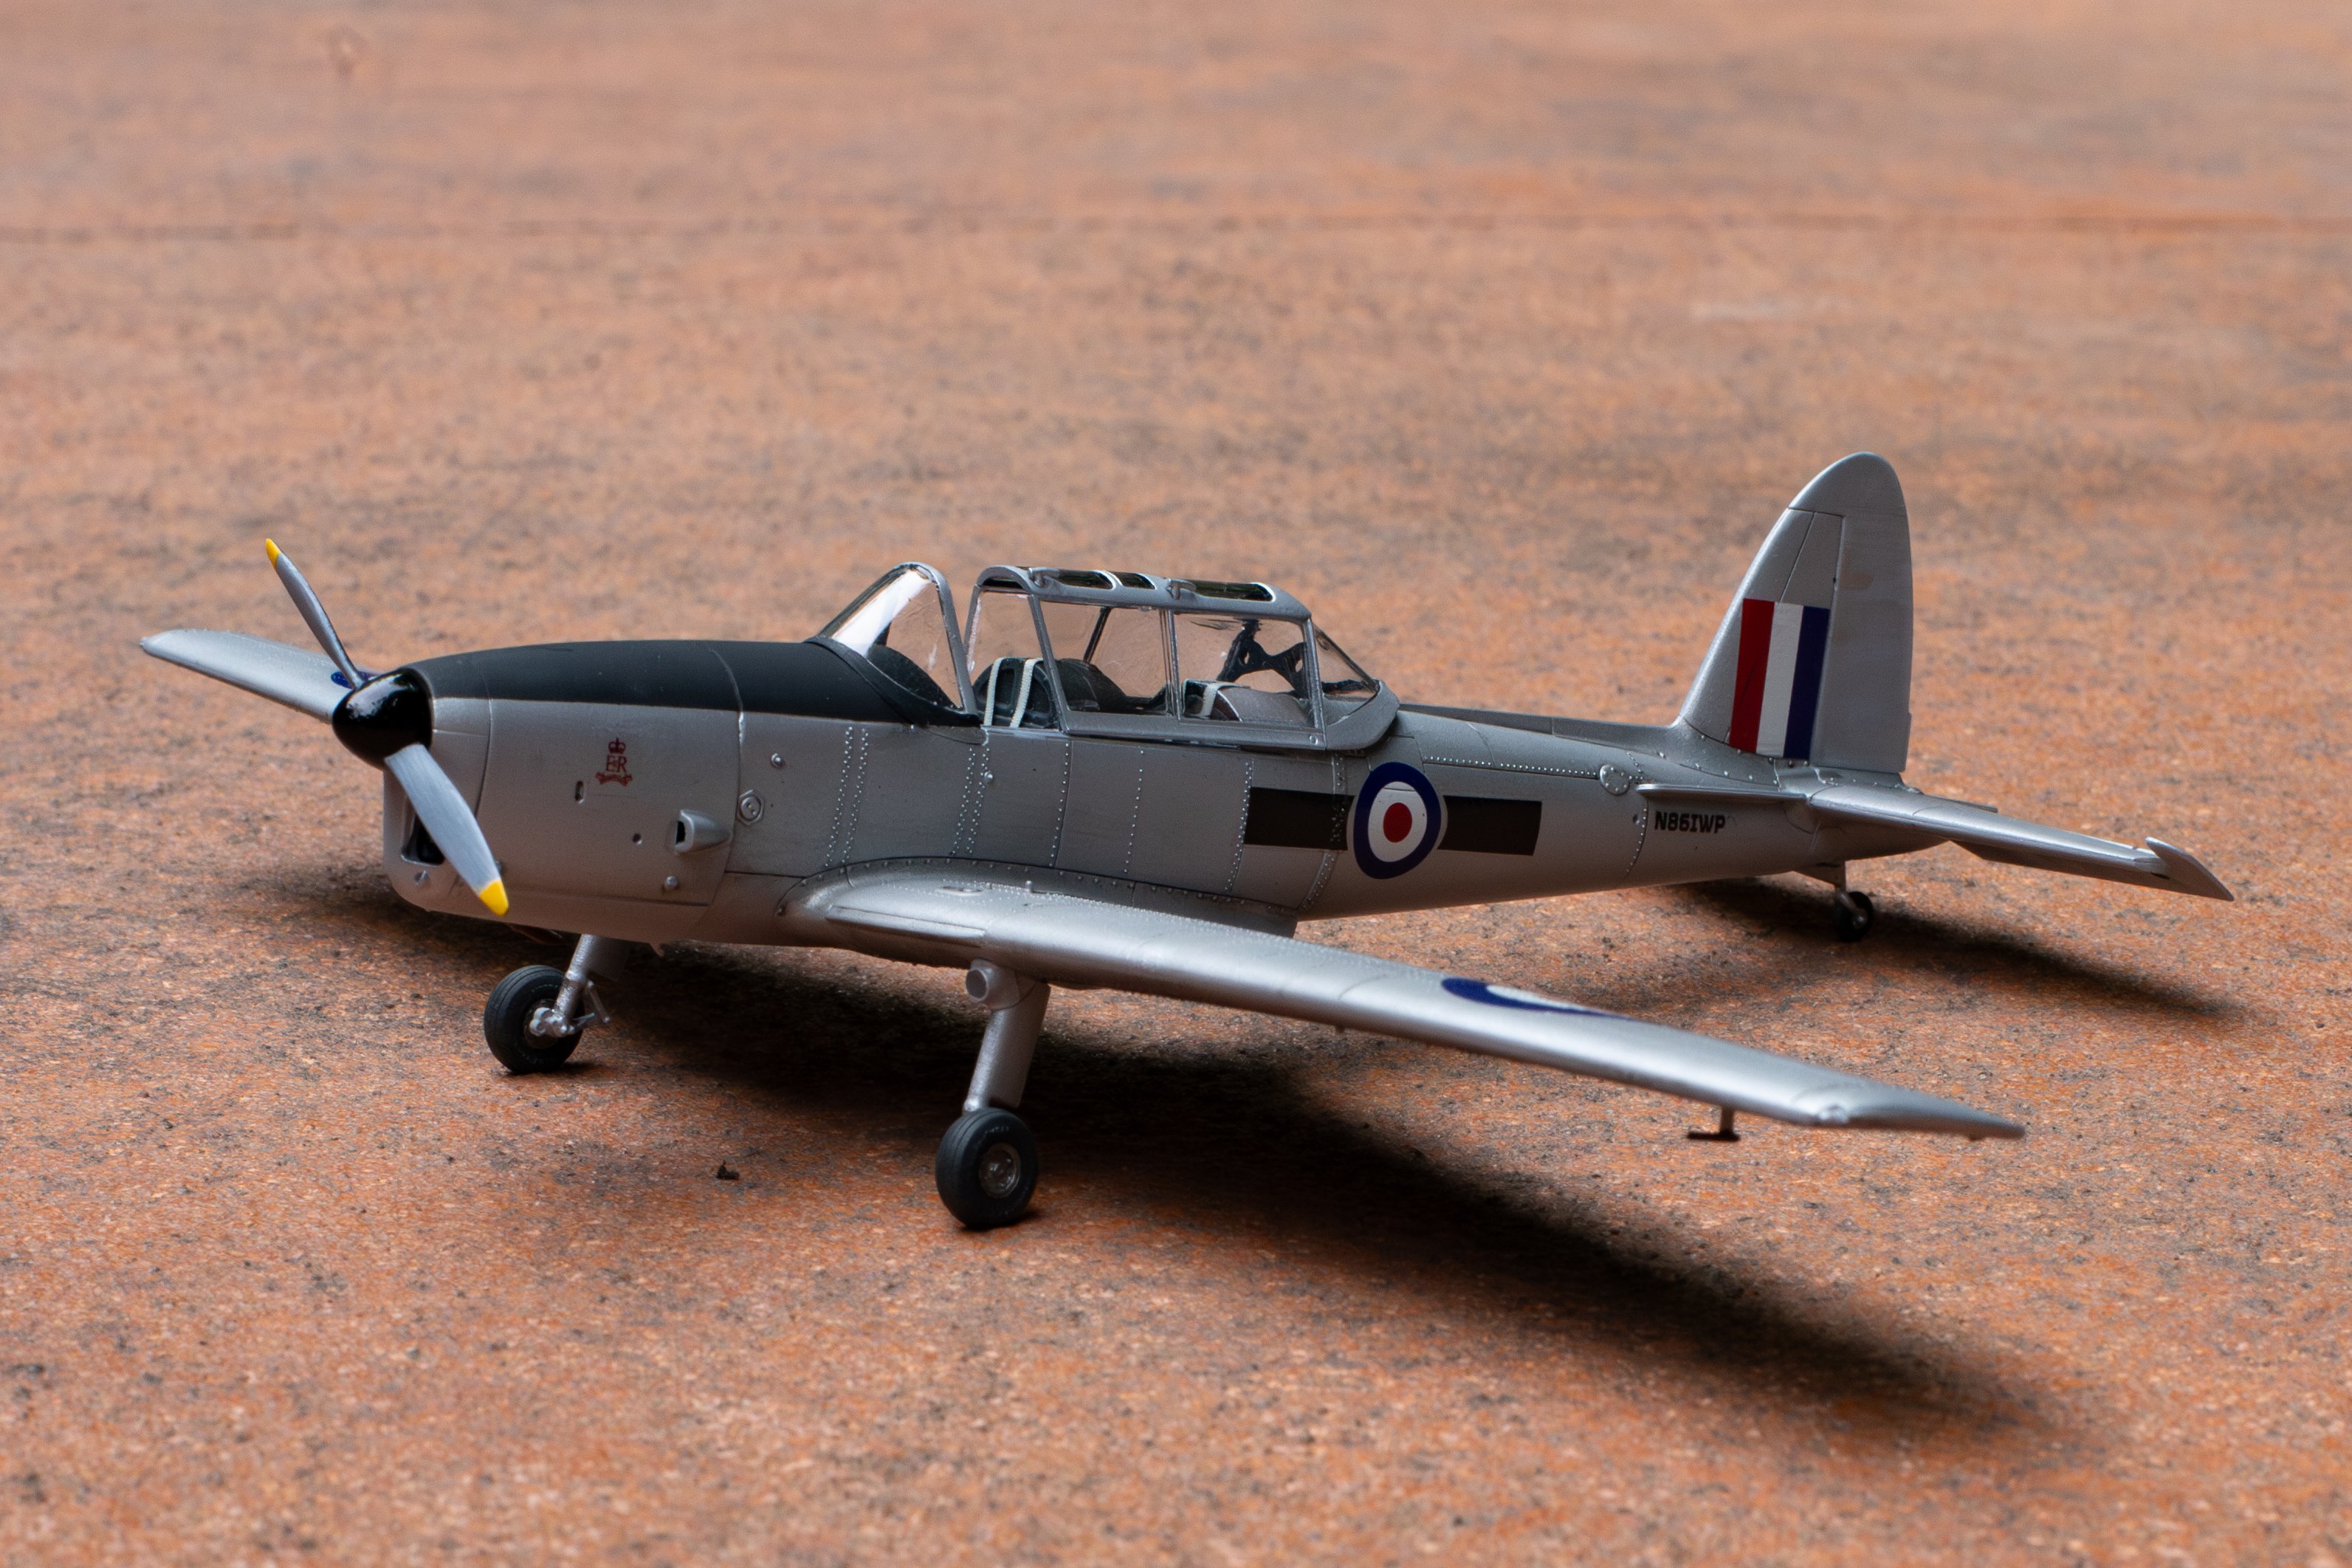
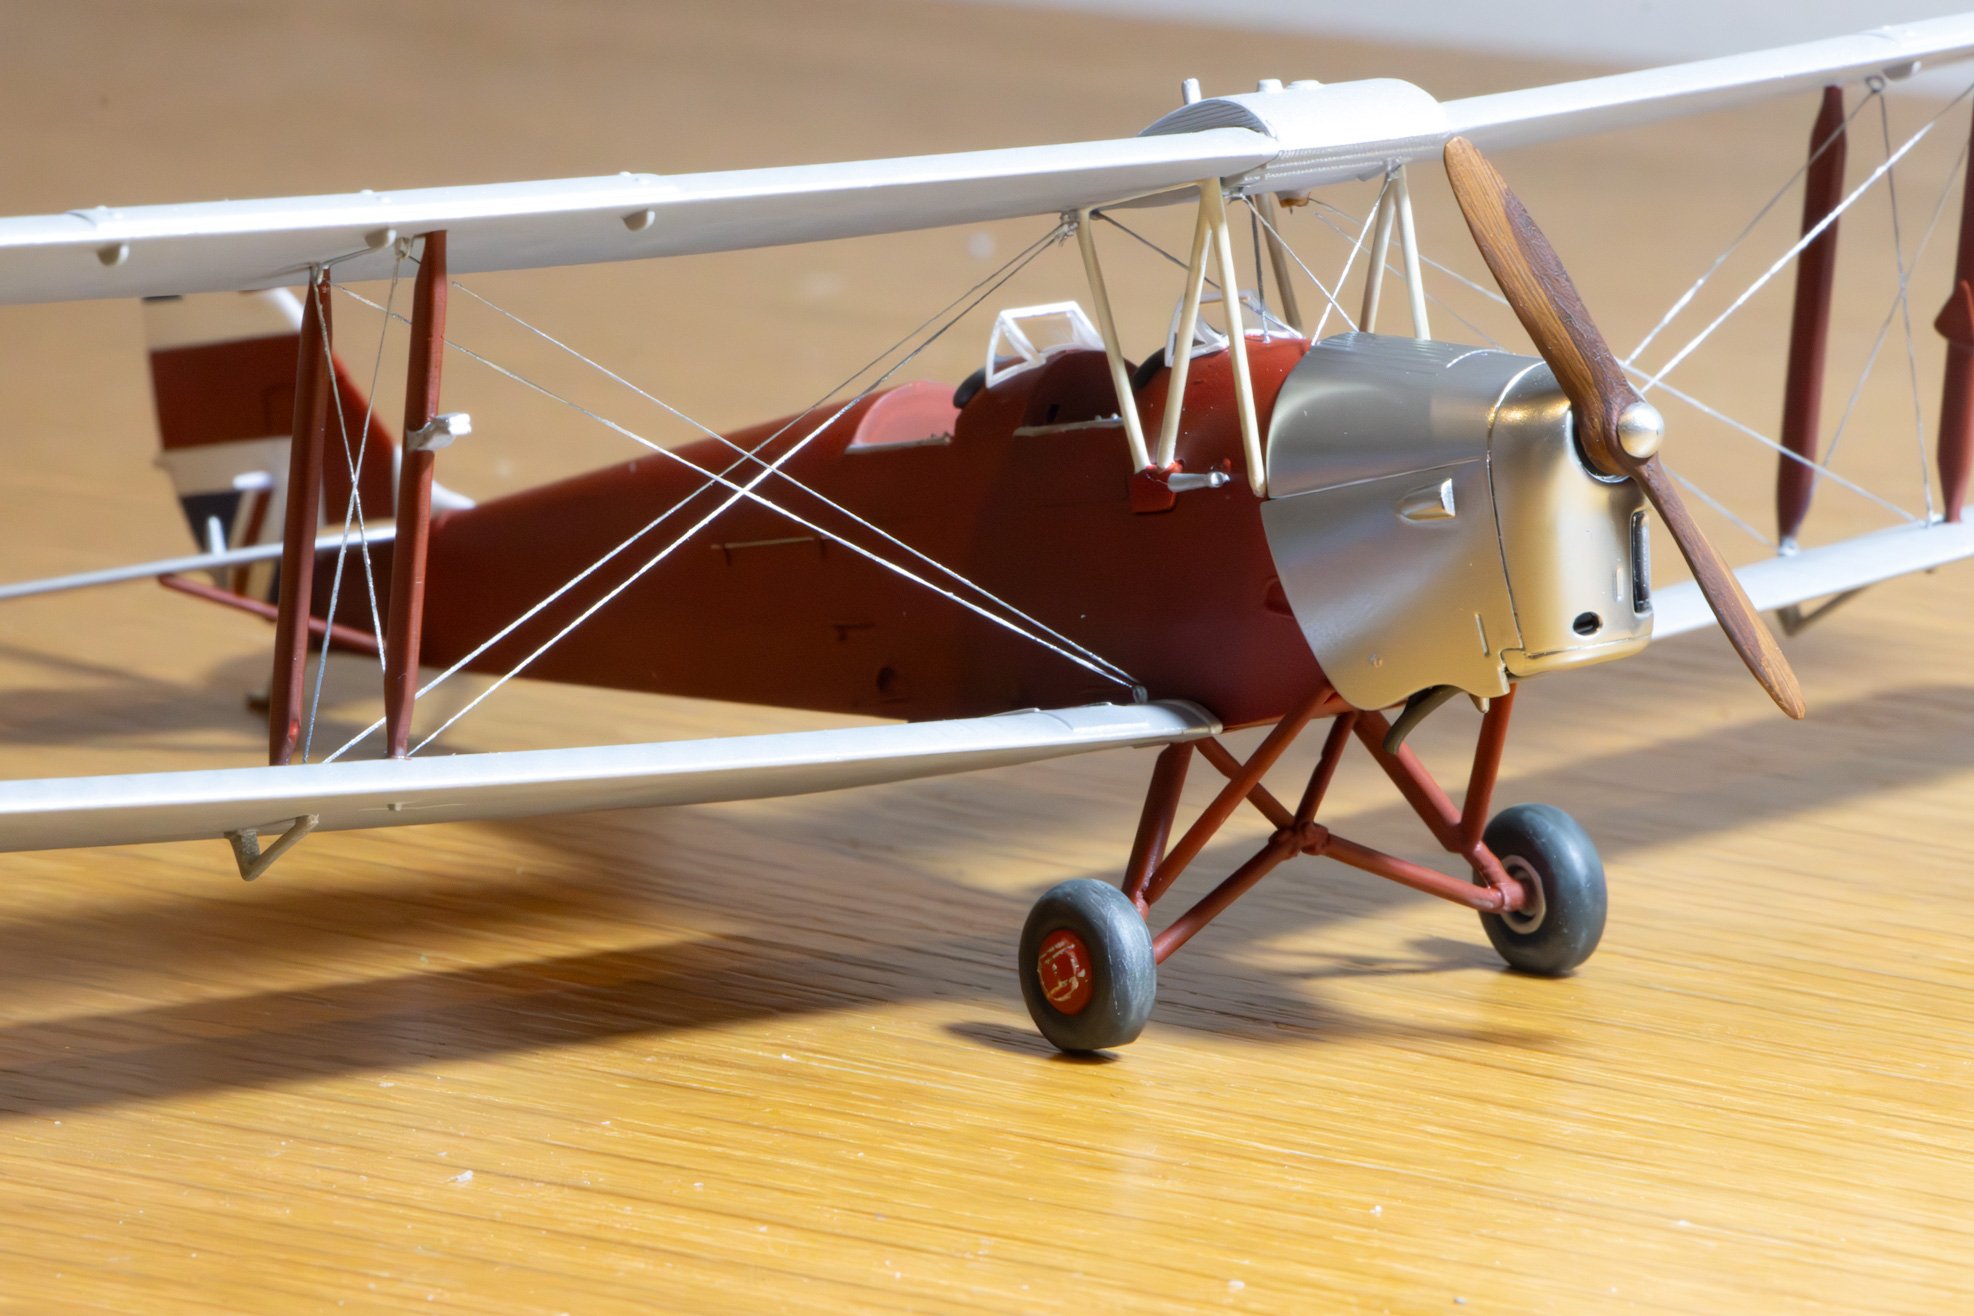
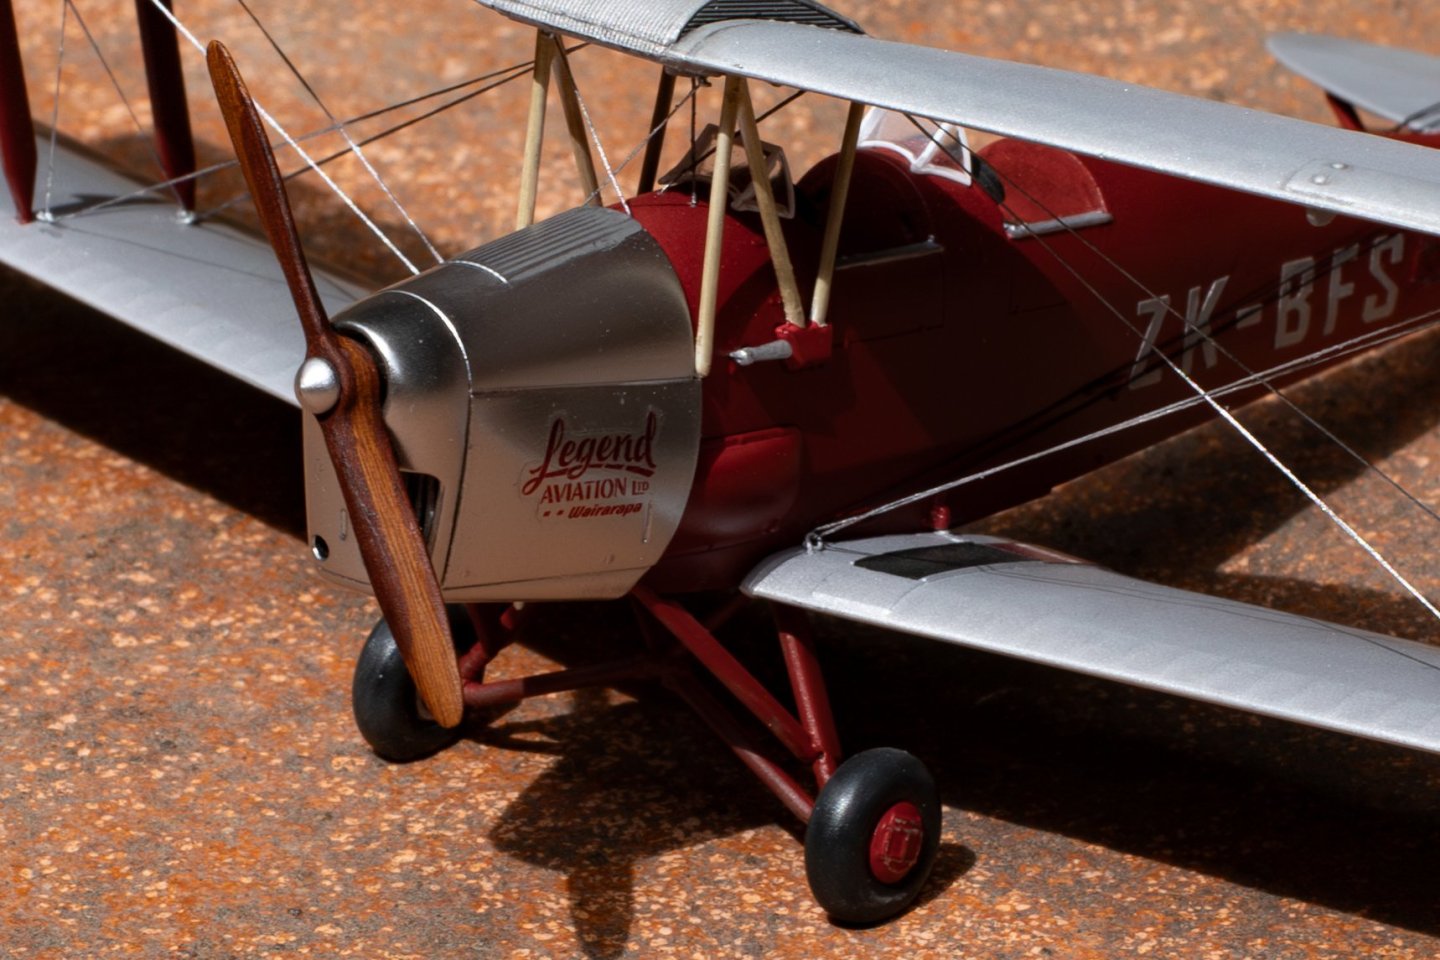
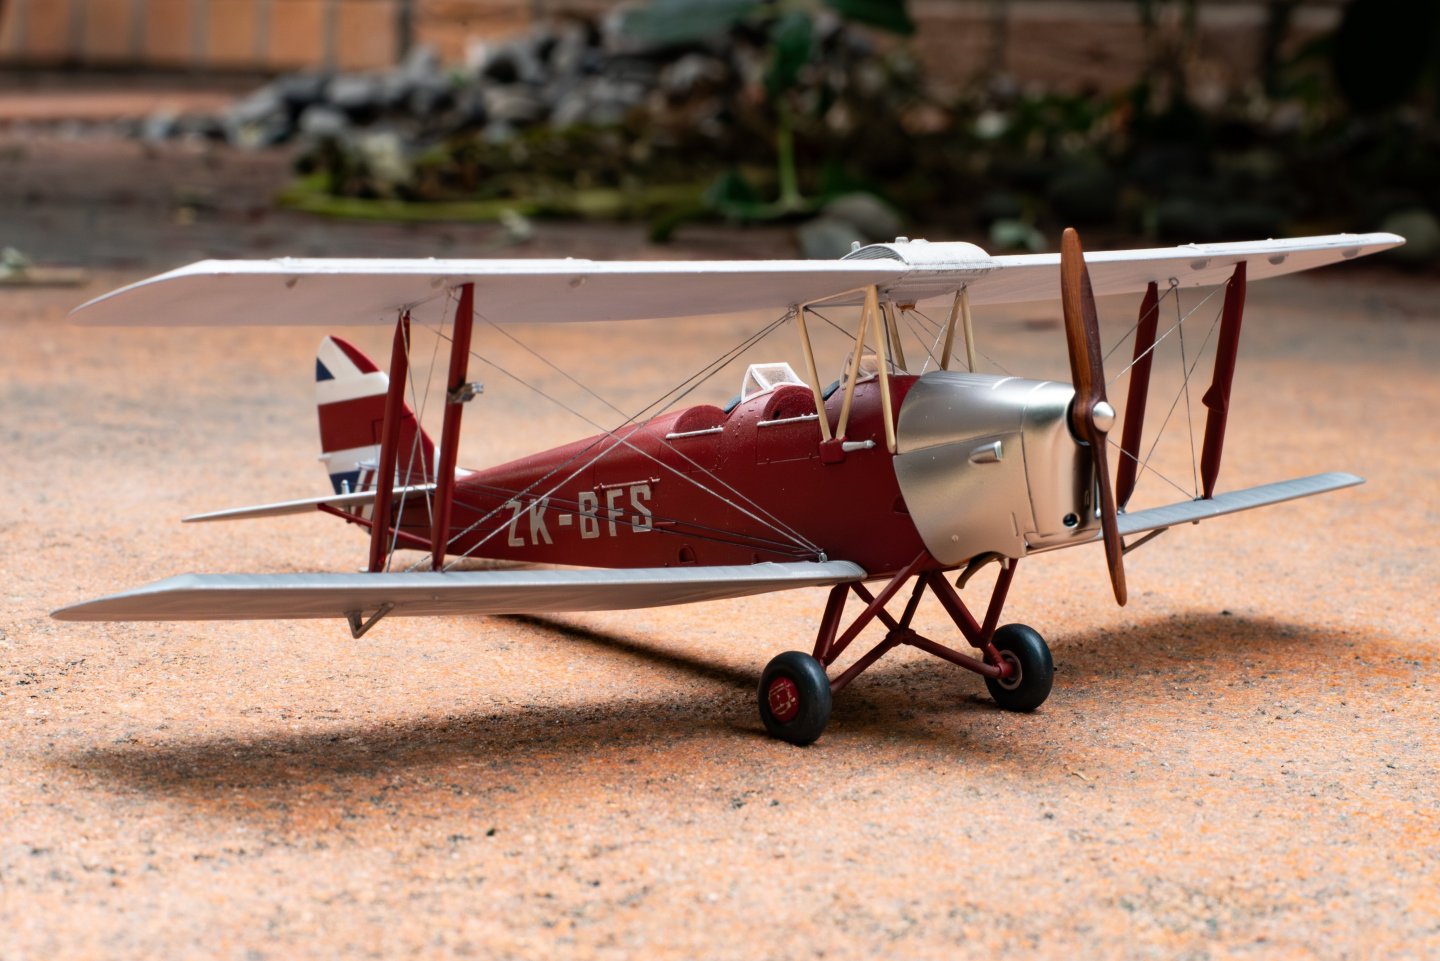
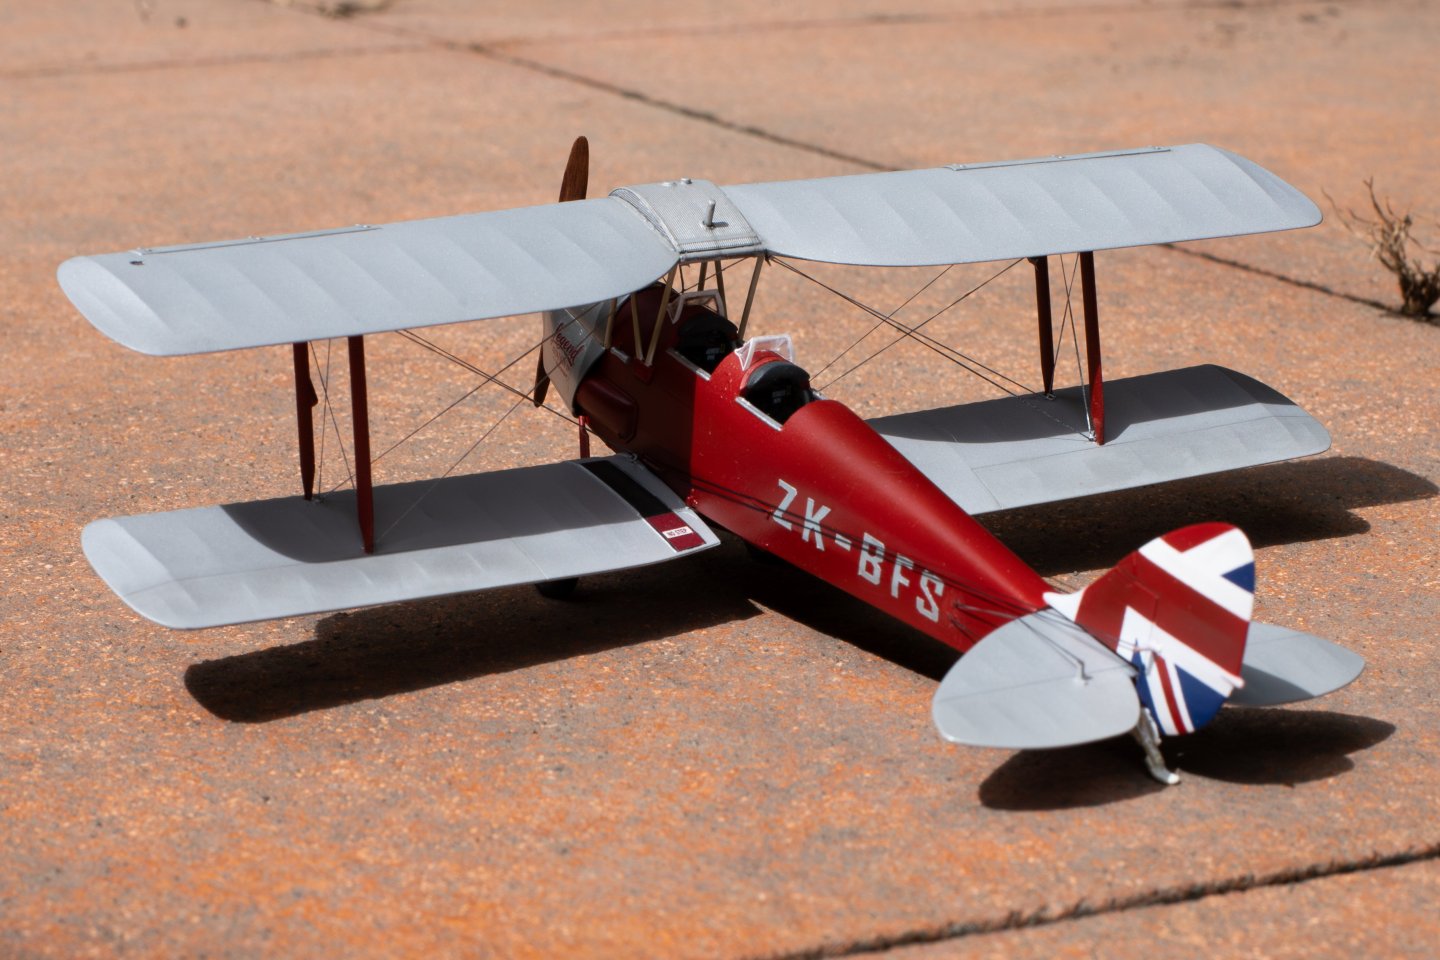
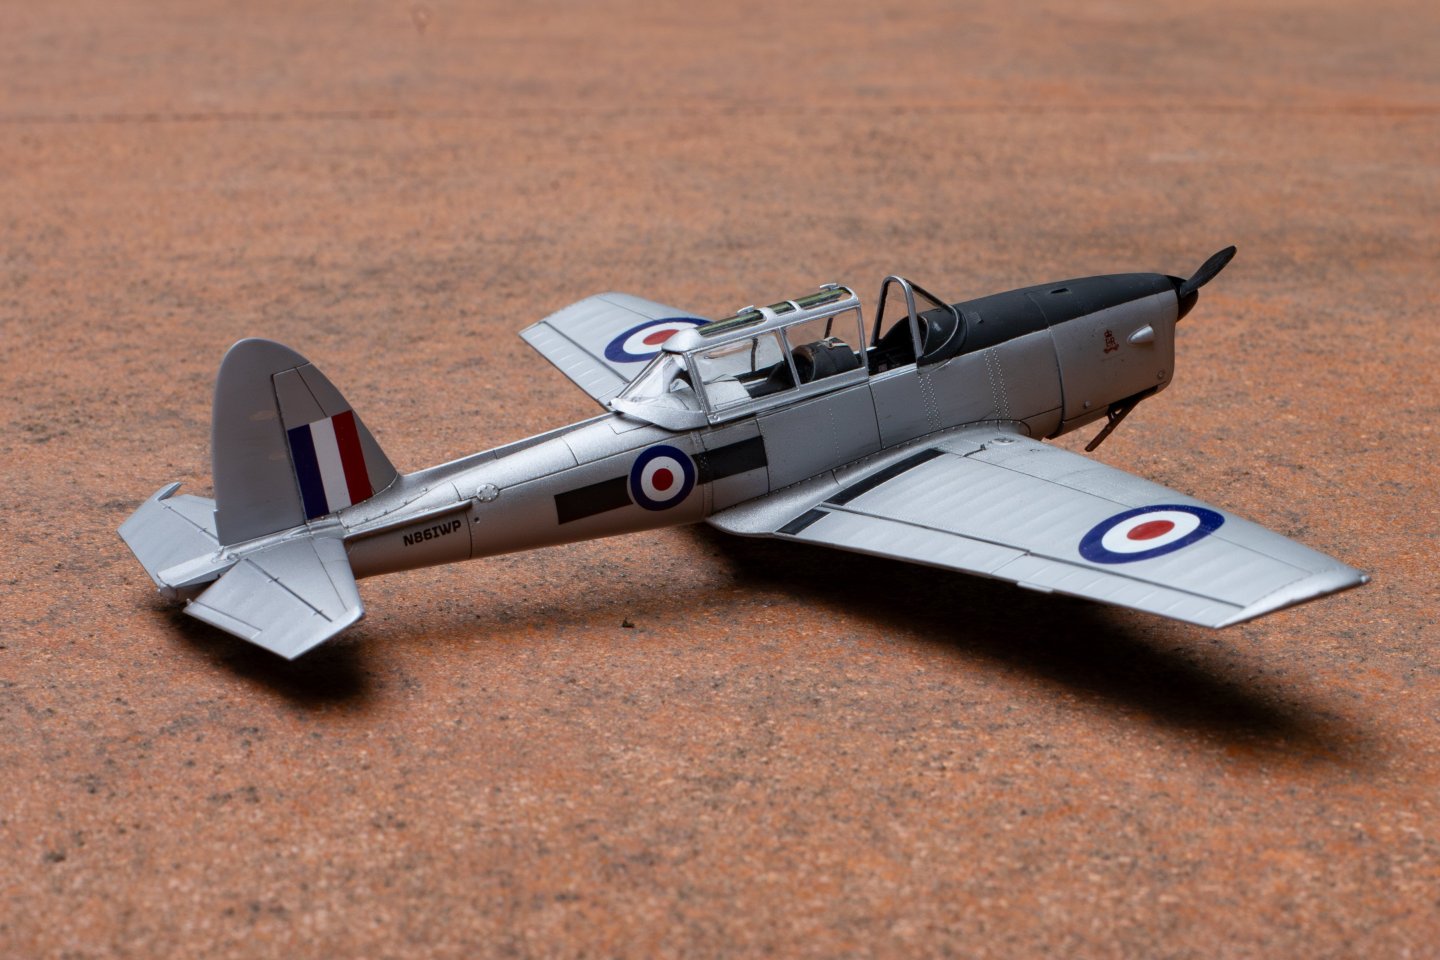
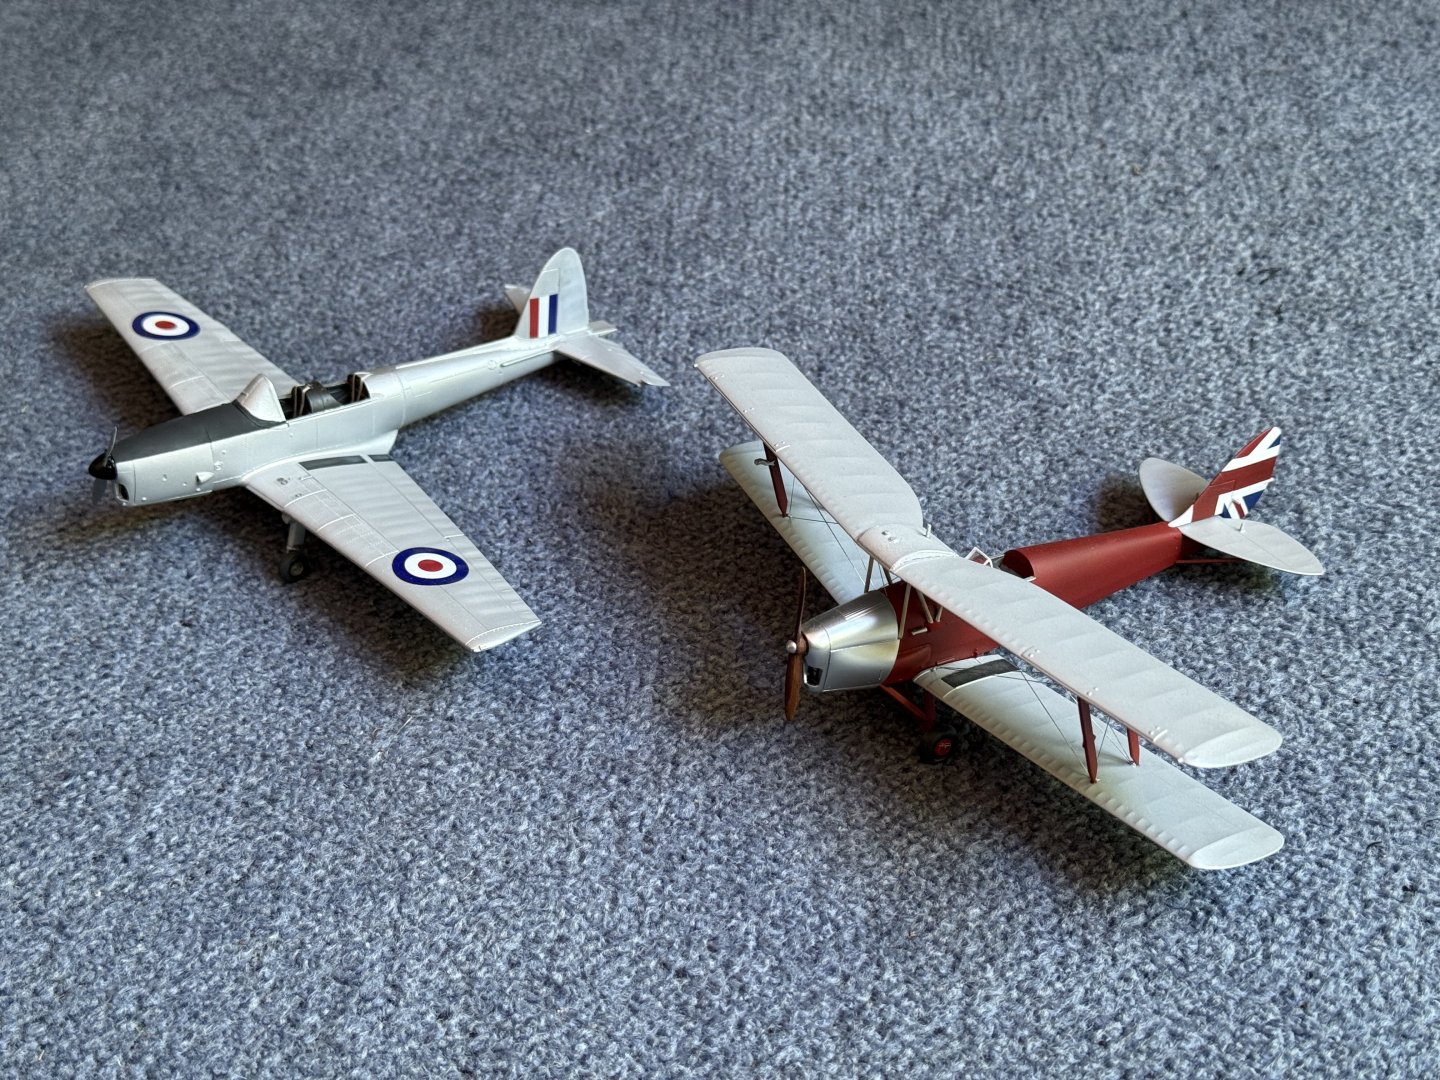
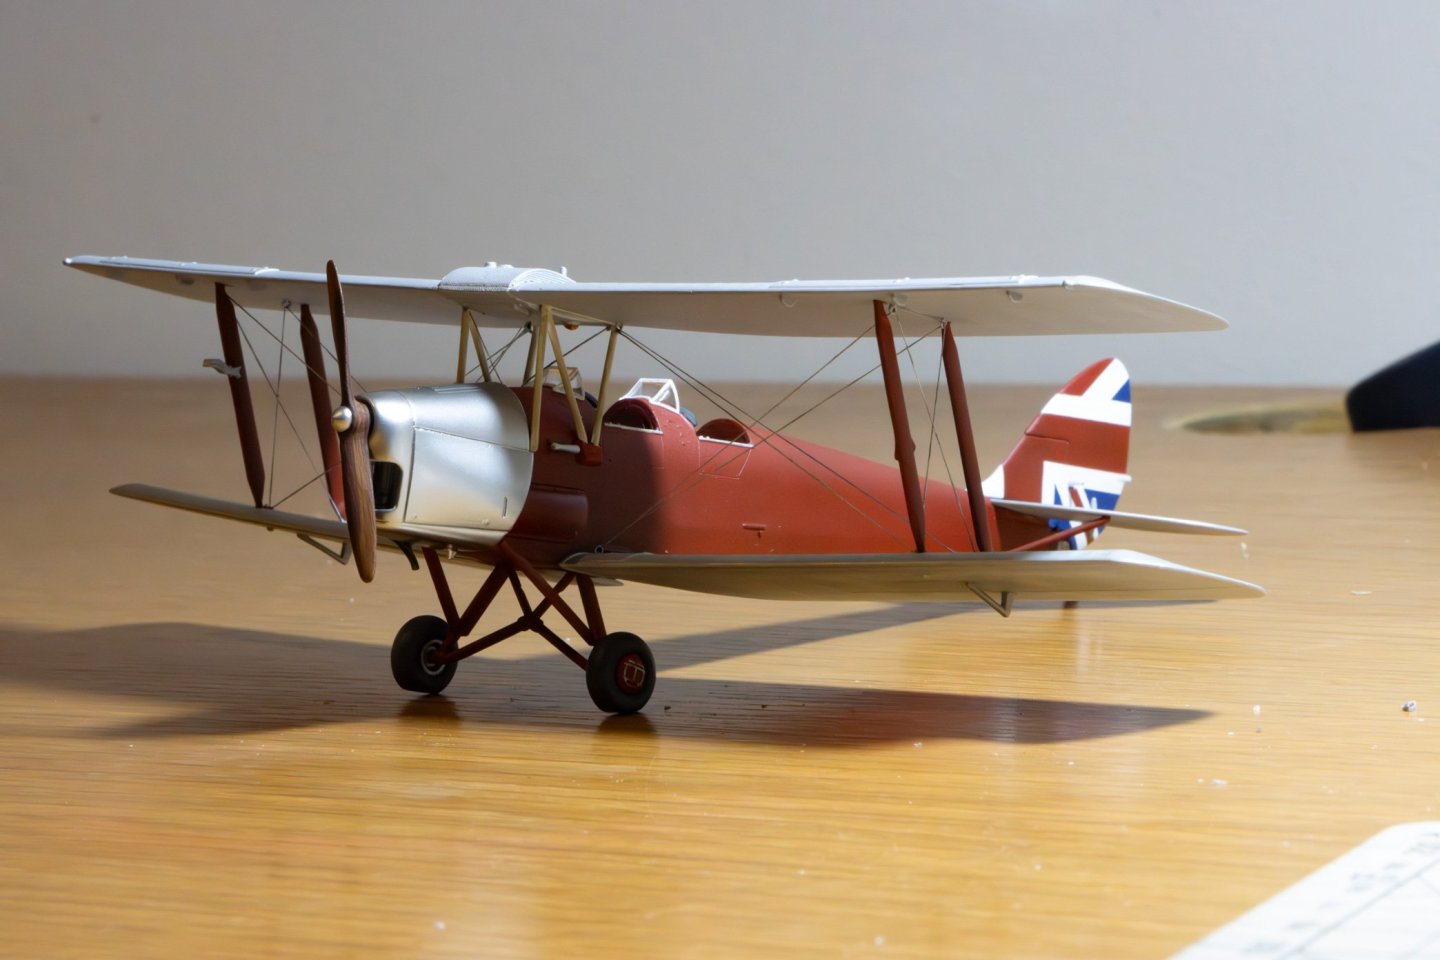
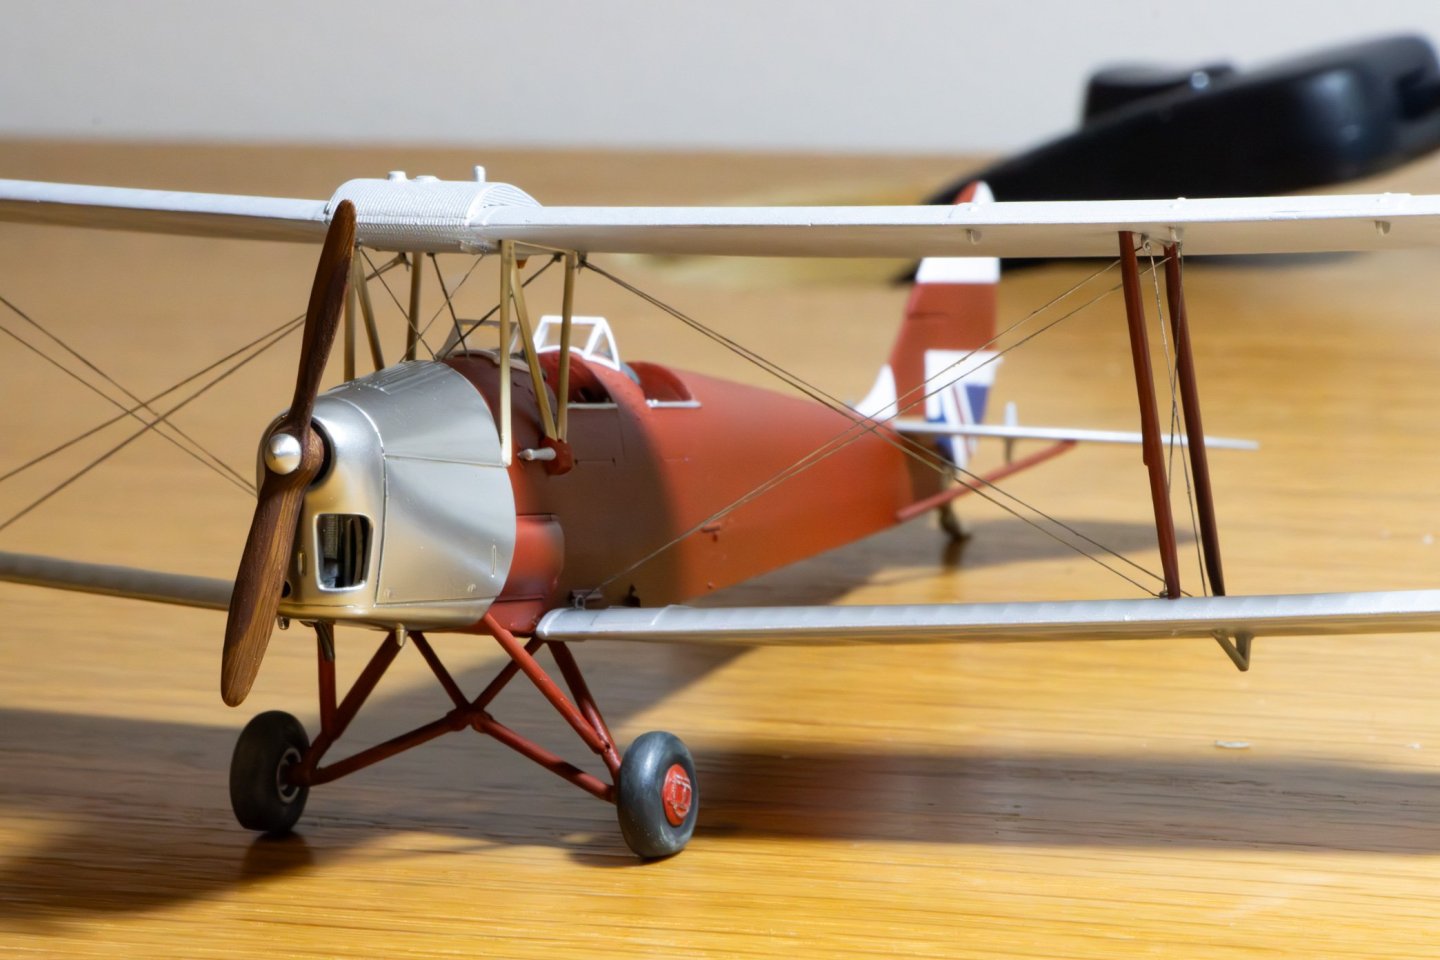
 Hey, So today they went to their new home! This project is complete. Its been fun and a unique build for me. I was happy with how they turned out and making my own decals was a nice learning curve. Here are the final pics. Thanks all for tagging along with me. Hope you all have a Merry Christmas!


- 49 replies
-
- 14
-
-
-
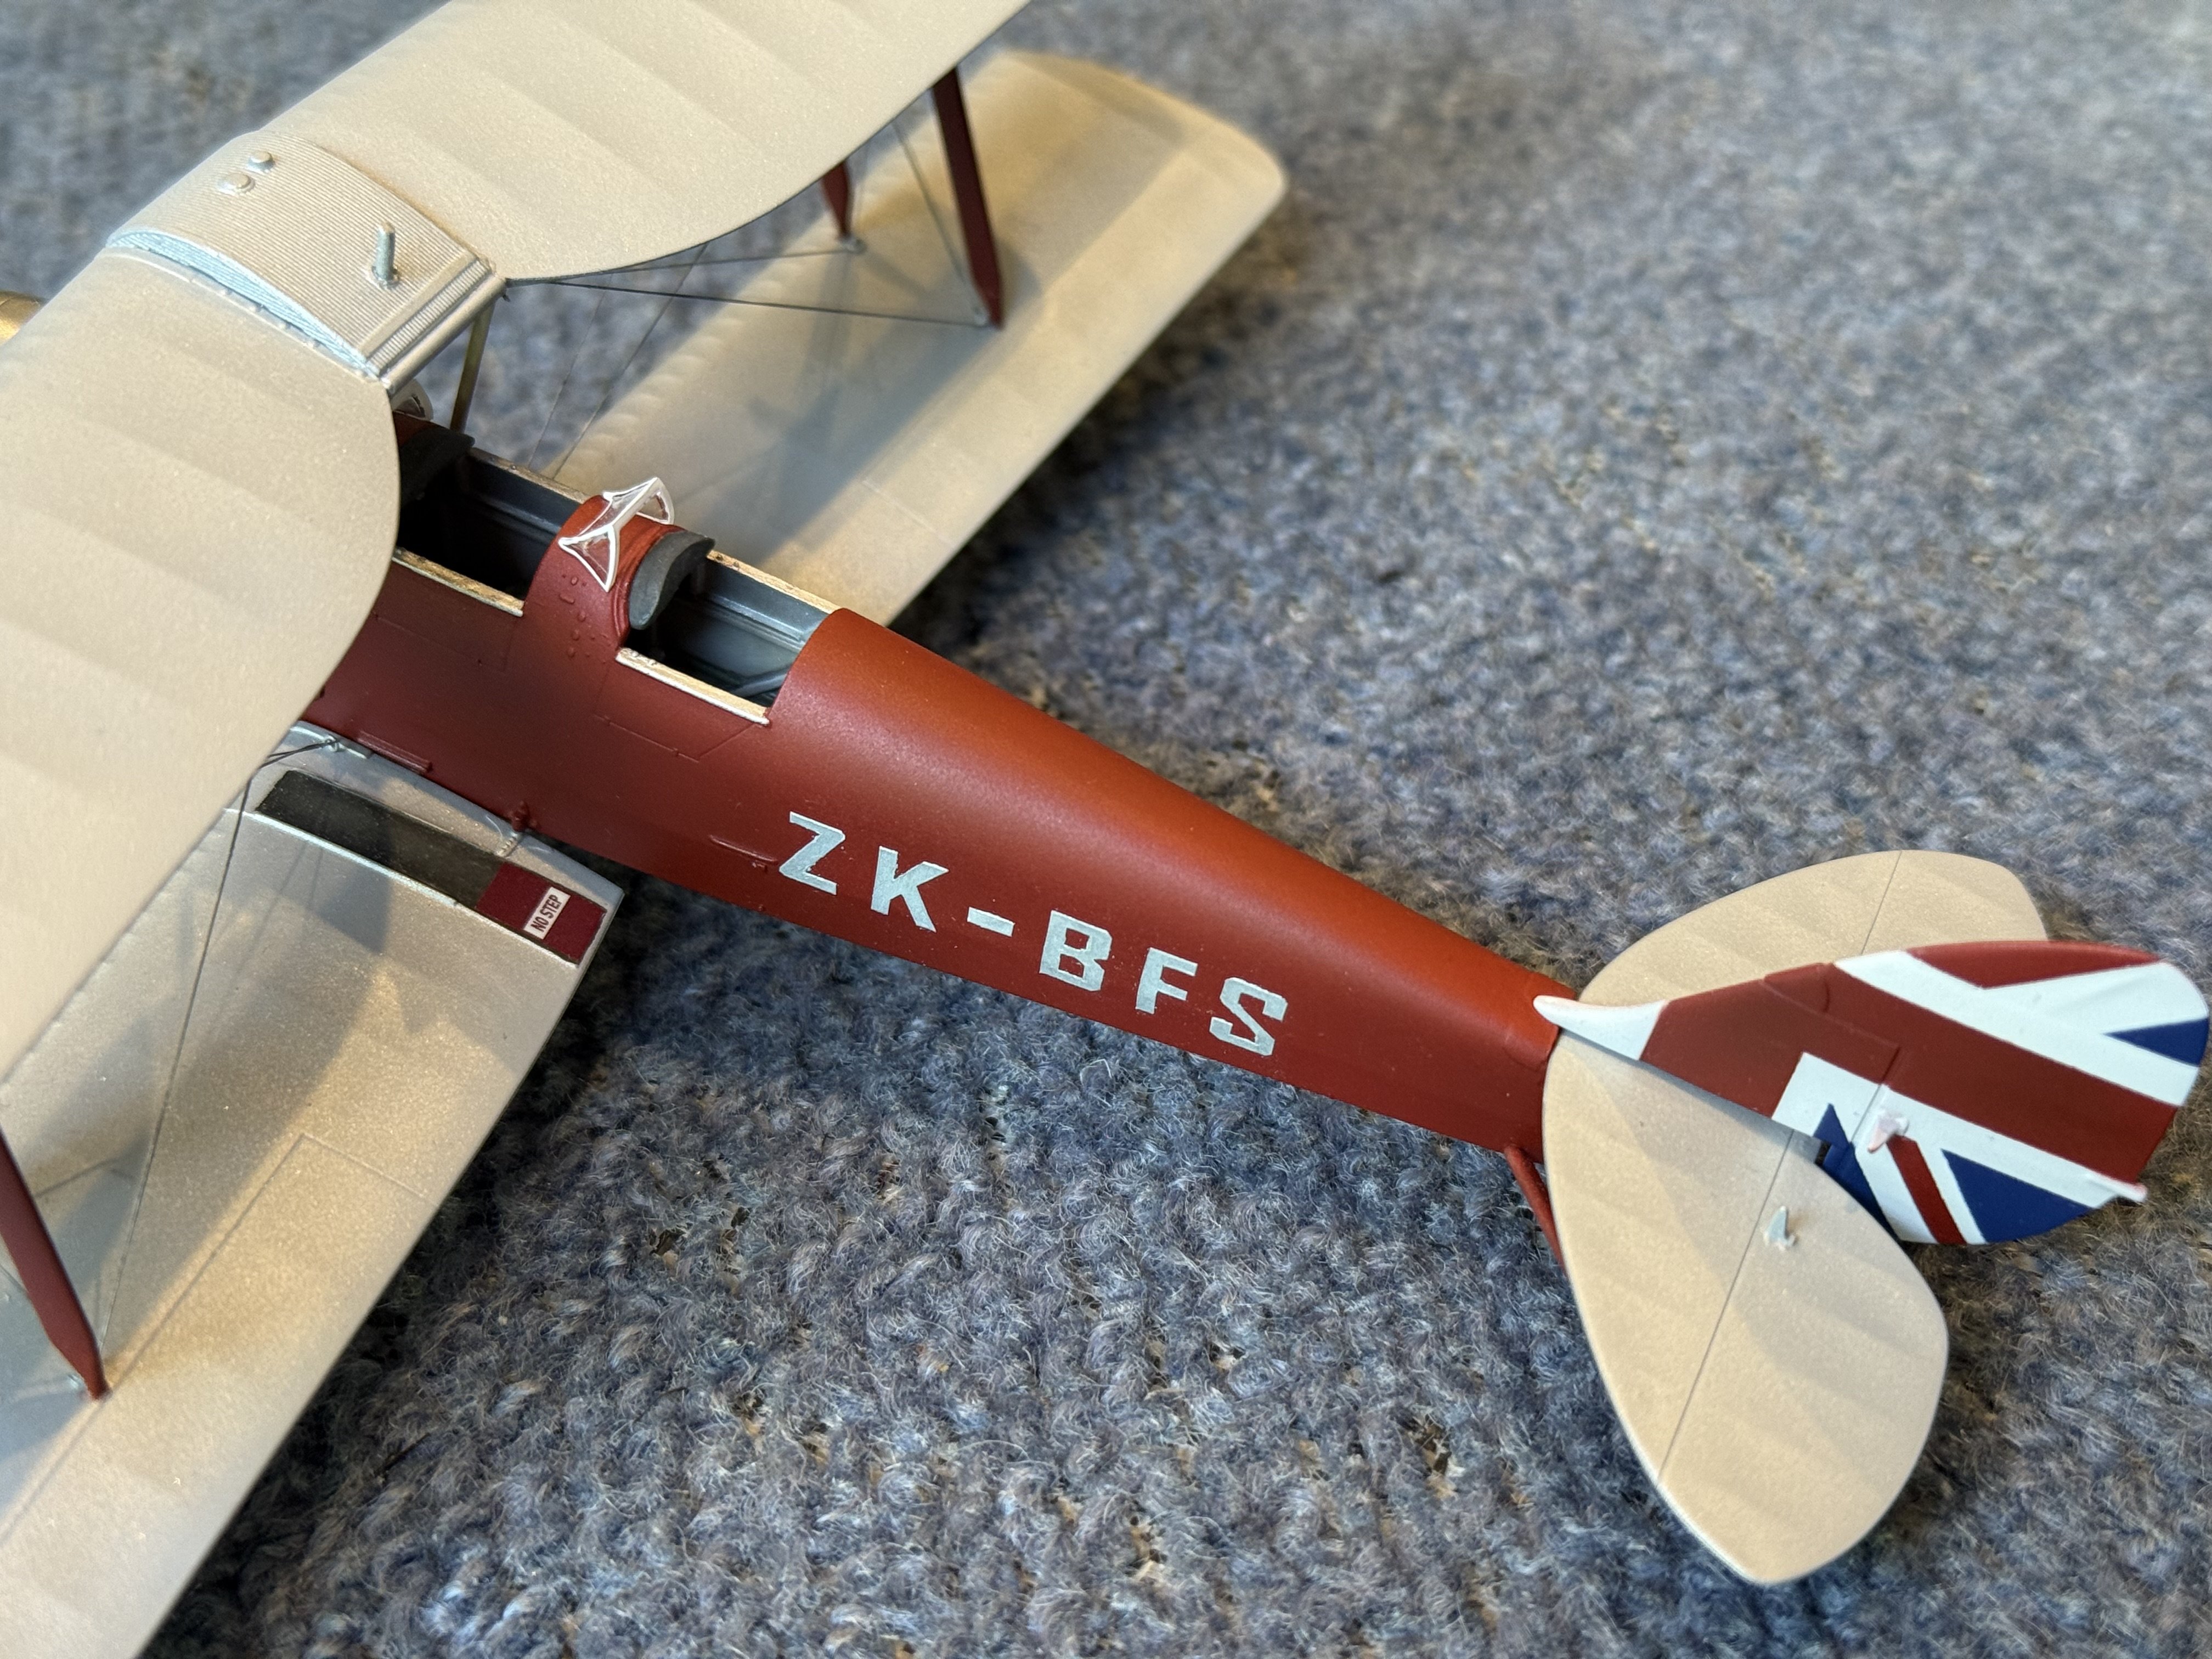
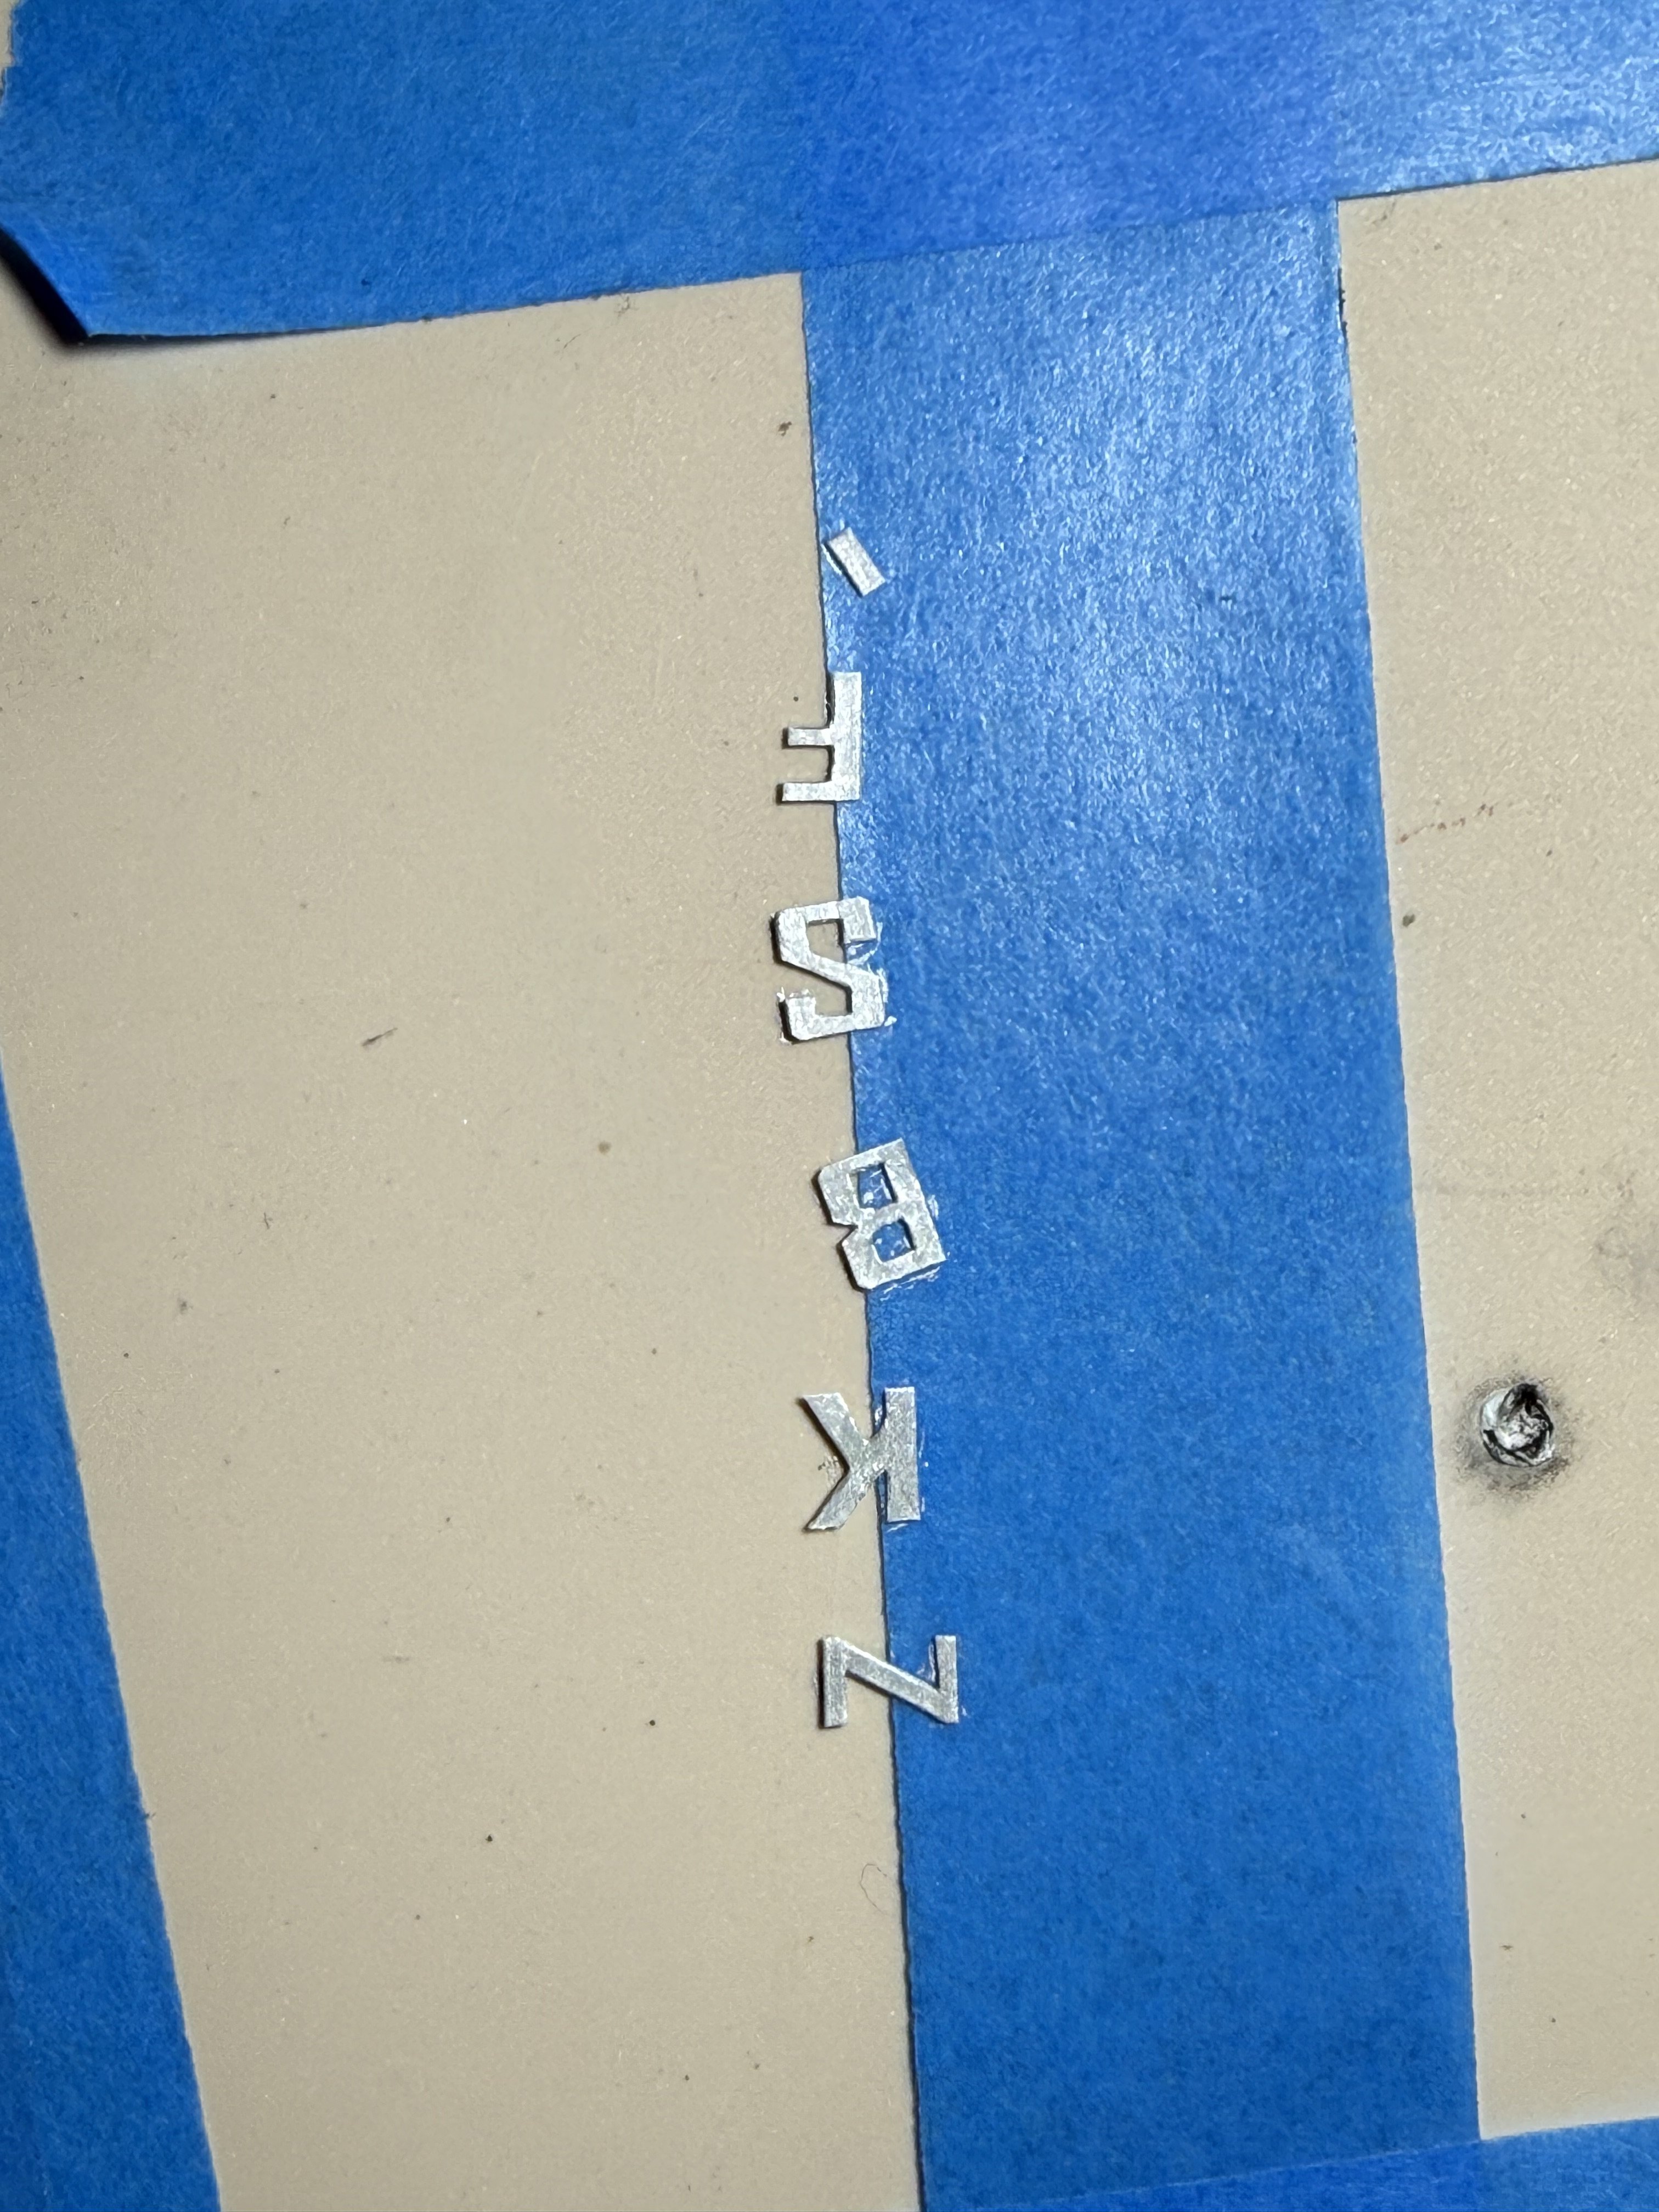
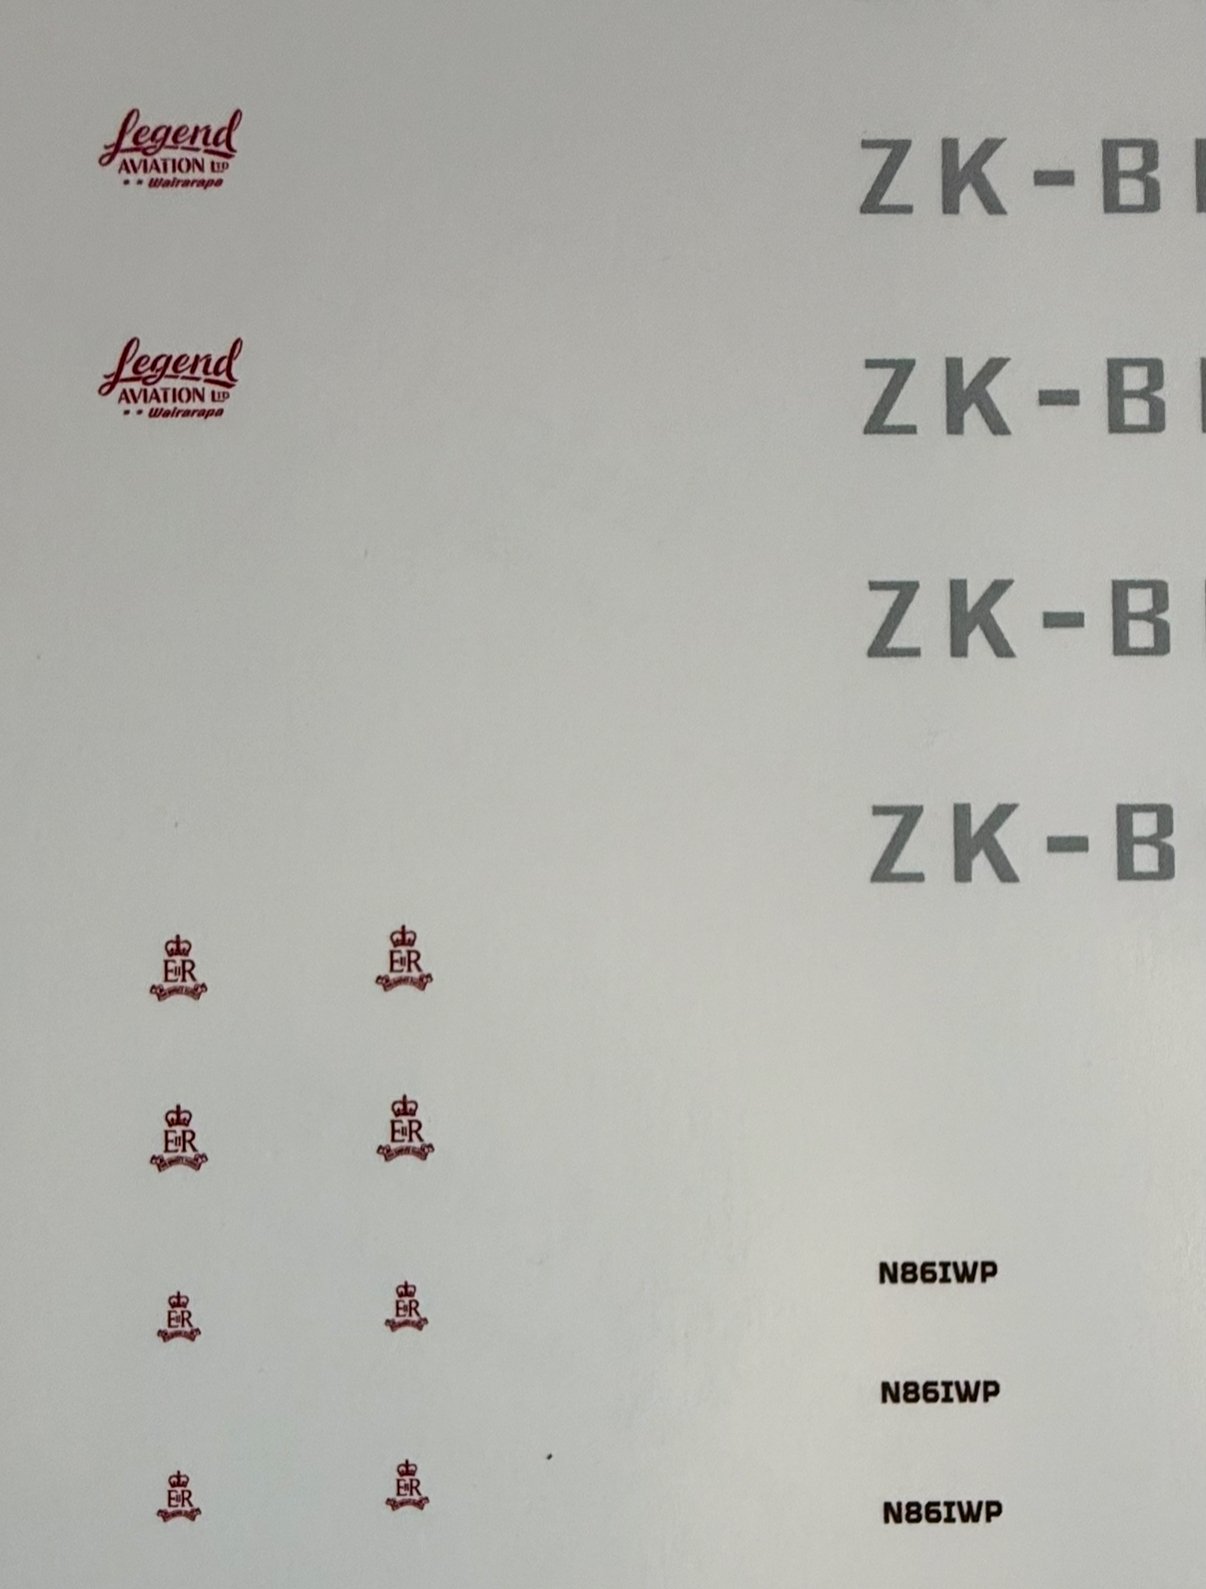
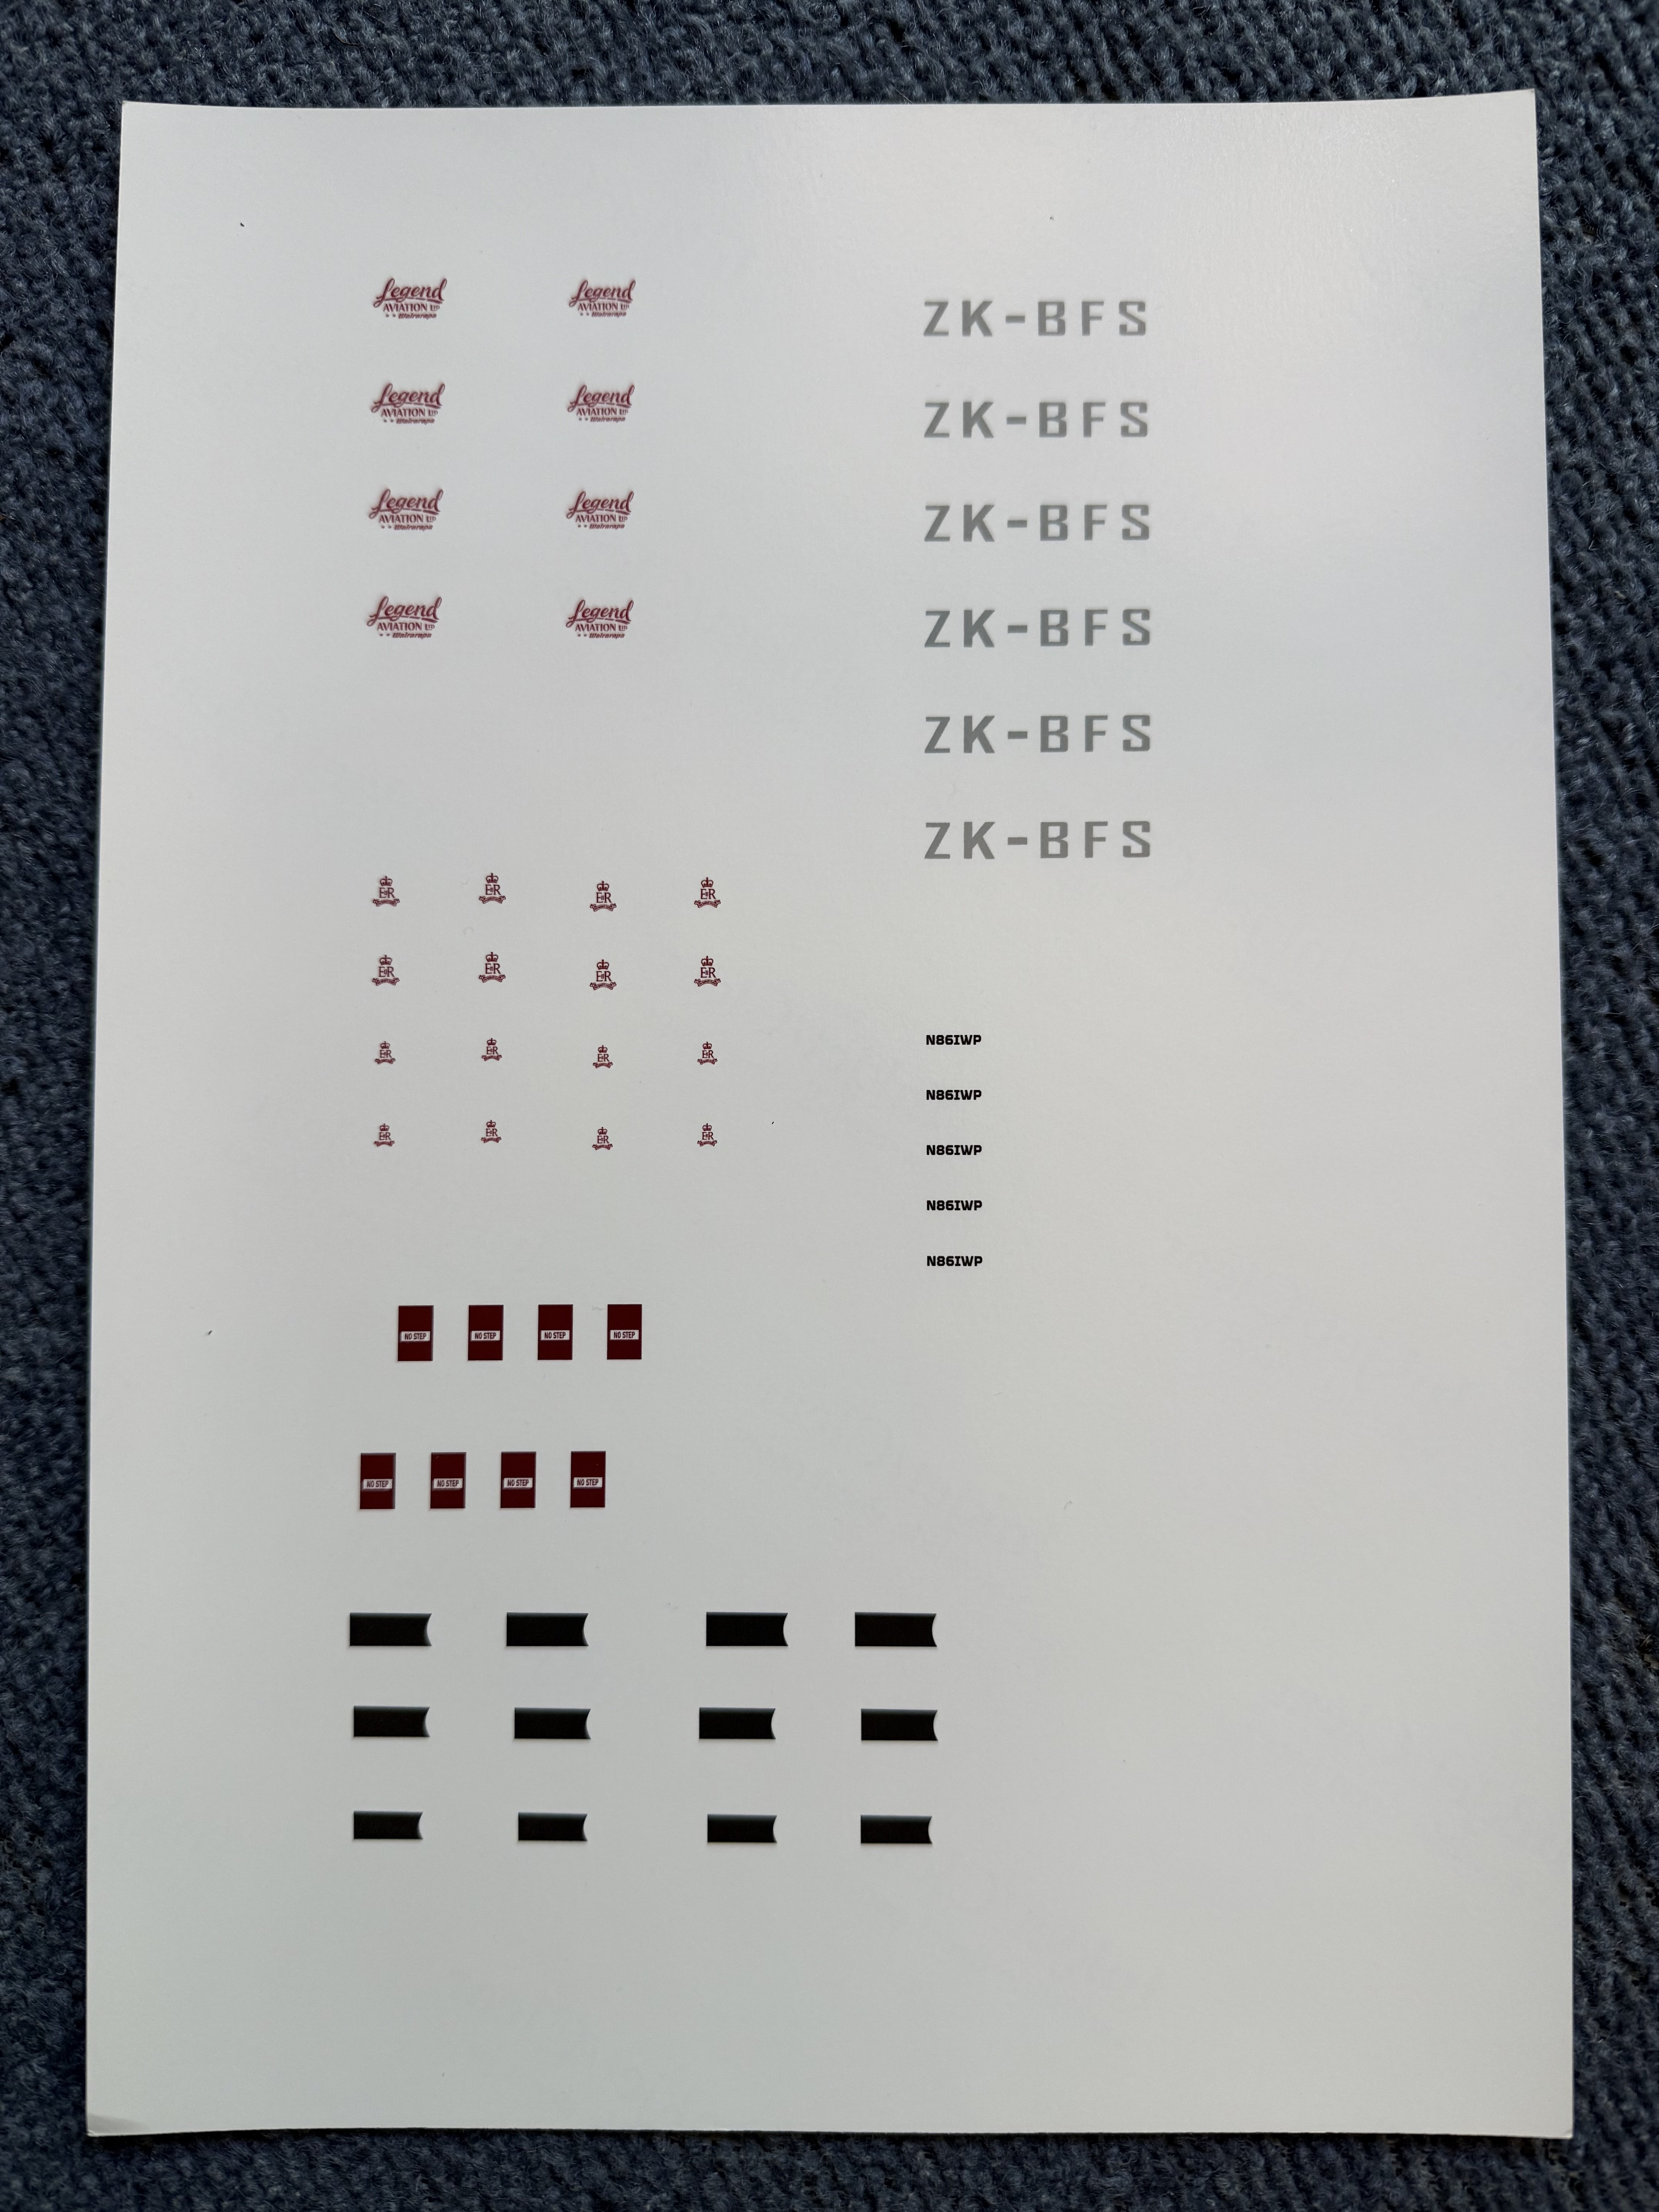
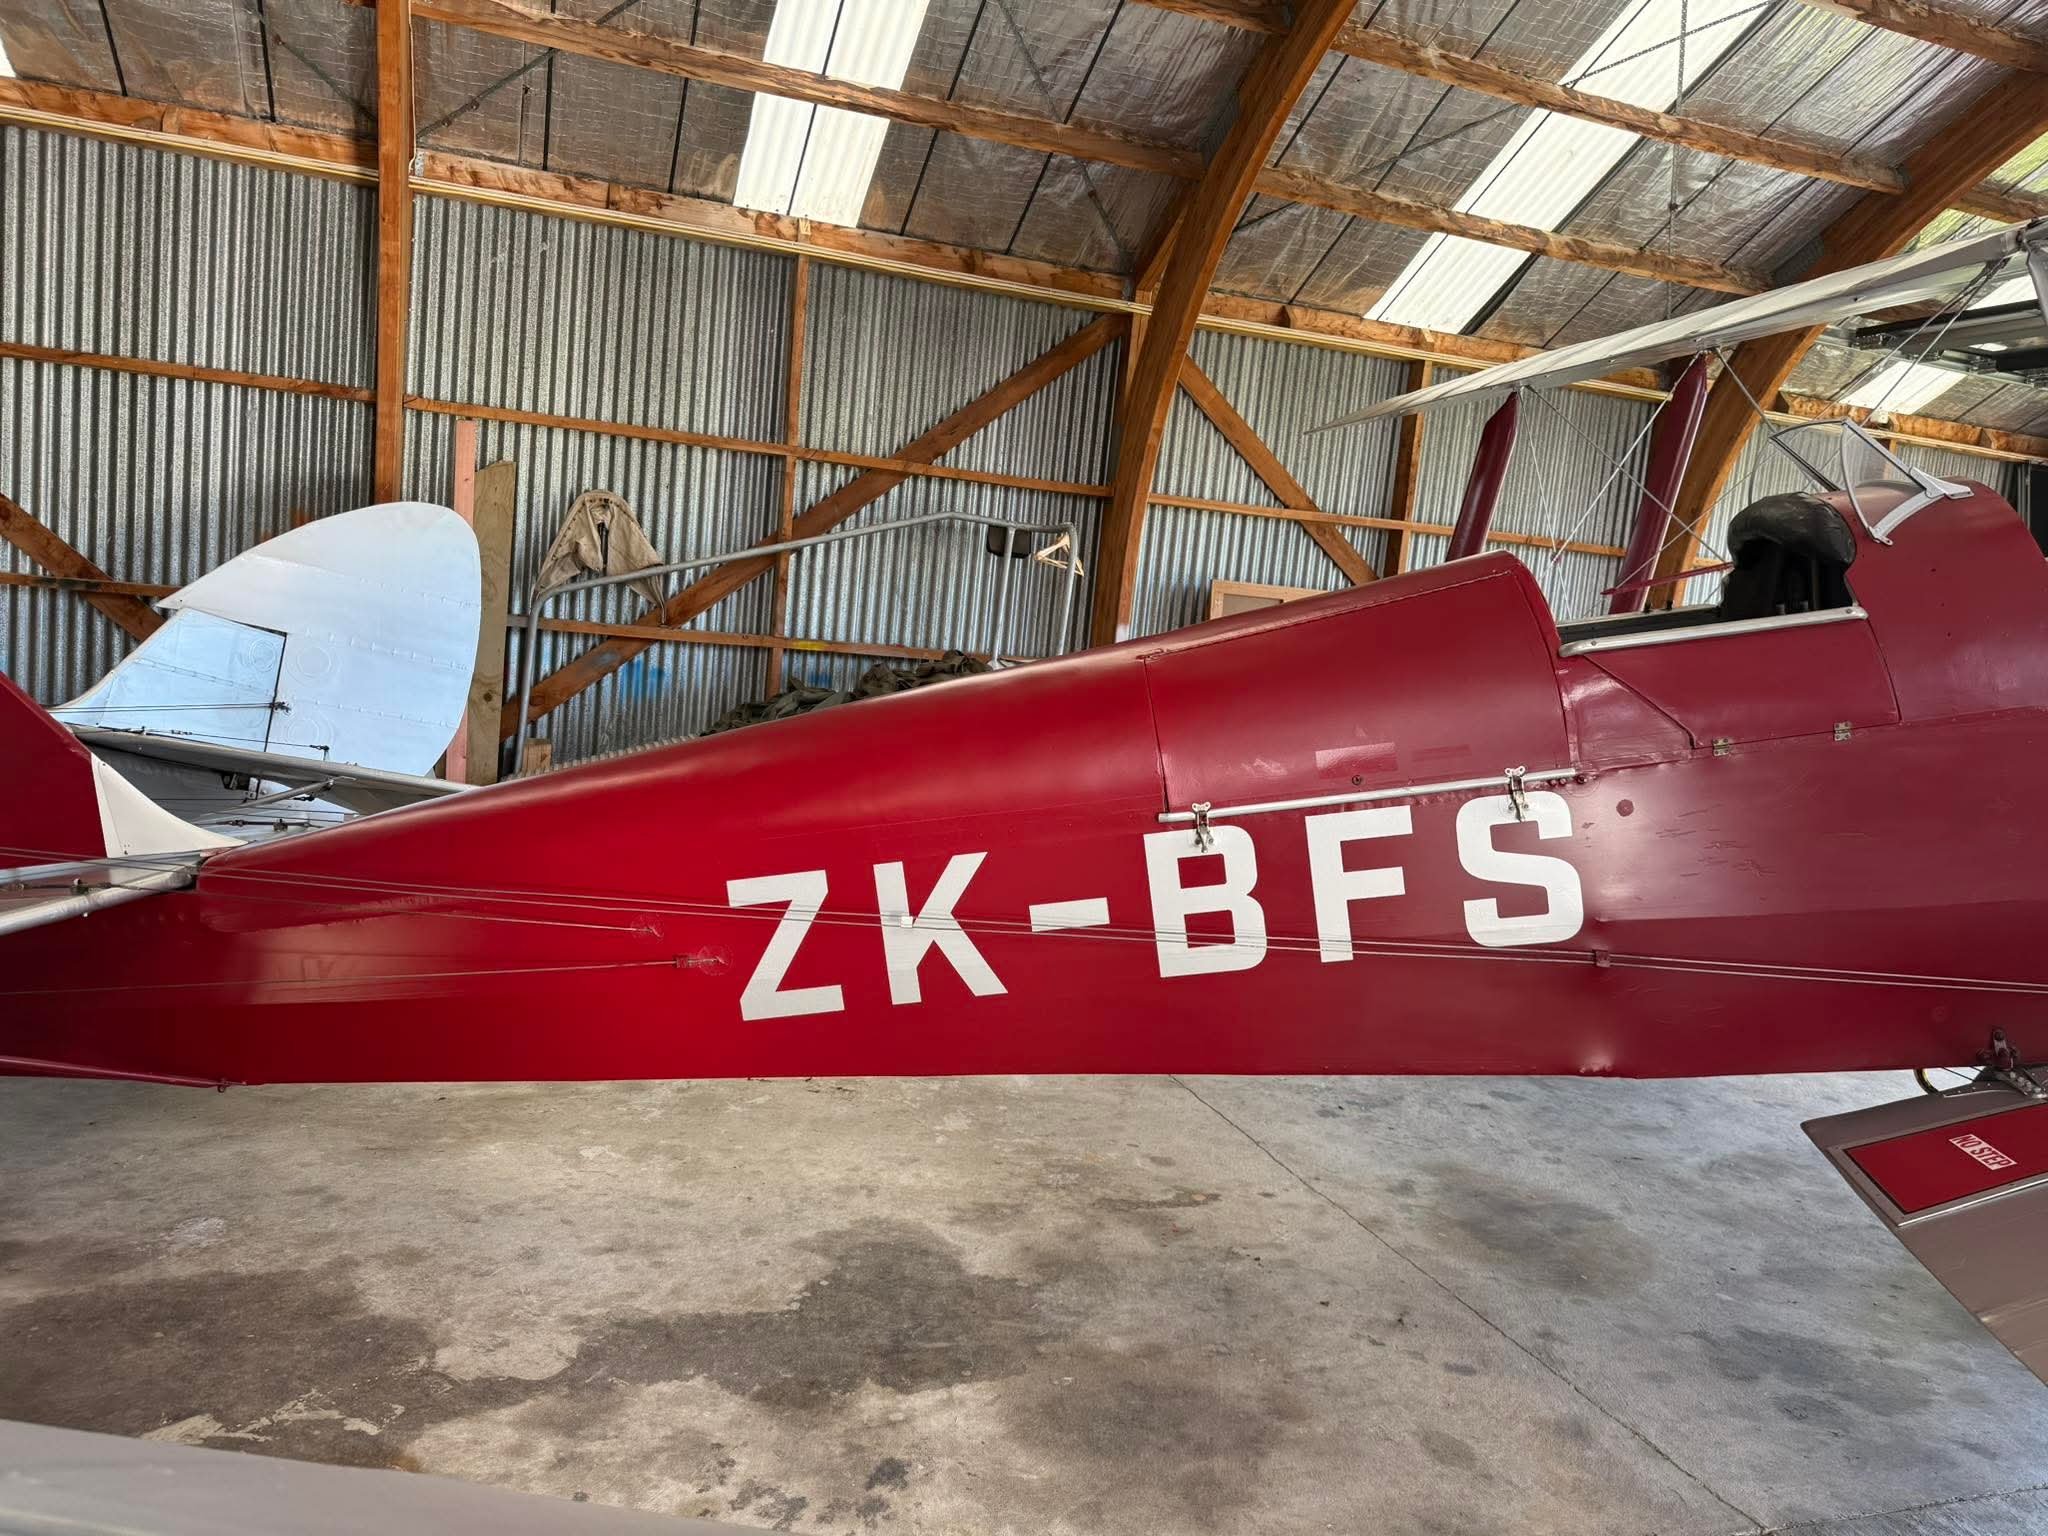
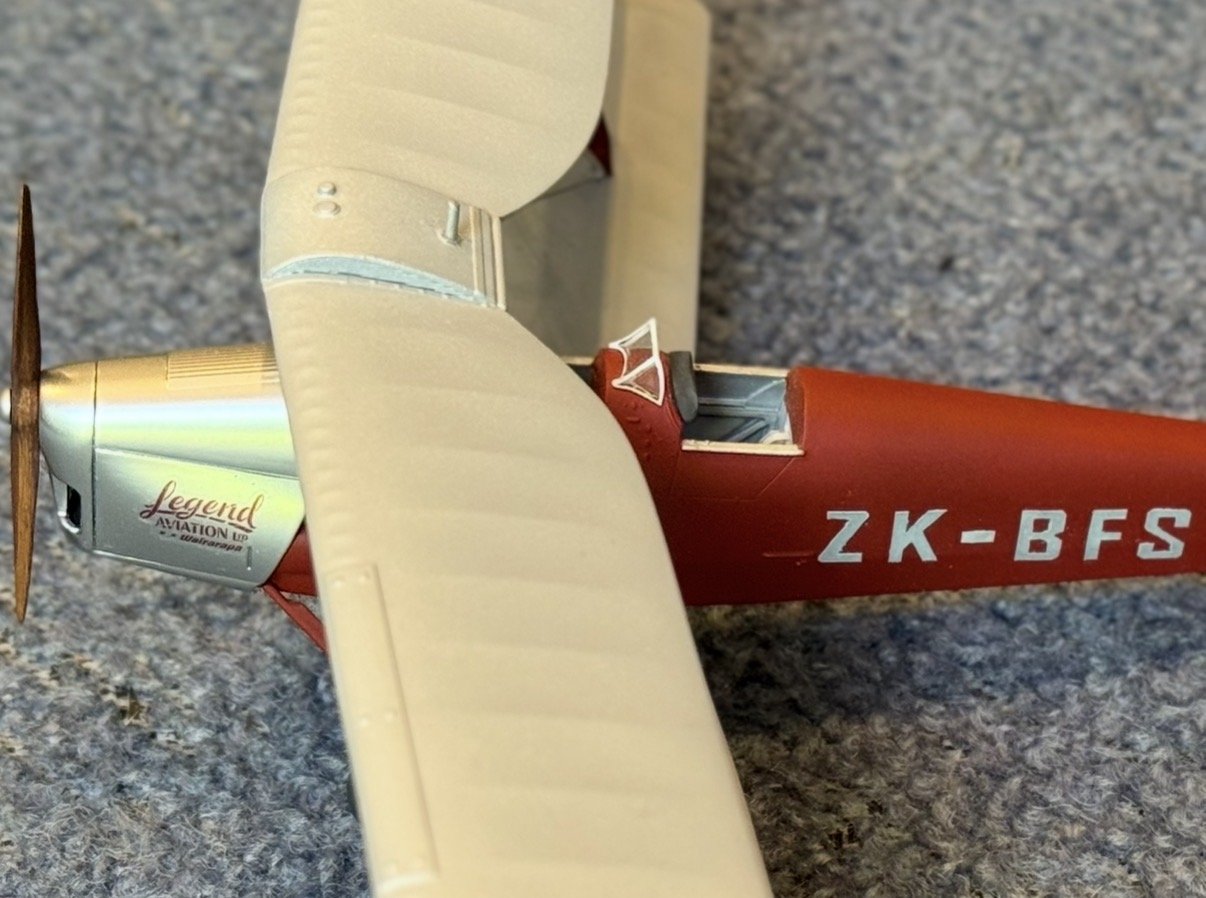
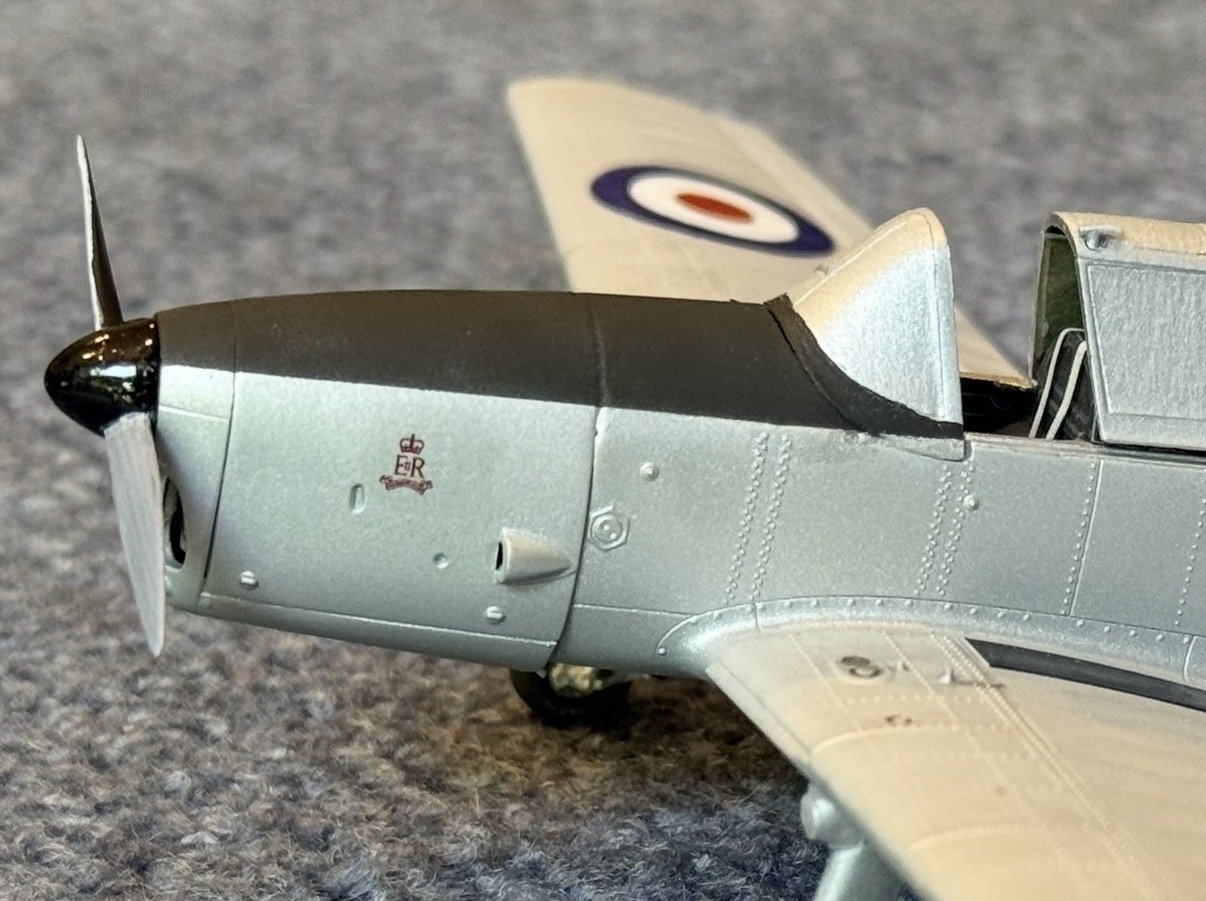
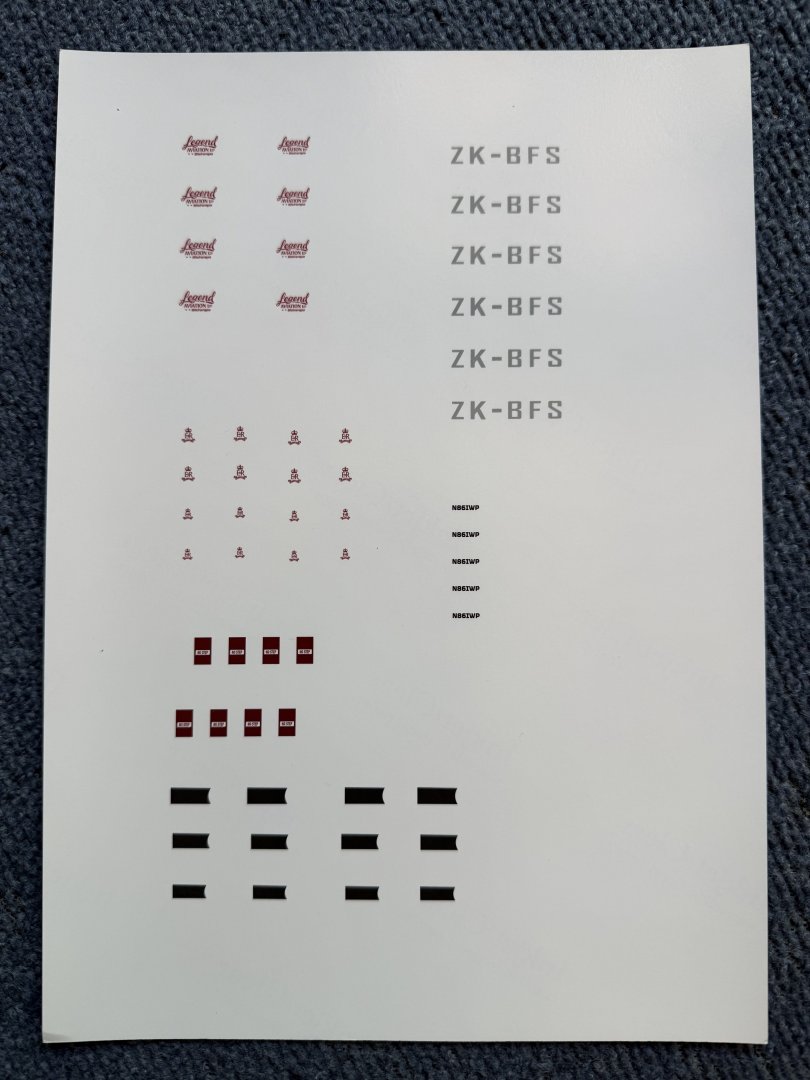
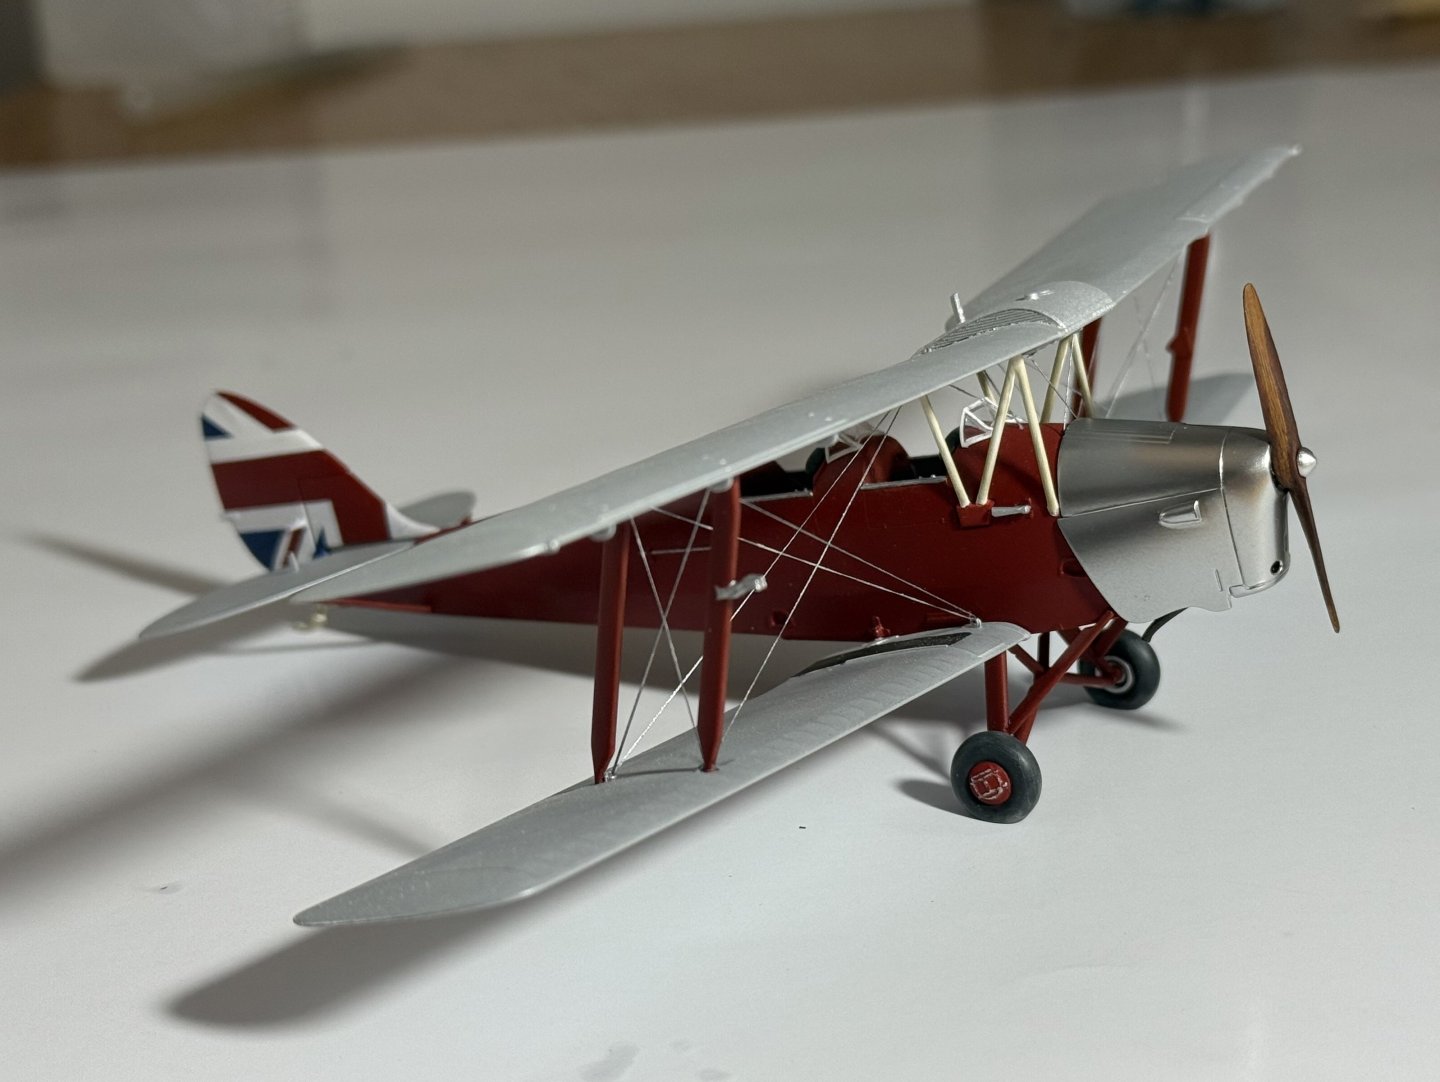
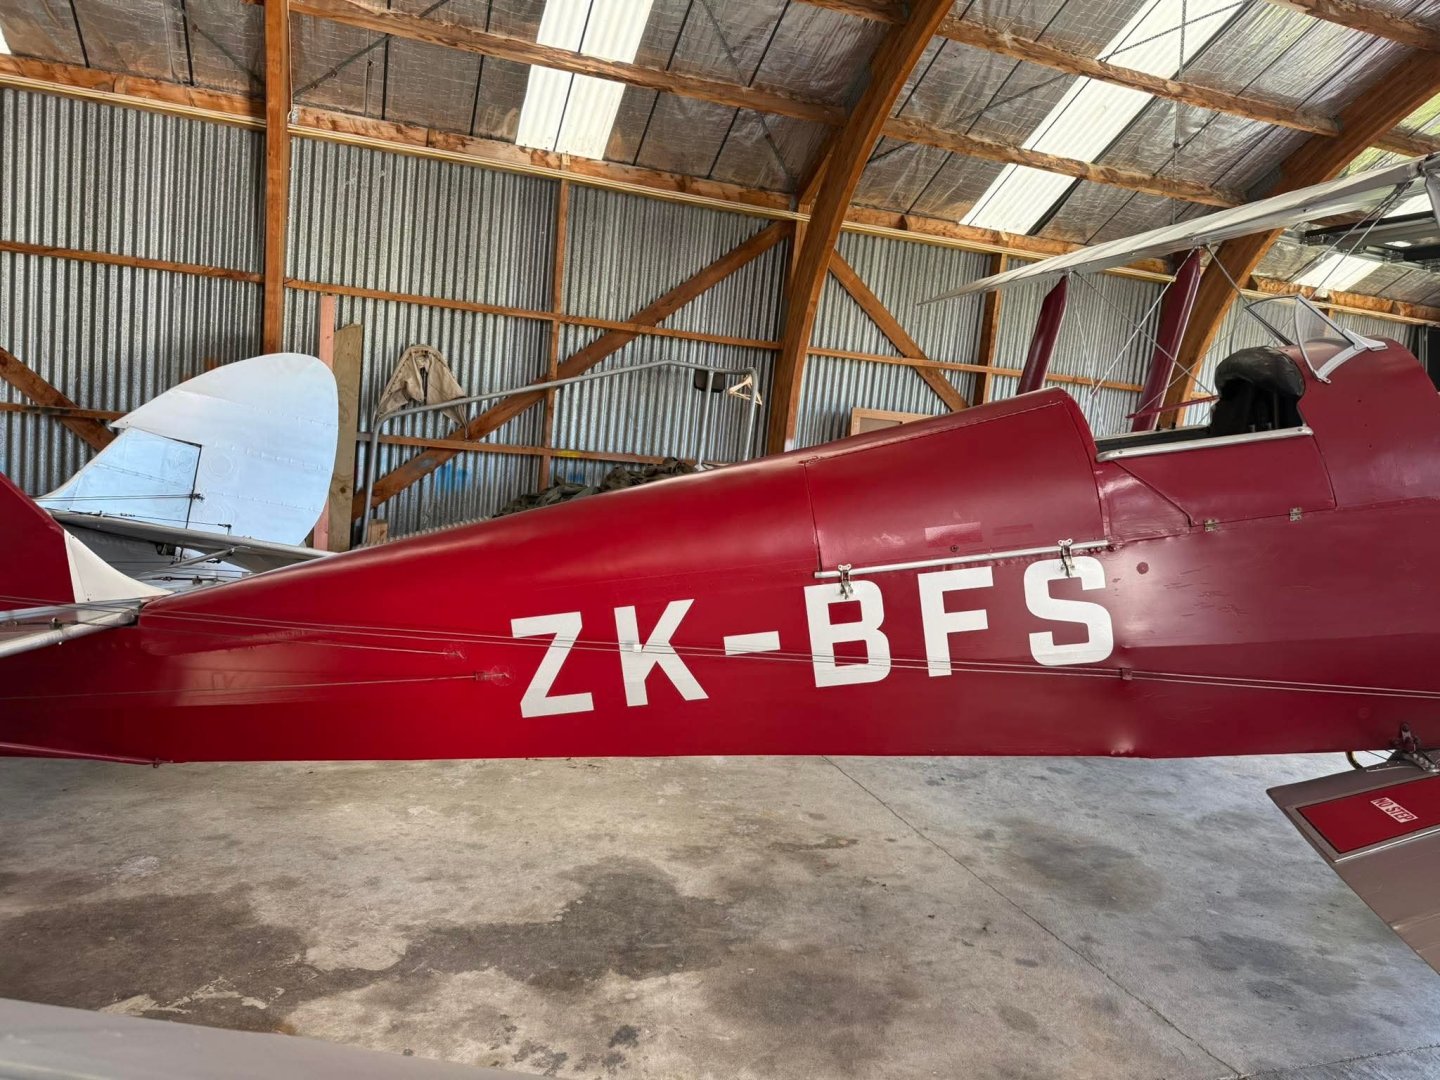
Experiments complete. All the Decals are on now! they all went on really smoothly! Slightly thicker than I was hoping but that’s a tiny complaint and over all I’m really happy with it. The only ones that have me trouble were the ZK-BFS ones. The clear ones were to see through due to no white being printable on inkjet. So looked terrible. Instead I carefully cut them out individually on the ones I’d printed on the white background rather than clear. ( I had a white decal and clear decal page printed) and then painted the top with the aluminium colour which did add some thickness but wanted it to work. Im happy with them! I’ll give them some time to dry well and then just tidy some of the edges and seal them all in with a gloss clear coat then I’m thinking to do a light wash on them with a shade darker grey mainly on the wings and the elevator and rudder control cables and I’d say these guys are done!

- 49 replies
-
- 11
-
-
-
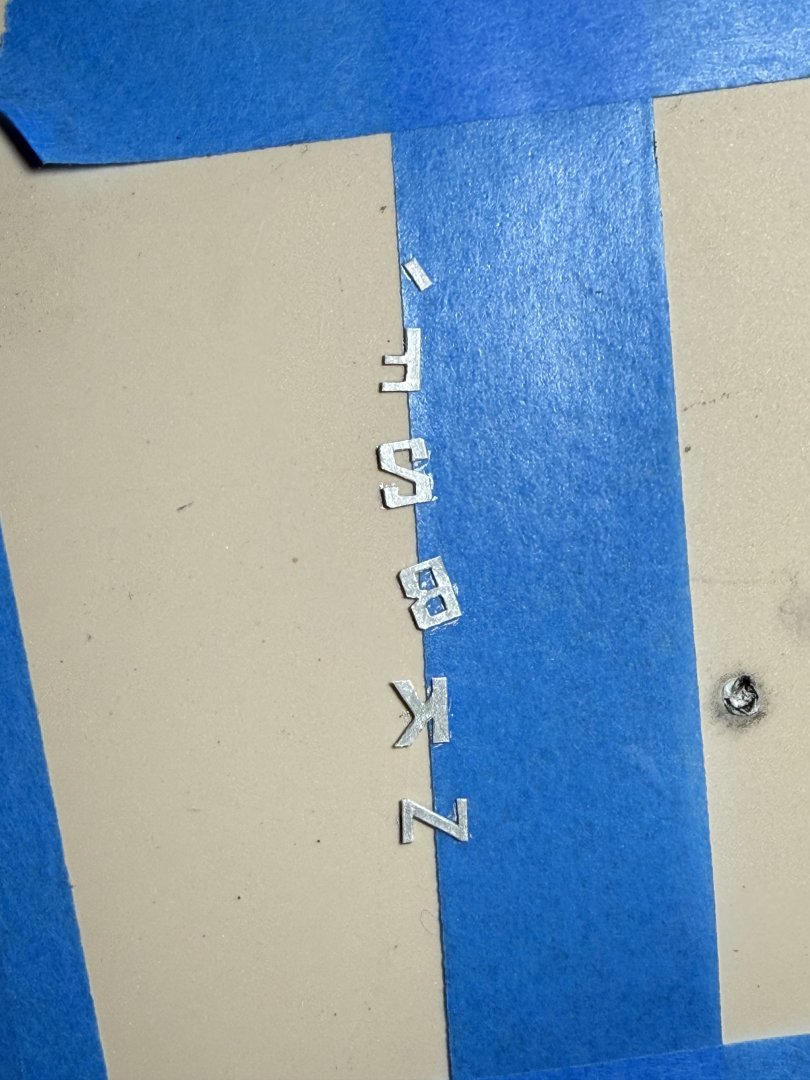
Hey all, so after months of delay I’ve finally got around to completing the decals! Hopefully I measured correctly and they are the correct sizes! Really happy with the inkjet quality as these aren’t very big! It has been given its clear seal coat and tomorrow after work I’ll begin experimenting to see how they work and the dos and don’ts. Will also see if the decal adhesives and softers work or not. I’ve a feeling once I commit to putting them on the planes that if they fail it will be an effort to reset to try again! So naturally I’ll probably start with the biggest and most important ones haha 😅 Not too far from the finishing touches now! Definitely dragged this build out much longer than I should have!

- 49 replies
-
- 12
-
-
-
Thanks, I don’t think I’d ever have thought to do these two aircraft myself! Glad I have though. When I was asked about doing these, I had to do a search to even see if there were any kits available! I was surprised with how many options and scales were available!
-
Lt. Biggles reacted to a post in a topic:
De Havilland Tiger Moth and Chipmunk by Lt. Biggles - FINISHED - Airfix - 1/48 - PLASTIC
-
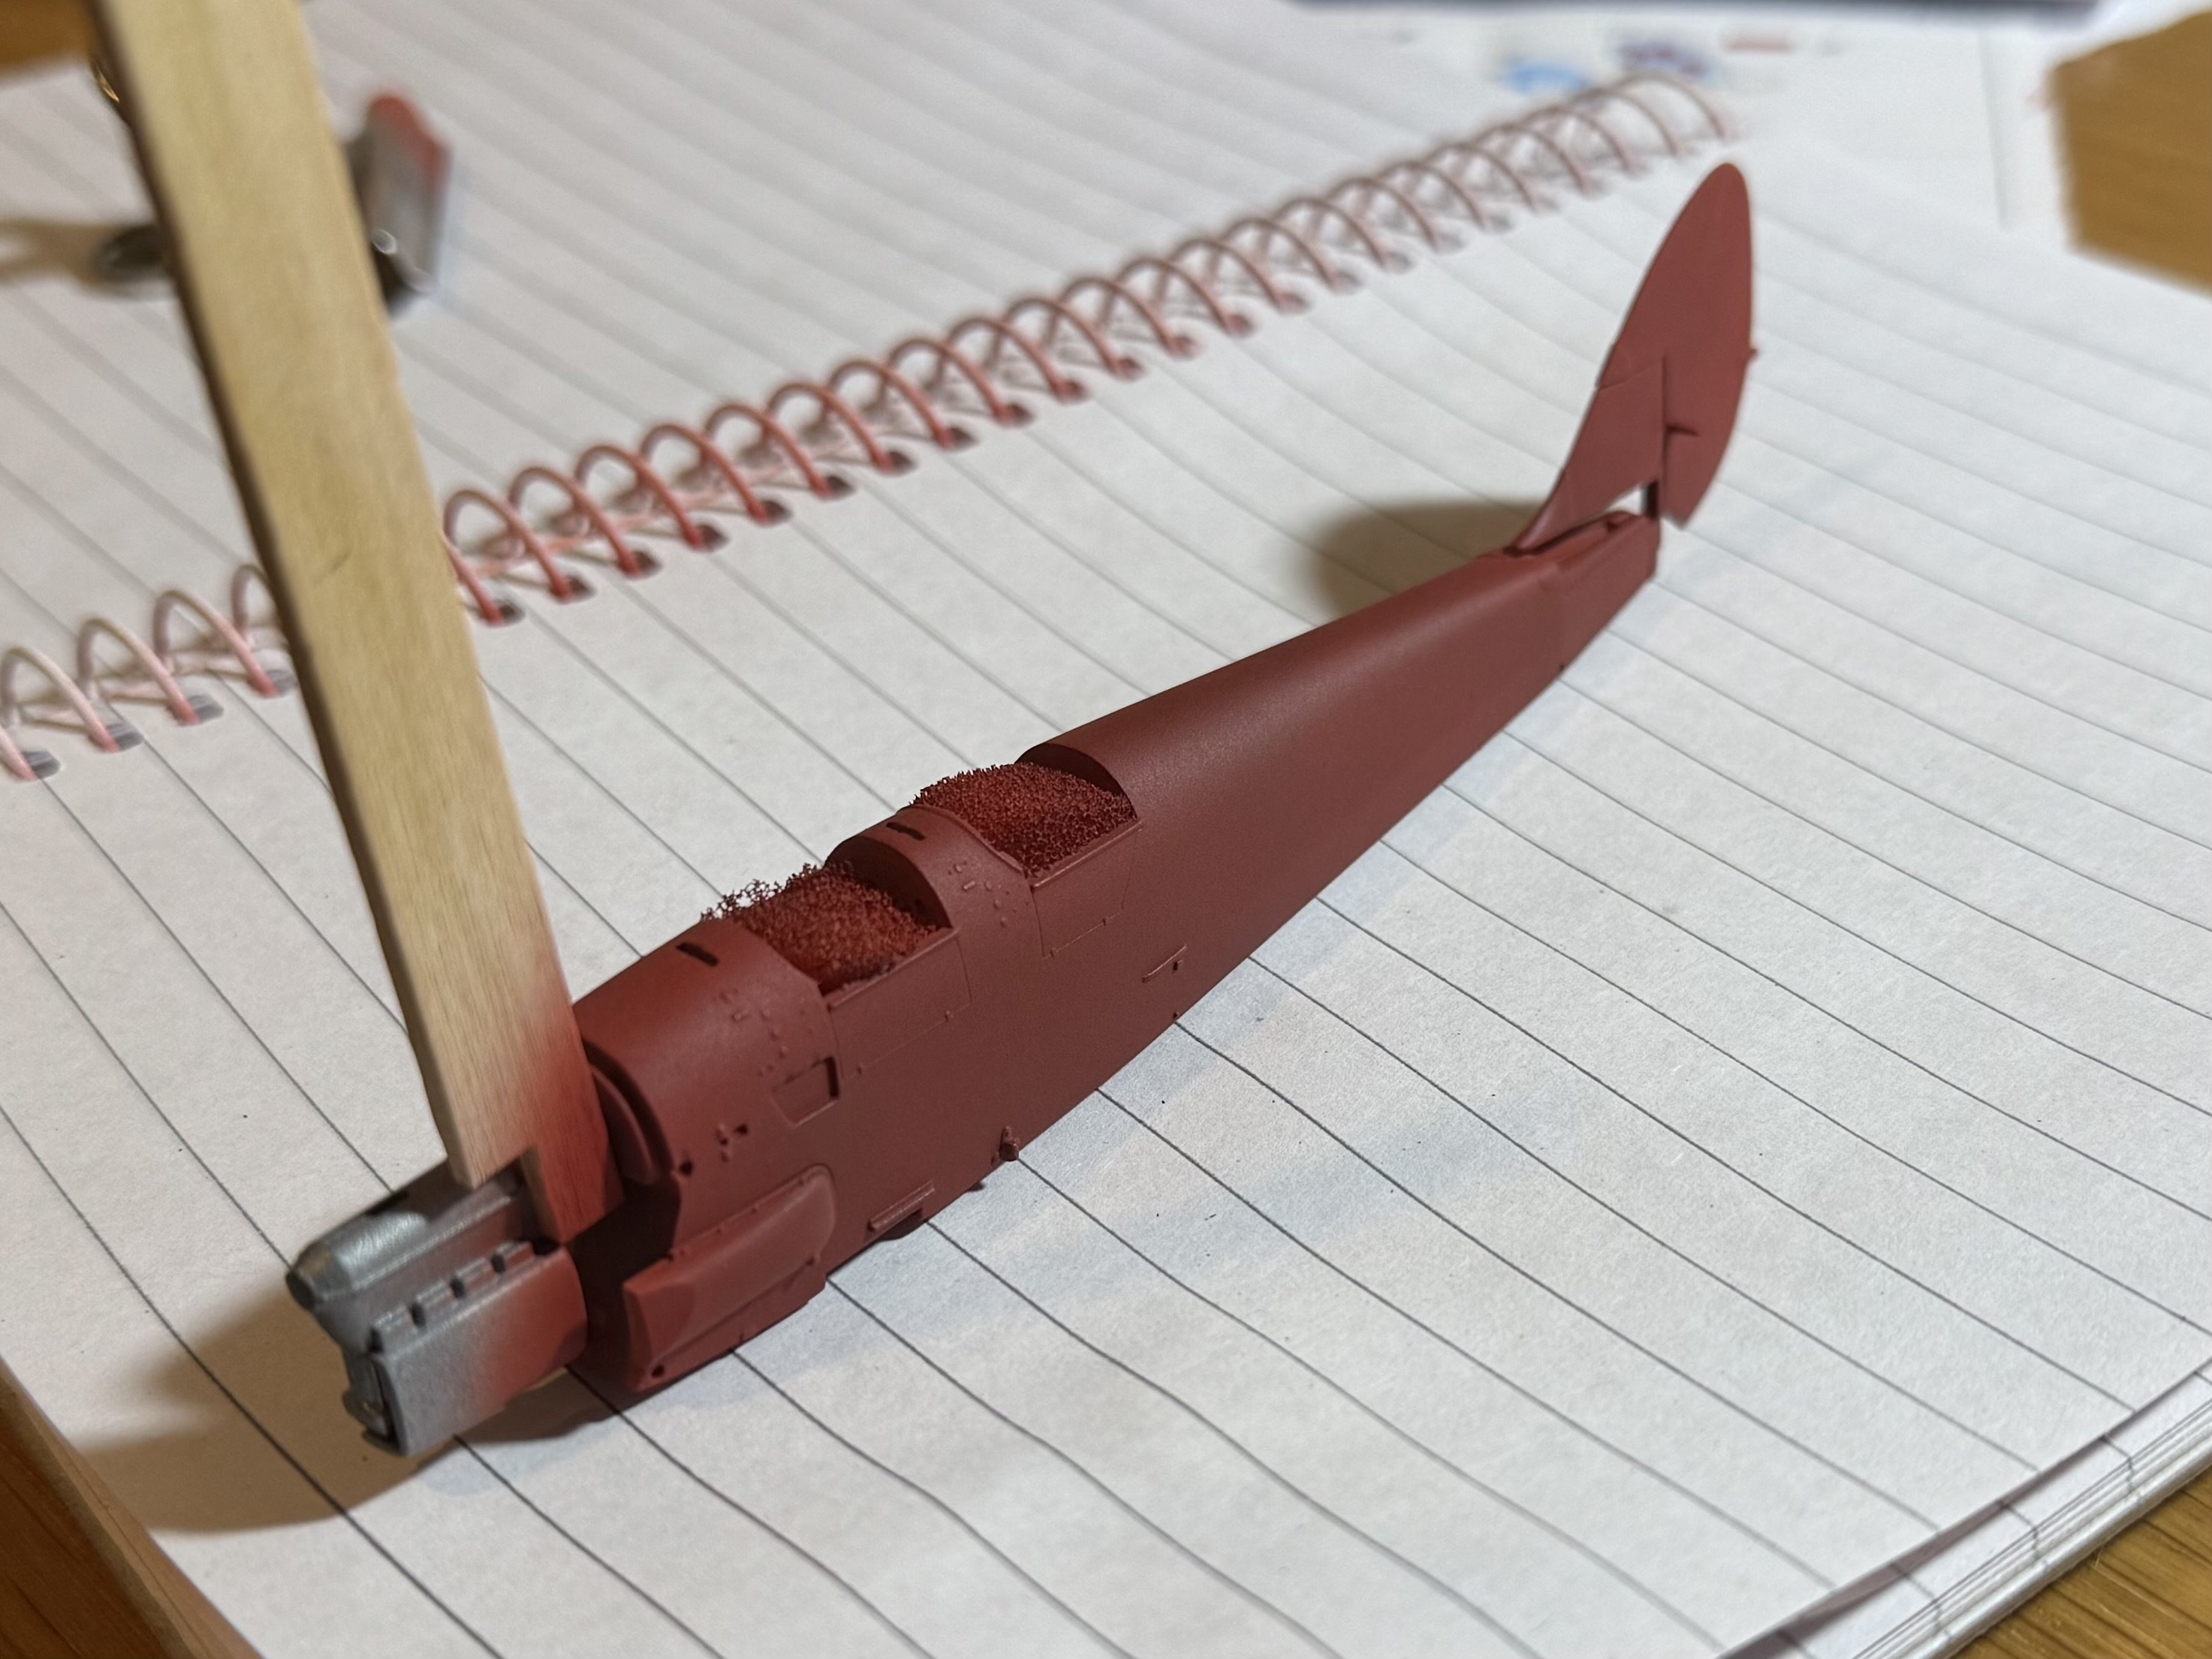
So I’m still waiting to get this file sorted and then send it to a printing place to print and then see how well home made decals go. But in the meantime time I started on the chipmunk that is the second aircraft I’m making for them. Made quick progress over the last few weeks and then went on a few weeks holiday, so was good to relax and recharge. tonight I put the primer on. So over the next few weeks can do the paint job which I’m still waiting on photos so I can see some details but pretty sure it’s will be grey with a black nose area and of course its own custom decals! Might be another few weeks before my next update. Hopefully these decals get a move on… which is up to me!


- 49 replies
-
- 14
-
-
-
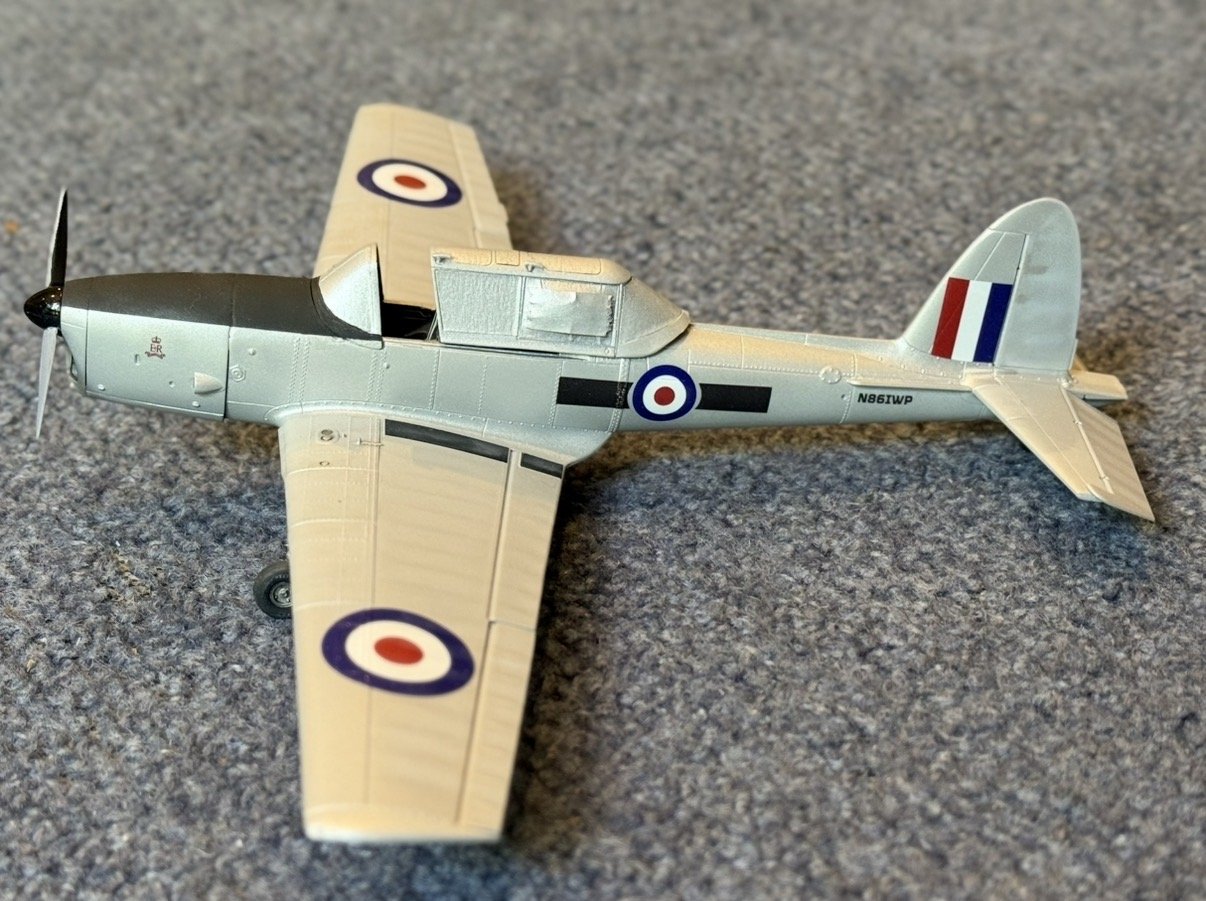
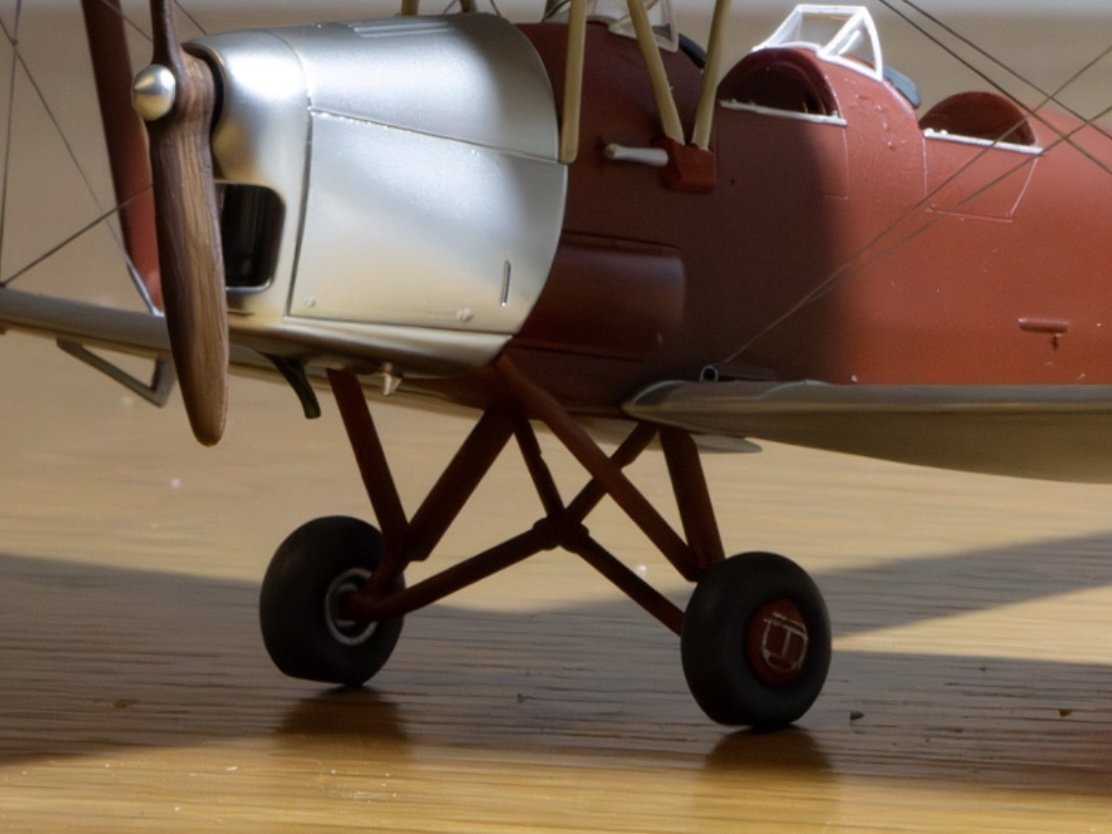
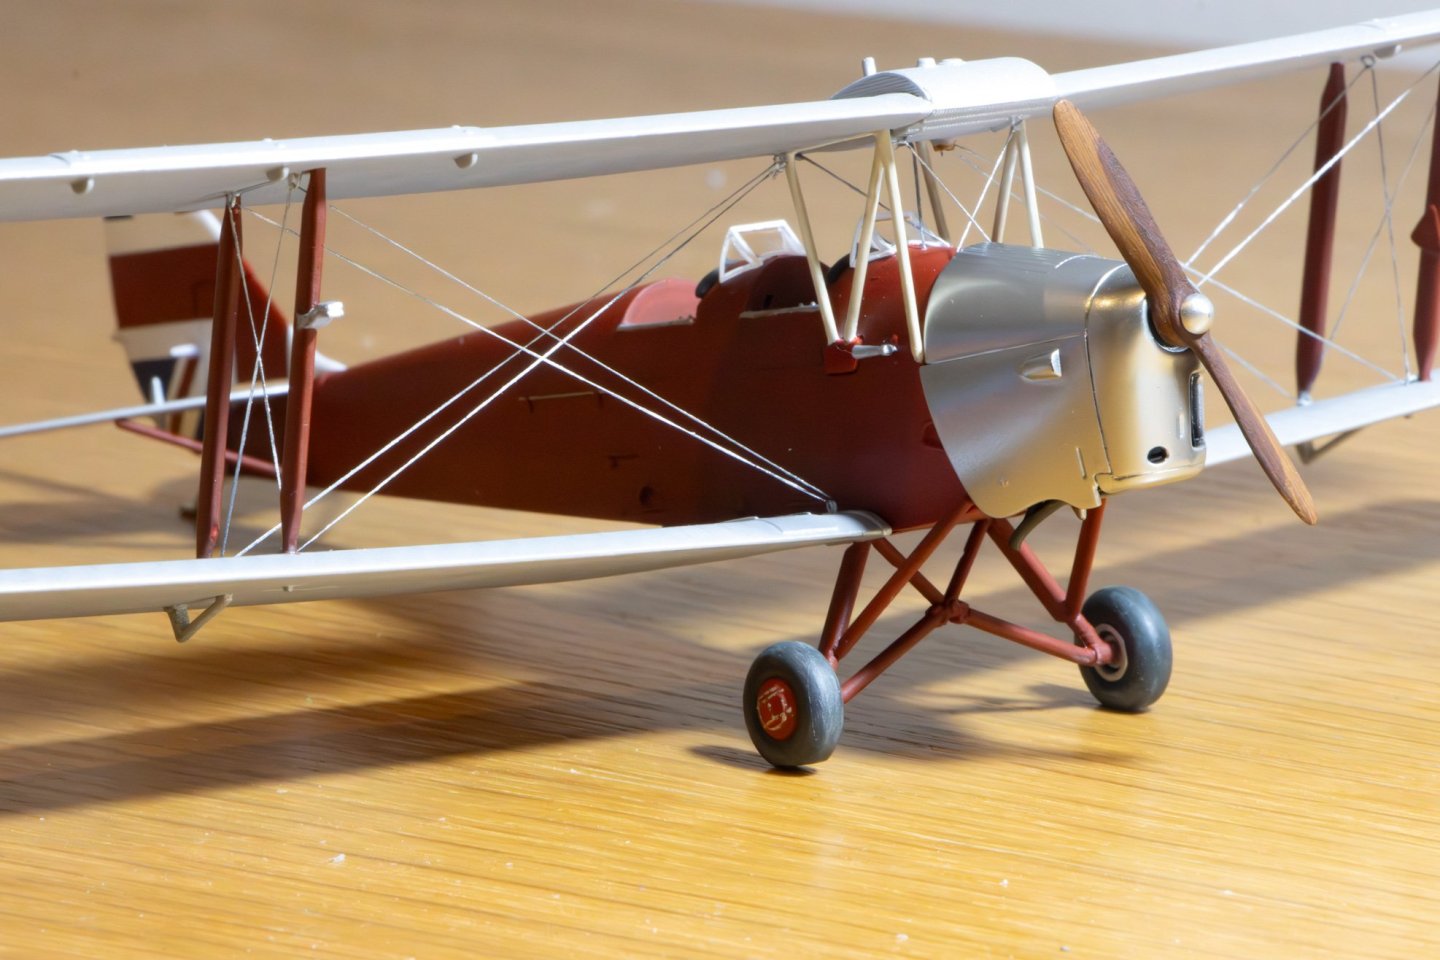
One thing I have been able to fix is the flat spot on the wheels. It seems to be set up for being level and not sitting on the ground which seems abit odd. So I sanded them down alittle and added some filler at the front and touched up the paint and now it sits perfectly flush.
- 49 replies
-
- 13
-
-
Hey, just doing the finishing touches on the decals. I have a few different types of decal paper but have to do the design work at a friend’s place and it’s taking awhile to get it sorted and life happens sometimes so it’s just waiting. After that’s done I’ll need to find a place to print it. I tried making my own stencil as I’d prefer to paint them on, but it’s almost impossible to make crisp lettering stencils free hand even with a brand new blade in the knife. So decals it will be! I’m so close but it’s really starting to drag out now! Hopefully get some progress in the coming weeks! it will get completed as someone is waiting for it, but they were told my one condition was there was no time limit as it’s a hobby for me. After this I’ve got the chipmunk to do and then I’m thinking about trying my hand at a wooden ship.
-
Lt. Biggles reacted to a post in a topic:
USS Essex 1799 Frigate by rlwhitt - FINISHED - Model Shipways - 1:76
-
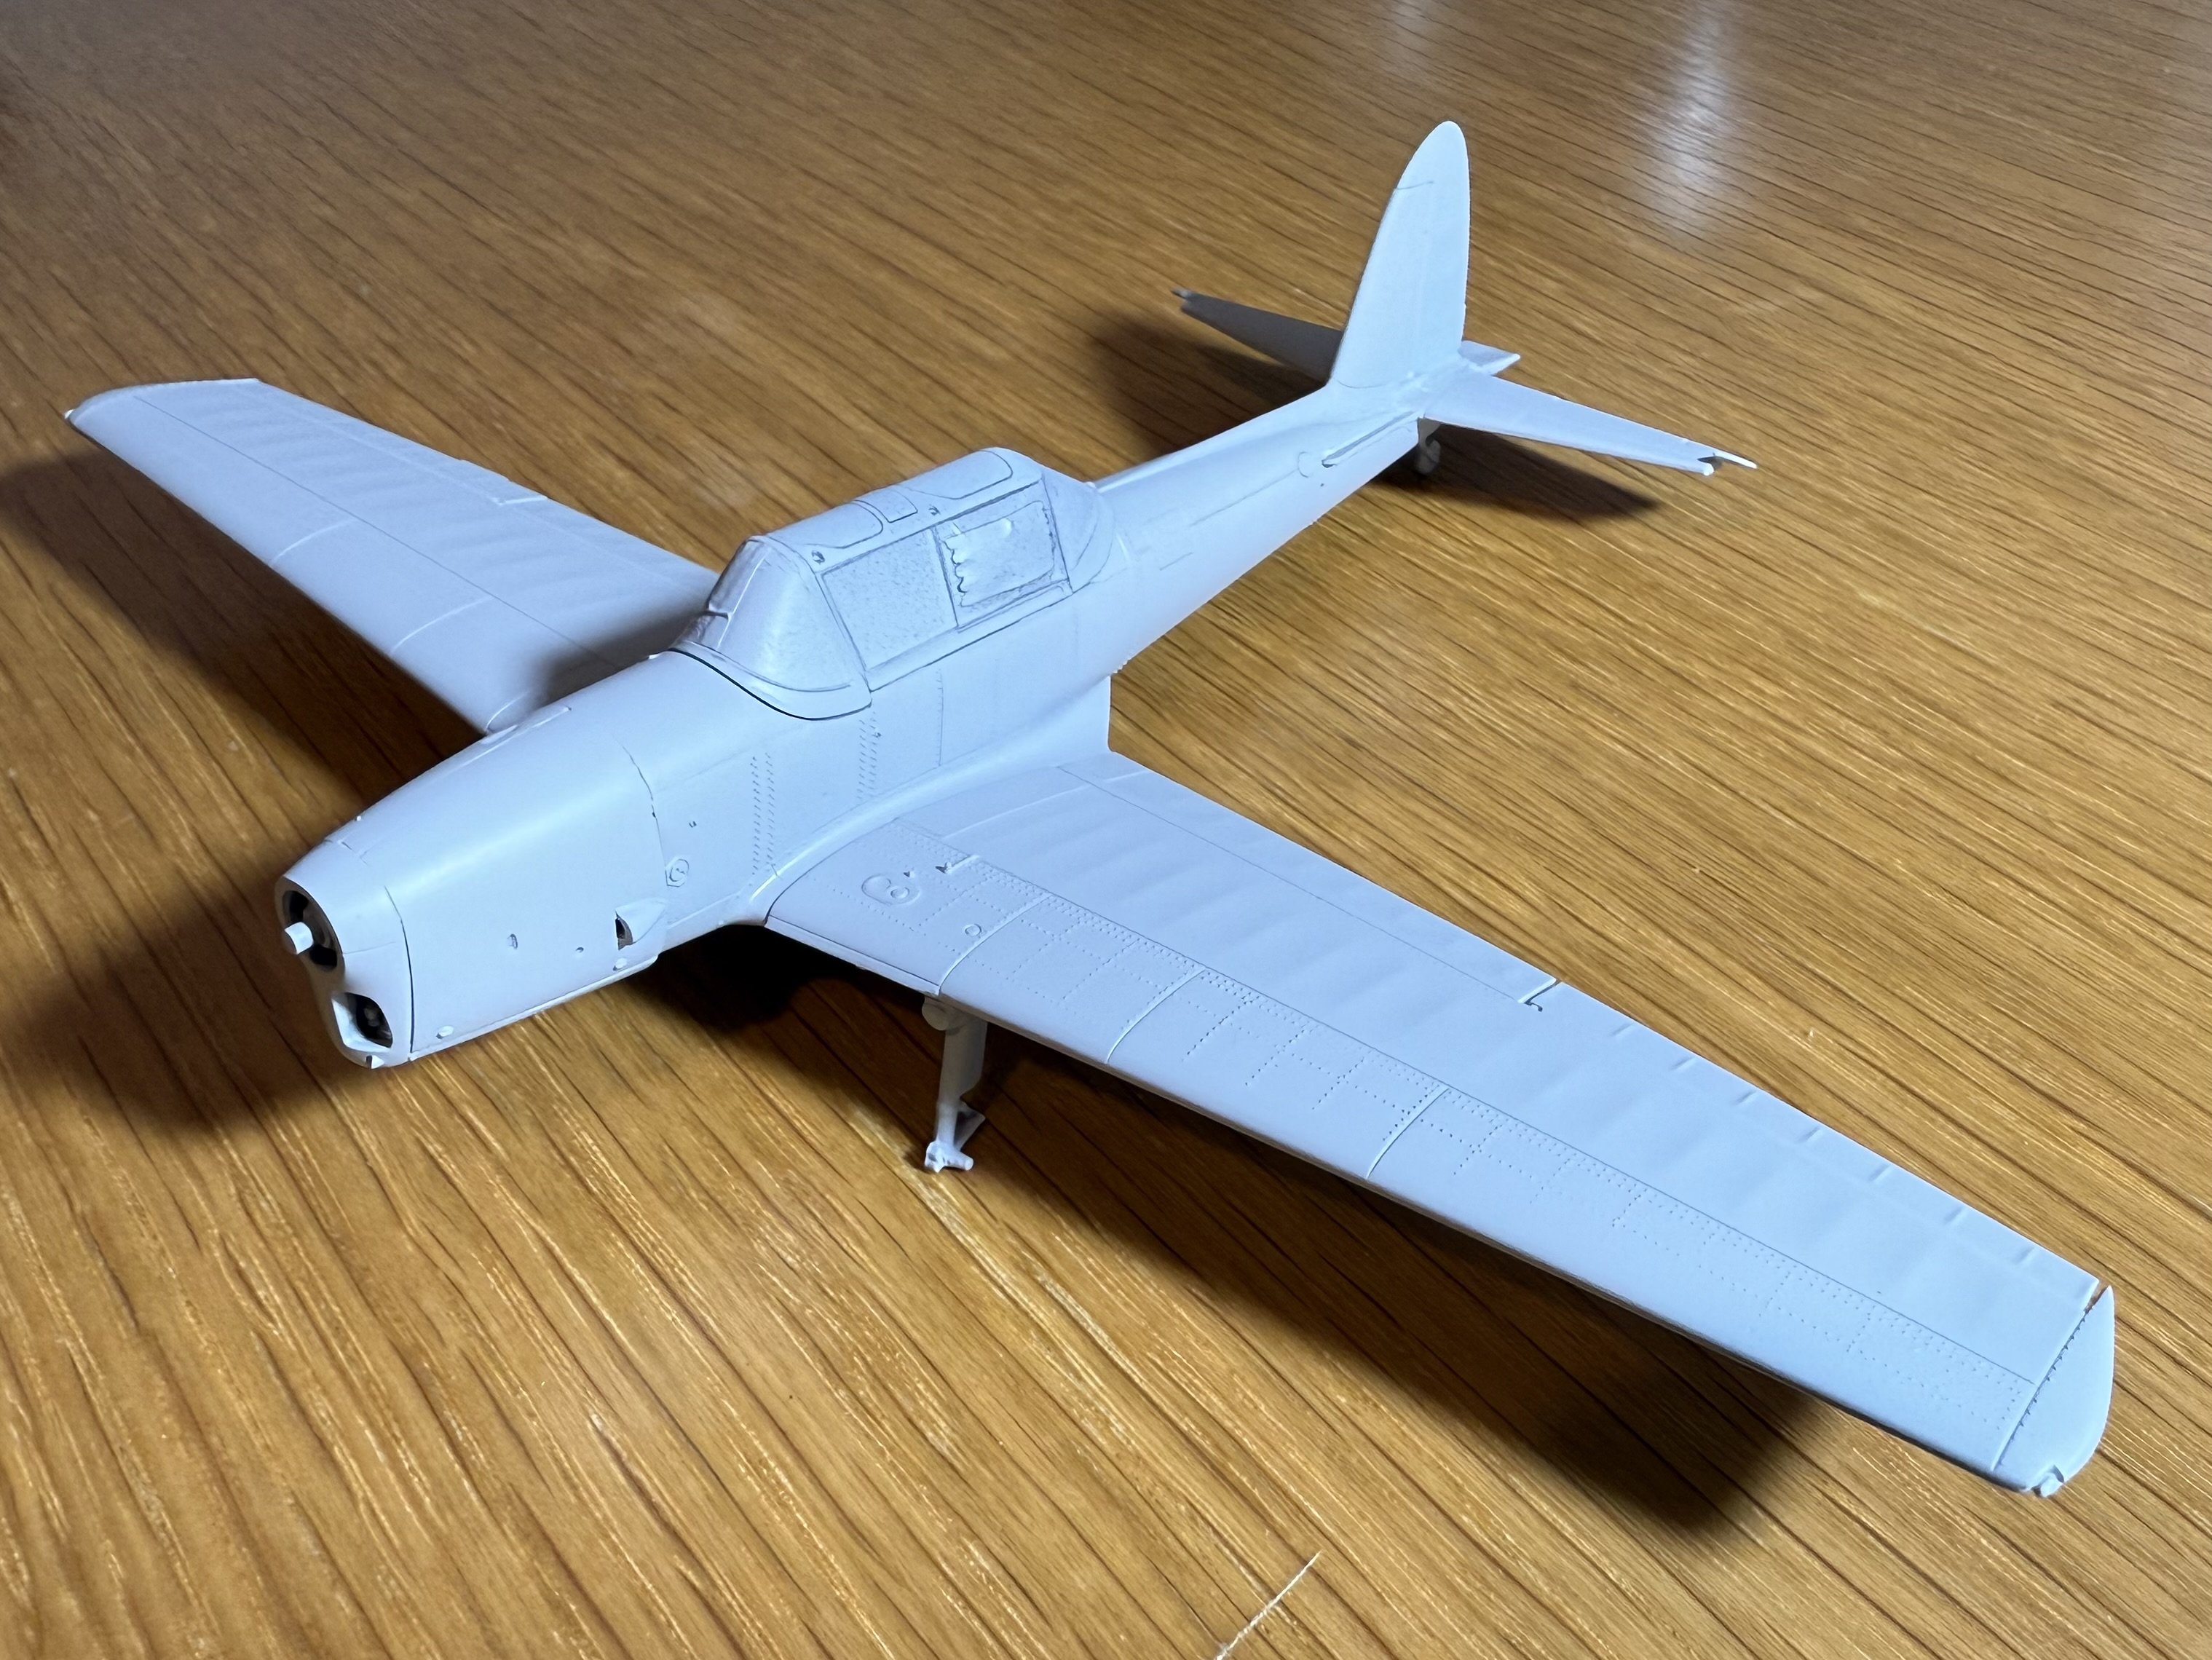
Haven’t been able to do too much work on it lately but slowly it’s come together. Did the wing rigging and used diluted paint to bring the colour to what’s needed. Paining it did thicken them but it’s ok, also painting the rigging showed the twisting a lot more too which surprised me. I am just waiting on the decal paper and then need to make a rego stencil, put on the elevator and rudder control cables. Which will remain black. And then try to decide if it should get a light oil wash. I’m undecided there yet… Took a few close up pics, I find they really bring out the little defects. What looks great to the eye can look horribly messy on a photo! One thing that shows up is the kits flat spot on the wheels don't line up with the ground. So I’ll have to sort that out.
- 49 replies
-
- 18
-
-
-
Lt. Biggles reacted to a post in a topic:
De Havilland Tiger Moth and Chipmunk by Lt. Biggles - FINISHED - Airfix - 1/48 - PLASTIC
-
Thanks for the options! Perhaps I can cut out my own stencils on Tamiya tape carefully for the rego. I looked at your link but they are over booked so shut down till they have caught up! I’ll order some super thin decal paper and print the nose decal and “no step” one. But the rego might be best to try paint! I’ll print out lots of different sizes till I get the right size and then can cut them out. I think I’ve got a good plan now!
-
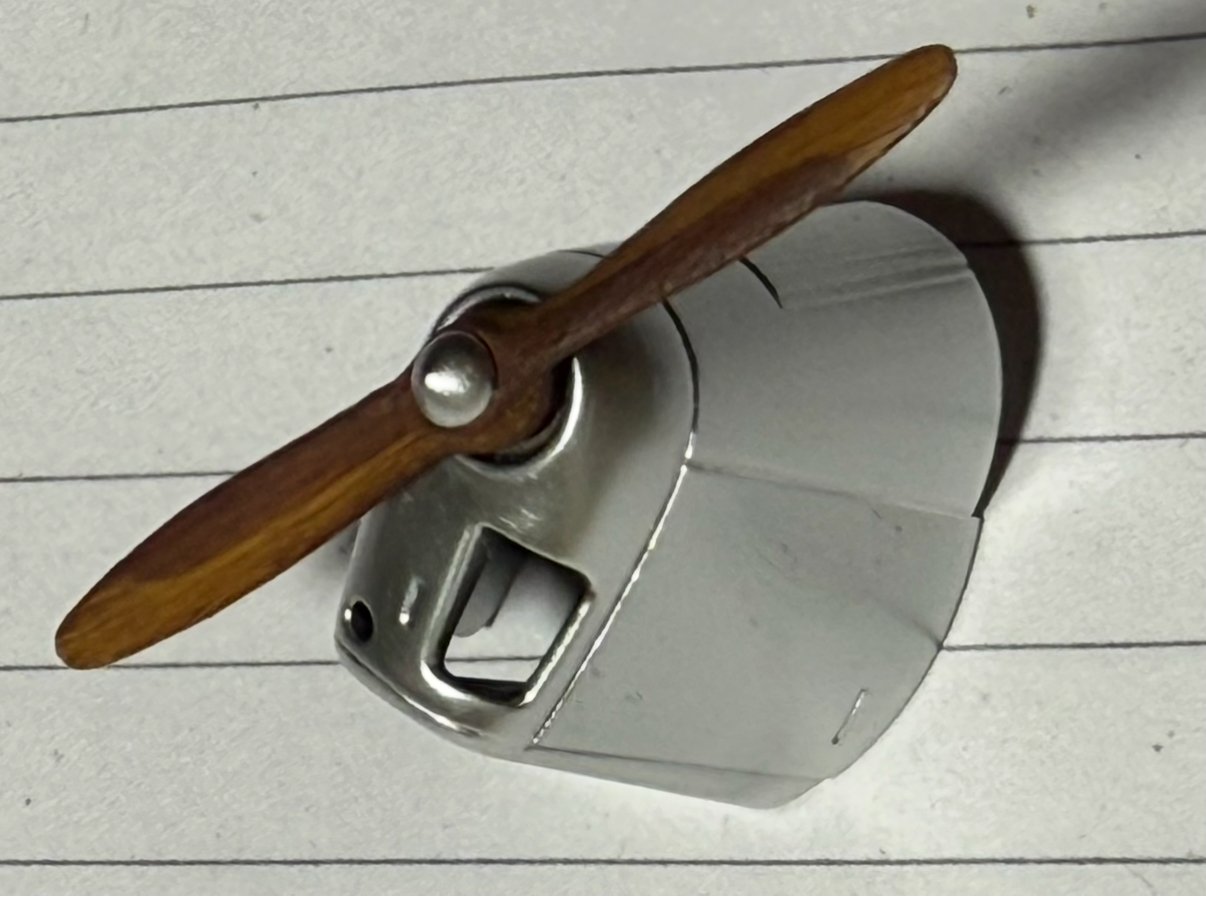
For the engine cowl I used the Super Metallic 2 paint from my P-51d build. Either super fine silver or Duralumin. Both are great looking colours! It stands out well against the silver and white dope mix on the wings. Hard to take good pics of it but it looks the part so I’m happy. Everything is coming together now! Next lot of pictures will be with it all together but before the rigging! Only the rigging on the nose I’m not sure how I’ll attach to the fuselage just in front of the windshield. Maybe I’ll drill tiny holes and hope I don’t smear CA glue everywhere while trying to get the ez line in the hole before the glue dries!!

-
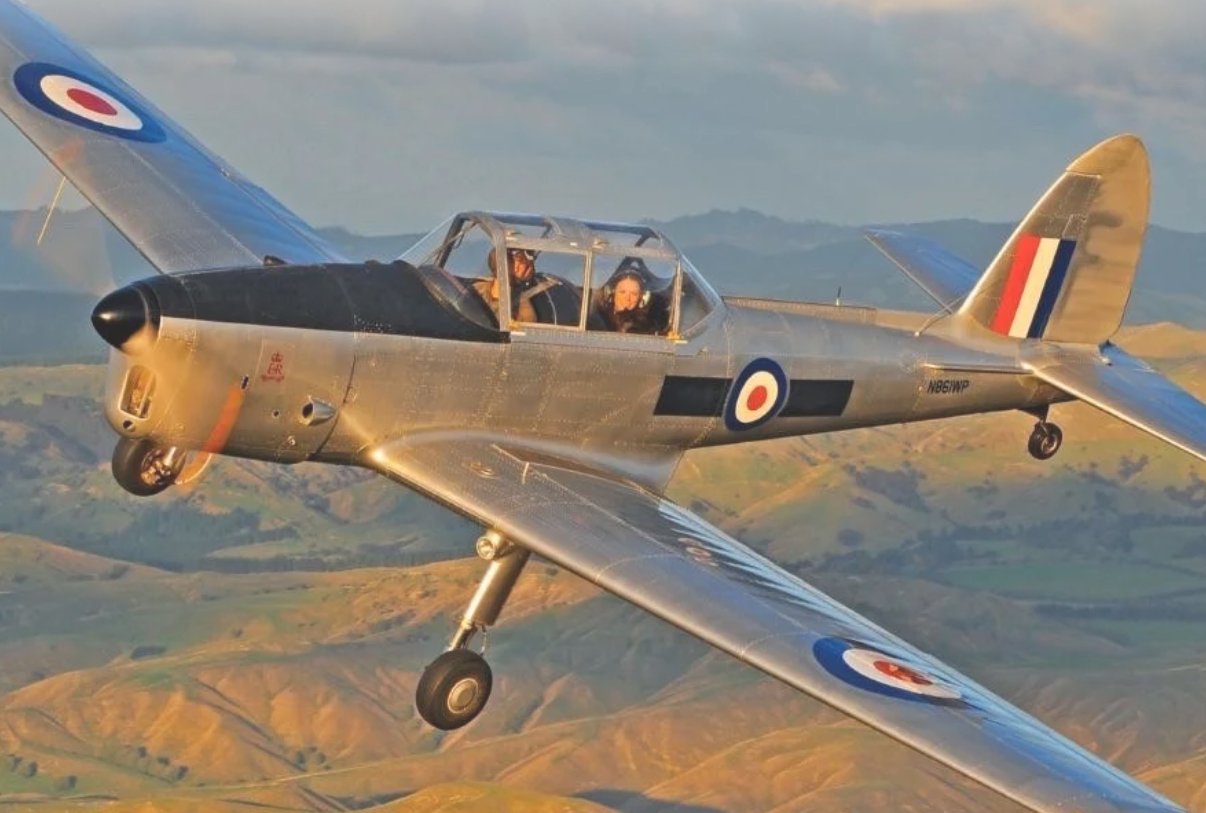
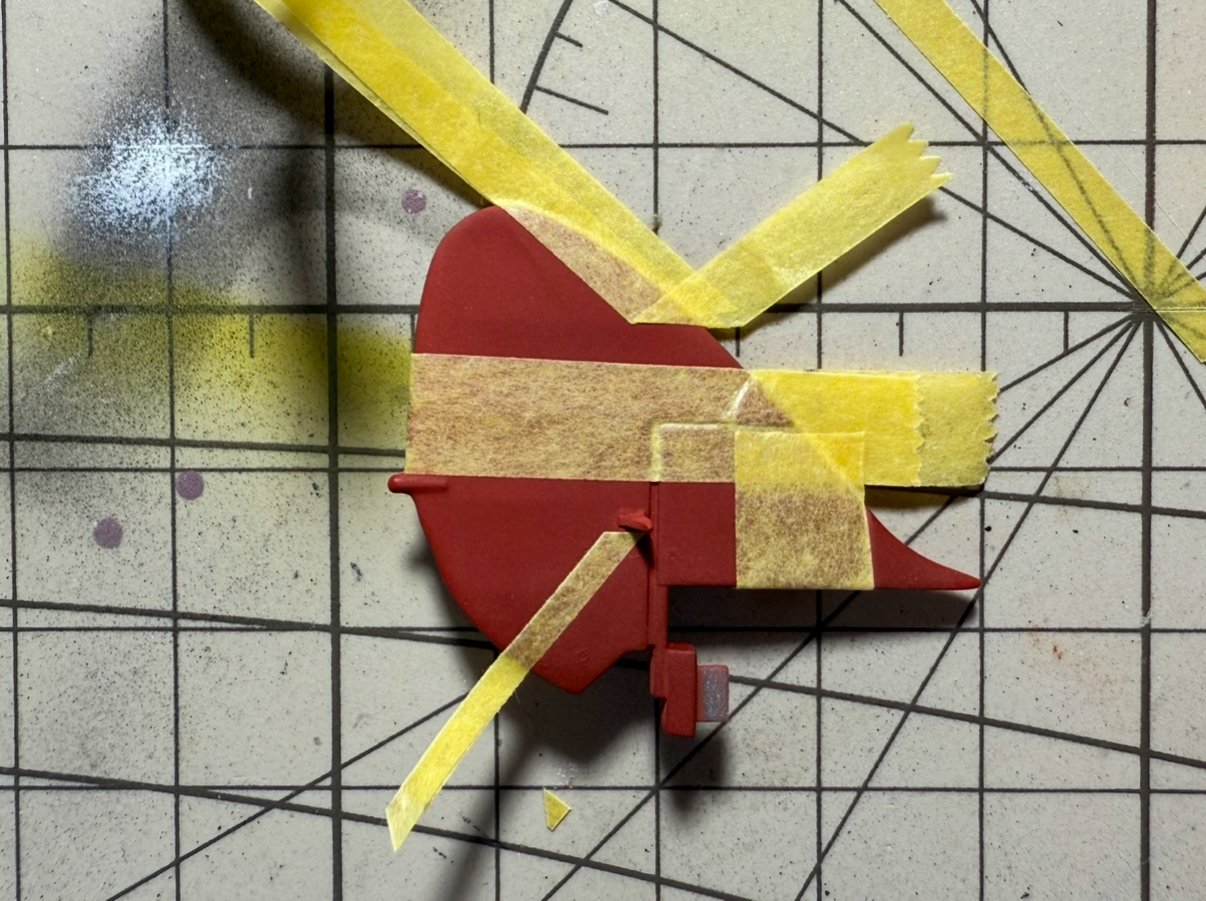
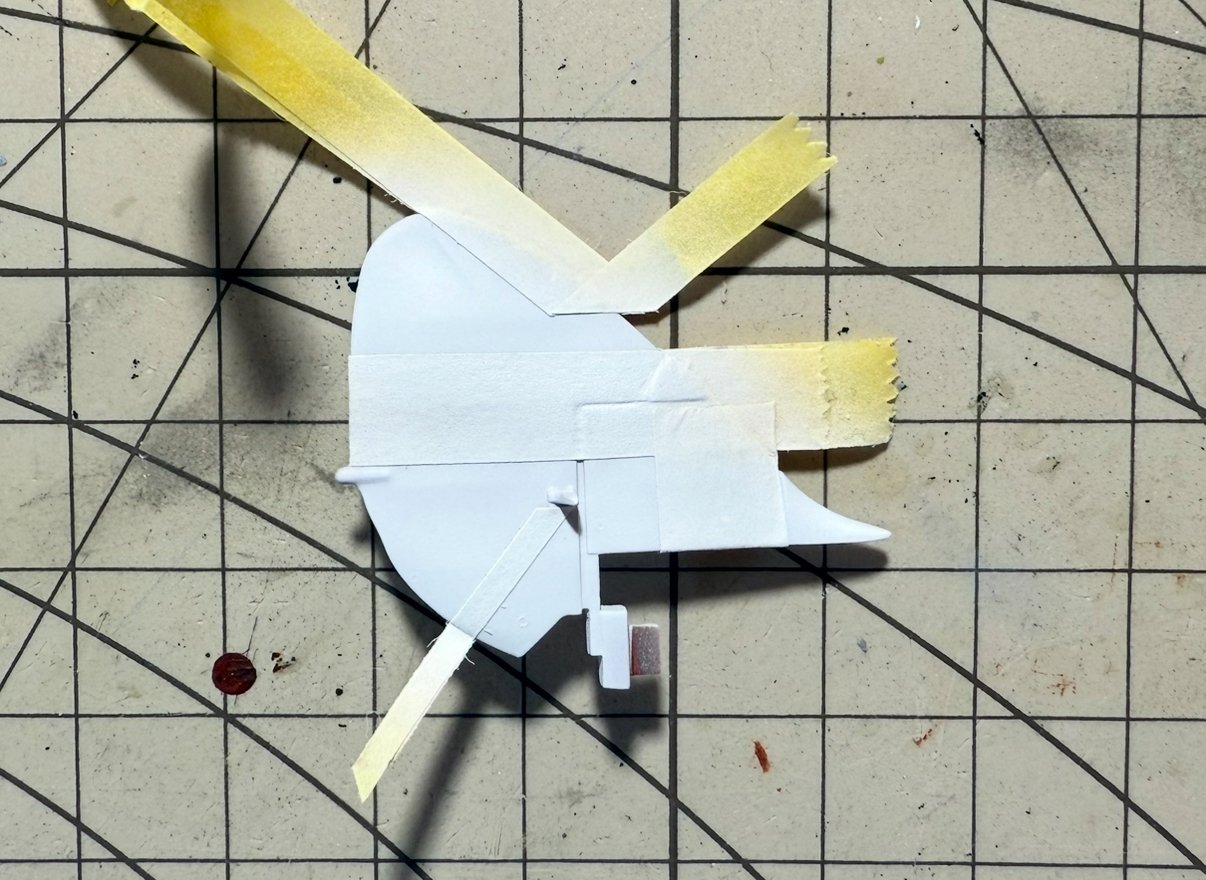
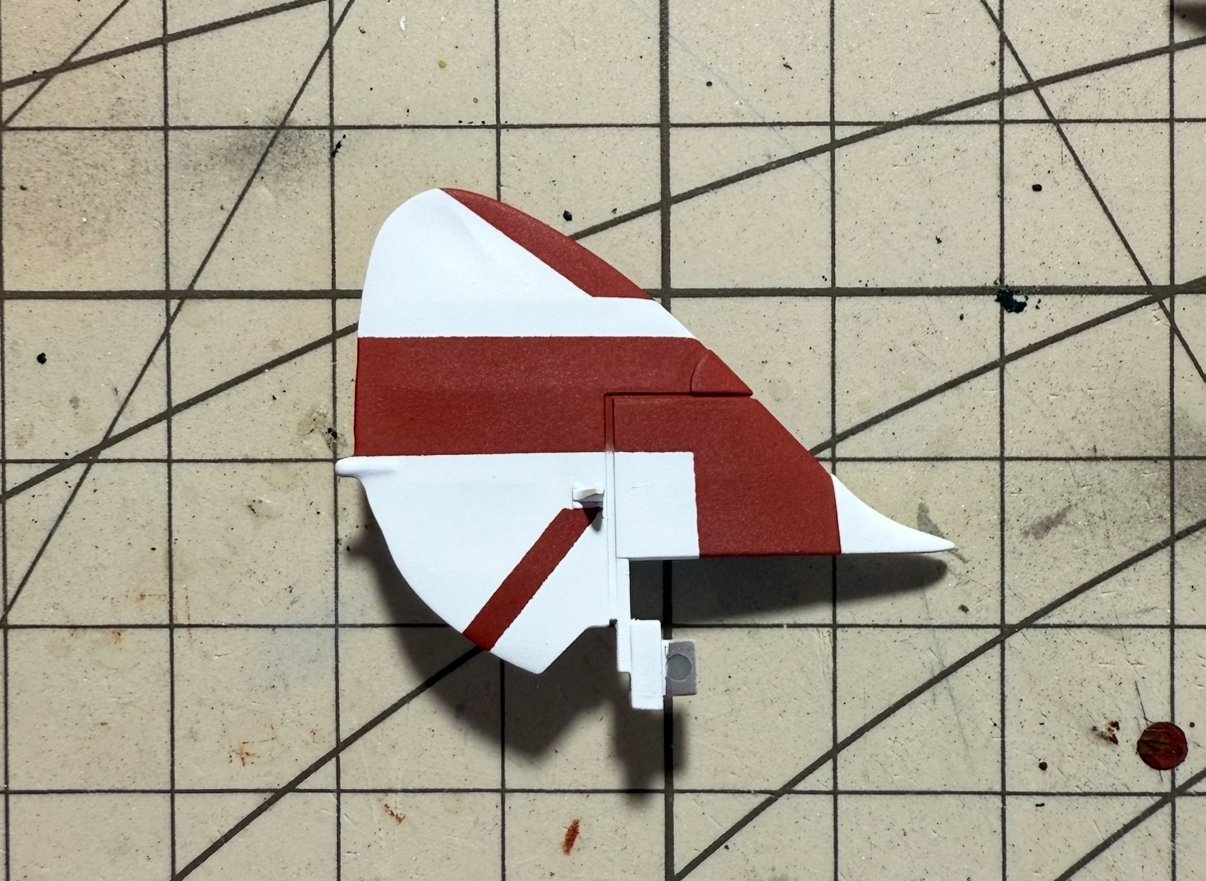
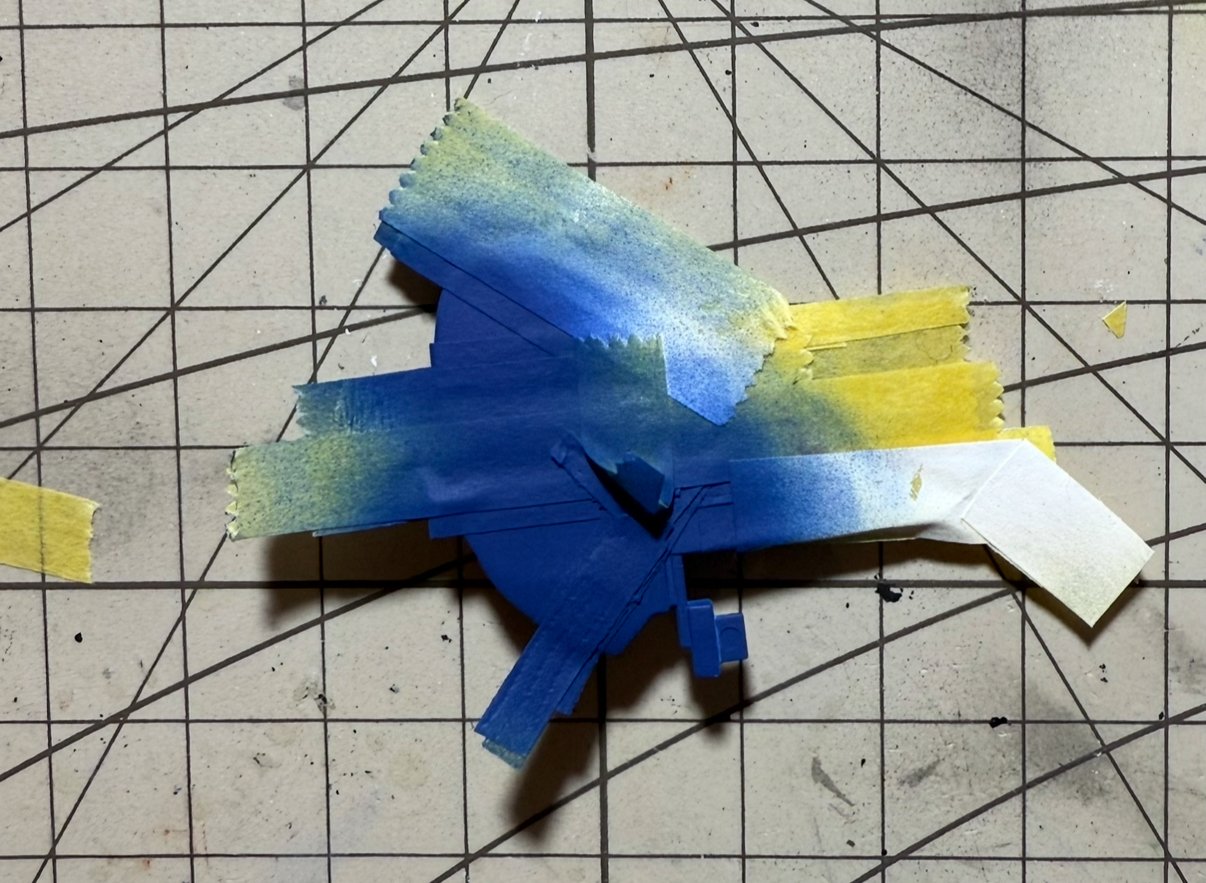
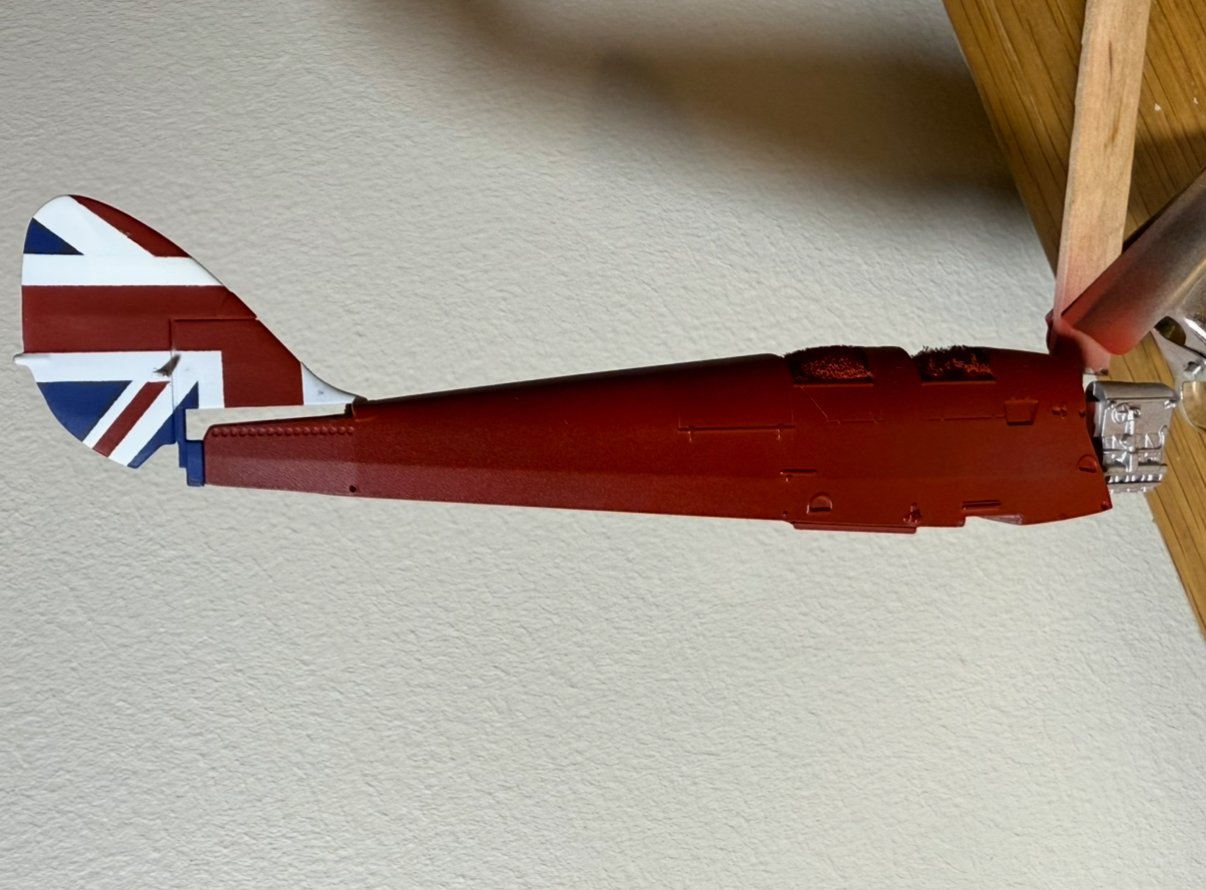
Managed to have some spare time so got into the Union Jack on the tail. Lots of taping. I had the reference picture on my computer and made is small till it matched the size of the real one. Then used a ruler on my screen to measure the colour bands thicknesses and cut tape to size. Then managed to somehow put a white finger print on the red.. so will need to touch that up later. It’s hidden on the other side haha. A few places need a touch up but for just taking the tape off it came out pretty good! Will do the job nicely I think!

- 49 replies
-
- 13
-
-
-
Lt. Biggles reacted to a post in a topic:
De Havilland Tiger Moth and Chipmunk by Lt. Biggles - FINISHED - Airfix - 1/48 - PLASTIC
-
Thanks, I’ve had a look around and will order some decal sheets made for aircraft models. Should be able to get the files sorted and vary the size slightly and the shade of colour so hopefully one of them is the right scale and get them printed at a print shop in town. Will be something new!
-
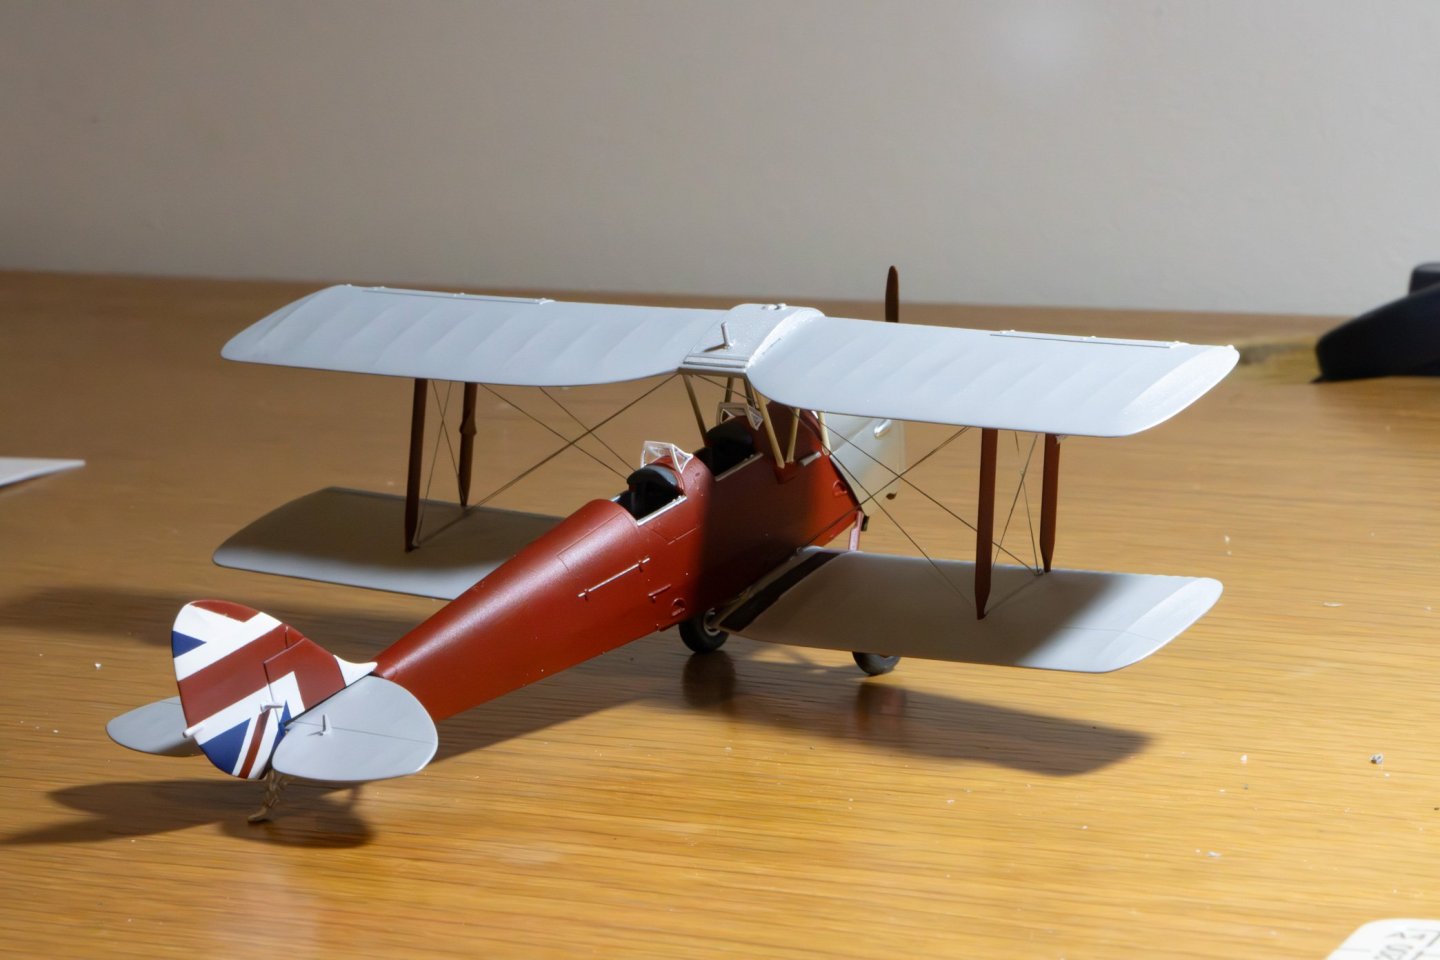
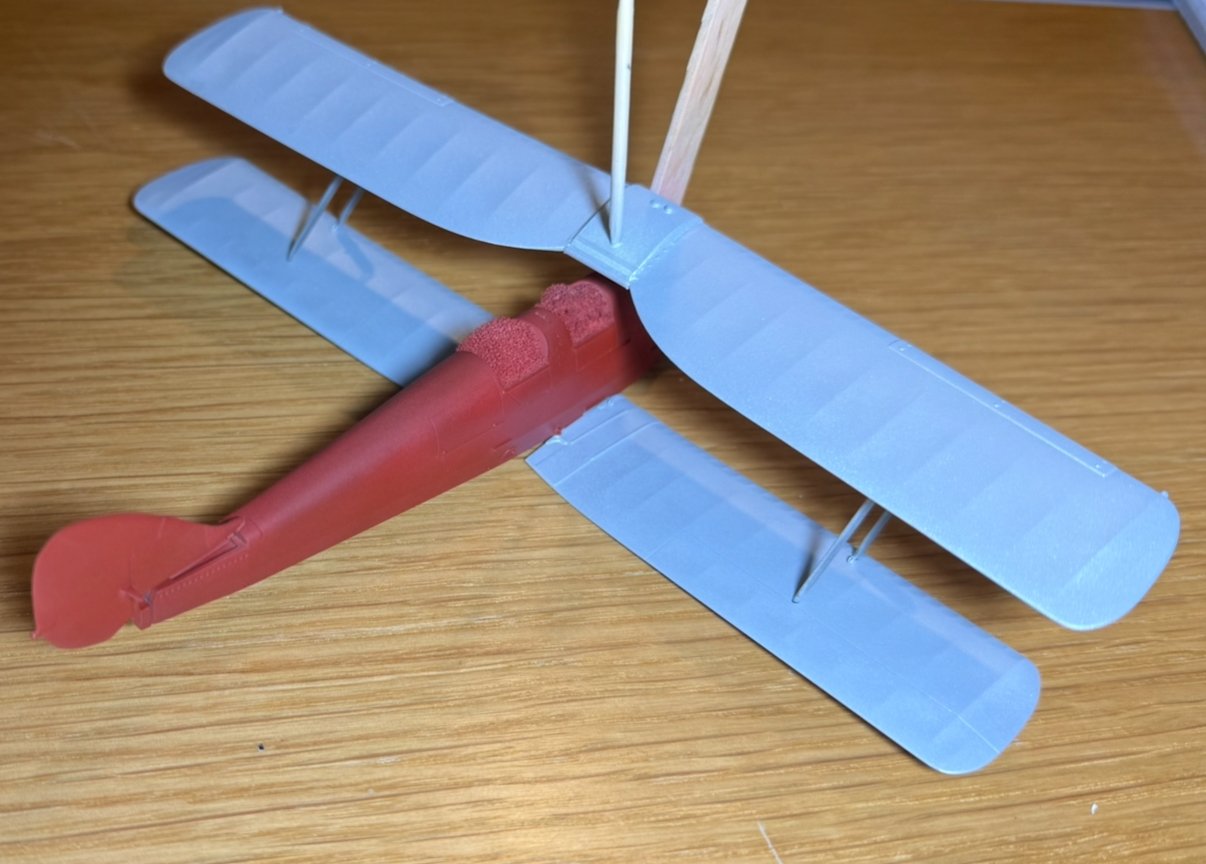
Heading off again this afternoon for a week so managed to sit down and get abit more work on it completed. Painted it straight red and then added abit of blue to bring it to a cherry colour. It’s abit of a challenge. The plane looks quite bright and I’m finding to get the right cherry colour comes at the cost of the brightness! So it’s the right shade of red in the sun now but I need to find a way to brighten it. I put a clear coat on it and that helped but still needs to brighten up. Maybe I’ll do a light coat of red on top to try freshen it up and clear coat that. Maybe just shoot it straight down for shadowing effect. Or a lighter shade of blue. Perhaps add some white with the blue. Colour mixing is fascinating with shades and tints. Anyway I roughly put the wings on that I’ve painted so it’s starting to look like a plane! Once it’s all together I’ll give it a very light wash as it’s a fairly new paint job so it’s in great condition.

-
I’m starting to think ahead and wonder how I’m going to do the custom decals. i guess I can make/buy stencils and paint them on. Or send the details away for a company to print custom decals. I’ve a feeling this part is the trickiest part of the build! But if anyone has any ideas or knows a company that does them I’d appreciate the into and ideas. This one on the nose on one side will be tough as I’ll not be able to hand make a stencil at all so need it printed or laser cut. For the rego, worst case I could make my own stencil but it won’t be as crisp and nice as a professional one. These will either make the final result or bring it down a few notches. If there is a place that I can pay to print custom decals I’d go down that road
-
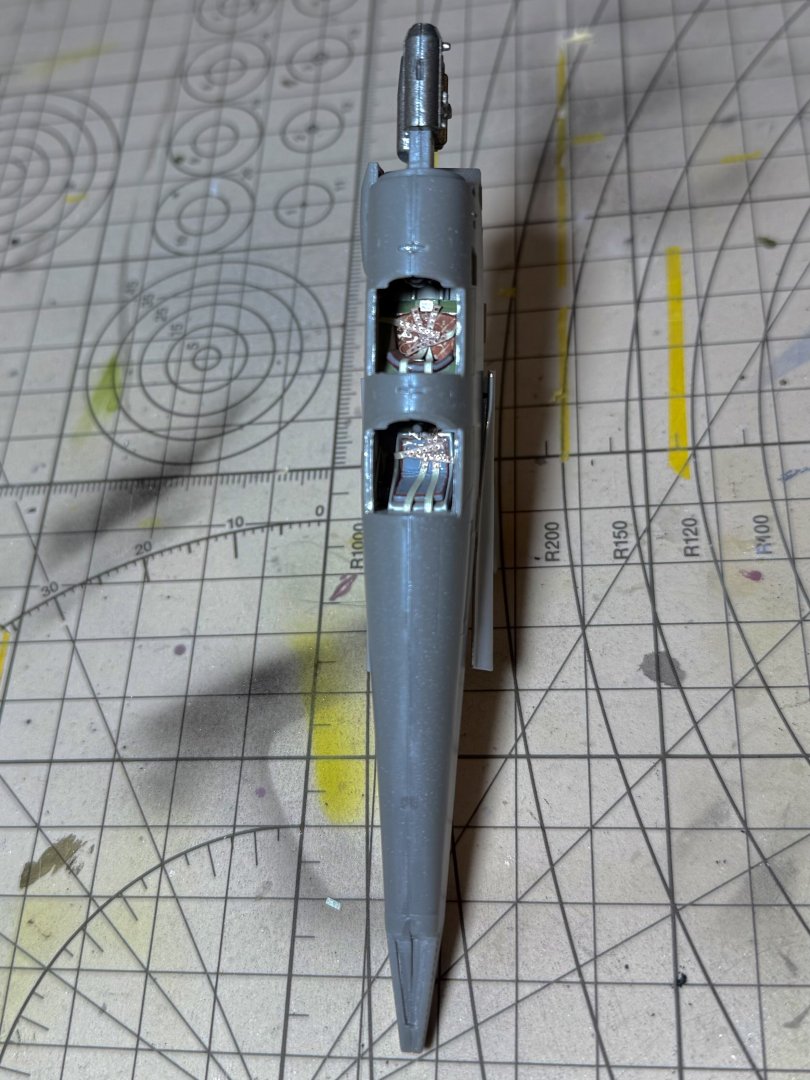
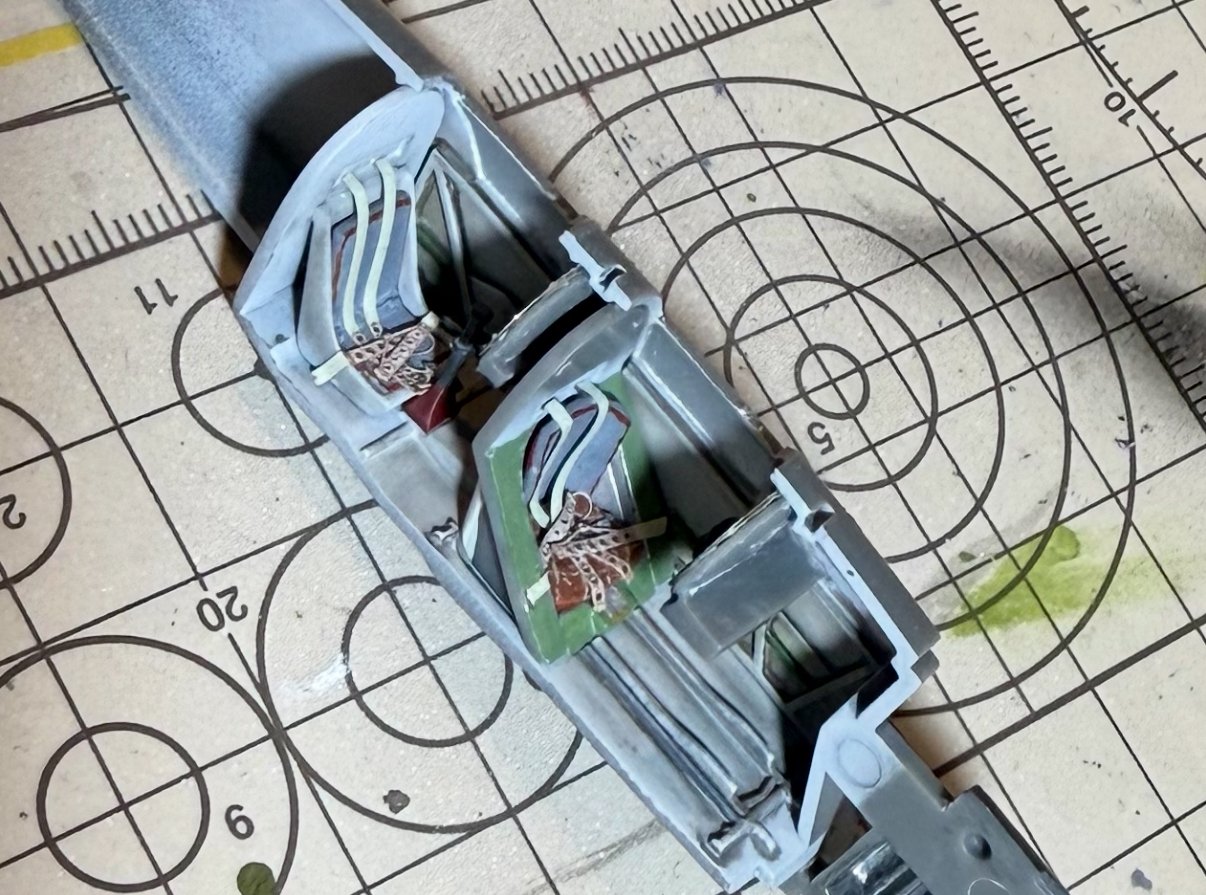
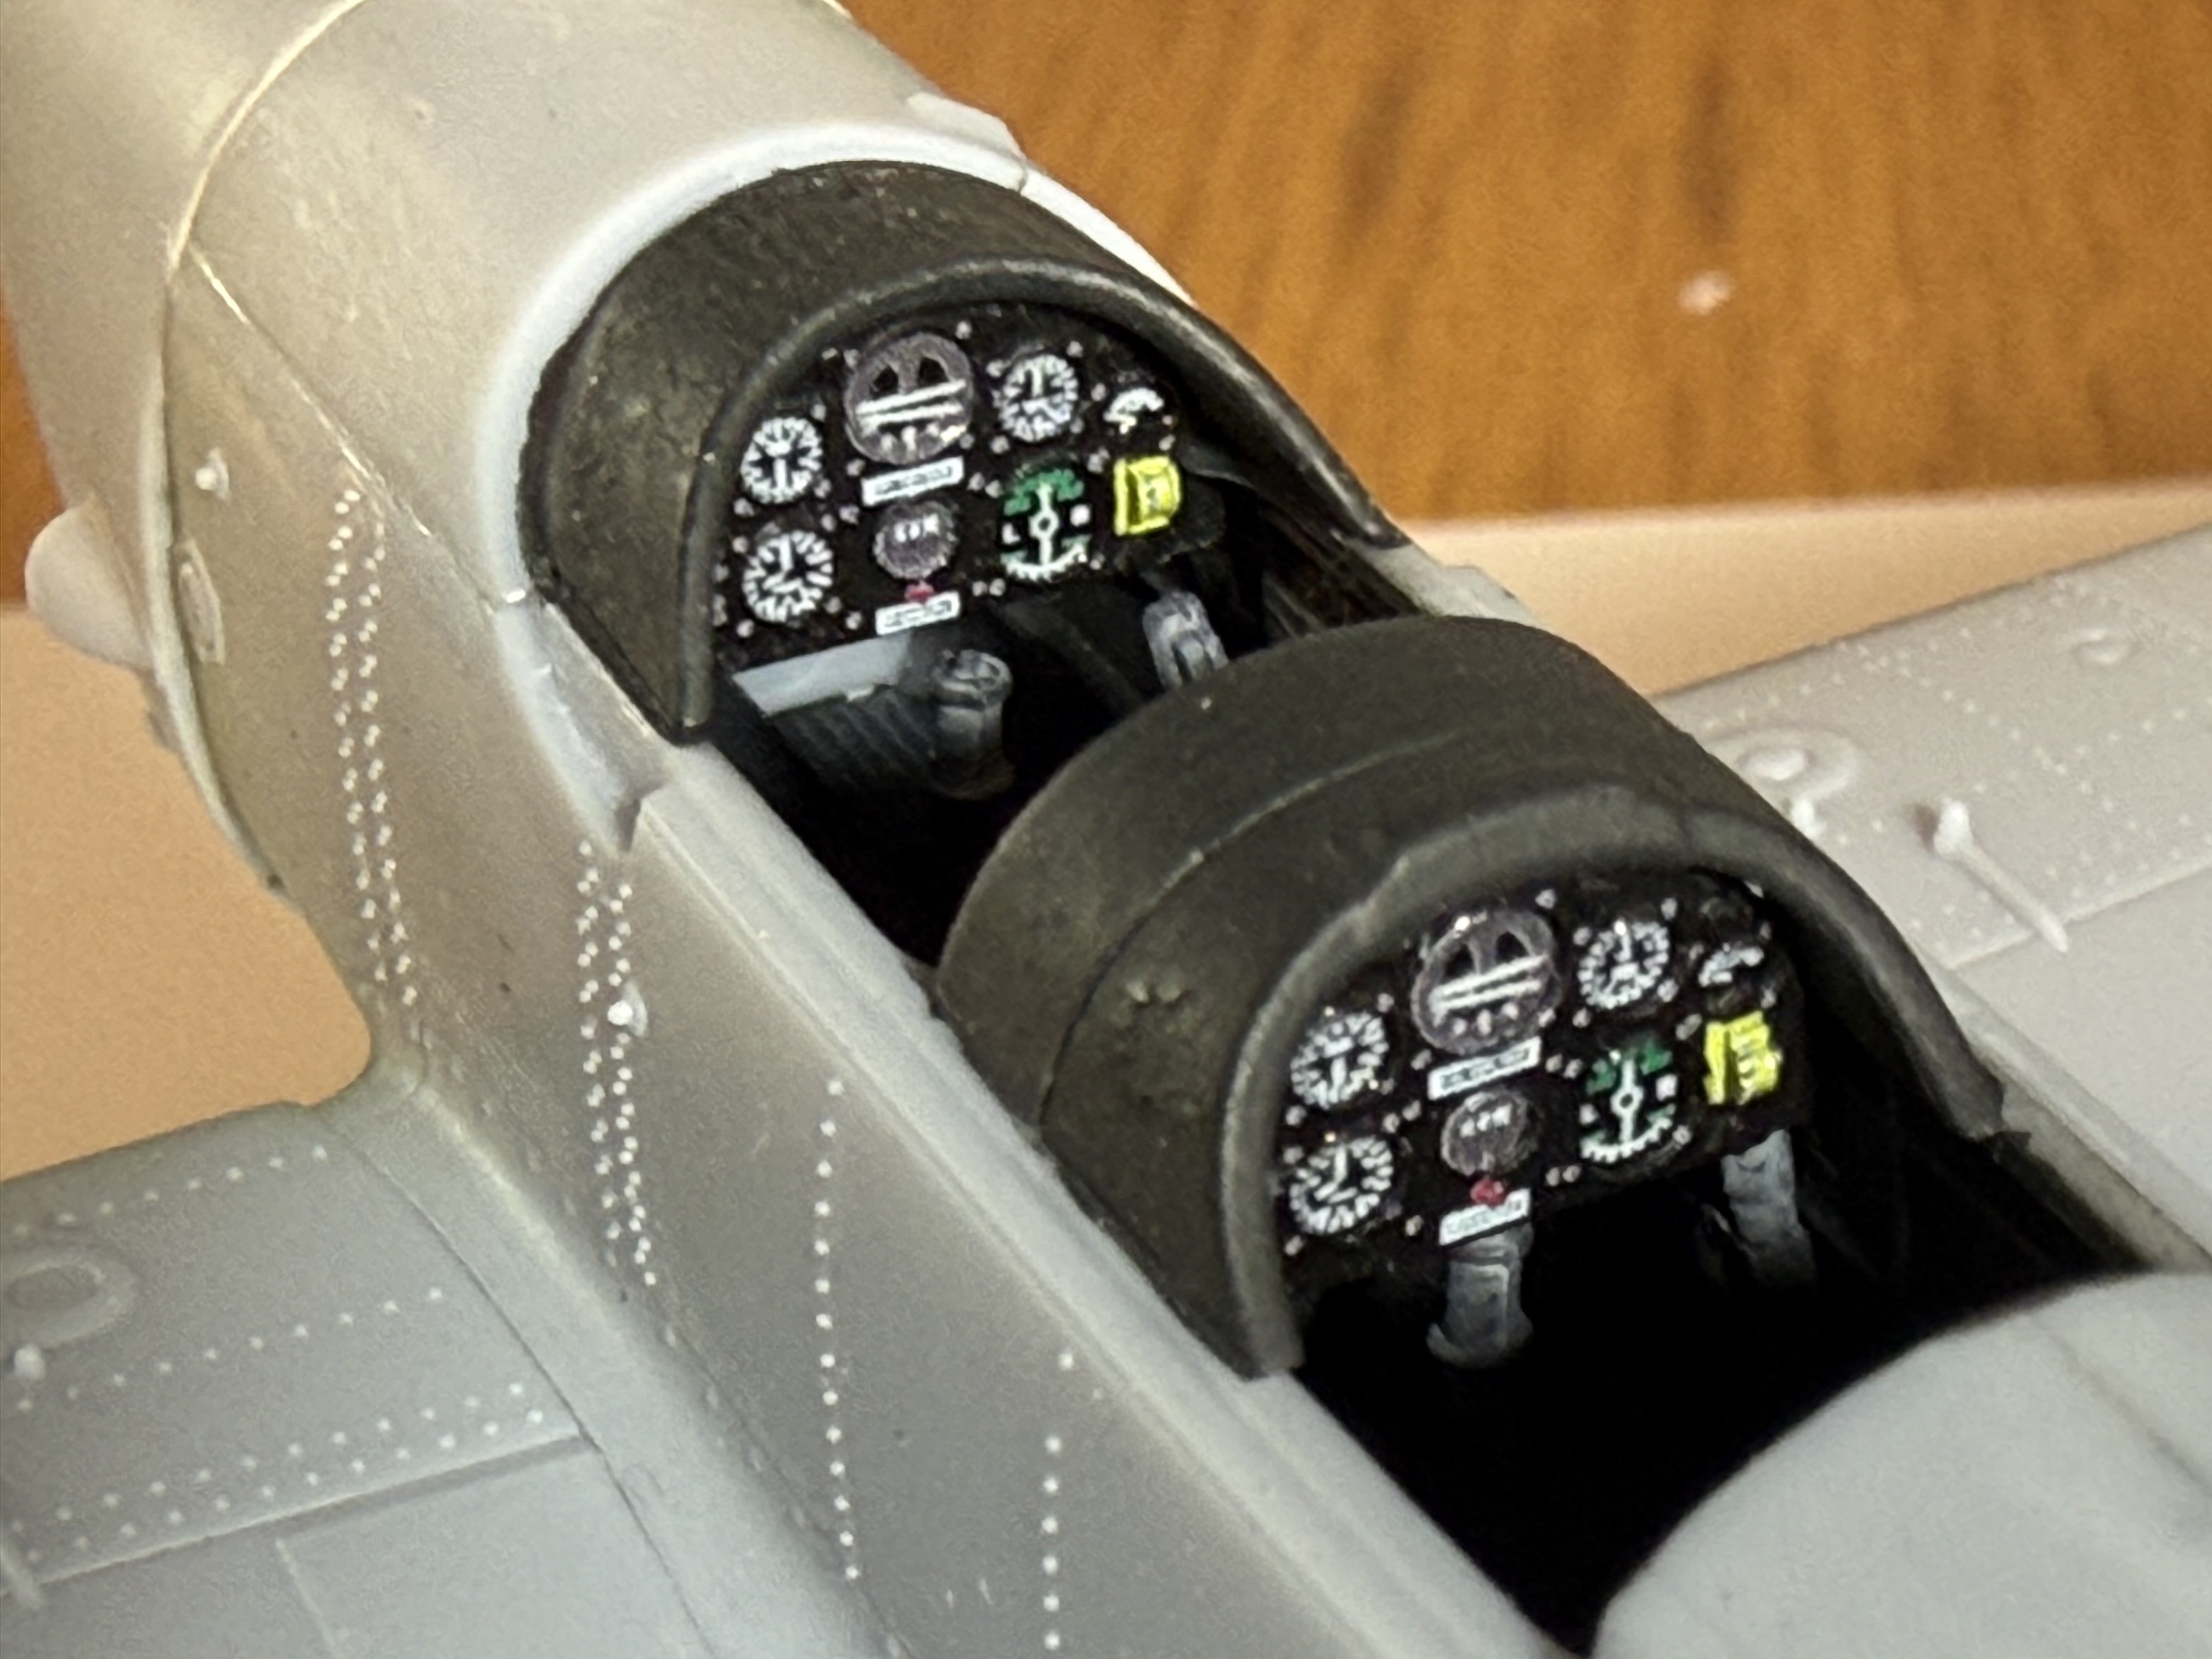
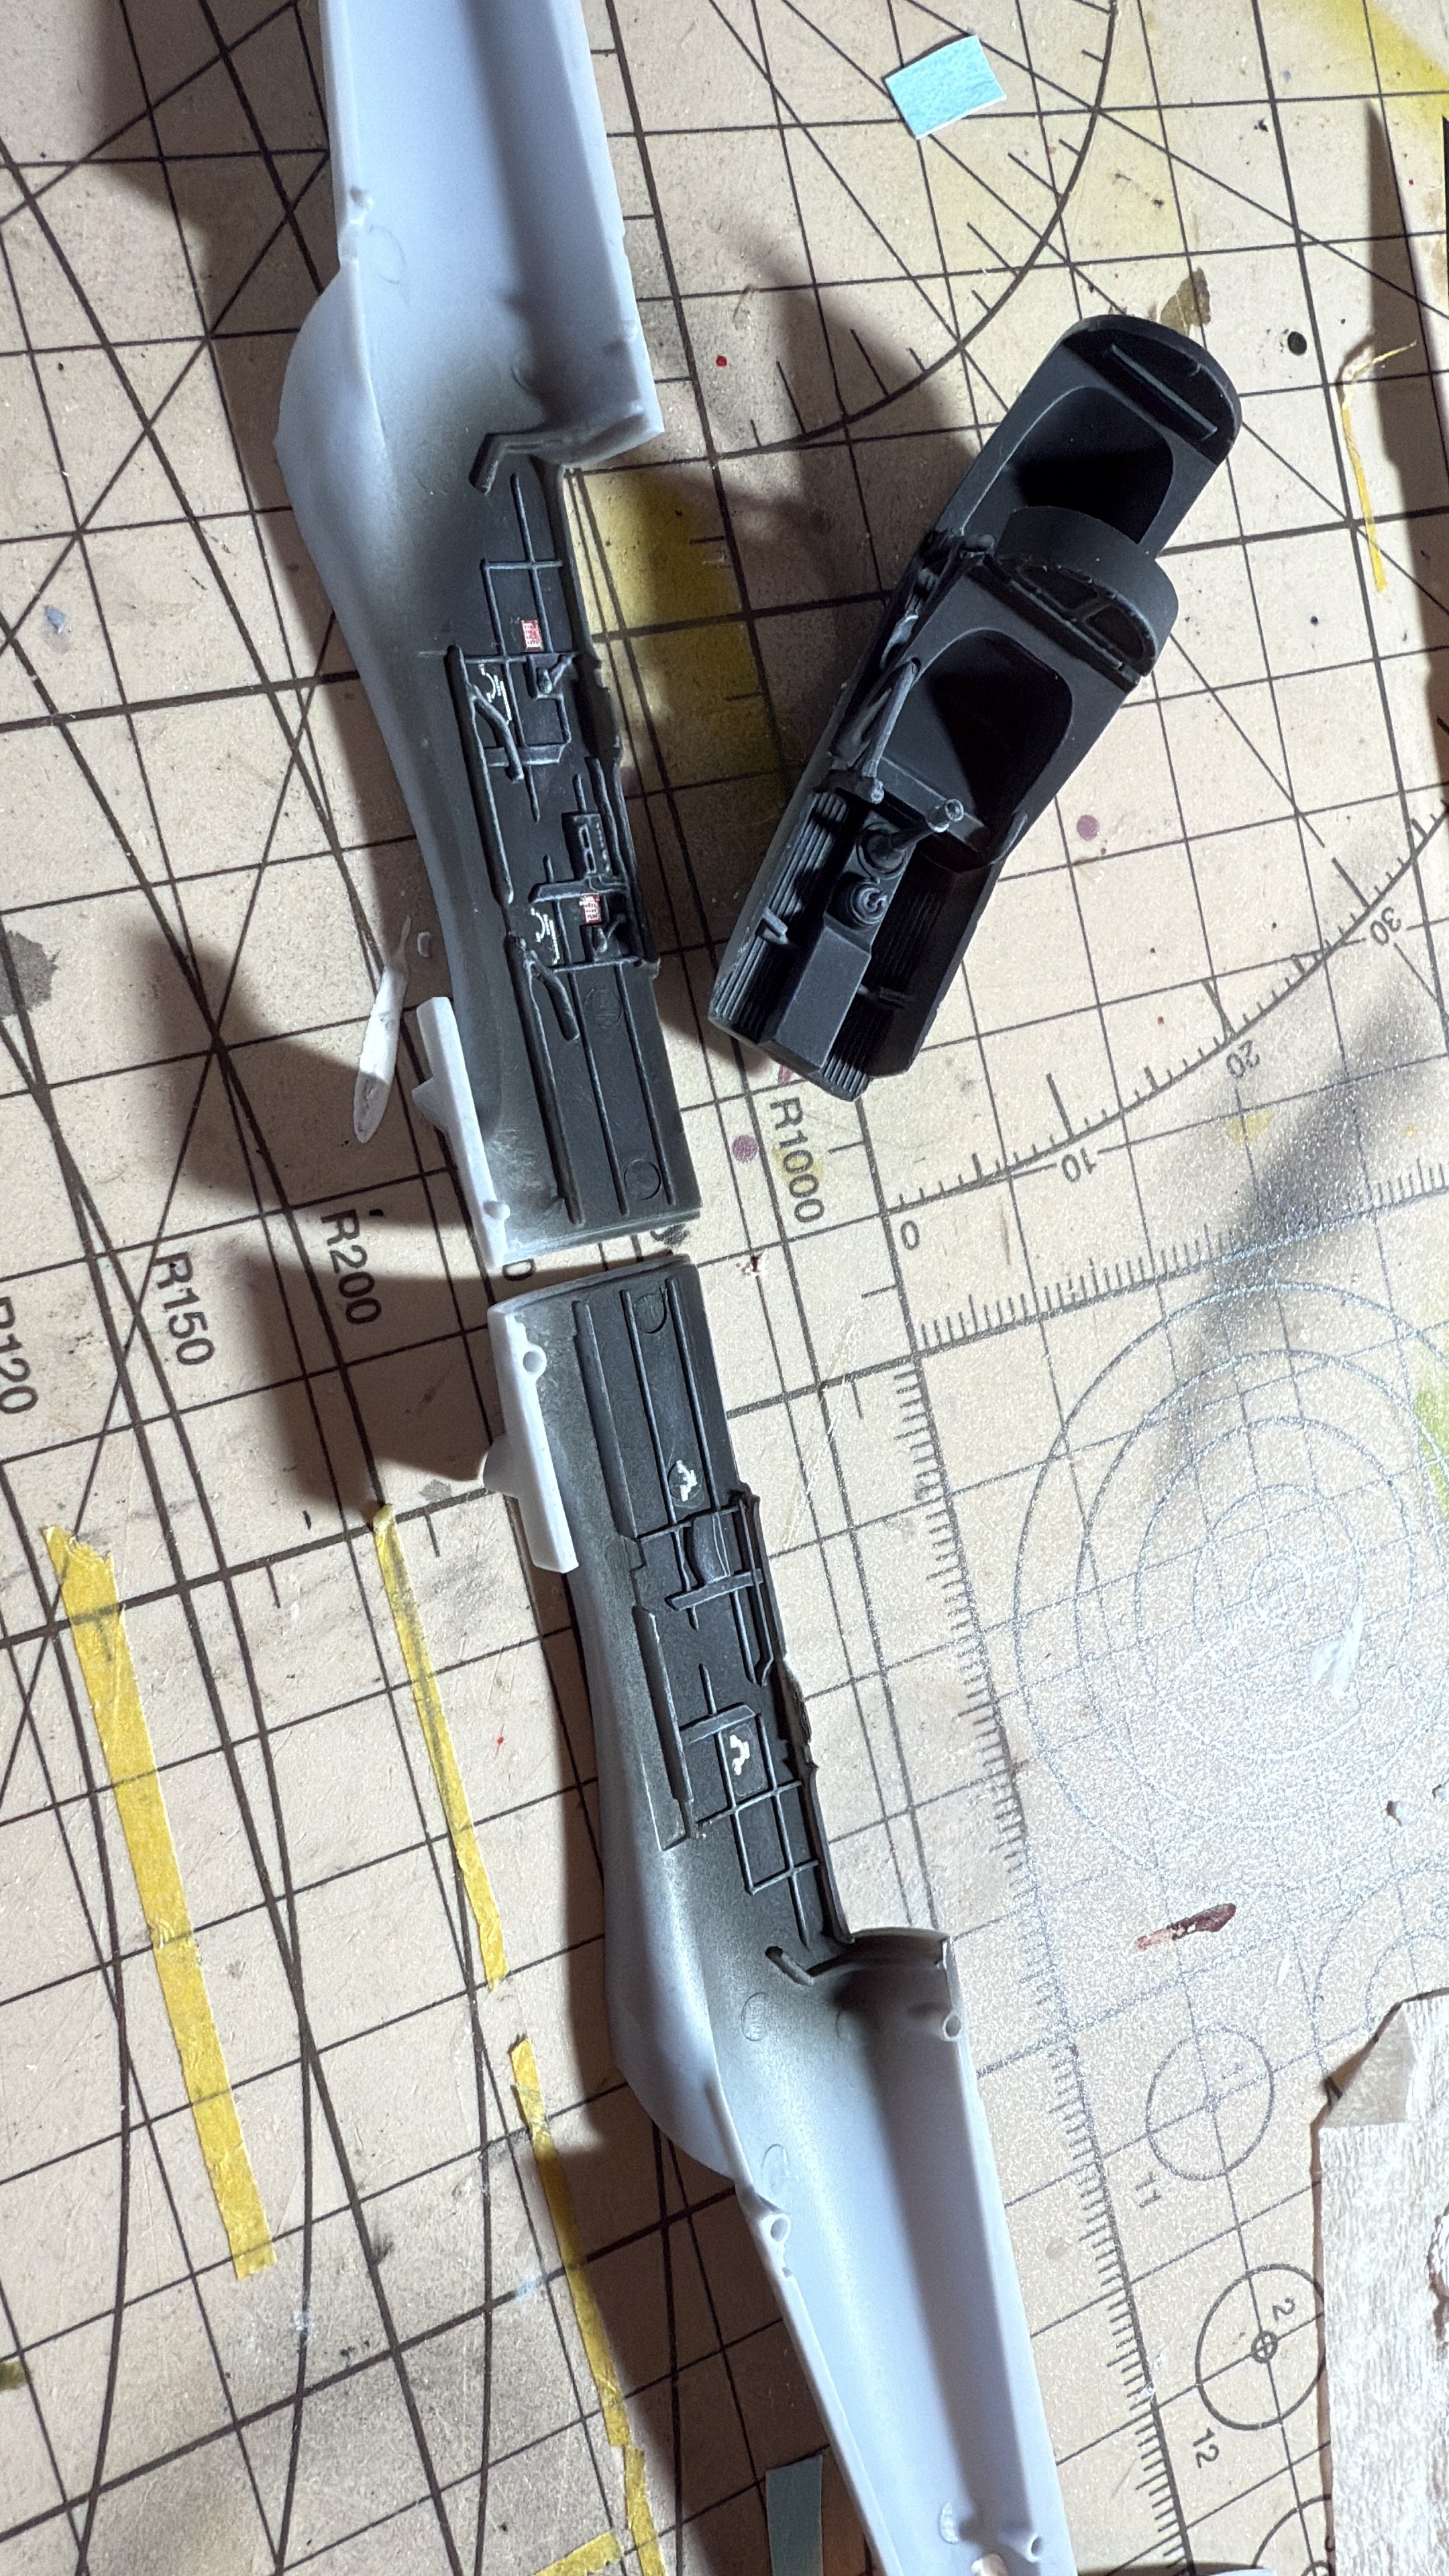
Hey, been awhile, been away most weeks and home just a few days at a time some slowed down build progress! But I’ve been doing what I can. Finished the cockpit as best I could with the reference pics. And sealed the fuselage together. Difficult to get good pics into the cockpits with light and shadows. But I’m happy. just not sure how the rigging will connect to the nose yet, but my attachments on the wings I think will work well. So will see what happens when that time comes and hope for the best at this stage!