

Jolley Roger
-
Posts
258 -
Joined
-
Last visited
Reputation Activity
-

 Jolley Roger reacted to Cathead in Timber-framed outdoor kitchen - Cathead - 1:1 scale
Worksite
Here's the actual construction site, just outside our home kitchen and adjacent to our herb garden. We hired a crew to pour the concrete slab (not my forte) but are doing everything else ourselves.
On the right side we're laying stone to connect over toward the house, using slabs of limestone collected from our creek valley.
There's actually some fun recycling going on here; there's an old hand-built stone cistern along the creek, built by much earlier homesteaders, that has been collapsing as the creek shifts and eats into it. We're leaving the remainder of the structure alone, but harvesting the eroded slabs that are already washing downstream and no long associated with the cistern. So not only are we getting nice slabs that someone else selected long ago, we're keeping their work alive by repurposing it rather than just letting it wash downstream. Other slabs we're harvesting ourselves from loose creek rock. For the geology-minded, this is all Pennsylvanian-era limestone; we also have copious shale and thin coal beds from the same era.
Cistern and view downstream from the same location:
Much of the woodworking will be done in my outdoor workshape space below the screened-in porch; you can just see an initial post pile to the left and a workbench to the right. This has enough floor space to lay out a full frame at a time and do all the joinery/cutting needed, before taking the final pieces up and around to the kitchen site for assembly. There's some nice shade here, which will be great because we're forecast for near-record temperatures in the mid-upper 90s early this coming week.
My stepfather arrives this evening and we'll get to work on Sunday, with the goal of having a bunch of pieces finished and ready to assemble/erect next weekend. We've invited various friends over for an open-house-style barnkitchen-raising, so the pressure is on to get work done! Should be a fun party, though, with lots of on-farm food and homemade mead and fruit wine on hand.
-
Jolley Roger reacted to Cathead in Timber-framed outdoor kitchen - Cathead - 1:1 scale
Timber harvest
Over the winter of 2021-2022, we logged out the cedars we'd need for this kitchen and a variety of other building projects. Much of this came from a grove along our driveway, which we wanted to clear and replace with deciduous trees. Here's the clearing work partway along:
Here are a couple log piles waiting for milling:
We've always done our own timbering work, with the occasional exception of hiring someone to take down a tree that's particularly awkward (such as leaning toward the house or power lines). Toward the end of the logging season, I sustained a nasty hatchet injury to my wrist while doing cleanup work (we have a wood chipper and chip most of the branch material for on-farm mulch rather than waste it). This pressed Mrs. Cathead into service finishing up the last bits of chainsaw work, along with a helpful friend.
The injury delayed the kitchen project from spring to fall; I've been able to recover to the point of doing all my normal weight-bearing work, though the wrist remains persistently (permanently?) stiff and sore. So the project is back on track.
-
Jolley Roger reacted to catopower in HMS Wolf 1754, 10-gun Brig (Snow) - Shipyard - 1/72 - CARD
Shipyard is a line of paper/card models from Poland, where paper models seem to be so prevalent. Shipyard includes kits of sailing ships, world lighthouses, dockyard structures, and more. But, this review is a look at one of their higher end products – one of their kits which, rather than featuring printed paper parts that must be cut out from their sheet, instead provides laser-cut parts that must be cut loose from their sheets and painted.
The range includes the small schooner Berbice, the Santa Maria, the cutter HMS Alert, all the way up in size to the 28-gun frigate HMS Mercury. The HMS Wolf kit, released around 2015, is about as close as one can get in size and complexity to the HMS Mercury kit, though their kit of the Dutch pinnace Papegojan is probably just about as detailed and complex.
All of Shipyard's laser-cut card kits are made in 1/72 scale. They all come in large, flat boxes that contain all the laser-cut components, plus color printed instructions, some plan sheets that are mostly for the rigging, laser-cut and etched sails, color printed flag sheets, wooden dowels for masts and yards, laser-cut blocks and deadeyes kits, white linen rigging cord, turned brass cannon and swivel gun barrels, cast resin decorative pieces, several jars of acrylic paint, a couple nice paint brushes, and more.
Everything comes pretty neatly packed with various components stored in separate cardboard boxes, which helps protect all the parts during shipping.
The instruction book is 32-pages in full color, including the cover, and is mostly photos at each stage, with the significant parts labeled by their part numbers. There is some text, but not much. What there is is in Polish, with German and English translations also given.
The Instruction Booklet
The one thing that is not included that I think would be really helpful, is a parts list that shows the numbers, where in the instructions the part is called for, and on what sheet to find the part. I'll come back to this later.
The Plan Sheets
Masting and rigging is detailed in the separate plans sheets. There is no one overall profile plan sheet, these are all just detail sheets. But, if you look closely, you'll notice that some assemblies, like the gun carriage are more fully detailed in the plans sheets. Also, the metal parts that you need to make, like hooks and eyebolts and such, are identified on one of these sheets, not in the instruction booklet. So, it's a very good idea to study these sheets to see what's described on them.
The kit contains no eyebolts, split rings, hooks or things of that nature. Instead, a couple sizes of copper wire are provided, and the plan sheet below identifies the small metal parts you must make in various sizes. These are all identified in the plans with the letter 'Z' as a prefix. The instruction manual will call for these parts, and you will find no part with this number. Again, that's because you have to make all the Z parts yourself from wire.
If you prefer to make your own sails out of, say, paper, some nicely detailed patterns are provided, showing locations of reinforcements, cringles, reef bands, etc.
The Parts
As you can see here, there are a lot of parts sheets, and on each of those there are a lot of parts. There's a LOT of detail here, and just seeing how much detail there is in the kit makes the kit really exciting to work on.
By the way, my apologies – these photos are on the blue background of my cutting mat and the photos were taken with an iPhone, which does it's own automatic color balance, so all the sheets look kind of yellowish here, which they are not.
The only color printed parts in this kit include the flags sheet, which is printed double-sided, and the decorative friezes. I don't know if this was intentional, but my kit included two copies of this sheet.
Apologies too for the bad focus on this photo – I don't know what happened here. In a sharper world, you'd see all the bulkhead parts and hull stiffeners. Those who've built Shipyard's paper models probably know already about how well these laser-cut parts fit together, and form a very stable hull structure.
This odd, brownish looking sheet is actually dead black. But, at least here you can see that the part numbers are there. When I looked at this sheet, I had to hold it at an angle, under a bright light in order to see the number or to even identify the part.
There is one small sheet of clear acetate for the windows and the stern lantern.
Note that the deck planking is engraved onto the card pieces, with nicely located butt joints, nibbed plank ends, proper scarf joints, and treenails.
Lots of parts make for lots of details and lots of work. But there's no shaping, drilling, milling, filing, sanding, carving, required. it's all mostly cutting, gluing, and painting.
Sorry, I didn't take pics of the cannon barrels, resin "carvings", brushes, rigging line, or the paint jars. But, I will mention that earlier kits of this line had jars of paint that could easily dry up. I'd mentioned this problem to Shipyard years ago. They have since gotten jars with rubber grommets in the lids to create a better seal, and this seems to have alleviated the problem.
Speaking of paints, those included in the kit are apparently some decent quality artist's acrylics. They go on dead flat and have some transparency to them, so you should be able to see some of the laser-etched details through the paint. The paint is a Polish brand called Renesans. I like them, but they hard to find, except on some European online art supply stores.
Summing it Up
This is a pretty well detailed looking kit. It, and the entire line of Shipyard laser-cut kits, are very different from most paper model kits, given that nearly every paper model kit is mostly paper that has to be cut, rolled, folded, or curved, and may have a laser-cut skeleton for strength. This kit is entirely laser-cut, but includes parts using other materials for best appearance or easiest construction.
The heavy use of laser cutting comes at a cost, and these laser cut kits are a lot more expensive than traditional paper models, and this kit is no exception. This kit has a cost that's somewhere in the neighborhood of $200, give or take, depending on where you purchase it. That's a lot more than a traditional paper kit, but not really much different from a comparable wooden kit, and there's a lot more to it than a box of wood with some laser-cut pieces.
The kit is available from a number of online shops, including Ages of Sail, where I got mine, Cornwall, Shipyard's online shop, and maybe someone will chime in about a Canadian shop.
Did I miss anything?
-
Jolley Roger reacted to Egilman in F-86F-30 Sabre by Egilman - Kinetic - 1/32nd scale
Thanks Ken...
Just taking it as I can get it brother, lots of medical coming up in the next few days, so I'm getting in what I can... Enjoyment is the ideal now, as I get more comfortable in my new situation, I'm sure production will get better, right now still just feeling my way, we both are...
Once I got a good look at the aftermarket additions they are so much better defined than the kit parts it was a must do, especially the Speed Brakes, the interior metalwork is almost exactly like the photos and manuals say it should be where the kit parts are a decent representative structure but doesn't represent what was actually on the airplane... The aftermarket does and since they were always open when sitting, they have to be represented accurately...
The next bit of surgery is to the nose wheel hub, 2910 had the early welded sheet metal hub with 6 spokes, the kit offers both the early and late cast 12 rib hub... the 6 spoke hub is hollow in the spaces between the spokes and the kit part molded them filled in, a small bit of cleaning out the spaces solves that issue...
And modeling move on.... (much like life itself)
-
Jolley Roger reacted to Egilman in F-86F-30 Sabre by Egilman - Kinetic - 1/32nd scale
Update:
Doing out the empennages starting with the Doors and Drop Tanks.... For the doors I switched from the kit parts to aftermarket cause the interior detail is much better defined, there is nothing wrong with the kit parts, just the resin parts look the part better and I can do more with them....
First step it to paint them flat black....
Then for the doors, the insides get a thin coat of Testors chrome silver....
They have cured overnight so are completely dry...
The drop tanks get a coat of flat black, Testors cause it lays down smooth without edges...
The next step is to dip them in the full strength future... give them an overall shiny coat and seal the chrome silver for the next step which is putting a black wash on the recesses and some uschi's steel powder rubbed into the reinforcing panels to make them stand out.... Then the sealed black gets a coat of RnB & decaling....
Slowly making progress my friends, I'll finish this thing probably sometime around the turn of the century it feels like..... {chuckle}
Onwards...
-
 Jolley Roger reacted to Ab Hoving in Cut and Paste - downloadable e-book featuring the work of Ab Hoving
This is not a book that is officially on the market. My son and I made it just for fun.
We hope you like it too.
Cut_and_paste_ENG.pdf
-
Jolley Roger reacted to Egilman in F-86F-30 Sabre by Egilman - Kinetic - 1/32nd scale
Update:
Well I went ahead and finished off the right side decals today...
Tomorrow I have some parts arriving for her, Landing Gear doors, Speed Brake Doors & Metal landing gear... She's now ready for an overall final coat of future and then attaching the wings to the fuselage... and finishing details...
Onwards....
-
Jolley Roger reacted to Egilman in F-86F-30 Sabre by Egilman - Kinetic - 1/32nd scale
Thanks everyone for the well wishes, it is much appreciated... The Admiral and I had a chance to talk out a few things this weekend and came to some resolutions....
As far as where I'm going to wind up, it is no different than before, it is where we all wind up eventually... Like Craig pointed out... And if I so choose I can look at it like I know the offramp I'll be taking from the highway of life on this rock, but it's up to me how long I take to get there... The Admirals suggestion was to get busy, I have models to build, lots of them and if I keep worrying about what might be I'll never get them done.....
So I'm here for the duration my friends, And I'm done moping/worrying about it... The only thing I can do is keep pushing forward til the man above says it is time... And that he hasn't brought up to me... the rest we will deal with as it comes...
So lets get back to modeling... the rest will work itself out... I have a beautiful bird sitting on my desk that needs my attention...
Thank you all...
EG
-
Jolley Roger reacted to Egilman in F-86F-30 Sabre by Egilman - Kinetic - 1/32nd scale
Thank you Brothers....
Just want you all to know how much your support is appreciated...
I went out and took a few more shots of the left side... Outside, since the Lord has graced us with beautiful sunny skies today.... I Never pass up the opportunity to enjoy such gifts...
Here they are....
It never ceases to amaze me at how much better models look in direct sunlight....
Trying to figure out an appropriate backdrop for when I get her finished, I want her sitting in a semi-realistic setting... before I call her done...
Anyway... Onwards... (snails pace yes, but still moving forward, no looking back)
EG
-
Jolley Roger reacted to Egilman in F-86F-30 Sabre by Egilman - Kinetic - 1/32nd scale
Thank you all... I know it's been a while since I've posted an update, RL is intervening in a hard way right now, but I have been plugging along as best I can...
Decaling is about 3/4th's done, Just the right side of the fuselage to go...
Here are some pics of the slow progress...
There were a lot of those technical decals, still some to go all down the right side...
Sorry for the slow progress but health is a major concern right now, keeping the muse going is getting difficult...
But I swear I'm gonna get this one done...
Thanks every one for following...
It means a lot...
-
Jolley Roger reacted to Egilman in F-86F-30 Sabre by Egilman - Kinetic - 1/32nd scale
Ok Brothers another short update....
Fuselage Stripe....
Accurate pointed stripe, 32 inches wide on the fuselage with the fuel port centered in the stripe... (properly located)
I just thought you all would like to see the outcome with all the angst that went into what usually would be a nothing job... (if the decal didn't disintegrate)
Now the finishing path is clear barring any other disasters...
ONWARDS... (finally)
-
 Jolley Roger got a reaction from yvesvidal in F-86F-30 Sabre by Egilman - Kinetic - 1/32nd scale
Agreed!🙂
-
Jolley Roger reacted to Egilman in F-86F-30 Sabre by Egilman - Kinetic - 1/32nd scale
Update...
Step 3, Scuff, Prime and Paint....
Using nail buffing sticks, I scuffed the surface between the masks...
Just enough to break the hard shell surface sheen, it wasn't very thick but then Future dries very very thin so it doesn't take much, and you can see how thin the RnB finish is as well just a few scuffs and I'm into the black undercoat.. you do not want to take this to plastic if you can help it... Cause if you break the undercoat edge you risk the edge lifting and that we don't want to have happen..
Primer....
Tamiya Thin Grey, rattlecan, done in several very thin coats, just enough to seal and cover...
Paint...
True North's Insignia Yellow 2ml mixed with Mr Color Leveling thinner 2ml, (50/50 ratio) using a fine 3/8ths inch sable artists brush (high quality) you brush out an even coat on the surface....
Allow to dry and brush out another, then another and so on and so forth until you get a deep even color tone over the painted area... As many coats as required... Allowing to fully dry between coats...
Yes it takes time, but for a thick glossy paint it is the only way to get a thin even coverage with a brush.... The pics is the first coat, I'll post more as the color starts to build and cover....
This is an old technique I learned doing custom model car bodies in my youth... {chuckle} Depending on how good the paint is it may come out shiny or may not but that is ok it's what we have Future for....
More later...
Onwards...
-
 Jolley Roger got a reaction from Egilman in F-86F-30 Sabre by Egilman - Kinetic - 1/32nd scale
Agreed!🙂
-
-
Jolley Roger reacted to Egilman in F-86F-30 Sabre by Egilman - Kinetic - 1/32nd scale
Update...
I have to paint the mid fuselage ID stripe... My technique of doing this is simple but involved... Please bear with me as I explain it...
The Insignia Yellow paint is scheduled to arrive on Monday so I need to start prepping for it now....
The first step is to mask out where the marking goes....
The inside edges of the tape represent the position of the marking... and we need to double check to see if we get it close...
Close enough... All painting will take place within the tape boundaries...
The bottom is roughly laid out as well...
We then clear the insides of the tape overlap...
And at least check and see if the opposite side looks the same...
The second step is coming up, re-masking the edge and covering the rest of the fuselage in masking paper to protect it from the next parts of the process.......
More as I get to it....
-
Jolley Roger reacted to Egilman in F-86F-30 Sabre by Egilman - Kinetic - 1/32nd scale
Thanks Ken,
Yep surprising that it is only the main stripe, the checkerboards were right next to it... I searched for a while online and I could only find one copy protected pic and anecdotal testimony, sufficient to convince me but not enough to offer as absolute proof... Thanks to Jolly Roger who provided the evidence of my presumption... I love this fora...
Thanks Jav....
Your 51 came out very nice...
Yellow on decals has always been a hit or miss proposition, sometimes it covers well others it doesn't similar to white... Generally you have to prime underneath them with either white or grey which is going to present a problem here... I will get into it on the next update....
-
Jolley Roger reacted to Egilman in F-86F-30 Sabre by Egilman - Kinetic - 1/32nd scale
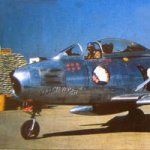
THANK YOU SIR!!!
That first image is a great general reference image for the insignia pattern showing the pointed stripe..... Also, you have it over most variations of F-86 usage RF-86F in the first image, a foreign service F-86E (australian), and a flight of US F-86F's... That is the best confirmation of my educated guess anyone could provide, full rounded and total...
Thank you Very Very Much...
You da Man!
-
 Jolley Roger got a reaction from popeye the sailor in F-86F-30 Sabre by Egilman - Kinetic - 1/32nd scale
Agreed!🙂
-
 Jolley Roger got a reaction from Old Collingwood in F-86F-30 Sabre by Egilman - Kinetic - 1/32nd scale
Agreed!🙂
-
 Jolley Roger got a reaction from mtaylor in F-86F-30 Sabre by Egilman - Kinetic - 1/32nd scale
Agreed!🙂
-

-
 Jolley Roger got a reaction from Edwardkenway in F-86F-30 Sabre by Egilman - Kinetic - 1/32nd scale
Agreed!🙂
-
 Jolley Roger got a reaction from king derelict in F-86F-30 Sabre by Egilman - Kinetic - 1/32nd scale
Agreed!🙂
-
 Jolley Roger got a reaction from Dave_E in F-86F-30 Sabre by Egilman - Kinetic - 1/32nd scale
Agreed!🙂