HOLIDAY DONATION DRIVE - SUPPORT MSW - DO YOUR PART TO KEEP THIS GREAT FORUM GOING! (Only 24 donations so far out of 49,000 members - C'mon guys!)
×

liteflight
-
Posts
206 -
Joined
-
Last visited
Content Type
Profiles
Forums
Gallery
Events
Everything posted by liteflight
-
 Good hooking axe, Steven And a fine body of men! Did you form a skaldborg? I see you have what I would call kite shaped shields Yes, the multiple reflections just form a texture and not a shine. Steel mail? i often imagine keeping this from seawater in a Drakkar! The mail might go in a chest, but weapons would be stowed beneath the floorboards, as would everything else. Viking WD40 with added phosphoric acid?
 -
Stand looking good. And bracing the formers a wise plan. Would you consider glueing on a temporary gunwale with balsa cement to stabilise the tops of the bulkheads? Or has your bracing Sorted them? Like the dark colour and contrast with untreated wood
-
Hi, Nelson I have been following your build, and appreciate the thinking behind the steps you take. Indeed, there will be a veritable fleet of longships setting out from the viks next spring. I can see them now, with the men in their gleaming silver mail coats, Ak47s akimbo and the Jarl in his winged helmet at the prow holding on to the dragon head. I know, I know! Titanium mail was not common, guns a long way off and NO WINGS, {I was seeing it with Hollywood goggles and to exercise Louis-da-fly’s eyebrows} I reviewed my stock of stains yesterday, and indeed I have only oak and mahogany on the shelf (And a couple of bottles of mixes of the two). we are in Stage 4 lockdown at the moment, and the suppliers Bunnings are closed to the public. Still open for online ordering, tho. I hope to try some trial staining today Did I mention the I do not love obechi wood? It has a very open grain and I have had sad experiences of it in my youth in model aircraft building, I am telling myself that the grain will resemble riven oak when used for the flooring timbers; and myself is replying that he will use some of the lime we got! linguistic aside: I hail from the northern part of the Uk, and the language and accents are greatly influenced by the Scandewegian settlers. So “riven” is common as an adjective in most of English, but my father ( who was from Cumbria) would use the verb “rive”, but not with the splitting meaning. the question “What are you riving at?” Suggested that you were applying lots of energy to little avail!
-
The little beetles are still used to make cochineal /carmine, used as a food dye nowadays. I have noticed that there have been several “eeeeugh! Did you know that red smarties are made from squashed beetles?” Articles in the press recently. Truly people are getting remote from their food these days. I have seen the beetles on cacti in the Canary Islands, where they still make cochineal As a linguistic aside, ladybirds (ladybugs to Americans) are of the species Coccinella, so the 7-spot ladybird is coccinella septipunctata, and gave their name to cochineal. I have not traced the linkage yet, but it might be as simple as someone calling the squashed-bug dye “red like a ladybird” On holiday in Crete ( highly recommended when permitted) I learned that the fabulous wealth of the Cretan kings based at Knossos came from a monopoly on successful farming the murex shellfish, and the ability to extract the exudate without killing the creature. Sounds good, but I seem to remember that it took the dye from 20,000 murex to dye the one inch stripe round a Roman senators toga. Imperial purple also called Tyrian purple, because it was thought to come from Tyre. It probably sorta did, because why would the Phoenician traders say where it really came from You mention the associated smells. They may have been only a footnote to the whole dyeing business which was ( and often still is) radically odiferous. For example the mordant used to attach the dyestuffs to wool was urine. The natural dyes are fascinating, and the introduction of the early industrial dyes is a saga of triumph, disaster and some linguistic interest. Magenta, for example! Named for a Redshirt battle and I think the first of the azo-dyes But the leader, Garibaldi, became a biscuit rather than a colour! Sorry to ramble. You lit my touch paper Rowers almost there and naturally dyed in the wool I was always taught that “the Pune was the lowest form of wit.” But I like them!
-
Cathead It works! and your explanation was perfect Many thanks Steven Many thanks for your comments. Genuinely useful! Bit of biographical info: I'm a native Scot and arrived in Oz about 7 years ago, so I speak a wee bit of the language. One word I do know in Australian is "Isocol" -the sovereign remedy for wrong-gluedness. I confess I learned from and with Bindy, This forum provides me with inspo Having poured out my woes about differing thicknesses (which of course have also required different close-fitting slots in the jig) I consumed a large mug of Rosie Lee and realised that I need to know rather than worry. So I shall liberate the scrollwork and find how it fits and how it must be when complete. Ditto some of the strakes to see how they nestle in the rabbit made by the doublers. Then I shall know better how to proceed! The lurking Drakkar Behind my shoulder is the sailing version of this boat - which will be made with similar parts but of different materials. It will have provision for a removable drop-keel and I need to give serious thought to sail control as the sail needs a wide range of angle to be able to sail close-hauled on both tacks. The rotating mast could still be a favourite way of achieving this, but this makes difficulties with mast stays, etc I am very aware that Queen Asa's ship was not made for ocean-going, so I expect to take some liberties with freeboard, etc. Certainly the model will be sailing in scale storm conditions more often than not I also find the Oseberg cross-section a bit awkward where the strakes join the upper planks. I would want to "hourglass" this a bit more in conjunction with raising the freeboard a bit And - I need to consider just where to fit the hydrofoils 😁 So now I go to liberate some strakes and the scrollwork and establish in my mind how this will work best Also to dig out of the shed the assorted stains I have, and try them on representative woods
-
Having had a helpful and clear how-to from Cathead on how to insert links into posts: I thought that this would be a safe and useful place to give it a go Link to my Oseberg build Being digital, this will either work, or conversely, fail to do so
-
Cathead, Thanks very much, I will give that a try very clear description
-
Not pedantic at all, Cathead I wanted to give credit where it is due, and clearly was ‘asty (hasty when said by a Cockney) A question, if I may, while you are here. in the opening post to your log, you quote a list of build logs you have referenced, and the Listings are Links. How do you do that? I wanted also to do that, and would cut-and-paste from somewhere in the blog if I knew where. I like the walnut stain, by the way
-
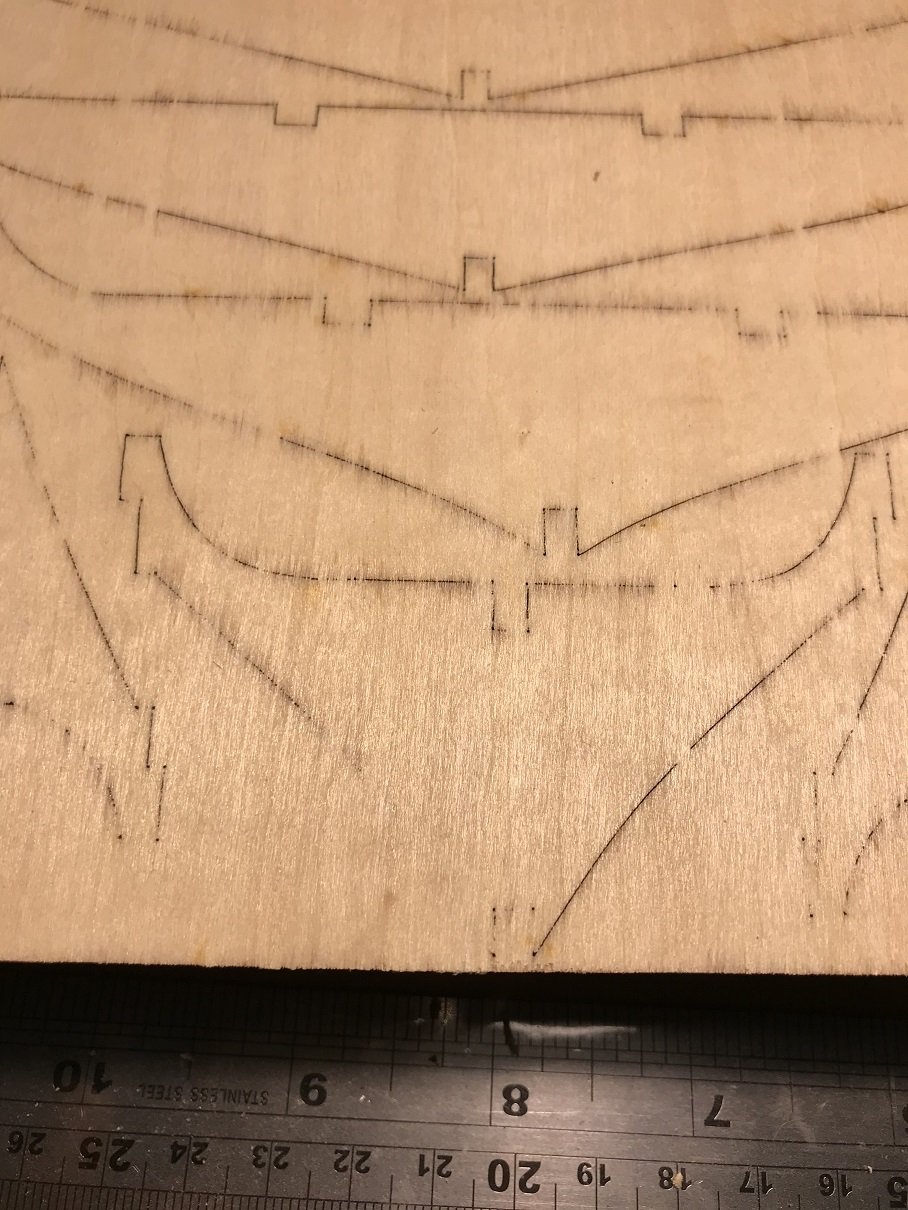
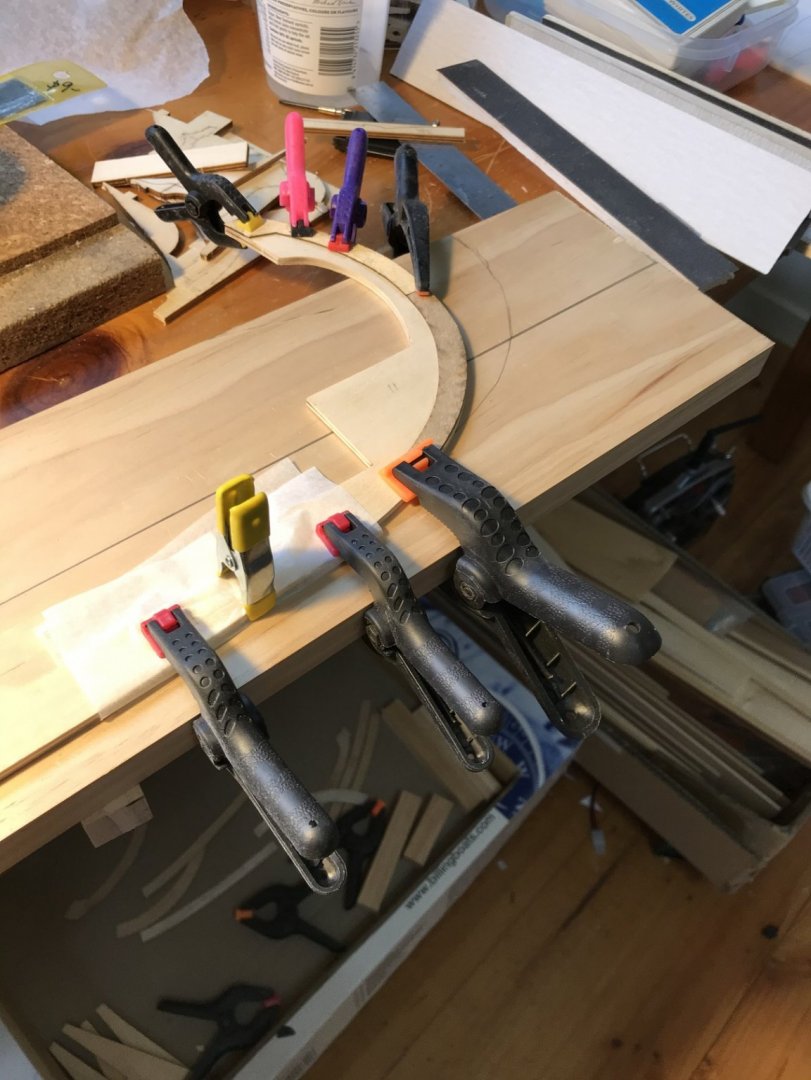
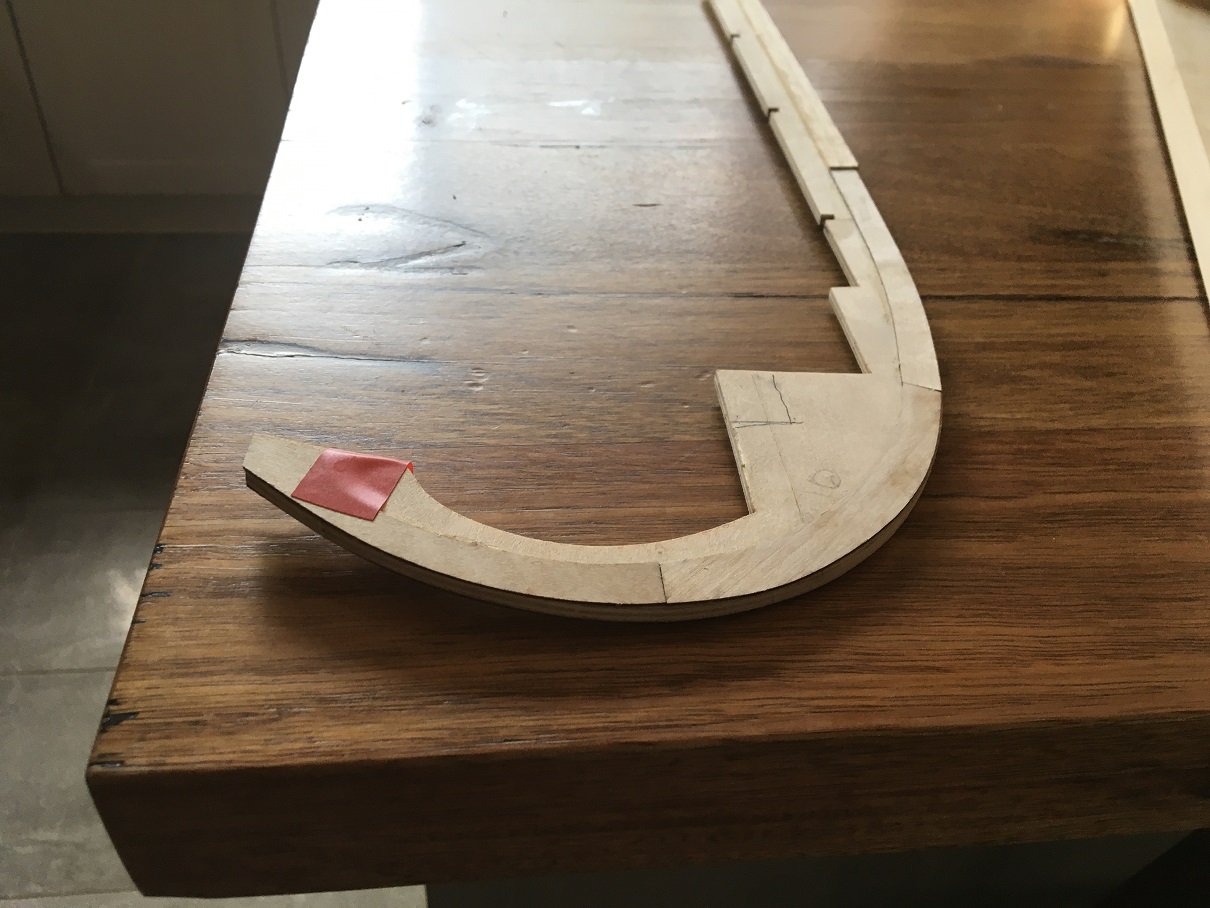
Apology I see that the last part of my previous post was rambling and incoherent🤥 I have the jig, boat and drawings and you don't, so it can't have made much sense. I will be shorter, sweeter and better illustrated with photos Friday Kit I'm not sure if this is a purely UK expression, meaning something made on a Friday afternoon with one ear on the hooter ending work. Laser -cut Kit. The 4mm ply was not laser-cut. It was deeply laser-scribed, but the final ply almost uncut at one end of the sheet (not flat on the platen, air jet nozzle blocked or voltage dropping as the cut progressed?) Front side of part of the 4mm sheet Back of the same sheet So I cut the parts out with a heavy craft knife and did a lot of sanding to make an acceptable shape. The process was to cut the tabs from the front, then trace to part from the back till it came away from the backing In retrospect I could have cut out the parts with a fretsaw, and this would have left me with less recovery to do. Live and learn The curved prow parts came from this same 4mm ply sheet, and one of them was at the less-cut end, and only about half burned thru' Now at last The build So far I have followed the illustrated guide as far as it agrees with the parts supplied Keel straightened and glued to Prow and stern (Bow also soaked in warm water and straightened) (Perhaps bending of the ply sheet held one end off the platen and explains why the sheet was not fully cut) Sanded flat and smooth when the glue (Titebond) had hardened overnight Reinforcing ply doublers one side added to prow and stern (there laser-cut (right through!) in 1mm ply sheet, and keel doubler 1.8 mm obechi strip only one side because of the thickness differences in the added parts! Second side doublers added Confusion I confess to being fairly confused now about how to proceed. The keel is straight, and I am sure that it will remain so as there are two longitudinal stringers as well as the planking to lock the straightness, but the prow has resumed its bend and I must do sommat about it The confusion is that the keel and ply doublers are now different thicknesses . Do I sand/plane the keel doubler to the same thickness as the ply doublers? I am inclined to leave it at its present thickness on the grounds that there is a healthier "step" to bond the Garboard strake into, I am also very aware that the ply "carvings" have to be fitted in some of the area of the doublers, and I have read several ways of reducing the whole lot to a harmonious thickness. Right now I incline to removing as much of the 1mm ply doublers as is necessary to fit the carvings, thinned or as supplied, My thinking is that this will give me a wider and more defined shoulder to fit the planks into - but run the risk of damaging the carvings in the planking process. There is plenty to do right now. I am admiring the Jack Aubrey build jig as created by Cathead. This seems to be an excellent way to achieve squareness of everything From Cathead;s build log of the Gokstad ship I wish to incorporate the openings at bow and stern as the original, and NOW would be the time to modify the relevant formers and keel parts I also need to start to process of arriving at the final colour for the ship. My intention is to achieve the colour she was on the burial day. So dark oak which has been maintained with the preservative slapped everywhere every spring, So wood, but dark and interesting. Confusing the decision is the fact that the stains/dyes/stuff used by others do not ring any bells of recognition with me. I have some Australian stains from another job, and these are spirit-based and would be absorbed into obechi with a rude sucking noise. What they will do to ply is unknown, so I need to dig out the cans and start experimenting. I lean towards a walnut/oak mix, but will show you how the stains look Also in the colour issue is my absolute decisions that: There shall be no laser char! There shall be no ply edge visible or exposed the first is being addressed by copious elbow-grease, and the address the ply edges I intend to laminate all edges that might be visible (and risible) with micro-veneer. I have supplies in pine and several other pale woods (it is around 0.2mm thin, that's .008" or 8 thou) Originally purchased for making and planking ships in bottles. Another decision is that this is my ship, and it will be ship-shape to my standards. Bearing in mind some drilling problems encountered later in the build by Von Kossa. I will predrill these holes (I guess they were for mast stays) before installing the ribs/formers andrew


-
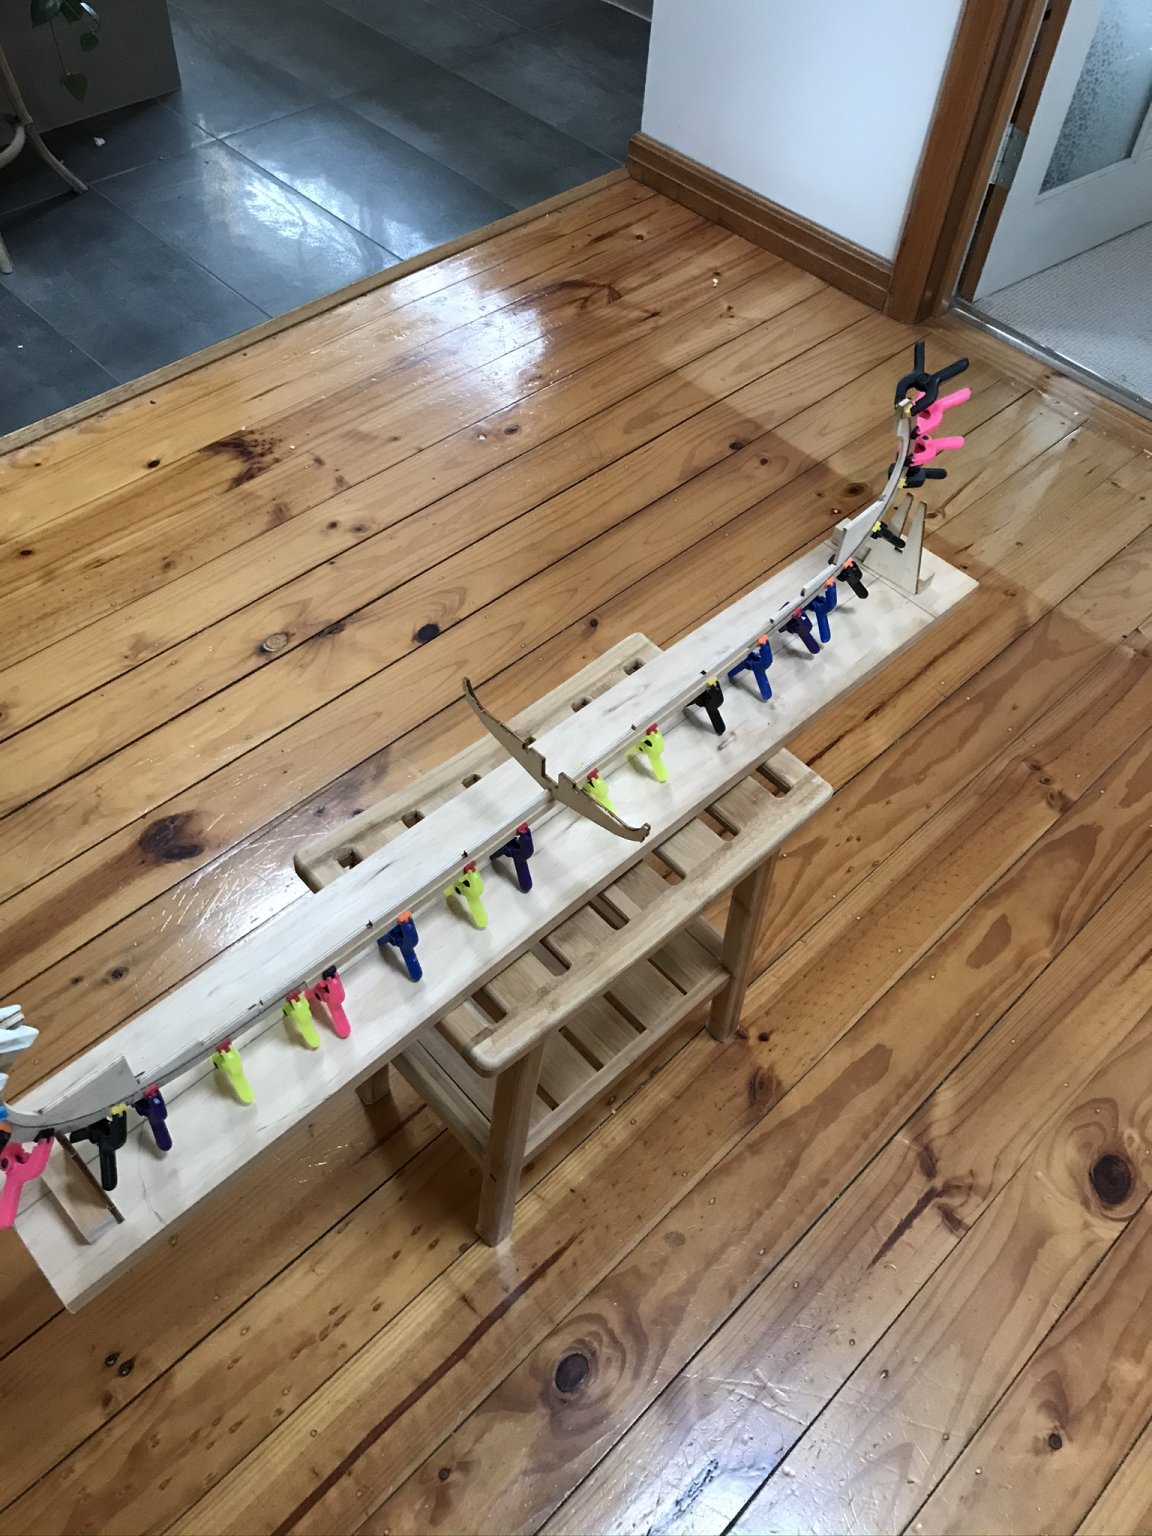
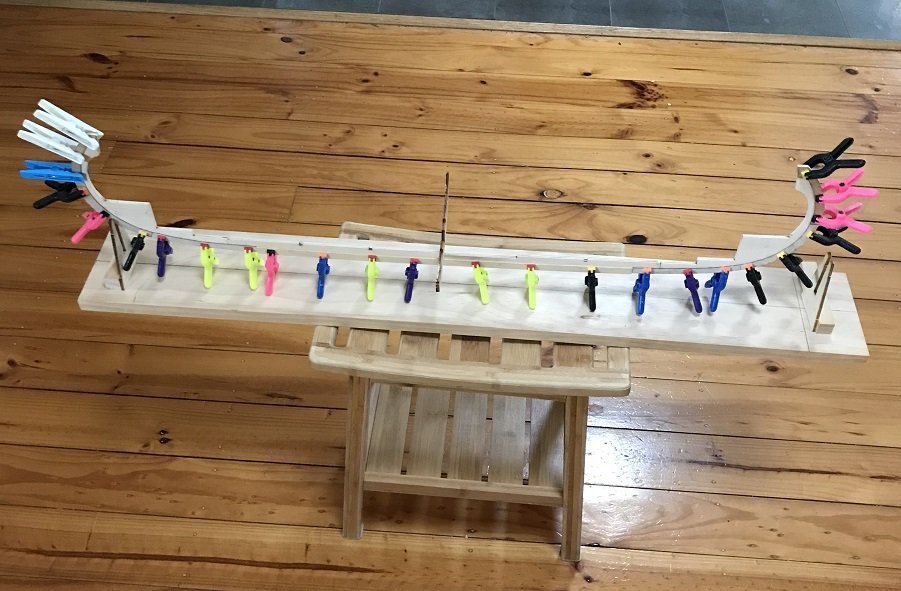
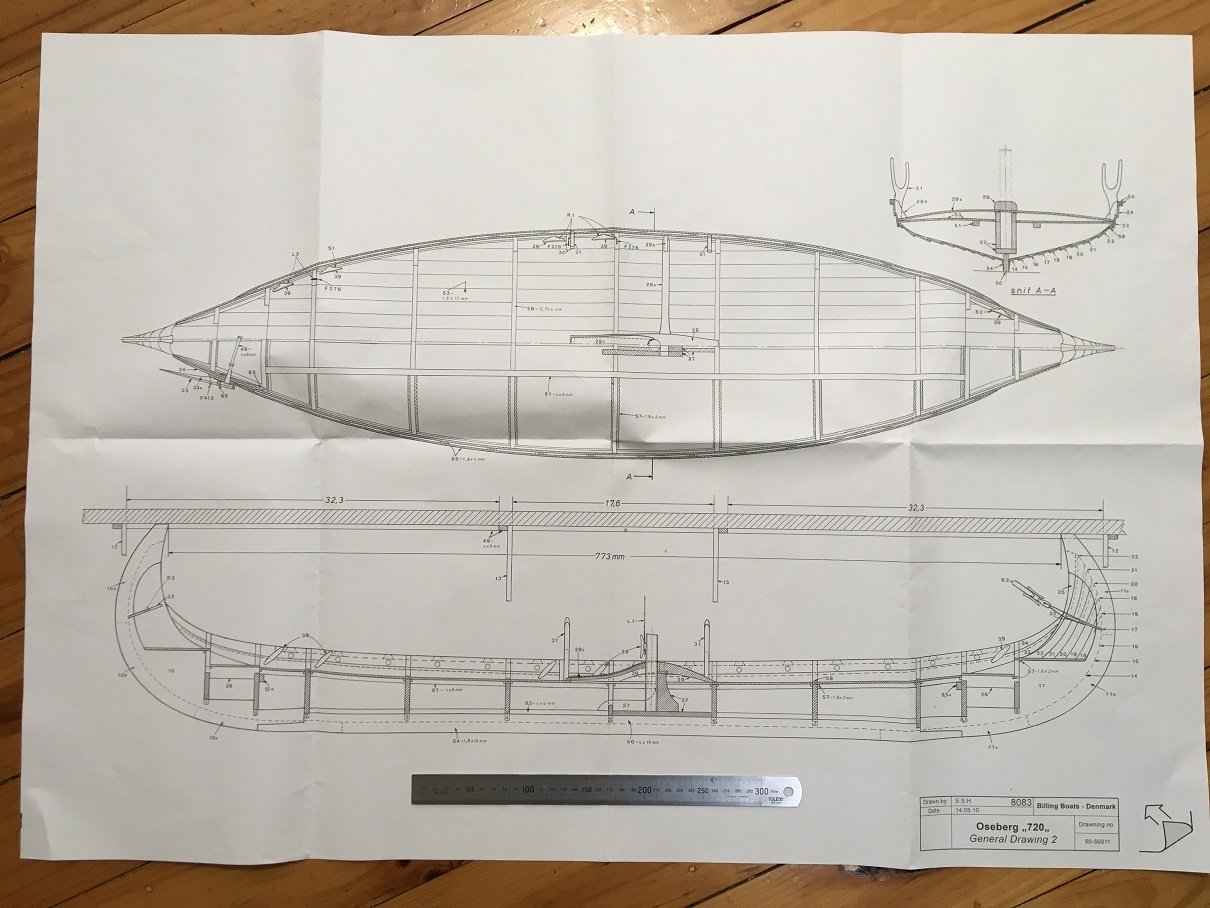
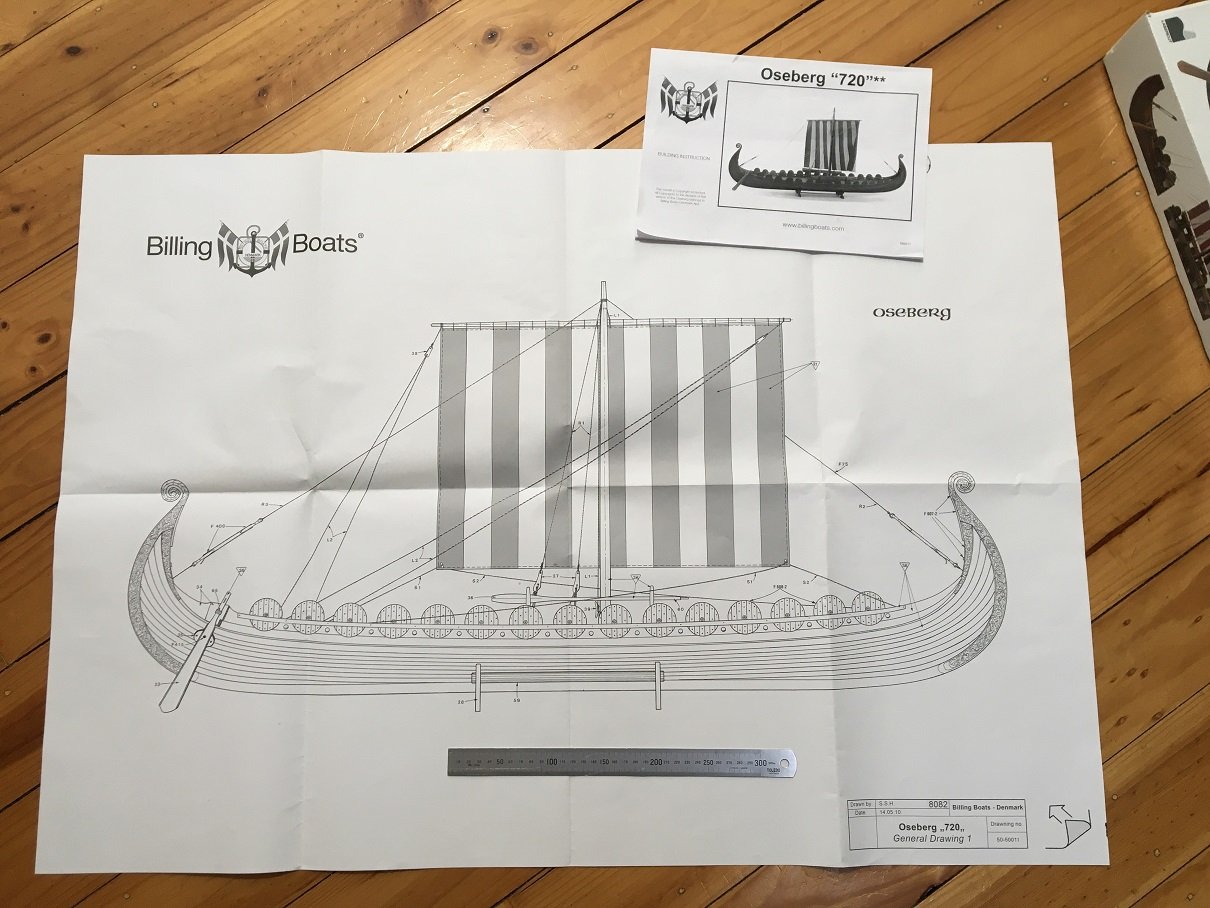
Standing on the shoulders of Giants The choice of Longship came down to size, as always at the back of my mind is a sailing model. On this count Billings won as it is, afaik, the largest Viking ship model kit on offer, and at 1/25 scale it makes into a substantial model I had also read all the relevant build logs in the Kit section, and KrisWood's absorbing saga in the scratchbuilt Forum I mean no disrespect by omitting excellent builders, but the Build Logs of Von Kossa and Jack Panzeca are the lodestars I am steering by - I cannot hope to achieve either their learning or excellent results, but I can learn a lot from them. Thanks guys! Billings kit 720 Oseberg Ship 1/25 Double-sided full size plan (with ruler for scale) In my view these plans are excellent. The instruction book is at the top of this picture (Thank you Steven for the pic-shrinking tutorial) The instruction book appears to be straightforward, but leaves a lot unexplained - hence my gratitude to the members who have posted their journeys of understanding and achievement. the Kit includes all required for the jig shown apart from the base-board, and this seems to earn Billings 30 brownie points. All is not, of course as it appears : Obechi 4 x 8 mm is supplied to hold the keel, and I chose to pin these to the base board such that the keel is a squeaky fit and held straight There are two parts in 4mm ply designed to hold the prow and stern timbers. They have a slot which does not fit any stage in the build, so they have been sleeved with soft balsa to be a neat fit The build jig also neatly holds the hull inverted for planking and other fun and two formers are supplied to make a frame allow the hull to be clamped securely to the frame The formers are shown (?glued) to the board using more 4x8 as a reinforcing block To me this means that either the keel holding members or the formers have to be cut away to allow them to fit. No great problem, but why? Next: Friday Kit andrew


-
I love both your CAD work (well beyond me) and your voyage of discovery about the plans and methods of turning them into a valid Oseberg ship. A couple of points you raised earlier: 1)how to produce the keel shape with the limited tools at your disposal I believe you have a power tool of some sort. I would manufacture a holder for it so that you can fix it to the bench (or an angle plate) This only needs to be wood with holes cut and split to clamp the tool. OR Mould a holder using silicone moulding goop (knead corn flour (cornstarch) into any RTV silicone till it is stiff enough, put tool in plastic bag (or wrap in kitchen film) and mould a holder from the silicone goop - leave to harden Then you could mill, sand or gouge the basic shape of the keel carefully to rough dimensions and 2) how to make treenails its not Nordic Drakkar building, but treenails in all sizes are easy to make from bamboo** split skewer roughly using a blunt knife make a draw plate* with lots of hole size options point one end of a bit of bamboo - push through a hole from the burred side, grab with pliers and pull through repeat till you have the size you need This is what Harold Underwood does with EVERY joint on his POF ship models *to make a draw plate (quick, nasty and effective) Find a bit of metal about 1/16th (1.5mm thick) mine is a disused brass dial disc using a masonry (hardened) nail - punch lots of holes in the plate using different force so as to produce different hole sizes there will be a pronounced burr on the back - good, it does no harm- but it could be partly stoned off to provide a sharp edge **Viking treenails would have been oak, and this might just work with White oak? other candidate woods might be ash or poplar. If you let us know where you are in the world, we could probably make more specific suggestions to help. A window photo you posted showed wooden tiles/shingles, which suggested to me Scandanavia or North America keep up the good work andrew
-
Bill, you sound pretty laid back You have it right: very similar expressions in the spectrum of discombobulation. Louie da fly Many thanks for the food for thought and references. I was aware that the Sutton Hoo ship was really a not-ship (or ship-shaped void) and I admire the early diggers recognition of what they had and calling in archeologists. I believe that the owning family had broken one plough too many on the stern or stem as they came near the surface, prompting the initial digging. More later ; we moved to Vermont and are loving it. Pronunciation note for our American friends. that's VER-mont here; not ver-Maant. but we have similar moonlight Next: the experts I am following with this build andrew
-
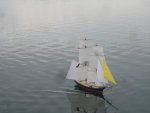
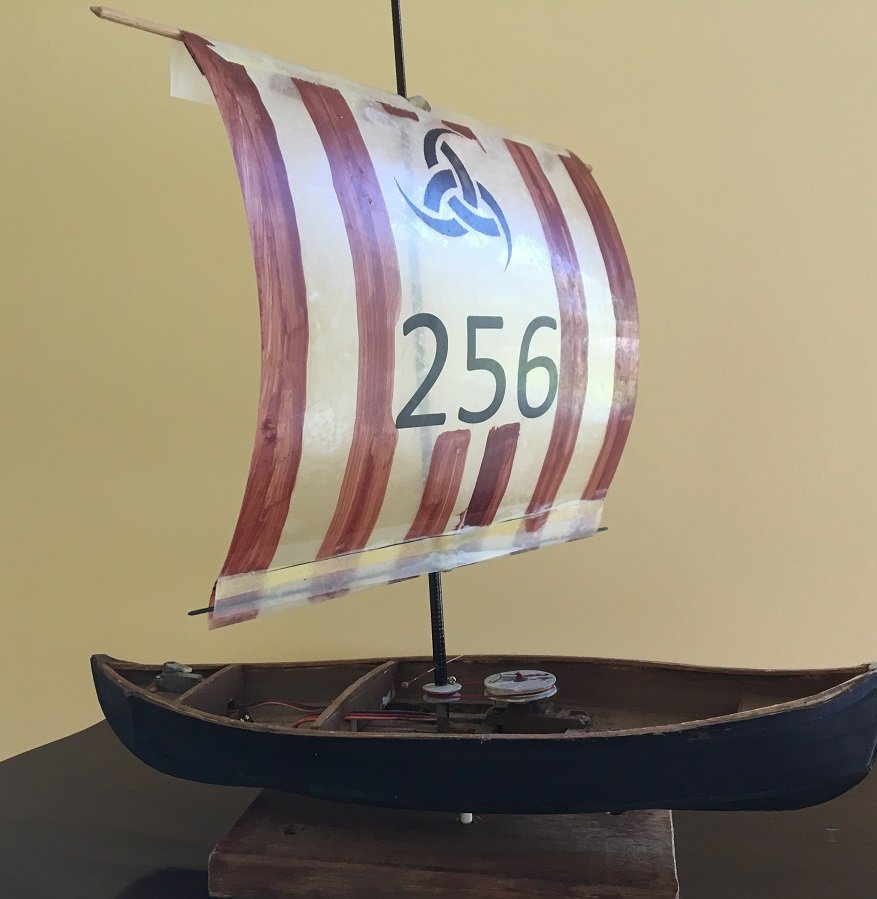
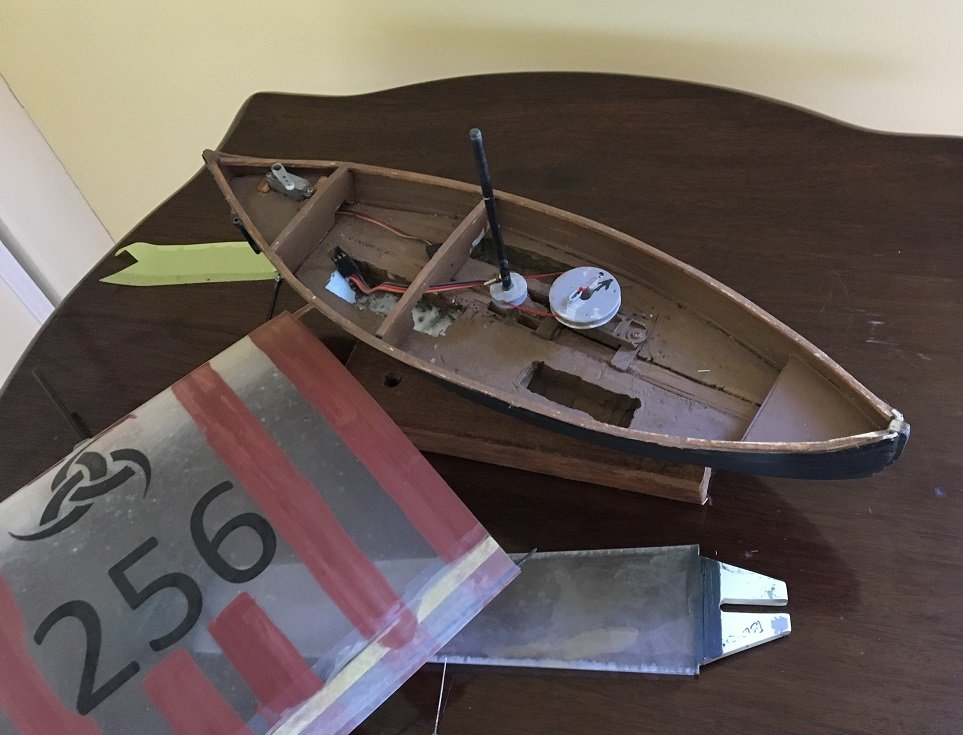
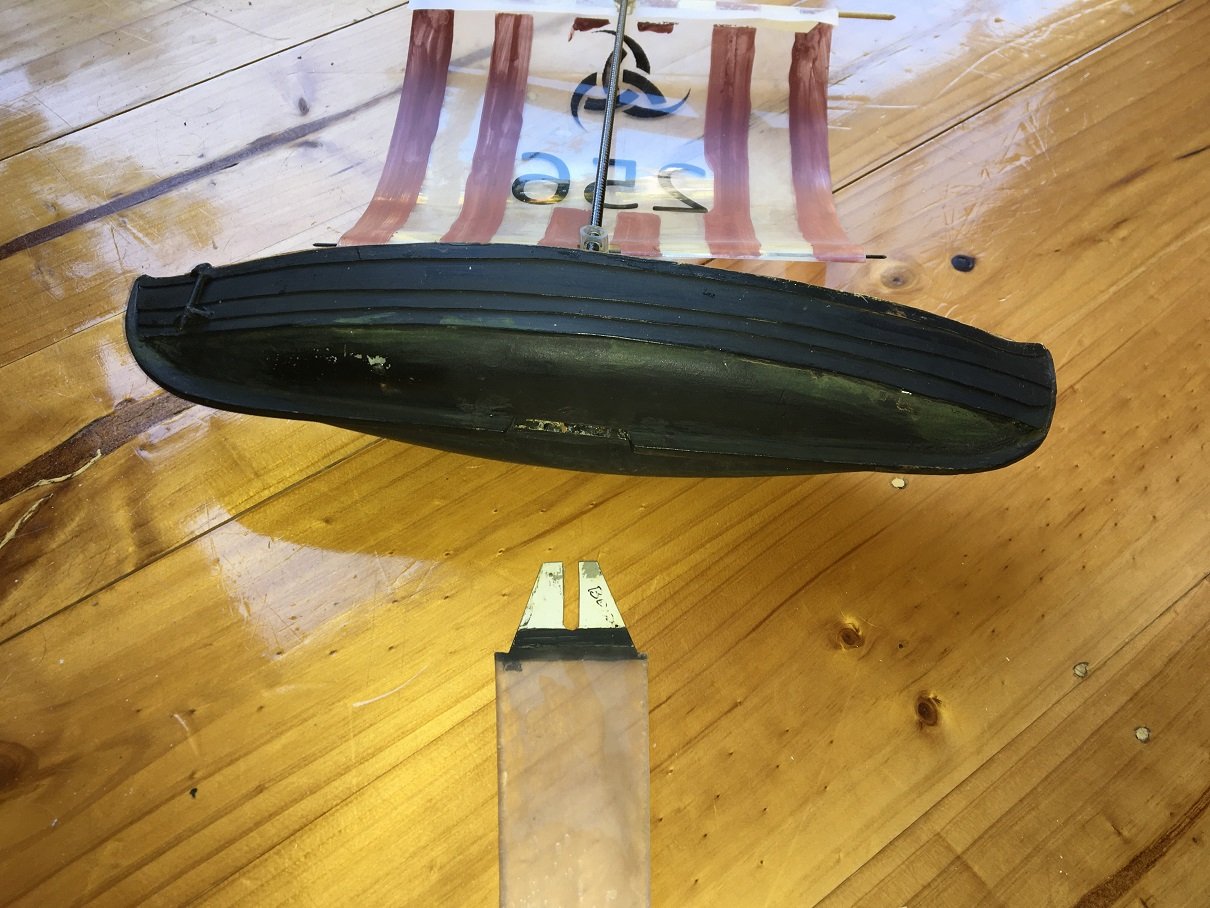
Thanks for the Views, likes and contacts Edwardkenway I'm sure there are plenty of challenges ahead with the Oseberg ship; some of them stemming from the kit, and the rest from my skills and mind-set. I am a little reassured that many of the builders report the strakes assembling without too much difficulty. And speaking of strakes and difficulty, here is Rødolm as she is now (probably a "he" in reality. I was told that the name means Red Dragon) AHA - i b'lieve that I have found how to drag a picture into text Every day, if you are not careful: you learn a new thing The "works" Fixed carbon mast pivot which rotates 170 degrees with pulleys. mast slips over and is pinned to the base. Sail is fixed to mast and made of heavy drafting film. Steering by steering oar (naturally) which was not in the box, but has a scale wooden oar painted on a large polycarbonate paddle-shape keel splits round mast base and is pinned in place Keel is 2mm polycarbonate and coarsly matted to make it less obvious the strakes over blue foam are visible (I could not do extravagant sweeps up at stem and stern because of the Footy rules, same reason as why there is not a Dragon head (at the moment) Batteries were 4 x AAA cells soldered up in pairs and painted to not stand out as they nestled in the cutouts Enough about wee bits of history - onward with the real star of the piece andrew PS Picture sizing? is this tolerable/ about right?
-
We have here a bad case of Byzantine rowercarvers arm, Janet! We must administer the antidote! a pair of boxing gloves and a Lego speedboat Daftness apart I have appreciated your approach to the unknowable, discussion and sensible resolution of each issue as it appears andrew
-
First model ship kit build: First build log on MSW. Be still my beating heart! The Kit: Billings large model of the Oseberg Ship (1/25). This turned out to be Billings part number 720 and has plywood laser-cut shields, and laser-scored scrollwork in ply (More on the laser and ply later as the build commences) The kit was a Christmas present (2018) from my lovely Admiral, and was ordered and obtained from our local model boat shop Float-a-Boat. It took about 6 months to arrive but this was not a worry, as we both had plenty to do since we had just moved house. By the way, "Oseberg" in Australia is pronounced "Osssburg" I'm sure I could have obtained it cheaper and faster, but the end cost would be huge, as real model shops will not be there unless we use them I failed to take the ceremonial unboxing and layout on the carpet pictures. Sorry Not much in the box, as longships do a LOT with a little material. Some dowels, stripwood - all obechi as far as I can see, sail material, build instructions (which make IKEA instructions look encyclopaedic by comparison) and a double sided full size plan, which includes (some) dimensions for the build Jig Why a Longship? I love them! I went to see the Sutton Hoo museum in Suffolk, UK and was smockraffled by the model of the reconstructed boat in the entrance. It's about 1.5m long and I remember seeing it's bow from water level and realising that I want to make one of them. So since that I have been reading about the construction - actual and model. I have learned of the wide range of boats in this style of construction then and now. I can remember walking round Stavanger harbour in the 1980s and seeing small boats whose construction and fastenings are clearly cousins of the Oseberg ship Confession. I have Previous Form In the early part of this century I raced Footy Radio-control (sometimes) yachts and progressed from state-of-the-art carbon masterpieces designed by Angus Richardson (he designed the 507 Footy still sold by Melbourne's RadioSailingShop) to satisfying scale gaff-riggers such as Presto (https://www.woodenboat.com/boat-plans-kits/presto-footy) I was asked by Angus to make him a Drakkar to the Footy rules to act as his Admiral's barge on ceremonial occasions, so I made one, learned a LOT and made him the requested Drakkar called Rodolm with an Angus-designed pattern on the sail (photos follow if anyone is interested) The lower hull was carved blue foam (to the sections of the Gokstad ship) with about 3 strakes above the foam to make the hull. The keel allowed a removable polycarbonate keel with lead ballast to be inserted. Mast was exactly in the centre of everything and sail was fixed to the mast. Both rotated up to 180 degrees to allow close-hauled sailing on either tack. Now regrettably Angus had poor sight, and Rodolm had low and symmetrical prow and stern (as it had to comply with the Footy rules) and sailing her turned out to be a challenge for him. I added a staff and mylar streamer to the stern to help him with orientation and wind direction. Info: "Footy" yachts have to fit in a Box 12 inches long x 6 inches wide x 12 inches deep. (Rodolm did) I am aware of venturing into a huge forum of skilled experts with diverse knowledge. Please feel entirely free to dive in and comment, help, suggest solutions and/or request more (or less) information To come in next post: The build so far Mine is a Friday Kit Decisions about Floor levels There will be no Ply edge visible! The Giants on whose shoulders I an planning to stand andrew
-
Many thanks, Ryland Craze That's a good thing to know, Now I will not fear falling at the first hurdle andrew
-
Thanks, Steven for the welcome and practical advice. i confess I have been an avid lurker on your Dromon and reconstruction logs I aim to comply with the naming requirements by cutting and pasting ( with appropriate alterations) but as I do that the formatting of the title is not visible on the screen. I would go right ahead if I knew that I could edit the title page Strength to your carving arm! andrew
-
Possibly Antipodean Antique Navarchs? or Parsupial ShipRights?
-
Thank you all for the welcome. The “trial” picture appears to have posted ok, and I believe that it tends to demonstrate one of my qualifications to participate in a shipbuilding forum: vast quantities of assorted clamps ;-} Build log will exist as soon as I can get to my laptop andrew
-
Time to modestly make my number with you all. I have been lurking , awestruck, for several years; but feel a build log coming on A little about myself: retired Mech. Engineer living in the (locked-down) edges of Melbourne lifetime aeromodeller and boat modeller main boat interests are scale sailing, so even when building a scale model ship my mind (for want of a better term) will be wondering about ballast and sail control veritably I have a lot to learn, not least about the practical details of posting of this forum I have read large numbers of build Logs on the forum, and notice the helpfulness, patience and darn good advice offered, so I want to get my toe in the water I need to learn How to size and post pictures, how to caption them, if this is possible. Andrew

-
Beautiful Boat, Keith. Reminds me of Hoshi, the schooner I learned offshore sailing on. The keel slots I would cut undersize with a a fine backsaw, and gently file out to width, but I shall watch your progress with interest and quiet cheering from the sidelines. andrew