CDW
-
Posts
7,756 -
Joined
-
Last visited
Content Type
Profiles
Forums
Gallery
Events
Everything posted by CDW
-

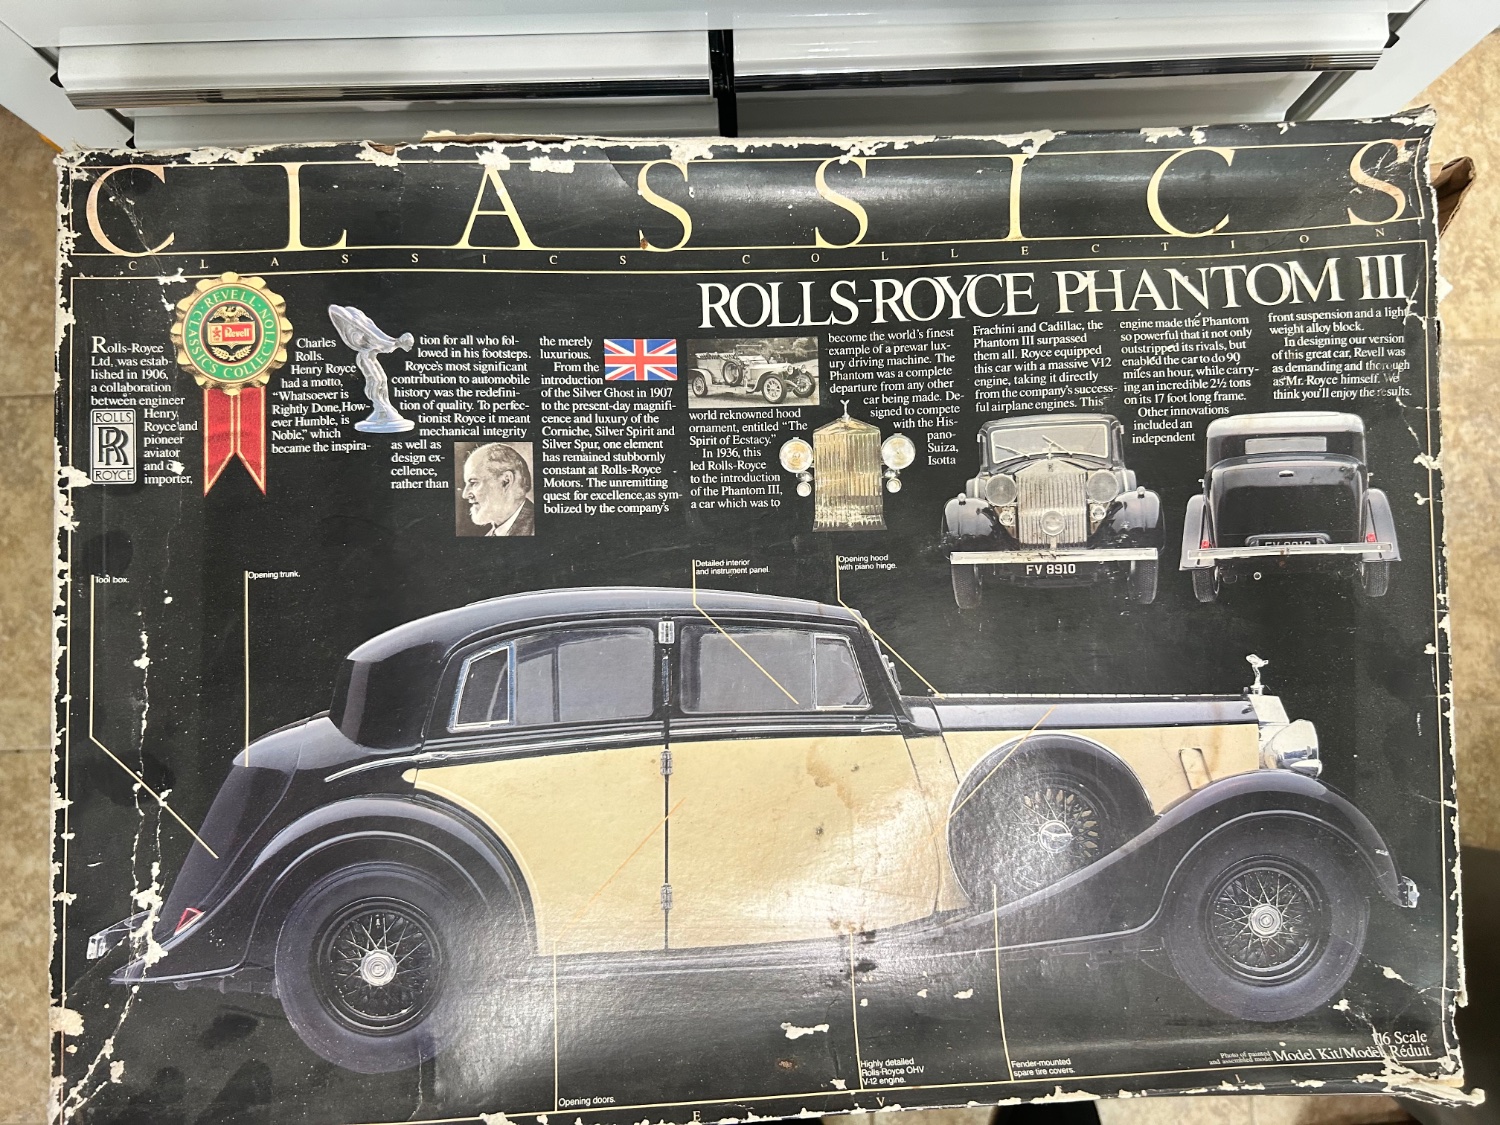
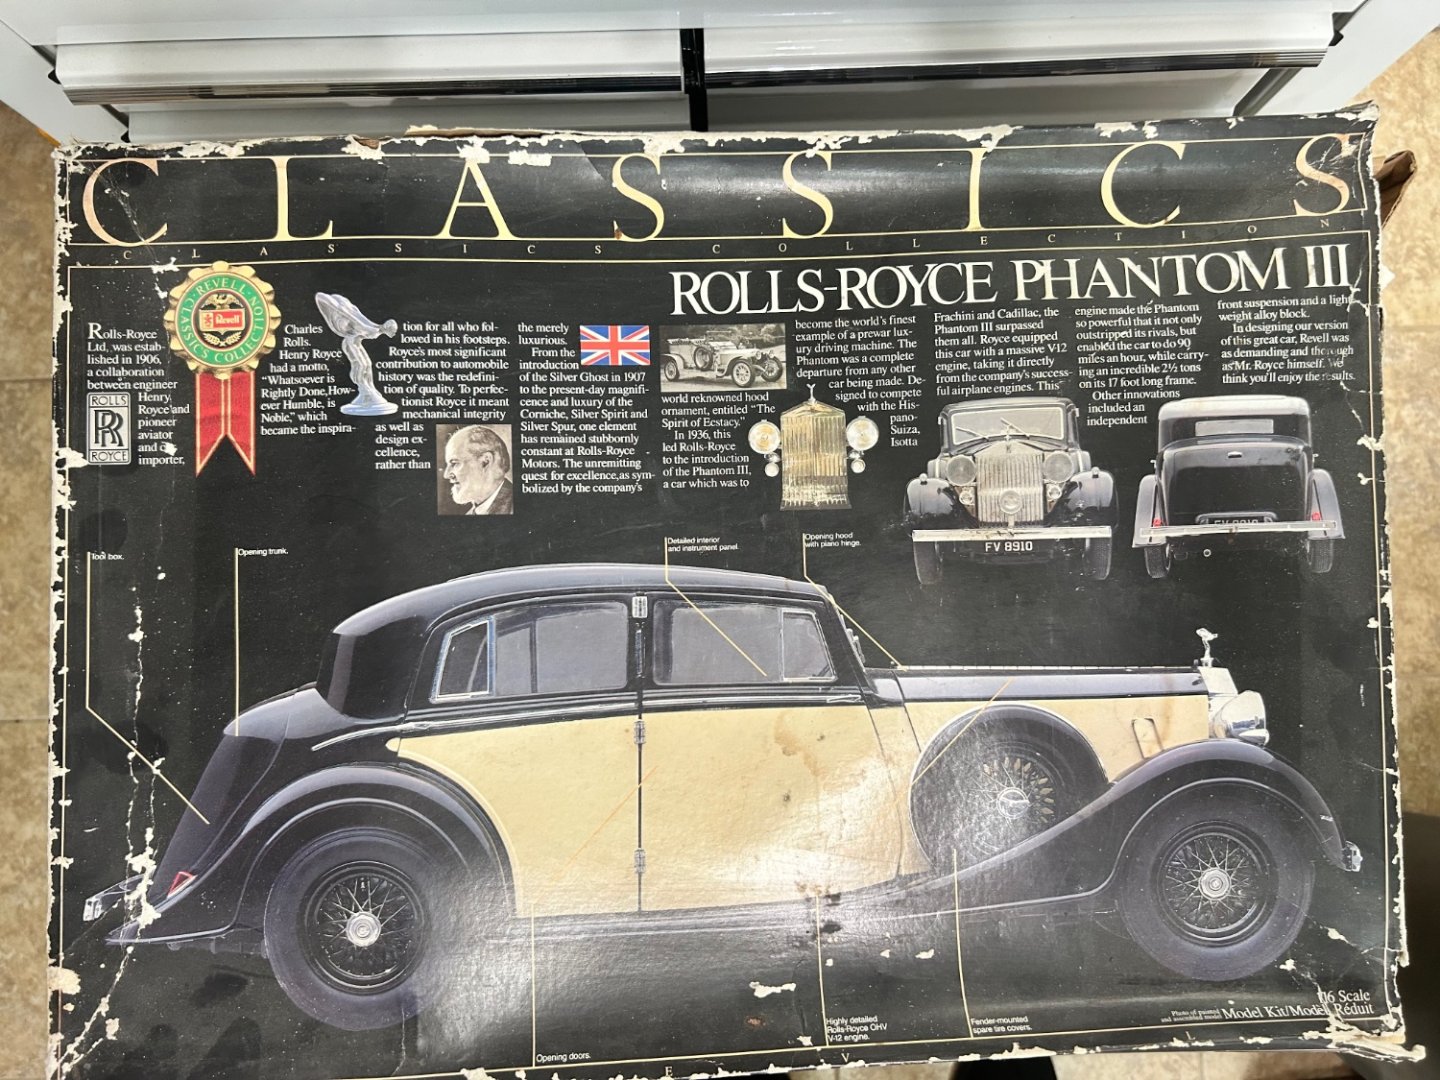
1936 Rolls Royce Phantom III by CDW - Revell - 1:16 scale
CDW replied to CDW's topic in Non-ship/categorised builds
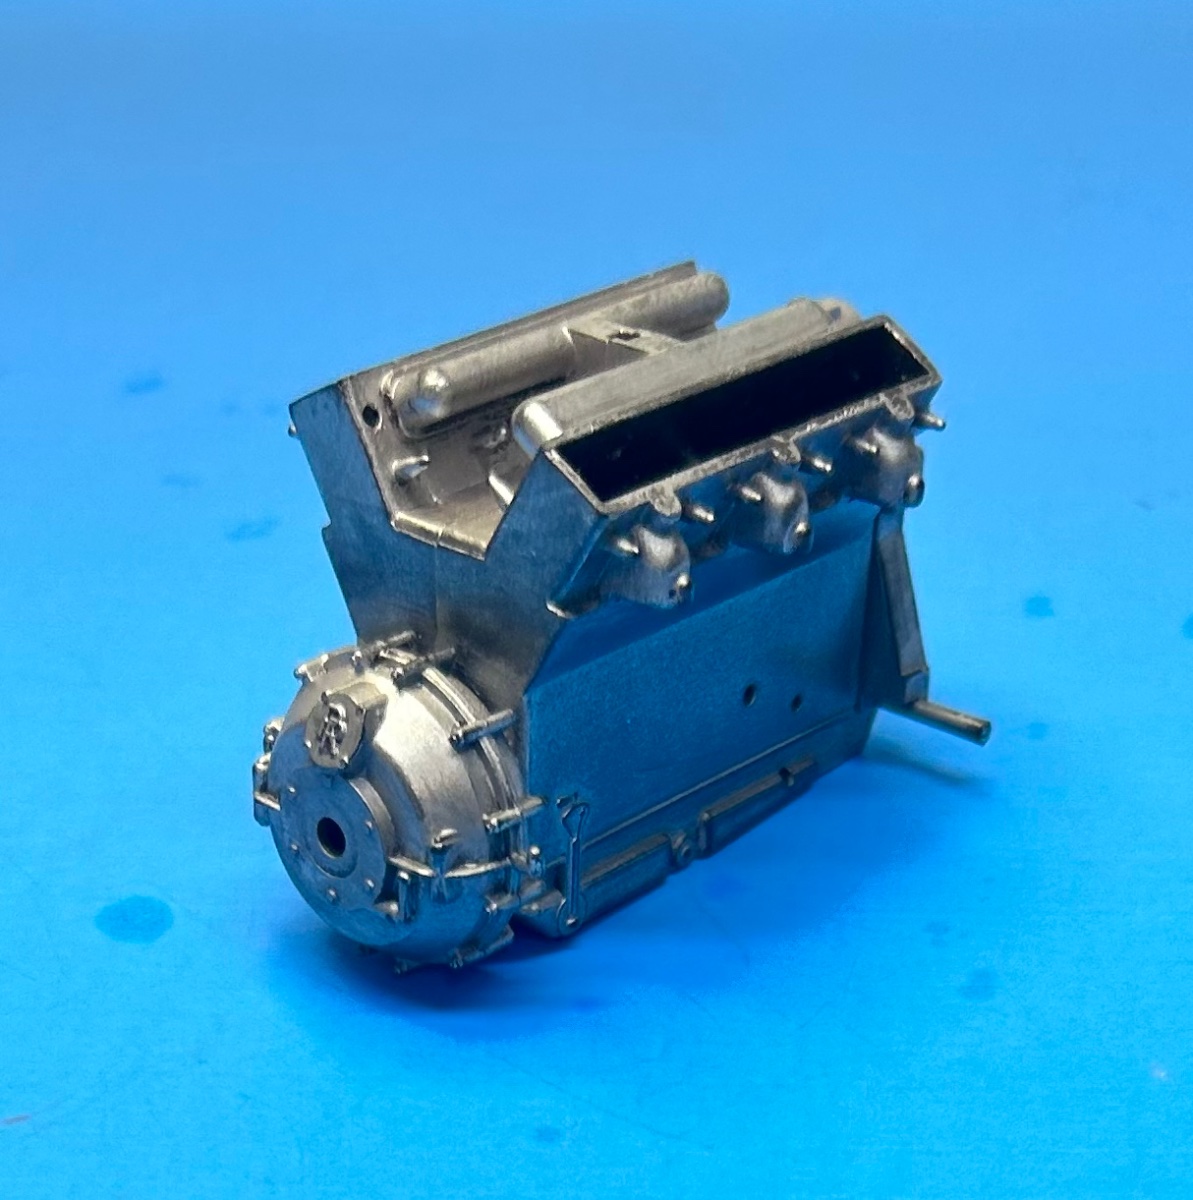
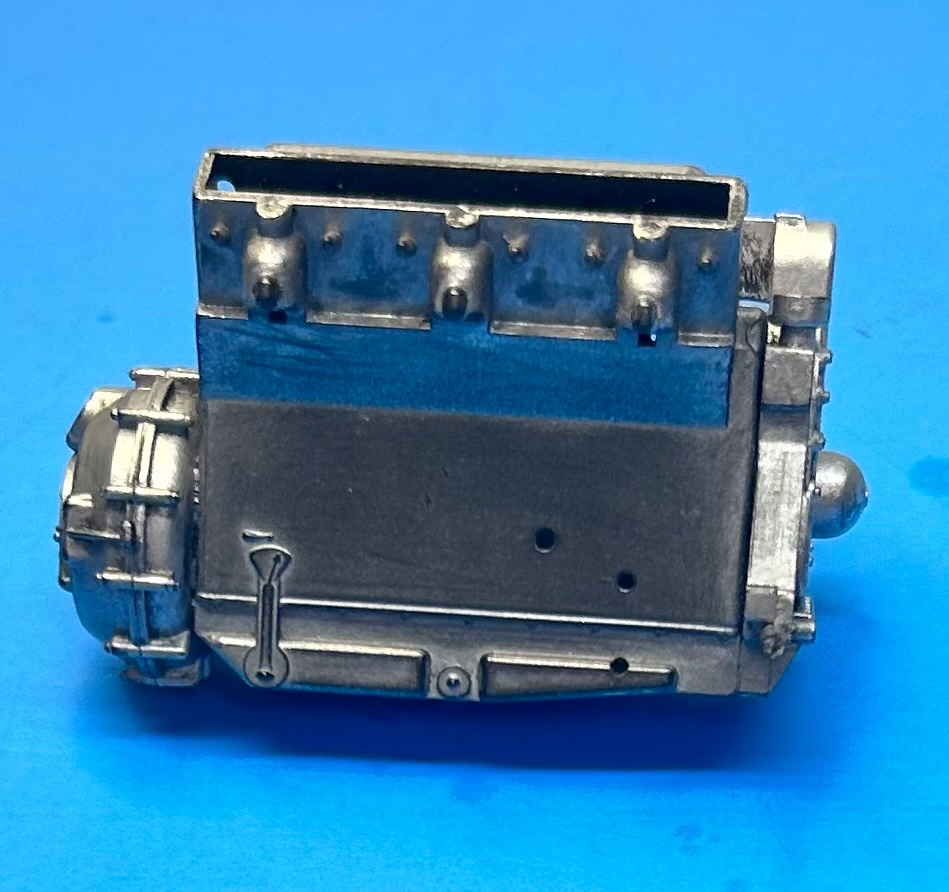
Couple of years ago, bought some tubes of AK True Metal wax paste in various metallic shades. I never got around to using it so decided to try some out on the Rolls V-12 engine block. Photos I’ve seen of the engine appear to be unpainted metal, so I first covered the engine block in a black primer then applied some AK true metal iron color then polished it a bit. Maybe it’s just me, but I thought it looked too silver. Next I applied some gun metal color and buffed it. It’s a shade or two darker. I think I like the gun metal for this piece. It’s going to get shaded and dirtied up a bit later so this will just serve as a base color for the block.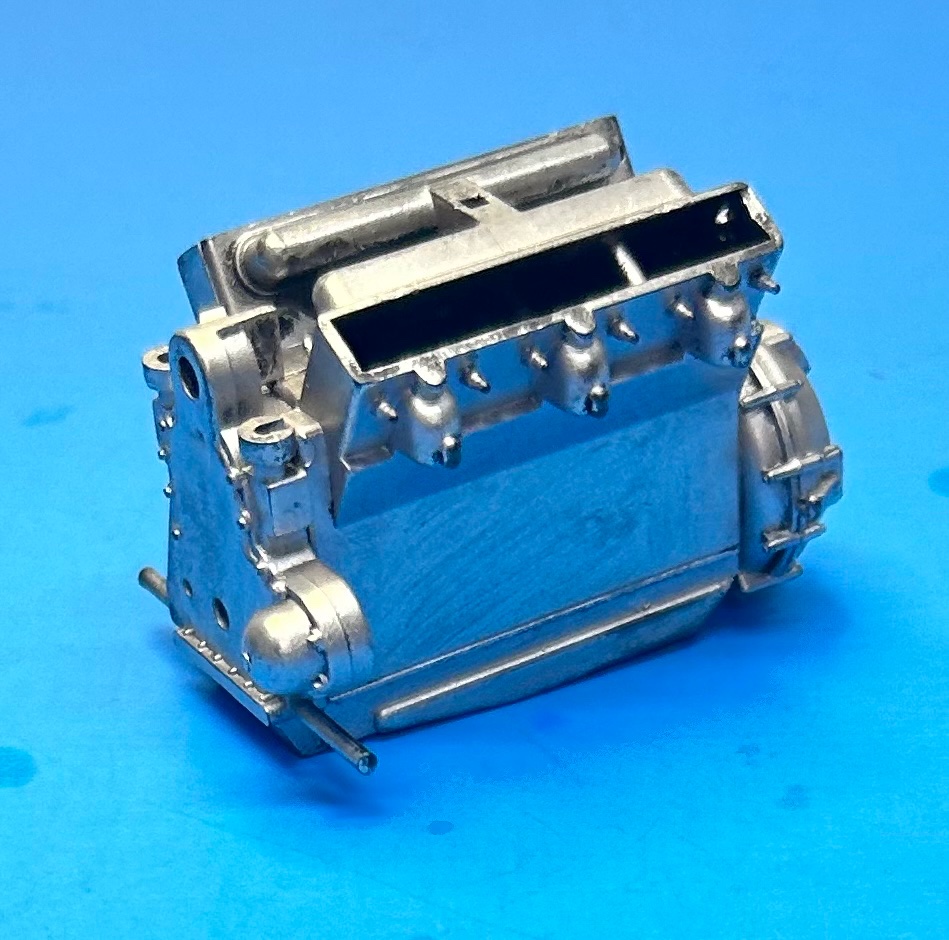

- 97 replies
-
- 13
-

-
Sea Harrier FRS1 by AJohnson - FINISHED - Airfix - 1:72
CDW replied to AJohnson's topic in Non-ship/categorised builds
Have any of you in the UK had a look at the newly released 1:48 Airfix Buccaneer yet? Their old one was challenging and I want to see the new one. Several of us did a group build challenge on the old one in the 90’s. It was a lot of fun. -
Sea Harrier FRS1 by AJohnson - FINISHED - Airfix - 1:72
CDW replied to AJohnson's topic in Non-ship/categorised builds
The photo etch set made a vast improvement on your Harrier. Looks great. I admire your persistence. Going to make a very nice little model when you’re done with it. -
1936 Rolls Royce Phantom III by CDW - Revell - 1:16 scale
CDW replied to CDW's topic in Non-ship/categorised builds
Probably one of the first things I'll do with this model is to strip most all the chrome plated parts. Need to start thinking about a jig to make my own spoked wheels, too. -
1936 Rolls Royce Phantom III by CDW - Revell - 1:16 scale
CDW replied to CDW's topic in Non-ship/categorised builds
Dang, I just started an old model that's been sitting around here for over 30 years and now learn it was worth almost half of that I needed to buy the 1:32 Border Models Lancaster (Wingnut Wings design). Sheesh...what have I done? Oh well, maybe I can sell it built. Done that many times before.- 97 replies
-
- 10
-
-
1936 Rolls Royce Phantom III by CDW - Revell - 1:16 scale
CDW replied to CDW's topic in Non-ship/categorised builds
About 30, maybe 35 years old now. They reboxed a Japanese kit for this...Aoshima I think. Edit: I just checked: it was from Gunze originally. -
1936 Rolls Royce Phantom III by CDW - Revell - 1:16 scale
CDW replied to CDW's topic in Non-ship/categorised builds
About 30, maybe 35 years old now. -
This represents a change of plan. Had intended to start a F-4G Phantom next, but now decided to do this instead. This kit has been in my possession a very long time and it’s time to come out of the box.
- 97 replies
-
- 21
-
-
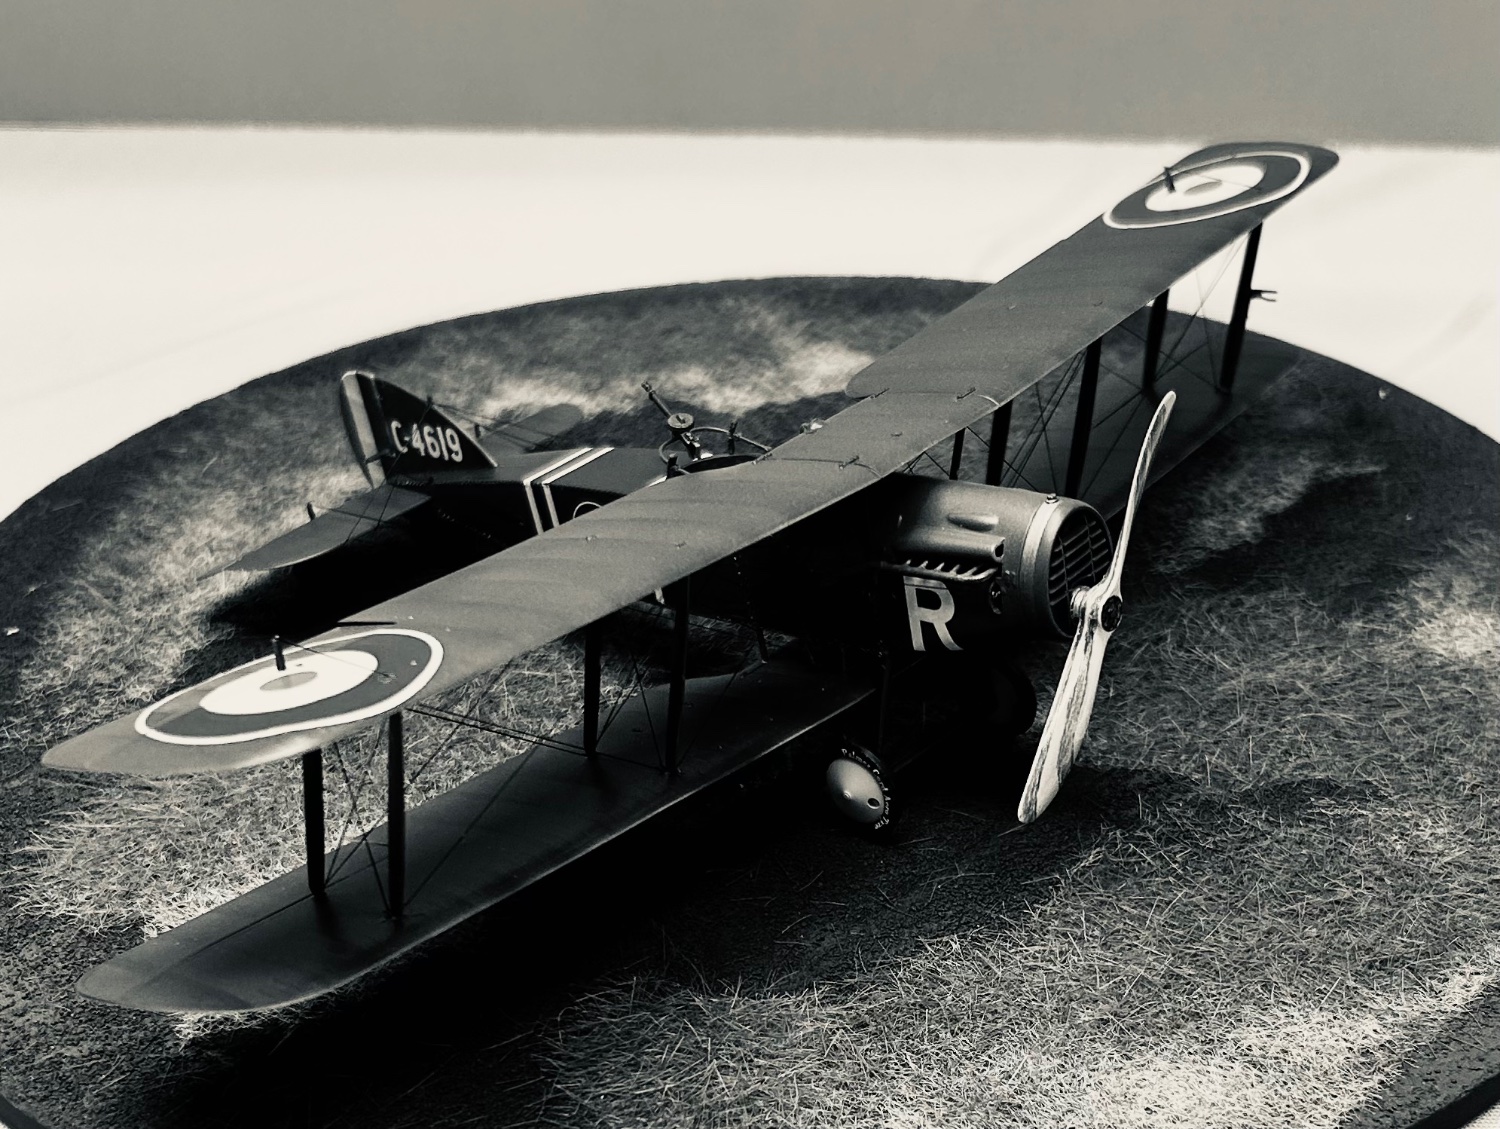
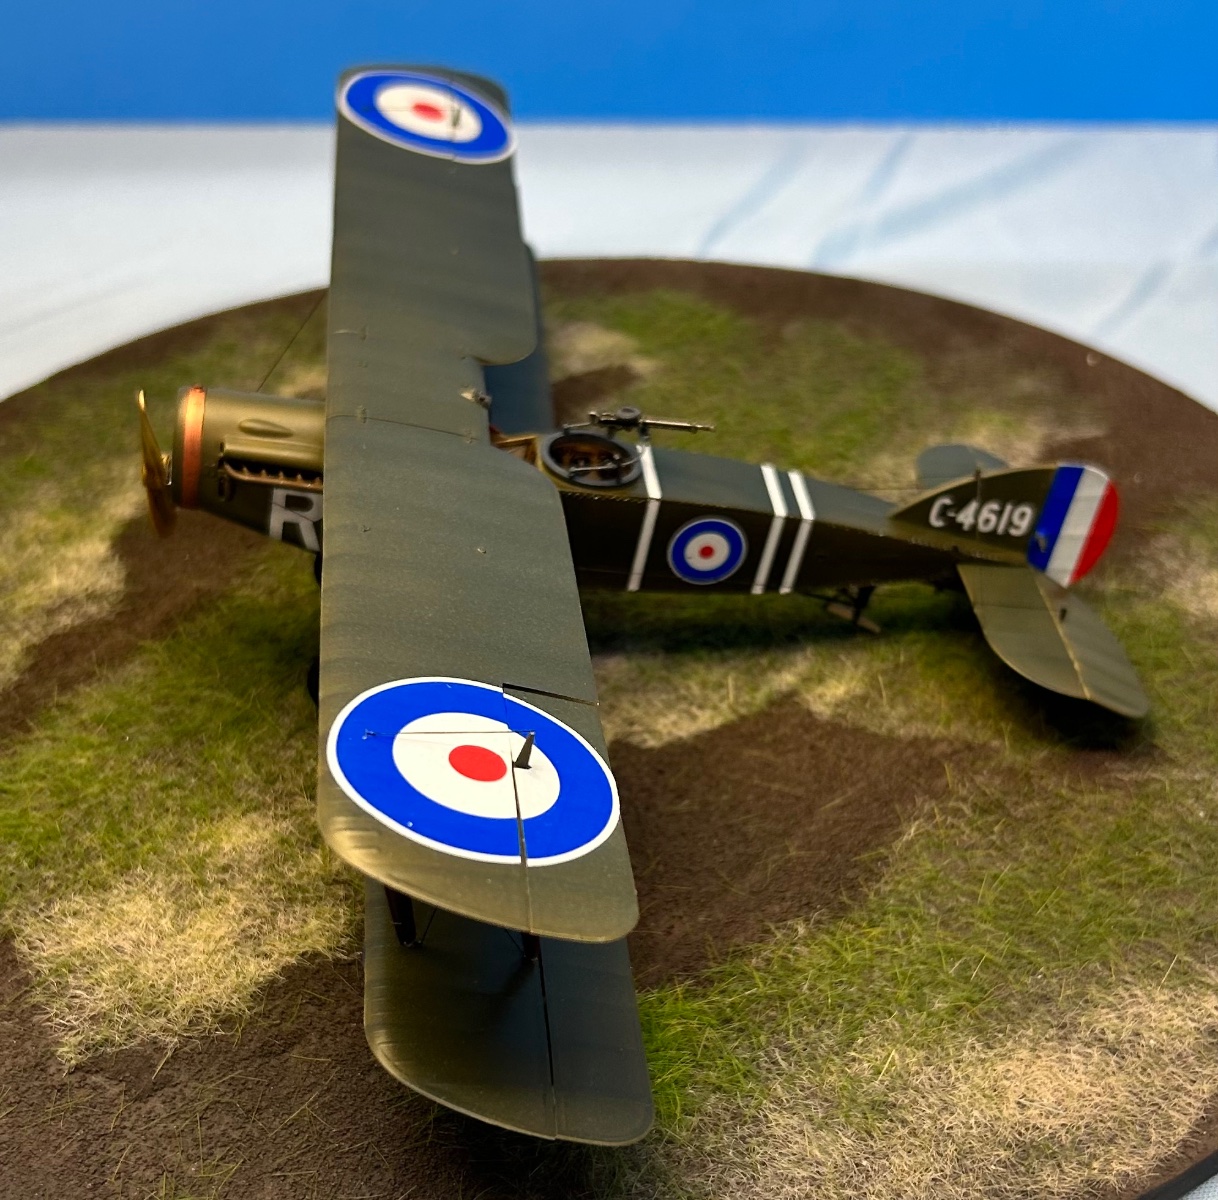
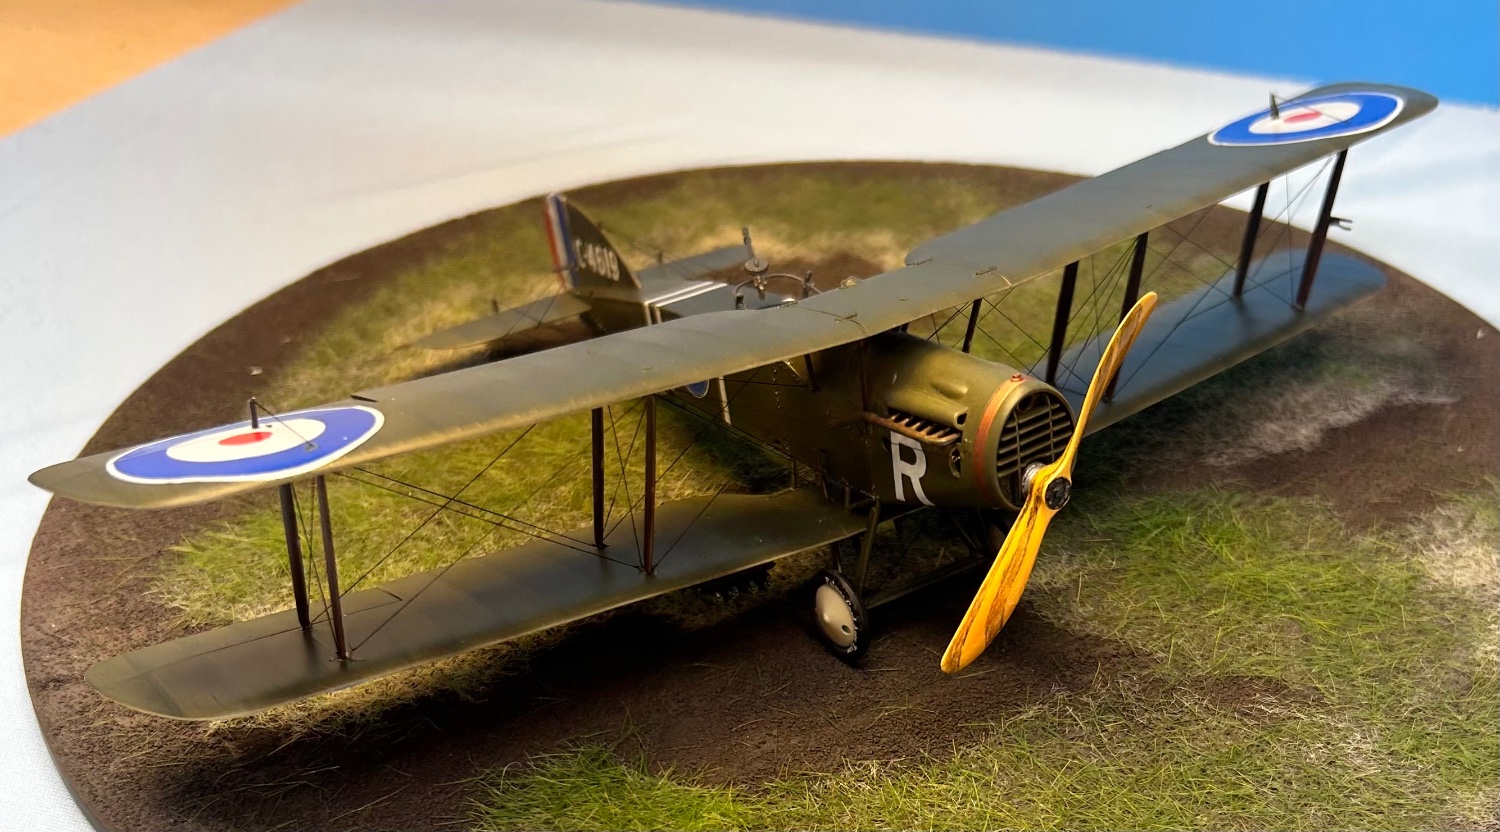
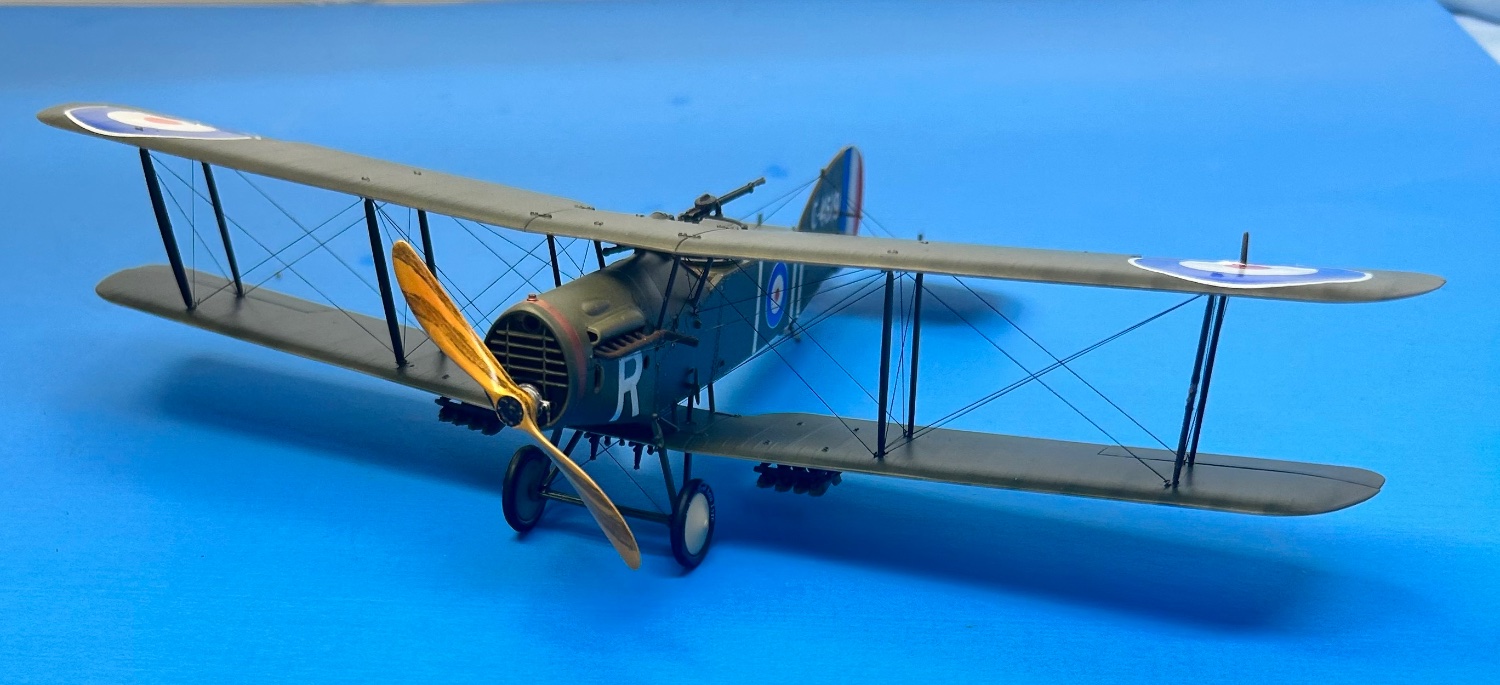
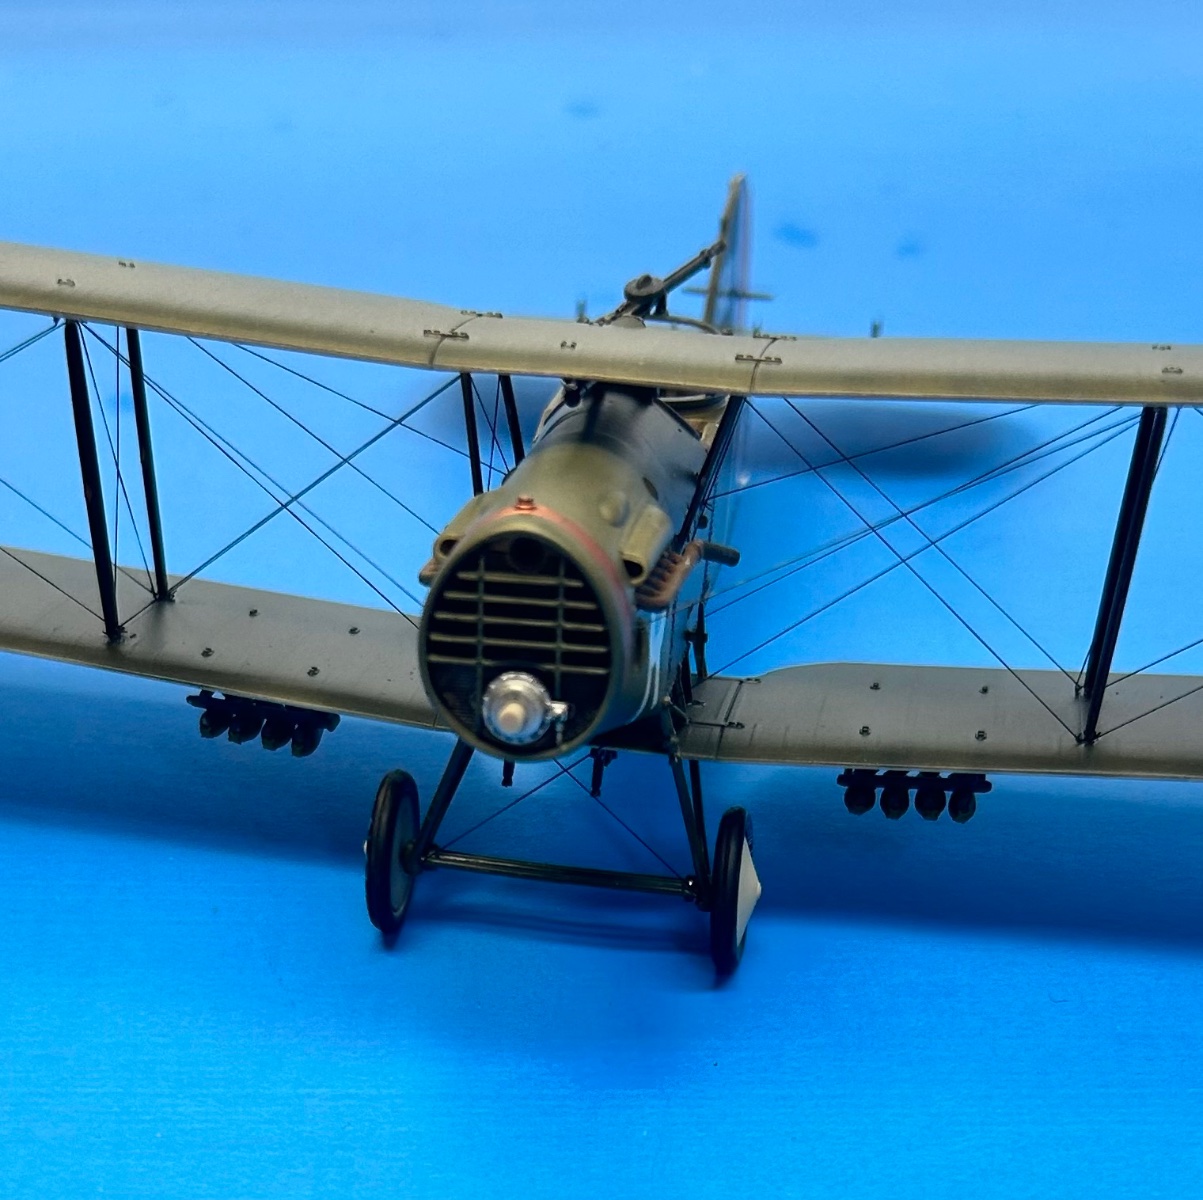
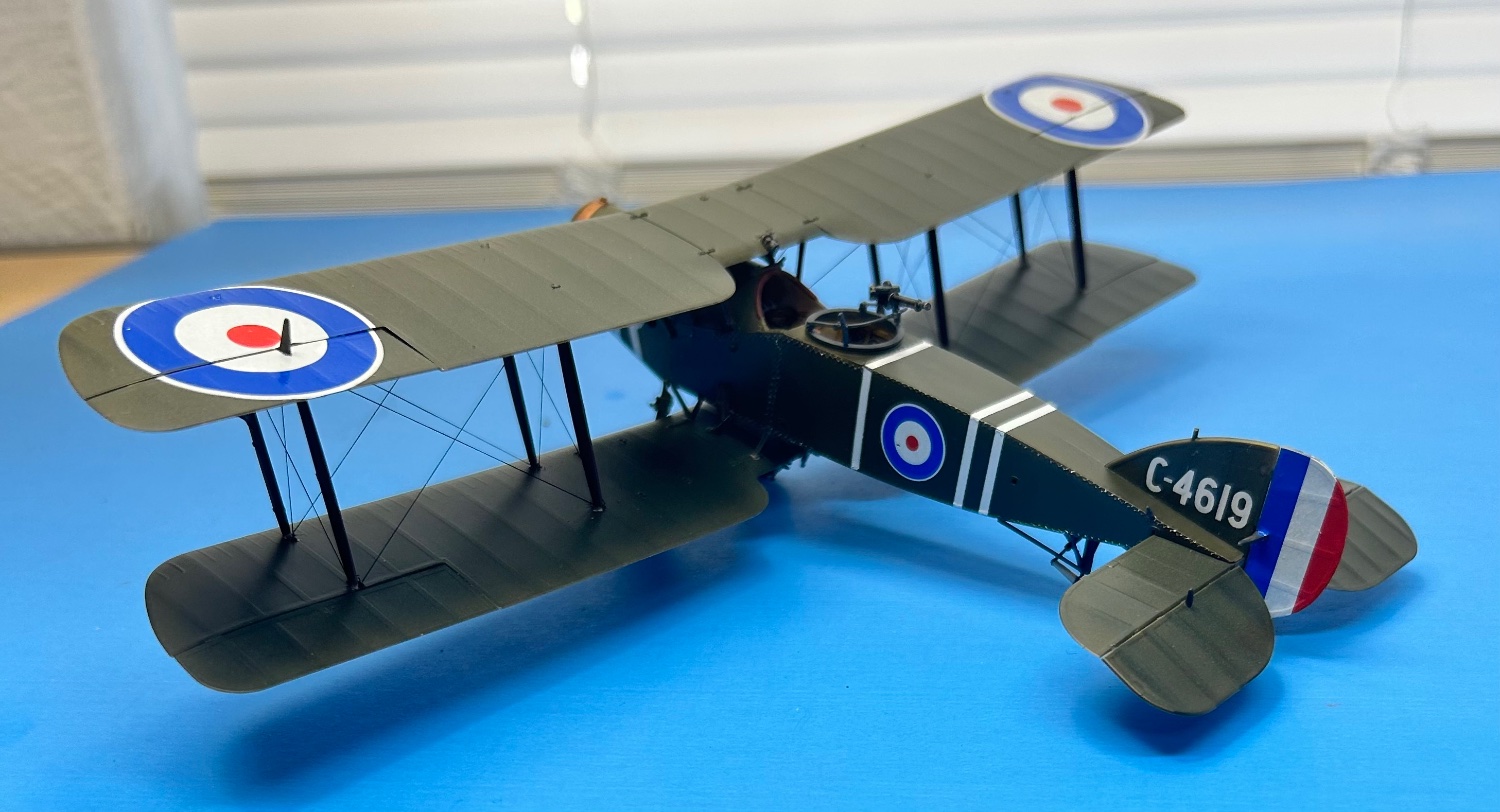
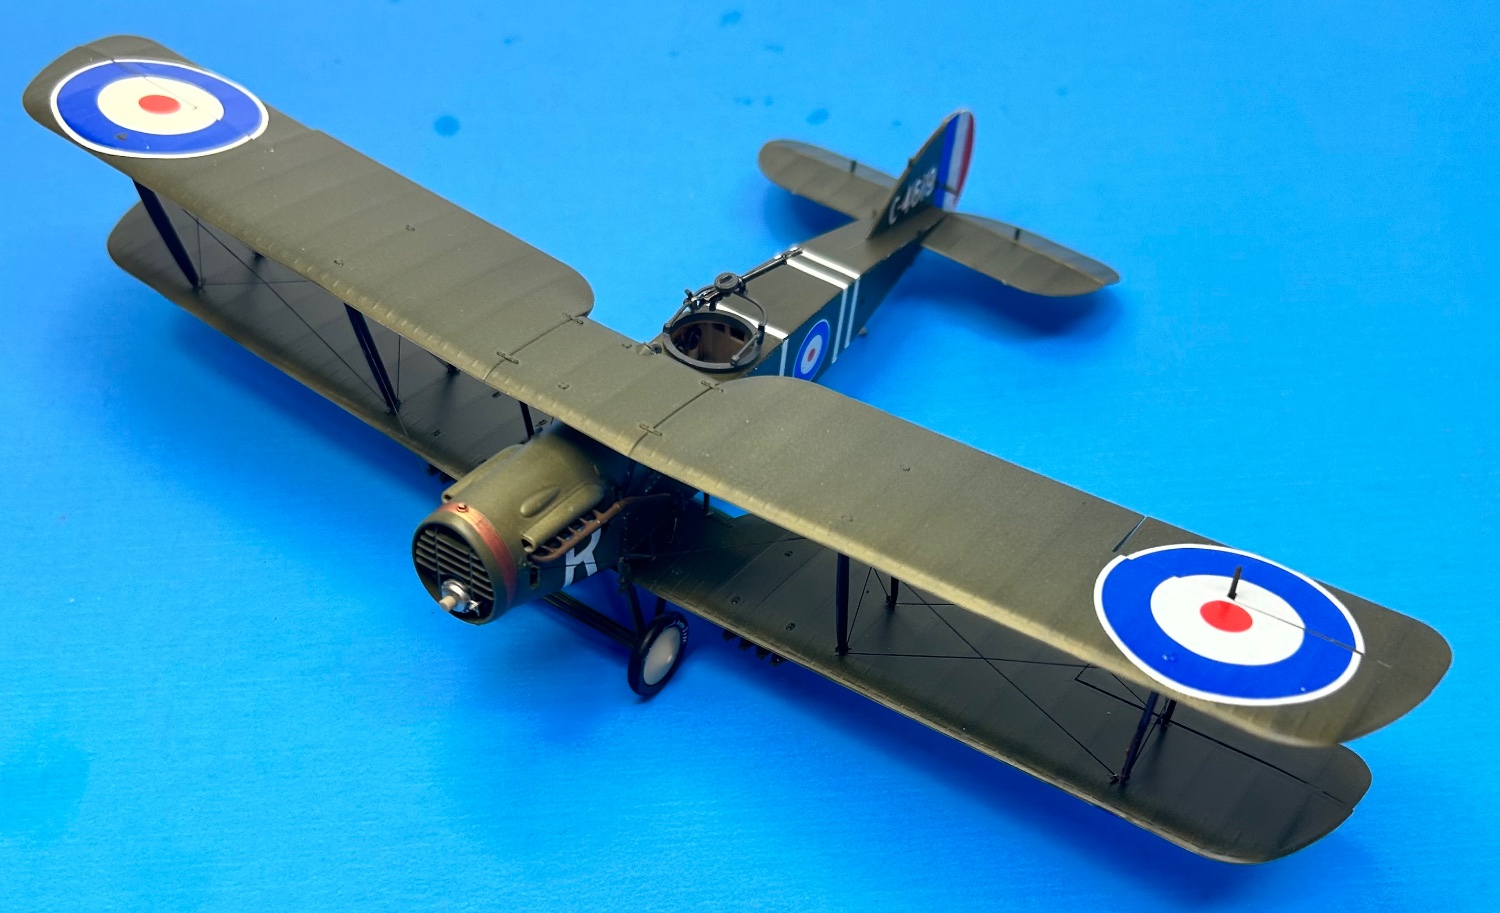
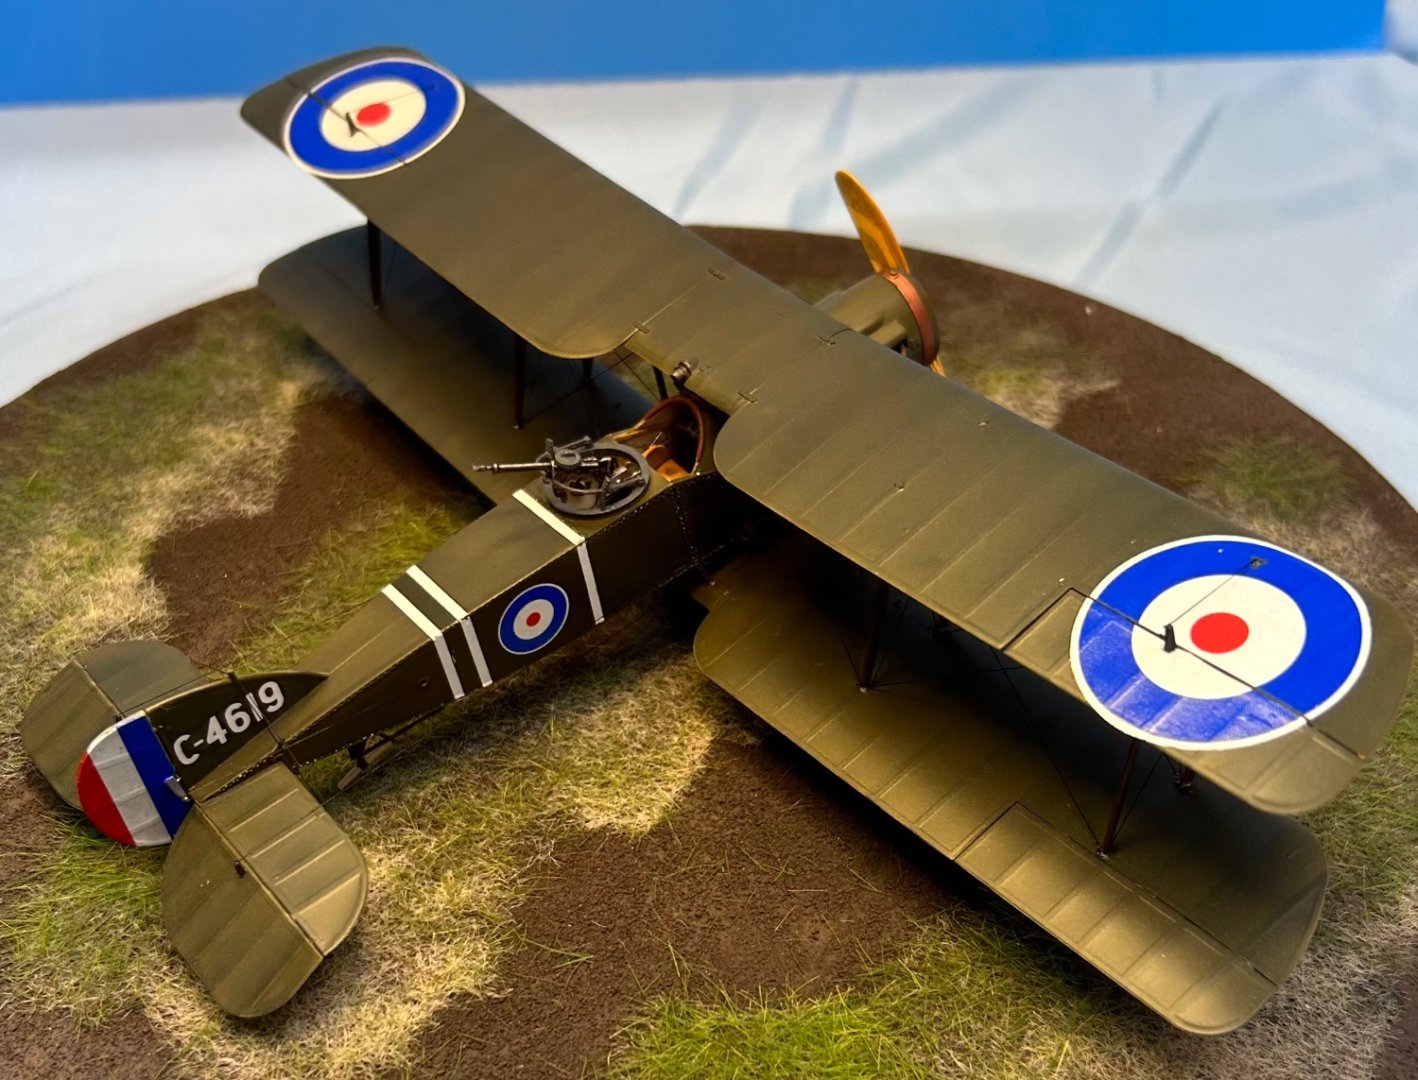
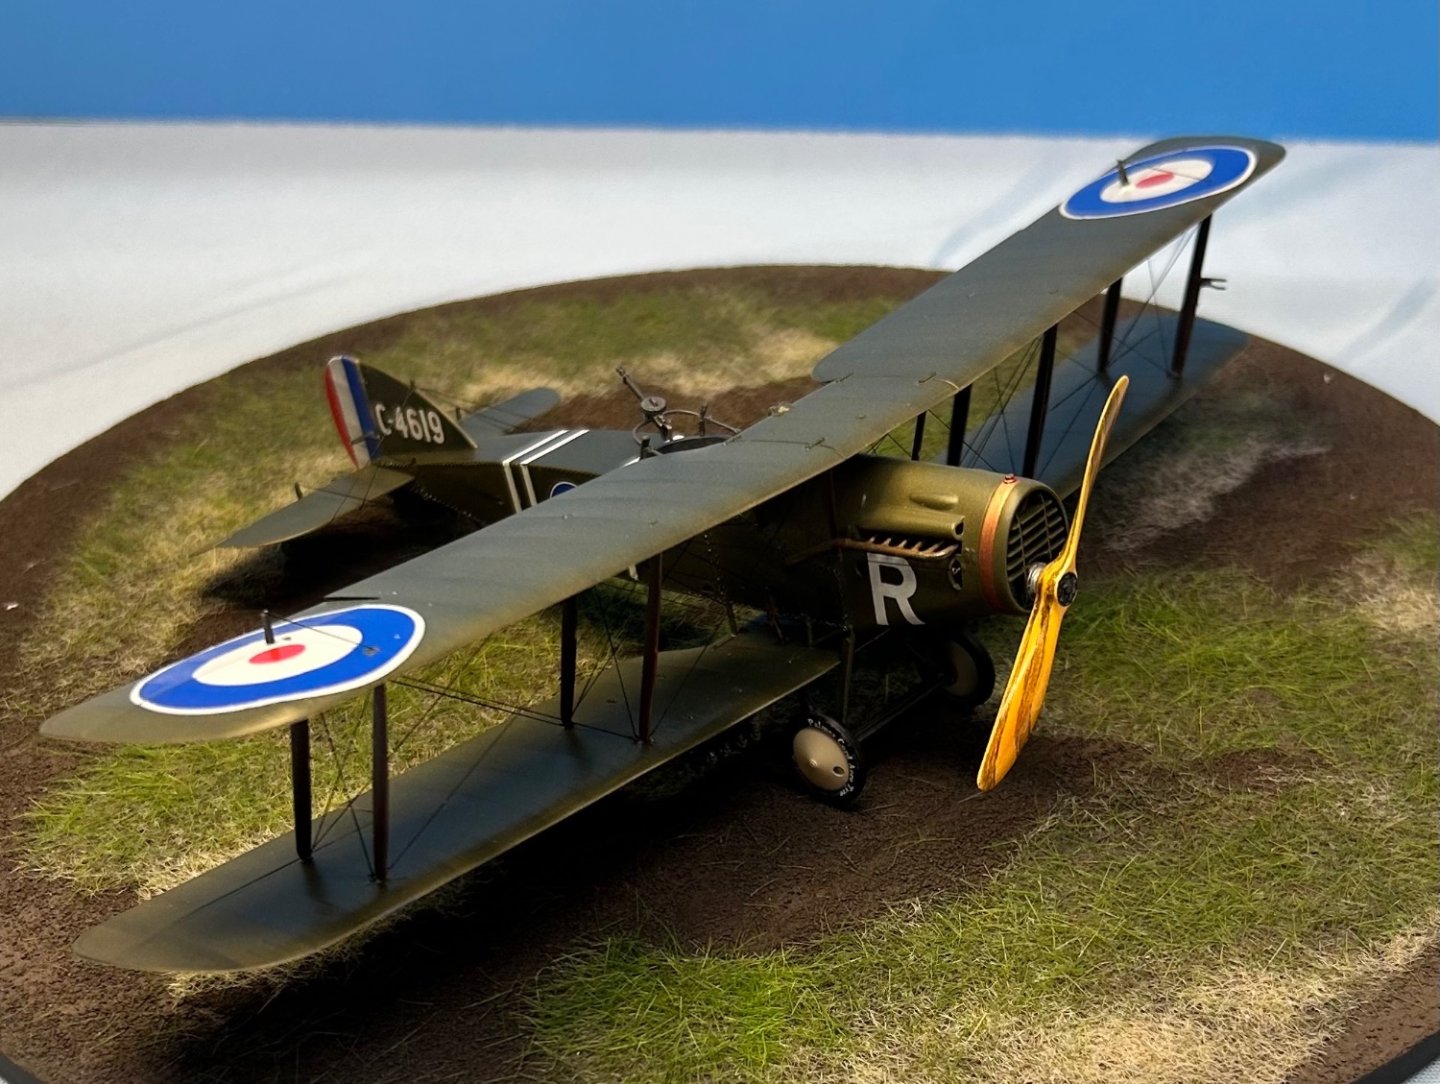
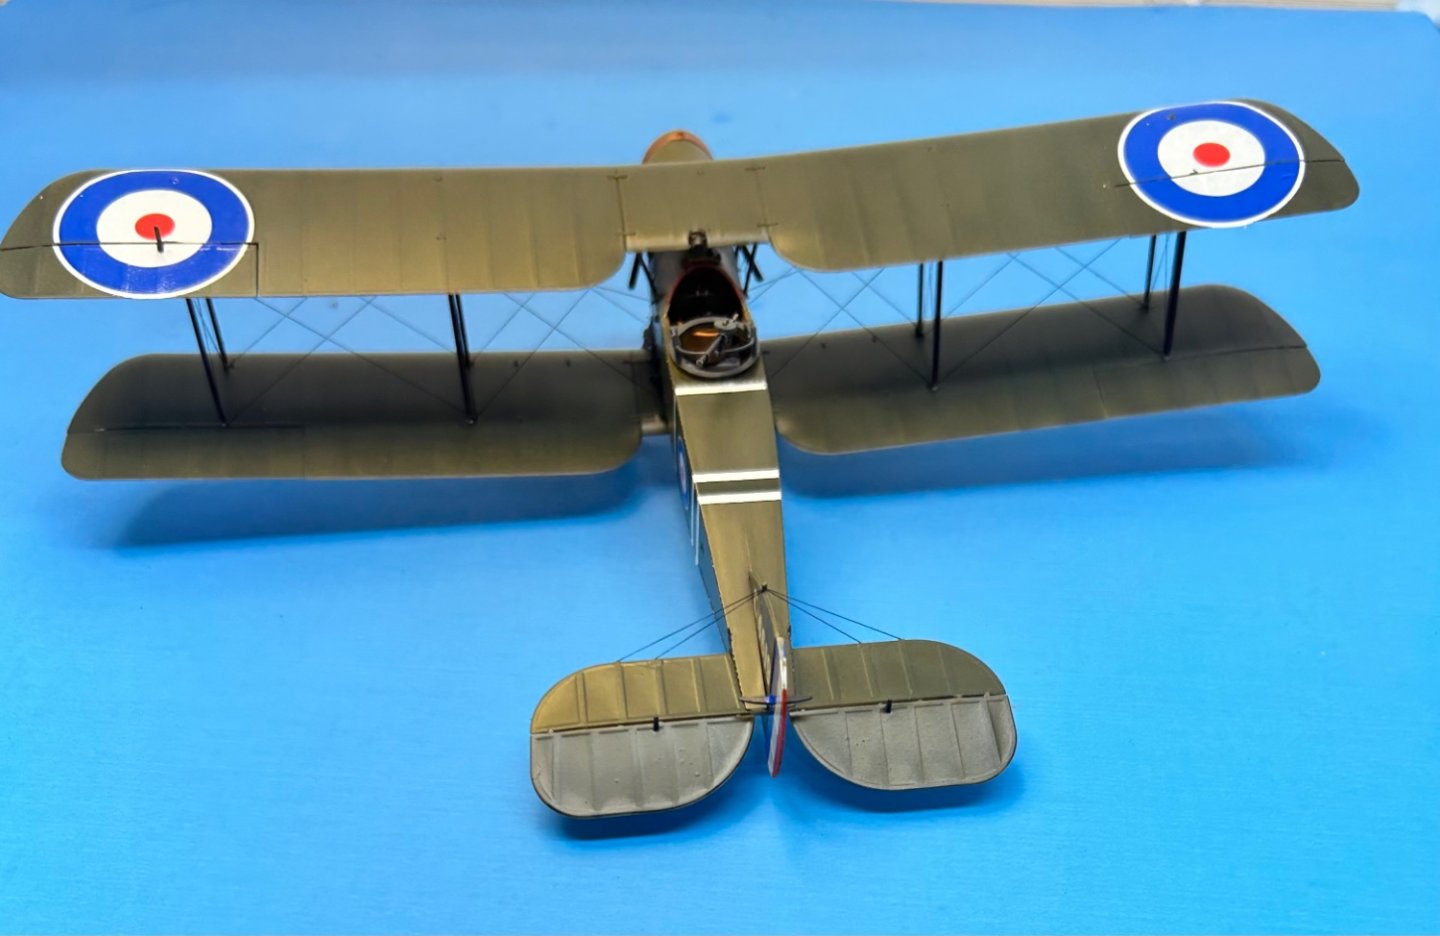
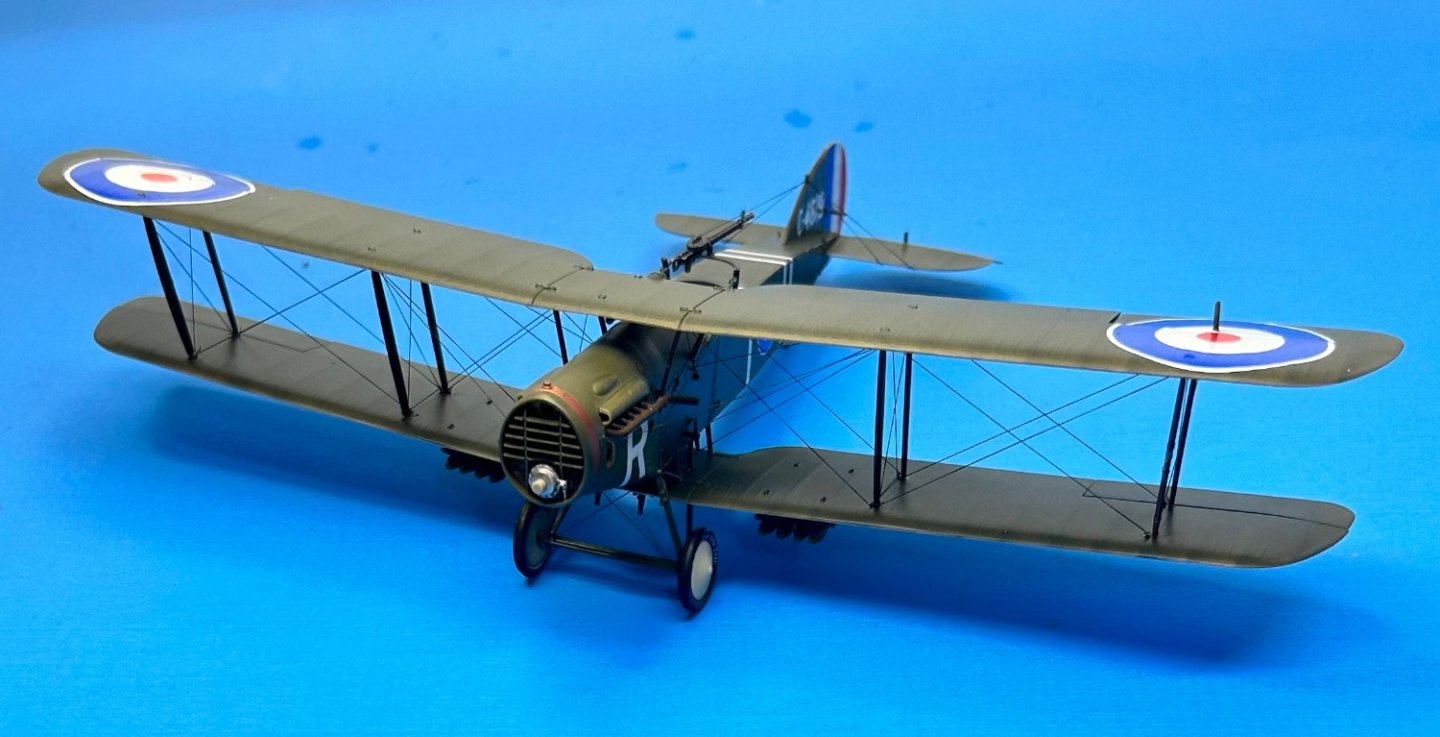
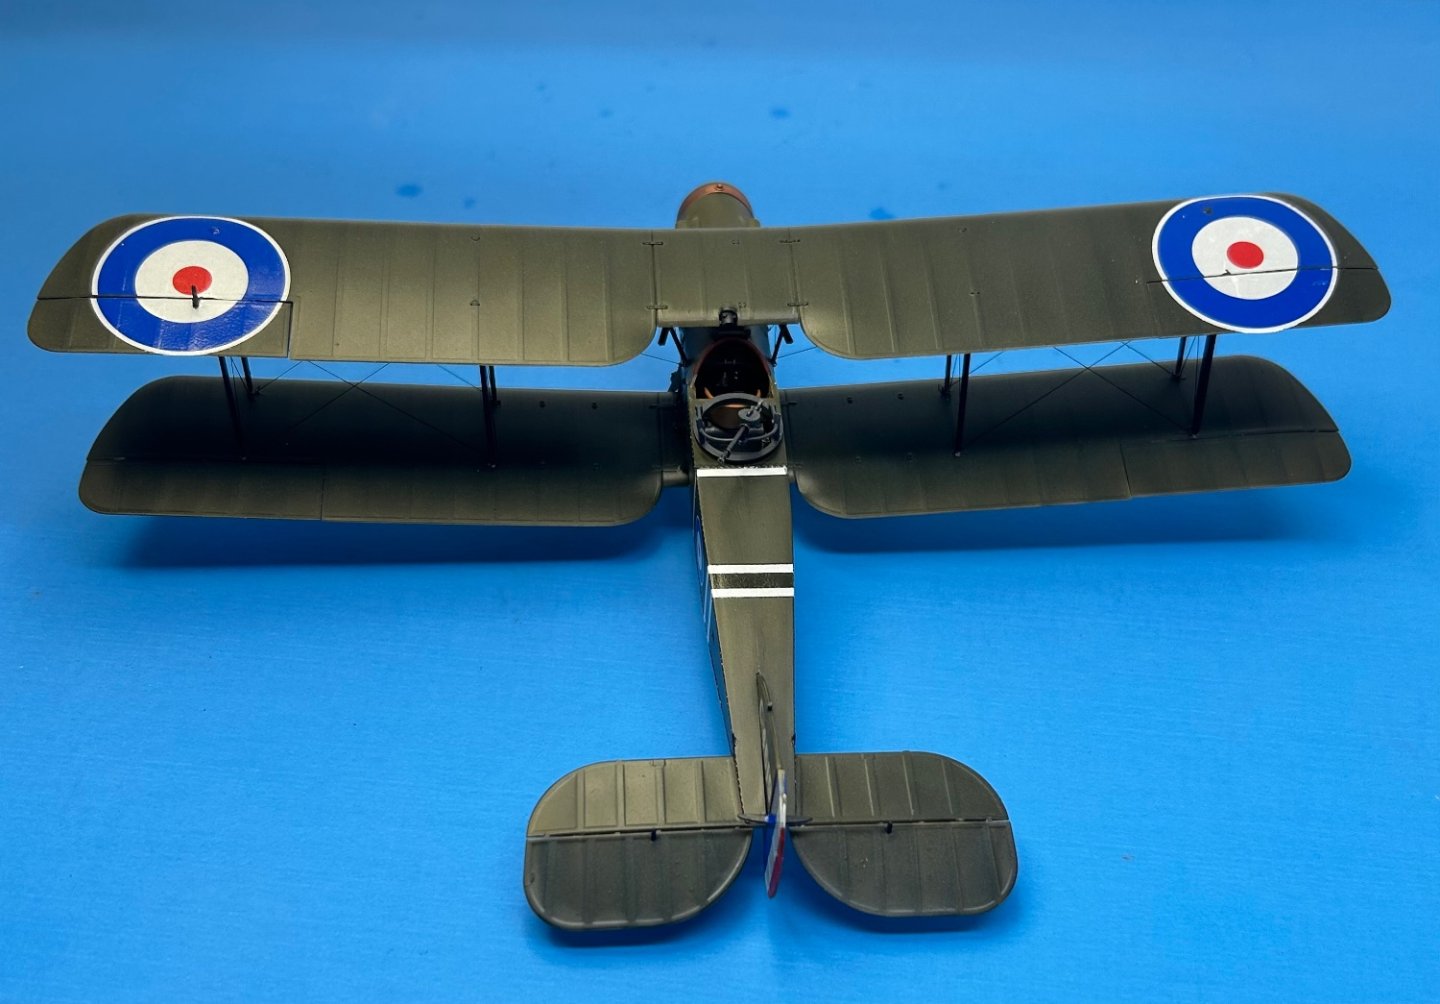
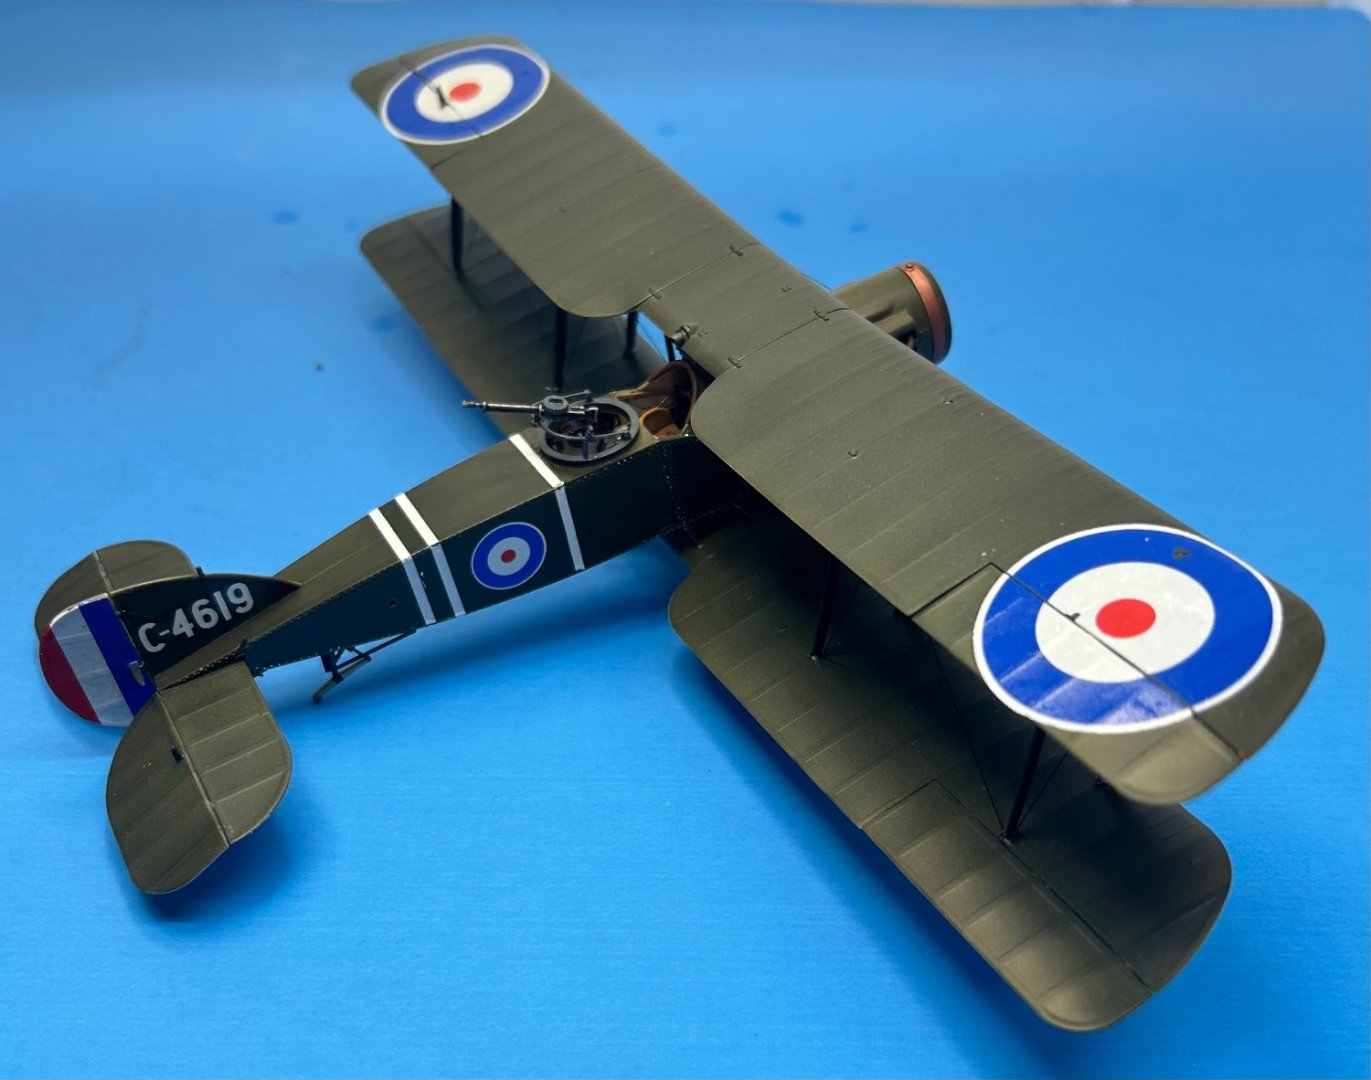
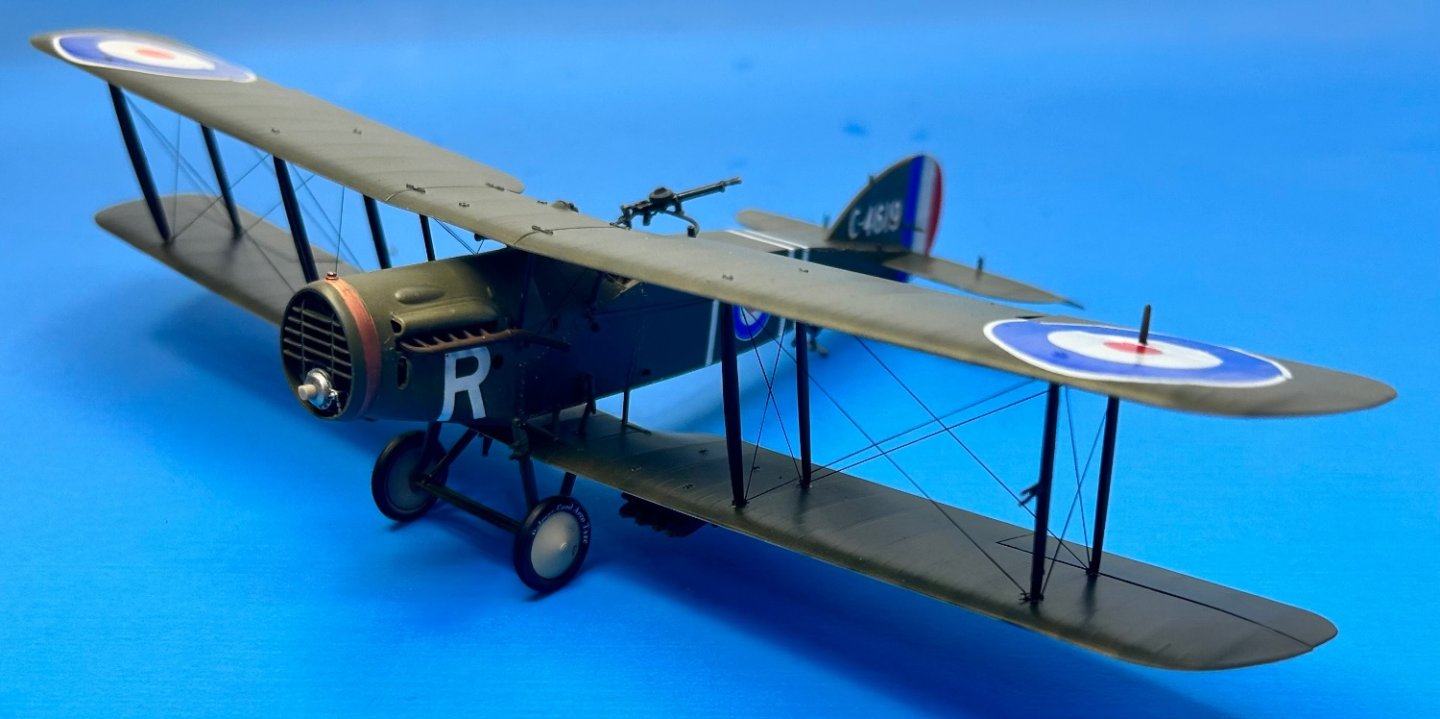
Bristol F.2B WW1 Fighter by CDW - FINISHED - Eduard - 1:48 Scale
CDW replied to CDW's topic in Non-ship/categorised builds
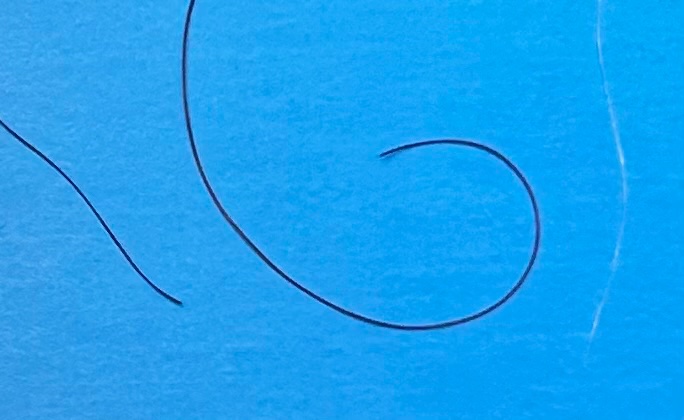
Yes, to mute the national markings primarily. I never tried it before, but this is a photo edit I found: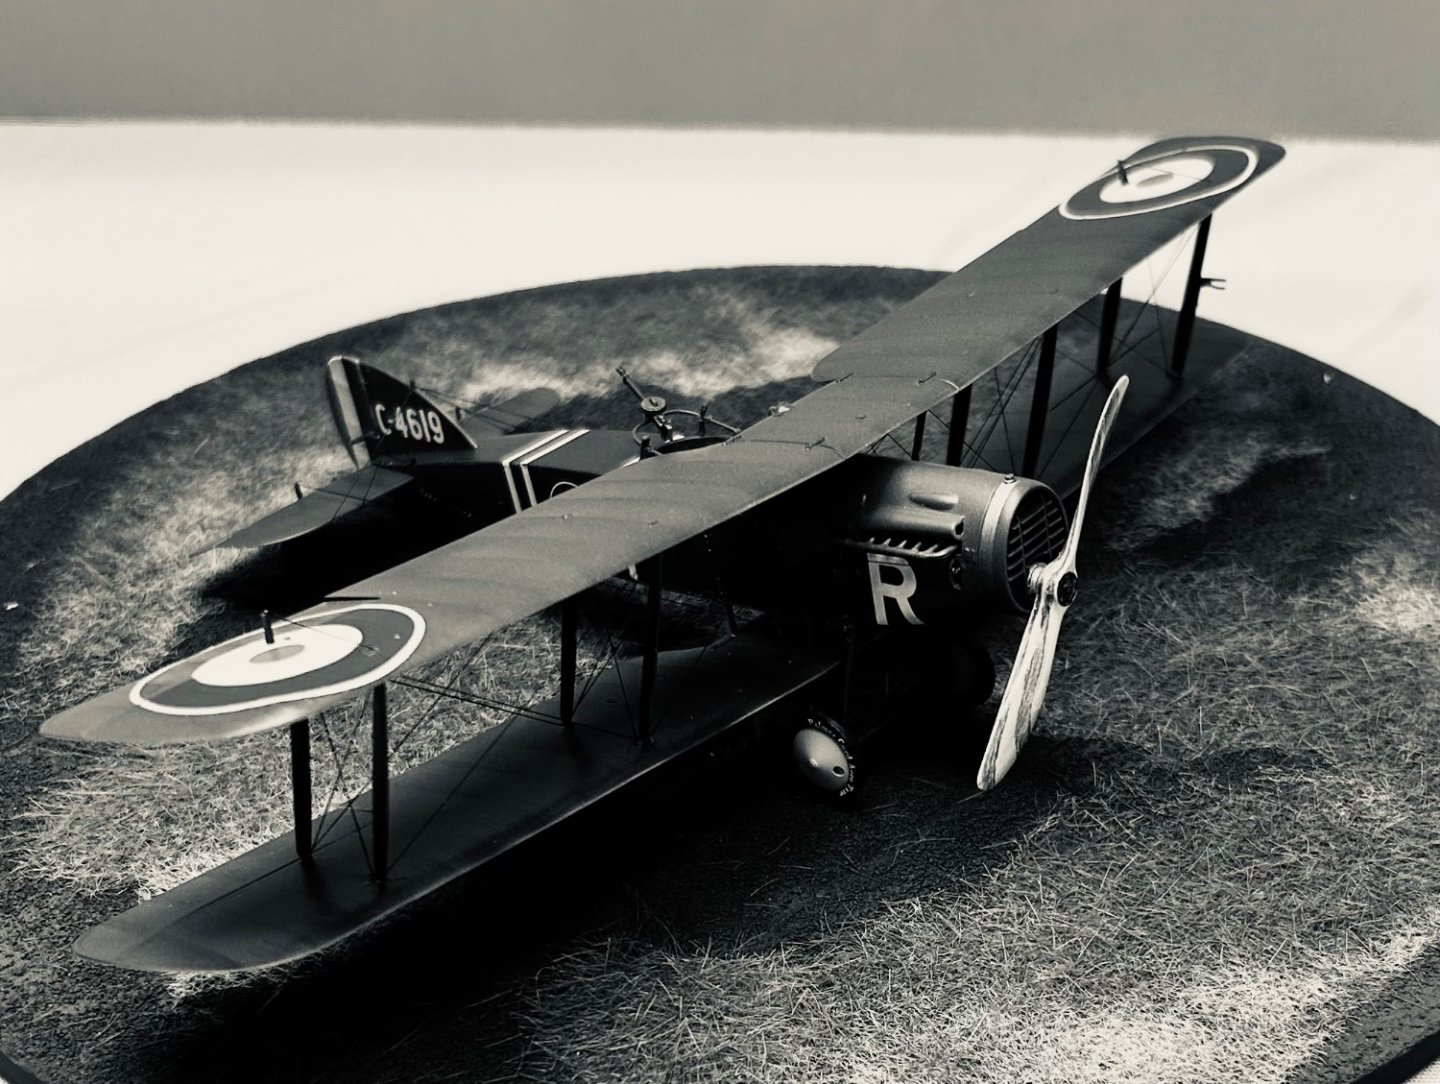
- 140 replies
-
- 13
-
-

-
Bristol F.2B WW1 Fighter by CDW - FINISHED - Eduard - 1:48 Scale
CDW replied to CDW's topic in Non-ship/categorised builds
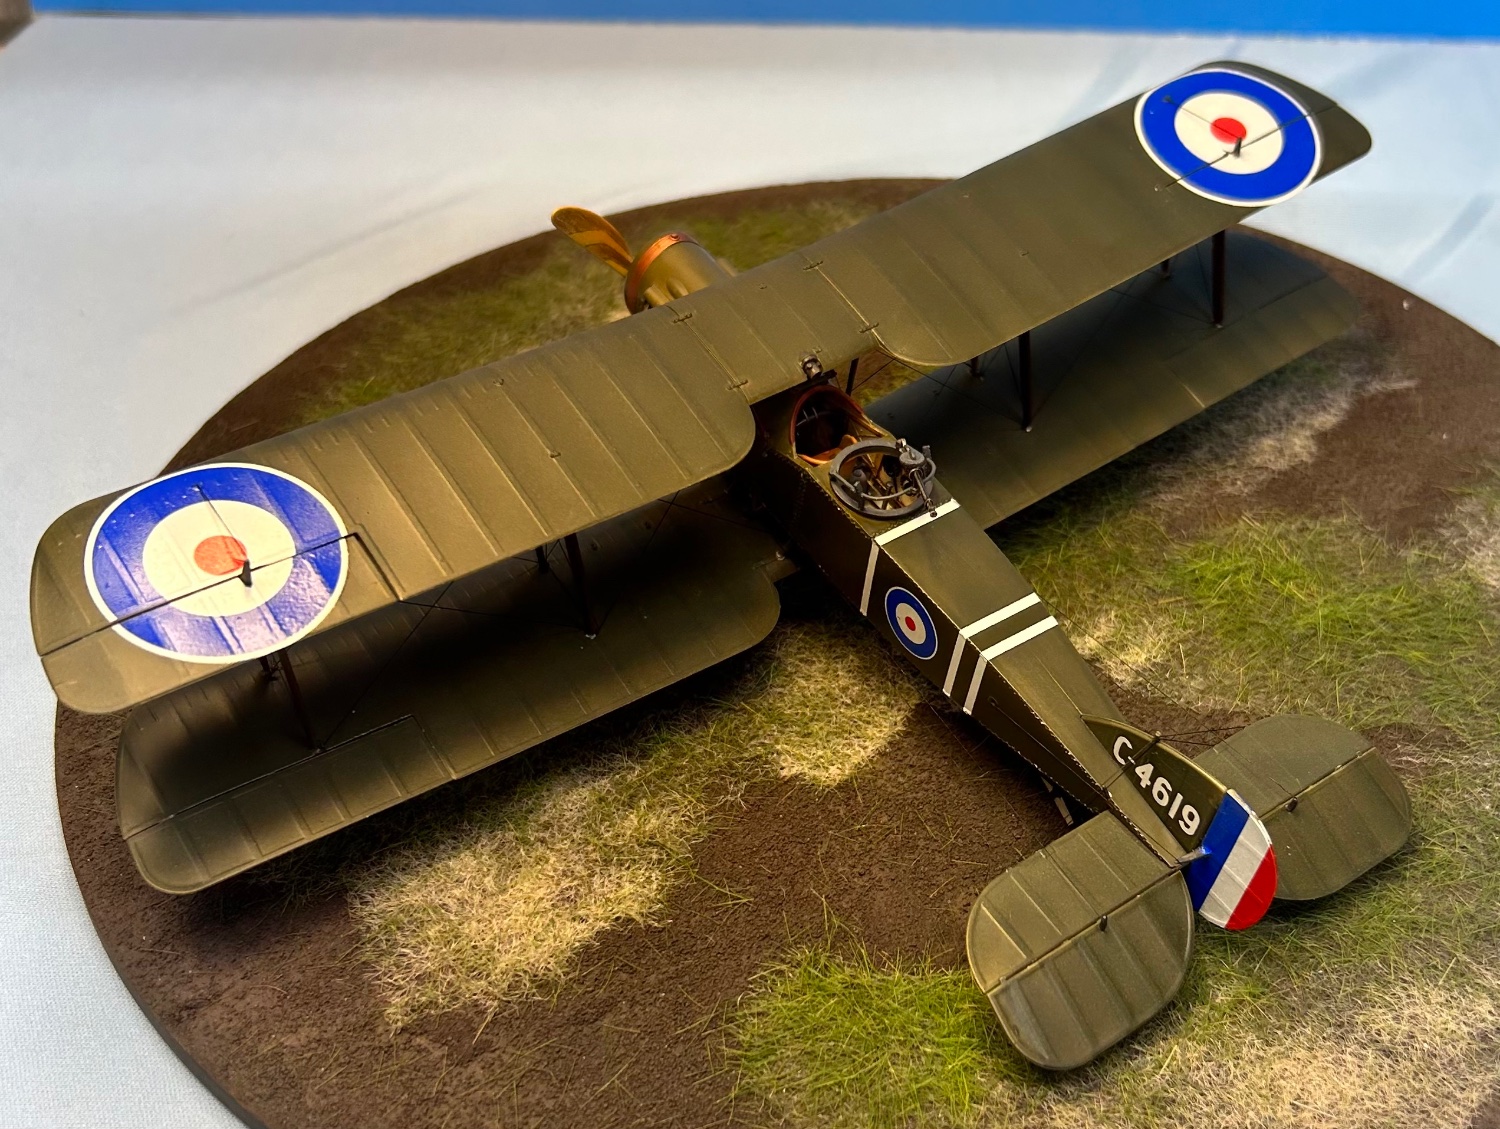
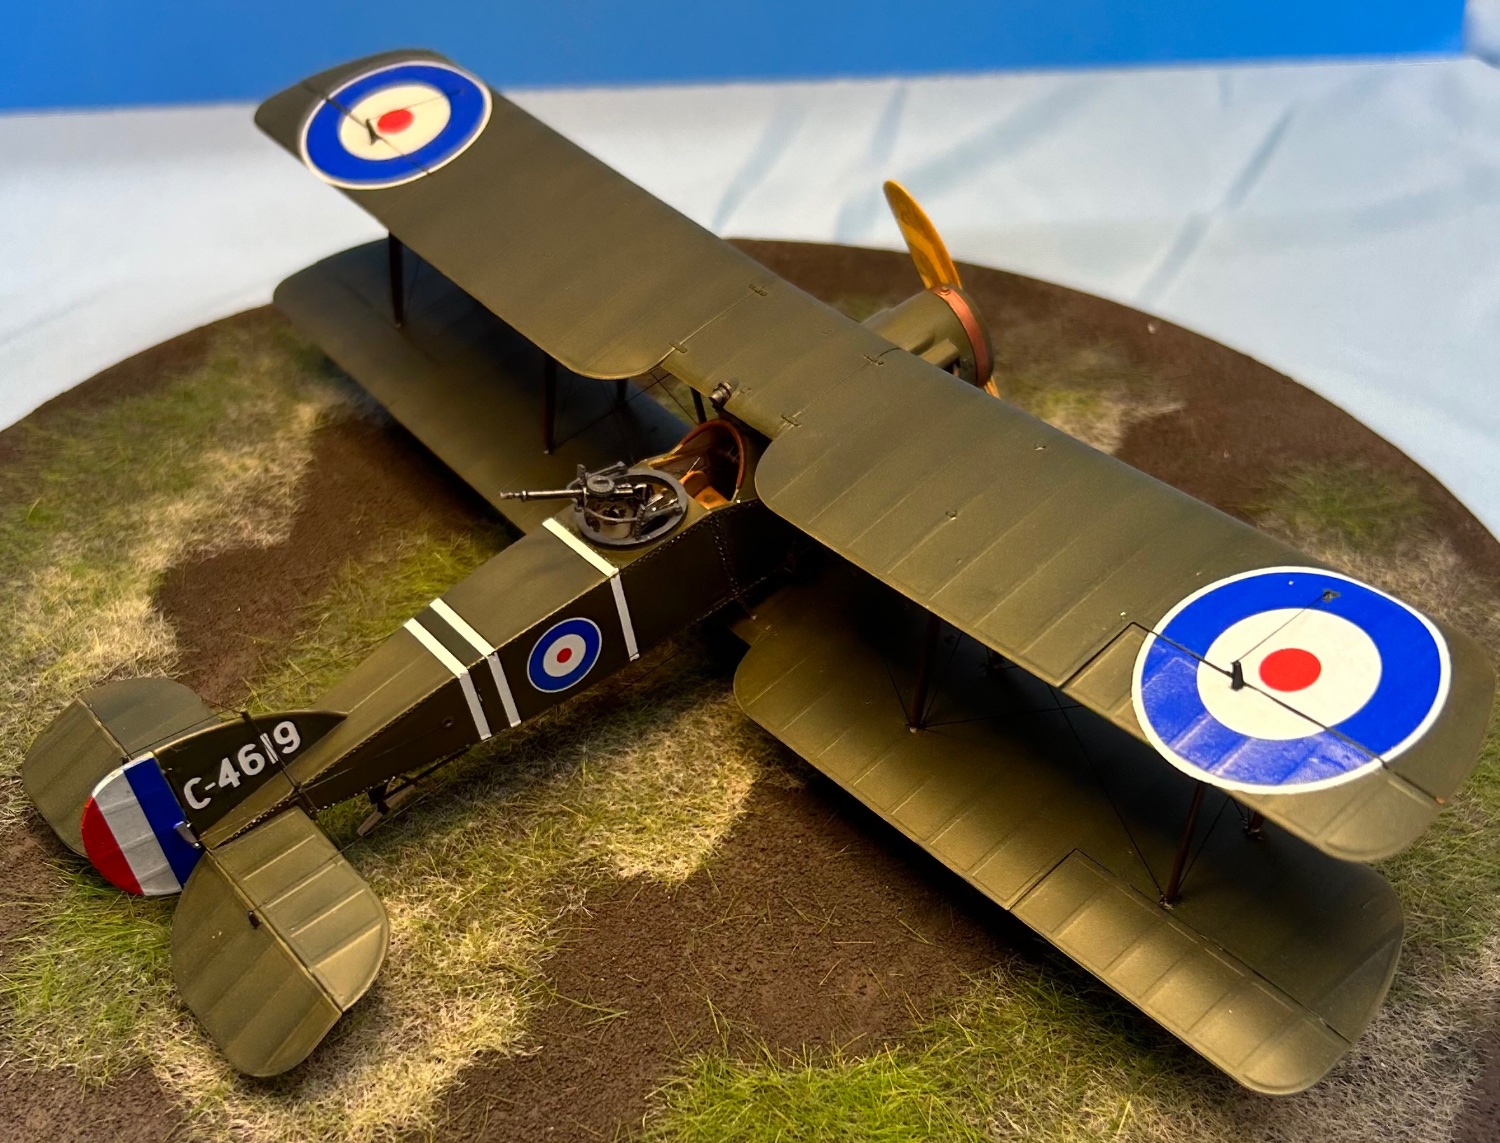
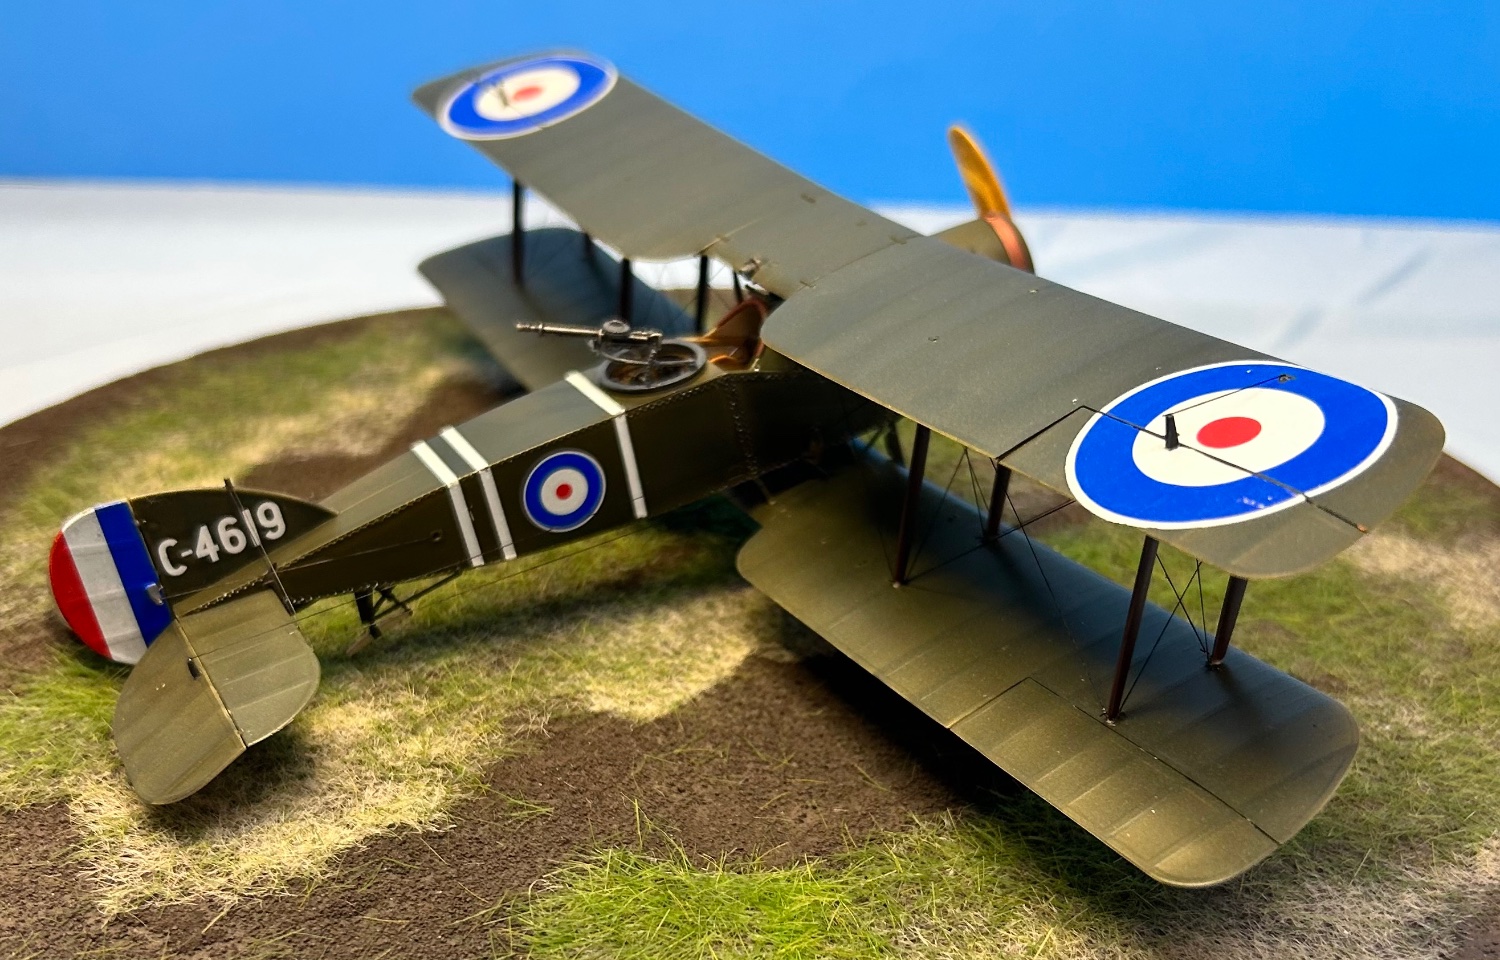
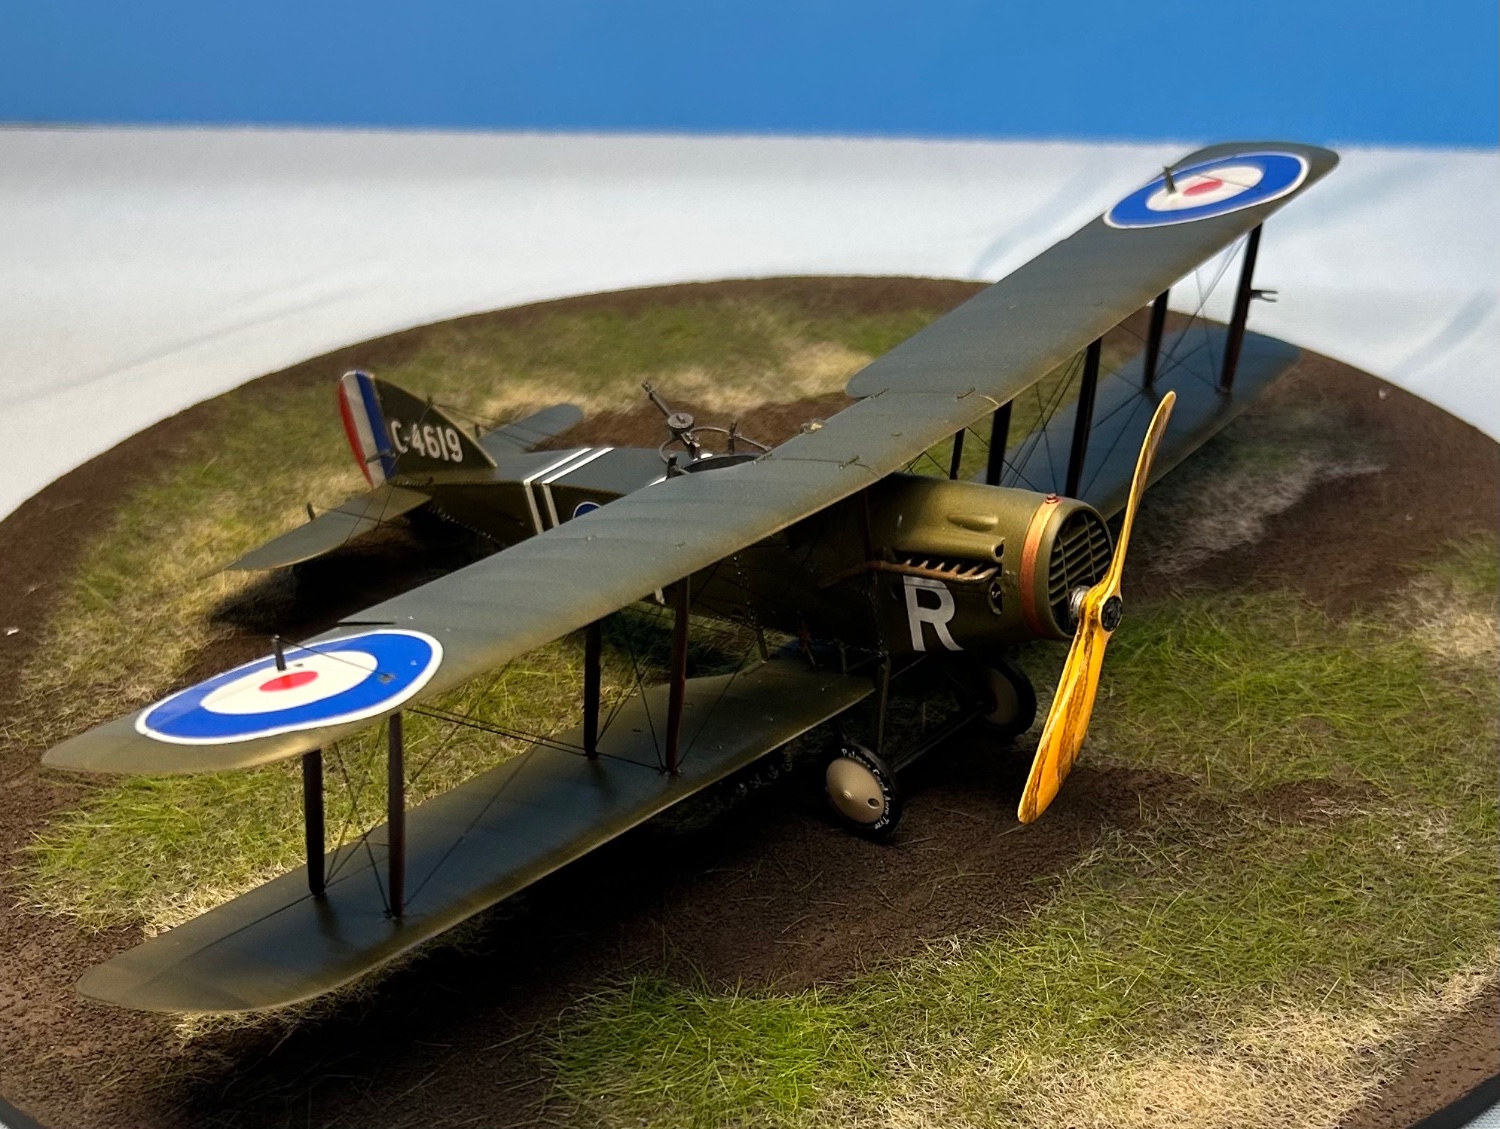
I will put a dull coat over all to unify the model, but this model for me is finished. Its been fun, a nice kit for a small amount of money. Thanks for following along, your likes and kind comments. See you again soon with another model.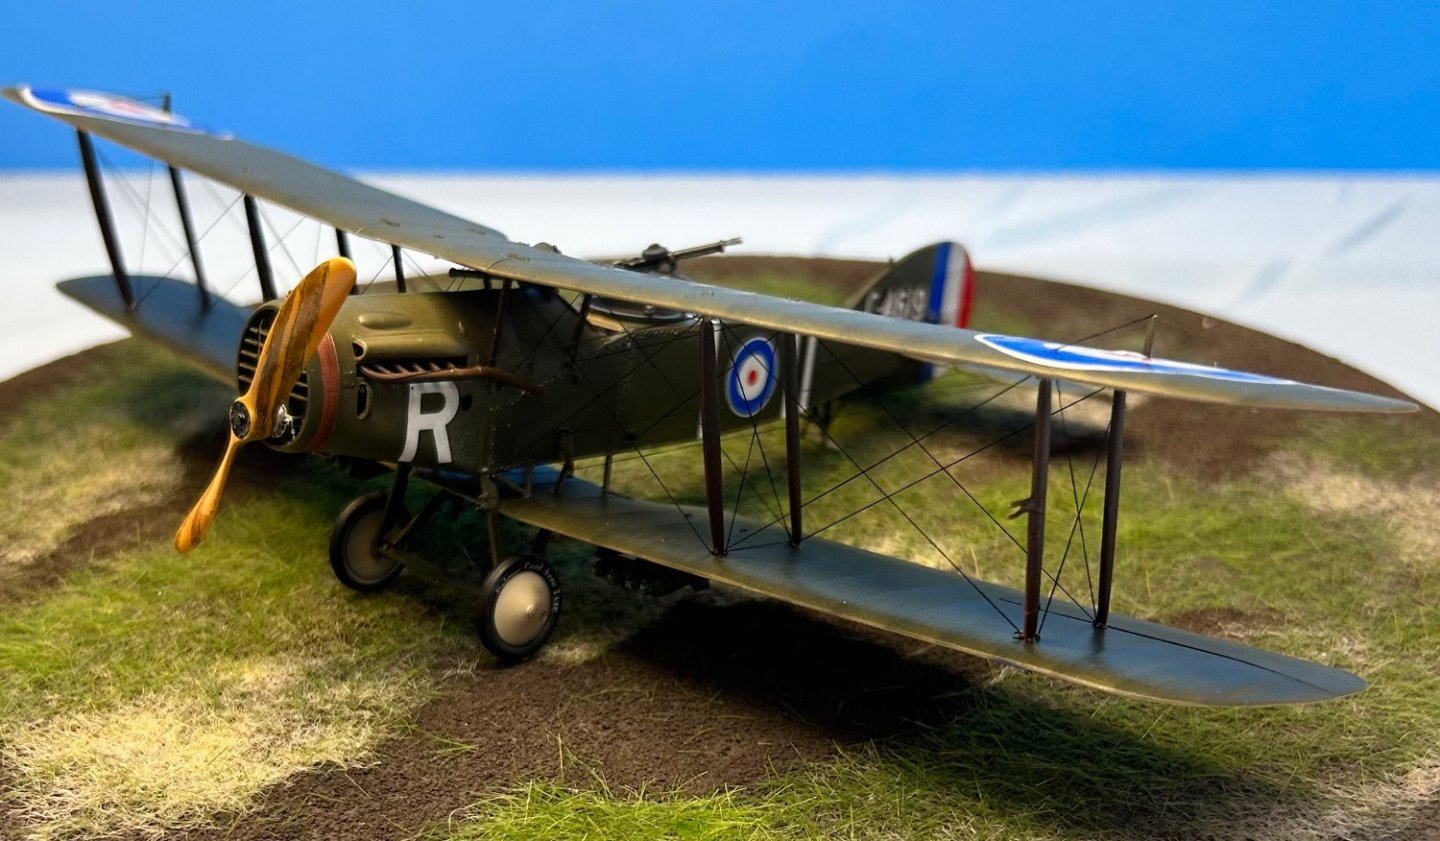


- 140 replies
-
- 20
-
-
-
Bristol F.2B WW1 Fighter by CDW - FINISHED - Eduard - 1:48 Scale
CDW replied to CDW's topic in Non-ship/categorised builds
Flying will be less of a chore with a prop.

- 140 replies
-
- 19
-
-
-
Looking at the incredible detail in your model, it’s hard to believe it’s 1:72 scale. You are doing a very excellent work on it and I enjoy seeing your photographic updates. Plus, it’s an aircraft I am not familiar with and that’s refreshing.
-
Bristol F.2B WW1 Fighter by CDW - FINISHED - Eduard - 1:48 Scale
CDW replied to CDW's topic in Non-ship/categorised builds
Was in my early 50's when diagnosed with cataracts and consequently had surgery on both eyes just afterward. Mine came on due to spending a number of years on limerock surfaces in the bright Florida sun. It was common among men in the field of work I was in, road construction. I thought I needed brighter light bulbs to see better, so I kept increasing the wattage until I was working on my models using a 250 watt bulb. My wife said, you need to see an eye doctor. I did, and the rest was history. The good news, it was immediate relief after the surgery. I literally came out of surgery with 20-20 vision. I had mine done at St Lukes clinic where a Doctor Gills was known worldwide for his cataract surgery, people coming from all over the country, and even from foreign countries to get their eye surgery there. Don't know if it's the same today, but I was given the choice of distance vision or closeup vision without corrective lenses. I chose distance vision so I would not need glasses to drive, just reading glasses. Alternatively, I could have chosen one eye with distance vision and the other with closeup vision but I didn't like the sound of that. Dr Gills said you get accustomed to it, but I stuck with the uncorrected long-distance vision for both eyes. Glad I did that. No problems since then, and that's been more than 16 years ago. -
On Hold - Nakajima Type KO 3 by CDW - Answer - 1:33 Scale - CARD
CDW replied to CDW's topic in Non-ship/categorised builds
I have been watching a ton of YT videos about paper model building. Very helpful and informative, I think. One of the modelers uses scissors to cut out most of his parts. His models seem to turn out well. Will scissors leave a raised edge, and are there other disadvantages to using scissors instead of a blade to cut out the parts? I have also noticed that several modelers use a spoon to flatten down edges that have been blade-cut. -
Bristol F.2B WW1 Fighter by CDW - FINISHED - Eduard - 1:48 Scale
CDW replied to CDW's topic in Non-ship/categorised builds
What you see on my F.2B is the medium Infini rigging. I would use the Infini fine size rigging on my 1:700 scale ships. I think the medium scales out to be around 1.2 inches at 1:250 scale. Failed to answer earlier, but the thread adheres well to any surface I have tried, plastics, wood, and metal, using thin CA. It would be a real pain to use a slower setting glue in my opinion as you would need to hold it too long in a stretched position until it set. But I have heard of those who use acrylic glue. Probably would work okay with as little stretch except as absolutely necessary to remove sags. -
Bristol F.2B WW1 Fighter by CDW - FINISHED - Eduard - 1:48 Scale
CDW replied to CDW's topic in Non-ship/categorised builds
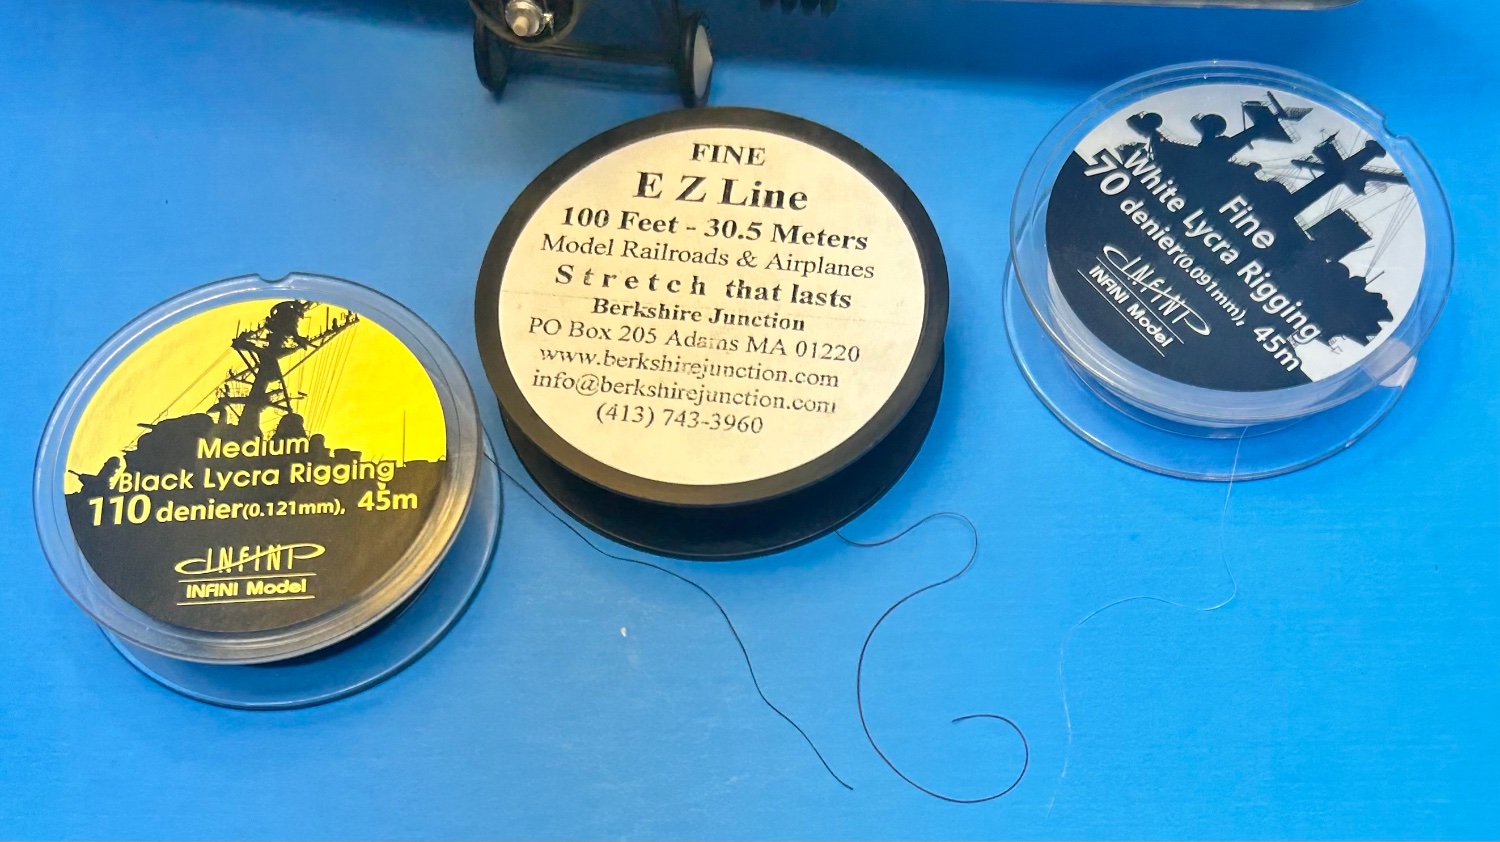
Pictured from left to right are rolls of Infini "medium" size rigging, EZ Line "fine" rigging, and Infini "fine" rigging. The first thing to take note of the terms medium and fine are only consistent between like brands. Both the Infini medium and Infini fine are both smaller diameter than the EZ Line fine. The Infini fine is very very fine indeed. Almost invisible. I can't really see a lot of difference in cross section. I magnified the photo as much as possible to let you be the judge of that. All the lycra thread I have worked with seems somewhat inconsistent in cross section. It looks flat, it looks round, it looks something in between, but once it's stretched it all looks alike to me with my mk.20-20 eyeballs. The Infini packages give the actual diameter measurement. EZ Line does not but it's obviously the thickest of the three.
- 140 replies
-
- 11
-
-
Bristol F.2B WW1 Fighter by CDW - FINISHED - Eduard - 1:48 Scale
CDW replied to CDW's topic in Non-ship/categorised builds
Thanks for the nice comments, much appreciated. While I had planned to use a very fine monofilament line and micro tubing for the rigging, I had to switch out to Infini lycra thread. In the past, had successfully used the monofilament and micro tubing for rigging 1:32 scale WW1 aircraft, but found the combination too unwieldy for this 1:48 scale model. Just not enough space to make it work for me. Half that battle is keeping the right focal length between my Optivisor and the model. That’s an issue no matter what medium is being used for rigging. At the right focal length, I find my visor often collides with the model. Several times I almost dropped it because of that. In hindsight I should have made a slightly larger loop for my tie off points. Next time I will do that. I wonder if the Eduard WW1 aircraft kits are reboxed Roden products. Anyone know? In past experience most Eduard kits I have owned were reboxed for their use. The 1:48 Tornado and 1:48 Mi-25 kits come to mind. They are actually Revell and Zvezda kits with Eduard details, instructions, and decals. I ask because I see some interesting 1:48 scale WW1 kits from Roden and may be interested to acquire a few. If the Roden kits were as nice as this Eduard one, I would be pleased. -
Bristol F.2B WW1 Fighter by CDW - FINISHED - Eduard - 1:48 Scale
CDW replied to CDW's topic in Non-ship/categorised builds
Looking at my photos, realized I left out some of the rigging between the fuselage and inner wing struts. Added those today. Also added the rigging on the rudder and horizontal stabilizer. That's about all the rigging I care to do today. Maybe I'll tackle a little more this evening depending on Mo (motivation).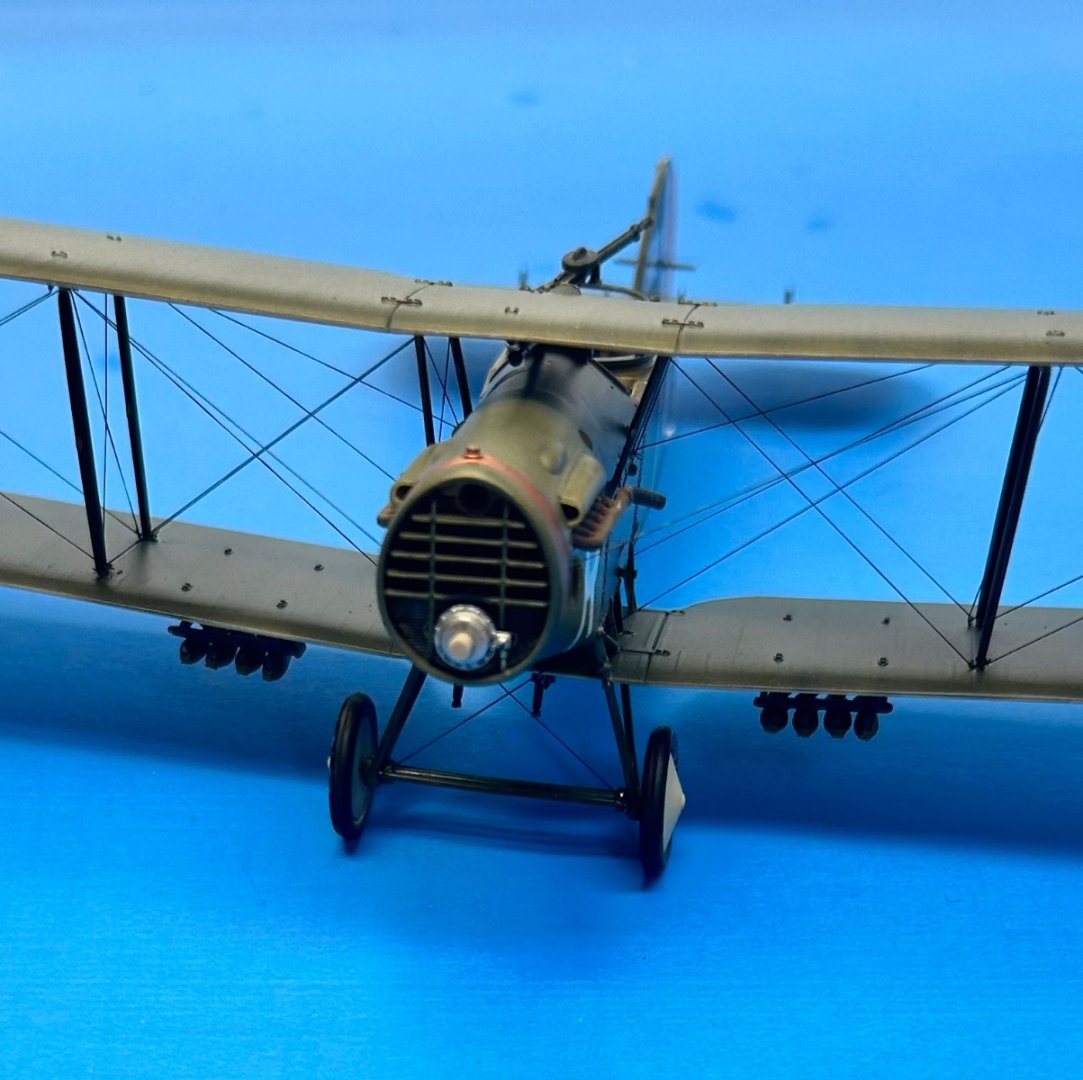
- 140 replies
-
- 17
-
-
-
F4U-1A Corsair by DocRob - FINISHED - Tamiya - 1/32
CDW replied to DocRob's topic in Non-ship/categorised builds
That really is a great OOB wheel well from Tamiya. The Corsair is the one 1:32 Tamiya kit I do not own yet, but your build may tempt me into one of my own. Beautiful progress so far, love your work on it.- 160 replies
-
- 10
-
-
Bristol F.2B WW1 Fighter by CDW - FINISHED - Eduard - 1:48 Scale
CDW replied to CDW's topic in Non-ship/categorised builds
Did you ever hear Bishop Sheen's teaching about the atomic bomb? It stays in my mind after decades. -
Bristol F.2B WW1 Fighter by CDW - FINISHED - Eduard - 1:48 Scale
CDW replied to CDW's topic in Non-ship/categorised builds
Thanks OC. -
Bristol F.2B WW1 Fighter by CDW - FINISHED - Eduard - 1:48 Scale
CDW replied to CDW's topic in Non-ship/categorised builds
I reminded the quote of General Lee, "It is well that war is so terrible, otherwise we should grow too fond of it." -
Great looking model, Jav.
-
Bristol F.2B WW1 Fighter by CDW - FINISHED - Eduard - 1:48 Scale
CDW replied to CDW's topic in Non-ship/categorised builds
I've been reading a book titled "Marked for Death". It's a historical account on the evolution of aerial warfare in World War 1. It wasn't nearly as glorious and civilized as we often see it portrayed in fictional accounts of WW1 air combat. The book portrays the Red Baron as a cold-blooded killer and somewhat demented in his outlook on life, entitled to kill, being the baron that he was. I was shocked to learn that statistically the average airman had a 70% chance of either being critically wounded or killed in combat. Sadly, the workers that built the aircraft didn't fare well either, many being poisoned by the dope that was used to protect and tighten the fabric skin used to cover the airframes. Ever wonder why two wings were used instead of one? It was simply due to the limitations of the airframe construction materials available at that period of time. Nothing else but wood and fabric were light enough to build an airframe that could sustain flight. Metallurgy of that day did not include the lightweight metallic materials we took for granted in WW2. Two wings could include box-girder construction techniques (wire bracing between the wings) that strengthened the wings to an extent that could survive the twisting effects of flight and abrupt maneuvers. -
Bristol F.2B WW1 Fighter by CDW - FINISHED - Eduard - 1:48 Scale
CDW replied to CDW's topic in Non-ship/categorised builds
Got to be careful not to paint myself into a corner. Certain details on this model such as the control surface cables will easily be destroyed during necessary handling of the model, so sequence of construction is an issue.


- 140 replies
-
- 18
-
-