

CDW
-
Posts
7,755 -
Joined
-
Last visited
Content Type
Profiles
Forums
Gallery
Events
Everything posted by CDW
-

On Hold - Nakajima Type KO 3 by CDW - Answer - 1:33 Scale - CARD
CDW replied to CDW's topic in Non-ship/categorised builds
Let's see how this first one goes. I can already see there is a lot to learn. One lesson learned is to buy a kit package that includes laser cut frames. Cutting the frames is tedious to say the least. My kit has some small airfoil ribs that are going to take some magic to cut without obliterating them. -
On Hold - Nakajima Type KO 3 by CDW - Answer - 1:33 Scale - CARD
CDW replied to CDW's topic in Non-ship/categorised builds
Wow, big savings there. The orders I put in with GPM had what I felt were reasonable shipping charges. I'll play around with the Answer site to see what happens with more items added to the cart. -
On Hold - Nakajima Type KO 3 by CDW - Answer - 1:33 Scale - CARD
CDW replied to CDW's topic in Non-ship/categorised builds
The company that publishes this kit, Answer, offers a laser cut frame package for less than $2. The cost/charge to ship that $2 item is over $30. I passed on it. -
On Hold - Nakajima Type KO 3 by CDW - Answer - 1:33 Scale - CARD
CDW replied to CDW's topic in Non-ship/categorised builds
Lol 😂 It’s enough to get by as long as you’re following the diagrams as you read it. It’s like hearing someone speak broken English. 😀 -
On Hold - Nakajima Type KO 3 by CDW - Answer - 1:33 Scale - CARD
CDW replied to CDW's topic in Non-ship/categorised builds
For this 1st model, I will forge ahead with the chipboard but in the future, will find some proper 1mm white card if I can. Otherwise will laminate as you described. I can see where the chipboard will be a bear to cut. I agree. Will try to find a pair of appropriate size o rings for the tires. -
On Hold - Nakajima Type KO 3 by CDW - Answer - 1:33 Scale - CARD
CDW replied to CDW's topic in Non-ship/categorised builds
If you look at the attached photo, you will see on the left-hand side of the image an area marked off by a dashed line. Within this area are the frames, the wheels/tires, a shaft piece that mounts the radial engine to the firewall (26f), and another pair of parts I cannot yet identify (11a). I know the instructions require the frame pieces to be bonded to 1mm card, but does the fact the other parts previously described fall within the dashed lines indicate these parts should be bonded to 1mm card as well? I don’t see anything that gives clarity to this question.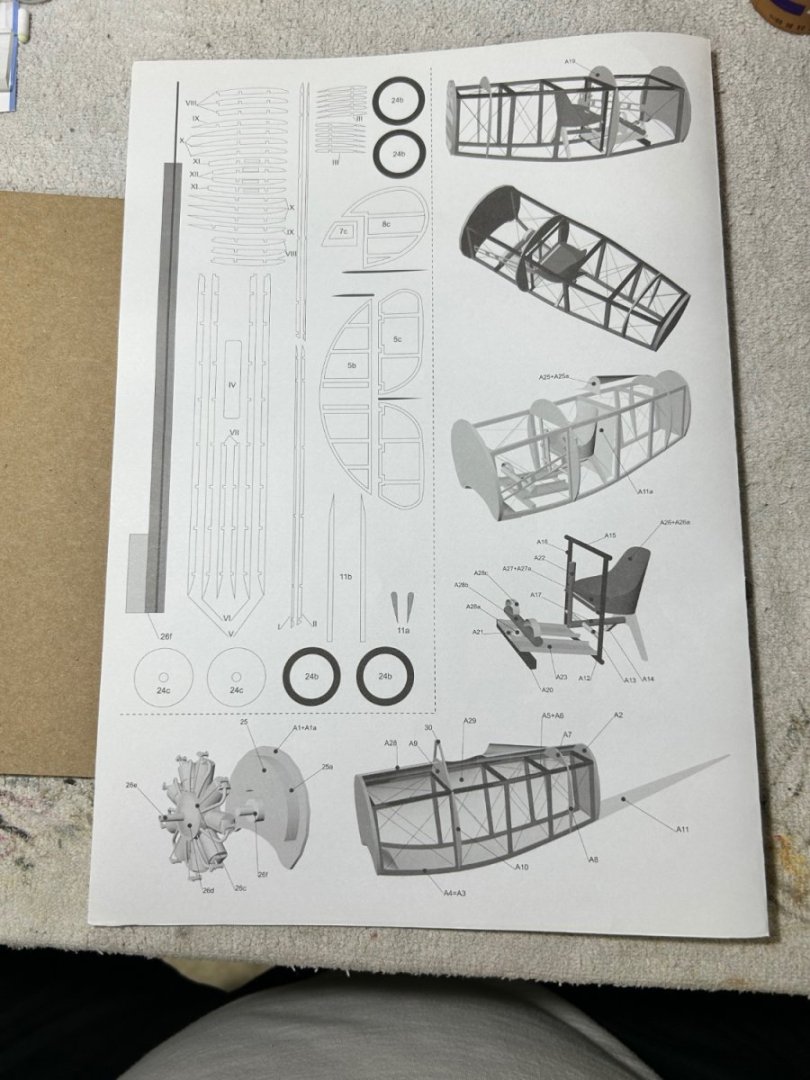
-
On Hold - Nakajima Type KO 3 by CDW - Answer - 1:33 Scale - CARD
CDW replied to CDW's topic in Non-ship/categorised builds
Thanks Chris. All I have on hand for 1mm card is a brownish-tan material. Knowing I will need to touch up some edges with silver, would I be better off finding some white 1mm card? I am concerned that silver over the brown-tan color of my 1mm card is going to look funky. Am I overthinking this? Will it matter brown or white? -
On Hold - Nakajima Type KO 3 by CDW - Answer - 1:33 Scale - CARD
CDW replied to CDW's topic in Non-ship/categorised builds
Following is a translation of the instructions from Polish to English as rendered by my iPhone: “Japanese hunter man Nakajima Type KO 3 Nieuport aircraft - history: Nieuport 10 was the first woisk aircraft of the Nieuport brothers company. Later, the company produced aircraft also for racing purposes, but in time-sle wonvey. usma produced aircraft main constructions for combat. The combination of plata gornedo 2 doliayowdho use a temporary wicrow with a ukiad in the shape of the letter Powierzohnia dolny plata was much smaller than the upper one (the difference in other awuptatowce was present). the plane teo tvou was called sesquiplan, or "pottora Wewcachthere was a mnesza), the aircraft of this yp was fortified versions. with a bruise 81 kW, which was marked as Nieuport 16. Nieuport 17 was created in Nieuporta 16, but structurally it did not differ much from its predecessors. Introduced iedvnie aerodynamic engine housings ora7 - what zanewne warniere. machine gun svachronizer. Thanks to this, you could move the rifle from the görny plata near the pilot. Some aircraft were equipped with Le Prieur rockets, designed to combat balloons. Such rockets made it possible to destroy the balloon in such a way that its wvbuch would not damage the attacking plane Rockets were placed 4 each on plata's gniers Nieuport aircraft, despite their advantages, were not devoid of flaws either. The bottom plate would be attached to the tvlko tvlko big point. which was very maio Gowne. Wonocowan, oo cacaos sriskrecalace simply tore the bottom plate from the fitting. Praktvcanie it» in Nieuvorcle 17 this system reached the peak of its capabilities, but this did not prevent Gustaw Delage from designing another model - Nieuport 24. This aircraft had onlywowv kad‹ub, a more convex wing profile and Changed shape of ailerons. The skrzvdel cranes were also reinforced to prevent at least the careful stagnation of the póttoraplata system, and a second Vickers machine gun was added. Masha; on the outside it had very similar dimensions to Nieuport 17. In February and March 1917, the preshedi aircraft tested and despite not very satisfactory results it was assigned to the production of seryin. Problems with the new glitch have arisen, so the assembly of the previous model began in Nieuporty 24 classic tail - Nieuporta 17, and the new model was called Nieuport 24 bis. The last version of the semi-toraplata by) Nieuport 27 aircraft. From its predecessor, pink- Only a split chassis axis and unprofiled vtoza are threaded. Tests were also carried out with other propulsions (Clerget 11E 200 hp, and Clerget 8Bd) to improve the achievements. However, not much has changed. and iedvny eqcopy of this type (Nieuport 25) za-ratwit to the Charles Nungesser front alloy. In total, about 7200 copies of all Nieuportow were produced - From 10 to 27. Technical data: Engine: Le Rhone 9Jb (120 KM) Spread:: 8.21 m Length:: 0.4 m Height: 2.4 m Supporting area: 15.00 m General notes: The model is medium difficult to build. Before gluing it should be Carefully read the general plan of the model and assembly drawings. Parts marked with an asterisk / and elements of a skeleton from 3 sheets / should be glued cardboard 1.0 mm thick. Parts marked with the letter P /right side/ should be glued like L /old side/. Possible allowances belong to the grinder with fine abrasive paper. White-re edge should be retouched with the appropriately selected color of paints / we recommend taking a silver marker available in stationery stores /. The model should be varnished with clear varnish after gluing. We use the principle of fitting part "dry" T. try it on twice - glues once. Model construction: We start construction by gluing the truss of the A3-A6 part of the cadlub. We can make pulls from threads according to the drawing. From the top we glue part of the A11. Soon on sale AIRCO DH.9!!! A19to wregiA9. We make the bottom of the upper wing from part 10b. зАтур01. 52kioret окк рату колтемут с 2.10 u la done oz. 9, skrysto sone 0 0) Doke)ау до кавива (any agrontan, 161 160 С21080 0 в ату 0 . кого онисти, Ora2 strip. Nasteprig doK/olamy shots to skrayde doltych. We then glue the upper wing to the zasiza / 04 g. Z. oze6ci 17 we glue the pyons. 77 /kaciuba wed une/rza skrzydia oónego wash tubkit we glue from the diwbch pages 02 W%. 2/asteenie 2. 20 po uKe.talowanna. We stick to the bottom of the chassis. Zastrzaly, pod we a 07 21 3122 shaped, skieanyda. zem and for glue to the chassis.- Rod waste nik unres 20zang u kadluba. Kola wonde. we according to the drawing from oze, 601 24., and nokseamy do tyia kaarus aa os l chassis. 2 czeso 29 we make tail ploze and doKleja do yu kadiuba. We glue the element 25 poodle r to the A1 bar. We glue the engine cze56 26 1 27 according to drawings E. Menty parts 27i and 27h are made of wire. We glue the cyanosis part 26f to the A1 part, and then embed it on non- Paint. We glue the finished covered to the cadlub. Sinlik. Elements of the engine cover c796% 238 are skidded to the junction, inneir we paint silver Elements 33-35 after forming we glue to the rifle. From part 30 skie.-we wash the windbreak and glue it to the cadlub. Then we make links of functions of the Control according to the summary drawings. The whole model can be varnished by a- Colorless direction. In the model it is recommended to use cardboard and cardboard Laser cut elements out /Including skeleton/, available for sale Shipping at the Publisher and in the Paper-Hobby store! We have fun! We have fun! Publisher Editor-in-chief of Tukasz Wawo¿ny Proiekt model Krzysztof Fiolek Illustrations on the cover Seweryn Fleischer P.PU.H.W. "Answer" Reductiveine model Post office.s. 70th 32-300 Olkusz Predestined dia adults. The editors do not bear Tel. 0-605 913 184 Responsibility of responsibility Fax 0-32 754 46 40 For advertising and advertising training. E-mail: biuro@answer.pl Printing: Printing house Www.answer.pl Answer Publishing House All rights reserved. Reprinting and copying only with the consent of the Publisher. All rights reserved. Retail sale at cente lower) than printed on the cover clearly with the consent of Wvdawe For the model you can buy a set of laser-cut elements price 9.99 zi” I am going slowly with this build, primarily looking over the parts and plans numerous times to familiarize myself with the designer’s intentions. As Chris said earlier, the instructions confirm that parts marked with an asterisk are to be bonded to 1mm card. Am I to assume parts not marked go on as-is, such as the skins? -
F-86F-30 Sabre by Egilman - Kinetic - 1/32nd scale
CDW replied to Egilman's topic in Non-ship/categorised builds
I even ordered a paper/card model of the F-4E with all the extras. Yeah, I know it's well beyond my skill level for card, but hey, I need it as incentive to press forward. Being the influence that he is, Chris C pointed the direction to a Polish website where eye-popping card models are showcased from modelers all over Europe. Could not resist a Phantom after that visit. -
This may have been part of it, but I am not so certain it's the whole of it. Where exactly thoughts and ideas came/come from remains elusive and not beyond debate. The regime of that time dabbled in many things not often seen as 'orthodox'.
-
On Hold - Nakajima Type KO 3 by CDW - Answer - 1:33 Scale - CARD
CDW replied to CDW's topic in Non-ship/categorised builds
A SPAD would be excellent! Love those planes. -
On Hold - Nakajima Type KO 3 by CDW - Answer - 1:33 Scale - CARD
CDW replied to CDW's topic in Non-ship/categorised builds
For this first build, I am going to cut my own frames. My calipers will be my best friend. Thanks for pointing this out as it would seem obvious, but the idea escaped me until you mentioned it. -
Think Operation Paperclip. Realize all the technological advances that came as a result of that operation, not the least of which was the 1st manned landing on the moon.
-
Beautiful case Alan. I expected it to cost much more and am impressed with it.
- 460 replies
-
- 5
-

-
- Finished
- Flower-class
- (and 1 more)
-
Amen!
-
Epic reply Chris. Bravo! I truly believe some of these type criticisms are a result of some sort of psychological disorder and cannot be taken at face value. As you said, just be amused, not bewildered.
- 165 replies
-
- 10
-
-
On Hold - Nakajima Type KO 3 by CDW - Answer - 1:33 Scale - CARD
CDW replied to CDW's topic in Non-ship/categorised builds
Amazing. I just learned how easy it is to translate Polish text to English text using my iPhone. Take a photo of the text then open it in the photo application. Hold your finger down on the text and a couple of special ‘begin and end’ icons will appear. Drag these icons to the portion of text where you want to begin and end the translation. Afterward, an option will appear to translate. It then translates the Polish text to English instantly. Not every word gets translated to an intelligible English word, but more than enough to get the meaning in context. I should have noted that the first thing I did was to go to the ‘translate’ app and selected Polish to English. I am learning a thing or two. Who says you can’t teach an old dog new tricks. Remembering it will be another trick. 😀 -
On Hold - Nakajima Type KO 3 by CDW - Answer - 1:33 Scale - CARD
CDW replied to CDW's topic in Non-ship/categorised builds
Valuable information. Thanks Chris -
On Hold - Nakajima Type KO 3 by CDW - Answer - 1:33 Scale - CARD
CDW replied to CDW's topic in Non-ship/categorised builds
So I gave the color printed parts two light coats of matt clear acrylic, only I used the airbrush and what I had on hand rather then find and buy a spray can. Seemed to work just fine as far as I can tell. Tomorrow, I intend on pasting the printed bulkhead, wing airfoil ribs, fuselage formers, and maybe a few other parts to some 1mm (or close to 1mm) card stock then cut them out when the glue is dry. Probably somewhere in those instructions they recommend what size card and which printed parts need to be glued to card to stiffen them up, but I can't find it. A lot of what I translate using online tools seems to come out as gibberish and otherwise not helpful information. It would have been nice if laser cut frames had been available for this kit then a lot of guess work would not be needed but maybe it will teach me some things in the long run by doing it myself. -
MRAP ATV by CDW - FINISHED - Rye Field - 1:35 Scale
CDW replied to CDW's topic in Non-ship/categorised builds
Thanks Edward -
Nice project Alan. Looking forward to this one. The Germans paved the way for the modern day, Marine Corps Osprey.
-
On Hold - Nakajima Type KO 3 by CDW - Answer - 1:33 Scale - CARD
CDW replied to CDW's topic in Non-ship/categorised builds
Any reason I should not use Vallejo or other matt clear acrylic through my airbrush? -
On Hold - Nakajima Type KO 3 by CDW - Answer - 1:33 Scale - CARD
CDW replied to CDW's topic in Non-ship/categorised builds
On a different subject: do I recall you saying that you use a spray-can of clear acrylic over top of your printed parts before handling them? -
On Hold - Nakajima Type KO 3 by CDW - Answer - 1:33 Scale - CARD
CDW replied to CDW's topic in Non-ship/categorised builds
Thanks to everyone who is following along...I can use the moral support. 😅 -
On Hold - Nakajima Type KO 3 by CDW - Answer - 1:33 Scale - CARD
CDW replied to CDW's topic in Non-ship/categorised builds
All I accomplished so far is to: a) separate the pages by removing the staple that held them together, and: b) scan the instructions then tried many times to convert them so as to translate I have wasted far too much time with very little success but once I got some success, I learned it was all a long climb for a short slide. The instructions seem to provide very little helpful information. Rather than waste any more time on this, I think I will plod ahead and see what I can do just by looking at the pictures. Doesn't look all that complicated.


