


DCooper
-
Posts
74 -
Joined
-
Last visited
Content Type
Profiles
Forums
Gallery
Events
Everything posted by DCooper
-
I had a bit of time to work with needle and thread . Still very rough but a whole lot less green. I learned a bit and it was getting easier as I went along. So that's progress I guess. Thanks for looking in.

-
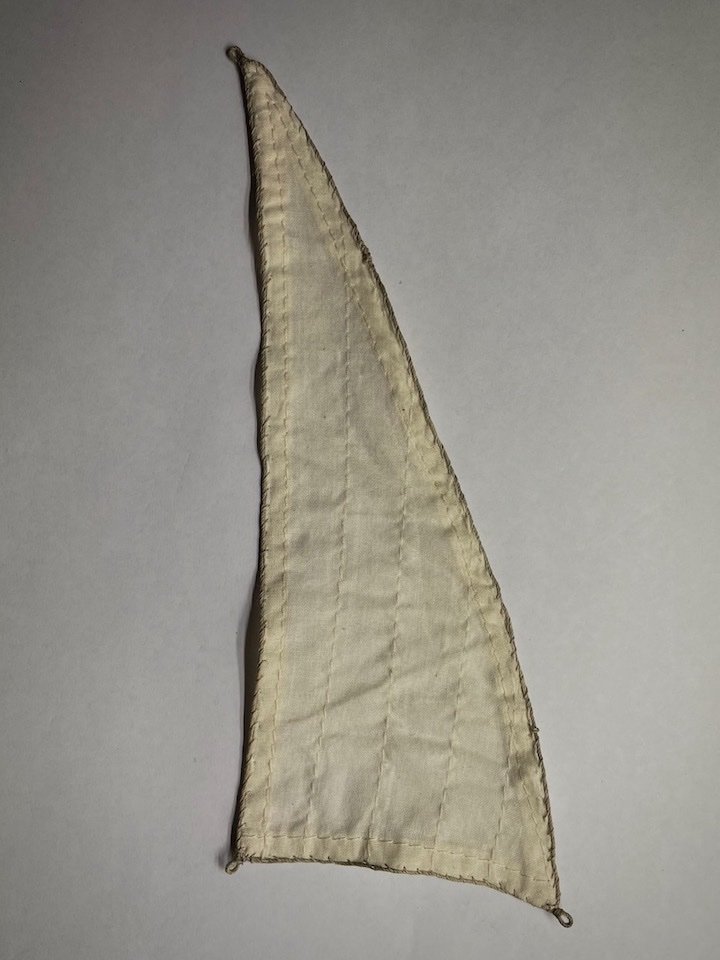
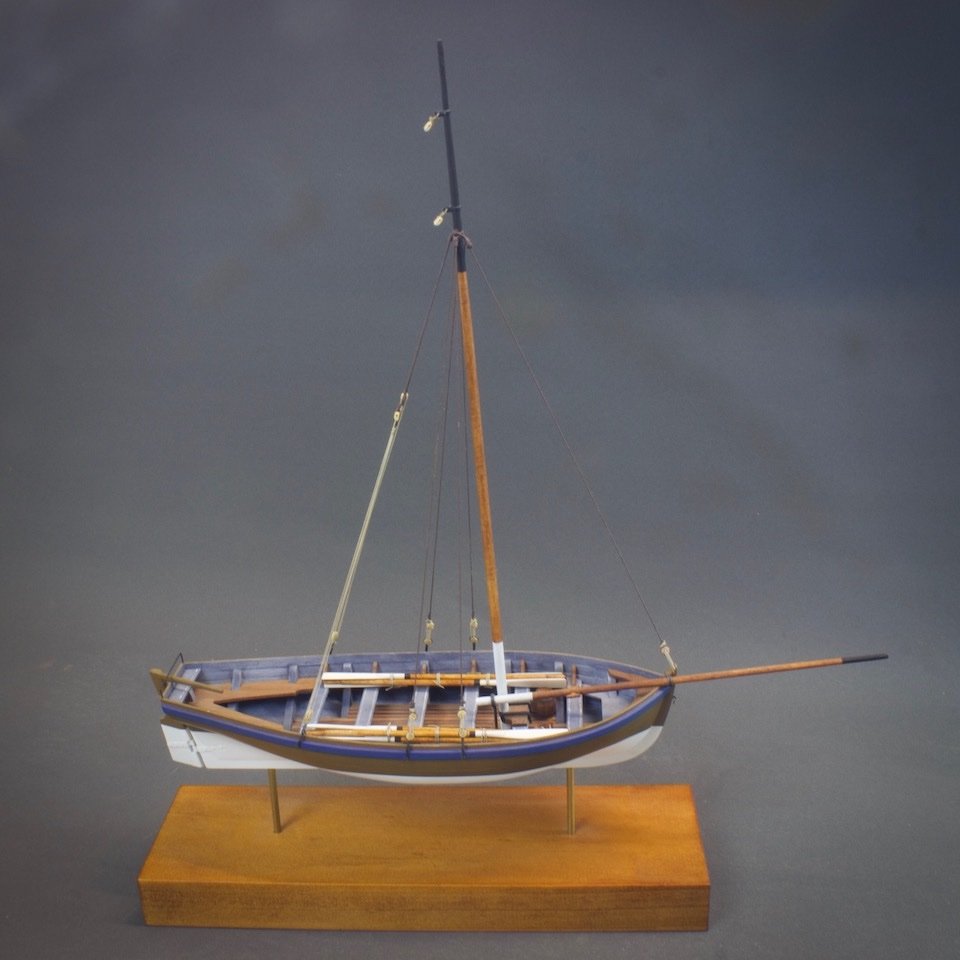
So, Seven years. Sure doesn't seem that long ago.... This one has sat in pride of place in one of my cabinets unfinished all these years. I get her out from time to time and to dust and clean her. But I have always been put off working on her as the oars needed making next and I'm not good at making multiples of subassemblies. I either mess them up or ( ominous foreshadowing ) don't make them all the same. Well with retirement nearing and the grey hairs multiplying I thought I'd just get on with it. So here's the results. Do you see my mistake? I was so happy they all came out the same size and shape then blew it in the painting. I think I can burry my sins where you can't see it on the model so all is not lost. The next step is making a little jig out of brass to help me cut and file all the notches for the oars and to make sure they are all the same size. I'm terrified that I'll mess up the spacing but can't wait another seven years to work up the courage. So once more into the breach. I would like to ask if anyone has some suggestions about trying to save the sails provided in this kit. They have a horrible dark green rope all around their perimeter which apart from looking dreadful doesn't suit my paint scheme. I was thinking I could remove and replace it with some heavy neutral coloured line. There is a good video on Youtube showing how to hand sew it on. Based on watch that a few times I think I could just manage it. Thoughts or suggestions welcomed. Here's what came in the box. I'm also looking at the booms and what not left to do. I was thinking of replacing the cast yoke with a wooden one. Ideas or suggestions on how to do that? Lots of things left to do but nice to have a little more progress on the little Jolly boat. She's one of my favourite of all my models built. Thanks for looking in. Dan


-
Any progress on your build? I am really enjoying your build and hope all is well. I miss your updates. Dan
- 139 replies
-
- 1
-

-
- san francisco
- artesania latina
- (and 1 more)
-
Thank you for sharing your wonderful work on these smaller projects. I never seem to have the time, patience or skills to finish a full ship build. I always start well then fade in the stretch and abandon ship somewhere on the way. I love these smaller projects you are doing as not only do they allow for a taste of all the different kinds of materials, techniques and finishes that a whole kit offers but in a smaller bite sized project with some hope of a finish. One of the great draws of ship building for me is all the myriad of things and materials to play with. Sigh, maybe one day.... Till then keep having fun and boy she's going to look nice finished Dan
-
Thank you for sharing your wonderful build. I am very inspired by just how fine and clean your details are. It motivates me to upgrade much of my past work and improve my future builds. I am following along and enjoying myself immensely, better still I want to got out to the bench and do better work. Thanks! Dan
- 75 replies
-
- 3
-
-
- constitution
- mamoli
- (and 2 more)
-
Looks mighty fine. A great improvement over trying to cobble together the broken kit parts. Did you think to score a deep groove lengthwise down the top rails so you could use a very dark paint wash to fake the separation? This structure will be much stronger than the kits parts that is for sure. I hope you are on the mend and feeling better. All my best wishes. Dan
- 89 replies
-
- 1
-
-
- constitution
- revell
- (and 1 more)
-
May I humbly suggest that you look at using soldered brass strip. If you pre-tin the top rail and make a simple jig you should be able to put this together pretty easily even if you are new to soldering. Much stronger result and once painted shouldn't look out of place. IHTH I am so enjoying your build and your ship looks beautiful. Dan
- 89 replies
-
- 2
-
-
- constitution
- revell
- (and 1 more)
-
A wise and elegant substitution for a fragile part that if broken latter in the build would have caused a lot of problems. Good solution. Dan
- 89 replies
-
- 2
-
-
- constitution
- revell
- (and 1 more)
-
Thank you for sharing a most wonderful build. I really like how this kit allows you to have a taste of each kind of construction and still provides a pleasing model. Your gun carriage is marvellous and justifiably the star of the show. I wish you sweet sailing to the completion of you build. Dan
- 81 replies
-
- 2
-
-
- naval smoothbore
- model shipways
- (and 1 more)
-
I am very much going to enjoy watching how your build progresses. I hope you are having fun as this is a wonderful old kit. Just don't get too bogged down on those three part decks. Dan
-
Thank you for your interest in my long stalled Constitution. I don't visit this forum as much as I would like. While not abandoned, I have had to put the Constitution into cold storage so to speak. I have pulled the kit out on many occasions over the last few years but as my desire to build a top notch model far, far exceeded both my skill and available time to model . I have sadly returned her to the to do latter shelf. Over the last year or so I have had a radical rethinking of just what I would like to accomplish with my models and have started to make rules or limits as to what scale of project I will take on. How this relates to this build is that once I clear some projects from my work bench I will be re starting this build with a much more focused approach to just what level of detail I can reasonably finish in a given amount of time. As an example I will remove much of the rigging I have added to the guns as it is, clumsy, over scale and cannot be readily seen on the finished model. Anything that is not easily seen will be omitted and that which is will be simplified as much as possible with an eye to what will look good and can be build quickly. There are so many wonderful Constitution builds that I have been reading incorporating outstanding levels of detail that if I try and follow that path I will end in madness, frustration and in the end a poor model to show for my efforts. Better to distill the best ideas I can and get something built. If I do have any skill it is painting and that is where I will focus my efforts. I will continue to treat each new part like it's own separate miniature and keep painting with multiple thin coats of acrylics, glazes and washes. Until then I'll keep reading and learning from the many excellent builders on this forum. A huge thank you to you all for sharing such fantastic models. Dan
-
I am sure that I am not the only one to be very glad you are well and that you have taken up the Constitution again. I will take a moment to thank you for all you have done so far with your build. Your build log has been most educational and informative. I can tell you that I look forward with much anticipation and interest in just what you come up with next. Thank you for taking the time to share your build with us. Dan
- 446 replies
-
- 2
-
-
- Revell
- Constitution
- (and 1 more)
-
A most excellent start. I very much look forward to your continued progress on this beautiful kit. I trust you are having fun. I applaud your decision to just build the kit your way and not get too bogged down in all the possible details and minutiae. I have stalled on my build for just that very reason, navel gazing at just which bits to 'improve'. Be bold and continue on your course and you will no doubt have a most stunning model in time. Thanks for sharing. ( and for reminding me to get mine back off the shelf of Doom. ) Dan
- 9 replies
-
- 4
-
-
- constitution
- model shipways
- (and 1 more)
-
Thank you Ken. Thanks for taking both the time and energy to create both a wonderful model and a clear, educational and inspiring WIP. I have the highest regard for both your skill as a builder and communicator. One day I will stare in to the abyss of my skill base and take up my quest to finish my Constitution buoyed by a number of your informative WIP's. You are a treasure trove of ideas and techniques and guide to just what a modeller can accomplish with knowledge, skill and persistence. Long may you continue to enjoy this hobby of ours. Dan
-
It is fantastic to see that you are continuing this wonderful build. Also nice to see that you have got your new mill, I'm sure you will find much joy and many uses for it. I hope you share them as I for one would love to see more information about machining with these smaller mills. Very envious as I'd love to have one to mess about with. I am looking forward to see what you have in store for us next. Dan
- 601 replies
-
- 1
-
-
- constitution
- revell
- (and 1 more)
-
Looking mighty nice. I've been following along with you progress. Great to see how well your ship is coming together. Looks to be a good sized kit to build. Dan
-
Evan, you just continue along at your own pace. It's such a joy to watch you work your magic on these old bits of plastic . Your posts are always informative and enlightening. Thanks for taking the time and effort to document and clearly explain not just how you are building your Constitution but why you have decided to build her in that way. Your build is very inspirational even to those with stalled builds of their own. Dan
- 446 replies
-
- 2
-
-
- Revell
- Constitution
- (and 1 more)
-
Yep. my sail was too big according to the plan too CF. In the end I'm not going to use it. I think it clutters up the look too much. But it is a shame because it could have been a nice addition. You could roll it and use it as stowed like I've seen on one other build. Really like what you have done and the stained timber is very nice. Dan
-
Victory! Looks mighty fine. For my two cents, I'd say scrape and sand the exterior until you get a nice even smooth surface and then paint. That's what I did and I'm very pleased with the results. Save the stain for you next kit. Especial as you said you still had a few gaps. ( I did too I thought they would show up too much under stain as you can't hide!) Excellent progress all the same. Thanks for sharing. Dan
-
Looking fine CF. Just take your time and carefully fit the last planks in. Test, mark, sand and repeat till you get there. Seems like a chore while you are doing it but it doesn't take that long. Just have fun and you are almost there. Dan
-
Good eyes there Amfibius but to give CF his due I think his is right and mine is...well not so right. I ended up with a pretty big gap at the stern which I had to fill with brown epoxy putty. The only issue I can see with the curve will be fitting the thick dark brown seat sections. Getting those to curve and fit well might be a struggle. CF you might just check that they fit now rather than wait until after planking( which is what I did). Edit : (Ahhh, silly me maybe if you angle the top of frame 7 you could straighten the curve and therefore lower the deck reducing the gap but leaving the deck flat for the seat piece.) I like your progress and I'm sure you'll get everything to fit. Hey, that's the fun part of building. If you haven't done so yet check out the forum section on the 18th century long boat. There are heaps of great build there and you can download a copy of Chucks instructions as a PDF which I have found super useful on my build especially the rigging. I like your clamps. I have to get me some of them for my next build. Dan
-
Progress; That's pretty much the standing rigging done. Now for the running rigging and the odds and sods. Still have no affinity for the rigging but at least some headway made. Back to work tomorrow so I will have to finish this one on the weekends. Steve -- I have about six pairs of those cheater glasses scattered though out my work area. I can't work without them now and I find the cheap 2$ shop ones just as good as my expensive reading glasses. Well not really the prescription one are perfect for reading Evan-- I am honoured Sir, Glad you like her. alde -- Give it a go! Nothing like actually making a start. Plenty for redoes on mine I can tell you. And much I would do differently but I didn't know until I tried. Thanks for all the comments. Dan
-
Progress; The rigging was a lot harder than I thought. Very rough and I had to go and get new material because I couldn't get the hang of the line provided with the kit. I have bought some 0.2 , 0.5 , 0.7 mm line which worked better but I ran up against my skill limits. everything is just so rough and I am even more in awe of those that can rig well. I am going to try and do the backstays next and se if I can't stuff them up too. Still having fun but need a lot more practice before I could say I like rigging. Jay-- I'm in Australia so I'm used to everything being more expensive, either through shipping or exchange rates. I'm definitely staying with the smaller builds. Way too much to learn before I try something bigger. Besides even though the shrouds kicked my behind I knew there wasn't that much to do so I kept going until I finished. Anything much bigger and I might have pulled the pin. I think I'll get this one finished pretty soon and once it's in the case I'll have a whole different outlook on the project. Thanks to all for looking in. Dan
-
Great work so far and timely advise re the deadeyes for me. Such a clean and precise build style you have. I look forward to how you handle the rigging of you build. Thanks for taking the time and effort to clearly show how you build. Dan
-
Welcome Cannon Fodder. Nice start and I hope you are having fun. I did go to the effort to sand off the char, more to get a nice finish rather than for strength. My kit seemed to have a very rough finish almost like it was flame cut with a torch, which I suppose in a way it was. Most of the edges won't show in the end anyway. How are you going to do your planking? Are you going to use the kit supplied pre cut pieces or all planks? If you go all planks you will need some more 1.5mm x 5mm stip. As for cleaning up the glue squeezed out I just use a moist Cotton bud(Q-tip) to wipe away the excess. Have you decided to paint or strain your hull? I'm getting close to finishing mine and yep I'm looking forward to my next one too. Dan
- 37 replies
-
- 1
-
-
- jolly boat
- artesania latina
- (and 2 more)