DONATION DRIVE - SUPPORT MSW - DO YOUR PART TO KEEP THIS GREAT FORUM GOING! (91 donations so far out of 49,000 members - C'mon guys!)
×


mikiek
-
Posts
2,276 -
Joined
-
Last visited
Content Type
Profiles
Forums
Gallery
Events
Everything posted by mikiek
-
 Stuart - you will get varying opinions and experiences here, but at least they are given with good intentions.
 -
Stuart - I didn't mean to bogart your log. There is just so much uncertainty about Niagara as she was built and what happened to her. A lot of opinions floating around. This link was just one of many, but it does show (before he passed) Joel's extensive knowledge and also how much debate there is regarding Niagara to this day. I got really overwhelmed with all the possibilities - this was my first build. I just decided to trust Joel's expertise and we schemed on what a historical Niagara might look like. There are no right or wrong decisions. You can go current with the plans or dig around a bit and come up with your version of historical. Historical was actually easier as there were less deck toys to build. Let us know how things are going....
-
Good comments Steve! Yup - Joel was the MSW member that helped me thru this build - an amazing man. On so many levels, I miss him to this day. Our consensus was that given the immediacy of the situation, only what had to be built was built. Skylights served no purpose in battle (just more splinters flying around). Same with davits and ships boats. Obviously there was at least one boat on Lawrence or Perry could not have transferred to Niagara. Our other secondary thought was that the boat(s) were built for one battle. If you lost and had to surrender there was no point handing over a perfectly good and repairable vessel. Longevity was not a primary concern hence the use of a lot of green wood for structural parts. This idea has been expressed in several books on the situation. The Brits seemed to have the same mindset with the boats they built. It was winner take all. There would be no second chance. No specs on hammocks. There was no room below deck (the only extra deck) for crew to sleep. We surmised they just slept on deck - again realizing that the mission was going to be short-lived - a week or two at most. Not like some ocean going adventure where they might have to live for months. Joel and I both crafted a binnacle for our builds. Apparently, much of the sailing on the Great Lakes was just sailing a mile or so offshore - within site of land. But there had to be times when a compass was needed. However, where a binnacle would have logically been placed, totally disagrees with the location of the Captains Skylight. Paint? They were basically in BFE. The only paint around might be what some creative mind could come up with using local materials. Fire Engine Red and Frenches Mustard Yellow would have been a stretch. There are some thoughts that black might have been used - just as many that there was no paint at all. Again alluding to the fact that they needed these vessels quickly and only for one fight. Paint ain't gonna help you in battle. Because I wasn't good with a plain wood colored hull, I went with black as that would have been the easiest color to create in the given environment.
-
You might check my build log (check signature below). I went back and forth on the question of historical or current. I went with historical and was very fortunate to have the input from a very informed MSW member. The guy was like an encyclopedia on anything historically nautical. Sadly, he suddenly passed away a few years ago - a huge loss to our community. Unfortunately, no original plans of Niagara are known to exist. So with Joel's help (many of his comments are in my log) we just did our best to understand the time and the circumstances and what/how they would have built the boat(s). For me, that was as intriguing as building the model. The 2 big things we went with were there was likely very few deck items/structures, and the paint job - if indeed there was one at all - would have been quite different than what the MS kit suggests. Here is one link to a good write up of the overall situation. It's kinda long but it can give you a good overall idea of what transpired. I also have several paperback books that I can recommend ($5-10 on Amazon). I just need to dig them up. One thing I did do and it's worth considering - The limewood included in my kit was awful. It splintered, feathered and frayed constantly. You will be using that for your decking and planking. I ended up replacing all that with boxwood which is a much harder wood. No regrets there other than some additional costs. Let me know if you run into any problems. I'll be glad to try and help.
-
Niagara is a great kit to build. Instructions are quite good and mostly understandable. The biggest problem I had was whether to go historical or modern. The MS kit is closer to the current vessel. There's several deck toys that most likely were not on the original. The paint probably would have been different also. I really didn't care for the color scheme suggested by MS. I would suggest reading up on the situation at that time in history. The story behind Niagara and her sister ship is quite interesting. I had no idea how much of the war was fought on or around the Great Lakes. Anyways it's an attractive build when completed.
-
Did the OP ever come across a sander? I have a barely used one I would sell.
-
Hey Cisco - looks like you are already committed to your process for this build. For future reference, the garboard placement is critical. It is always the first strake I try to lay. Frankly, it doesn't matter much whether it is a wider plank than the rest. The important thought is to get it laid correctly. The upper edge should be perfectly horizontal, meaning the strake above it should need almost no shaping, bending or whatever. Once you get 1-2 strakes laid above your garboard, then figure out your bands. You can do a lot of math to calculate them or just use some proportional dividers to make the process much easier. I use that technique for all planking. This link post 244 will give you a tutorial. If it works for you great. It may seem a little overwhelming at first (and of course it requires another expenditure for the dividers) but it is almost foolproof as you get down to the last 2-3 strakes to be laid.
-
If that block plane is the little mini one they are great. One my most useful tools.
-
You will need to do some scarphing to get wood that thick to curve that much. I hate to see you waste all that good wood. I ended up cutting various rhombus like shapes. It's kind of like figuring out a puzzle except you make the pieces as you go. You can then sand the inner and outer edge to round it off.
-
If there is a problem with hull layers - don't consider Lancia Armata - 3 layers of sticks. Quite frankly, none of the layers matched up with the previous layers.
-
Beginner looking to start building, In the USA
mikiek replied to lstmysock11's topic in Wood ship model kits
I use this holder 98% of the time. Niagara has not been discontinued. Check around, you don't have to buy it at Model Expo. That said, unless you have all day every day to work on it - it would likely be a multi-year effort (voice of experience). It's a beautiful build and definitely something to shoot for. But like I said earlier, focus on the task in front of you for now. As you near completion you will have some questions to ask yourself, most importantly "Do I even want to build another boat?". -
Hey Cisco - I use a combination of CA (medium) and white glue (Titebond Mold & Trim). Let's say you want to glue a 6" section of your plank - start with a 1/8" dot of CA then run a 2 7/8" line of white glue, another dot of CA, another line of white glue and finish with a last dot of CA. Then lay your stick and apply pressure to the areas where the CA is for 10-15 secs. The CA should dry quickly and act like a nail in your plank, holding it to the subsurface. Once the CA takes hold you still have time to adjust & clamp the white glue areas.
-
Beginner looking to start building, In the USA
mikiek replied to lstmysock11's topic in Wood ship model kits
If you find you like the Model Shipways kit there are several options for the "next build". Pride of Baltimore, Rattlesnake, Niagra (my first build), Confederacy for starters. All of these have many build logs for reference and many of those authors are still online at MSW so you can PM directly. Another option to get a taste of a complete build without having to dedicate months to planking or rigging is the cutaway builds. They just take a slice out of a boat that includes the under decks, main deck and usually 1 mast with all the rigging. These are some of my favs. They take up very little space for display. There are a lot of others out there, but as I mentioned earlier, be ready for 3rd world instructions. Lastly, I get a little worried when I see builders worrying about the next build when they haven't started the kit on the bench. I say this from personal experience. During my first build which lasted about 2 years, I ended up buying multiple "next" kits and tools. If I lived to be 150 I would not finish all the kits I bought. So just be careful! -
Beginner looking to start building, In the USA
mikiek replied to lstmysock11's topic in Wood ship model kits
Good call Andrew. A good thing with Model Shipways is the instructions are usually good and easily understandable. As you move to other kits (especially those from the EU) you will find that a lot of instructions are in another language, usually with a secondary booklet with a translation to English. These can be very frustrating to work with. Something you don't need on your first build. -
I hear ya - with the heat wave in TX (and elsewhere) my workshop runs about 82-84 degrees even with the portable A/C unit running so I have not been in a hurry to get out there right now. I gave up the planking instructions early on. They just seemed to contradict most of what I have learned. Instead, I went with what I know will work - which included a rabbit big enough to accept 3 layers of planking. Stay with it......
-
The foam is absolutely worth it. No stress or strain on the keel as some other options incur. It allows for easy angling, even to radical degrees when you need to plank either the wales or garboard. If your build has a painted hull the foam reduces scratching. I have also found it in a league of it's own if you ever have to transport your build. Worth every penny.
- 62 replies
-
- 1
-

-
- lancia armata
- panart
- (and 1 more)
-
Stand looks good Cisco. Have fun.
-
A few thoughts - IMO the garboard should be one of the first sticks to be laid. If you you get that one correct it should eliminate a lot of shaping on the strakes above it. Maybe I should rephrase - there will still be the usual tapering of sticks at the stem and possibly at the stern, but not the wonky kind of thin, thick, thin, thick of a single stick. You can hide some of those "last strake" weird shapings by where you finish the planking. Obviously, if you finished on the top 1/3 of the hull (never recommended), any odd shaping is going to be in plain view. It is better to try to finish where the hull is curving inwards - usually about 60-70% down from the wales. Even if you end up with a really funky "last stick", it will not be totally visible due to the angle that it is laid. Of course this will vary per build but there is almost always a section of the hull that is barely visible when viewing from the side. Regarding your staining concerns, consider a natural stain. Minwax makes one that is decent. There is no actual coloring, it just gives your wood kind of a wet look. Particularly since you upgraded to some decent wood, I would suggest that you play around with it some. If I don't paint, I use the Natural stain. On a related note, your wood upgrade looks great. Makes me wish I had done the same.
-
Old NRG Article on Deck Plank Spacing
mikiek replied to mikiek's topic in NAUTICAL RESEARCH GUILD - News & Information
OK Kurt - good to hear there will be a replacement. -
Old NRG Article on Deck Plank Spacing
mikiek replied to mikiek's topic in NAUTICAL RESEARCH GUILD - News & Information
Any progress on this matter? Once again, I am not trying to be a butthole on this situation. The article used to be published in the NRG "How to " forum. I have found its value more than once. Others as well. Yes, I have the article downloaded from this thread, so I am covered. But I suspect others will not find it. I feel like the article should be public in the NRG 'how to" forum. -
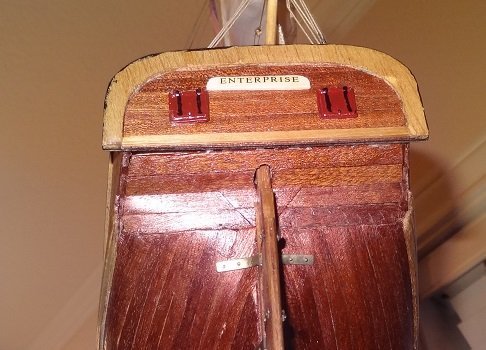
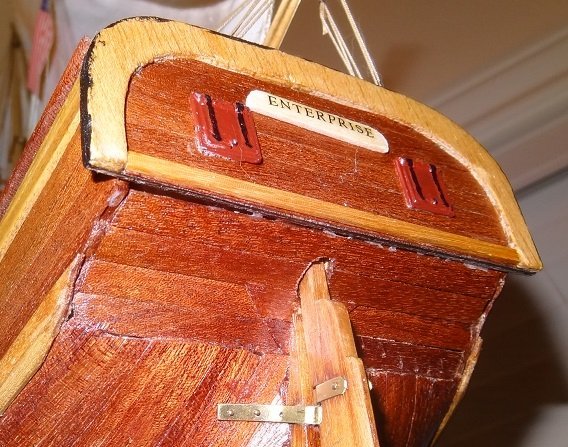
I hope you have figured out your question by now but for the record - the waterway at the bow is several smaller pieces each edge bent a little. A joint is made for each piece so it can be fit to the next end to end. Each piece is slightly off angle so it bows a little from the previous stick. After its all dried just sand down the edges.
-
Thanks Richard. I have been cheating a little bit - already working on some of the interior. That has been one of the things I like about this kit. There's a lot of other tasks that I can do while planking.
- 62 replies
-
- 1
-
-
- lancia armata
- panart
- (and 1 more)
-
same boat but not sure if it is the same kit - take a look at post #40 https://modelshipworld.com/topic/14957-armed-virginia-sloop-by-captain_hook-finished-model-shipways-scale-148/page/2/ theres a few pics that show what I am trying to describe - the side planks do not bend around that last stern frame. They stop at it.
-
Working on this same build - just slightly ahead of you. I concur on the walnut. Worst wood I have ever seen in a kit, however I am using it. I've had misgivings about this kit since I started it and didn't want to waste a lot of good wood if I decided to toss the whole thing (which I have thought about more than once). I think the 3 layers is an attempt to get the dimensions of the strakes to scale. Can you imagine trying to use 1 stick that was the thickness of 3? Virtually impossible to work with.
-
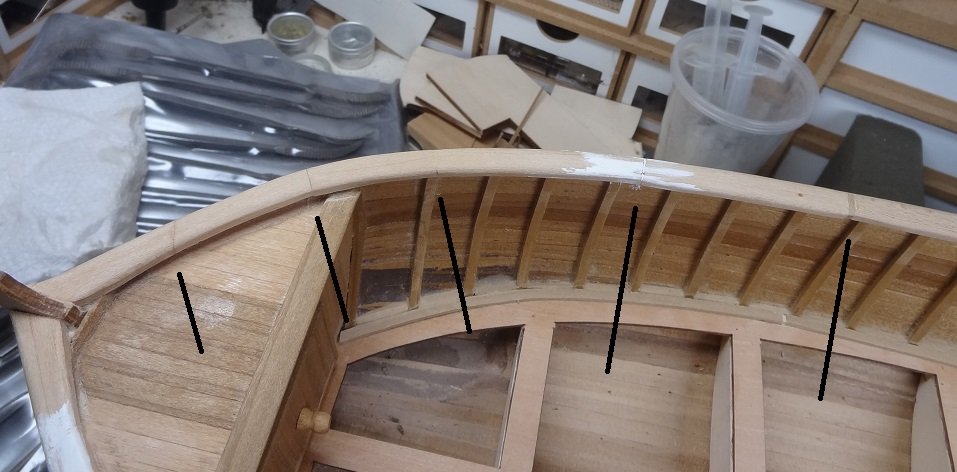
You and I had a conversation about these in my log. These will help hold pieces down when nothing else will. Is that wood you are having to bend over a frame piece or a filler block that you had to shape? Whichever, are you sure you are supposed to bend a stick around it? If it was a shaped filler block maybe you didn't sand enough of that edge off? Smoothing it out a little. That appears to be almost a 90 degree bend which doesn't sound right and would have been virtually impossible in the period. Every boat design is different but many have horizontal planks running from the top of the transom down to stem. You trim the ends to get that half circle shape of the transom. Then your side planking just butts up against those edges and don't need to wrap at all. Just some things to consider. I've never seen this build so I could be way off base.