
HOLIDAY DONATION DRIVE - SUPPORT MSW - DO YOUR PART TO KEEP THIS GREAT FORUM GOING! (Only 13 donations so far - C'mon guys!)
×


mikiek
-
Posts
2,276 -
Joined
-
Last visited
Content Type
Profiles
Forums
Gallery
Events
Everything posted by mikiek
-
 Hey Rowboat - what did you use for a stand? Those little blocks of wood that com with the kit are pretty cheesy. Not sure I trust them.
 -
The spar holder looks good. There's a lot of rigging you can do right there - off the boat. For your stanchions and hammocks check out a material called tulle. It's used in fashions and wedding dresses. It comes in several colors. If you don't entirely cover your hammocks with some material the tulle can be used as a webbing - page 21 post 624 in my log. I used white with Niagara and black with my current build. I prefer the black. You can get it at any fabric store - probably online too. Besides protection, the idea of the stanchions and rails was to let hammocks dry/air out.
-
Nice move - on the mantle. I'm proud of ya! You stayed with it even when things weren't going your way. I sometimes think these builds are a real test of character. Are you considering a case of some sort? Over time these things collect all sorts of debris, bugs and dust bunnies and they are not easy to clean out. i hope you stay with this hobby. There will be up and down periods. Just don't get too crazy with the highs or too depressed with the lows. You have what it takes to be successful. Which all leaves me to get after the completion of mine.
- 195 replies
-
- 2
-

-
- enterprise
- constructo
- (and 1 more)
-
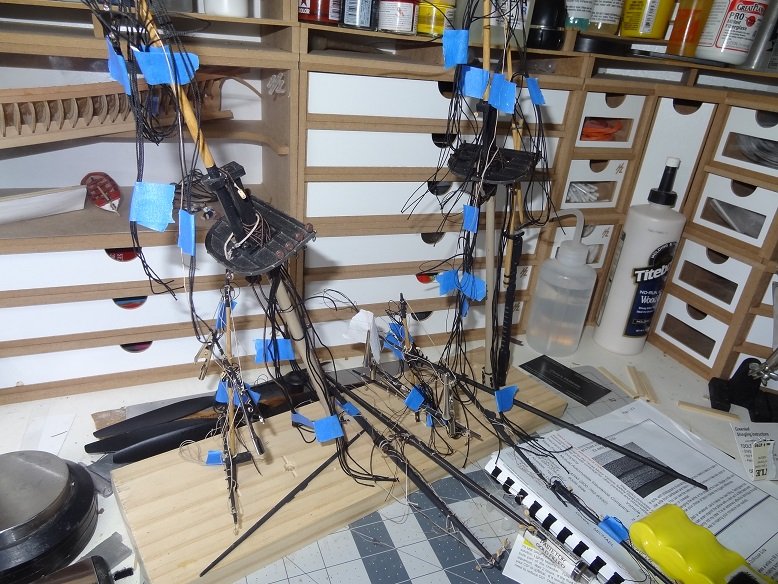
Hey Tom - if it makes you feel any better, I put off rigging for almost a year. I tried to find photos in my log but could not so pardon if I post a couple here. The bowsprit is a good place to start, just so you can start seeing results. The more results you see, the more you may want to accomplish. There is a ton of rigging you can do without ever touching the boat. Almost everything on the masts/yards for instance, at least the standing rig. Take a look at the stand I used. There was a hole for every section of mast. As you can see I grouped the ropes to keep from having a big spaghetti bowl. These days I use alligator clips instead of tape. They help keep the ropes taught while they are hanging. When you are ready, take a section off the stand and mount to the ship and figure out where the loose ends fasten too. You may hear many suggestions on where to start - bow to stern, stern to bow, top to bottom and even a few bottom to top. Honestly I don't think it matters that much. My only suggestion is to do the lines that run down the centerline first - kind of inside to outside. It's terribly frustrating to reach thru a bunch of lines to tie off a rope. Another suggestion is to get a couple of hiliter markers - yellow and blue. As you begin to work on a line hilite it in yellow on your plan for "in progress". When it's finished go over the yellow line with blue for "done". It's an easy way to make sure you don't overlook one, because going back later is never fun. Just relax - mmmmmmmmmmmmmmmmmmmmm
-
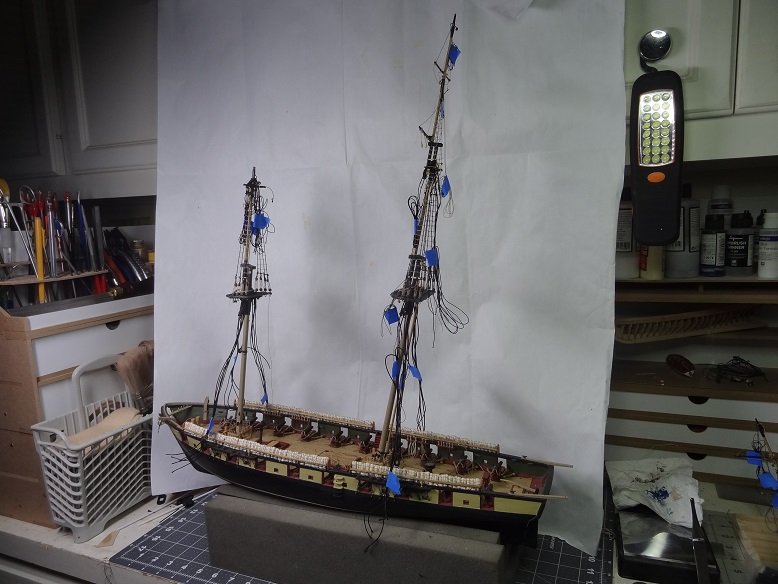
Hey hey - it's a good feeling isn't it? I like how you set the fore main. So what's next?
- 195 replies
-
- 1
-
-
- enterprise
- constructo
- (and 1 more)
-
You might want to start experimenting with rope coils to hang over the pins in the rails. All your rigging will terminate at a pin. Then you want to hang a coil over that. Theres a lot of ways to make coils and you will need quite a few of them. Thats what is holding up my completion. You might try making a mockup pin rail to work with. Getting the coils to hang naturally takes some finessing and you will be reaching in thru the rigging to hang them. This is where those alligator forceps can come in handy.
- 195 replies
-
- 1
-
-
- enterprise
- constructo
- (and 1 more)
-
Rowboat I posted my drawings to your thread. Maybe that will help. I believe your plans are older than mine. Since you have a paid version of the plans I don't think there is any copyright issues in doing so.
- 136 replies
-
- 1
-

-
- enterprise
- constructo
- (and 1 more)
-
ok lets see if i can remember how to upload pix 🤔 - see if any of these might clear things up - note the ref no, i assume my plan is newer than yours. There are still some confusing spots but sometimes if you look for the same rope or block in another drawing it will make better sense. I think the worst thing is looking at some tackle from the side and you see just one when really there may be 2 side by side. Hope this helps.
- 195 replies
-
- 1
-
-
- enterprise
- constructo
- (and 1 more)
-
I will photograph the drawings from my plans and send to you. I dont see that symbol in mine and the jibs are fairly straightforward.
- 195 replies
-
- 1
-
-
- enterprise
- constructo
- (and 1 more)
-
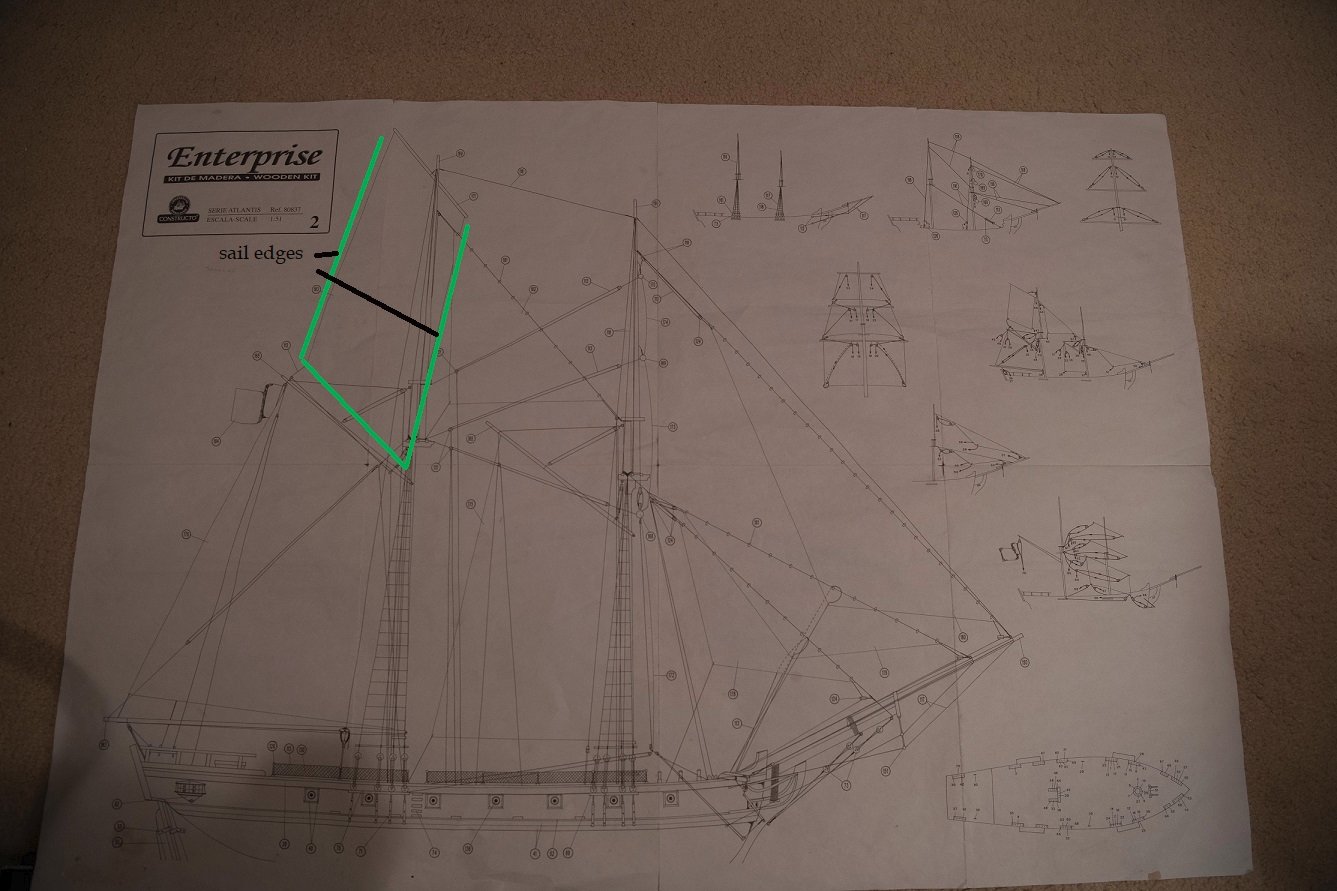
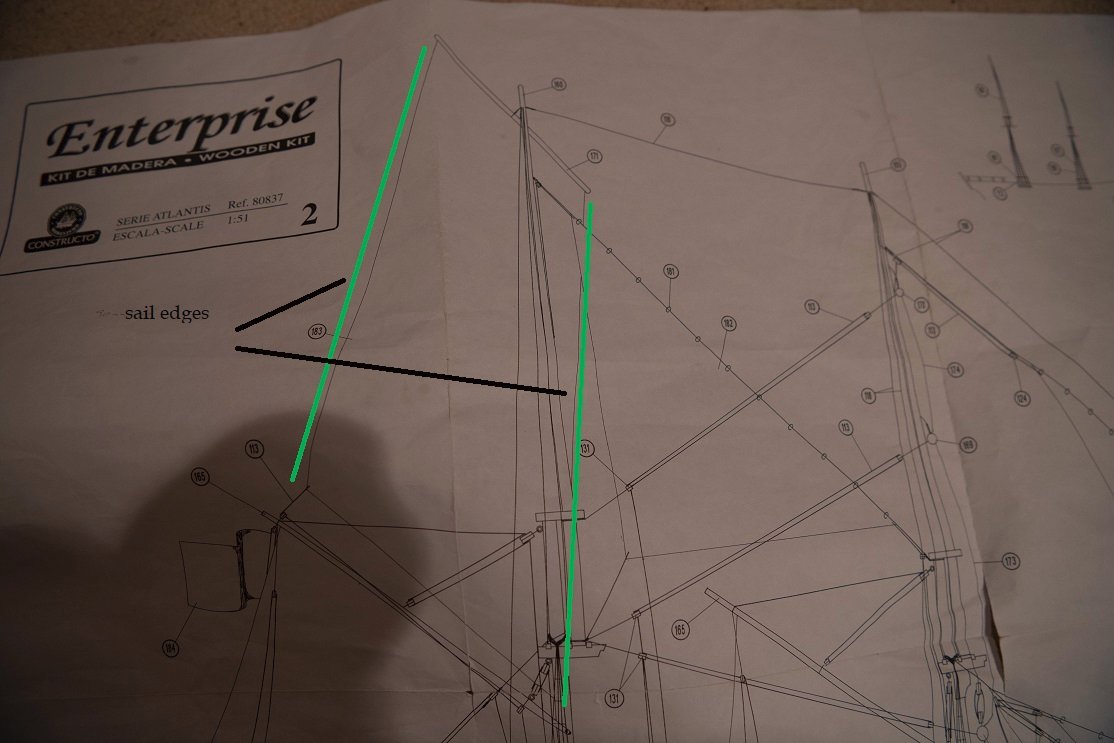
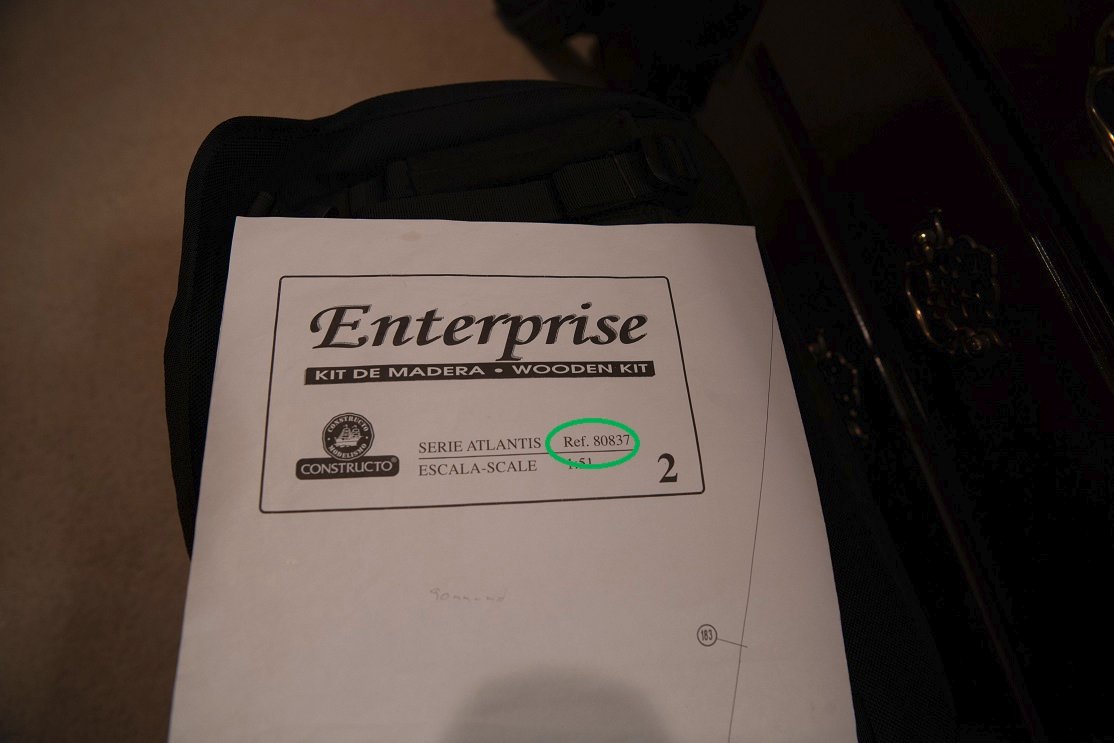
Your plan sheet is layed out different than mine. Your ref no is 80822 - mine is 80837. Probably why I have been confusing you. However I see something similar to your pictures on the big drawing that shows the entire ship from the side. The 2 lines you are referring to are the sail edges - at least on my plan. Very hard to distinguish from a rope except that mine shows the 2 lines terminating at the bottom corners of the sail.
-
Rowboat - PM me if you want to go thru what you are seeing vs what I am seeing. If you haven't reached rework fatigue. I HATE REWORK - but sometimes ya gotta do it. I'm here if you need it.
- 195 replies
-
- 1
-
-
- enterprise
- constructo
- (and 1 more)
-
Something wasn't sitting well from reading your description of the gaff topsail rigging. I reviewed mine and had a look at the plans again. That gaff topsail yard only has 1 rope seized to the center. That rope runs thru a block at the top of the mast then straight down to pin 46. Try googling ' 4 sided "gaff topsail" ' and it will come up with a few pix of how they hang. I also came across an item that called our 4 sided version a donkey topsail. Try alligator clips for grouping ropes and easily pulling them out of the way. They add some weight so your ropes stay taught. They are also easier to remove than untaping and reusable . You can buy a bag of 50 for about $5
- 195 replies
-
- 1
-
-
- enterprise
- constructo
- (and 1 more)
-
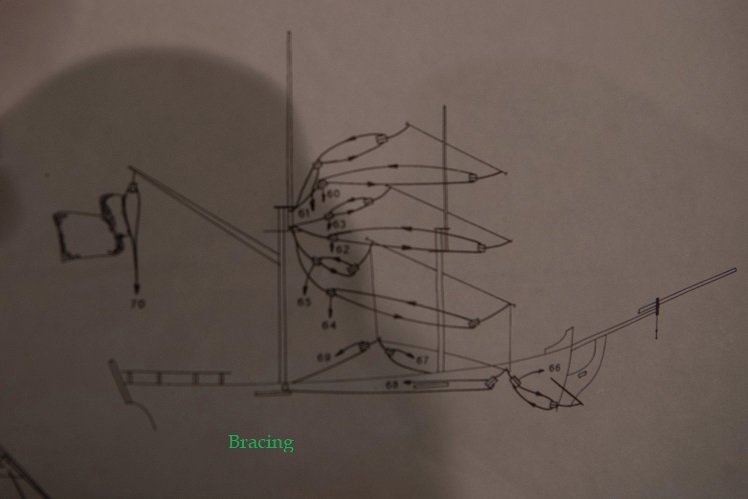
Usually the bracing is the last thing you do. So you don't have to stick your hands thru it. If you haven't seen them before checkout alligator forceps. They can be a huge help grabbing lines from a distance and reaching across the deck. The 5" & 8" ones are the most useful.
- 195 replies
-
- 1
-
-
- enterprise
- constructo
- (and 1 more)
-
Hammocks are a tough call. I agree with Darrell in one sense. However, I can't tell you how many times I knocked part of them off while rigging. There are a lot of different styles as well. This is something you definitely want to design on some scrap before you 'go live'. In my log there was even some conversation as to whether they even had the rails (and hammocks) on the original. There was really not much room to hang them below deck.
-
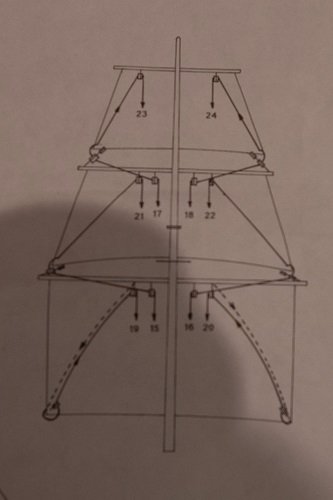
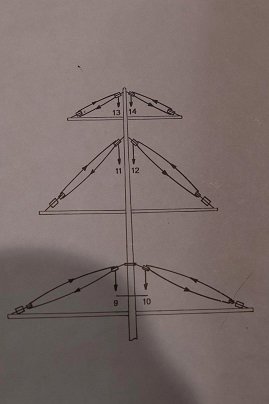
I wish the drawings were numbered. On the rigging plans in the upper right section - theres a row of 3 drawings at the top. Below that there is a row of 2. Take a look at the 2nd row left drawing which is showing the entire system for furling/unfurling the sails. A concern I have - at least based on what I can see in your pix - is both the top sail yard and mainsail yard should have 2 blocks seized in towards the mast on each side of the mast. It looks like you only have 1. Again, it may just be the angle of the photo. The drawing will show how those are used. Your 2nd photo that shows the large & small block combination. A rope should come from the top gallant corner thru the large block, over to one of the inner blocks on the yard then down to the deck. It looks like you have drilled a hole in the yard and are running that rope thru the hole? BTW - the smaller block in that combo is used to raise/lower the yard. You can see that in the drawing in the upper right corner. It looks like you are doing that. Both the topsail yard and mainsail yard are rigged the same way. If you think tying off 2 ropes to the sail corner is odd wait till you get to the main. That should have 3 blocks seized to each corner.
- 195 replies
-
- 1
-
-
- enterprise
- constructo
- (and 1 more)
-
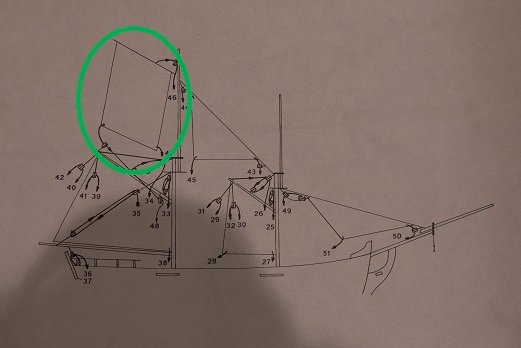
btw - that sail is called a gaff sail and as I said the triangle shaped version of a gaff sail is much more common. It also sits better as the mast and gaff make 2 sides of the triangle, the luff of the sail makes the 3rd side.
- 195 replies
-
- 1
-
-
- enterprise
- constructo
- (and 1 more)
-
For future reference, an easy way to do the rings is to open them wide enough to slip by the mast then lightly glue them in place on the sail with some CA. When it is time to install the sail all you need to do is slide a ring over the mast and squeeze shut with long nose pliers or forceps. That way your fingers and the shrouds are not fighting each other. I'm sorry I always seem to be too late with comments.
- 195 replies
-
- 1
-
-
- enterprise
- constructo
- (and 1 more)
-
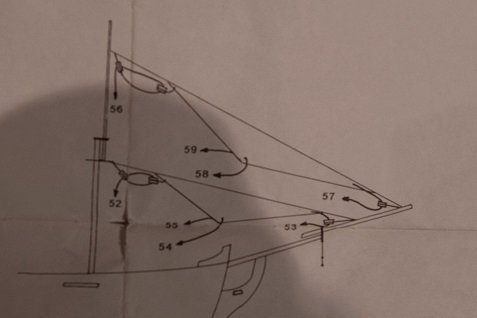
Yes the front corner rope of the topsail goes straight down to the deck. No blocks. The 4 sided version of this sail is rather odd and it just doesn't sit very well in a model. It needs some wind to fill it and blow it out some. The 3 sided version is pretty common in schooners.
- 195 replies
-
- 1
-
-
- enterprise
- constructo
- (and 1 more)
-
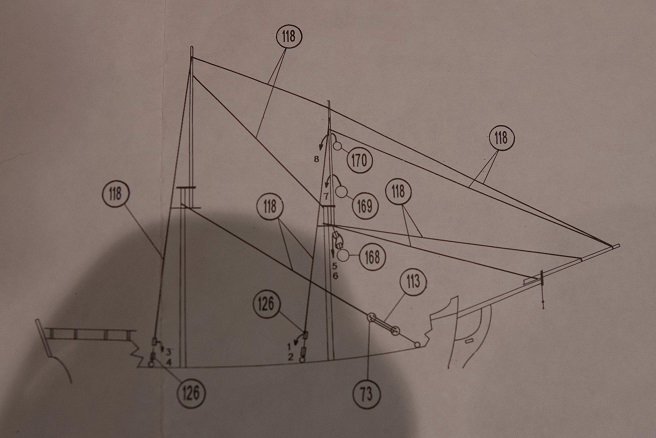
I'll address the first question - your main topsail corner. There should be a single block out towards the end of the gaff and another on the gaff close to the mast. The rope from the sail corner goes thru the outer block, then the inner block then down to the pinrail. Make sure the outer block is seized farther out than the sail corner. The idea is that pulling that rope from the deck would stretch the sail out tight. Looks like you may have it although maybe the outer block needs to go out a little further.
-
Thanks man - I am so grateful to have had the Marestella designer, Zoran there with me all thru the build. As I mentioned, I did a lot of practice on scrap before attacking the real materials. I can't stress enough how much that can help. Maybe the most helpful thing was using a thread that closely matched the sail. This was some true linen thread (european) although every situation will vary. If you want the invisible look try using flyline - about a 6/0 - the stuff is about as thin as a hair and if your colors match you will barely see it. This is especially helpful for the bolt rope. Just Google 'flyline' and you will see all sorts of vendors. I have found the Uni-Thread brand to be the best as some of the others tend to fray a lot I would strongly suggest getting used to using flyline. For that perfect scale it should be used for most seizing. In most cases seamen would carry some thin rope in a belt pouch and this was used for most seizing repairs. So almost all commercial/kit rope is too thick for seizing. Stay with it you are almost there.
- 195 replies
-
- 1
-
-
- enterprise
- constructo
- (and 1 more)
-
Oh, and you are improving with each sail. Sometimes these types of tasks are best practiced on scrap material before moving to the real thing. If you are folding material and then hemming it iron/starch the heck out of it first. In fact I do that to the entire sail. It'll look like a starched shirt at first but by the time you are finished bending and rigging, the sails will have a nice look to them. If you want to add a 'billow' to the sails wrap them longwise around something like a glass or something to give them some roundish shape.
- 195 replies
-
- 1
-
-
- enterprise
- constructo
- (and 1 more)
-
I should have posted this sooner. I went through the same adventure with the Trajta build. I started the sails at about post 128 and was receiving advice from the kit designer. It drags on for a while but you might find some helpful tips there if you don't mind reading some more.
-
Aww man! - I guess I didn't pick up that you were sewing. Just the hems or are you making them from scratch? re: twisted lines, if you wet the lines and then stretch them it can help. If you have the time cut them to length, tie or clamp one end, wet them and then weight down the other end and let them dangle, even for just a few hours - this is before you would rig them obviously.
-
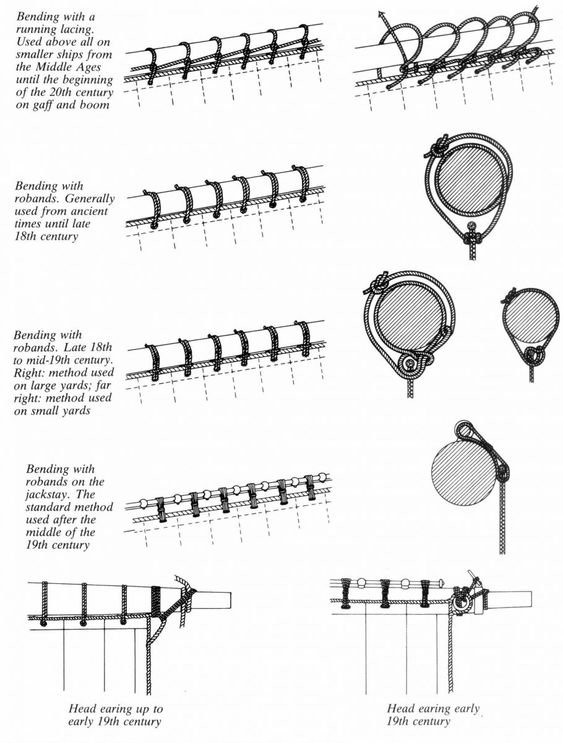
Hey Rowboat - this is a little late but for future ratlines I just use half hitches all the way across. Tie one to the outer shroud first and then use a dot of glue. work across but don't glue the hitches in the middle - at least at first. Do glue the other outside hitch. You can then slide the inner knots up or down to get them even and then glue them. A lot of people use white-ish line for the rats so they are easier to see. Post #93 in my log shows how to fix a sail to a gaff or yard. It's some sort of lashing but I don't remember the specific name. You will have to do that before mounting the spar. I poked small evenly spaced holes along the edge of the sail. Then I mixed some walnut shell & water to make a brown die. Then dipping a toothpick into the dye and then carefully stick the toothpick into the sail holes. This gives the appearance of something almost like a grommet in the sail. Granted they didn't have the grommets we know today, but they did put stitching around the holes to reinforce. You can barely see it on post 93. Just practice a few times first - you don't want to over do it. Found a sample of the lacing I was talking about. This will work on yard or gaff. The upper left lacing example shows an easy way to bend sails to spars.
-
Hey Rowboat - I was actually out working on E tonite and was thinking of you. You are almost to the point where you are going to have to make another decision(s). As you start to rig (running rig) you will hit a point where you have to start adding sails. The square sails don't fit into this decision but the fore/aft sails will for sure. Think about it - those sails are going to billow out on one side (hopefully). With all the rigging they pretty much have to stay running down the center of the boat but you will want them to look like they are filled. So one question will be what side of the the boat do I want to see the filled sails (billowing out). I guess that's the leeward side? Along with that comes - do I want to display the windward or leeward side of the boat (assuming the boat will display against a wall). Part of that may be decided by - which side of the boat do I think is the best to display? That may be decided by better planking, covering a big snafu or something else like that. So once you determine the display side, you have to figure out how those fore/aft sails should be set - windward or leeward. Once you start working with the sails you will need to shape them accordingly. There are many processes to do that so be sure you ask before you begin with them. The fore/aft sails have a lot less rigging but need a lot more shaping. The opposite is true of the square sails. I'm just rambling all this because it's better to have that worked out ahead of time. I'll be taking some pics of where I am at on my E so check that thread in a few days. I am running into a few things that could help you out down the road. Almost forgot. The plans for our boat show ratlines on the main shrouds running up to the main top. They DO NOT show rats running up the shrouds (just 2 ropes) from the main top to the top of the upper mast. How the heck did the guys get to those upper sails? You may want to consider doing rats on those upper shrouds as well! The yard looks great!
- 195 replies
-
- 1
-
-
- enterprise
- constructo
- (and 1 more)