mikiek
-
Posts
2,276 -
Joined
-
Last visited
Content Type
Profiles
Forums
Gallery
Events
Everything posted by mikiek
-
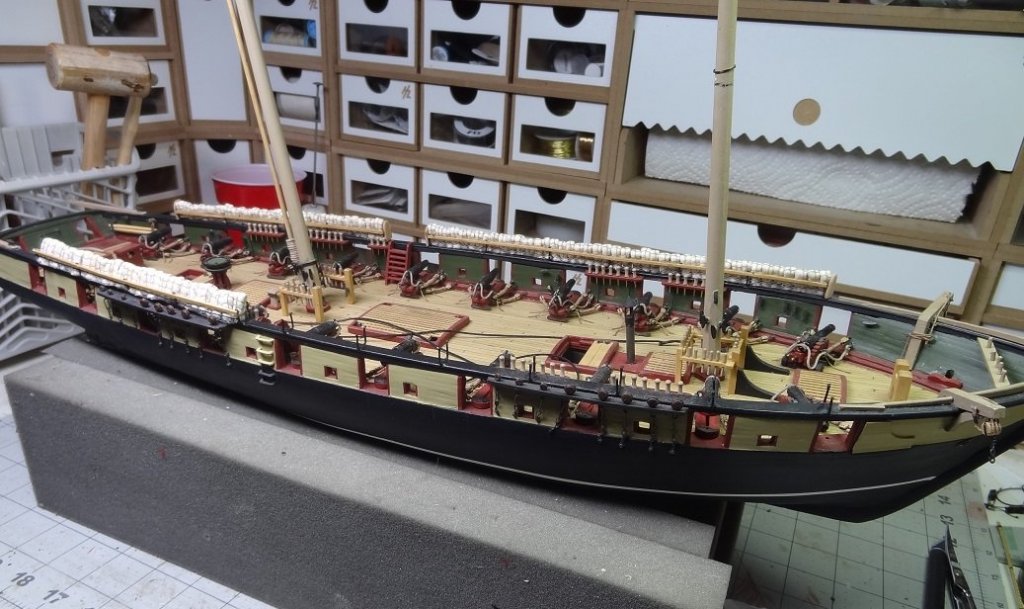
 Wrapping up Arrow so it's back here to Niagara. I have have more deck work to do than I remember. Hammocks for one. I had also decided that I didn't like the look of ships boats hanging off the quarter davits. So there won't be any. I won't leave them stranded though - besides Commodore Perry needs one. I finished one of the yawls early on and that one will hang off davits at the stern. I was about half way thru another one that I will place over the grates on deck. Will not build the third one. Then there's rigging. Again, early on I actually finished all the spars. Made them all from squares. Joel was always after me to rig this build so I'm going to give it a try. The spars are all still separate so I am going to rig each piece and then assemble them. Yards are up first. Believe it or not the royal shown in the pic took almost half a day. I was all thumbs today - have been for a while. I imagine it will come to me soon enough.
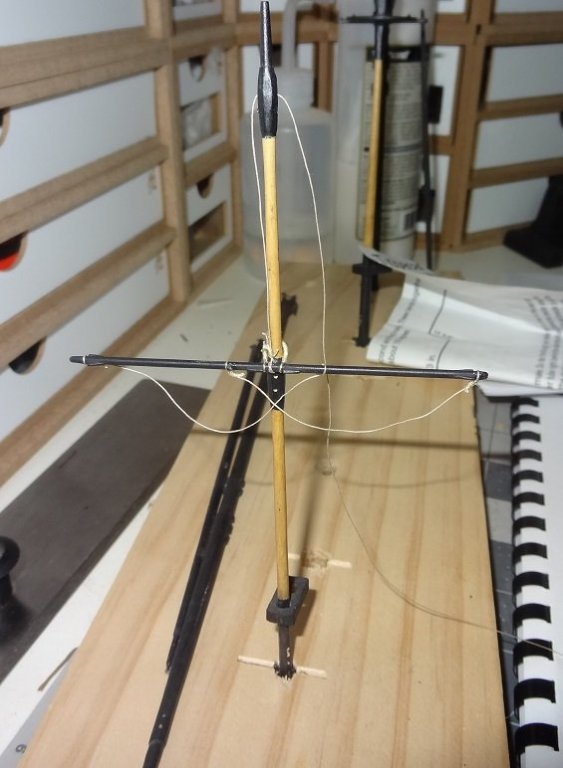
- 843 replies
-
- 7
-

-
- niagara
- model shipways
- (and 2 more)
-
I'm still kind of bummed out over Joel. His loss really took me by surprise. He was quite a fellow. Always direct, honest with a sense of humor almost as dry as mine. He loved this hobby and this site as well as most things nautical. He was a teacher and I learned a great deal from him. Although I have never met Joel personally, I consider him to be my friend. I will miss his wit and style greatly here at MSW. Moving on - trying to at least, I am going to order the display case for Arrow tomorrow! I'm wrapping things up here. Rigging is done, as is the anchor. I didn't take any in progress pix mainly because it just looked like a bunch of ropes all over the place. Just need to finish painting and I'll call this one finished. Hopefully that will free up my time to focus on Niagara which I am dedicating to Joel. I'll start taking some pix of Arrow soon and get them posted. I'll go into some details and observations about the build then. She has been an interesting build.
-
Don't know if everyone has seen this yet. I have a heavy heart this morning. I am dedicating the completion of this build to Joel. Niagara was my first build and I joined MSW because it quickly became evident that I would need help. Joel was one of the first experienced builders to jump into this thread with comments and advice. He seemed to have an above average interest in Niagara and that piece of history. Joel was always there to help and add commentary for all Niagara builders. I will miss him greatly.
- 843 replies
-
- 3
-
-
- niagara
- model shipways
- (and 2 more)
-
Welcome back Scott. I appreciate the comments. Getting closer to completion - about half way thru with the last mast. Then anchor & paint. Last weekend I was beginning to think about what to build next.
-
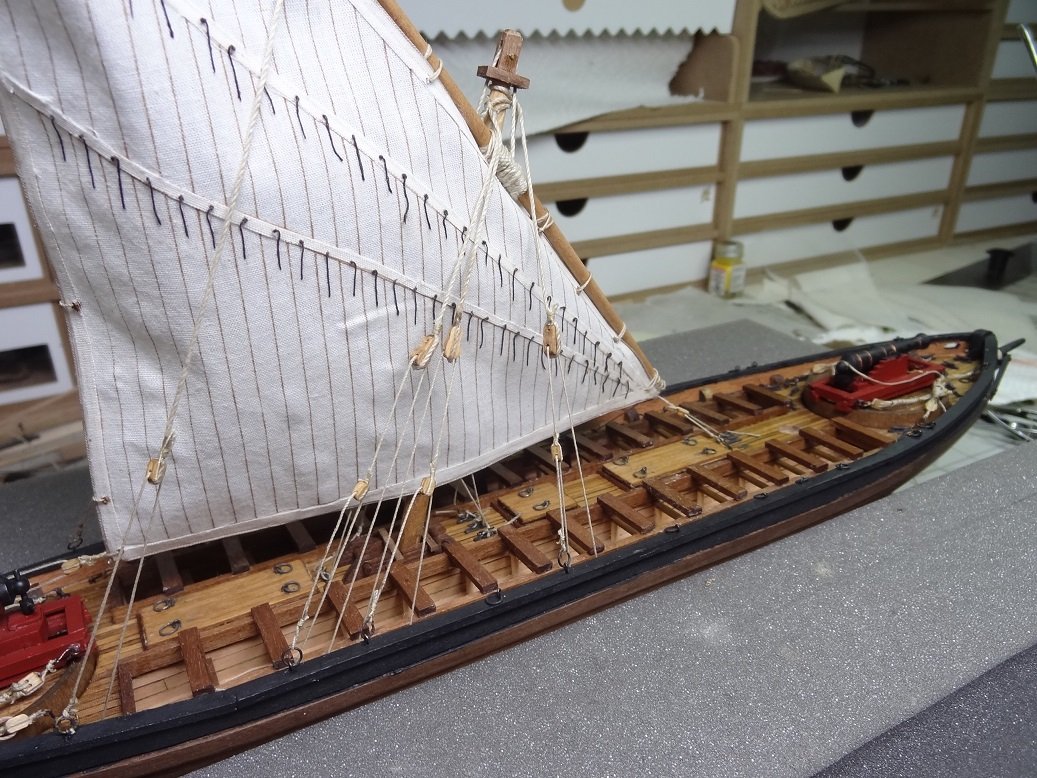
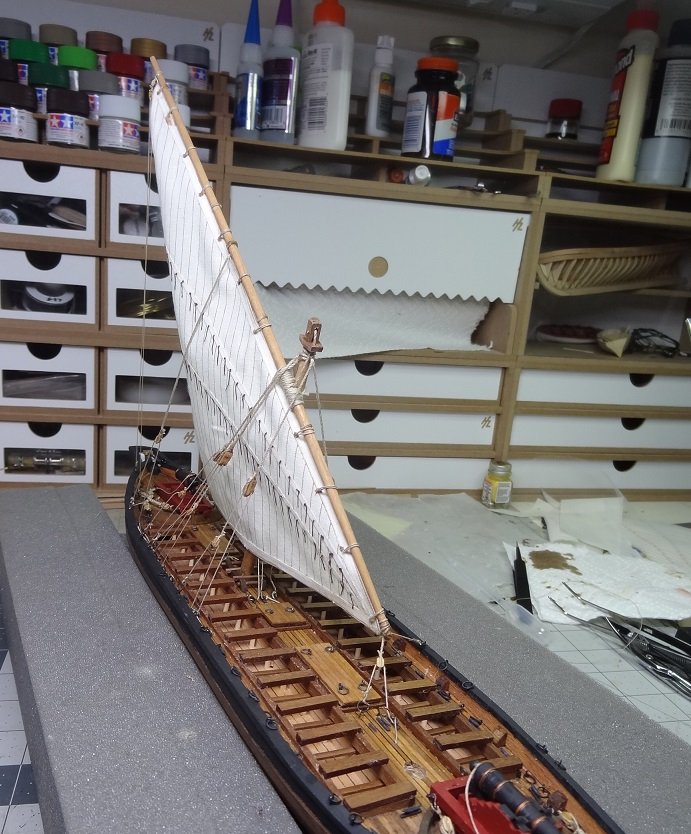
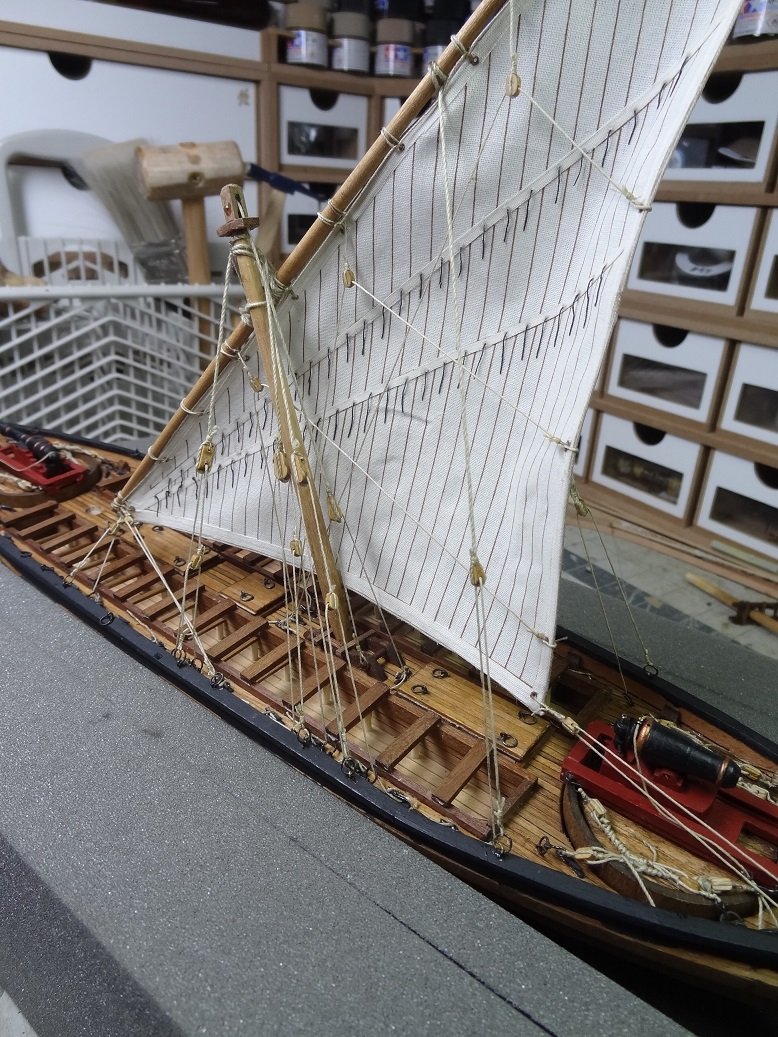
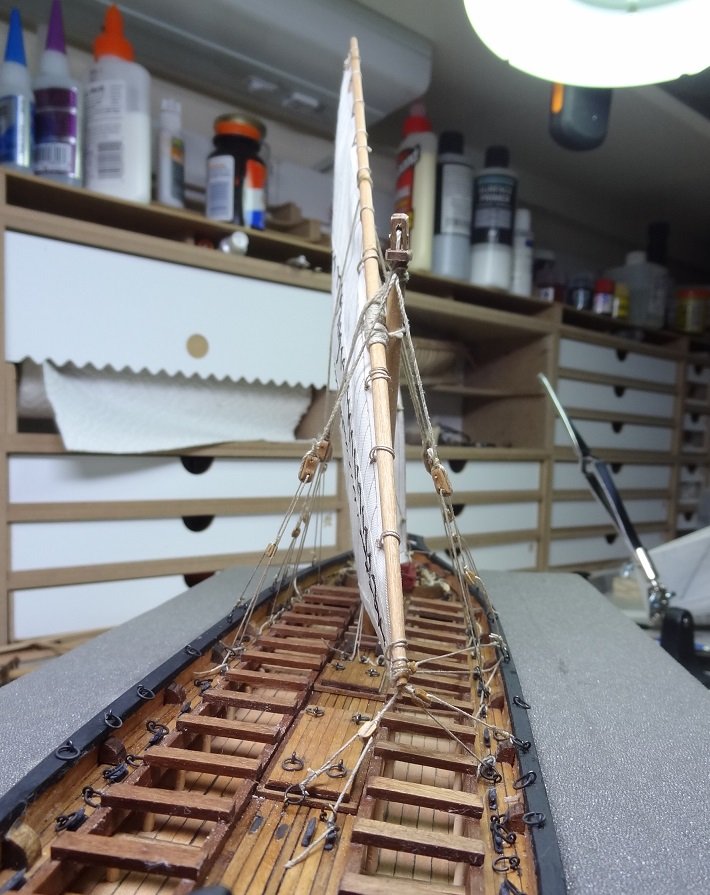
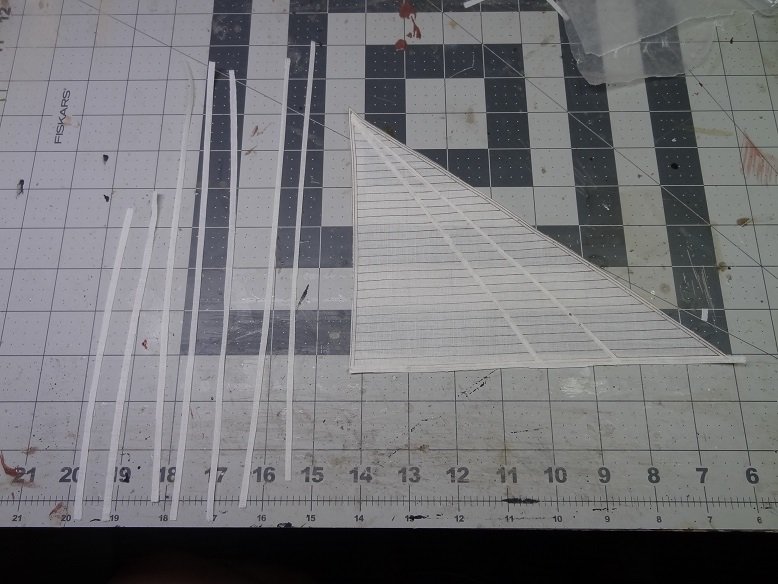
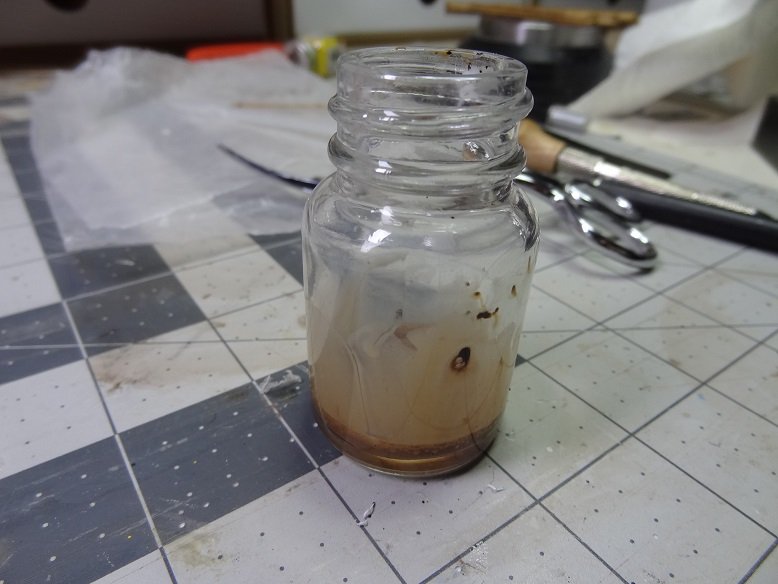
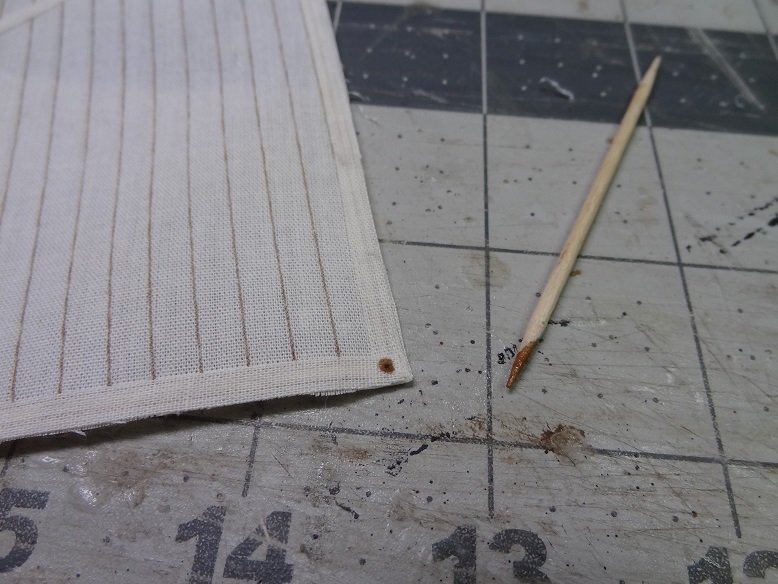
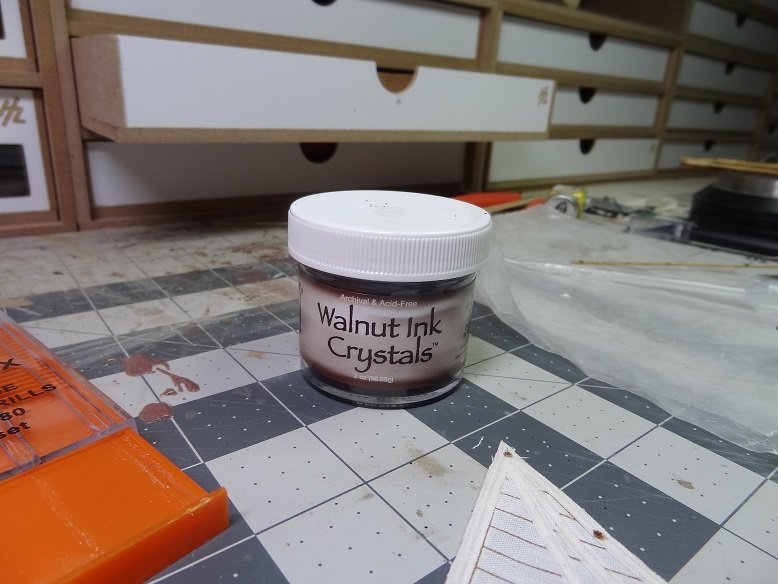
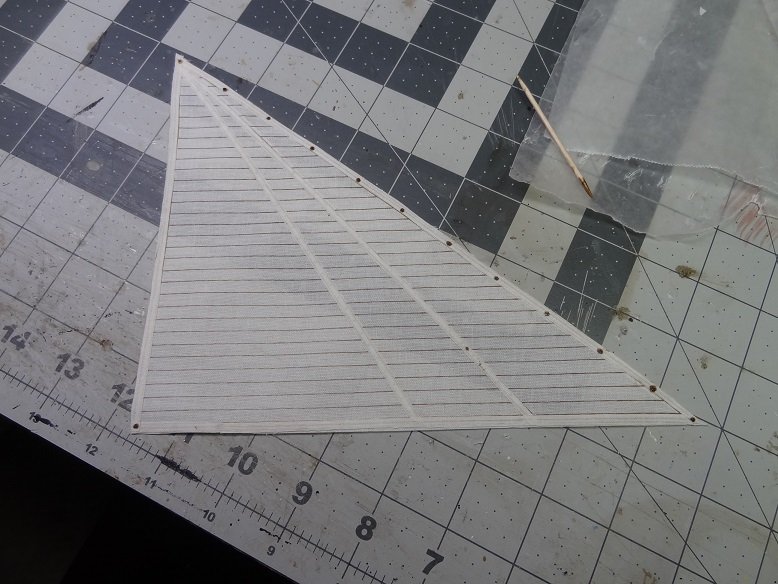
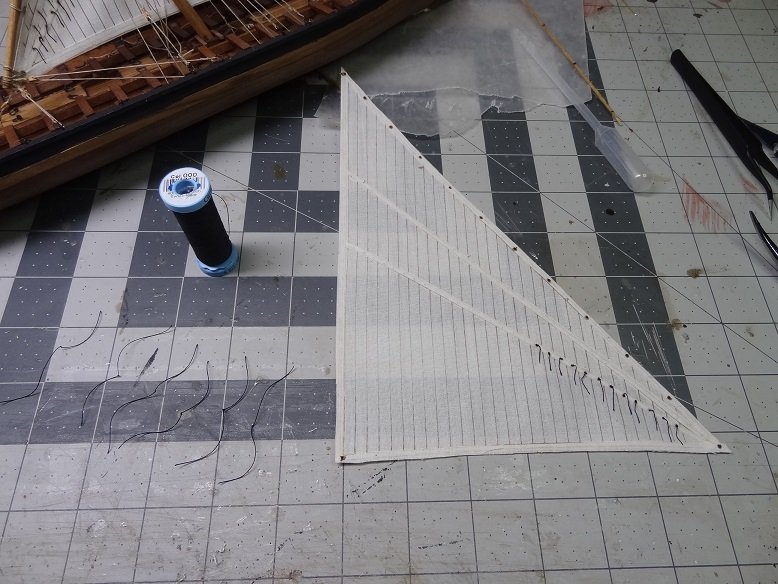
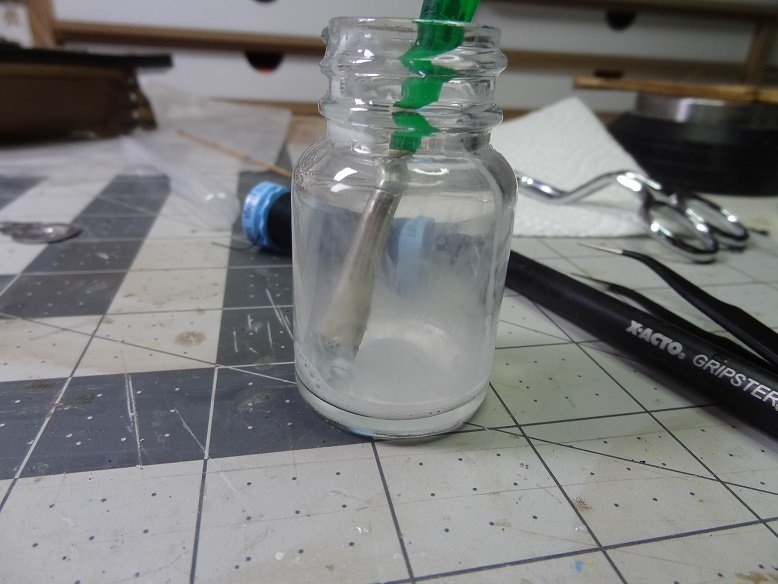
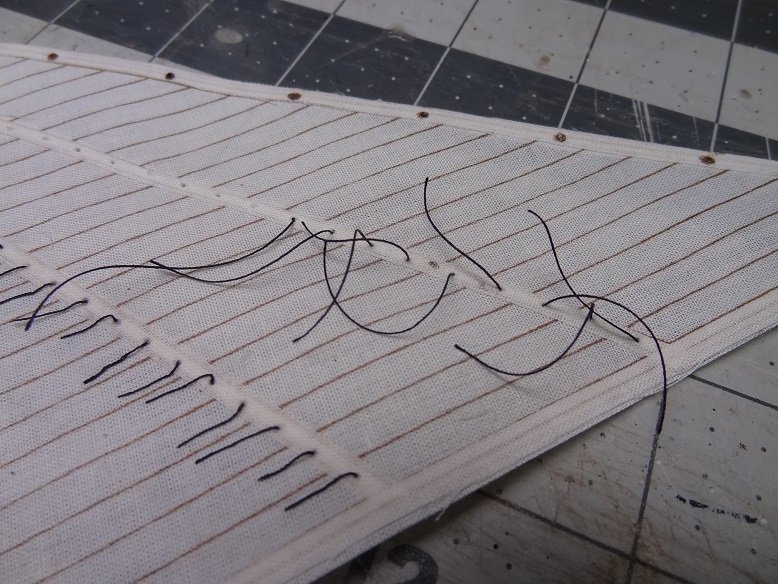
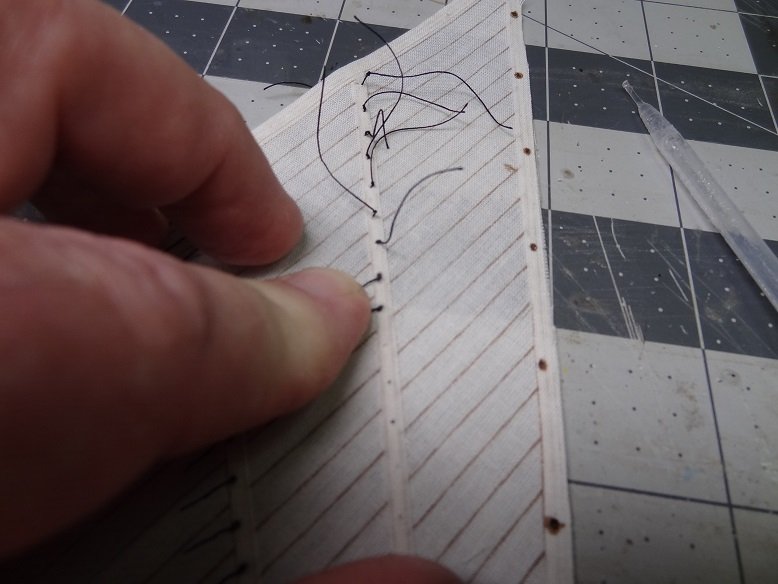
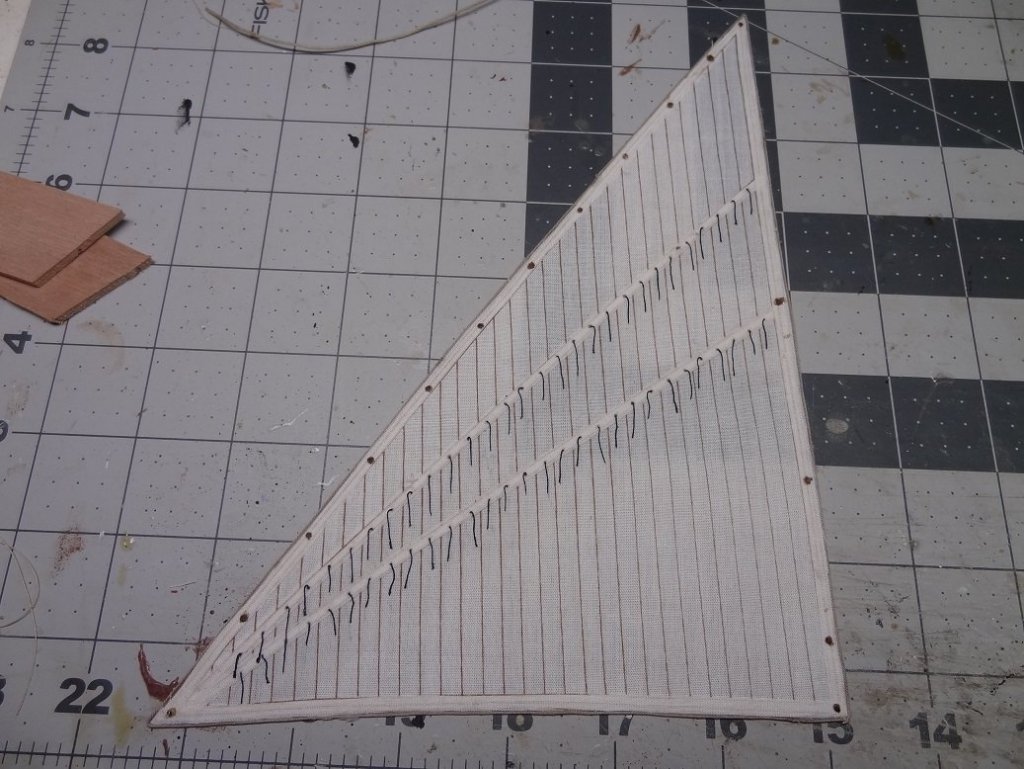
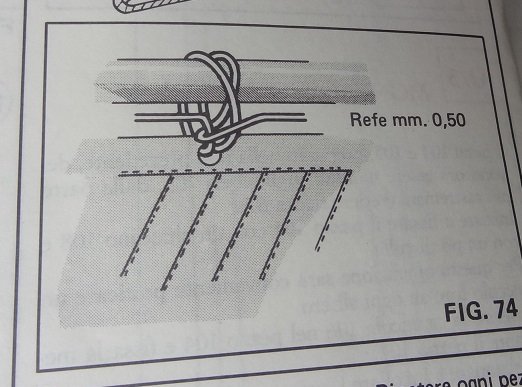
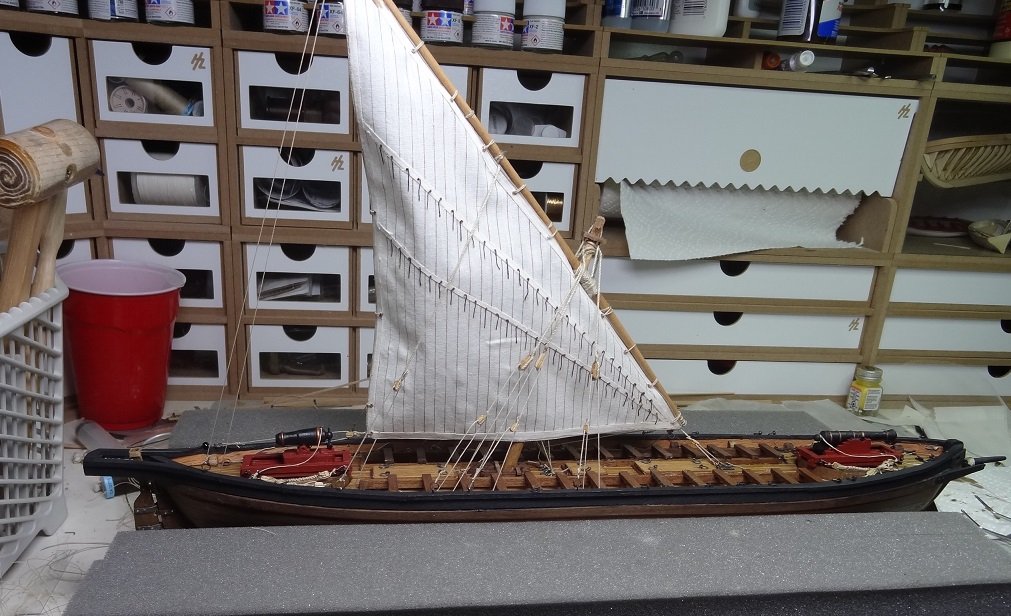
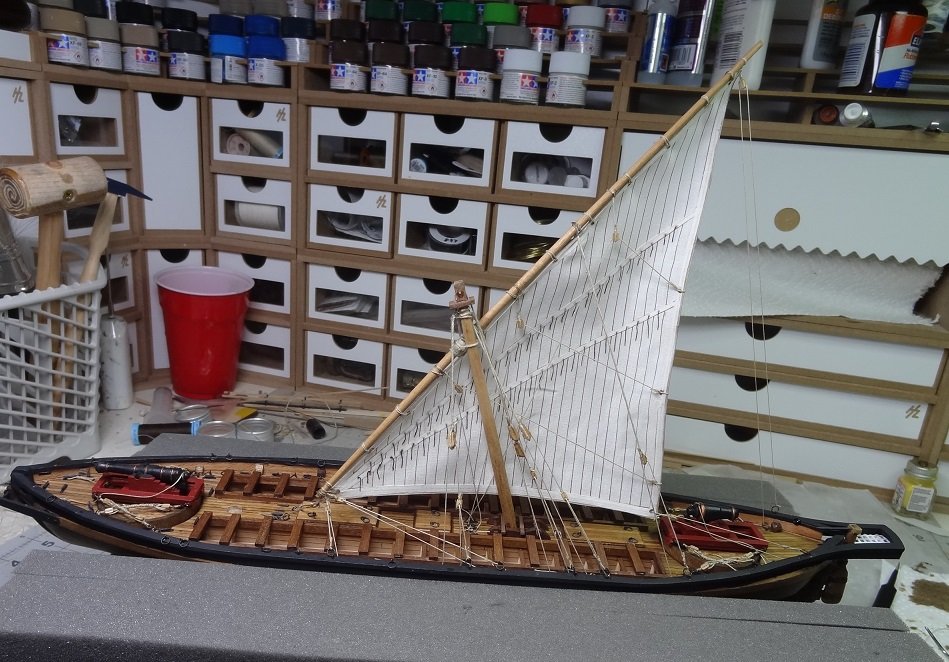
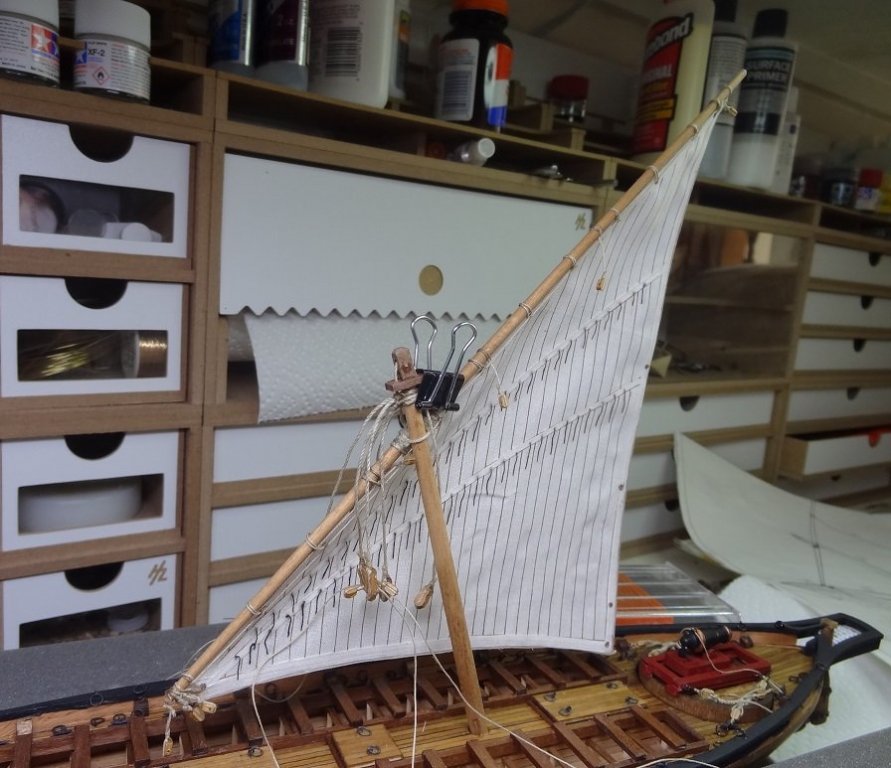
I threatened to show you guys what I did for the rear sail when I did the fore sail. So I'll hold true to my word. This is just one way of hundreds so I'm not suggesting you follow my lead but maybe there will be something you can use someday. The sails with the kit come with stamped markings - edges, strips, etc. I decided I was going to just work with what was there. Preparation - Cutting the material is not difficult with a new blade and a straight edge but the material can fray some and leave threads hanging loose. The fix for that is to starch the heck out of the material before you do anything with it. Problem is starch can burn under a hot iron, so you can't just soak the material and then iron. You have to spray lightly and iron, then repeat this 4-5 times. The material needs to be able to stand up on its own. Same goes for the scraps. Some of that will be used for cutting thin strips for the sail. The sail marks show a border all the way around the sail edge, and 2 strips running diagonally for the telltales. These strips were all cut from excess material and were about 1/8-3/16 inch wide. Strips were glued in place with Elmers. I will say I was impressed with the way it held the strips to the sail, even with a little rough-housing. The next step was to put eyelets in the appropriate places. I had a thread about what would be grommets in this day & age. It was noted that reinforcement stitches would have been added but no sort of metal grommet. In that same thread someone suggested poking holes for the eyelets then using some dyed Elmers with water place some of that around the edge of the eyelits. So I mixed Elmers & water 60/40 and added walnut crystals for color. I'm sure brown paint could have been used as well. I dipped a round toothpick in the glue and then slowly stuck it into the eyelit hole and twirled the toothpick aroundso that all the edge of the eyelit picks up some of the mixture. I had to do this on both sides of the sail. Now time for the teltales. I found it was easier do use a pin vise and drill holes into the material and then use a needle threader to pull the lines thru.The lines are about 2 inches with a halfhitch tied in the middle to hold the line in place on the sail. Next you have to give these boys a haircut. I applied a spot of CA where the knot in the telltale meets the sail. This keeps the telltale in place. I had to hold the telltale in place while gluing because some of them ended up glued in funny directions. And finally I have to get them to lay flat against the sail. Once again Elmers come thru. Just white glue and water. And you start painting the telltale. The result. Then there is the rope that goes around the sail edge - don't recall the nautical term. I glued that again with Elmers. I had to do that in small chunks. The material tended to shrink up for some reason so I would glue about 3-4 inches and then put a weight on it while the glue set. One thing, with all the Elmers being applied it did give the sail a good stiffness that I liked. Then I laced up the sail to the yard. Don't know what this lashing is called but it was easy and worked well. Now to get the rigging up....


-
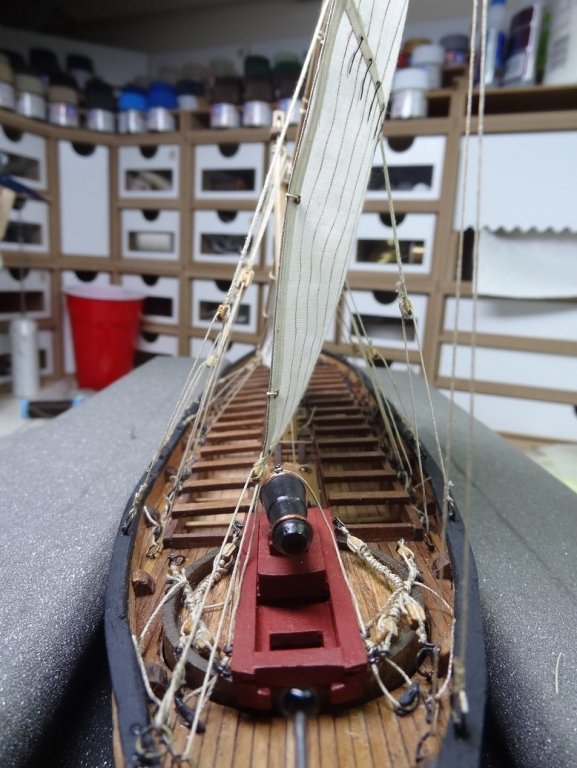
Oohhh. Touchy subject One thing almost for sure. It wasn't painted the colors of the MS kit - fire engine red and French's yellow. Several paintings show both either all black or black and gray or buff at the gunwales.
-
Hi Don - Thanks. Now if I can just come up with a plan for some admiralty style rigging. The minimalist approach. I know I'm always whining & griping about rigging this girl. The fact is I like the way it looks right now. Don't need lots of ropes and yards in the way. Besides I could save a bundle on the display case
- 843 replies
-
- 2
-
-
- niagara
- model shipways
- (and 2 more)
-
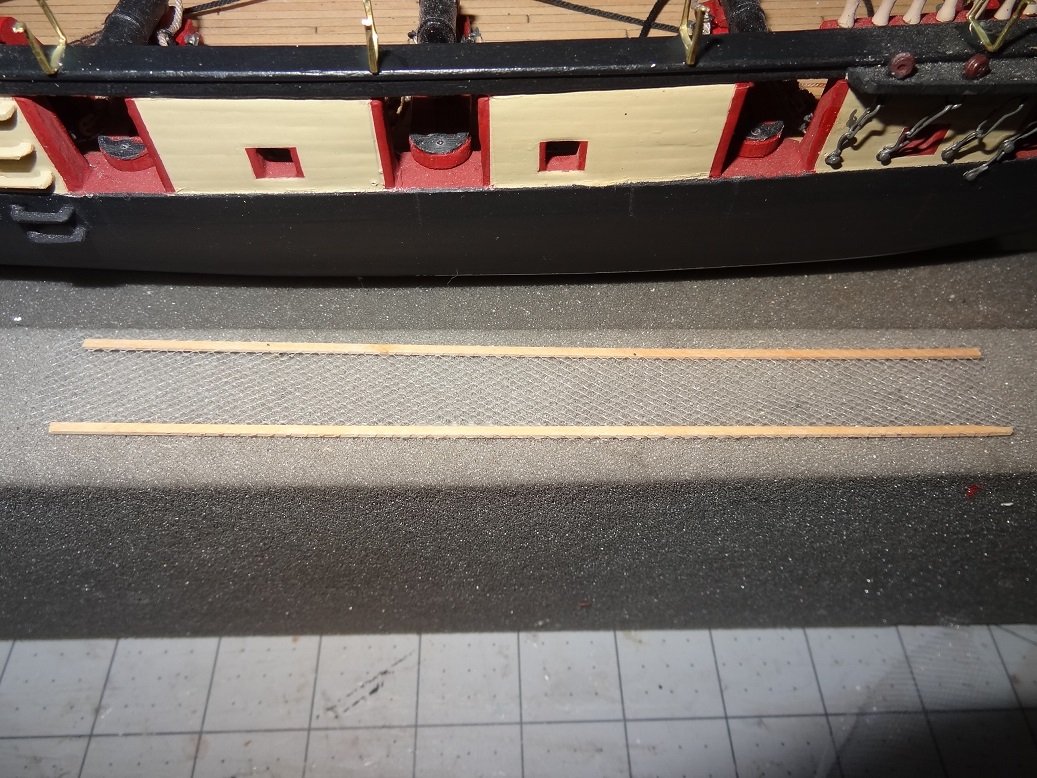
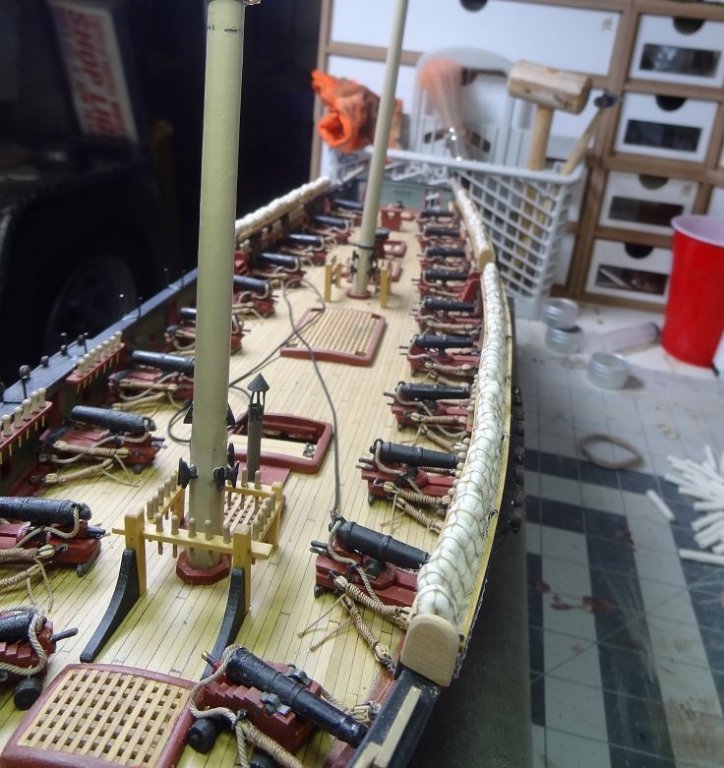
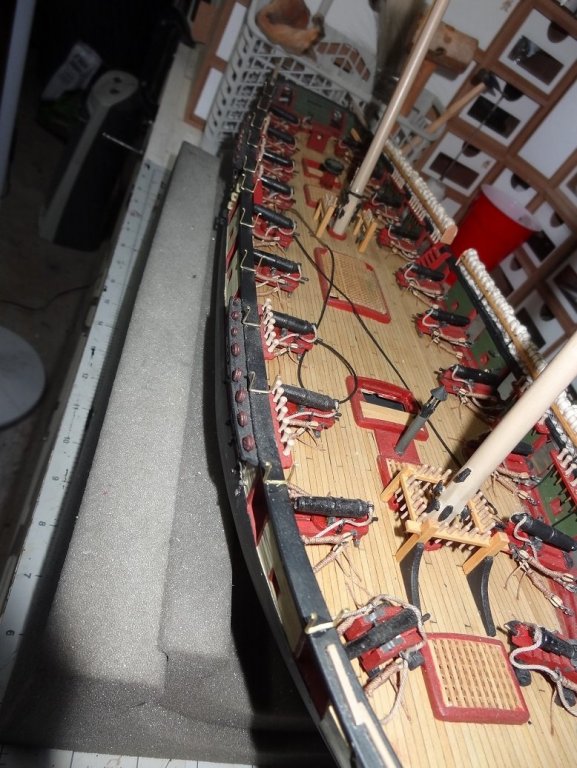
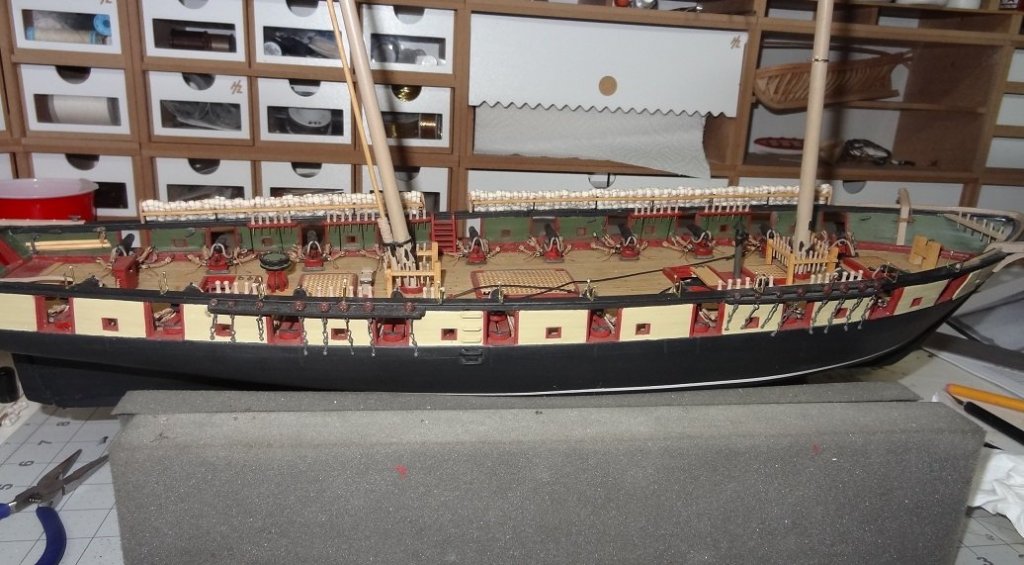
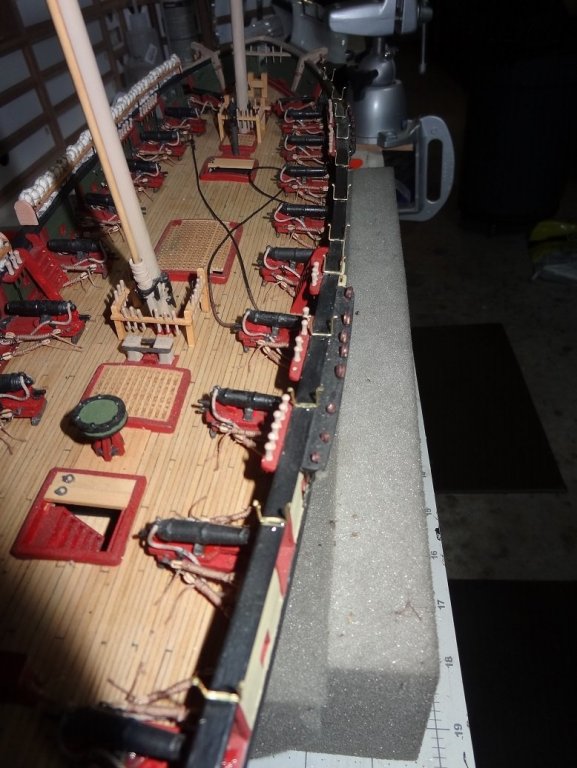
One more section finished. For some reason, the hammocks did not seat very well when I glued them to the rail. some of them are not laying squared up. This was about 25 rolls, meaning the last section has about 50. Won't be too soon to be finished with this task. I took Don's lead and brought her out into the daylight for a few snaps. A gorgeous day today. Quite similar to the day of the big battle.

- 843 replies
-
- 7
-
-
- niagara
- model shipways
- (and 2 more)
-
You'll get no argument from me on that. Sadly, there were not that many of these galleys, and as was typical of a lot of U.S. builds in that era, there seems to be no record of plans. They did resurrect one in an archaeological effort. Quite a bit was learned about the hull structure, but almost nil when it comes to rigging. I've done my best to stay with the plans on this build. No redesign or bashing.
-
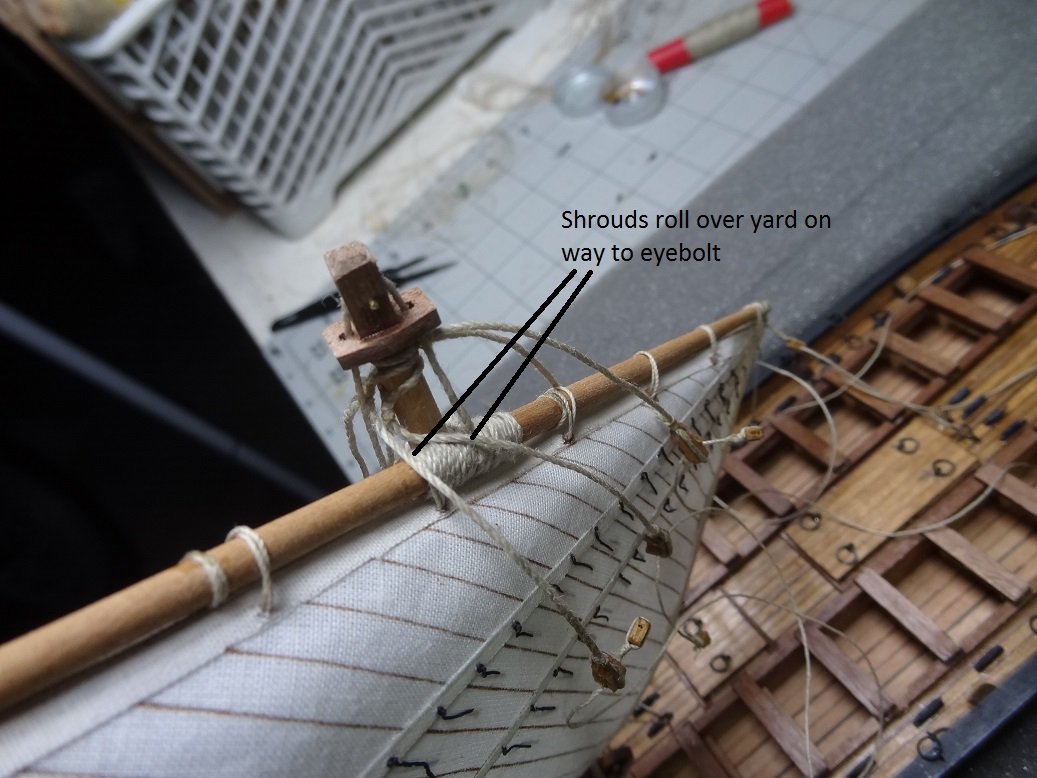
I guess we are the mercy of the kit designers interpretation. Both Arrow and a larger Xebec kit show shrouds over the yards. I'm sure there are countless variations of the fore/aft setup.


-
Still staying with it. I'm lashing the hammocks and getting the stanchions ready. I had the epoxy out earlier for the barge I am building to go with the tug, so I decided to go ahead and use that to get the stanchions on the handrail. Should be ready to paint in the morning. Then put the webbing in place. I showed the details for all this when I did the port side. Got one helacious thunder/lightening storm outside. G'nite ya'll.


- 843 replies
-
- 7
-
-
- niagara
- model shipways
- (and 2 more)
-
A pretty scary venture. Nice drawing. Brails are one thing. The shrouds another. Not sure how they would manage to let a yard(s) out to head downwind. Shrouds are completely in the way.
-
JCF - What you're saying makes sense. I am curious though, would these brails just dangle and flap around when not in use? Seems like trying to keep them taught might end up doing bad things to the sail shape. I came across similar situations several times on the fore/aft sails. The shrouds on the leeward side are one example. Depending on how much the sail is let out and/or how far around the yard has rotated the shrouds could really be in the way.
-
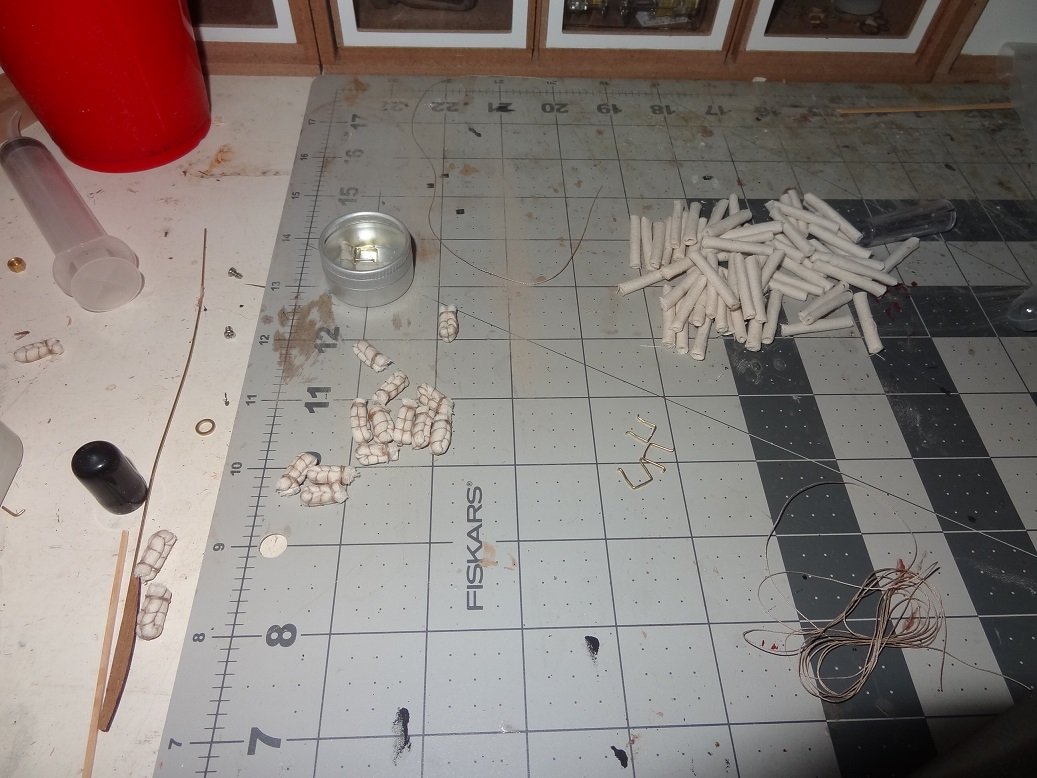
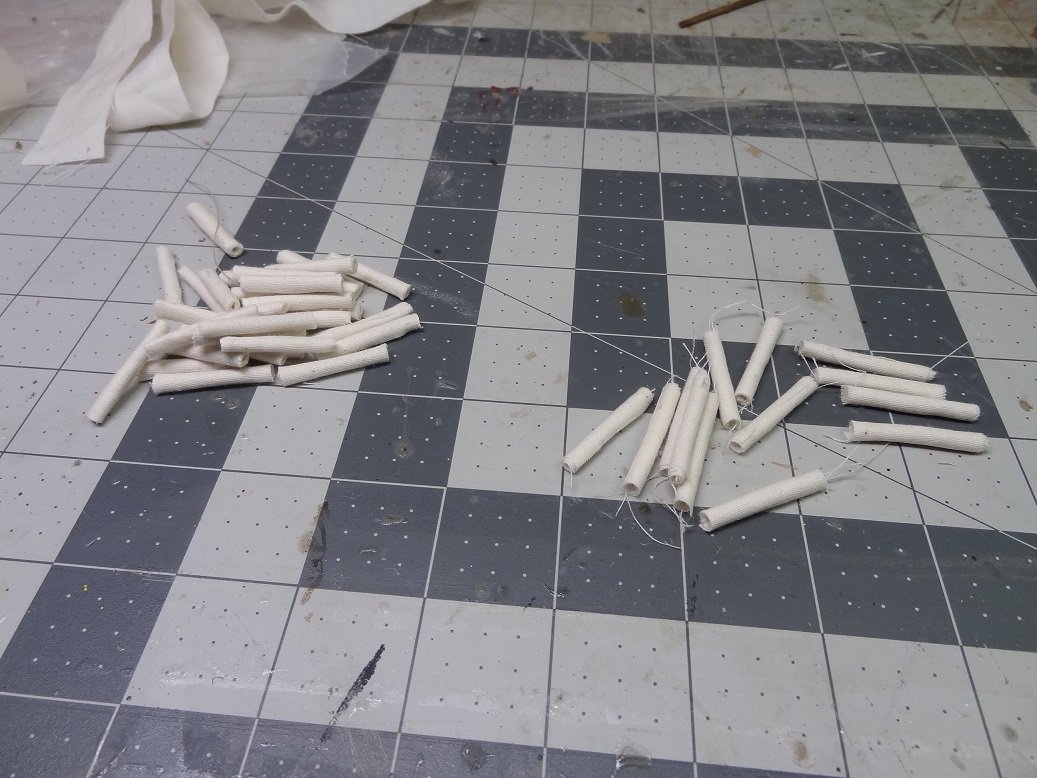
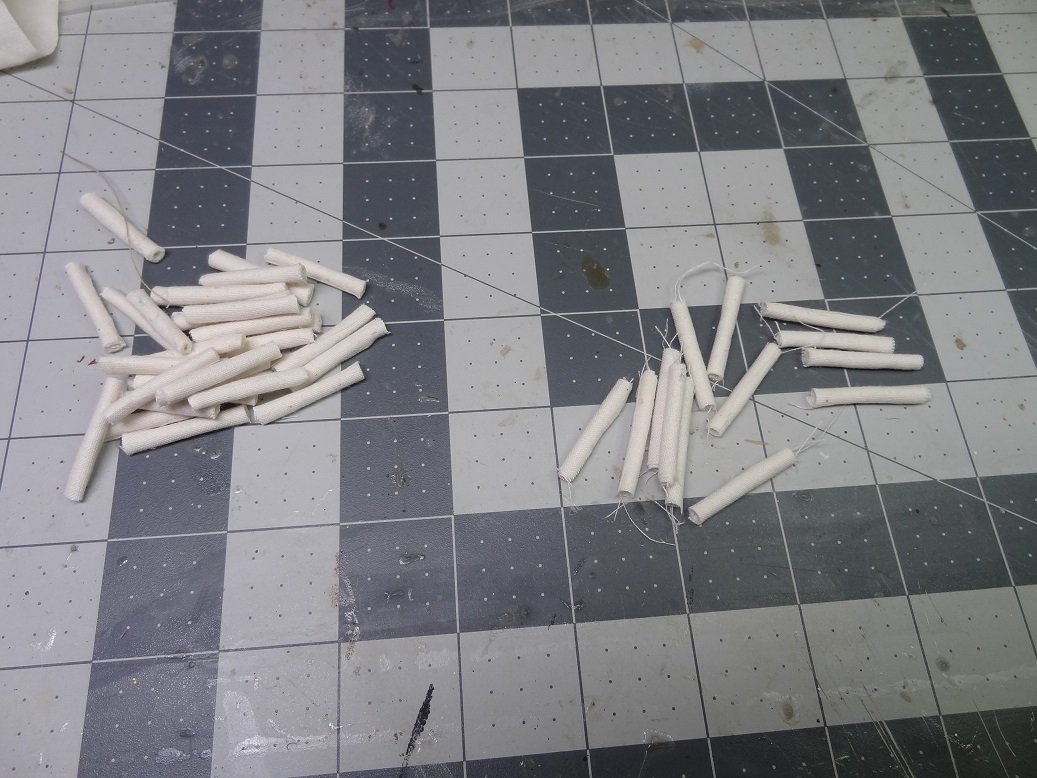
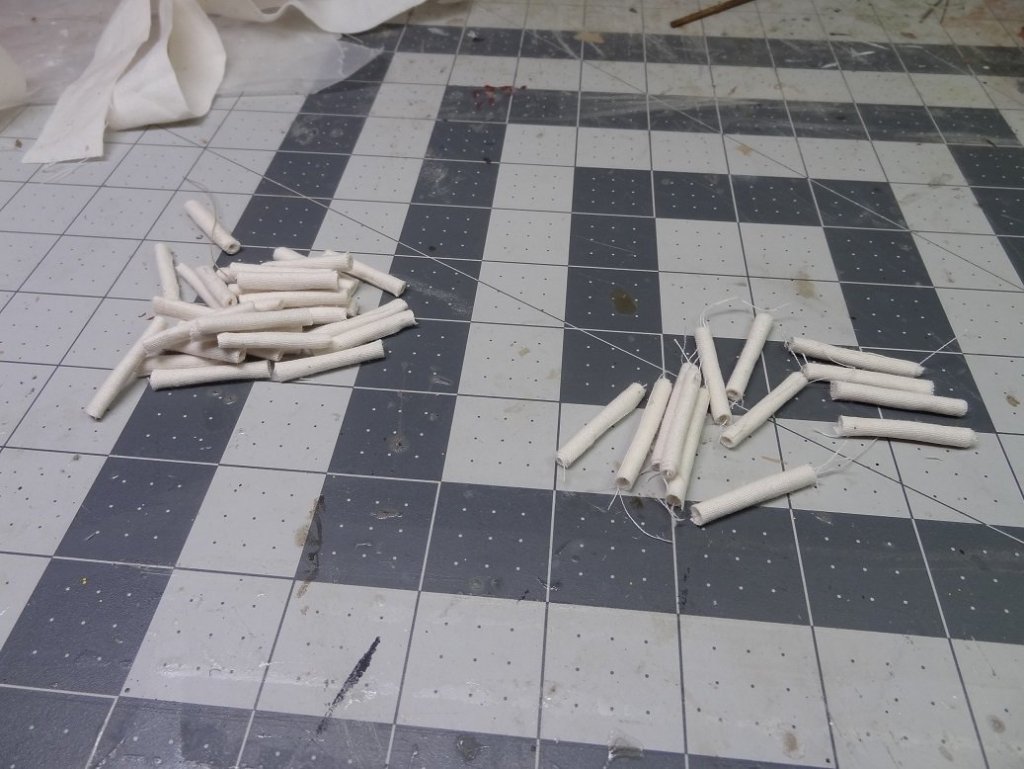
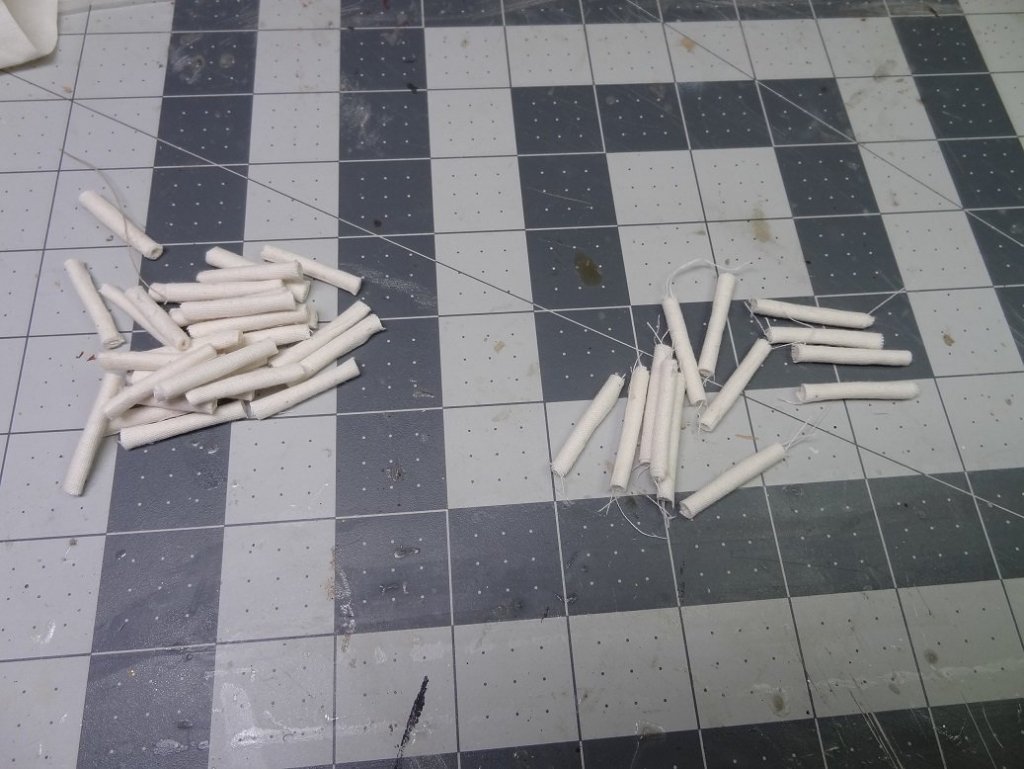
Rrr-ooooooooooooooooooooooooooooooooooooooooooooooooooooooooooooooooooooooooooooooooooooooooooooooooooooooooooooooooooooooooooooooooooooooooooo-ll another one - Je-ust like the other one. Time to blow the dust & bugs off the old girl and get back to the task at hand. This is 30 something rolls so I'm about half way there. The last time I was doing these start to finish in batches of 10-12. This time I'm going to cut & roll about 75 then go back and tie them up
- 843 replies
-
- 5
-
-
- niagara
- model shipways
- (and 2 more)
-
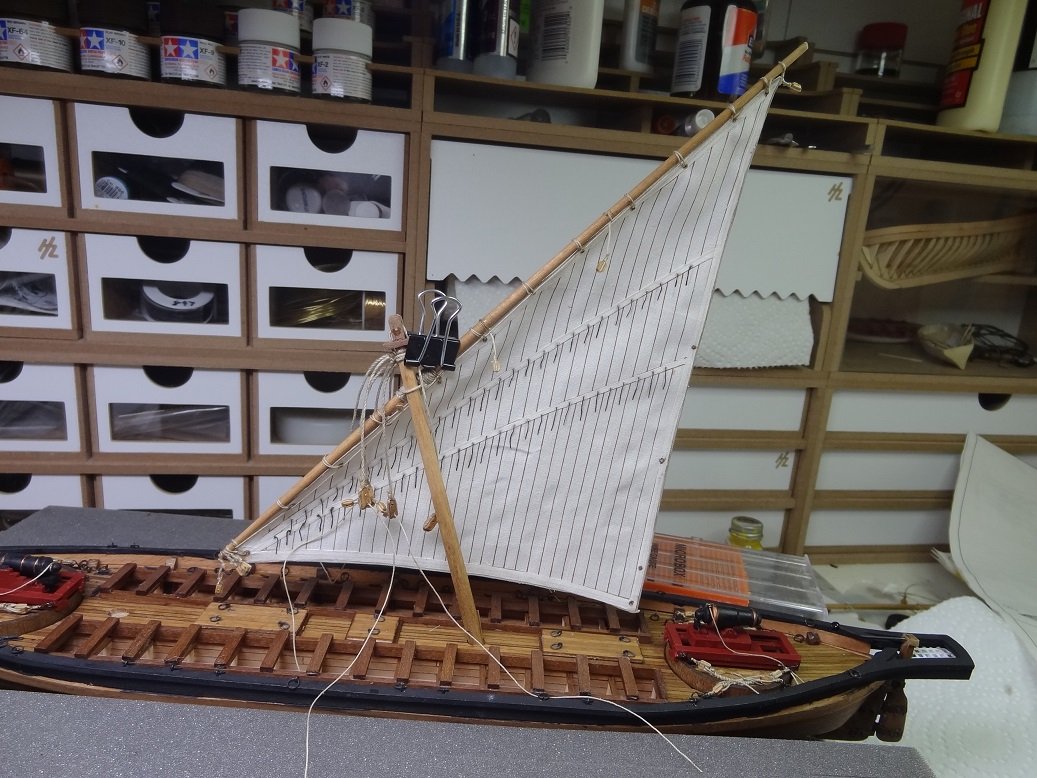
Never got any feedback regarding the shrouds. I kinda had one of those 'duh' moments, realizing I could just turn the shrouds where they wrap around the mastheads so that the seizing is over the yard rather than centered on the mast. It worked OK. I believe I have finished one sail/mast assembly. I think I have been working on it for about a week. The lateen system has it's own set of quirks but I imagine it's still easier than square rigged. I still credit the Lauck Street tutorials for opening my eyes to seizing and how it can be done. I always thought seizing had to be done at the point where it would end up. If you wanted a rope seized to an eyebolt you did the seizing at the eyebolt. I'm sure that's how it was done in real life. I never realized I could do the seizing 2"-3" away and then slide the finished seizing where ever you want it. Almost like zip seizing but it looks a lot better. Or maybe I'm the only one that didn't know. I did cut some corners on the cleats. They are too small and there is just not enough room to tie them off correctly. I glued them with CA instead. We'll see how that works out a year from now. Some of the ropes are a bit loose. I've already cut the ends to size, so the only way to really fix them would be to pull them, replace the rope and re-rig. That ain't hapnin'. I thought I would paint some lacquer on the ropes to stiffen them up and see if they shrink a little after they dry out. Anyway, below are some pix. Looks like I will be taking a break from Arrow for a bit. I'm short quite a few blocks and don't have near enough to do the fore sail. More on order.


-
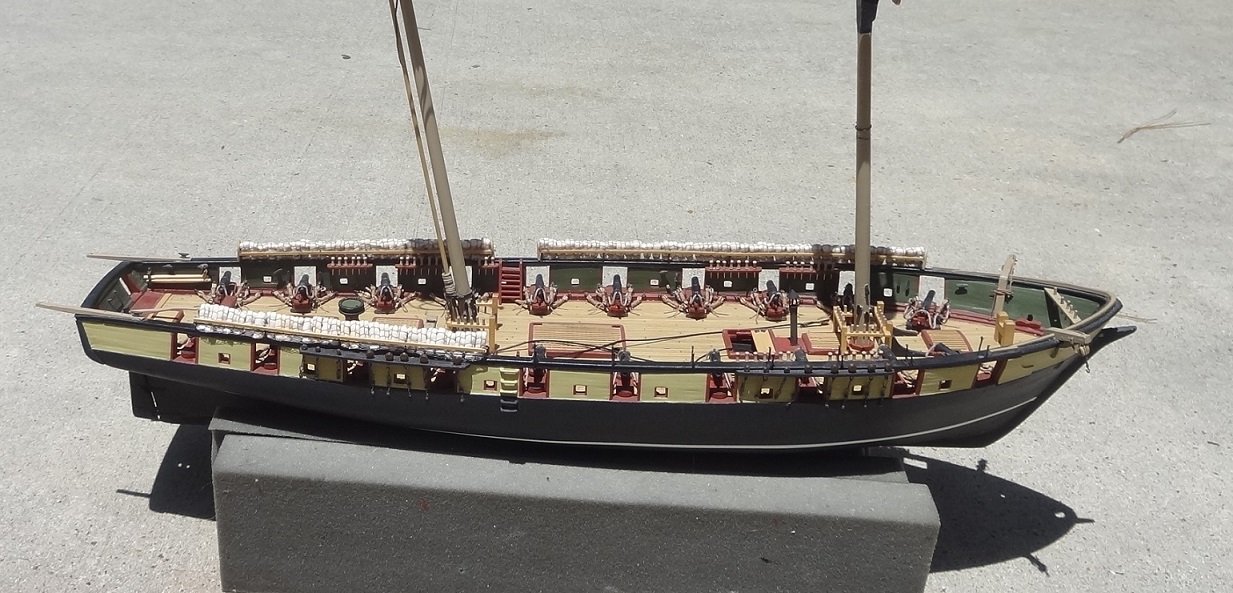
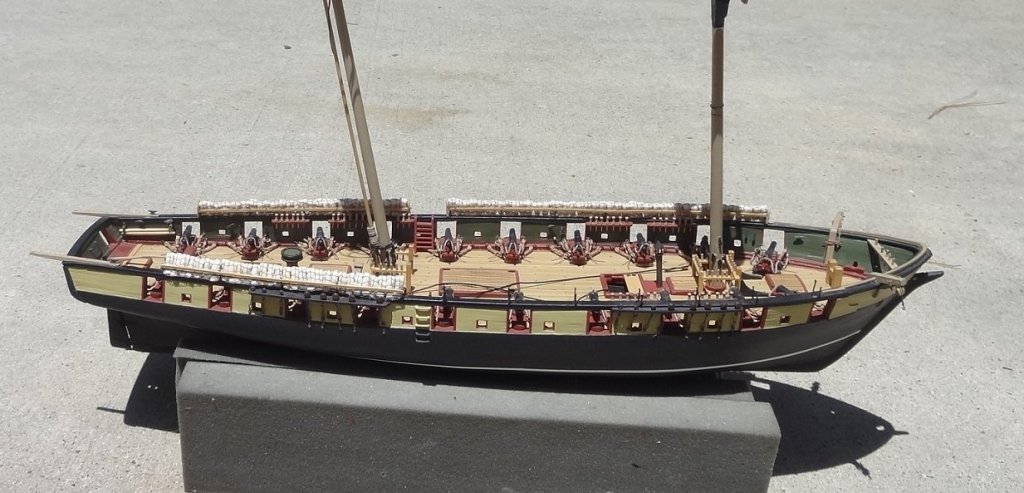
Well these were American - but Arrow was not an actual boat. This kit is just a representation of the galleys used in the period. The problem they had is no one wanted to be on one. A lot of rowing, not much protection from musket fire. From what I know they tended to fill these boats with crew they DID NOT want on the big boats. Usually captained by a lieutenant or acting officer. However, since I am in charge, I will make a few executive decisions. Sadly, they will be based mostly on looks rather than functionality.
-
Looking good Matt. There's something about the natural finishes that really appeals to me. Rigging - from someone that hates it. Get yourself 3-4 different color hilite markers. As you install a block or line mark it on the plans. Use one color for done, another for next up, etc. Another helpful thing about beeswax, ropes that are waxed will stick together. So you wax the last couple inches of a rope that you are about to seize to a block. Fold the end over to make a short loop and press it against the longer side. They should stick - not permanently but long enough for you to do the seizing. It can be almost like a third hand sometimes.
- 50 replies
-
- 1
-
-
- artesania latina
- Virginia
- (and 2 more)
-
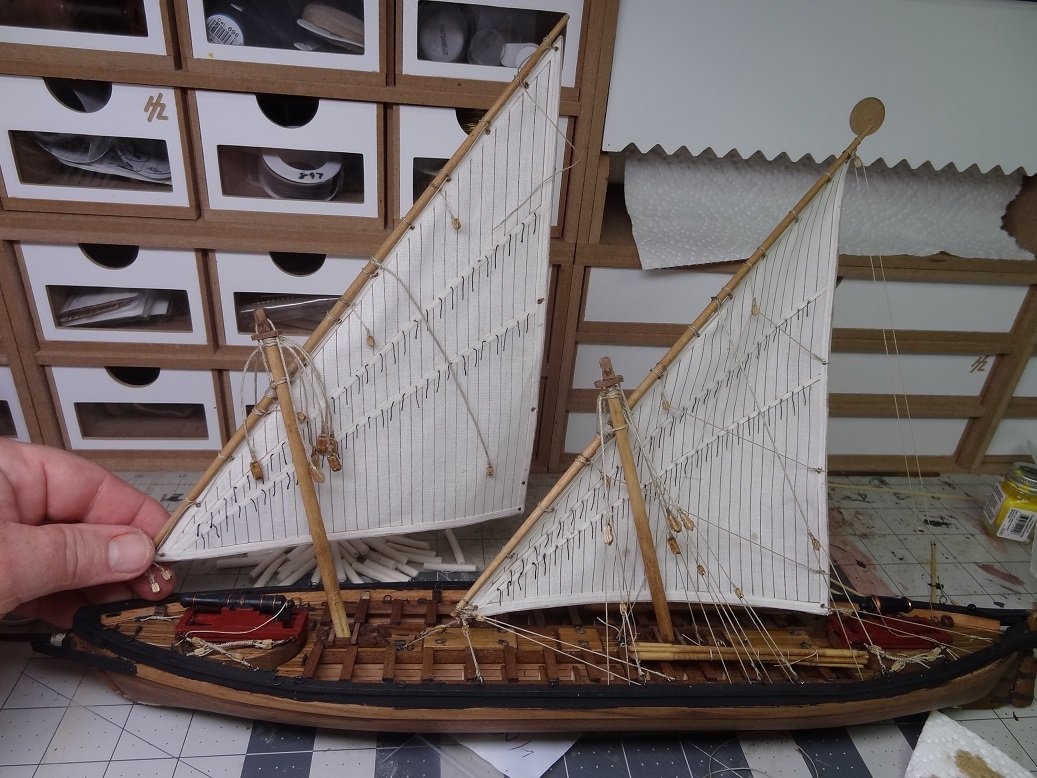
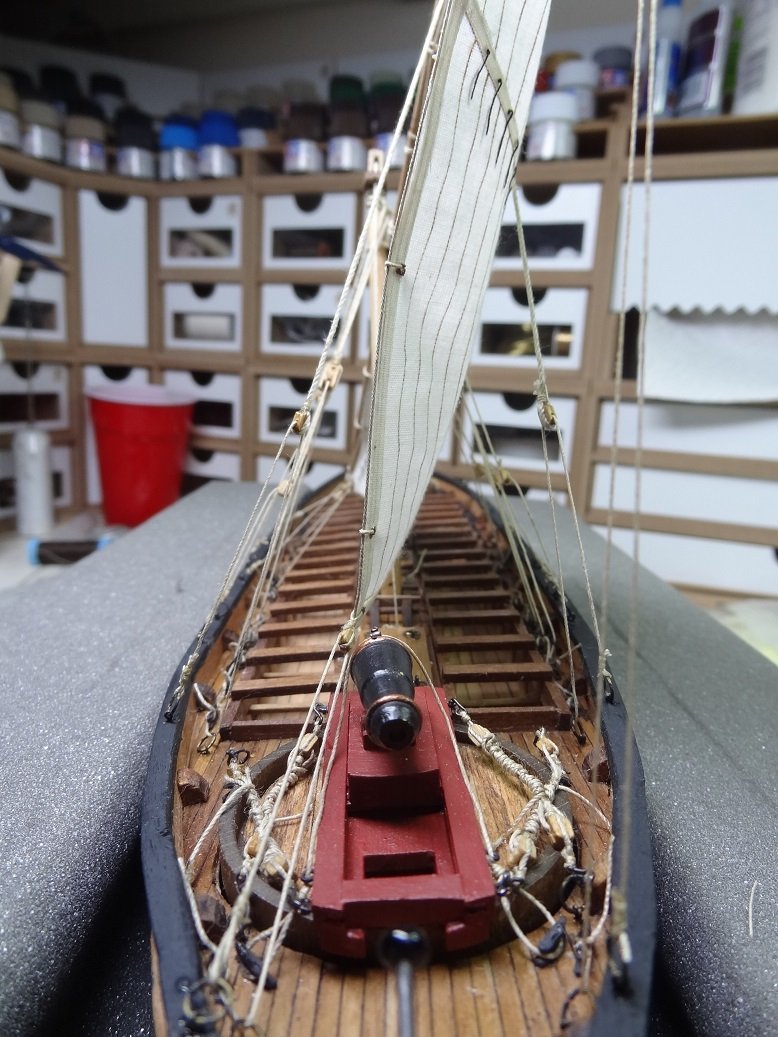
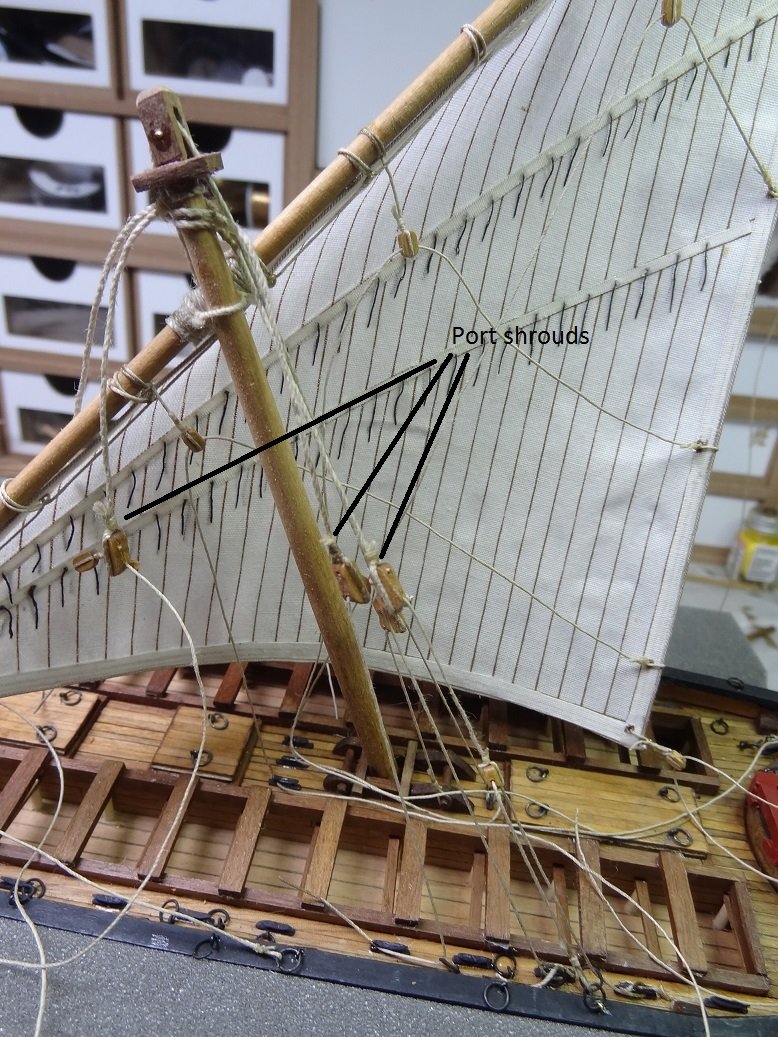
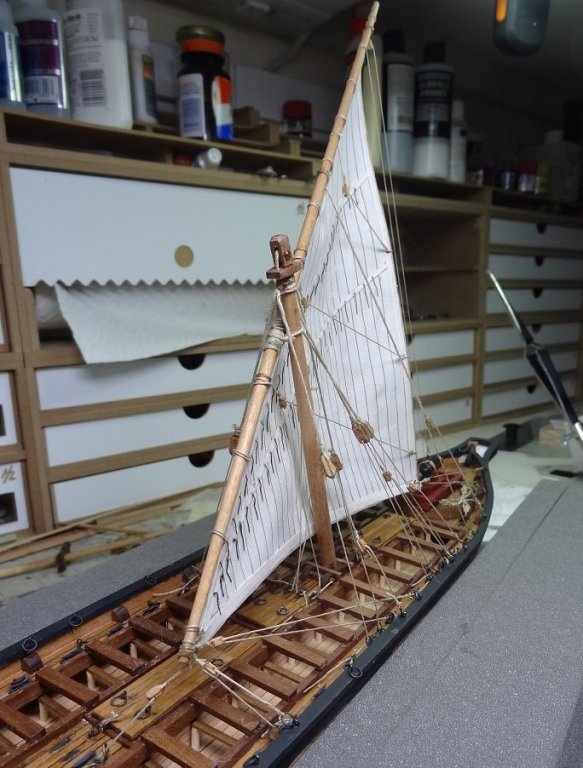
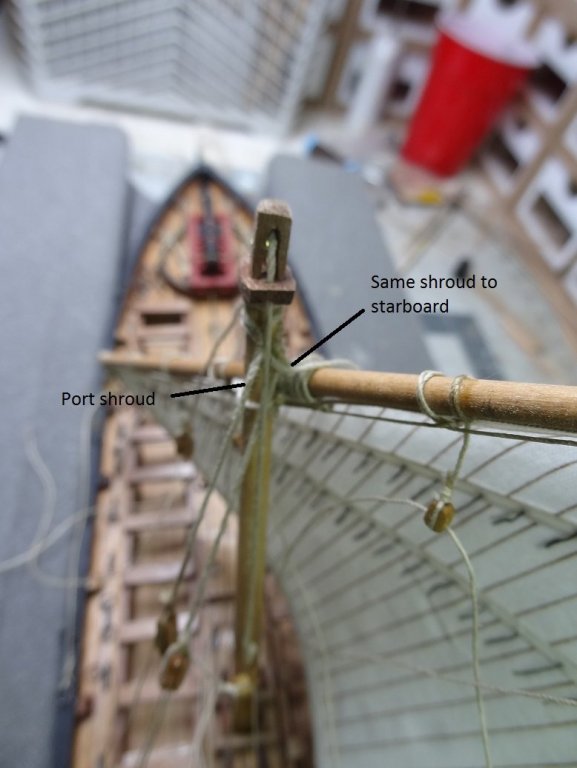
Welcome Blighty. I hope I don't scare you off with my rigging problems She is a good looking boat, albeit somewhat off the beaten path. I'm still plugging away at the sail and rigging. Still working on the rear mast (not sure if that would be the Main in this case). I've been doing the rigging from the inside out. Which means quite a few lines were put in place before I started the shrouds. It just seemed like once those shrouds were in place there's no getting underneath them. Almost all the lines are either seized to an eyebolt or fastened to a cleat on deck. At best a difficult task. There are 3 main shrouds per side. All extend only about half way from the mast head and terminate with a seized block. A line runs thru the block - one end has a block seized the other end runs thru an eyebolt on deck and is cleated. Another line runs thru this block - on end is seized to an eyebolt on deck the other end runs thru an eyebolt on deck and is cleated. A little complicated but not a real problem. Here is my problem. The 6 shrouds (3 per side) were made from 3 ropes middled and seized at the mast head. The yard with sail is attached under the mast head with the yard being on the starboard side of the mast. The port shrouds run down to the deck nicely but the starboard shrouds have to go over the yard before heading down to the deck this looks rather funky. I'm not sure what the solution is. If anyone has any ideas I'd love to hear them. I am probably going to post this question in the rigging forum as well. I will say again, I am very pleased with the sail. The printed pattern may not look as good as if I had cut & glued strips but it has held together well. All the strips I did glue on have stayed on well. That was a big concern after I mounted the sail to the yard and began rigging. It has been "roughed up" several times. I will do a how-to when I do the fore mast.


-
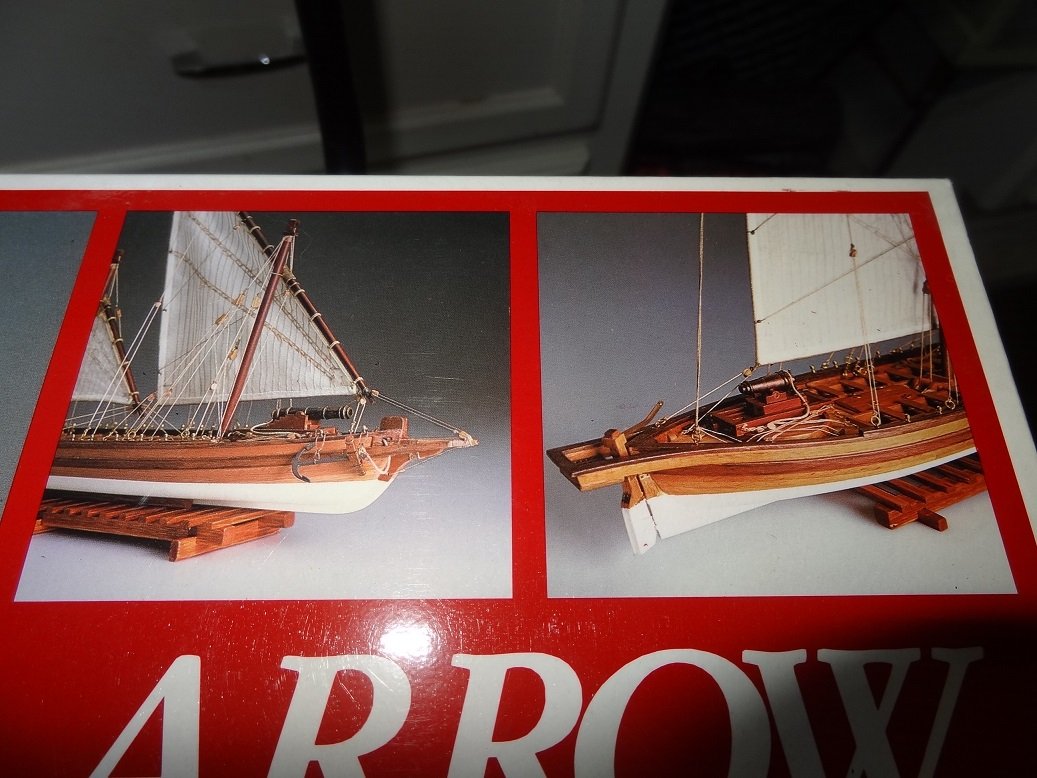
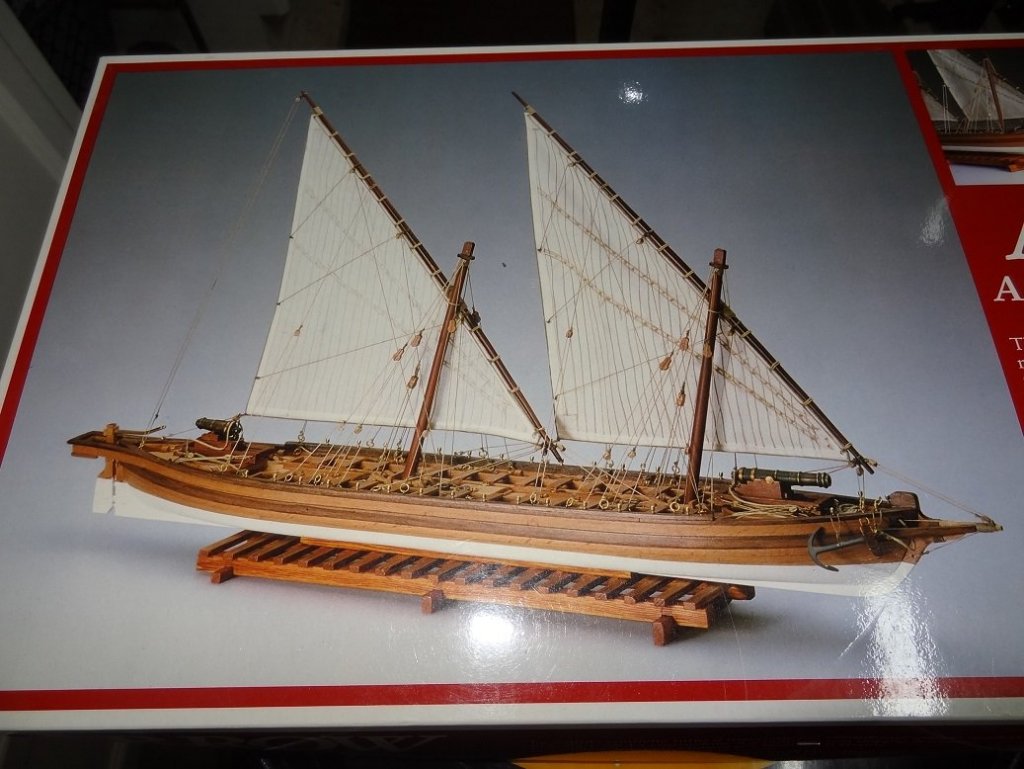
Right your are wefalck. Shoulda had that in my OP. The build is the row galley Arrow circa 1813. It is supposed to be a rendering of the boats used on Lake Champlain.
-
Thanks Dave, I got it. And I agree, after the explanations here, Amati kinda went in their own direction. Nah, that never happens. Henry, you go right on being nautical. Just bare with me if I have to ask you for clarification. I want to learn the proper terms for things. This kit was no help for that. None of the rigging shown has any sort of name or description. Heck, I had to go look up brail and cringles
-
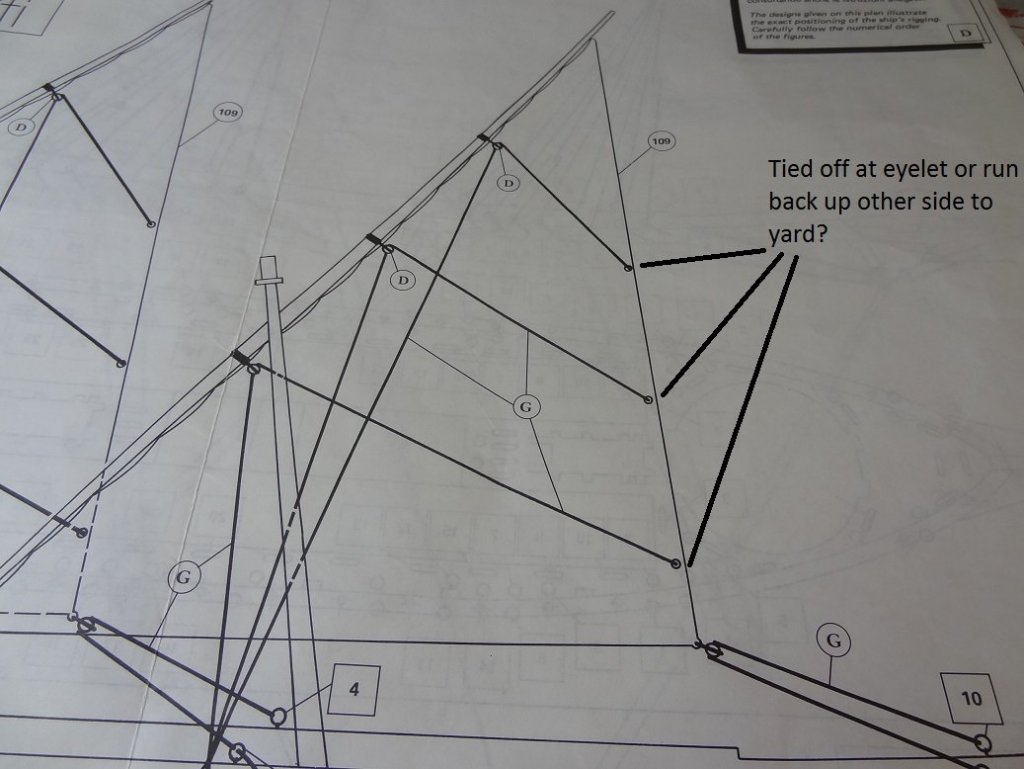
Henry - There is a bolt rope (albeit glued) on the sail. No cringles. I'm not familiar with the term "middled" nor can I find the appropriate definition. The pic of the plans that I posted show 3 blocks that the brails pass thru before going to the leech. Are you saying there would be 3 blocks on the back side as well? So a brail starts at one side of the deck, goes up thru a block, back to the eyehole (cringle), up to a block on the back side and down to the deck? Just curious, if the sail is to be brailed, is that done on one side or the other? Both sides simultaneously?
-
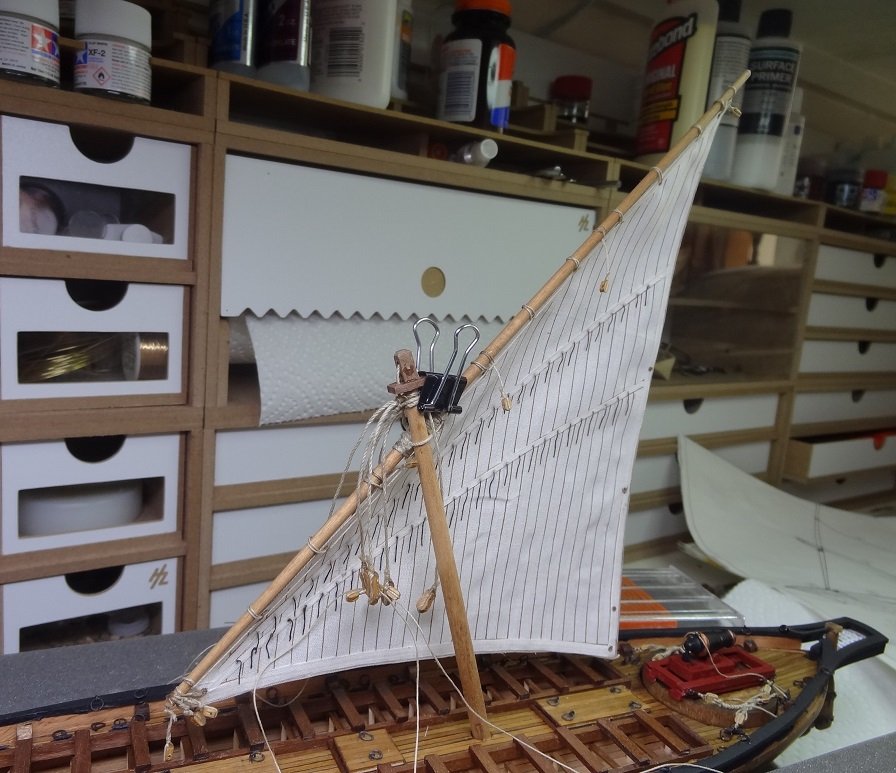
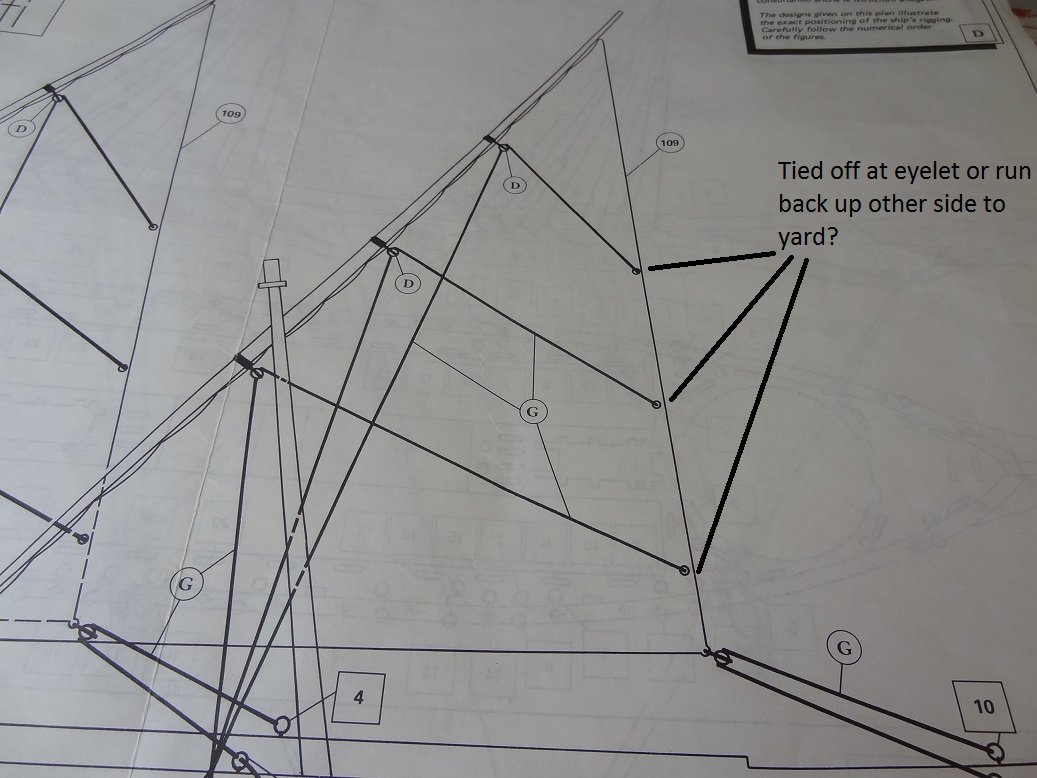
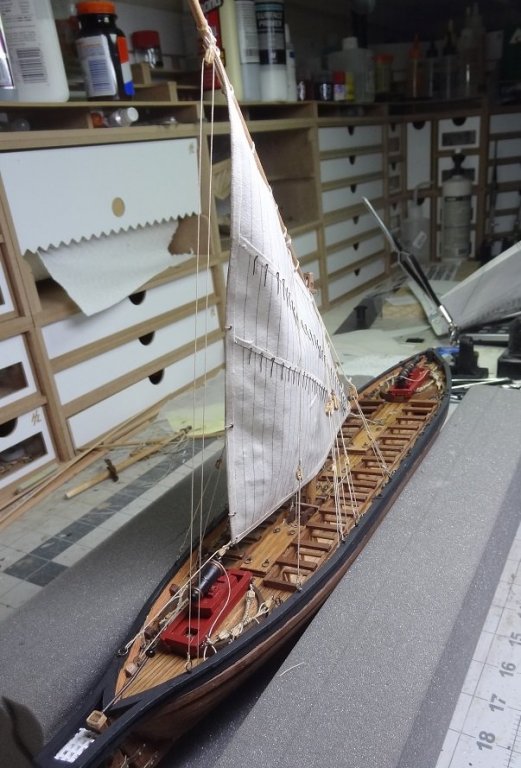
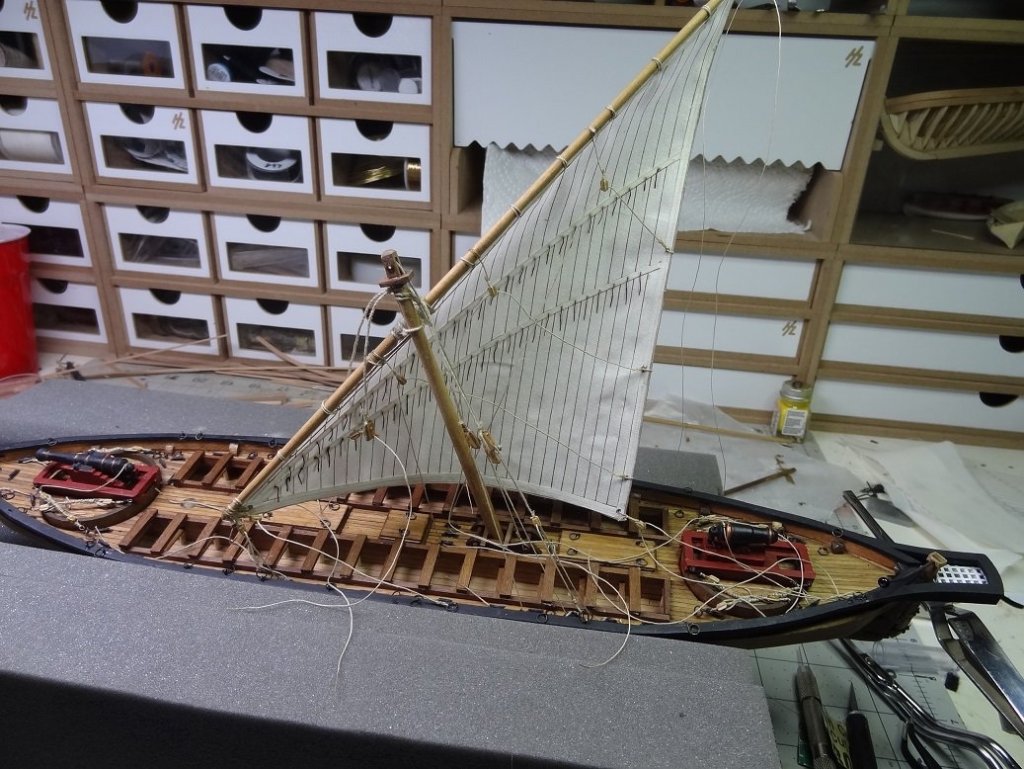
I'm working on rigging for Arrow. This is a 2 masted lateen rig. Instructions are difficult as they just show one side of the fore/aft rigging. I'm assuming all rigging to be symmetrical? If there's something on one side a similar something should be on the other? The ropes that come from the yard to eyelets on the leech, do those terminate at the eyelets? Maybe a big granny knot on the other side? Or do they go thru the eyelet and back up to the yard on the other side?

-
I had a question to post so I also took a few pix. She's not at any particular milestone right now. Just working on the standing rigging. Instructions are difficult as they just show one side of the fore/aft rigging. I'm assuming all rigging to be symmetrical? If there's something on one side a similar something should be on the other? I will say I'm pleased with my sail so far. It has proven to be very durable as I laced it to the yard and am working with the mast/yard. All the strips I glued on have held up and the sail has held it's shape nicely. So my question is regarding the last pic. The ropes that come from the yard to eyelets on the leech, do those terminate at the eyelets? Maybe a big granny knot on the other side? Or do they go thru the eyelet and back up to the yard on the other side?

-
Nice work with the paper parts Mike. I always find them troublesome. Yours appear to have come out very smooth.
-
I love the outdoor shots Don. You just can't get that kind of light inside. The view isn't too bad either. Must be warming up there.
- 653 replies
-
- 4
-
-
- trabakul
- marisstella
- (and 1 more)