
Jsk
-
Posts
279 -
Joined
-
Last visited
Content Type
Profiles
Forums
Gallery
Events
Everything posted by Jsk
-
Artist Tea paper is different than that used in most tea bags these days. My understanding is that in the 1940s and 1950s model airplane builders discovered that they could apply dope to Japanese paper to cover the wings to form strong, light weight flying surfaces. I believe (and might very well be wrong) that Silkspan is the marketing name for the same product which is also marketed as Artist Tea Paper. I looked at using the paper a couple months ago but haven't gotten around to experimenting yet. https://www.amazon.com/MLNSUNNY-16-5x16-5White-Handmade-Cyanotype-Printmaking/dp/B0CPBS86JD/ref=sr_1_2_sspa?crid=3M42YJI7Z66Y5&dib=eyJ2IjoiMSJ9.DKLHlpK7Zl0af8yNdie4c436zuW9pn4WnYwe9KJtlj2iQoYShOqOSby2rSazJC9tzBuU0jrfDbXkUBuxLNSqkQWrb4cjLB59GvJyQJFoP2aSdINjdk3EonxYfI-i1A_G5eo3Jg8FjlYvAr1GehyNdXObnPcMw6KX9UOp8VjjQUaHski-NIeSnILM2T5tKaEfwOGwvIwpNfZofTkz7BogtK7-Xw8hQb7rLLeECmwD6B6wHw5TwV4Tkiyb_Zi9blQaxitAKHSAsj7gdUq_WlzWIb5q0i2h4Lvv6knYiMBSK4s.LsQL2qESpRguKigNzd6ZfAQMzKvlhiYSt6-cNKhYmoM&dib_tag=se&keywords=artist+tea+bag+paper&qid=1725009701&sprefix=Artist+tea%2Caps%2C1326&sr=8-2-spons&sp_csd=d2lkZ2V0TmFtZT1zcF9hdGY&psc=1
-
 Maritime filigree? Looks great. And challenging! Isn't there a hobby of just cutting shapes in paper?
- 146 replies
-
- 4
-

-
- Speeljacht
- Seahorse
- (and 2 more)
-
Masterful!
-
So if I understand this technique, the sail ends up being two thicknesses of silk span (three at the overlap seams)? The seams are on one side only but the sail is transparent enough so that you can see them on both sides?
-
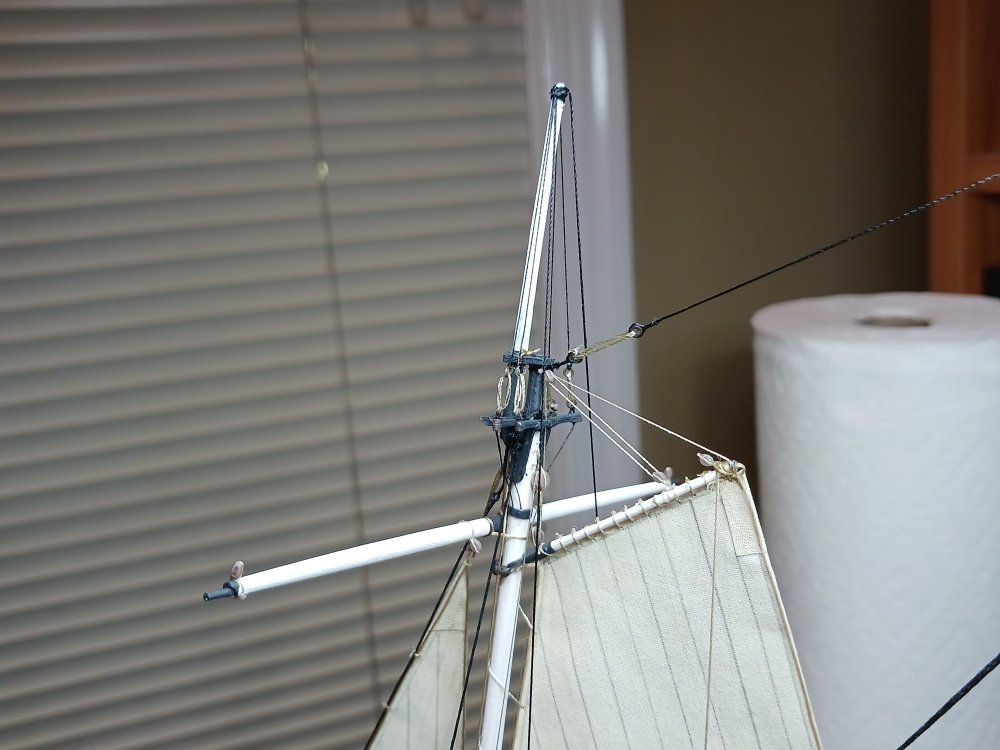
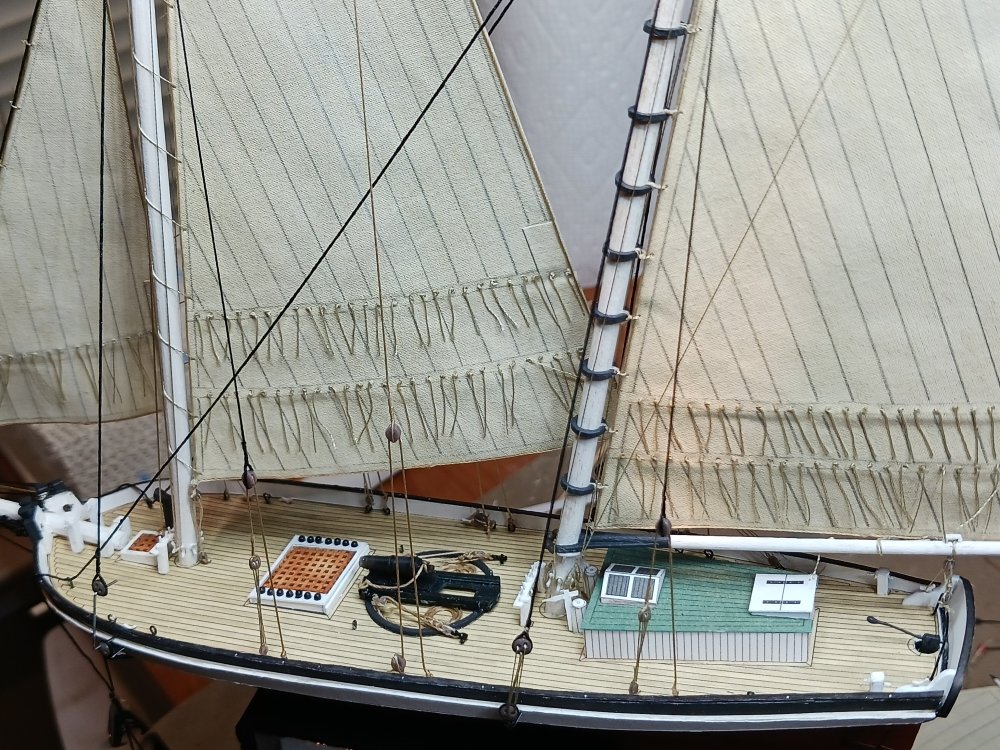
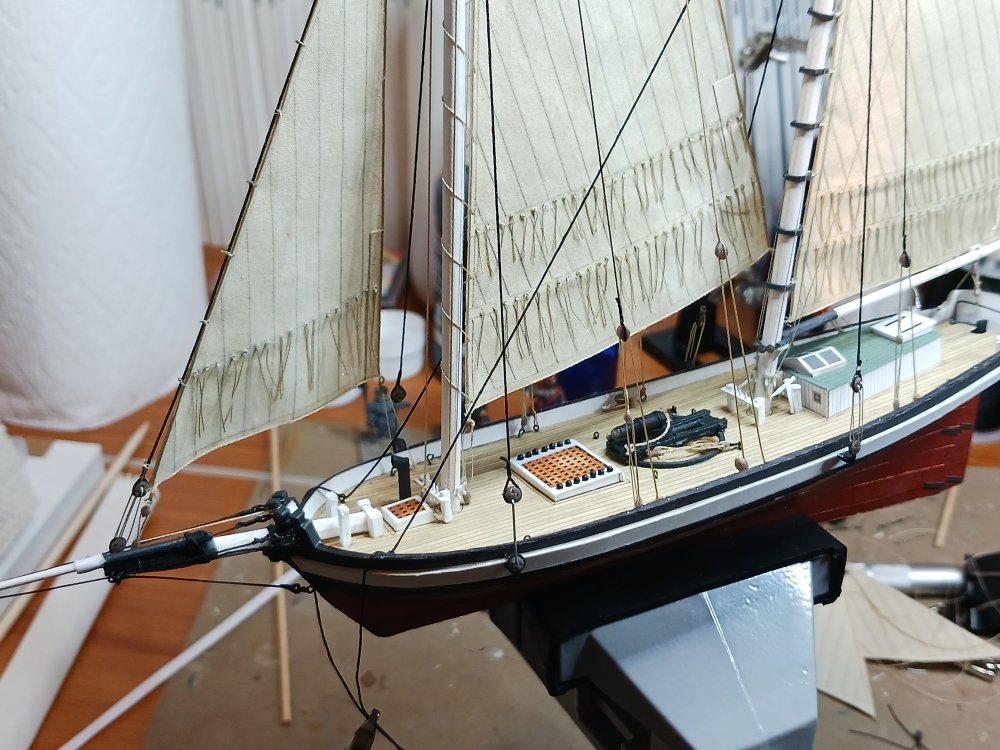
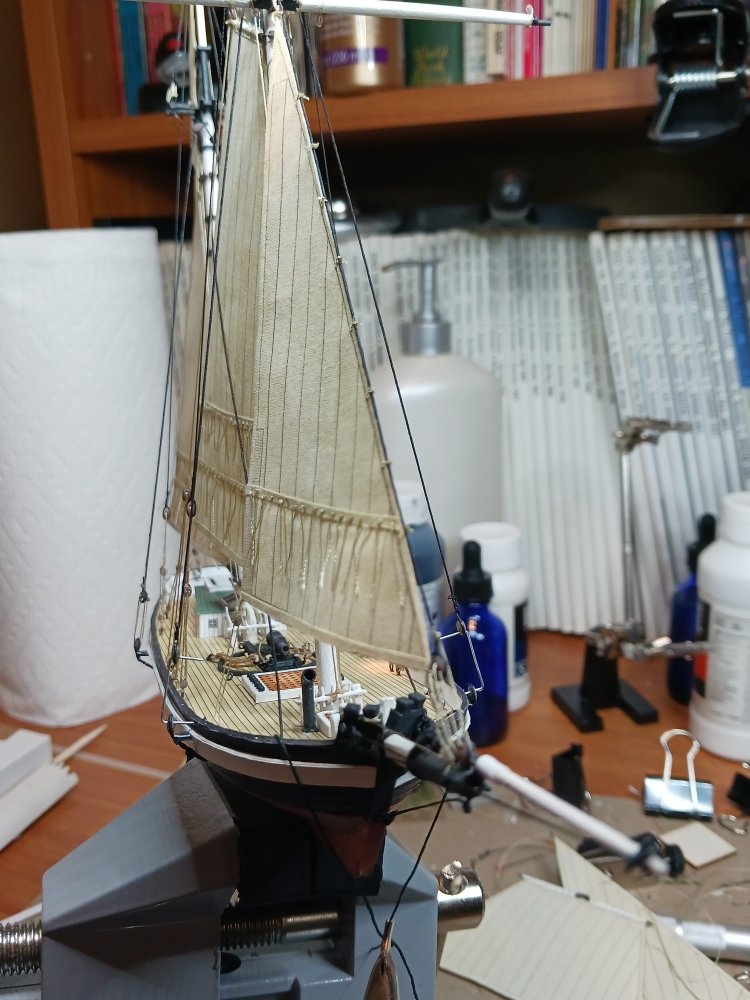
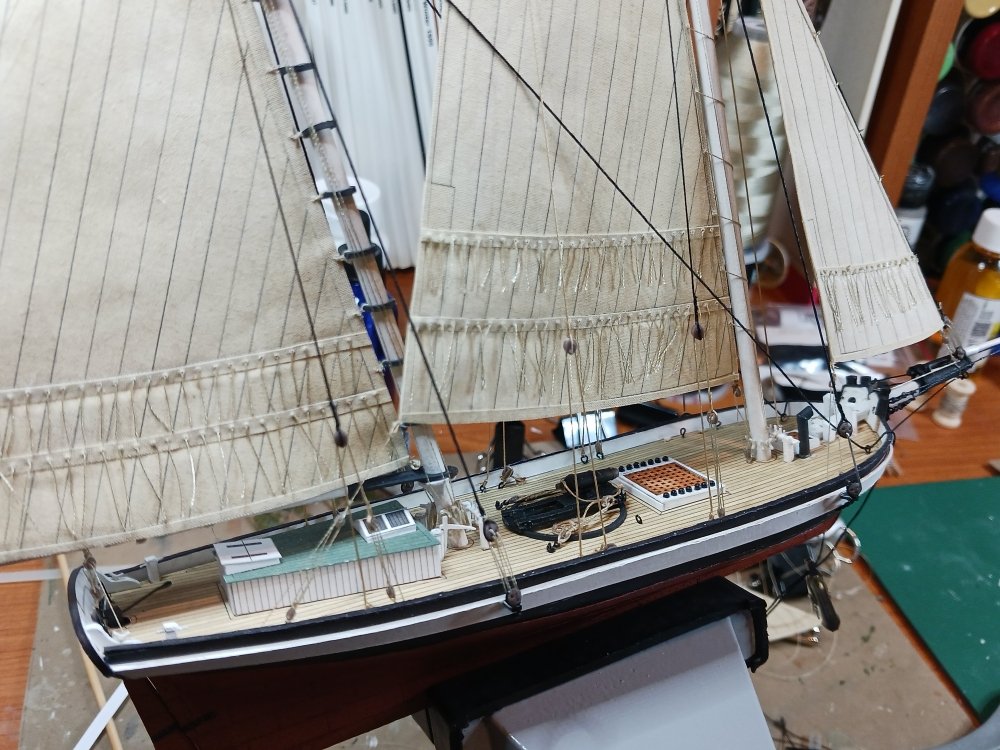
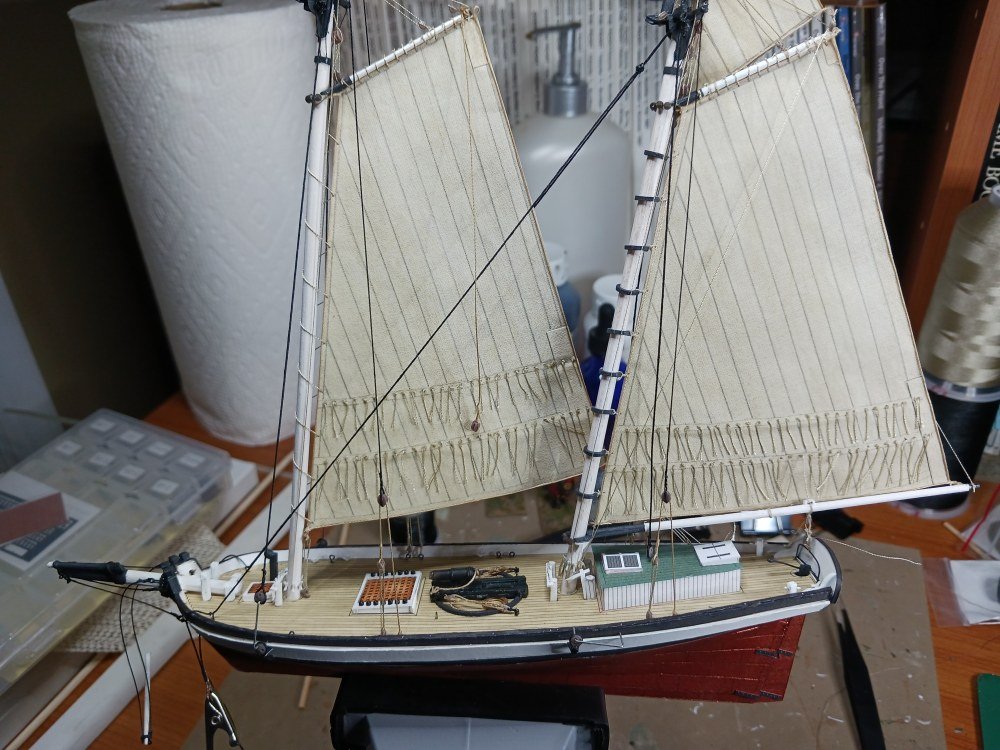
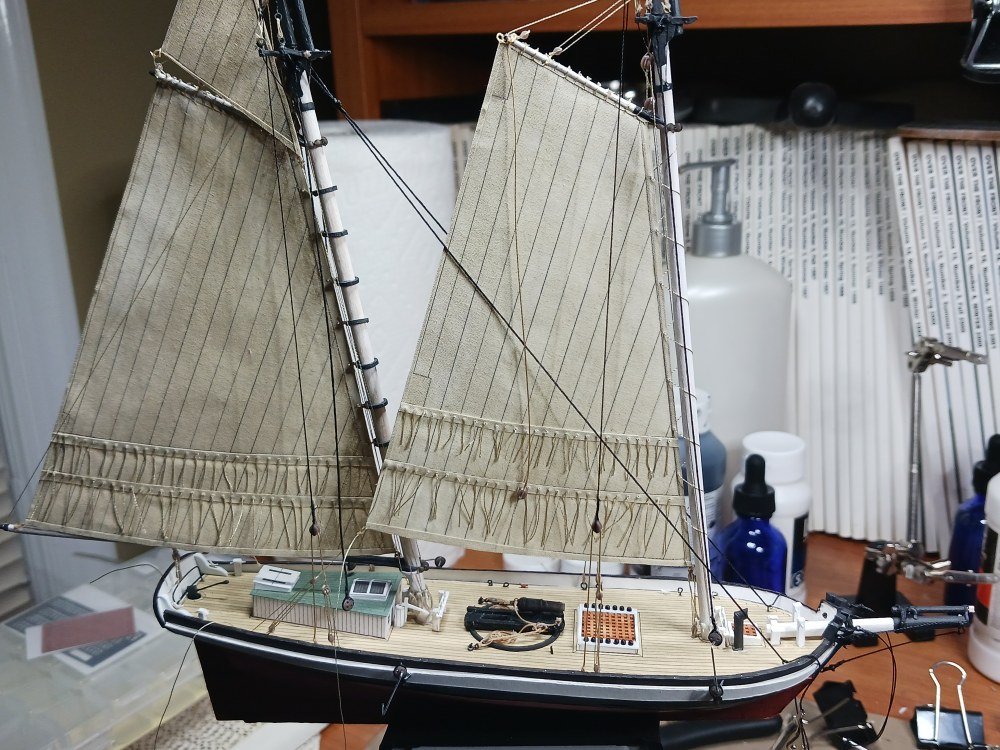
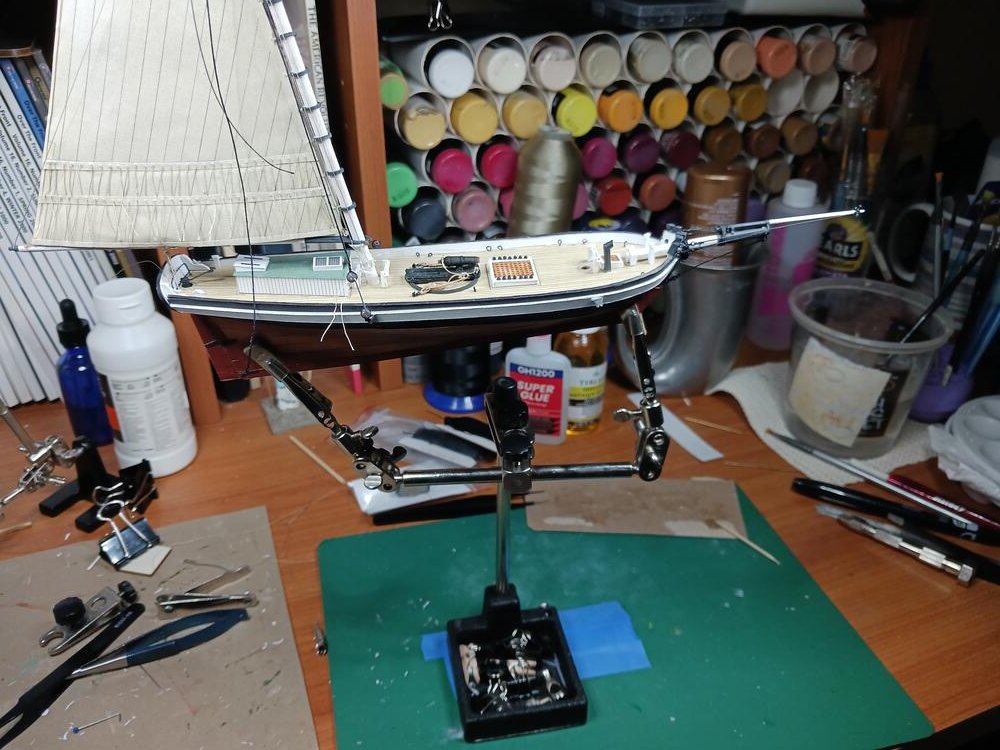
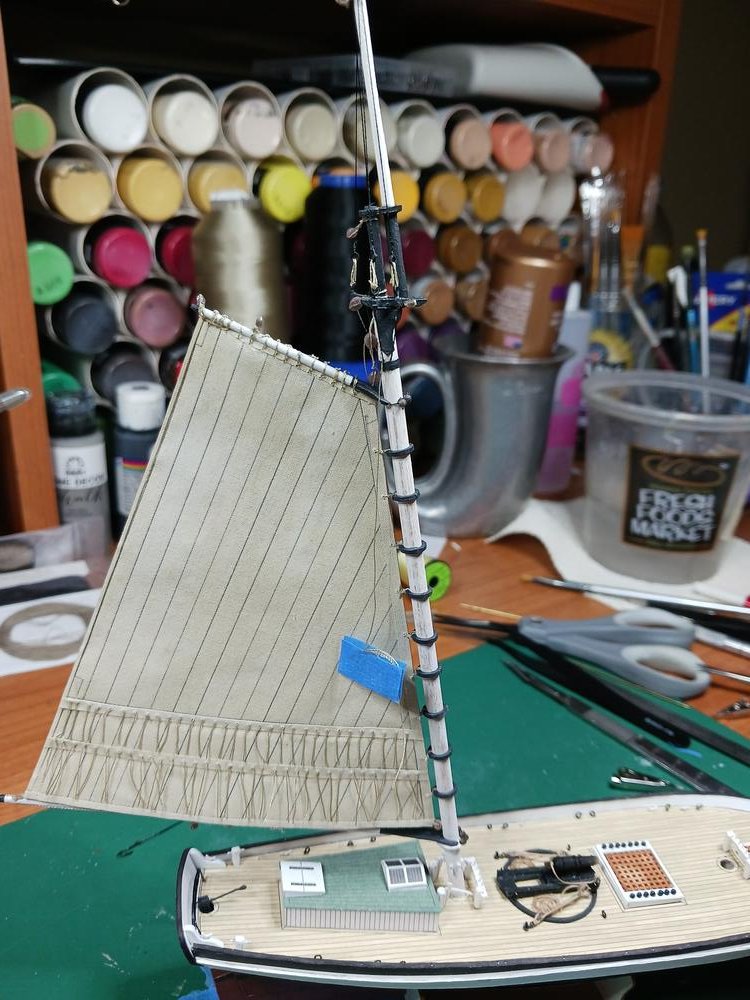
Some more progress shots. She's actually getting fairly close to being finished. There's the topsail and jib to add, some rope coils, the anchors and a few rigging lines to go. Then I'll have to see if I can make the stanchions that go along the bulwarks or if I can source them somewhere. For some reason I feel like raising the ensign should be the very last thing to do!


- 63 replies
-
- 6
-
-
- card
- Revenue Cutter
- (and 2 more)
-
Phil, thank you for your service. Even obscure boats need a little love now and then. I'm looking forward to watching this develop.
- 490 replies
-
- 3
-
-
- minesweeper
- Cape
- (and 1 more)
-
"That’s the future. What a fascinating modern age we live in.”
-
oooh... that's exciting! Thank you for going the extra mile. Now I'll have to go through my stash and see what I need to stock up on.
-
Well, these are exciting! Since these are 3d printed would special sizes be available as a custom order? Just curious. I find myself drawn towards 1/72 and 1/100 scale and most commercial accessory offerings are a bit over scaled for that.
-
The blue and white are the only indications he's Bavarian. No reason he couldn't be from a state or unit with a simpler flag. Just sayin....
-
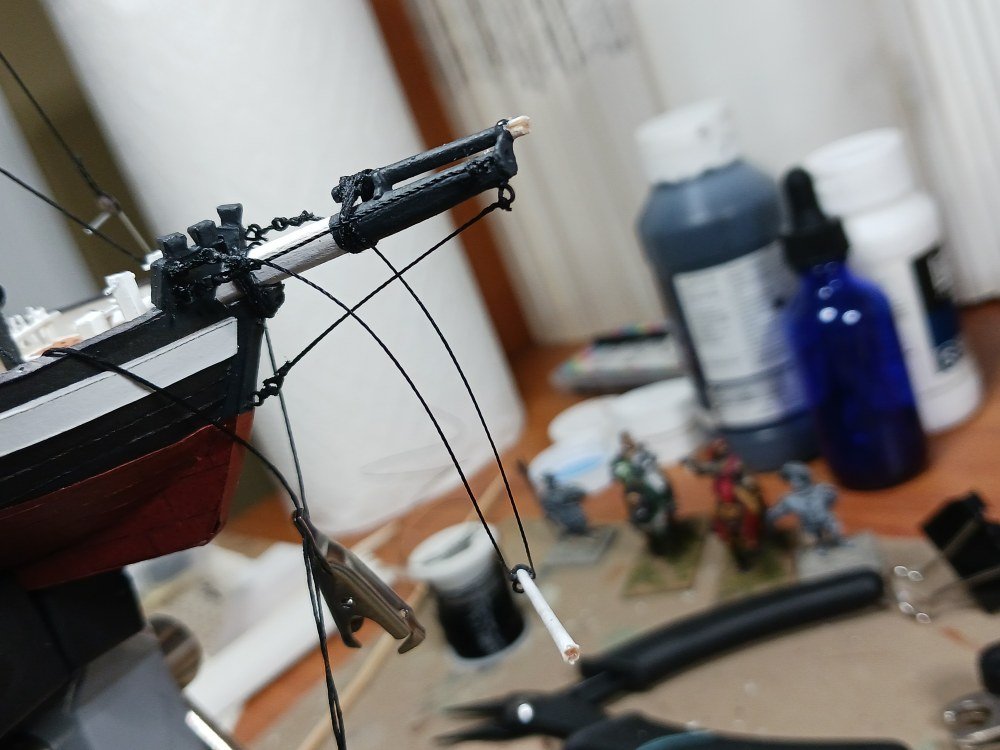
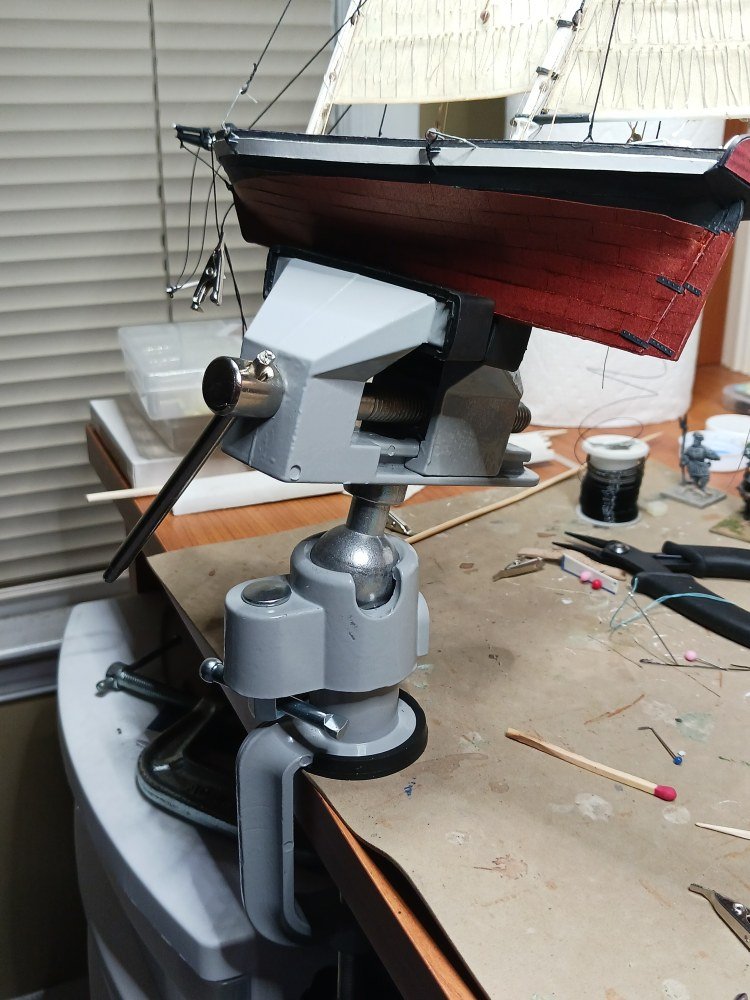
It's been almost a month since my last update. However, that does not mean that things have been at a standstill. In fact, progress has been good. Rigging--as I'm coming to learn--is a hobby unto itself! I've even developed some competency at stropping 2mm and 3mm blocks and thimbles. Outside of the hobby it's been a rough Summer. I gave up driving years ago due to poor eyesight. After a decade of using the Washington DC area public transportation I'm now lucky enough to have a job within walking distance. It's 1.2 miles between work and home. A pleasant stroll except for playing human Frogger crossing the streets. But this Summer has taken a toll with its 90° F temperatures and 90% humidity. Spousal Taxi has been laid up with health issues, landlord is MIA, It goes on and on.... Still, hobby world has been good. Until this: My first breakage. Guess I'll have to pin it some how. But I did add a cool new toy to the shipyard: And finally some progress shots:
- 63 replies
-
- 7
-
-
- card
- Revenue Cutter
- (and 2 more)
-
Just out of curiosity, did you fair the bulkheads? One thing I've noticed about Tomek's designs is that they are very precise. Just a slight bit of imprecise gluing or extra material can throw things off. Not fairing the bulkheads certainly came back to haunt me in the Revenue Cutter. Just that extra bit of material cascaded to the point where my final skinning strakes were a bit too short. In your picture it looks like the bulkhead might be a hair too wide and causing a bit of a bend in the skin rather than a nice smooth curve. But given that you've got another layer to go it might not be at all visible later on.
- 146 replies
-
- 4
-
-
- Speeljacht
- Seahorse
- (and 2 more)
-
Hmmm... thanks, guys. So a hook or an eye. Working at 1/72nd scale I don't think a spliced eye would be noticeable--at least given my dodgy vision! Probably beyond my hand/eye coordination, too. Hooks might be an option. I bought some from Syren when I first started this project. The smallest, though is 4mm total length. That would come in at 11.3 inches in 1/72. That seems over-scaled. Hand crafting smaller hooks may very well be beyond my abilities, too. I wasn't able to craft 'em when I rigged the gun which is how I ended up with the Syren hooks. In this case it seems to me that it would be less egregious to forego both eyes and hooks and tie the lines directly to the rings than to have over-scaled hooks. Historically, how big would the hooks be?
-
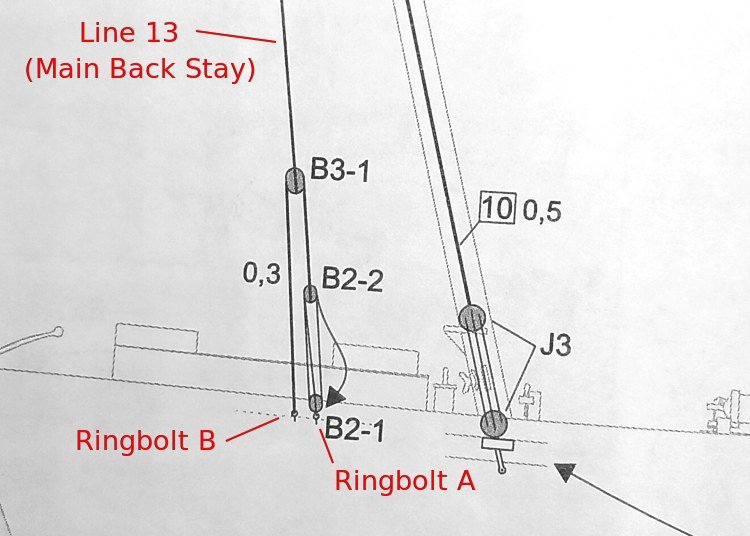
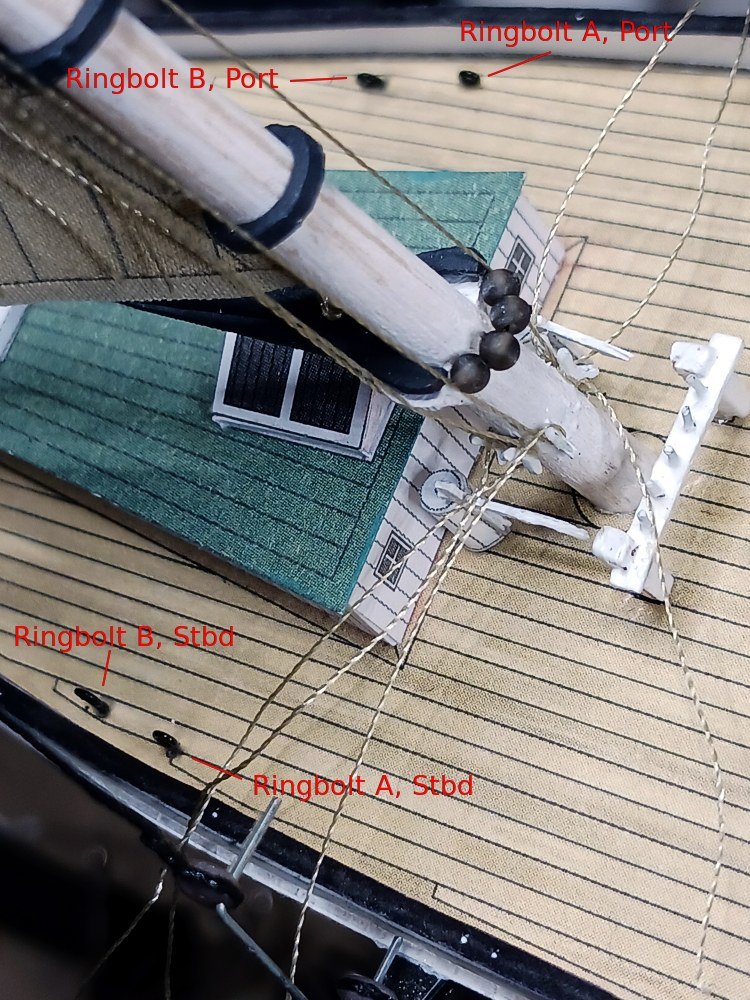
What would be the most likely way of terminating the tackle lines on a back stay? Below is a picture of the rigging diagram of the Revenue Cutter I'm working on as well as the area in question on the model. Block B2-2 terminates on Ringbolt B--but how? Would it be tied to the ringbolt? Block B2-1 is attached to Ringbolt A--but how? Likewise, would it be tied directly to the ring or would there be a hook? Does the tackle fall tie to the ringbolt, too? TIA
-
Yeah, personally, I'd try it but I'd have a contingency plan in place. Having said that, I'm not sure what the difference is between poly and acrylic and how the passage of time would affect things. Maybe someone with furniture refinishing experience would have better insights?
-
I'd be leery of doing that. I've always read that you can put oil based paints over acrylics but not the other way around. The reason being that oil based paints will continue to off-gas over time. This traps pockets of gas which cannot permeate through the acrylic on top. However, acrylics don't (apparently) off-gas so the oil seems to sit on top just fine. Still... I'd think choosing one or the other and sticking with it would be the better way to go.
-
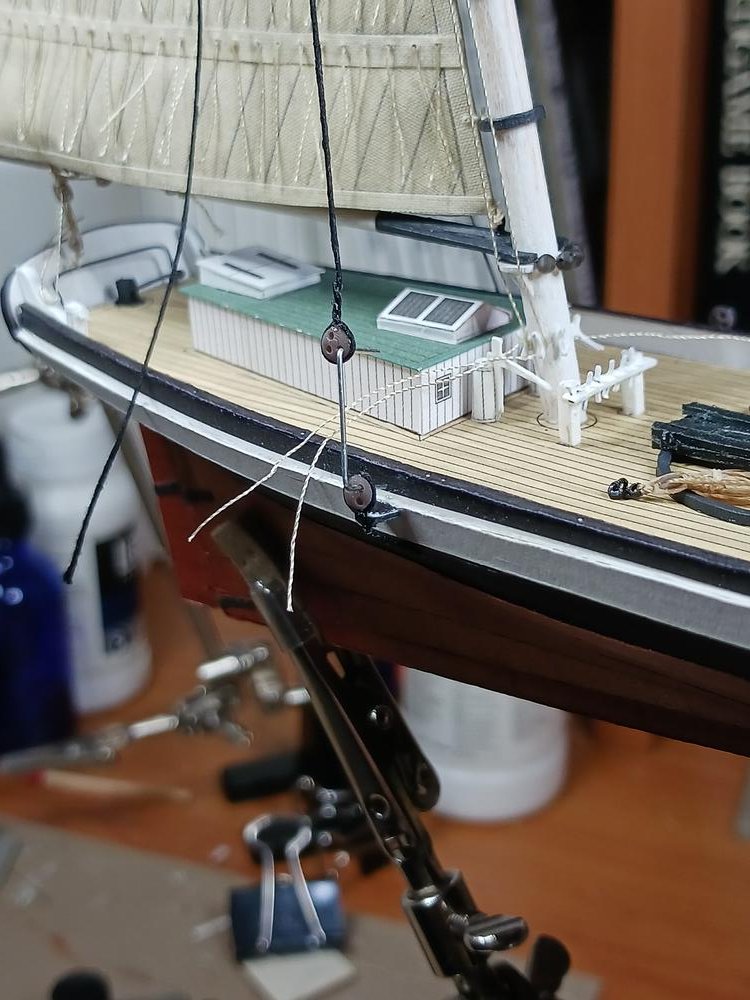
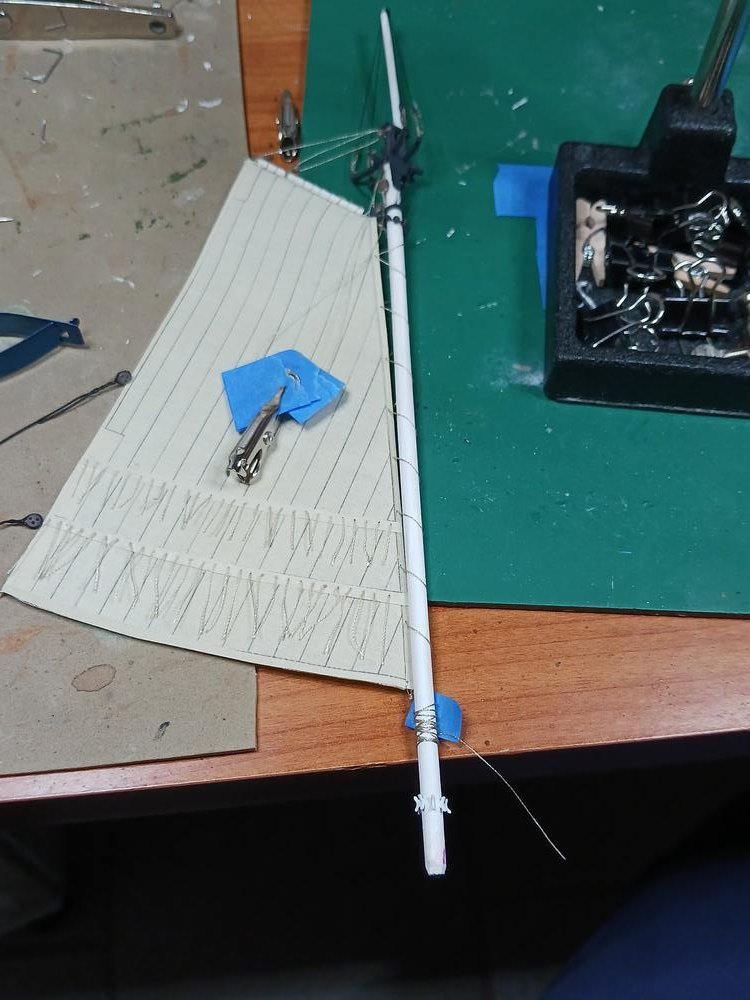
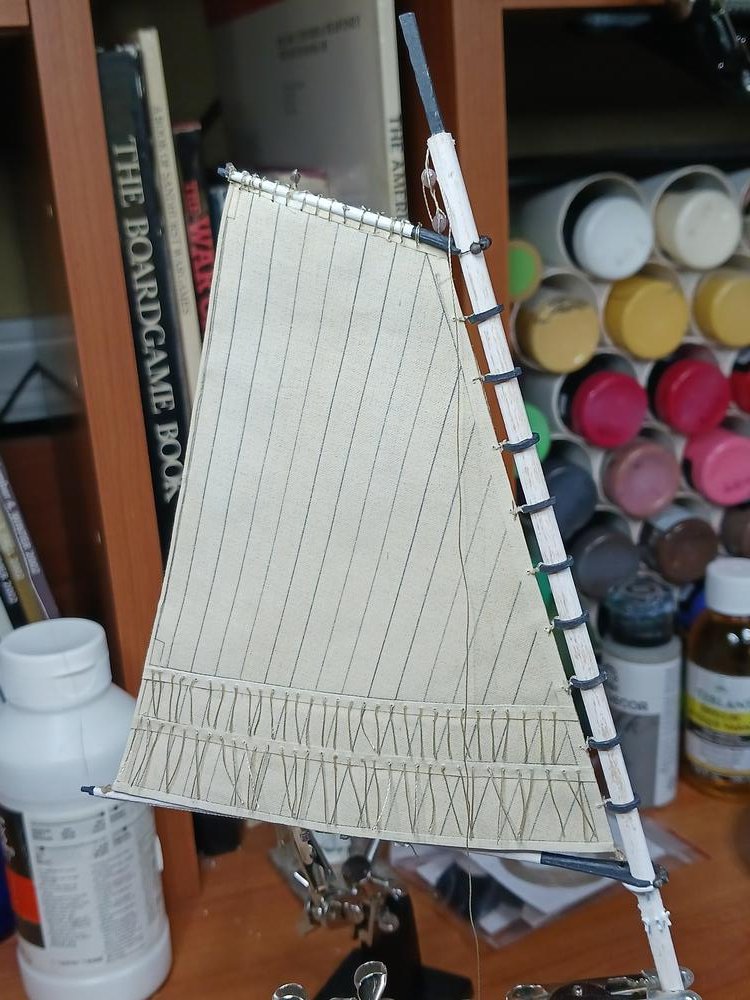
Slowly closing in on having the main mast finished. I've got to admit that rigging is taking me much longer than I thought it would. But then, I had no personal experience with rigging a ship model so it's been a fairly steep learning curve, too. I'm not real happy with my knot tying abilities--they all look sloppy to me. Part of that, I think is a vision issue. I have vision in one eye only and therefore lack any real depth perception. That makes it difficult to grasp lines with tweezers and maneuver them through other lines. Not to mention getting scalpel blades close to knots when trimming off the excess line! Still... I'm probably being more critical than average viewers will be. The main mast with the main sail and most of the running rigging done off-model: Stropping the deadeyes--there's only one on each side on this model. Lesson learned for next time: I did not check the orientation of the eye holes before stropping. I kind of got lucky but it could be better: It might be a little too long but using a common household staple for spacing the deadeyes was darned convenient!: Weaving the shrouds through the tops was quite a challenge. Clipping the excess line had my heart in my mouth!: I had to find some way to keep the model secure while rigging. The 'Helping Hand' worked in a pinch but I may look for other solutions: The foremast is ready to go after I've got most of the main mast done. You can't tell by looking but the running rigging lines are coiled up in the painters tape and the number of the line is written on the tape to identify each line according to the kit supplied drawing: Thanks for viewing and all the reactions!
- 63 replies
-
- 3
-
-
- card
- Revenue Cutter
- (and 2 more)
-
That is a lot of small parts for a model that appear to be only 9 inches long. She's coming together really well.
- 22 replies
-
- 1
-
-
- Enchantress
- JSC
- (and 1 more)
-
This is one of my favorite reproduction ships! Looks like you're doing her proud even with the challenges.
-
A great result you can be proud of. And relieved that it's done! Congratulations!
-
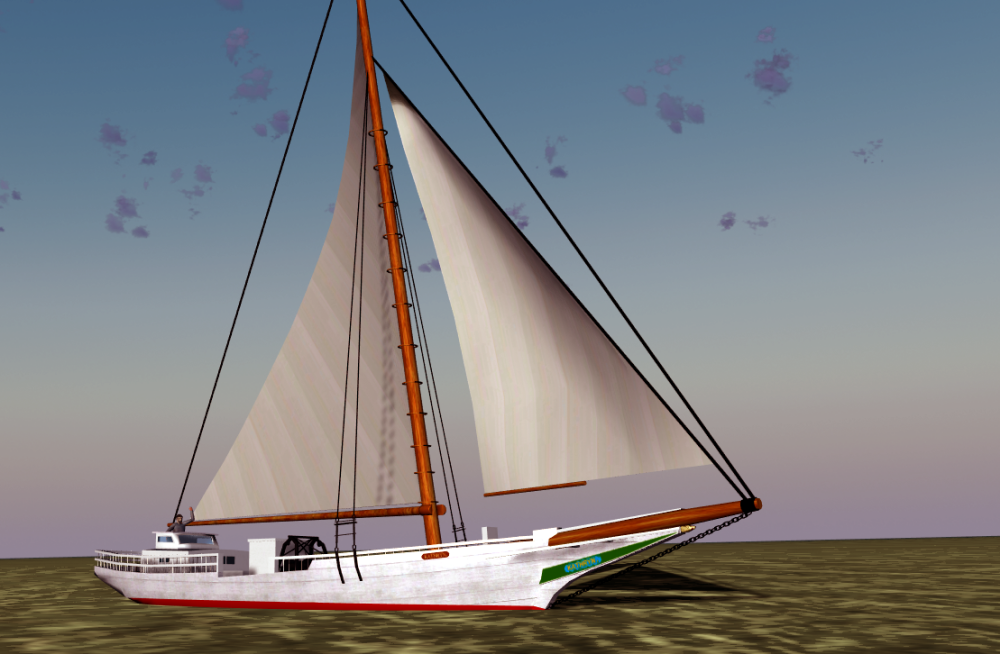
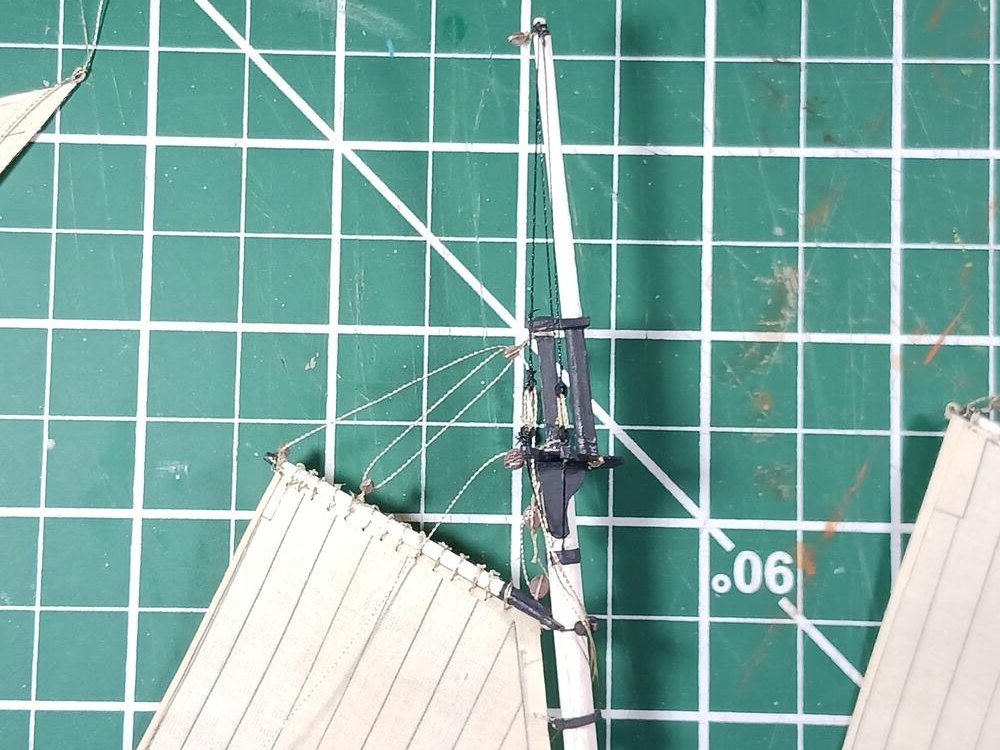
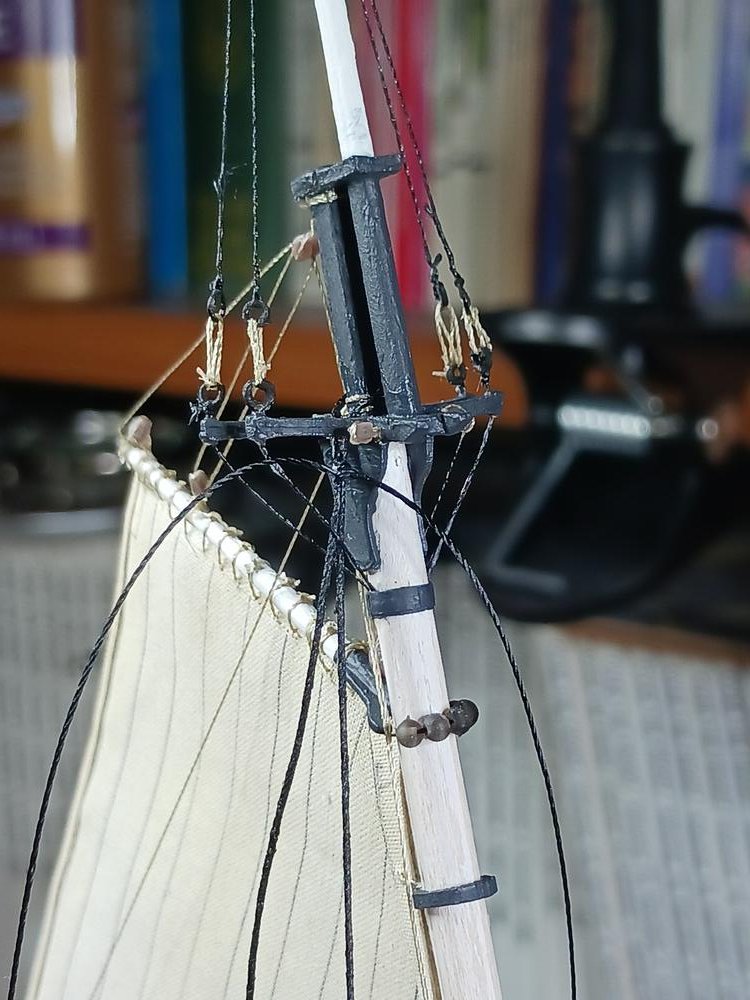
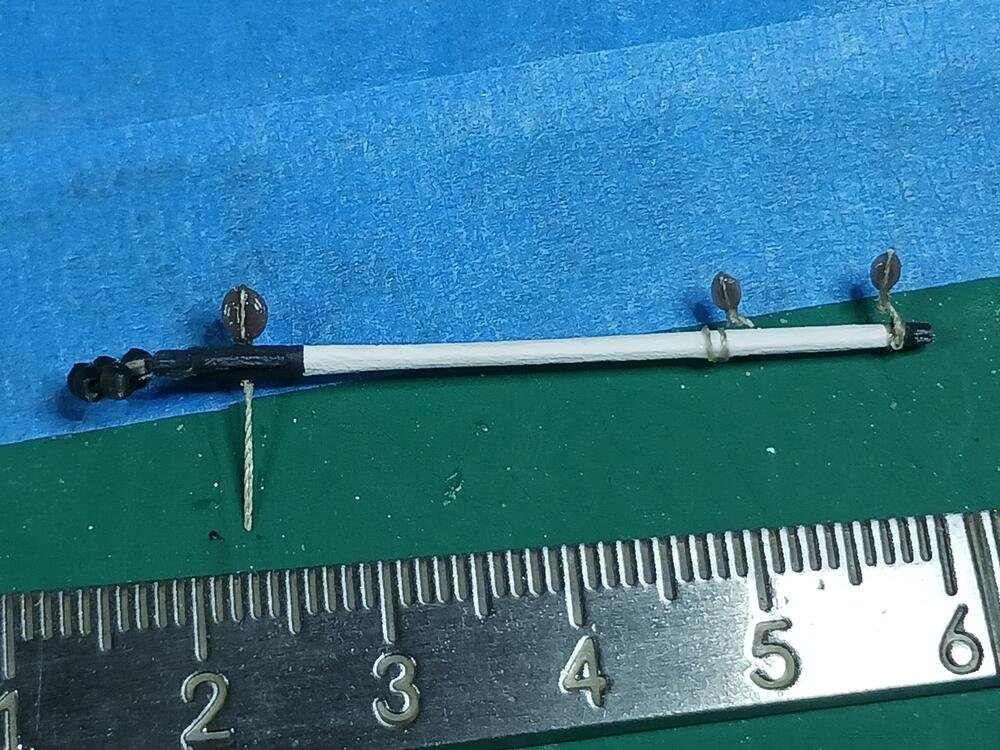
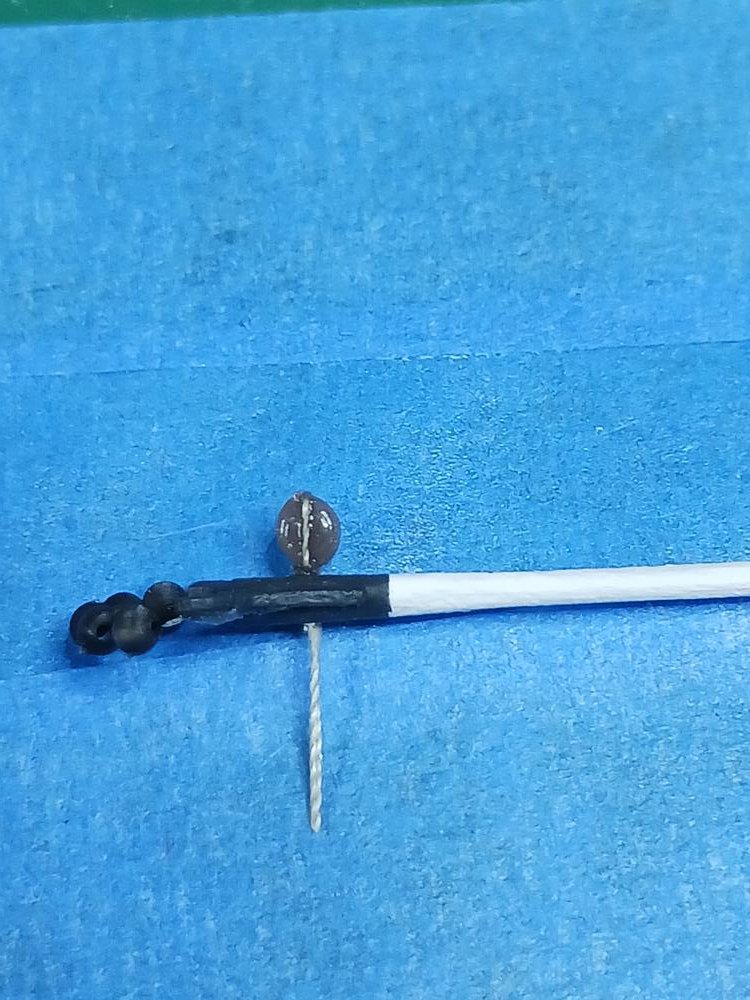
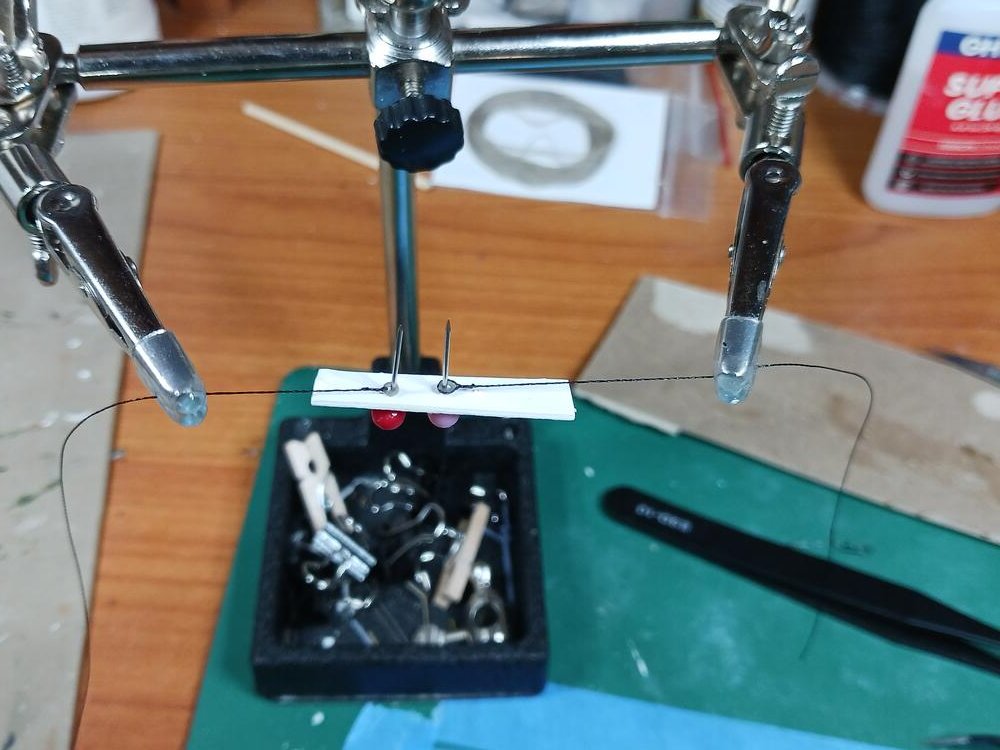
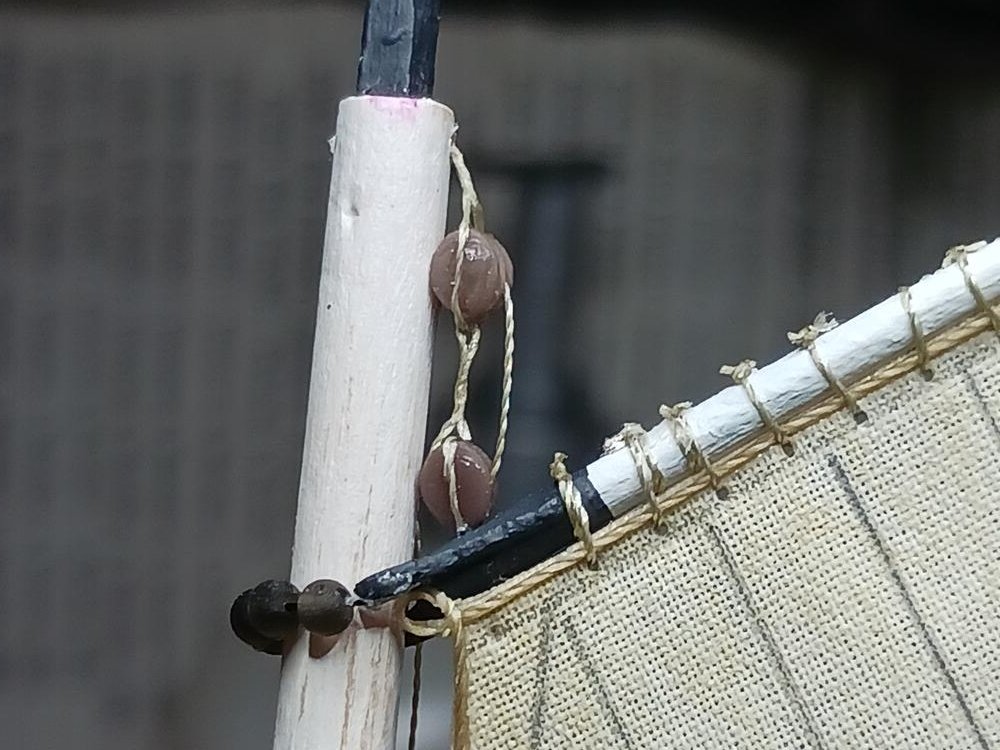
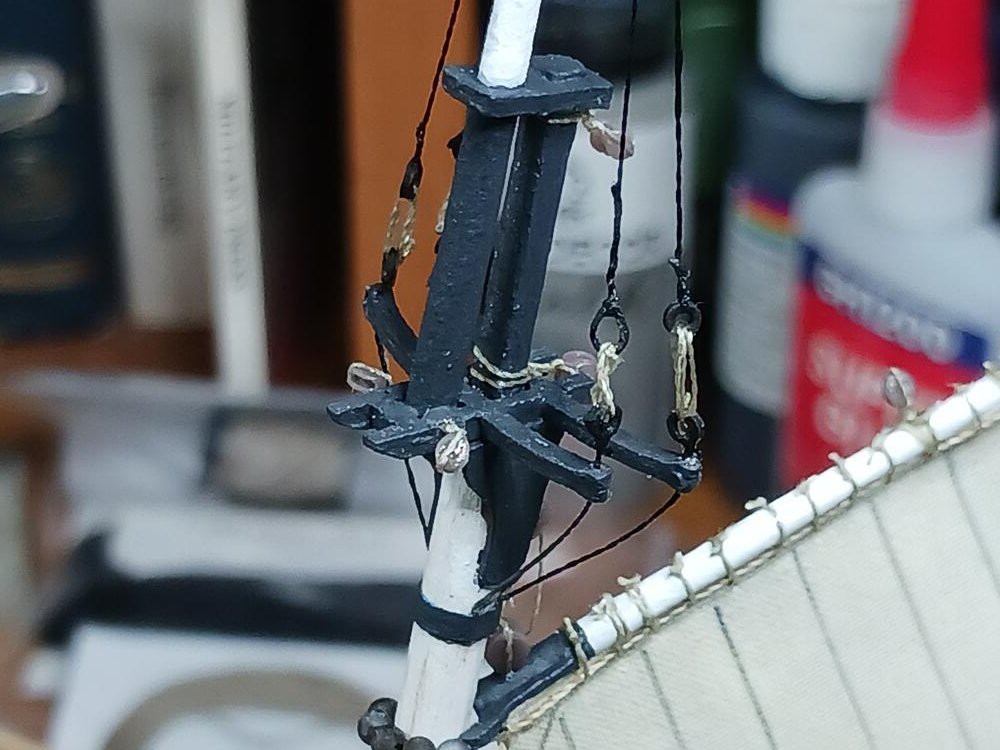
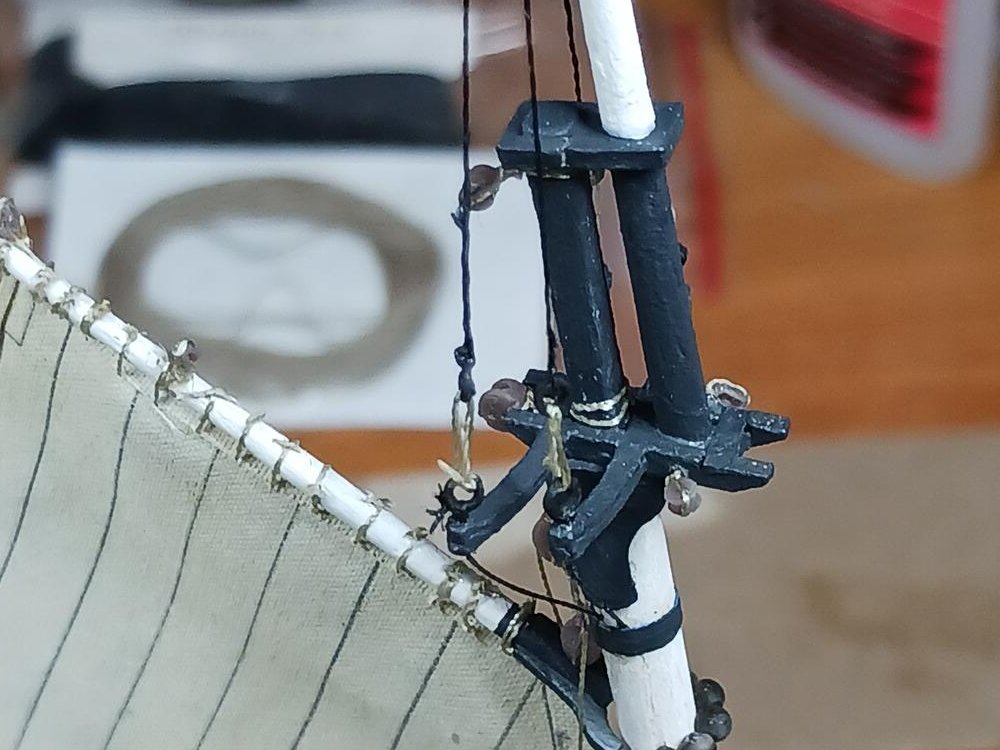
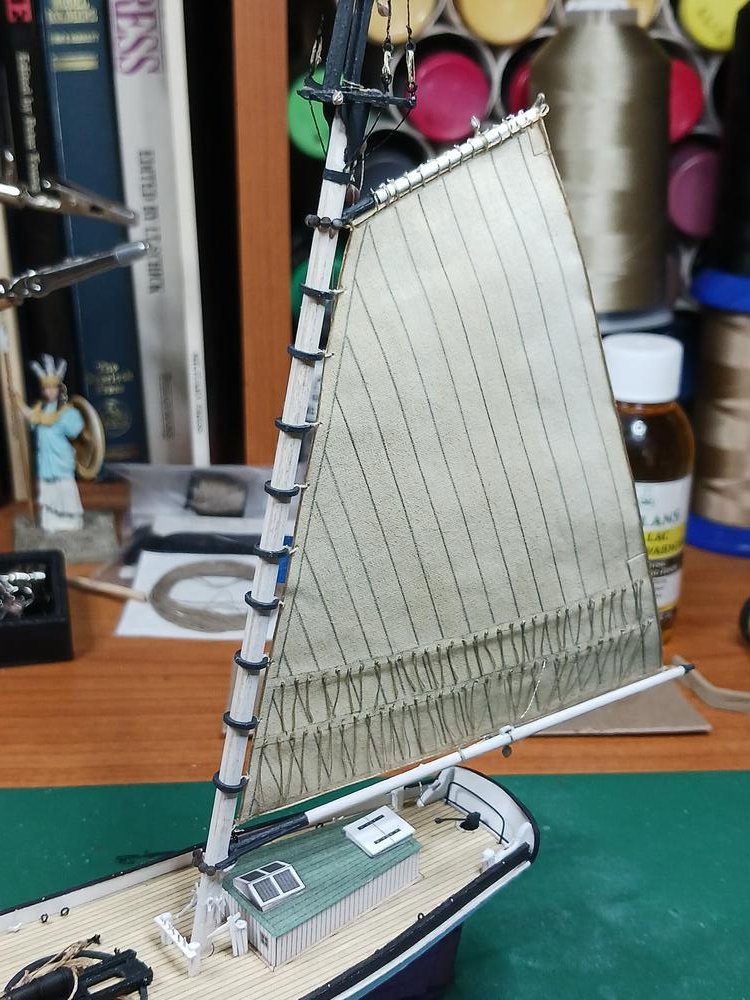
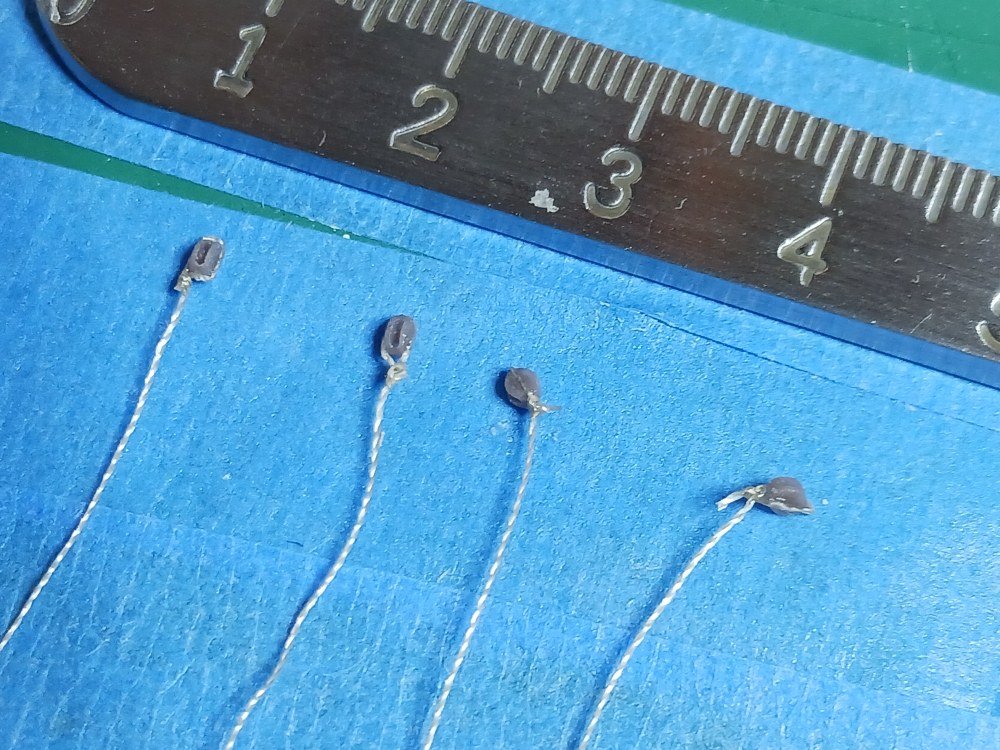
OK, a major milestone has been reached: The mainmast has had the off-ship work done and is ready. After attaching the hoops to the mainsail I attached the various blocks to the boom, gaff and mast. The easiest way to do this was to strop the blocks and simply twist the thread and coat it with CA to form a spike which could be inserted into a hole drilled in the spar. I didn't even try to create eye rings to attach the blocks to. I think any ring I created would have looked vastly over scaled. I wanted to attach the hoops to the mainsail separately because I didn't think I'd be able to accomplish it with the hoops already on the mast. It's a good thing I took that approach because, while the hoops seemed to have plenty of play on the masts, by the time I added the lines to tie the hoops to the sail, the thickness of the lines made the hoops fit VERY snugly over the mast. There's no way I could have run the line through the hoops with them on the mast. In fact, I originally forgot to install the main boom and had to remove the sail. I was really afraid I was going to end up ripping some of the hoops from the sail but it all turned out OK. Once the sail and the gaff were on the mast I bent the sail to the gaff. I started out double wrapping the robbands around the gaff but decided that looked too bulky for 1/72 scale. So I switched to a single wrapping. I rather wish I hadn't done that because, while I think a single wrap looks better the inconsistency bothers me. Once I had the boom, mainsail and gaff on the lower mast I could tackle the top mast and trestle tree. However, the topmast shrouds pitted me against my Nemesis... thimbles. Thimbles in 1/72nd scale. Thimbles that are only two millimeters, outside diameter. Thimbles, dammit! I was able to strop one. In ten attempts. Good thing I bought an extra set. I tried my old standby of coating a loop of thread with CA and that sort of worked but I wasn't entirely satisfied with them, either. Eventually I gave up trying to strop and simply tied the lines to the thimbles. Once I made that concession I had to figure out a way to space the lanyards evenly. My solution was to tie two lines to two thimbles, hold the lines in opposing arms of my 'third hand'. I stuck two pins through a piece of card to mark the distance between the thimbles, placed the thimbles over the pins to space them correctly, removed the card and gently run the lanyard through them being careful to not pull the lanyard too tightly and thus inadvertently change the spacing. It worked well enough. The final challenge here was the futtock shrouds. These appear to attach to a band around the mast. Most of the models I've seen use eyebolts but, again, I have difficulties making eyebolts small enough for 1/72 scale. So I ended up gluing the shrouds directly to the mast and then wrapping the threads with a small strip of painter's tape. I then cut off the excess thread and painted the tape dark gray to represent the metal band. I think it will be secure enough. Though, the lines could be a bit tighter. It was quite satisfying to mount the mainmast in the hull!
- 63 replies
-
- 4
-

-
-
- card
- Revenue Cutter
- (and 2 more)
-
Thanks, @0Seahorse, I don't think I'd have figured the outhaul line on my own. Thanks, everyone, for stopping by and the likes.
- 63 replies
-
- 1
-
-
- card
- Revenue Cutter
- (and 2 more)
-
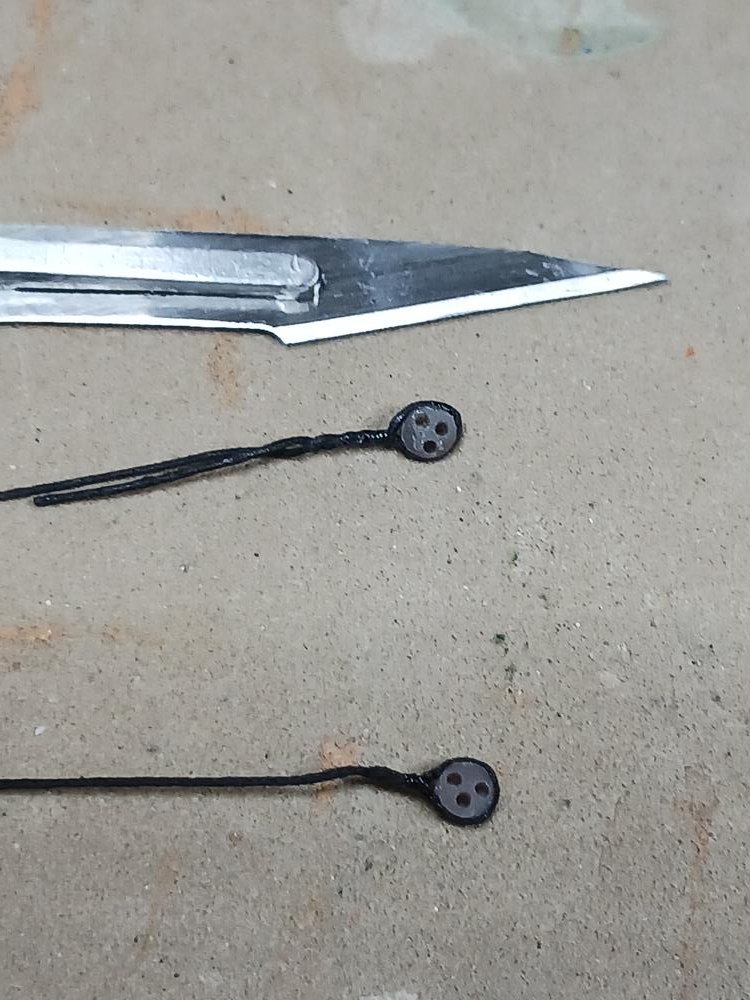
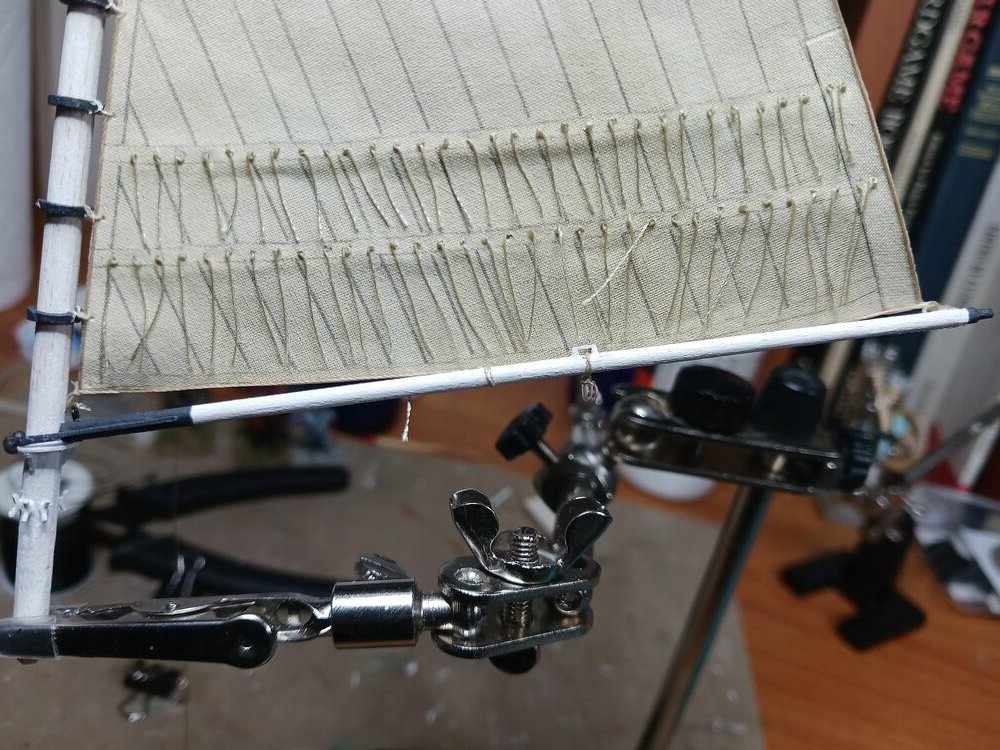
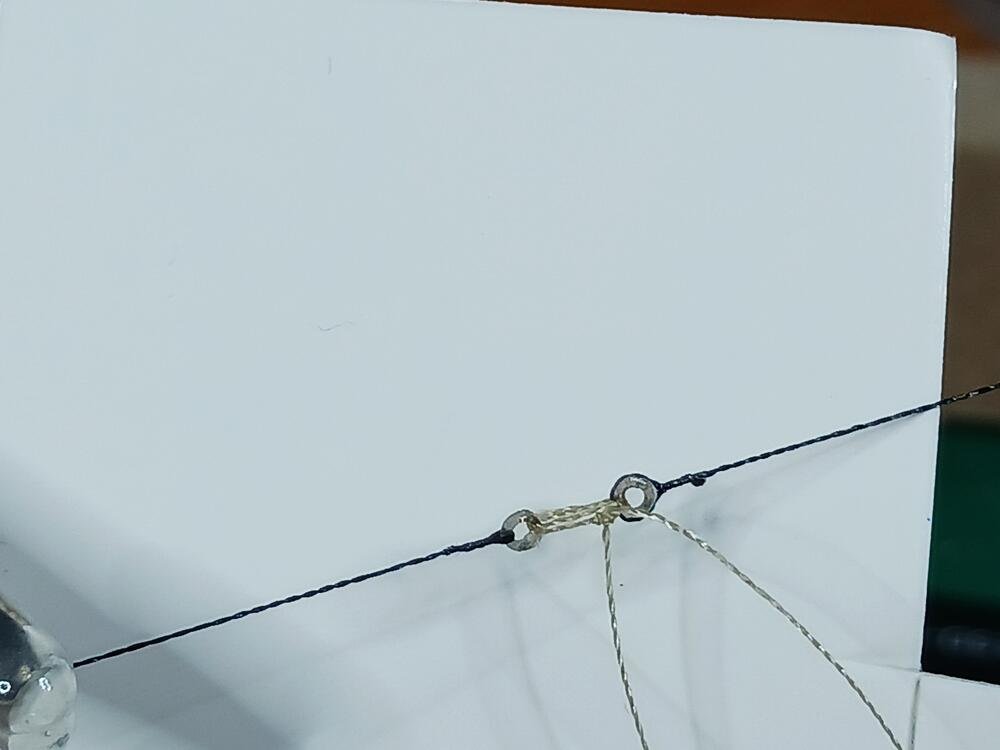
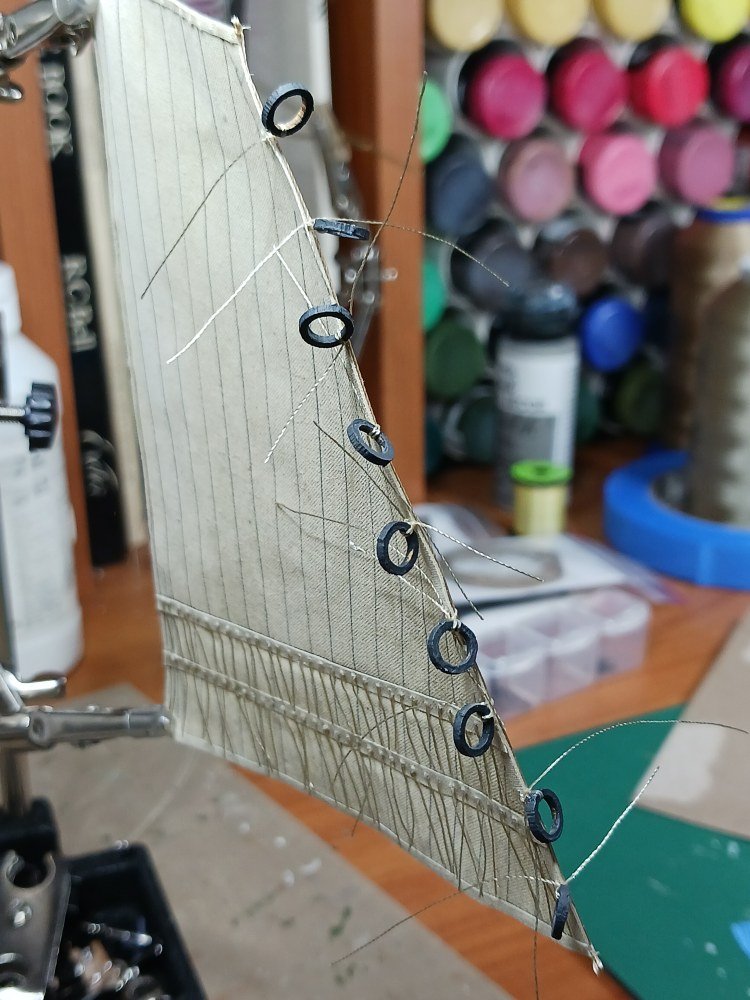
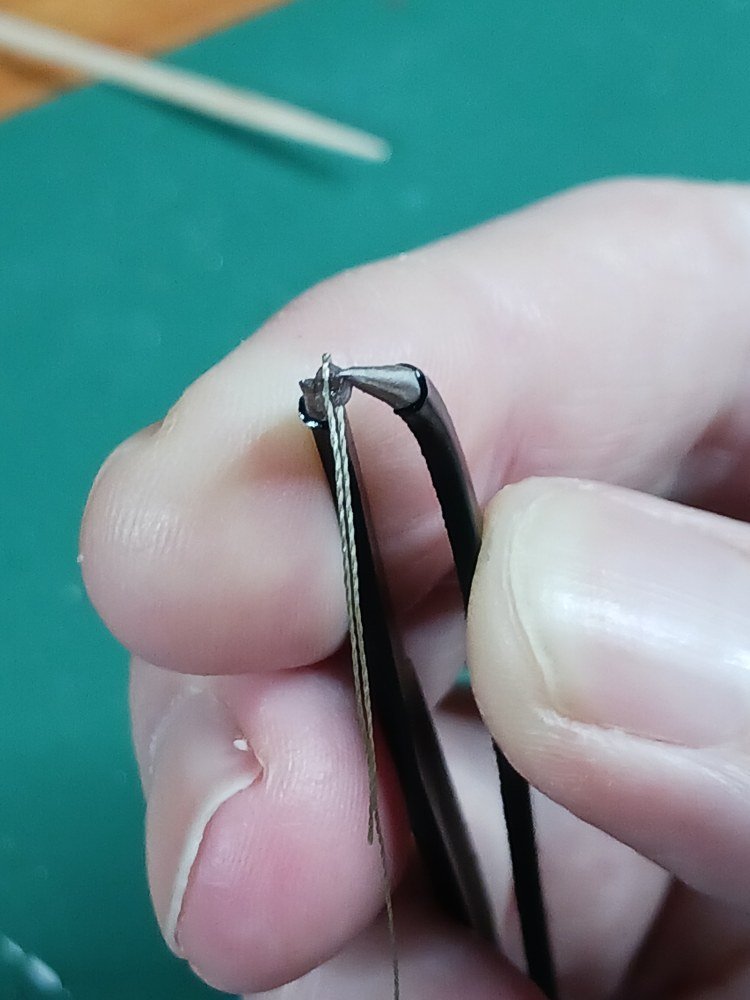
Tried stropping some blocks yesterday with moderate success. These are tiny 2mm single blocks. I first laid the blocks on some painters tape with the sticky side up to hold the blocks in place. Then I applied some CA to the exposed sides of the blocks and laid the line across ensuring that the line ran from top to bottom. After letting that dry I picked up the blocks with tweezers, folded the line over and glued it to the back side of the block. Then, after letting that dry I tied the line off at the base of the block. My eyes and coordination just weren't good enough to do any wrapping here so I finally gave up on that idea--at least for now. I then took on the mast hoops. This went easier than expected. I made a loop in the line and slipped the hoop over the loop. Then feed the two loose ends of the line through the loop basically hitching the hoop to the line. Then I ran one of the loose ends of the line through the hole in the sail and tied it off the the other loose end. The picture (rather obviously!) shows the sail before trimming off the loose ends of the lines.

- 63 replies
-
- 3
-
-
- card
- Revenue Cutter
- (and 2 more)
-
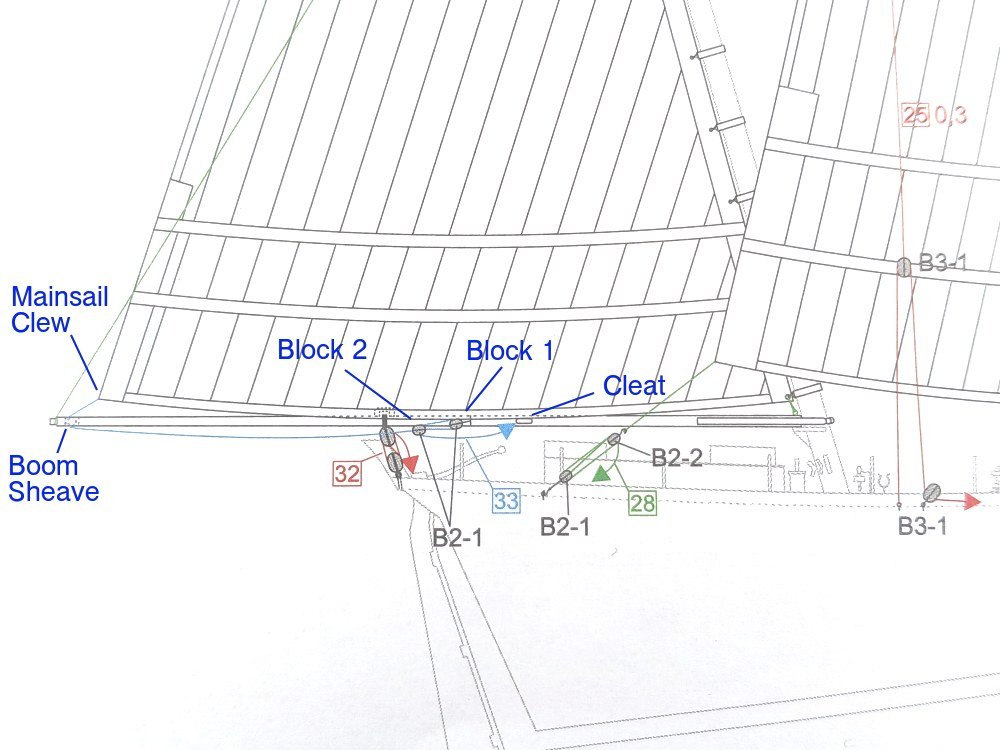
Thanks, Chris. Next question for the collective: I'm looking at the mainsail outhaul in the drawing below. Looks like line 33 (in blue) runs from the Mainsail Clew => Sheave at the end of the boom => Block 1 => Block 2 => Cleat on the boom. My question is about Block 2. This drawing is the only place it appears. Block 1 is shown in another drawing of the boom but Block 2 is not. I'm not sure what Block 2 is attached to. Would it be appropriate to seize it to the boom at the same point that the tackle for line 32 is attached? There is a little squarish bracket (I don't know what it's called) on the boom at that point. The other example I've seen has a block on the lower side of the boom jaw and the line would run Clew => Sheave => Jaw block => Block 1 => Cleat. That seems less practical to me with the cabin located where it is. Hmmm...
- 63 replies
-
- 2
-
-
- card
- Revenue Cutter
- (and 2 more)