HOLIDAY DONATION DRIVE - SUPPORT MSW - DO YOUR PART TO KEEP THIS GREAT FORUM GOING! (Only 72 donations so far out of 49,000 members - Can we at least get 100? C'mon guys!)
×
Jsk
-
Posts
279 -
Joined
-
Last visited
Content Type
Profiles
Forums
Gallery
Events
Everything posted by Jsk
-
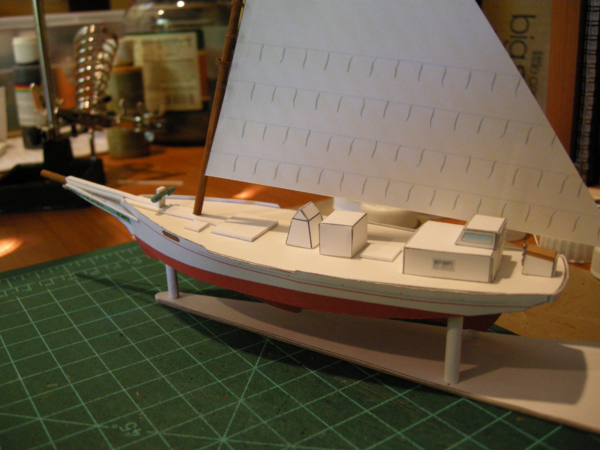
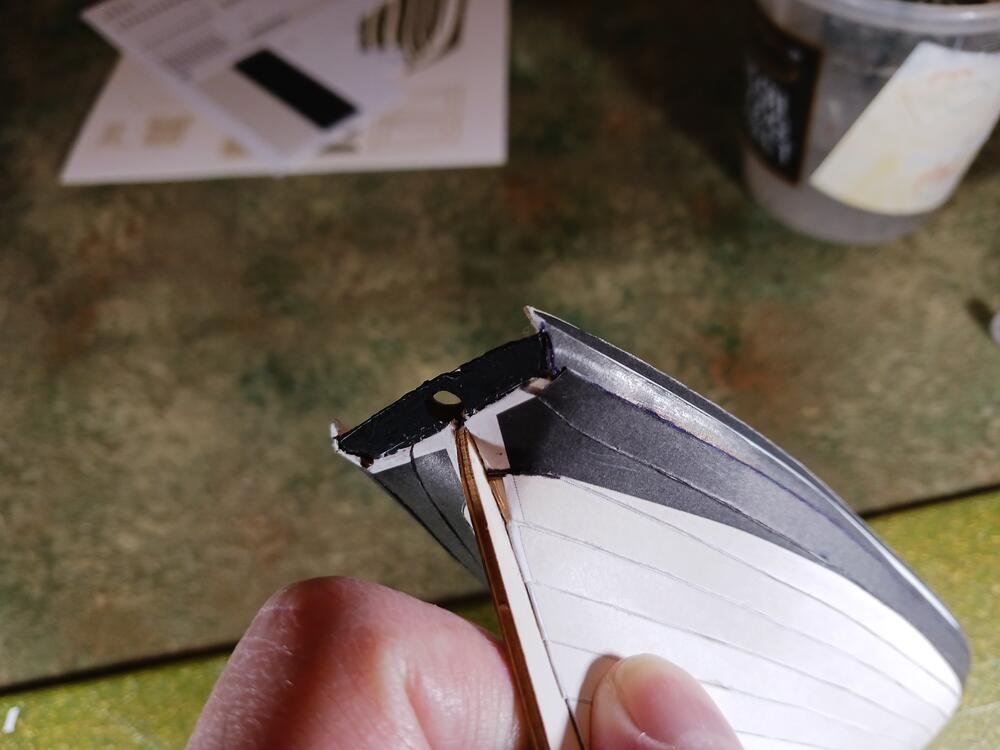
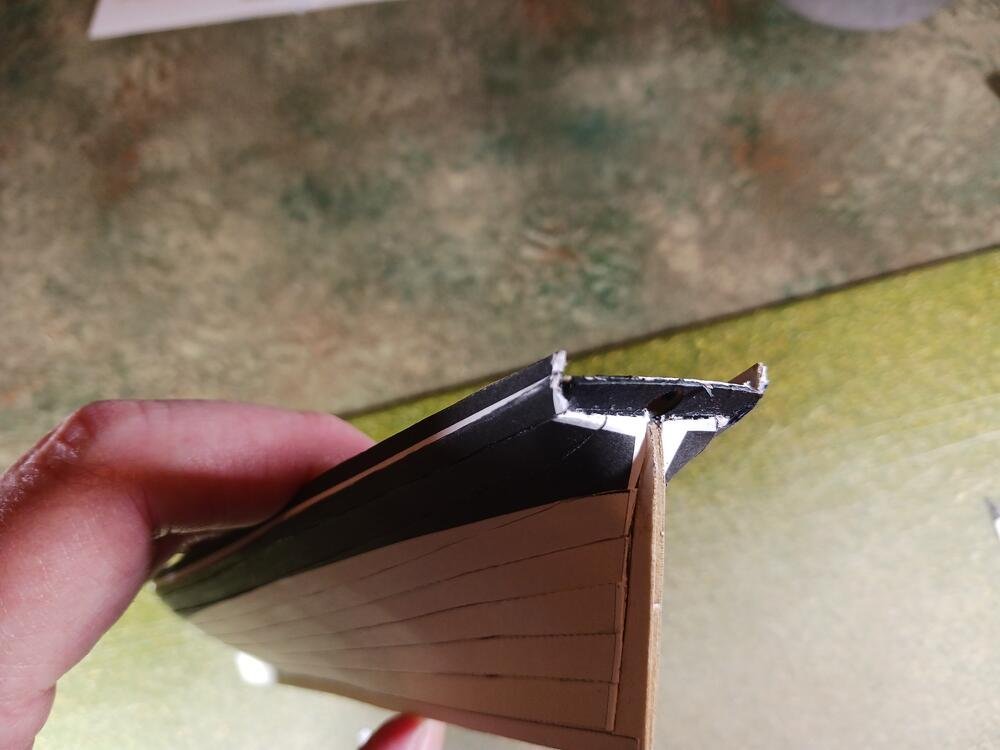
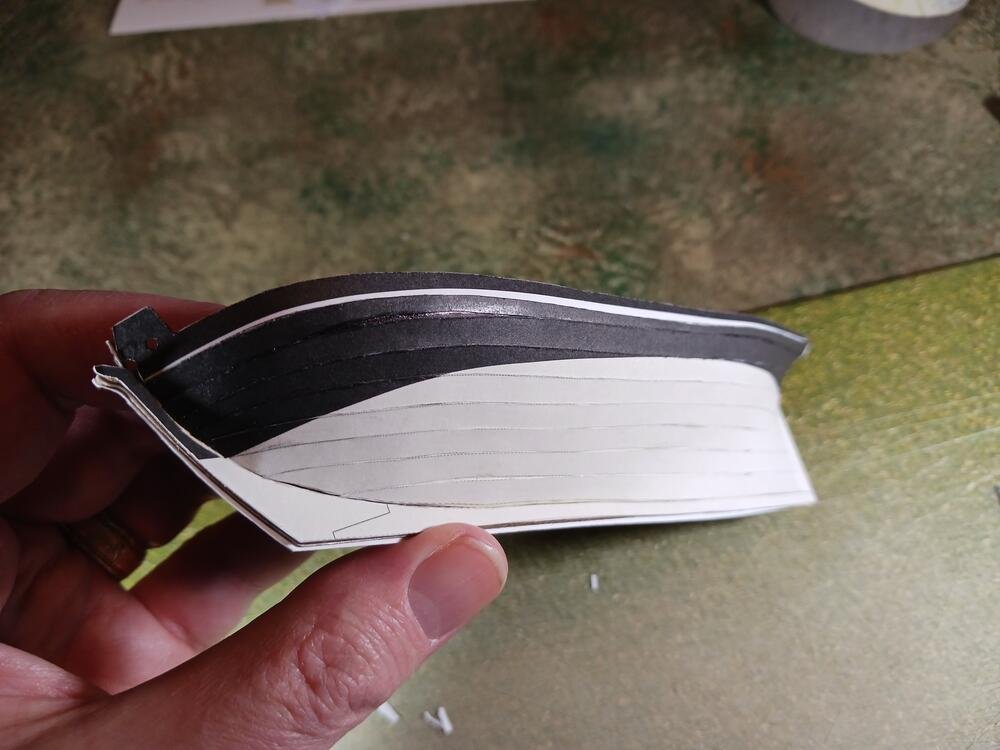
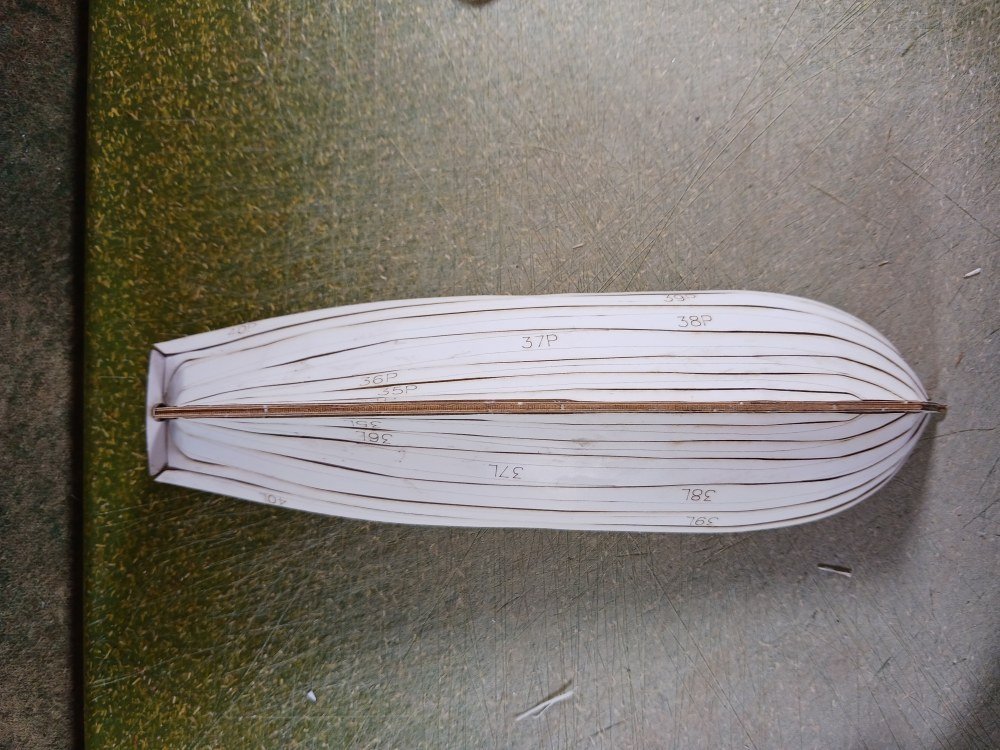
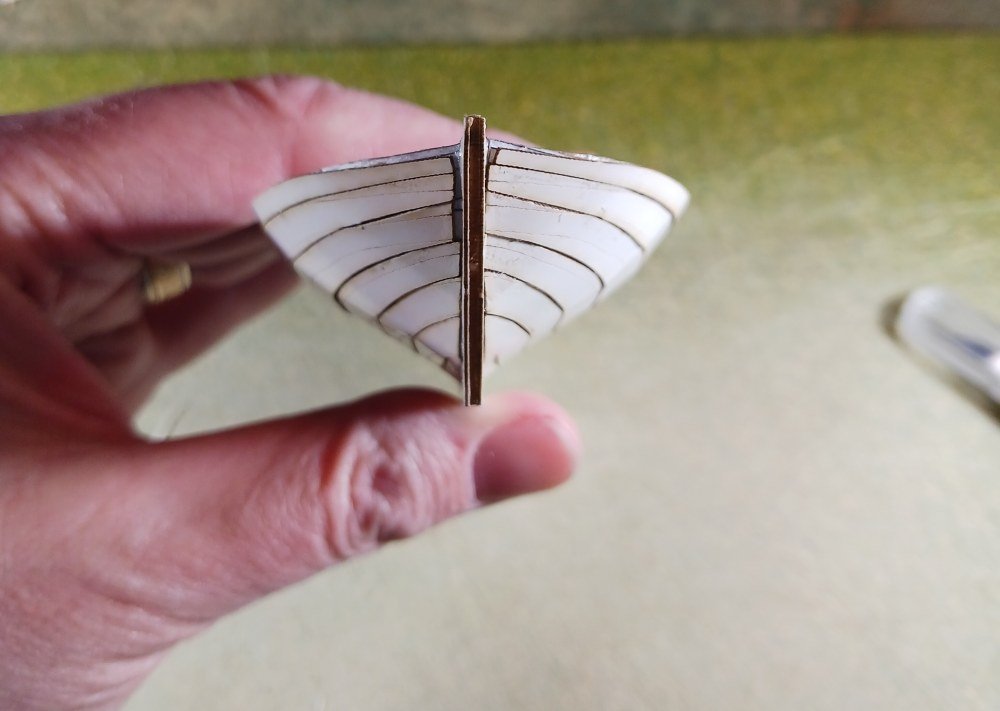
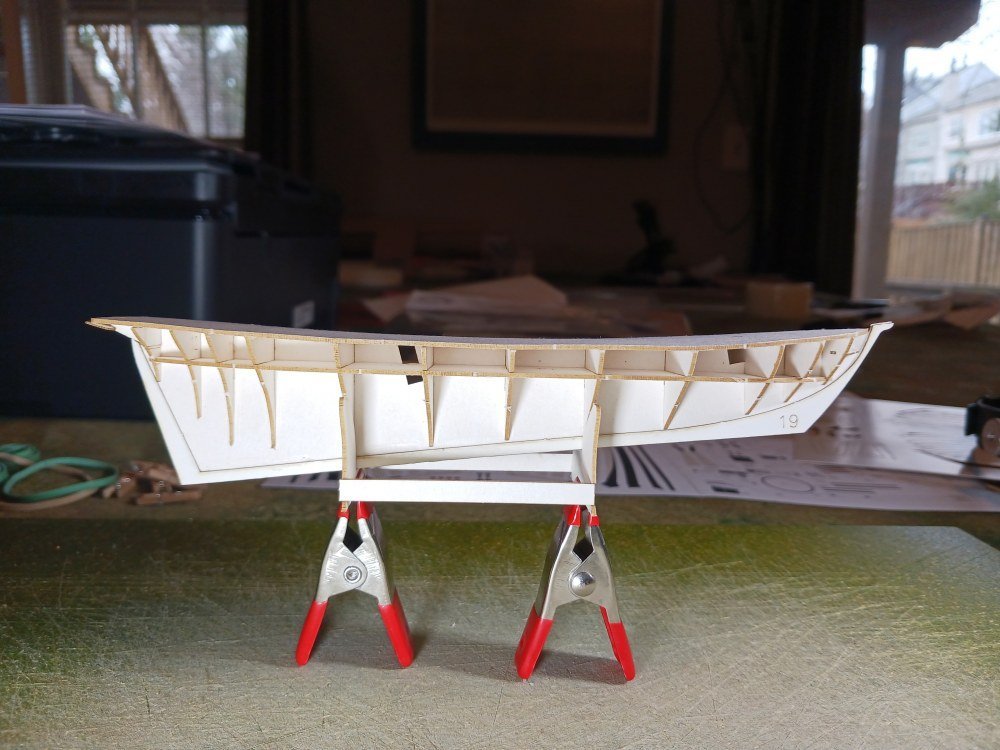
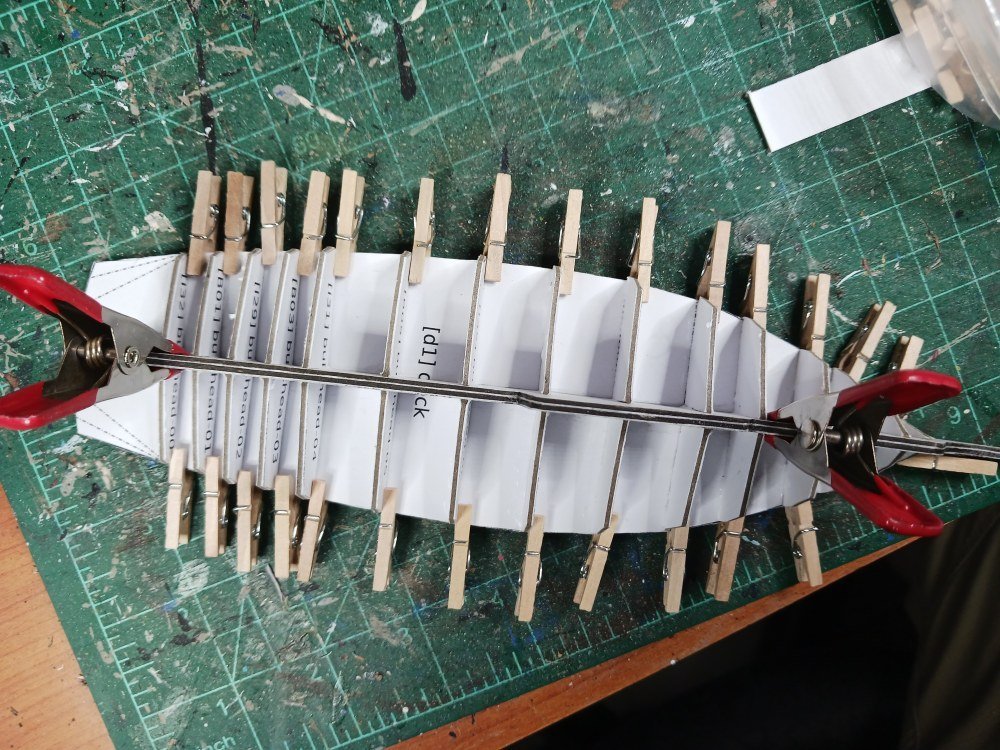
 Slowly progressing with the Revenue Cutter. I've got the third layer of the hull completed. Next step is the copper bottom. Interestingly enough, I had some fit problems here and I'm not sure why. You can see on the last couple of pictures how the strakes didn't seem to be long enough to reach all the way to the stern. This has really got me puzzled as everything else in the design has been really precise. I suspect it's caused by my asymmetric building snowballing into something larger. Nevertheless, I compensated by leaving some extra material on the strakes, making them longer, and made it work. I'll need to do a little bit of patching and some painting to make it all match but that's no big deal. I was thinking about adding some weathering effects anyway--particularly on the copper bottom which I want to have greenish tinge. Still having a lot of fun with this kit. So much so that I've ordered another three kits from Seahorse. So the stash is growing!
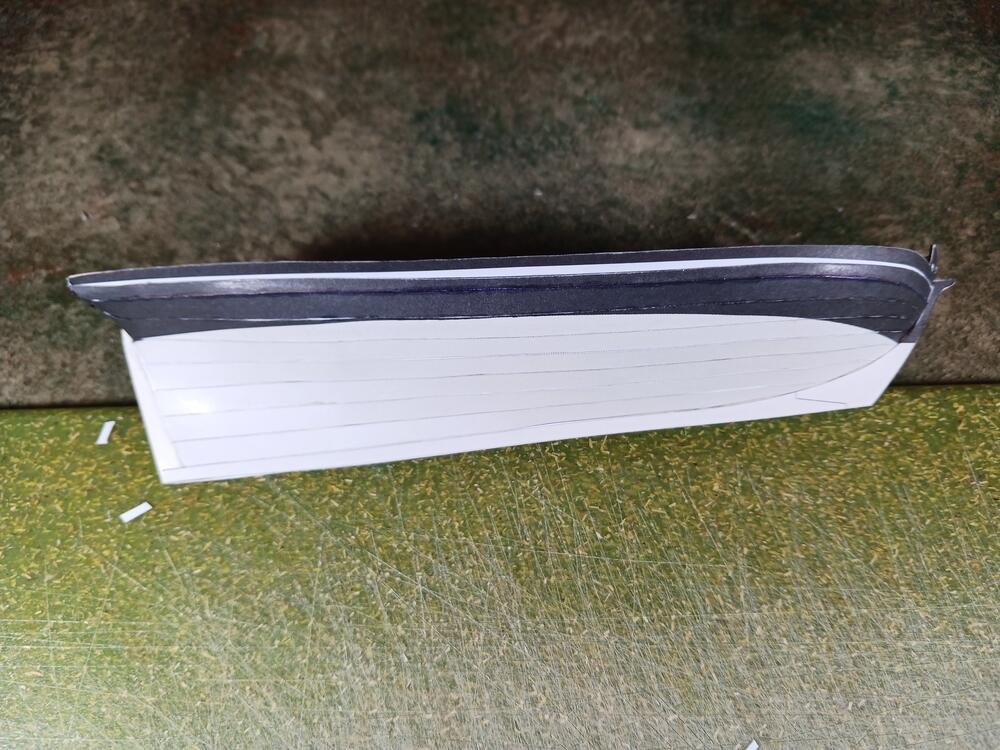

- 63 replies
-
- 7
-

-
- card
- Revenue Cutter
- (and 2 more)
-
Welcome, Dave! And as a coworker likes to say... "The perfect is the enemy of the good." 😉
-
USS OLYMPIA by gberger - FINISHED - 1/4" scale
Jsk replied to gberger's topic in - Build logs for subjects built 1851 - 1900
Wonderful! One of my favorite ships of all time and you've done her proud. -
Wow! Are you sure you want to go with that bright green for the stand? Makes the whole thing look a little garish. 😉 --jeff
-
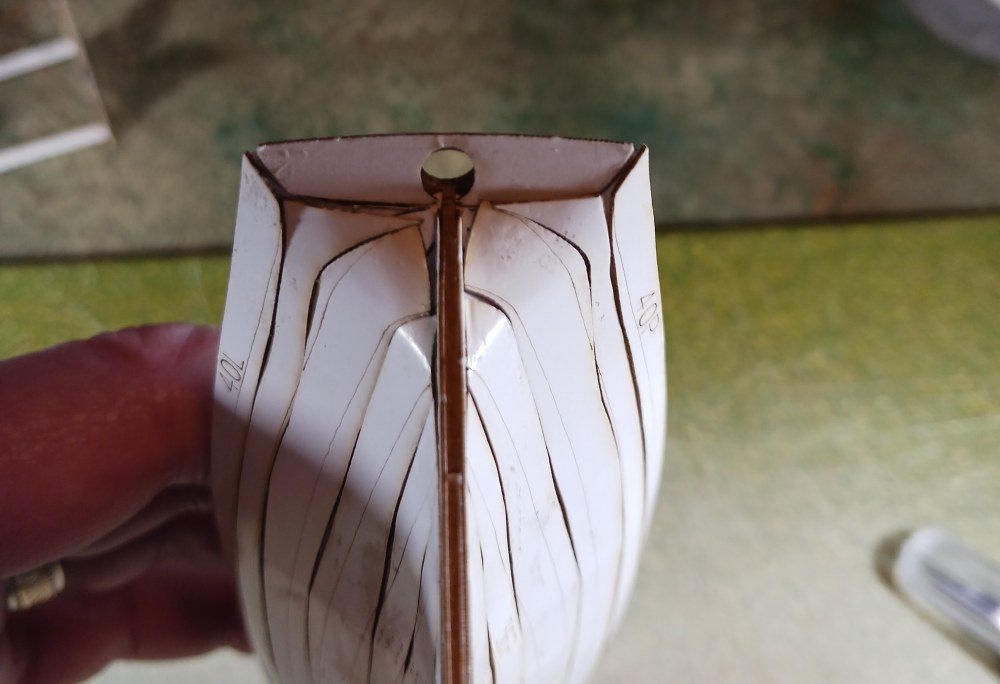
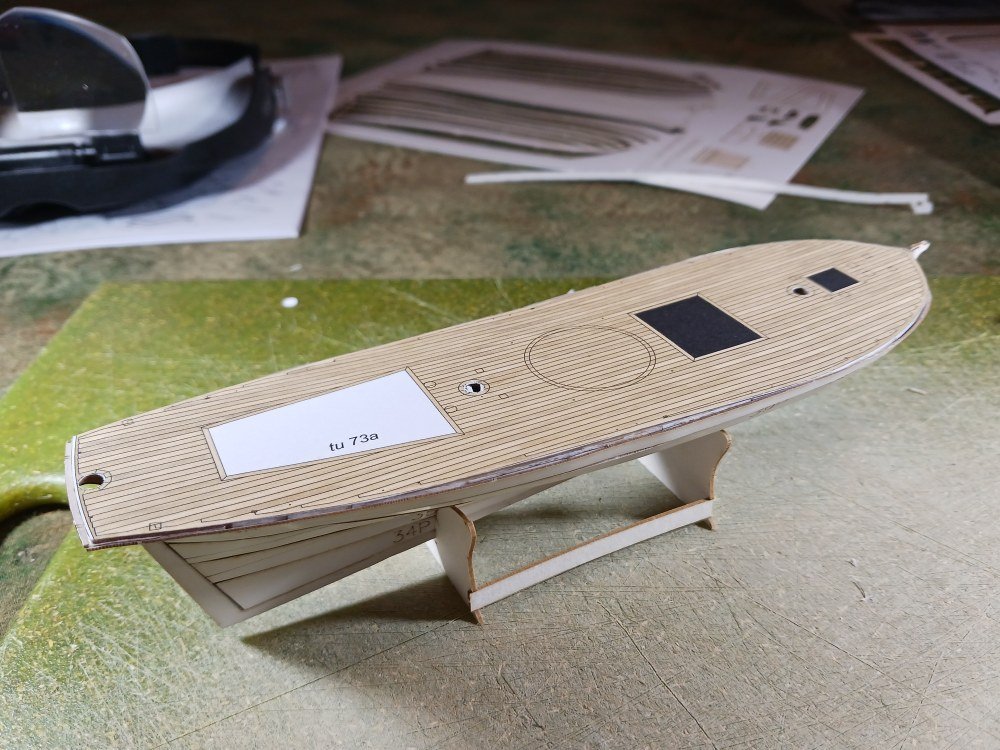
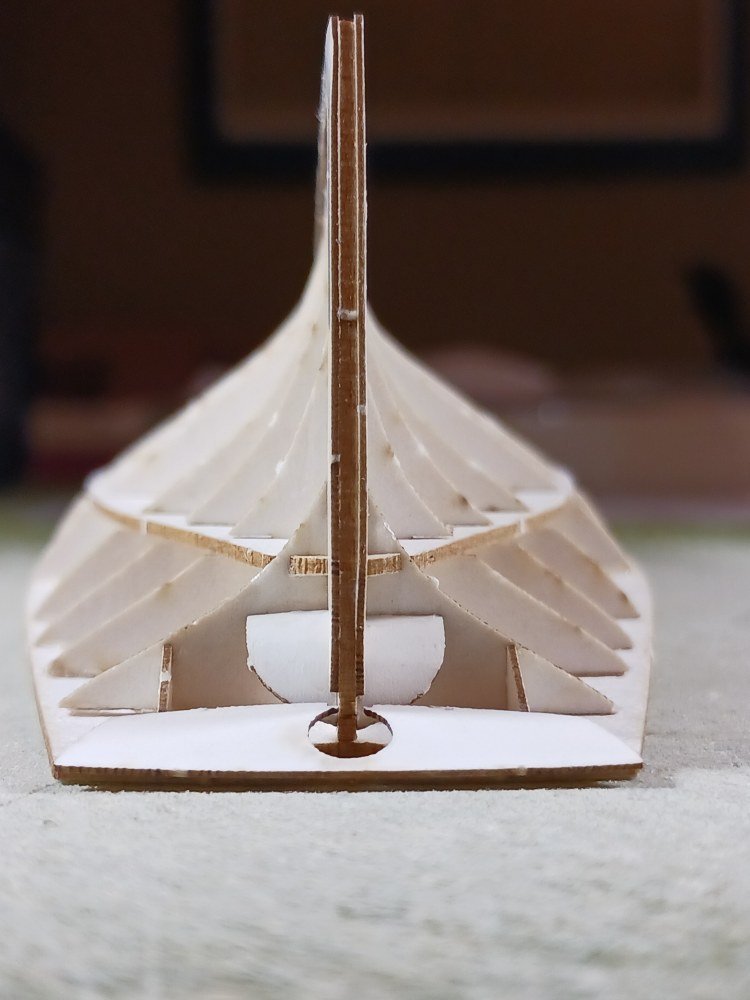
It was another weather-related day at home today so I spent time in the shipyard. Not much to describe since it was mostly repetitive work adding the strakes. I did give the joins a coating of CA and did a little bit of sanding before starting this step. I'm still a little concerned over my inability to keep everything symmetrical. This is most obvious when looking at the model from the ends, particularly the stern. Again, I don't think this will matter in the long run as long as I can do better on the final layer--which I'll be working on today. Once I completed the sides I was left wondering when to add the printed deck. Did it go on before or after adding the bulwarks? Then it occurred to me that I was using the laser-cut parts. The instructions assume you're laminating the printed parts at the very beginning of construction. So the printed deck would have been included at the very beginning--before you add the bulwarks. Puzzle solved!
- 63 replies
-
- 6
-
-
- card
- Revenue Cutter
- (and 2 more)
-
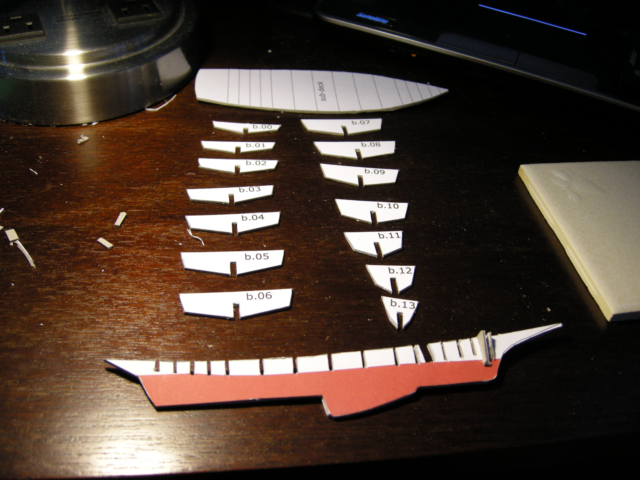
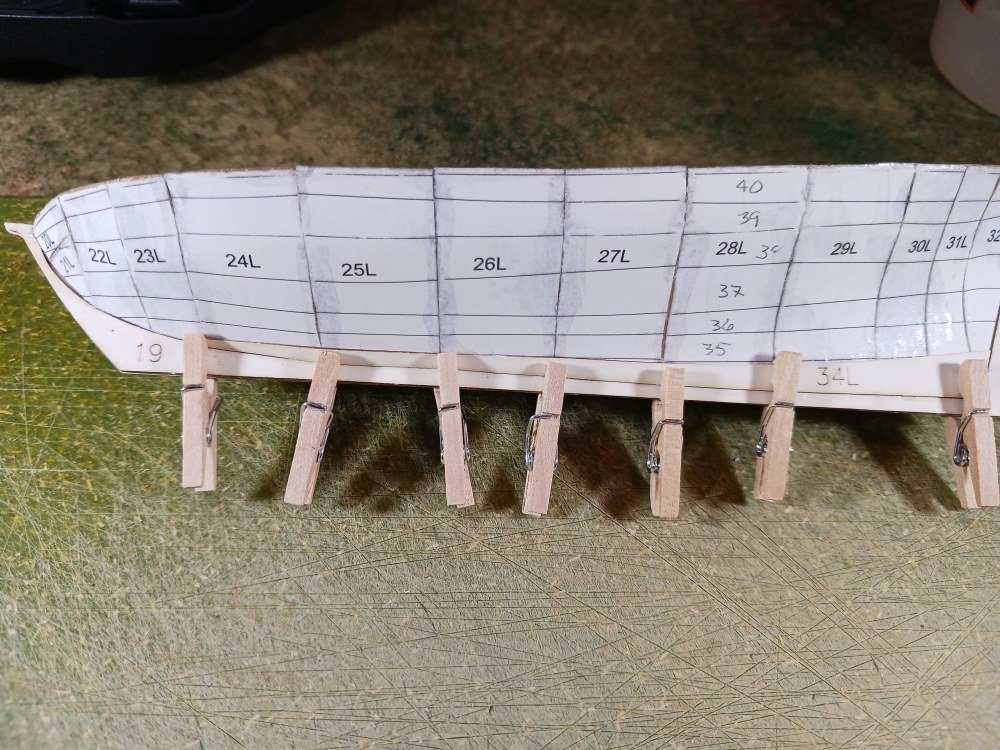
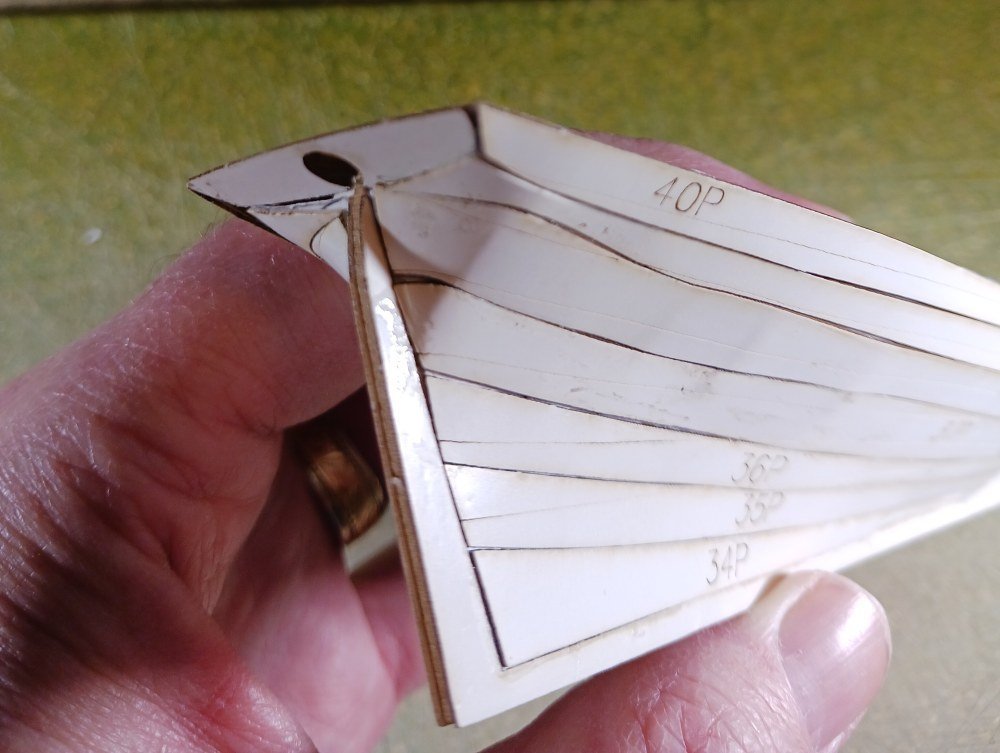
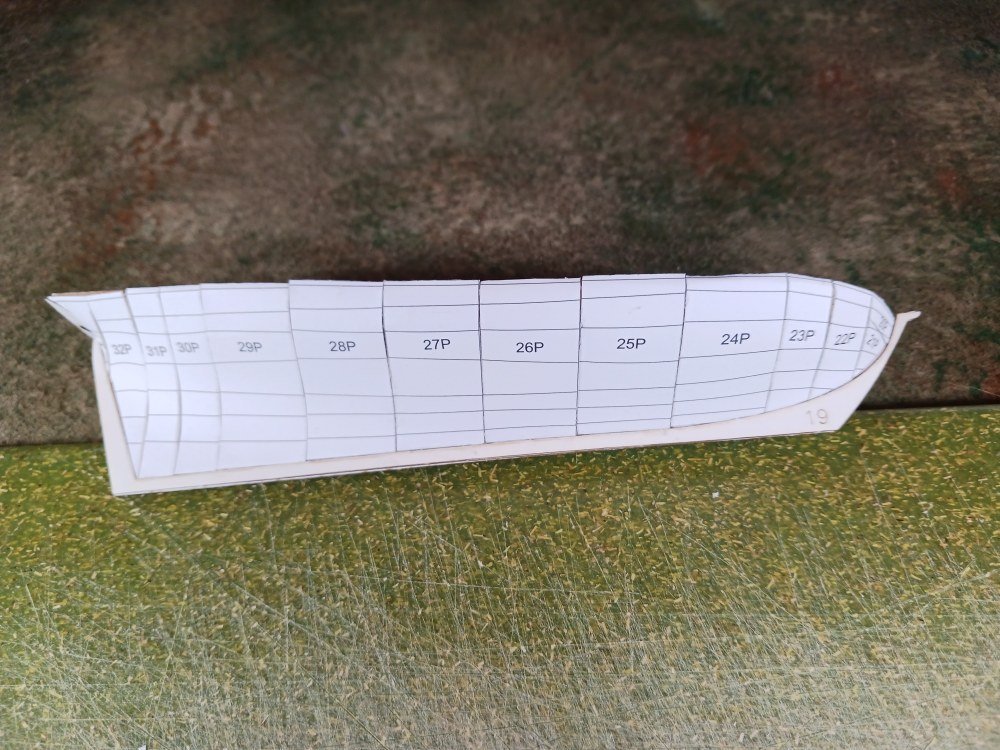
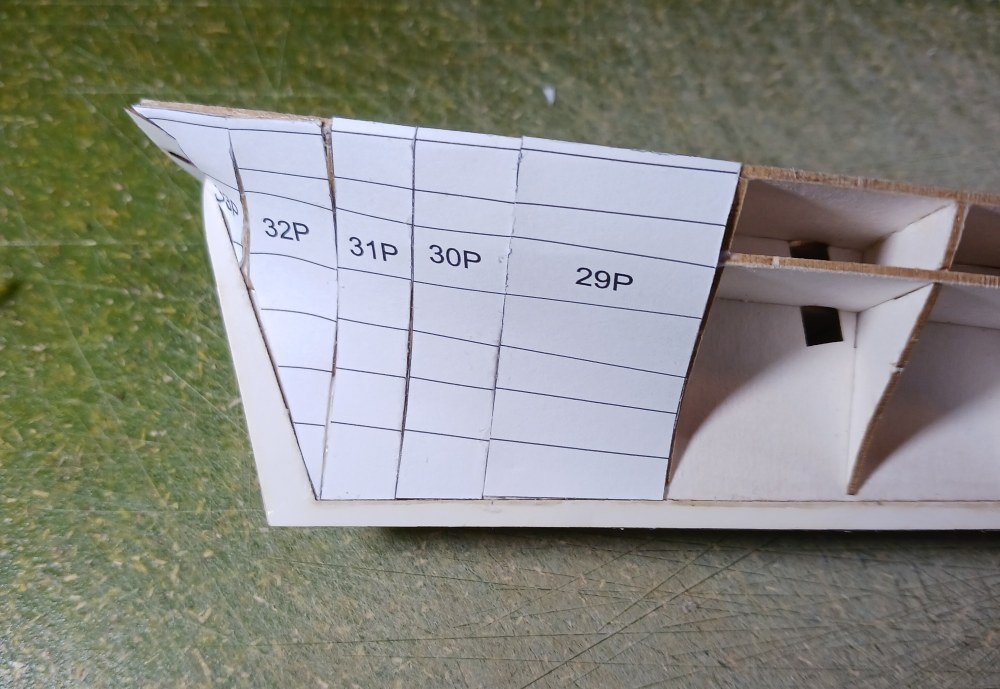
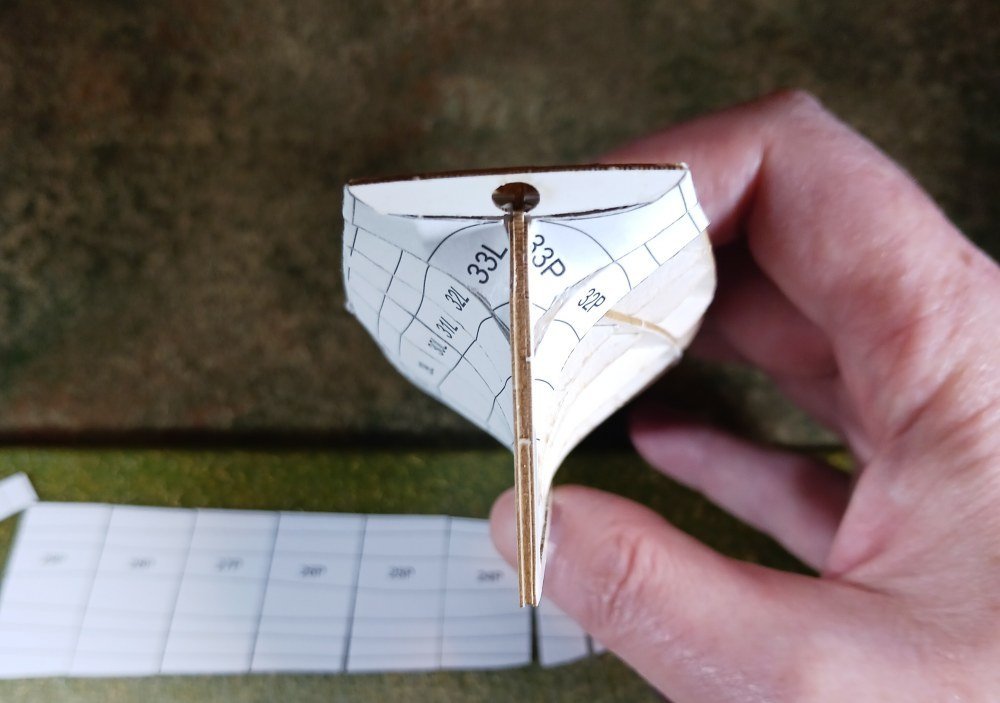
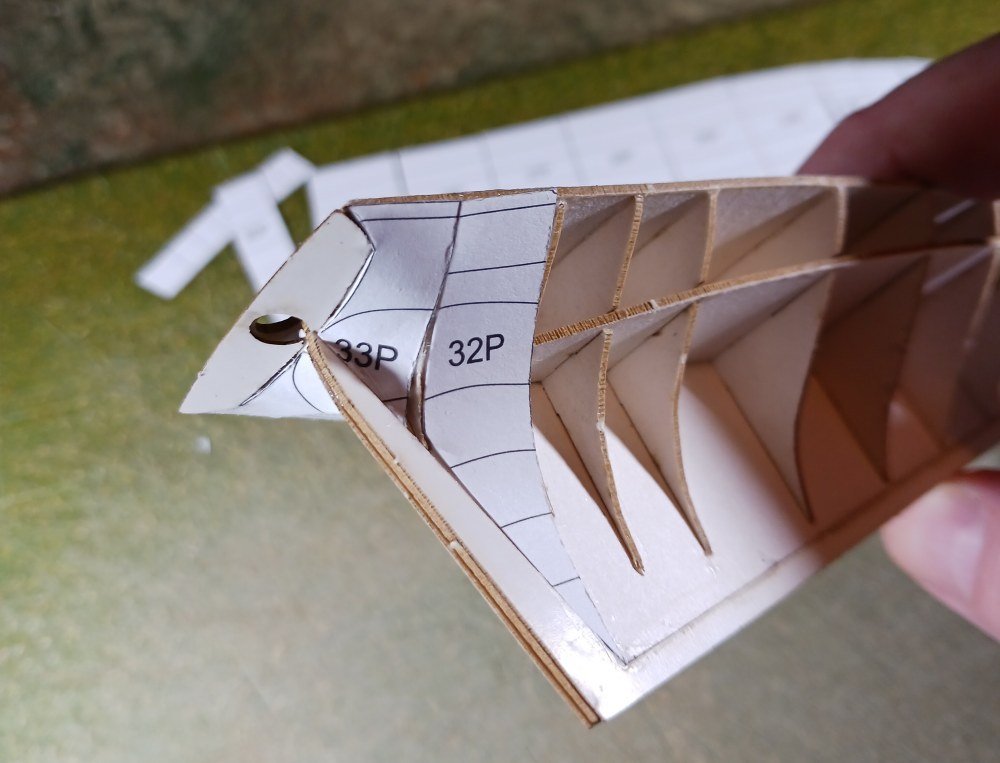
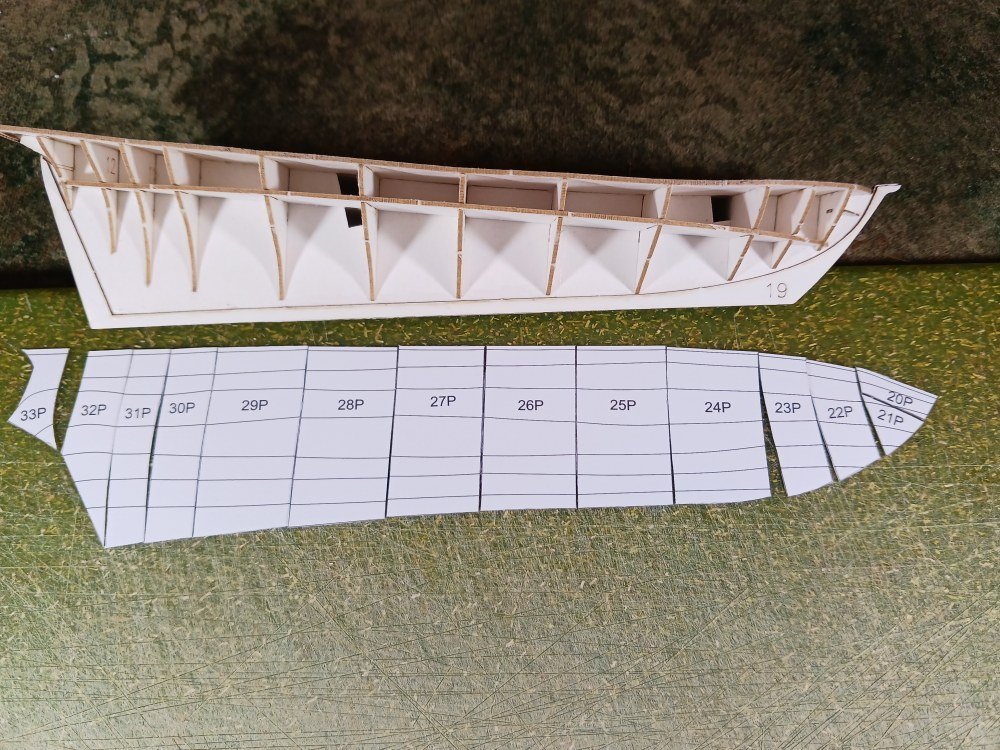
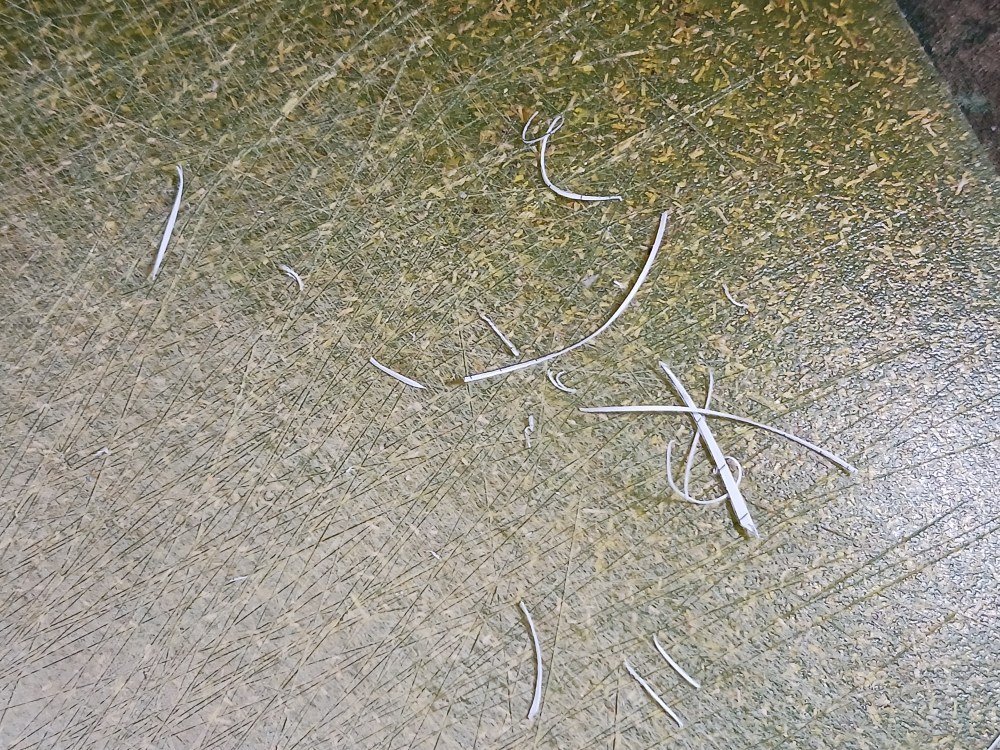
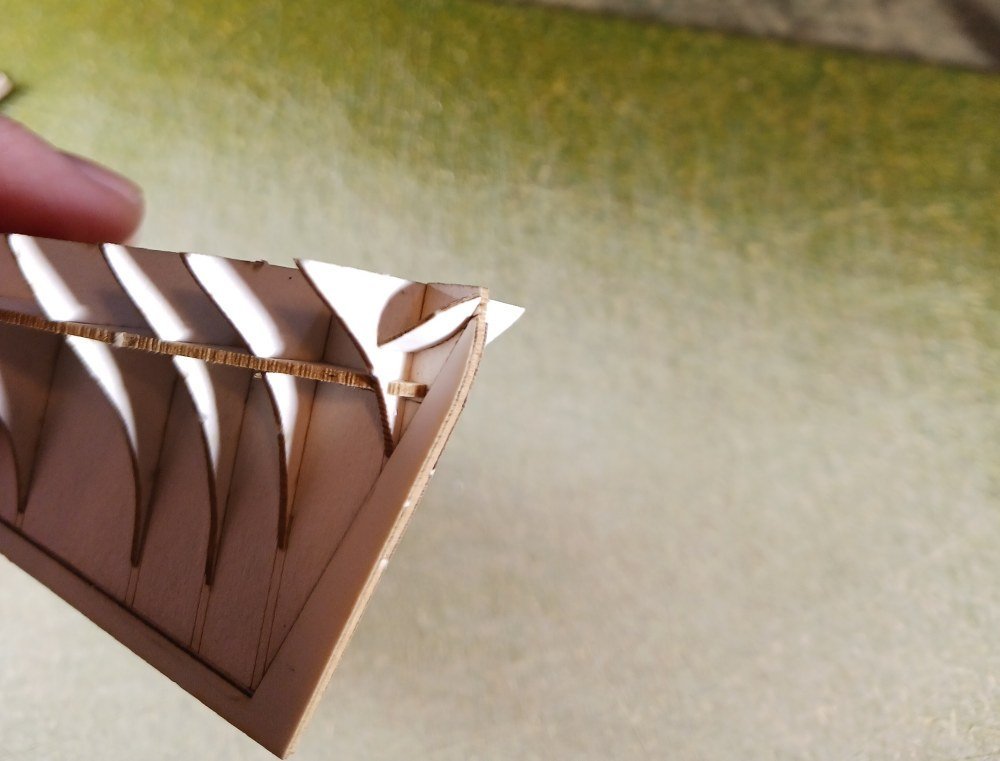
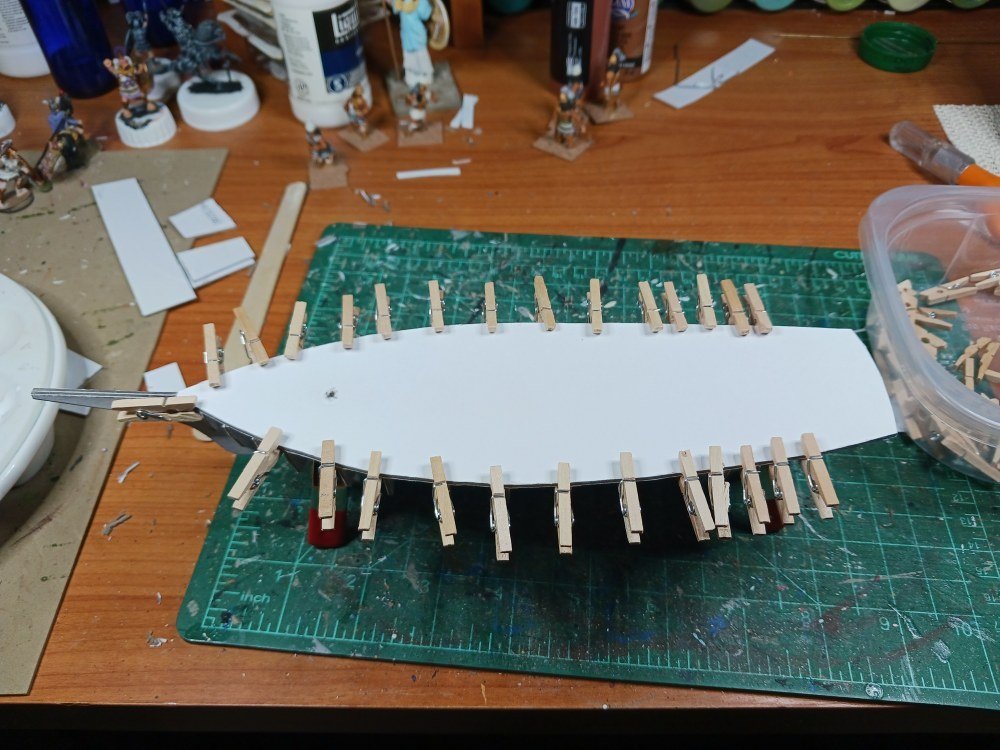
Received an unexpected day off work today due to weather so I got a little more work done on the cutter. I decided to document the construction more than I did yesterday. Yesterday I decided to skin the starboard side of the hull starting with the ends and working towards the center. The reason for this was because the end pieces are more irregular in shape and a bit trickier to fit. In the end I'm not sure it made much difference. The first picture shows all the parts cut and arranged in order. I started at the aft end since that was the trickiest of all. Part 33P did need a little bit of trimming but I went too far and ended up with a gap at the bulkhead. It looks worse than it feels. I think it will OK once the next layer of planking is attached. I typically put a little glue (Aleene's Tacky glue) in a small paint palette and use a brush to apply the glue to the model. I first fit the piece to its position and do any needed forming or trimming so that it fits well without glue. I then remove the piece and apply glue where the edges of the piece meet the hull structure. I then replace the piece fitting the bottom edge against the keel as if it was fitting into a rabbet and then smooth the piece against the bulwarks in an upward direction. Occasionally I need to apply a little more glue to the top edge to ensure the piece is glued to the subdeck. All in all it's been a trouble free exercise. I'm a little concerned that the tiny mis-alignments I see in the hull are going to cause problems later on. Or, they won't matter because they get cover over with the other layers. Hmmm... not sure which is more likely. Nevertheless, I think I'll apply some filler and some CA to joints and top edges so I can do a little sanding to smooth things out.
- 63 replies
-
- 6
-
-
- card
- Revenue Cutter
- (and 2 more)
-
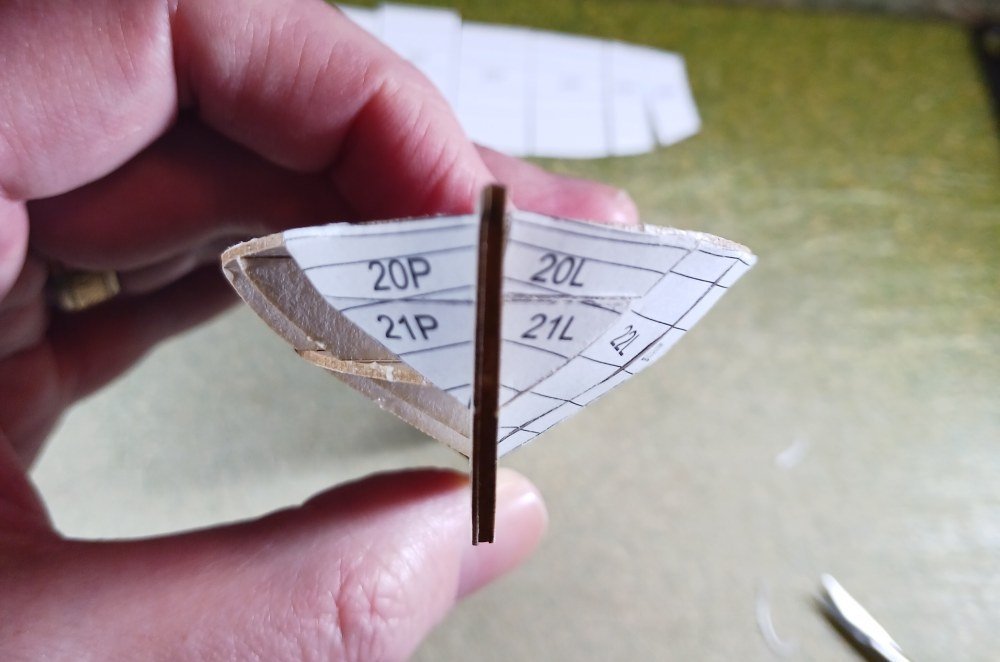
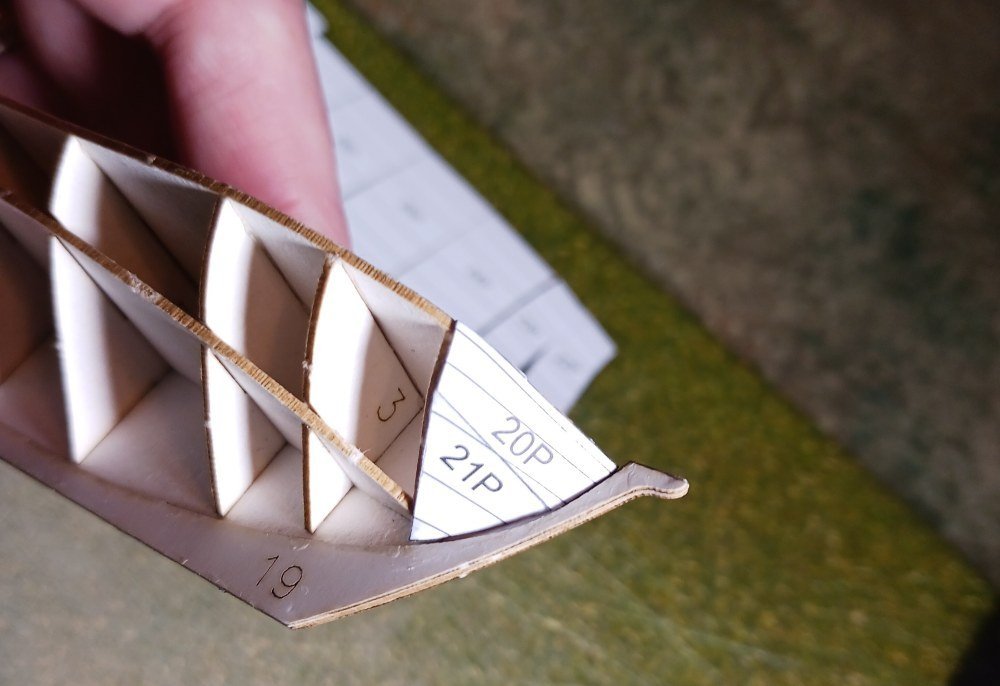
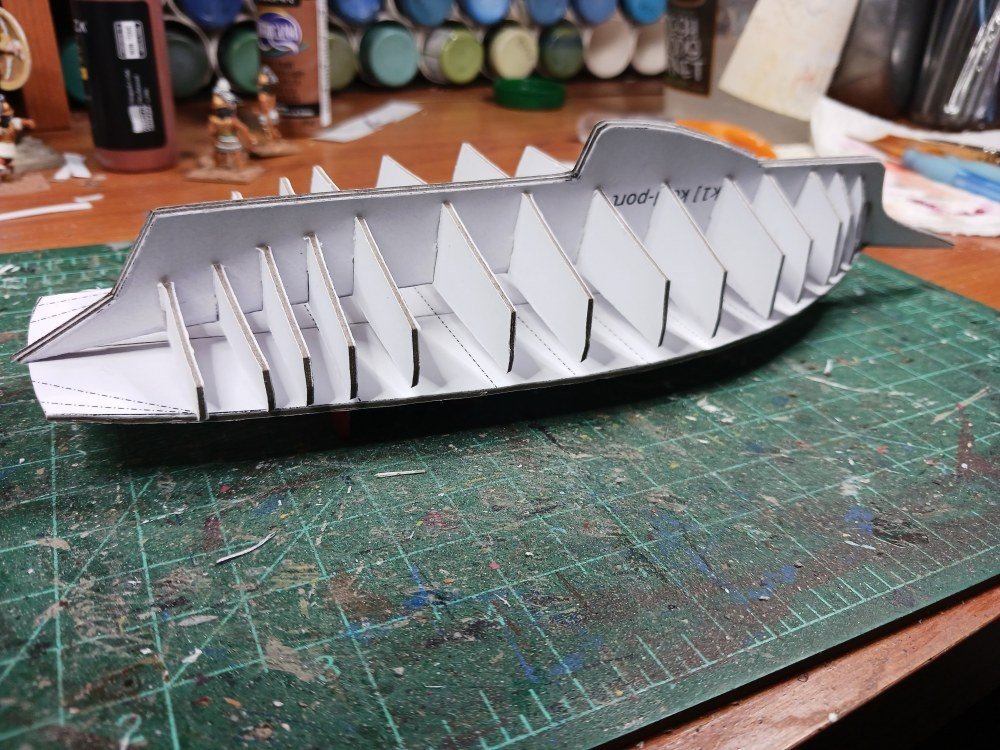
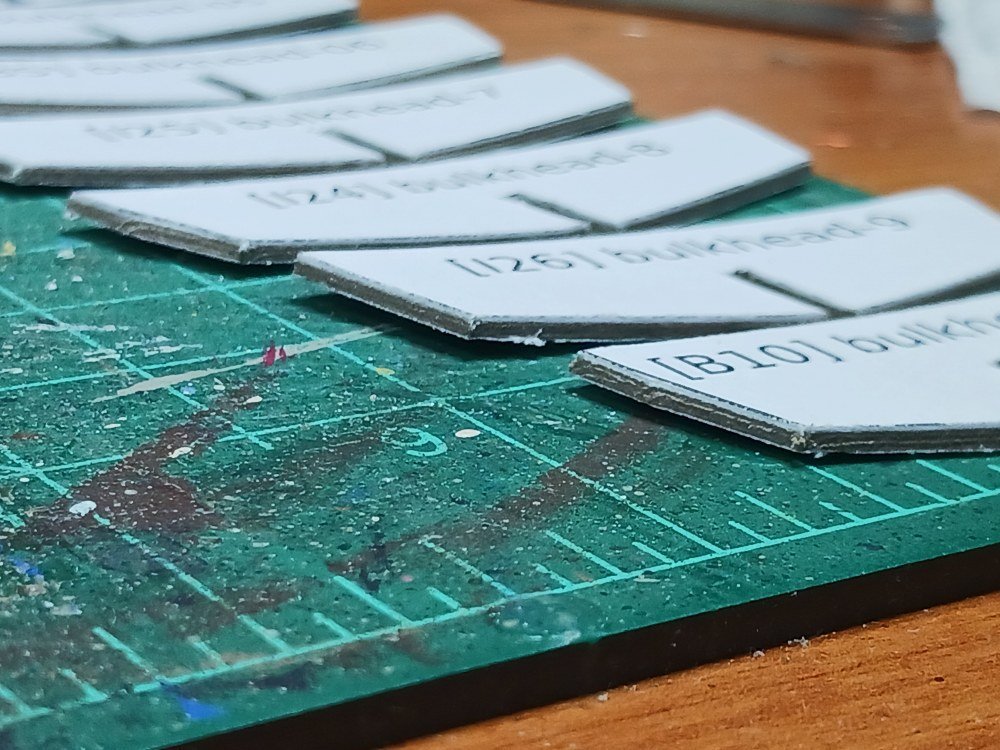
That's correct. No joiner strips (or tabs) in this design. The bulkheads are 1mm thick so there's not much room for error. This is just the foundation, though. There's a layer of longitudinal planks that go on top of this.
- 63 replies
-
- 4
-
-
- card
- Revenue Cutter
- (and 2 more)
-
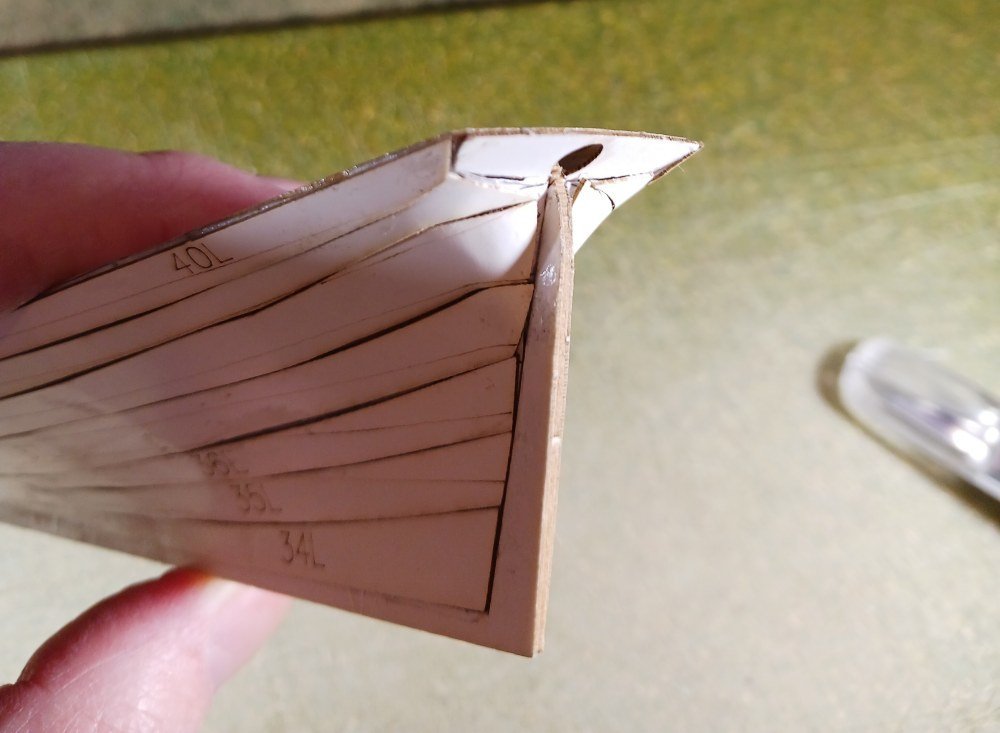
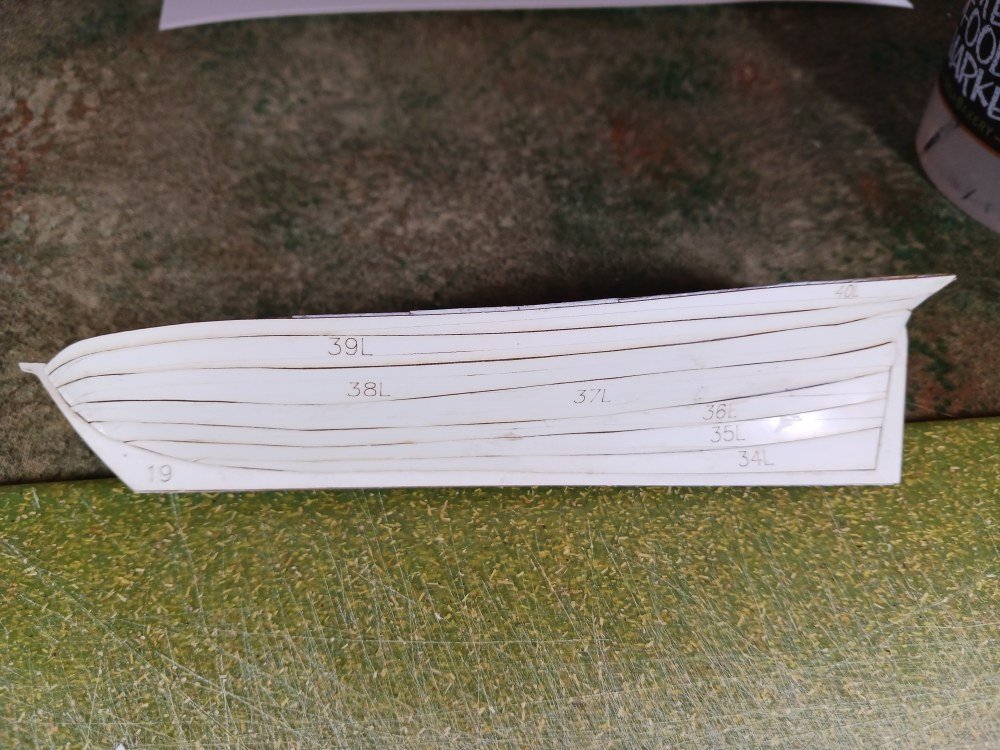
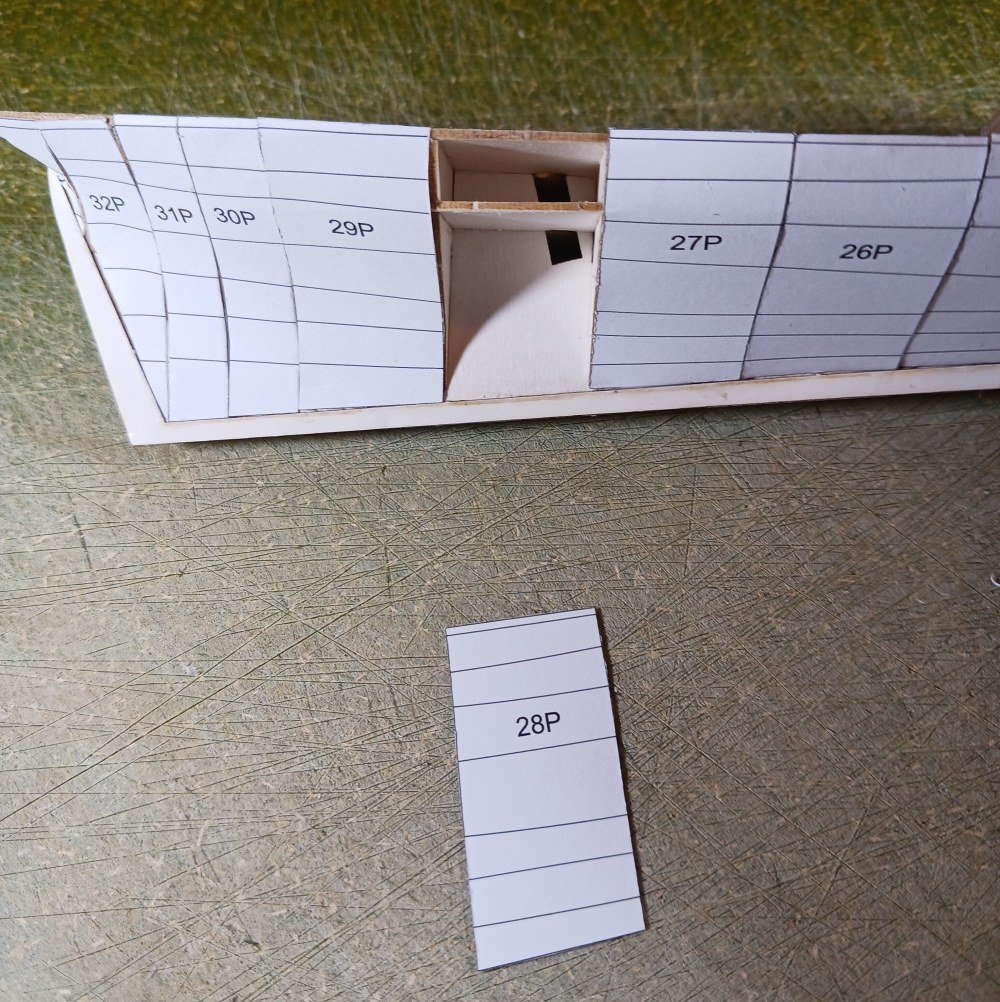
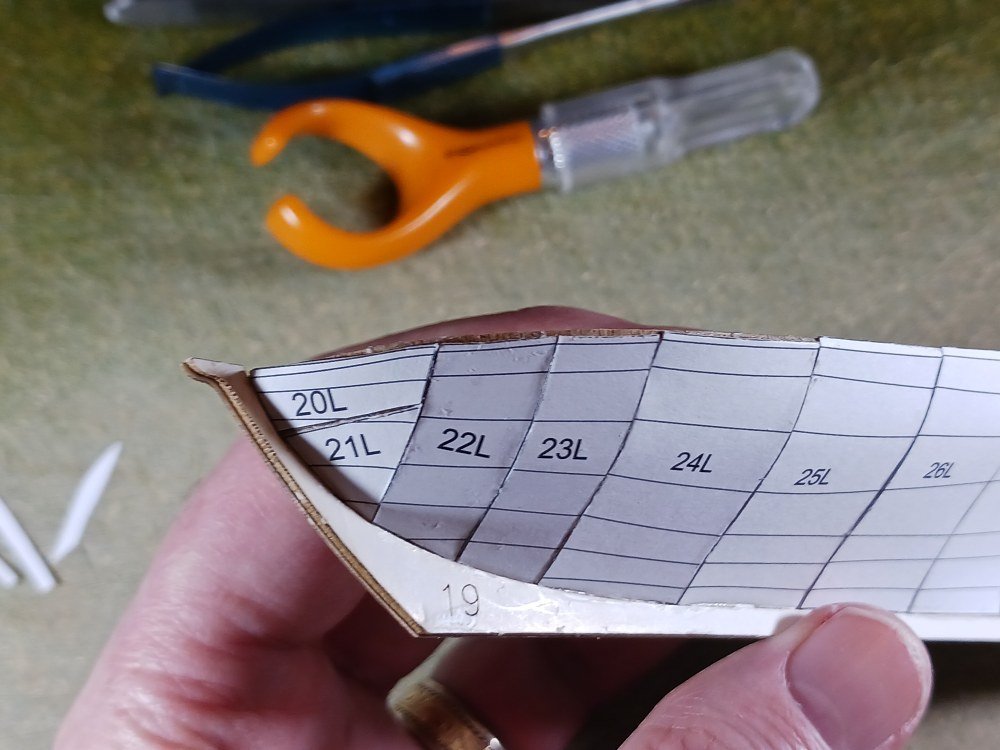
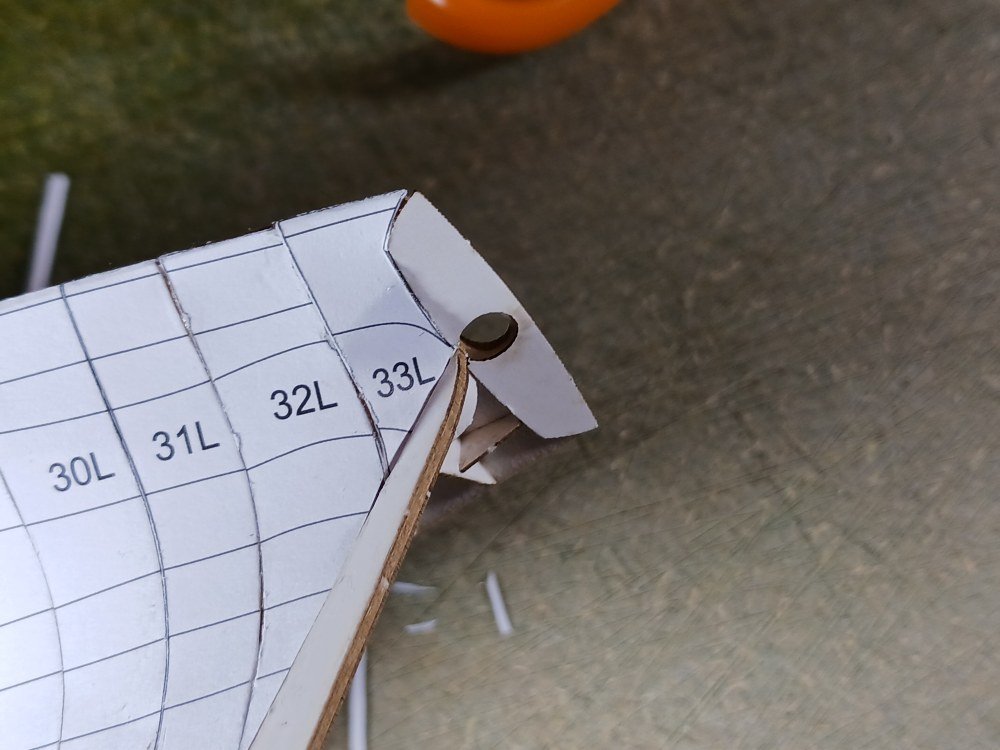
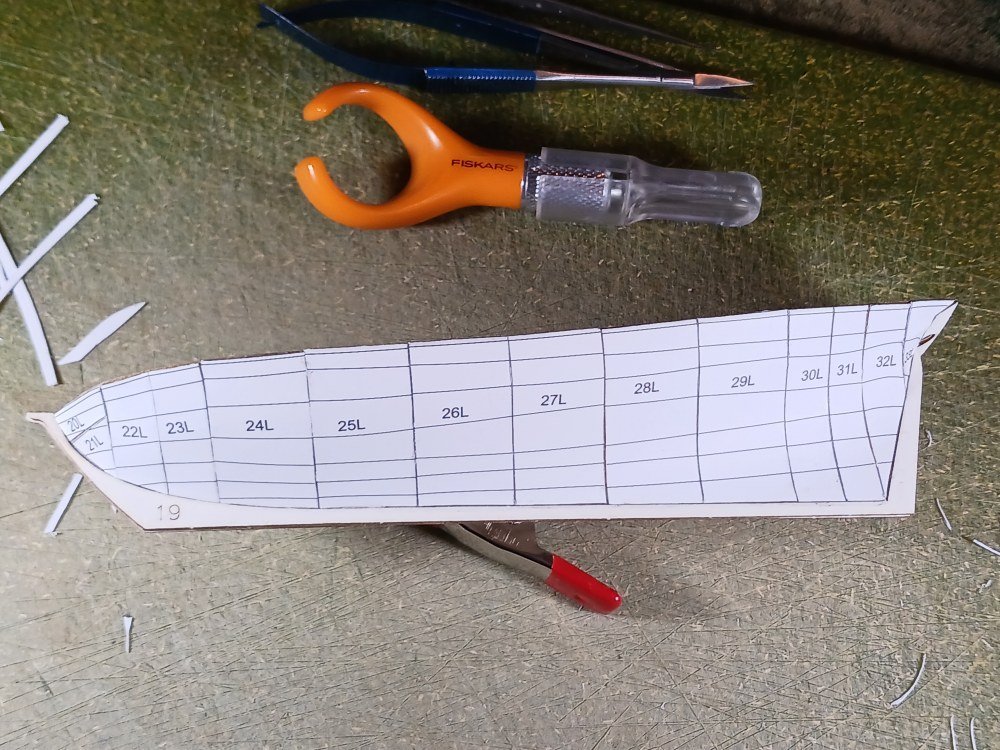
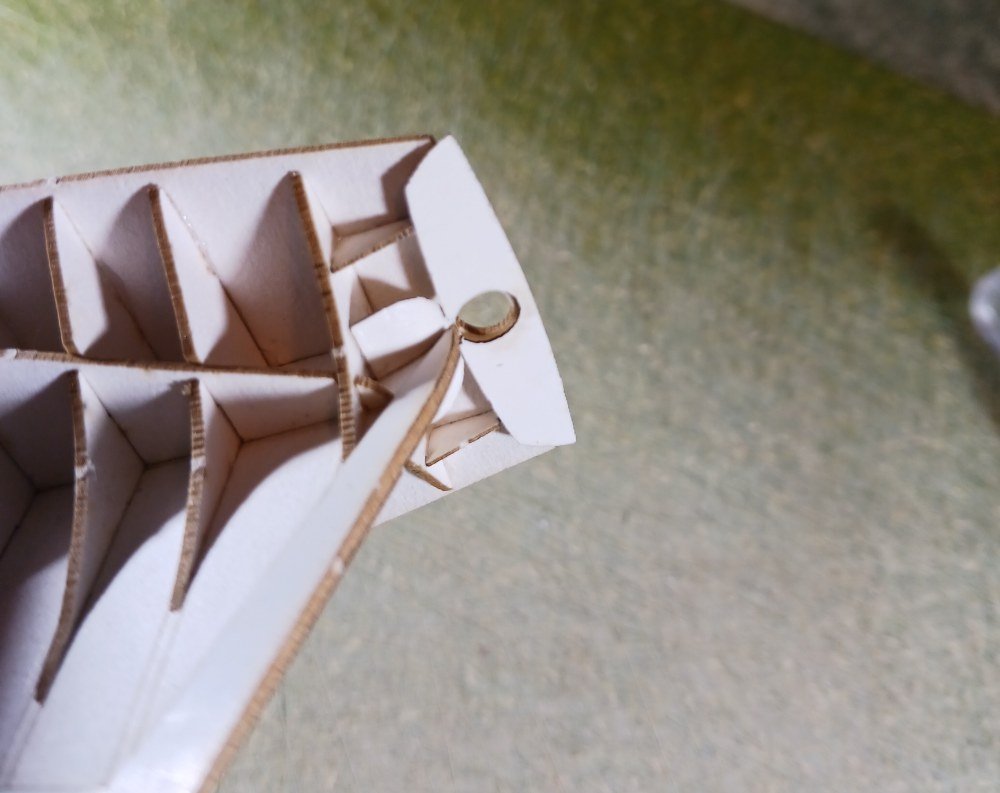
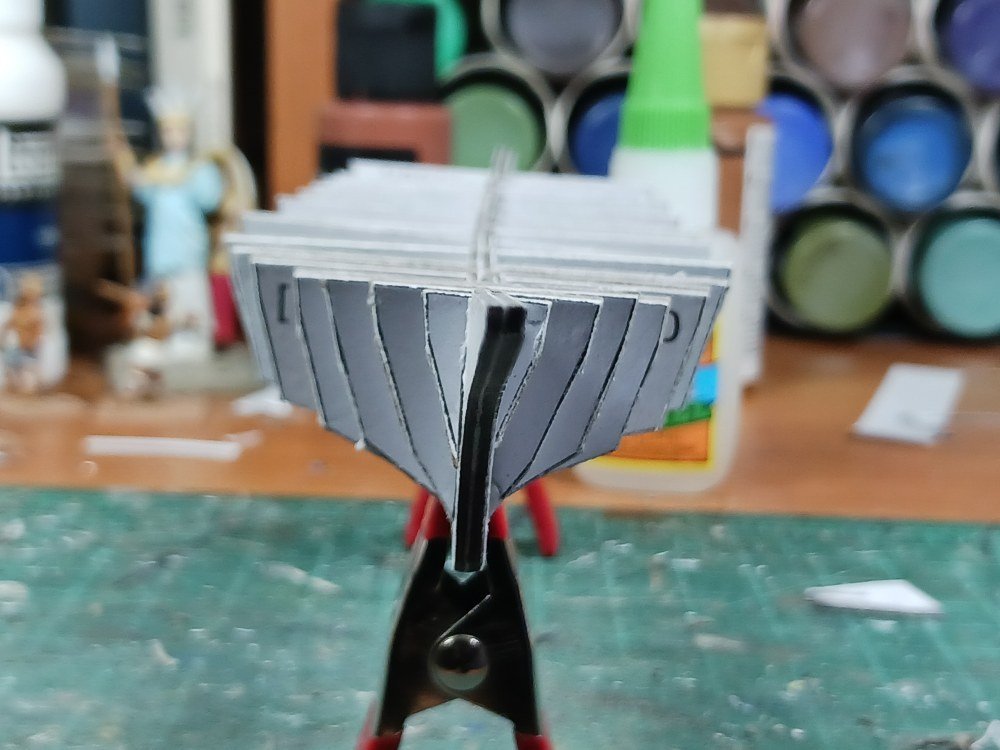
So far... the Zen continues. Got a couple hours of boat building in today and attached the first layer of skin on the port side. The only tricky piece was 33L which transitions from the hull to the counter. Now I know the purpose of piece 16. It supports 33L just under the counter beside the opening for the rudder. The accurate fit of these pieces is impressive. The fourteen pieces of the siding required extremely little trimming to get nice joins. Most of this was just to expose a little more of the bulkhead so the the next piece would have a little more support. The only piece that was less than optimal was 33L and that was at the very end. I think for the starboard side I'll start from the ends and work towards the center where it will be easier to adjust the fit. I'm going to try to get the starboard side done over the next week.
- 63 replies
-
- 5
-
-
- card
- Revenue Cutter
- (and 2 more)
-
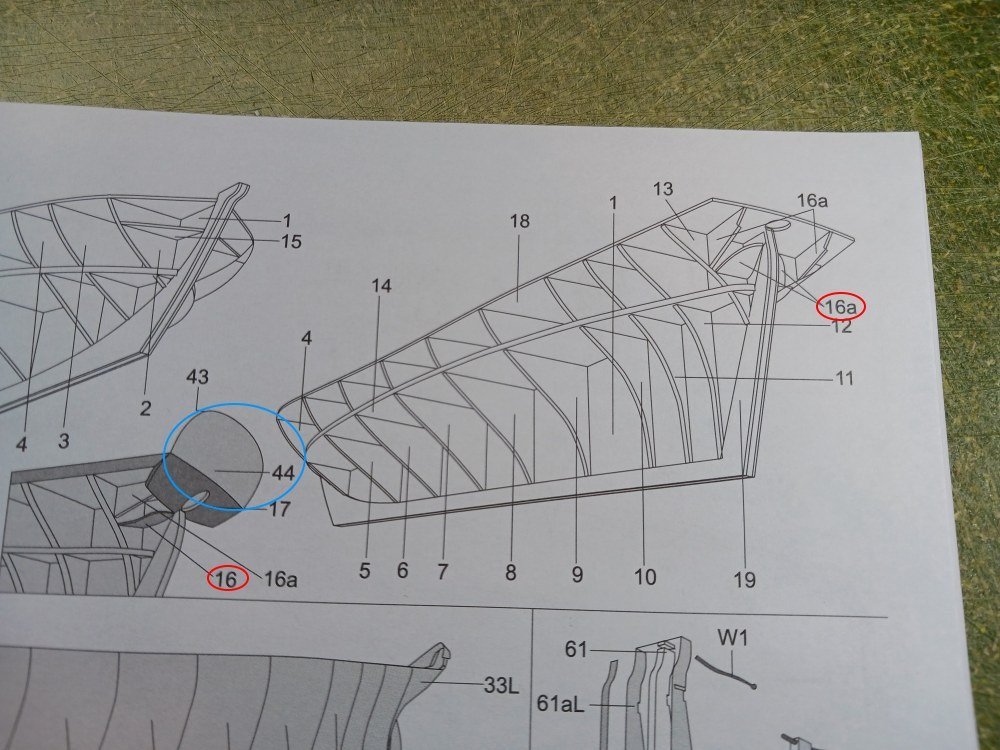
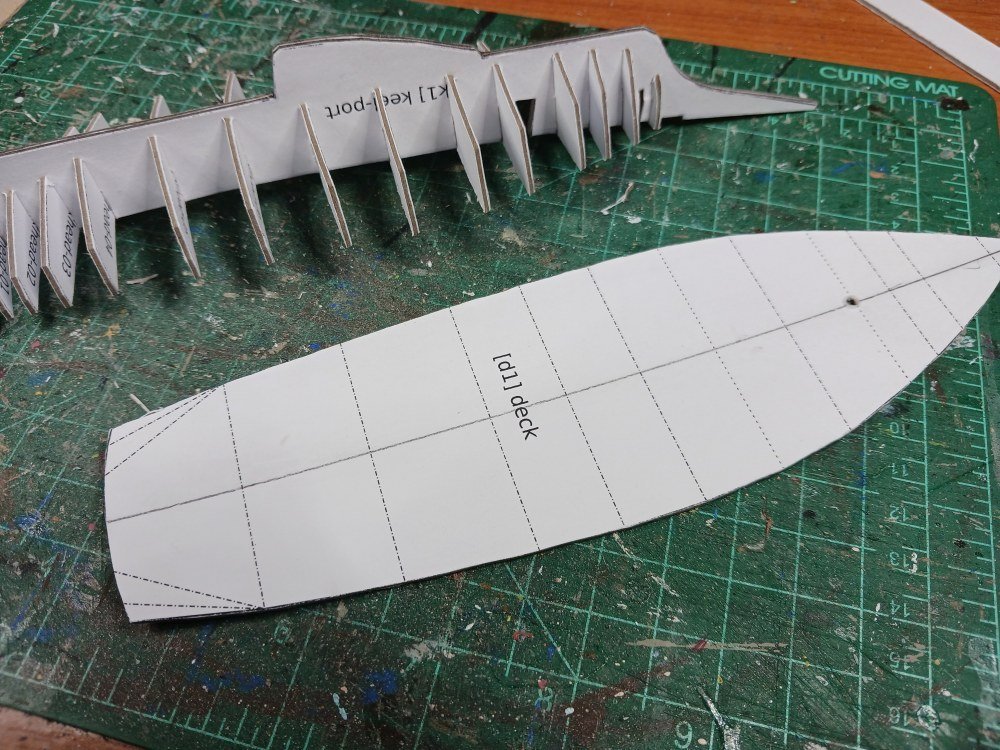
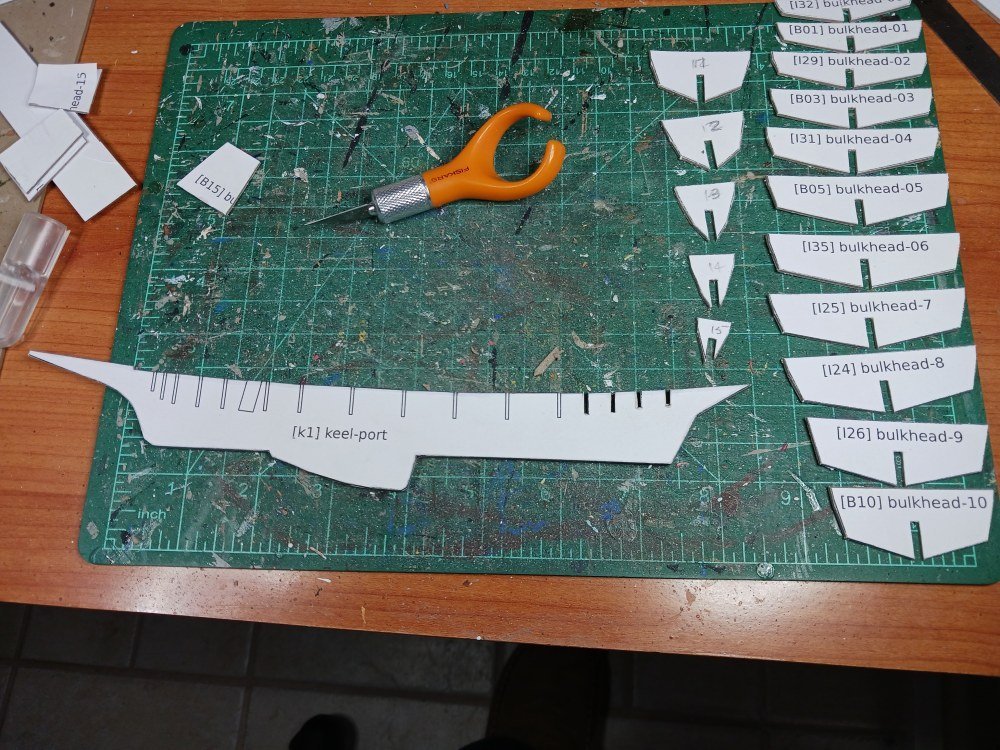
I've been a bit frustrated with the scratch build skipjack so I decided to start one of the recently purchased Seahorse kits. I recently reviewed the kit here. What a pleasure. I've not progressed far--only through the first drawing--but this is so much more relaxing than home-grown! I'm only aware of one gaff on my part: I glued bulkhead 13 facing forward like all the rest. But 13 has some guide lines on it that should have been facing aft. Oh, well. I did notice one typographical error in the instructions. Part #16 is erroneously identified as 16a in the line drawing even though it is correctly identified in the shaded drawing right below. Not a big deal. I have to admit I'm not sure of the purpose of part 16. As far as I can tell they will be entirely covered. Maybe it will become clear later on. And maybe it's better that they are hidden. In the enlarged photo below I noticed that I did not get them symmetrical. (Might have helped if bulkhead 13 faced aft!) I actually didn't notice it until resizing the picture for this post. I only see out of my left eye, I wear glasses as well as a magnifying visor. Consequently, I have found that two layers of lenses and lack of binocular vision and depth perception often lead me to believe that things are straight and even when they actually are not. Must be why I'm drawn to hobbies that require visual acuity! I also think part #43/44 (the transom) is better attached in a later step. At this point the rake of the transom is unclear. Later on a couple of knees are installed which should hold the transom at the correct angle. I'll probably start attaching the first layer of the hull tomorrow. Looks kind of tricky so we'll see if I can keep my Zen going!
- 63 replies
-
- 4
-
-
- card
- Revenue Cutter
- (and 2 more)
-
For plastics I don't think I'd ever go back since I've started using Plastruct Plastic Weld. It's applied with a brush on both parts which slightly melts the plastic. The the parts are then pressed together. You've got a couple seconds to make adjustments but not many.
-
Seems like it's been more that a week since I worked on this. There have been challenges. After... I don't know how many years--15?... my color inkjet printer finally gave up the ghost. That brought me to a halt but it gave me an excuse to get a color laser printer as a replacement. (I think printers are the bane of card modelers!) I have to admit I'm not sure this printer is the best for what I want to use it for. It really produces curled prints on card stock. The paper feed is finicky, too. Oh, well. It's what I've got now. Meanwhile I've been trying to recover some small competency with Inkscape and SVG. When I was finally able to print out the next round of parts I discovered that somehow my original printouts were only 96% of what was expected. It's only a test-build I keep telling myself. But I have to keep reminding myself to reduce anything as I print out since I don't want to start over from the beginning. Even with the challenges I do believe the workflow will work. Wings3d (to model) -> Blender (to unfold) -> Inkscape (to arrange and color) -> print and build. The fit is not quite what I want but I think that's more on me messing things up as I learn every step of the process as I go.
-
No problem. I particularly like the spear wielding skeleton as the figurehead of the Revenge. Reminds me of the Reavers from 'Firefly'!
-
Looking for card model of a Thames River Barge
Jsk replied to John Ratzenberger's topic in Card and Paper Models
Very late to this post but would the following be of any use? https://www.kallboys.de/mondorfer-bastelboegen?start=60 . I'm not familiar with river barges but the Aalschokker Maria Theresia looks similar to my unpracticed eye. -
Thanks, everyone. I've started collecting bits and pieces of card from the kitchen recycling bin but I'm always tempted to try and find the 'perfect' cardboard. Some good suggestions here. The admiral just rolls her eyes! Especially when I remind her that it's still cheaper than golf!
-
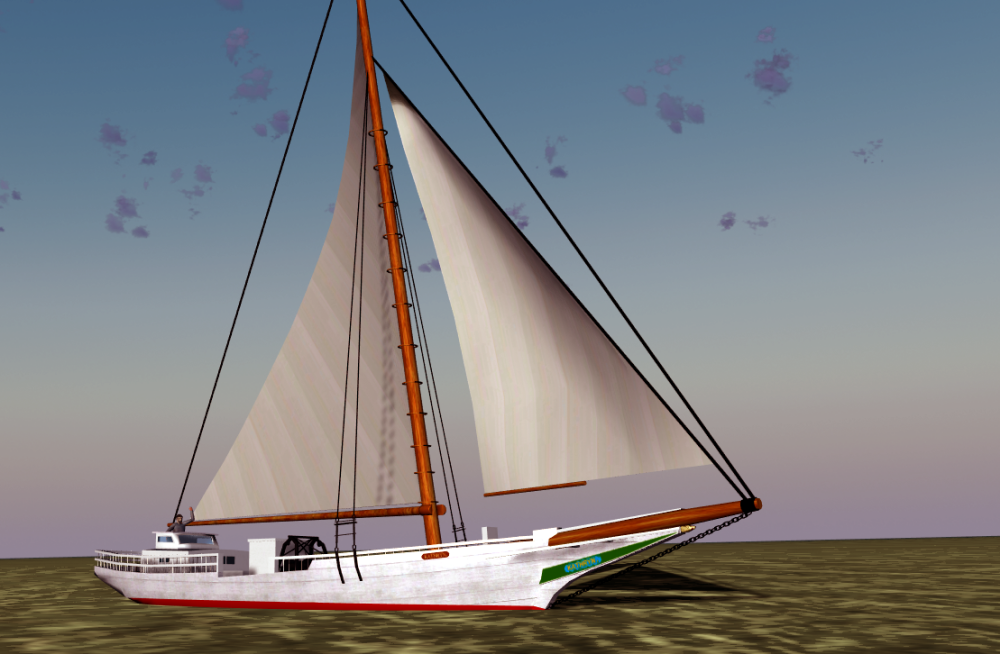
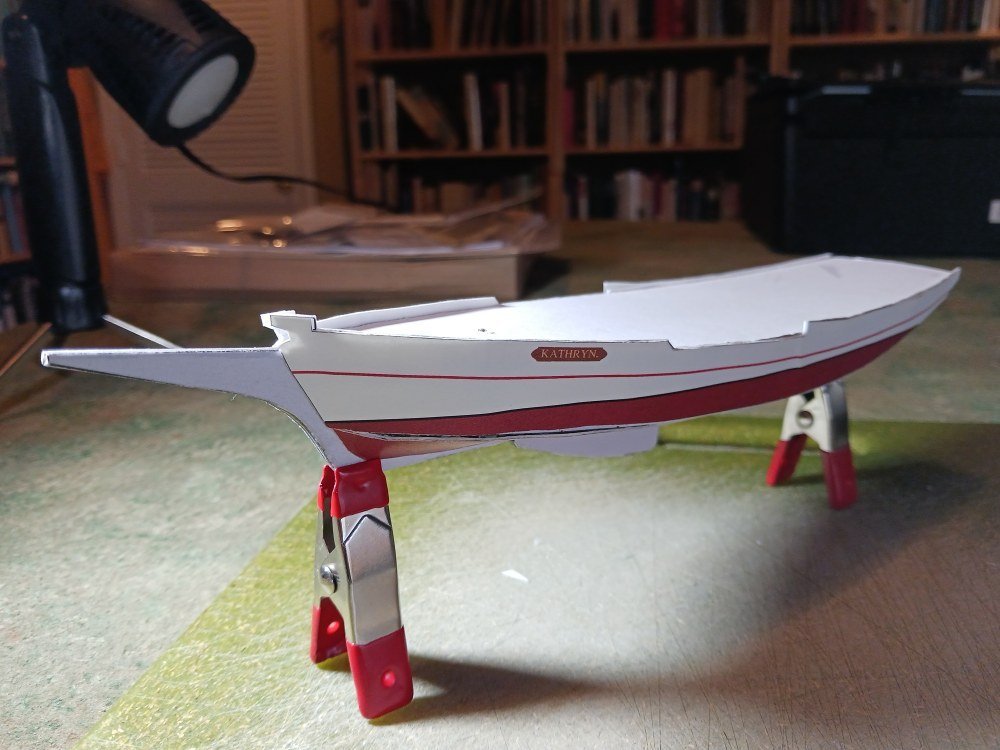
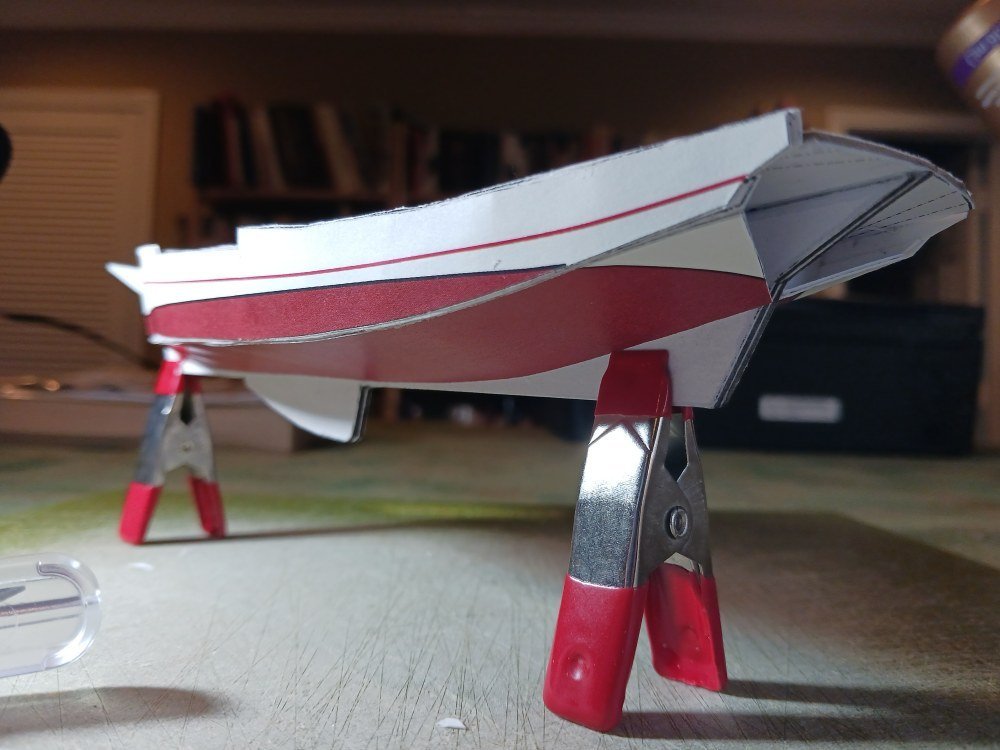
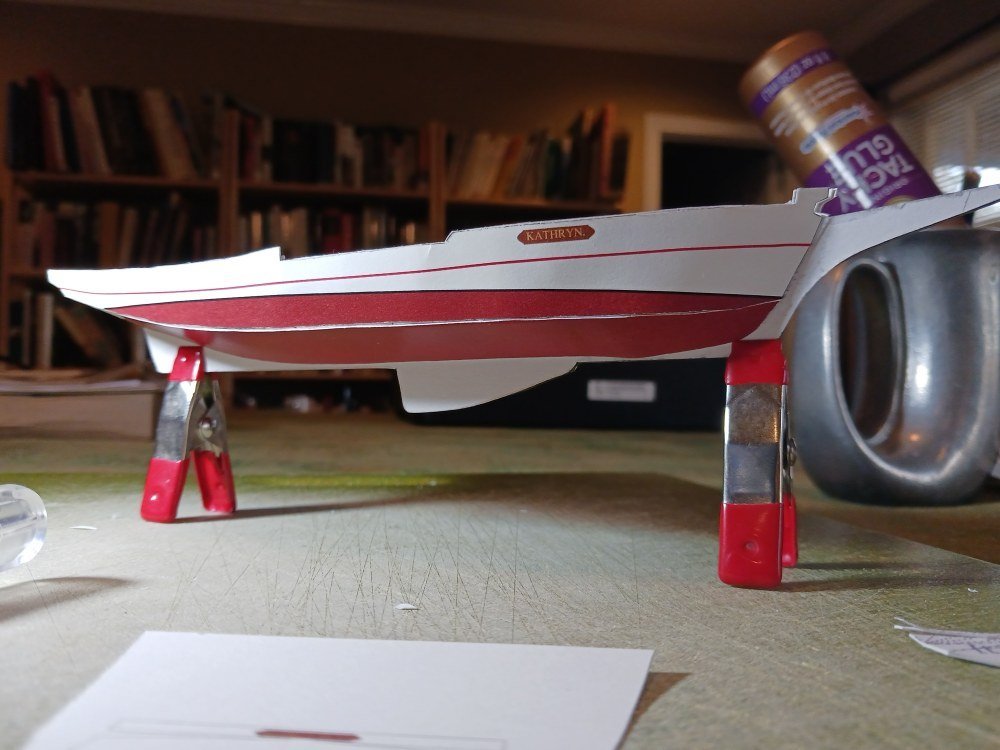
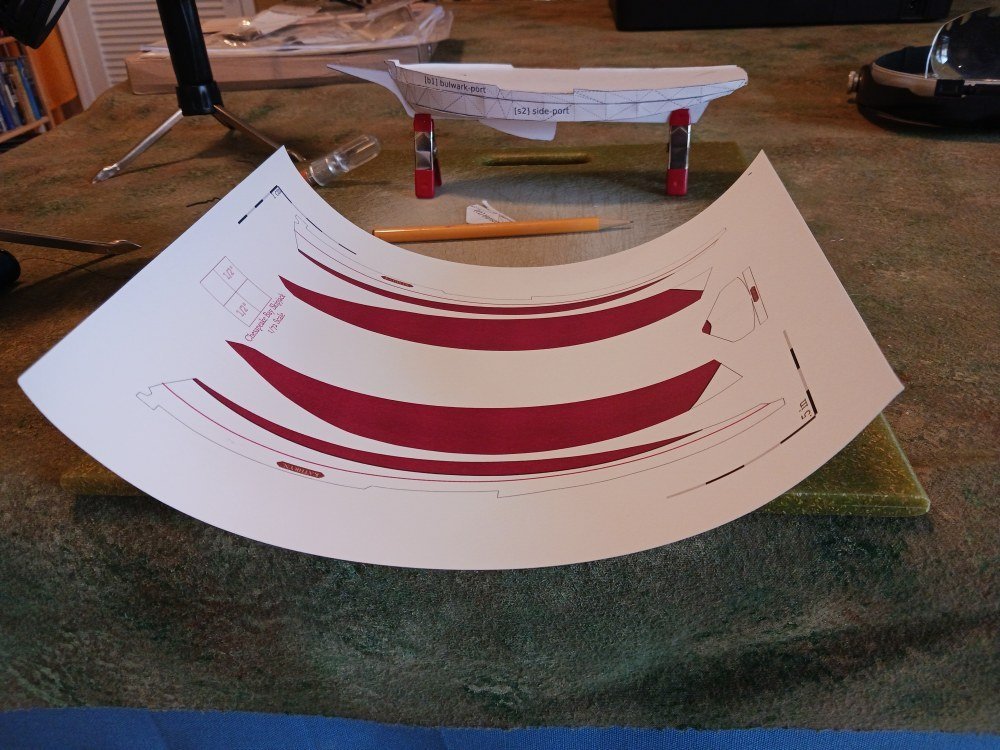
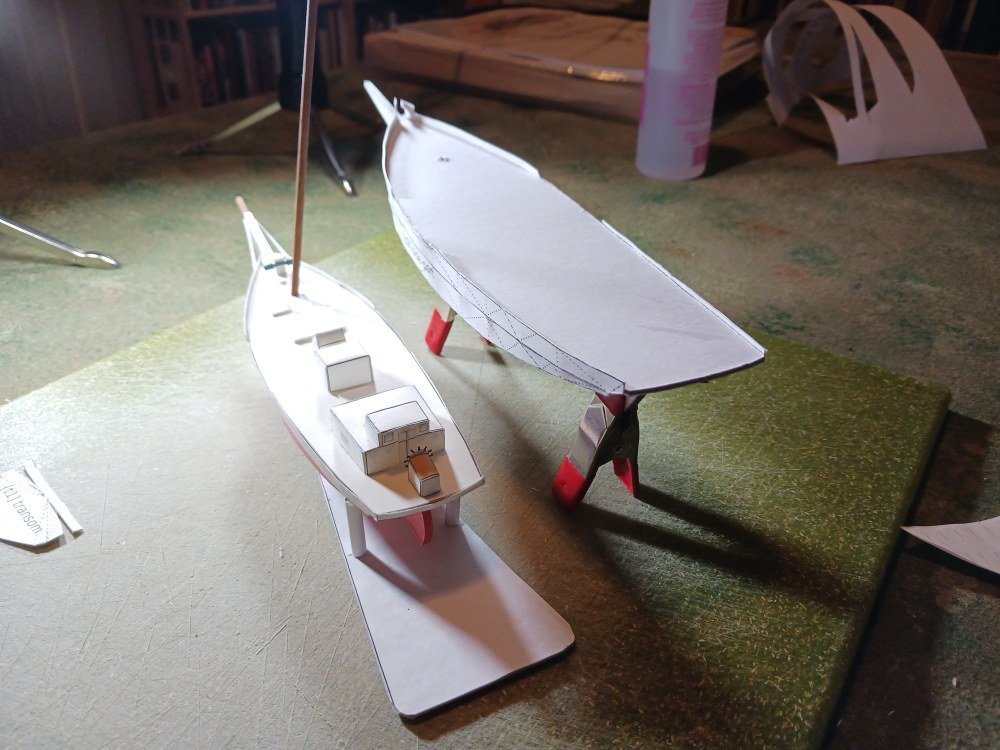
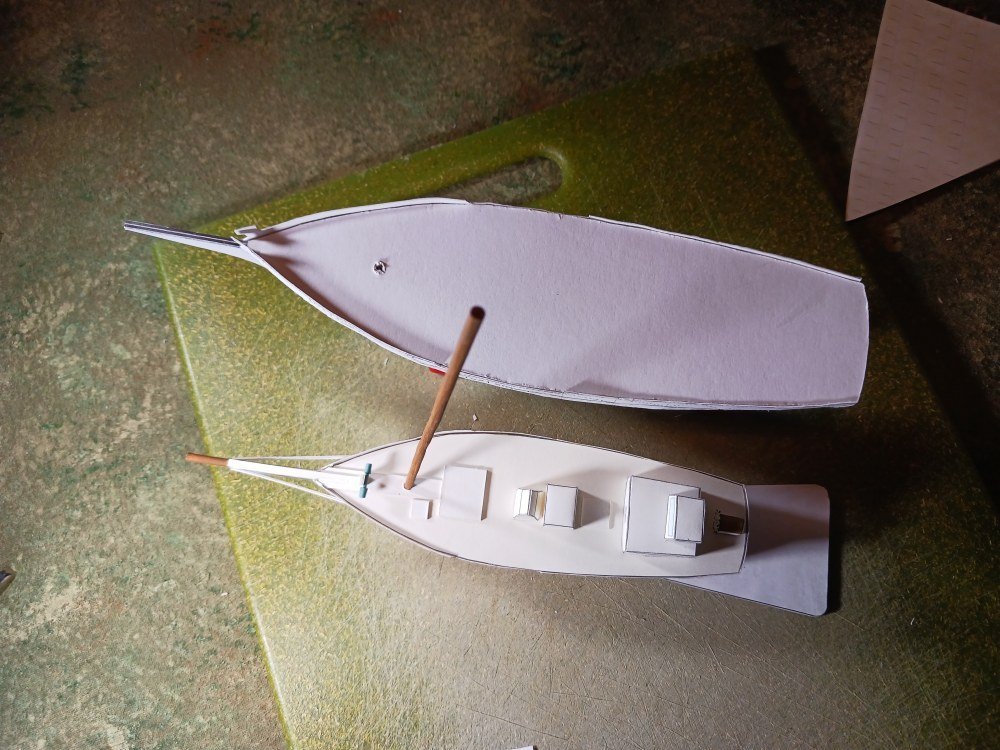
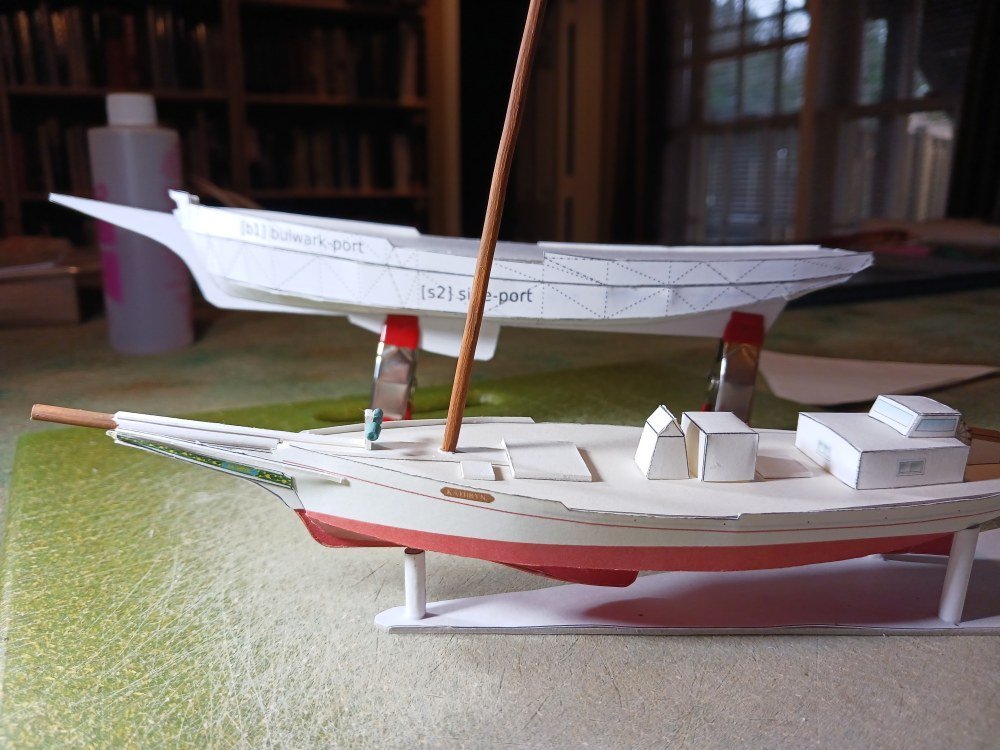
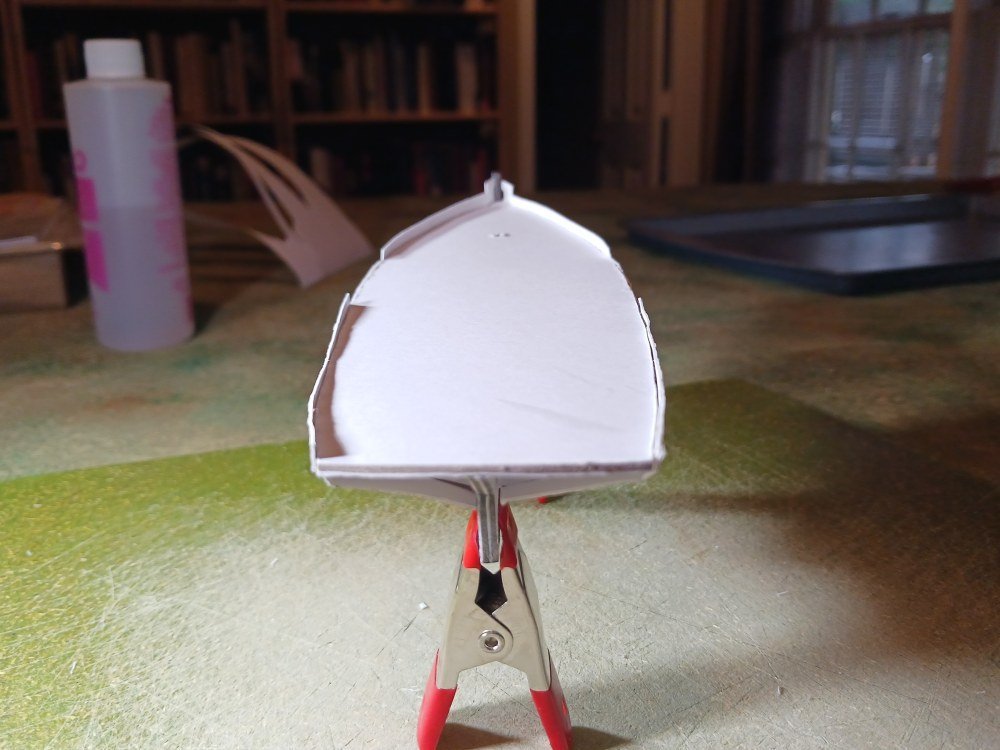
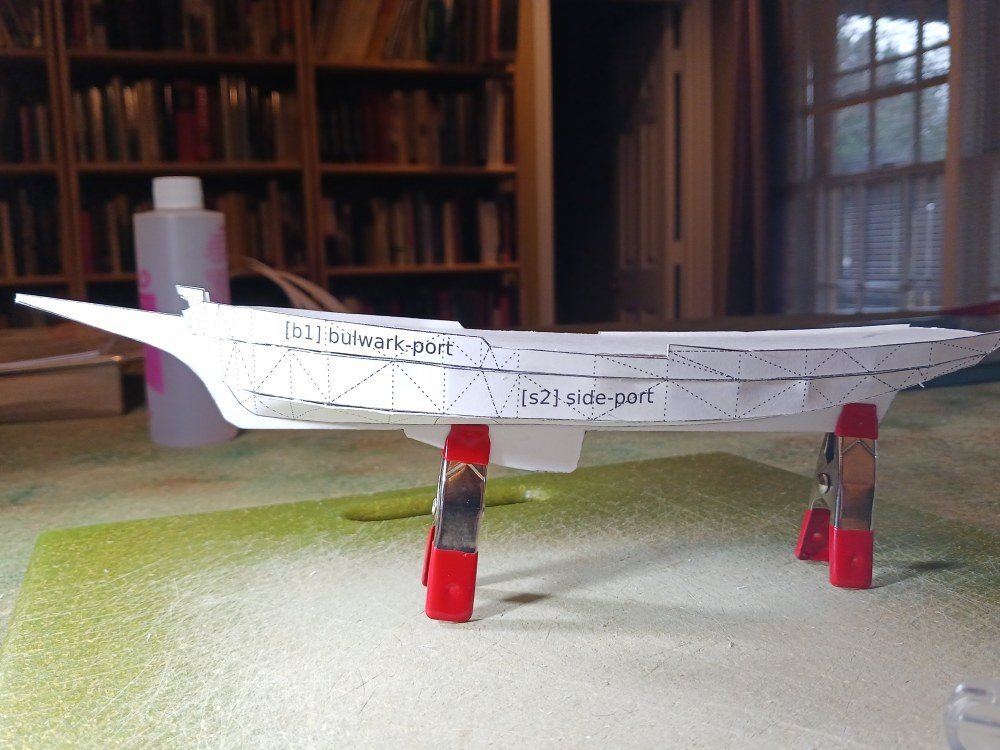
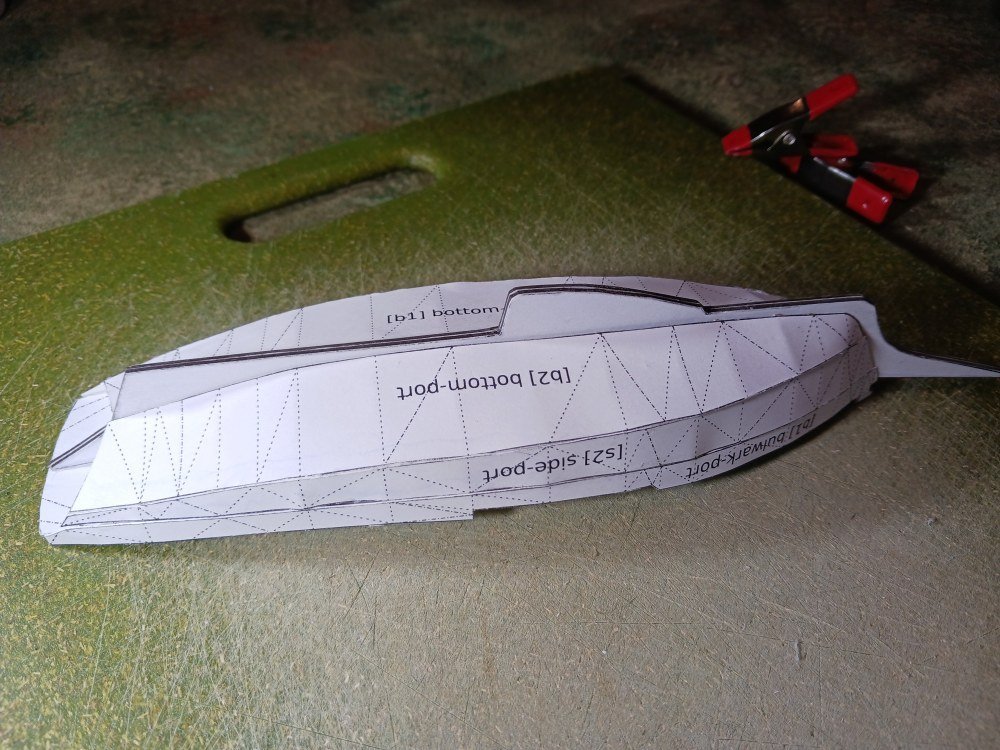
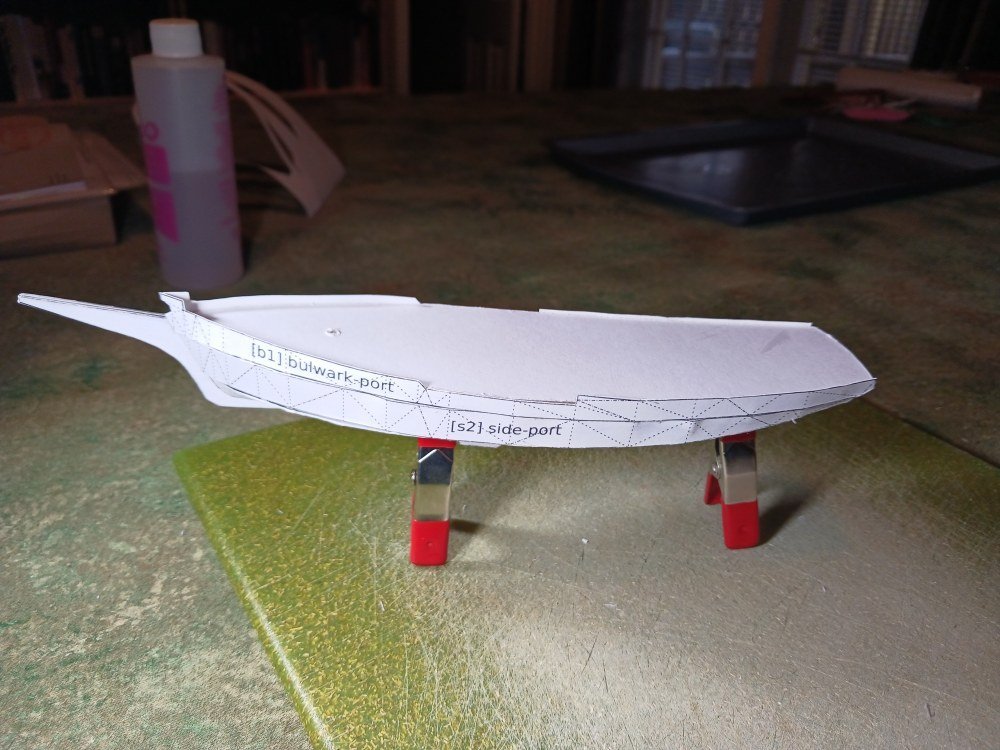
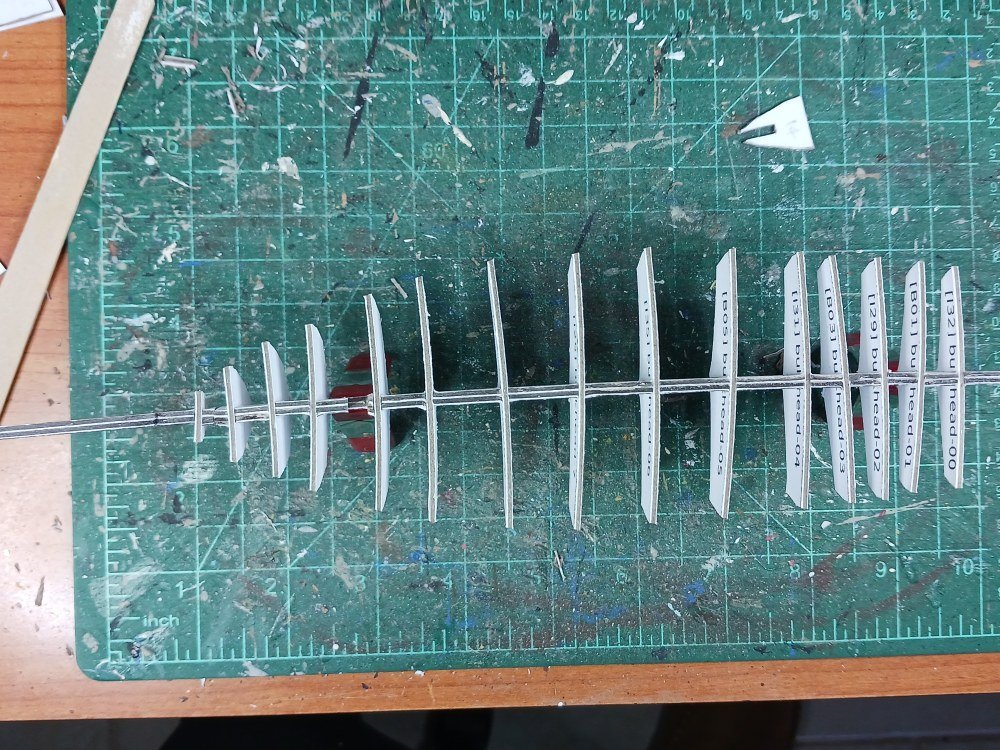
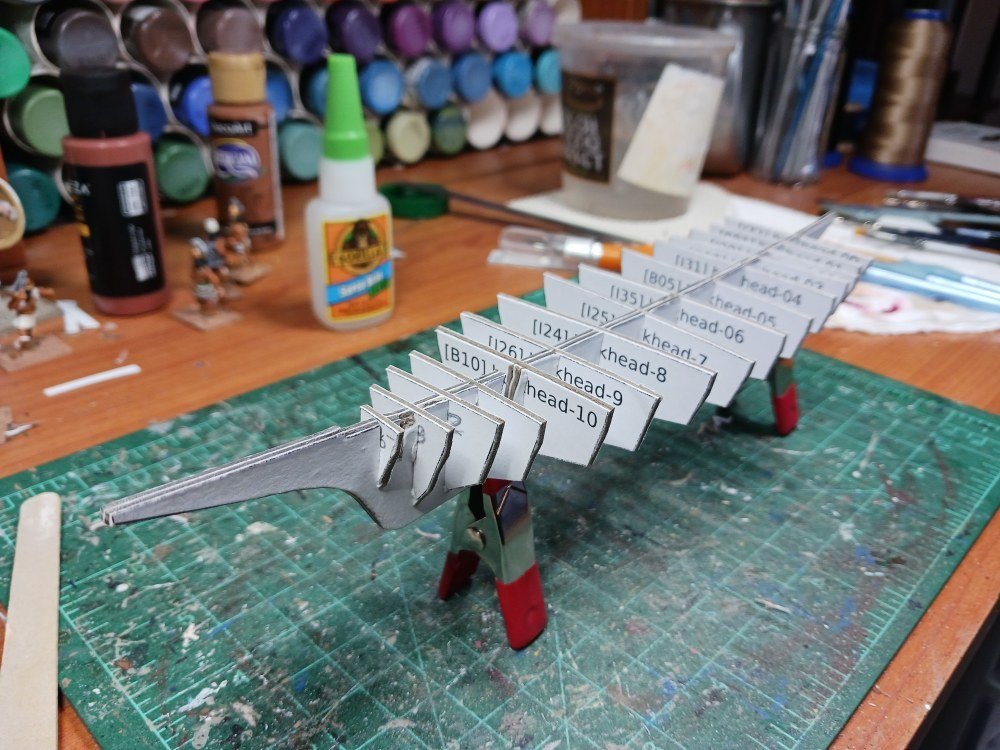
First, I’d like to wish you all a happy New Year. May Dame Fortune grant you peace, contentedness and many, many hours of happy modeling time! Now, a little back story: Kathryn and I have quite a lengthy relationship. Well, frankly I’ve been infatuated with her for years but she doesn’t know I exist. (But the story of my adolescence doesn't need to be retold here!) I started designing a card model of the skipjack Kathryn in 2016 based on the HAER papers available from the US Library of Congress (https://loc.gov/pictures/item/md1454/). I refer you to an old build log I did at PaperModelers.com: https://www.papermodelers.com/forum/design-threads/37710-1-100-scale-chesapeake-skipjack.html. Life happened, other hobbies took priority, and I drifted away from model building. Meanwhile, the unfinished Kathryn sat ignored on the mantel in my ‘man cave’. But I didn’t completely forget about my old flame. One of the competing hobbies is the open source flight simulator ‘Flight Gear’. Being a contrarian, I wanted to use it to simulate sail boats. So I enhanced the basic virtual model of Kathryn, ported her into Flight Gear and started (with the help of the Flight Gear forum members) to tinker with the configuration files in order to ‘sail’ the virtual seas. I called it ‘Float Gear’. I refer you to the Flight Gear forum if you’re interested in that unfinished journey: https://forum.flightgear.org/viewtopic.php?f=4&t=40606 Now that the worm has turned yet again and my interest in ship models has resurfaced I’d like to revisit the old girl yet again. One thing I want to accomplish is a larger scale. The original card model was at 1/100 scale—common enough for card models but a bit small for my eyesight these days. I wanted to go to 1/72 scale to match the Viking ship I recently finished. I also wanted to try out a different electronic workflow. I still enjoy using Wings3d (www.wings3d.com) to create virtual models and the original model is still valid. However, back in ’16 I wrote my own script to extract UV coordinates from the model and output them in SVG format in order to create the patterns for card modeling. UV mapping was (and remains) a tedious process in Wings3d. And, UV coordinates don’t necessarily reflect the true shape of the model’s surfaces. Let’s just say it was more work than it was worth. Making revisions was a nightmare. However, over the intervening 7 years other tools have become available. I recently came across a plug-in for Blender which ‘unrolls’ a 3d model. I want to explore that option and see if it really is usable for card modeling or if it is still too limited. So far, the signs are good. In future posts I intend to document how I’ve used Wings3d, Blender and Inkscape to design a card model of Kathryn. While I’m not entirely certain this experiment is going to work, I’m fairly convinced that—at least for a fairly simple model—the real challenge is going to be my rather limited modeling experience. But for now I’ve accomplished enough with a test build to show some progress. The pictures pick up after I’ve cut the longitudinal spine and various bulkheads out of 1mm chipboard. The keel/spine is then doubled to give a final thickness of 2mm. I have explored having these pieces laser cut by a third party but I finally decided I was putting the cart before the horse. I think I need to ensure the design is good before committing to that. After all, I want to make sure it's functional before going for efficiency and ease of construction. As mentioned elsewhere there was a fair amount of warping going on with the spine and the bulkheads. Nevertheless, I dry-fitted all the components in order to assess the situation. Puzzling this out it dawned on me that I had the locations of a number of the bulkheads and the spine marked on the deck piece. That was not intentional, it was just a by-product of the modeling/unrolling process. But I figured I could use those marks to ensure the straightness of the framework. Then I proceeded to cut out the various side pieces. Again, the dotted lines represent the triangles of the electronic model. But as I assembled the model I found that they provided reliable guides to aligning everything. Notice the bottle of isopropyl alcohol in the background. I had inadvertently skipped gluing the 'skin' to one of the bulwarks. This resulted in a bit of puckering since the side pieces do undergo a bit of twisting to make them fit. So... I had my first experience of using IPA to unglue things. Actually, it works pretty well. Poured a little IPA in my paint tray and used a cotton swab to apply it to the glue joints. After giving it a few moments to soak in I carefully started to separate the joins with a dental tool I keep in the hobby toolbox. I had to unglue four bulkheads to get to the puckered area. No harm done, though. The IPA did cause some of the printed ink to run slightly but it did not affect the paper at all. You can also notice that Kathryn suffers from 'hungry horse' syndrome. The smaller, 1/100 scale version didn't suffer like this. IIRC, the card I'm using for the skin is 67#. Maybe 90 or 110# would be better for this larger model. While the model in general is incredibly sturdy, the skin seems more flimsy than in the smaller model. I suppose this is due to the card having to span larger distances at 1/72 scale than it does at 1/100. You can really notice it along the sides of the hull from an end view. Here's a view of both the old 1/100 and the new 1/72 scale models for comparison. And finally a shot to compare sizes between the two models. I've not yet attached the transom and it appears that I've cut the deck about 1mm too long. But I think the next step is to lay on a second layer of skin to smooth out the starving nag look. I'm not sure if I need to apply some putty and a sanding stick to smooth out the inner skin or whether that would just be extra work with no significant benefit. My intent is to make the outer layer slightly longer than the first and to arrange them so that the seams between the top and middle pieces are staggered (probably at the waterline rather than higher up as they are in the first skin). The seam between the middle and bottom will of course still be located at the chine. A second skinning will also allow me to finish up the graphics. After that I'll deal with the transom. Well, that's how things sit for now.


-
What do experienced card models use for scratch building? I started a quick proof of concept build but didn't have any materials on hand. Perusing a popular buy-anything-you-want-and-have-it-delivered-almost-before-you've-hit-the-buy-button site I ordered some 1/16 inch thick mat board thinking that is should be fairly good for card modeling. It arrived with a built in warp and I almost sent it back. Probably should have. It wasn't even accurate in its thickness. And I've discovered that it de-laminates in a soft breeze. Once you've cut though the outer surface the layers inside aren't much more cohesive than dryer lint. But the problem when ordering things on-line is that you simply can't trust the descriptions or even the reviews. I decided to just get on with the build. I know I'm going to regret it but this is just a proof of concept. At least... that's what I keep telling myself. So, in order to turn lemons into lemonade: What materials have you used that have worked well? What card stocks or other materials have been a joy to work with? Do you have favorite sources? TIA Not bad from a distance: But, oh, so curvaceous:
-
Laser cutting services?
Jsk replied to Jsk's topic in CAD and 3D Modelling/Drafting Plans with Software
So, @Kevin-the-lubber, what type of specs do you need in a dxf file? I've currently got my drawings as svg in Inkscape which has two dxf export options: AutoCad R.12 and AutoCad R.14. I'm assuming it depends more on the software used to program the cutter and what it can import to create the G-code. I've also read about assigning the cut in black but any etching in red. Is that a thing? Since I've got 15 similar bulkheads I think etching a part number onto them is important to avoid confusion. If I go this route I'd like to make it as easy as possible and less time consuming for the laser operator. As for material right now I'm thinking chipboard or something similar... 1.0 or preferably 1.5 mm thick. @clarkt reading the services provided by the Etsy laser-cutting vendors most of them seem to decline doing any cutting of metal. Looks like they'll etch but not cut. I'm thinking you'd have to go to a more industrial vendor. Photo-etch seems more practical. Seems like hobbyist photo-etch is fairly common. -
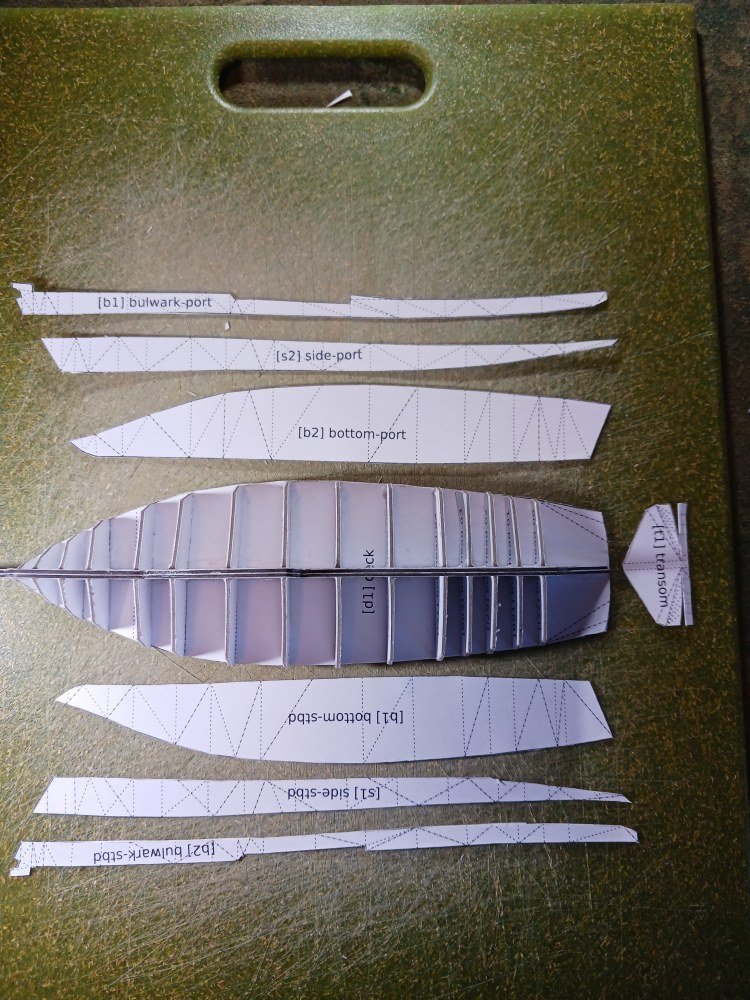
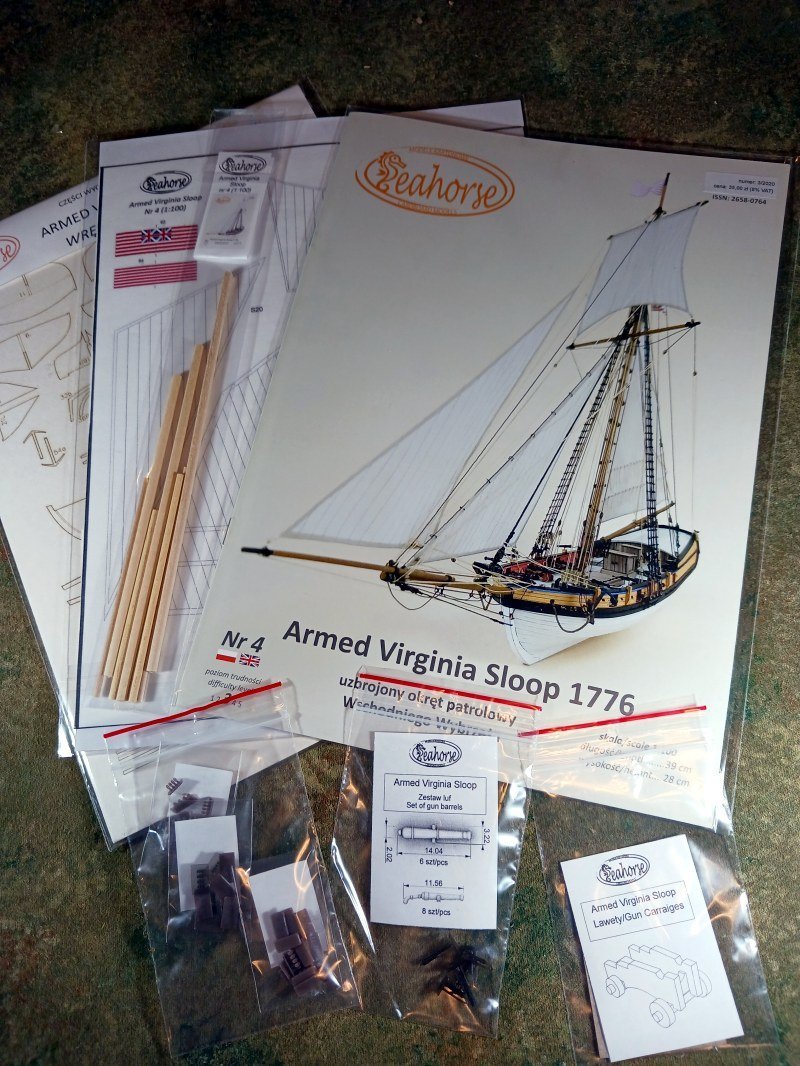
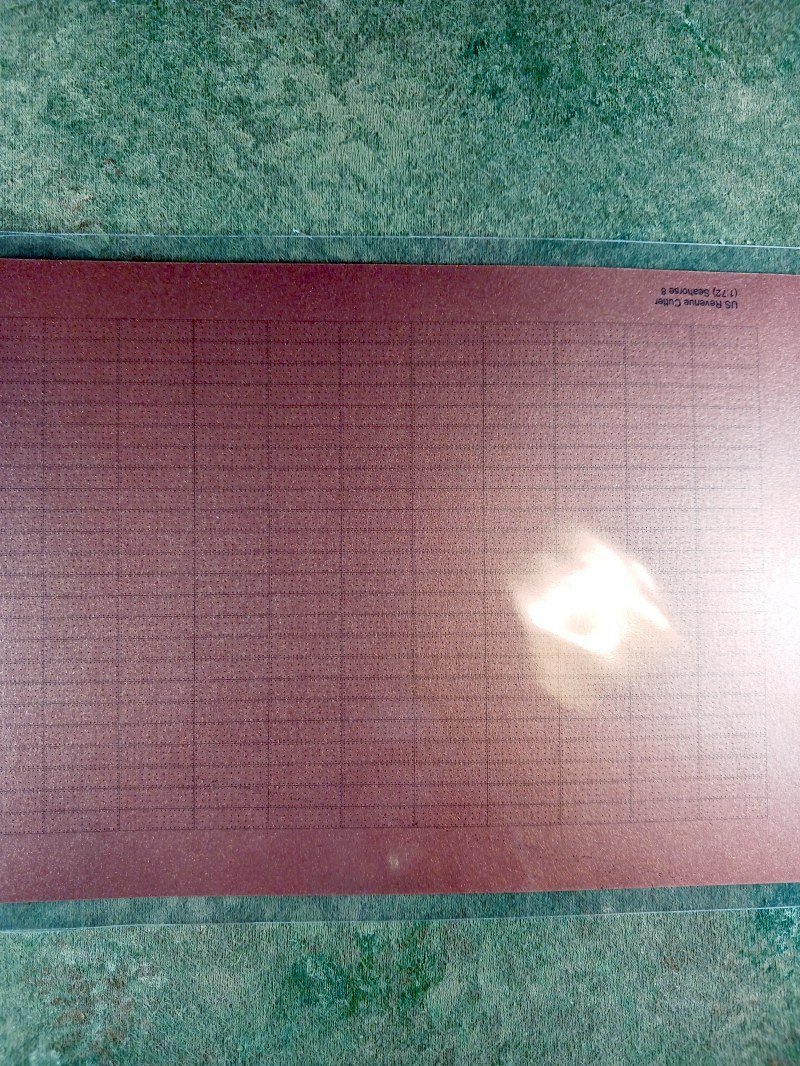
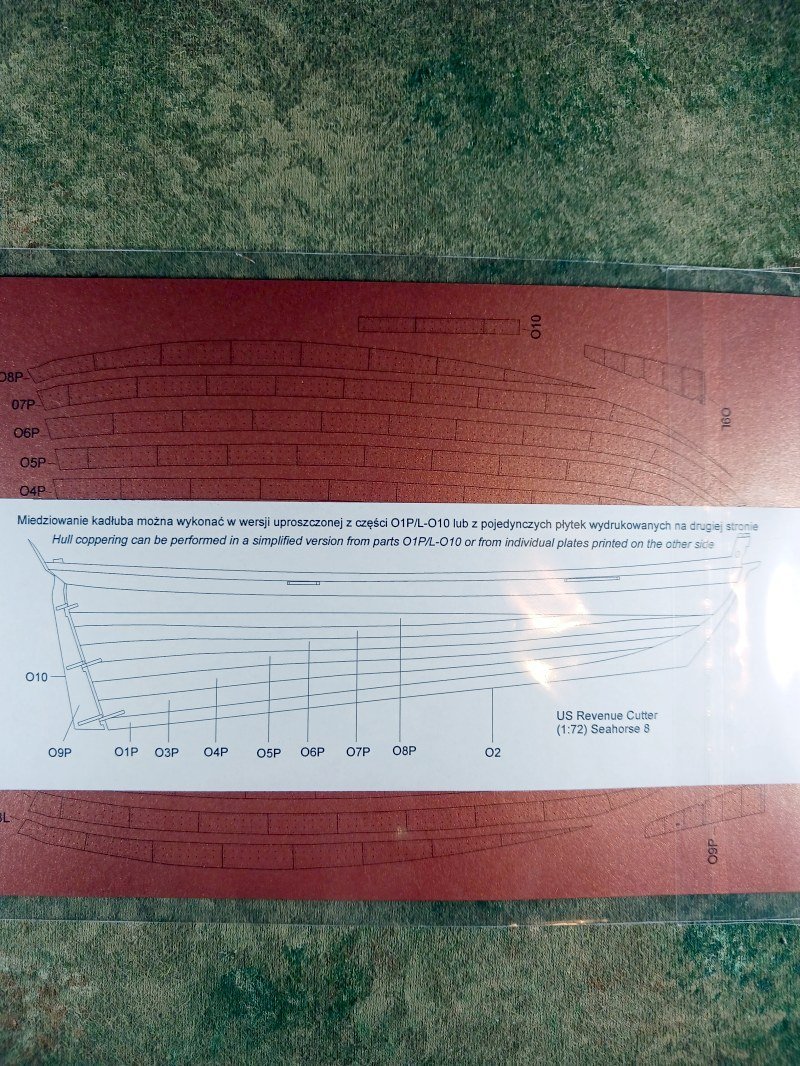
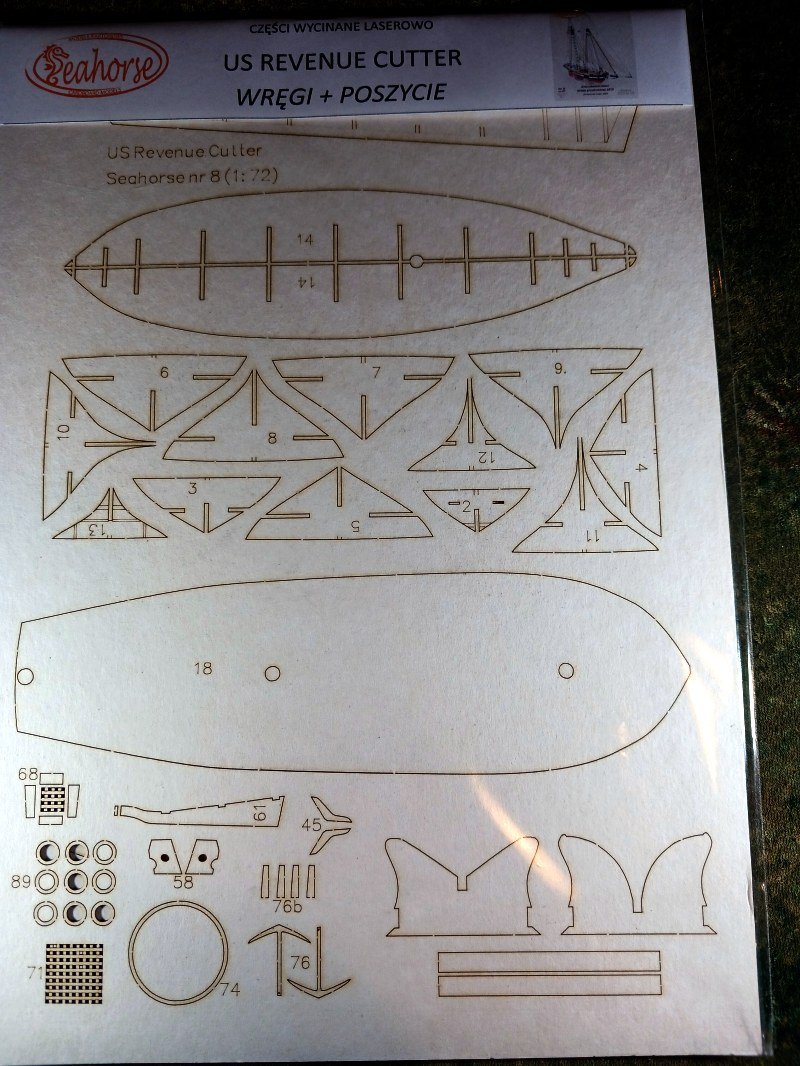
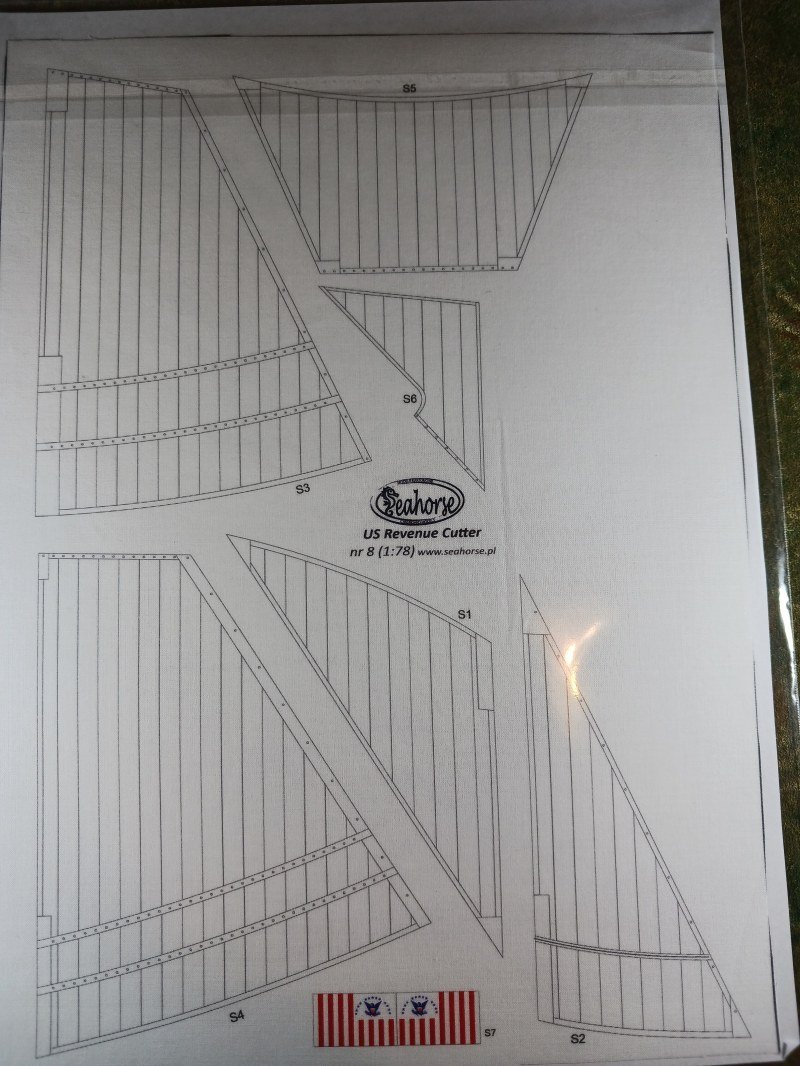
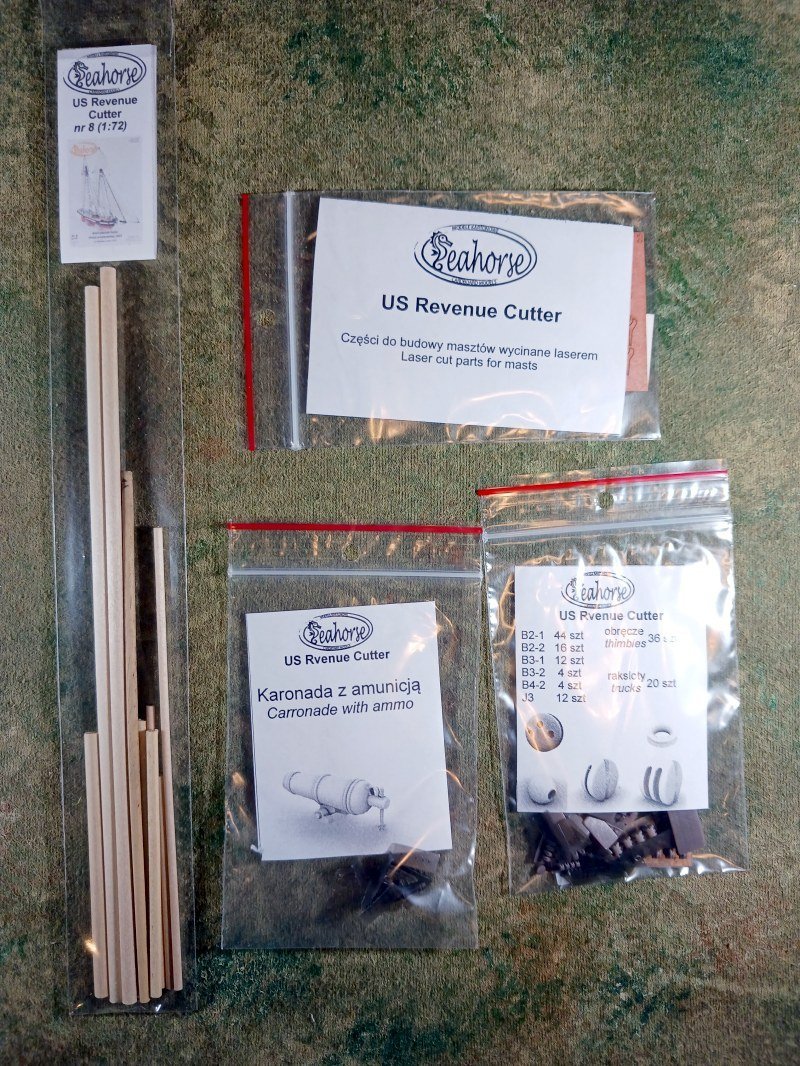
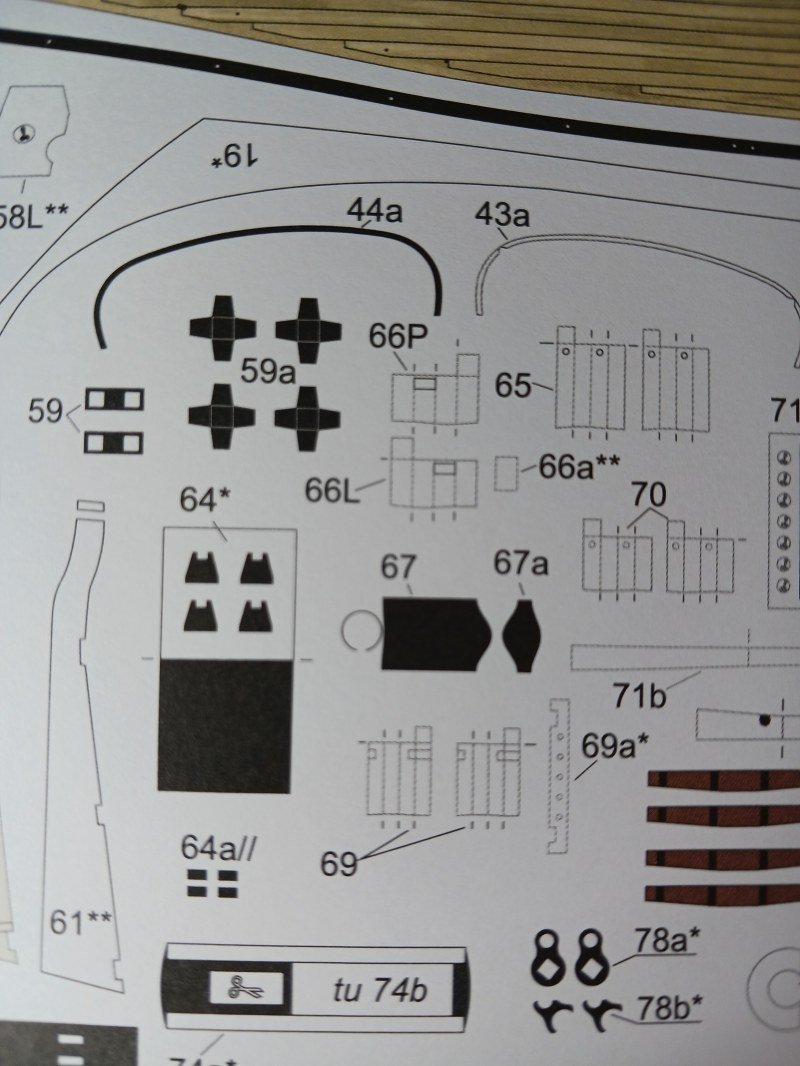
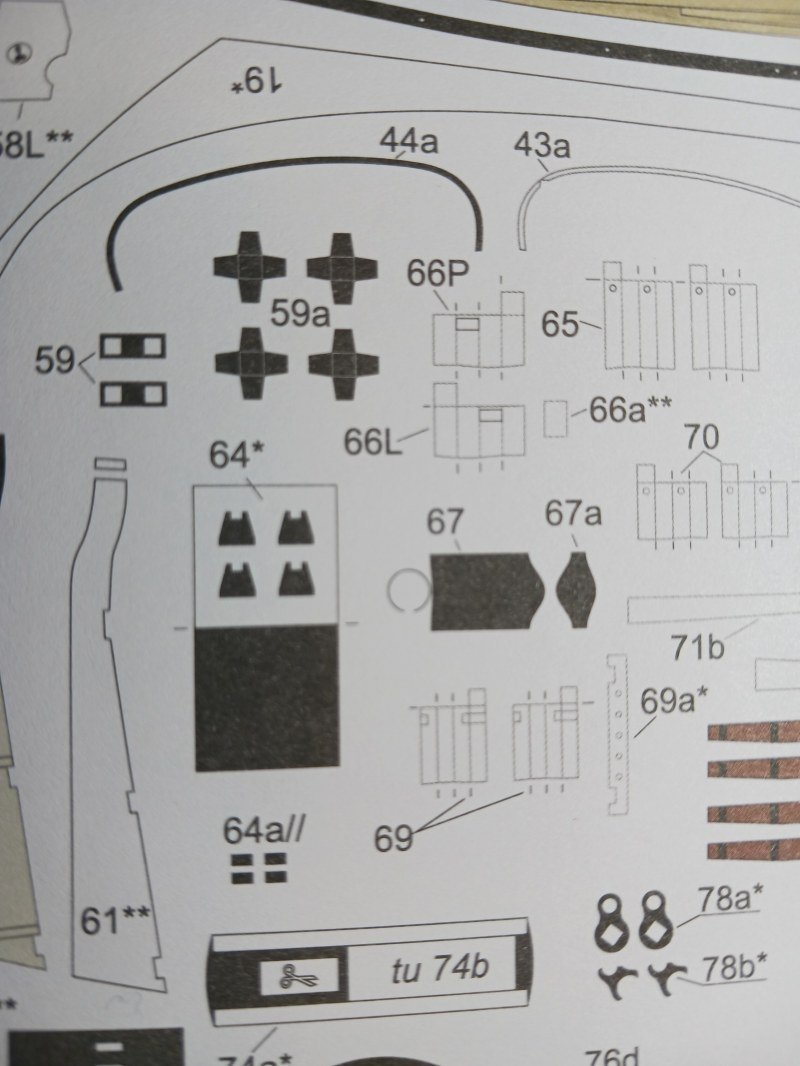
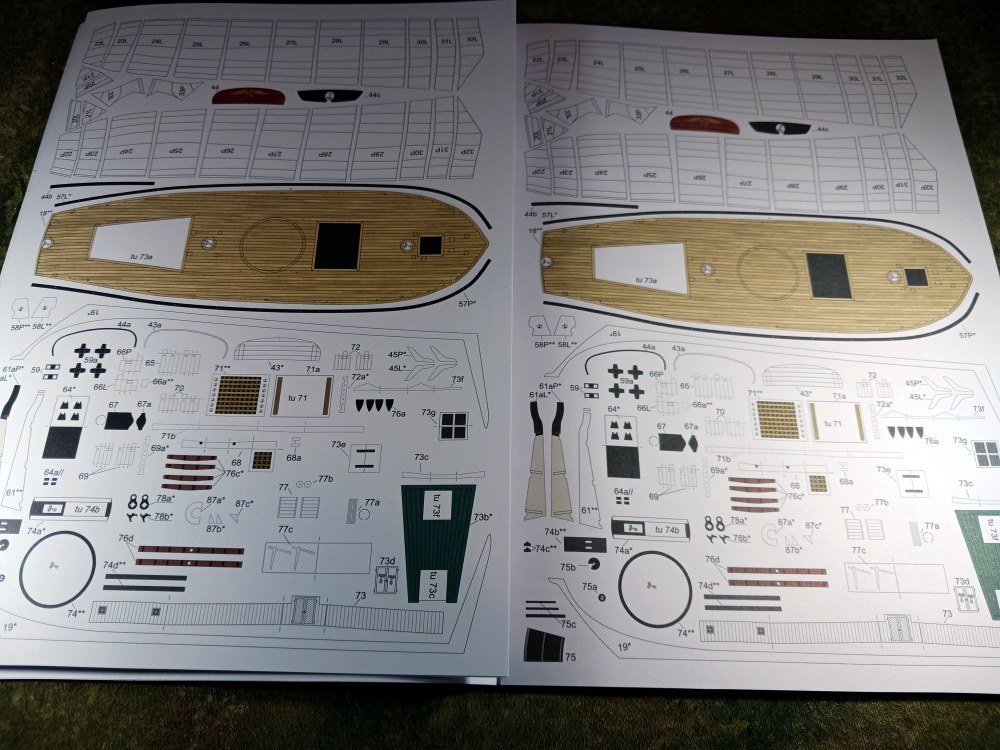
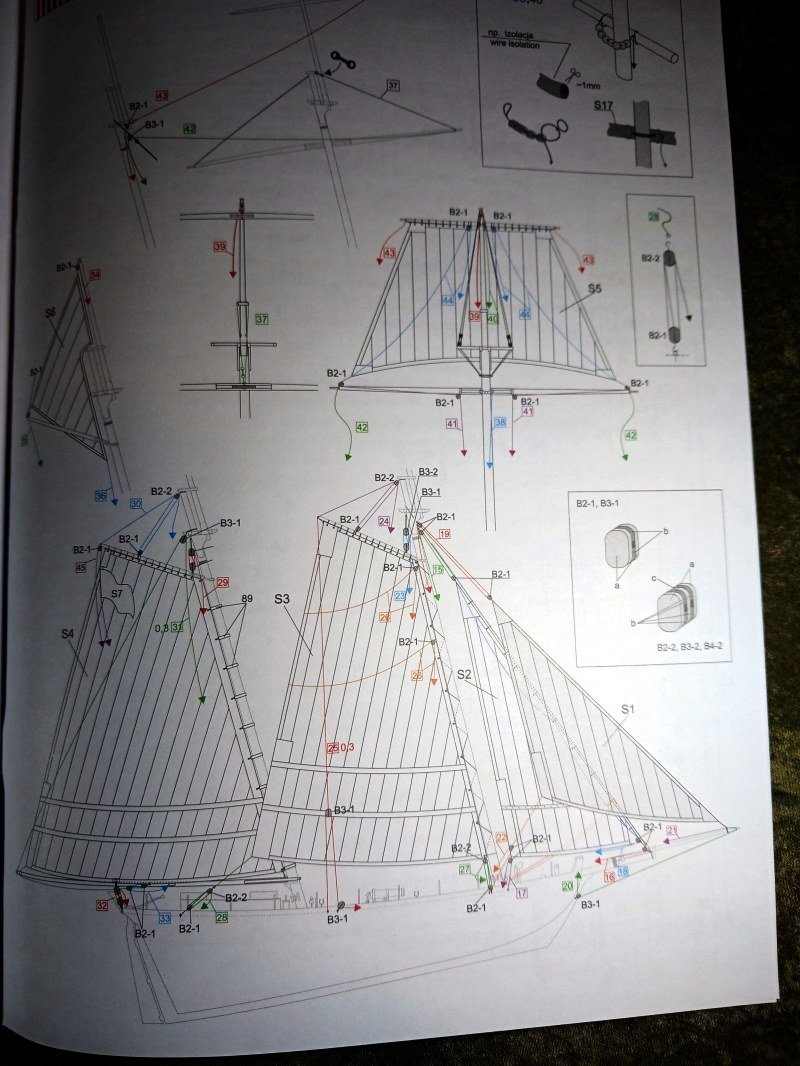
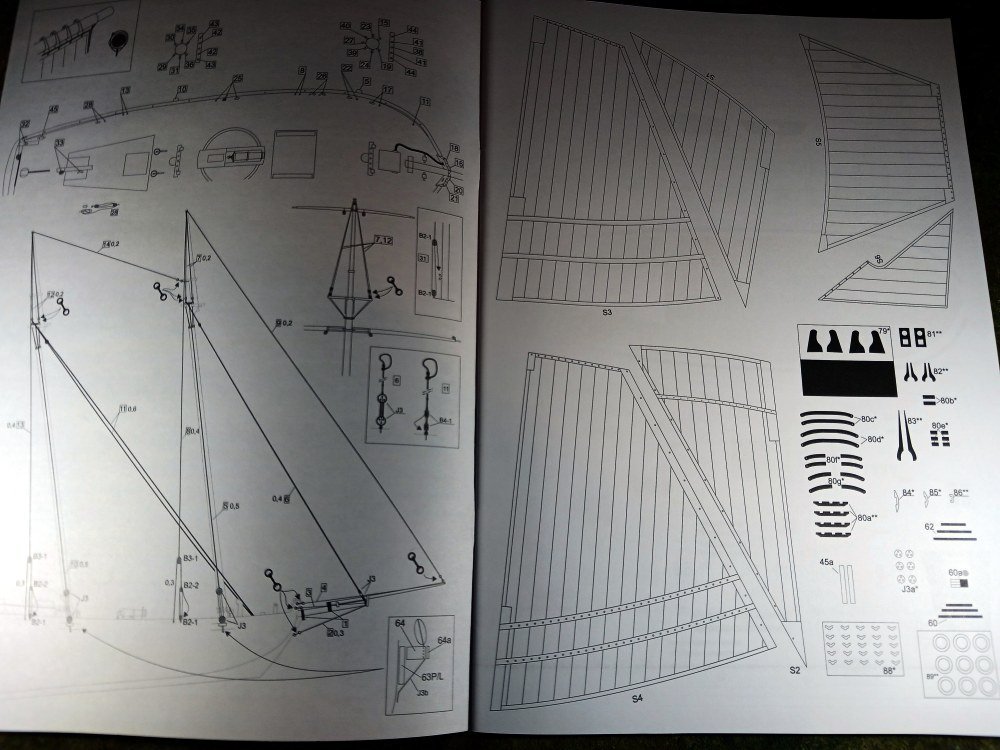
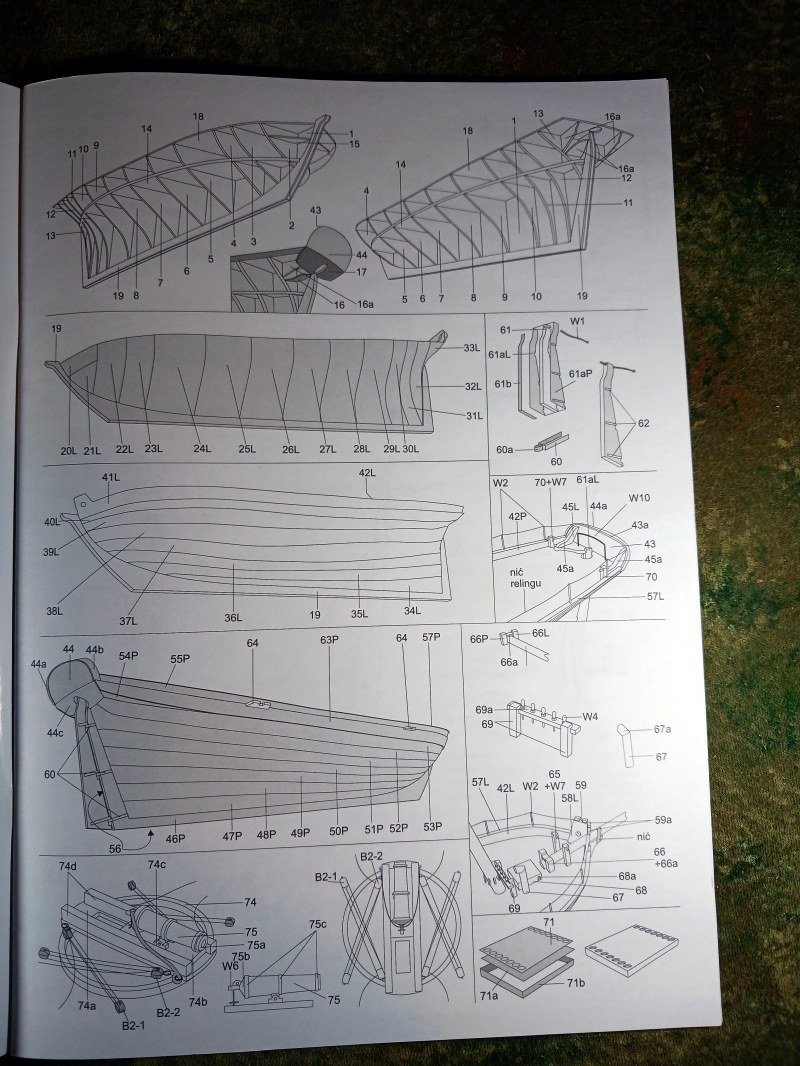
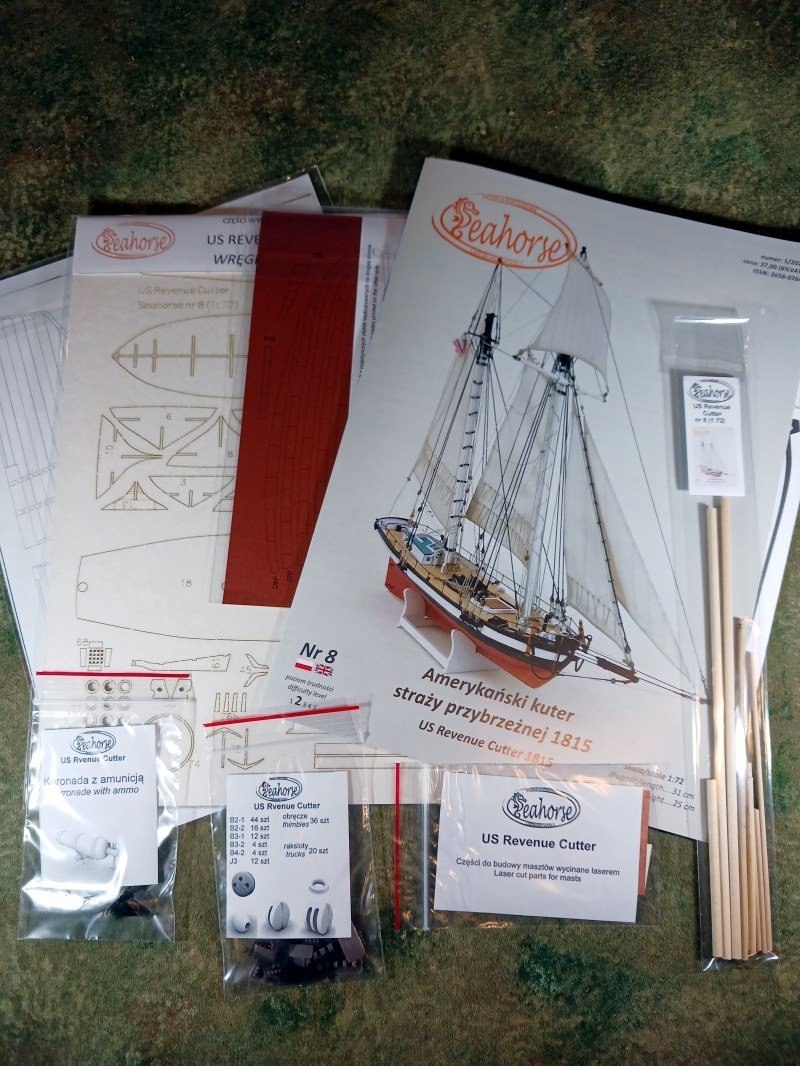
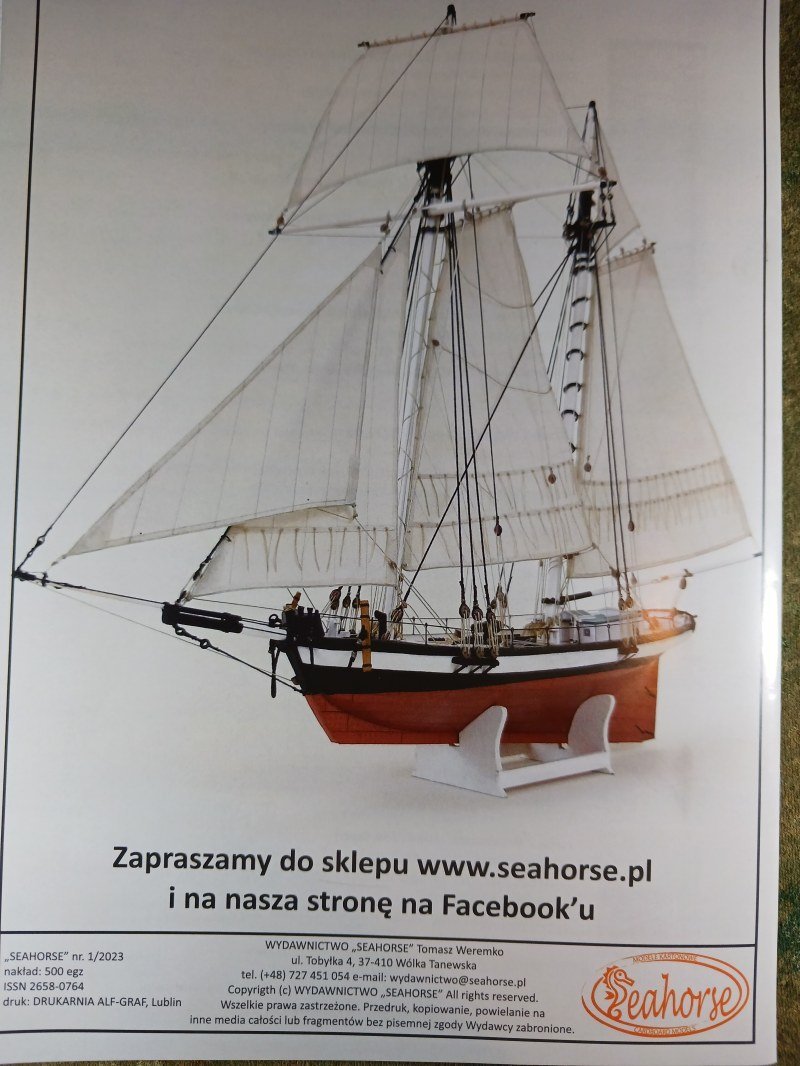
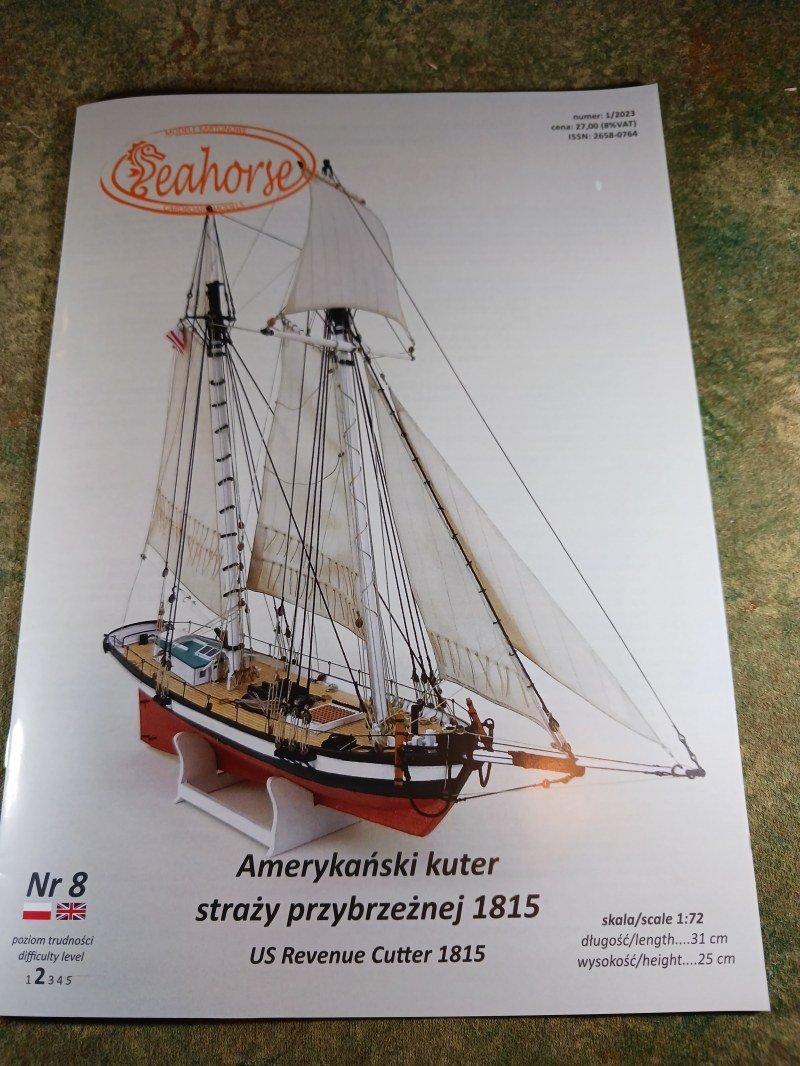
I once owned a rescue dog who needed a lot of behavioral work. So after some one-on-one sessions with a specialist we eventually graduated to attending obedience classes with others. I can’t say that we ever overcame all the issues (and I’m not sure who was training whom!) but I certainly learned the value of positive reinforcement. Consequently, since I have a tendency to be easily distracted and leave unfinished projects laying around, I wanted to reward myself for completing my first wooden ship model. While I enjoyed the wood model, my situation is perhaps not the best for them. Simply put, sanding wood makes too much dust for me to do in our living spaces and I really don’t have an interior space to do it. With the arrival of Winter sanding outside isn’t much of an option. So I’m putting off the next wood model until Spring and the return of good weather. So returning to my interest in card models I read up on the models produced by Tomasz Weremko, aka, Seahorse. Card models are certainly more apartment friendly than wood models and they are much more budget friendly. Level of detail, of course, is entirely in the hands of the builder and designer. While I’ve tinkered with designing and building my own card models, I’ve never actually built a commercially available kit. I still consider myself a novice builder and while I love the look of fully rigged ships I hesitate to commit to building one. I wanted something small, preferably in 1/72 scale to match my last model, and without too much rigging. I first decided that Searhorse’s Armed Virginia Sloop would fit the bill. However, its 1/100 scale means that some of the details are going to be quite challenging for my hand-eye coordination. I confirmed that by reading Clare Hess’ build log. (Mr. Hess’ log can be found here: https://shipmodeler.wordpress.com/2022/07/29/building-the-armed-virginia-sloop-paper-model-part-1/) But Seahorse also offers a US Revenue Cutter in 1/72 scale. In addition, according to Mr. Weremko’s complexity scale the cutter ranks as a ‘2’ as opposed to the sloop’s level of ‘3’. It ticks all the boxes! Did I mention the budget friendlyness of card models? I ordered both as full kits complete with laser cut parts, sails, dowels and (almost) all the necessary bits and bobs provided. Both kits and shipping from Poland came in at $72.00 USD. I ordered directly from the Seahorse web site on December 4th and eagerly awaited the arrival of the kits from Poland. After checking the tracking website daily (which stopped showing progress once the packages arrived in Los Angeles on the 9th) they arrived in my mailbox on December 16th. Mustering my dog-training discipline, I’ll save the sloop for later but I instantly opened the cutter package and reviewed the contents. As expected, there’s nothing disappointing about this kit. The basic model is presented as a saddle-stitched (e.g., stapled) booklet with full color photos of a finished model on front and rear covers. Ah, something to aspire to! There is, of course, a minimum of written text in both Polish and English comprising of a short history of the ship and ‘Basic Rules and Tools’ for construction. There are four pages of pictorial instructions, two pages of parts printed in black on white paper and two pages of parts printed in color on card. Now, in my set there was a second set of the card-printed parts inserted into the fold. I’m not sure if this was an oversight or if the second loose set was included because the printing of the first set (which is bound into the booklet) is a bit weak. Or, perhaps Seahorse can sense a ‘newbie’ and kindly included spares. Whatever the reason, intentional or not, it gives me a sense of security and a makes me think that Seahorse is a quality operation. (It’s also a bit unsettling that I joyfully anticipate looking at a centerfold of a model… ship!) There are a couple of hazards for neophytes. The first is that the required thickness of card for laminated parts is appended to the part number and is easily overlooked. The number is followed by ‘//’ or ‘*’ or ‘**’ to indicate 0.3, 0.5 or 1.0 mm card thickness. However, I think I’ve shielded myself from this potential error by purchasing the laser cut parts sheets. I’m also puzzled by this sentence in the instructions: “To avoid too many symbols, uncommon thickness of some parts should be matched to the width of the stripes covering its edges.” I can only assume that this refers to the keel which is considerably thicker than 1.0 mm and has a piece that runs along the bottom edge of the keel. That ‘edge’ piece appears to be about 4 mm wide so, therefore the keel should be laminated to that thickness. Now that I’ve typed that up it makes sense to me. I also see a couple parts with ‘W’ numbers which are not part of the printed sheets. I believe these need to be created from wire (which is mentioned in the ‘Basic Rules’). The templates for these parts are on the fourth page of instructions along with the mast and spar diagrams. The most numerous of these appear to be the rail stanchions surrounding the deck to prevent crew from falling overboard. My last observation is in regard to the copper sheathing below the waterline. It’s interesting that Seahorse has provided a simple solution and a detailed solution to the sheathing. On one side of the copper colored sheet the sheathing is designed as strips to cut and apply much like the hull planking. But if you flip the sheet over you find that it has been printed to represent the individual sheets of copper. So, depending up on your sense of fanaticism, er, level of detail, you have options. I like that. All said and done, I’m quite happy with my purchase. I’m not certain when I’ll get started on the cutter and the Virginia sloop is certainly farther down the line. (Maybe the sloop will be next Winter’s project.) At this point I’m still mustering my canine-induced self-discipline and working on resizing my skipjack design. But once I’ve hit the ‘proof-of-concept’ stage in that project it’s ‘game on!’ on the cutter. Pictures (or it didn't happen!):

-
Laser cutting services?
Jsk replied to Jsk's topic in CAD and 3D Modelling/Drafting Plans with Software
Hmm... yeah. Yowsa! Somehow I thought laser cutting would be less expensive than 3d printing. Doesn't seem to be the case. I see a couple Etsy vendors I might contact. Thanks for that suggestion. I don't really have a budget nor the space right now for my own equipment. It was mostly an idle thought as I rework my old skipjack card model design. But I could picture myself designing and selling laser cut models as a retirement activity in a few years. I enjoy the design work and if the equipment was robust enough to produce make-as-ordered kits it might help offset the expense. I'm sure making a profit is highly unlikely. Spending a couple thousand on the equipment isn't totally out of the question. Probably cheaper than golf as a hobby! -
Are there any laser cutting/die cutting services that cater to the hobbyist? Having built one laser cut wood model (and I'm awaiting some laser cut card models from Seahorse) I was wondering if there are any services that would laser from my own svg or dxf files for reasonable prices. Surely, there's someone out there in 'maker' world who does this? TIA
-
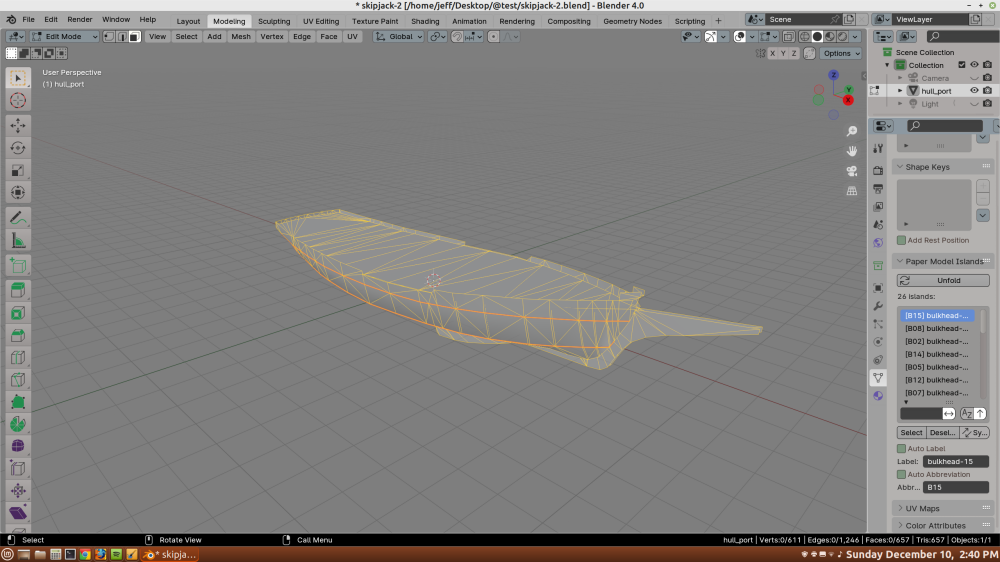
Well, it took 7 hours to figure out how to do it but I was able to name the islands and identify the individual bulkheads in Blender. It's tedious, though, and duplicates work I already have to do when creating the model. I'd really like to have them auto-named from the 3d model part names. Oh, well. I kept simplifying and simplifying the model to try and get rid of the unrolling anomalies I was seeing. If that keeps up I may end up with a boat in the form of a cube. That would explain why all the tutorials for this Blender plug-in show you how to make a cube! Nevertheless, I think I've got enough to try a little proof-of-concept build just to see if the shapes are accurate. Maybe next weekend.
-
Thank you, Frank. I suppose everyone has their own style which they impart to their models. We're all artists! Just not all of the same skill levels, of course 😉 Yeah, I threw away a number of those shroud thingies. Tiny, tiny, tiny.
-
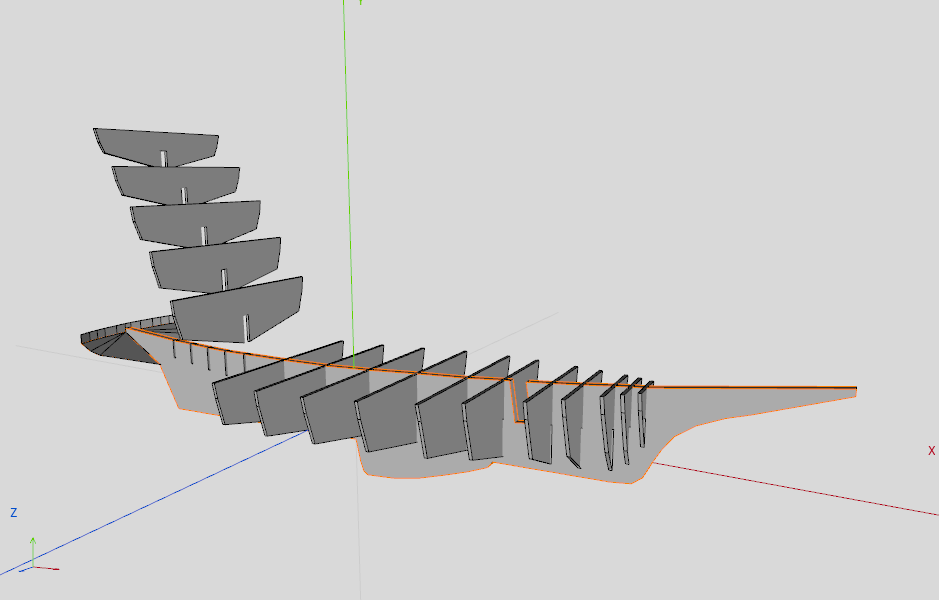
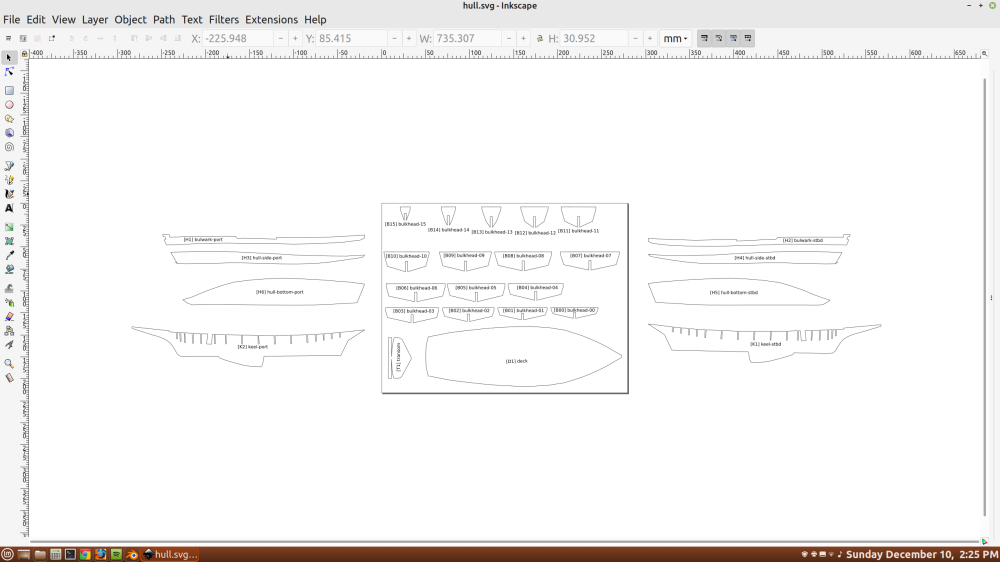
Hmmm... I've been tinkering with this. Most of the on-line examples of people using this Blender Plug-in are just simple models and the plug-in works just find. But how many card models of cubes do you need? Ships are a bit more complicated. So the workflow I've been following is to export my Wings3d model to *.obj format, import into Blender; Define where the seams will be on the various parts and then export the model via the paper-model plug-in to an *.svg document; Edit the document in Inkscape. There are challenges--even with the fairly simple hull form of the skipjack. First, what I really like about the plug-in is that it extracts the actual shapes of the polygons (well, triangles--the model must be triangulated) of the model and basically unrolls the model into 'islands'. The script I wrote years ago worked by extracting UV coordinates from the model but that opened a whole new can of worms as UV coordinates do not necessarily represent the true shape of the polygon. This leads to the first challenge. The 'unrolling' is not totally predictable. While you can mark where you want seams (e.g. edges of the 'islands'), the plug-in will not hesitate to add additional seams (or even add islands) if it determines that the island will not lay flat. I've found that I have to go back to the original model and tweak it in order to prevent unwanted seams. But by tweaking the model you also change the way the plug-in 'solves' where seams are needed. So it can be a very iterative process. I've not been entirely successful in getting rid of unwanted seams and islands. For example, the skipjack has a port and starboard bulwark. In the model, the geometry of each is identical except that they face opposite directions. Yet the plug-in resolves them differently--even though one bulwark is a duplicate of the other. In fact, while it resolves one bulwark as a single island, it insists on taking one triangle from the other and making it a separate island so that that bulwark consists of two islands while the opposite one is only one. Frustrating! I've also had the situation where the plug-in does not recognize two separate islands if they share a single vertex. (Actually, I don't think they share the vertex. In the original model it's two vertices that are located at the same coordinates.) I've not found a solution for this--it could be a Wings export or Blender import issue that merges the two vertices. The second challenge is that while the plug-in will generate glue tabs and labels for the islands they really aren't very usable. I'm not too concerned about the tabs because I'd rather create them when I undertake the graphics work in Inkscape. But it would be nice to be able to name the islands or better yet have the plug-in recognize the names of the parts in the model. When creating the *.svg file the plug-in places the islands rather randomly on the page. Without labels it can be difficult to determine which bulkhead is which. There are 15 of them in the skipjack model scattered across the *.svg file. This would be a significant issue with a more complex model. Thirdly, it seems that all the parts that you want to unroll have to be joined into a single part for the plug-in to be able to solve them. At this point I haven't found a way to undo that joining in Blender. So if I need to tweak the model, in essence I need to go back into my modeling program to do it. So for every change prompted by the results of the plug-in I need to tweak the model, export the model, import the model, reapply the seams and export to *.svg to see the results. I'm sure this is partly due to my knowing just the bare basics of Blender. That's because I've always found Blender work-flows to be terribly labor intensive. Catch 22. While this sounds like a lot of whining I'm still optimistic. I guess worst case/best case scenario is that I can maybe translate the plug-in's Python code for unrolling and implement them in my old Ruby script. Or, maybe I finally learn Python and Blender and fix the 'challenges' myself in the plug-in. Ultimately, though, I'd rather be making models! None of these issues are show-stoppers. Yet. Here's a re-arranged sample of the Blender's *.svg output. This is a 1/72 scale rendition shown on a 8.5x11in page:
-
So I've been thinking about reviving a project I started years ago: a Chesapeake Bay Skipjack card model. I originally modeled it in Wings3d (which I still use frequently) and wrote a script to extract UV coordinates from the 3d model and convert them to *.svg files which could then be printed out and assembled into a card model. Not being very good at 3d math, however, posed some real challenges in the writing the script which I was never able to completely solve. At the time there weren't many options for converting a 3d model to a card model except for Pepakura--but since I don't operate any Windows computers that was not available to me. I've noticed that Blender now has an add-on that that seems to duplicate what my script did. But perhaps better? I've tinkered with it a little bit but I'm wonder if there's enough potential to continue. Blender being rather infamous for dumping you into the deep end right off the bat. So has anybody come to grips with the add-on? Is it reliable?