6ohiocav
-
Posts
543 -
Joined
-
Last visited
Content Type
Profiles
Forums
Gallery
Events
Everything posted by 6ohiocav
-
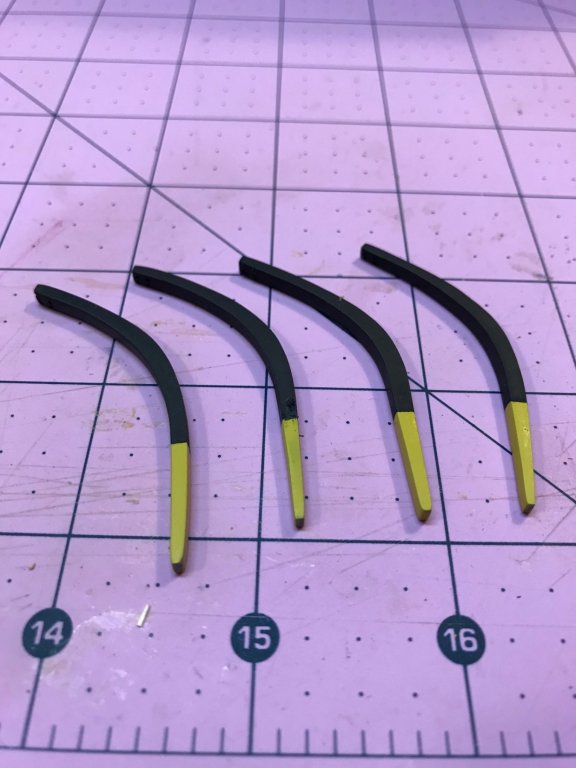
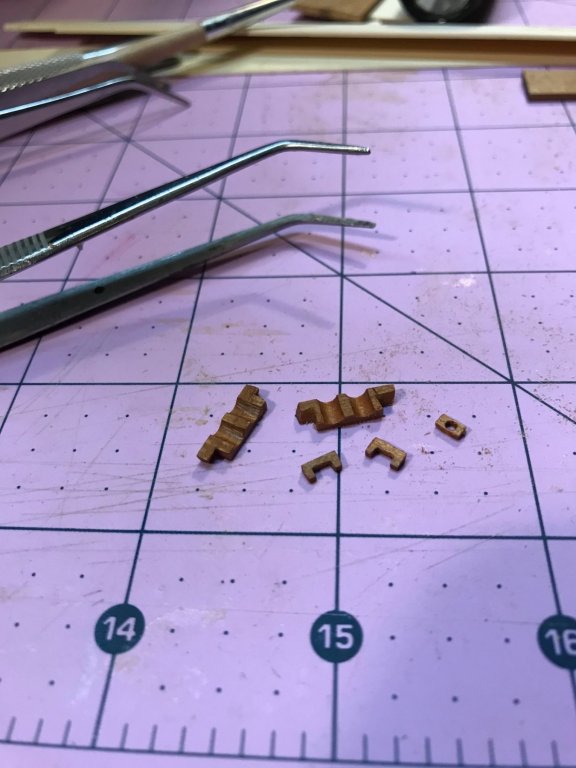
 QUARTER BOAT DAVITS The punch list is getting small. I worked on the boat davits over the weekend. As I have done for most of the build, I discarded the laser cut parts and made the davits out of cherry. I traced the pattern on to a strip of cherry and cut them out with my band saw. I mounted a small drum sanding bit in the Dremel for initial shaping and used a series of files and sanding sticks to finish them up. It is a long and tedious procedure, but the end product, with sharp edges and perfect finish is well worth the effort. I applied the yellow and flat black paint with the airbrush and installed the pieces to the ship. I used card stock blackened with a Sharpie for the metal bands. I am very pleased with the look of the card stock. It is easier to work with than brass, takes the color perfectly, and wraps around the davits very well.
- 648 replies
-
- 7
-

-
- niagara
- model shipways
- (and 1 more)
-
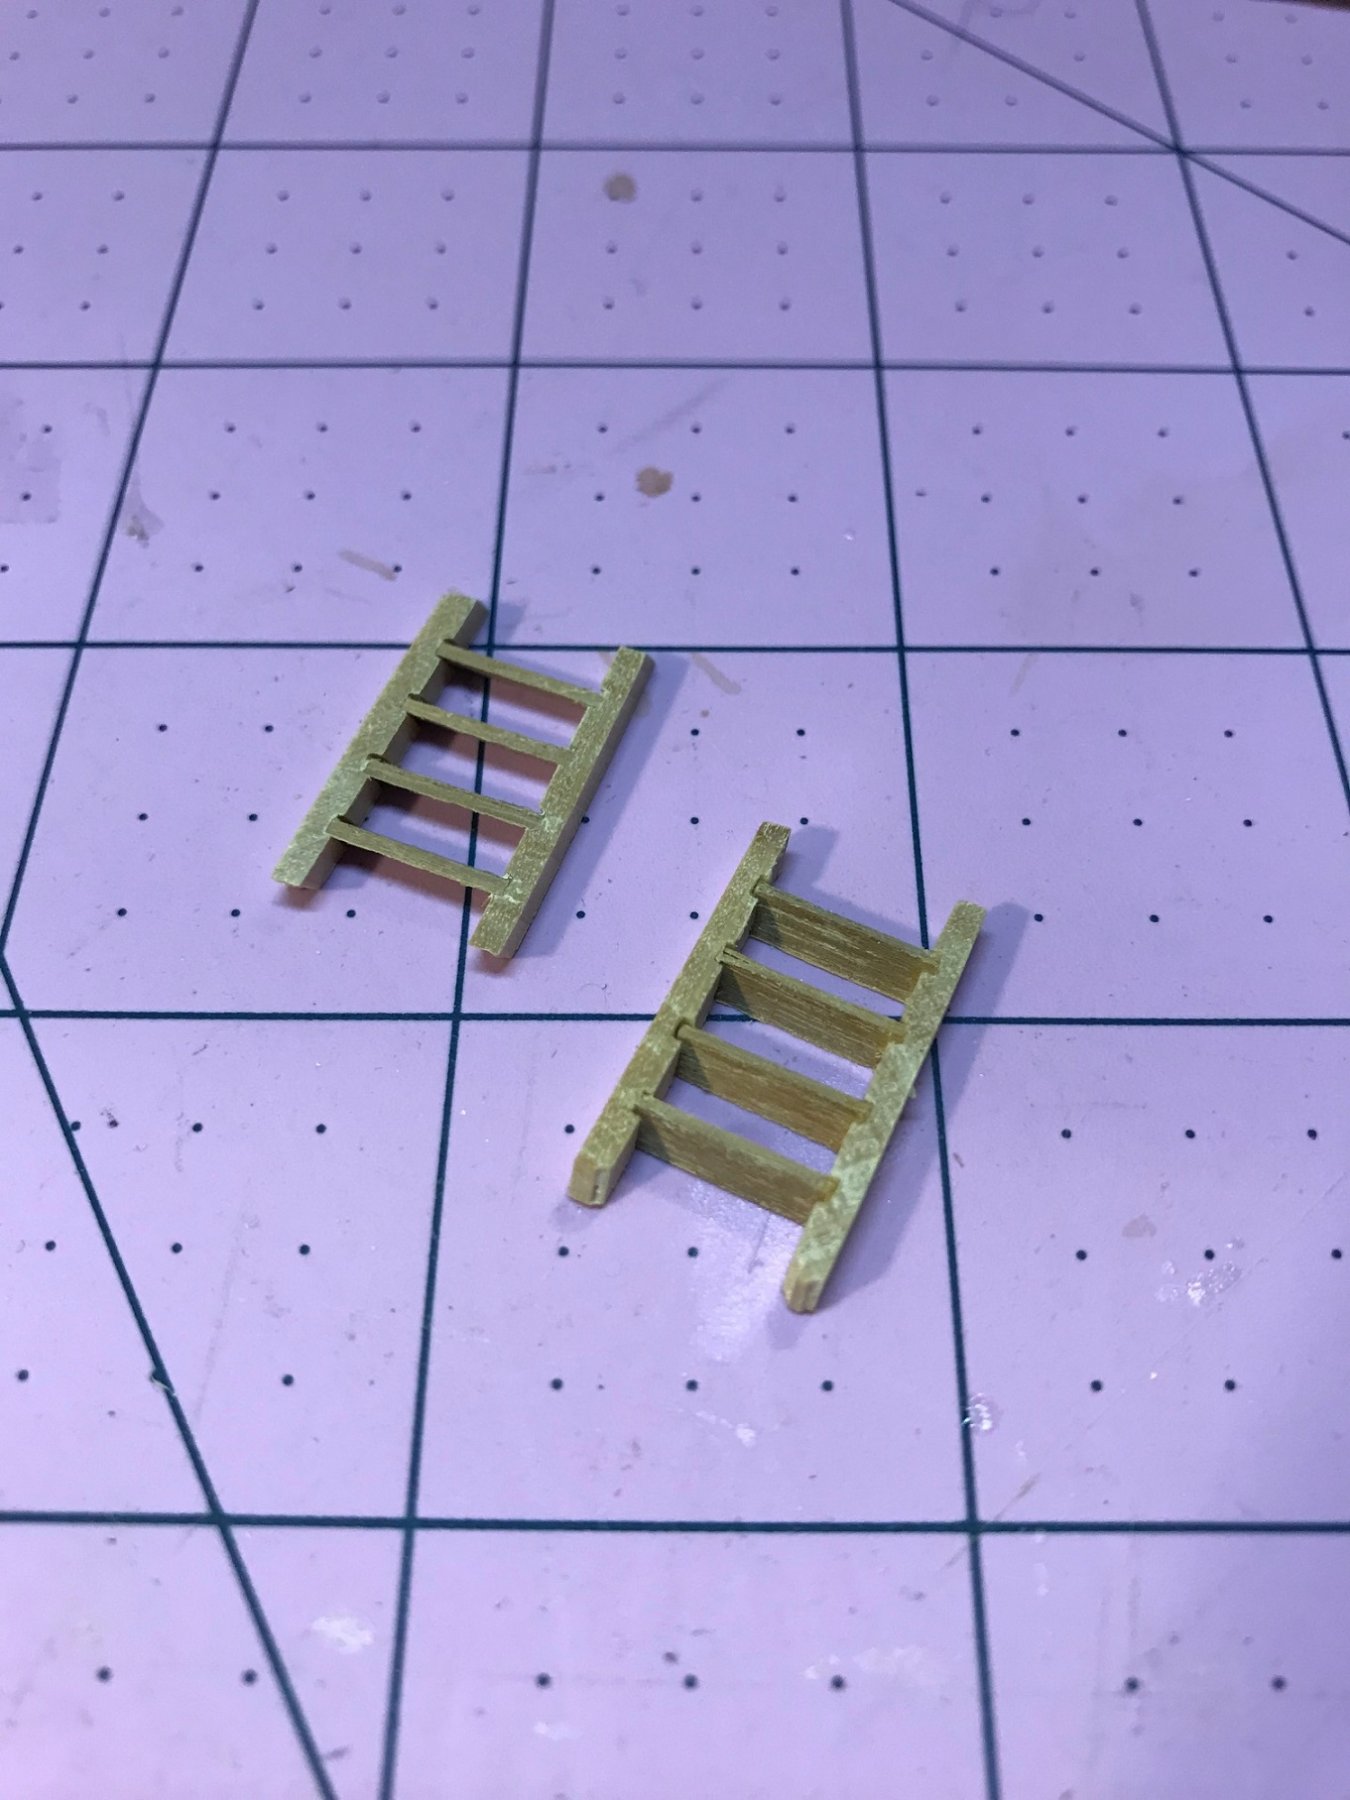
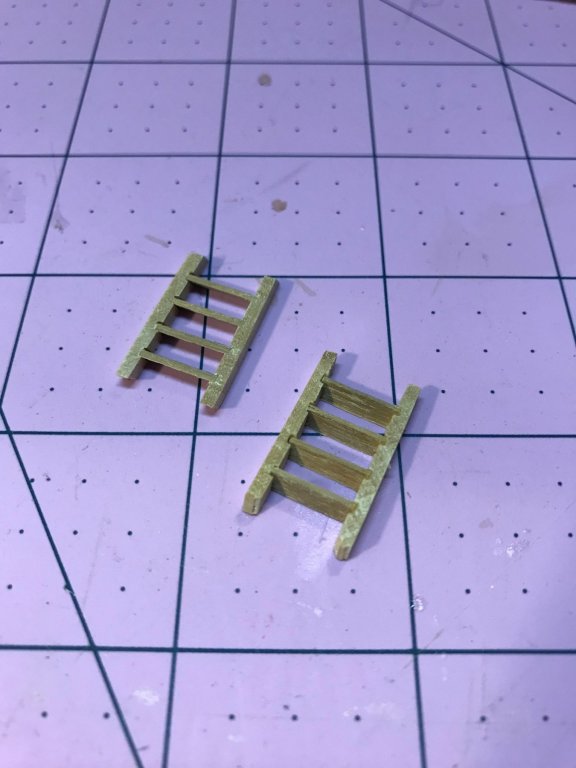
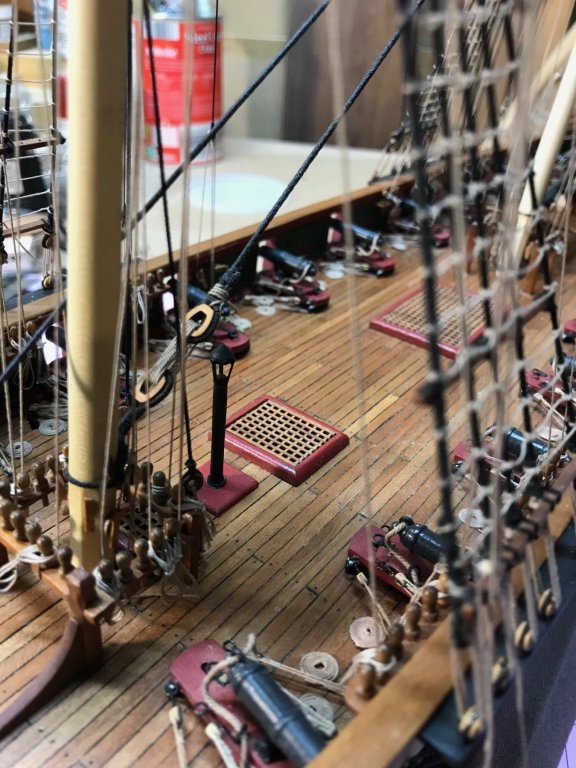
WELCOME ABOARD! - LADDERS AND SEA STEPS The crew may now board their ship. I finished the ladders with a coat of paint and attached them to the deck. I had to move some rope coils. It is pretty tight in there. I cut the sea steps out of some boxwood strips I had around. I applied some yellow and flat black paint and glued them to the hull.
- 648 replies
-
- 8
-
-
- niagara
- model shipways
- (and 1 more)
-
Mike, I think I am following you, and I agree. Your plan to lay steelers near the deadwood should bring your stern planking back into pattern. And, since this is a double planked ship, what you learn here should give you great input for the final walnut veneer. Is the walnut as wide as the 6MM planks? That is pretty hefty stuff. Looking great.
- 136 replies
-
- 1
-
-
- enterprise
- constructo
- (and 1 more)
-
Tom, I blackened my hooks, and they are so small, and have to be handled gently anyway, I did not have a problem knocking off any of the finish. Way... way easier than painting. Planking looks good. Sanding, filler and paint will remedy all of your ills.
-
Ron, Looking good. I opted for flat black - no finish. I have stayed away from any over finishes. All of the natural wood was tung oiled. Dull finishes have been my friend. Just my personal taste though.
-
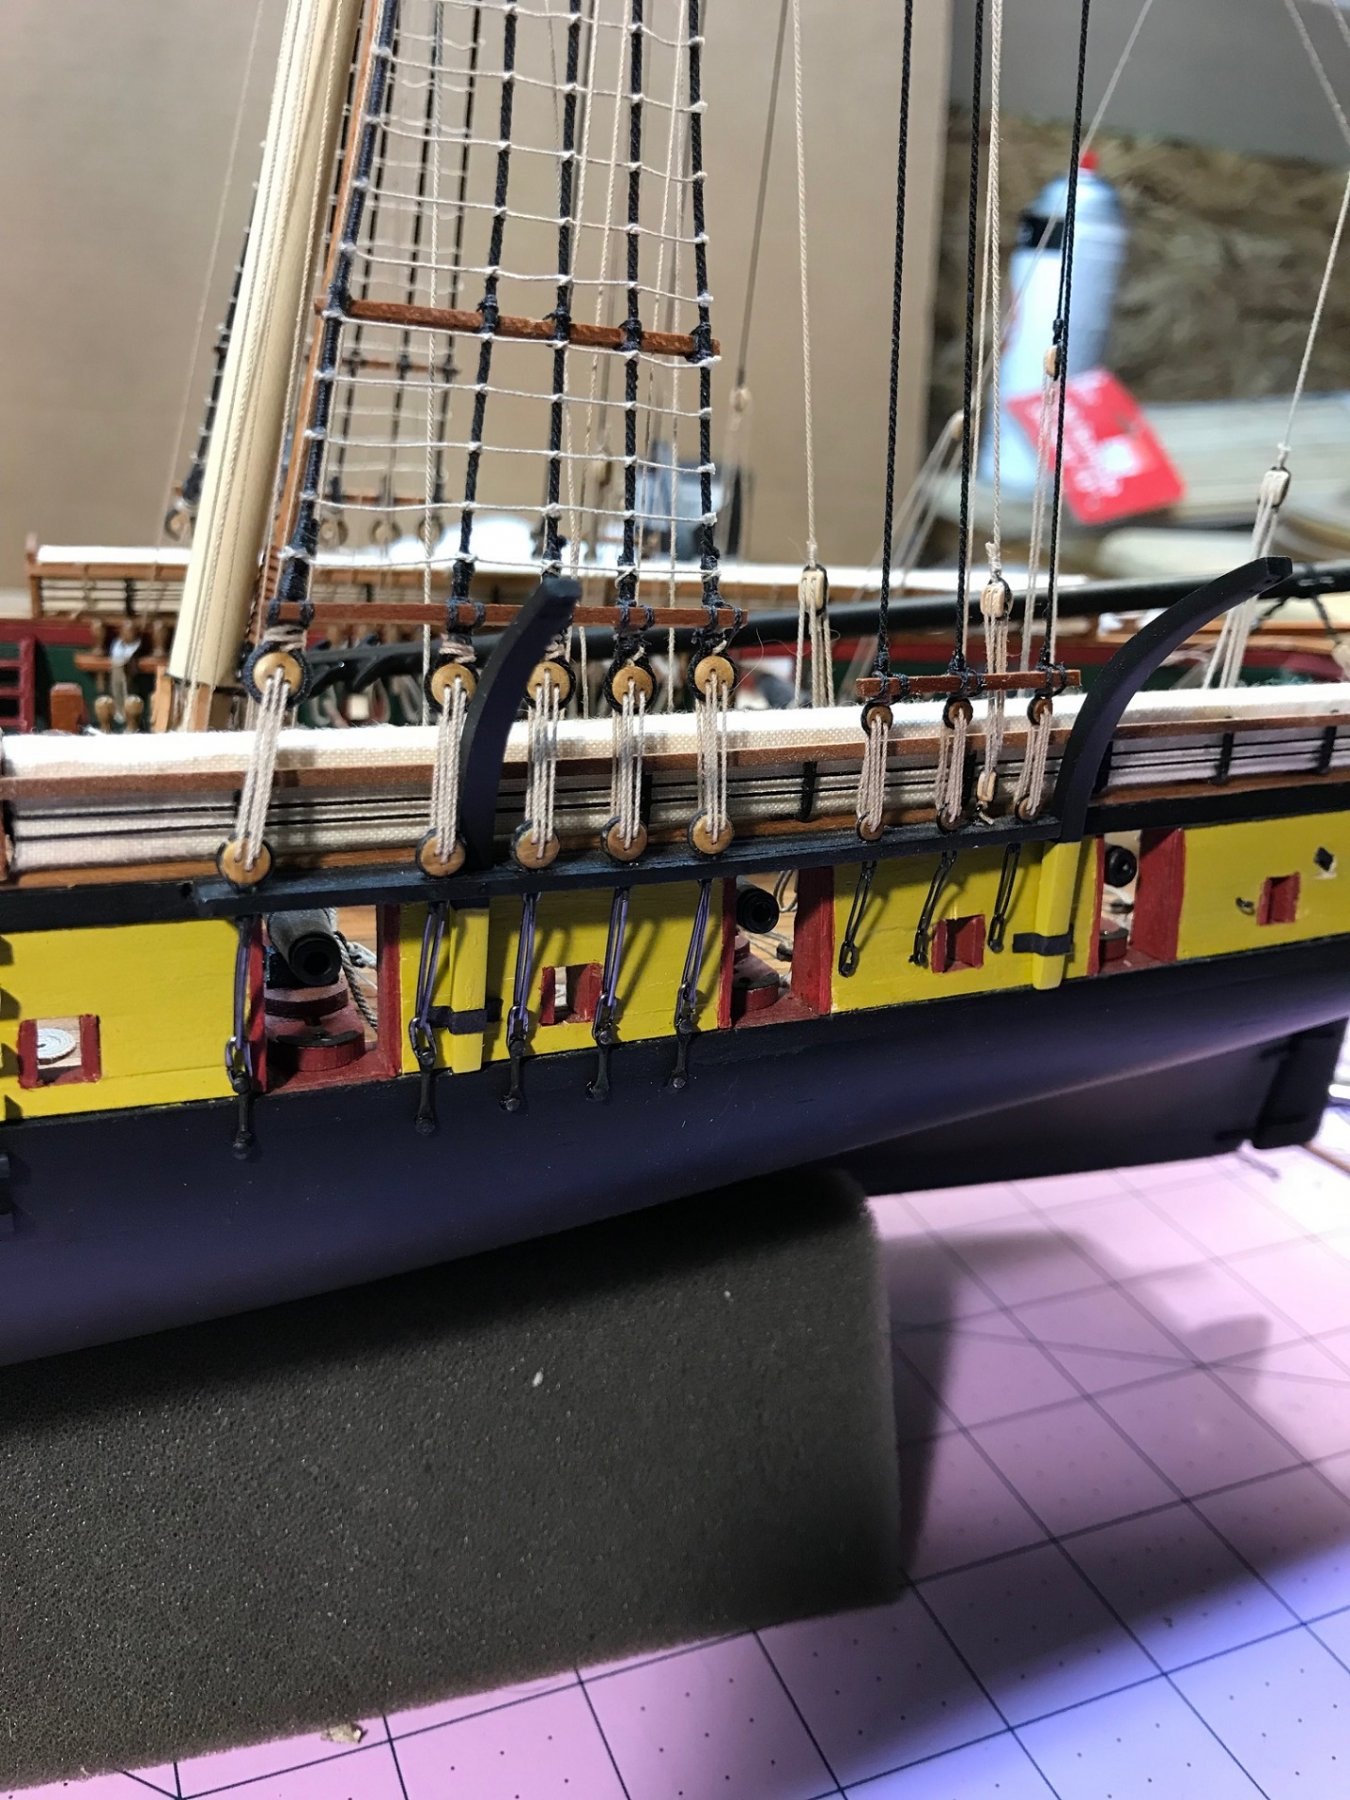
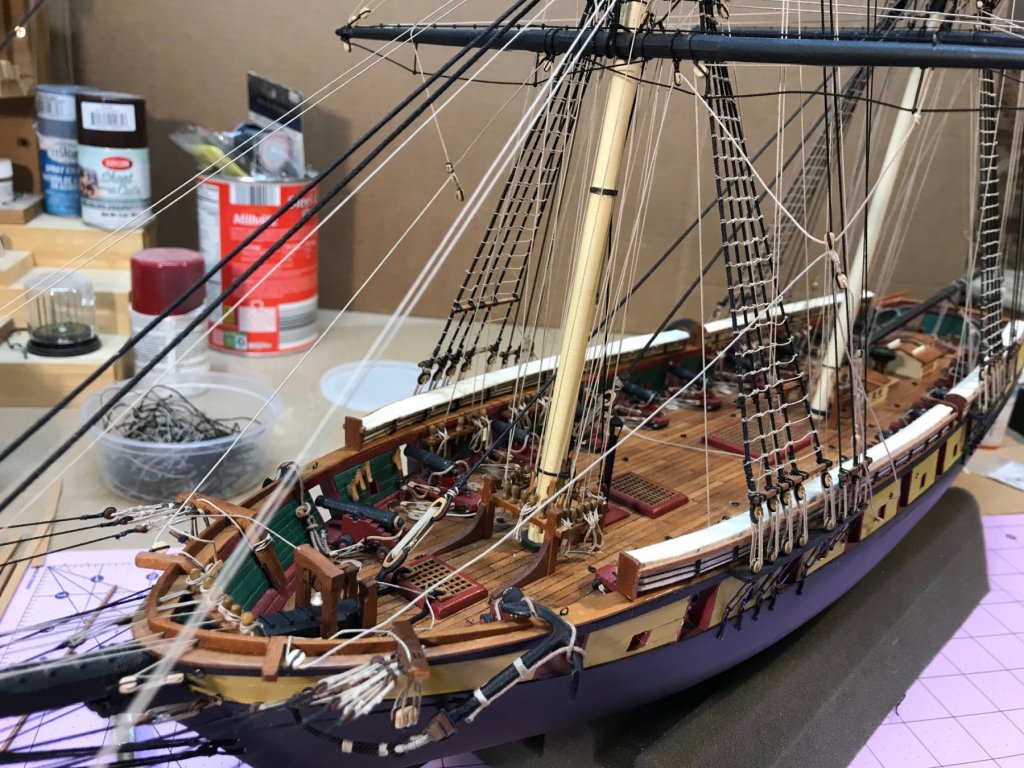
HAMMOCK RAIL INSTALLATION I installed the hammock rails over the weekend. The canvas looks pretty good and adds to the visual effect. I also rigged the sheet and tack lines for the foremast. When I went to work on the main mast, I realized that I had run out of .018 rigging line so I placed an order to Syren.

- 648 replies
-
- 9
-
-
- niagara
- model shipways
- (and 1 more)
-
Mike, I think I have spent more time just looking and thinking about our Niagara than actually building on it. Forgive me friend as I have been remiss in not extending my salutations to you for your wonderful build. A simply fantastic accomplishment. I certainly admire the subject. Love the table and showcase.
- 843 replies
-
- 2
-
-
- niagara
- model shipways
- (and 2 more)
-
Mike, How did you do the name?. I have printable decal sheets that I am going to try. I also have the option of engraving a black plank and painting the letters, but have not decided if adding the plank to the stern will look good.
- 648 replies
-
- 1
-
-
- niagara
- model shipways
- (and 1 more)
-
Svein, I would think twice about adding brass tree nails on the black wales. That contrast might be too much. Black treenails might be better, and I believe more authentic, even though they may not be seen very well. Perhaps you should do a small section first, and if you don't like it, you could probably paint over them. Just my amateur opinion.
-
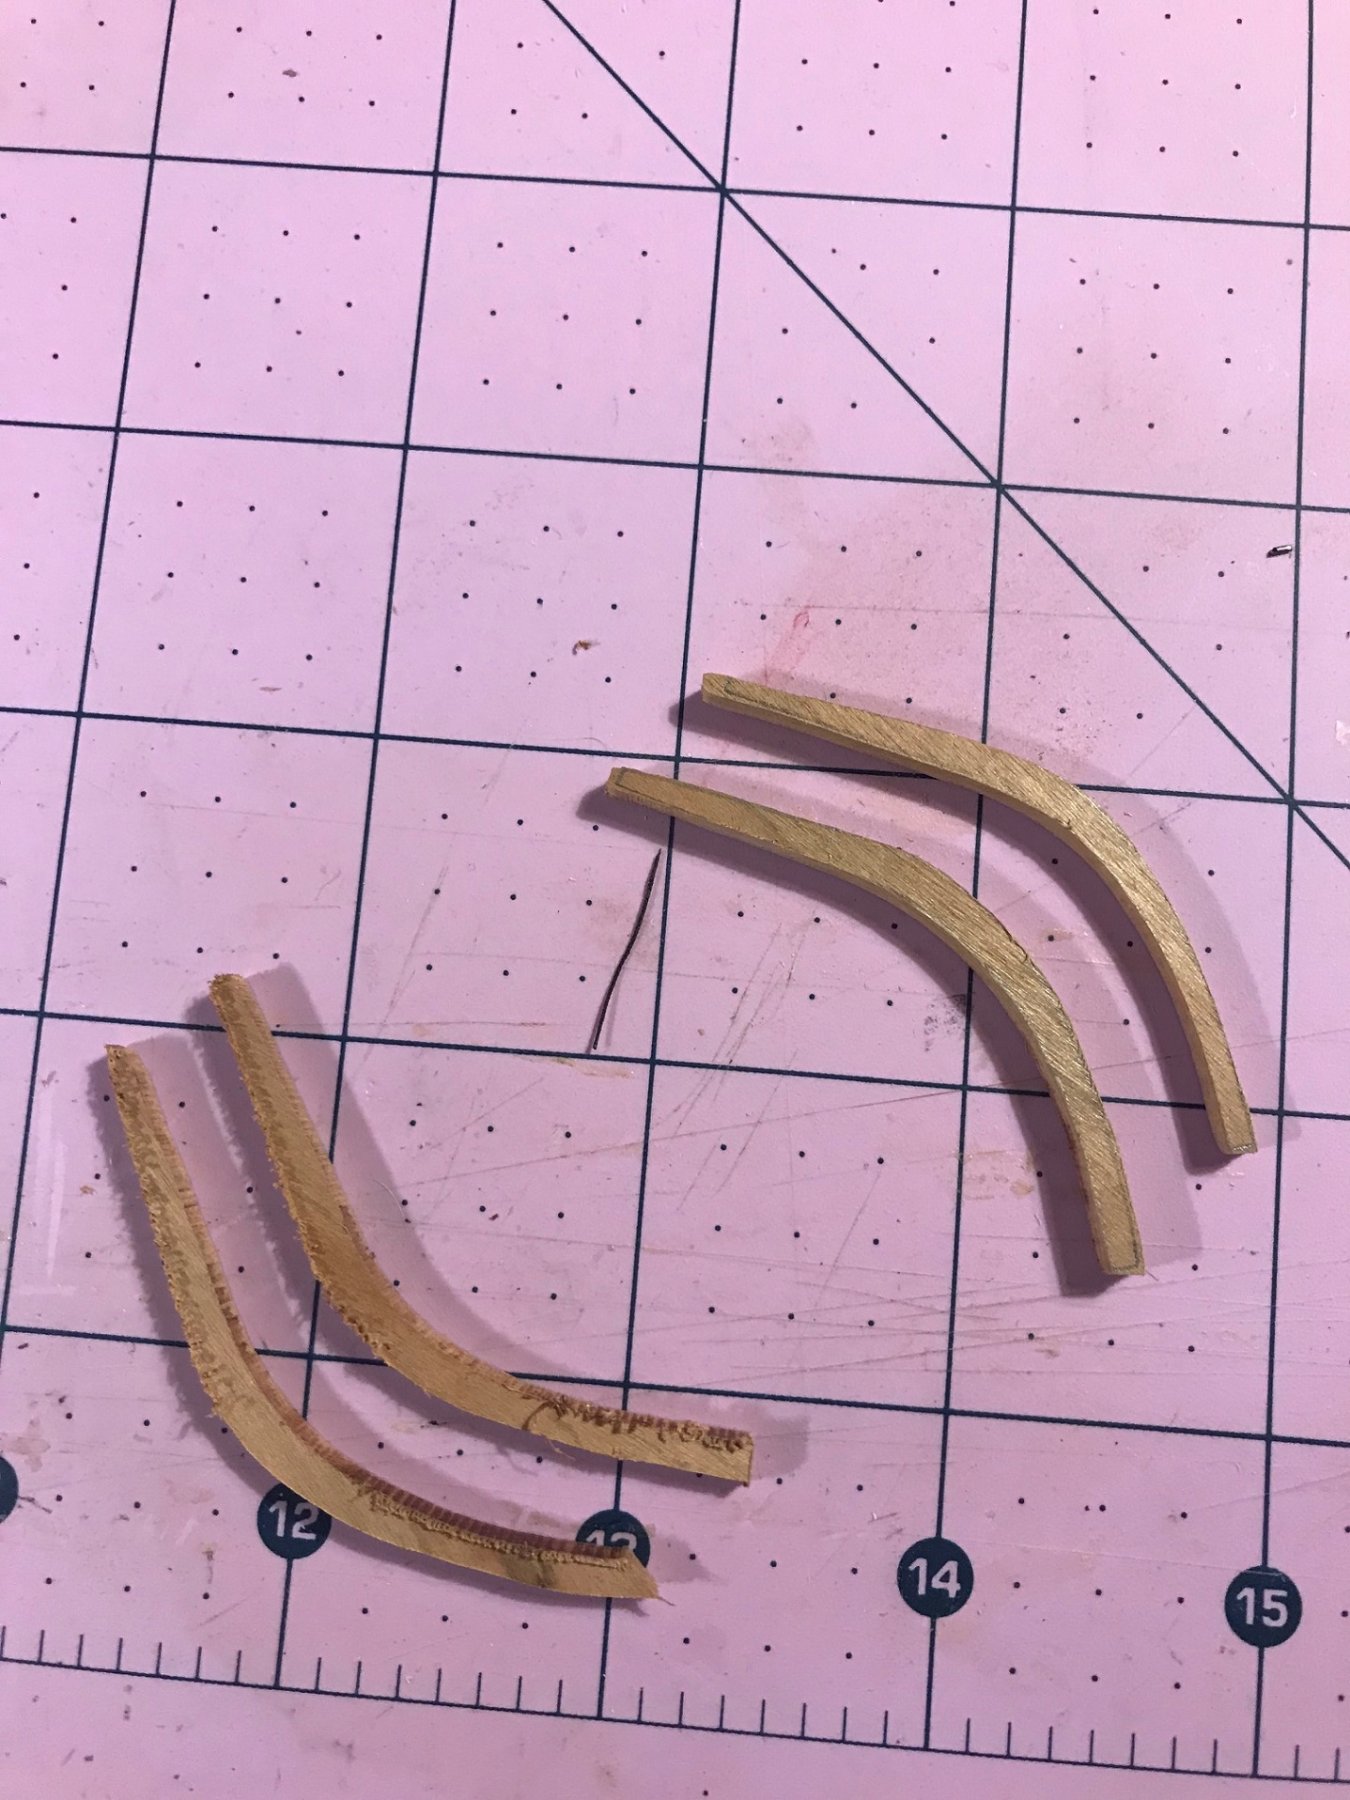
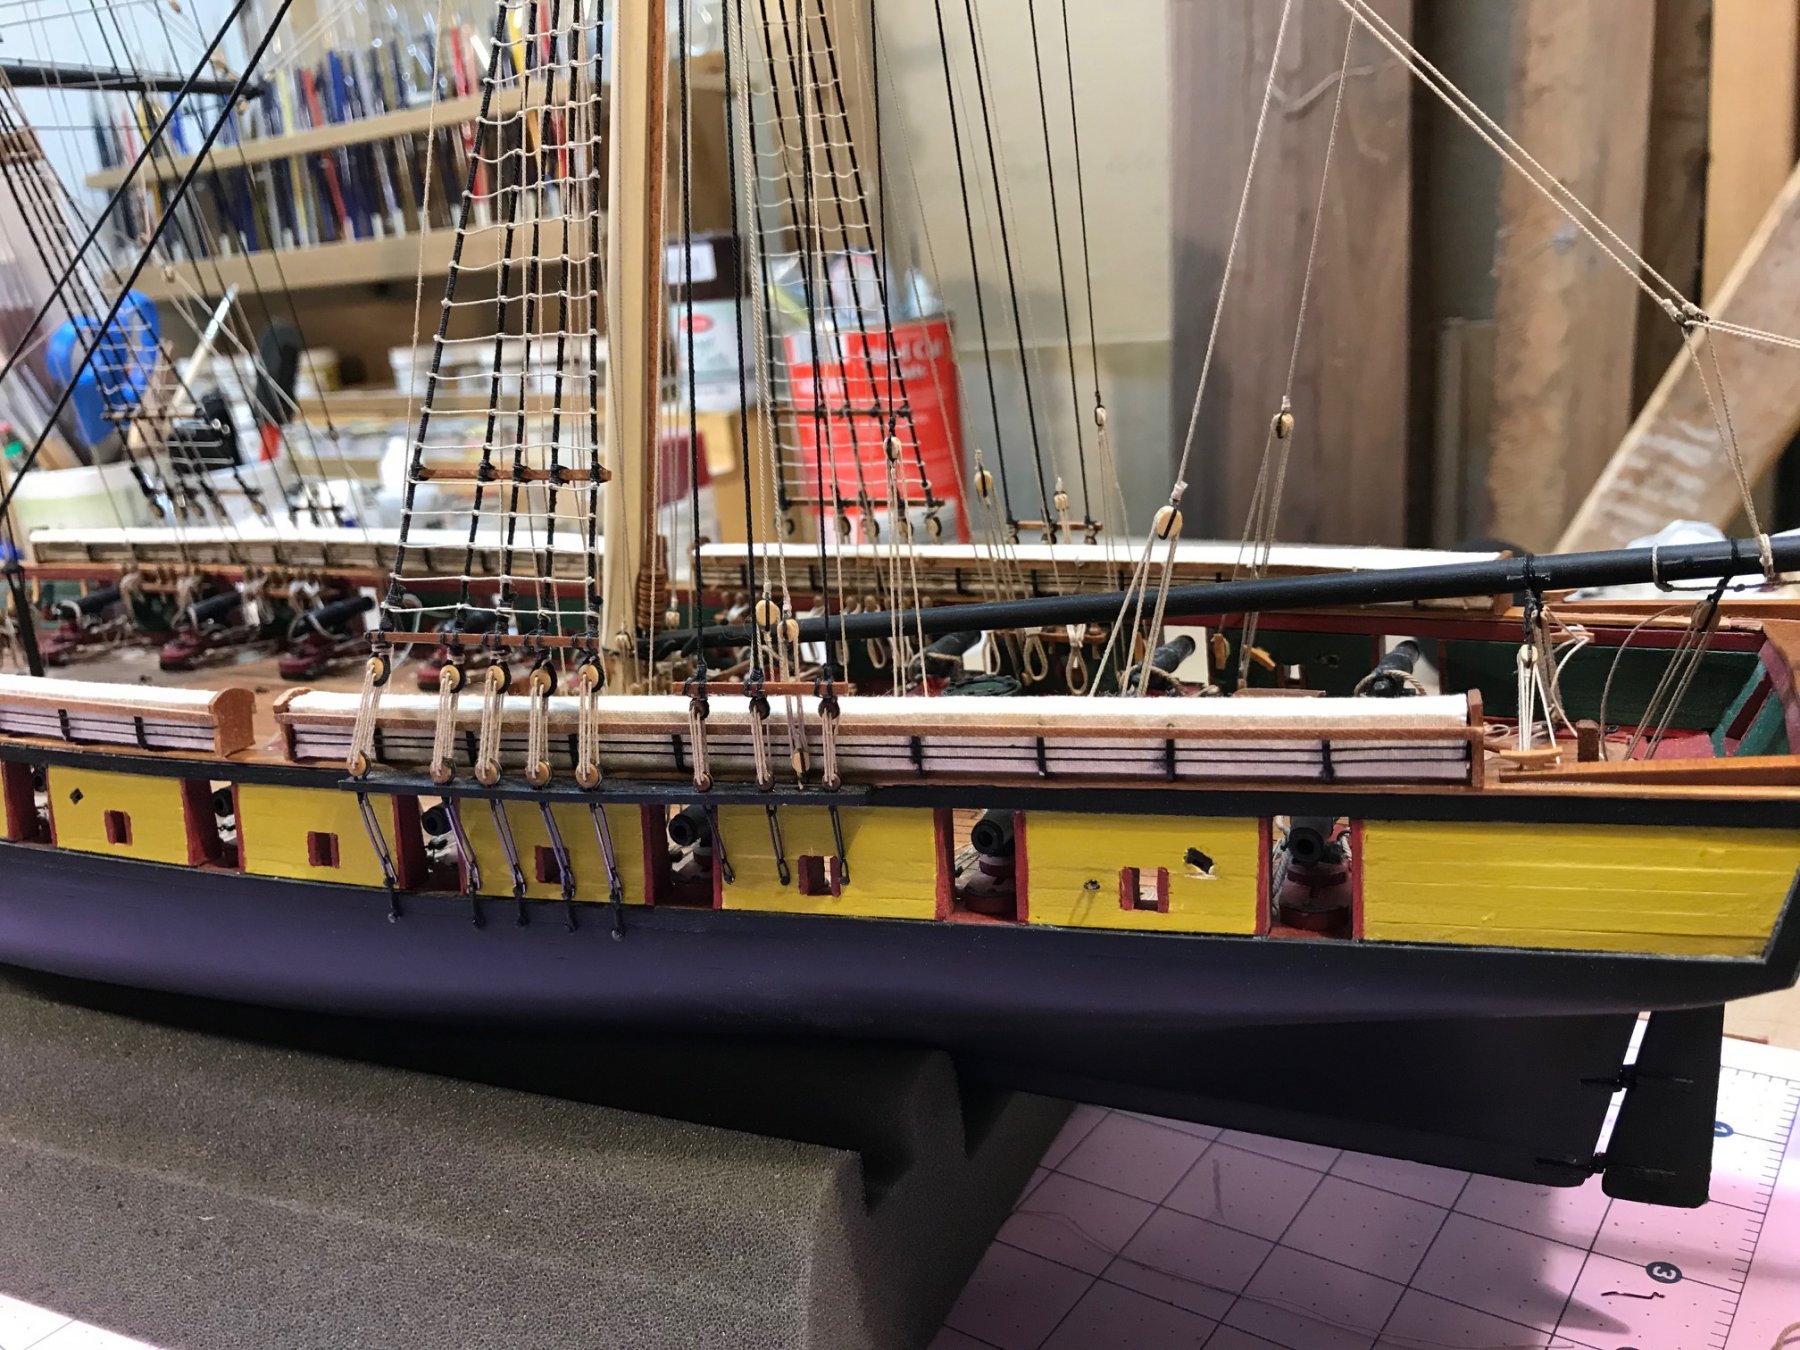
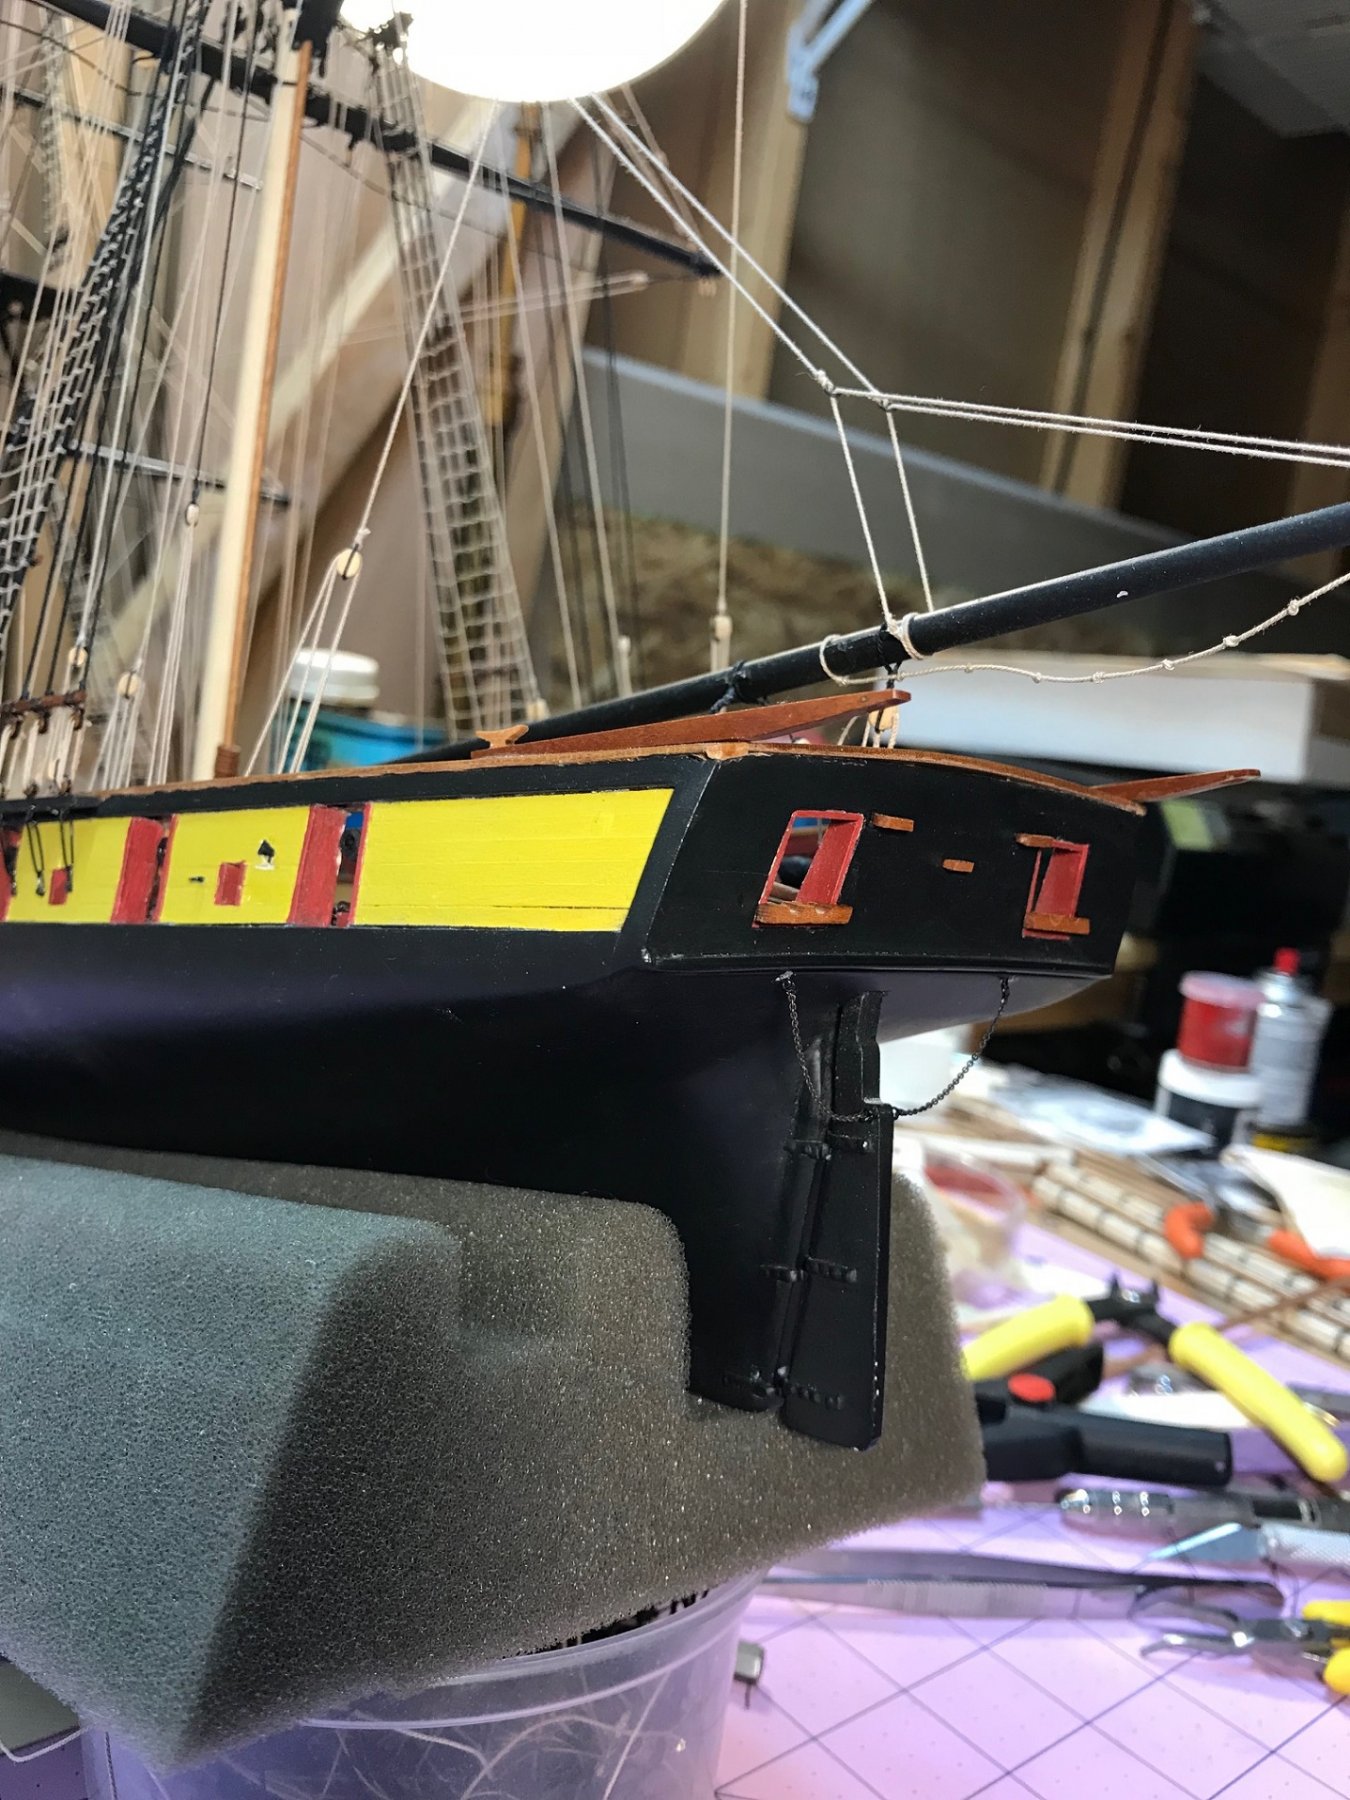
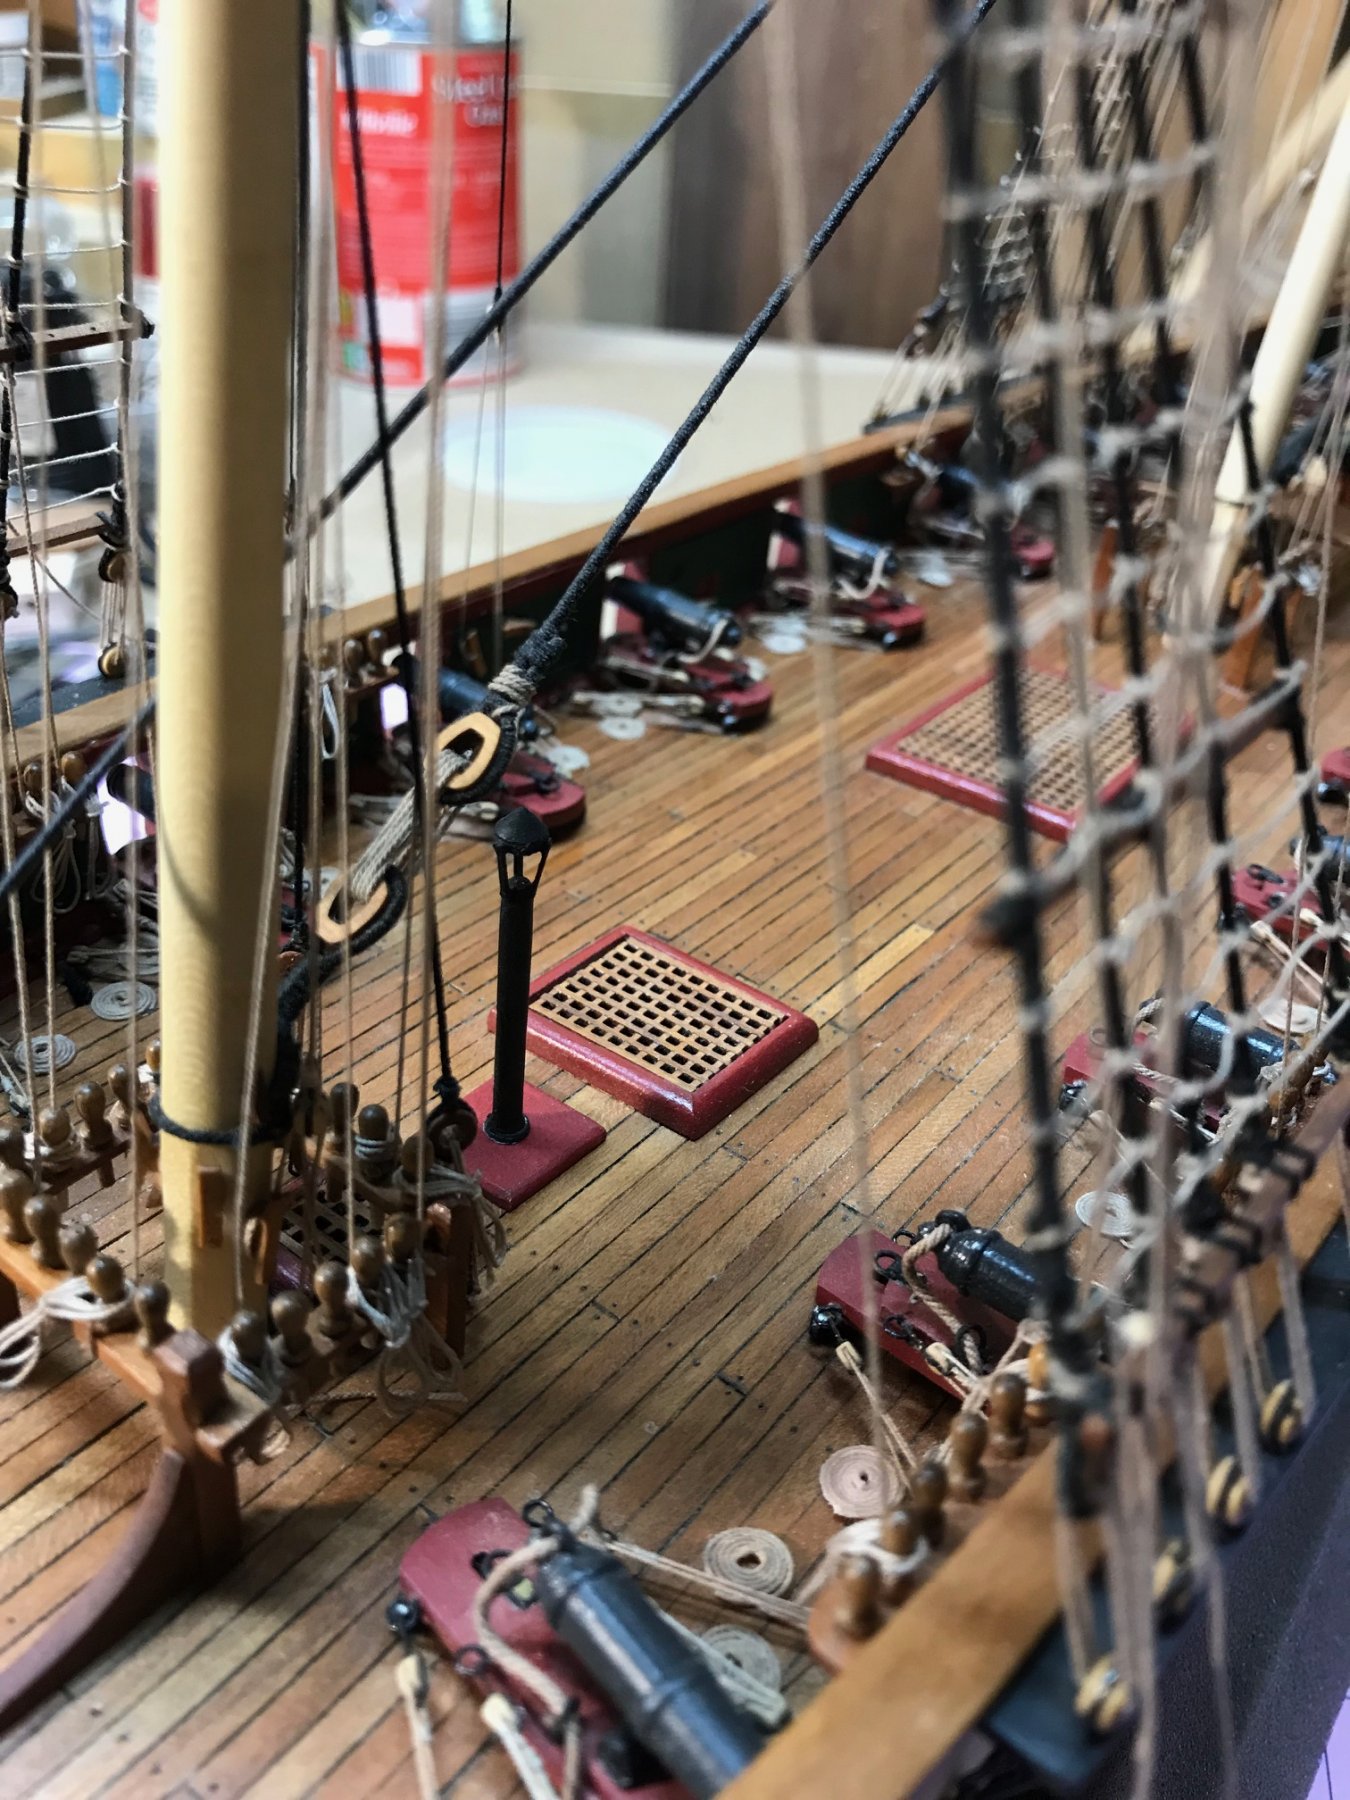
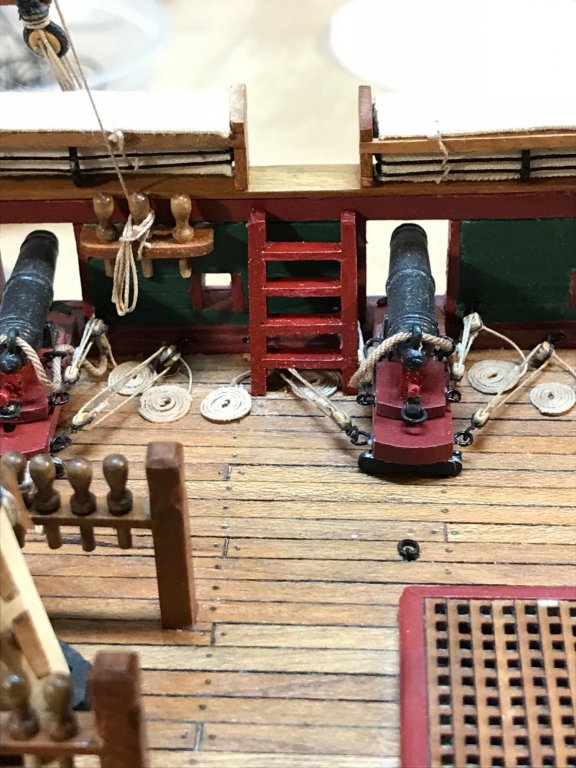
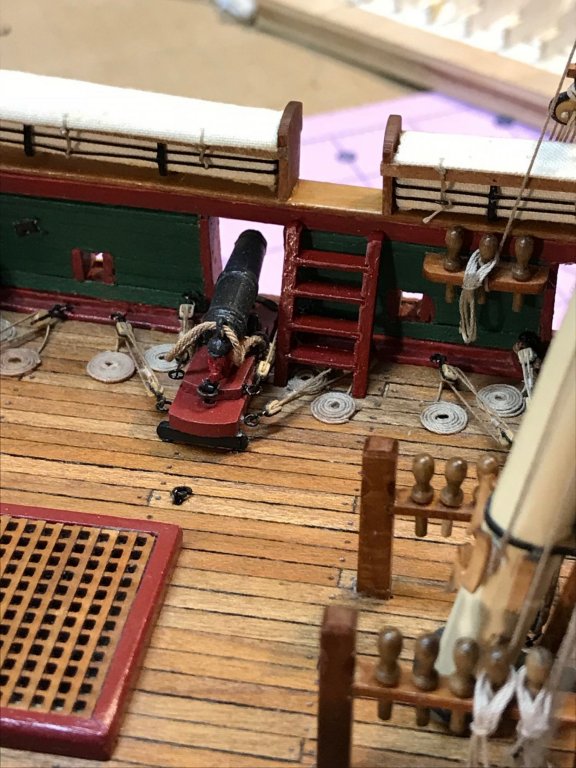
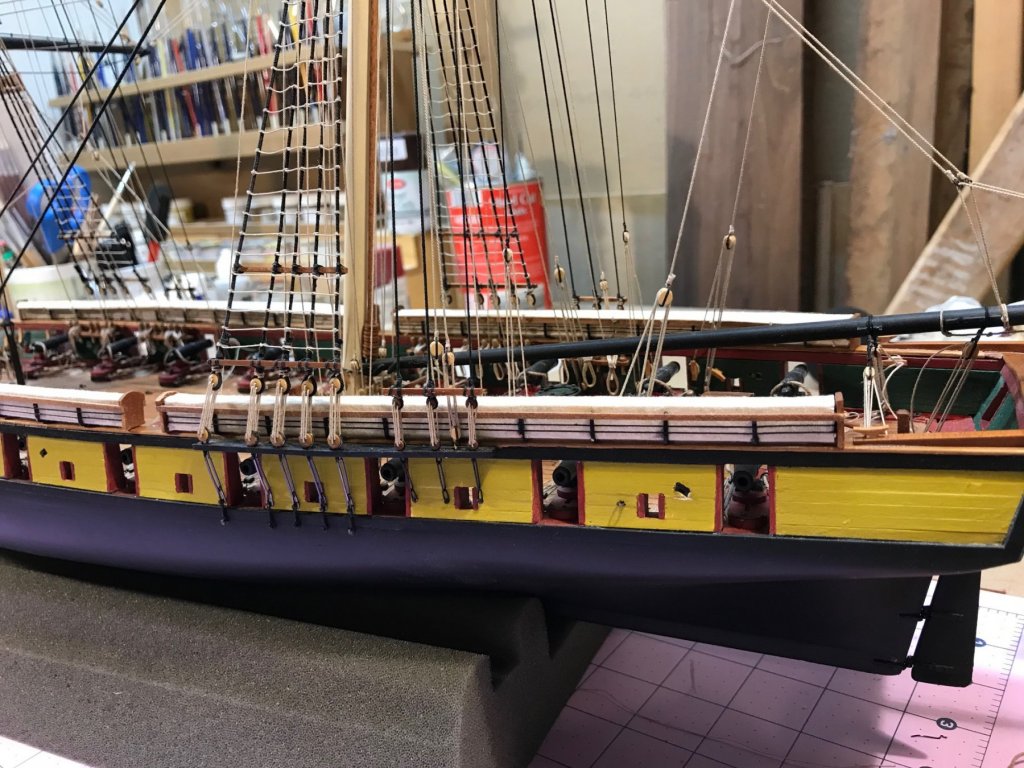
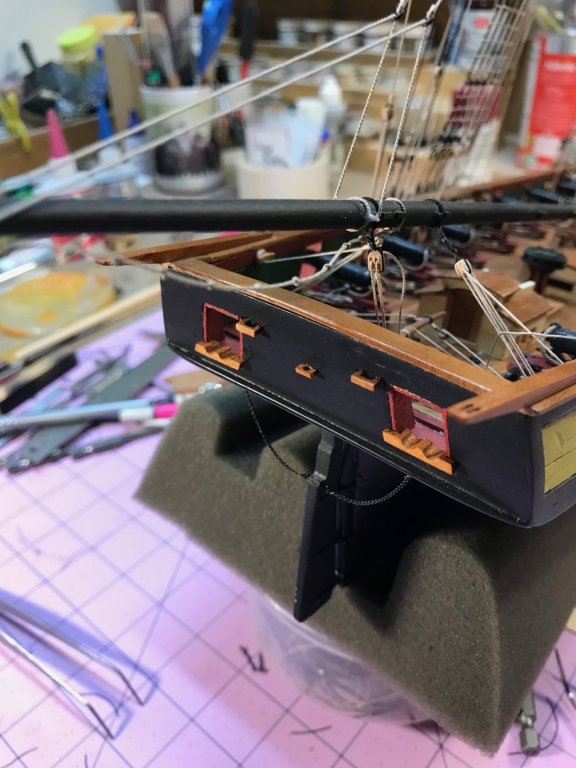
MOORING CHOCKS, BOAT GRIPES, ENSIGN STAFF BLOCK, AND RUDDER CHAINS I worked on the stern over the last couple of days. I carved the mooring chocks, boat gripes and ensign block out of cherry. Started by rough cutting on the jig saw, then finished them off with files and sanding sticks. Very small and tedious. But what else is new. The plans call for them to be painted black. I decided to finish them off with tung oil instead. I might change my mind and paint them later. I have a lot of touch up painting to do when the day is done. Work on the rudder chain was another story. The brass chain provided in the kit is extremely fine. Great quality, and to scale, but very difficult to work with. The links were so small, I had no wire thin enough to pass through them for eyebolts. I had to use a black thread and tie it to an eyebolt. The thread is so fine, it is not visible so it worked fine. It was very difficult however, and I had to do this under magnification. I then blackened the chain and inserted the eyebolts in the hull and rudder.

- 648 replies
-
- 7
-
-
- niagara
- model shipways
- (and 1 more)
-
Looking good Mike. That looks like a real challenge without a rabbit.
- 136 replies
-
- 1
-
-
- enterprise
- constructo
- (and 1 more)
-
Tom, I just had some time to get caught up on your build. I agree with Mike regarding the cross trees. Look on the bright side. Your encounter with your exacto knife produced a good example of a dark red color that if matched, would be outstanding for your gun platforms, ports, and waterway. Probably better that you harvest it from a local paint supplier than your finger though. Everything looks real good.
-
Svein, The Beauty of Castella Boxwood! Wonderful work. I use my basswood as kindling for the wood burner. I will be following along on this great build.
-
Wow. Thanks everyone Ron, I have worked earnestly on this project for about 2 years, with a number of long term breaks due to vocational and family obligations. Shame life has to get in the way of our hobby. You are off to a great start and your ship will be a great model when finished. Steve, I have used Syren blocks, hooks, boxwood cleats, and all of the standing and running rigging rope. I used walnut Model Shipway pins that I picked up on line. As far as the wood, I substituted all of the kit wood with Cherry from stock that I harvested on my farm. The lower masts are holly, everything above is cherry. I used Cherry strip wood on the deck, and the rails, deck structures and implements were scratch built from the same cherry. The only basswood from the kit that I used was to plank the hull, and as I look back on it, I wished I had used a hard wood for that as well. I thought it would be fine since I had decided to paint the hull per the plans, but in all honestly, the bass wood is so soft and the edges so fuzzy, that the finish is less than desirable. I have to do some touch up painting when done, and perhaps I can fix some of these areas. Russ, The color scheme was a big issue at the time. I purchased all of the suggested Model Shipway's paint for the Niagara. My first impression was the MS red was way to bright, almost orange. I decided to take the edge off by adding black. That gave the color a more flat appearance and darkened it quite a bit. I learned that it only takes a couple of drops of black. Unfortunately, I am trying to figure out how to replicate my very inexact method of mixing, since I ran out of my first batch. I also darkened the green, but just barely. The yellow was another challenge. The MS "yellow" suggested for the outer bulwarks is actually beige. The Niagara is more of what appears to be a Royal Navy yellow ochre. I ended up buying a half of dozen yellows and settle on a "yellow Chromate." It has a little too much sheen, but is more appropriate than beige. Tom, Thanks for the kind words. As I have said before, I owe a lot to the skilled shipwrights on this forum, and especially the Niagara Builders that came before us, for the tips and techniques that helped a ton in achieving these results. There is no way I could have done any of this without all of you. And Mike, you are right as usual. I actually did mix up some extra, and since I have been so slow on getting this done, it dried up.
- 648 replies
-
- 5
-
-
- niagara
- model shipways
- (and 1 more)
-
Don, Thanks for stopping in and for your kind words. Mike, I actually still have most of that raw white basswood, since I only used it for the planking. That seems ages ago, and the new Niagara logs bring back memories of the "old" days. I totally agree that this is a good kit, and gives the modeler many options to enhance it. I would recommend it to anyone, including first timers like myself.
- 648 replies
-
- 3
-
-
- niagara
- model shipways
- (and 1 more)
-
LADDERS I had some time last night to build a couple of ladders. The plans call for them to be painted red. The red paint I chose for my ship was a mixture of MS gun red (too bright for my taste) and MS black. I unfortunately ran out of my initial batch, and I have not been able to figure out what my combination was. I will be experimenting to see if I can match the color.
- 648 replies
-
- 6
-
-
- niagara
- model shipways
- (and 1 more)
-
Looks great Ron.
-
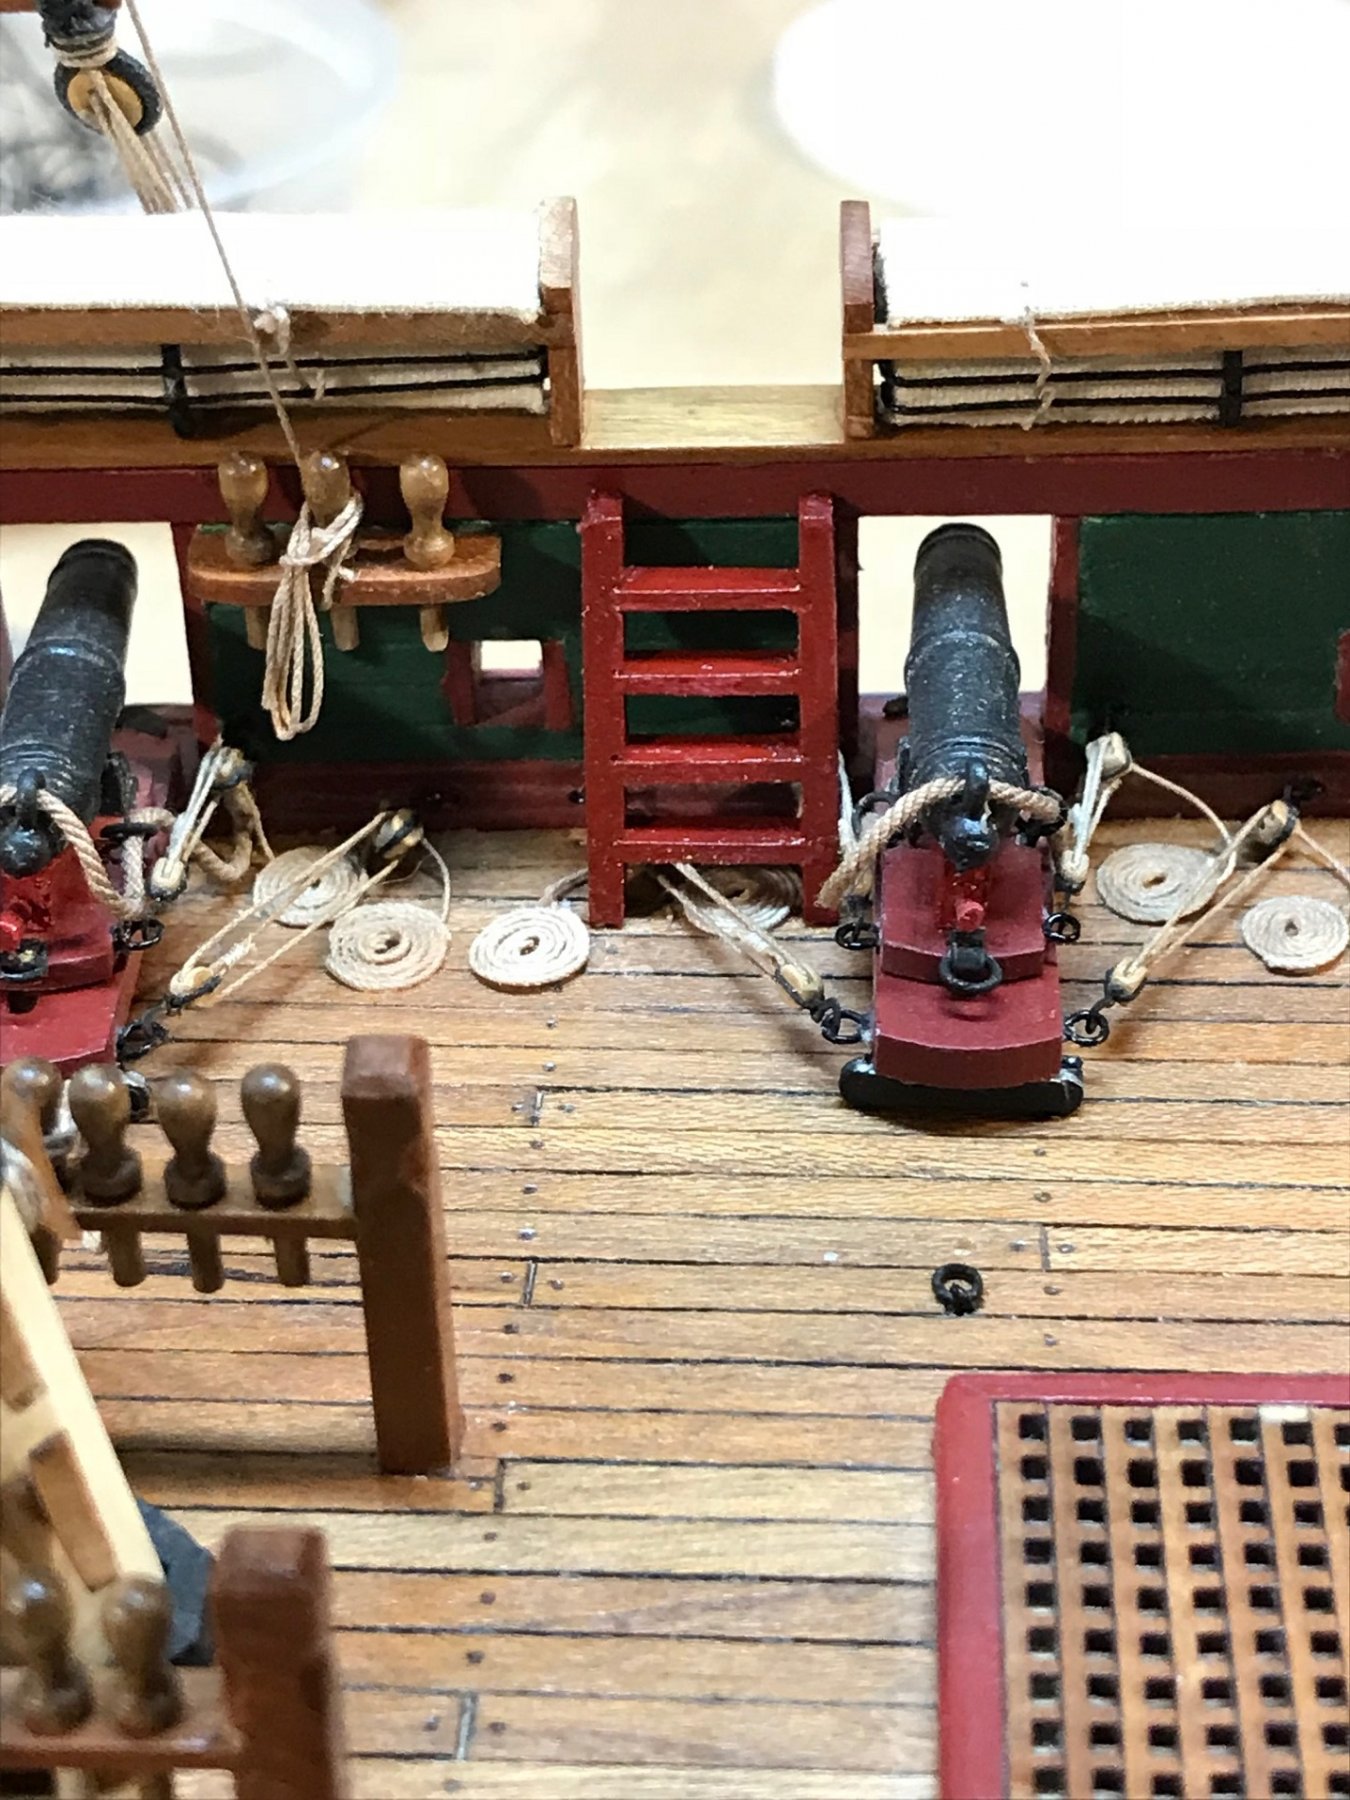
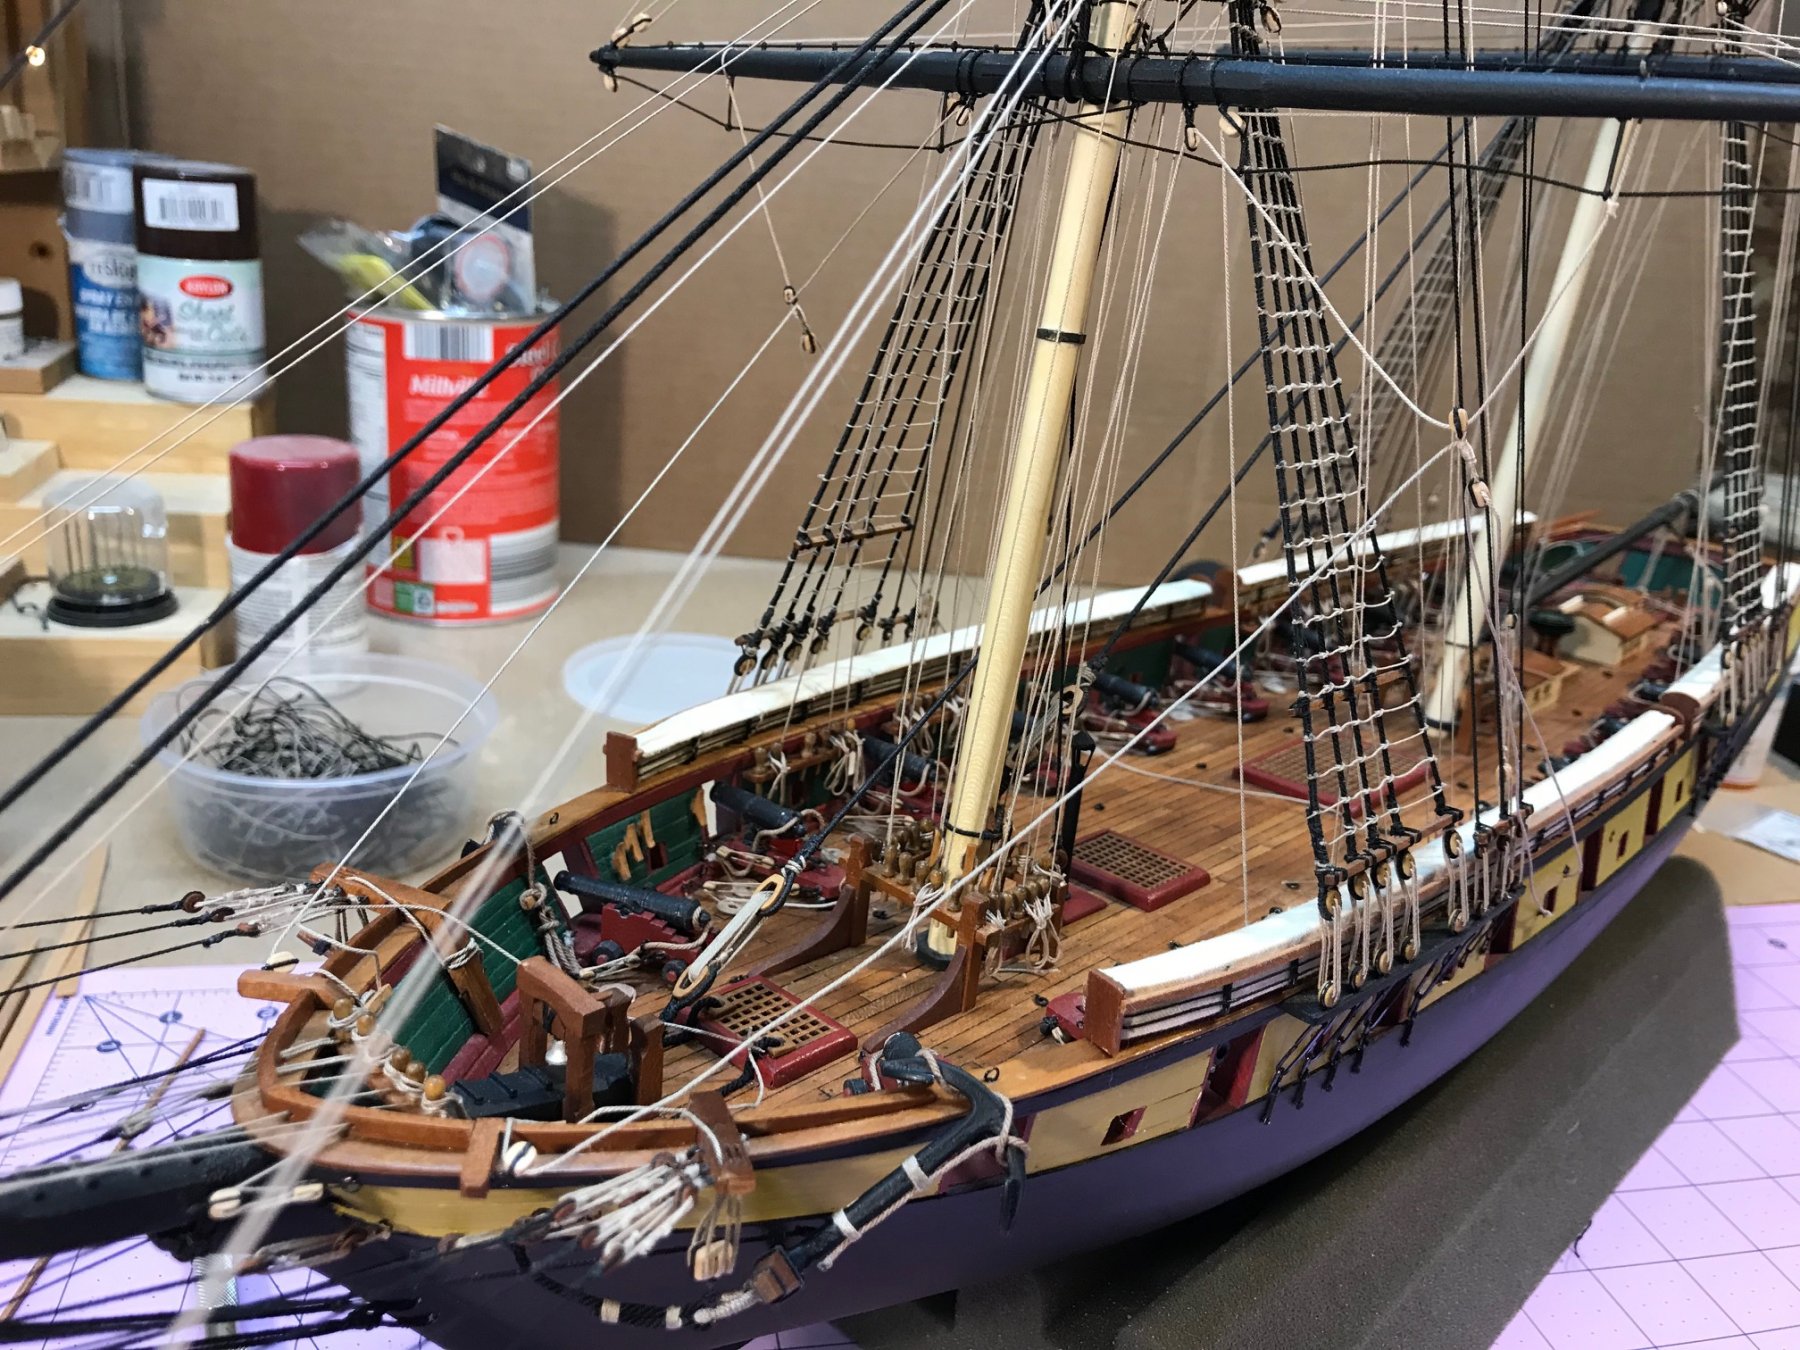
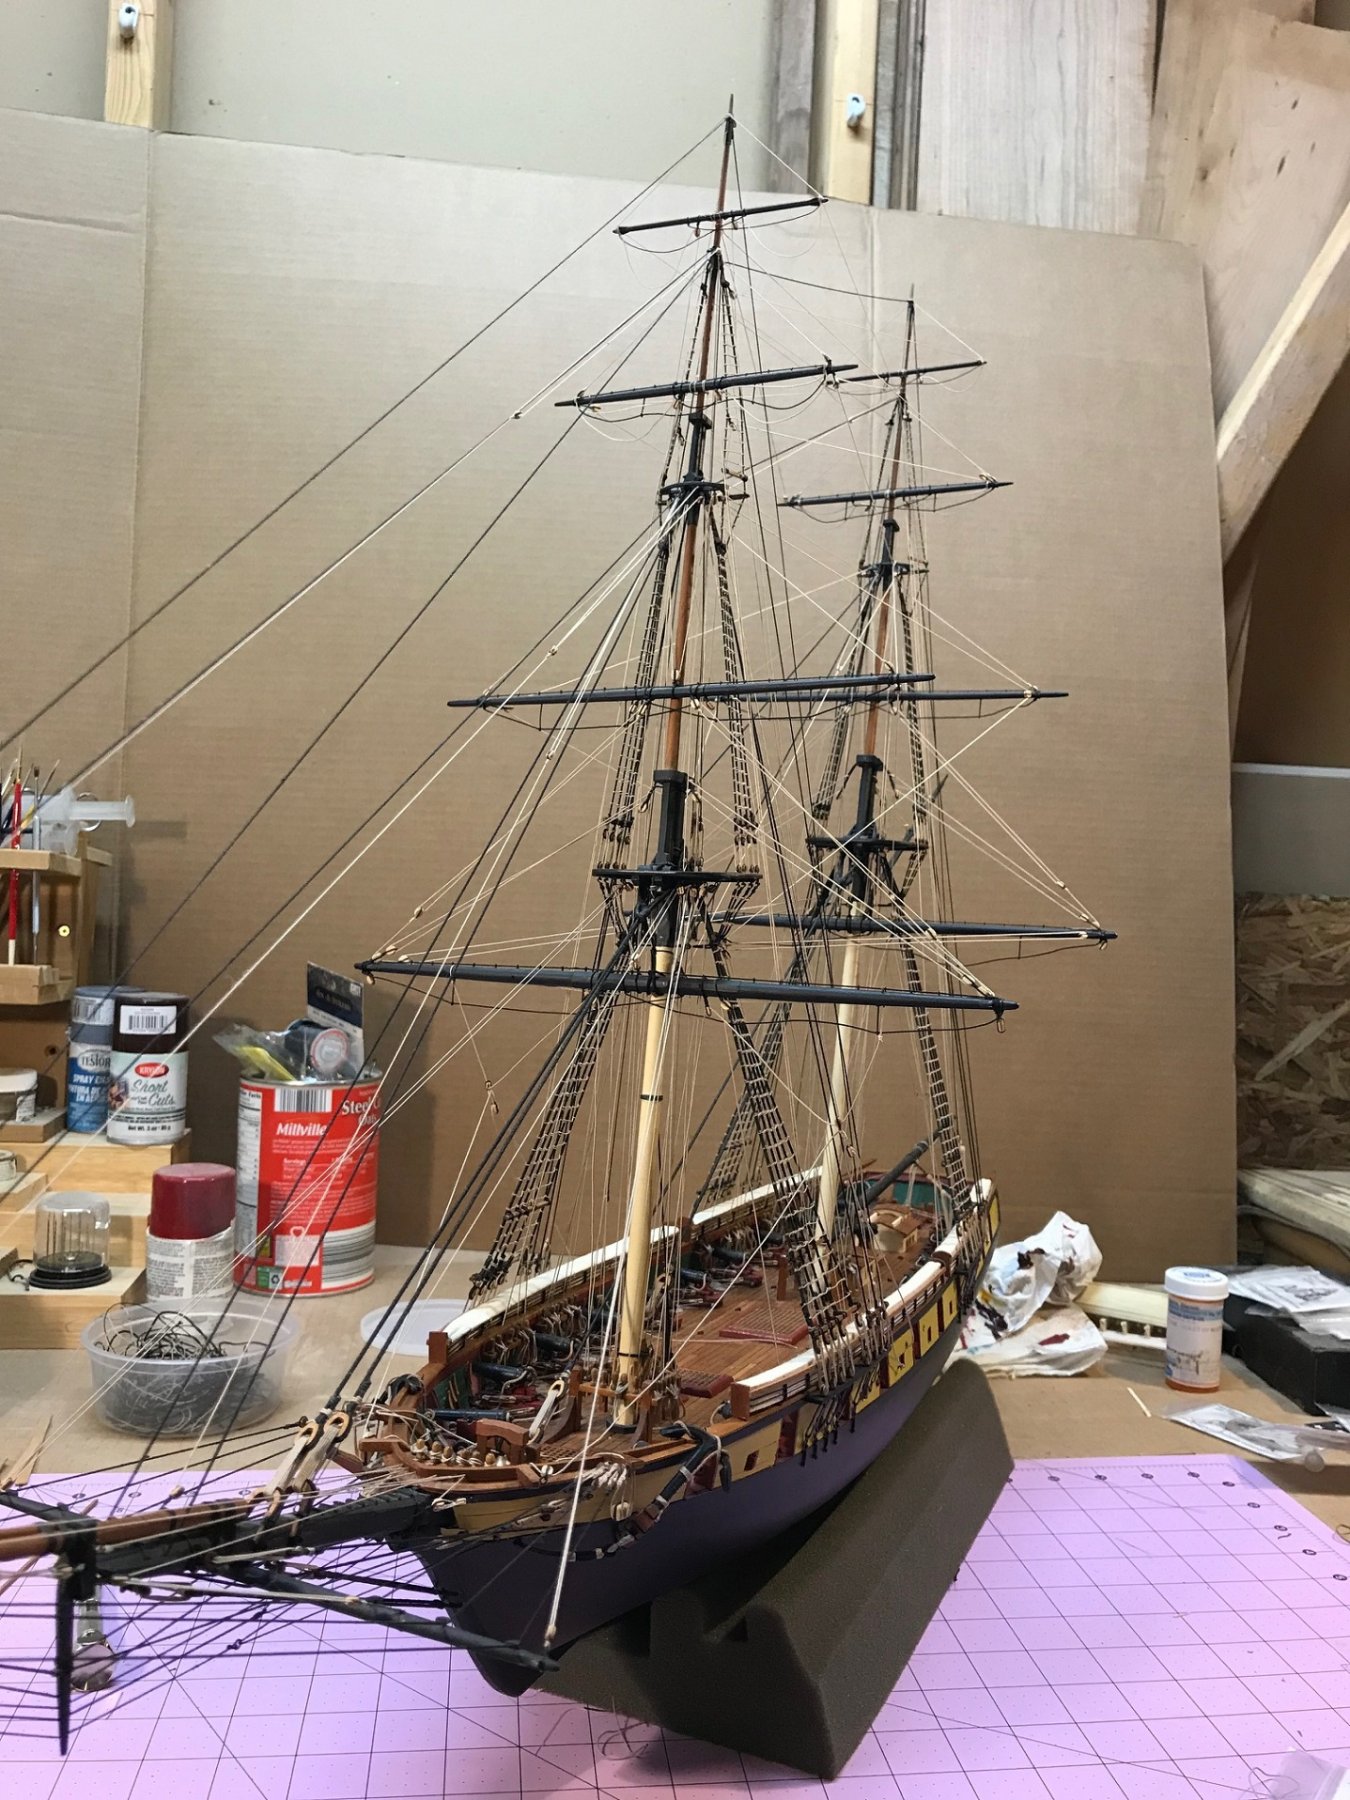
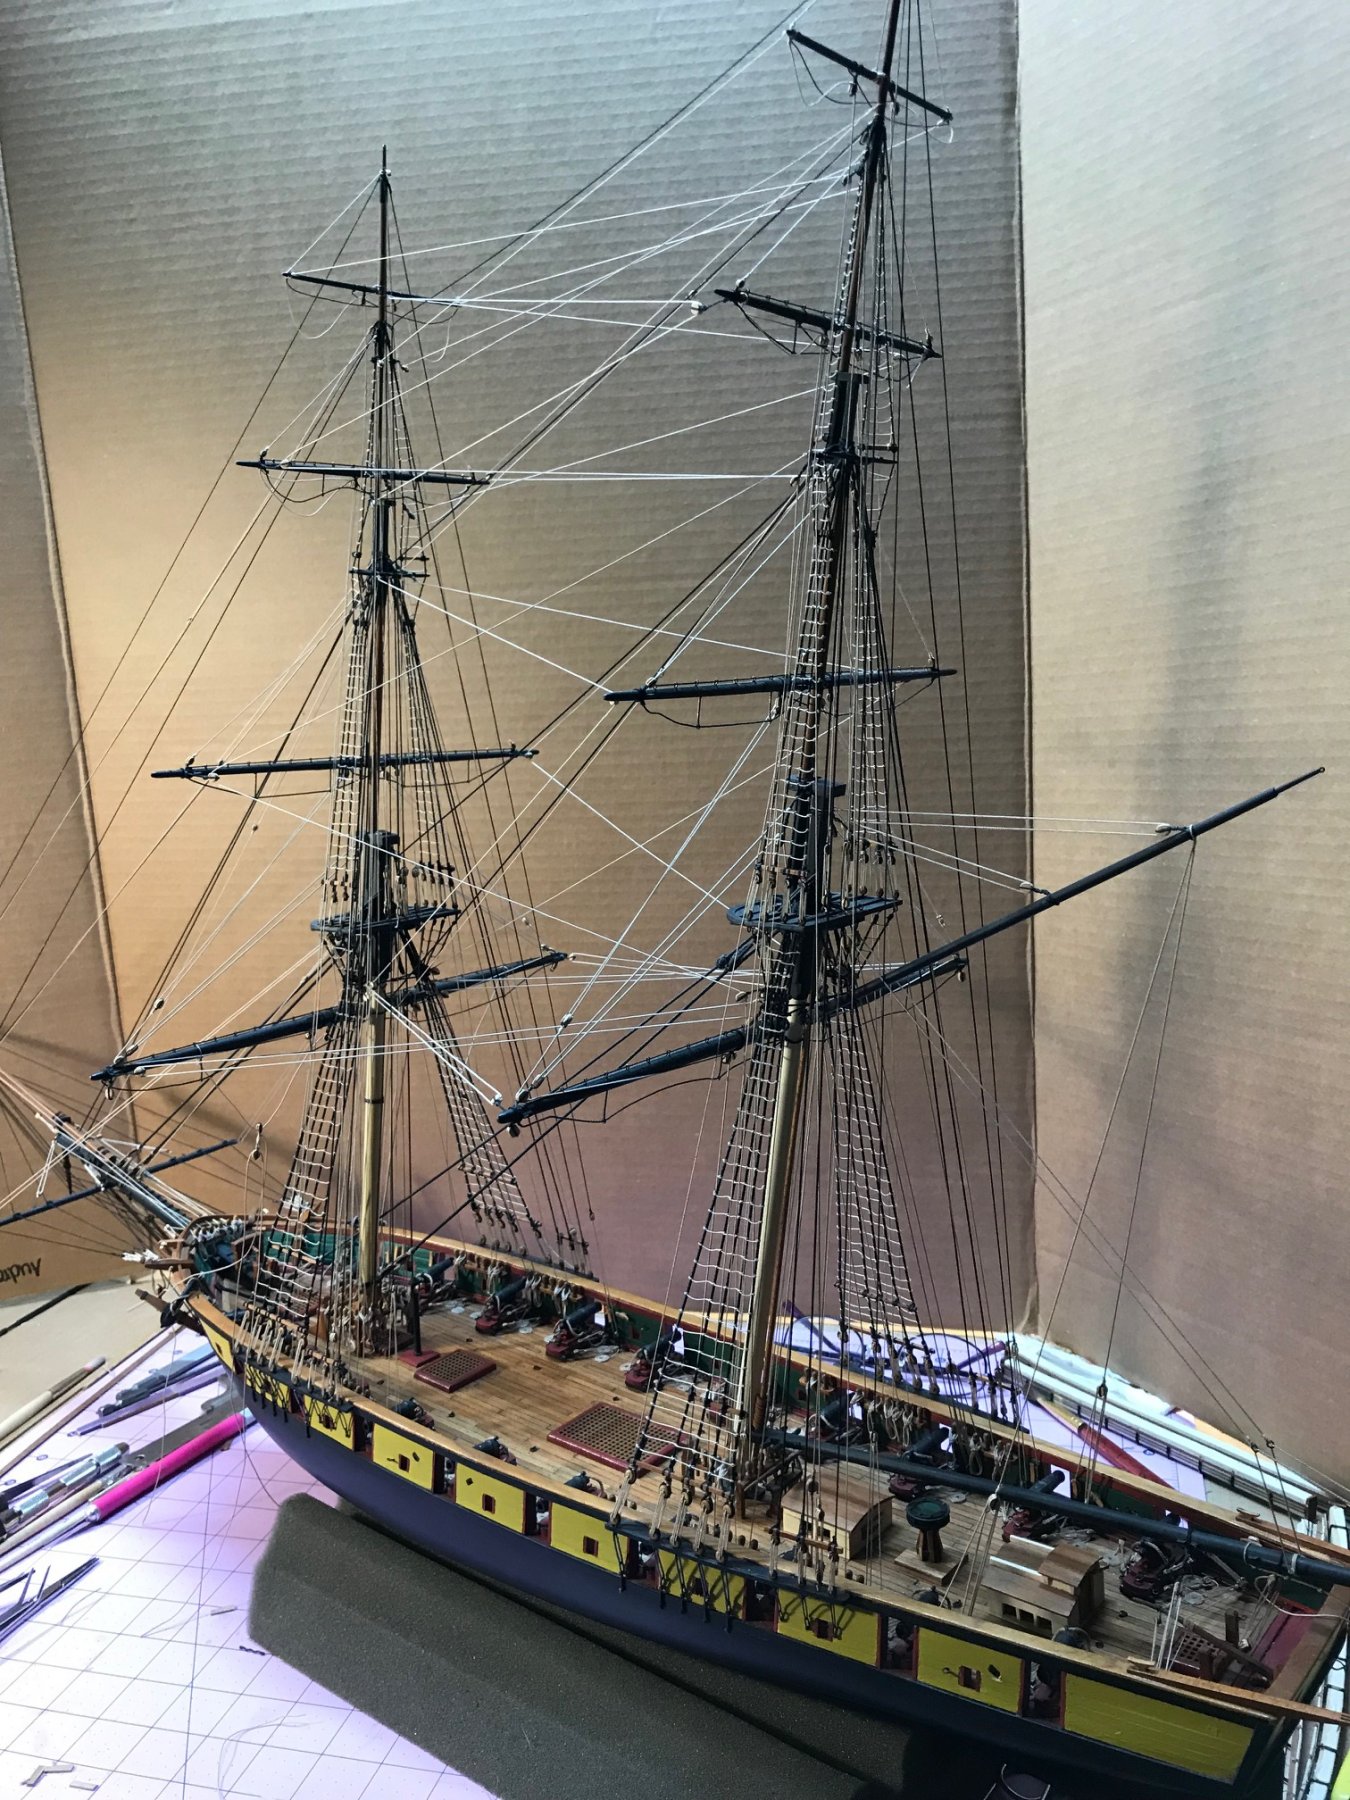
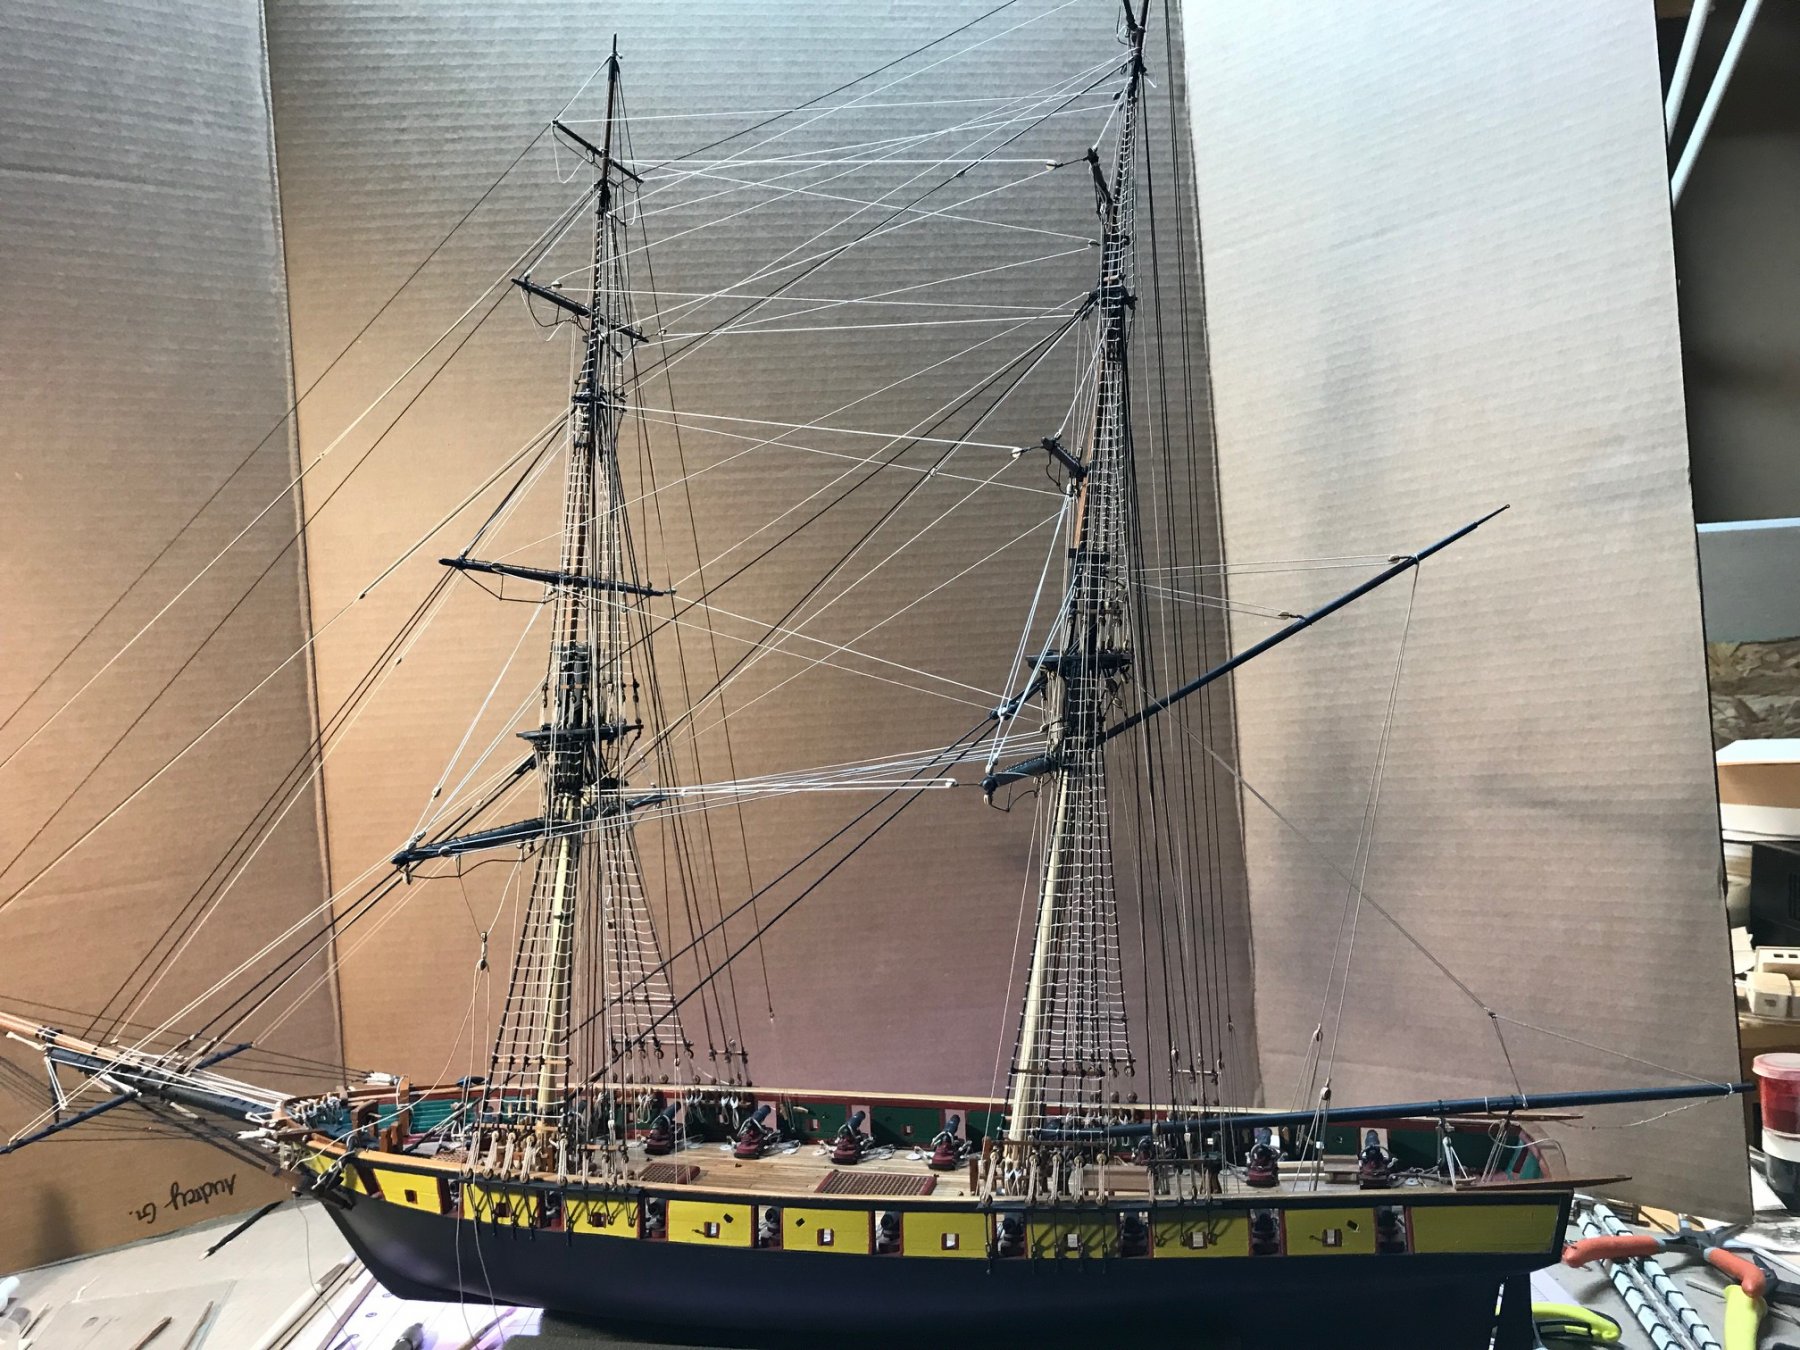
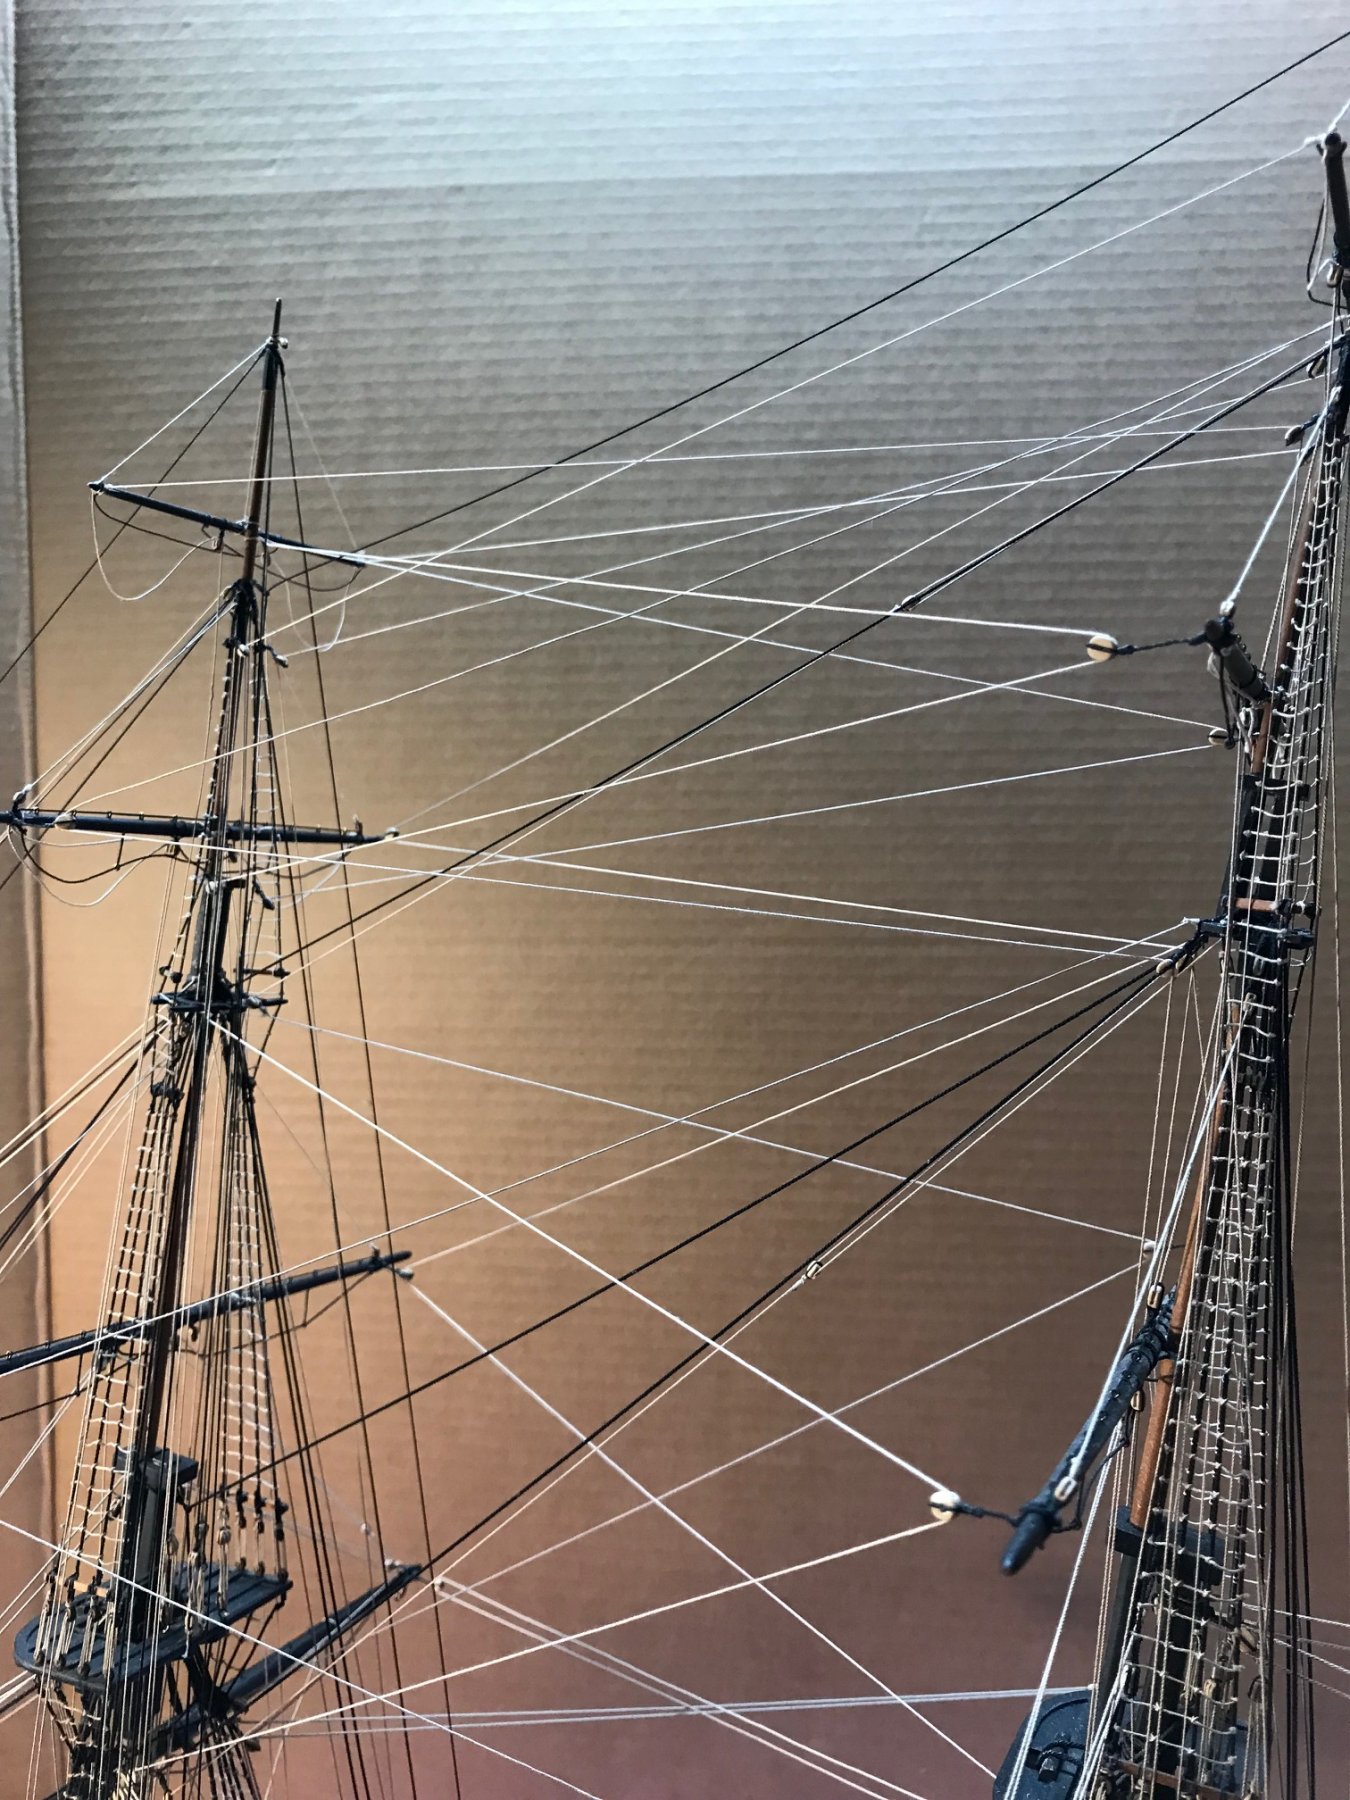
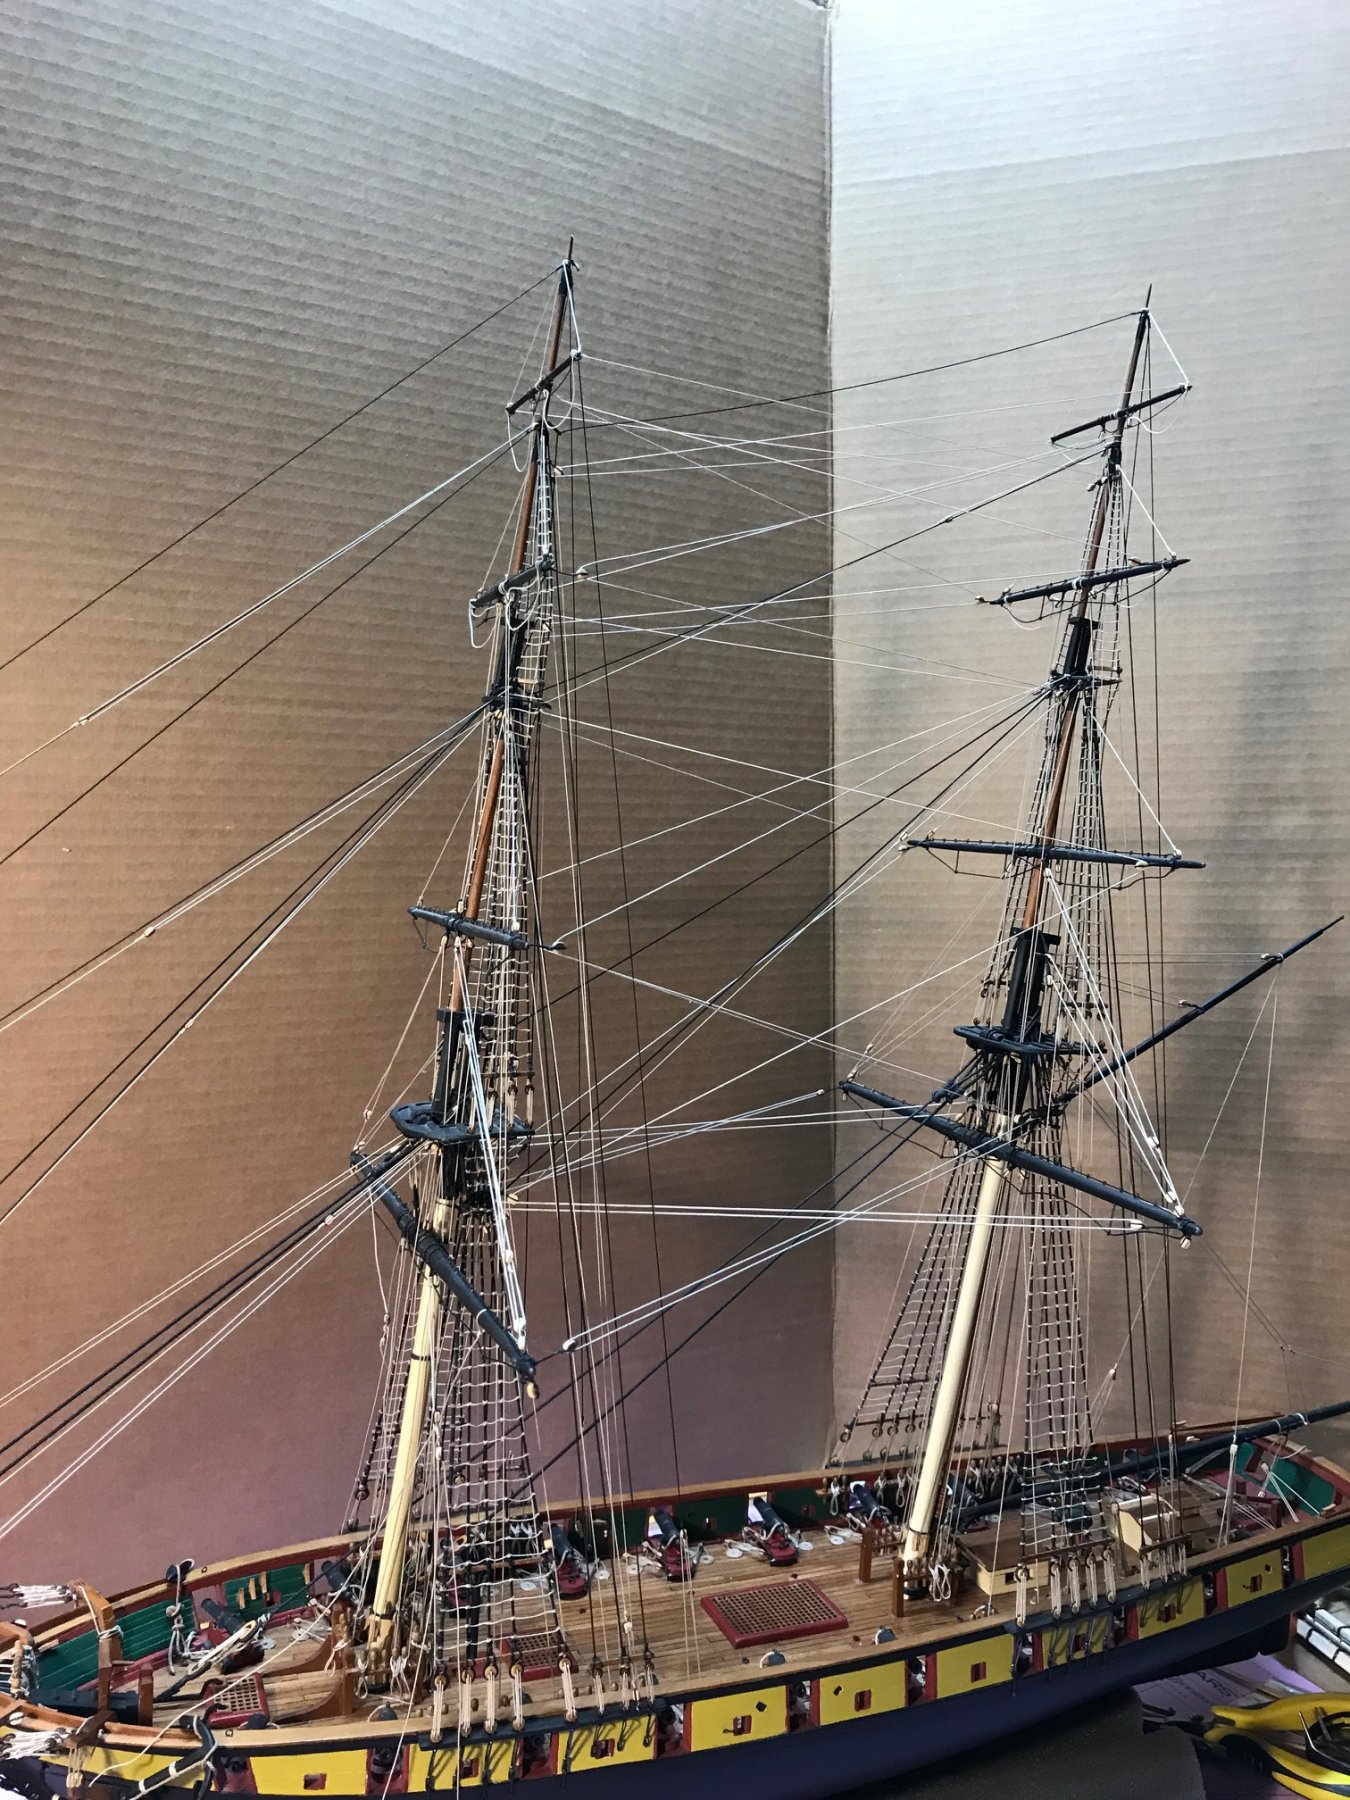
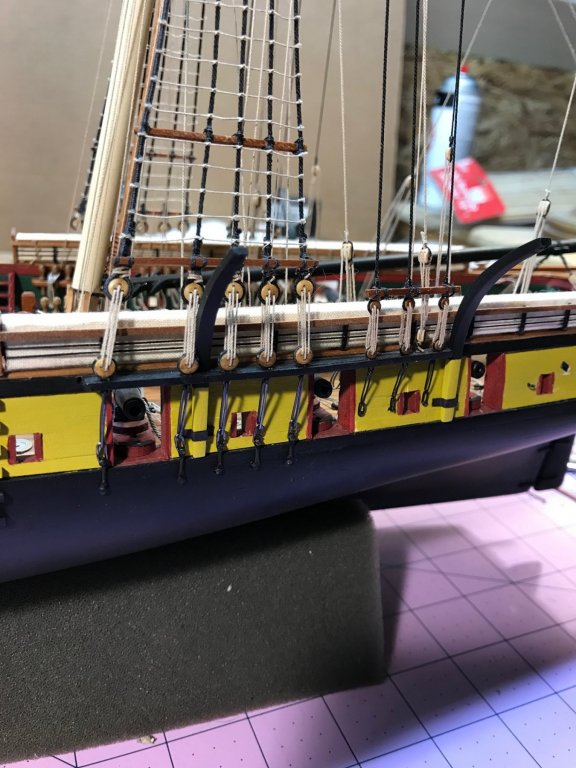
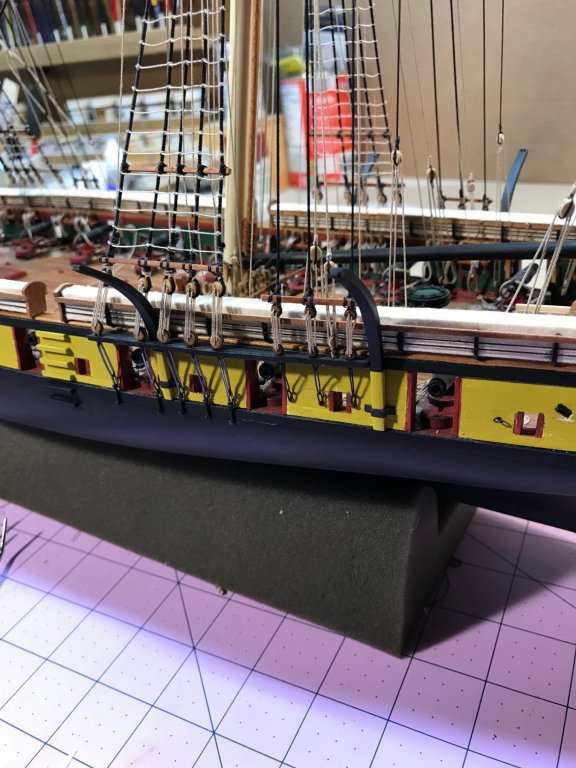
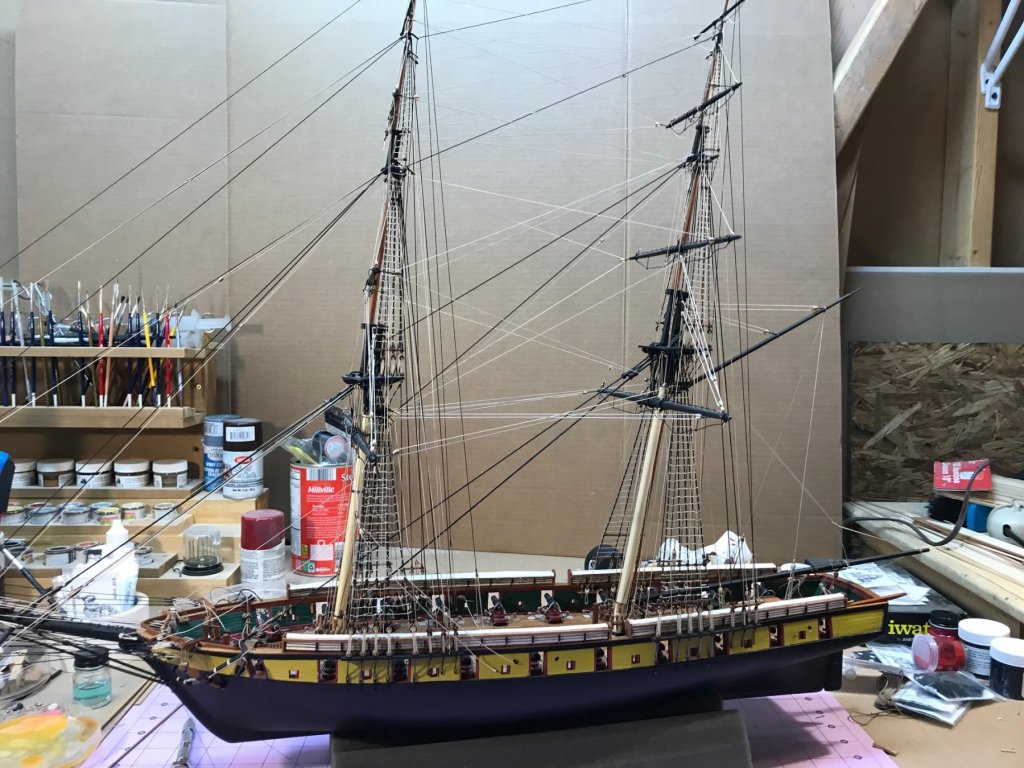
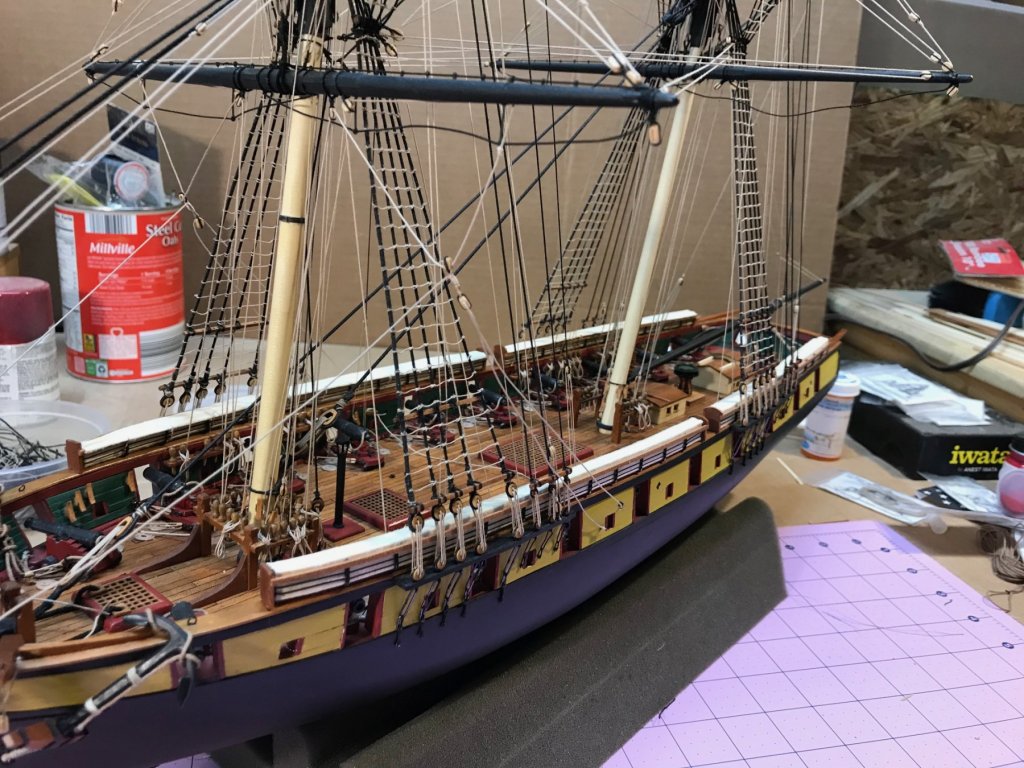
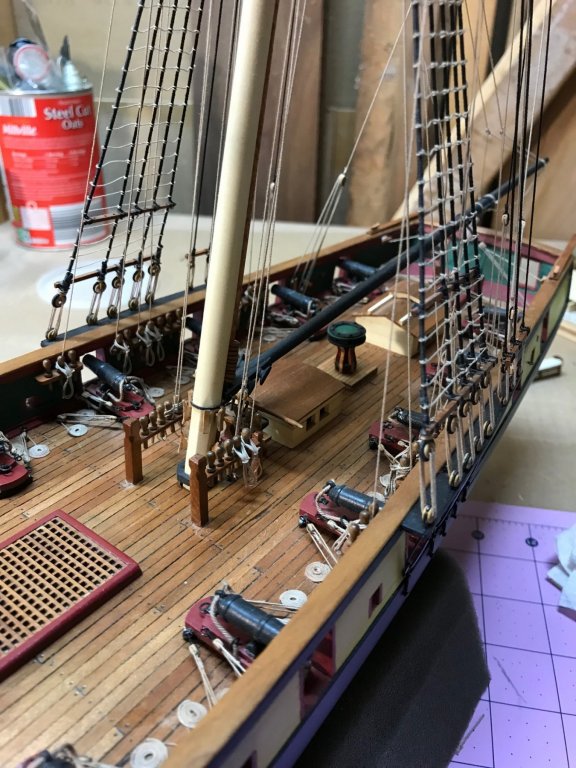
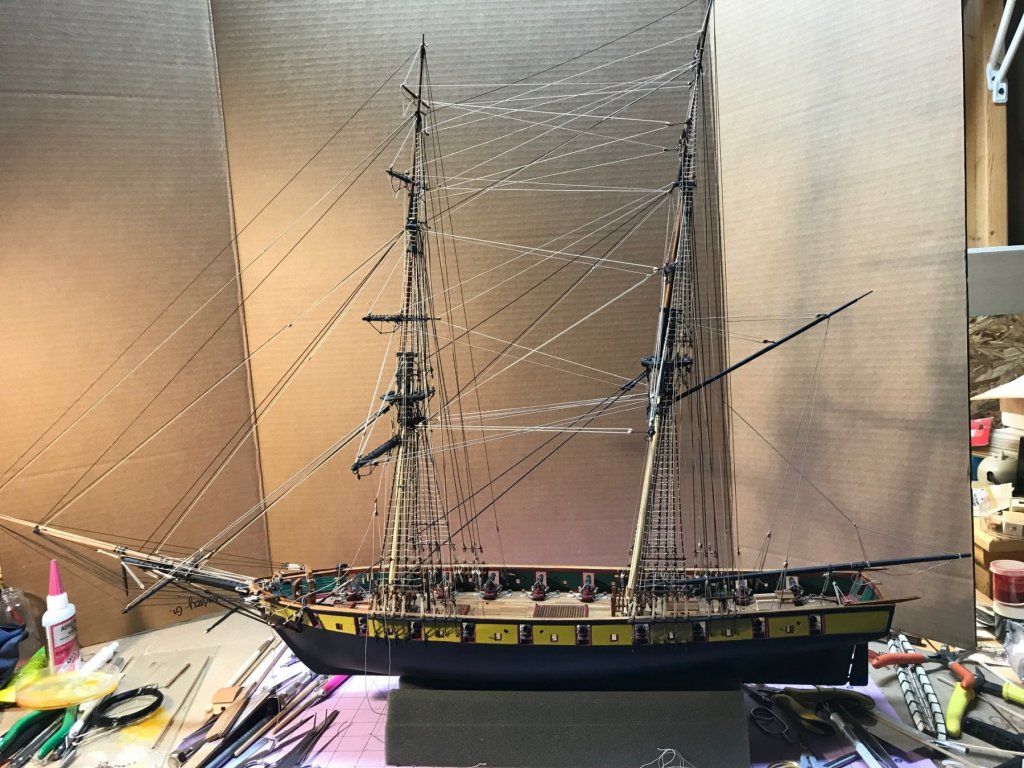
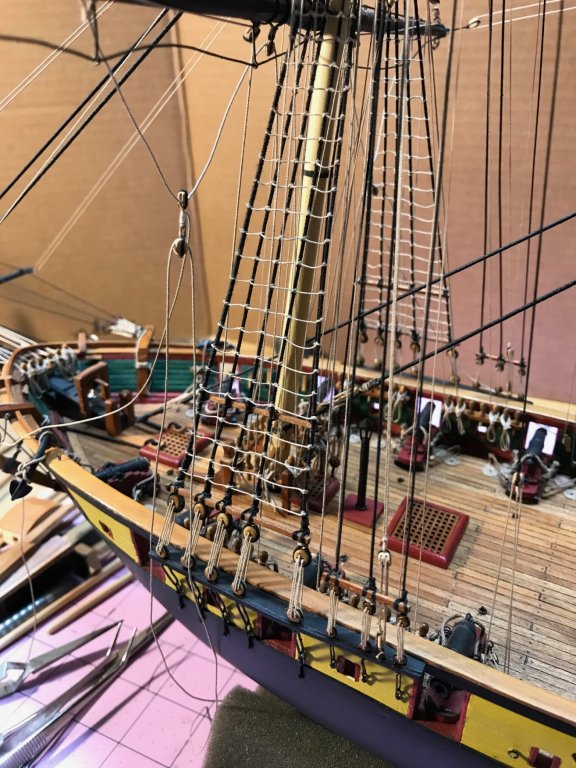
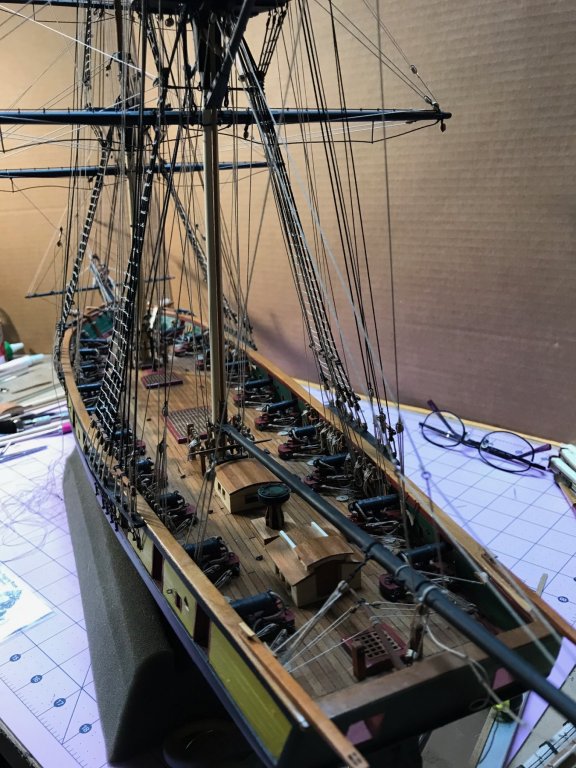
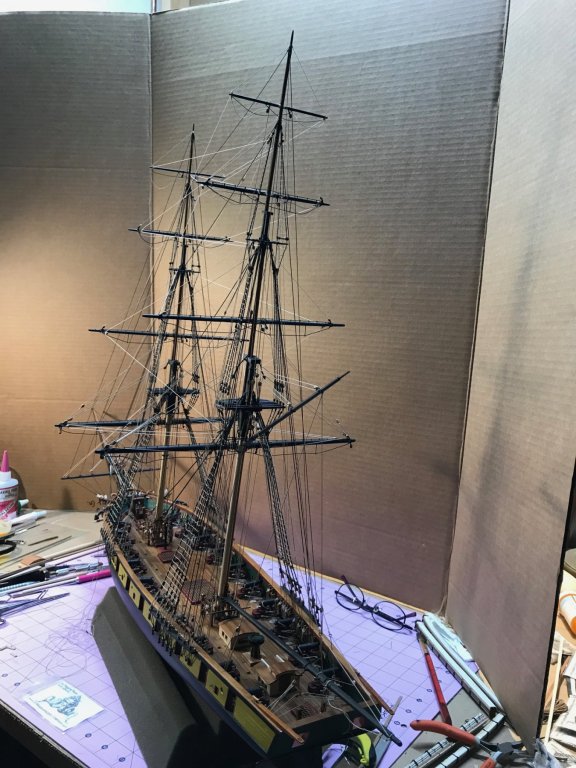
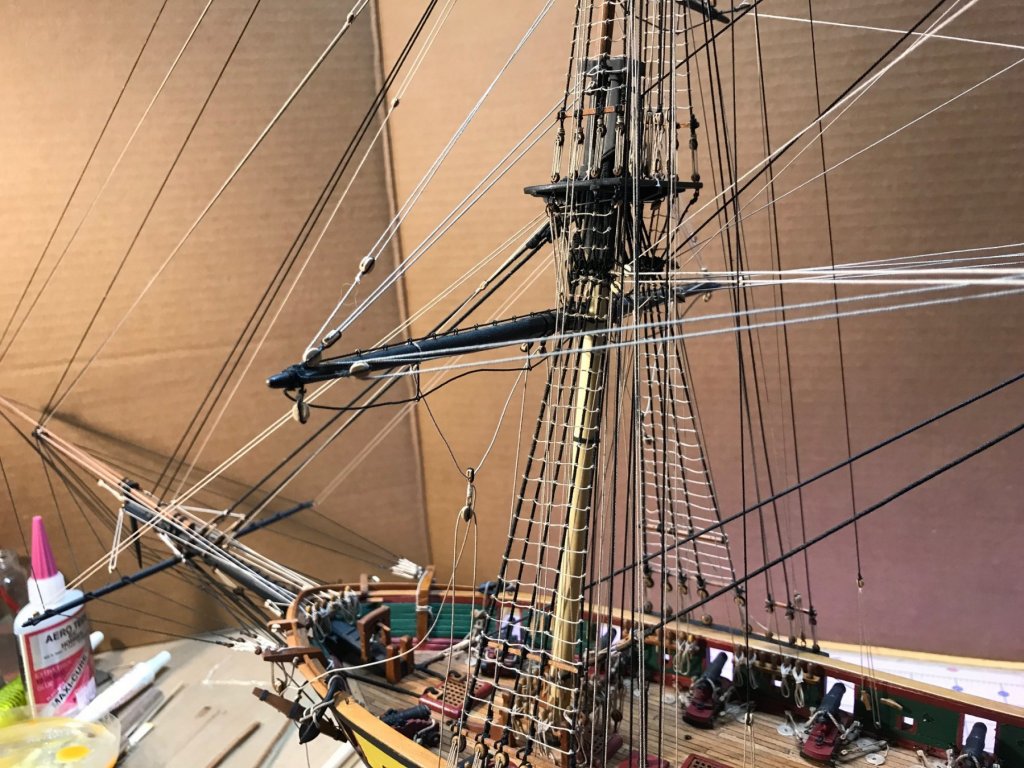
BRACES I finished all of my deck work. I added eyebolt rings to the deck for the haul rigging for the guns. I should have done that sooner. I also created a slew of rope coils to hang on the pins and glued down the deck structures. Having done all of that, I was prepared to rig the braces. I had previously tied 16 blocks, now it was time to lash 16 rigging lines to various locations (royal yards, hounds, upper shrouds, upper tree, lower shrouds) and then snake them through the blocks and tie them off on either a pin on the rail or a cleat. This was an incredibly tedious endeavor. The upper braces had to be run down the mast among a score of other lines. Getting them through without crossing or twisting around another rope, in an area that is hard to see was frustrating. I would pull the line down to the designated tie off pin, and then look to see how it laid on the other lines, and if twisted (a frequent occurrence) would invariably have to pull it back out and start again. I think I got it though, and while my adherence to the actual pin rail plan is loose (pardon the pun) at best, it is workable. As I look at it, while securing the yards, and giving me a great understanding how each line had a meaningful purpose, it still looked like a proverbial cats' cradle. This took all weekend to accomplish. Boat davits, securing the hammock rails, and some minor work on the stern is just about it for the ship. Then I have to build the boats, which I have decided to scratch build with holly ship lap planking. Should be an interesting challenge. As I download the recent photos, I realize I have not send any large shots of the ship lately. Here is where I am so far.


- 648 replies
-
- 9
-
-
- niagara
- model shipways
- (and 1 more)
-
You would not find a more historically correct book than "In the Hour of Victory - the Royal Navy at War in the Age of Nelson" by Sam Willis. It is based on primary sources and the narrative is riveting.
-
Tom, I rolled mine up using inverted point tweezers on a glass plate after soaking the rope in a whiteglue/water mix. Once you get the hang of it, it should not be a problem. You only need 80.....ughh.
-
Tom, Indeed it is. Can't get any better than Chuck's blocks and ropes. Looking great. Good choices.
-
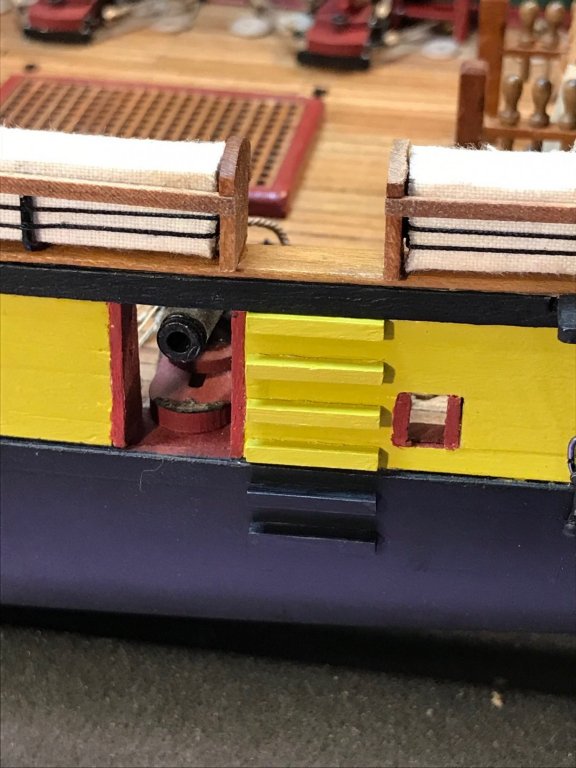
JS, I have been following you log for some time now. Your work is outstanding, and your narrative is descriptive and informative and will be of great service to future Constitution Builders (which might be me someday). I am struck by the challenges you are currently facing with the important measurement of the height of the gun ports and your plywood deck plus planking. I did the very same thing with my Model Expo Niagara. I used a birch base for the deck and planked veneer strips over it (I actually applied the veneer to the birch before gluing the assembly to the hull). All of my guns are on the upper deck, and I had to put together a carronade just to check if my ports would be high enough since I added some extra thickness to the deck. You might want to do consider the same as I would be a bit reluctant to rely on the plans for exact dimensions. I also used a block of balsa wood cut to the dimensions of the gun ports and "built around it" with strip wood to assure consistency. Good luck and smooth sailing, and if you don't mind, I may come out of the shadows more often going forward.
-
Mike, I had to use a grinding bit to open up the hole. I squared the hole as best I could with an ultra fine carving bit, but in the end, I decided NOT to inlay the square chaffing blocks since the joint was not up to par. It would have been a piece of cake if I had thought of it before installing the grate. Gluing them on top was ok. Another "should have...." moments. I realize I failed to answer your question of what's next. It's because I am not sure, but I will say I have acquired three HMS Victory Kits - a 1/90 Mamoli, a 1/90 Corel, and a 1/78 Mantua-Panart. It is going to be one of those with a lot of scratch built parts. Any suggestions? I have milled a large supply of cherry, pear and boxwood and just picked up some Ebony from Keims that I need to rip.
- 648 replies
-
- 2
-
-
- niagara
- model shipways
- (and 1 more)
-
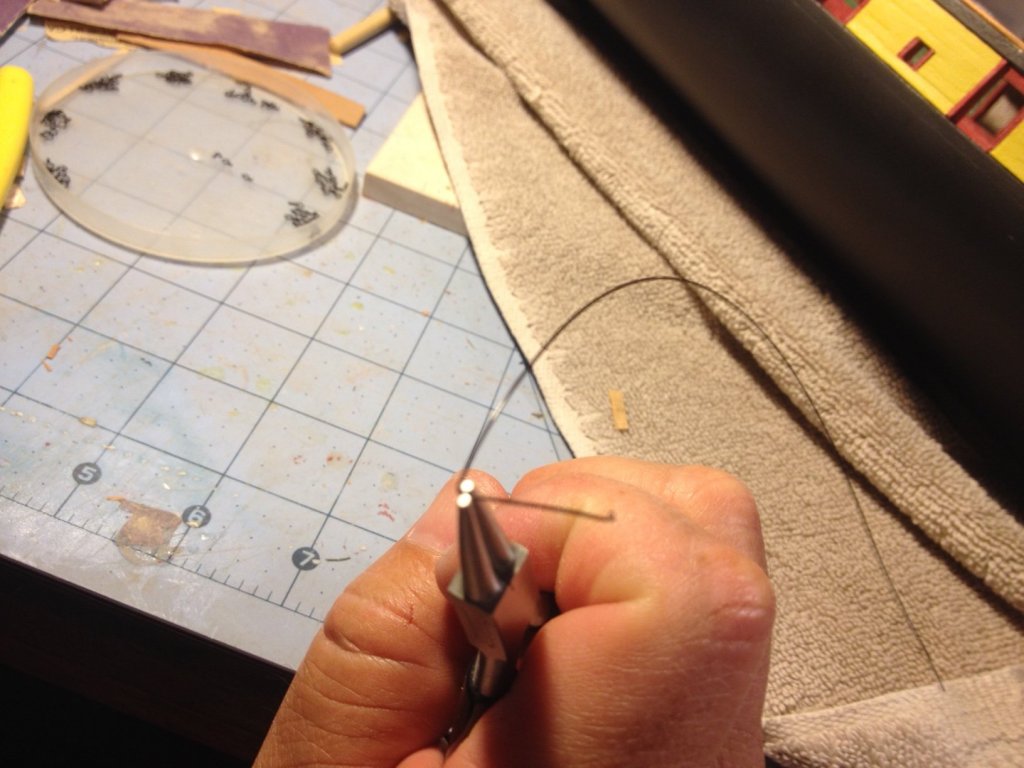
Black wire for eye bolts/rings
6ohiocav replied to Johnnyreg's topic in Metal Work, Soldering and Metal Fittings
John Following up on JCFrankie's suggestion, while you are at the jewelry making supplier, pick up a pair of rounded pliers. I use a dull black steel wire and with the pliers, can twist out a slew of perfectly round eyebolts in quick order. The ends of the pliers are much smaller than the photo suggests. Good luck.
-
Mike, BRAVO my friend. While I dabbled on my build, you not only finished your Niagara, but completed a whole other vessel, and it looks FANTASTIC. You finished it so quick, I did not have time to follow it. What's next...????