
HOLIDAY DONATION DRIVE - SUPPORT MSW - DO YOUR PART TO KEEP THIS GREAT FORUM GOING! (Only 13 donations so far - C'mon guys!)
×


Modeler12
-
Posts
1,716 -
Joined
-
Last visited
Content Type
Profiles
Forums
Gallery
Events
Everything posted by Modeler12
-
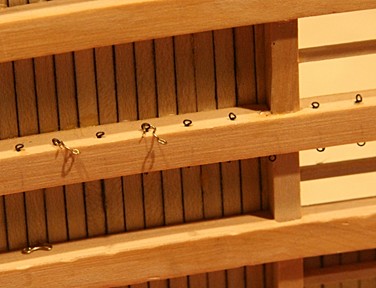
 With several hundred sailors and marines aboard, sleeping arrangements were important and always crowded on the berth deck. The hammocks were strung and attached to hooks along the gun deck beams with 18 to 24 inches between sleeping bodies. Before going too far, I decided to add the 'hooks and eyes' to the gun deck beams. But I cheated. Instead of attaching the hooks (hard to make) to the beams, I reversed it and attached the eyes to the sides of the beams instead. The eye bolts are made by the technique discussed earlier and epoxied in place every 24 inches apart. The hammocks will have the hooks (four of them shown below) You are looking up at the gun deck beams from below. Hence, it is important to install all of the eye bolts before this part goes onto the frame. BTW the hammocks would go between every other beam; but now, how to make the hammocks?
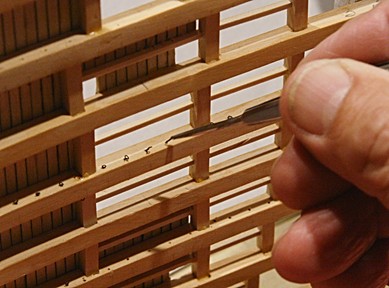

- 572 replies
-
- 13
-

-
- constitution
- frigate
- (and 1 more)
-
I bet that every sailor had a knife and perhaps a spoon, but not a fork, Mark. Chopsticks, may be??? That would be easy to add. One reason I wanted to see what this would look like is that the riding bit has a slice of blood-wood on its back. Some Worcestershire sauce and a touch of red might be just fine. But enough is enough.
- 572 replies
-
- 4
-
-
- constitution
- frigate
- (and 1 more)
-
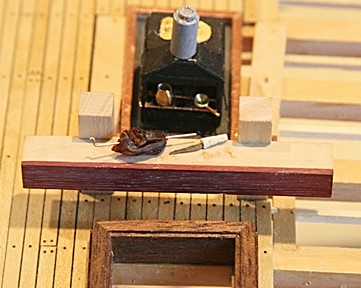
Well, guess what? I just had to make sure that the turkey would not be forgotten. So here it is (with a carving knife) on top of the big riding bit. I am sure those large blocks of wood would be used for just that purpose. It is in a perfect place for all the butchering that might take place aboard a ship. I promise, that this is the last of this series. Well . . . . . The turkey may have to pass also. It tasted like BBQd kangaroo or perhaps crockodile. Both are tough and need sharp teeth and a tolerant stomach. But the usual, spicey sauce is alright. (At least it covers the after-taste, if you have any).
- 572 replies
-
- 9
-
-
- constitution
- frigate
- (and 1 more)
-
Thank you fellows. So far it is still fun. Moving down one deck, I am making a bunch of hooks to be mounted to the gun deck beams. They are for the numerous hammocks. I also have made a lantern to be mounted in a corner behind one of the C-knees. But it will have to wait until the inside of the frames are planked. I just want to make sure I have the location right for the LED wiring. Then it is back to the sewing machine to make some hammocks. This will all take some time . . . . .
- 572 replies
-
- 4
-
-
- constitution
- frigate
- (and 1 more)
-
If you look very closely you might find the spoons and forks. Somehow I misplaced them and I cannot find them The turkey is very sweet from Fresno California. The spit and turkey may be displayed somewhere, but I thought the pot and pan were better inside the oven. Anyway, enough of this tiny stuff. I need to get going on other parts of the section. PS It is time to also remove some of the dandruff. But for now the oven is retiring to a safe place.

- 572 replies
-
- 9
-
-
- constitution
- frigate
- (and 1 more)
-
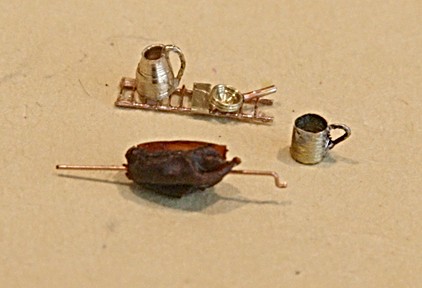
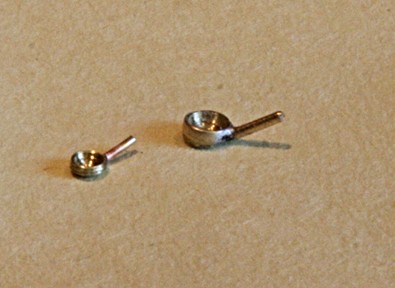
Thanks Jack. But like I mentioned, I didn't like the bulky frying pan. So here is a smaller version. The handles were silver soldered. I might mention that earlier I showed how the handle to the frying pan (the bulky one) was brazed onto the 'pan' while it was still attached to the brass rod. Now I make the pan or pot and cut it off the rod. Then I come back and add the handle. That, of course, is the tricky part. But I hold the handle in a hemostat with some paste at the end and hold that against the brass pot as best as I can. I then use a mini torch to heat the brass pot until I see the paste liquify and make the joint. Again earlier I had both pieces in two hemostats and juggled them together. No good. When the joint is made I had to undo one of those hemos and usually broke the joint. Leave it free. Oh, I almost forgot the roasting spit.
- 572 replies
-
- 11
-
-
- constitution
- frigate
- (and 1 more)
-
Like any thing you do in this hobby. The more you practice, the better you get. I made one more 'coffee pot' and the wire grill that will be installed in the oven above the coals. There is also a roasting spit. I still have to make the drip tray in front, and then I am going to call this part done. Actually now that I look at the picture, I may redo the frying pan.
- 572 replies
-
- 8
-
-
- constitution
- frigate
- (and 1 more)
-
Right on George. But forget about the plate settings, forks, etc. I am not that crazy and I don't use a microscope. Just another pill to steady my nerves and some to help my eyeballs. That might help. Well, not really, I have never tried those. . . . .
- 572 replies
-
- 3
-
-
- constitution
- frigate
- (and 1 more)
-
Rob, the first thing you need to keep in mind is what you want to do with this modeling 'thing'. Did you buy a kit? If not, that is the best way to start, and you can select any of those that are 'starter kits' on several internet sites. If you feel more confident, go for the one you really like. Do you have any skills with small (or large) tools? There are lots of places to buy them, but keep in mind what you really need to get going are: Tweezers, various sizes but keep them small. Knives to cut wood. You definitely need one or two with lots of blades. A series of small files or sanding blocks. And I hope others will fill in the rest. Welcome to this site, Rob and have fun..!!!!
-
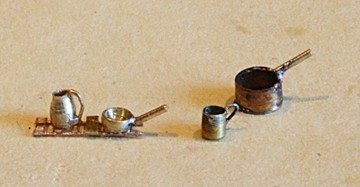
OK. this one is for the guys (who always live up-side-down) and like their beer. Instead of just a glass, this one is a pitcher. Go at it Steve. I could not help it, but making these tiny pots and pans is fun. I may not even give it up yet. After all, this hobby is to have fun, right?
- 572 replies
-
- 12
-
-
- constitution
- frigate
- (and 1 more)
-
Another pot and a frying pan in the making. Pretty soon I'll have to give up this nonsense and get back to work.
- 572 replies
-
- 9
-
-
- constitution
- frigate
- (and 1 more)
-
Brass wire, installed into a pre-drilled hole with a slight touch of CA, sanded and then quickly blackened works for me. The deck below needs to be stained and then some polywipe. The stove and stanchions are free to be moved at this point.
-
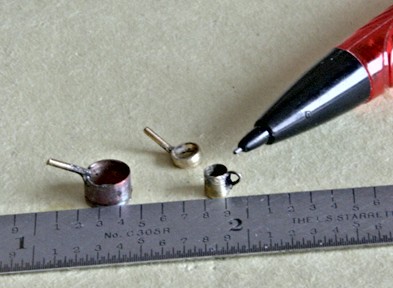
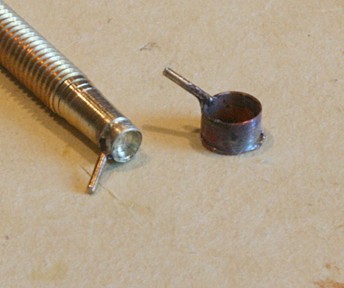
Here is a 19 inch diameter copper pot. All I need to do is to figure out how to attach the handles. I may drill some holes and either braze or epoxy the handles in place. In either case I will do that before cutting the pot off the tubing. It's back to the hardware store and see what else I can find.

- 572 replies
-
- 6
-
-
- constitution
- frigate
- (and 1 more)
-
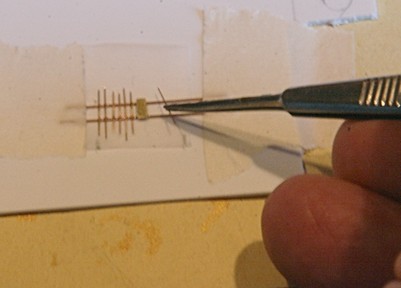
I'll give it another try or two, CW. For my first attempt I used some standard wooden dowel and that is just not good enough. The wood tends to split real easily at the size I am working. I need to use some very fine grain wood such as boxwood. I have used that before to make tiny carriage wheels and it was a lot better than any of other woods. In addition I want to try some copper from electrical wire But right now I need to make a grill on which these pots and pans can sit over the fire. Here is one way I am going about it. I am using .015 inch thick phosphorus bronze wire for the long pieces and .008 inch thick wire for the cross parts. The center flat is some brass. I know I cannot silver solder these pieces and have them all brazed at the same time, so I am using epoxy. Obviously after the epoxy is fully cured, I will trim the ends, paint it black again and fit it inside the oven just inside the front. There will be a small shelf and a roasting spit underneath.
- 572 replies
-
- 5
-
-
- constitution
- frigate
- (and 1 more)
-
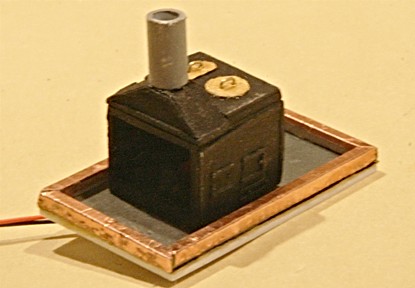
Marc, that is by far the nicest comment I have received yet (well, it ranks pretty high). I am having fun, and that counts. Adding LEDs has been in my book for a few years and this time I decided to go for it. I must agree that the stove and coals make it look a lot better than a light hidden behind a wall. But I may still resort to that later on in other areas. Right now I am still pondering the question about making some pots and pans to scale with my clumsy fingers. I'll come up with something, I hope!!???!!! Oh, here are a couple more additions to the stove. I know, it is a lot less impressive without the light and the exhaust pipe needs some straightening. Those are things I don't see unless I take pictures.
- 572 replies
-
- 6
-
-
- constitution
- frigate
- (and 1 more)
-
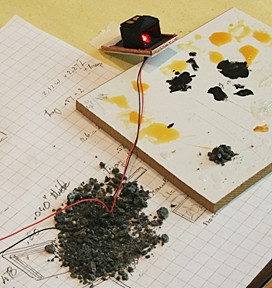
Steve, I don't need no tiny turkeys no longer. I am going to barbeque some pork ribs tonight and will be using a grill (not a rotiserie; by now I am so tired of that word that I forgot how to spell it). To be honest, I am surprised about all the nice comments and thumb-ups I have been getting. The admiral will have something to say about that when we devour another rib or two. Right now it is back to making piles of coal.
- 572 replies
-
- 6
-
-
- constitution
- frigate
- (and 1 more)
-
Thank you guys. It is amazing what those little lights can do. Now I am curious about other places and am thinking some nano LEDs in places such as the sail room (orlop deck) and couple lanterns on the berth deck. Then I have to tie them all together and have them come through the keel.
- 572 replies
-
- 4
-
-
- constitution
- frigate
- (and 1 more)
-
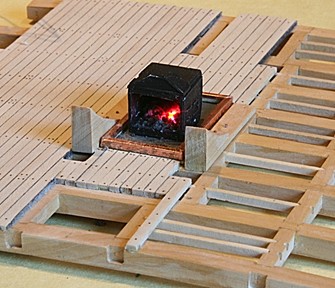
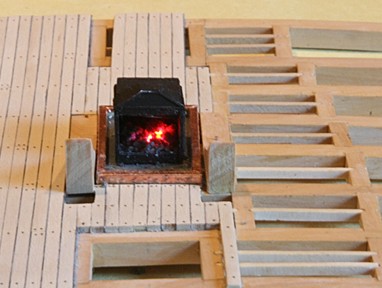
It's a good thing that I tried this because it would have been difficult to install the LED and coal with the front blocked with spits etc. Now my plan is to assemble the stove and base with coal as one unit before I go any further.

- 572 replies
-
- 14
-
-
- constitution
- frigate
- (and 1 more)
-
That looks good, indeed, Dave. My first attempt to make the drip tray was ok, but the wrong size. I noticed yours has rounded corners and that looks good also. I might try that. Thus far I like working with styrene. I have done some silver soldering of brass and copper (and blackened that), but for this stove I have more options using the styrene sheets and shapes. They come in a wide variety and if I had to start the oven again I might look into using styrene angle pieces for the corners.
- 572 replies
-
- 4
-
-
- constitution
- frigate
- (and 1 more)
-
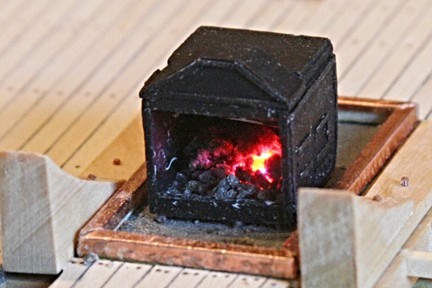
Thanks. The stove (as I call it ) will be fitted around the coals shortly. But my first attempt to make pots and pans failed badly and I may have to short change that. My fingers are just not steady any more. But perhaps the red glow and coals will help.
- 572 replies
-
- 5
-
-
- constitution
- frigate
- (and 1 more)
-
Question about stoves and how the rotisserie worked
Modeler12 replied to Modeler12's topic in Nautical/Naval History
Indeed, Wayne, and I keep being amazed with people like you who have such a large source of information both in your head and on your shelves. Thanks for sharing. -
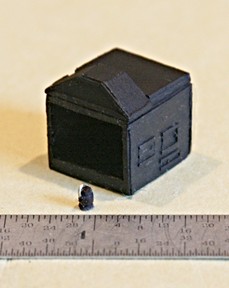
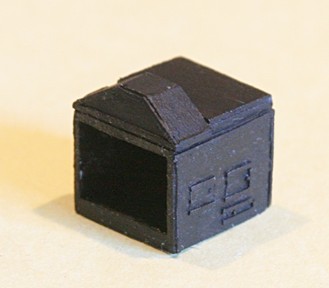
More work to be done, but I did not want to wait with painting the inside black. I might not get to it with spits and grills in front. Of course, give me a paint brush and I won't quit, so the outside got its first coat (which I will rub and probably do again). I still have to make the lids for the boiling pots and lots of other goodies in front. Thanks George for the pictures of the Connie. I had seen most of them but not the one showing the back side of the stove. I am sure this was a very busy area with the kitchen crew feeding a couple hundred sailors. I think I might add some barrels and crates here. BTW this little cube is about 1/2 inch and the little trim strips are styrene 0.010 x 0.020 inch.
- 572 replies
-
- 7
-
-
- constitution
- frigate
- (and 1 more)
-
Question about stoves and how the rotisserie worked
Modeler12 replied to Modeler12's topic in Nautical/Naval History
Well, I am about to give in to all those articles and pictures I see. If this was such a marvelous system, I am surprised that it did not last in history (despite the invention of electricity). I am in the process of adding a stove to my cross section and that raised the question in my mind. I will not add the pulley system but will show a couple spits in front (hand cranked) and the grill top as shown in the photograph Wayne Tripp showed about the galley on the Victory. I hope I can make some pots and pans to go with it (but the scale 1:76 is rather small for my eyes to handle). Just a final comment to Barkingmad: I am really not the kind of person who does not believe any thing he reads. But I do believe in questioning something I think is not right. This was one of those times. -
Question about stoves and how the rotisserie worked
Modeler12 replied to Modeler12's topic in Nautical/Naval History
Thank you Wayne for that detailed explanation about the Brodie Stove and how he got a monopoly on his stove design. It was my understanding that Mr. Brodie got his contract on the basis of the whole new design of using cast iron and other features to replace old brick furnaces, etc. The use of the fan, pulleys and chain were not specifically mentioned (but I may be wrong there). To add fuel to the fire, let me also question the use of the distillation pipe at the back of the oven. I believe that could work, but was very complicated and produced very limited amounts of distilled water. Perhaps enough for use by the physician (if he even knew the benefit of using pure water to treat wounds). I doubt that the pipe lasted very long with all the other activities taking place behind the stove. -
Question about stoves and how the rotisserie worked
Modeler12 replied to Modeler12's topic in Nautical/Naval History
That is exactly my point. Why do models and literature show those elaborate gears and chain when it did no good? My theory is not that they are not shown, but that the fan did not put out enough energy with simple hot air blowing through the blades. Indeed, hot air can rotate a blade held in the stream as it rises (we have all seen the Christmas toys with a couple candles and the rotated merry-go-round). But to power a rotisserie that has meat hanging from it (and poor bearings along the way) requires more than a fireplace fan.