Modeler12
-
Posts
1,716 -
Joined
-
Last visited
Content Type
Profiles
Forums
Gallery
Events
Everything posted by Modeler12
-
 Wayne, when you go to the part where you request to become a member, you'll see what information they want. I figured that I had to be a member to get into the details and ask questions (like here). It is a new requirement, hence old members are not included. I'll do as you suggest some other time.
- 572 replies
-
- 2
-

-
- constitution
- frigate
- (and 1 more)
-
Thanks Ken. I will check this out. My computer firewall warns me that the MSB site is 'dangerous' but I cannot believe that. So, here goes. No. To become a member MSB insists on having personal information that I do not want to share. eg home address, birth date, etc.
- 572 replies
-
- 1
-
-
- constitution
- frigate
- (and 1 more)
-
I am aware of those drawings (that's why I mentioned the powder room in my initial plans), but what do they really look like? Do they take up the full beam? What about the heavy outlines? Is there a special material to surround this area? What size are the powder barrels? The light room is of course a main 'attraction' and I am toying with the idea of adding some real light there. But, again. I would love to see what the tiny room looks like from the outside. According to the plans, the sail room is above the powder room on the orlop deck, but what is on the starboard side of the sail room? Could it be that the powder room is really on the orlop deck???? Lots of little details to think about. Just curious: if the powder room was/is really in the bilges instead on the orlop deck, I would think that any water down there would be a real problem. But, as you said, that is what the AOTS shows.
- 572 replies
-
- 2
-
-
- constitution
- frigate
- (and 1 more)
-
It is a lot of extra work for this model, otherwise I would do all of them this way. But my intent is to have one half of the model (port side) finished while the starboard side will have various structural parts shown. Only small parts of the hull and decking along that side will be planked in order for more light to come through and show the inside. Hence not too many of those chocks would show. I may also take some liberties in the details along the port side for the same reason. What I really need are the details of the 'powder room' and light room in or below the orlop deck. Any suggestions, pictures?
- 572 replies
-
- 6
-
-
- constitution
- frigate
- (and 1 more)
-
Thank you fellows. It is an interesting project and again I am learning as I go along. I made a couple of the frames with the 1/4 inch wide slots in the bottom sawed and filed individually, but I am having trouble keeping them lined up. So for the rest I will hold off slotting them and try to cut them all at one time (or in groups of three or four). I do need to keep a loose fit so I will have some degree of freedom for final alignment in the lateral positions. I am also toying with the idea of making up some strips to use on the outside for clamping the frames during final glue up. This came from seeing what Gimo did with the Triton cross section. The difference again will be that the wooden strips need to be bent to the outside contour.
- 572 replies
-
- 2
-
-
- constitution
- frigate
- (and 1 more)
-
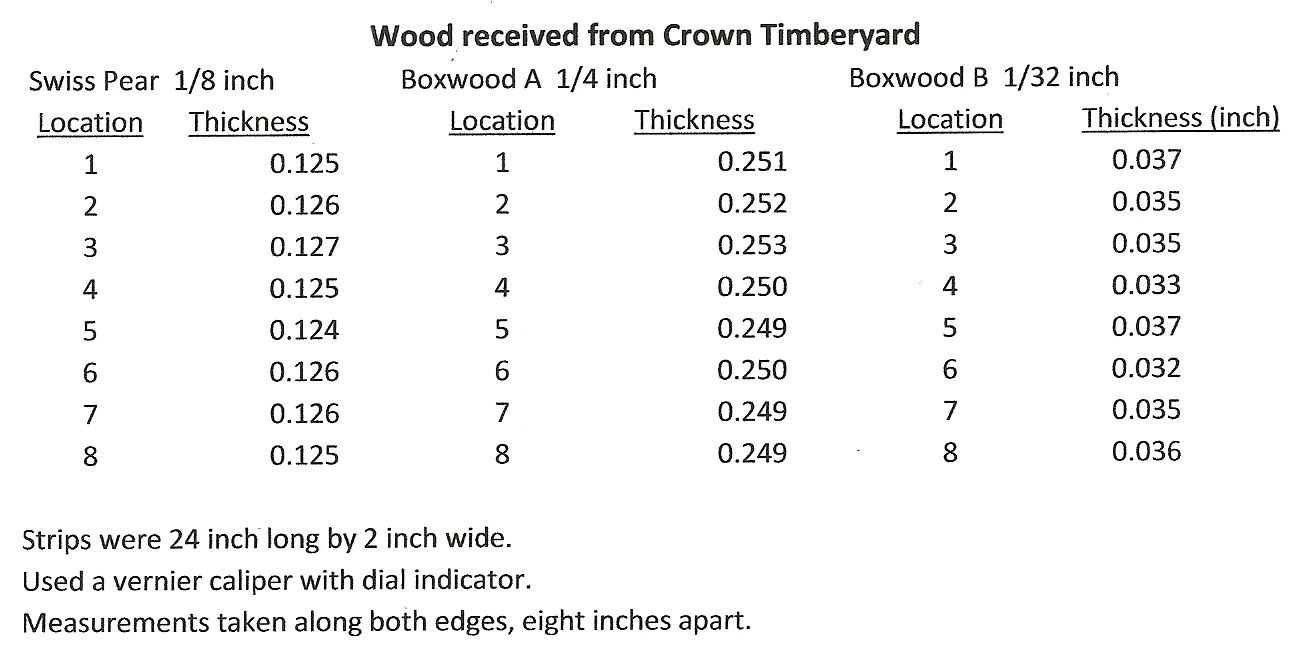
Here is the first (and also the front) frame set. Since this is the most visible one, I decided to make the front frame somewhat like the real thing. I used nine pieces and used some pear to give the chocks a bit of contrast. I still need to show the scarf joints towards the top, but decided to make those two parts out of one piece. I also used steel rods (15 inch long real) to hold the parts to the second frame (thus making up the frame-set). I am keeping the frames rather 'fat', because (unlike most other cross sections that are in the middle of the ship) all frames have a different shape and I want to keep enough room for sanding them when all are done. Of course, the keelson still needs to be trimmed and all will be dry fitted until I am satisfied they are a go. BTW the picture shows this set in the second position. It really belongs in the notch in front of the keel/keelson.

- 572 replies
-
- 12
-
-
- constitution
- frigate
- (and 1 more)
-
Let me add a comment about 'nomenclature' and the confusion about tolerances. When I bought the lumber from Crown Lumberyard I did not specify a tolerance on thickness or anything else. What I did, when I received the material, was to measure the 'deviations' from the specified thicknesses. It was one of the considerations of quality. In other words, tolerance is something you can tolerate and is specified (usually) as a plus or minus amount from what you want. The deviations in my analysis is what I found from the measurements. The latter may lead to specifying tolerances in the future but not now and maybe never as far as I am concerned.
-
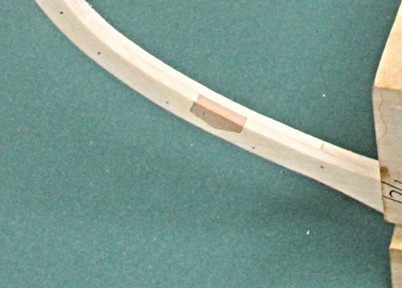
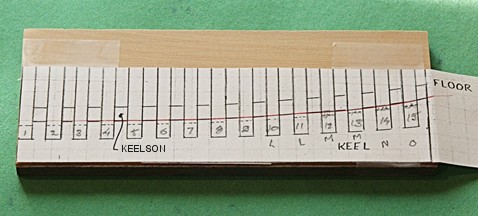
One more picture. The keel and keelson have been notched to receive the frame sets when they are band-sawed to shape. My milling machine did a nice job of making clean cuts, but it was a bear to keep track of where I was for each cut. Both the horizontal and vertical positions had to be noted as I went along. The width of the slots is .197 inches (two times the frames) and the depth is about .170 inch for the keel and .080 inch for the keelson. Thus, when I cut the frame sets there should be a .250 inch saddle that fits inside these notches. Still confused? Just wait until I start cutting the frame sets. It is clear in my mind; but sometimes that don't mean diddly. BTW the keelson will be trimmed to a narrower piece. But I will do that after all the frame sets fit nicely. It will be the last part to be glued in place (for this assembly).
- 572 replies
-
- 9
-
-
- constitution
- frigate
- (and 1 more)
-
While I am glueing up the frame sets, I started on the keel. It is made of 1/4 inch thick boxwood (a bit darker than normal) and a piece of 1/32 inch walnut for the 'false keel' on the bottom. I made a copy of my framing plan and taped it to the keel. This will serve me to cut the curved top as well as notching the recesses for the frame sets. Keep in mind that a set is two pieces of frame and that the gap also represents two frames or one set. The numbers refer to frame sets (or a total of 15). I intend to use my mill to do the notching. I will do the same for the 'keelson' which goes on top of the frame sets and keel. Confusion sets in, right? Unless you read the book by Harold Hahn. When all of this is in place we will have the keel, frames and keelson all glued together, I hope Meanwhile it's time to make more frame sets.
- 572 replies
-
- 6
-
-
- constitution
- frigate
- (and 1 more)
-
CaptainSteve, making horseshoes like that is one way to get more cans of beer aboard. In fact, the more you screw these up the more beer for us.
-
Mark, you beat me to my second post. I hope it explains my steps.
- 572 replies
-
- 2
-
-
- constitution
- frigate
- (and 1 more)
-
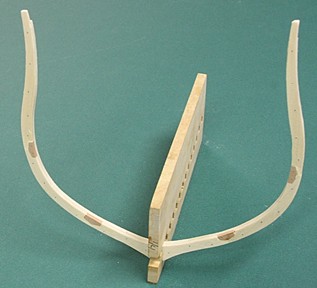
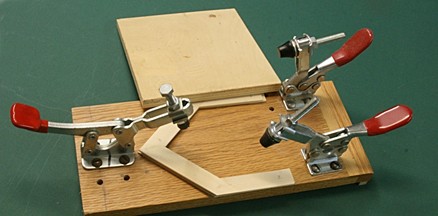
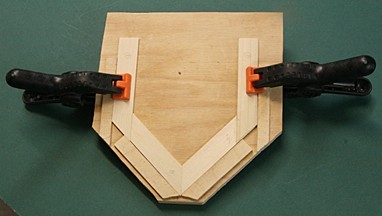
When I have a few of each type, I laminate them together using wood glue. This fixture may be a bit unique. I use toggle clamps that apply a lot of pressure. There is a 'caul-plate' (a piece of 1/2 inch plywood coated with wax), and the two parts will be bonded like that forever. I have tried to use shims to get the right thickness, but gave up because it was not necessary. Then it will be a matter of taking the 15 frame drawings, glue a copy to each frame and start cutting along the lines (that are not clearly shown on the stiff paper). That comes later when all laminates are done, but I do intend to cut the inside of the frames first and then the out side.
- 572 replies
-
- 11
-
-
- constitution
- frigate
- (and 1 more)
-
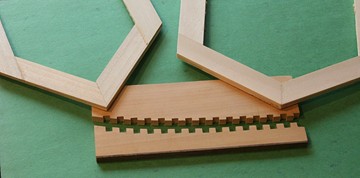
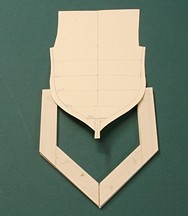
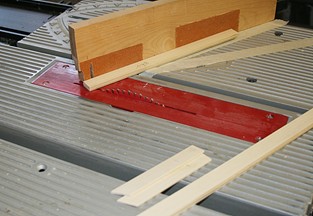
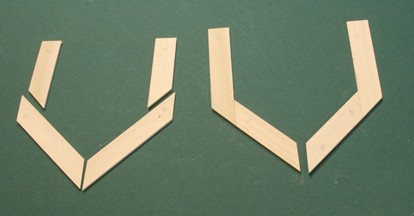
Time to make some saw dust. The frames come first. I am using poplar which is readily available at Home Depot and the white parts is what I looked for in some 1x2s. Eighteen inch lengths were then ripped into strips 0.098 inch thick. I have a Ryobi table saw which has a sliding miter table. It is ideal for cutting the small segments that come next. The drawing shows how segments make up the frame shape. It is important that the wood grain follows the length of the frame pieces, but it is not critical enough to cut them as the full size frames were (are). However, it is important that the seams do not overlap in adjacent parts. Hence there are two different segments. The next pictures shown what I mean. Rather than trying to laminate all eight pieces in one step, I first glued the four equal segments together. The plywood plate and wooden strips are my guides. Note this is for the forward frames which will be cut apart to fit against (not around) the keel. There are four of these sets. The other 11 sets (15 frames) have a different glue-up fixture that I will show later. I might add here that the frame that is most visible from the front will have the various futtocks, etc.

- 572 replies
-
- 9
-
-
- constitution
- frigate
- (and 1 more)
-
I agree with Tom. The holes or slots should be outboard as far as possible. The whole idea of the channel is to move the shrouds out in order to get better leverage or a greater angle to the masts. I would fill the holes, file slots and cover the edge as Druxey showed.
-
The deck looks like it is made of one piece of wood that is quite thick. Can you force the deck in place with your hand? If you can, the rubber bands or cord should do the job. Otherwise you may need to use larger screw clamps and use the piece below to hold the clamps in place.
-
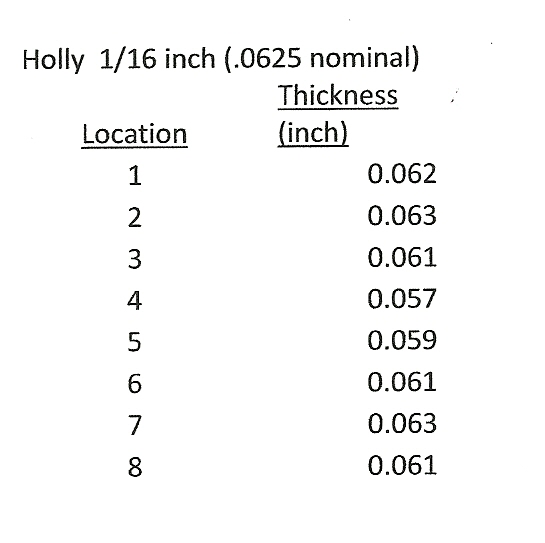
This may be your opinion when it comes to a 2x10, but when I pick up a piece that is 1/32 inch thick it flexes enough so the two 'main sides' will bend slightly and then what? It still is a 'flat' piece when I put it down on my workbench or saw table. All pieces I received from Crown had one or both sides machined true, so all I need to do is cut these sheets to the width or size I need using my table saw, jig saw or hand tools. But now I am confident that at least the thickness is what I want. Furthermore, the measurements I presented had thickness values on both sides of the sheet. Compare #1 and 8 as well as 4 and 6 for example. How do you measure parallelism?
-
This is turning into an interesting discussion, but I still maintain that evaluating a product received from a vendor needs some kind of measurement of quality. That is what I tried to do. Whether or not it is 'over analysis' or 'time consuming' or 'truly scratch building', is irrelevant. I think most of us will agree that a vendor who can offer and produces a product that we want and produces that in good quality is the one we go back to.
-
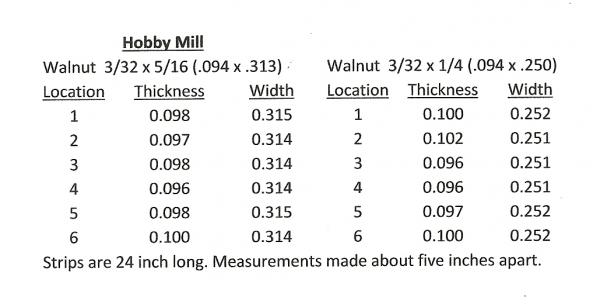
OK Chuck, you asked for it. Here are some results of walnut strips I bought a long time ago from Hobby Mill. Again I selected the two pieces at random. It was obvious that they were sanded to the final thickness. I never bought lumber from anyone else, so I guess I got spoiled by buying from two good places. When I cut my own (without sanding) I range plus and minus .010 inches. Sanding brings it closer but my sander is crude and I cannot consistently get to POM .005 inches.
-
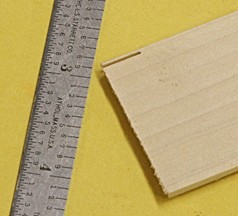
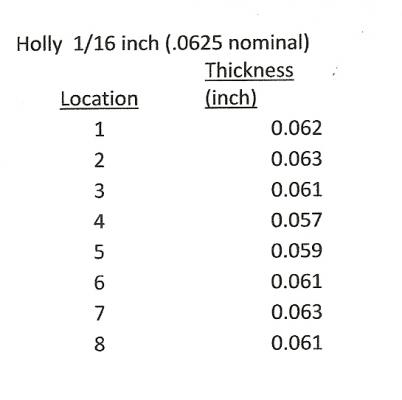
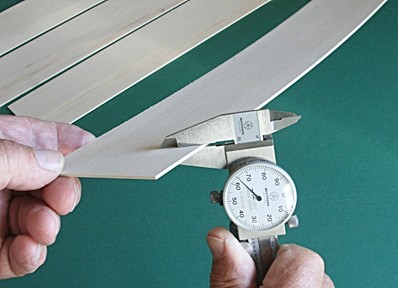
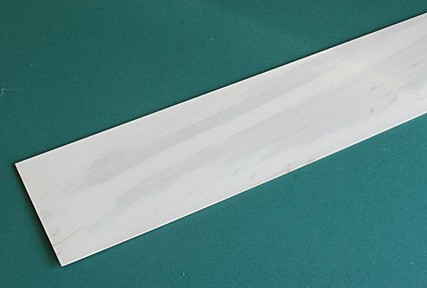
If anyone told me that the wood they received from a supplier was determined to be 'great' or 'looks beautiful' and nothing more, I would call that 'under analysis'. To make some measurements of materials received should be considered normal in any other trade. I did not (and will not in these cases) specify tolerances, but I will rely on vendors who can provide me with good quality stuff. As mentioned above, I did take some measurements of the holly. They are listed below for a random selected piece out of four. I had ordered the material to be about 200 square inches at 1/16 inch thick but of random lengths and widths. I received more than that and the widths were generally a bit over three inches and about 24 inches long. One exception was the four inch wide piece that is shown below. It had streaks of grey which might be fine for my intended use (deck planking). There was one three inch wide piece that had some dark streaks along one edge. Crown elected to simply send this to me instead of trimming it. I did not use micrometer with a small footprint. You can see how I measured the thickness below.
-
My analysis is not overkill and perhaps you missed the point. Irregardless of what might happen with humidity and temperature changes, the quality of the machining and variations in thickness would be the same for the same piece. In fact, I would seriously doubt that changes in thickness due to humidity changes from day to day could be measured with the tools I have. What I tried to do is to evaluate the wood I bought from a new supplier and thickness as well as appearance were my criteria.
-
Keith, I might add here that the sheets appear to be sanded to the final thickness. I don't know for sure, but it appears that the sheets were hand-fed through the sander, because when I hold the sheets at an angle to some bright light, I can see areas that are more shiny than others. In other words, I can see highlights, but cannot feel or measure any changes in thickness. I bet a light hand sanding will take care of that, should it be a problem. What I find also interesting is that the sheets don't vary by more than a couple thousands across the width. Compare 1 and 8 or 2 and 7, etc. The sander must be aligned very well. The upshot is that I am very please with what I ordered and I will go to Jason again when I need to.
-
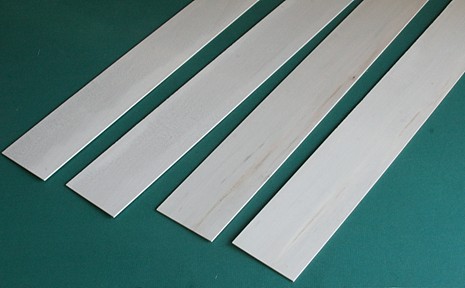
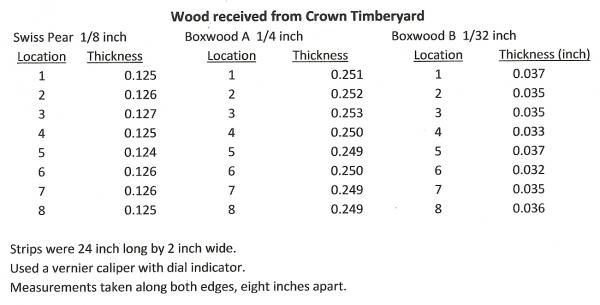
I just received a number of sheets of wood from Jason at Crown Timberyard and decided to make some measurements of the thicknesses. The sheets were clearly marked in plastic packages and looked very smooth and neat. They were two inches wide except for one four inch wide piece of holly that he had included for my evaluation. The latter had streaks of grey in various locations but might be interesting when used for deck planking. It also was very smooth. The Swiss pear sheets are excellent with very uniform grain distribution. A couple of the boxwood sheets, however, had some distinct grain stripes but certainly not obtrusive. All in all I am very pleased with the appearance. I took three samples to measure (I will do the same with the others later). One is a sheet of Swiss pear at a nominal 1/8 inch thickness. The other two are Castello boxwood at 1/4 and 1/32 inch nominal thickness. Hence it covers the range of sheet thicknesses I ordered. I probably should have included the 1/16 inch thick holly, but that comes later. The results are shown below. The 1/32 inch piece is a bit on the 'heavy' side, but overall the thickness measurements are within a nice tolerance.
-
I just received a number of sheets of wood from Jason at Crown Timberyard and decided to make some measurements of the thicknesses. The sheets were clearly marked in plastic packages and looked very smooth and neat. They were two inches wide except for one four inch wide piece of holly that he had included for my evaluation. The latter had streaks of grey in various locations but might be interesting when used for deck planking. It also was very smooth. The Swiss pear sheets are excellent with very uniform grain distribution. A couple of the boxwood sheets, however, had some distinct grain stripes but certainly not obtrusive. All in all I am pleased with the appearance. I took three samples to measure (I will do the others later). One is a sheet of Swiss pear at a nominal 1/8 inch thickness. The other two are Castello boxwood at 1/4 and 1/32 inch nominal thickness. The results are shown below. The 1/32 inch piece is a bit on the 'heavy' side, but overall the thickness measurements are within a nice tolerance. I still need to do some more design work before cutting any of the above. I might mention here that the frames will be cut from poplar wood.
- 572 replies
-
- 2
-
-
- constitution
- frigate
- (and 1 more)
-
Computers: Ha I was totally impressed with the Friden and Marchant mechanical 'calculators' while in college where I used my good old slide-rule daily. Later I learned about the TI series of 'calculators' and I still use the model 30XA for my daily dose of hands-on arithmetic. Charts usually leave me cold, so do the proportional dividers, but the 30XA is always at my side. Age 78. Then again, I was really interested in the modern navigation tools used on small and large vessels. It was on a small vessel in Hawaii where we spent last week cruising the islands and I got to know the captain on a very personal basis. He and five other crew members are on their 10 day crossing back to Seattle with reported 25 foot waves most of the way. I tried to sign up, but was rejected with a smile. Because of this web site and building a model sailing ship, I actually knew more about the olden days of sailing than my good friend the captain.
- 396 replies
-
- 3
-
-
- Idea
- Bright Idea
- (and 1 more)
-
Can i live without a BYRNES TABLE SAW
Modeler12 replied to shihawk's topic in Modeling tools and Workshop Equipment
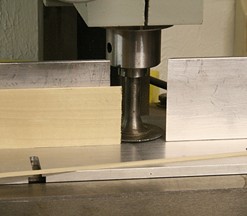
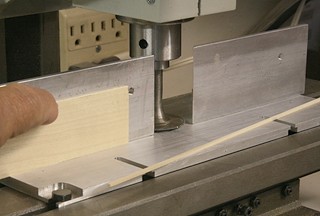
I don't have a Byrnes table saw, but I do have a nice milling machine. I use it to rip boards and can get to within pom 0.001 inch in thickness. Here are some pictures of my set-up. The mandrel was given to me by a shop that did a lot of machining of aluminum honeycomb. It uses a 1.5 inch diameter saw blade (available from Thurston) and has a very thin washer on the base. I can go down to 0.020 inch and up to about 3/8 inch in width. Notice that the aluminum table I made becomes the 'fence' and the two heavy angle pieces are now the 'table'. Raising the mill (z axis) changes the thickness and the y axis controls the depth of cut. Once I have the correct settings, I lock the three axes in place and every thing is very rigid. The variable speed of the mill is also a benefit. I have another table saw with a three inch Thurston blade that I use for miter cuts and other flat cutting. That one was adapted to an old Shopsmith. Hence I can go back and forth without having to set-up every time I need to rip another piece.