Modeler12
-
Posts
1,716 -
Joined
-
Last visited
Content Type
Profiles
Forums
Gallery
Events
Everything posted by Modeler12
-
 Here is another addition to my Byrnes saw. Feather-boards. When the wood is wide enough, I use my left hand to guide the wood against the fence. But when it becomes very narrow, I have used a piece of wood to guide it, but the feather-board does a better job. Of course, I need to change the setting for different widths, but so be it. I use 1/8 plywood and cut the slots on my mill. I made five for 'reserve'. The 1/2 inch aluminum bar fits snugly in the slot and the two 8-32 screws hold the thing together.
- 572 replies
-
- 6
-

-
- constitution
- frigate
- (and 1 more)
-
Congratulations, Mark. I know you have been thinking about buying this mill, and I know you will enjoy learning what can be done with it. I have used mine numerous times as a fine drill press as well as a milling machine. I notice a pencil mark on the base. That would be a good cut-out since the y-axis knob can be a knuckle buster as you rotate it. I have mine mounted close to the front of the table and have better clearance that way.
-
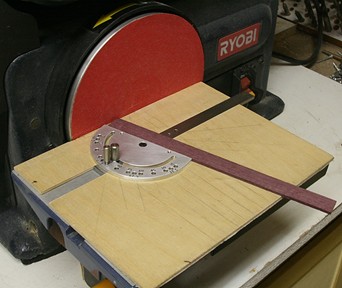
I have used 1/8 plywood for several 'zero clearance' applications (9 inch Delta bandsaw, scroll saw, sander and now my Byrnes table saw). For the table saw inserts I cut the shape with the grain in the long direction. The Byrnes miter gauge fits on my Ryobi sander by spacing the plywood as shown below. The plywood is held to the table with double back tape. All have worked like a charm.

-
Likewise Tom. I also 'used to sail'. When my wife and I were dating (more than 50 years ago) I had a Junior Folkboat in the SF Bay. We had a lot of fun and some great adventures with it, but my wife did not like to be in charge of the jib. So, we finally got rid of it. Since then I have had a couple small boats and crewed for friends. The avatar you see is when four of us chartered a boat in Phuket, Thailand, and cruised the Adaman Sea for ten days. I was the cook and bottle washer aboard, but did handle the boat from time to time.

- 1,350 replies
-
- 4
-
-
- constitution
- model shipways
- (and 1 more)
-
Tom, what I also like about your log is that you are including lots of pictures and good descriptions of how you are going about your work. The details are fantastic! There are lots of innovative ideas that you incorporate. I like your hammocks, for example. But as I look closely, you have also done a marvelous job with the carronade rigging. I will have to go back in your log to refresh my memory. Just curious, why did you give up sailing and what kind of boat did you have?
- 1,350 replies
-
- 3
-
-
- constitution
- model shipways
- (and 1 more)
-
Thanks Tom. I tend to be a cheapskate sometimes, but I have used this sander for several years now and I still like it. For about $120 at Home Depot you can buy this combo belt and disk sander that works great for numerous projects. The adoption of the miter gauge seemed a natural for the small stuff.
- 572 replies
-
- 2
-
-
- constitution
- frigate
- (and 1 more)
-
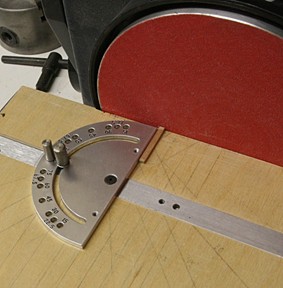
There is one additional nice feature about the Byrnes saw. It has a great little miter gauge. I can also use it now on my Ryobi sander. All I did is make a 1/8 inch thick plywood 'zero clearance' plate that is double back taped to the sander table. Actually I cut the plate into two pieces as shown below. That created the slot for the gauge. The accuracy of square or angle cuts is now much better. The dowel pins in the gauge assure me that the angles are repeatable and true.
- 572 replies
-
- 5
-
-
- constitution
- frigate
- (and 1 more)
-
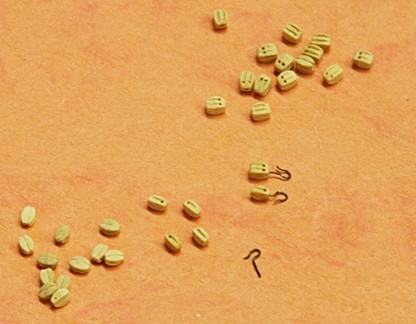
As long as I was drilling tiny holes, I decided to prepare the single and double blocks I need for the corronade rigging. I has been ages since I did this for my full size model, but the idea is to drill a hole in the end of the block and epoxy a hook right into the block. This saves a lot of space that is needed for the tight quarters. Below are some of the blocks I will use. They are equivalent to about 7.5 inches full scale. The two shown with the hooks are dry fitted and need to be adjusted for length and alignment when the epoxy is still 'wet'.
- 572 replies
-
- 4
-
-
- constitution
- frigate
- (and 1 more)
-
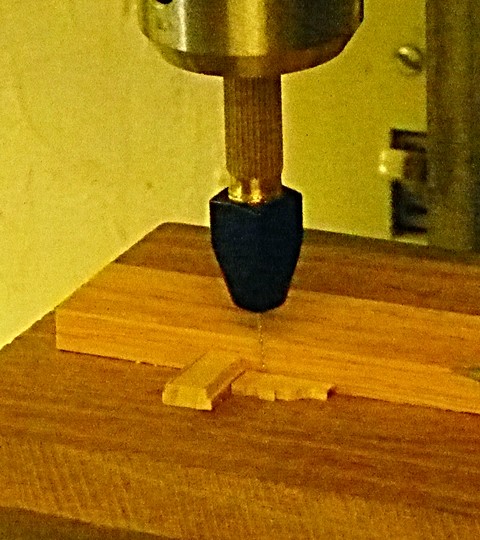
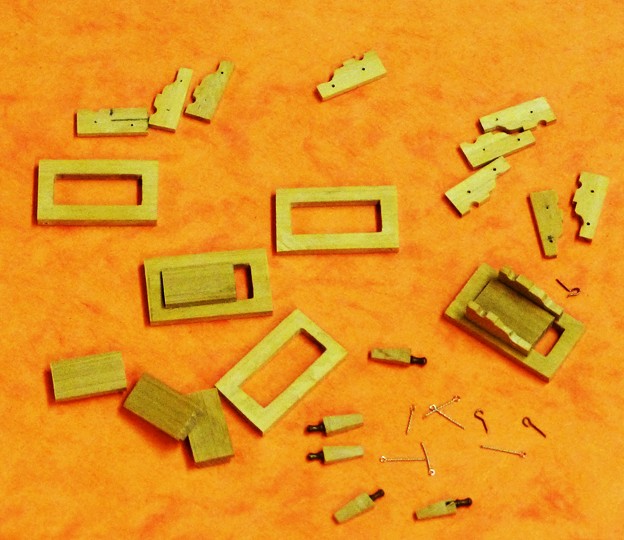
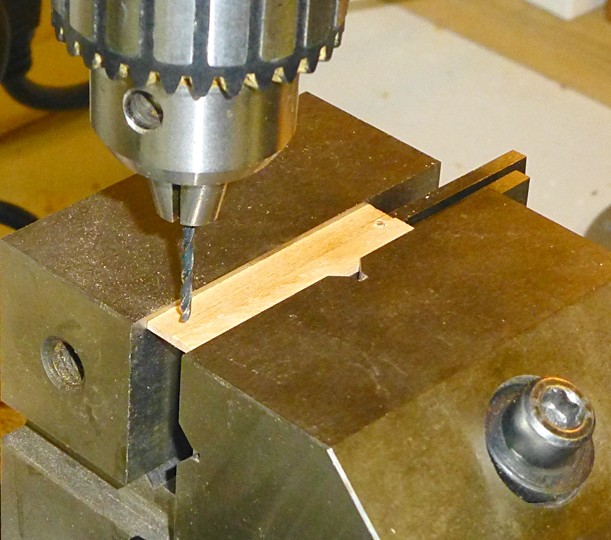
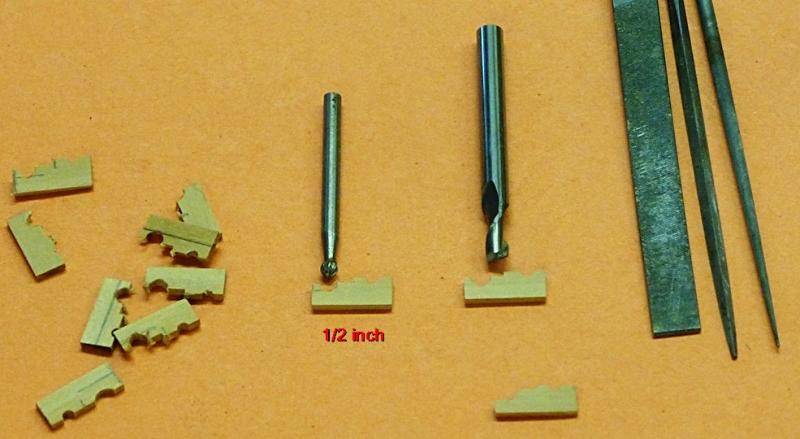
Here are most of the pieces required for the carriage. Missing are the 'bolts' or rods that connect the side supports and, of course, the carronades. Doing it this way is a lot more work than the laser cut pieces I used for the full model. Using the mill and other tools gave me a totally different perceptive about modeling this simple structure. More fun I show the second picture because I used a rather crude way to drill the 0.018 inch holes in the side carriage for the eye bolts and cross rod. The hand drill, with its bit, was mounted into the chuck and this turned out to work ok. Not perfect, but the parts that go into those holes will be epoxied any way.
- 572 replies
-
- 5
-
-
- constitution
- frigate
- (and 1 more)
-
SFC you bring up some good points. As I mentioned, the material is very uniform at first glance and it machines well when all goes well. The impact problem is what did me in. I know that others have used it to make pen blanks, for example, but the fellow who did this had the Corian supported with a metal sleeve on the inside. To get around the 'round' issue, I might start with power sanding the square piece with numerous flats (octagon or so) and then carefully turn it to a cylinder. I am not totally giving up, but for now it is on a back burner.
-
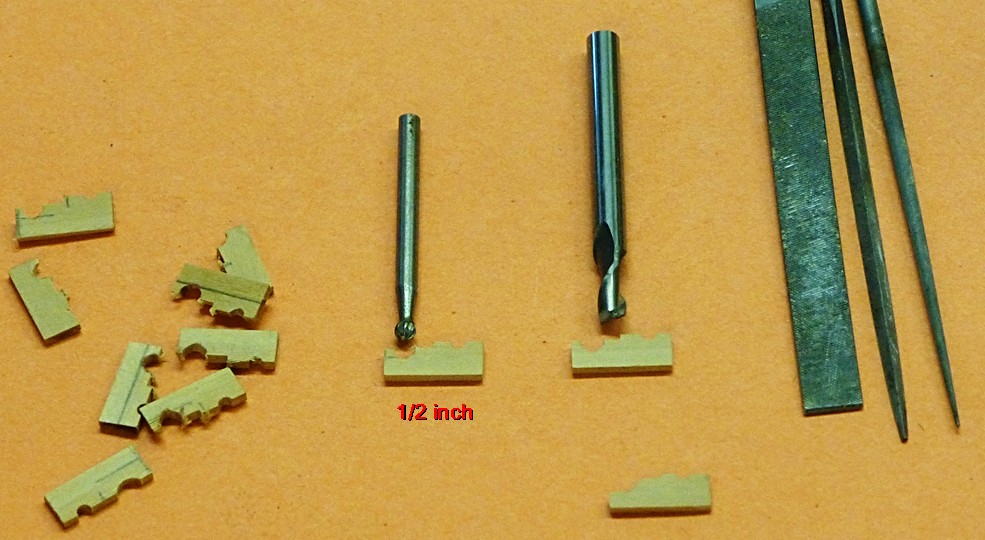
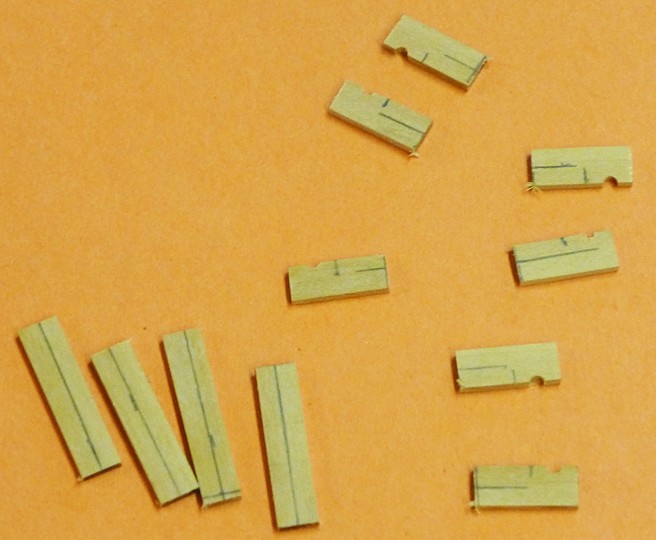
For the spar deck carronades I started to make the carriages. I need four but will be cutting material for at least five. Using my new saw I cut Swiss pear stock for the carriage base, side supports, cradle and quoin. The side carriages came first and I drilled holes (double up on the planks) for the gun supports. After cutting the parts to length (1/2 inch), I used my mill for the flat spots and a round bit for the rounded contour. Some filing is still necessary to round the curves and smooth the parts. I'll make the other pieces the same way with my mill. As yet, I have not made the gun barrels.
- 572 replies
-
- 3
-
-
- constitution
- frigate
- (and 1 more)
-
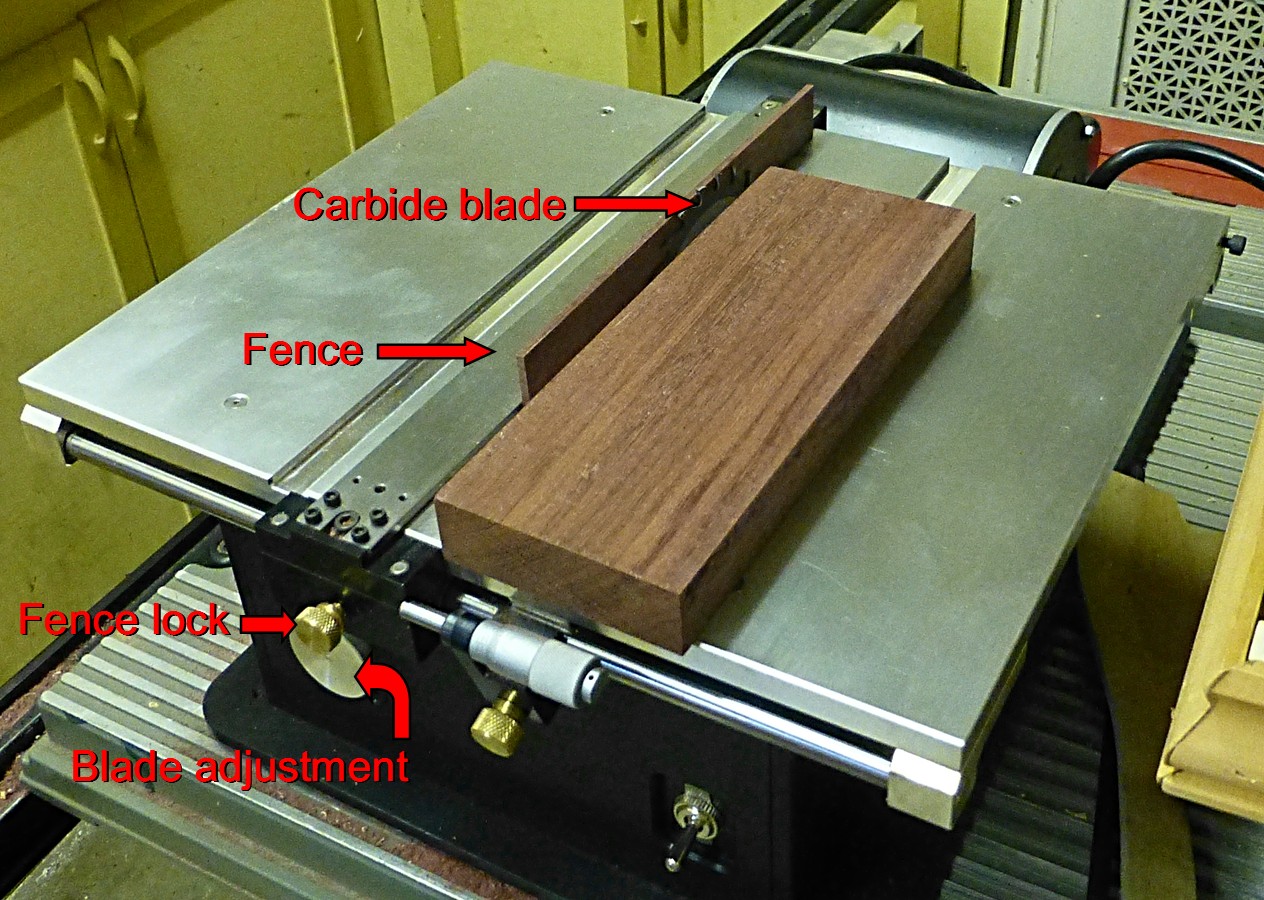
I'll take a look, Mark. Kickback has been no problem with this saw. As I mentioned, I use the carbide blade for thick ripping (up to 3/4 inch) and the thin jewelers blade for ripping and cross cutting. On my old Shopsmith I encountered kickback when cross cutting (thin blade), but with the nice miter gauge on the Byrnes saw I have not encountered any. I have a supply of wood pieces I use to 'test' my setup. I measure the thickness of this test and use the micrometer on the table to zero in on what I want. Again this works fine and I can get to within a thousands of an inch.
- 572 replies
-
- 2
-
-
- constitution
- frigate
- (and 1 more)
-
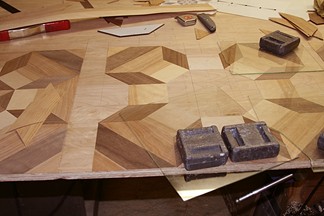
Thanks Julie, the base is 3/4 inch plywood. I used carpenters glue for each piece and a section of pane glass and a lead weight to glue them down. Obviously this took a while. The desk top sits right in front of me with my computer etc. on a sheet of 1/4 inch glass to protect the veneer.
-
Julie Mo, you are electric-frying; full of energy and sparkling. I also have used veneer a lot, but not too much for modeling. The thickness is intriguing but the grain patterns usually are no good. If you can find the wood you want, go for it. I am sure your search on the web should come up with something useful. PS I am working from my desk which .. . . .
-
Michael that is some fantastic work. Now that I see what you did with Corian, I will have to give it another try. Like I said before, I could use brass, but that is another media that I am not familiar with when it comes to turning tiny parts. In either case, I will have to experiment some more.
-
Tool Maker's Surface Gauge
Modeler12 replied to jbelwood's topic in Modeling tools and Workshop Equipment
John, you probably know that the gauge is useful for a lot of places where you need to mark or make measurements. I use one with a magnetic base to level the table on my mini-mill.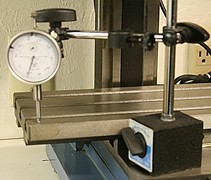
-
soldering iron or torch? advice please
Modeler12 replied to Mark Pearse's topic in Metal Work, Soldering and Metal Fittings
A few years ago I put this video on-line about just this subject. I am sorry it is so long and not that exciting. But I tried to convey the idea that 'small is for small, and anything large needs a big one'. Besides it has a some suggestions about flux. -
Can i live without a BYRNES TABLE SAW
Modeler12 replied to shihawk's topic in Modeling tools and Workshop Equipment
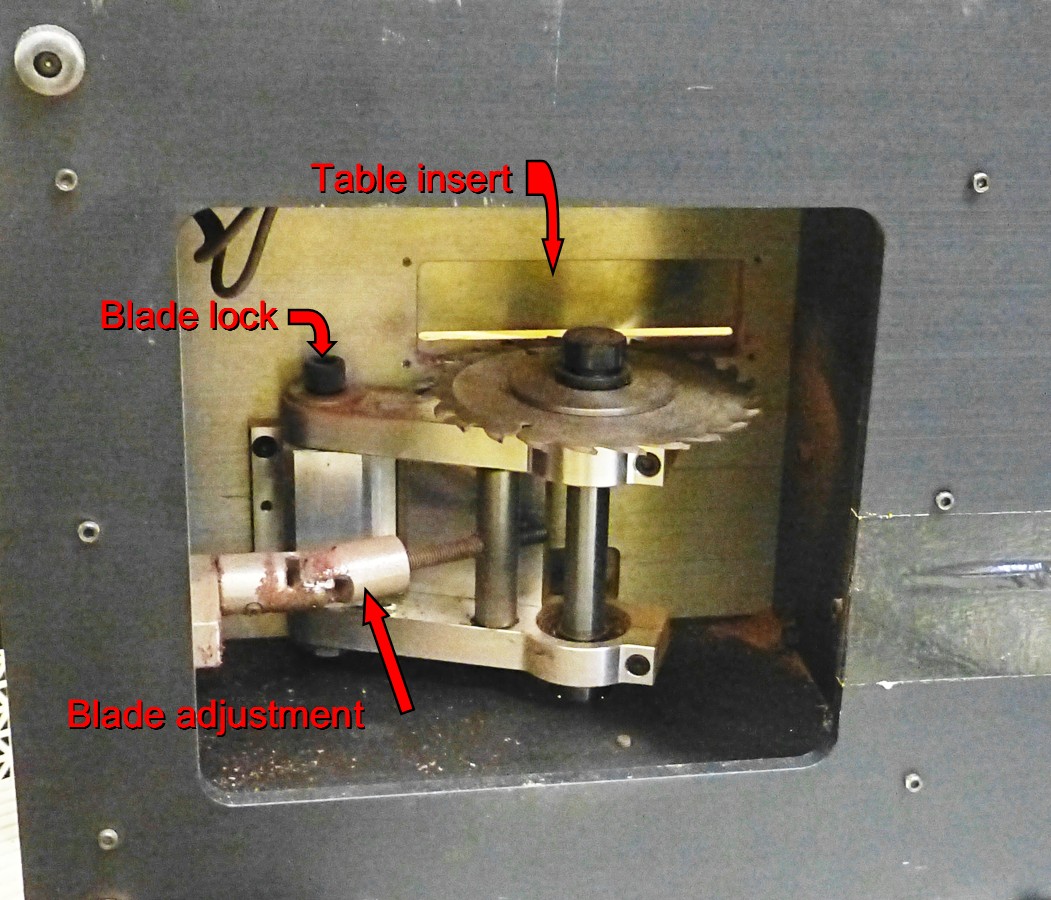
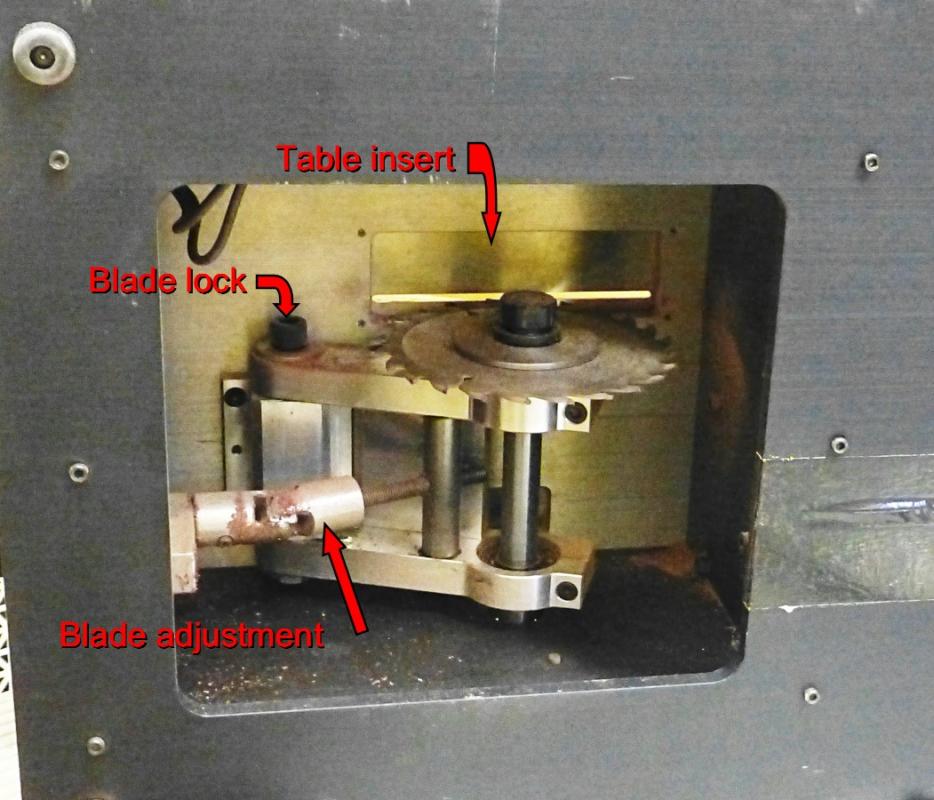
Indeed the machine is great. But I did not like the long allen head wrench. However, the allen head wrench that I have was too short. Instead of buying another set, I took a longer bolt as shown below. This way I can leave the wrench in place (a little snug fit). I should have noted that this is to lock the blade in its up/down position. The pictures are not very clear about this since the machine was turned on edge. Now the 'new' allen wrench is underneath the table to the right. This allows the blade to be 'locked' in place.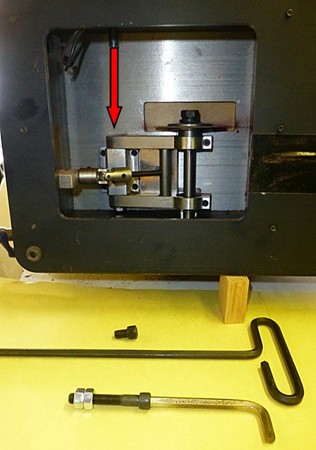
-
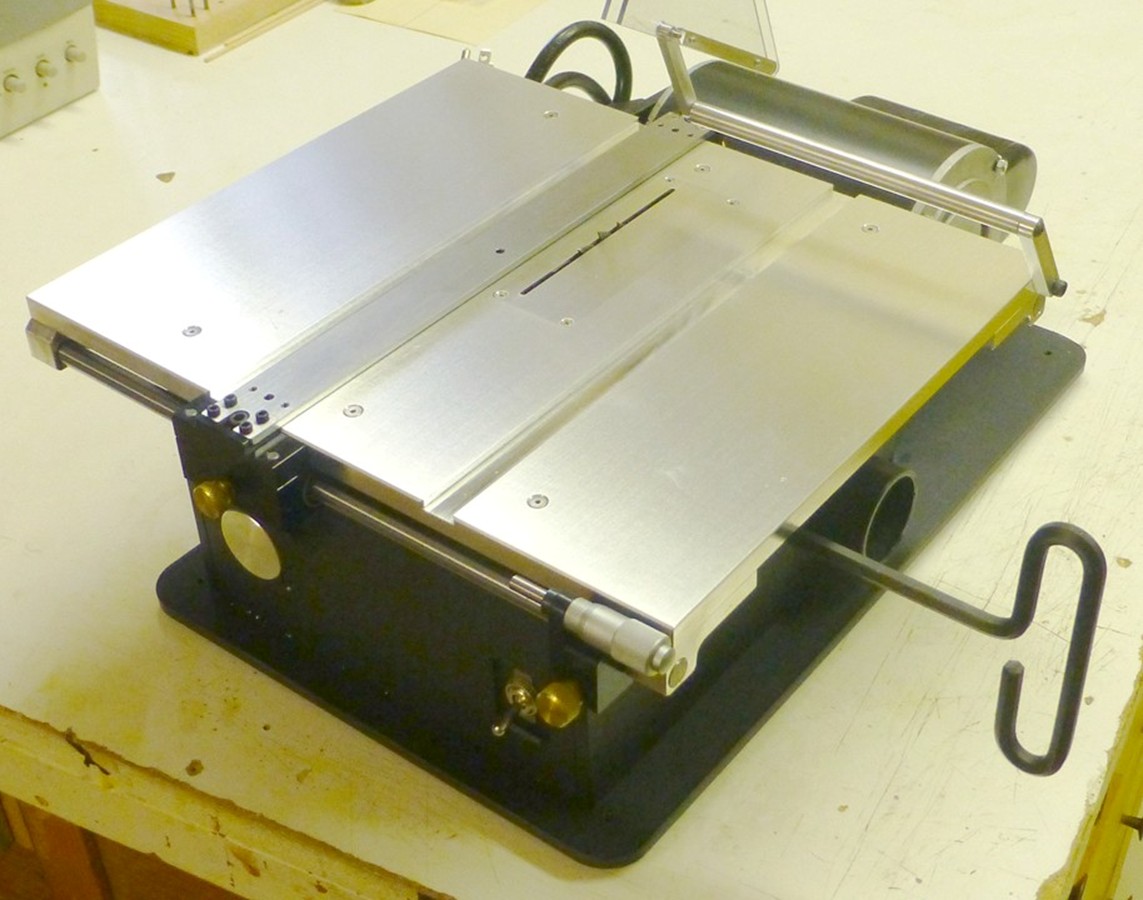
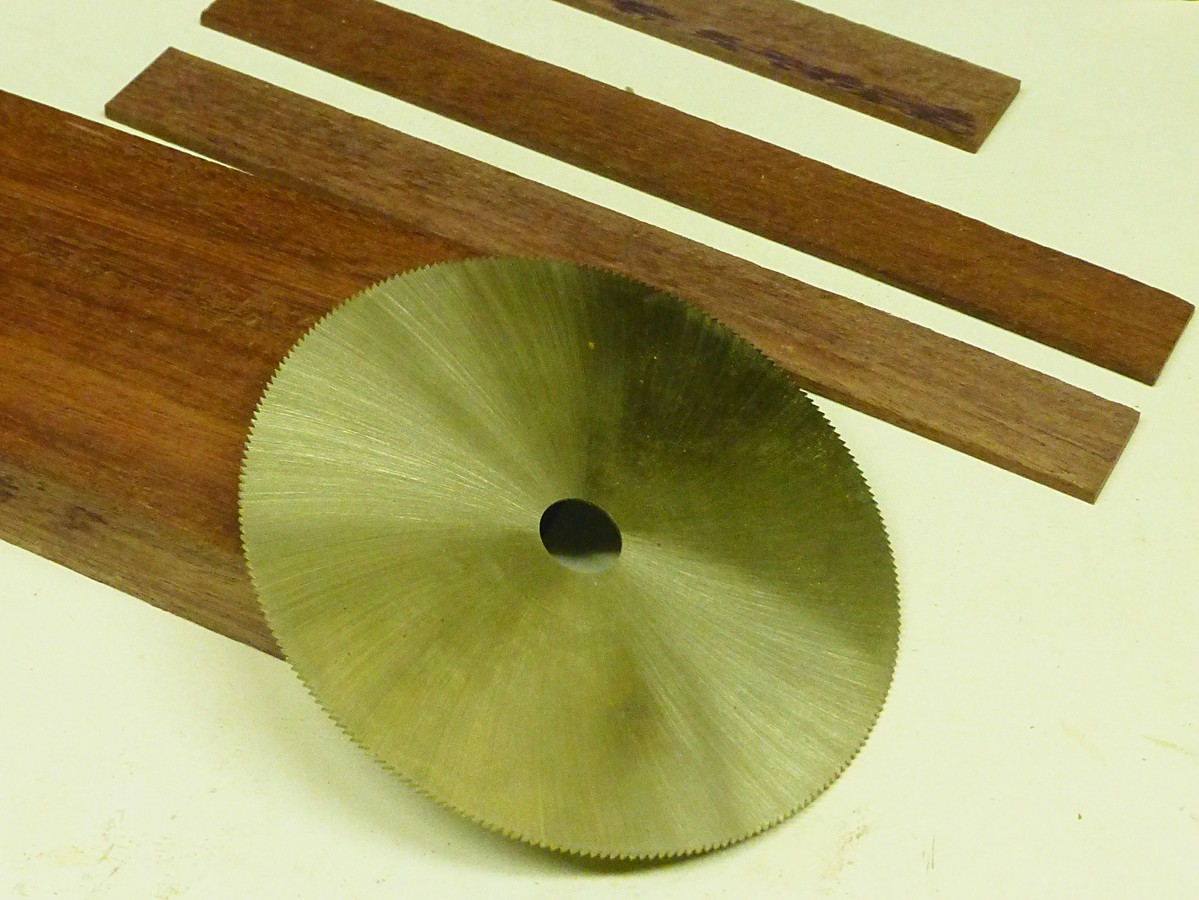
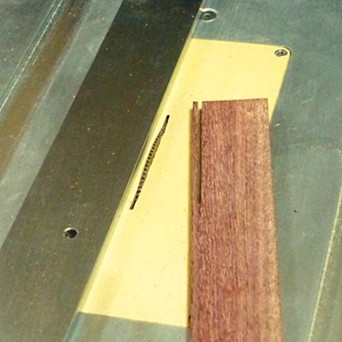
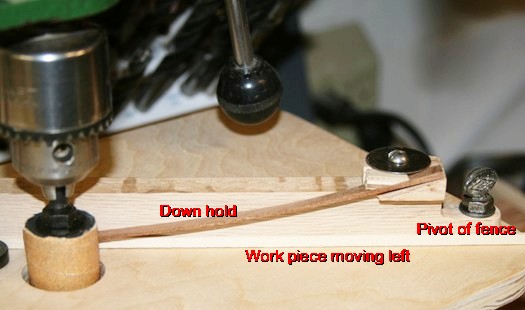
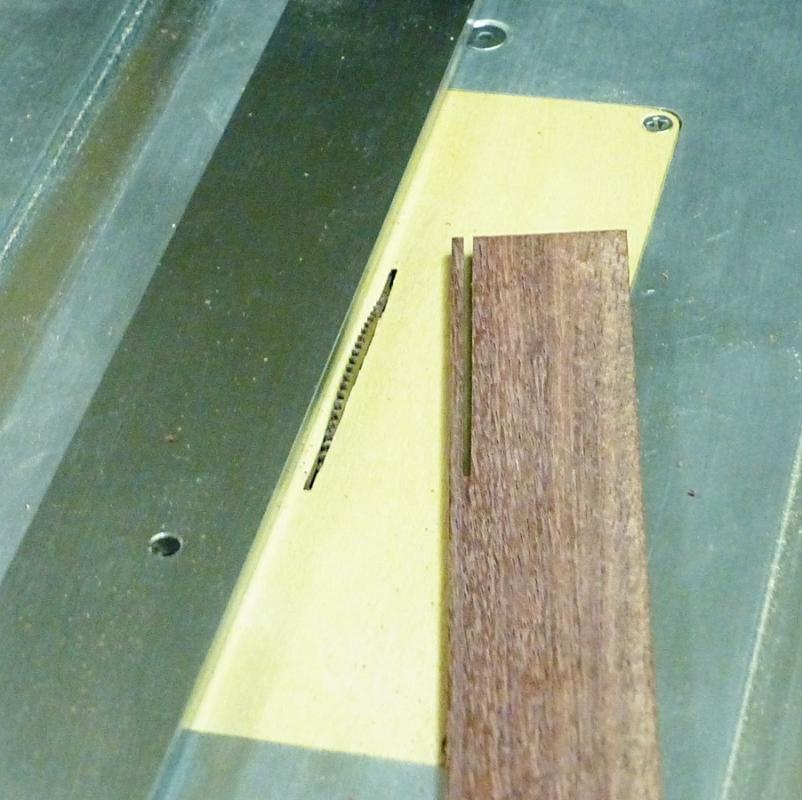
I know the cannons and other items on the cannon deck are not yet finished. However, I do need to cut numerous planks for the hull and bulwarks. So, I decided to invest in a better table saw. Jim Byrnes comes to mind and his table saw is what I received a couple days ago. Made some trial cuts, made new table inserts for narrow blades I have and I think I am ready to go. Meanwhile I am looking into some 'improvements' of the saw. More later. Elsewhere I made some comments about the saw, but for this build log let me add the following comments and pictures. 1. The long, hex wrench got to go. I am looking into making a 'permanent' knob to lock the blade into position. 2. The inserts I made work good. I can make more out of 1/16 inch thick plywood. After I install one and with the blade in position on the arbor, I slowly raise the saw and cut through the insert until I am satisfied of the depth of cut. this gives me practically zero clearance between the blade and table. 3. I have a few old (and one new) blades that have the 1/2 inch arbor hole. They work fine on this saw and I can order more directly from Thurston. I prefer the 3 inch diameter because it gives me more lateral stability and there is no need to have the extra 1/2 inch sticking up above the table. 4. It has been suggested to add a 'splitter' just behind the blade. It would prevent the wood from closing up right after being cut and it would be a fraction thinner than the blade for clearance. I will try to do that on mine but it would not be for every insert I make or use (unless I can think of a way to make them inter-changeable). Meanwhile I dug out the old thickness sander and it still does a good job cleaning up the thin planks. If you like to know how it works, let me know. It is an addition to my drill press. Back to the gun deck . . . I think. . . .


- 572 replies
-
- 5
-
-
- constitution
- frigate
- (and 1 more)
-
Can i live without a BYRNES TABLE SAW
Modeler12 replied to shihawk's topic in Modeling tools and Workshop Equipment
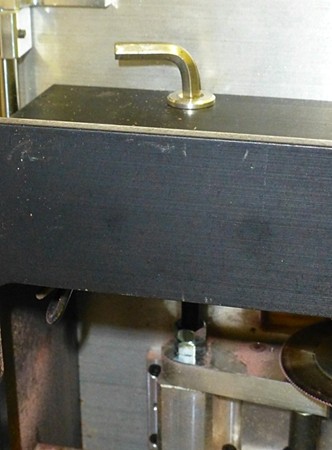
When I change blades I have to replace the insert anyway. So, to remove it first makes it easier to get to the nut that holds the blade on the arbor. Notice I made new inserts for the thin blades I have. I just like to have as much support on the table as I can get. Jim's instructions also suggest to remove the insert when changing blades As yet I don't have a shop vacuum attached, but by having the bottom covered I should get a lot more suction and a cleaner box when I get to that point. The cover I am talking about is a simple piece of cardboard held in place with a piece of tape for now. -
Can i live without a BYRNES TABLE SAW
Modeler12 replied to shihawk's topic in Modeling tools and Workshop Equipment
I just received my table saw from Jim and like what I see and have done with it thus far. Here are a few comments, not necessarily critical but suggestions for improvements in the 'instruction sheets' that are part of the package. 1. Page 2 'Operation'. The 1/4 inch allen key is huge (too long) and the diagram does not show it nor where it is supposed to go into. 2. Some pictures would help to identify the components. The diagram included is a good start but not enough. 3. The Lubrication of the shaft and knuckles of the u-joint is fine, but where are they? You have to turn the machine on edge to see the large opening in the base and locate those parts. When you do, you can see how the yoke swings the blade up or down and also the locking bolt at the pivot point. 4. To change blades I had to remove the table insert, then loosen the two nuts (next to the blade and at the end of the shaft). Then I turned the machine on edge to get to the blade and washers. This is not difficult but it took me a while to see how to do this. I took the following pictures for my own benefit. Notice the plywood table insert which I use with the fine blade as a 'zero clearance' table. I will use the carbide blade for rough and large cuts and then this fine blade for cutting strips. So, changing blades will happen often. To be sure, the machine is great and the cuts I have made are nice and uniform. One thing I have added is a simple cover for the large opening in the base. This is where saw dust came through and spread all over the counter top. The dust port does not work well unless you do that.


-
Good luck, Ulises. I concur with your desire, but doubt that it will ever happen. Models are just that; a representation of what the original looked like (perhaps how it behaved, how it was built, etc.). But that should not restrict the modeler as to what to use in a much smaller scale. As I mentioned before, there are parts that will never be made 'the way it was', even full scale. Kontiki tried but had lots of compromises. Rope is not made from the same materials nor the way it was plied. Neither are cannons, chimneys, and anchors to give a couple of examples. So, you don't like the following?

-
Sam, I am out of town right now, but I was very interested in your comments and experience with Corian. The sample piece I have worked with was left over from our kitchen counter top that was installed several years ago. The top is a large u-shaped surface and the seams were not at the intersections but about six inches up from that. I recall that the installer used some kind of 'cement' that matched the color and pattern real well. In fact, to this day you cannot see where the joints are. I still think that this material has some properties that could be useful in model making, but its brittleness makes it too sensitive for what I was trying to do. But just the same, as others have said trying other materials can be fun and interesting.. Some might work, others not.
-
Well, I have given up on Corian for modeling (for now). I tried to turn another piece i my lathe to make a corronade and it also broke. It is just too brittle. It worked well with my mill, cuts nice and clean, takes paint, but is so-so with adhesives and it is too fussy when any force is applied to the side (like in turning a lathe project). But, like the old saying goes, 'nothing ventured, nothing gained' (or something like that).
-
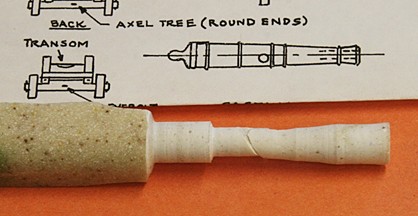
Weight should not be a problem if you compare it with materials typically used to make cannons. Brass and pewter are much heavier. Wood is lighter but not often used to make cannons. I don't know the exact density of Corian but it is probably similar to Plexiglass (acrylics). Here are some results of my tests. I took videos of all of this but it takes a while to edit and publish that. Perhaps I'll add more later and show the results. But let me use words instead, right now. 1. Bonding Corian with PVA did not work. It fell apart almost by lifting the pieces off the table. No big surprise. 2. My first try using CA did not fare much better, but that was because I did not sand the surfaces. They were as cut on my table saw. When I repeated the CA test after sanding the results were much better. Pulling on the two strips was very strong (I could not break it). However, when bent the two came apart with a snap. This 'cleavage test' is tough on any adhesive including epoxy. 3. Borden's plastic cement did not work very well which surprised me. The upshot is to try epoxy and if that does not work I'll give up using Corian for anything that needs a strong bond. Meanwhile I tried turning a square piece in my small lathe. I purposely had the piece stick out of the chuck by about 2 inches. As expected, it chattered a lot when I used a regular bit until I got down to round stock. I forced the issue and took a good size bite which broke the piece in two. The cantilevered end just did not like what I did to it. I repeated this but after getting it round, I drilled a center hole in the end and used a center support to turn the piece down to about 3/16 inch. After that I forced the bit towards the center and as expected the part broke. With care I am sure I could have gone down to 1/8 inch diameter and with a shorter piece and some support down further. However, I learned enough to say that this was no worse than I have happen with wood. Metals such as brass are better, of course. Finally let me just say that I would not make a 'wooden ship model' with Corian, but I may use it for small parts such as cannons and special items. Let me add this picture. The drawing is full size of the cannons I need. The break did not come as a surprise because I knew that I was stretching the bite I was taking. So, next time . . .