-
Posts
1,716 -
Joined
-
Last visited
Content Type
Profiles
Forums
Gallery
Events
Everything posted by Modeler12
-
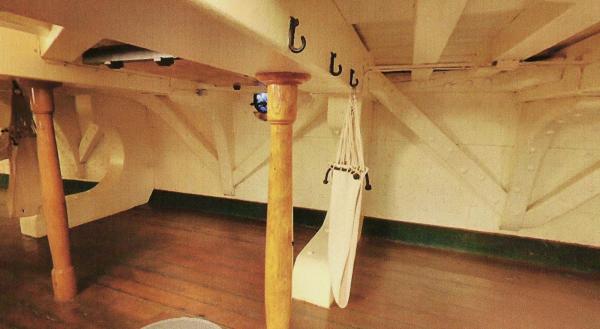
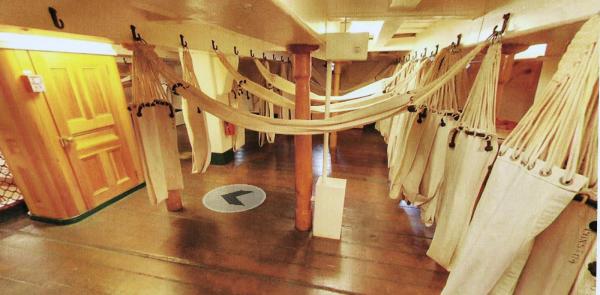
Perfect Henry. That explains why there are more than one hammock on the same hook. When you look at the pictures they are arranged just like you said.
- 572 replies
-
- constitution
- frigate
-
(and 1 more)
Tagged with:
-
That does not mean that I will have enough to cover the deck, George. But it is interesting that someone on the real Connie team decided that lots of hammocks were a good 'investment'.
- 572 replies
-
- constitution
- frigate
-
(and 1 more)
Tagged with:
-
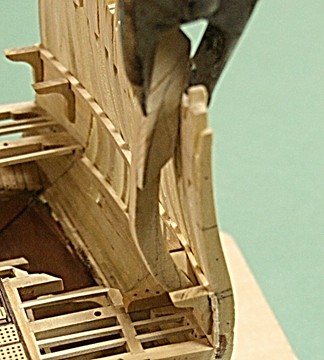
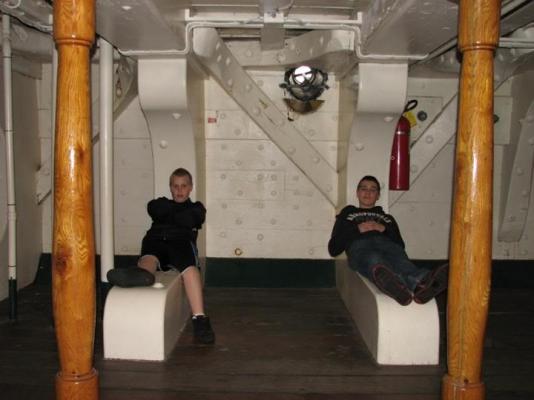
Sorry, one more point about the view above and Mark's comment when I mentioned that the hanging knees I made were too thick and too wide. The picture below is the view taking from the same spot as above but looking toward the starboard side (the one that will be not there on my model) Notice that the hanging and standard knees are indeed a lot thinner and narrower than I made them for my model.
- 572 replies
-
- constitution
- frigate
-
(and 1 more)
Tagged with:
-
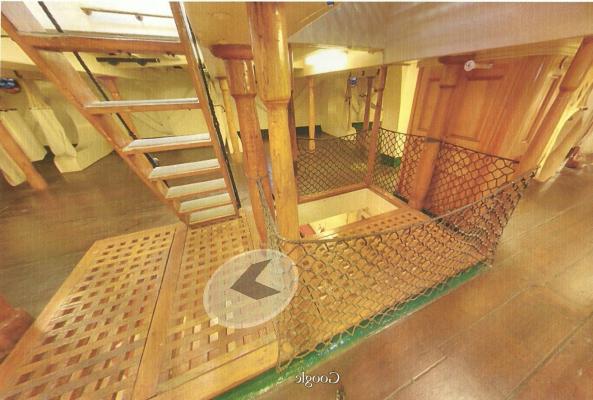
By way of explanation about the hammocks, here is what the berth deck looks like on the Connie. The ensign cabin is to the left. PS This will be the point of view when I cut part of the deck and frames away on my model. The fore mast is barely visible at the top right side.
- 572 replies
-
- constitution
- frigate
-
(and 1 more)
Tagged with:
-
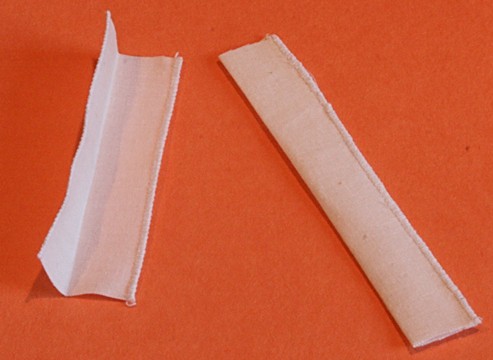
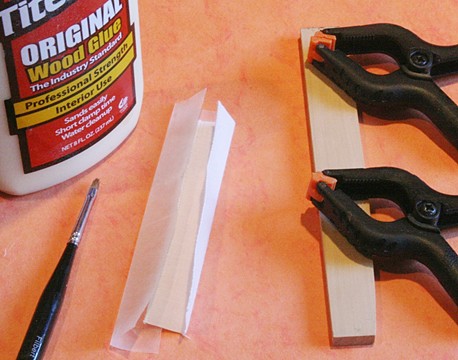
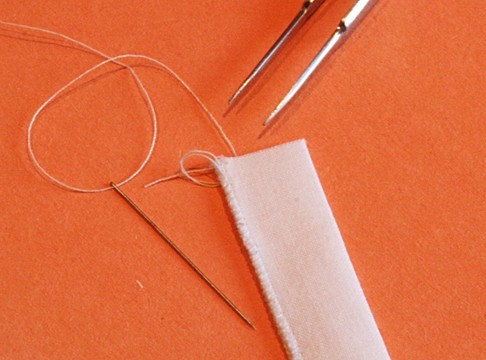
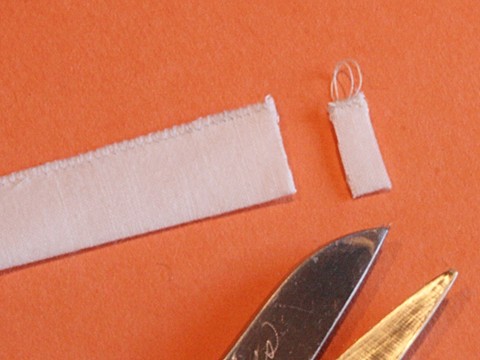
I need to take a step back in time. Before I can glue the gun deck in place, I need to finish the 'decor' on the berth deck. That means installing hammocks. Earlier I had put in eye bolts underneath the gun deck beams and made a few hammocks. Now I needed more. However, most of the hammocks on the USS Constitution (as she is now in Boston) are hanging folded in half. The first picture below shows six full size and the new folded version. Let me outline how I made the latter. I started with some light weight cloth (same as what I used for the sails on the full scale Connie) and cut one inch wide strips. Those were then overedge stitched on my wife's sewing machine. They were folded in half and the edges glued together with some PVA. I made some loops with white thread (the ends of the thread were glued to the back side with some CA glue). And then the piece was cut off. All I need are about twenty more
- 572 replies
-
- constitution
- frigate
-
(and 1 more)
Tagged with:
-
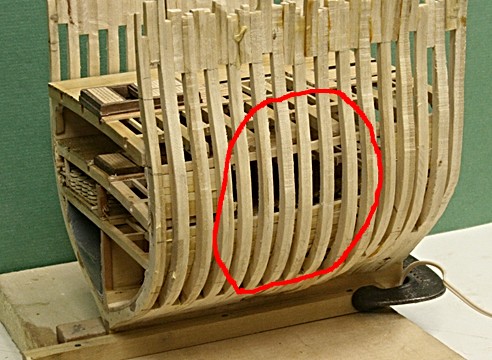
It is the story of my life, Mark. But it will take a lot more than a 'touch up sanding' for me to be where I was a few years ago. I finally decided to smooth the outside of the frames a bit and cut those ugly tops off the port side. I needed to do that in order to locate and fix the gun ports, but it also looks a bit better. The top cut is well above the final rail, so there is room to maneuver. Likewise there is a lot more sanding/filing to get the hull smooth enough for planking. I'll concentrate on this side before doing the starboard side.
- 572 replies
-
- constitution
- frigate
-
(and 1 more)
Tagged with:
-

Help with Model Shipways kit choice
Modeler12 replied to Bill Gormley's topic in Wood ship model kits
Might I add one bit of advise about your choice. Is there anything special about these ships that attracts you attention? Are you at all interested in the history of them, be it the battles they were involved in, etc. Being that you have built WWII ships (albeit out of plastic) I am sure you know a bit about their service in the Pacific. -
Thank you guys, but there are a few 'happenings' or plain screw-ups. I am sure some of you may have noticed, and I really know where and why. But, again, this is below decks and barely visible in the final show (I hope). Just now I started to sand the outside of the frames and that is going pretty smoothly. I need to do this before the gun port openings can be located and cut. More later.
- 572 replies
-
- constitution
- frigate
-
(and 1 more)
Tagged with:
-

Simulated caulking
Modeler12 replied to Nirvana's topic in Painting, finishing and weathering products and techniques
We never heard about Nirvana's experiment that I am aware of. So I tried it with one of my admiral's eye liner and compared it to a marking pen on two pieces of the same planking wood. Revlon does not excite me. The results are hardly any different in application and results. I didn't even take a picture. There have been numerous suggestions here (and I won't go into what I use), so I will leave it up to 'what ever works for you'. -
Just one more, George. This one is for Euclidean, our new member. It was on November 11, 1675 when Gottfried Leibniz demonstrates integral calculus for the first time by finding the area under the graph of y = ƒ(x).
-
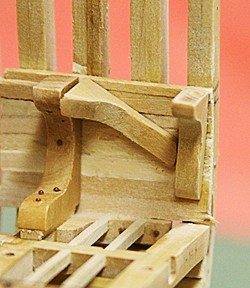
Confusing! The hanging knees are a bit too thick and wide. But on the berth deck they will be mostly out of sight. It was a good practice for the gun deck where neatness really counts.
- 572 replies
-
- constitution
- frigate
-
(and 1 more)
Tagged with:
-
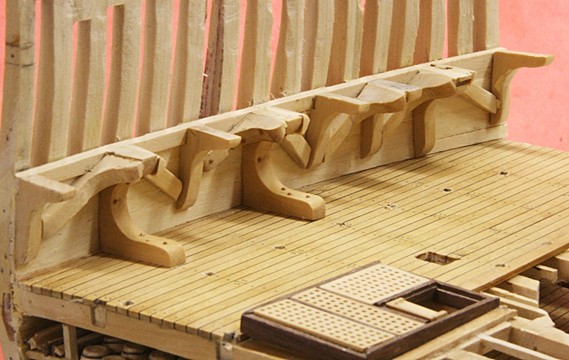
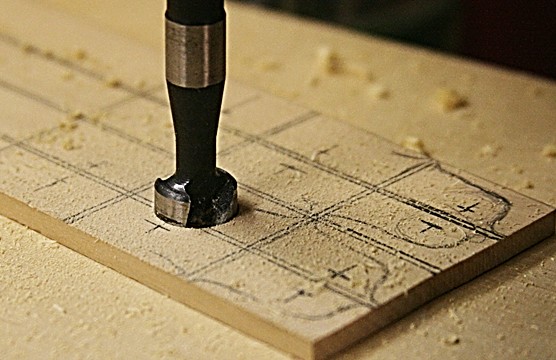
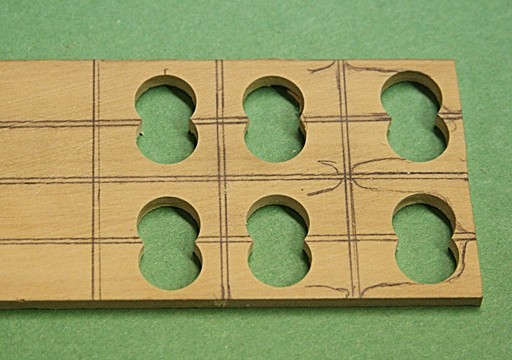
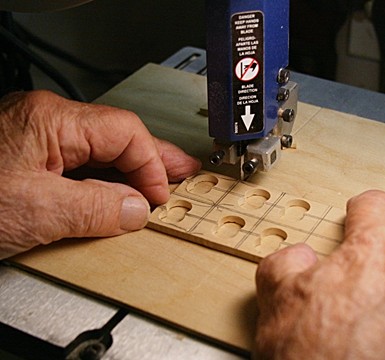
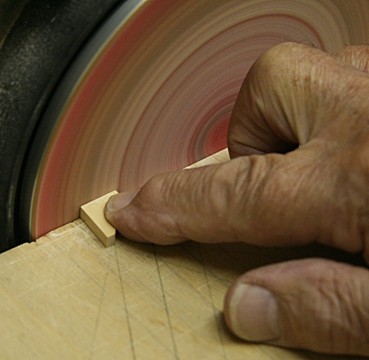
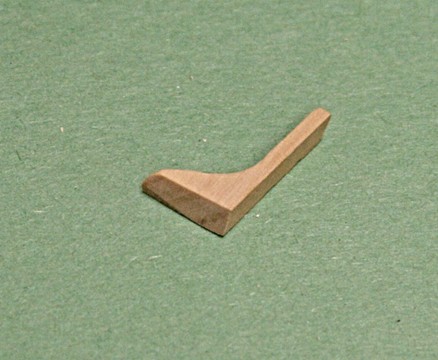
Making the knees Let me (for this record) show how I go about making the knees. The example is for one of the hanging knees on the berth deck level, but the method also applies to all of the knees on the other decks (except for dimensions and shape) I start with a piece of 3/16 inch thick boxwood, lay-out the sizes and cut the round part of the shape using a Forester drill at 1/2 inch. Then I cut each piece from that to rough shape using my small band-saw. A disk sander is used to shape the part, fitting it to the spot I want. After it fits pretty well, I glue it in place. Some touch up work will be necessary, because these pieces are difficult to get right the first time.
- 572 replies
-
- constitution
- frigate
-
(and 1 more)
Tagged with:
-
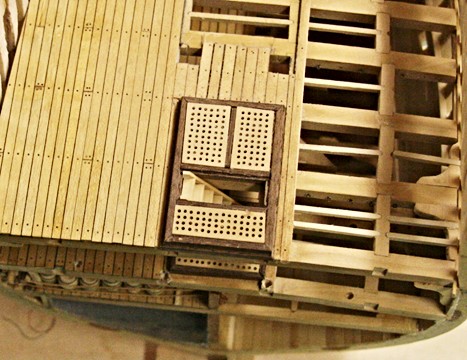
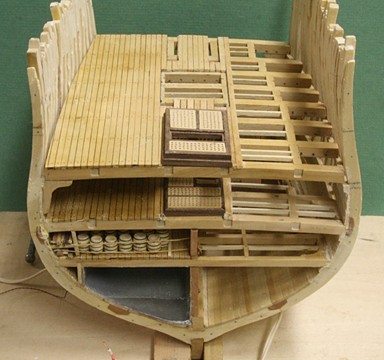
Looking down on the gun deck. The berth deck is glued in place but all (or most) pieces associated with the gun deck are still loose. I just finished making the stairs that go down to the berth deck, and as you can see, the posts are not yet cut to length. I still need to make the 'hanging knees' which are going to be tricky because of the compound angles. Again the right hand side of the gun deck will have parts of the beams, carlings and joist cut away. I am getting closer to do that, but I decided to make all the parts you see so they line up before I 'destroy' them.
- 572 replies
-
- constitution
- frigate
-
(and 1 more)
Tagged with:
-
There still will be little or no paint and the port side will have the outside planking and copper plates. Both sides will have the channels and deadeyes while the starboard side will have a few outside planks but no copper. So the top rails will be in place, but the spar deck will still have part of the structure shown. A foreshortened mast will be there but no rigging to speak of. I hope that all makes sense, David.
- 572 replies
-
- constitution
- frigate
-
(and 1 more)
Tagged with:
-
Thanks Dan, old buddy. I only hope that your 'busy' schedule does not mean 'bad' news. Send me a 'personal', please.
- 572 replies
-
- constitution
- frigate
-
(and 1 more)
Tagged with:
-
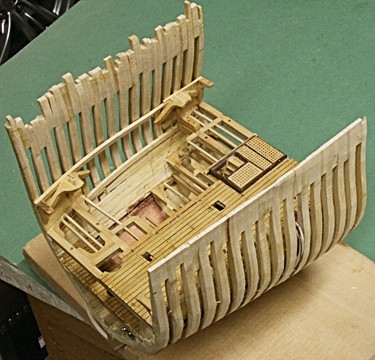
Let me expand on this a bit. The outside of the hull (frames) is extremely rough right now and I will start working that soon. However, what I wanted to show is where the frames (and other parts of the deck beams, carlings and joists) will be removed. There will be two cannon openings on the gun deck. One towards the left which happens to be only partly there (which is good so I can show the details of the construction). The top of the cut out will be just underneath the channel so I can still include that and the deadeyes, but only a few of the chain plates.
- 572 replies
-
- constitution
- frigate
-
(and 1 more)
Tagged with:
-
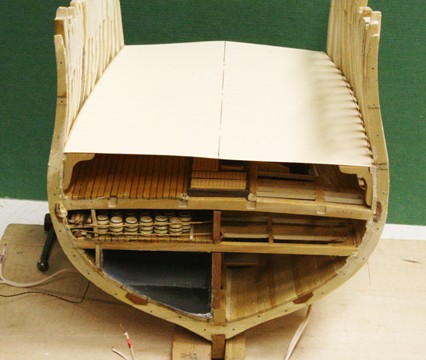
Right from the beginning I had in mind to make the various decks on the bench and then use a template to cut and fit them between the frames. The pictures below gives you the idea and it seems to work. There are some minor flaws that I have to correct. The standing knees are in place but the top edges don't match the curvature of the beams. So I have to do some work there. In fact the knee in the starboard front needs to be replaced all together. Then I will cut the deck part way to show the lower decks along the starboard side.
- 572 replies
-
- constitution
- frigate
-
(and 1 more)
Tagged with:
-
Waist and then there are 'related parts' like heel, hand, palm. At least they are naval related. For an interesting reference see the nautical dictionary http://www.alquiler-directo.com/boat-hire/nautical-dictionary-h.php
- 572 replies
-
- constitution
- frigate
-
(and 1 more)
Tagged with:
-
Steve. I wonder how many body parts a ship can have.
- 572 replies
-
- constitution
- frigate
-
(and 1 more)
Tagged with:
-
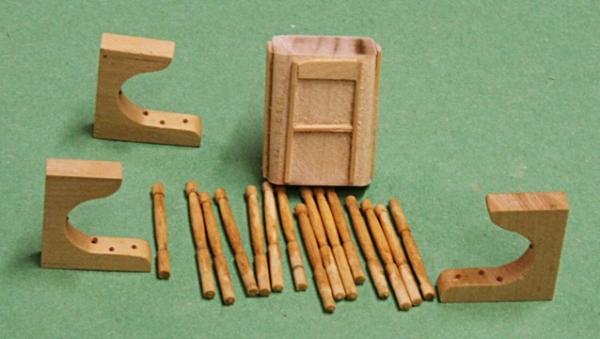
I should have added the following picture to explain the knees. This must have been mid-ship and gave me the idea that every beam was supported by one of those C-knees. So I made a dozen or more. Does anyone need some extra knees?
- 572 replies
-
- constitution
- frigate
-
(and 1 more)
Tagged with:
-
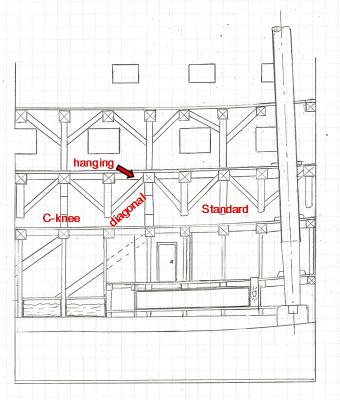
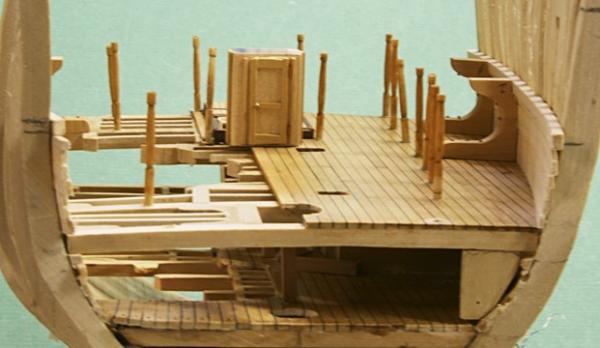
Looking aft There will be a forest of posts (three more down the center to be made and two along the front). Again, I don't want to cut them to length and glue them in place until I know how high. I juggled and carved the C-knees to fit the bulwark above the beams. It turned out that towards the bow there are fewer than I expected. I also show the ensign cabin with the door on this side. Although private, this must have been cramped quarters. What will make a difference is when I make and install the other knees: 1. the standard knees that stand vertical against the bulwark but don't go all the way to the deck. 2. the hanging knees that go diagonally from the bulwark to the deck beam above. 3. the lodging knees that go horizontally between the beams and against the bulwark (some of these I have installed on the orlop deck). The diagram above is an older version with the water tanks too small. But it does show where the various knees go on the berth deck to support the heavy guns above. I think the berth deck will be mundane but lots of hammocks should help.
- 572 replies
-
- constitution
- frigate
-
(and 1 more)
Tagged with:
-
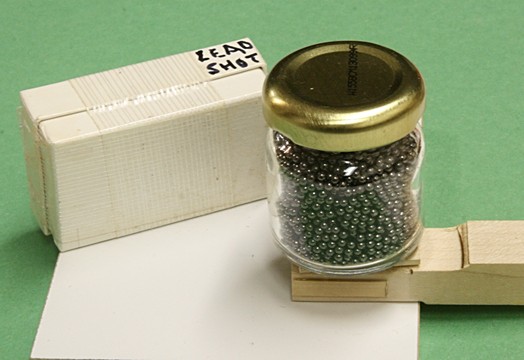
The posts and the ensign cabin are made and ready to be installed. I need to locate and drill holes for the elongated posts and also modify the C-knees (as I call them) to fit against the bulwark. This will be done after the gun deck is fitted in place, so I can measure the height I need and cut the posts to length. I might mention that to glue the thin strips against the cabin walls I used some lead shot in a jar (or box). They are small but heavy.
- 572 replies
-
- constitution
- frigate
-
(and 1 more)
Tagged with:
-
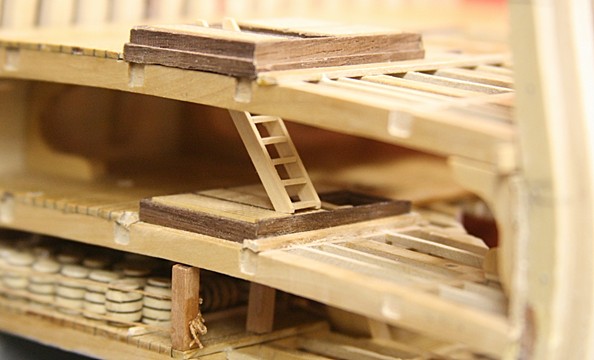
The final product is a long ways away. But thank you for your interest, Carl. The next step is to make more of those round posts on the berth deck. They help to support the heavy gun deck above. I counted about 16 for my cross section alone (and that does not include four thinner ones at the corners of the hatches). The ladder you see goes up to the gun deck and will be included. I also want to make that small wooden enclosure or cabin for one of the officers and lots more hammocks.
- 572 replies
-
- constitution
- frigate
-
(and 1 more)
Tagged with:
About us
Modelshipworld - Advancing Ship Modeling through Research
SSL Secured
Your security is important for us so this Website is SSL-Secured
NRG Mailing Address
Nautical Research Guild
237 South Lincoln Street
Westmont IL, 60559-1917
Model Ship World ® and the MSW logo are Registered Trademarks, and belong to the Nautical Research Guild (United States Patent and Trademark Office: No. 6,929,264 & No. 6,929,274, registered Dec. 20, 2022)
Helpful Links
About the NRG
If you enjoy building ship models that are historically accurate as well as beautiful, then The Nautical Research Guild (NRG) is just right for you.
The Guild is a non-profit educational organization whose mission is to “Advance Ship Modeling Through Research”. We provide support to our members in their efforts to raise the quality of their model ships.
The Nautical Research Guild has published our world-renowned quarterly magazine, The Nautical Research Journal, since 1955. The pages of the Journal are full of articles by accomplished ship modelers who show you how they create those exquisite details on their models, and by maritime historians who show you the correct details to build. The Journal is available in both print and digital editions. Go to the NRG web site (www.thenrg.org) to download a complimentary digital copy of the Journal. The NRG also publishes plan sets, books and compilations of back issues of the Journal and the former Ships in Scale and Model Ship Builder magazines.


