

MESSIS
-
Posts
1,232 -
Joined
-
Last visited
Reputation Activity
-

 MESSIS got a reaction from Kathy Teel in L' Hermione by MESSIS - Artesania Latina - 1/89 - 2nd build
Two jib sails (inner jib and fore mast staysail) in position. The wind blowing I think isnt bad, but the main or standing jib, is still not going to be used.
Forecourse sail is also in place (not fully secured) but the yard is fastened through the parrel and its trucks on the mast.
-
MESSIS got a reaction from Kathy Teel in L' Hermione by MESSIS - Artesania Latina - 1/89 - 2nd build
Shrouds on the main mast, and somebody started climbing the rattlines....
-
.thumb.jpg.6d6ee4bdbfaac2c58ecc77e7b80ae374.jpg) MESSIS got a reaction from Matt D in L' Hermione by MESSIS - Artesania Latina - 1/89 - 2nd build
MESSIS got a reaction from Matt D in L' Hermione by MESSIS - Artesania Latina - 1/89 - 2nd build
Two jib sails (inner jib and fore mast staysail) in position. The wind blowing I think isnt bad, but the main or standing jib, is still not going to be used.
Forecourse sail is also in place (not fully secured) but the yard is fastened through the parrel and its trucks on the mast.
-
 MESSIS got a reaction from cog in L' Hermione by MESSIS - Artesania Latina - 1/89 - 2nd build
Yards have been formed and then prepared with a pass of cellulose sealer and then had a fine sanding with a 240 and 320 sandpaper. After that two passes of black acrylic vallejo paint did the miracle.
After drying the yards were equipped with their fine quality double and triple blocks from Syren Model ship Co.
-
MESSIS got a reaction from Kathy Teel in L' Hermione by MESSIS - Artesania Latina - 1/89 - 2nd build
Standing rigging almost finished. Some shoe paint was used in order to clean the glue stains from the ropes. The ''binding thread'' (auxiliary thread used to bind standing rigging ropes in position) was waxed for better adhesion. All the standing rigging ropes (from Modellbau Tagelgarn), were excellent quality and I have not treated them in any way. Mizzen mast backstays still to go.
-
MESSIS got a reaction from cog in L' Hermione by MESSIS - Artesania Latina - 1/89 - 2nd build
It seems that the air has filled the jibsail.
That was the GAC 400. Applied and dried having small rice bags on its surface forming by gravity the air blowing in it.
-
 MESSIS reacted to Louie da fly in 10th-11th century Byzantine dromon by Louie da fly - FINISHED - 1:50
Thanks everybody for all the likes.
I've added all the benches for the starboard side
and lined up the slots for the benches in the port stringer and glued it on
Here are the benches for the port side ready for gluing into place.
And I've scarphed on the "tail" extensions for the stringers. Once the glue is dry I'll start curving them to fit the curve of the tail.
Quiet awhile ago I did a lot of experimenting on how best to make the shields for the pavesade - the row of shields along the side of the ship to protect the upper oarsmen, bearing in mind that real shields were pretty darned thin (usually between 7 and 10mm = about quarter to half an inch), which scales at 1/7 to 1/5 of a millimeter (= about 6 to 10 thousandths of an inch if my maths is correct)
Turns out tissues (as in blowing your nose!) are the best material for this job. I made a mould out of builder's bog, put in layers of tissue glued together with (quite a lot of) PVA (white) glue and squoze (is that a word?) the resultant paper/glue gunge between the male and female halves of the mould. Once dry I had to trim each shield to shape, then sand to get a reasonably smooth surface for painting. I've done about 5 so far - another 45 or so to go.
I've put a lot of research into the shield "devices" (decoration) used by the Byzantines, and once I've made the rest of the shields I'll be able to paint them with accurate designs, though I'm mixing and matching the colours to a certain extent (within the colour palette I know the Byzantines to have used).
Steven
-
 MESSIS got a reaction from mtaylor in Which jib sail flys last?
@SpyGlass Thank you for your nice words over my sails, but again and mostly thank you for your help which I appreciated very much.
-
MESSIS reacted to Louie da fly in 10th-11th century Byzantine dromon by Louie da fly - FINISHED - 1:50
Hmm, dunno. I hadn't thought about it, but certainly a nice rectangular hole like that doesn't seem suited to a round bit of rope.
Next step in construction:
One of the Yenikapi galley finds had slots in the wale to take the ends of the oarbenches.
In line with that I'd made similar slots for the upper oarsmen's benches, but as I'd already discovered the upper wale was too low for them I added a stringer on top of it to take the slots.
While making the oarsmen it was necessary to get the correct relationship between the gunwale (the pivot point of the oars) and the water level (where the oarblades reach to) and the level of the oarsmen's hands; they all have to be in a straight line. Unfortunately, I discovered that even with the new stringer the slots were too low, so either the oarblades would be too low or the oars wouldn't sit on the gunwale or the oarsman's hands would be too high. And anyway as it was the benches would be only about 200mm (10") above the deck - Though an oarbench doesn't need to be as high as a normal chair - and in fact shouldn't be, because it makes the centre of gravity too high - they shouldn't be that low.
So I had to raise the notches so the benches would be higher. I decided to add yet another stringer on top of the first one, smoothed off to look like it's part of it, with new slots to get the benches high enough up for the oarsmen to sit properly. Here's the starboard one under way.
I just carved the slots in the underside of the stringer, as the lower stringer would act as the underside of the slot (the photo below shows the stringer from underneath - the diagonal beams are the oars).
Here is the port side stringer with one end glued in place, ready to bend round on top of the lower stringer. And the first two starboard benches in place with an oarsman sitting on one. 'E looks 'armless . . . (I'm still working on the exact configuration of the oarsmen's arms to get everything to line up).
After I'd added the starboard stringer I found that some of the slots didn't line up with the ones below them, and I was in the process of ungluing the rotten thing and starting again, when I realised the two slots nearest the bow actually did line up, and the ones on the new stringer were actually better located than the lower ones. So I left it. Then I had the problem of what to do with the lower slots. Fill them up so they couldn't be seen? But as it turns out the oarbenches conceal the lower slots so I don't really have to do anything to them at all.
My next step is to get all the starboard benches in place, then I can draw lines across the breadth of the ship at each bench to make sure the port benches line up with the starboard ones - something I hadn't thought of when I started putting the benches in place last time.
Steven
-
MESSIS reacted to Tom E in US Brig Niagara by Tom E - Model Shipways - 1:64 Scale
Evening,
I think Niagara needs an update.
Admittedly, hanging out in the "Non-ship" section with my B-25J build
Niagara will be always be my "main" build. I'm seeing this ship thru to the very end!
Plus, I may be building a bomber in another section, but I can almost guarantee I'll always have a wooden ship build going.
I already know Bluejackets Bowdoin will be after Niagara.
The Royal Yards have been started.
These weren't too bad to build.
Being smaller it didn't take too much time, mostly sanding to shape and attaching the hardware.
The foot ropes were simple, so no real fuss with these.
Either that or I'm getting better at this...………..NAH!!!!!
I would constantly use the tweezers to see how my ropes "balanced out" in relation to the centerline of the yard.
I followed this rule for all Yards and the footropes.
Not too shabby.
Still some touch up work to do with some black paint.
I see some glue shine.
They fit perfectly into the grooves of some clothes pins and made rigging a bit easier.
I now have a full compliment of Yards! Little bit of a milestone in my book.
The Spanker Boom and Gaff are on order next.
After the those are ready, It'll be time to start putting it all together.
I'm thinking carronade sleds first, just the sleds. I've seen it done on other builds and seems the logical way.
Masts will be rigged off model as much as possible.
Be good!
Tom E
-
 MESSIS got a reaction from Archi in Which jib sail flys last?
@SpyGlass Thank you again! Its actualy hard to come on all this you just explaind if someone hasnt the luck to sail such a sailship.
So, posting a picture of what I have done. Thats the maximum I can succeed by keeping wind into the sails.
-
 MESSIS got a reaction from GrandpaPhil in Which jib sail flys last?
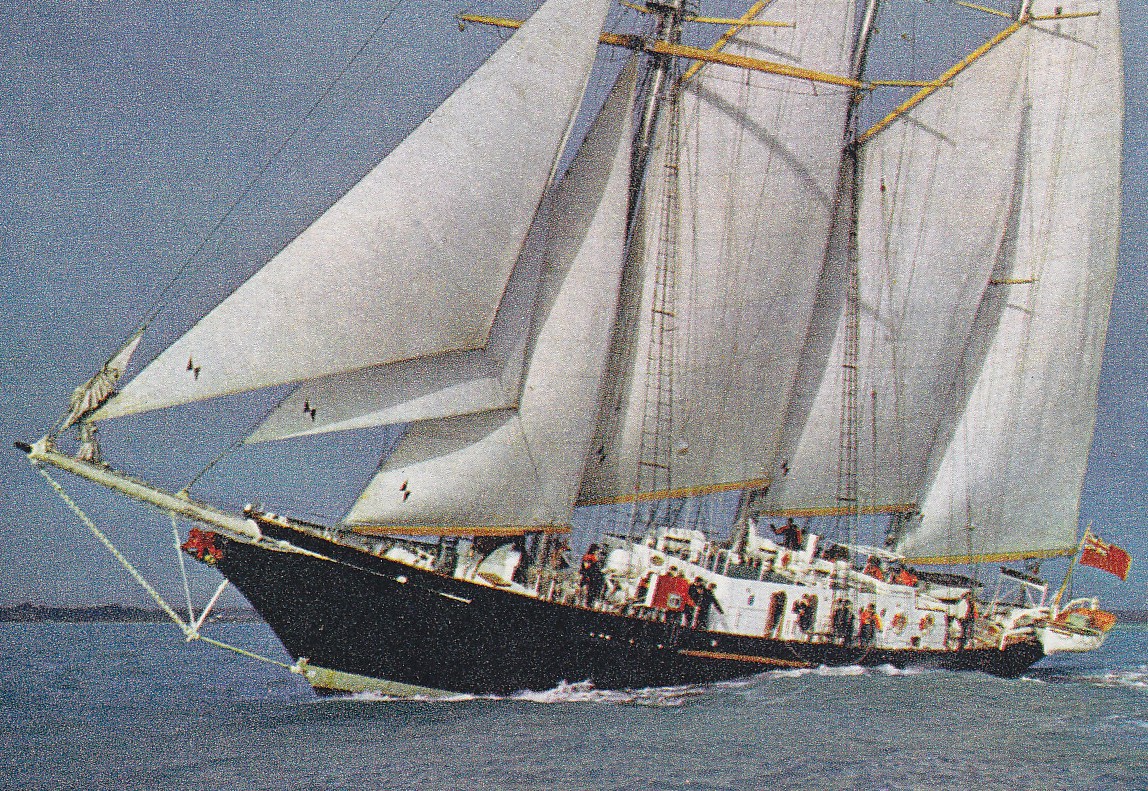
Am planing to finish Hermione's sail plan using only two jib sails instead of three (ships full rig plan). Is it correct (in order to picture a correct sail set) to fly the inner and outer jib sail and spare the flying jib, which I assume was the third and last jib to fly.
In other words is the flying jib the third and last jib to fly?
I believe thats picture no 1, there is the inner and outer jib, the flying jib is missing.
But what about picture no 2, is there the outer and the flying jib flying and there is the inner jib the one missing?
-
MESSIS got a reaction from mtaylor in Which jib sail flys last?
@SpyGlass Thank you again! Its actualy hard to come on all this you just explaind if someone hasnt the luck to sail such a sailship.
So, posting a picture of what I have done. Thats the maximum I can succeed by keeping wind into the sails.
-
 MESSIS got a reaction from coxswain in Which jib sail flys last?
@SpyGlass Thank you again! Its actualy hard to come on all this you just explaind if someone hasnt the luck to sail such a sailship.
So, posting a picture of what I have done. Thats the maximum I can succeed by keeping wind into the sails.
-
MESSIS got a reaction from mtaylor in Which jib sail flys last?
Am planing to finish Hermione's sail plan using only two jib sails instead of three (ships full rig plan). Is it correct (in order to picture a correct sail set) to fly the inner and outer jib sail and spare the flying jib, which I assume was the third and last jib to fly.
In other words is the flying jib the third and last jib to fly?
I believe thats picture no 1, there is the inner and outer jib, the flying jib is missing.
But what about picture no 2, is there the outer and the flying jib flying and there is the inner jib the one missing?
-
 MESSIS got a reaction from Tom E in L' Hermione by MESSIS - Artesania Latina - 1/89 - 2nd build
It seems that the air has filled the jibsail.
That was the GAC 400. Applied and dried having small rice bags on its surface forming by gravity the air blowing in it.
-
MESSIS got a reaction from coxswain in L' Hermione by MESSIS - Artesania Latina - 1/89 - 2nd build
Yards have been formed and then prepared with a pass of cellulose sealer and then had a fine sanding with a 240 and 320 sandpaper. After that two passes of black acrylic vallejo paint did the miracle.
After drying the yards were equipped with their fine quality double and triple blocks from Syren Model ship Co.
-
 MESSIS got a reaction from Dutchman in L' Hermione by MESSIS - Artesania Latina - 1/89 - 2nd build
Yards have been formed and then prepared with a pass of cellulose sealer and then had a fine sanding with a 240 and 320 sandpaper. After that two passes of black acrylic vallejo paint did the miracle.
After drying the yards were equipped with their fine quality double and triple blocks from Syren Model ship Co.
-
MESSIS got a reaction from GrandpaPhil in L' Hermione by MESSIS - Artesania Latina - 1/89 - 2nd build
Yards have been formed and then prepared with a pass of cellulose sealer and then had a fine sanding with a 240 and 320 sandpaper. After that two passes of black acrylic vallejo paint did the miracle.
After drying the yards were equipped with their fine quality double and triple blocks from Syren Model ship Co.
-
MESSIS got a reaction from Tom E in L' Hermione by MESSIS - Artesania Latina - 1/89 - 2nd build
Yards have been formed and then prepared with a pass of cellulose sealer and then had a fine sanding with a 240 and 320 sandpaper. After that two passes of black acrylic vallejo paint did the miracle.
After drying the yards were equipped with their fine quality double and triple blocks from Syren Model ship Co.
-
 MESSIS got a reaction from JayCub in L' Hermione by MESSIS - Artesania Latina - 1/89 - 2nd build
Yards have been formed and then prepared with a pass of cellulose sealer and then had a fine sanding with a 240 and 320 sandpaper. After that two passes of black acrylic vallejo paint did the miracle.
After drying the yards were equipped with their fine quality double and triple blocks from Syren Model ship Co.
-
 MESSIS got a reaction from Jeff-E in HMS Victory by Jeff-E - FINISHED - Panart - 1:78 Scale - Bow Section
Great work! Brilliantly done.
Christos
-
MESSIS reacted to Jeff-E in HMS Victory by Jeff-E - FINISHED - Panart - 1:78 Scale - Bow Section
And a few more....
Thanks to all of those who looked in and left comments or likes. I am quite happy with how the finished model turned out with all of the modifications and enhancements I made to the original kit.
Thanks again for looking.
-
MESSIS reacted to Jeff-E in HMS Victory by Jeff-E - FINISHED - Panart - 1:78 Scale - Bow Section
Hello All,
The next lines that were attached were the foreyard lifts, the fore topsail sheets, the clue garnets and the yard tackle pendants. Because these photos were taken after all the lines were rigged I have posted two of the same photo, one labeled and one unlabeled, for a bit of clarity, I hope.
The first two are a general view of the yard lifts, sheets, clueline and yard pendants and after that a brief description of the marked lines.
The yard lifts are made from 0.5mm tan thread and the it's end is seized into the eye on the single block on the mast cap and reeves through another single block stropped to the sheet block attached to the end of the yard then back through the block on the mast cap and down to the deck where it reeves through a kevel block fitted to the inboard rail at the fore end of the fore channel.
The topsail sheet line was made from 0.75mm tan thread and was secured by knot in the end of it to the sheet block at the end of the yard and then down through the sheet blocks on the underside of the yard next to the mast and down to belay to inner sheave on the topsail bitts.
The clue garnet is made from 0.5mm tan thread and one end is secured to the yard with a timber hitch just outside the clue line block attached to the yard, it reeves through the block attached to the tack blocks and then through the clue line block on the yard and then down to belay on the outer sheave on topsail bitts.
I decided to show the yard tackle pendants rigged instead of being tied up to the yards as they normally would be when not in use. Rigging them also made the yard a bit more secure. They are made from 2 double blocks one on a pendant of 0.75mm thread 50mm long attached to the end of the mast the other block has a hook stropped to it and an eye formed in the other end of the strop so that the falls can be attached. The falls were made from 0.25mm tan thread and reeved through the blocks and belayed to one of the posts on the side rail.
The outer tricing line is made from 0.10mm tan thread and was used to haul the yard pendant up against the yard when it wasn't in use. It reeves through a single block attached to the yard and then through another single block attached to the first shroud at the futtock stave and then down to belay on deck. The inner tricing line attached to the other double block just above the hook and reeves through a single block fixed to the front shroud next to the block for the outer tricing line and belays on the deck. It is not shown on the model.
The next few photos show some of the belaying points and the sheet an tack blocks rigged.
Thanks for looking in and the likes.
-
MESSIS got a reaction from cog in L' Hermione by MESSIS - Artesania Latina - 1/89 - 2nd build
Standing rigging almost finished. Some shoe paint was used in order to clean the glue stains from the ropes. The ''binding thread'' (auxiliary thread used to bind standing rigging ropes in position) was waxed for better adhesion. All the standing rigging ropes (from Modellbau Tagelgarn), were excellent quality and I have not treated them in any way. Mizzen mast backstays still to go.