Check out our new MSW Sponsor Innocraftsman
×


JRB9019
-
Posts
249 -
Joined
-
Last visited
Content Type
Profiles
Forums
Gallery
Events
Everything posted by JRB9019
-
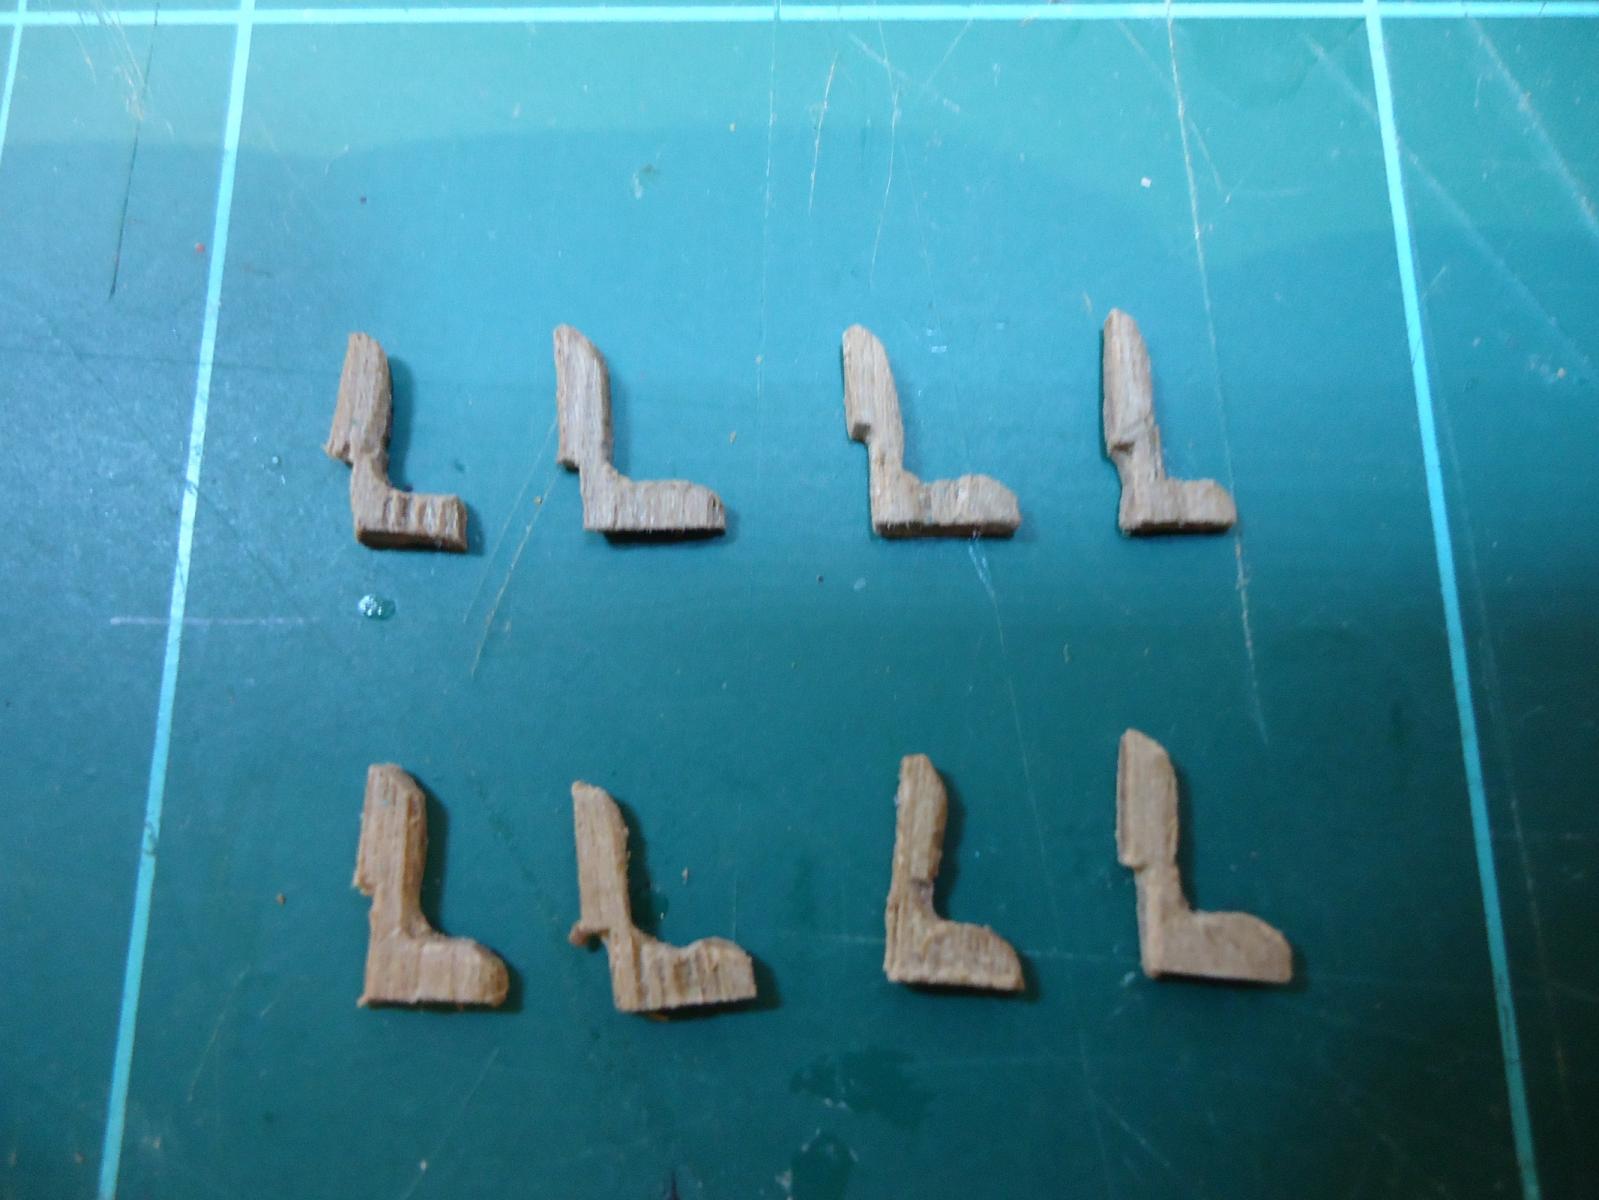
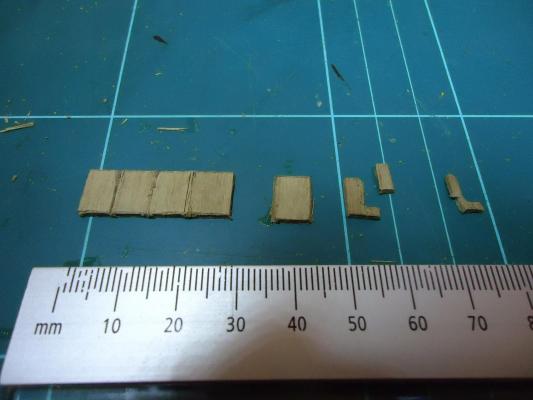
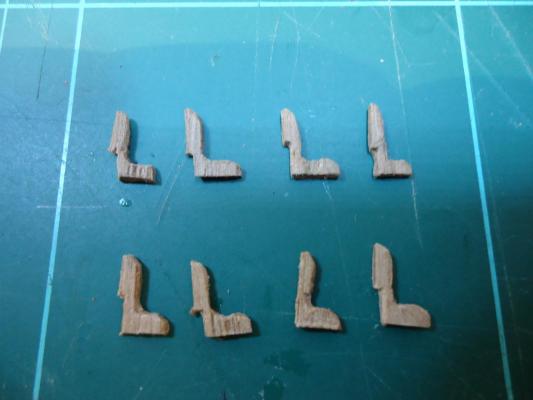
So, I completed my 8 home-made Channel Support Knees. Lots of careful cutting and filing - I have just about managed to take all the skin off my fingers! Trying to hold such tiny pieces whilst filing away is not easy! Here's a picture of the process And here are the completed pieces Looking at the photo I can see that I need to a little tidying up. Next.....
-
Hi - Just found your build log. Looks really sharp - can't wait to see more. John
-
Hi Rick Welcome back to the Pickle World. I notice you took a long break - join the club. I started my Pickle In September 2012 and managed to complete the hull, decking and painting. Then life decided to intervene - apart from not having the right equipment to be able to see what I was doing and Pickle was left to hiberrnate. Then a few weeks ago, things changed for the better, the wraps came of Pickle and we're back with a vengance!! I've even finished the carronades - now that was fun! Amazing what magnification and good lighting does to help - but that doesn't seem to be an issue with your workshop ................... sigh, one day, one day!!!! Onwards and upwards John
-
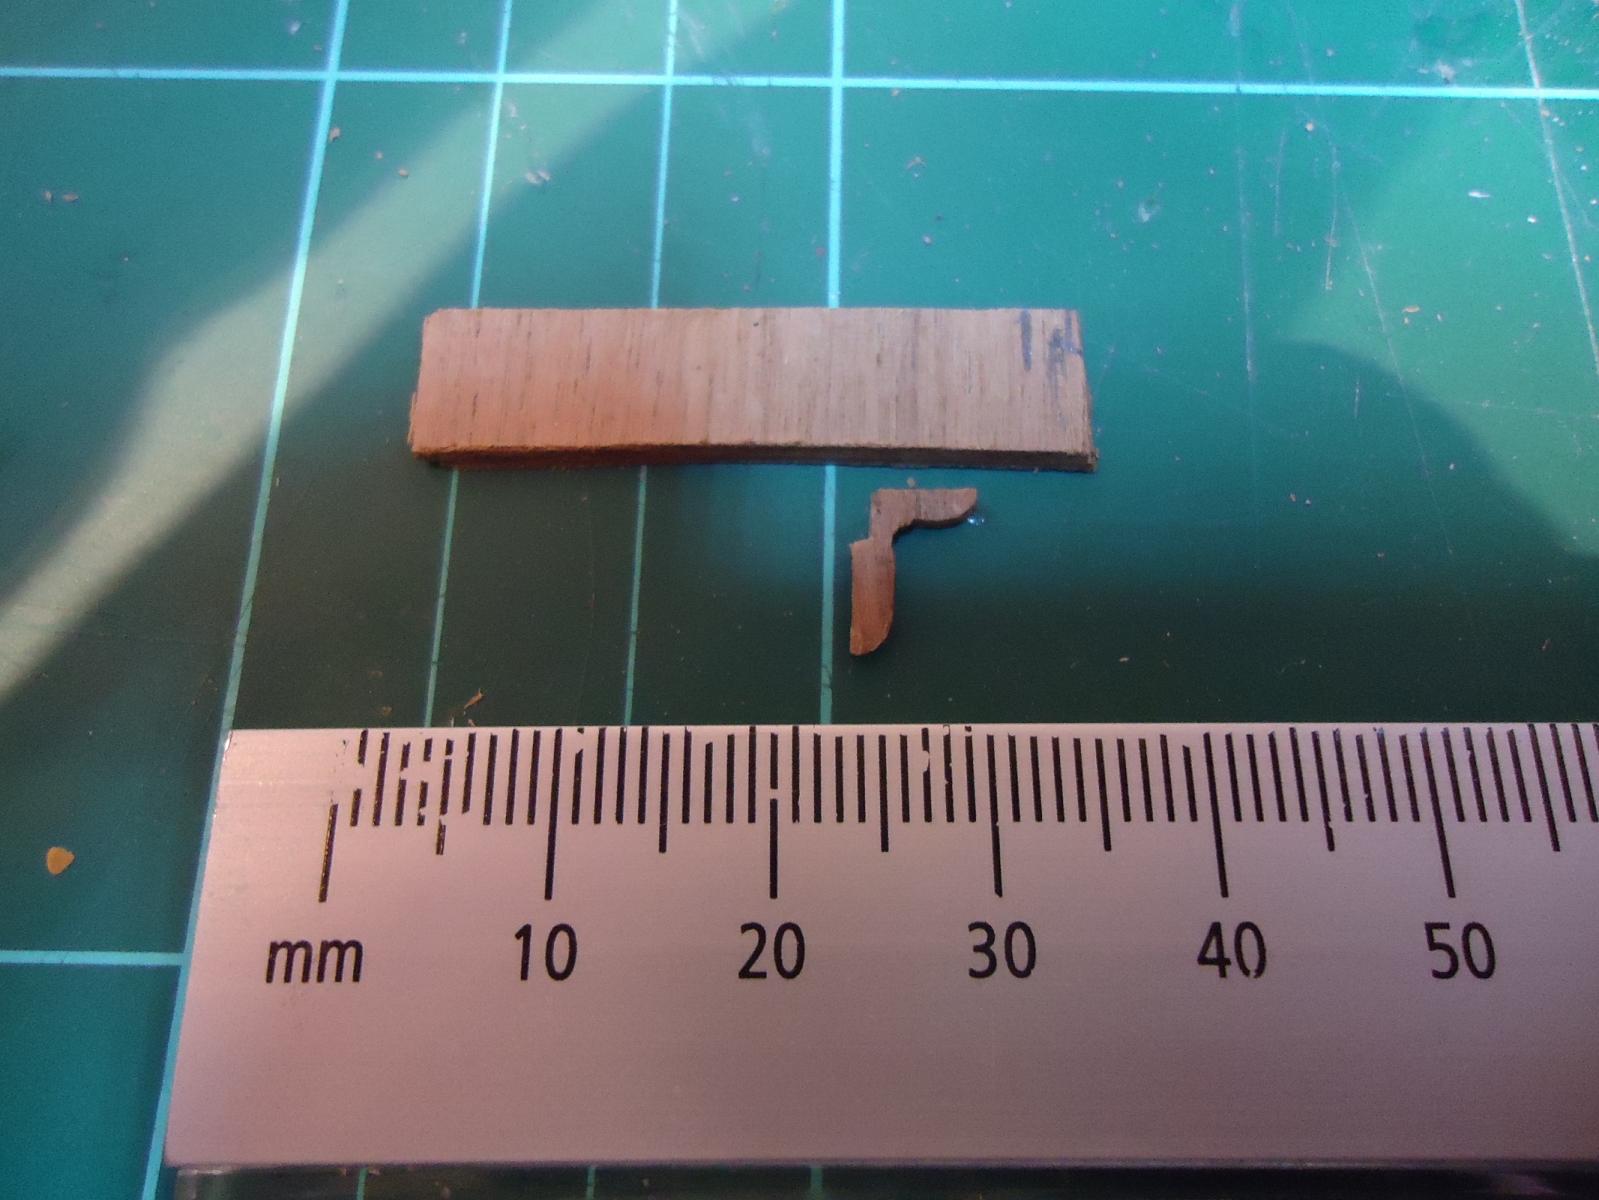
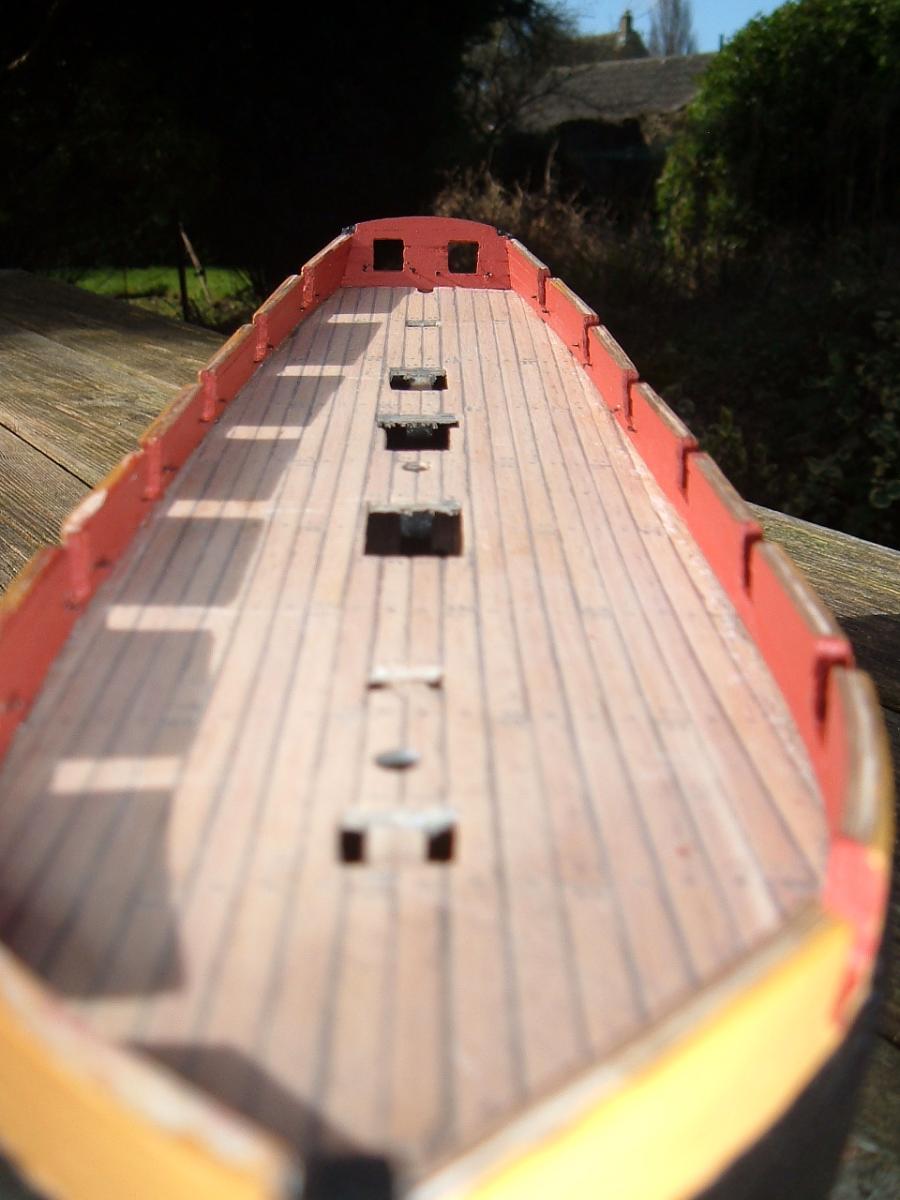
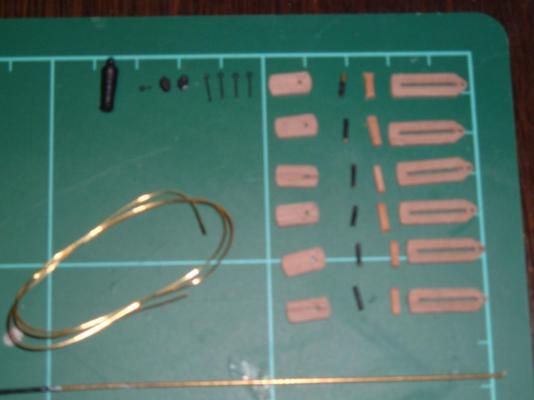
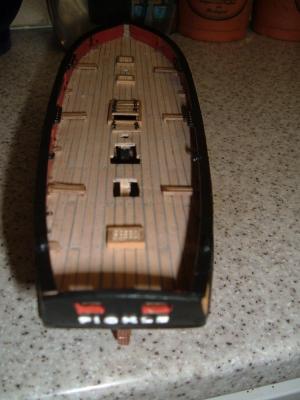
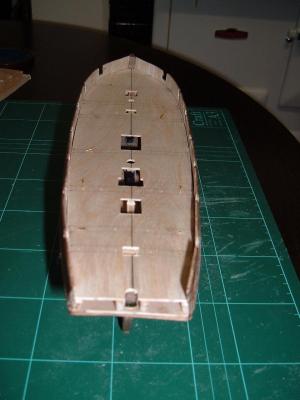
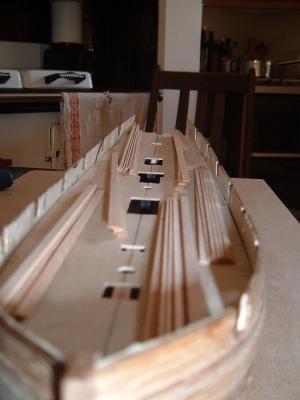
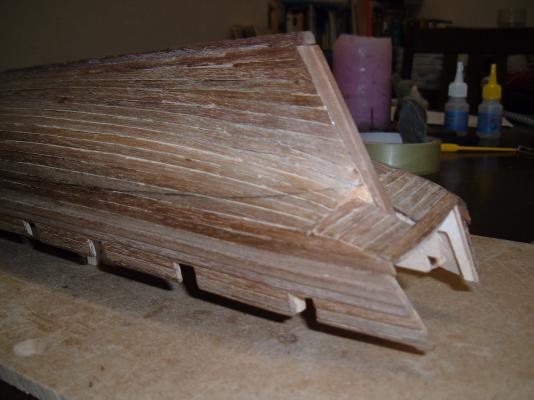
Phase 6 Deck fittings Additional deck fittings are completed. The Windlass and Pawl Bitts assemblies are correctly situated, the dome-head pins fitted, marked and the appropriate sighting holes drilled. The two small cleats and seven eyelets are found, holes drilled and pieces fitted. Making the Channels I cut out and sanded the four channels then had lots of fun painstakingly drilling the holes into the inboard sides. I fitted the pins, market their position on the hull and carefully drilled the positioning holes. Of course, each channel is slightly different so I was careful to mark which one was which (Main-Starboard etc.). I then decided to paint the channels before fixing the Deadeye Strops, but of course that was tricky as they were already free standing. Improvisation called for, I used the fixing pins to place the channels on to a piece of cardboard, marked the relevant name and then completed the painting. Before anyone questions my shoddy workmanship, I have purposely not painted the front edge so that I have a better surface for fixing the facing boards once the Deadeye Strops are in place. Deadeye Strops Assembly started on the Deadeye Strops. All went well until I started to read the instructions. Ah yes, "Spring the 'nubs' of the strop, with deadeye, into the locating slot". Help!! Luckily Flyer was on hand to provide some sanity and a translation into layman’s English. I had previously carefully primed and painted the Strops while they were still attached to the brass sheet. Clever move (I thought). However by the time the Strops were clipped and the ends filed smoothly, of course all my black paint had disappeared. So now I had the free-standing Strops to paint. Hmmm. Well, this cardboard idea that I used with the channels seemed to work, so I cut another piece, drilled 16 holes, pushed the Strops through, clipped the cardboard on to my trusty little helping hand and voila – ready to prime and paint again! Making the channel knees So, decision time. I had noticed that the channels provided with the kit had no supports – other than the Strops of course. I used my new copy of Karl Heinz Marquardt’s The Global Schooner and found out about Standard and Support Knees, studied the excellent build logs from Blue Ensign and Flyer and decided to branch out into the new world of ‘making it myself’!! First things first, I found some spare wood on the provided 1.5mm Walnut sheet that has included the four channels. I cut out my first support knee, realised I would have to do a bit more work by removing a section so that the Knee would fit snug against the hull and the Black Strake. First one done – and I was so pleased that I took a photo!! Seven more to go and then I need to decide if I am to go the whole hog and craft eight Standard Knees for the top of the Channel as well.


-
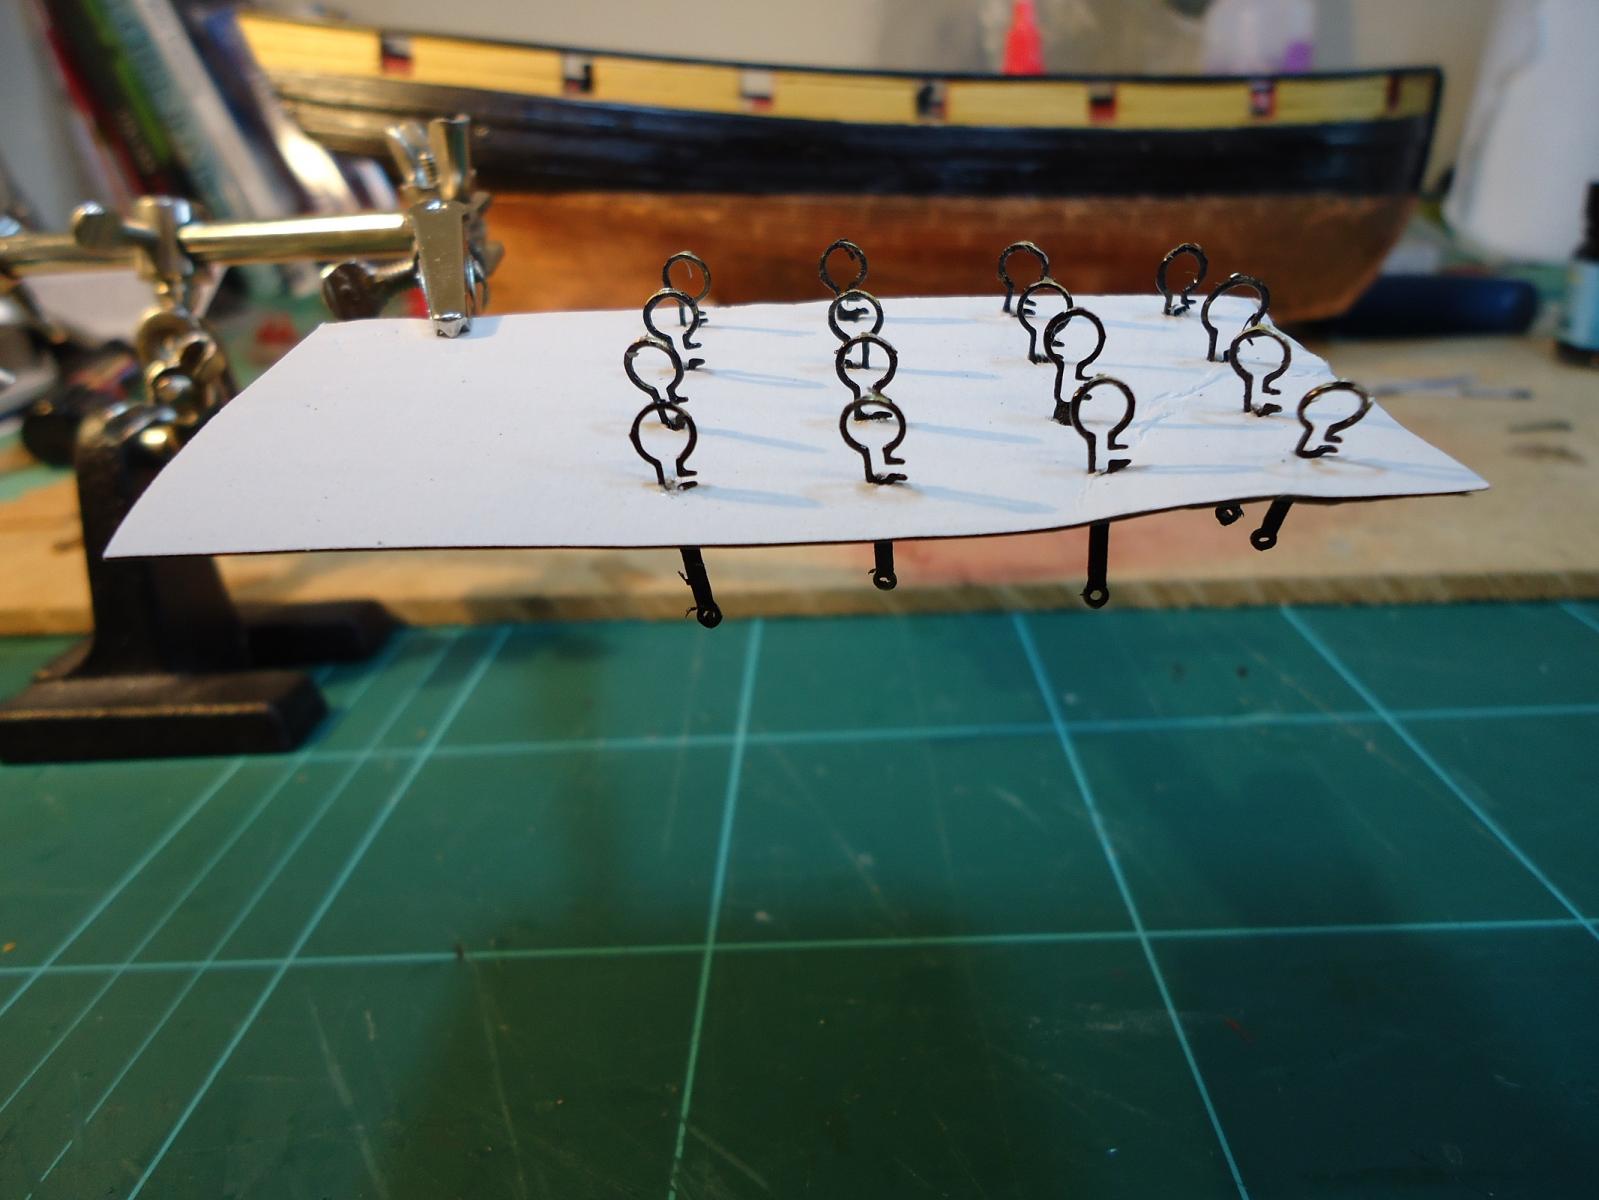
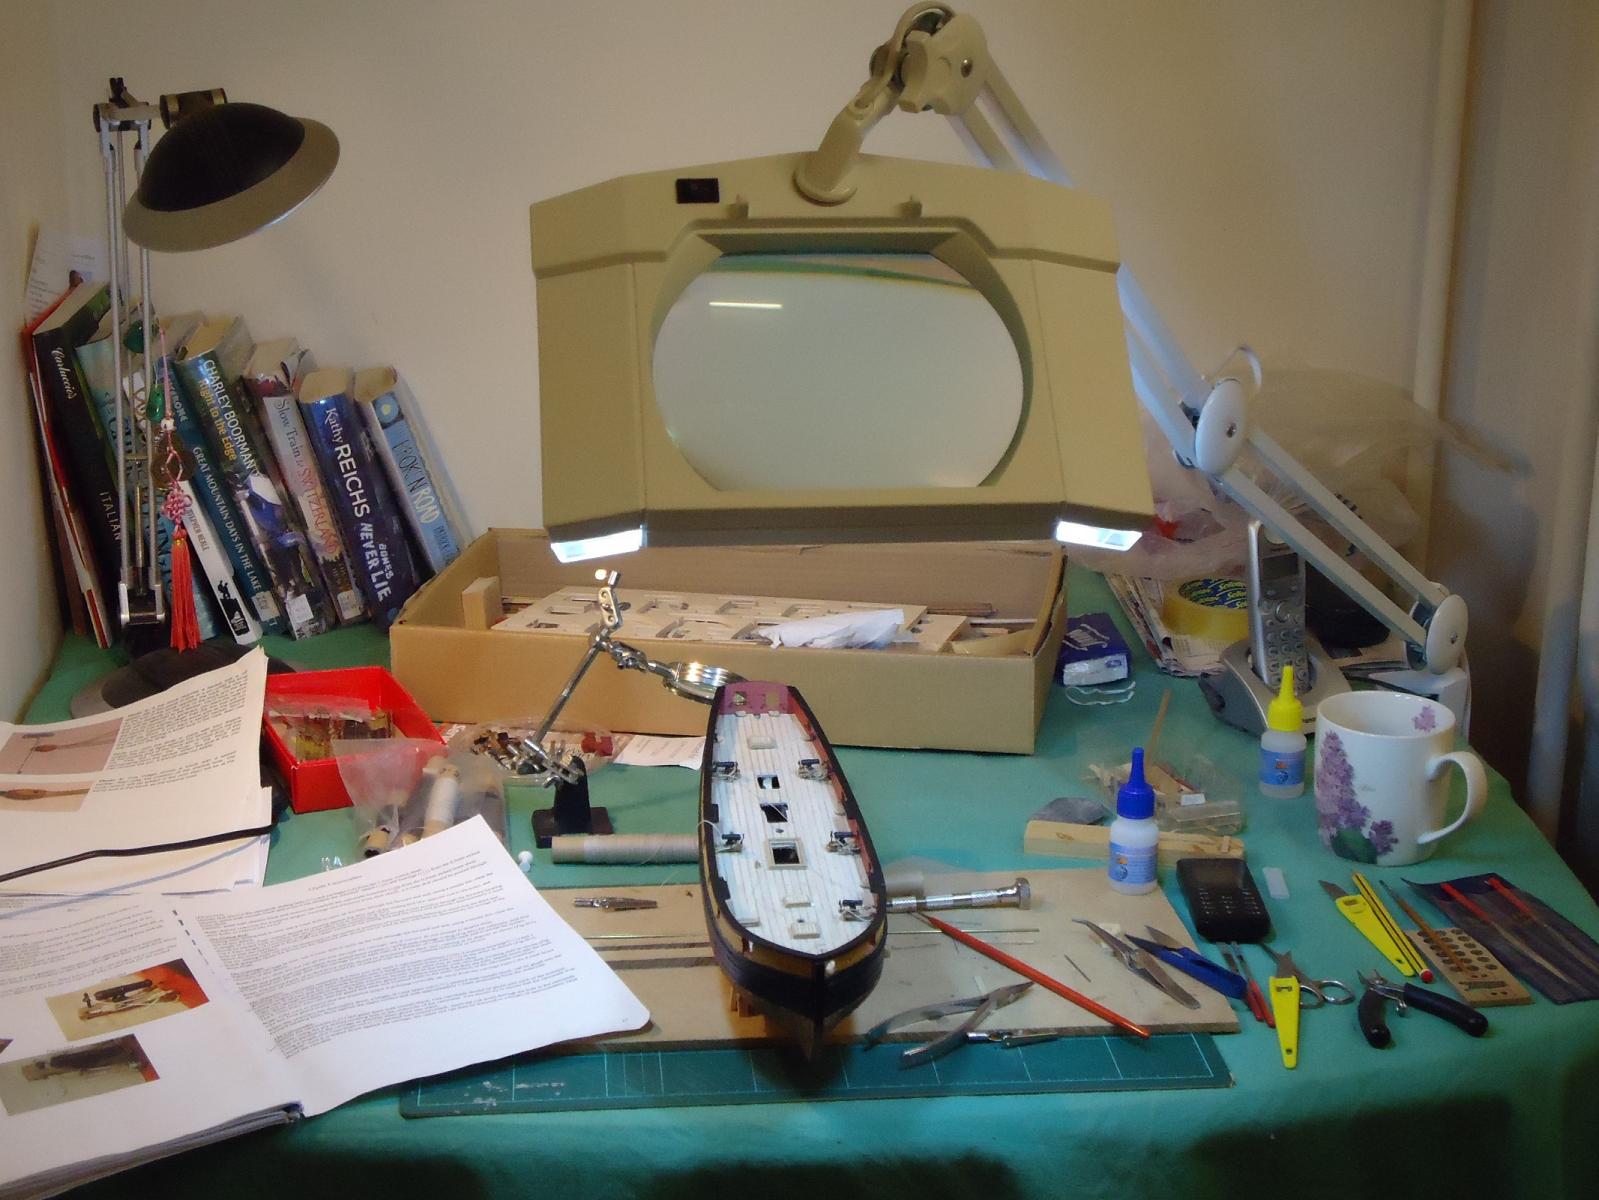
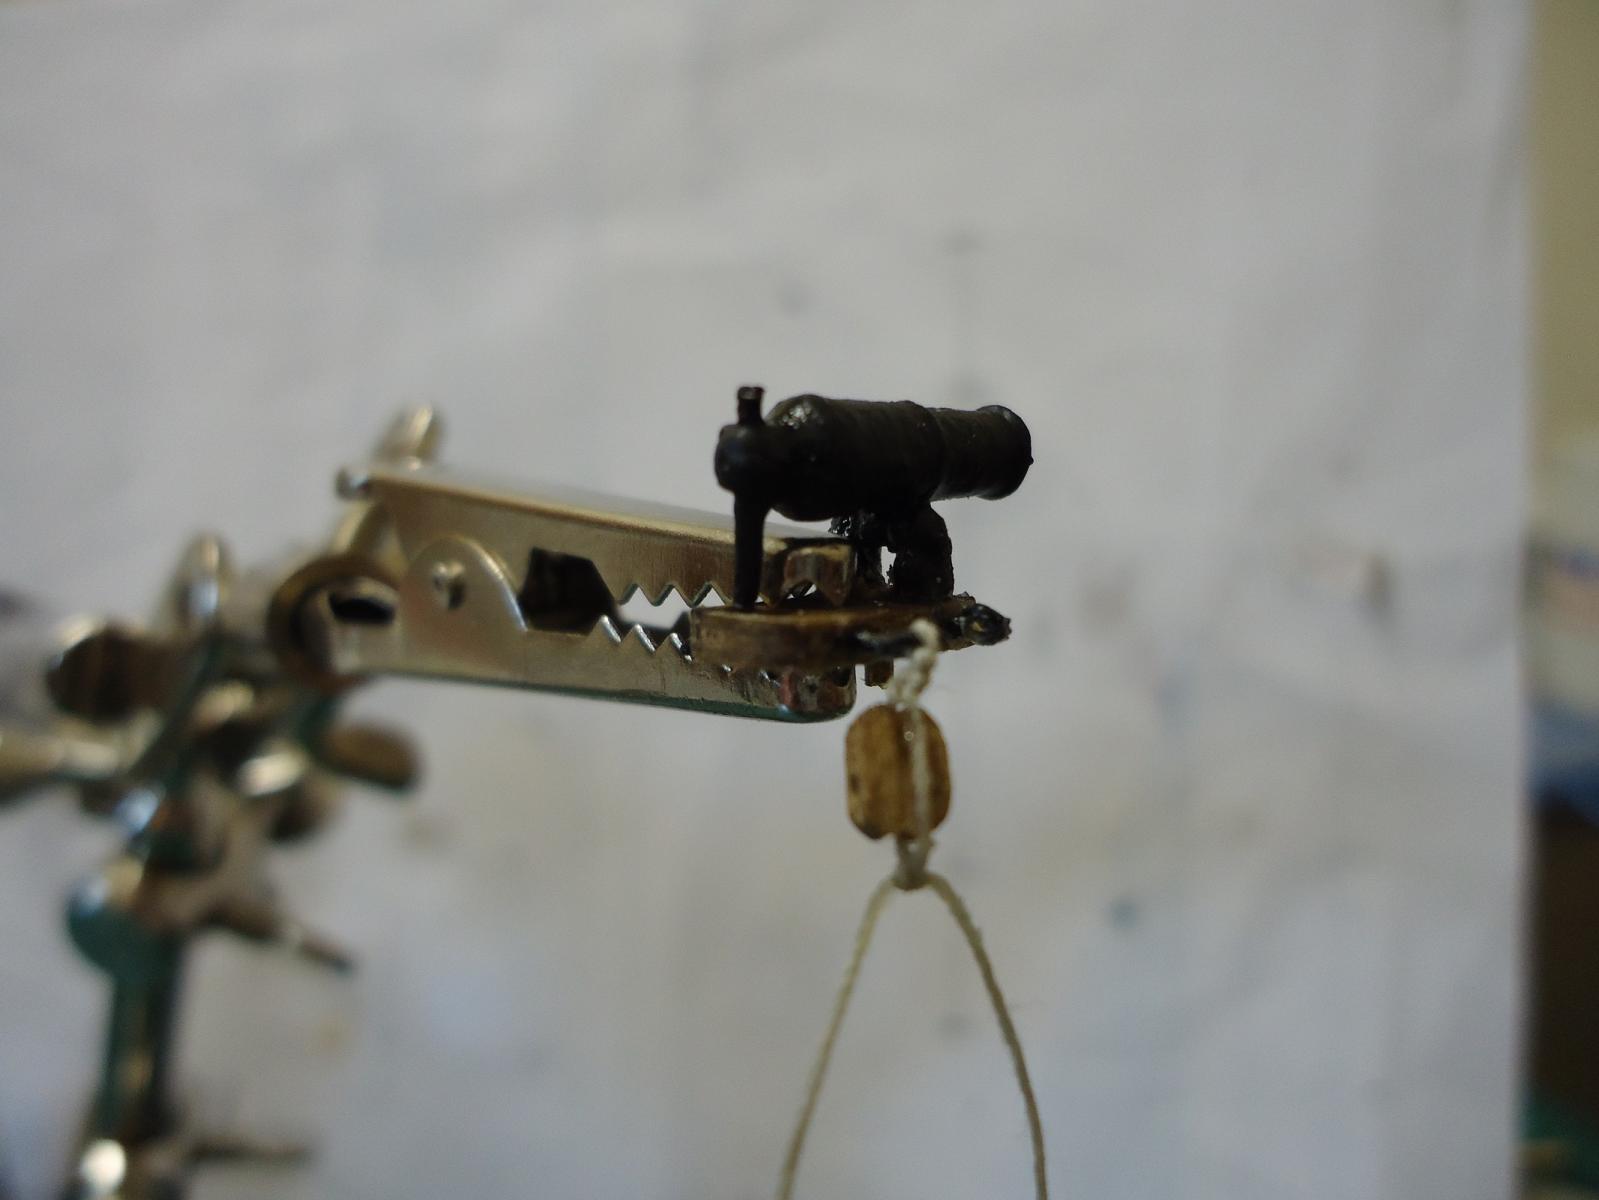
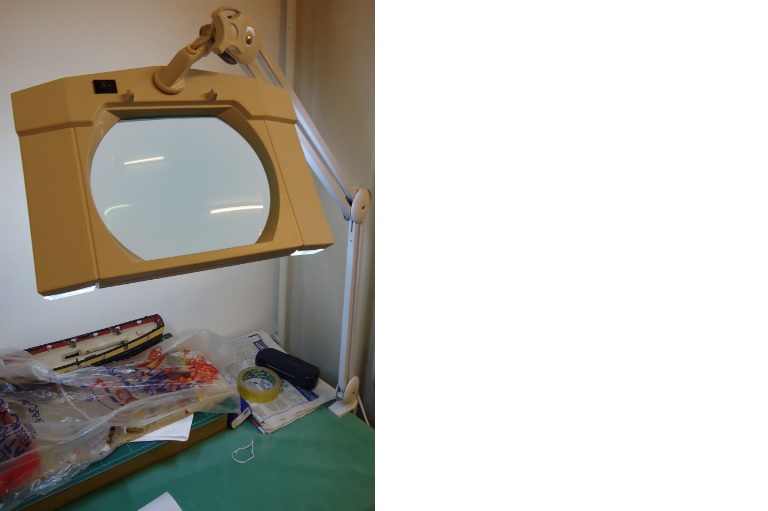
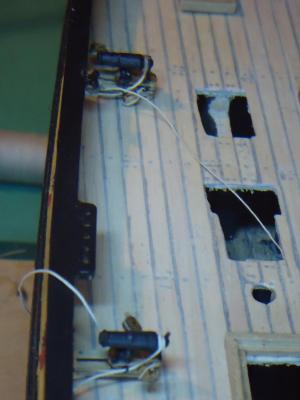
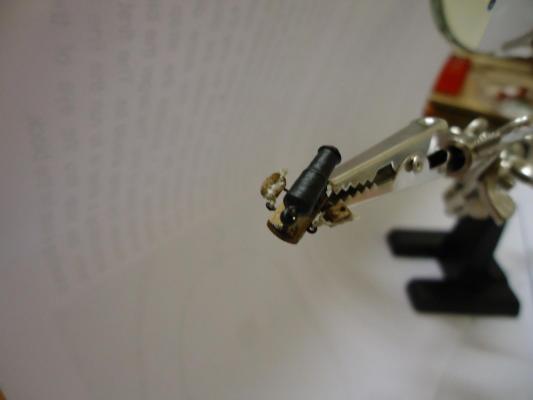
Fitting the gun tackle Having managed to somehow secure the blocks to the eyelets, these were then fitted in to the inner bulwarks before making a start on the Breech rope. Before then, I finally purchased a proper Magnifier and LED light. Thanks to Tony (TK11) for the suggestion. Here it is, fitted to my new work-place. It’s awesome, I can actually see what I am doing!!!! The Breech Ropes I made a start fitting the Breech Ropes. Initially, I had taken the carronade off the deck to try and fit the Breech-rope as I couldn’t see what I was doing. Now, though, I was able to leave everything in place and was able to complete the task. This picture shows two carronades completed with the Breech Ropes ready to be made fast to the inner bulwark rings. Starting to fit the Breech Ropes 1st Breech Rope and tackle completed Finally, all carronades were completed, the Breech Ropes tied and the gun tackle rigged. As can be seen, I had also decided to not use Cheeses but rather tie the tackle up. All done and time for the next phase


-
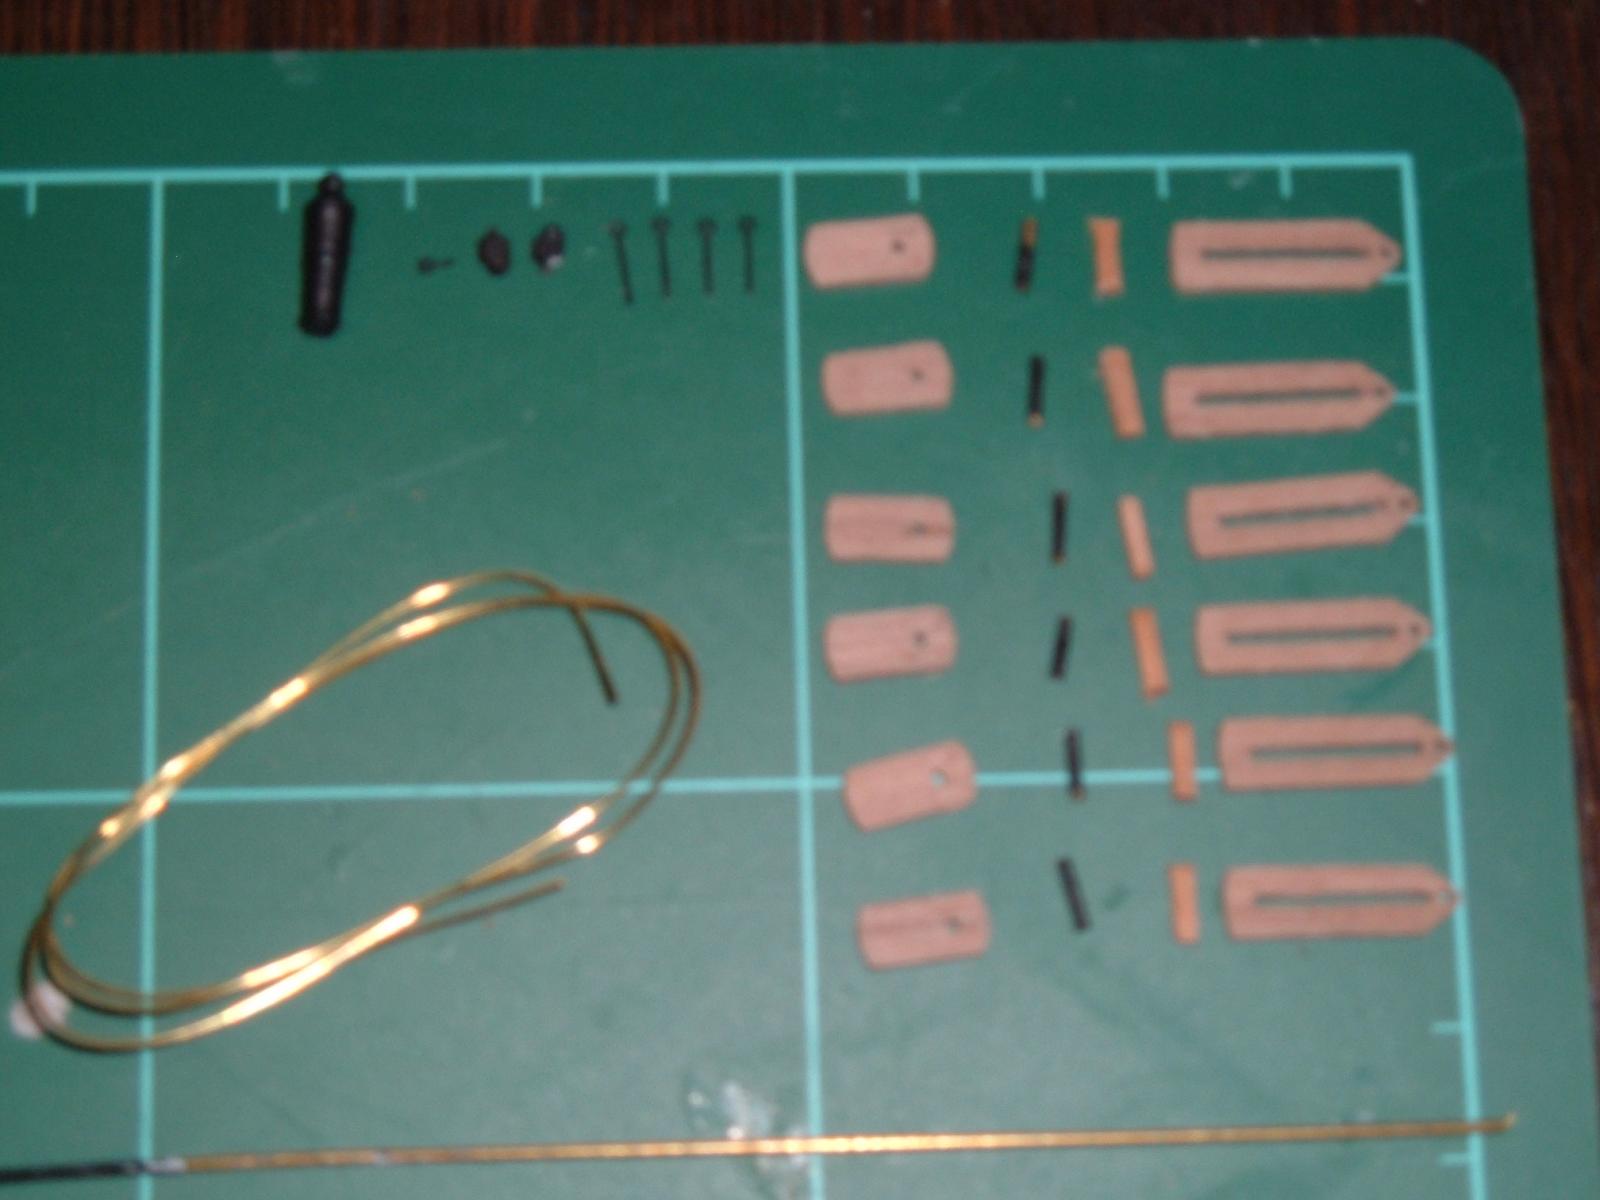
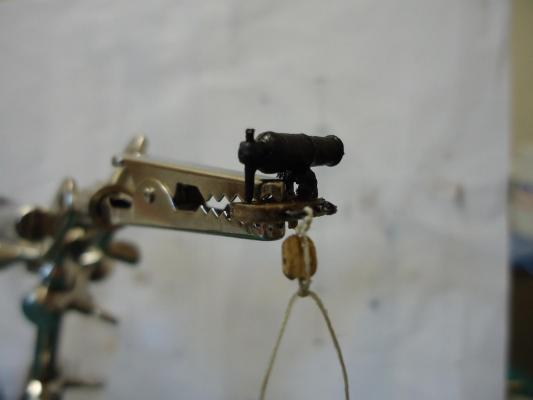
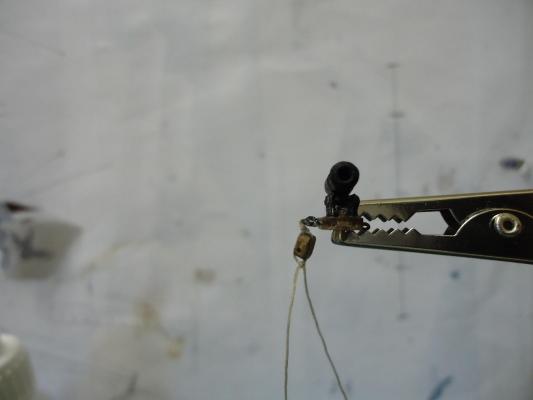
Phase 5 Building and installing the carronades Carronade Sliding Beds The building and rigging of the carronades was going to take me a lot of time and patience (Thanks goodness there are only six of them!). So, I decided to build them in stages and do something else in between. Here’s a quick photo of all the parts needed to make up the Carronade (from right to left), the Sliding Bed, the base fitting, the fitting pin, the carriage. For each carriage I will need; the four carronade rigging eyelets, two trunnions, two trunnion bearings and spigot, and the carronade itself, all shown at the top left-half of the picture. Finally, the copper wire and copper rod shown at the bottom of the picture. Firstly came the sliding beds, each made up of a pre-formed base, a second piece of walnut fixed to the base and sanded into shape and a length of brass rod painted black. Finally these six sliding beds were placed (using the brass rod pin) into the previously fitted deck blocks. Carronade Build I eventually managed to assemble my first carronade, using the “lets thread everything onto a wire” method – as opposed to the very professional “first, build a template” method as shown by Blue Ensign in his build. Believe me, I tried the template method and couldn’t get it to work! Holes were bored for the eyelets, the eyelets fitted and finally a test deck placing carried out. All looked well, so I managed to complete the rest and fitted them in place. Oh yes, I can finally post half-decent photographs here!! Christmas had been and gone and I was given a new camera. At last I can take some photos!! No super-macro work, but a lot better than it used to be, that’s for sure! Fixing the tackle-blocks I was still without a decent magnification system and things were getting quite hard. To help me along, I purchased one of those little helping hand and magnifying glass things. I put this to use straight away to help me tie and secure the blocks on to the carronade base. Securing the blocks

-
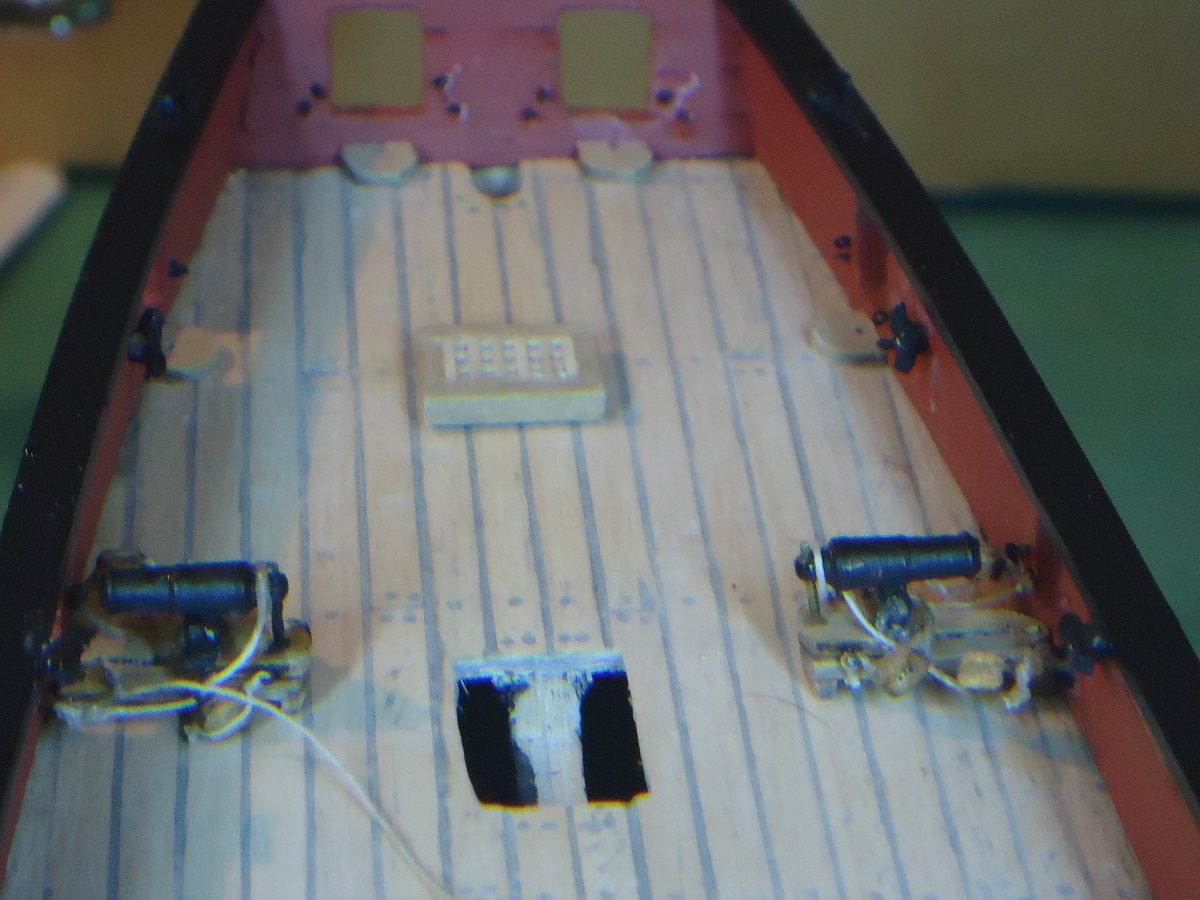
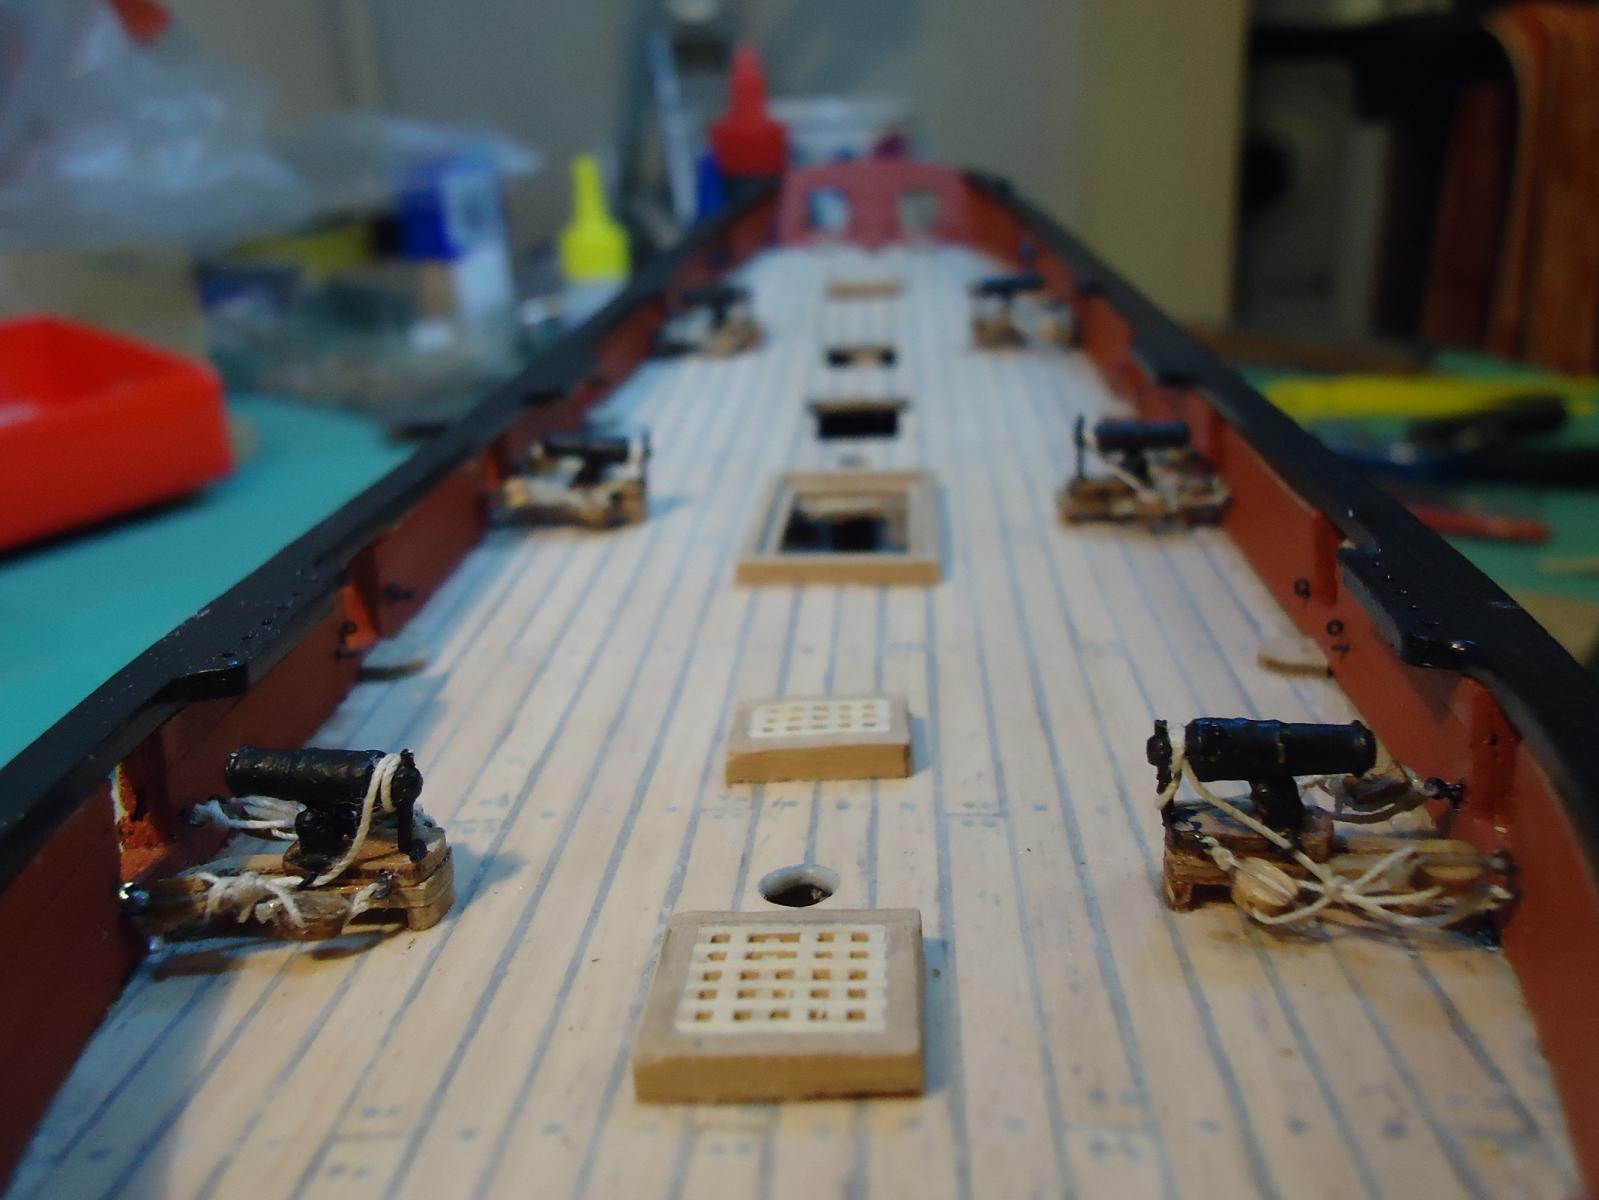
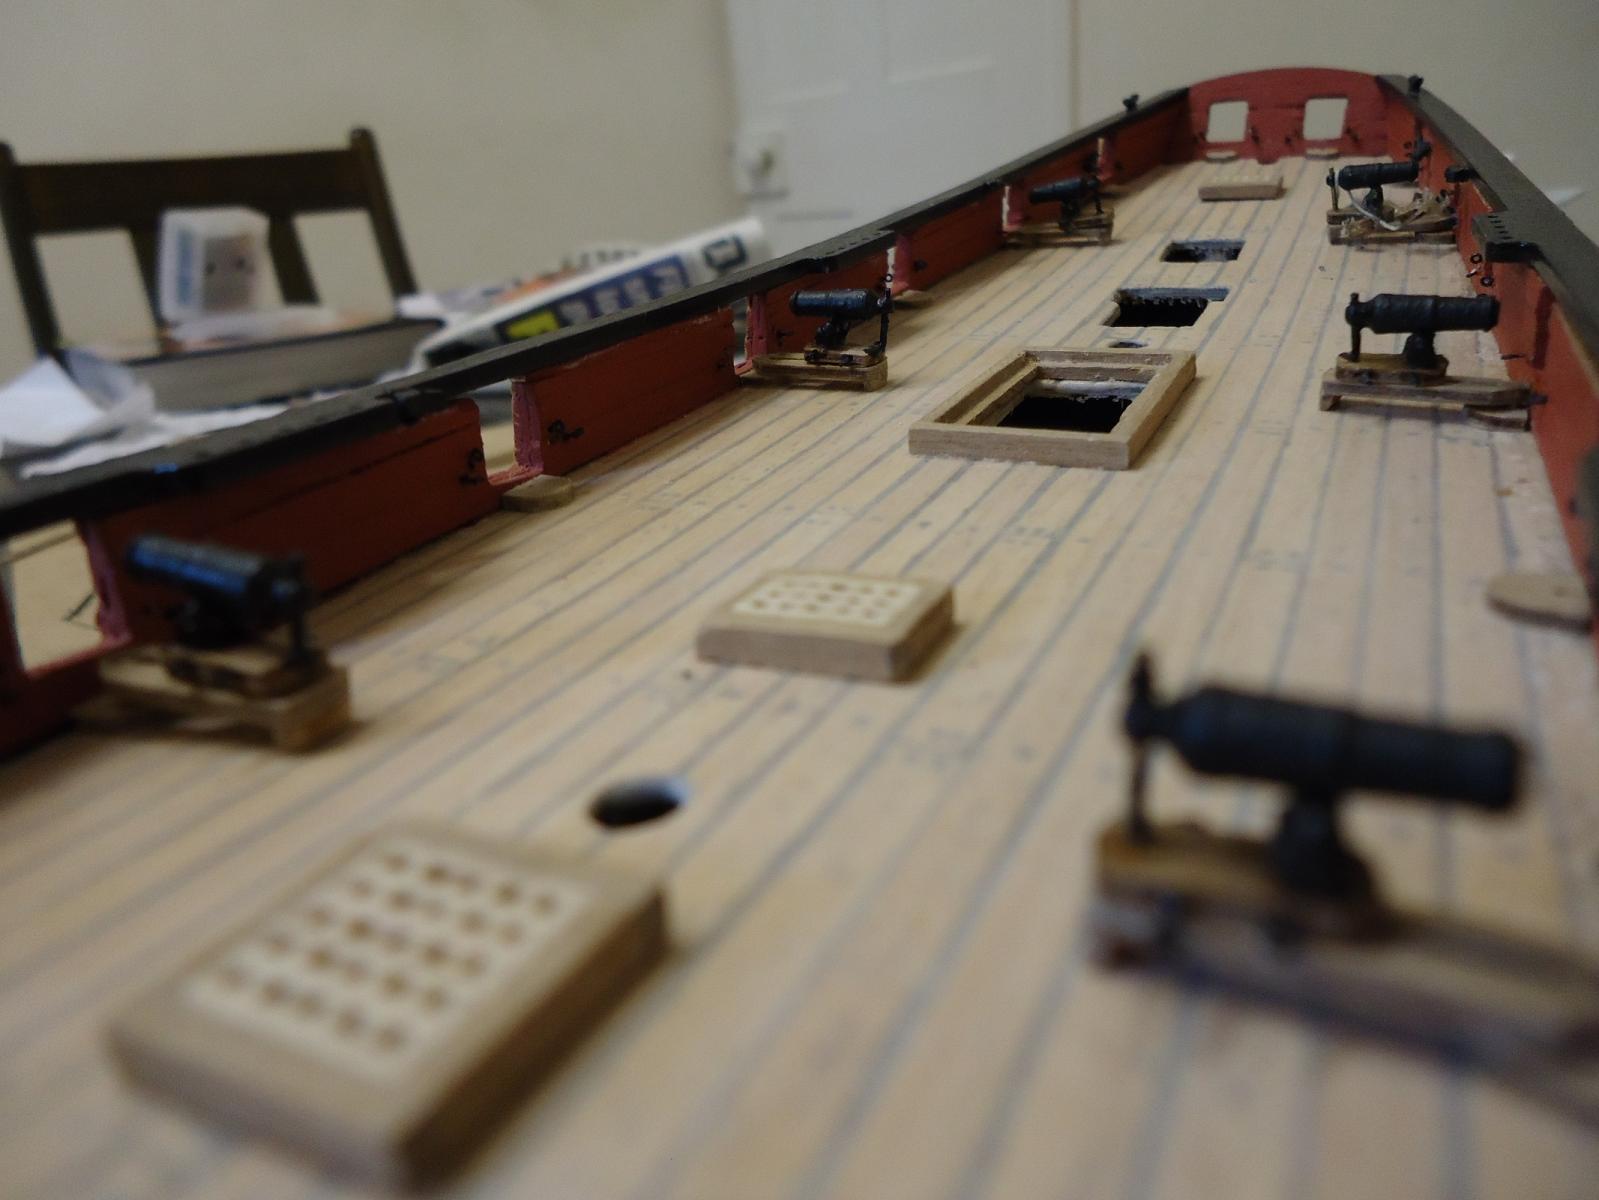
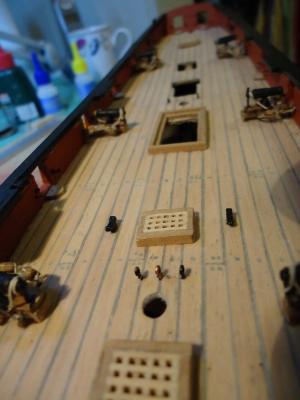
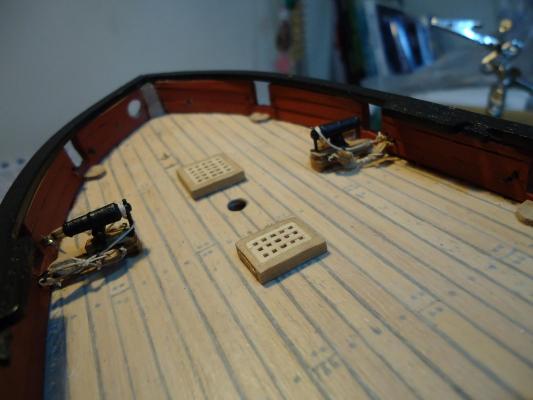
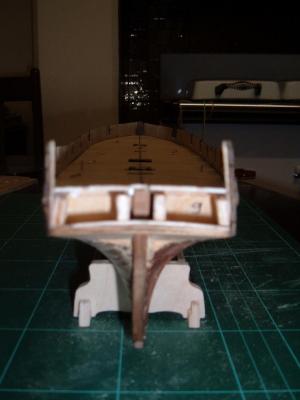
Back again at last Lots of time has passed since my last posting - but life gets in the way sometimes! In the meantime, I've upgraded my Library, being lucky enough to be given The Global Schooner and Eighteenth Century Rigs and Rigging by Karl Heinz Marquardt for Christmas. I then found Longridge's The Anatomy of Nelson's Ships which I picked up for an absolute bargain at a local book fair. Finally, I have found John Harland's excellent Seamanship in the age of Sail in my local library so will having that out on loan until I can find another copy elsewhere. I've moved to a more permanent modelling workplace, meaning I don't have to unpack and then clear up again every time I want to do some work. This is a huge step fowards and I have already done more work in the last two weeks than I did in the last 12 months!! Anyway, I retrieved Pickle from hibernation and got to work again. Phase 4 The Inner Bulwark fittings Before starting with the fittings, the manual states that I had to fit the capping rails, which made sense as some of the cleats to be used in the next step were actually fitted to the capping rails, so it would have been difficult to fix the cleats if the capping rails weren’t fitted!! However, after reading through the instructions I decided to drill the holes and fit the carronade rigging eyelets before fitting the Capping Rails. The reason for this was that it was easier for me to get to the Bulwarks for measuring, drilling and fitting without the Capping rails fitted and it also meant that they wouldn’t be scratched by my drill vice in the process. Cleats and Carronade fittings So, firstly I had to identify and paint 64 brass eyelets and 8 small cleats. Following the strict guidelines from the manual, I measured and drilled the holes and positioned the eyelets around the gun-ports (to be used later to rig the Carronades). After messing around with the first few measurements using all sorts of devices, I came across the idea of making a template. I took a piece of waste planking and measured, marked and finally drilled holes for all four of the required positions (i.e. 2 each side of each gun-port). It was then easy to simply place my template against each gun-port side and drill/mark the position for each hole through my pre-drilled template. I then removed the template and completed the hole drilling using a drill vice. Finally, I cut to length and using super-glue fitted all the eyelets around the gun-ports. Capping Rails Time to fit the Capping Rails. Here was the moment of truth. As the Capping Rails were pre-cut and shaped, if my build hadn’t been done correctly or the frame had warped during the build, then as soon as I offered the Capping Rails to be fitted, the errors would show up and I hadn’t a clue what to do next!! As it was, the Capping rails followed the Bulwarks and Bow exactly – great news… There were some minor imperfections around the height of some of the Bulwark planking as it appears that I had trimmed too much in some places earlier on. However, I used some waste planking to fill the gaps and sanded these down accordingly. Finally, I was ready and glued and fitted the Rails (which I had pre-painted). The only slight difficulty here was keeping them in place long enough for the glue to set so using all my fingers and toes it all came together in the end. At last with the Capping Rails in place, Pickle really looked like a real ship!! Carronade Deck Blocks I fitted 16 deck blocks. Only six will be used for Carronades which is correct, according to the sources. Deck Fittings Time for a spot of woodwork again!! Using the supplied grating strips, I made up the appropriate sized hatches for the forward, middle and after hatch assemblies. I then formed the hatch linings and glued them around the gratings and finally sanded each piece before giving then a coat of varnish before gluing them in place. For the main hatch assembly, I had to create both ledges and hatch linings. These were all glued together and finally the hatch covers cut, sanded varnished and fitted. Oh yes, before I fitted the hatch covers, I had to build and fit the 12 ringbolts. Each of these was made up of 2 individual copper eyelets. One eyelet had to be opened, a second ring slotted in and the original eyelet closed again. Then they all had to be painted black (without filling all the eyelet holes!!!!). So, time again for a few photos. The first shows the deck from the Stern . Here the newly fitted Capping Rails and hatches can be clearly seen together with the Carronade Sliding beds. The next photo shows the Deck Hatches in more detail, firstly on the forward deck. Thirdly, the main hatch. I have let 2 of the main-hatch covers off to show the decking below. Once I finally decide if I will keep it like this, I will of course glue them in place, but for the moment they are not fixed. The Deck Hatches from the Stern Now the deck hatches were complete, there was no longer a reason to avoid the issue, so it was time to face the building of the Carronades……
-
Thanks for the help Peter. I has started to press these stubs down, but got worried that I was going to snap them! I will try again - but first, I will paint the Channels leaving the front and back edges clean so that they will stick better later on.... So anyway, I had a quick look at Pegasus. It seem like you've done this before!!!! This is seriously beautiful work, Congratulations. Is your location correct by the way? You live in Lenzburg? Regards John
-
Hi Peter Admiring your Pickle build. I read that you are planning to add sails. Interesting - I have the same plans - but I am planning to have mine furled. However, I have started my investigations into the additional running rigging and belays that will be needed (up- Down-haul, sheets etc.) so will be keeping a keen eye on your findings! However, I have noticed that you have just fixed the Channels and Deadeye Strops - which is exatly where I am on my build. Can you (or anyone else!!) translate the "Spring the 'nubs' of the strop, with deadeye, into ach locating slot"?? What happens to the pieces of the strop that bend outward at the top of the strop? Once the deadeye is fitted, are these bent downwards? I can't quite work it out......... Many thanks
- 293 replies
-
- 1
-

-
- pickle
- caldercraft
- (and 1 more)
-
Hi all Many thanks for all your advice. Having looked in to all your comments and suggestions, I eventually went for Tony's suggestion of the Table clamp version of Warco Magnifier LED light Square Lens. Here it is installed at my workbench It's amazing, I can actually see the carronades I have been working on without really seeing what I was doing!!!!! Happy days and it's back to work... Thanks again one and all.


-
Thanks MAK41 Your comments make sense. As the future "Captain" of my Pickle, I guess I can therefore make my own decisions! However, I am still keen to see if other Forum members have tried fully modelling the foredeck. As Pickle builders will know, as seen below, Pickle's Foredeck has almost no fittings / Catheads or the like

-
Thanks Bob - maybe in the end I'm just going to have to try something based upon the ships I have seen and hope things turn out OK!! John
-
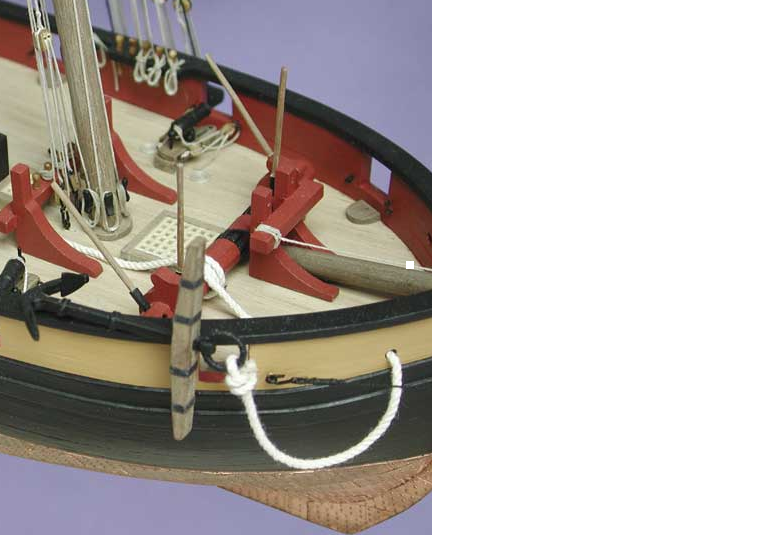
Hi all Having restarted my build of H.M. Pickle, I'm needing to make some decisions for later in the build. I've learnt by reading these forums that planning ahead is vital as some things need to be done before it's too late! Pickle builders and followers will be aware that no sails are involved in the standard kit. However, I am wanting to add sails to my model - but furled. Adding sails without the appropriate running rigging doesn't make sense, so I am wanting to add this also. My first actions are to identify the belaying points for the three fore-sails (forgive me if this is not technically correct, but I believe Pickle would have carried a Jib, Flying Jib, and a Fore Staysail). Pickle's belaying plans do not show these belaying points, however, Petersson's "Rigging Period Ship Models" refers to the belay points. However, in reality, it seems as if small racks are provided on the foredeck as well as various cleats attached for the various sheets. I was lucky enough to find a schooner almost like Pickle at a Tall Ships Day in Gloucester (UK) and took some photo's (but not enough it seems!!!!). One example shows this: And here is another version of belaying that I have seen: So, my question is - has anyone seen any full belaying plans for a Schooner, preferably of Pickle's size? I know that I will also have to tackle the halyard and downhaul arrangements for all the sails - I have photographed an example here, Again, any info on the belaying plans would be appreciated. Many thanks John

-
Thanks Norman - I'll check Hobbycraft out
-
Hi - I also found this one: Link is: http://www.craftlamps.co.uk/product/daylight-led-ultra-slim-magnifying-lamp-xr but this is listed at £200 - cheap as the RRP is £265!!!! I may well stick to Tony's link where I found one for £75, which is acceptable - any comments??
-
Hi Tony I've had a quick look - and will go back and look in more detail later. Thanks John
-
Hi all, I have read the Forum topics on the various lighting solutions that are used to help us in our fantastic hobby - and I have also seen mention of magnification kits, such as the so-called "jeweller's helping hand" which are fantastic. What I am looking for is advice / reviews of the all-in-one solution, giving good magnification and light (Daylight quality) in one. The equipment could be desk and/or floor mounted as I don't have a dedicated workshop-style space at present. Oh, by the way, I live in the UK and really need UK-based stock if possible. Any advice greatly appreciated. Just to confirm what I am talking about, I have seen this one on the Historic Ships Website - the link is http://www.historicships.com/Tools/Magnifying/MagniLamp7inYJ8069-6912/MagniLamp7in.htm But they only ship to the US and Canada. Many thanks and Best Regards John
-
Furled , unfurled or no sails -Preference
JRB9019 replied to Canada Steve's topic in Masting, rigging and sails
HI Jay Thanks for your suggestion. I have the book! When I originally purchased it, I took a look, but it didn't make much sense. Now, I'm starting to understand it better and yes, it really is good advise. For general interest, I spoke to Jotika here in the UK yesterday, They were really helpful, and as my build (Pickle) is a schooner, they also suggested two other books: - The Global Schooner: Origins, Design and Construction 1695 - 1845 by Karl Heinz Marquardt and - Eighteenth Century Rigs and Rigging, again by Karl Heinz Marquardt. Apparently, the first book lists every spar, line, halyard and block, giving size, dimensions etc. which can then be used to calculate the correct size for the model being built. Of course all the belaying plans are there also. So that's on my book list for sure. Finally, we have a tall ships festival near where I live next week and there will be a schooner there that more or less resembles Pickle, so I'll be down there taking loads of detailed pictures for future reference.... John -
Skippy - you can also use my log as a 'Let's learn how not to do things' session !! Having said that, I slowly get better as I go along. Regards
-
Furled , unfurled or no sails -Preference
JRB9019 replied to Canada Steve's topic in Masting, rigging and sails
Greg, I've just been blown away by Dr. Mike's work. Wow, is all I can say - it also goes a long way to show how the addition of furled sails really adds to the model. On the same note the A.L. Endeavour model is fantastic too..... I might just take the bait when I get that far on my own model (if I ever do!) Starting to go down the path of adding sails (furled or otherwise) does raise many additional questions though, such as : 1. I presume that there is no point in just adding furled sails to a model without the appropriate running rigging, leading on to the question - how to find out what running rigging is needed, what additional belays, blocks, cleats etc, etc. are needed, where to fix them on the model etc, (as they won't be shown on the plans if no sails are intended). 2. Again, I refer to a kit that is not planned for the addition of sail, I assume that you can't just rig your ship with the standing rigging and then add the sails and appropriate running rigging as much of the standing rigging will get in the way. In that case, (and knowing that every ship is different) are there any standards / rules / advise around as to sequencing the rigging? Well, that will do to start with !! Any comments/help/tips would be very gratefully received.... Regards -
Skippy, I am half-way through building Pickle as a first-build myself. So, I've made all the mistakes that you hopefully won't!! At this stage of the build I would highly recommend inserting balsa blocks in the first two (Bow end) bulkheads and shape them accordingly. Why, you may ask? Having this extra form will help when you lay the planking later on - otherwise you could end up with a flat-spot which you won't notice until you start trying to lay the second planking..... I suggest you have a look at Blue Ensigns Pickle log for details.... Good luck with the build
-
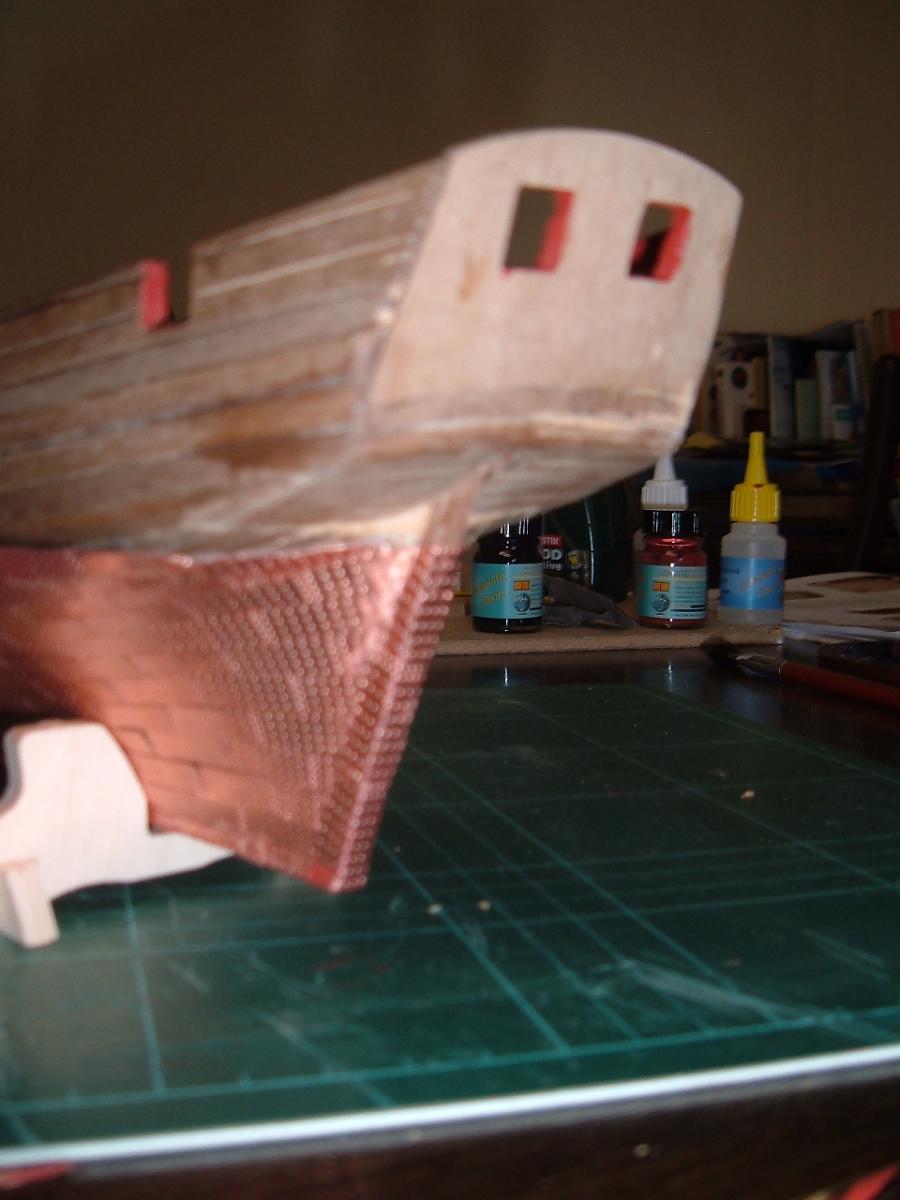
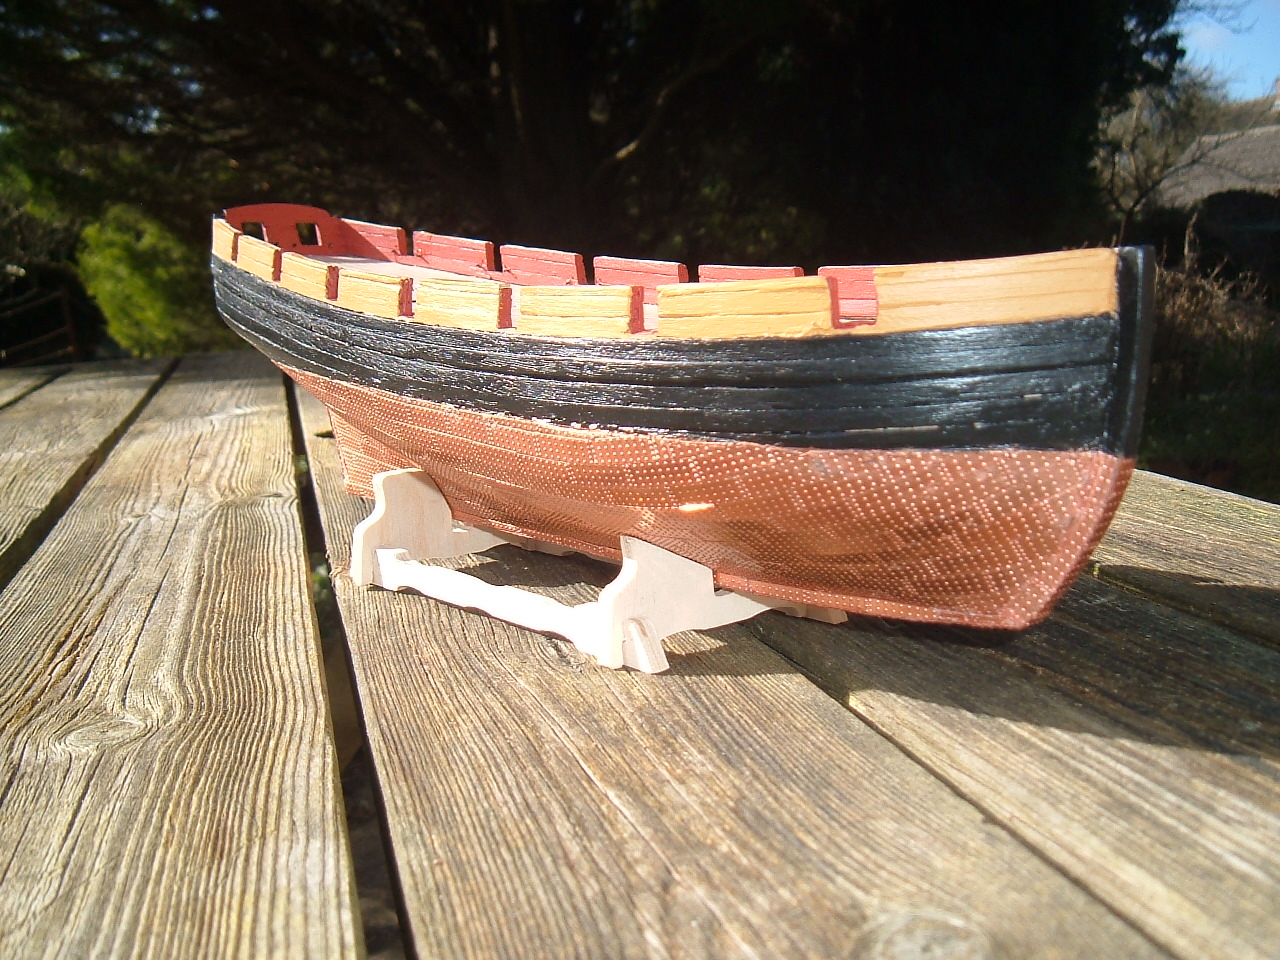
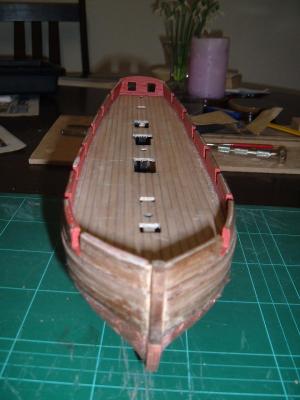
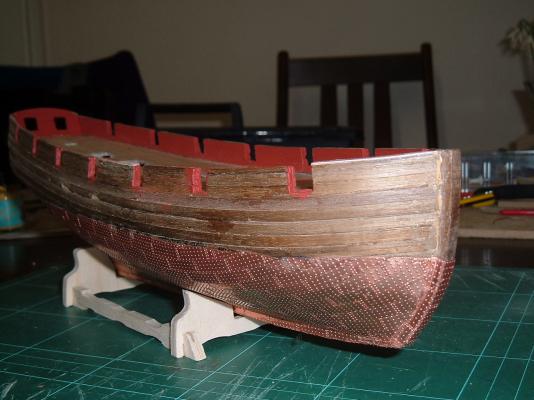
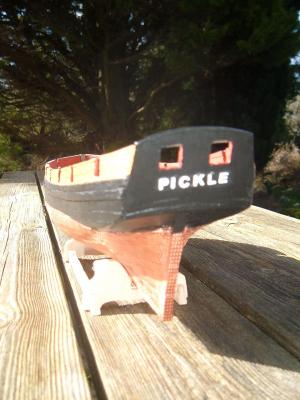
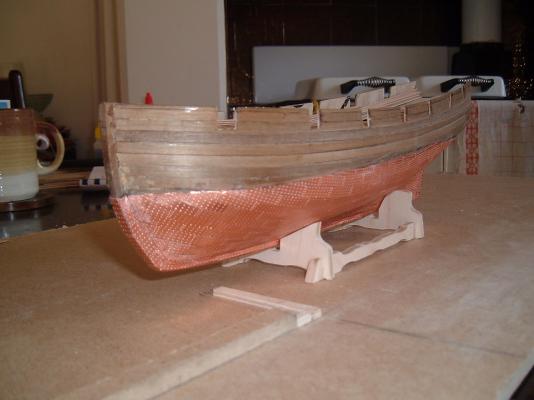
The Decking So, using the Three Butt Shift System, I completed the decking, leaving a small space between each plank. I then finished off my “imitation” fittings by drilling the appropriate holes. Finally to the finish. Based upon a recommendation by a Forum member, I made up a batch of plaster filler and coloured it with black acrylic paint . I had tried this method on the lower deck – and perhaps because of the confines of the space hadn’t been too happy with the amount of colouring left behind. So, I lost my nerve and only coloured to a mid-grey !! Using various tools, I applied the mix and ensured that all the gaps were filled both between the planks and my imitation fitting holes. Quickly moving on, I cleaned and scraped the deck and finally sanded the whole lot down with fine sand-paper and finished off with 600 grade. Once all was smooth, a quick wipe-off and then a couple of coats of protective non-gloss varnish. Normally in the past, when I have used varnish before, the varnish has really brought out the colours of the wood. However, this varnish didn’t do that and so therefore the contrast between my caulking lines and “fittings” are somewhat lost. Still, not too bad for a first attempt!! You can see the decking in the following picture and will also note that the transom is already fitted – I’ve described the transom fitting below. Deck Planking complete looking from above the Bow The Inner Bulwark planking The Inner Bulwark planking was then laid followed by a lot of trimming and sanding around the gunports. Finally the tops were planed and sanded back to the appropriate height. The Transom If you have read my log before, you will have noticed that I was not too happy with the way the transom was taking shape – and I was correct!! Having cleaned the ends of both the decking and the 1st, 2nd planking and inner Bulwark planking, I tried to fit the transom piece. I found that it didn’t fit, in fact there was a least a 1 cm gap. So using a waste piece, I spent ages shaping a filler piece. Once fitted then quite a lot of sanding and filing to make things look ship-shape (excuse the pun!!). In the picture you will see the darker piece of wood at the bottom of the transom which is my filler.. The Transom is finally complete Finishing off With the transom finally fitter, I then had to plank the inside of the transom. With that done it was time to paint the inner bulwarks. I must admit that I did for once make life easy for myself here as I painted the planks before fitting them. Now, it was just a case of touching up here and there and also painting the gun-port sills. The Inner bulwarks are completed Painting and finishing the Hull So, with the carpenters gone for the moment it was time to get in the painters. Whilst the painters were busy, I used masking tape and copper paint to try and “straighten up” the water-line at the edge of the copper-plating. Not too bad I think, this is now actually starting to look like a real ship!!! Hull painting complete - looking from above Hull painting complete - looking from Starboard Bow The ship is named And so it came about that on this day after a lot of painting and layout work, the good ship Pickle had her name put in place – and the ship builders left in good spirits for a cup of tea !!! Hull painting complete - the Stern view and name


-
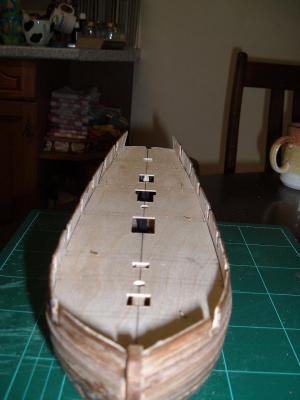
Fitting the Deck After marking the centre-line the deck was fitted, no problems here - for a change. Deck Top view from the Bow Deck Top view from the Stern View from the Stern Preparing for Decking I firstly needed to make a couple of decisions. - What system was I going to use to lay the decking? - Was I going to deck in full length strips, or was I going to cut them into proper lengths? - How, if at all was I going to make caulking lines? - How, if at all was I going to show decking fittings? Firstly, I decided to use the “Three Butt Shift System” and so I needed to cut the decking into the correct lengths, so using the jig that I made right at the beginning of this project, I cut the decking timber. I also decided to show the deck fixings – I’m not good enough to use the professional methods that are described in other logs, so an imitation was needed. Using my faithful jig as a guide, I therefore drilled two holes at either end of each plank and did this for about ¾ of all my planks. The rest I would do later once the decking was laid. Finally the prepared timber arrived on site and was stacked on deck ready for the workers to begin decking!! The timber is stacked on deck ready for the workers to begin decking tomorrow
-
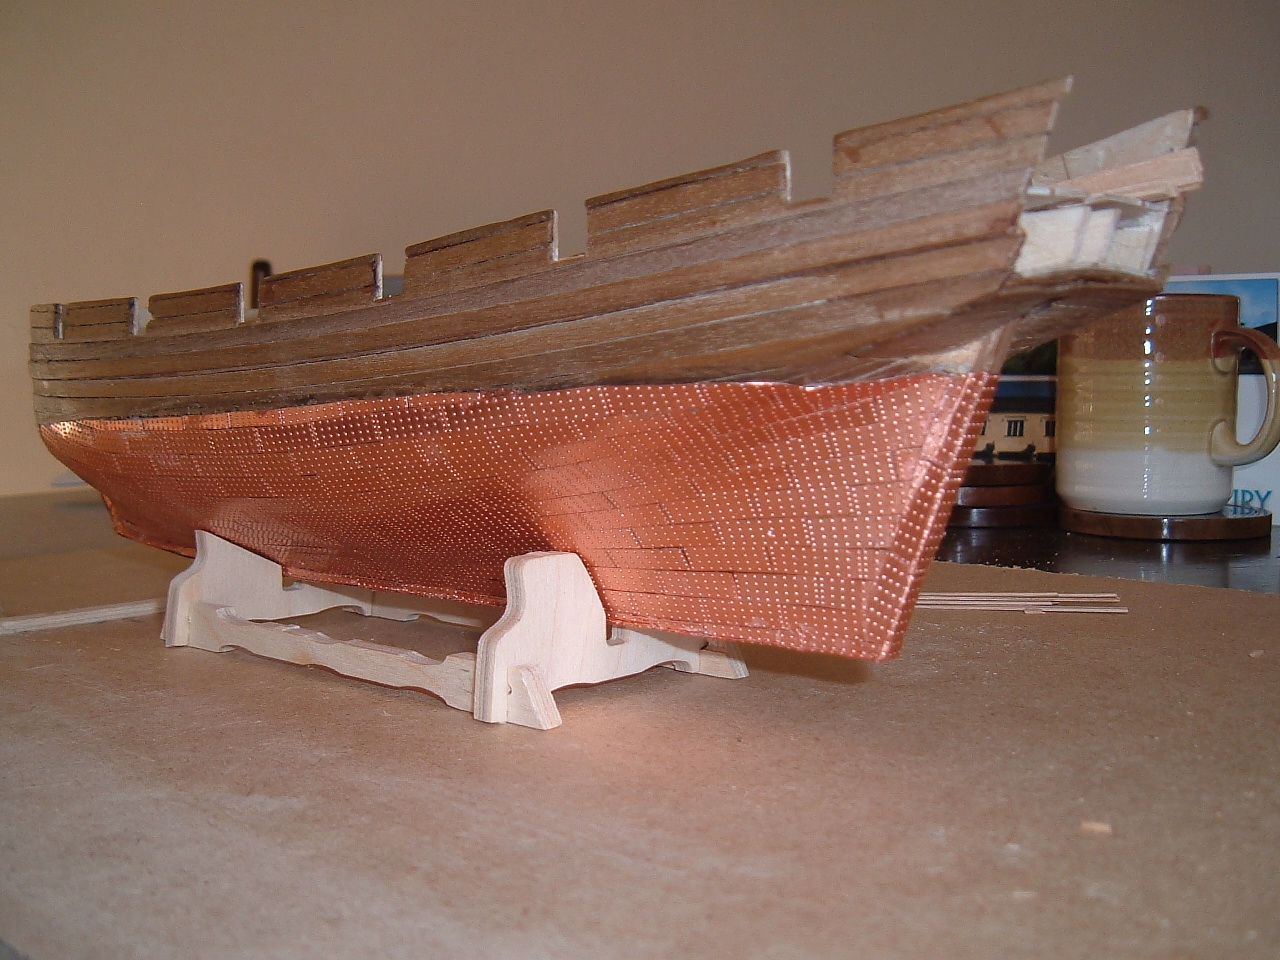
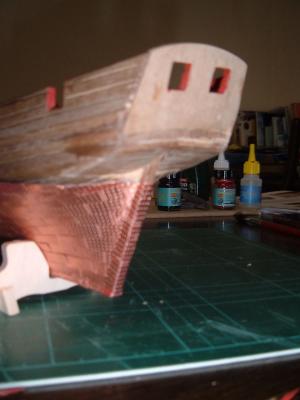
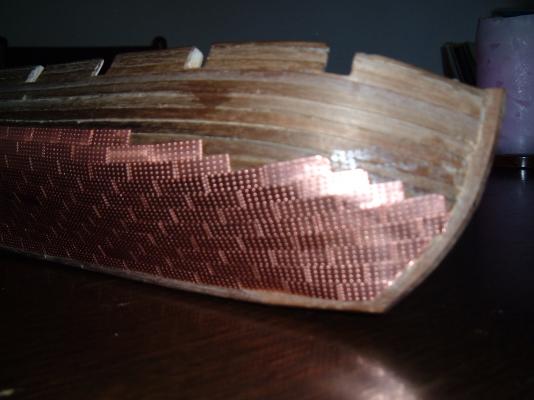
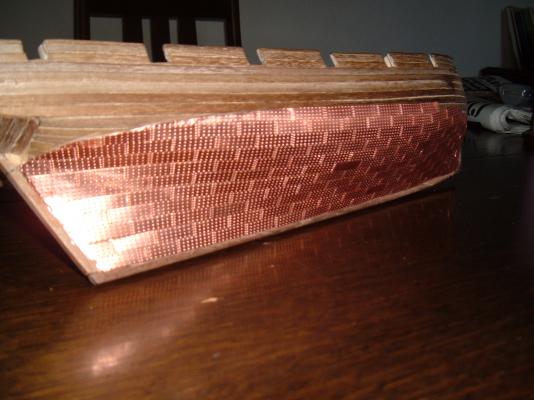
Copper Plating Starts Before starting the plating, I had to draw the waterline. I used the instructions and the jig provided with the kit to raise the bow slightly and I now had the waterline. This shot also shows the completed Stern-Counter as described above and you can also see the small area that I had to use filler for. The Waterline I was not looking forward to the next part – i.e. the copper plating, as it seemed like a big slow job. Actually, once I had worked out what to do, it was easy. I used thick standard super-glue and had one side done within 2 hours (excluding the shaping of any filler tiles that I needed near the bow or the water-line). As you will see, I added small cut-offs shaped with a fine metal file to complete the curve around the stern. If you look to the centre of the ship, you will see that the plates run straight. The actual waterline curve runs about 2mm above these plates and I am wondering if I should spend hours and hours filing tiny slivers of copper to make the curve. The instructions state that I can also use copper paint to complete this, but I’m wondering if I should just leave things as they are…… Plating completed - looking from the Bow I now completed the bow plating and got so carried away with the process that I didn’t notice that I had gone way over the waterline. It wasn’t until a plate didn’t lie correctly as it was now half over the black strake that I realised what I had done !!! Thank goodness for the Black Strake is all I can say. The way I was going I would have ended plating halfway up the mast before I had noticed !! So, I removed the excess tiles quickly before the glue really set. If you look closely, you can still see the glue marks where I had to remove the plates. Duuuhh !! So, hopefully those marks will be removed by a little sanding prior to painting. Plating completed - looking from the Stern Warnings about using Super-Glues In finishing, I would mention one warning to any new modellers out there. You will come across warnings to use masks when using the super-glues. The warnings will tell you that the super-glues can affect your breathing/lungs etc. You may think – yes, right health and safety gone mad again - and ignore the warnings. Please don’t ignore the warnings and get a mask!! After the first 20 or so tiles I finished for the evening and I ended up with a really tight chest and really bad cough the next morning. So, I found my mask, and used it all the next day and even so, my chest wasn’t too good and I was really quite breathless and coughing again the next morning. So the mask that I used was actually a dust protector one, such as to be worn when doing a lot of sanding etc. etc. and I thought that this would have been good enough. WRONG AGAIN. So now I have to find a shop that sells the correct masks – any ideas of masks out there?? Has anyone else had these problems? Funny thing is, I did use standard super-glue when fixing the 2nd planking and didn’t have any reaction what so ever. It must be this thick super-glue that’s the problem, and of course you can’t small anything so don’t realise what you are actually breathing in…. Next Steps Once I get my mask, I will finish the tiling of course and then I make a start on the upper-deck. This means a lot of cutting away of the original tops of the bulkheads which should be real fun!! Copper Plating Completed The Copper Plating is finally completed. As you will see, the finishing line is not good, but a little fine-tuning with a file and once the hull painting is complete it should be OK. The finish is quite difficult, especially as you end up having to glue tiny pieces of copper to fill any gaps and it doesn’t look too clever – oh well!! Plating complete looking from the Port Bow Plating complete looking from the Port Stern

-
Hi Rich Many thanks for your help - much appreciated. I think my problem is that I have to go right back to basics. We all read about "now, just strop your block" etc. - great, but if you don't know what stropping means then life gets tough!! Still, luckily enough there are enough logs / tips and advice to be found now which seem to solve most problems - and people like yourselves who offer advice too. Have a great Easter John