HOLIDAY DONATION DRIVE - SUPPORT MSW - DO YOUR PART TO KEEP THIS GREAT FORUM GOING! (Only 13 donations so far - C'mon guys!)
×

Blighty
-
Posts
316 -
Joined
-
Last visited
Content Type
Profiles
Forums
Gallery
Events
Everything posted by Blighty
-
 Mike, take no notice of Rossi46, I can handle glowing comments all day. As for weathering and aging the boat, it's not so difficult............... if there is a blob of glue on the surface, paint it brown and turn it rusty! I have made plastic models for some time and was always more into the painting than the building, remember this show from the 60's or early 70's?
- 296 replies
-
- 6
-

-
- chaperon
- model shipways
- (and 1 more)
-
Hi, Another change, I have filled in the door apertures on the front radii of the boiler deck. i think building a door frame on the corners would be labor intensive and would use non standard timber, if there was such a thing back then! See the attached estimate of what I think the interior would/could look like. The lobby is wider for easy access of multiple passengers and luggage. I also assume there is an interior door for each room. There's no intent to build interior walls but I did want to justify the deletion of the doors on the rads. Len.

- 296 replies
-
- 5
-
-
- chaperon
- model shipways
- (and 1 more)
-
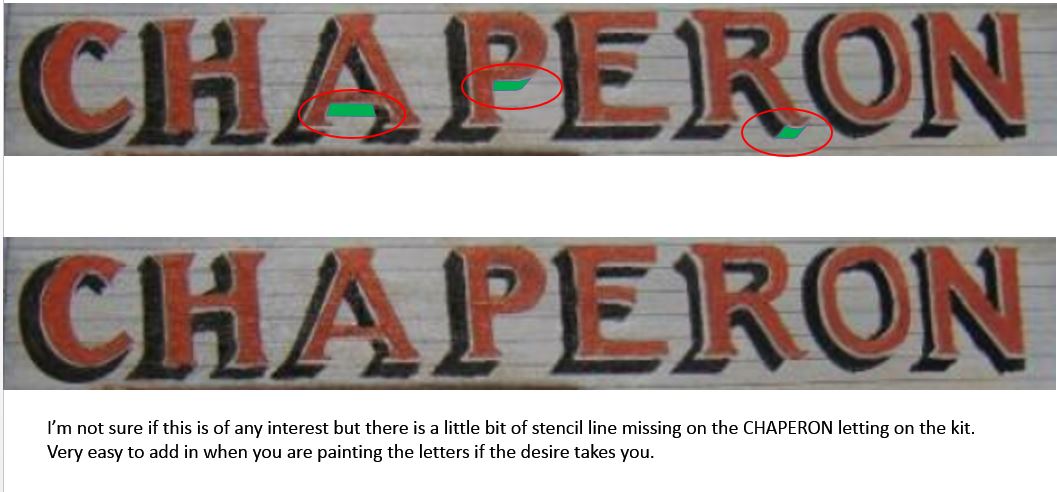
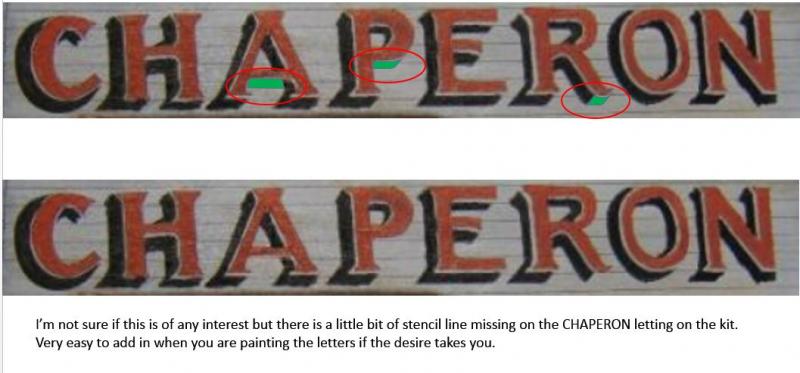
I was looking through my Power Point and thought I'd give a head's up to anyone who is likely to build this kit. (and at all interested, haha). There is a little bit of lettering missing on the CHAPERON stencil. Easy fix. Len
- 296 replies
-
- 5
-
-
- chaperon
- model shipways
- (and 1 more)
-
I love your build, great work, following with interest.
- 69 replies
-
- 1
-
-
- city of monroe
- steamboat
- (and 1 more)
-
Hi Doug, my first build was the Emma C Berry, a nice kit POF but I could not do the rigging at all. I ended up tieing lines round the masts, and anything else I could find. Yours is looking really good from what I could see, it i supposed to get easier.\ Len....... Where in Ont are you? I'm in Windsor
-
Haha, no it's not attached, I just put it up for a pic.......(or did I)? Never the less thx for the heads up. I have been checking out the various photos I have of the real Chaperon, it was configured quite differently over the years but one of the most interesting was the inclusion and omission of the Texas Deck. Does anyone know the reason for this? Sorry wrong pic
- 296 replies
-
- 6
-
-
- chaperon
- model shipways
- (and 1 more)
-
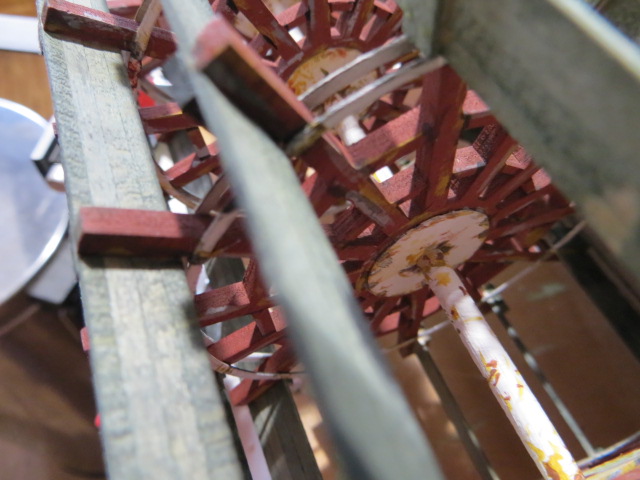
A couple of pics of the wheel, still a bit of detailing to do but the washes are complete. Now it's back to attaching battens. ZZZZzzzzzzz! Len
- 296 replies
-
- 8
-
-
- chaperon
- model shipways
- (and 1 more)
-
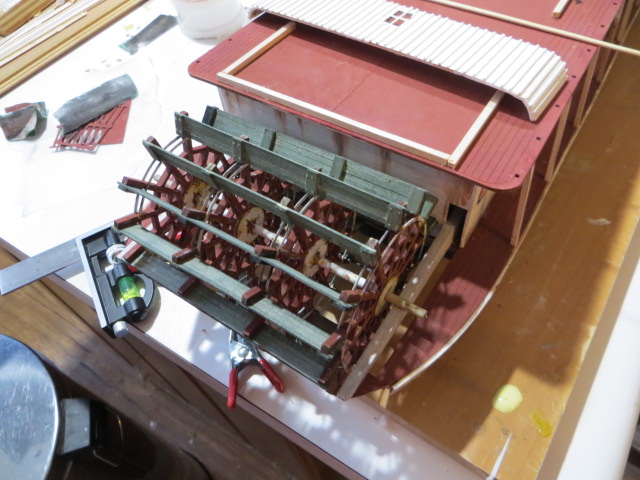
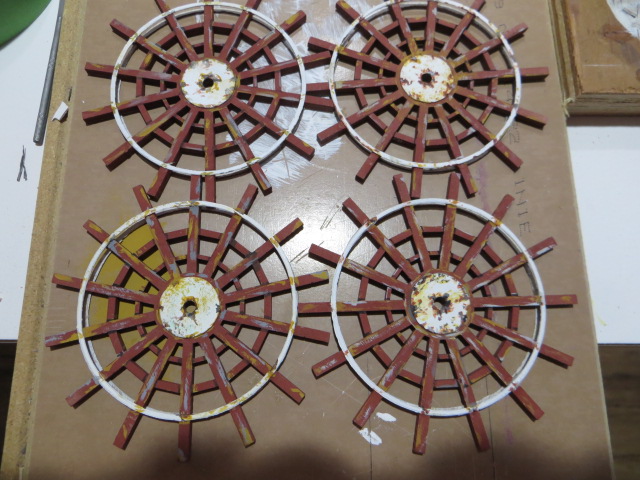
Thx LM, welcome aboard this riverboat, I hope you enjoy this ride also, feel free to chip in, all comments are very welcome. Unfortunately the current owner/operator of the Chaperon is not too keen on maintenance and upkeep hence the scruffy turnout. lol. Definitely a fun model to build, it's looking more and more tortured every day. I'm about 90% complete on the stern wheel so I'll post a pic in a few minutes, just a bit of rust to add, and needless to say needs a good clean up ant it will be mint again.
- 296 replies
-
- 3
-
-
- chaperon
- model shipways
- (and 1 more)
-
Even the old man looks impressed based on the photo in the background. Looks great Em.
- 144 replies
-
- 3
-
-
- surprise
- artesania latina
- (and 2 more)
-
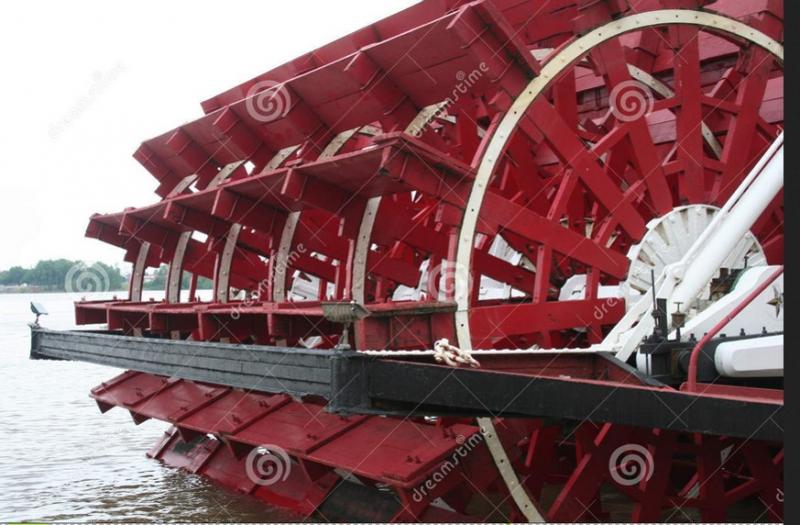
Cathead, Mike, This is the ref pic I selected for my paddle attachment, looks like Mike's method. I saw more pics similar to this one as well. I'm not sure if I will be able to do the U bolts, I struggle to see small detail like that.
- 296 replies
-
- 6
-
-
- chaperon
- model shipways
- (and 1 more)
-
That looks good Mike, I'll take a closer look at that ad likely apply similar. You have a tight build there, nice clean fits. Thx for the tip. Len
- 296 replies
-
- 1
-
-
- chaperon
- model shipways
- (and 1 more)
-
Ummm! clamp on the stern wheel, tell me more??? :rolleyes:
- 296 replies
-
- 2
-
-
- chaperon
- model shipways
- (and 1 more)
-
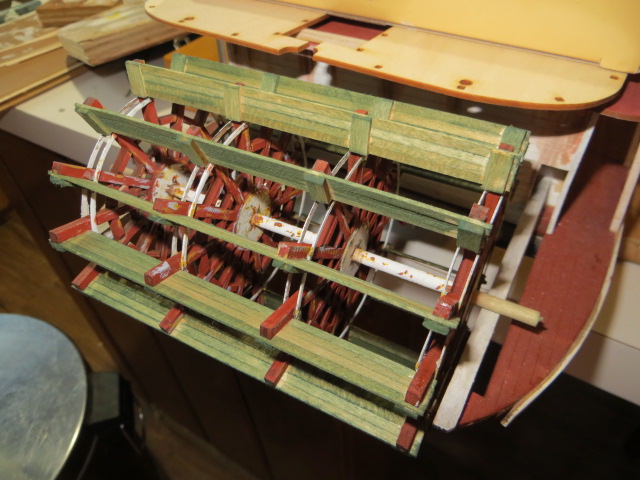
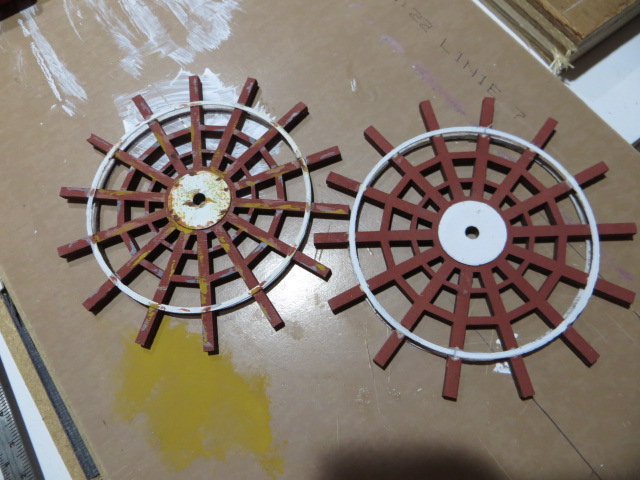
I felt like a break from gluing the 1/32" battens to the wall of the boiler deck so I decided to start on the stern wheel, much more fun! I found it fairly straightforward to glue the 2 halves of the 56A rings together then glue to both sides of each segment of the wheel. I pushed each wheel segment onto the axel to align the washers ad glued those on too. The parts were pre painted with Krylon undercoat spray cans, white and red oxide. Next came the aging of the wheel sub asms, it took about 10 minutes per side to complete. I will give the complete wheel a black/green wash to finish it off, the wash will dull it down a bit, I hope. Here are a couple of picks, one pic shows a none aged segment for comparison purposes. The paddles will be unpainted but vinegar dipped. I have a sample in vinegar right now see if I can get the effect I'm looking for. Unfortunately my beloved tipped the old recipe away, it was close to 2 weeks old and working really well, so now I have a new batch brewing, see how that works in a day or 2.
- 296 replies
-
- 7
-
-
- chaperon
- model shipways
- (and 1 more)
-
Hi Mike, Warping has been an issue for me too. However the washes I applied involve saturation of the wall surfaces so I expected to see warping. Some of the warping was very extreme. when it had fully dried out it went close to where t started. At that point I clamped the parts up in correct location and sprayed with water once again and left overnight. I have stress free joints all round. I will take some picks of the next warping I get and show how severe it got. I wish I'd taken some pics.
- 296 replies
-
- 3
-
-
- chaperon
- model shipways
- (and 1 more)
-
Hi Bob, You could plank the upper decks to hide the seam line.
- 296 replies
-
- 3
-
-
- chaperon
- model shipways
- (and 1 more)
-
Hi, Not to much going on right now worth taking pics of. I'm bending the radii of the walls on the boiler deck using the bend fixtures supplied with the kit, they work well, so thought I'd give a status summary of my impressions to date. I am not qualified to aim this at any of you experienced guys but I think I can offer some useful tips and/or advise to the first time builders or guys wondering whether to purchase this kit as their next model. First off, this model is all but 3 feet long, I have a great final resting place for the Chaperon to sit, right on top of the TV surround, it will be about 5 feet off the ground, out of reach of the youngest of my Grandkids and a very pleasing spot to display. This model is very likely the largest I am likely to build purely due to display restrictions. I have a temporary work station in the kitchen, I use the island counter but we are redecorating the spare bedroom into a hobby room and I will be moving my gear into there, should be done in about a month. My current work surface is 30" x 42" and is more than enough room to work in a very scruffy manner as I do! I have lots of scrap offcuts of wood I use for kindling when we go camping but I cut small squares about 6" sq. to use for gluing, painting, cutting and trimming boat parts. You see, if I spill CA glue or enamel paint, or cut the worktop surface of the kitchen island, my boat, my tools,my clothes, my pillow and myself would find them selves on the front lawn, never to be allowed back in the house. That is not a good thing. Difficulty:- I don't think the average DIY guy will have to much of a problem with this. Patience, a few off the shelf tools and flat work surface to work from is about all you need. The instructions are isometric views, easy to understand, there are a few details that require clarification but the internet and this forum are more than up to the task of providing adequate assistance if in need. The detail level of the base kit I think is very acceptable, however if you want to upgrade or add detail it is a very rewarding and accommodating model to do so. I think there are plenty of pics on the net of this ship and if you look carefully you can see alternate layouts that have been employed to do different loads. I'm pretty sure this shipped every thing from live stock to cotton bales and timber too tourists. One of the most pleasant parts of the build for me was doing the upgrades, giving it my own flavor was very time consuming, which I enjoy and have plenty of, and still more to come. The use of very sharp knives and other tools are an obvious requirement so I would be reluctant to give this type of model as a gift to any of my grandkids until they are age appropriate. Quality:- Fantastic, I have been very impressed with this kit, the laser cut parts were well done extremely accurate and fit beautifully with mating parts. There were just a couple of minor laser cutter path errors, hardly worth mentioning but I am being unbiased so I'll tell ya! The boiler doors were mismatched and a couple of man doors were slightly out of line, I salvaged the man doors and cut new boiler doors. This is an absolute no brainer but now you know. The only other issue I have found is it looks like I will be a stick of 1/8th" square wood short, again nothing to worry about. The instructions do say that full length pieces need not be used for the landings on the walls for the boiler deck, I used full length and that is where a lot of wood was used up. Recommend this or not? Absolutely, it is a great kit, I don't want to finish it though, I'm enjoying it very much, so if you are thinking about this one, go for it, you could do a lot worse. Finally, doing a build log,I'm not sure what the % is of guys who do logs but I have really enjoyed doing this one. I have to be honest I often look at the amount of people who look in and it gives me a real boost to do my best and keep the interest going, so in danger of going on, thx for reading, following, contributing etc. I have a build to get back too. Be pictorial updates in next couple of days. Len
- 296 replies
-
- 6
-
-
- chaperon
- model shipways
- (and 1 more)
-
Hey Mike, I was hoping you got to read this log and come aboard, just to let you know I open your log almost daily for info and guidance, thx for your efforts in starting it in the first place................ and complements on your Chaperon, I bet she looks great on display in your 'pride of place'. Len
- 296 replies
-
- 6
-
-
- chaperon
- model shipways
- (and 1 more)
-
We've got to stop meeting like this, I think I'm off to the model shop today to pick up YOUR shopping list, thx Ken. Yet another gem. Len
- 296 replies
-
- 3
-
-
- chaperon
- model shipways
- (and 1 more)
-
I have a question regarding simulated glass. Should I or shouldn't I add glass? There is non included in the kit and I'm easy either way. However, if there is such a thing as 'the norm' I will likely follow that route. Trouble is I didn't even think about it on the lower level and that is now going to be difficult to add the glass now the deck above is glued down but I can remove the windows and door skin if need be. Anyone have thoughts on this? Thx in advance. Len................ To all following this log, thx.
- 296 replies
-
- 4
-
-
- chaperon
- model shipways
- (and 1 more)
-
Jack, To date, this forum and You Tube have been splendid sources for guidance, but I have noted this guy's name down just in case. Thx for the follow up. Len
- 296 replies
-
- 4
-
-
- chaperon
- model shipways
- (and 1 more)