
Supplies of the Ship Modeler's Handbook are running out. Get your copy NOW before they are gone! Click on photo to order.
×

Blighty
-
Posts
316 -
Joined
-
Last visited
Reputation Activity
-

 Blighty reacted to John Gummersall in Chaperon by John Gummersall - FINISHED - Model Shipways - Scale 1:48
Finally started the planking of the boiler deck.... I hate deck planking,,,, I really like the look, but I hate doing it. Way to tedious and the process gets old pretty fast. As before I used the 1,3,5,2,4 planking pattern.
Since deck planking is not fun enough I decided to take a break from planking and have even more fun with the 1/32" square battens on the boiler deck walls. Talk about getting old fast,,, wow..
Prior to planking I painted the walls just to get the first few coats on them. I then added the 1/32" square battens. After that I will just air brush to put on the final coats. Probably could have just waiting until all battens were installed, but I figured it would be easier this way. Once all is painted I will add the windows/doors that were painted earlier. Instructions call to sand the 1/32" battens down to 1/64" to look more realistic. When I first read that I thought that was some sort of designer joke, as no way (at my skill level) would I be able to do that. But when you think about it, after the battens are glued into place, a sanding stick easily trims them down to look more realistic.
Note in the stern wall section the battens (in red) do not go all the way to the top. This is to allow for the deck trim (added later) to not interfere with the battens.
In order to get a better connection between the side and bow sections, I added a piece of scrap wood. I plan to connect the side and bow sections together and then put the structure onto the boat. If I glued the pieces to the hull separately, I have a feeling that joint would not go together too well.
Looking ahead I noticed a little issue,,,, with next boiler deck ceiling (Hurricane deck floor). What is wrong with this picture?
Seems to be an issue with the smoke stack hole on part 123S. 🙂 Not a big deal, it will be awhile before I get to that point. I opened a ticket with Model Shipways and I am sure a new part will be here well before I need it.
-
Blighty reacted to mbp521 in Chaperon by John Gummersall - FINISHED - Model Shipways - Scale 1:48
All of those battens were indeed a tedious process, but it looks like you managed your way through it very nicely while keeping your sanity. 😁
Sure look like someone was having an off day when they cut the hurricane deck piece out. It was probably a Friday and they were ready to go take in the South Florida night life, or maybe it was Monday after too much of the South Florida night life. 🙃 Either way ME is usually pretty good about getting replacement parts out quick.
Looking good!
-Brian
-
Blighty reacted to mbp521 in Chaperon by John Gummersall - FINISHED - Model Shipways - Scale 1:48
Glad to see you were able to avoid a major disaster with that decking. I’d be lying if I said I didn’t shed a tear or two while narrowly avoiding disaster on any of my builds. But you learn from experience. Fantastic recovery though, deck is looking great.
-Brian
-
Blighty reacted to John Gummersall in Chaperon by John Gummersall - FINISHED - Model Shipways - Scale 1:48
As planking proceeds I guess it is time to air a little dirty laundry....
In regards to the boiler deck, the instructions call to glue the four pieces that make up the boiler deck into one solid piece and then attach it to the hull. That part is good... problem is since I was planning on planking the deck I felt it would be best to plank it after it was attached to the hull. My thinking at the time was that the extra glue and planking might make the deck stiffer and harder to attached to the hull.
There are two problem with that logic...
First issue is that since the vertical stationaries have not been attached yet, there is a lot of boiler decking in the front half of the boat without much support. And 1/16" planking being what it is,,,,, it could easily break when applying the planking if too much pressure is applied to the planks
Ask me how I know this 🙂
You can see from the picture below where a little too much much pressure was applied.... calling for a repair job. What you can not see is all the tears..
The second issue with planking the deck after it is applied to the hull is also related to the lack of support on the deck. That being the glue as it dries tends to bend the decking (that is not supported) upward. I don't have a picture of it, but with the decking curved up on both sides, the hull looked like a bird flying. Thus repair job #2 comes into play. Basically I wetted the boards that needed to be bent back into shape and added some (shall we say) persuasion to hold them down. To insure they boards did not bend too far down there are some 3/16"x3/16" temporary support posts applied along the side of the hull. They are not glued and just held in place by the pressure of the "persuasion".
Once the deck dry they will easily be removed. Disaster averted..
Had the same issue with a stern section but got creative with a clamp for the "persuasion".
So,,,, if you plan to plank the deck I would suggest you plank the deck before it is attached to the hull. The planks will tend to bend the deck, but at least you will have a flat surface to add some weight to hold the decking down until the glue dries. And in reality the extra 1/32" planking will not add that much stiffness to the deck and will certainly be easier than trying to deal with split and bent decking if you plank after the deck is attached to the hull. Dumb you get early,,,, smart you get late 🙂
Tomorrow I will do the same process to the other side of the boiler deck
-
Blighty reacted to ccoyle in Chaperon 1884 by mbp521 - FINISHED - Model Shipways - Scale 1:48 - First Build Log
Congratulations on a superb model!
-
Blighty reacted to J11 in Chaperon 1884 by mbp521 - FINISHED - Model Shipways - Scale 1:48 - First Build Log
Outstanding representation and one to be proud of!! Congrats!!
-
Blighty reacted to Cathead in Chaperon 1884 by mbp521 - FINISHED - Model Shipways - Scale 1:48 - First Build Log
Ooooh, is that an ACW ironclad? Tantalizing.
-
Blighty reacted to mbp521 in Chaperon 1884 by mbp521 - FINISHED - Model Shipways - Scale 1:48 - First Build Log
Yes sir. About time I get my feet wet in the scratch build world.
City Class - USS Cairo. Coming soon. Just need to study up a little more on the plans and I'll start the build (and the build log).
-Brian
-
Blighty reacted to yvesvidal in Chaperon 1884 by mbp521 - FINISHED - Model Shipways - Scale 1:48 - First Build Log
We will be following you, no doubt.
Yves
-
 Blighty got a reaction from mbp521 in Chaperon 1884 by mbp521 - FINISHED - Model Shipways - Scale 1:48 - First Build Log
Fantastic build, very well done and thanks for keeping us entertained with your informative log. A build for the ages.
Blighty
-
 Blighty got a reaction from Cathead in Chaperon 1884 by mbp521 - FINISHED - Model Shipways - Scale 1:48 - First Build Log
Fantastic build, very well done and thanks for keeping us entertained with your informative log. A build for the ages.
Blighty
-
Blighty reacted to mbp521 in Chaperon 1884 by mbp521 - FINISHED - Model Shipways - Scale 1:48 - First Build Log
Tom,
thank you you for the kind words.
For all the top decking I used silkspan and Modpodge for the tarpaper look. I cut scale strips of silkspan, applied a coat of Modpodge then laid the silkspan over it. Each strip is slightly overlapped to give it the tarpaper look. Once this was all dry, I painted it all with a coat of flat acrylic black paint. Where the silkspan strips overlap, I went a little over the lines to give the effect of the tar seeping through the joints. Pretty simple really.
While I like this method of “tarpapering” the roof, the credit goes to Kurt Van Dahm. It was his article on constructing the Chaperon where I got the idea.
There is is also a fantastic scratch build of the Arabia by Cathead where he uses masking tape and black pastel for the tarpaper look. I’m considering trying this method on a future build as a comparison.
I hope this this information was useful.
-Brian
-
Blighty reacted to mbp521 in Chaperon 1884 by mbp521 - FINISHED - Model Shipways - Scale 1:48 - First Build Log
Eric,
Funny you should say that, my first thought was "Herbie the Love Bug" a Disney movie.
Yves,
I sure hope it does. This is a truly fantastic model, and it has been a pleasure to build. More builders should give it a go.
-Brian
-
Blighty reacted to yvesvidal in Chaperon 1884 by mbp521 - FINISHED - Model Shipways - Scale 1:48 - First Build Log
Wow, Wow, Wow!!! This is becoming serious! Such attention to details, such realism. I suspect your Build log will boost sales of Chaperon at Model Shipways.
Yves
-
Blighty reacted to Cathead in Chaperon 1884 by mbp521 - FINISHED - Model Shipways - Scale 1:48 - First Build Log
That's fantastic! Love the googly eyes, you could've donated the model to a Disney movie.
-
Blighty reacted to mbp521 in Chaperon 1884 by mbp521 - FINISHED - Model Shipways - Scale 1:48 - First Build Log
Good morning everyone,
This week marks one year that I have been working on this build. I must say my how it has flow by.
This week I worked on finishing up on the forward rigging of the chimneys, landing stage, searchlights, mast and boom. Completing this portion really starts to pull things together. It also creates lots of snag points and I am going to have to watch myself when working around these areas or I'm going to be rebuilding some pieces.
Tying off the top ropes on the chimneys.
Forward turnbuckles in place.
Last parts of the chimney rigging going in.
Searchlights mounted and the control ropes being ran.
Searchlight control ropes completed and upper mast and boom rigging.
I was also able to add a little details to the fore deck. I used some leftover dead-eyes to create the rollers on the fore deck fair leads.
Lastly, I finally finished the searchlights. I was looking for some old model car headlights to use for the lenses, but I wasn't able to find any that I had in my junk box. I had to ponder what to use for a while, I even tried drying out an old pair of contact lenses that I had, but these just didn't come out right. Then my daughter cam up with the brilliant idea to use googly-eyes for them.
This was what my first impression of using them looked like.
After having a little fun with this, and much to the disappointment of my granddaughter (she loved the eyes on the boat) I surgically removed the lenses from the googly-eyes, added some brass wire for the filament and then snapped the lenses into place. I couldn't have asked for a better fit.
That's all for now. I will work on getting the lower blocks and rigging to hold down the stage, the rope coils and the rest of the bull rails cut out and in place this week. I'll also try to figure out how to mount the lifeboat/work boat booms. Hopefully I will come up with some sort of solution. She is really starting to come together, I can see the finish line in sight.
As always, thanks for all the likes and thanks for looking.
-Brian
-
Blighty reacted to mbp521 in Chaperon 1884 by mbp521 - FINISHED - Model Shipways - Scale 1:48 - First Build Log
So I have a question.
I am coming to the point where it is time to construct the boat booms. The instructions call for two eye-bolts to be linked together and one end inserted into the dowel, the other inserted into the deck to make up the pivot point for the booms to swing out on. This seems like a cheesy way to do it, but I want to get it right. I've looked at the old pictures of the Chaperon and the only one I can find that has a clear shot of them doesn't really have any good detail.
I have also looked at Jens Mittelbach's 3D website of Chaperon and from what I can tell he just has the booms sitting in what looks like a socket and the boom just pivots inside of that socket.
Does anyone have any clear guidance as to how these were actually built. I'm sure that each boat builder had their own method, I'm really just looking for some common way to build it up right.
Thank you in advance.
-Brian
-
Blighty got a reaction from mbp521 in Chaperon 1884 by mbp521 - FINISHED - Model Shipways - Scale 1:48 - First Build Log
A truely beautiful model, love the detail, adds so much interest.
Do you plan to illuminate the skylight deck?
Thx for the log.
Super fan Blighty
-
 Blighty got a reaction from Canute in Chaperon 1884 by mbp521 - FINISHED - Model Shipways - Scale 1:48 - First Build Log
A truely beautiful model, love the detail, adds so much interest.
Do you plan to illuminate the skylight deck?
Thx for the log.
Super fan Blighty
-
Blighty got a reaction from Cathead in Chaperon 1884 by mbp521 - FINISHED - Model Shipways - Scale 1:48 - First Build Log
A truely beautiful model, love the detail, adds so much interest.
Do you plan to illuminate the skylight deck?
Thx for the log.
Super fan Blighty
-
Blighty reacted to mbp521 in Chaperon 1884 by mbp521 - FINISHED - Model Shipways - Scale 1:48 - First Build Log
Aww come on Eric, I can't suck you back into my rudder conversations again?
Kurt,
Thanks for the input. I agree, the website is really neat and has inspired many new ideas and subtle touches to add to my build.
I have seen these photos on the UofW website, but since they were labeled as the Chaperon Towboat, built in 1904, I wasn't sure as to the accuracy of the lifeboat style on this one. I looked at some of the other photos of the 1884 Chaperon and zoomed way in on them and can somewhat make out that a couple of them show flat transom lifeboats, but they are a bit grainy.
As for the configuration changes of the 1884 Chaperon, there are some subtle differences that I have noticed through the photos, like the addition of searchlights, the front wall of the main deck by the stair case (open as opposed to being enclosed), the smokestack "crown" (or what ever the decorative top piece is called) has seen several changes, different color schemes on the trim (hard to tell with black and white photos) but it is definitely noticeable on the doors and the "Anchor and Arrow" between the smokestacks, but I haven't seen too may photos that drastically change the look of the boat structure itself.
As for the third rudder, I am seriously contemplating adding it. No monkey rudders though. I can't find any evidence that the Chaperon ever had these.
-Brian
-
Blighty reacted to kurtvd19 in Chaperon 1884 by mbp521 - FINISHED - Model Shipways - Scale 1:48 - First Build Log
That computer generated Chaperon is neat. The guy seems to have used a lot of sources to put it together but I think there are a lot of presumptions - especially the interior. The interior looks just way too elegant to be accurate from the history I was able to find on the Chaperon. I could be wrong about this and I would sure be interested in seeing more of the documentation he used. I will try to find out more.
As to the life boat I have attached two photos from my files that clearly shows it tied off alongside. Other photos I have seem to support this being the same boat are small and unable to be enlarged enough to confirm it's the same boat. There were changes to most steamboats over time and the aft boiler deck cabin structure is different than the kit. I have photos of the Chaperon that show the aft end that agrees with the kit. But there is documentation of several rebuilds of the Chaperon over time and none of the photos have been dated. The photos were taken from various sources - obviously none are copyrighted.
As to rudders, I have not sen any photographs that show the rudders and I wouldn't say if it had two or three forward rudders. I have never seen any evidence of monkey rudders behind the wheel. If you like the look of three rudders go for it - there isn't anything that I have seen that would say it had two or three but three was very common.
-
Blighty reacted to mbp521 in Chaperon 1884 by mbp521 - FINISHED - Model Shipways - Scale 1:48 - First Build Log
Hello everyone,
I wanted to pose a question about rudders. I was doing some research on the internet on the Chaperon to find out what style of lifeboat she carried with her. The kit contains the standard britannia ones that bare pointed on the bow and stern, but in many of the old photographs I came across show ones with a flat transom on them.
Anyway, while researching this I found there were several pictures of steamboats in “dry-dock” where they show them with three rudders instead of just two. I’ve seen the additional “monkey rudders” mounted aft of the paddle wheel, but this third rudder was mounted to the hull in line with the other two.
I’m sure the timeline would dictate the evolution of the boats, but my curiosity got the better of me so I went down the rabbit hole and started looking into rudders (again). I really couldn’t find a whole lot of info on when they started putting three rudders on steam boats or if there were just a few one-offs where the shipbuilders were experimenting with maneuverability of the boats. Then I stumbled across a site of a gentleman from Germany who put together beautiful high-res drawings as well as a 3D virtual tour of the Chaperon. That’s when I saw that he had also included three rudders on his drawings. So being the novice in the world of steamboats, I figured I’d pose this question to the experts. Personally I think it’s pretty cool looking to have three rudders, but I would till like to keep my build as historically accurate as possible.
Any thoughts on this?
BTW: here is the link to the site I was referring to. I’m not real sure of it’s accuracy, but it does resemble the MS kit.
https://www.jensmittelbach.de/steamboats/chaperon/index.html
-Brian
-
Blighty reacted to mbp521 in Chaperon 1884 by mbp521 - FINISHED - Model Shipways - Scale 1:48 - First Build Log
Eric,
I have been using heat shrink for years and it holds up well in all types of weather. I use it on the wiring of my trailers that sit in the sun/rain/snow year round and haven't had a single connection rot away. The only issue that I had with doing the bands this way was I had to secure them in place with a touch of CA because they tended to slip on the wooden dowel. There are some heat shrinks that have a heat activated glue on the inside of them that helps seal the connection and would probably work a little better in this type of application, I just used what I had on hand.
-Brian
-
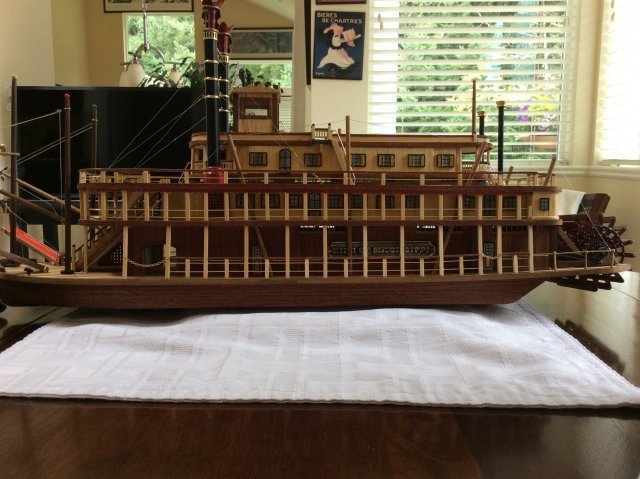
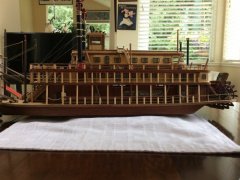
 Blighty got a reaction from GrandpaPhil in Chaperon by Blighty - FINISHED - Model Shipways - Weathered and aged - My first build log
Hi, last few pics, hope you like em.