HOLIDAY DONATION DRIVE - SUPPORT MSW - DO YOUR PART TO KEEP THIS GREAT FORUM GOING! (Only 36 donations so far out of 49,000 members - C'mon guys!)
×

Boxbuilds
-
Posts
315 -
Joined
-
Last visited
Content Type
Profiles
Forums
Gallery
Events
Everything posted by Boxbuilds
-
 Hello Keith. This is a very nice effort. Whatever approach you take to refurbish your ship is the right approach. You want to be happy with the result and your experience with woodworking serves you well here. I have found paint thinner to vary greatly in its aggressiveness. I have used it when I suspect that someone plastered varnish or some other coating over the original paintwork. Over time it turns yellow and black and ruins the original work. The trick, as you know is to test and be gentle, right? It made a huge difference on the Nuestra Senora Afortunado restoration. Although the owner didn't want to retain the patina(sad), the detail in the decks and other bits came out. But soap, toothbrush and water often do the yeoman's portion of the work. I continue to look for matching drawings to identify your ship. I appears to be English based upon its flags. I'll also look into the heraldry displayed on the shields and sails. They could be notional or real. Some look common. As I see anything I'll let you know. I am doing the same for folks at cast your anchor hobbies so I'll combine efforts. The ship appears to represent an early carrack of three masts, 16 guns, topsails on 2 masts and a lateen missen. Interestingly, the bowsprit (or mast) does not go into the ship. It rests below the beak, seated in the stem. It carries a sprit sail. I counted only 7 guns on the starboard but I think I saw a hole where the balancing eighth gun went. Is that possible? Additionally, I count 24 "gunports" on upper decks, which would raise the count to 40 guns. So I think I'll look for a forty gun ship and let you know of any candidates for your consideration. If I overstep here, I apologize and will back off. It's just fun for me. Regarding the maker of the ship....The tag on your ship is just like that on the GH! The turned guns, mast construction, nailed yards, colors and sail materials seem identical. I have a question out to the Cast Your Anchor Hobbies folks about the provenance of a ship like ours that they worked. You may not know that we've identified four other ships made by this manufacturer. Sooner or later I hope to get to the source of these ships. This is an interesting project and I look forward to watching its progress.
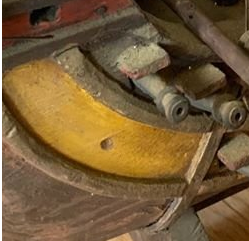

-
Marc, I am new to this thread. I saw your pieces on carving and admired it so much that I copied it and created a single doc that I can use as a reference. Hope that's ok. The artistry demonstrated in this topic is about the best collection I've read. I am working on Sergals SR. I have completed the planking. I am framing the insides of the lower 2 lines of gunports. So I am not too far. I have had a bevy of challenges and I think this topic will give me better insight about approaching the next steps. I thank all all of you on this topic for sharing your experiences and expertise. John boxbuilds
- 2,696 replies
-
- 3
-

-
- heller
- soleil royal
- (and 9 more)
-
Ok. Looking at the CBMM site I found interior pics of the wheelhouse. ....no wheel. only life preservers and tools. good enough for me. Finally fixed the windscreen frame, so Back to glazing...
- 17 replies
-
- 2
-
-
- martha
- chesapeake bay maritime museum
- (and 2 more)
-
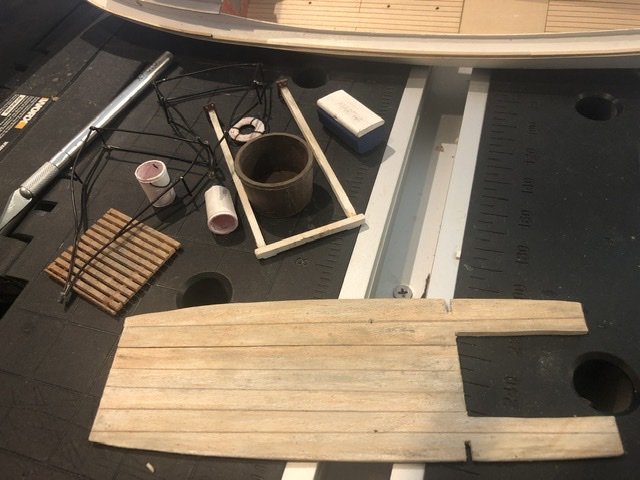
I am finishing the trim and rails and starting the cabin. I also finished the false deck, weathered it, and created support for the dredge uprights. The pic shows the kit deck that will be painted white. Also the other paraphernalia and false deck are shown. The dredges are made with soft wire. Uprights are basswood. Other pieces were 3D printed from my own designs I had a few problems of my own making. RTFI READ INSTRUCTIONS. They directed when to glue and I skipped over that. I tend to skim directions and glue to drawings. 80 percent of the time you get away with it but that other 20 percent is destructive. Then when I needed a clamp to gently squeeze parts towards each other the clamp popped close and took out the windshield frames. Luckily there’s enough scrap to remake the lost parts. I talked about paint parts in their frames. It should be cautioned that such methods can make it trickier to extract the parts. Be careful with small, fragile pieces or they’ll need repair. Sanding the edges will be important. I made a console and printed a wheel based on cockpit photos of random crabboats. I couldn’t find a good one of Martha’s interior and I’m pretty sure my guess of location is off. I welcome input re that.
- 17 replies
-
- 4
-
-
- martha
- chesapeake bay maritime museum
- (and 2 more)
-
Helping folks recover memories and nostalgic bits is rewarding. Plus I/we learn a considerable amount. I have a history degree specializing in the Tudor period so rooting around in the nautical aspect while using 30 some years of modeling experience makes it a joy. I’m sure you share similar feelings. So thanks for your comment. The whole club appreciates it.
- 31 replies
-
- 2
-
-
- galleon
- restoration
- (and 2 more)
-
Like I said it’s old news. I am flabbergasted that searching for old reference sources for Harry pulled that book up!? So I wanted to share it. It has some old techniques that are interesting although not useful today. hang in there and thanks for your sacrifice John
- 31 replies
-
- 1
-
-
- galleon
- restoration
- (and 2 more)
-
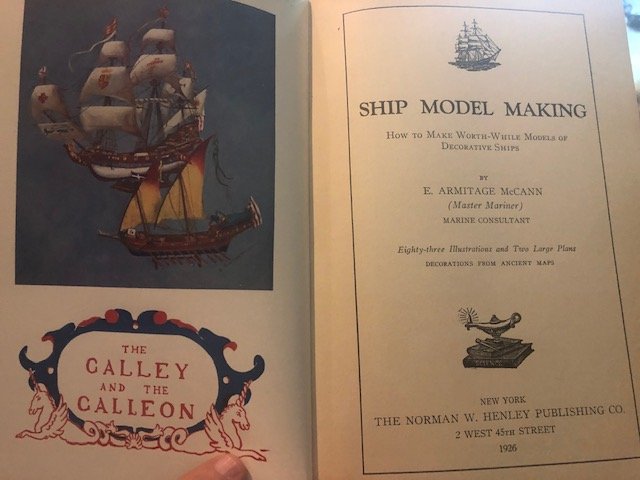
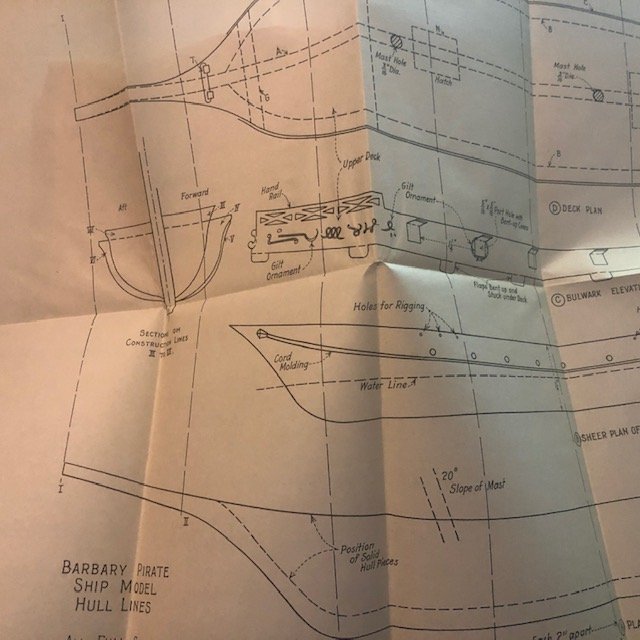
I discovered a book by Armitage McCann about the Nuestra Senora Afortunado. This is old news, I know, but Interesting that a book on the subject was floating around. The book covers the NSA and how to build a Mediterranean pirate galley. In the book the NSA is named Nuestra Senora Delicioso. The instructions describe techniques common in 1926 including how to make special use tools and where materials can be found….an interesting look at the past. They are very detailed and include many detailed drawings (full size) of different parts of the ships. An envelope is glued to the back cover of the book that contains plans for the two ships. McCann explains that the ships are designed to be faithful representations of period ships rather than a specific ship. He glosses over his choice in designing curtailed rigging for the sake of the novice modeler and focuses on providing a good looking mantle piece. That was evident in the excecution of the restored NSA. In any case this is an interesting historical point giving a bit more provenance to the ship which I will share with the owner.
- 31 replies
-
- 4
-
-
- galleon
- restoration
- (and 2 more)
-
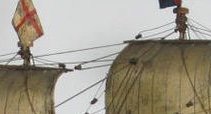
Sorry I missed this question till now.... The tops are turned as one piece with only a hole for the mast. the only other shaping are indentation on the upper edge of the top across which the futtock shroud passes. What follows is unauthentic but how it is: The futtock shrouds are fastened to the mast below the top, pass across the lip of the top and then are attached to the mast below the tgallant top, becoming (magically) the upper shrouds. On the MAAS model the futtock shrouds have a deadeye fastened at the upper end. The deadeye becomes the attach point for the lanyards/deadeye that become the upper shroud. see pic strange but true
.jpg.9fff1f66afaa5fbca1b6a80ae02bcf0d.jpg)
- 71 replies
-
- 3
-
-
- great harry
- henry grace a dieu
- (and 3 more)
-
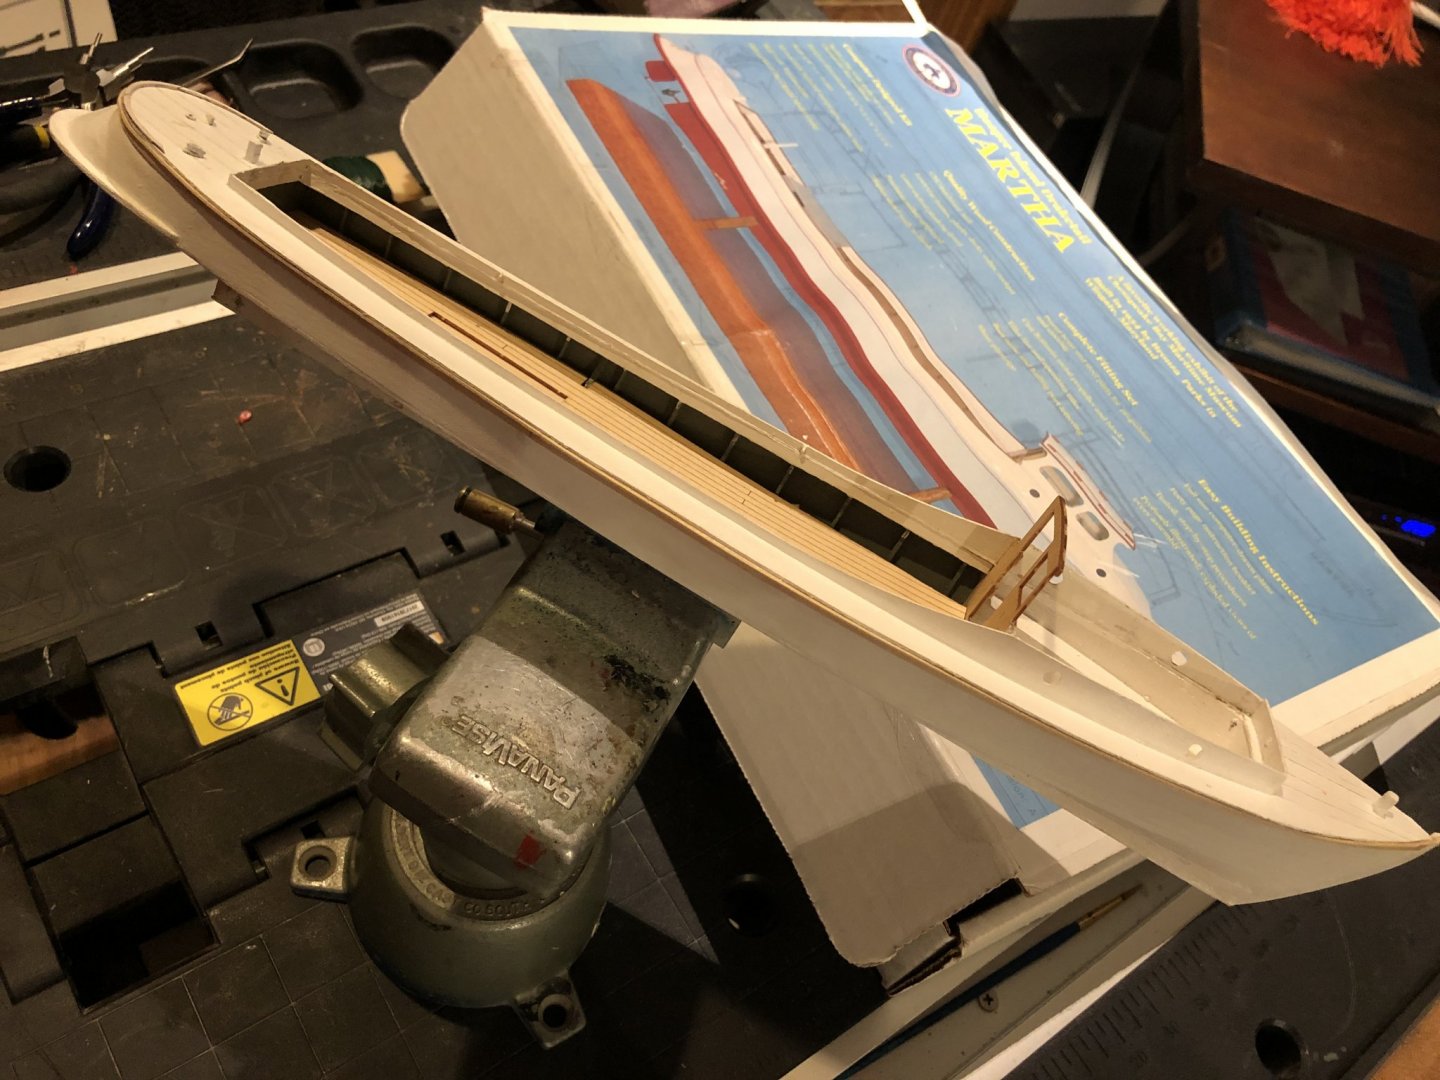
This model has gone together well. The instructions pointed out cautions that proved worthwhile. Like any kit there are issues of fit and alignment that took some care. Sanding the machined hull was somewhat nerve wracking. Yes, I can sand a block of wood, lol. The hull had such nice lines and was so precise that I feared taking off too much in a spot and messing up the conformity. That especially applied to the slight grooves on the bow resulting from the machining. I opted for a very conservative approach and some fine lines can still be discerned. Maybe paint will further smooth the lines. The keel post is 1/32" thick. Instructions call for a drilled hole in it for the propeller shaft.............good luck. I will be remanufacturing that piece from scrap and trying again. The biggest deviation I made so far was to start painting sooner than instructed. The forward cabin bulkhead and the keel are candidates to be broken if the ship is overhandled. So I painted and sanded the bits in situ on their parts boards. This had the added advantage of dealing with small and delicate parts since the attachments to the board gave them stability and purchase when being sanded. The rudder line guides are VERY small and delicate. Removing them from the board was possible but the result was hard to handle and looked out of scale. I substituted half of a split ring of equal size. I made seat cushions from dark red material for the benches in the cabin. I attempted to tack the pot metal rudder control blocks to the deck but the castings were too small and fragile so I ended up following the instructions and glueing them to the pads on the deck. I made sure to clean and widen the rudder line feed holes in the block before installation. The side coamings went on fairly well. Instructions called for careful alignment, clamping and gluing. I glued sections of the coaming rather than the whole piece. That gave me more control and accuracy. In researching these workboats, I looked for equipment normally found aboard them. Martha herself is not a crabbing boat, by purpose, but I wanted the option to illustrate how a ship like her might have been used. While there were as many uses for them as there are variations of design, I chose the soft shell crab harvesting by a small outfit based in the Hooper Island or St Michaels area. I have located photographs of the boats in use and am attempting to replicate their equipment...at least what I can see. Small tools aside, I have cobbled two dredges, buckets, crab pails, life ring, and ice chest. To accomplish my illustration AND have a kit version of the Martha, I am going to fashion a false deck on which to attach the equipment so it looks natural but which allows me to easily remove the "working" look. How to do that is a part of the design I haven't mastered yet...to be continued
- 17 replies
-
- 4
-
-
- martha
- chesapeake bay maritime museum
- (and 2 more)
-
Ebay. It was of particular interest because we are frequent visitors to the CBMM. St Michaels is a great town and the museum is very informative. The lighthouse is open for visits and the in workshops of the museum one can see progress being made on boats in work as well as other life size exhibits. I've gotten some great photos there. I also like the character of unique style boats and the draketail fits that bill (pardon the duck pun).
- 17 replies
-
- 4
-
-
- martha
- chesapeake bay maritime museum
- (and 2 more)
-
Keith, It has all the characteristic parts. Wire fastenings, same cannon turnings, same deadeyes, same heavily cast anchors, same mast and truck construction, same paint colors and the yards were also nailed to the masts. It appears to be a representation of very early drawings that were out of proportion rather than an attempt to model an actual ship. Nothing wrong with that. It's kind of a artistic piece~ Who made these?? I will keep looking but it eludes me too.
- 71 replies
-
- 2
-
-
- great harry
- henry grace a dieu
- (and 3 more)
-
I just started a nice model of the Martha, a Chesapeake Bay Maritime Museum model of a Hooper Island draketail, a turn of the 20th Century workboat. These bay water boats are unique in their narrow beam and long length. Many sport a mid-engine powerplant and a low cockpit. Taking their design from torpedo boats and having a slopped transom, they look a bit like ducks, hence the name. The kit is the best quality I have ever attempted. The CBMM kit starts with detailed instructions whose explanations are clear and expressive enough to avoid confusion. The hull is machined basswood that only needed light sanding to be ready for assembly. Wooden components were laser cut and completely cut through...some kits require you to clean up or finish the cuts...and are easy to extract. Line, metal parts, "windows", and decals are clearly packaged and "clean." It even has a nicely formed wooden base plate for the stand. Assembly is progressing quickly. Parts are fitting tightly although slight sanding is sometimes necessary. So far this is great fun .....so I'll get on with it

- 17 replies
-
- 9
-
-
- martha
- chesapeake bay maritime museum
- (and 2 more)
-
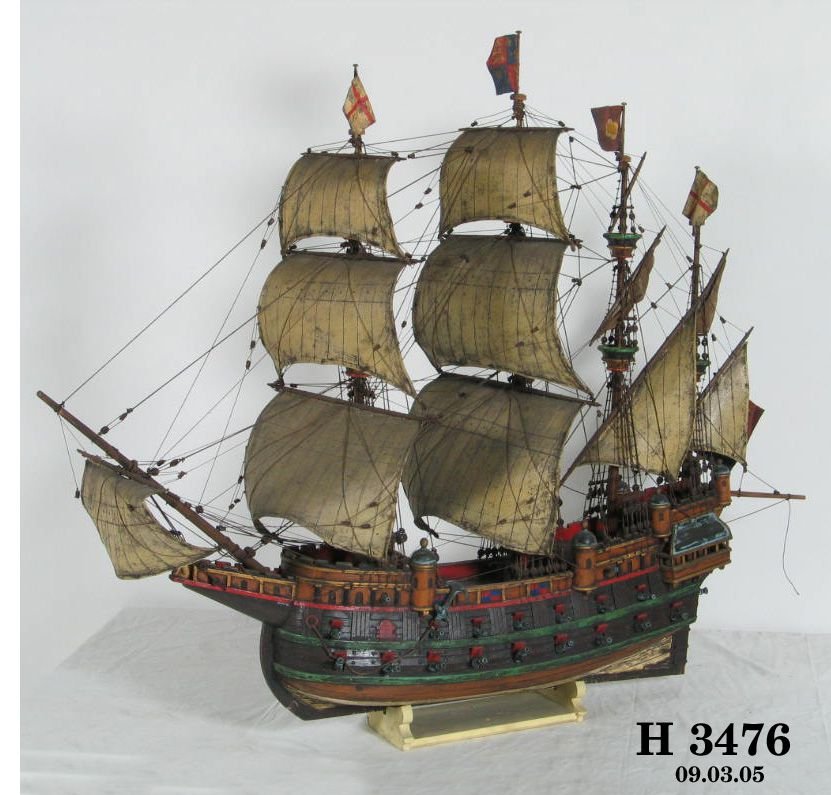
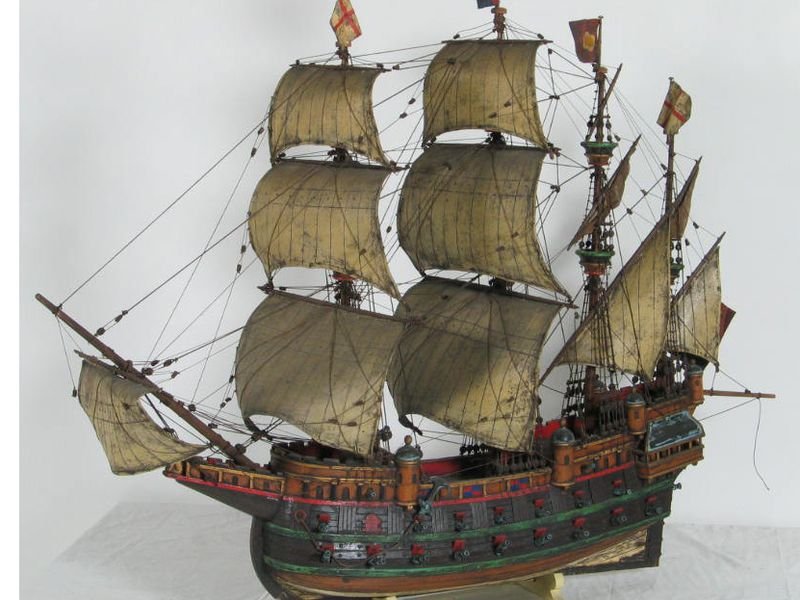
Could be. I have searched for and found several german toy makers but none did these. ...still lookin' gotta go with the owner's wishes as you've said before. This change only affects the fore and main masts. We still have to replicate missing yards. caps, deadeyes, blocks and the flag staffs It'll still be 85%+ original. here is the MAAS model:
- 71 replies
-
- 4
-
-
- great harry
- henry grace a dieu
- (and 3 more)
-
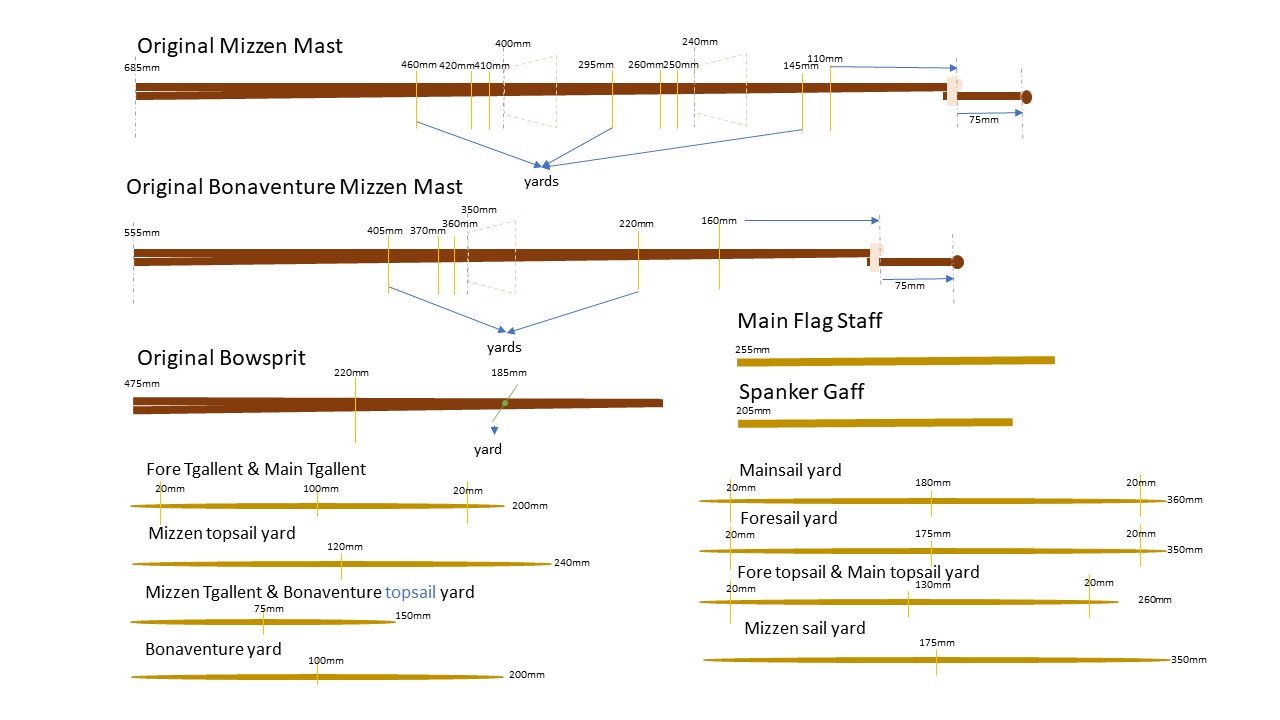
Unquestionably yes. The pros and cons were presented including veracity to the one they had. But they felt that the ship had been changed inaccurately and they wanted it "returned" to the appearance of the MAAS version. The above is the plan to do that. I've finished the yards and other masts drawings:
- 71 replies
-
- 4
-
-
- great harry
- henry grace a dieu
- (and 3 more)
-
The second ship you found looks like another sister to ours. Same anchor, knots, deadeyes, and style in general. Who/what company made these? The owners have agreed that they want the MAAS ship to be the model for theirs. They say they want the masts stepped. To that end I converted the single pole mast we have to a plan for stepped masts (main and fore). The concern is to get the yards positioned to fit the existing sails and a general need to transpose any other mast data to the new masts. Flag masts and top caps will be added.
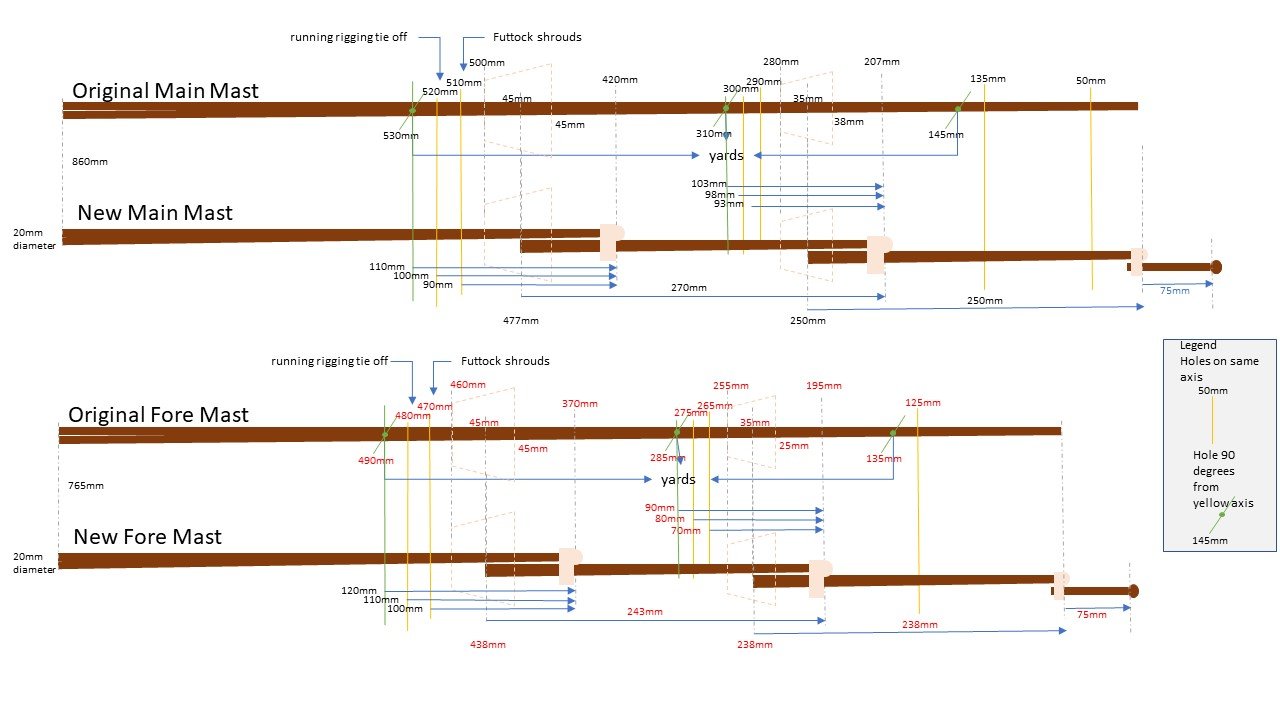
- 71 replies
-
- 4
-
-
- great harry
- henry grace a dieu
- (and 3 more)
-
I have found at least 3 different ship models that appear to have been built by the same builder/manufacturer. Given the "made in" Germany tag on it I've become really interested in finding such outfits.
- 71 replies
-
- 3
-
-
- great harry
- henry grace a dieu
- (and 3 more)
-
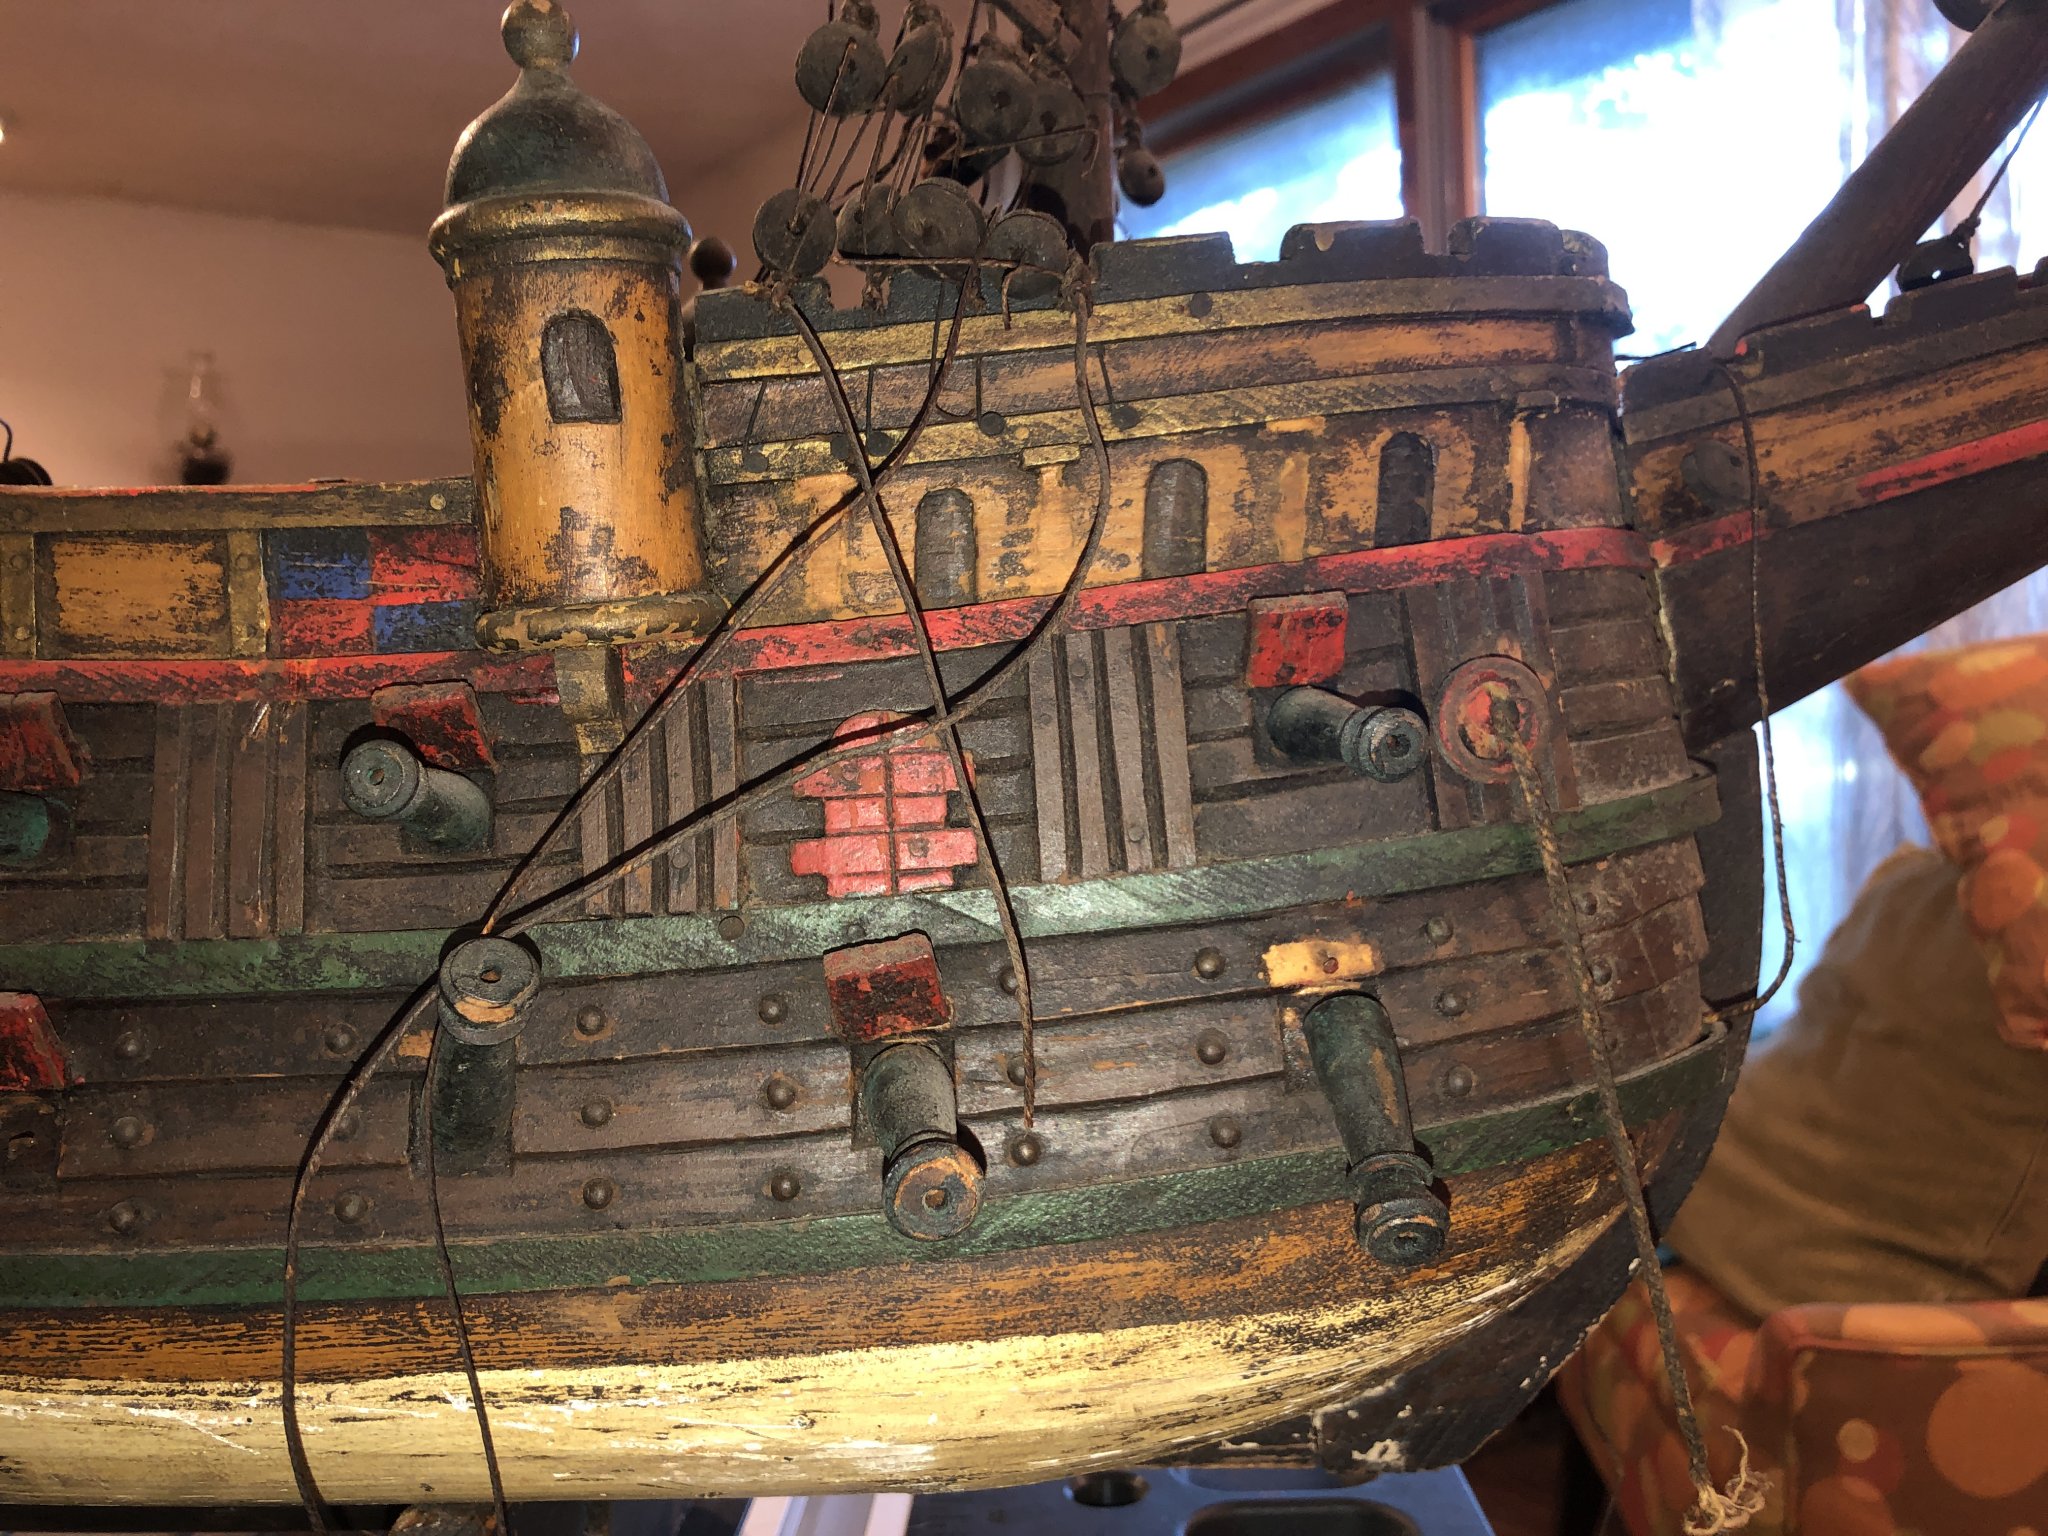
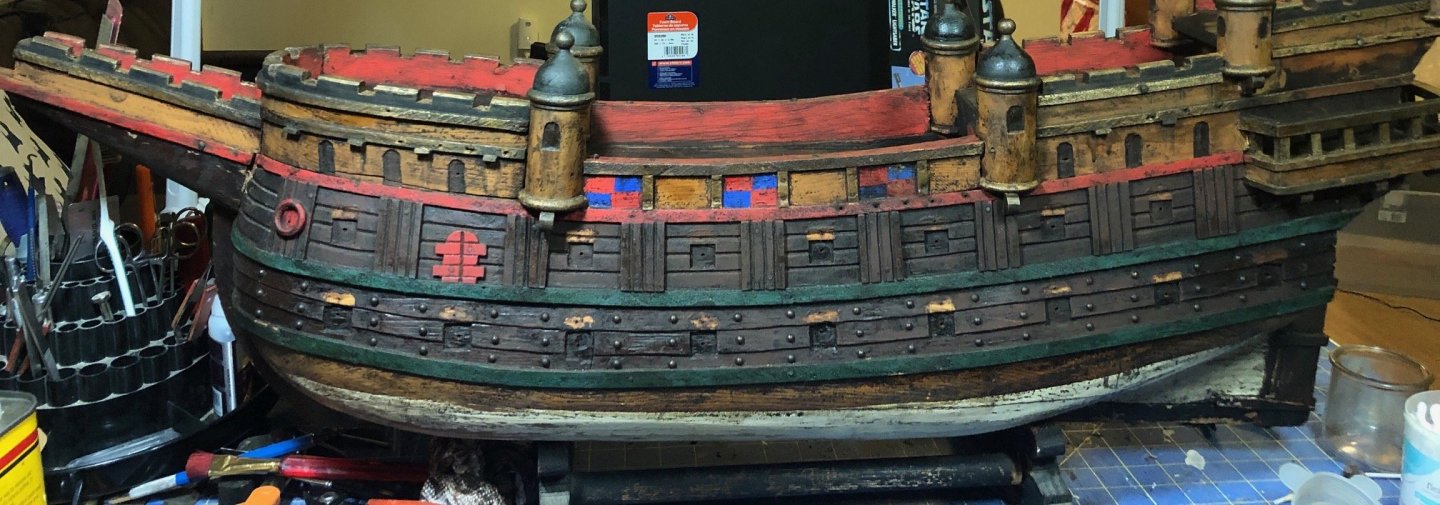
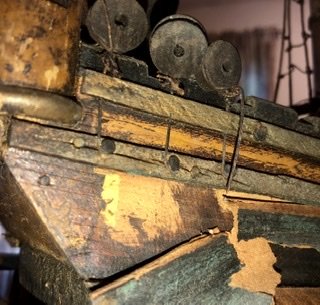
Looks like we have another rigging dilemma: 1 The number of deadeyes on the MAAS model main mast appears to differ from our model; 2 the tops on the MAAS model have deadeyes/lanyards but not ours (see att diagram); 3 the MAAS beak head is decorated with columns and arched portals different from ours; and, 4 as mentioned before, the masts have flag masts and caps. I lean towards getting with the owners, showing them the differences and recommending replicating the MAAS model. One of them may have been repaired in the past and my money is on the less detailed one......but who knows. Rigging the upper shrouds in either case is incorrect. The lines are tied off below the top and are brought up outside the top like a futtock shroud. But the line is continued above the top and attached to the mast like a shroud. Ratlines are tied to the upper shrouds. From a distance the rigging appears familiar but was obviously an expedient in manufacture. A confusing issue is he construction on our model. Where the MAAS model shows 7 deadeyes for the main mast, ours shows 5. I looked for evidence of where 2 other deadeyes might be attached on the bulwark of our model and found none (see blowup pic). The wire chain plate from the lower deadeye to the hull goes through a hole drilled in the bulwark and down the side of the hull where it is grounded on a nail. While I can't see evidence from the photo available, perhaps the missing main shroud deadeye attachment is simply to the side of the hull unlike its mates.
.jpg.50ba3676f8fbbeee4e9001fa76b10593.jpg)
- 71 replies
-
- 4
-
-
- great harry
- henry grace a dieu
- (and 3 more)
-
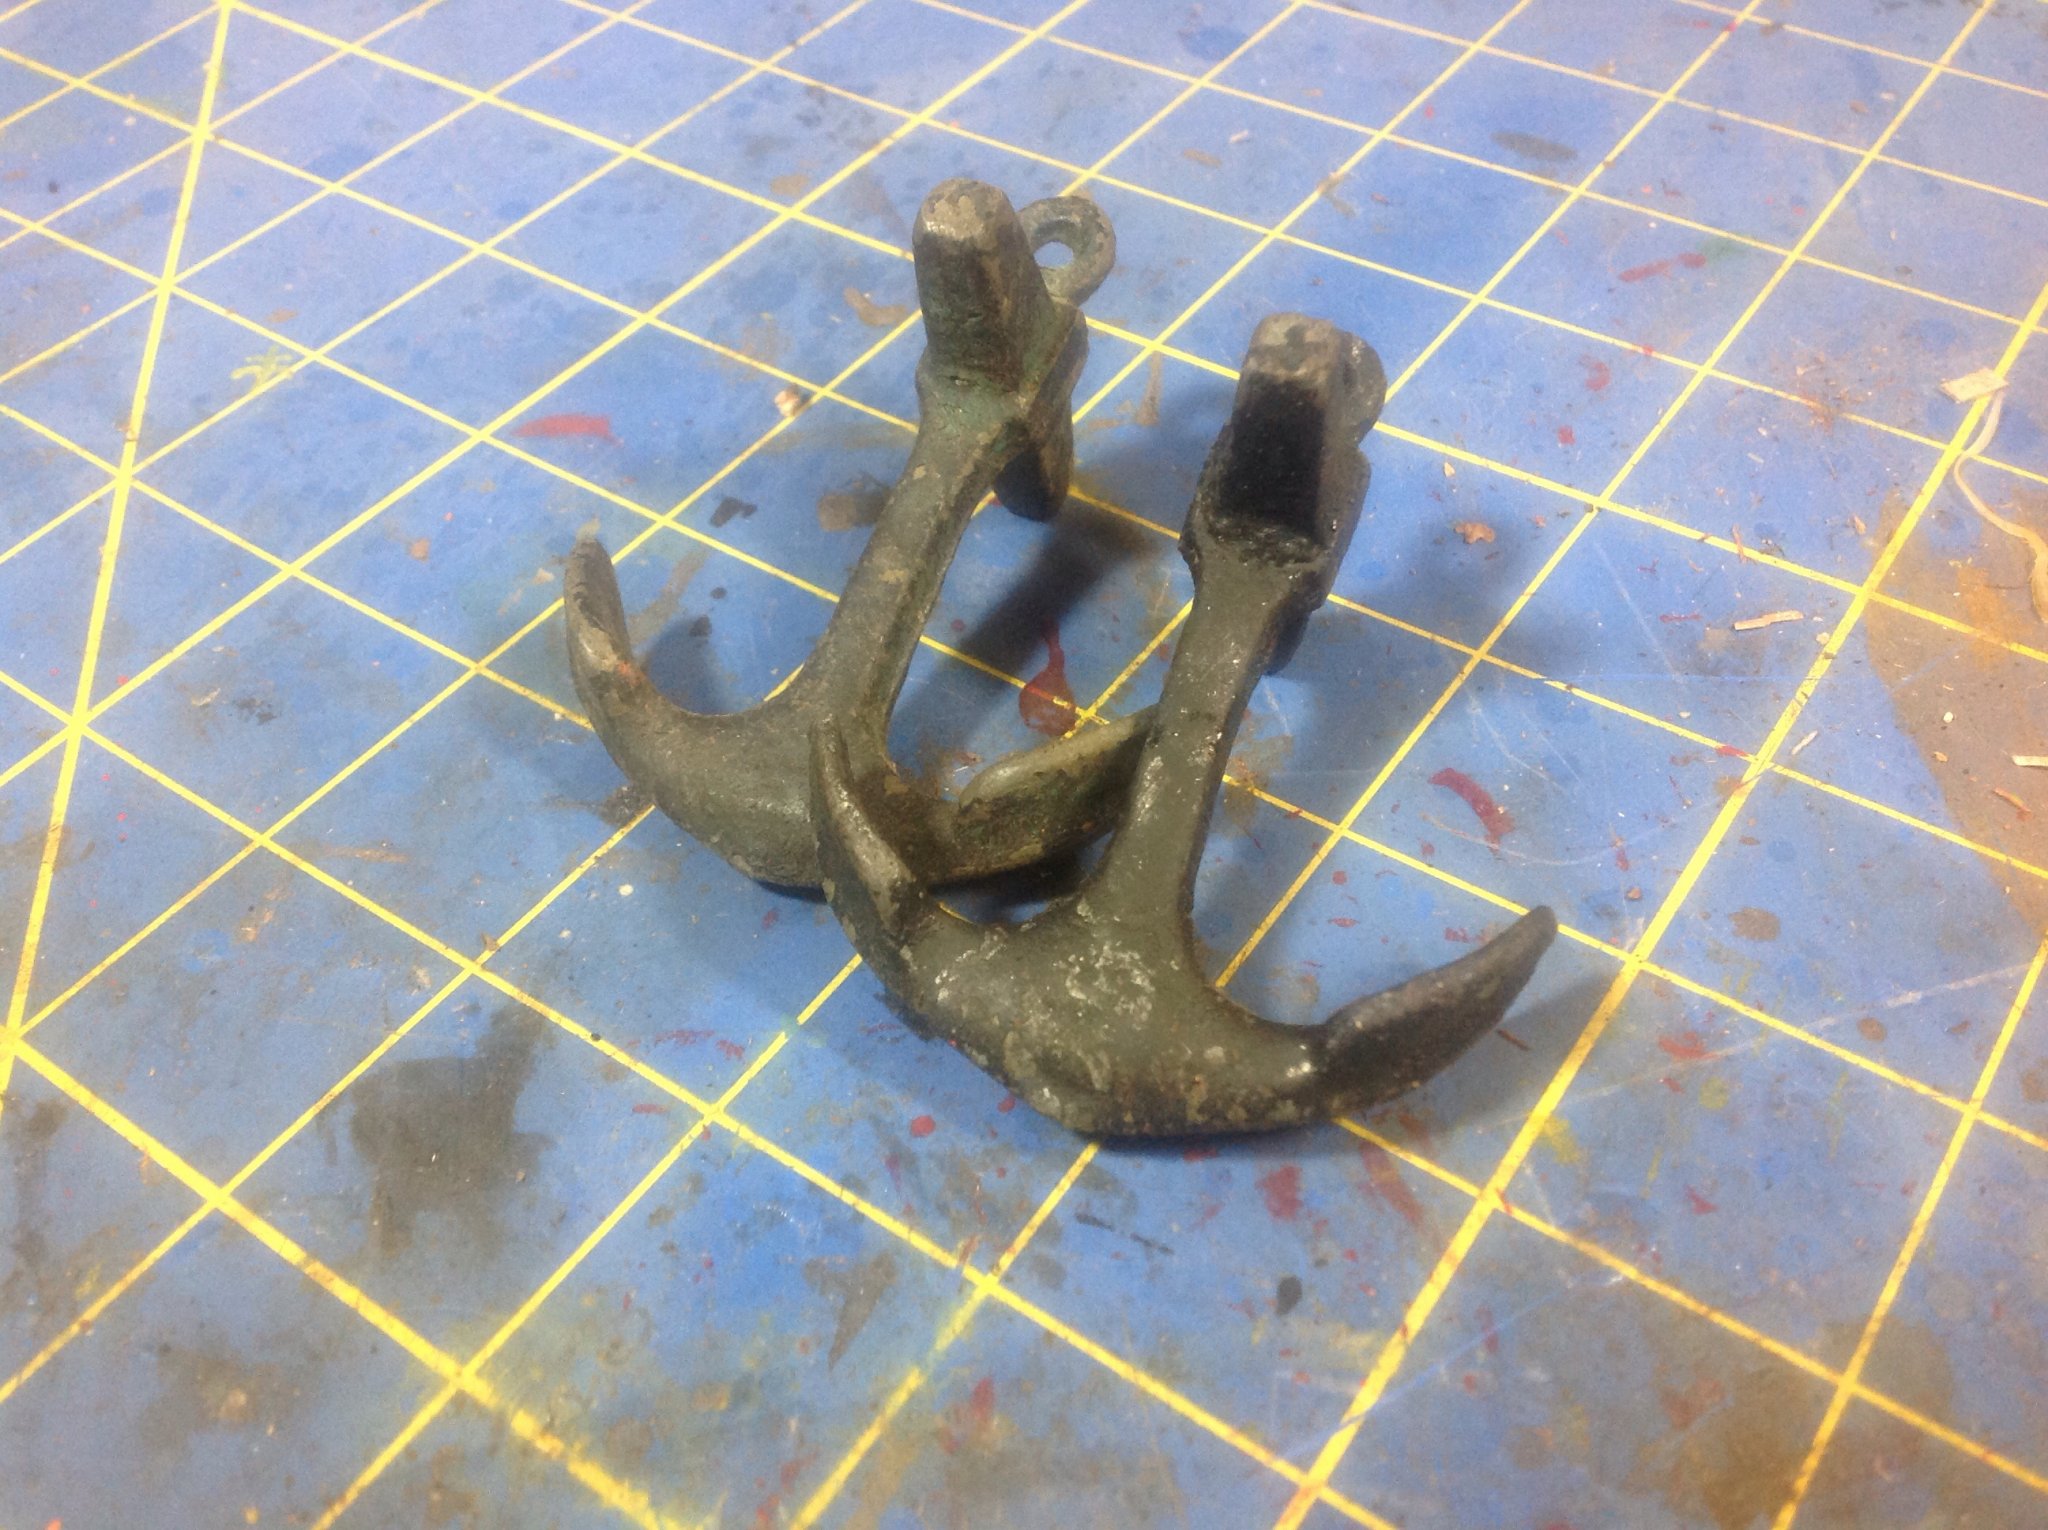
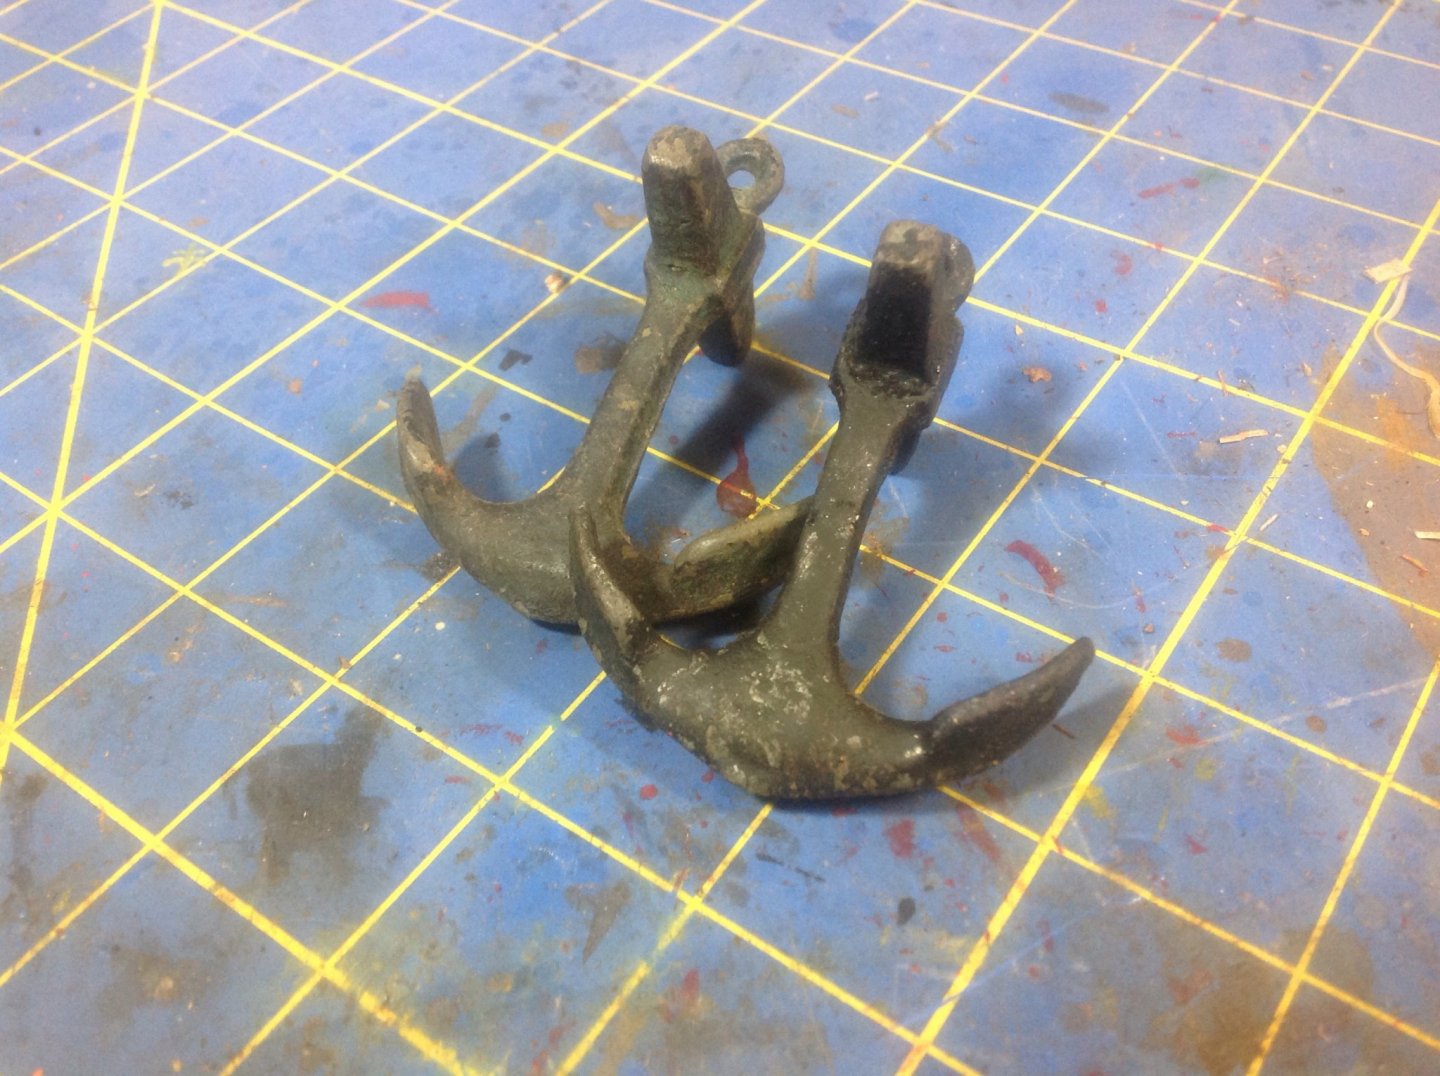
There are several repair tasks to do. One of the pot metal anchors was broken in half. To avoid scorch marks I might have caused with a torch, I used a resistance soldering tool to mend it. After cleaning, fluxing and tinning the parts I set them up in a jig. That gave me two hands to work with and was important when the metal took so long to reach temperature. Cleaning off the residue and a dab of matching paint and it is presentable again. The rear galley once had a roof. The Australian model still has it. It is made of card stock. only fragments of fragile black and gold painted card stock remained. Using the Aussie ship I frabricated a similar roof. It's received a first coat of paint. Gold trim will be applied and weathered once the base coat is finished. I placed piece of the old roof on the new one in the pic to compare the contour and gold trim. That trim is different than that in the Aussie model which looks light blue. Also reworked the stand... simple clean and glue job.


- 71 replies
-
- 5
-
-
- great harry
- henry grace a dieu
- (and 3 more)
-
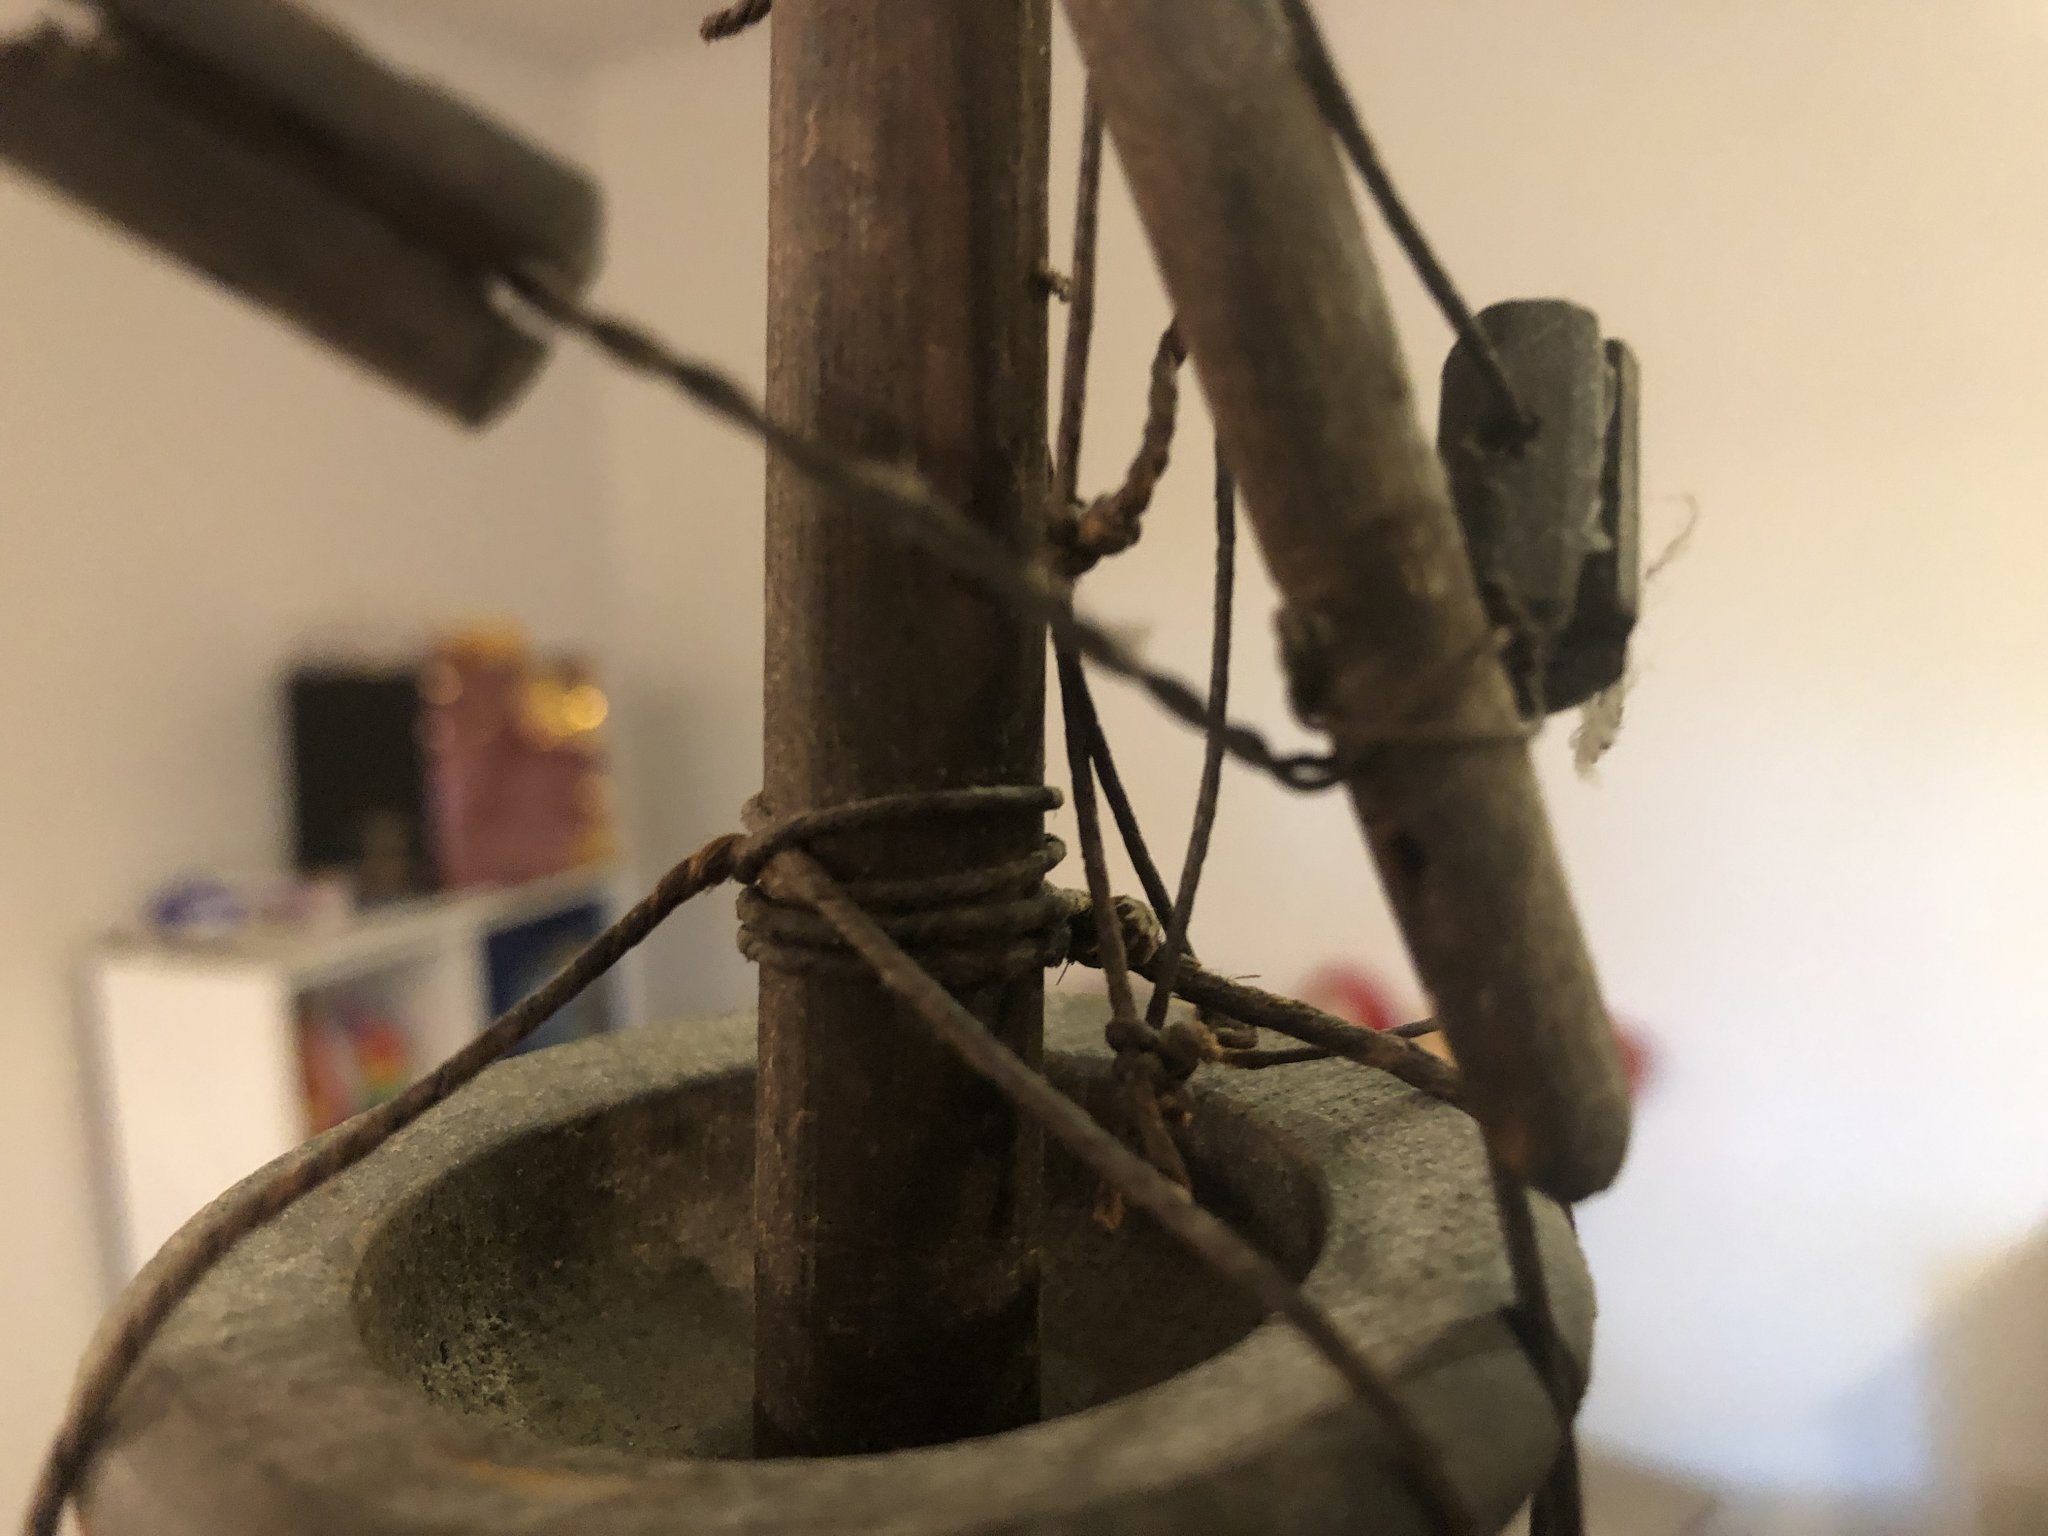
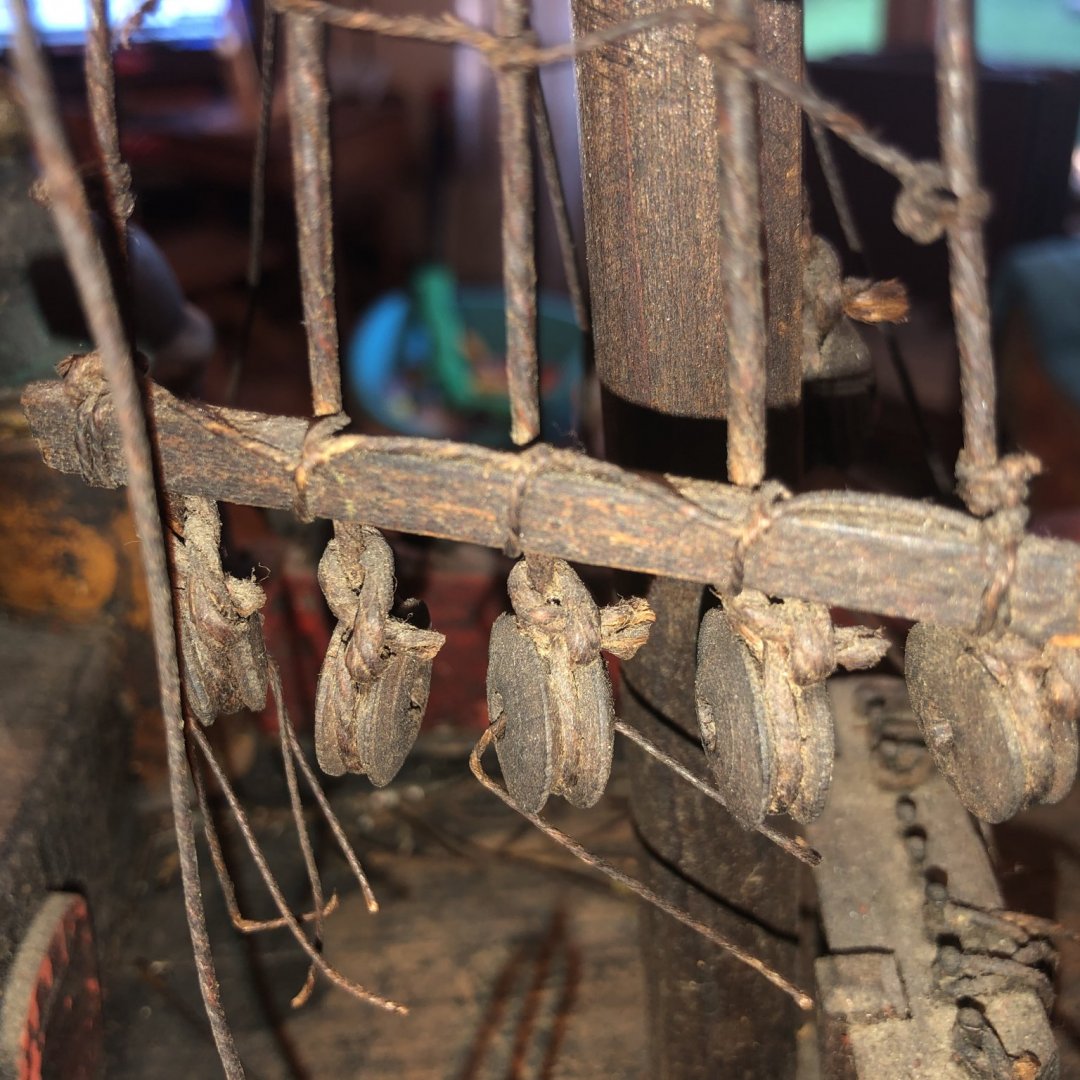
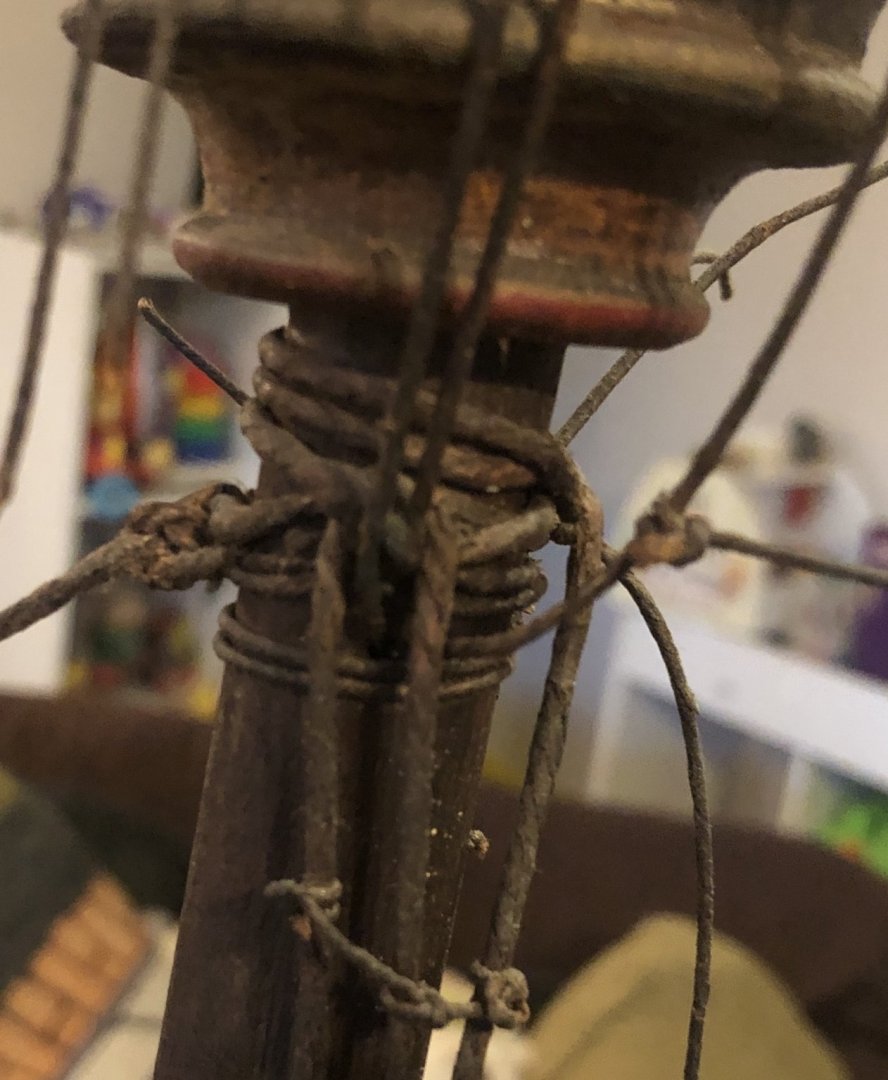
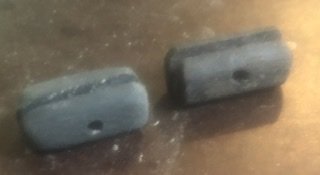
Besides the wire Feathermerchent describes, closer inspection also shows small nails used to reinforce the joint. Many of the techniques used to tie lines is non-standard. The pics attached show stay lines and futtock shrouds around a top; deadeye attachment to the shrouds; a half hitch commonly used around the masts; and, deadeye attachment to the hull. Some lines are attached to the hull tied around a nail. Uncommon or unlike a ship of this age, it has fife rails with belaying pins at the base of the fore and main masts. Deadeye positions along the hull only seem to support the lower shrouds. The masts are a single piece of dowel with turned crows nests slipped over them into position. They are supposed to be topped by a cap and flag mast. Hopefully this will contribute to the veracity of the rigging plan.


- 71 replies
-
- 5
-
-
- great harry
- henry grace a dieu
- (and 3 more)
-
The cleaning is basically done. I am comparing the "look" with the MAAS model and they are close...so I didn't clean too deeply. The guns, gunport covers, rigging and masts have been removed. The masts and yards will be shipped to the member that's going to rig them. We are missing topsail, topgallant, main and lanteen yards -- one of each. The flag masts are also going to need replacing. Feathermerchant will provide replacement yards. He is also getting the rigging. It is three diameters: .5, 1, 1.5 mm (lanyards, running rigging, and stays respectively). It is nice to see the colors and gold trim come out Unfortunately, the dirt covered myriad splits/cracks. None threaten the integrity. It will be better to leave them alone. It adds age character. The gun covers and guns will be replaced soon
- 71 replies
-
- 6
-
-
- great harry
- henry grace a dieu
- (and 3 more)
-
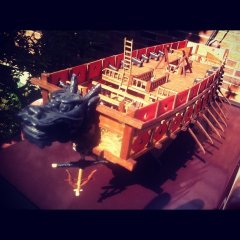
6/23/20. Planning and start of work The ship has been photographed. An inventory of the existing model and parts was made. This allowed our members to know the model’s condition, the tasks involved and what must be remade. The tasks are being shared among club members, as appropriate. A distributed approach to projects was carefully considered by the club. The project benefits from the talents of the team members and the task list is finished more quickly. Of course good communication and attention to the task dependencies is essential. Clear plans are important. A rigging plan is being constructed from Pics of a twin model at the museum of applied arts and sciences in Australia. Other drawings will likewise maintain consistency with the original. Each member will be adding to this log regarding their work. Another key aspect of the project is understanding the owners’ expectations. They become our goals and guide. In this case the owners asked for a restoration that retains the aged appearance they grew up with. Over the years the ship condition deteriorated. The gallery roof is gone, there is damaged and missing woodwork, a sail is missing and the rigging is “gone.” Cleaning is started. It is bringing out underlying colors and gold trim was discovered. To access the complete hull the guns, gunports, rigging fragments, masts, yards, bowsprit and sails were removed. The cleaning will target dirt and show the original detail that were lost to age. Some guns, blocks and dead eyes are missing. Drawings of these items are done. And prototypes to compare with original parts are being completed. It is of Note that this model’s parts are unique and don’t conform with conventional commercial parts. Once the missing pieces are ready, the parts, yards, masts and rigging plans will be sent to the team member who will rig them.
- 71 replies
-
- 6
-
-
- great harry
- henry grace a dieu
- (and 3 more)
-
Thanks. Yes we'll put up a pic as we received it. This is , I believe the original 1514 configuration of the GH before its redesign and streamline work in 1557. Bill Nyberg and I are working on rigging plans so this'll be a good time to get more detail. The ship was renamed the Edward after Henry's death so that may provide another source...
- 71 replies
-
- 1
-
-
- great harry
- henry grace a dieu
- (and 3 more)
-
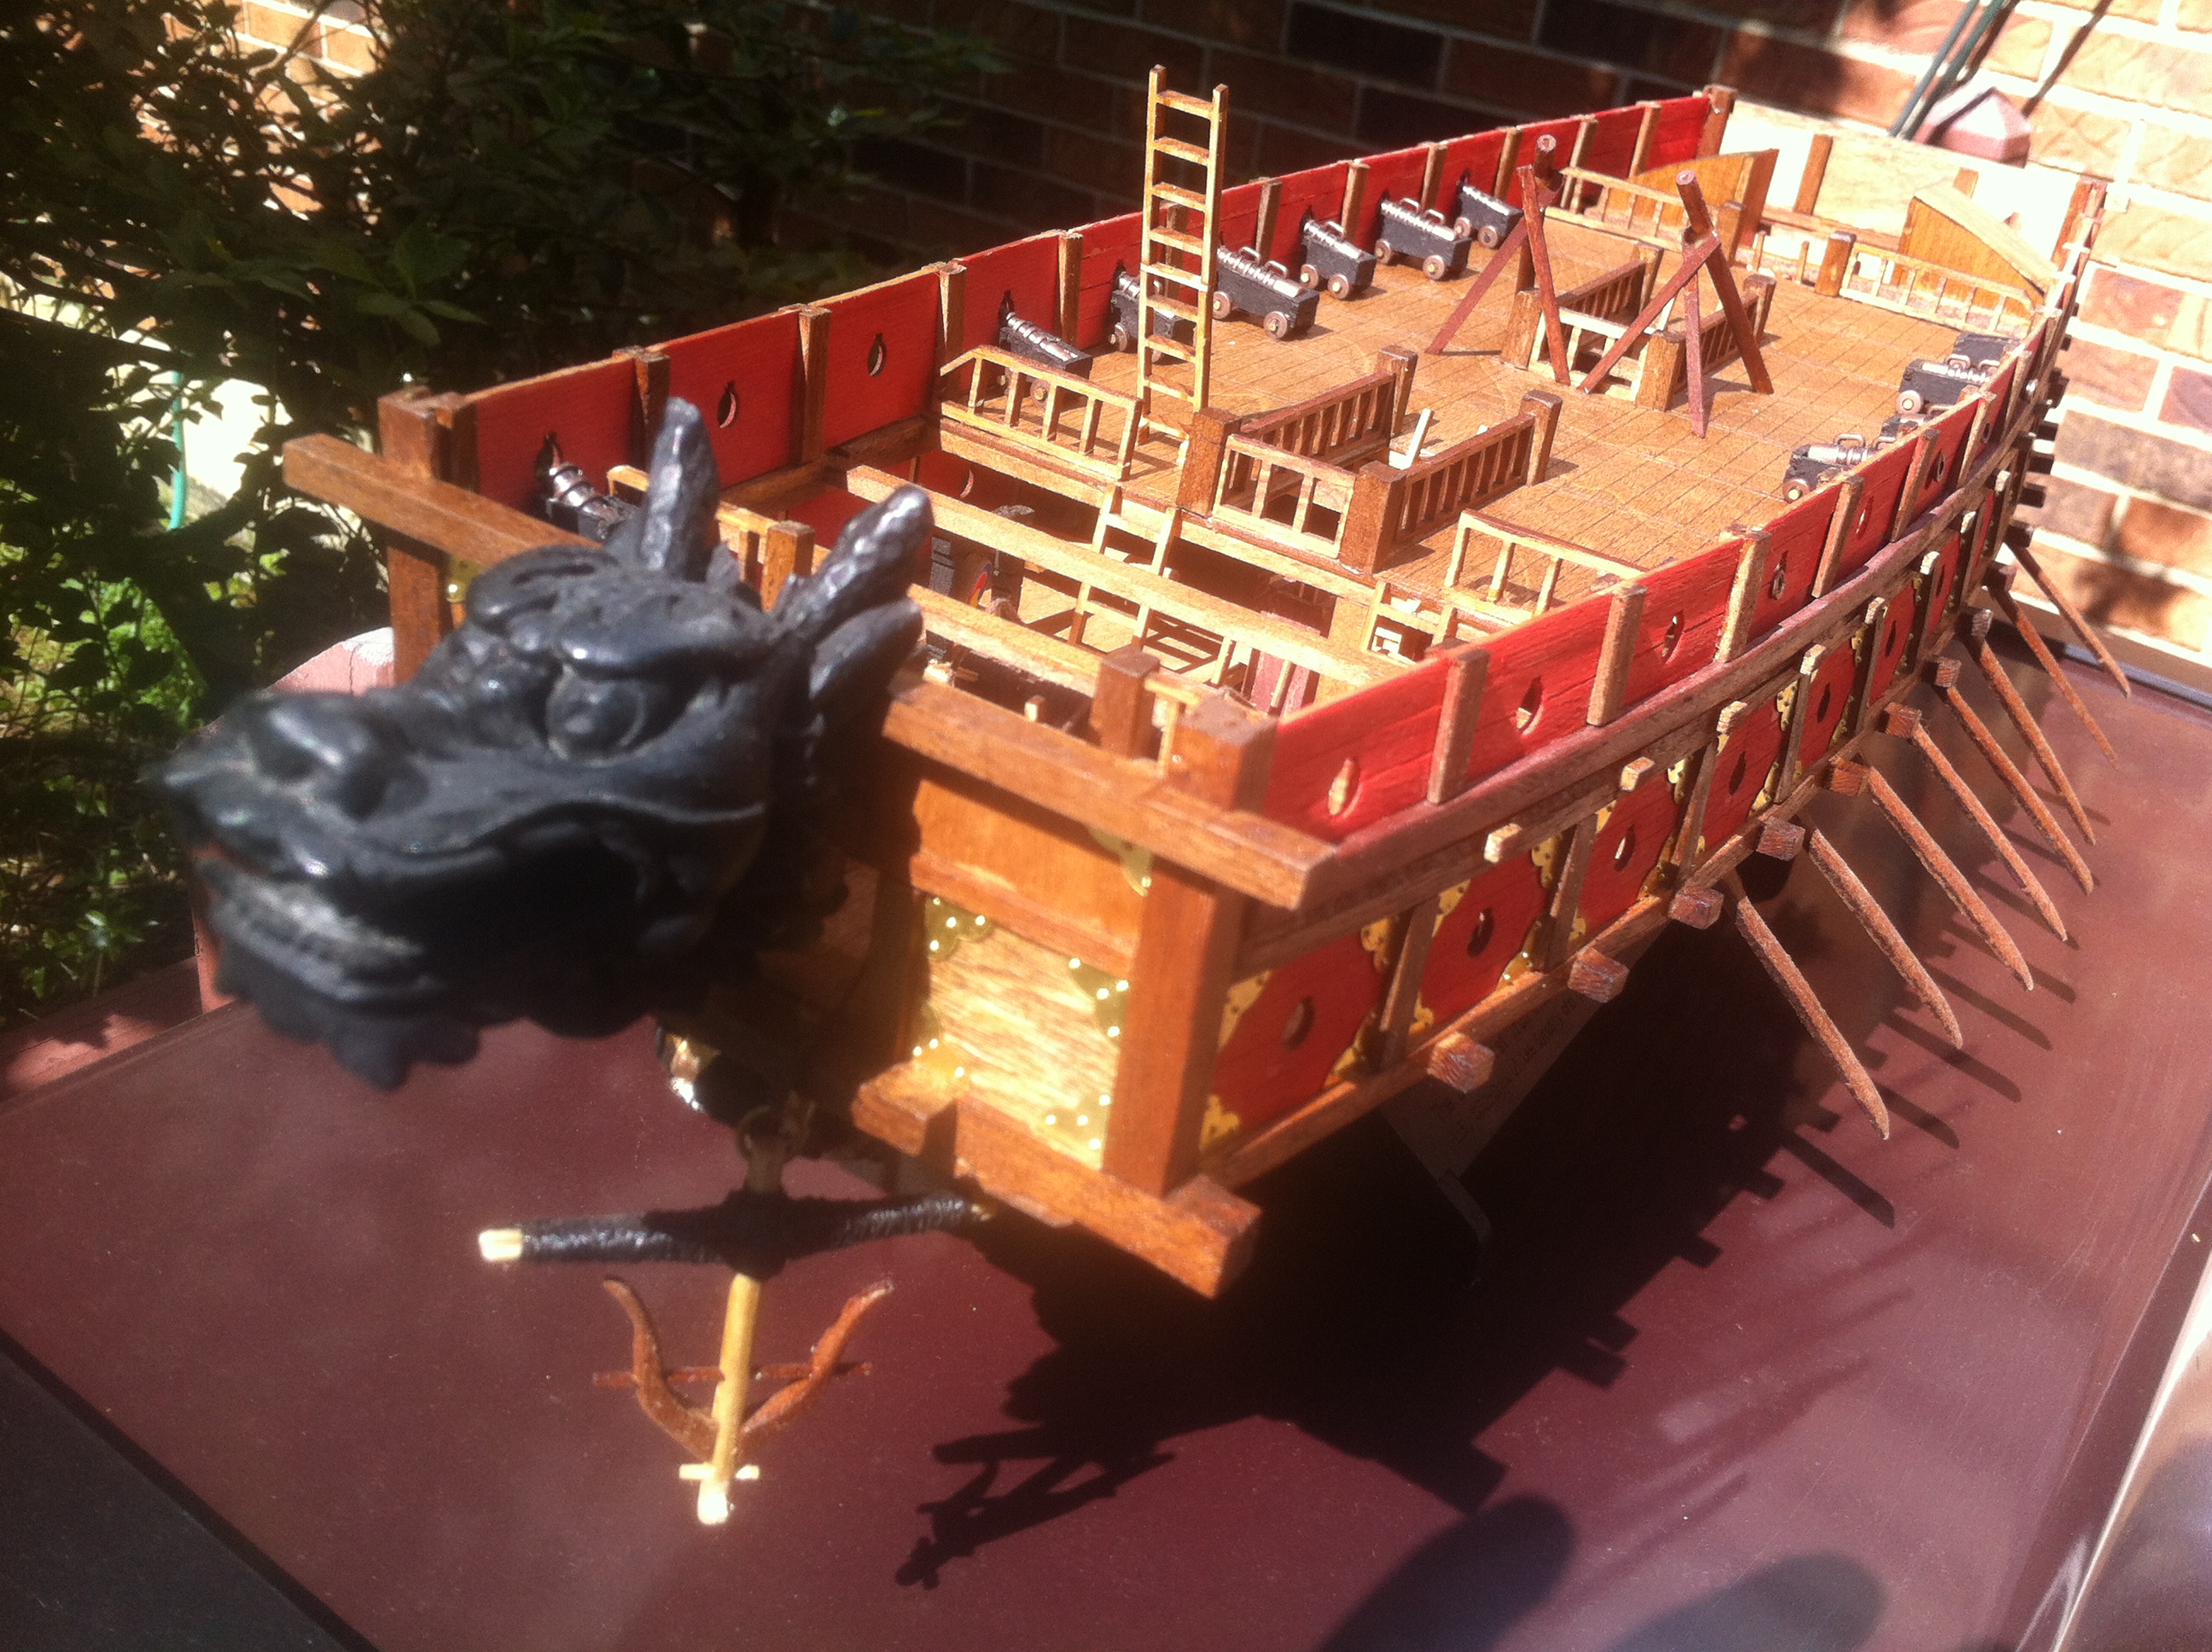
The Shipwrights of Ohio has been chartered to restore an old model of a British carrack of the 16th Century. It sports four (or five, if you count the bowsprit). The mizzenmast and bonaventure midden masts have lanteen sails. While there are Spanish carracks of similar design, they only influenced GHs construction. This model has few lines in place, has broken woodwork and is in sore need of cleaning. It is missing a few pieces that will have to be reproduced. Club members are researching, drawing rigging plans, inventorying, and cleaning. Stay tuned.

- 71 replies
-
- 4
-
-
- great harry
- henry grace a dieu
- (and 3 more)

.JPEG.dafa96df2c2b63b81843998633c3d3a6.JPEG)