king derelict
-
Posts
3,294 -
Joined
-
Last visited
4 Followers


Recent Profile Visitors
4,121 profile views


-
 AJohnson reacted to a post in a topic:
HMS Monmouth (F235) by king derelict - Trumpeter - 1/700 - PLASTIC
AJohnson reacted to a post in a topic:
HMS Monmouth (F235) by king derelict - Trumpeter - 1/700 - PLASTIC
-
Landlubber Mike reacted to a post in a topic:
HMS Monmouth (F235) by king derelict - Trumpeter - 1/700 - PLASTIC
-
Canute reacted to a post in a topic:
Anshan by mikegr - 1/700
-
Canute reacted to a post in a topic:
HMS Monmouth (F235) by king derelict - Trumpeter - 1/700 - PLASTIC
-
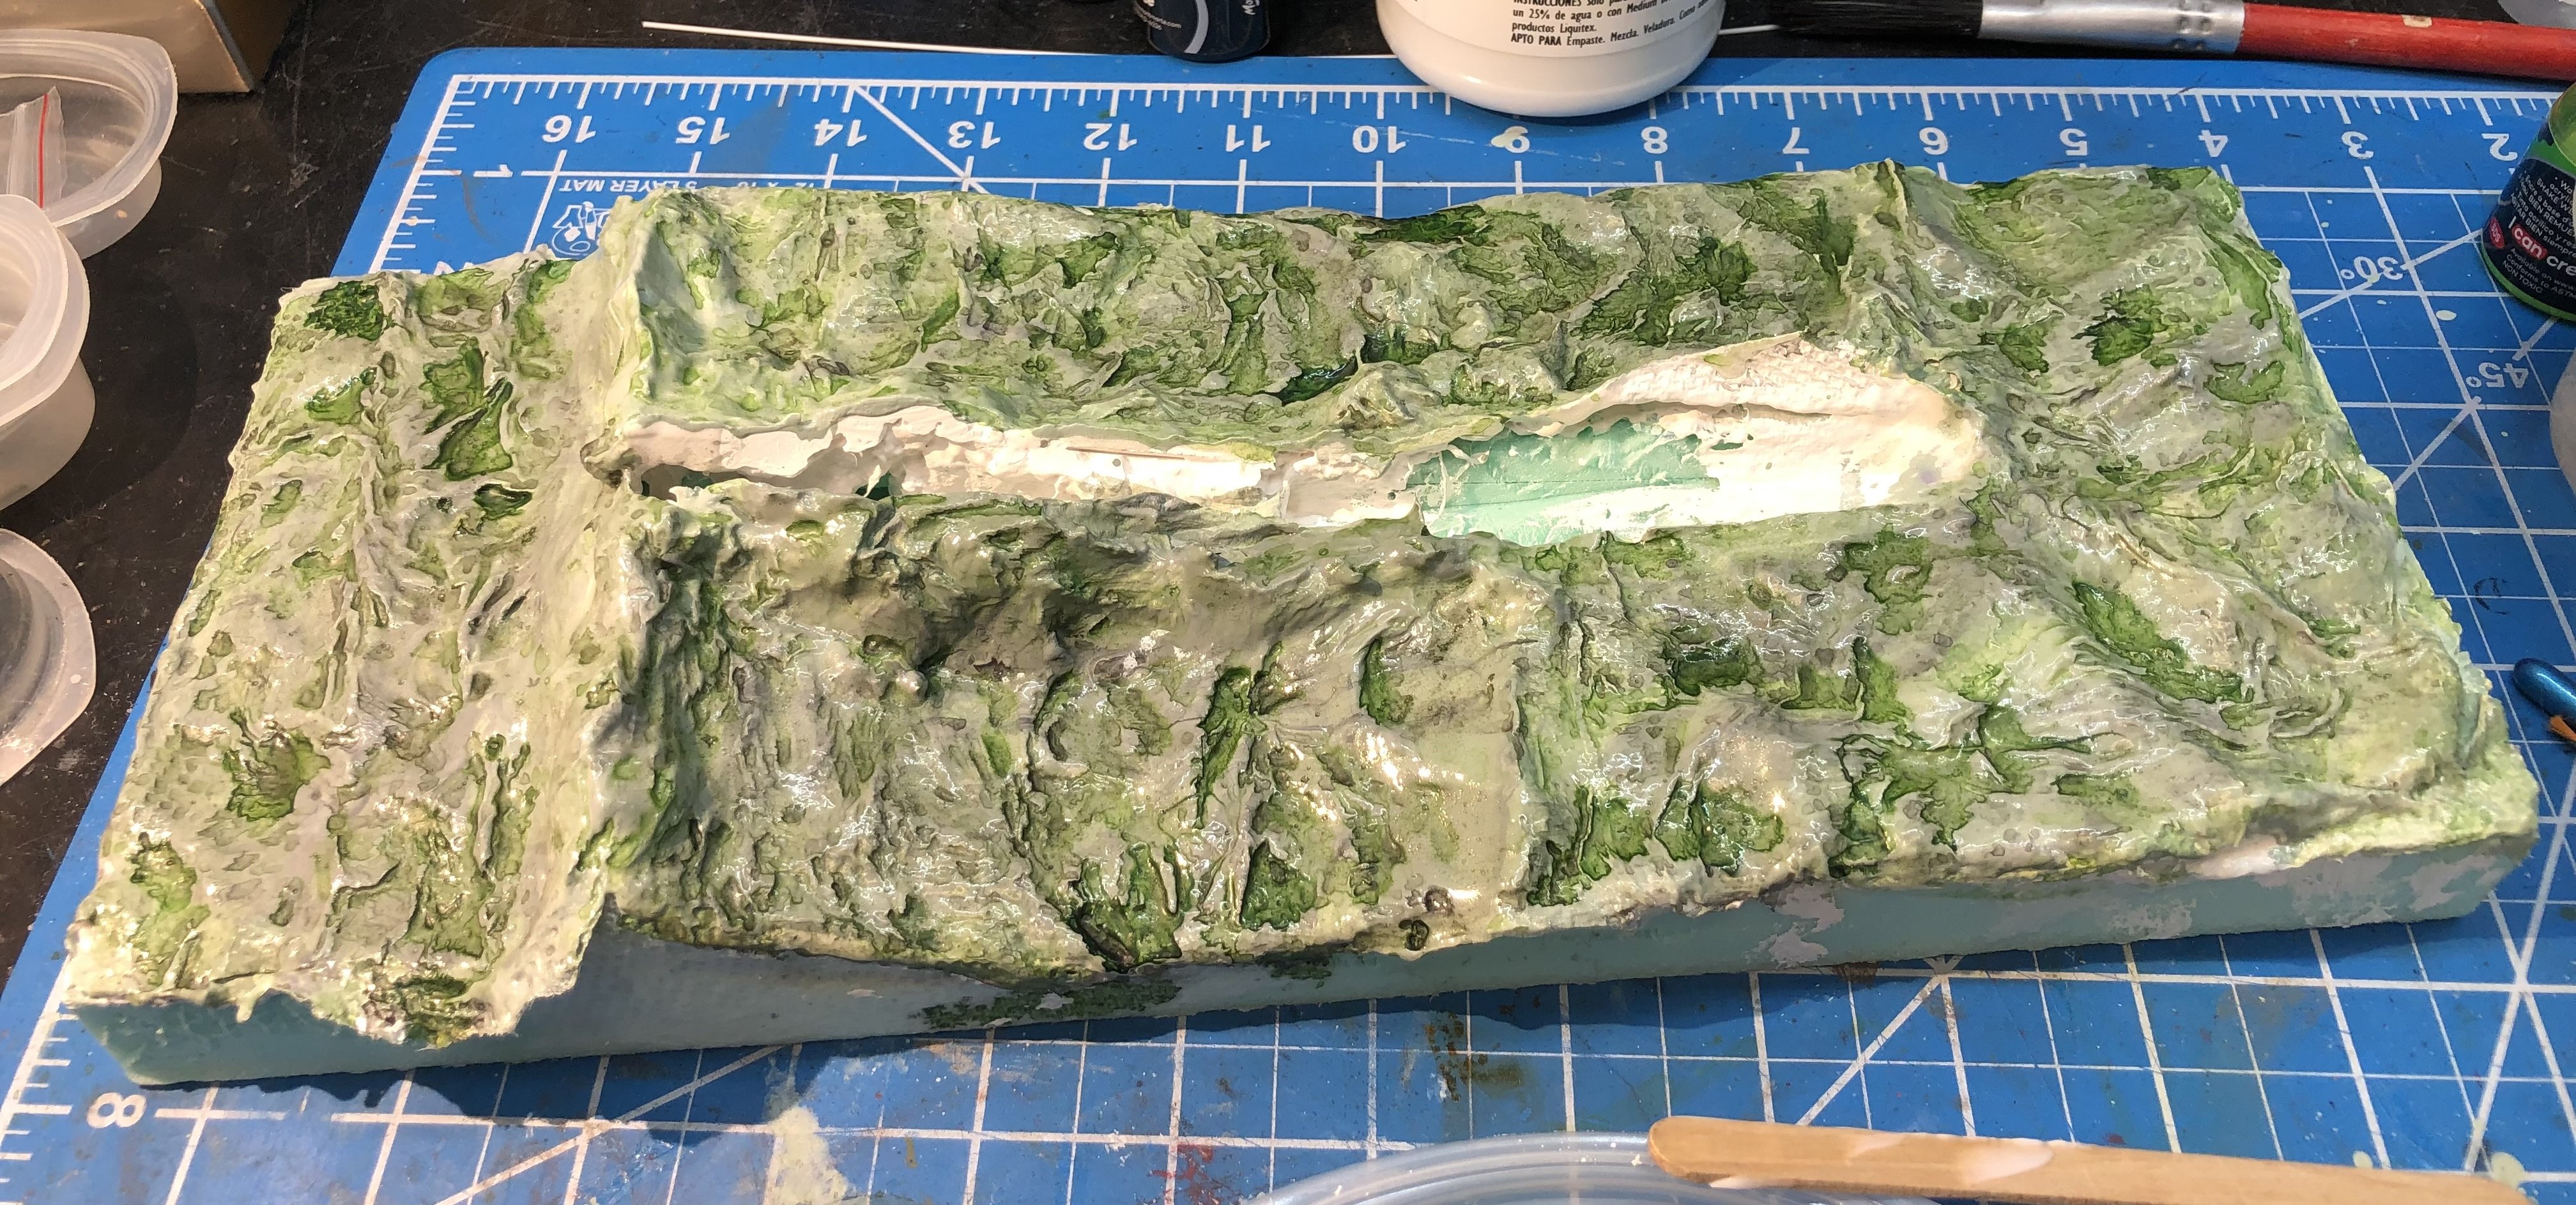
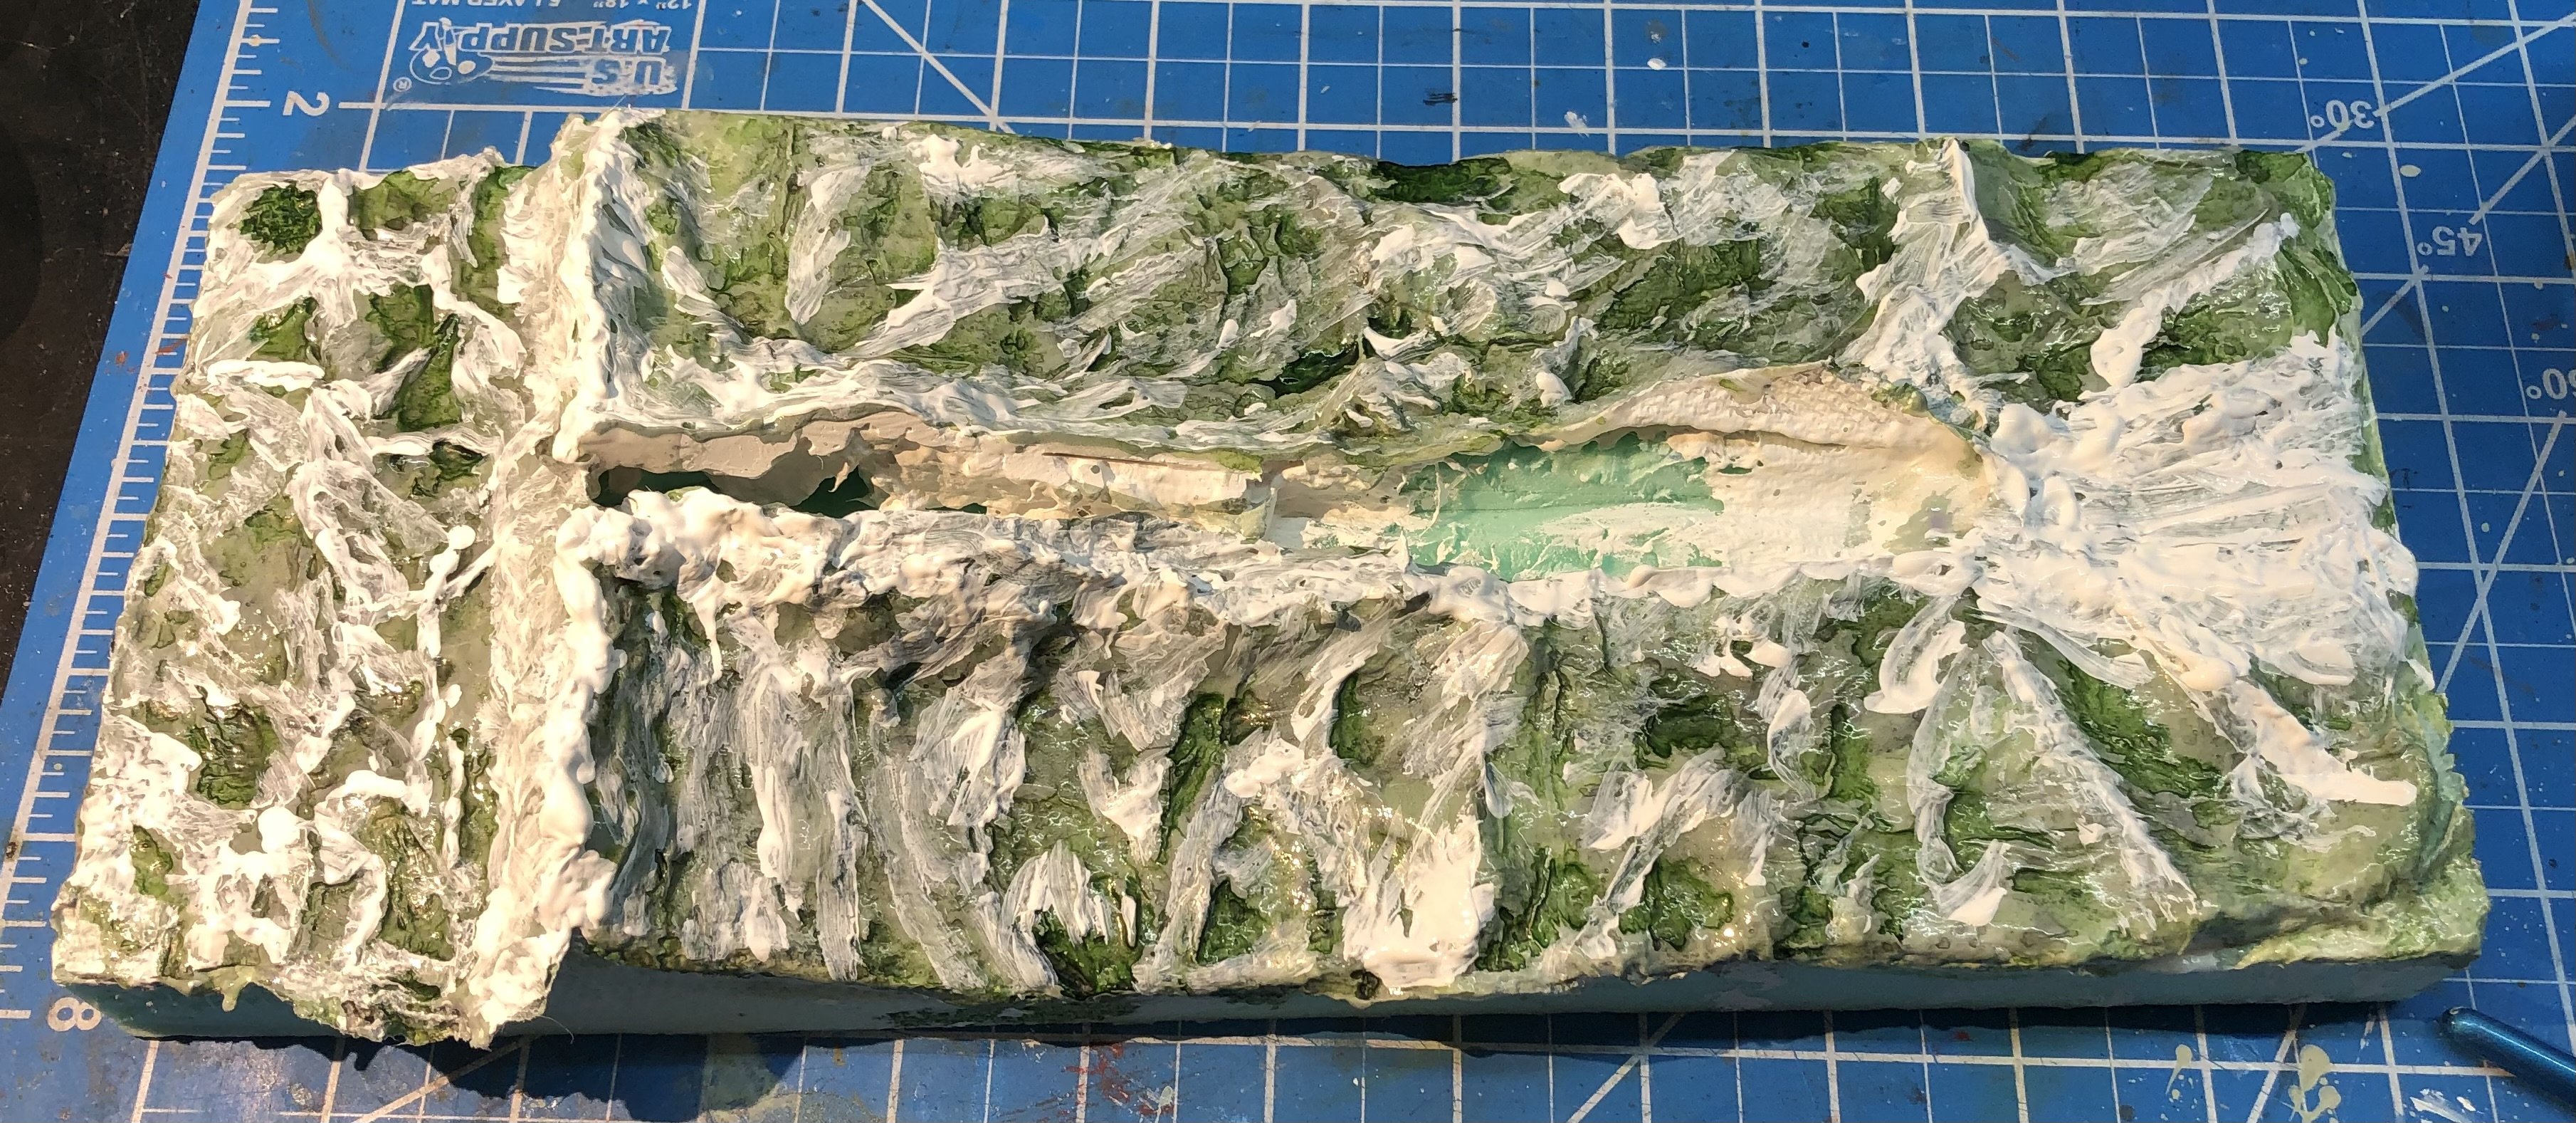
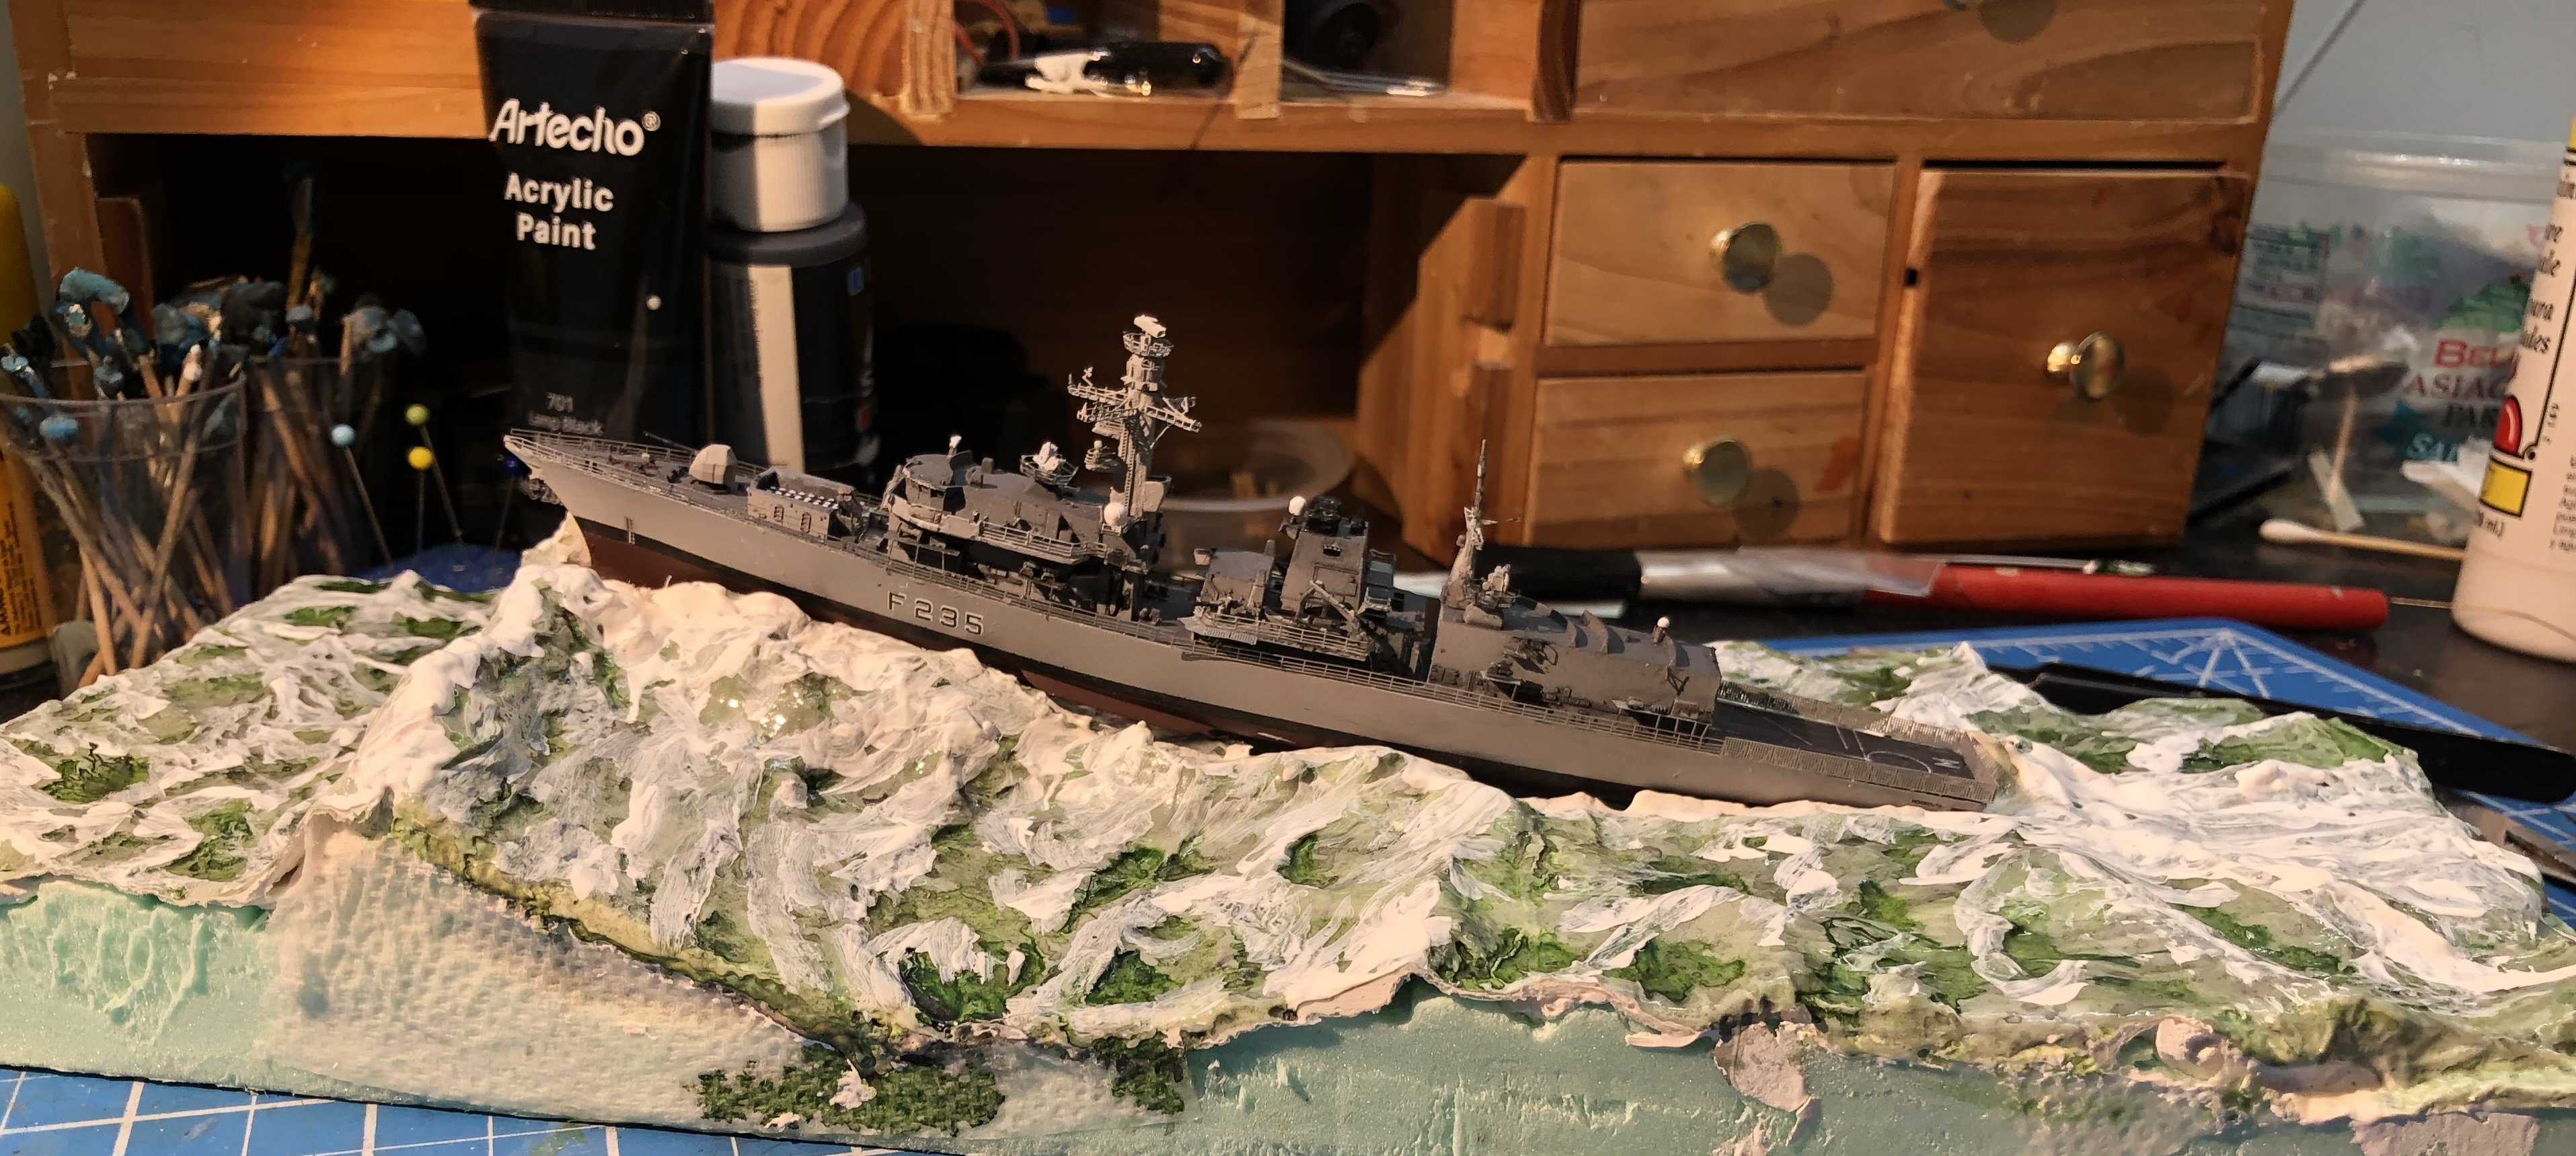
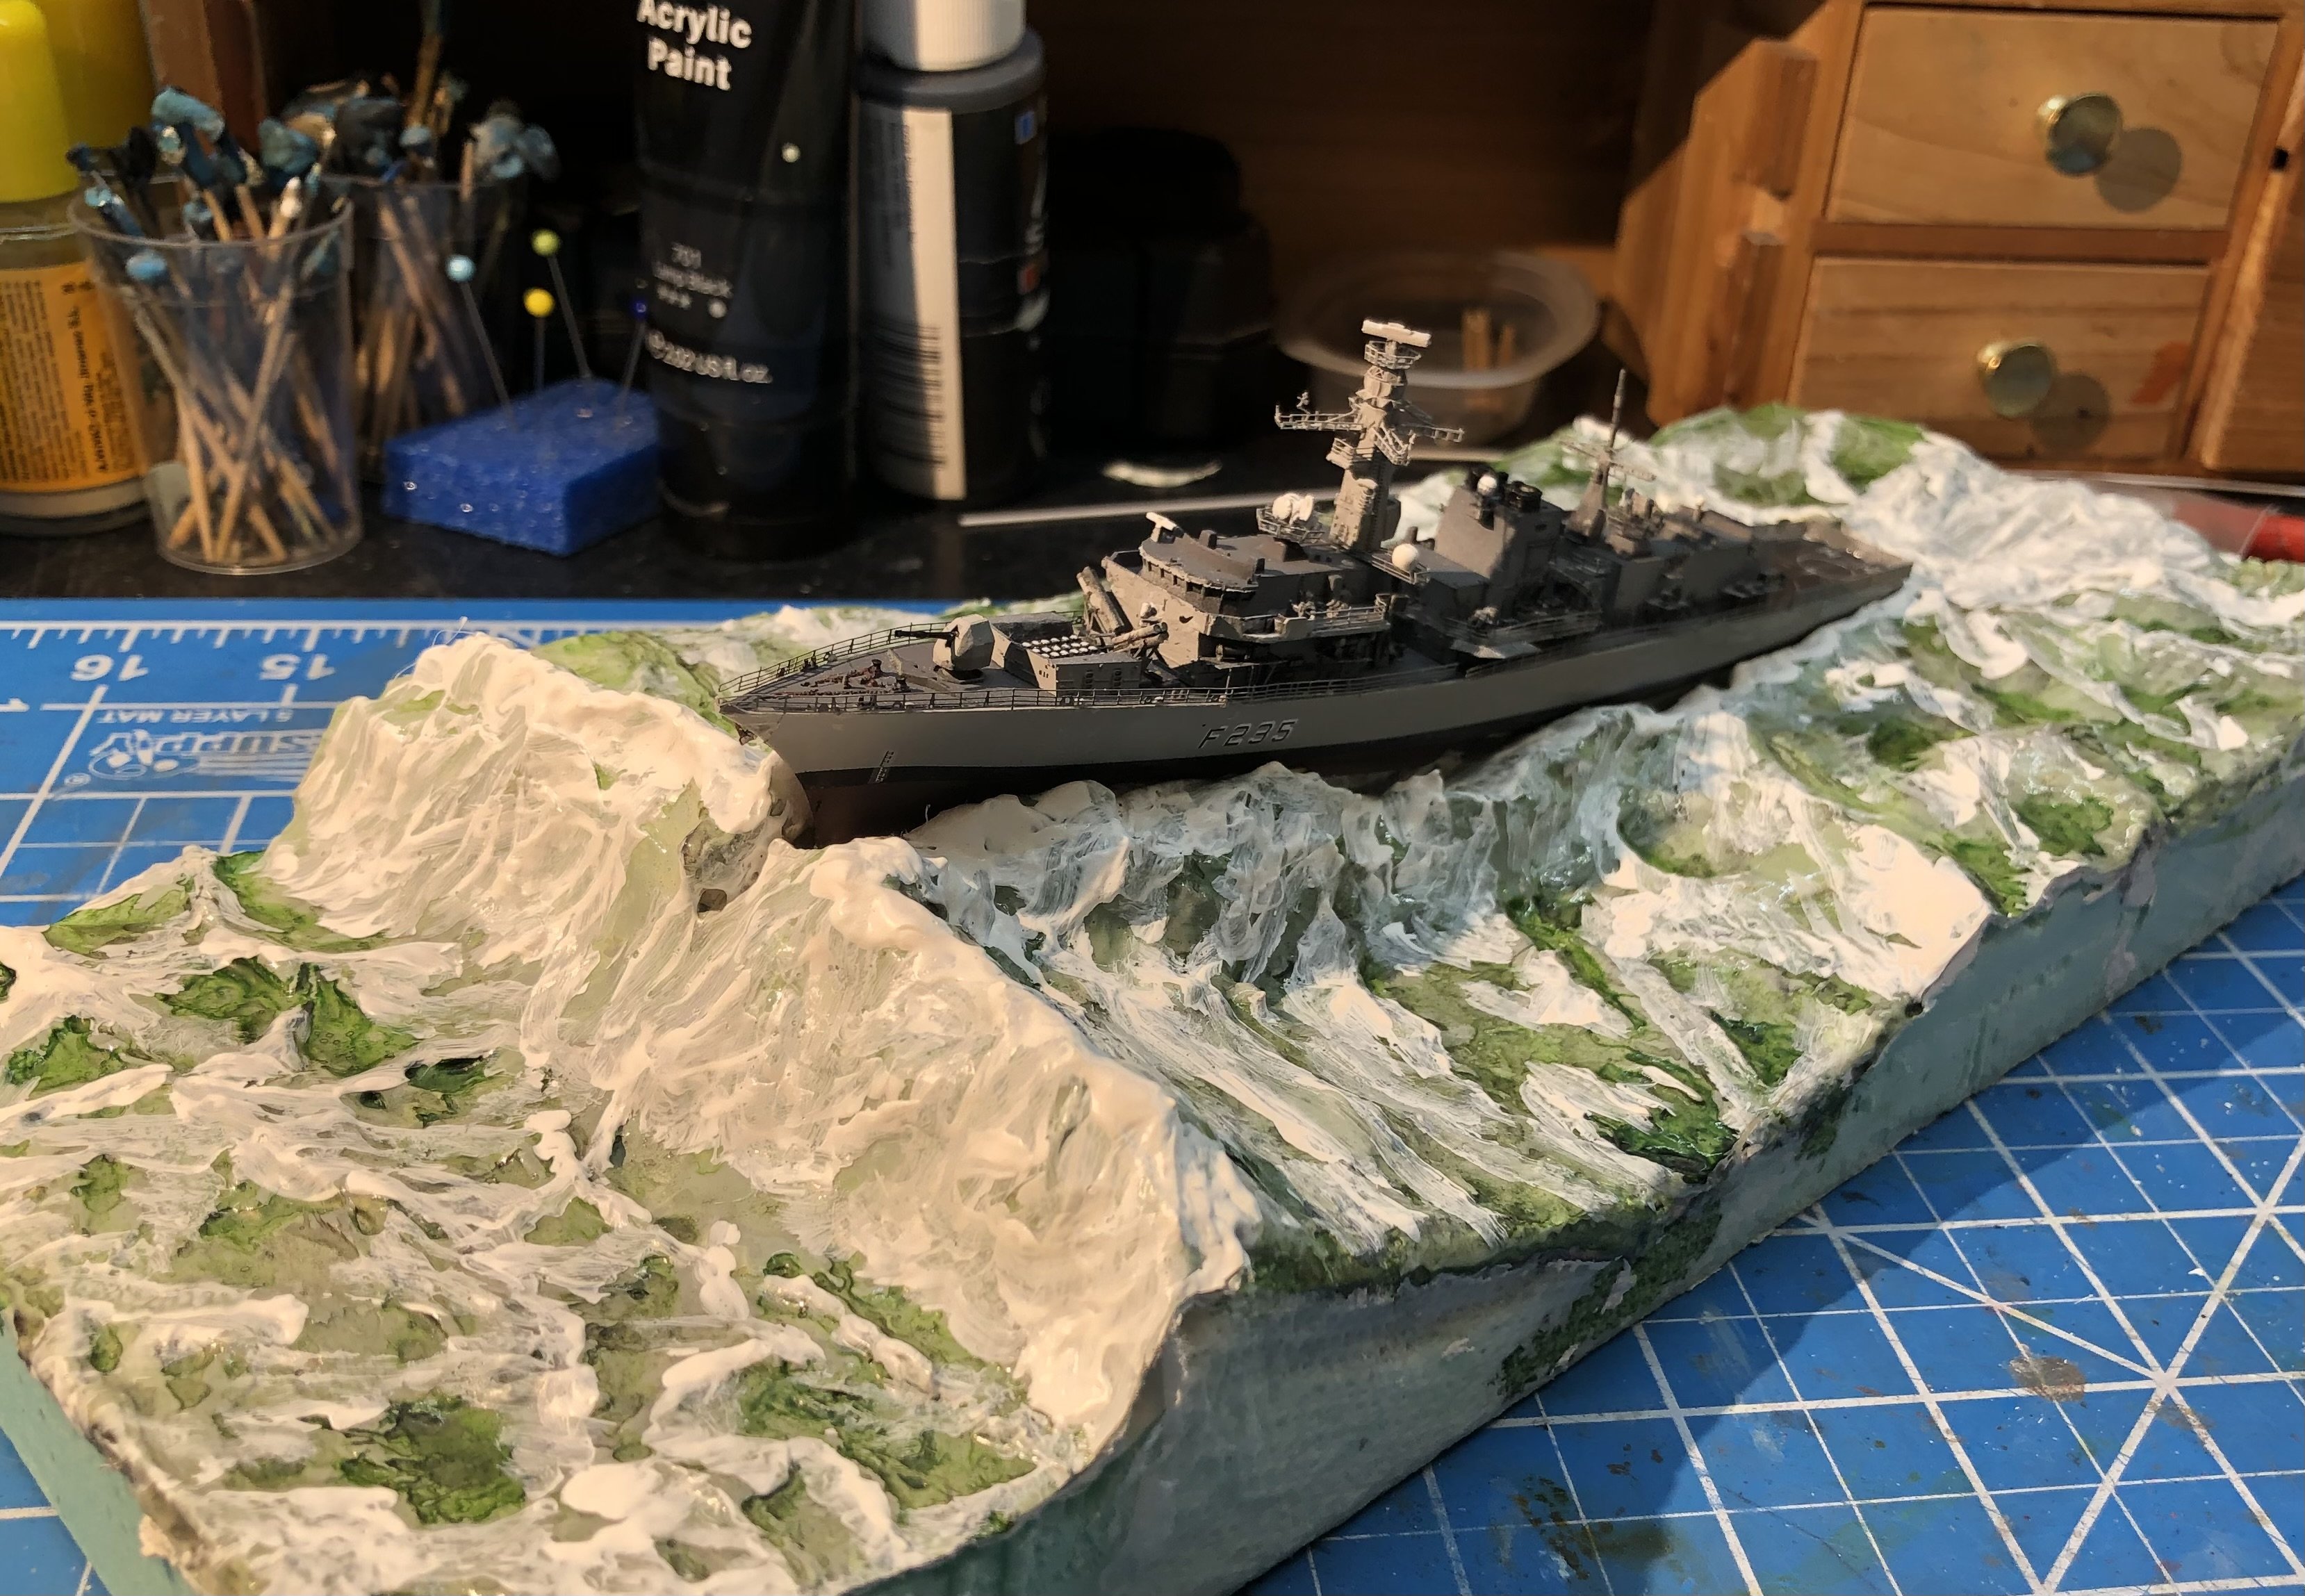
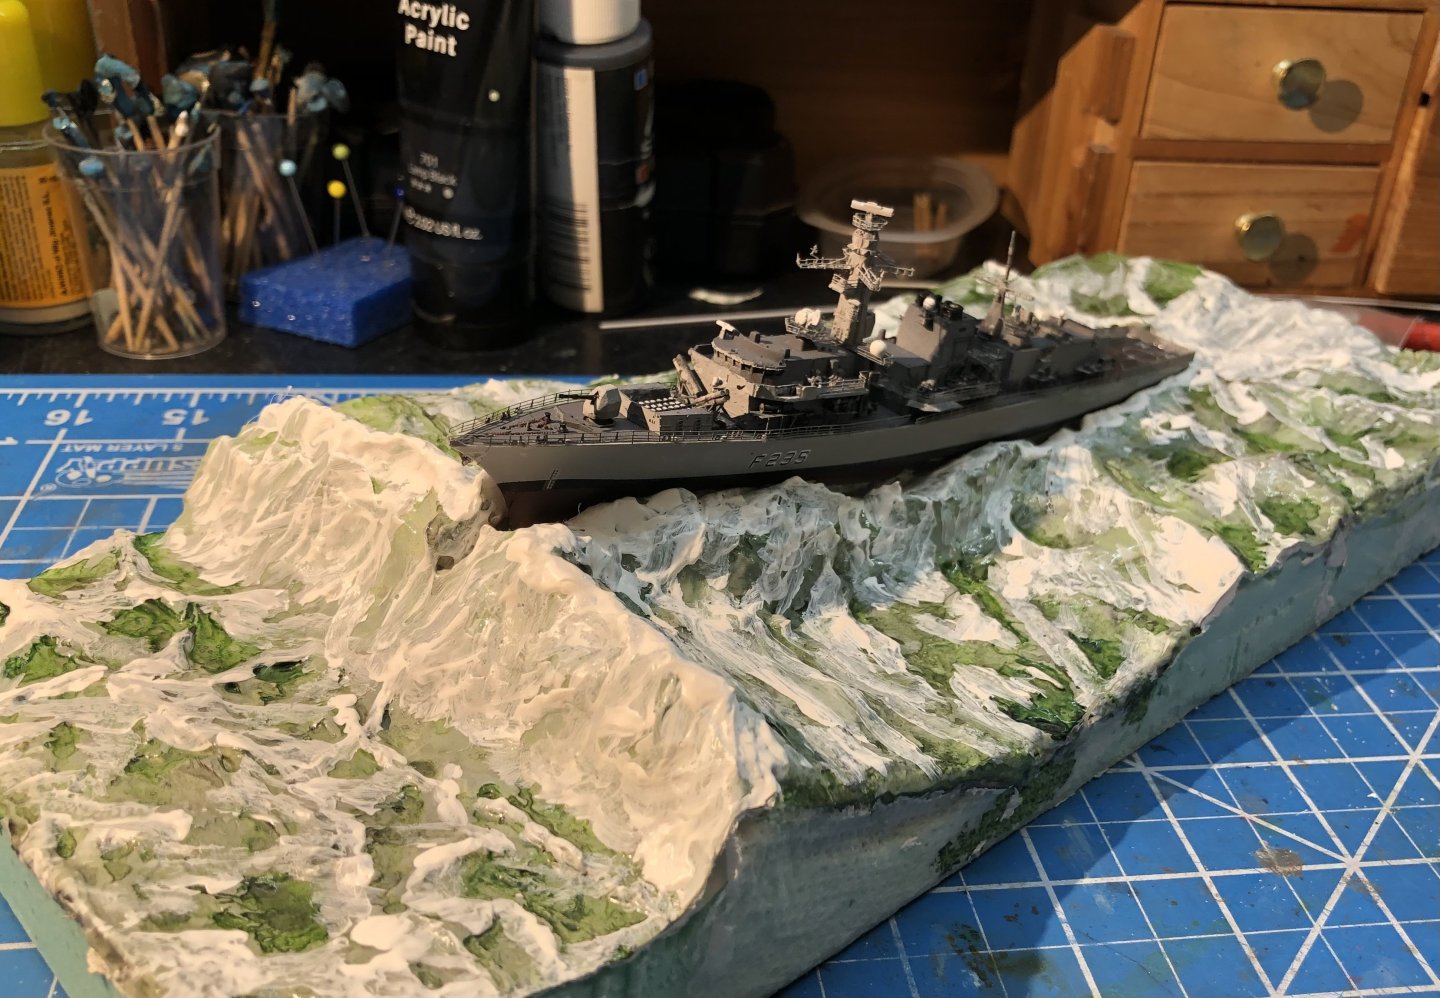
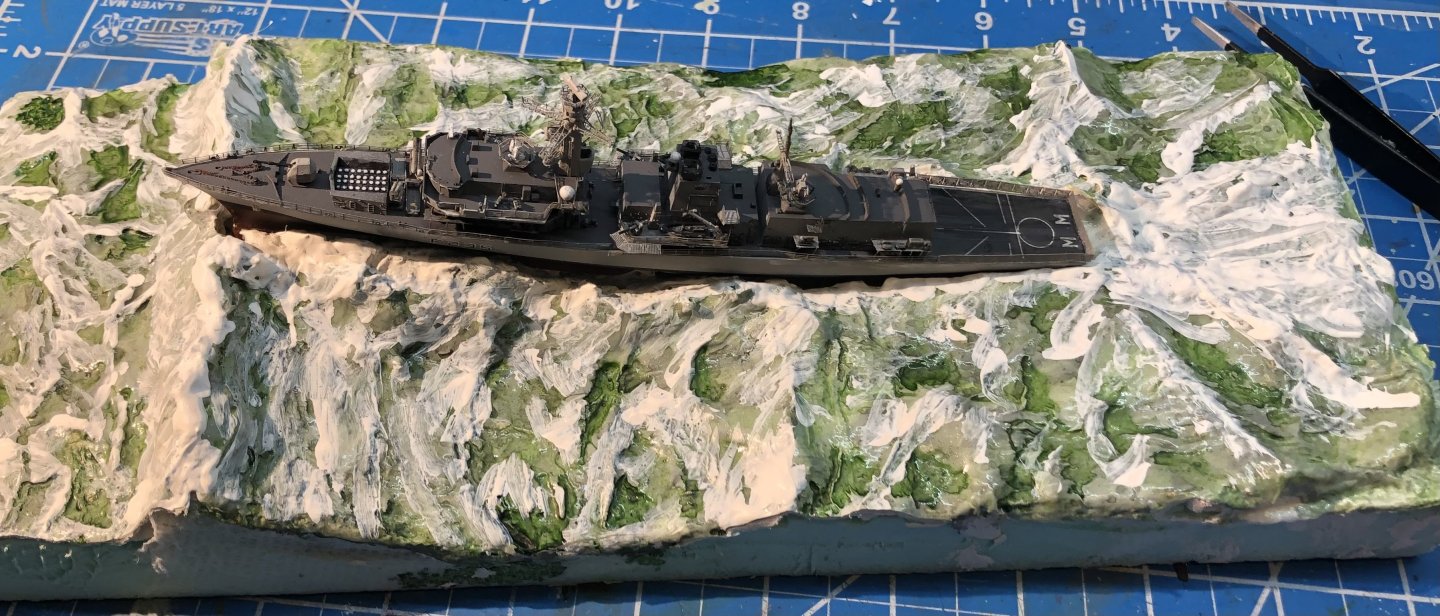
A belated happy new year to everyone. I’m finally back home and starting to pick up where I left off. i got to Amsterdam in time to get stuck there because of the big winter storm. I was there for five days with flights and rail service cancelled. Luckily I found a very nice hotel in the city centre and made the most of the time. Finally I was able to get to Berlin by train to visit old friends about to leave for Japan and then back to the UK to spend some time with my dad. I missed out on some time in Poland but managed to pick up that awful flu that is hitting Europe hard. Yesterday was the first day I felt like getting off the sofa and doing something constructive. I spent some time looking at the seascape and decided I didn’t like it, they were colours were too just a dull series of grey and not convincingly watery. I gave the whole base a wash of heavily diluted sea green acrylic ink and allowed it to puddle in the low spots. I think that’s going in the right direction but it’s a bit too green now so I added a wash of diluted black acrylic ink which toned the green down nicely. I then added a mix of Liquitex gloss medium with some acrylic white paint stirred in and started working on the wave tops and areas of foam. it’s a bit rough still but it feels like it’s got a bit of life now. I checked the fit of the hull and decided to add Monmouth to the base. It might be a bit premature but the PE on the model makes it very fragile and I think it’s safer on the base. As it was I managed to knock two pieces of the flight deck netting off My next task is to start working the teddy bear stuffing into the spray and foam but I can’t find the bag left over from the Flower corvette seascape. Hopefully progress will continue in the next few days. Alan


-
king derelict reacted to a post in a topic:
Hawker Hurricane Mk IIc by Javlin - Fly Models - 1/32 - PLASTIC
-
king derelict reacted to a post in a topic:
Hawker Hurricane Mk IIc by Javlin - Fly Models - 1/32 - PLASTIC
-
 king derelict reacted to a post in a topic:
HMS Monmouth (F235) by king derelict - Trumpeter - 1/700 - PLASTIC
king derelict reacted to a post in a topic:
HMS Monmouth (F235) by king derelict - Trumpeter - 1/700 - PLASTIC
-
king derelict reacted to a post in a topic:
HMS Monmouth (F235) by king derelict - Trumpeter - 1/700 - PLASTIC
-
king derelict reacted to a post in a topic:
HMS Monmouth (F235) by king derelict - Trumpeter - 1/700 - PLASTIC
-
king derelict reacted to a post in a topic:
Bentley Blower by RGL - Airfix - 1/12 - PLASTIC
-
 king derelict reacted to a post in a topic:
1955 Chevy Convertible Indy 500 pace Car by CDW - Revell - 1:25 Scale - PLASTIC
king derelict reacted to a post in a topic:
1955 Chevy Convertible Indy 500 pace Car by CDW - Revell - 1:25 Scale - PLASTIC
-
king derelict reacted to a post in a topic:
1955 Chevy Convertible Indy 500 pace Car by CDW - Revell - 1:25 Scale - PLASTIC
-
king derelict reacted to a post in a topic:
1955 Chevy Convertible Indy 500 pace Car by CDW - Revell - 1:25 Scale - PLASTIC
-
mikegr reacted to a post in a topic:
Anshan by mikegr - 1/700
-
king derelict reacted to a post in a topic:
Starcraft Adjutant AI by yvesvidal - 1/6 - RESIN/PLASTIC
-
Very nice PE work Mike. It’s building up to a nice looking ship Alan
-
Old Collingwood reacted to a post in a topic:
Starcraft Adjutant AI by yvesvidal - 1/6 - RESIN/PLASTIC
-
Jack12477 reacted to a post in a topic:
Starcraft Adjutant AI by yvesvidal - 1/6 - RESIN/PLASTIC
-
Canute reacted to a post in a topic:
Starcraft Adjutant AI by yvesvidal - 1/6 - RESIN/PLASTIC
-
yvesvidal reacted to a post in a topic:
Starcraft Adjutant AI by yvesvidal - 1/6 - RESIN/PLASTIC
-
Amazing work Yves. You are showing the way to the new frontiers of the hobby in great style. Congratulations alan
-
thibaultron reacted to a post in a topic:
Rebuilding the fleet by mikegr - 1/700 - restoring old plastic models
-
Lovely guns Mike. I like your seascape a lot too. I am getting keen to getting back to mine alan
-
Wow Mike, that’s going to be interesting. My eyes ache looking at the instructions. But I’m sure you will do a great job alan
-
Thank you very much Dan. Amsterdam was very enjoyable and pretty with the light covering of snow. I was lucky to find a very nice hotel not far from Centraal station and close to the maritime museum which was very interesting. I am a bit of a disappointment, I prefer the maritime museum over the Van Gogh museum. The delay meant I missed my visits to Warsaw and Krakow. The good news was I arrived in Berlin in time to say goodbye to my friends who are moving to Japan in three weeks time. And in the uk my dad seems much better than I hoped alan
-
The train was two minutes late getting into Berlin and very comfortable. I was amazed at the chaos in Amsterdam, Paris and Brussels considering that the snowfall was moderate and the temperatures not far from freezing. Lack of deicer was mentioned. Berlin was seriously cold but the public transport worked and my first flight to Manchester was bang on time. Then I had the next flight from Frankfurt cancelled, eventually reaching Manchester at midnight and my cousins at 3am. I picked up the rental car and due to a car crash on the motorway I took six hours for a two hour journey. Feeling seriously victimized at this point but the great news was finding my dad much better than I expected. He’s trotting around the house with his stick and doing very well. Just got to keep him away from high shelves. Dan, sorry for hijacking the thread alan
-
Another beautiful car Rob despite the setbacks you did a great job. Congratulations alan
-
And most of my cold weather gear was in my bag that KLM has mislaid. Primark men’s floor on Damrak was full of similar folk fighting over the last medium and large clothing sizes in the store 😃
-
Sorry to see disaster strike with such a beautiful model nearly finished. Congratulations on already working the recovery. Alan
-
Absolutely beautiful Bulldog Dan. The finish is immaculate and realistic too. Great work. after five days stuck in Amsterdam because of the snow, flights cancelled at Schiphol and NS trains cancelled for days Im finally on my way to Berlin where the weather is also due to deteriorate. I got to know Amsterdam a bit better though alan
-
Hi Mike The tweezers look pretty good. They are nice and thin at the tips so easy to slide under delicate PE. Nicely made I look forward to trying them. I bought some nice looking fine point tweezers off eBay a while back but they turned out to be some off brand instead of the brand name in the description. They are okay but the points are very thick and clumsy so they don’t get used a lot. Happy New Year alan
- 40 replies
-
- 3
-
-
-
- Five Star
- Akitsu Maru
- (and 1 more)
-
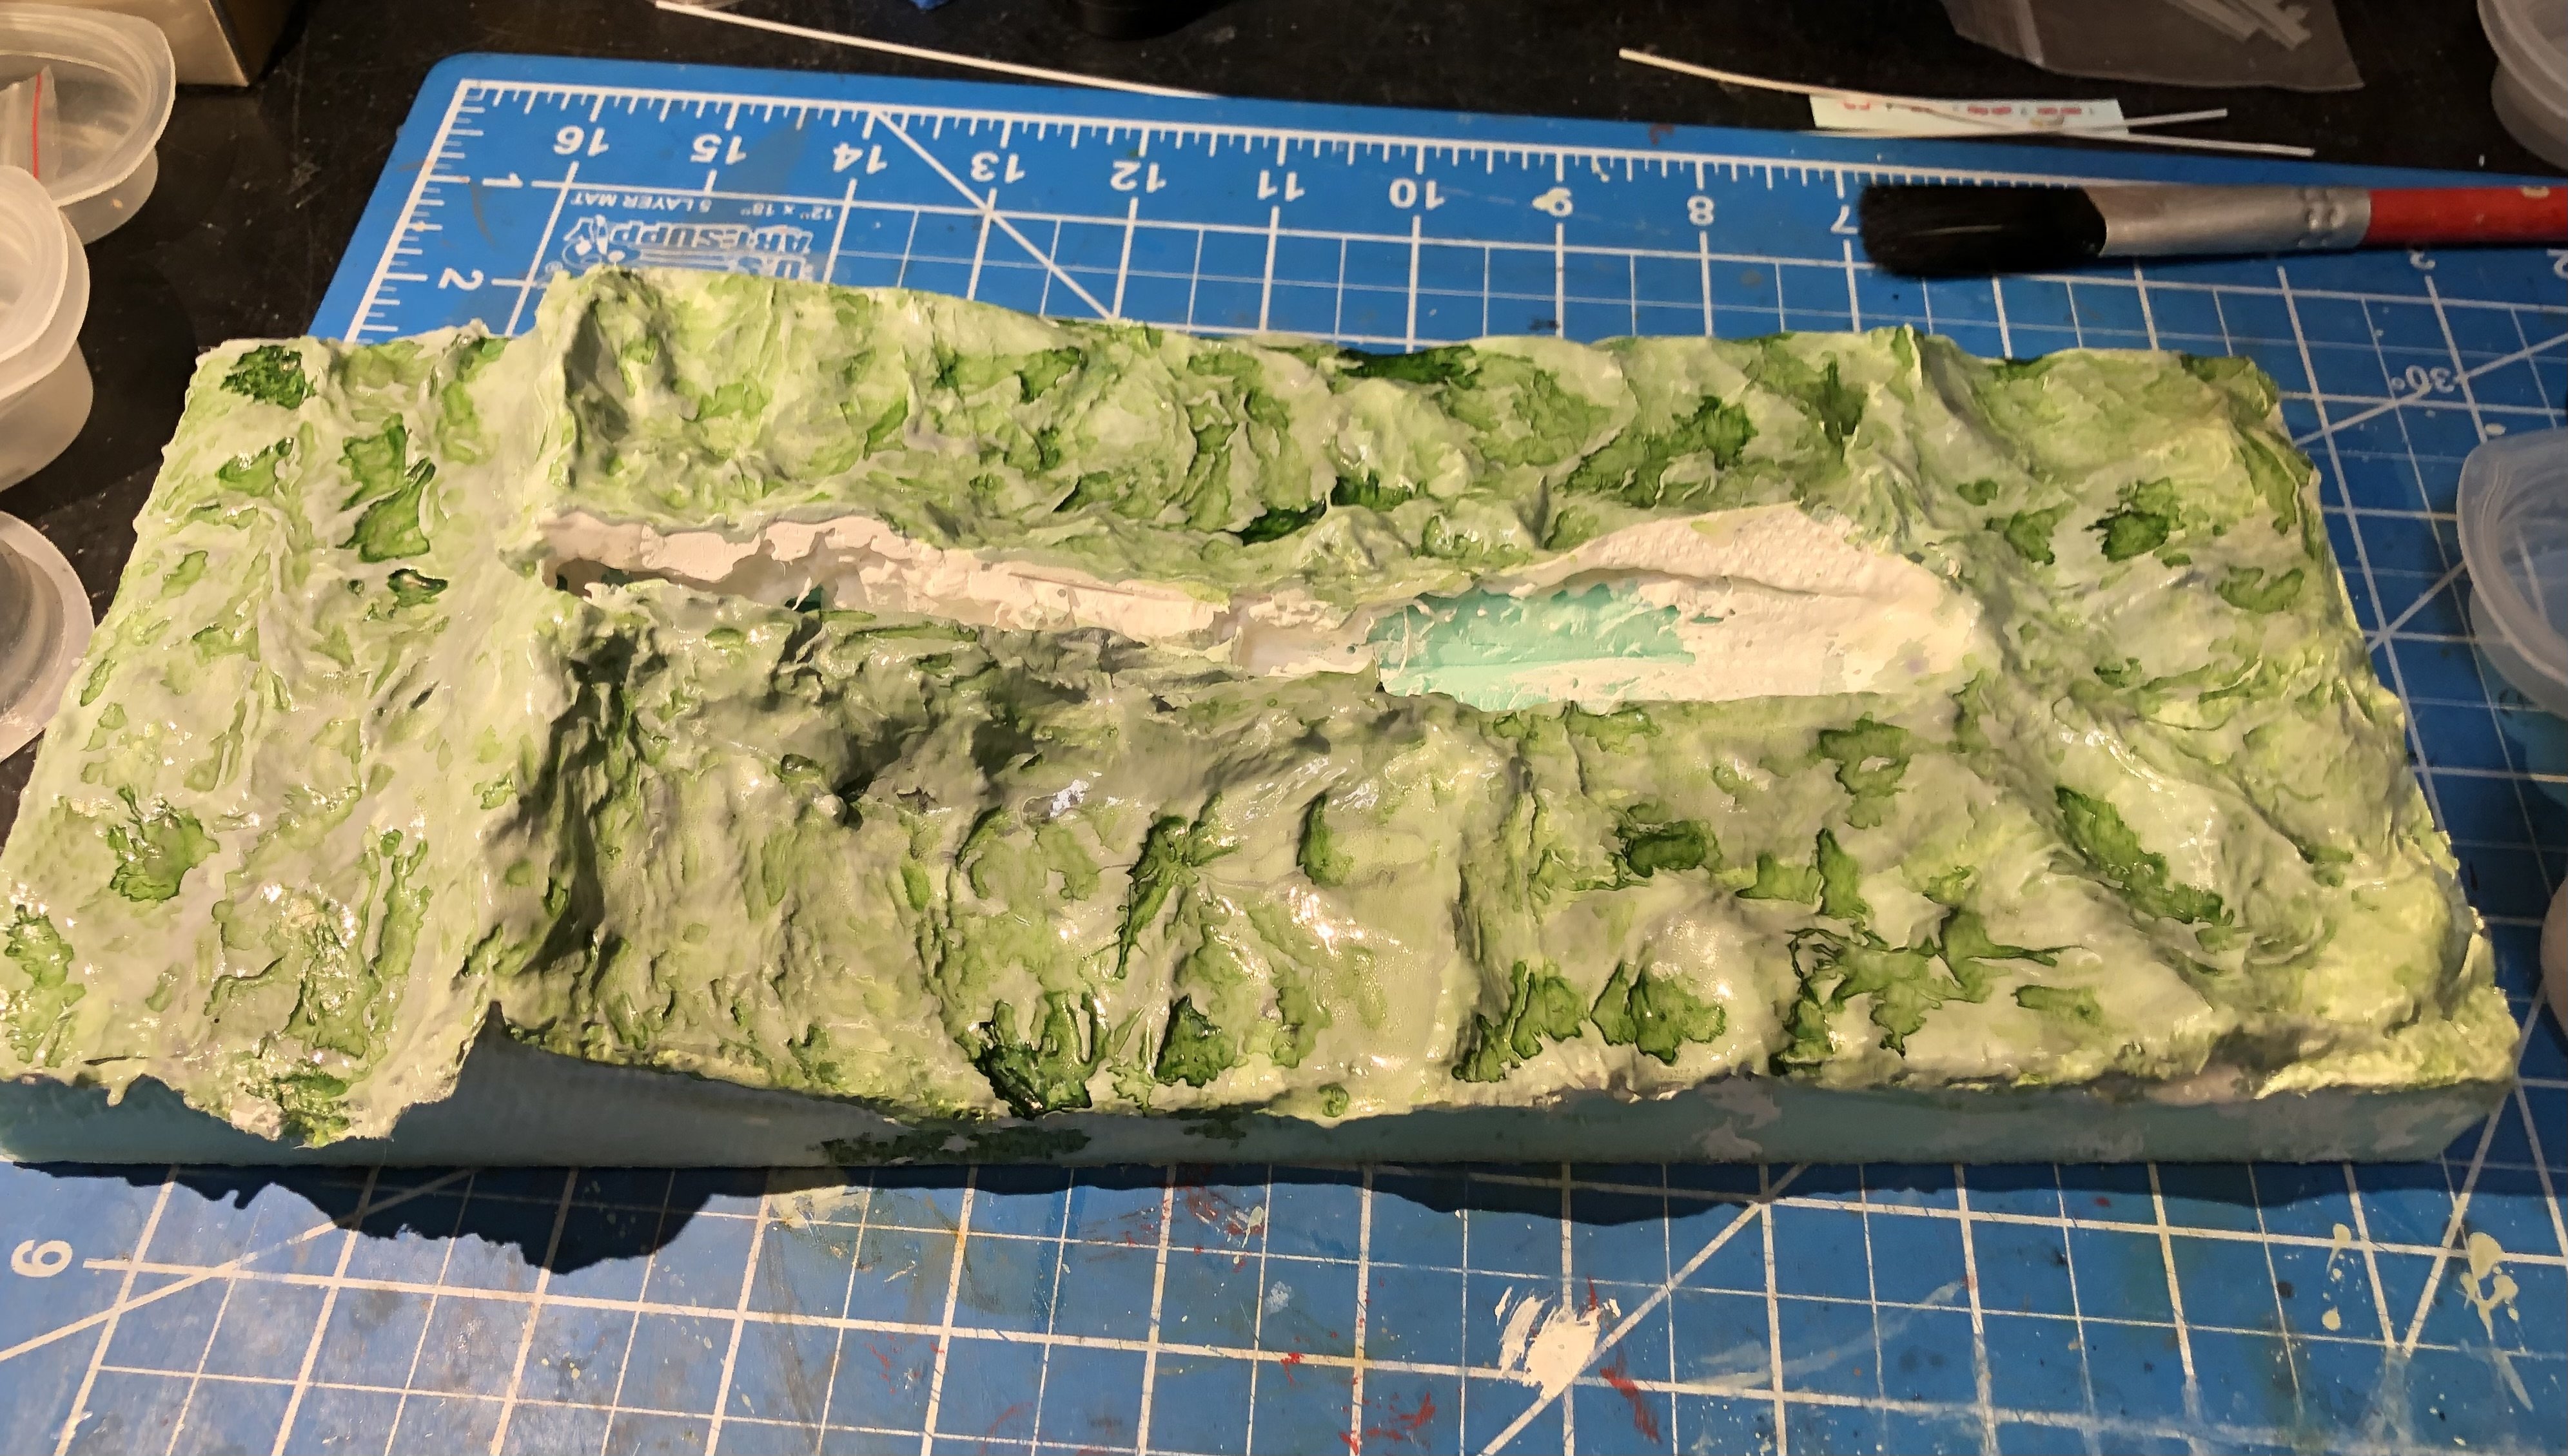
I seem to have been very slothful during the Christmas period with not much getting done on Monmouth. I added a slightly darker wash in the shadows of the waves and painted a coat of gloss medium over the whole thing. I’m still undecided about the overall color being too light and I thought the gloss might help me decide. I’m tempted to start adding the wave crests and foam and see how it shapes up. I’ve been looking for the bag of teddy bear stuffing that I used for my Flower corvette but I can’t find it anywhere so Ive ordered more. I’m writing this sitting in Atlanta airport waiting for the flight to Manchester. I will be in Europe for three weeks so no progress until later in January. Happy New Year all alan
-
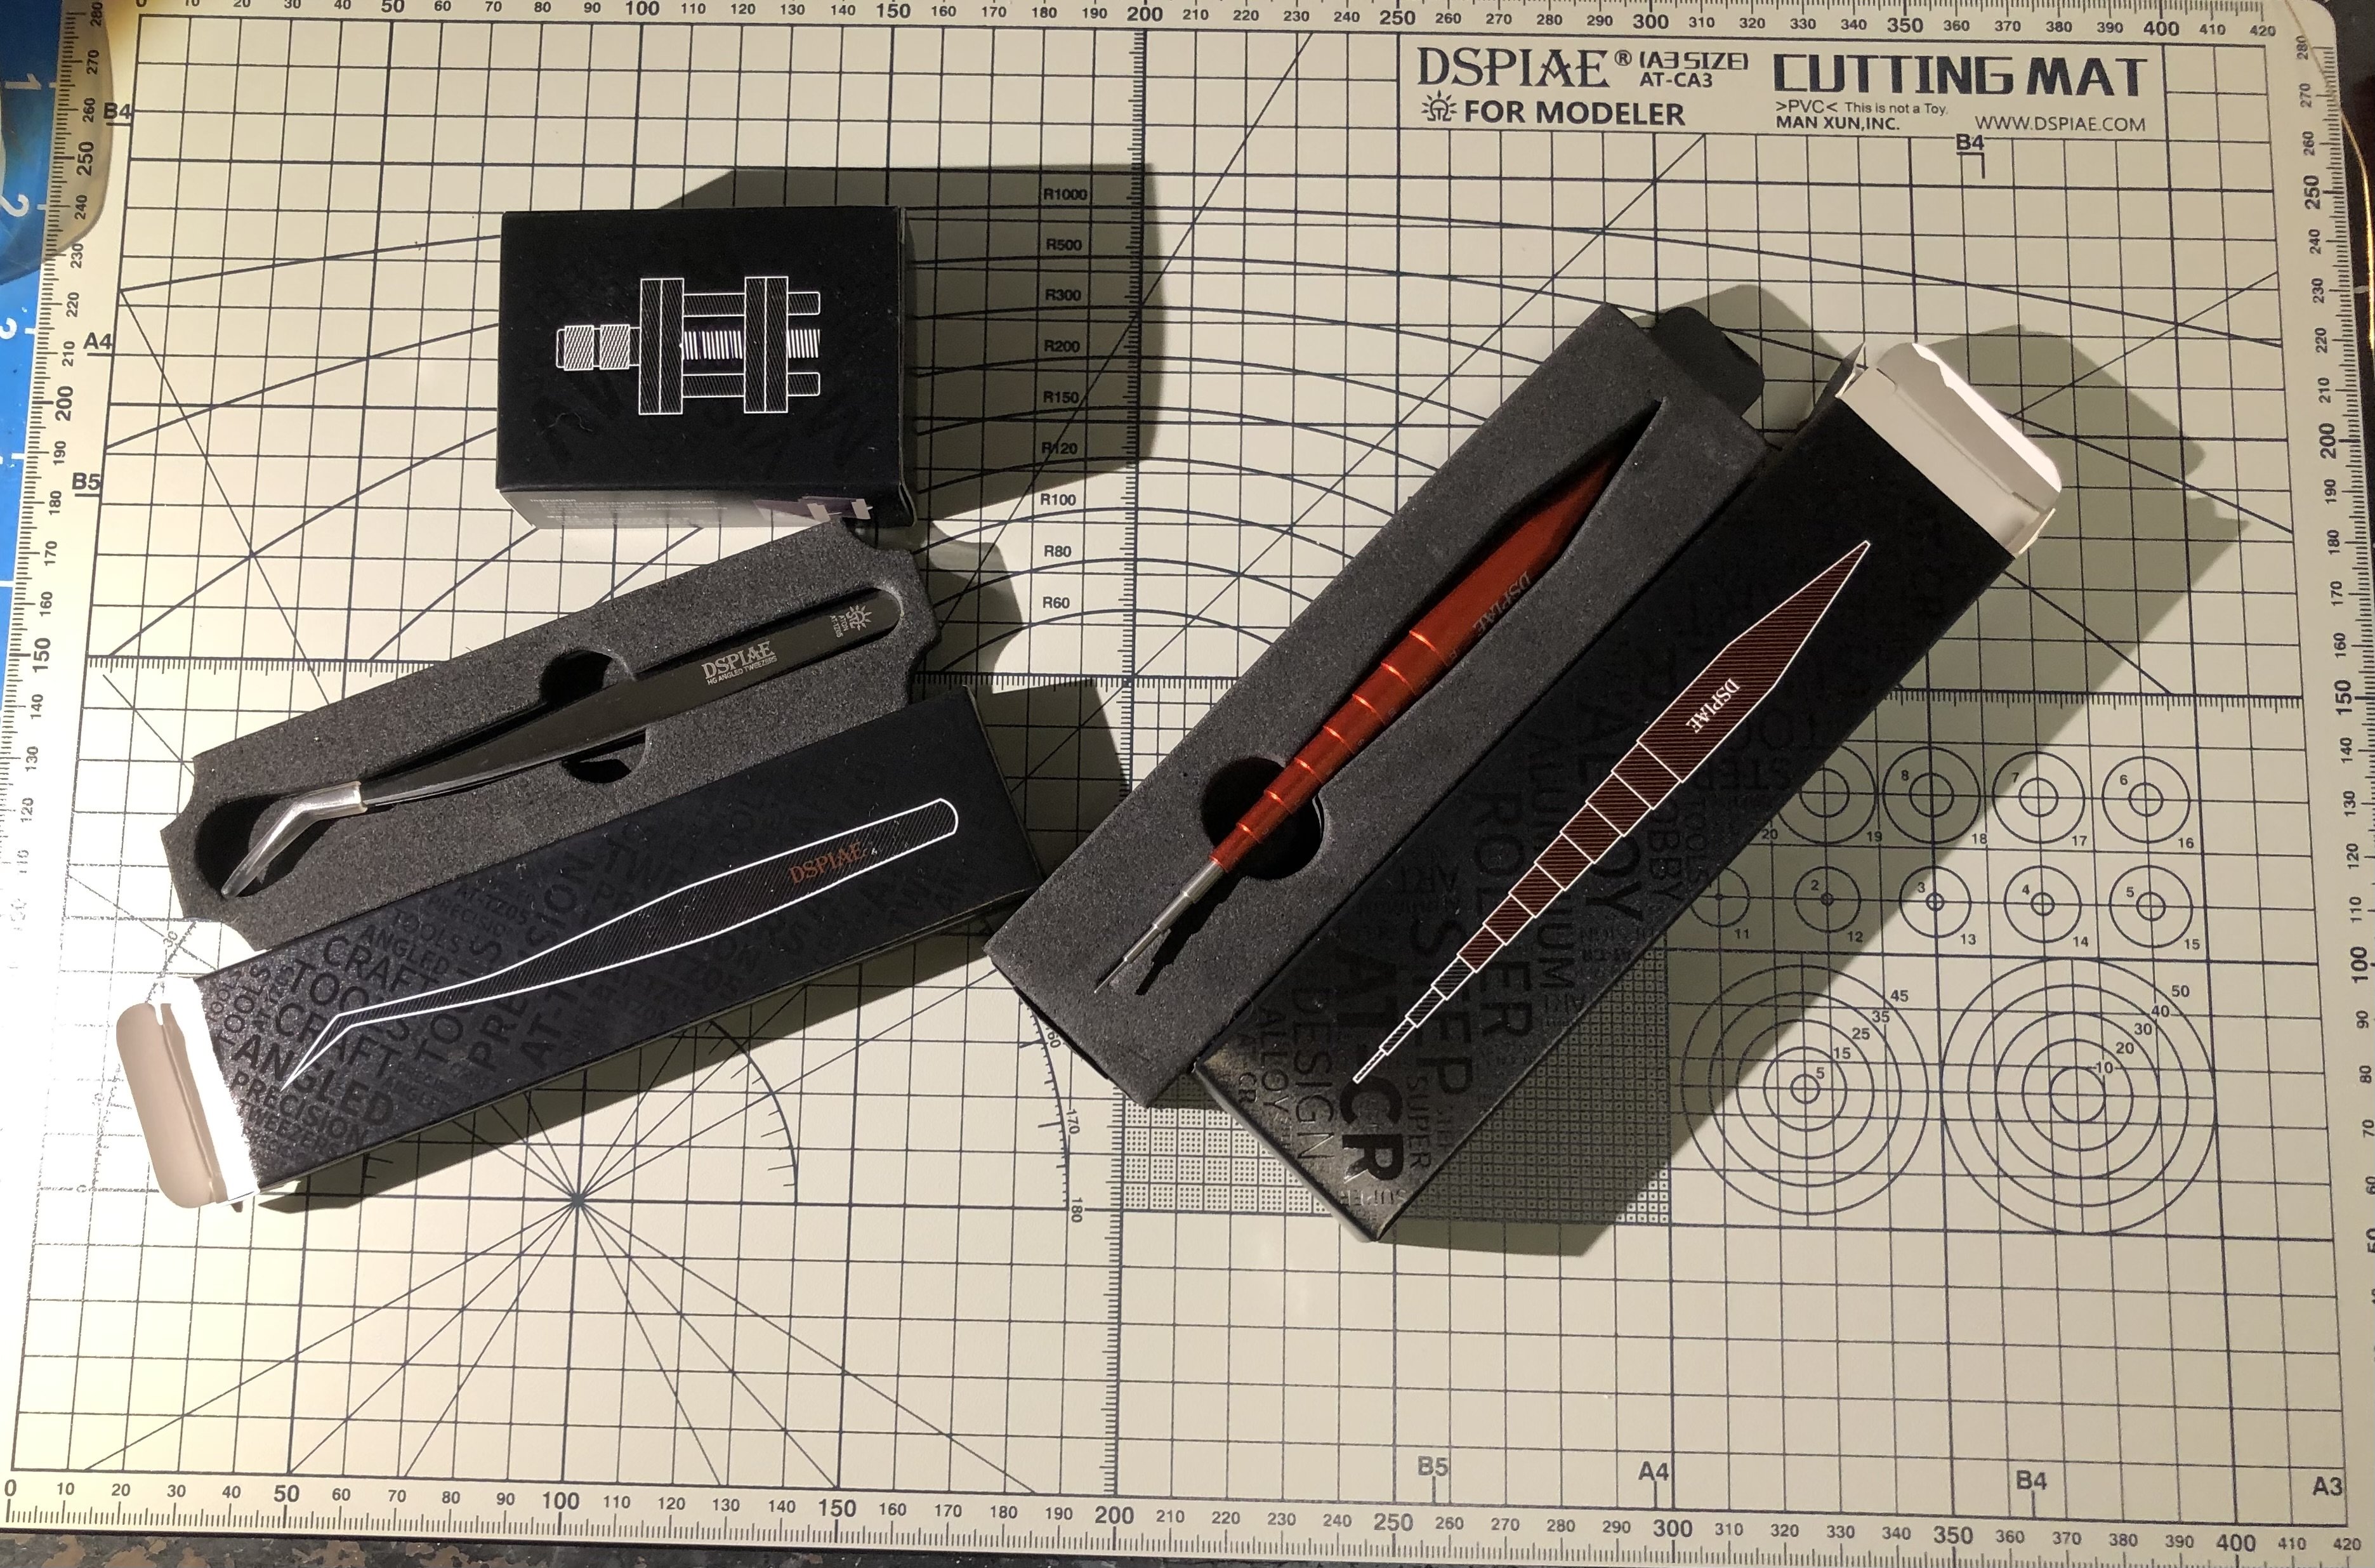
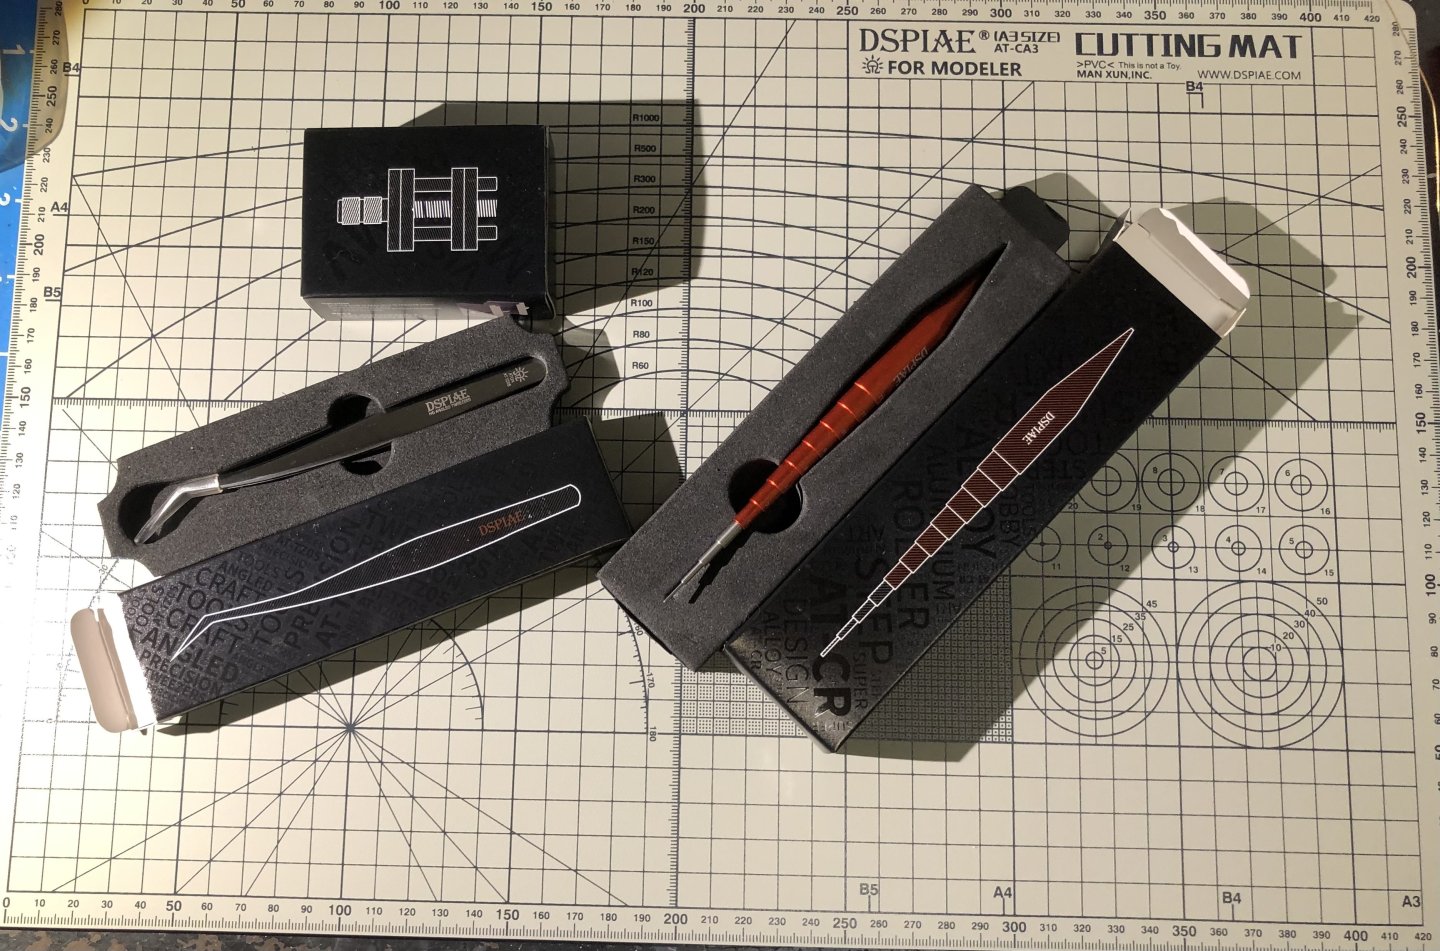
Oh with all this flat rate shipping stuff I had to make it worthwhile. So a few more DSPIAE bits join the tool chest. New cutting mat, angled tweezers and rolling tool along with the Vice which is very nice, another one may go on the new year shopping list. I’m impressed with the quality of the tools, they look like they will last. Happy Christmas alan
- 40 replies
-
- 2
-
-
- Five Star
- Akitsu Maru
- (and 1 more)
-
Thanks Andrew, I’m beginning to think that I might have bitten off more than I can chew but it will be interesting. Happy Christmas and a joyous New Year alan