HOLIDAY DONATION DRIVE - SUPPORT MSW - DO YOUR PART TO KEEP THIS GREAT FORUM GOING! (Only 24 donations so far out of 49,000 members - C'mon guys!)
×


BobF
-
Posts
175 -
Joined
-
Last visited
Content Type
Profiles
Forums
Gallery
Events
Everything posted by BobF
-
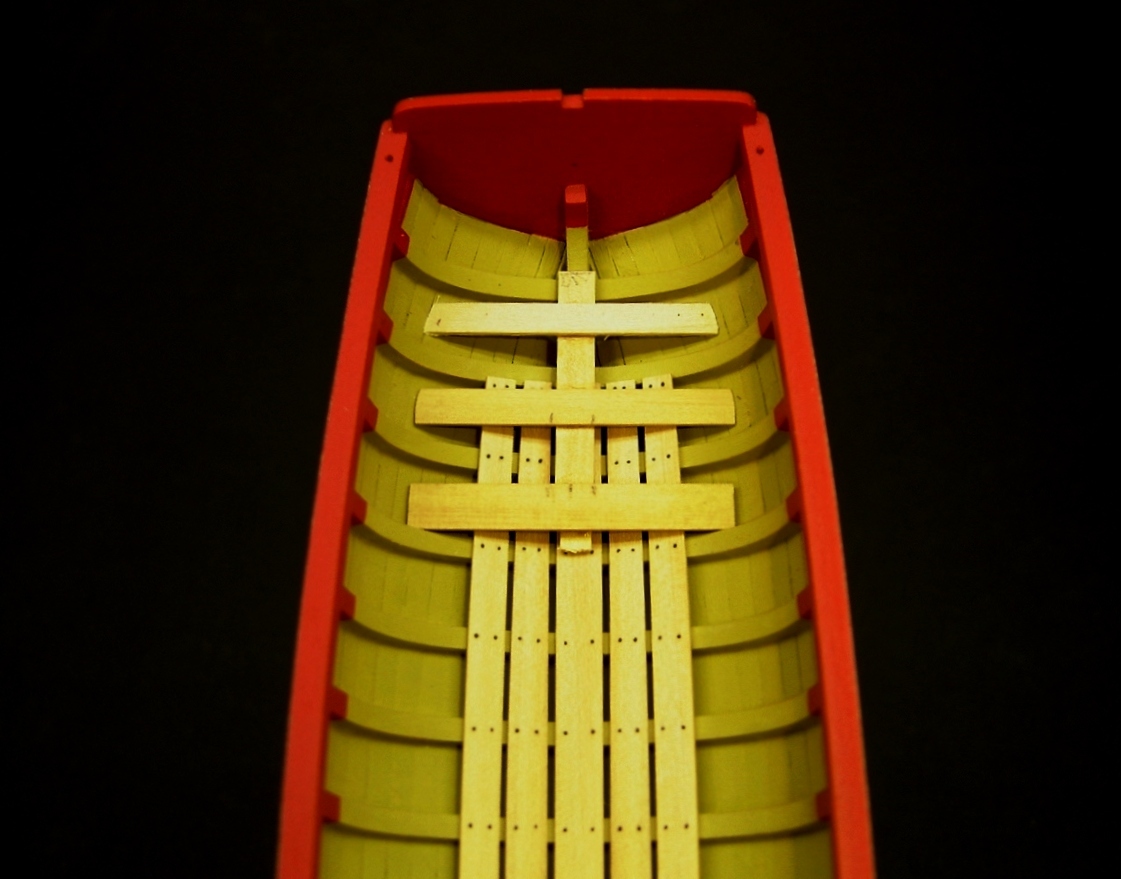
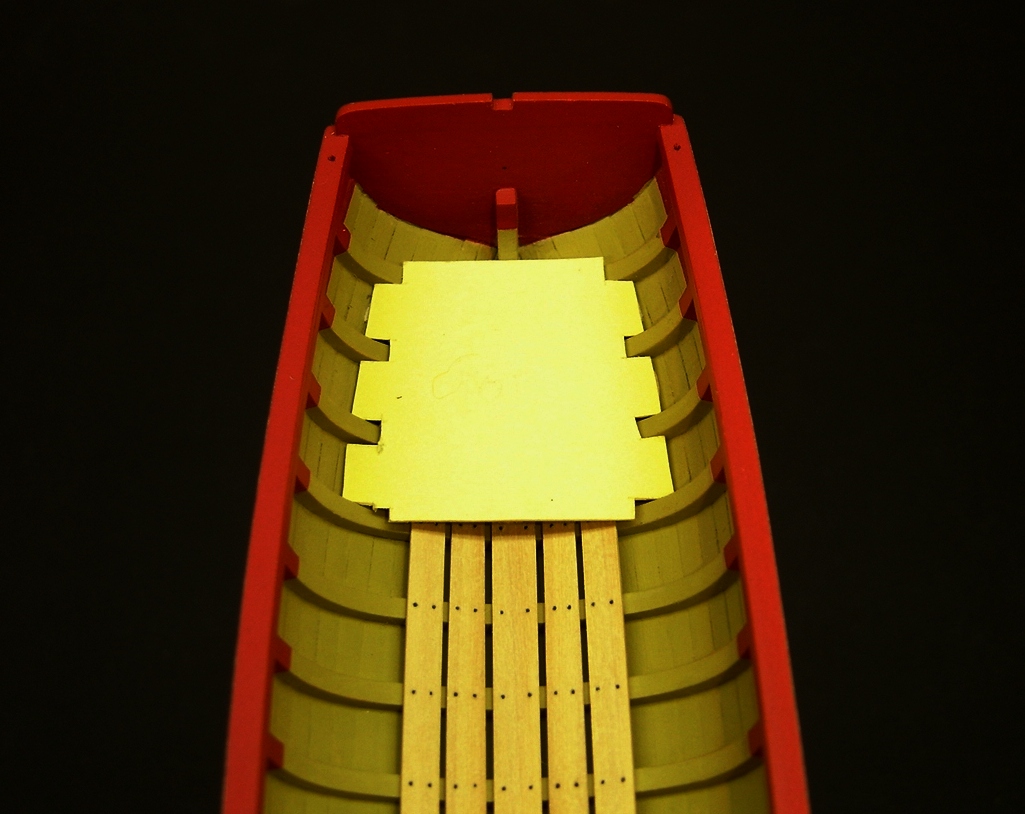
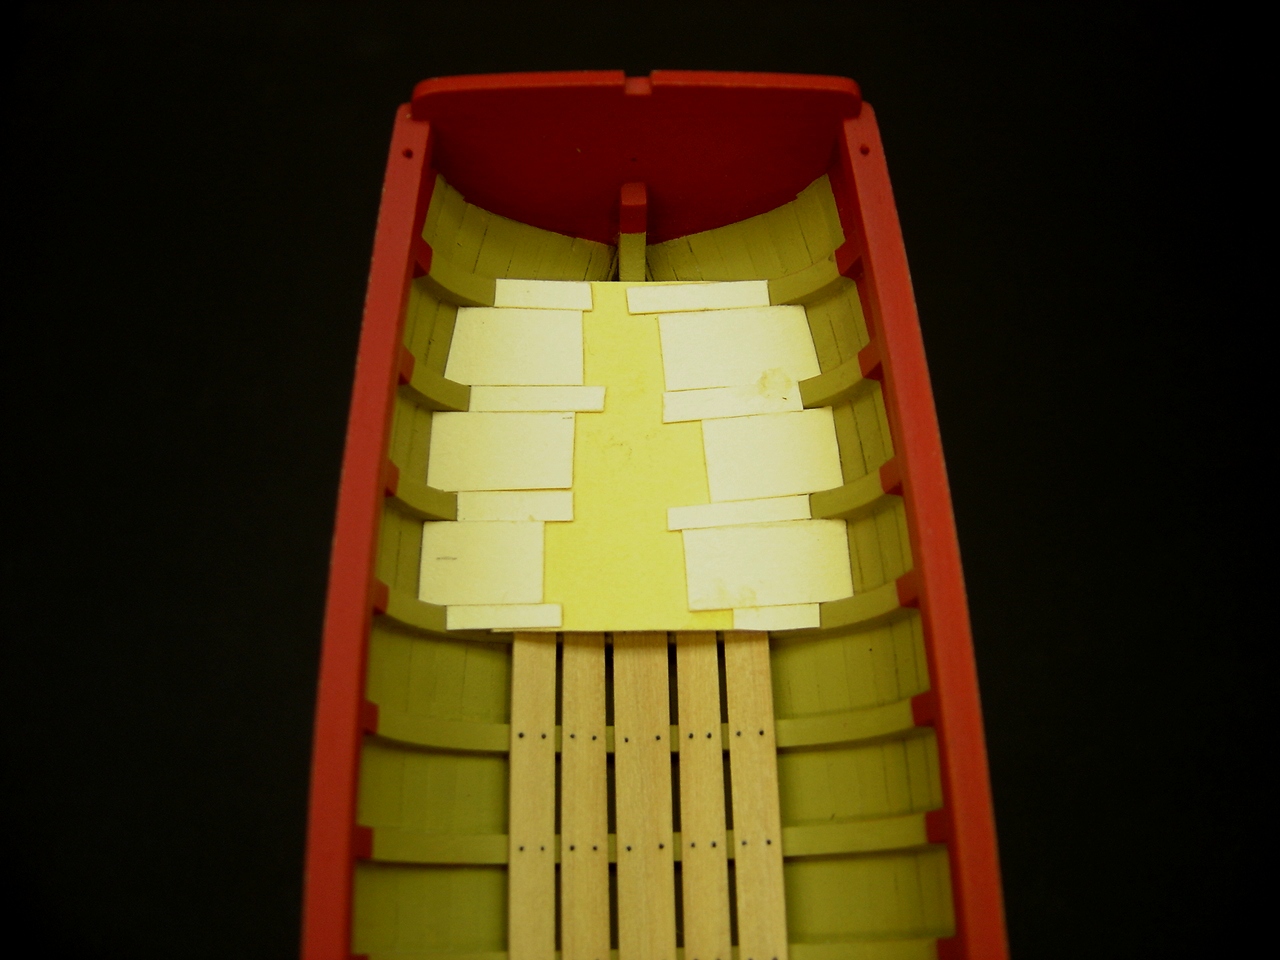
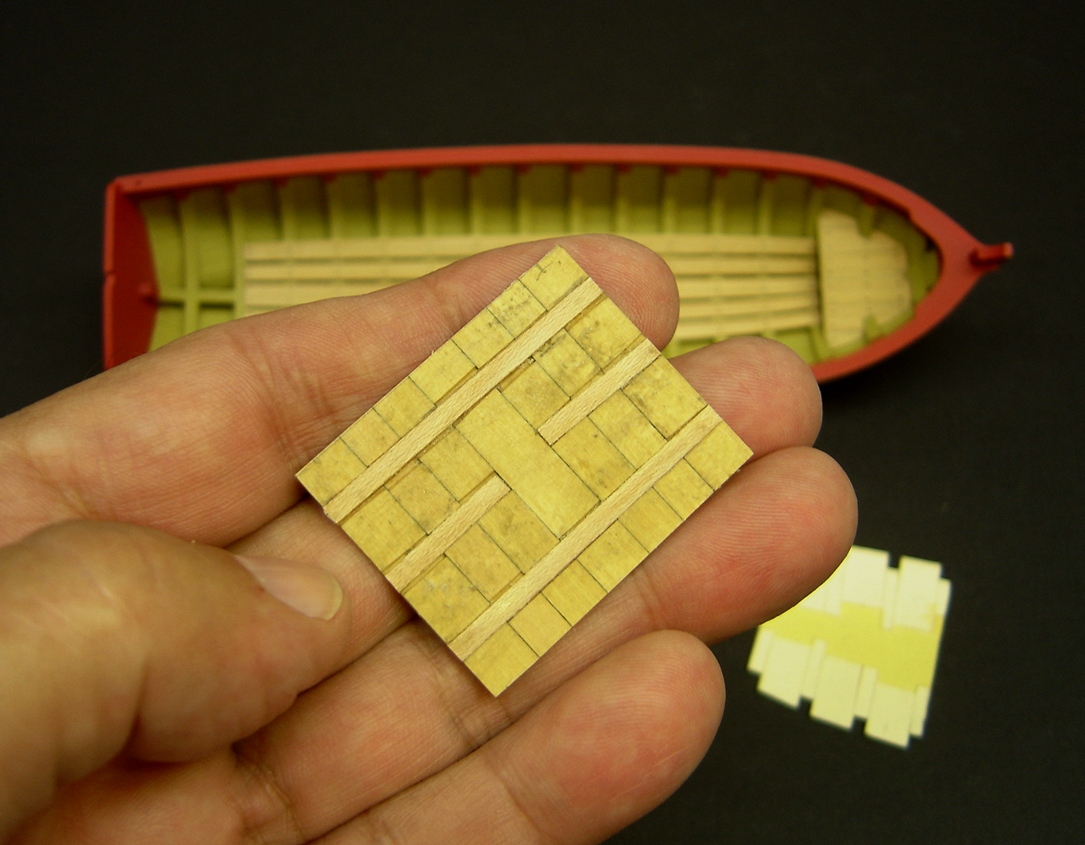
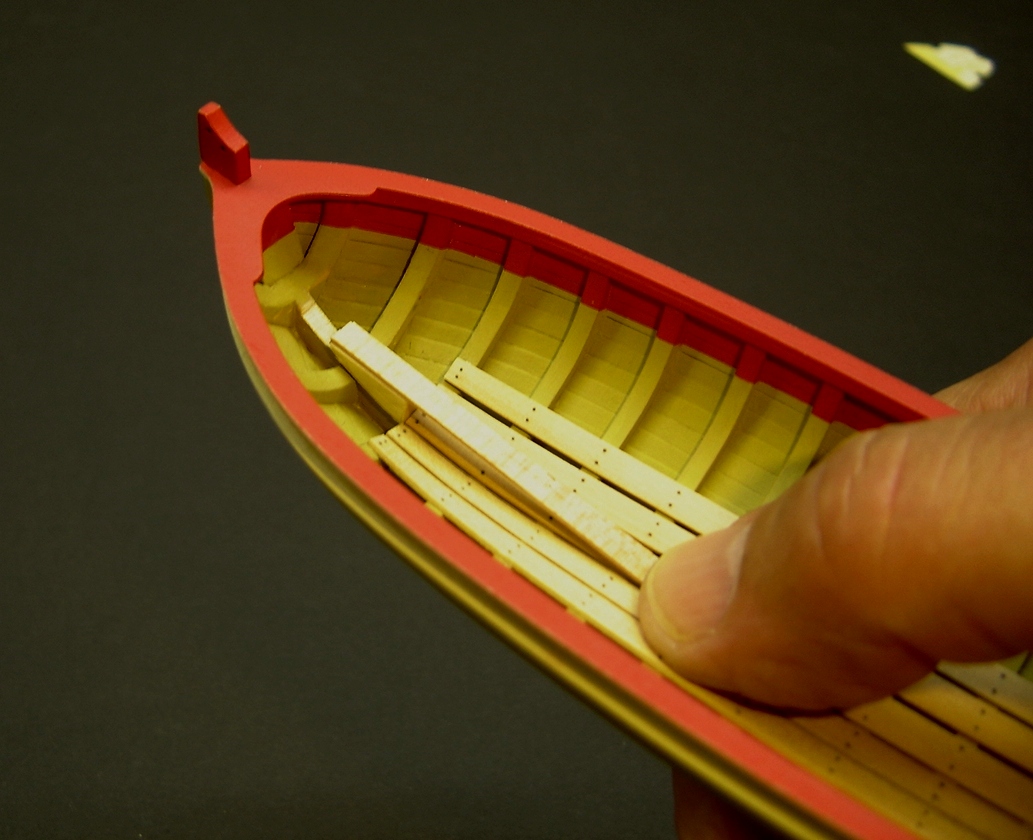
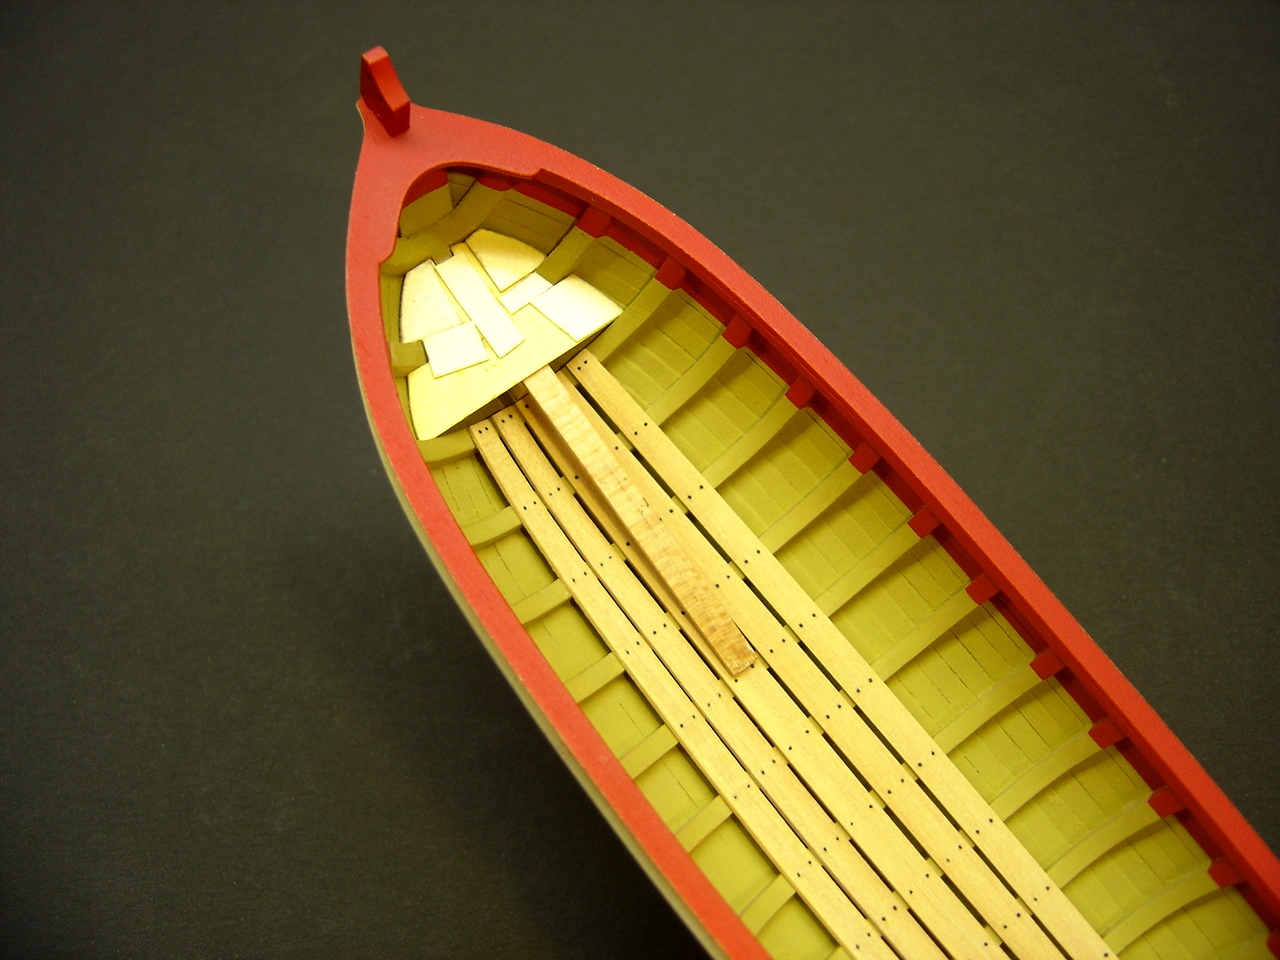
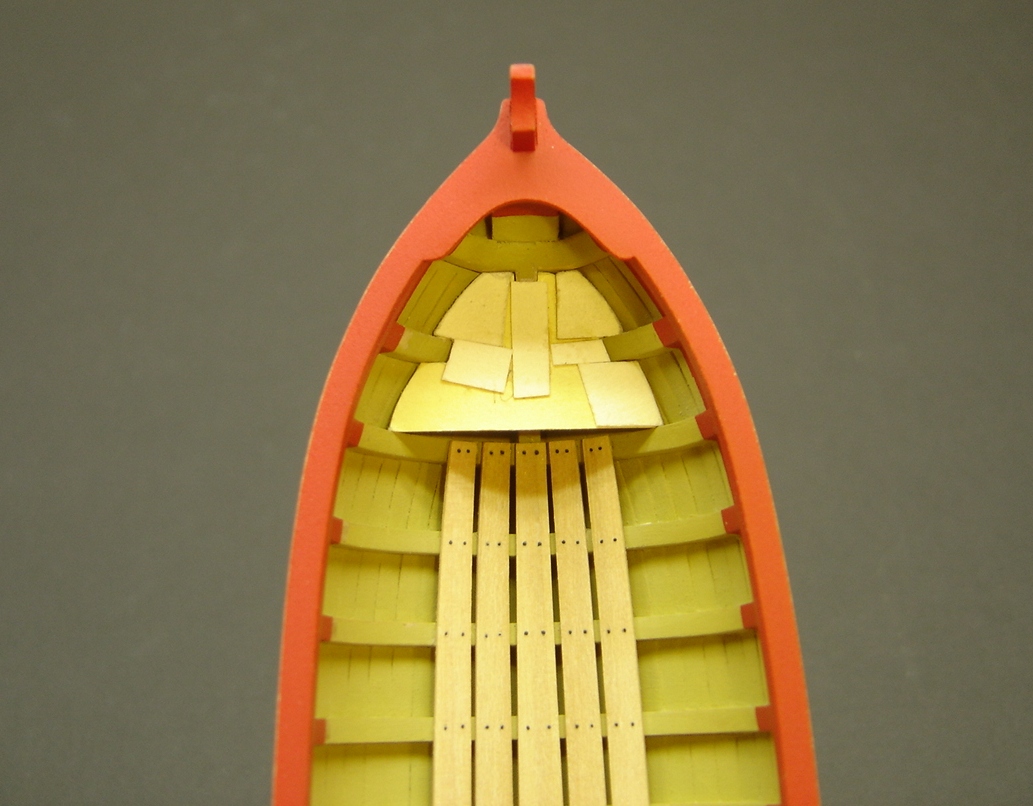
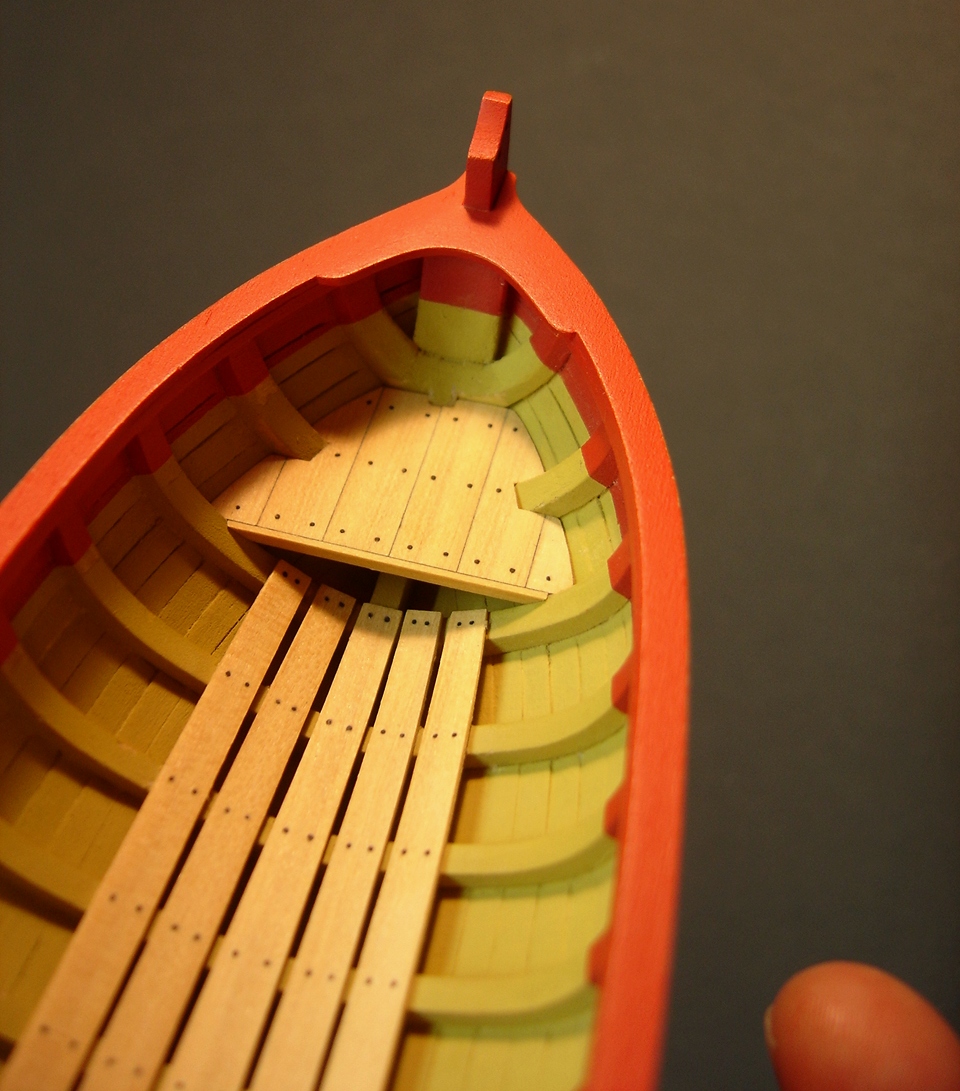
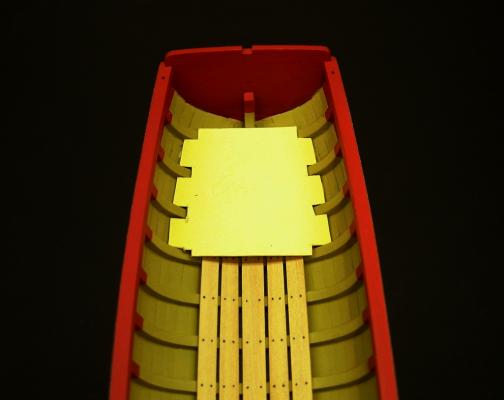
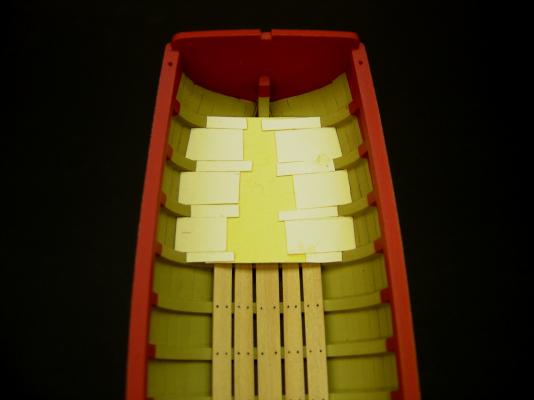
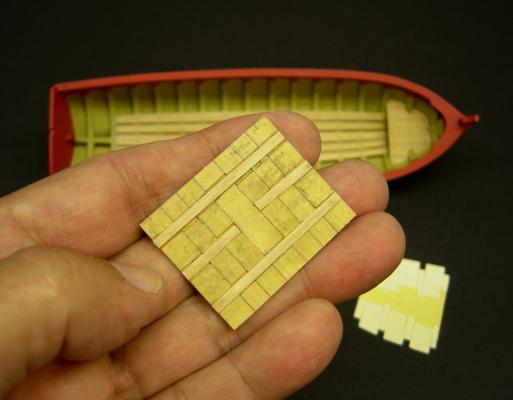
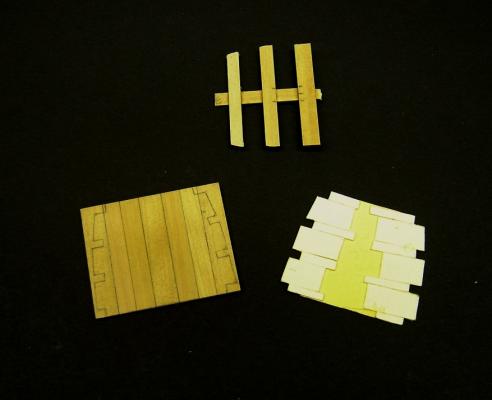
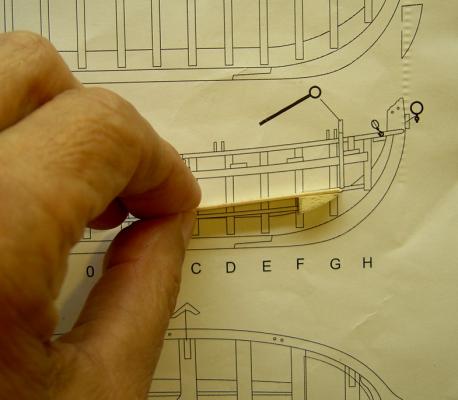
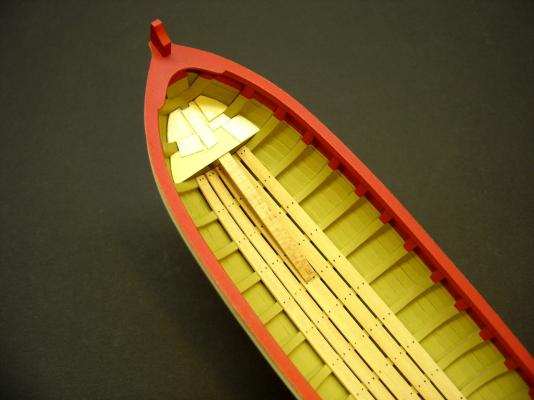
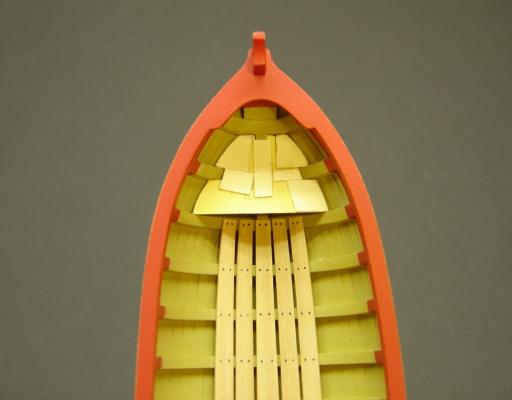
 Like the forward platform, I wanted to use a spacer of some sort to support the template at the correct height inside the hull. This one turned out to be a little more involved, but it wasn't difficult to make. A rough form of the template was laid on top of the spacer, and small pieces of card stock were glued in place to get the final shape. The planks for the platform were joined together by cutting shallow grooves in the bottom of each plank, and gluing thin strips in the grooves. Even though still quite thin, the assembly was fairly rigid. I'll explain in my next post why I didn't run that middle strip all the way across. The last photo shows the shape of the template transfered to the platform, which is ready for shaping. BobF
- 277 replies
-
- 15
-

-
- model shipways
- 18th century longboat
- (and 1 more)
-
David - It's looking really good! It looks like you are using the most important tools, a sharp knife and patience. Keep up the good work, and keep those photos coming. Your shipmates in Tri-Club will expect a full presentation when you come home. BobF
-
I really had second thoughts about posting this review, since so many good things have already been said, and certainly in a more eloquent manner. However, Allan and Bob Friedman deserve all the kudos we can give them. So, here is a review of this remarkable book that appeared in my local club newsletter. Scantlings of Royal Navy Ships 1719—1805 Comparisons of 1719, 1745 Establishments, Ship Builders Repository and Steel’s Elements & Practice of Naval Architecture by Allan Yedlinsky Distributed by: Sea Watch Books, LLC, Florence, Oregon www.seawatchbooks.com, seawatchbooks@gmail.com The first impression one might get when they open Scantlings of the Royal Navy 1719—1805 by Allan Yedlinsky, is that here is a book that would be useful to only the most advanced and demanding model ship builder. This is certainly understandable, but not necessarily the case. The reasons for this will be presented later in this review. The book begins with an introduction by the author. He discusses the various sources he has used to research his models, along with the pros and cons of these references, which included as-built drawings, builders drawings and contracts. Scantlings from the various Establishments were quite useful, but hunting through these multiple sources proved cumbersome and time consuming. This was the primary factor that motivated Mr. Yedlinsky to compile this remarkable amount of information into a single easy to use reference. The book features five primary sources, which are combined into two segments. The first segment includes the 1719 Establishment that deals with eight vessel sizes rated from 20 to100 guns, the 1745 Establishment, which covers eight vessel sizes rated from 24 to 100 guns, and the 1750 alterations to the 1745 Establishment that shows altered dimensions proposed for several vessels rated from 50 to 90 guns. The first segment ends with a handy index, Notes for the Establishment Tables, and an interesting Synopsis of the 1745 Establishment Report that includes tables showing minimum and maximum crew size, position of grape shot for each rate, and the compliment of small arms these vessels would carry. The second segment is composed of 1788 The Shipbuilders Repository, author’s name unknown, and 1805 The Elements and Practice of Naval Architecture by David Steel. Yedlinsky states that the 1788 tables are far from complete. However, when combined with Steel’s work, they comprise the largest, and most comprehensive section of this book, 174 pages. This segment also has it’s own index. It is interesting to note that in both instances, the author uses “folio numbers” rather than page numbers, which emulates Steel’s practice. These are located in the upper corner of the tables, next to the spiral binding. Like the first portion of this book, there are some extensive notes that include quotes by Steel on the fore magazine, and particulars of bomb vessels. This section concludes with tables describing the scantlings for various ships’ boats and anchors. The final 10 pages feature drawings that will help the reader cross-reference the terms used for various timbers on a sailing ship with the information in the tables. One particular illustration of a First Rate is extremely detailed, but may require magnification. Never the less, the author has made every effort to make this book as user-friendly as possible. Larger fonts are utilized, and typographical errors that occurred in the originals have been eliminated. This book measures 14”x8 ½”. The spiral binding allows the pages to lay flat, producing a 28” format that allows for easy viewing of the various tables. As stated earlier, novice and intermediate modelers may question the need for such a book. This is a valid assumption since most confine their projects to plank on bulkhead and solid hull kits. Yet, it is certainly no secret that the materials provided in these products are often questionable in terms of quality and scale. As these individuals progress from model to model, they will develop higher standards, and question these inadequacies to a greater extent. This remarkable book could be considered an investment in their modeling future, but there is no reason why the benefits cannot be realized immediately. Scantlings of the Royal Navy 1719—1805 by Allan Yedlinsky is a remarkable research tool that both researchers and modelers will find invaluable. It is highly recommended. BobF
-
Thanks, Mike. When it comes to model ship building, I like to think outside the box, while maintaining a reasonable level of accuracy. This little model has given me a lot of opportunities to do exactly that. Currently, I have the template made for the aft platform. That assembly should be installed very soon. Regards, BobF.
-
David - Many modelers consider Monitors to be simplistic vessels. Your log on the Lehigh proves otherwise! Can't wait to see your card models up close when you come home. Keep up the great work! BobF
-
David - Although I'm stepping down as NRG Secretary, I'm not exactly riding off into the sunset. I hope to remain active within the Guild in other capacities. We'll see what happens. I'm sure you'll get to see the model in person in the not too distant future. Get well, and come home soon! BobF
- 277 replies
-
- 1
-
-
- model shipways
- 18th century longboat
- (and 1 more)
-
Chuck, I appreciate your comments. Considering the fact that I probably use my airbrush only once every two or three years, somehow, it turns out OK. The mentoring I have received from Kurt V, I'm sure, has definitely helped. BobF
- 277 replies
-
- 1
-
-
- model shipways
- 18th century longboat
- (and 1 more)
-
Hey Toni, Yeah, my grandkids take a lot out of me, but I wouldn't have it any other way. Stepping down as NRG Secretary, hopefully, will give me more time to model, and thanks for the kind words. BobF
-
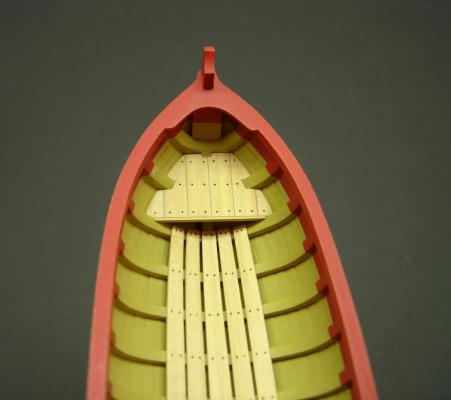
Well, I finally was able to spend a little time in my workshop. The net result is that I was able to complete the forward platform on my longboat. I may have been re-inventing the wheel on this one, but I decided to use a spacer block, so my template would have the proper shape, at the correct height inside the hull. The block, with a strip of wood glued to it, was made thick enough so that the template would give me the shape of the upper surface of the platform. The wood strip helped keep the block in place as I worked with the template. This worked out pretty well. It took me a couple of tries before I was able to get a template I was happy with. I then blackened the edges of the planks, and glued them to two wood strips that were positioned so they wouldn't interfere with the frames. Once I had the platform cut to shape, and I was happy with the fit, I used black paint brush bristles to simulate three rows of nails. For a final touch, I added a small strip of wood across the face of the platform. This strip was actually "L" shaped, which allowed me to glue it to the underside of the platform. I've been told by friends who have completed their longboats that the forward platform is the more difficult of the two. I sure hope they're right. BobF


- 277 replies
-
- 18
-
-
- model shipways
- 18th century longboat
- (and 1 more)
-
One of the nice things about belonging to a club, is the fact that members sometimes bring in extra items they don't need. The plate glass is a good example of that. At the time, when I obtained it, I had no idea that I would be doing edge bending with it. The glass just seemed like too good an offer to pass up. (My wife would be rolling her eyes, if she read this!) It just so happens that the glass was also "armored" and fairly thick. Actually, you can use just about anything that has a smooth surface, is rigid, and isn't too thick. This last requirement has more to do with the size of the clamps you are using, than anything else. So, don't just focus on glass. BobF
-
Thank you so much. I hope that what I have posted here will be of some value to you. I noted your questions about edge bending. If you are going to use the kit supplied strips, I really don't think there's any other way to do it, where the plank runs will have a pleasing appearance. Prior to starting the long boat, I always spiled my planks the old fashion way. Chuck has convinced me that there is a place for this technique in our approach to planking a hull. I don't think it can be applied to every situation, but it will work in most cases. It'll also save on wood, and it's not that difficult to do. The key is using lots of clamps, so the plank can't buckle. Also be sure to place a piece of card stock or paper under the clamp, so you don't leave an imprint in the soft bass wood. I will now get off my soapbox. Please don't hesitate to drop me a line if you have any questions, and good luck! BobF
- 277 replies
-
- 3
-
-
- model shipways
- 18th century longboat
- (and 1 more)
-
Hi Dan, The model is looking great, and your log makes for some enjoyable reading! I like having you ahead of me as far as progress on the long boat is concerned. I'm definitely going to school on your fine work. Now, if I can just remember to put that thwart in the right way. Seriously, thanks for sharing your trials and tribulations with us. BobF
-
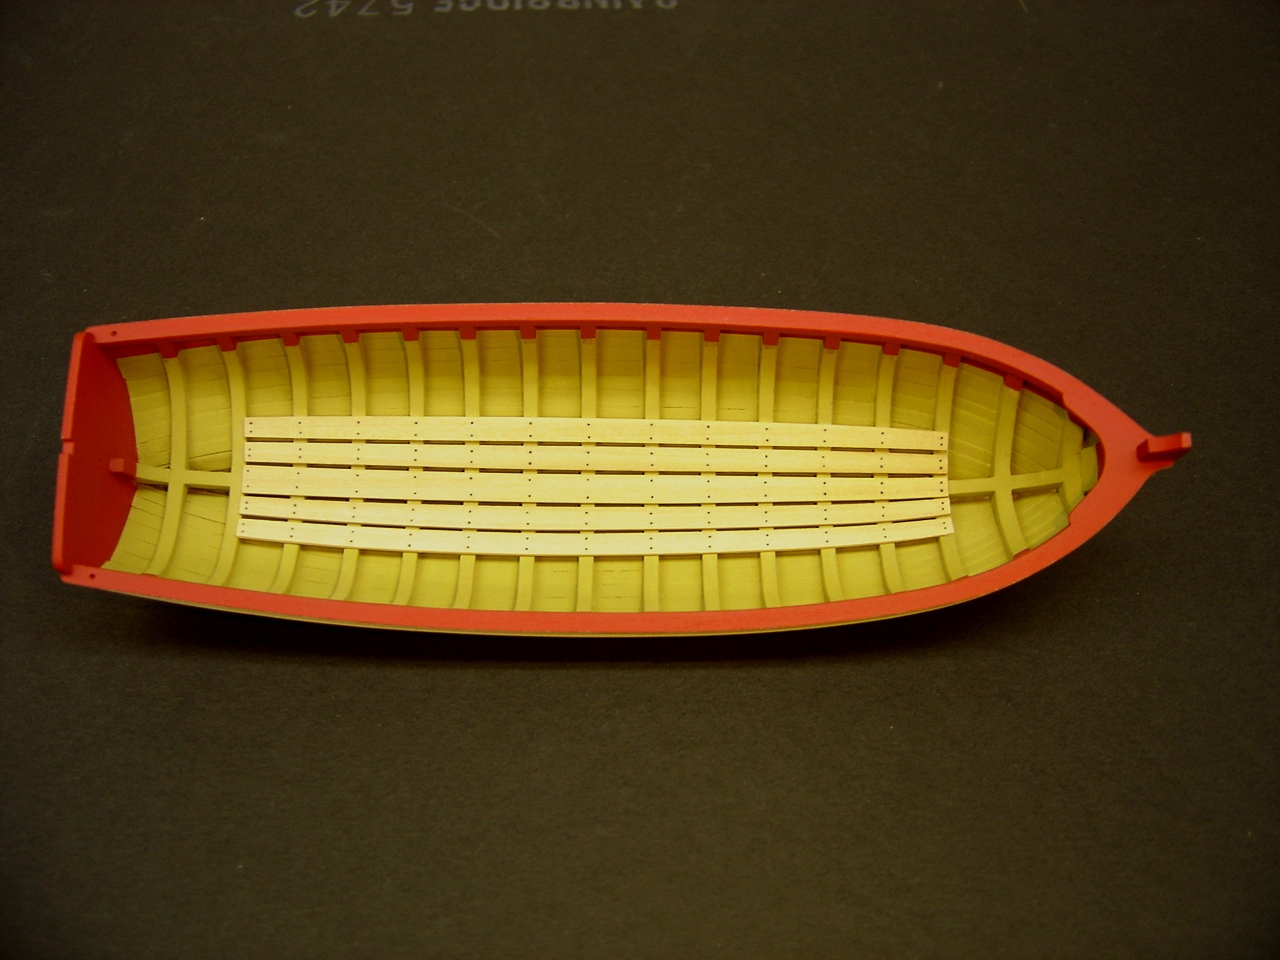
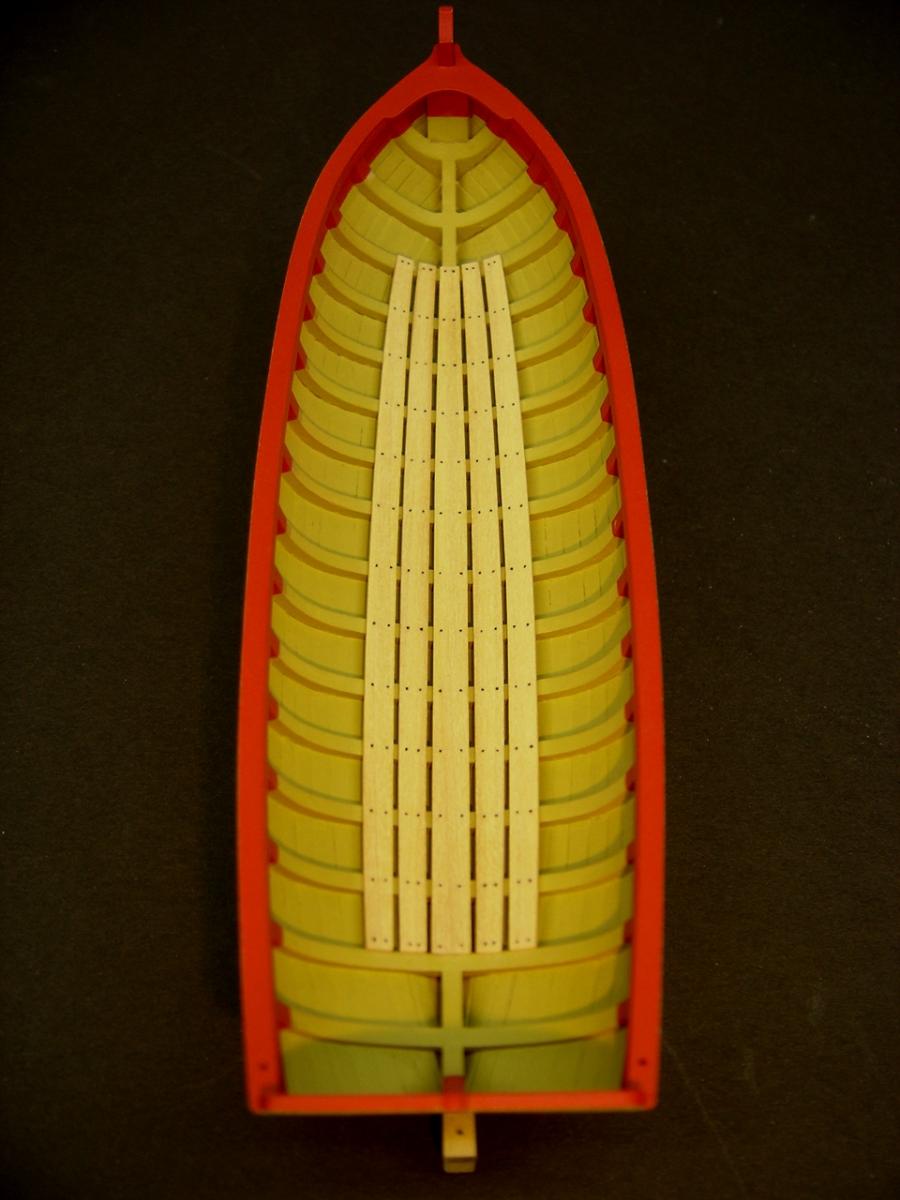
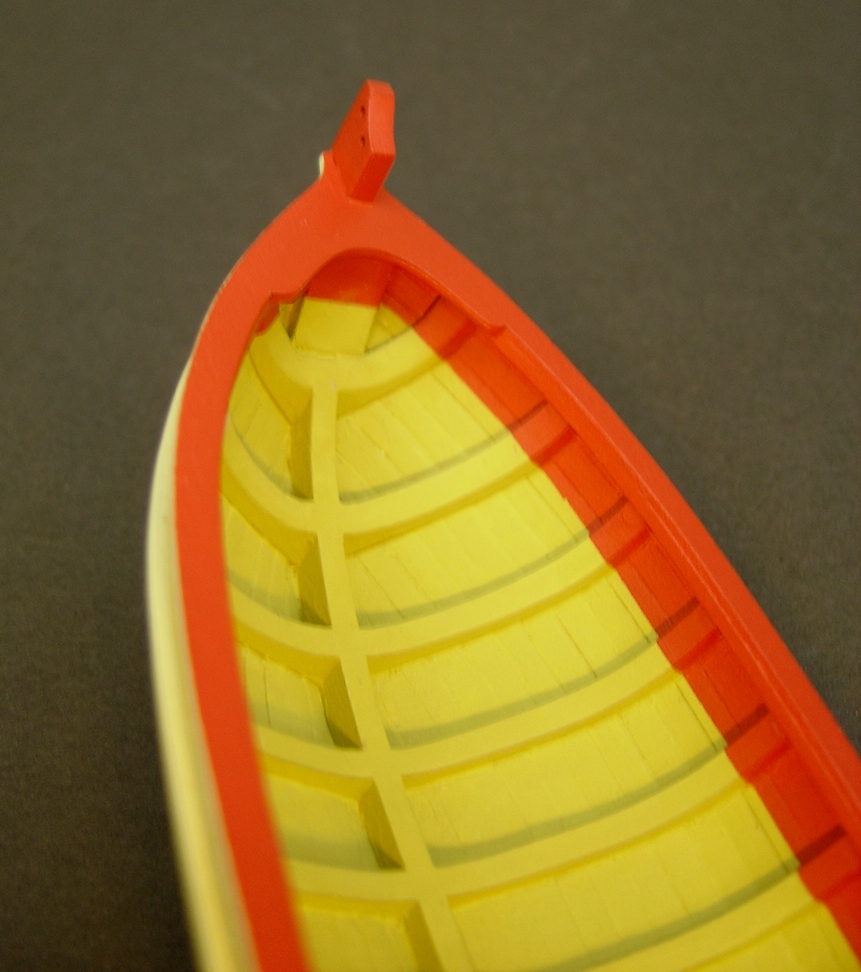
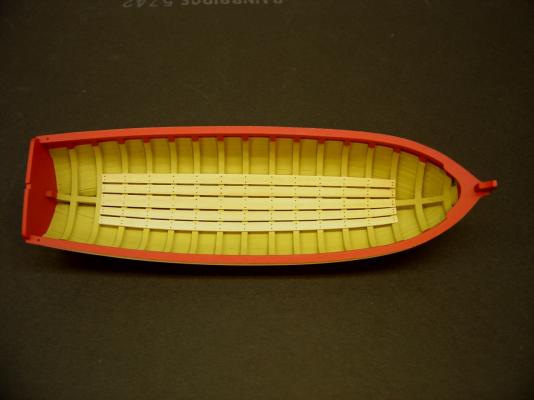
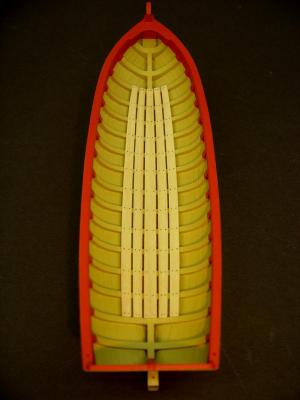
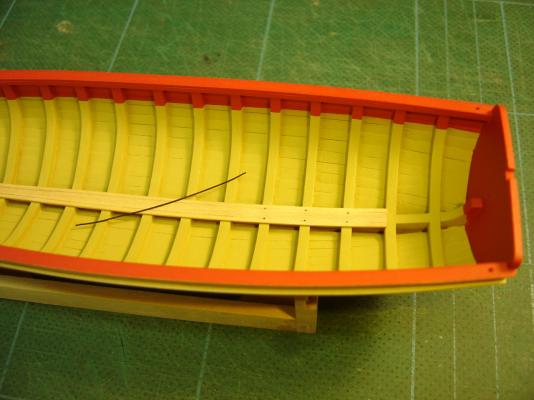
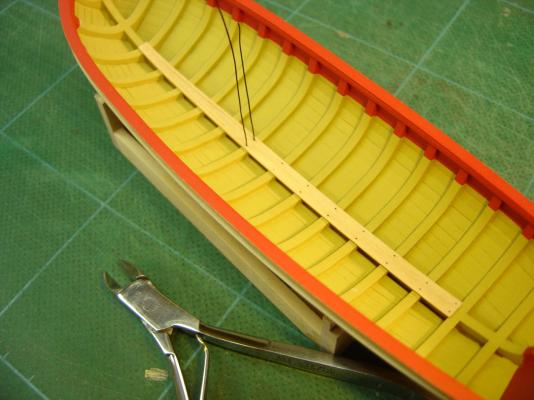
Here are two photos of the completed floorboards. I copied their shape off the kit plans, but some edge bending was needed so that uniform spacing could be achieved between each pair. These pieces were made with boxwood. The platforms are next. BobF
- 277 replies
-
- 12
-
-
- model shipways
- 18th century longboat
- (and 1 more)
-
Hi Chuck, I honestly don't know. I had an old brush that was expendable, so I cut the bristles off, and threw them in a Zip Lock bag for safe keeping. The bristles are random in size (diameter), so I had to sort through them, until I found enough the same size to do the job. I'm sorry that I can't be more helpful. BobF
-
J - Welcome to the hobby. Although I've been building model ships longer than I care to admit, I still took time to study all the build logs very closely before starting my own long boat. I think you're on the right track, and don't hesitate to ask questions if you aren't sure about something. This is a very supportive group, who are more than willing to help. BobF
- 277 replies
-
- 1
-
-
- model shipways
- 18th century longboat
- (and 1 more)
-
David - I love your advice: "Always double check everything, and take nothing for granted." Excellent words to model by! The Teaser is looking good. Keep up the nice work. BobF
- 27 replies
-
- 1
-
-
- teazer
- blockade runner
- (and 2 more)
-
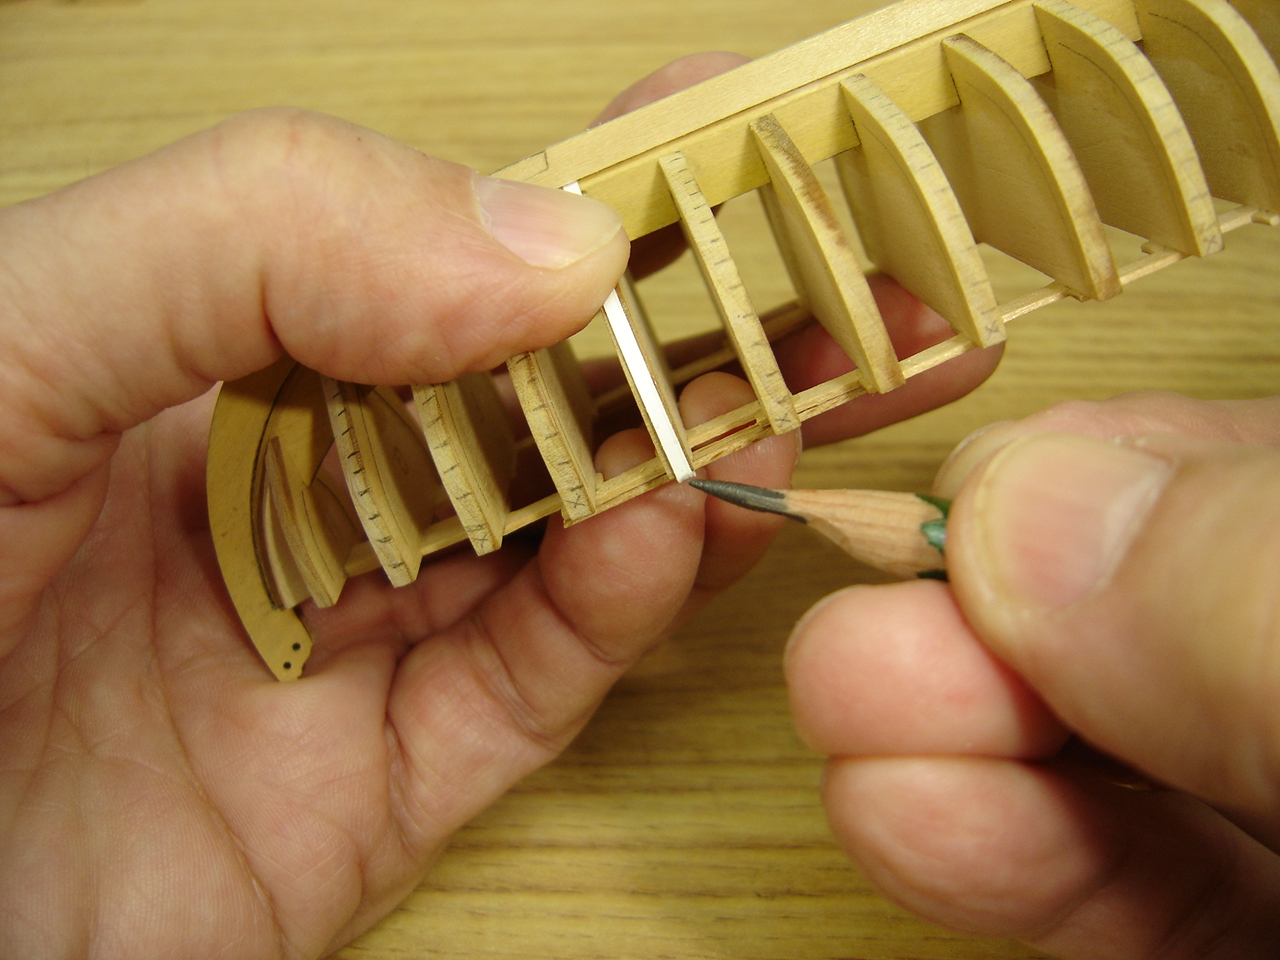
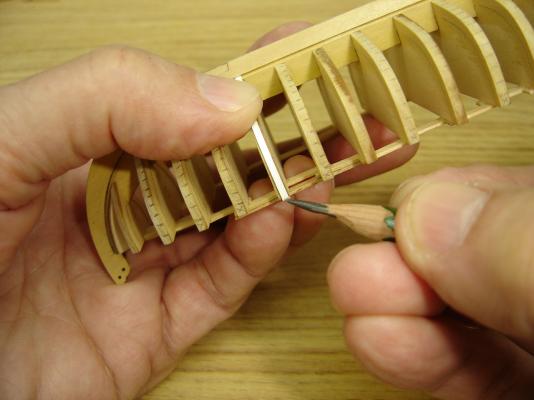
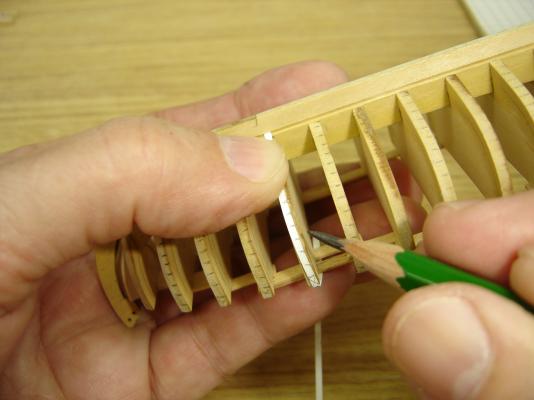
Hello Al, Yes, on the long boat, the tick marks take the place of the proportional dividers, which are too cumbersome for such a small model. Another departure from conventional spiling practices is the fact that the tick marks allow you to plank from the keel up to the sheer plank, which is what I did on the long boat. At this point, I have not used this procedure on larger hulls. I've given numerous presentations on spiling, and this little long boat is causing me to rethink how it can be done! BobF
- 277 replies
-
- 1
-
-
- model shipways
- 18th century longboat
- (and 1 more)
-
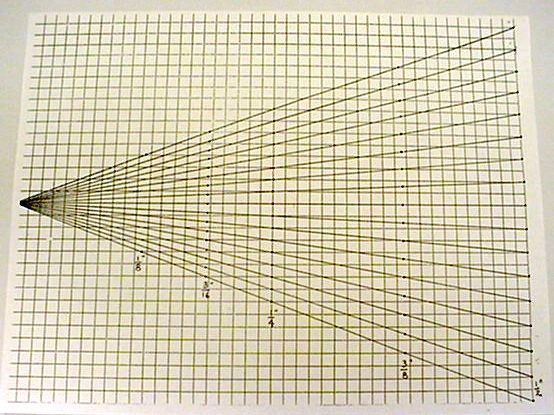
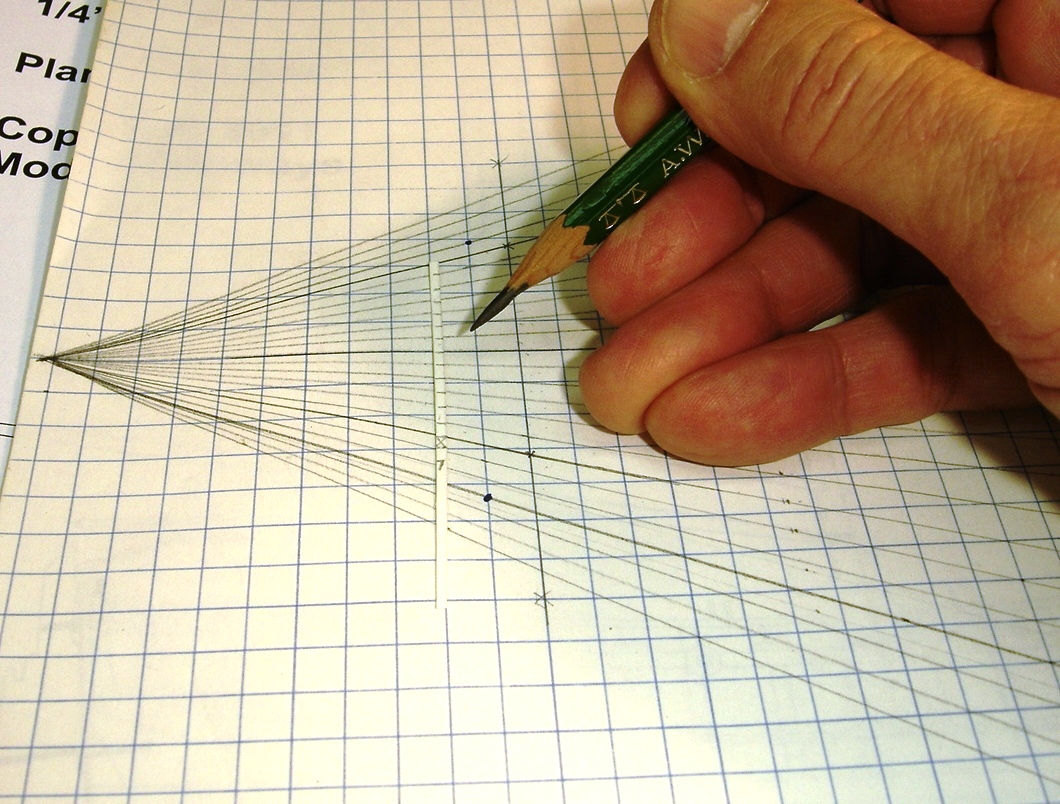
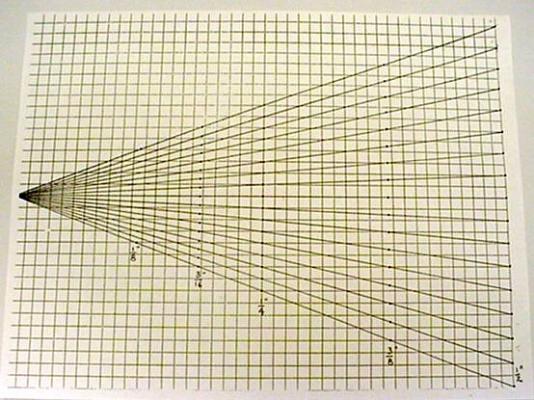
The grid was made using 1/4" graph paper. There are a number of variations, but this is one of the easiest to make. If you look at the attached photo, all the lines are equally spaced on the right side. In this example, the spacing is a 1/2". It can be whatever you want it to be. I think I used 1/4" spacing on the grid for the long boat. The lines all converge to the center of the page on the left side. One thing I should mention about this particular grid, is the fact that there is a very slight distortion in the spacing out towards the upper and lower edges of the grid. This does not come into play on the long boat, since you will be laying out only 11 or 12 planks. Using a card stock strip, you mark the distance from the sheer line to the keel. Lay that strip on the grid, and find the location where the tick marks intersect the converging lines that will give you the number of spaces (planks) you require. You then mark those points on the strip, and transfer those points to the corresponding bulkhead on the model. The marks, in many cases, will be different for each bulkhead, so you will have to repeat the procedure for each one. At the bow, you will lose planks as they are glued into the rabbet, so the proportions at the bow for the remaining planks may change. If you intend to glue two full planks to the model at the sheer line per the instructions, you will then have to measure from the bottom side of the second plank to the keel to get your remaining proportions. I proportioned all the planks, which made the planking job at the bow a little easier, but that's your call. If you have questions about this procedure, please don't hesitate to drop me a line. BobF

- 277 replies
-
- 7
-
-
- model shipways
- 18th century longboat
- (and 1 more)
-
Hi Bob, I'm glad that you like it. I have to admit that I'm not sure sometimes how some of my ideas are going to turn out, or how they will be received by all of you. Your kind words are appreciated. BobF
- 277 replies
-
- 1
-
-
- model shipways
- 18th century longboat
- (and 1 more)
-
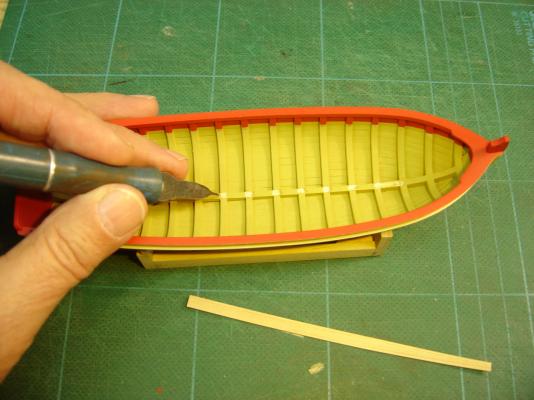
Before I could start gluing the floor boards in place, I removed small amounts of paint where the glue would be applied. A very handy tool for this purpose is a ground down Exacto chisel blade. I use this tool for a lot of applications. Remember to wear eye protection if you decide to make one of these. Prior to gluing the first board in place, I drew a light line with a compass along each side of the board. These two lines are where my simulated nail heads will be located. I used black paint brush bristles to simulate the nails. Although not perfectly round, they are so small it's hard to tell the difference. The bristles are easily trimmed and sanded flush with the surface of the floor board, which produces a nice effect. BobF
- 277 replies
-
- 13
-
-
- model shipways
- 18th century longboat
- (and 1 more)
-
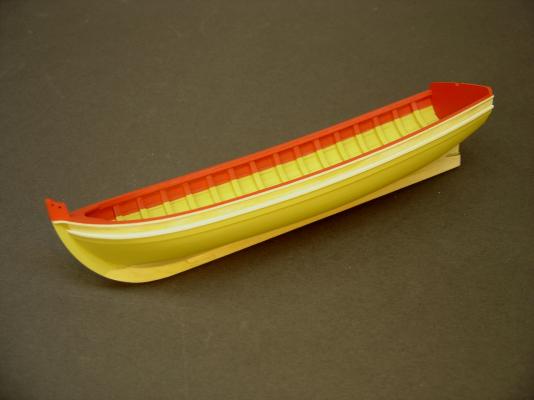
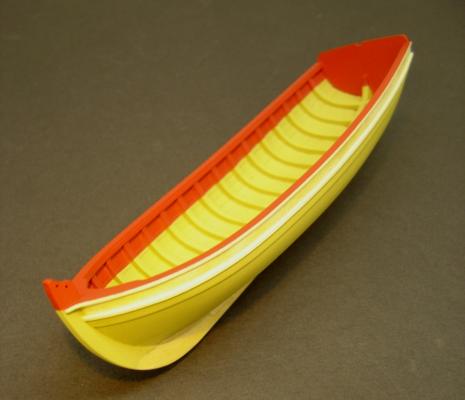
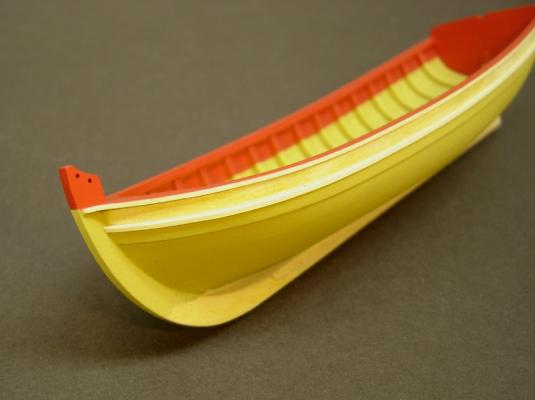
Here are some photos of the partially painted hull. I decided to leave the white bottom until a little later. I'm going to start on the floor boards and risers next. I like to airbrush my models, but masking can, sometimes, be a real pain. The interior probably took me a good three hours to mask, and only 30 seconds to paint! Never the less, I feel that the results were worth it. I'm using Floquil antique white, ATSF red, and depot buff. I'm not very happy with that last color, but it's time to keep moving froward. BobF

- 277 replies
-
- 11
-
-
- model shipways
- 18th century longboat
- (and 1 more)
-
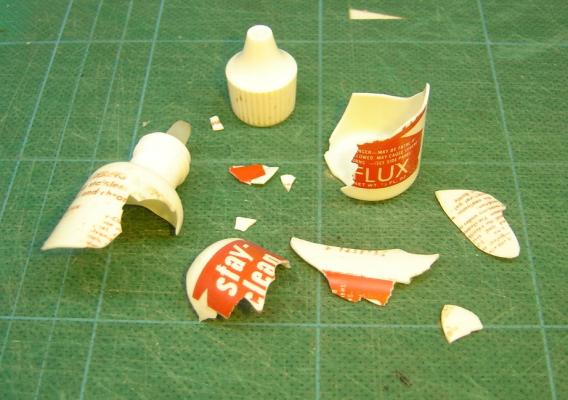
Hello all, I just wanted to share an unpleasant experience that I had the other day. I was soldering some metal fittings for my longboat. I was using Stay-Brite solder and the flux that comes with this product. While dispensing a drop of flux on to an applicator, the bottle shattered in my hand. (See attached photo.) The liquid splashed on my nylon vest, my hands, my throat, and my face. I immediately started experiencing a slight burning sensation where the flux had landed on my skin, which I immediately started rinsing with cold water. The nylon vest was ruined. It wasn’t until afterward that I noticed that some droplets had landed on the lenses of my Opti-Visor. I consider myself very lucky. The bottle of flux which I was using was very old. I’m guessing that I may have purchased it as much as 20 years ago. The fact that the bottle shattered would lead me to believe that the plastic material had become brittle with age. It just so happens that I had a second newer bottle, which I carefully squeezed. The bottle appeared to be quite pliable. Anyway, if you use this product, please be careful with it. Eye protection is a definite must! BobF
-
Hello all, I just wanted to share an unpleasant experience that I had the other day. I was soldering some metal fittings for my longboat. I was using Stay-Brite solder and the flux that comes with this product. While dispensing a drop of flux on to an applicator, the bottle shattered in my hand. (See attached photo.) The liquid splashed on my nylon vest, my hands, my throat, and my face. I immediately started experiencing a slight burning sensation where the flux had landed on my skin, which I immediately started rinsing with cold water. The nylon vest was ruined. It wasn’t until afterward that I noticed that some droplets had landed on the lenses of my Opti-Visor. I consider myself very lucky. The bottle of flux which I was using was very old. I’m guessing that I may have purchased it as much as 20 years ago. The fact that the bottle shattered would lead me to believe that the plastic material had become brittle with age. It just so happens that I had a second newer bottle, which I carefully squeezed. The bottle appeared to be quite pliable. Anyway, if you use this product, please be careful with it. Eye protection is a definite must! BobF
- 277 replies
-
- 4
-
-
- model shipways
- 18th century longboat
- (and 1 more)
-
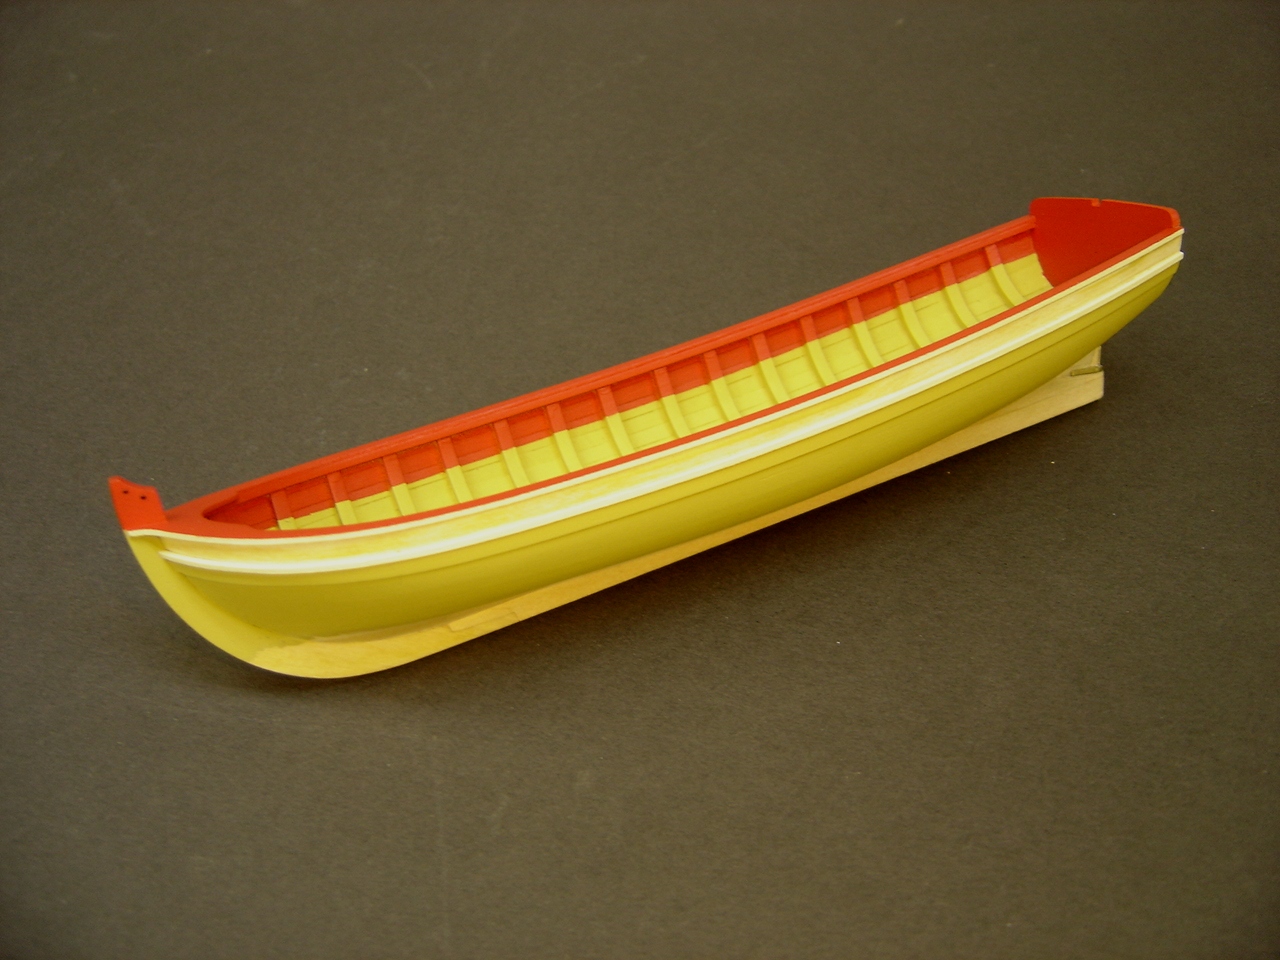
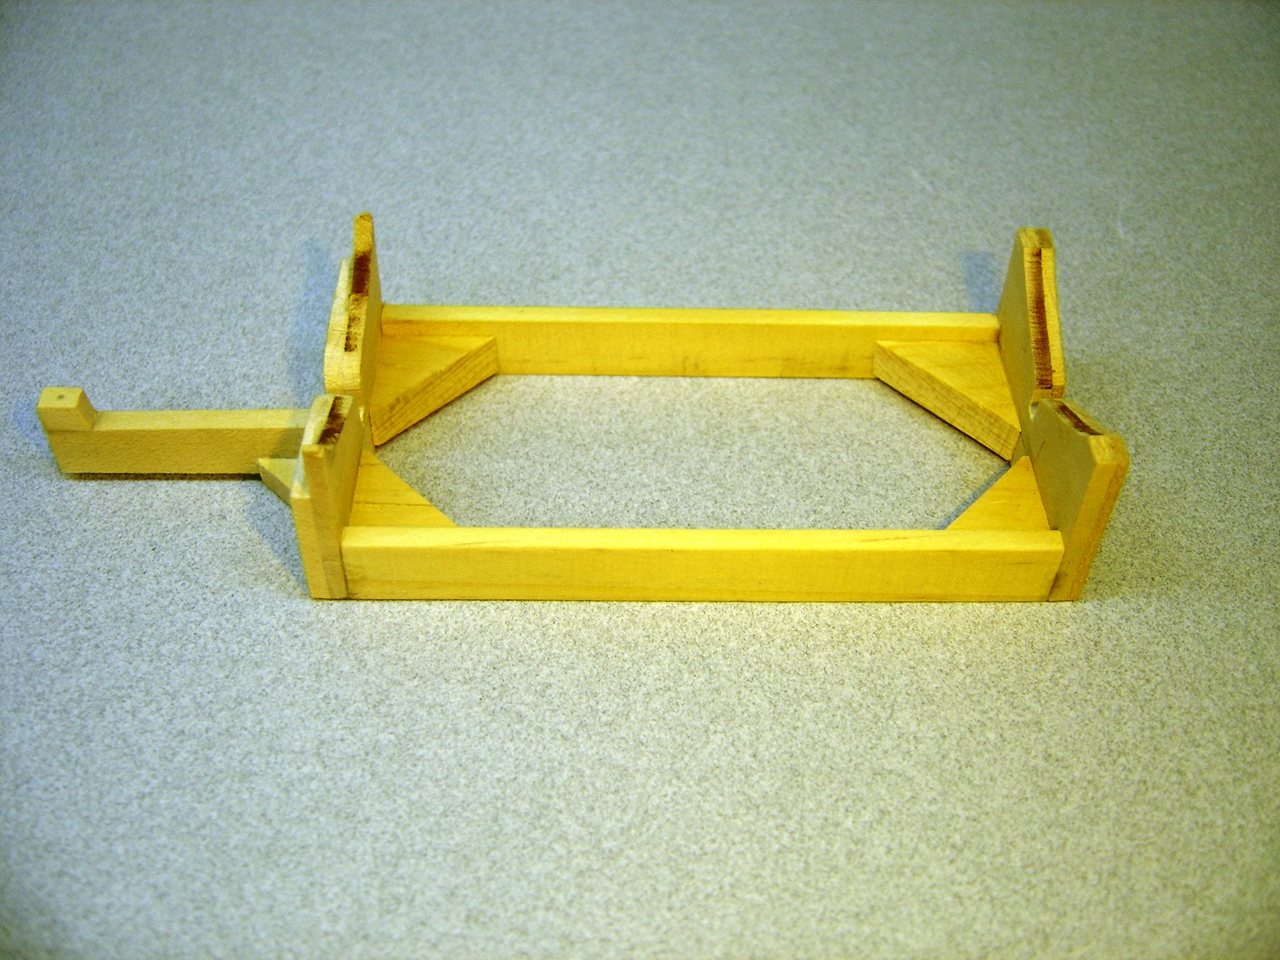
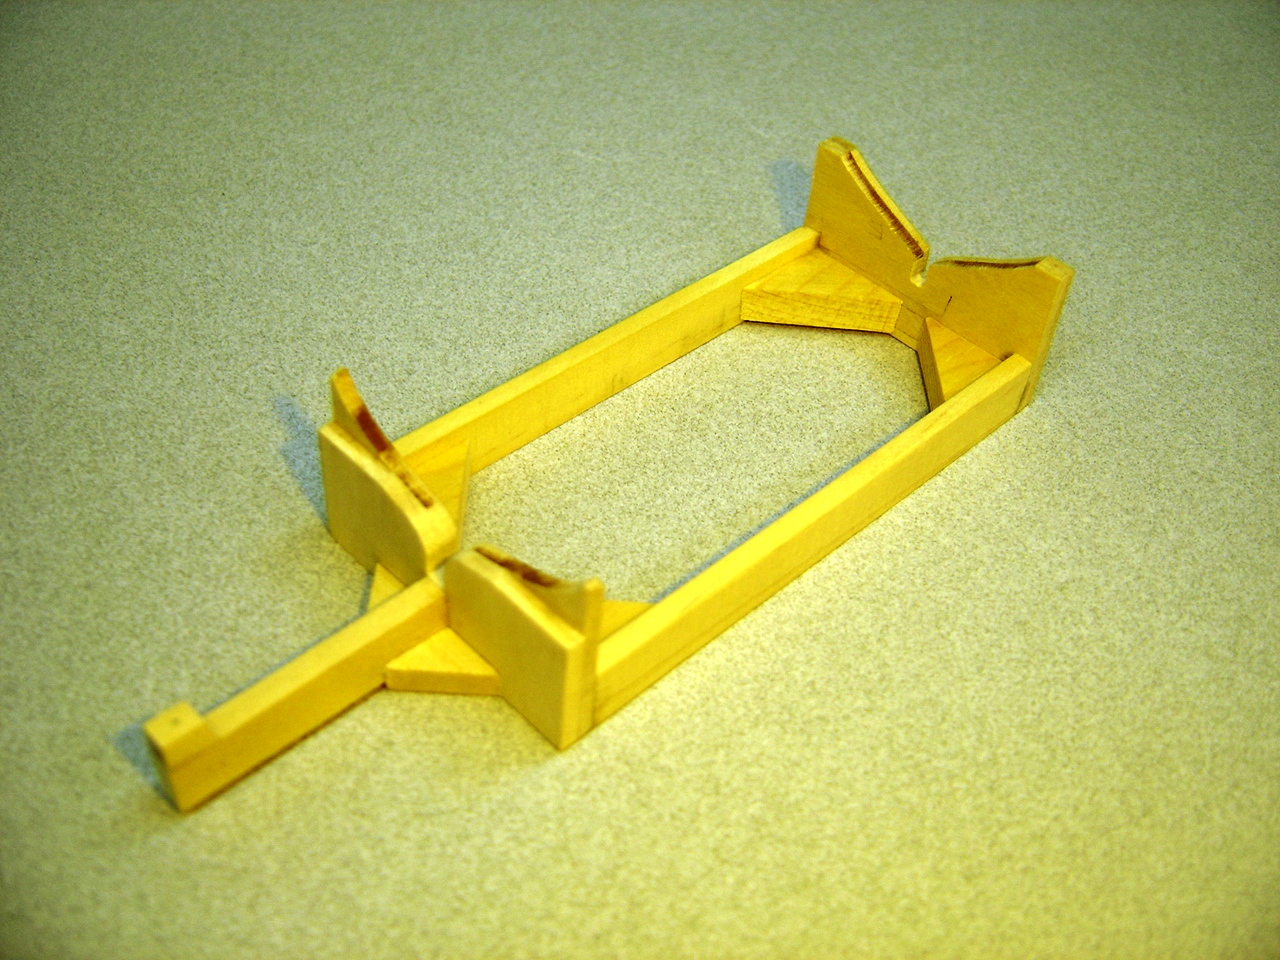
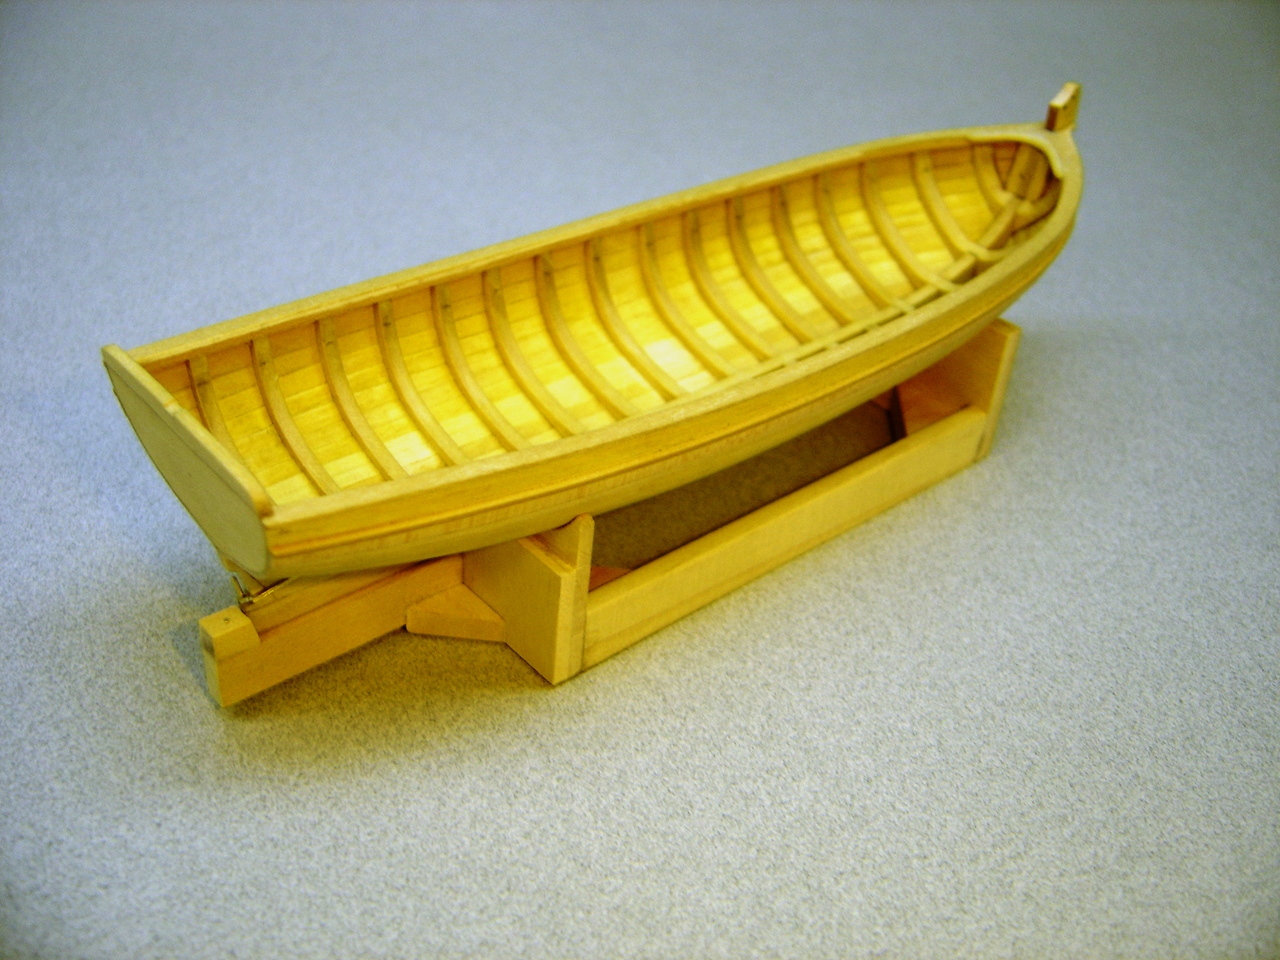
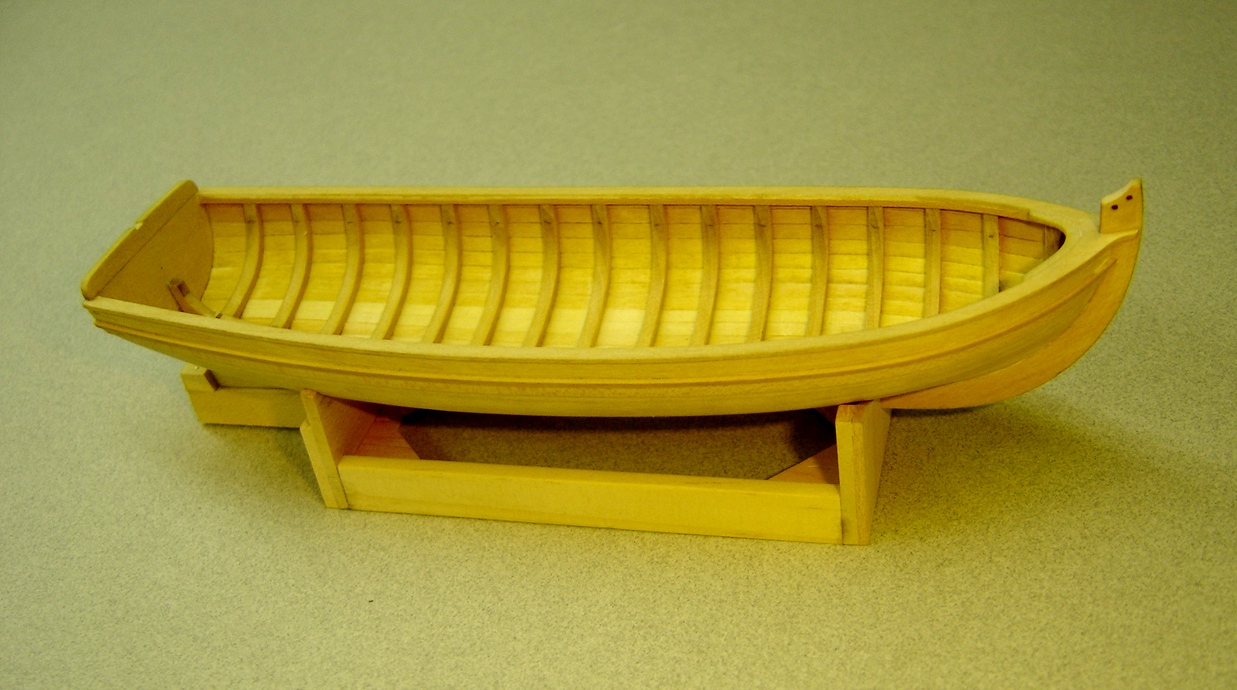
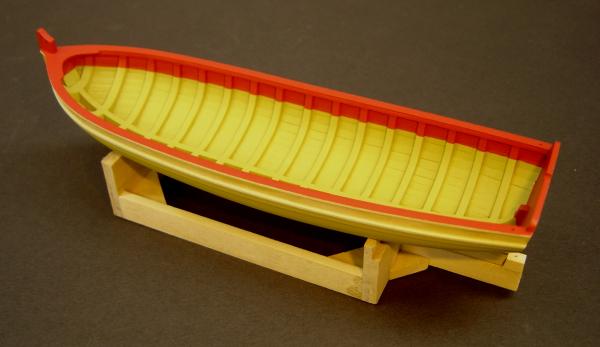
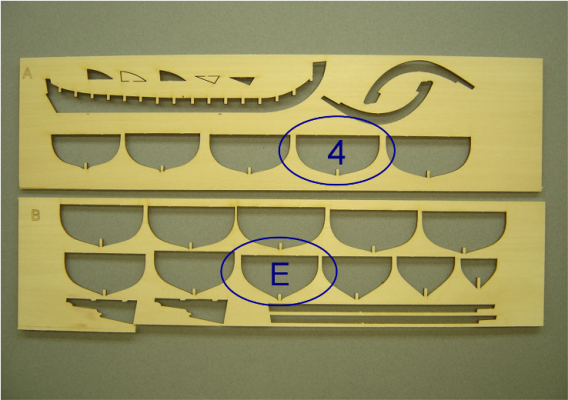
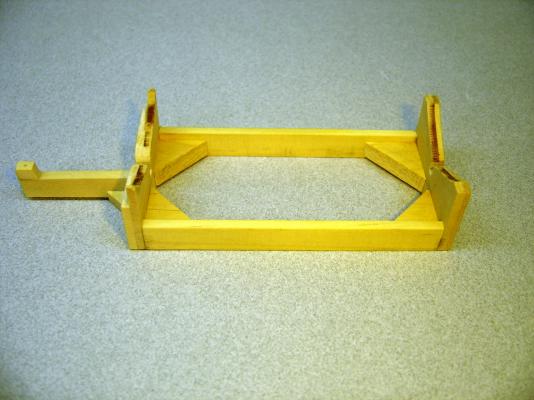
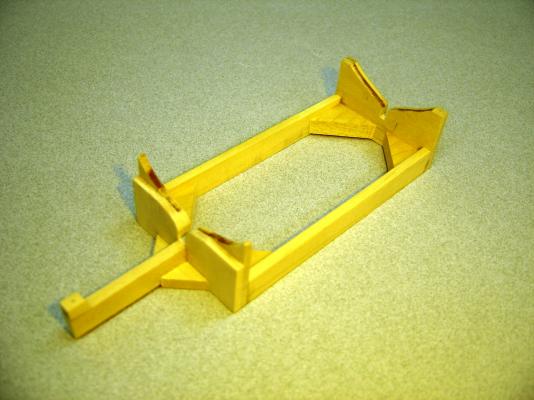
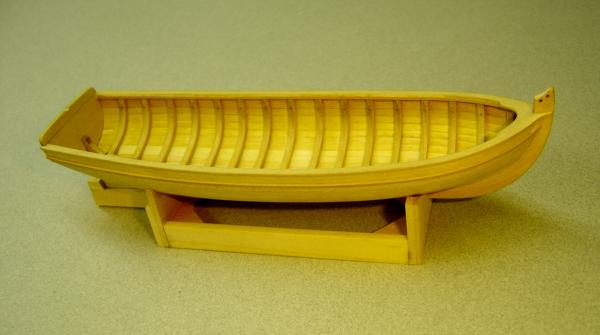
I'm at the point on the model where having an accurately built cradle can be beneficial. It occurred to me that the scrap wood that held the frames might be of some use in building one. After some experimentation, I found that the areas that housed frames 4 and E would work. Because of the added planking on the hull, some trimming was required, but it worked out well. Using scrap wood, I was able to build the cradle. The extension and stop at the back of the cradle will insure that the model always sits in the exact same orientation, which will help with laying out the waterline. I do this for all of my models. When I checked the plans, I noticed that the hull had a little drag to it. (The stern sat lower in the water than the bow.) At first, I thought this might be a printing error, but checking some references, I found another longboat that also had this characteristic. So, the craddle was adjusted accordingly. BobF


- 277 replies
-
- 16
-
-
- model shipways
- 18th century longboat
- (and 1 more)