HOLIDAY DONATION DRIVE - SUPPORT MSW - DO YOUR PART TO KEEP THIS GREAT FORUM GOING! (Only 24 donations so far out of 49,000 members - C'mon guys!)
×


BobF
-
Posts
175 -
Joined
-
Last visited
Content Type
Profiles
Forums
Gallery
Events
Everything posted by BobF
-
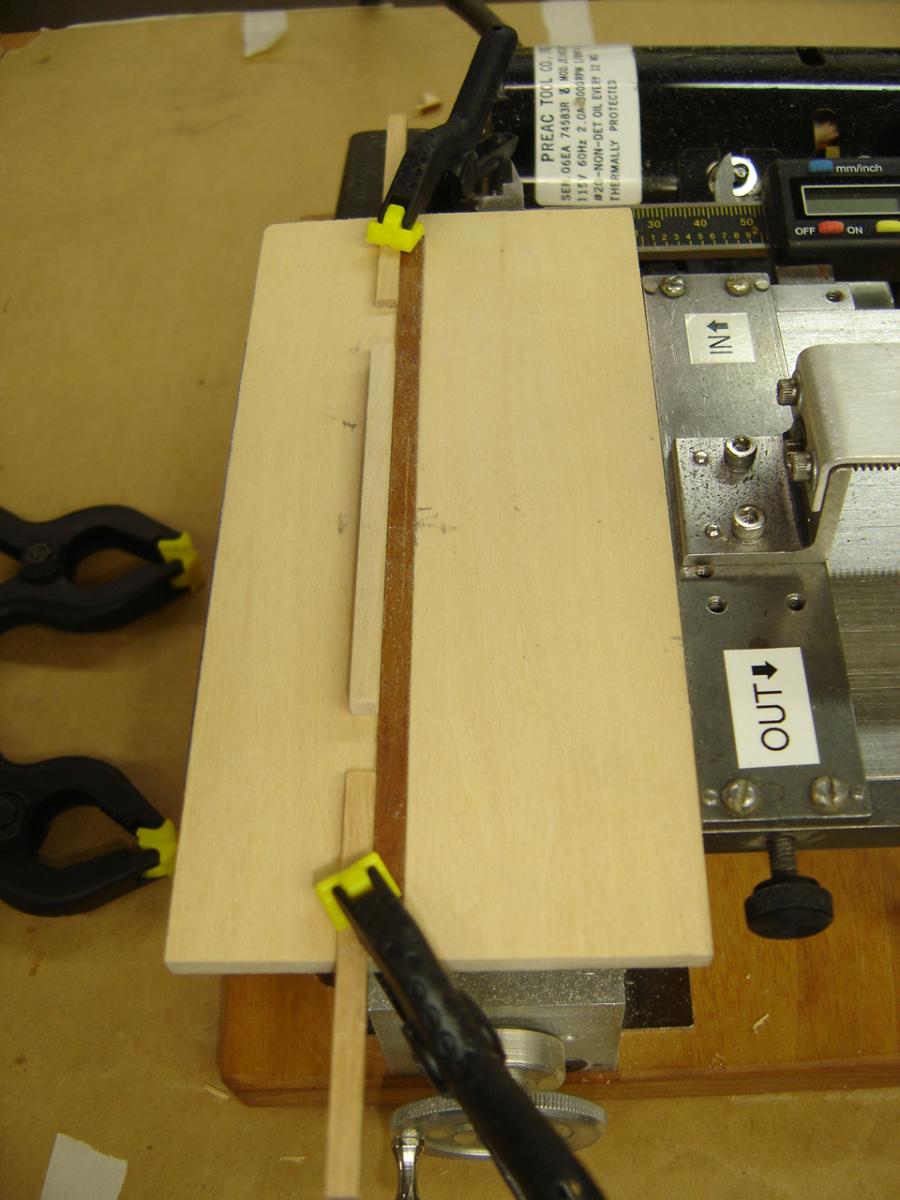
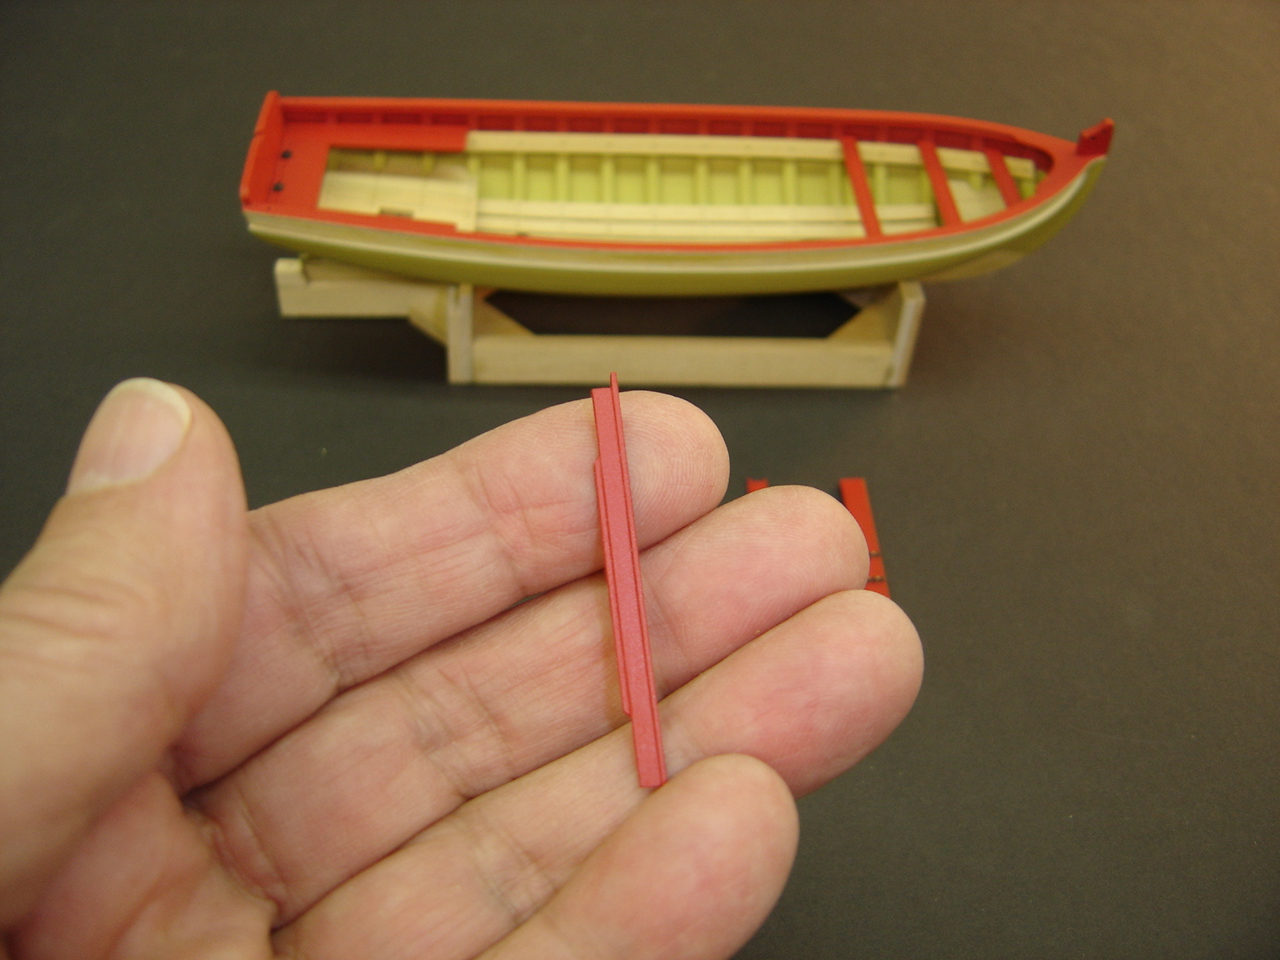
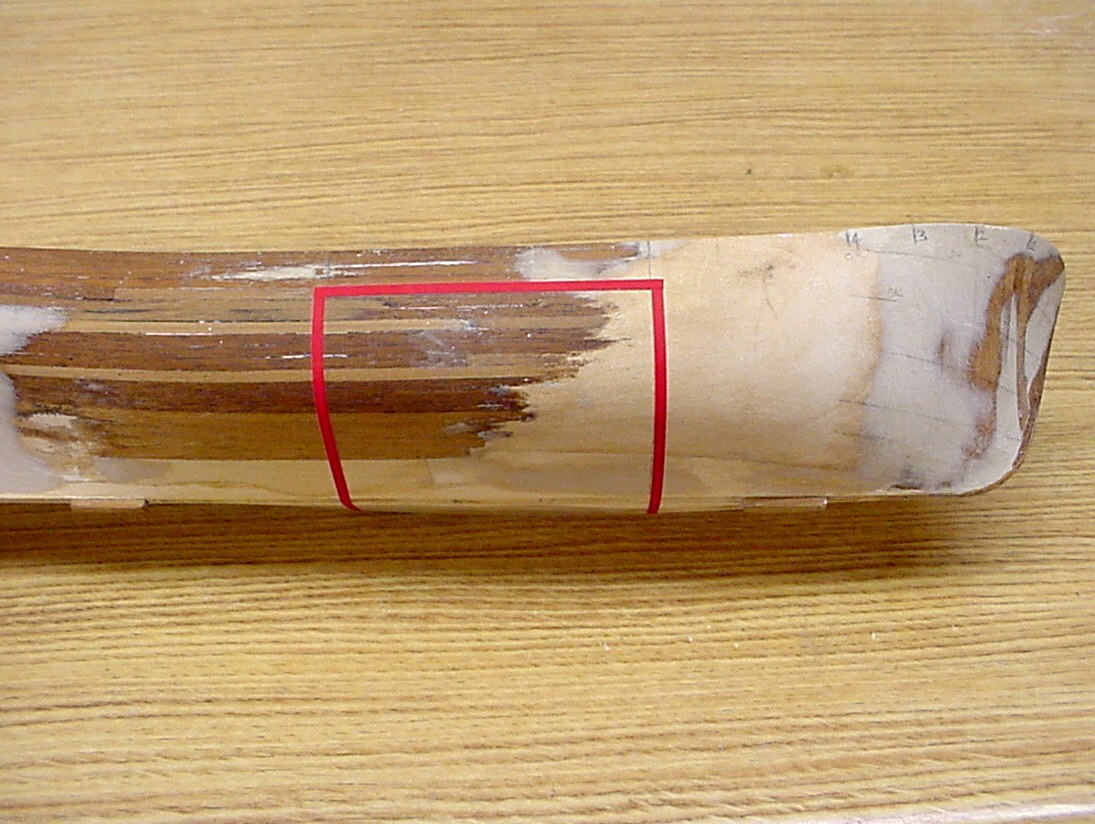
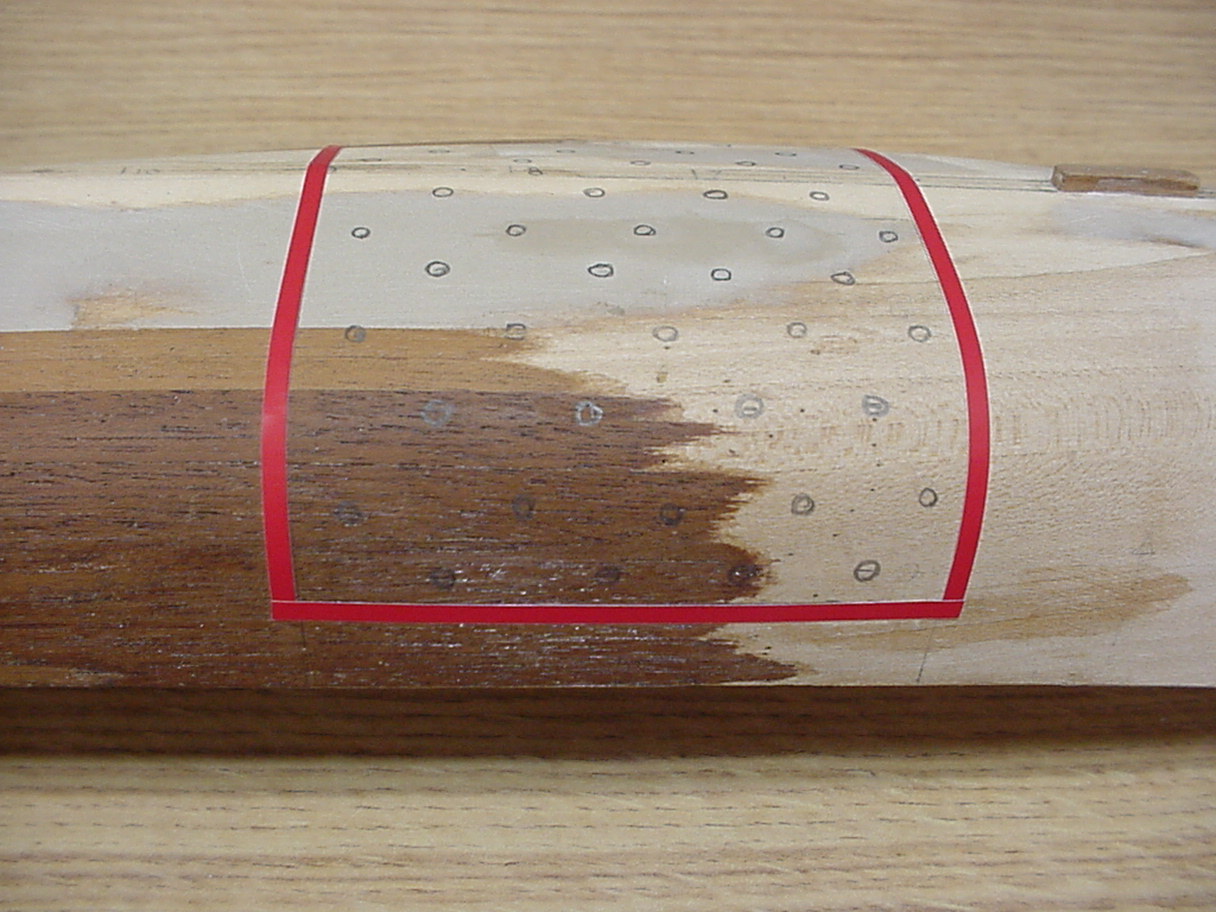
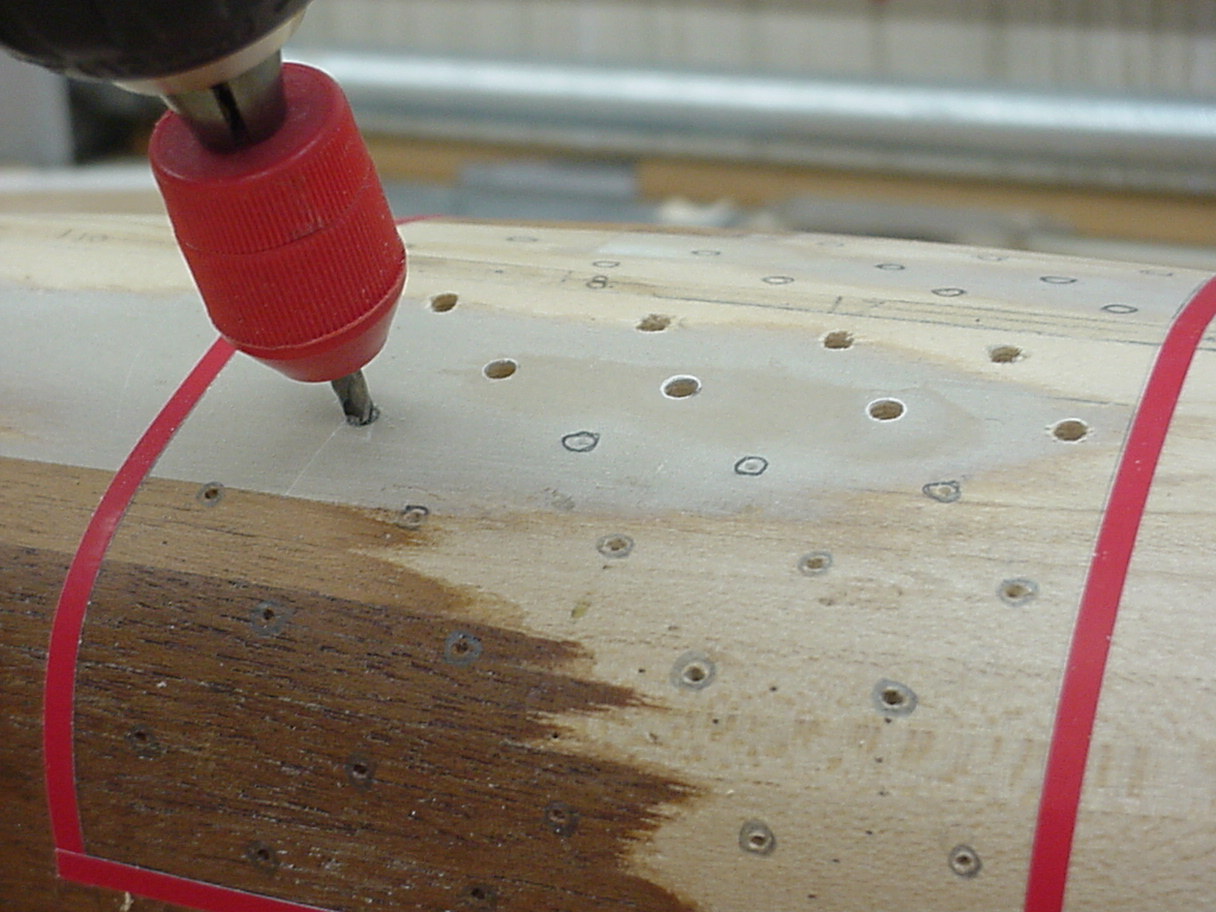
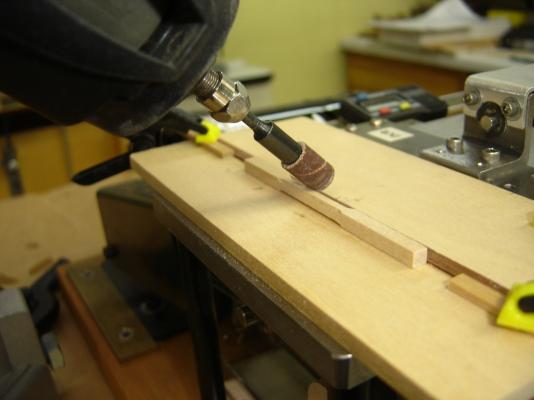
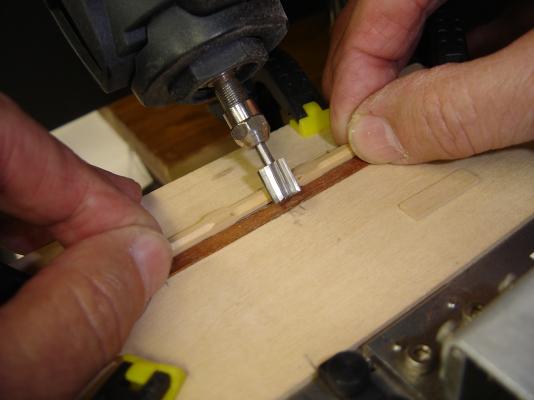
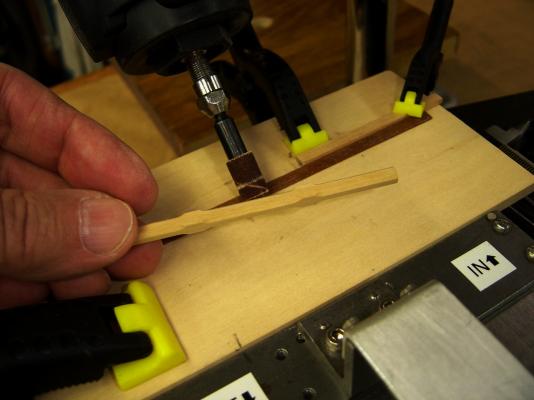
 When it comes to sanding, filing, or cutting bevels into square pieces of wood, my hand/eye coordination leaves something to be desired. Although I was looking forward to making the windlass, I felt that I would have to come up with another way of fabricating it. My solution amounted to what might be called a poor man's milling machine. It involved combining my Dremel drill press with my Preac table saw. The drill press base was clamped to my work table, and the head was rotated 180 degrees. The Moto tool was set at a 45 degree angle, and a sanding drum was inserted in the chuck. The Preac rip fence would be used for making fine adjustments. A sheet of basswood, with a strip of wood glued to it, would be kept against the fence as it was adjusted. In the photo, you can see a piece of stock in position, and two lengths of scrap wood that will be used as stops. The Preac saw isn't absolutely necessary for this procedure, but it really helped. Once you have marked off the limits on your stock, it becomes a matter of slowly adjusting the rip fence, until you have the proper depth of cut. For this initial step, keep your stops set well within the area you will finally want to remove. Set the stops to their final position, only after the proper depth of cut has been achieved. On my first effort, I overlooked this detail, and ended up with a bevel that was much too long! After finishing my first cuts, I noticed that the sanding drum was leaving deep scratches in the surface of the piece. I tried sanding them out, but it pretty much defeated the purpose of this whole procedure. So, I changed over to a Dremel High Speed Cutter, which is sold two to a package. These worked quite well. Once you have beveled all three areas, you can cut off the excess, and use the piece as shown in the kit plans. Please note that this last photo was taken before I changed over to the high speed cutter. BobF

- 277 replies
-
- 12
-

-
- model shipways
- 18th century longboat
- (and 1 more)
-
Mike: Yes, I was referring to the risers not being vertical. I usually like to plan ahead when I build a model, but this one caught me by surprise. I couldn't help but think about how early in the construction of the hull, the problem was created. Installing the windlass wasn't even on the radar screen! Anyway, thanks for the kind words. BobF
- 277 replies
-
- 1
-
-
- model shipways
- 18th century longboat
- (and 1 more)
-
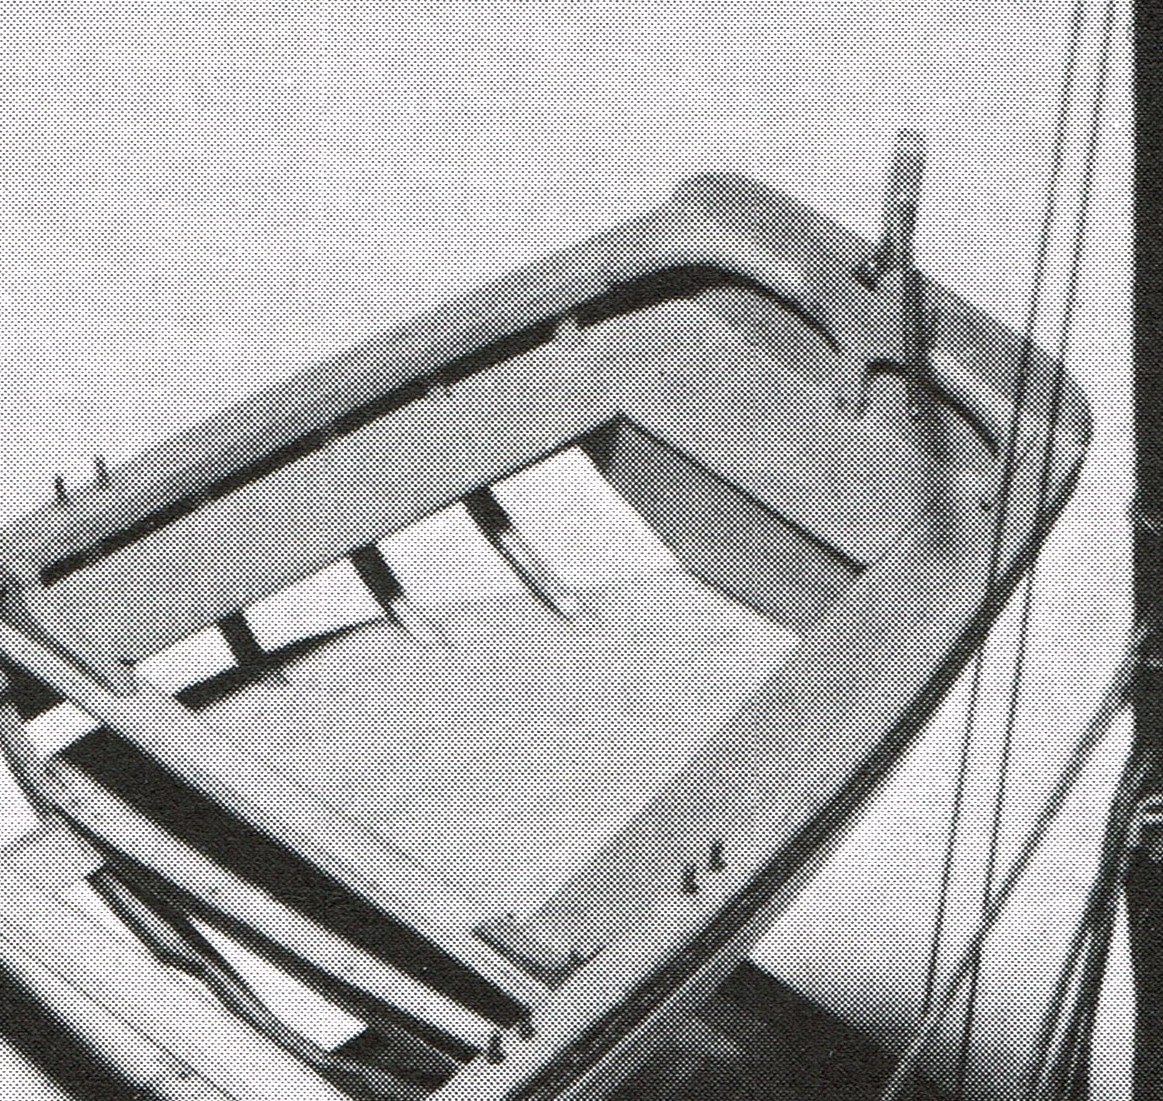
When I started working on the windlass, it didn't take me long to realize that I had a problem with the risers. They were way out of plumb, which made mounting the windlass directly to them pretty much out of the question. After studying contemporary models, I noticed that it was common for the windlass to be mounted to slotted plates that were mounted on the risers. I tried making a pair that were bevelled on the back side, which I hoped would compensate for the problem. Unfortunately, they were much to thick on the top edge, and didn't look very pleasing. The only other option seemed to be cutting into the risers, which would allow me to affix the plates with the correct orientation. Not historically correct, but I couldn't see any other way to solve my predicament. Since the risers were made out of boxwood, I wasn't very optimistic about the eventual outcome. Taking my time, the cuts were made, but my paint job got pretty banged up. As you can see, I also had to cut into one of the frames. Prior to taking this photo, I did some touching up!. There wasn't much room below the riser, so the plates aren't as wide as those featured on contemporary models. Finally, I decided to insert a small plug inside the slots. If visible at all, they would appear to be the axles for the windlass, and they also gave me some surface area for gluing the windlass in place. I plan on the windlass being a slide fit. BobF
- 277 replies
-
- 8
-
-
- model shipways
- 18th century longboat
- (and 1 more)
-
Hello all, Here's a review on SeaWatch's latest book. I hope you find it informative. BobF USS Susquehanna 1847.pdf
-
- 5
-
-
Ahoy mates, Here is a review of Volume IV Revised, which I wrote for my club newsletter. It pretty much echos what has already been written. SeaWatch didn't have to print the supplement, but they did. Now we're able to keep our original editions up to date at a minimal expense. Here's a company that's looking out for its clients! BobF Swan Vol. IV Revised Edition.pdf
- 3 replies
-
- 10
-
-
Dan: Saw the model at our club meeting last night, and it's really impressive. I really enjoyed discussing possible display options with you. Can't wait to see how it all turns out! BobF
- 175 replies
-
- 1
-
-
- 18th century longboat
- model shipways
- (and 1 more)
-
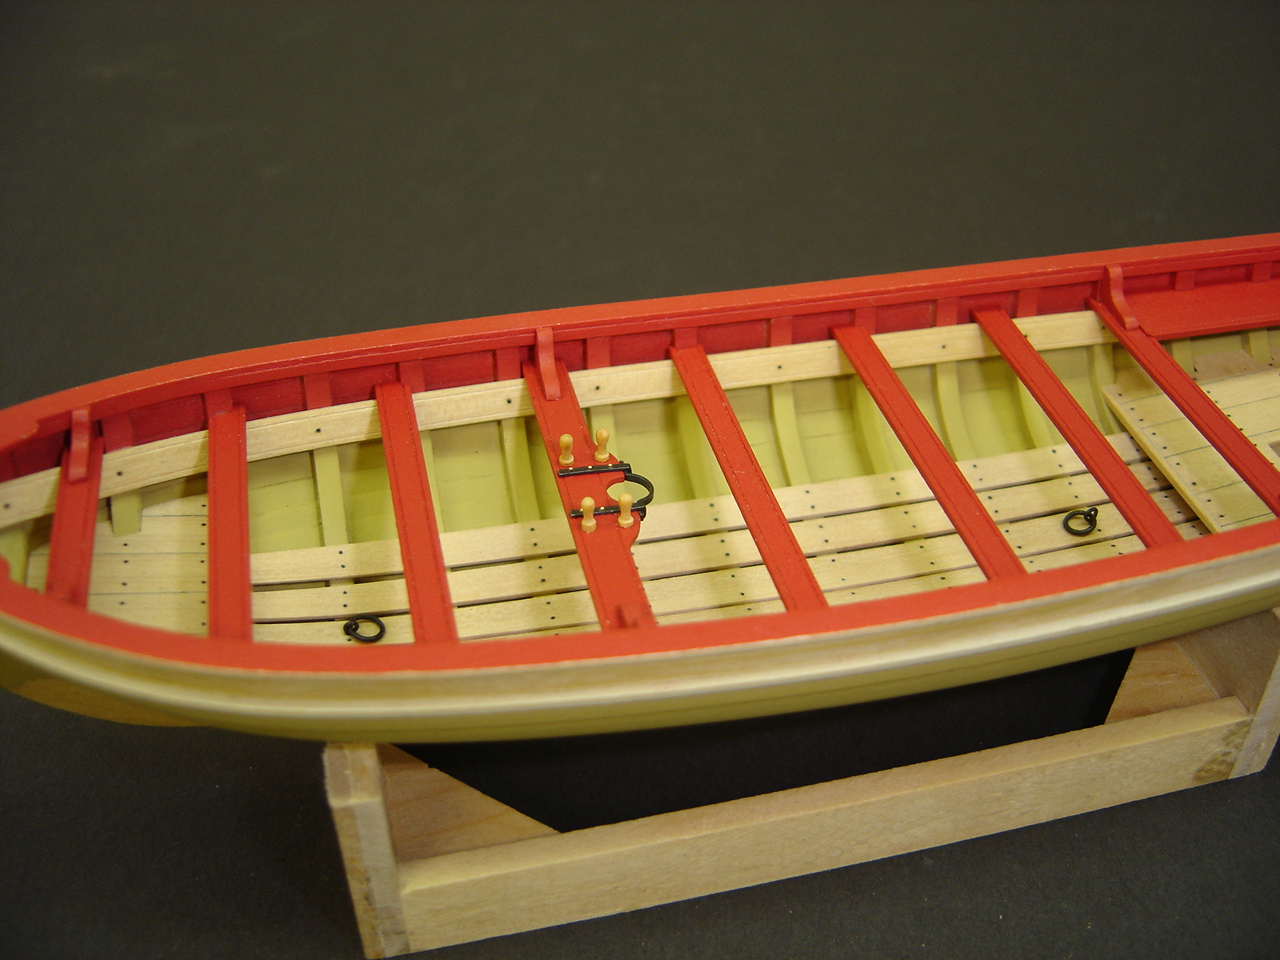
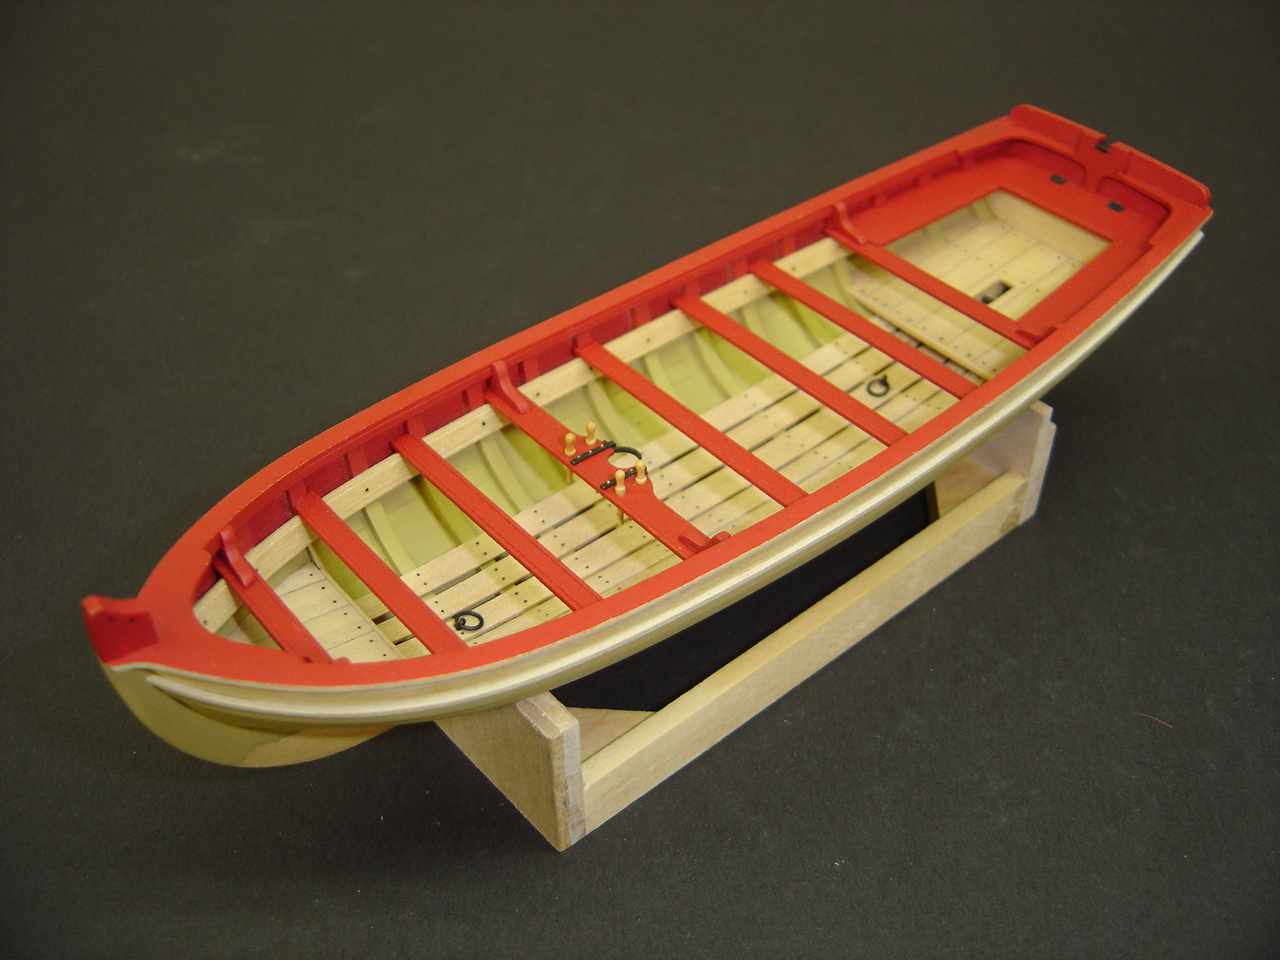
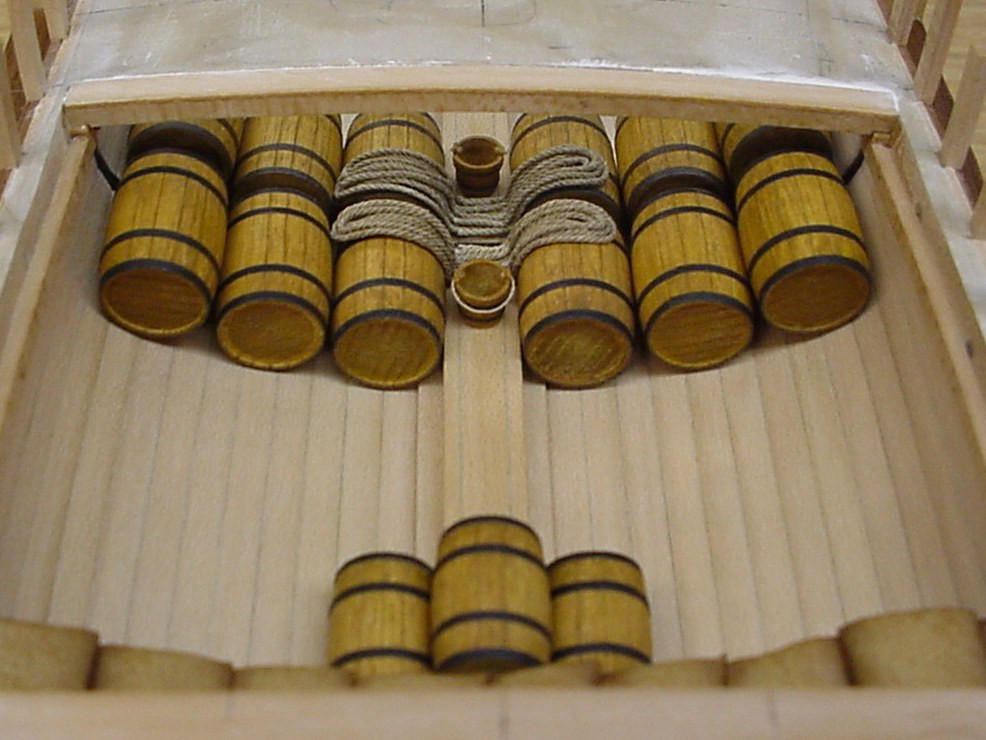
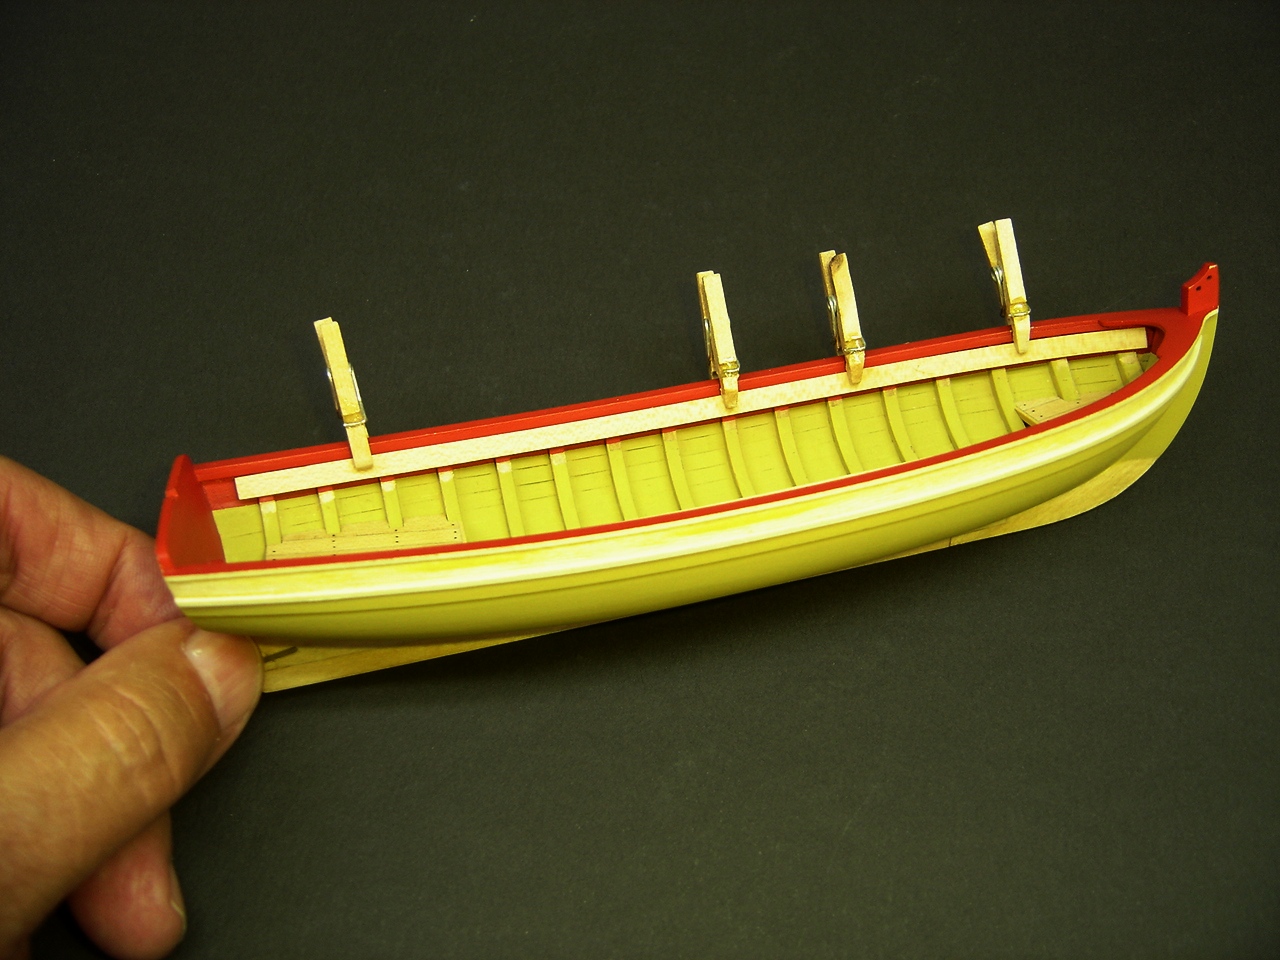
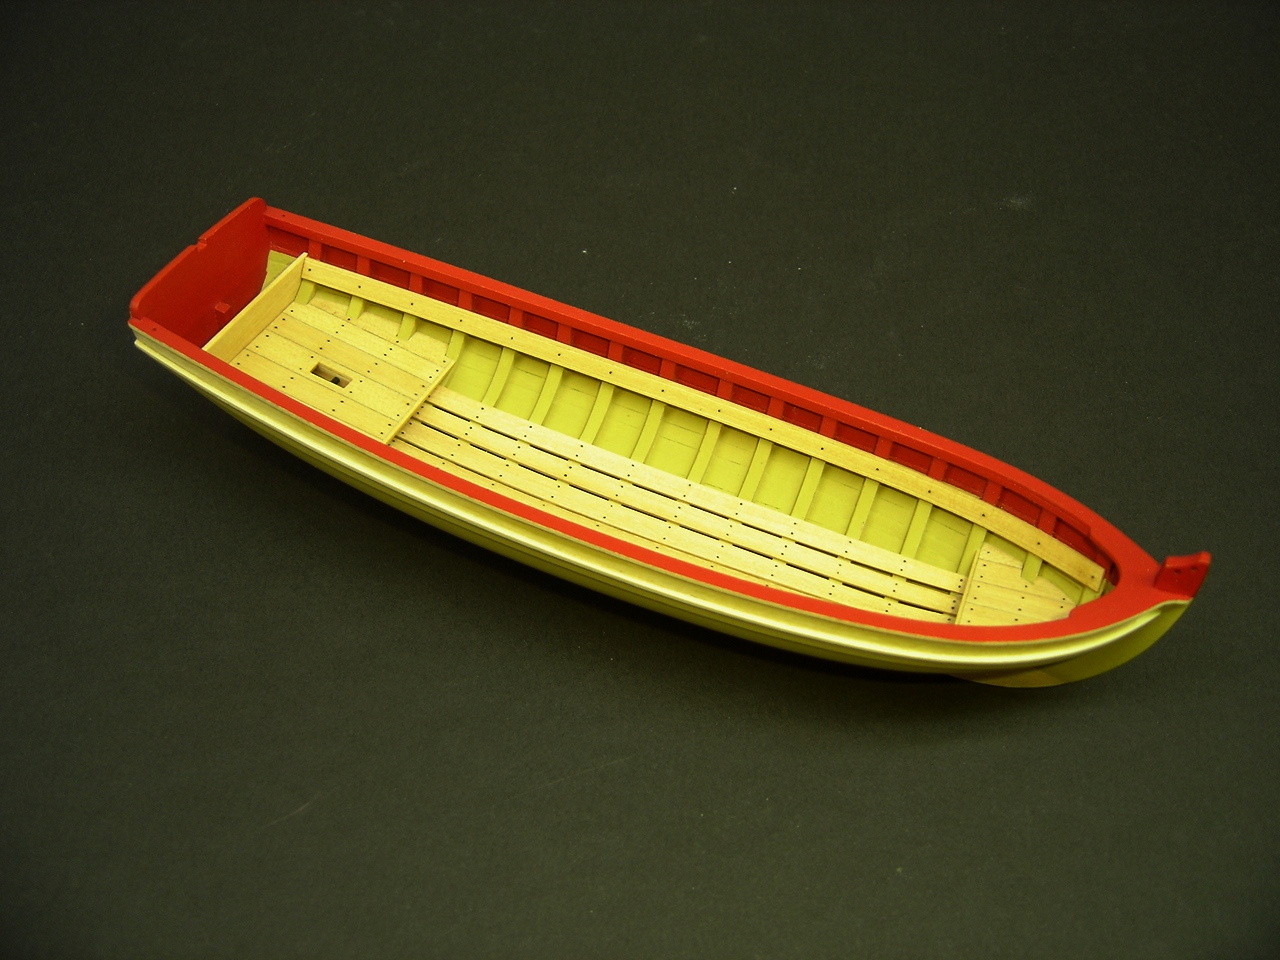
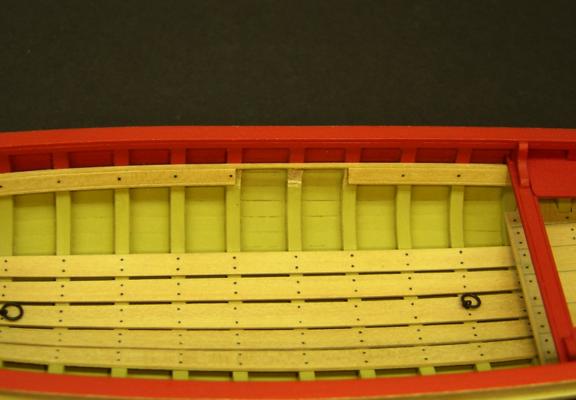
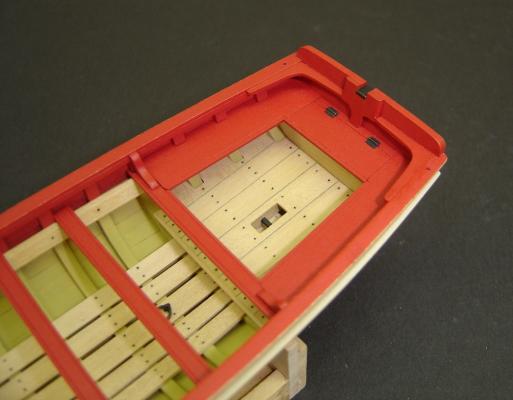
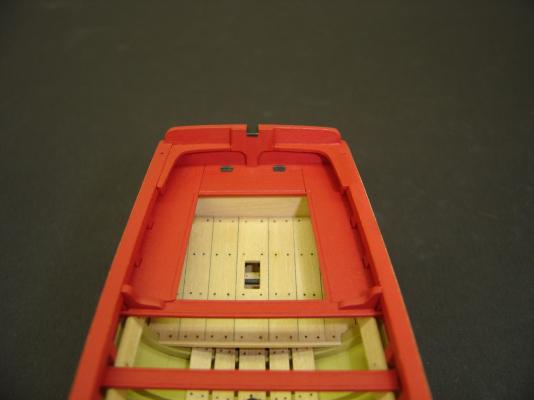
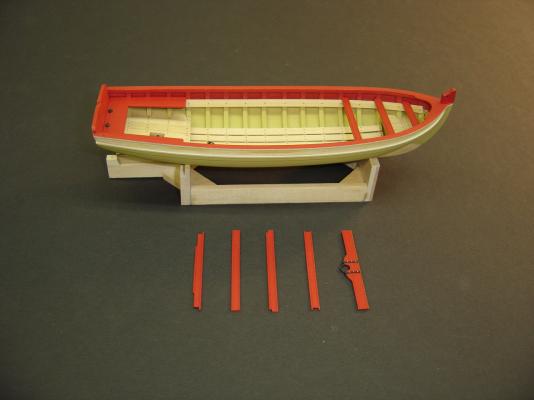
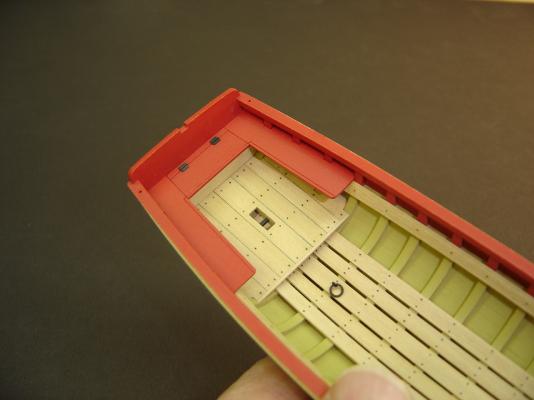
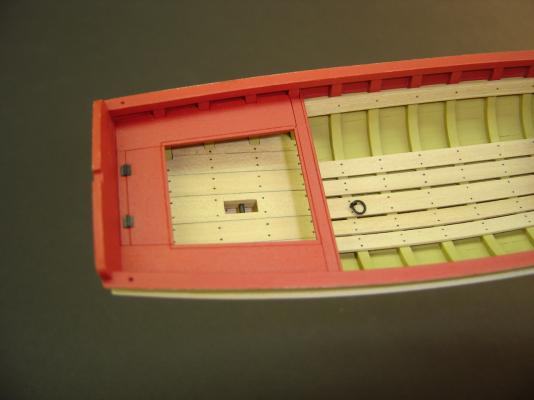
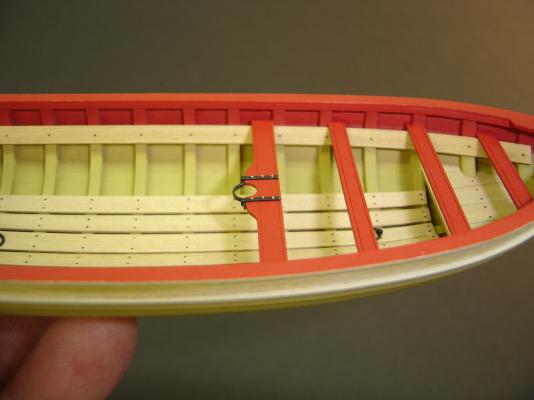
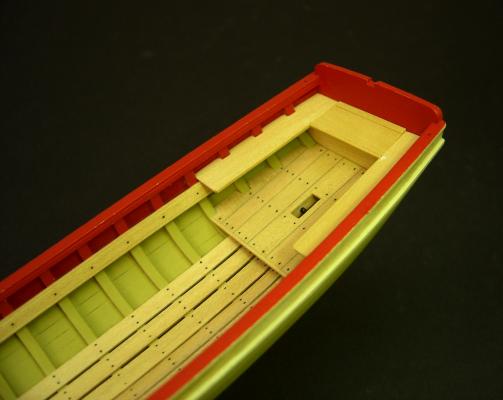
Here are some photos of the completed cockpit area and the thwart that supports the mast. Some changes to the cockpit were based on photos of contemporary models. Apparently, it was quite common for these craft to have additional bracing on the interior side of the transom. Here is one such model. If you look closely, you can see a metal plate in the notch that would have supported the anchor davit. This makes sense since the davit probably exerted considerable stress on the transom while working with the ship's anchor. Here's my interpretation of that photo: No modifications to the thwart were made, other than the fact that I substituted boxwood belaying pins for those supplied with the kit. Some of the thwarts have not been glued in place yet. I placed them in position for these photos. I think the additional room will help with the installation of the windlass, which is next. BobF

- 277 replies
-
- 13
-
-
- model shipways
- 18th century longboat
- (and 1 more)
-
Toni - Thanks for the kind words. Actually, I don't have any great plans for the rigging, other than how the deadeyes are fastened to the hull. Contemporary models show them hooked to the chainplates. So, that's what I hope to do. Also, I noticed that the metal support at the heel of the bowsprit is anchored to the forward thwart, not the platform. I'm kind of getting ahead of myself here, but please stay tuned. BobF
-
J & Jack, Thanks for the kind words. It feels good to be contributing to MSW again. BobF
- 277 replies
-
- 1
-
-
- model shipways
- 18th century longboat
- (and 1 more)
-
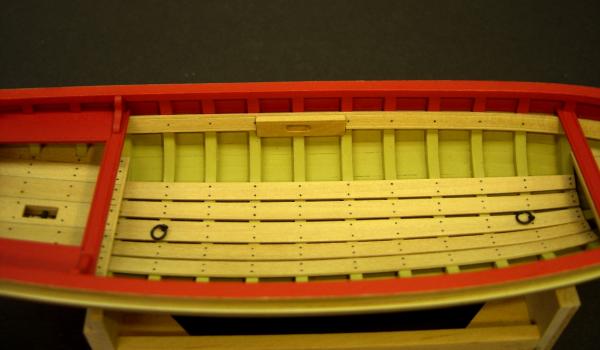
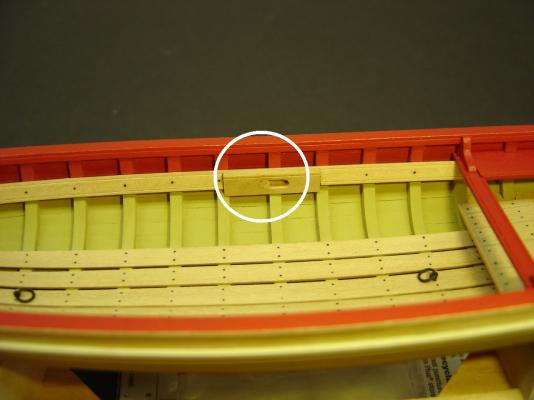
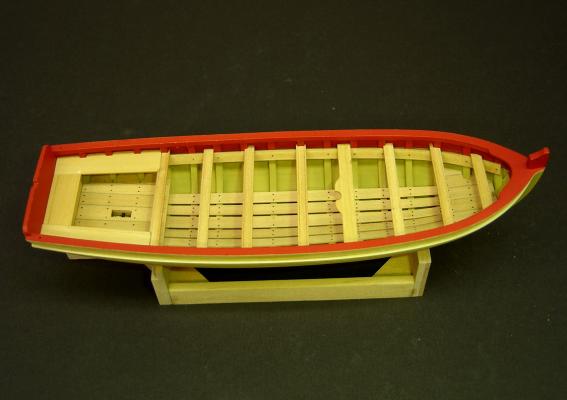
Hello all, Pulled the longboat out of mothballs, and started working on it again. Although all the thwarts are finished, I'm going to leave those off that are on either side of the windlass until after the windlass is installed. I noticed that the cockpit seats on NMM longboats have scribing all the way around their inner edge, so I thought I'd try it. This caused the thwart at the forward end of the cockpit to have a rather strange shape, which took a while to configure. The scribed lines didn't line up perfectly, but I really didn't want to do them over again. I decided to embellish the support straps that hold the mast bracket in place. I drilled three #80 holes in each strap, and inserted pieces of brass wire to simulate mounting bolts. Since they are so small, I decided to leave them bright, so they could be seen. I still need to mount the belaying pins, so this thwart has not been glued in place.


- 277 replies
-
- 21
-
-
- model shipways
- 18th century longboat
- (and 1 more)
-
Hello all, I just wanted to apologize for my lack of participation lately in this discussion group. Two months ago, I decided to remodel my workshop, and that pretty much brought my modeling to a screeching halt. The good news is that I'm getting close to finishing what I set out to do, and will soon be resuming work on the long boat. I'm really looking forward to it! BobF
- 277 replies
-
- 10
-
-
- model shipways
- 18th century longboat
- (and 1 more)
-
Hello all, I just finished writing a review on 17th Century Dutch Merchant Ships for my club newsletter. Marcus has already submitted a very nice write-up of his own for MSW, but I thought a few extra comments on this remarkable book couldn't hurt. I hope you find it informative. BobF Dutch Merchant Ships.pdf
-
Charlie - Here are some photos I took of the Sultana's interior, when I attended the Washington NRG Conference in 2001. I hope they help. BobF


-
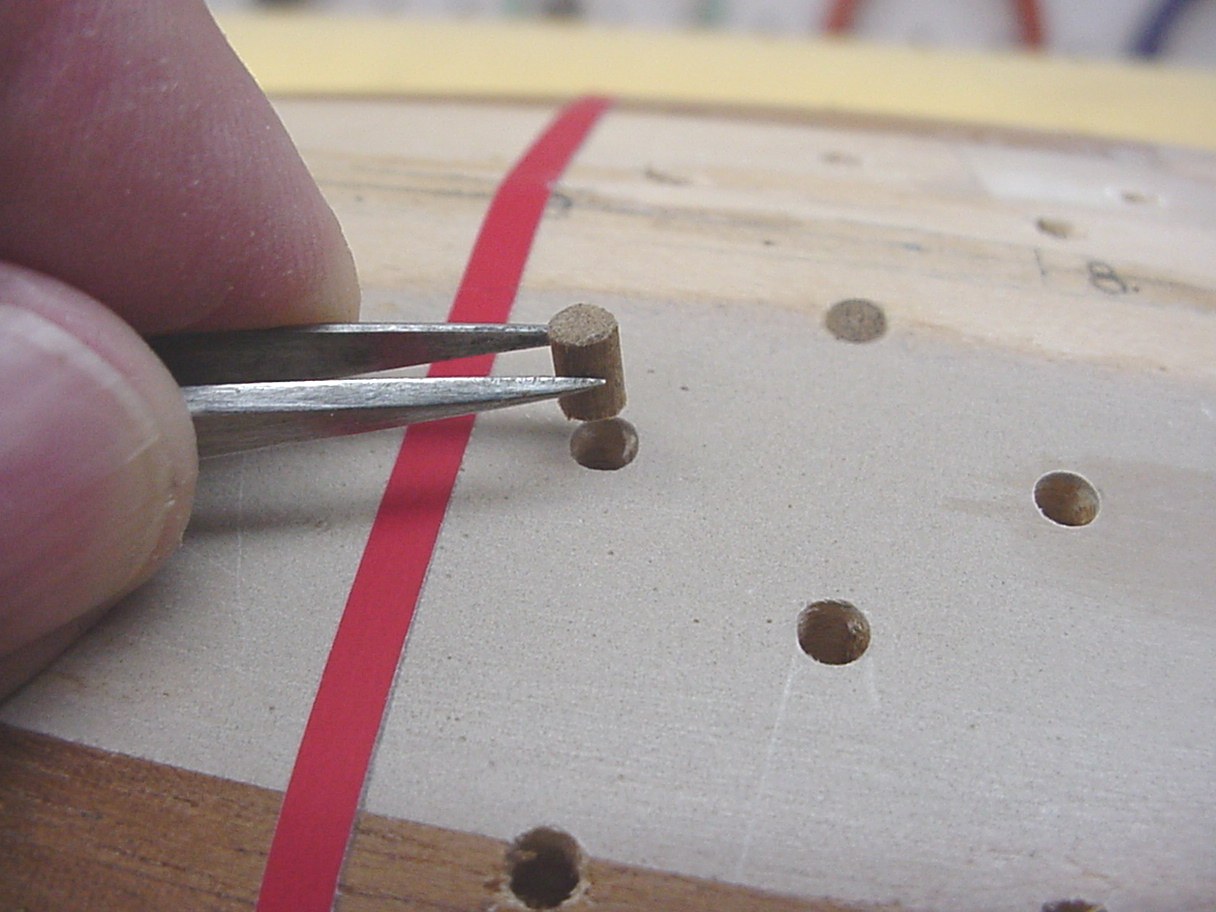
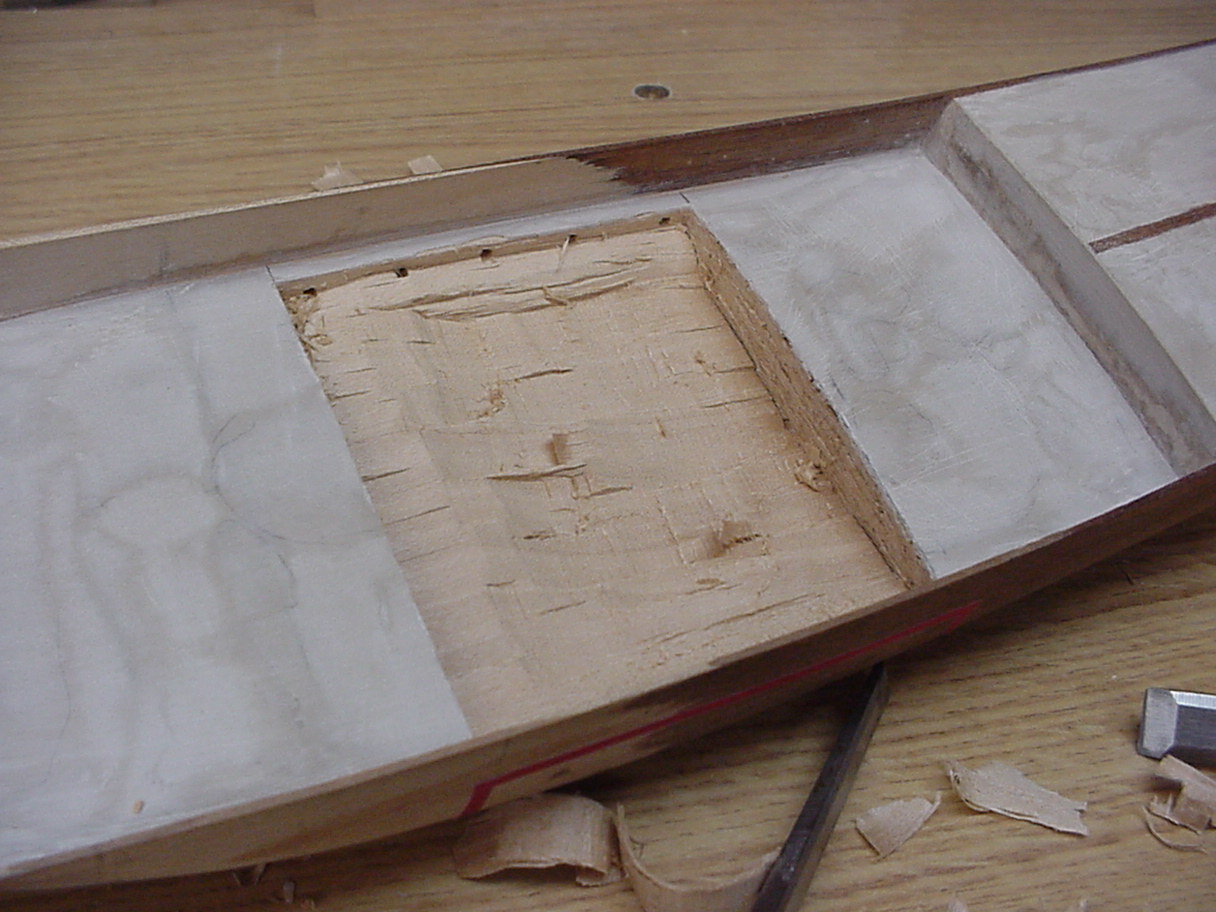
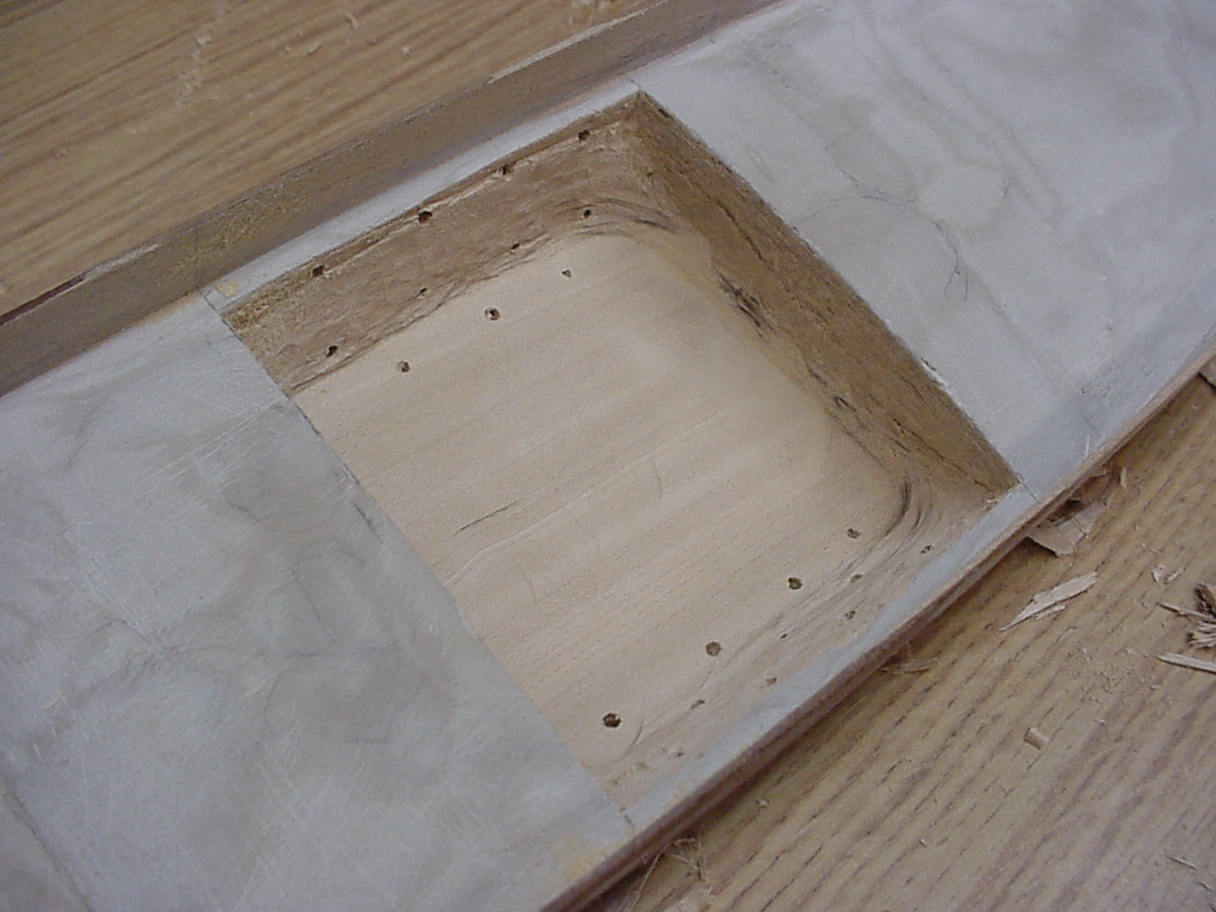
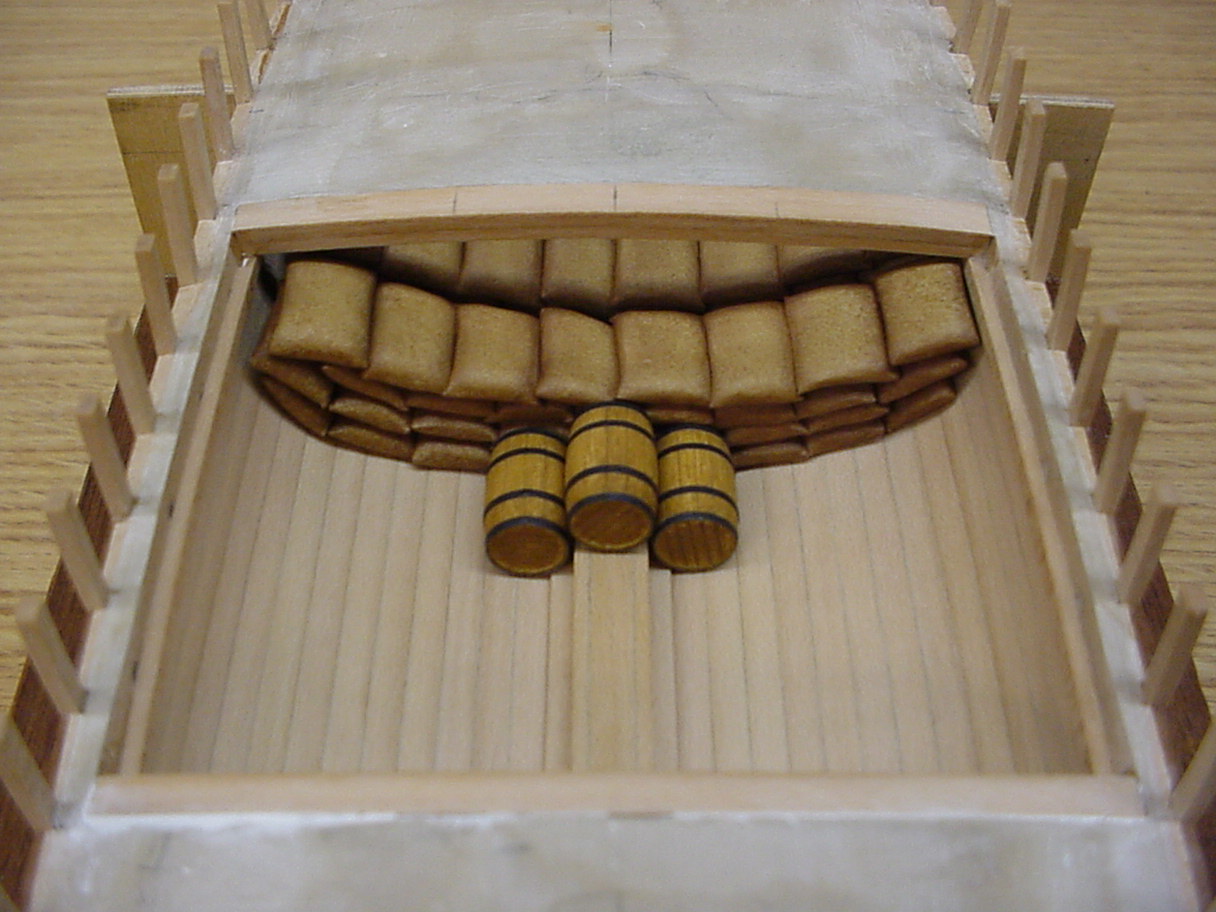
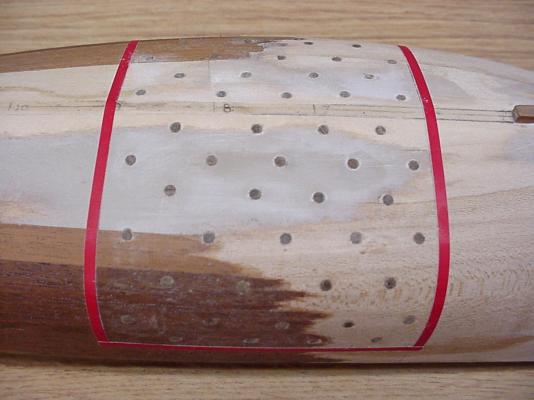
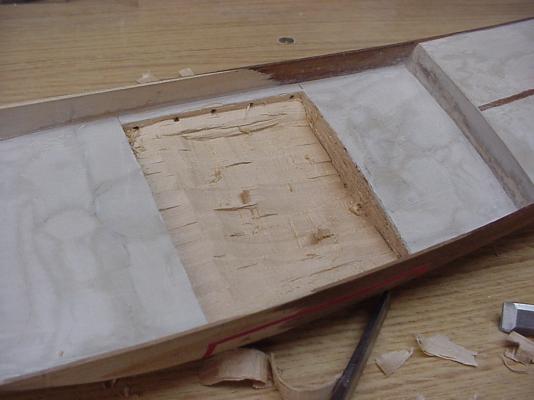
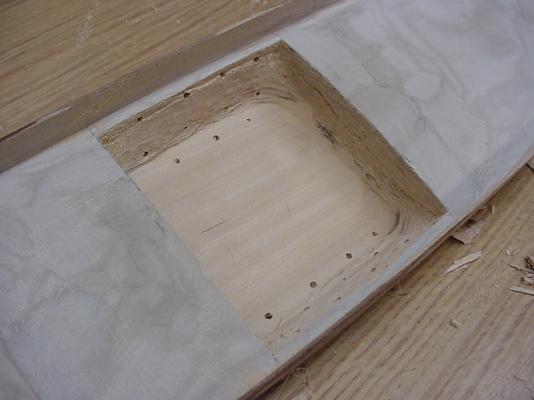
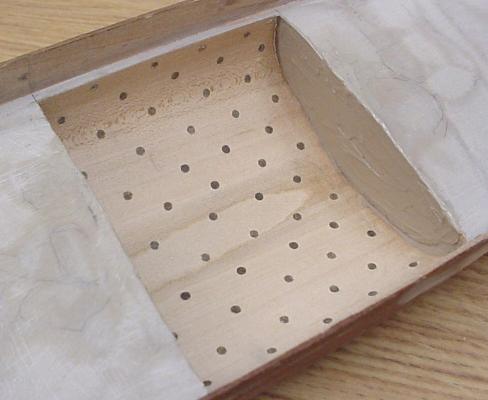
Charlie - I had a similar situation with a cargo hold I wanted to incorporate into a solid hull. What you want to do is a lot more complex, but maybe this might work. Like you, my biggest concern was maintaining a consistent thickness while carving out the hull. I think the photos pretty much explain what I did. The pegs were 3/16" long, but you could make them any length you wish. Once the area was hollowed out, the rest was pretty straight forward. I ended up installing mirrors behind the cargo to give the illusion of depth. I hope this helps. Good luck! BobF


-
I just finished writing a review on this book for my club newsletter. So, I thought I'd share it with the rest of you. I certainly agree with all the positive comments that have already been made. BobF Comet of 1783.pdf
-
Hey Ryland, Your model is looking great! When I zoom in on one of your photos, I'm so impressed with how clean and precise.your work is. Thanks for sharing it with us. BobF
-
Andrew - Another source for potential nails or trunnels is the old fashion scrub brush. The bristles are quite stiff, and primarily brown in color. I knew a modeler who once trunneled a scratch built Hanah with these, and it looked great. They may not all be the same diameter, so some time would have to be spent sorting through them after they are cut from the wood backing. I really appreciate the kind comments about my model. BobF.
- 277 replies
-
- 1
-
-
- model shipways
- 18th century longboat
- (and 1 more)
-
Hmmm. I'm stumped as to why the glue would bleed through the wood. That certainly could impact how staining the hull will turn out. Applying a pre-stain wood conditioner might minimize, or even eliminate any uneven appearance. It would be a shame to cover that very nice planking job, but if all else fails, the hull can be painted. I wasn't happy with my stain job, and had to pursue that option. BobF
- 55 replies
-
- 1
-
-
- 18th century longboat
- model shipways
- (and 1 more)
-
This little long boat can be very deceptive. I've planked a number of models, and I feel that this one was the most challenging. It's hard to believe that this was your first attempt at planking. Congratulations on a very nice job! BobF
- 55 replies
-
- 2
-
-
- 18th century longboat
- model shipways
- (and 1 more)
-
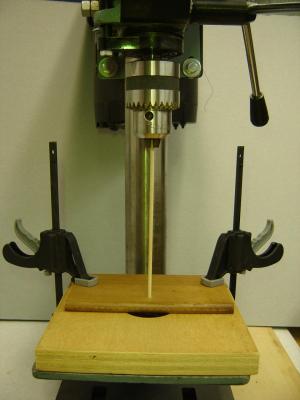
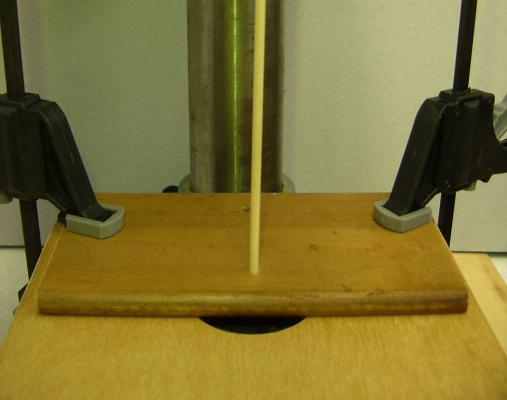
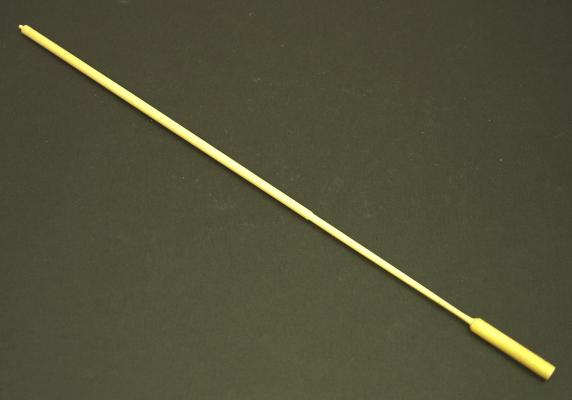
Hi Dan, Here's something that has worked pretty well for me. Depending on the length of the spar or mast, I chuck up the dowel in my drill press, and use a piece of scrap wood to steady the stock and prevent whipping. You may have noticed that the stock isn't exactly plumb in the photo. I set this up for this post, and didn't excatly take my time. A little bar soap can be used as a lubricant, if you are concerned about generating heat from the friction that might occur. It's not a very good photo, but here's my mainmast, which was done in this manner. As you can see, the plug that rotated inside the base is still attached, and there aren't any heat marks. BobF
- 175 replies
-
- 6
-
-
- 18th century longboat
- model shipways
- (and 1 more)
-
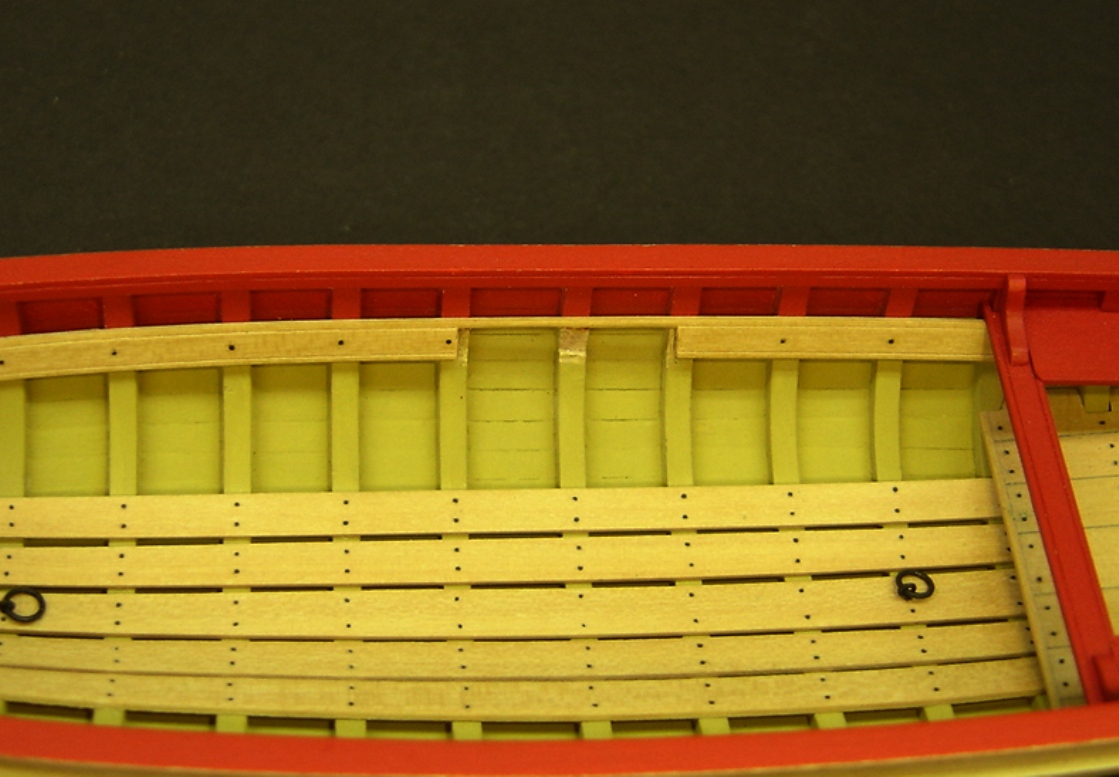
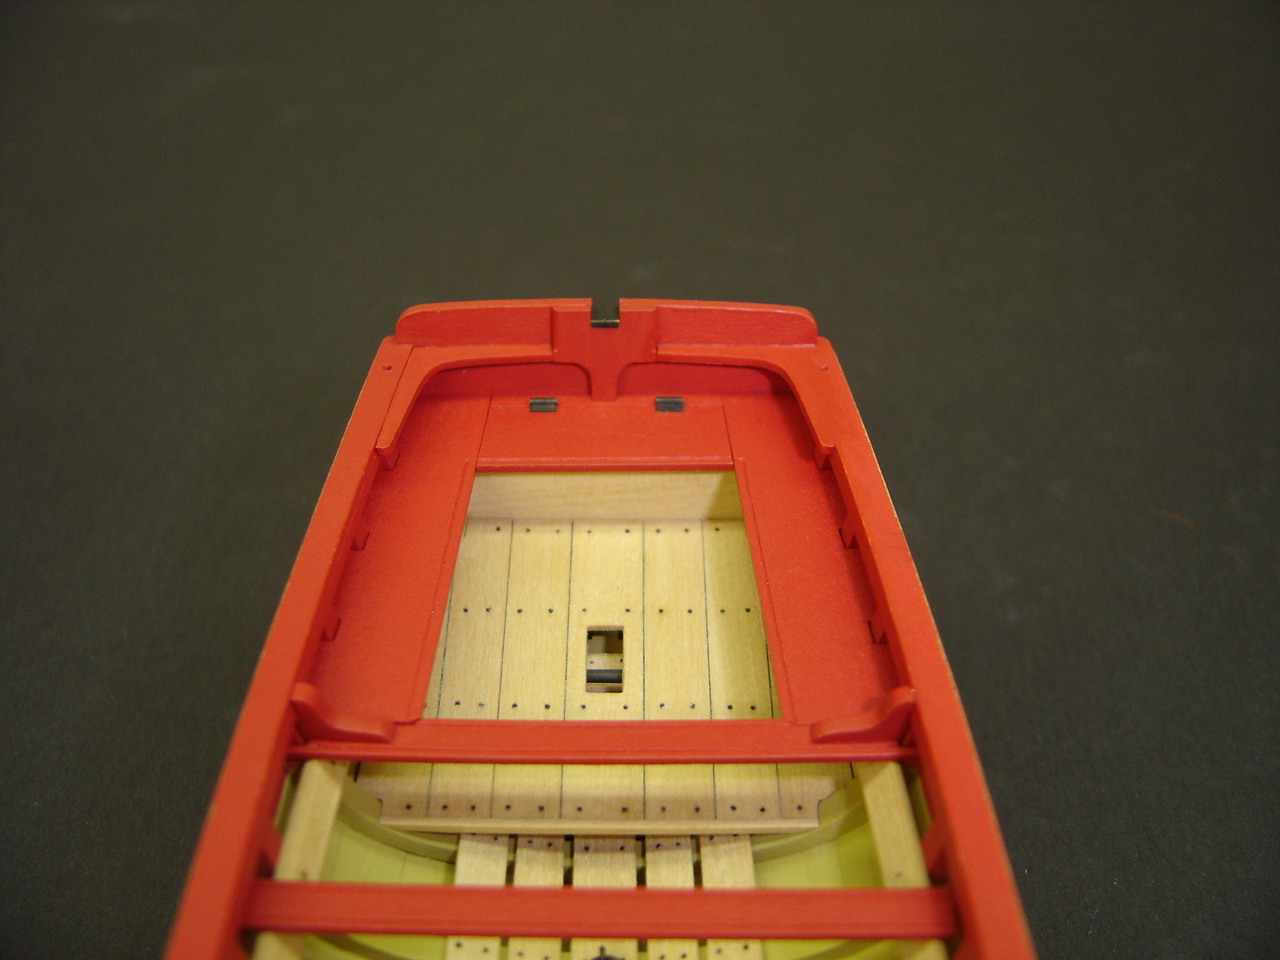
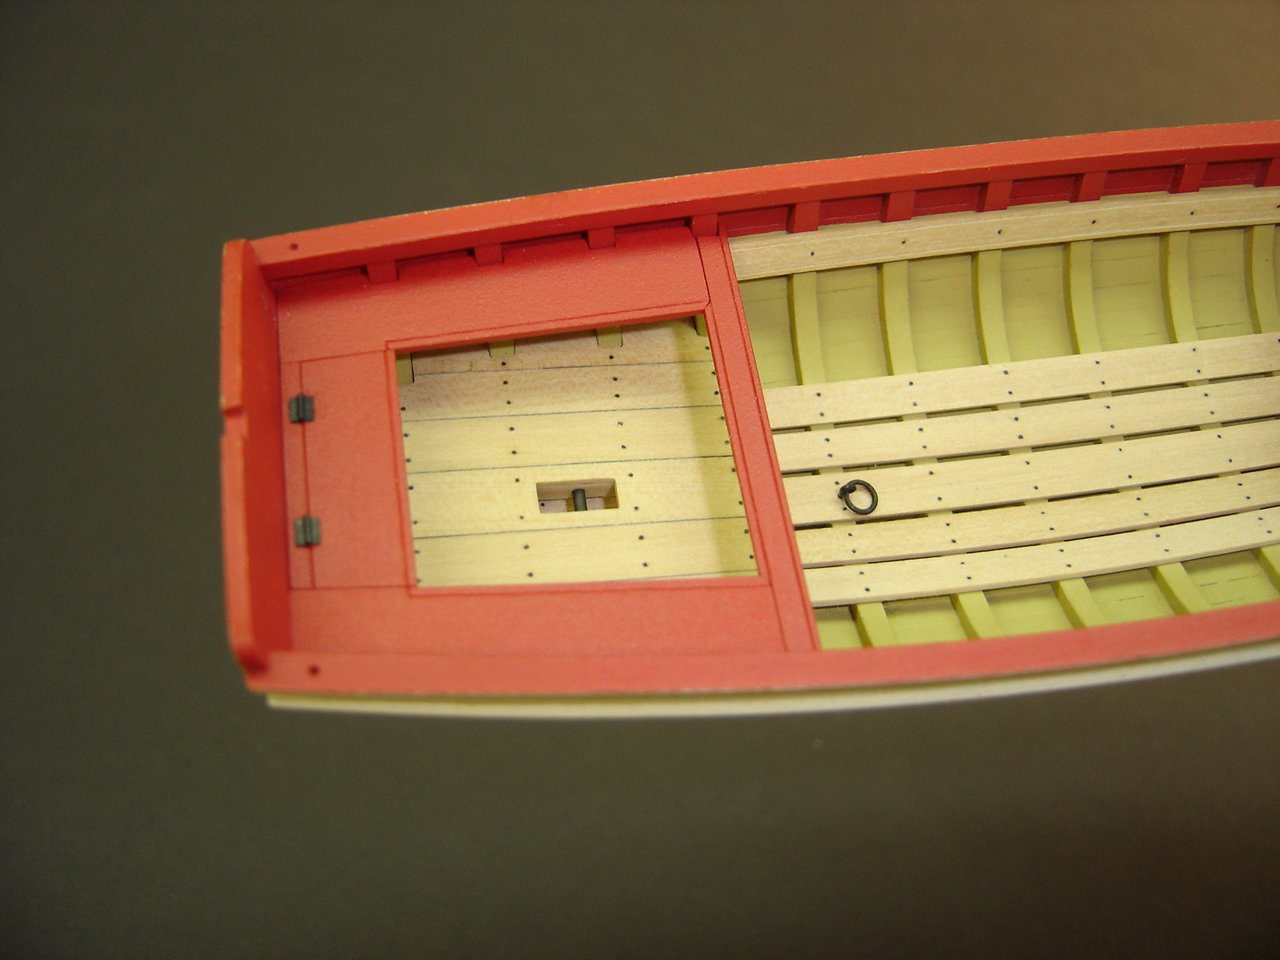
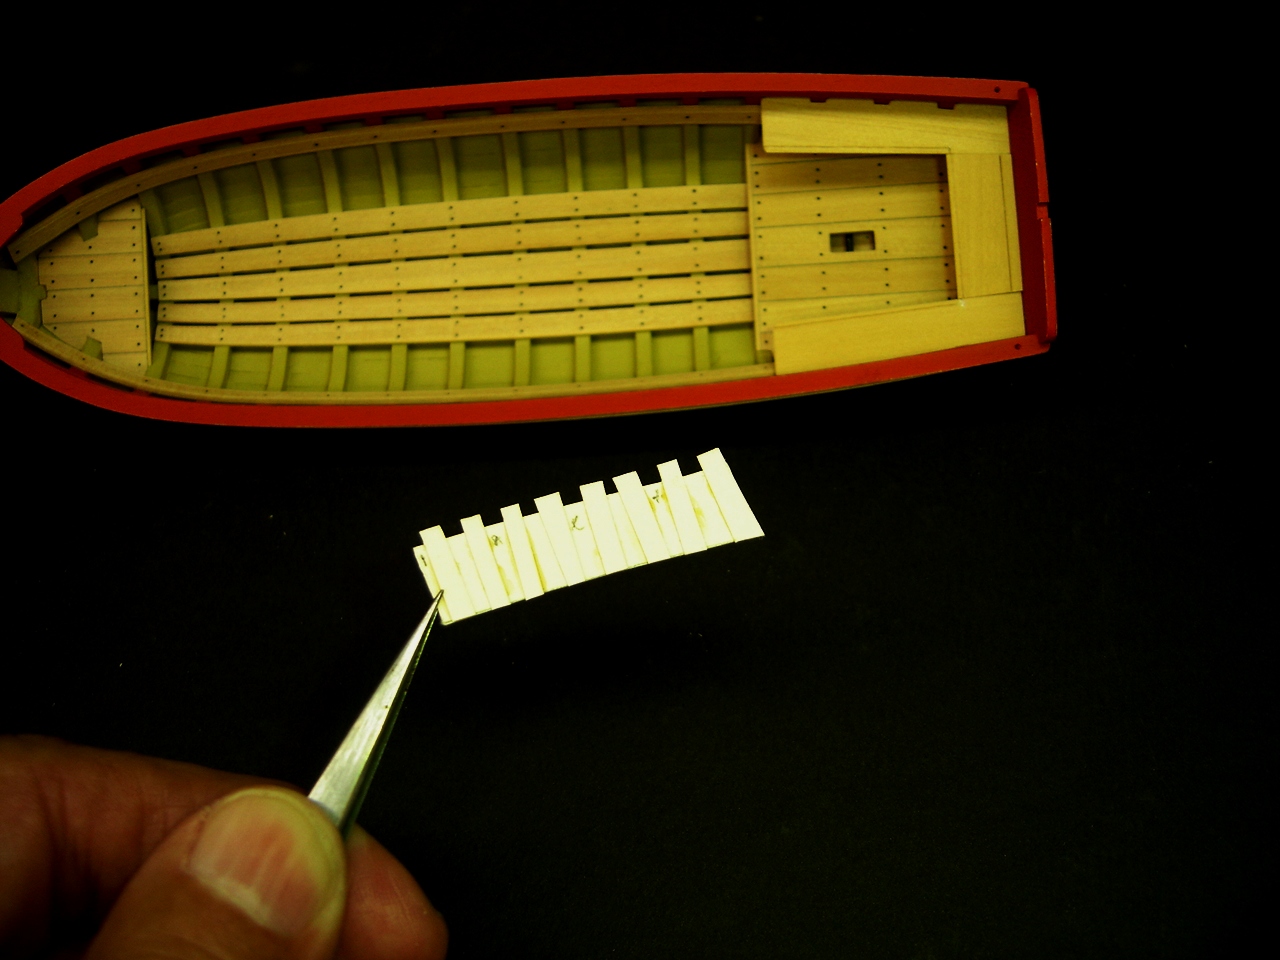
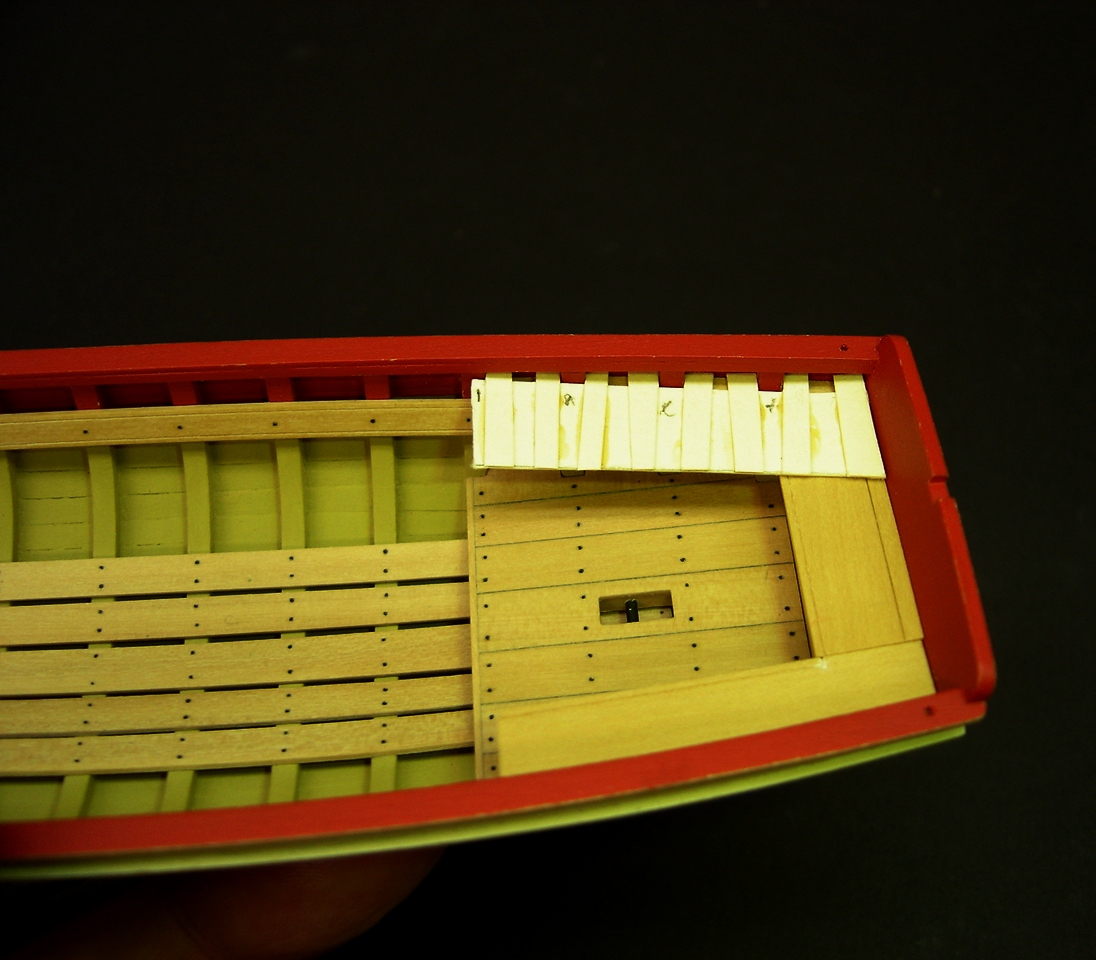
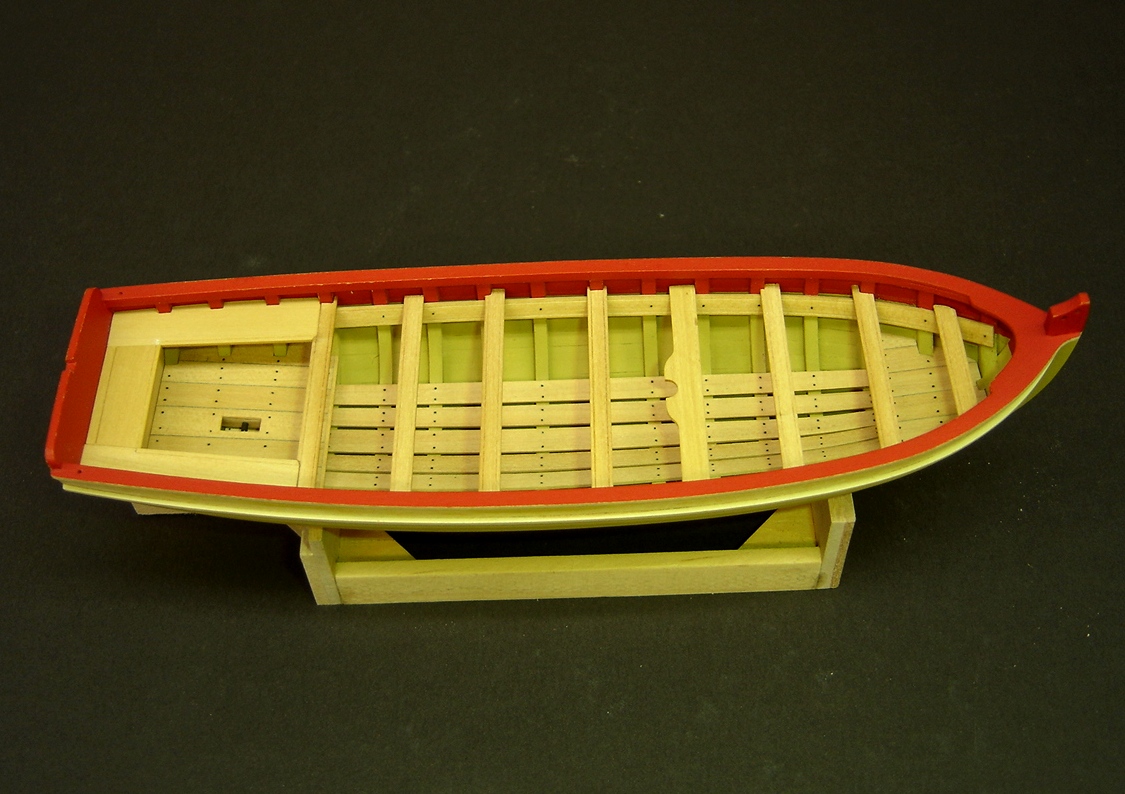
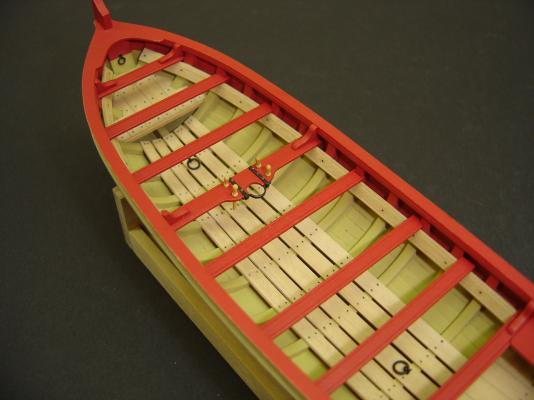
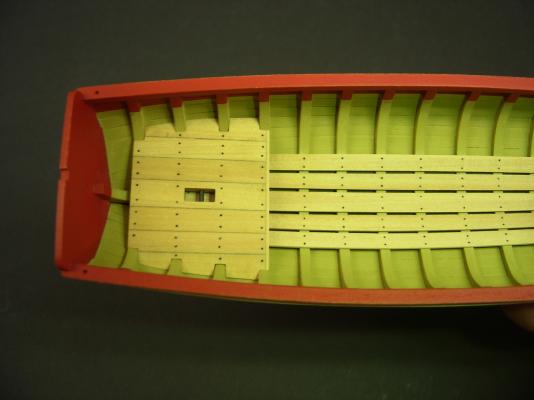
Hello all, Nothing really earth-shaking to report. I decided to use templates for the port and starboard cockpit seats, which took a lot of guess work out of the process. I intend to paint all the thwarts and cockpit seating, so none of these pieces have been glued in place yet. I also want to install the ring bolts in the center floor board and apron. The ring bolt in the apron is for the staysail halyard block, which would have hooked onto the ring bolt. BobF


- 277 replies
-
- 9
-
-
- model shipways
- 18th century longboat
- (and 1 more)
-
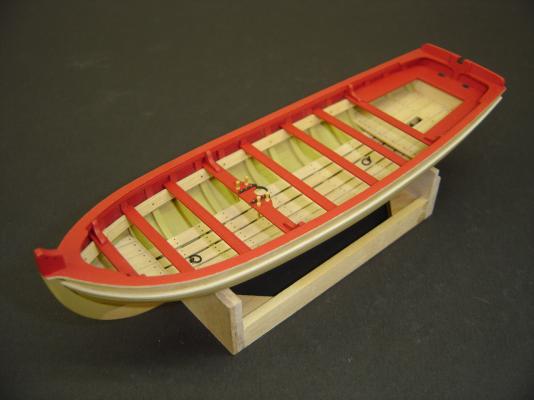
With the platforms completed, the risers were next. I used two spacers to make sure the distance between the cap rail and risers was correct. The miniature clamps were a big help, although they did have a nasty habit of popping off, if I bumped them! Not having the frieze strips glued in place also paid off here, since there was a good chance that they would have gotten damaged. Never the less, I still managed to nick the red paint job on the cap rail in a few places. After scribing and pre-bending the strips, I decided to put the simulated nail heads in before the risers were mounted. The last photo shows the port riser and the front face of the storage locker in place. BobF

- 277 replies
-
- 15
-
-
- model shipways
- 18th century longboat
- (and 1 more)
-
Hi Dan, Very innovative approach, and the illustrations are excellent. I'll certainly consider your procedure, since I still have that "hurdle" ahead of me. Which bit did you damage? I may have extras. BobF
-
Mike: Beautiful job! Congratulations, and thank you for sharing your work with us. BobF
-
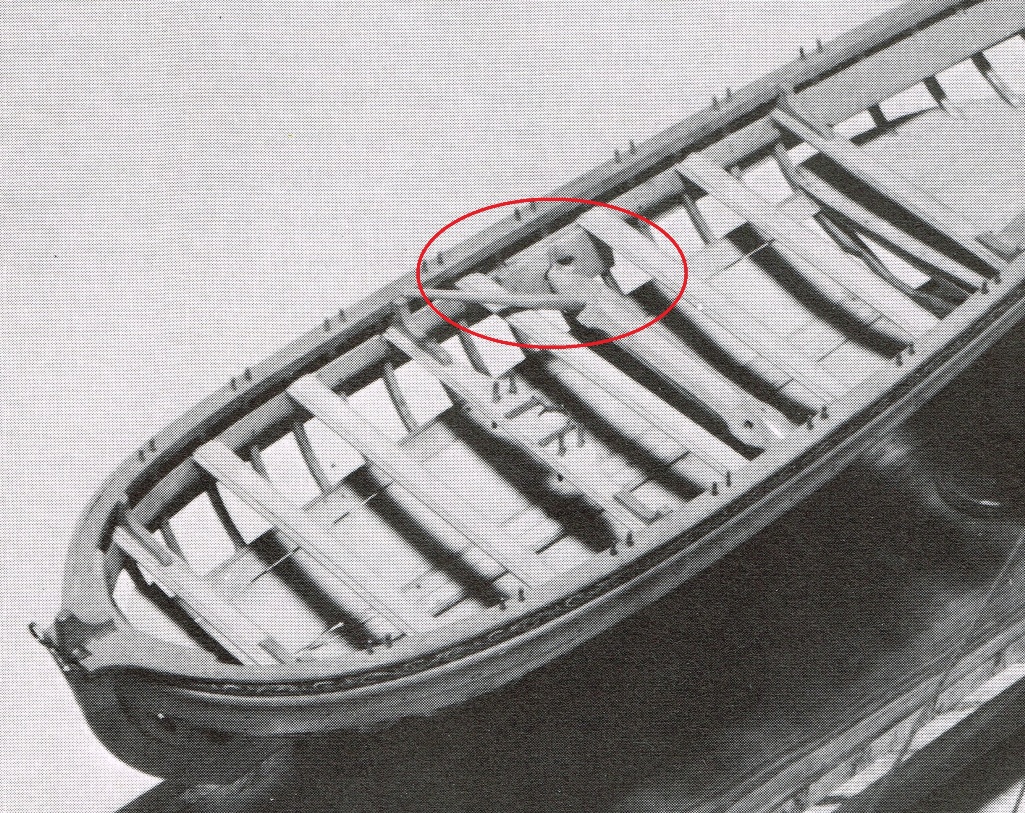
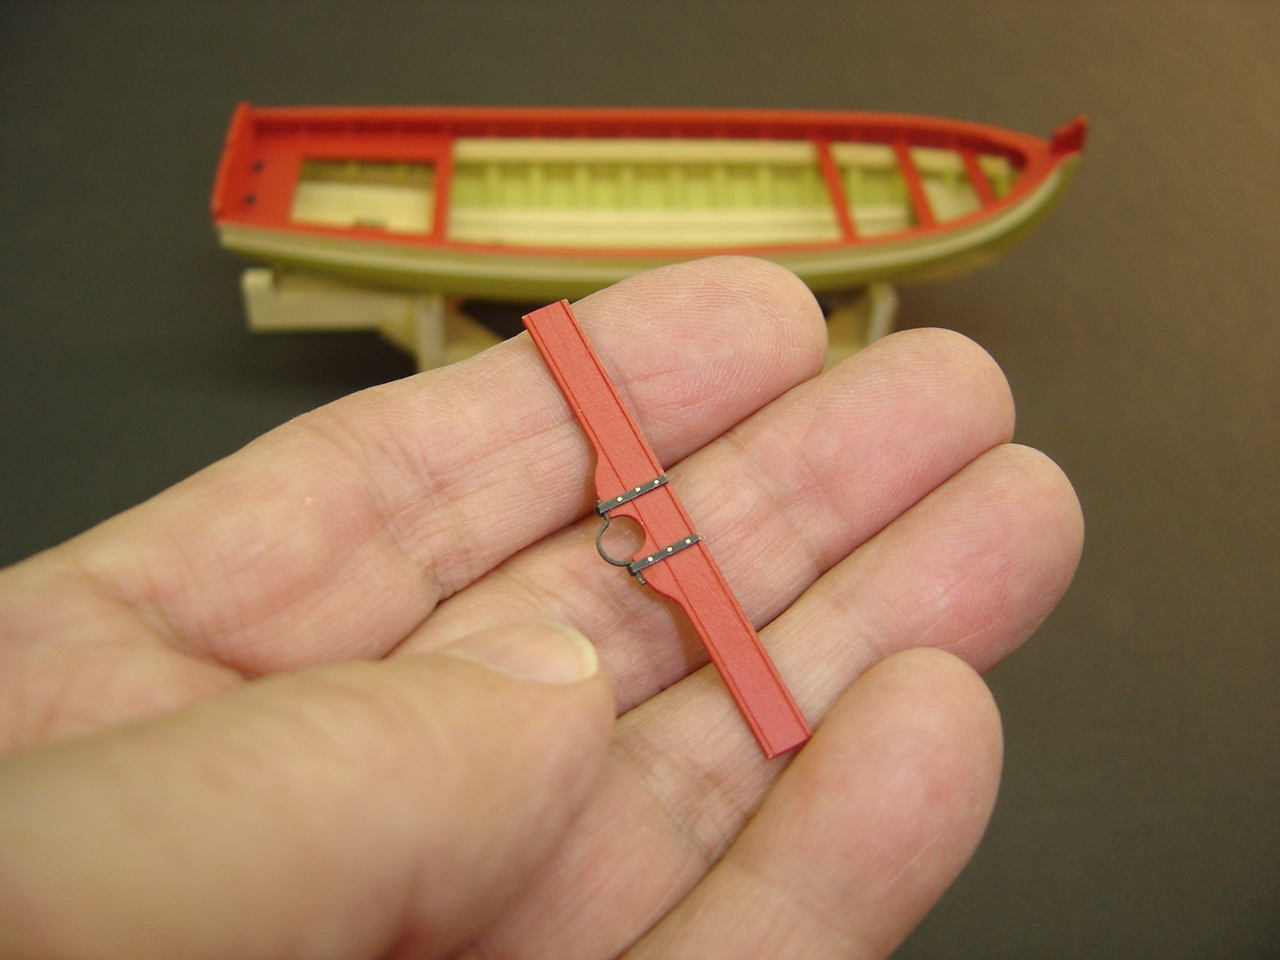
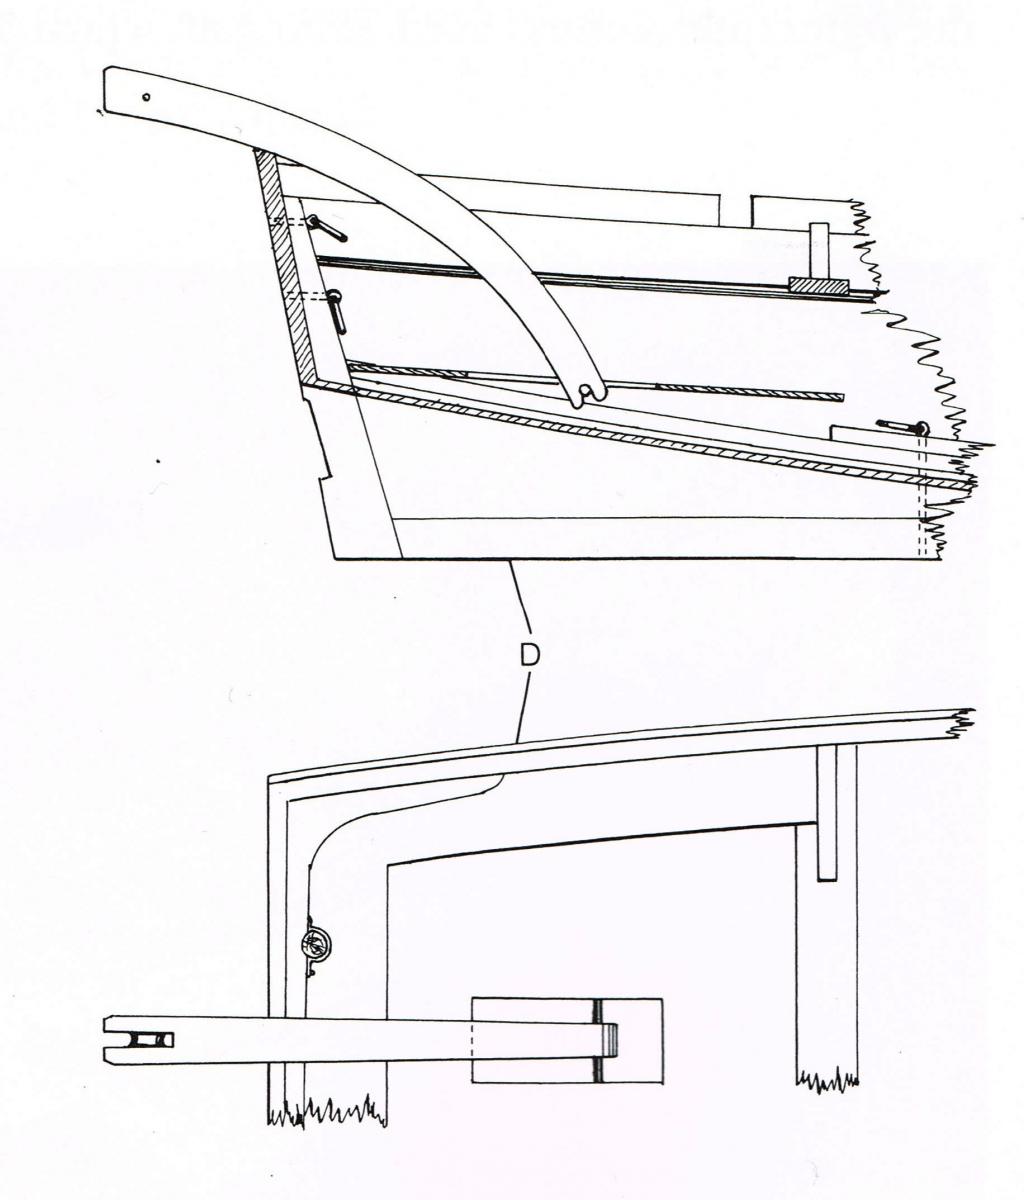
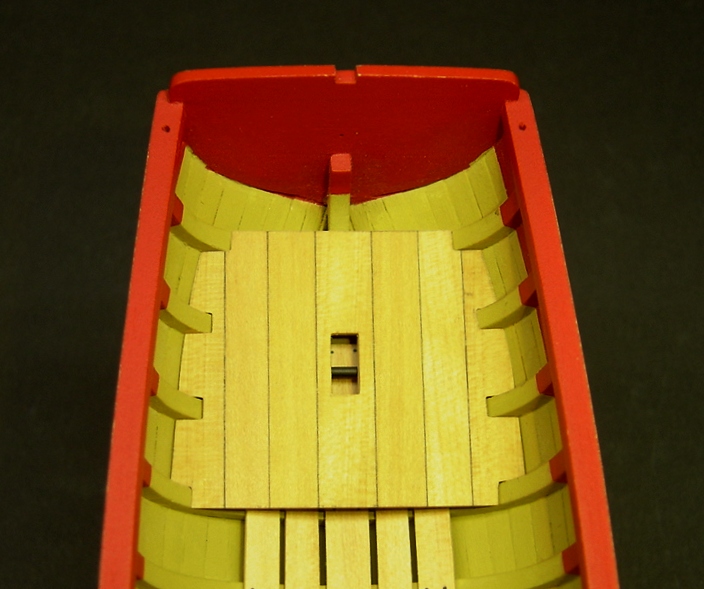
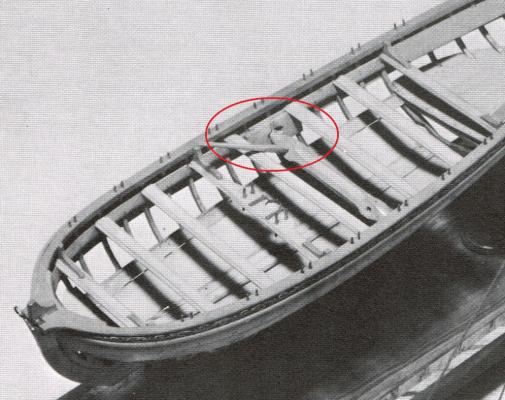
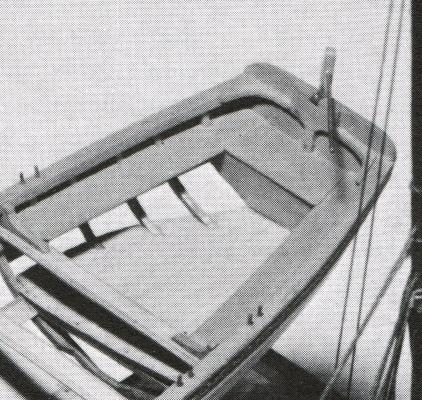
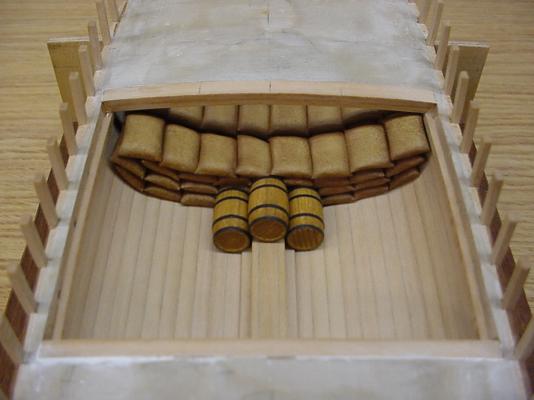
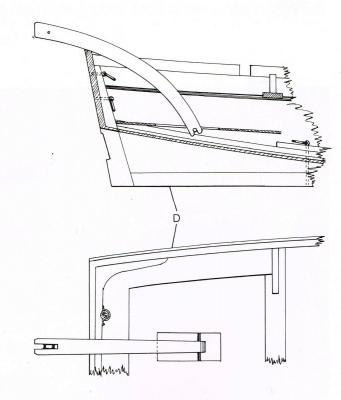
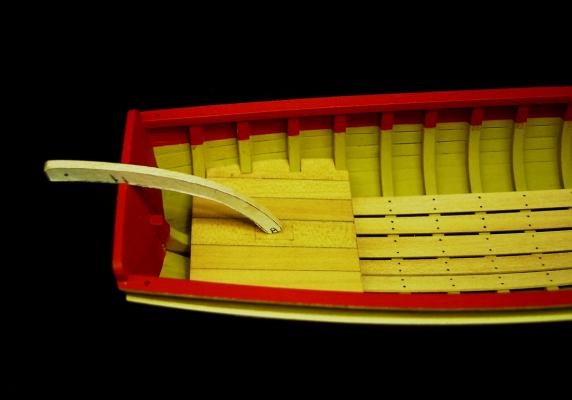
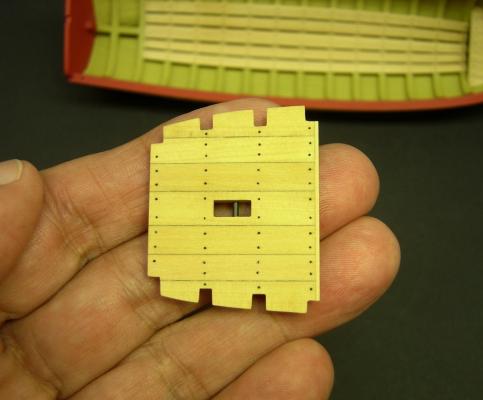
Here's the platform cut to the required shape. The port and starboard sides were beveled to a sharp edge on the underside. I wanted to get as clean a fit as possible. If you look closely, you can see a rectangular box marked on the middle plank. This area will be removed, which is the reason that strip of wood on the underside of the platform did not go completely across. It was quite common for these boats to be used to assist the parent ship in retrieving it's anchor. This was done using a windlass like the one featured in the kit, and a davit that hung over the stern. The next illustration was taken from The Arming and Fitting of English Ships of War 1600 - 1815 by Brian Lavery, and illustrates how this davit was positioned. Note the notch in the bottom of the davit that fits over a pin located below the platform. I made a mock-up of the davit, and placed it in position to see if the location was feasible. It appeared to be reasonable, so the area was cut out, and a blackened brass pin, set in two blocks, was glued in the proper location. At this point, I cut back the forward end of the platform, and installed a thin strip of wood, which I feel gives the assembly a more finished look. Like the forward platform and floor boards, I used black paint brush bristles to simulate the nail heads. BobF
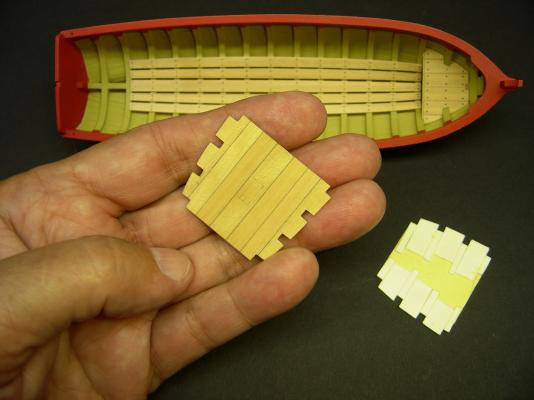

- 277 replies
-
- 18
-
-
- model shipways
- 18th century longboat
- (and 1 more)