Tom E
-
Posts
469 -
Joined
-
Last visited
Content Type
Profiles
Forums
Gallery
Events
Everything posted by Tom E
-
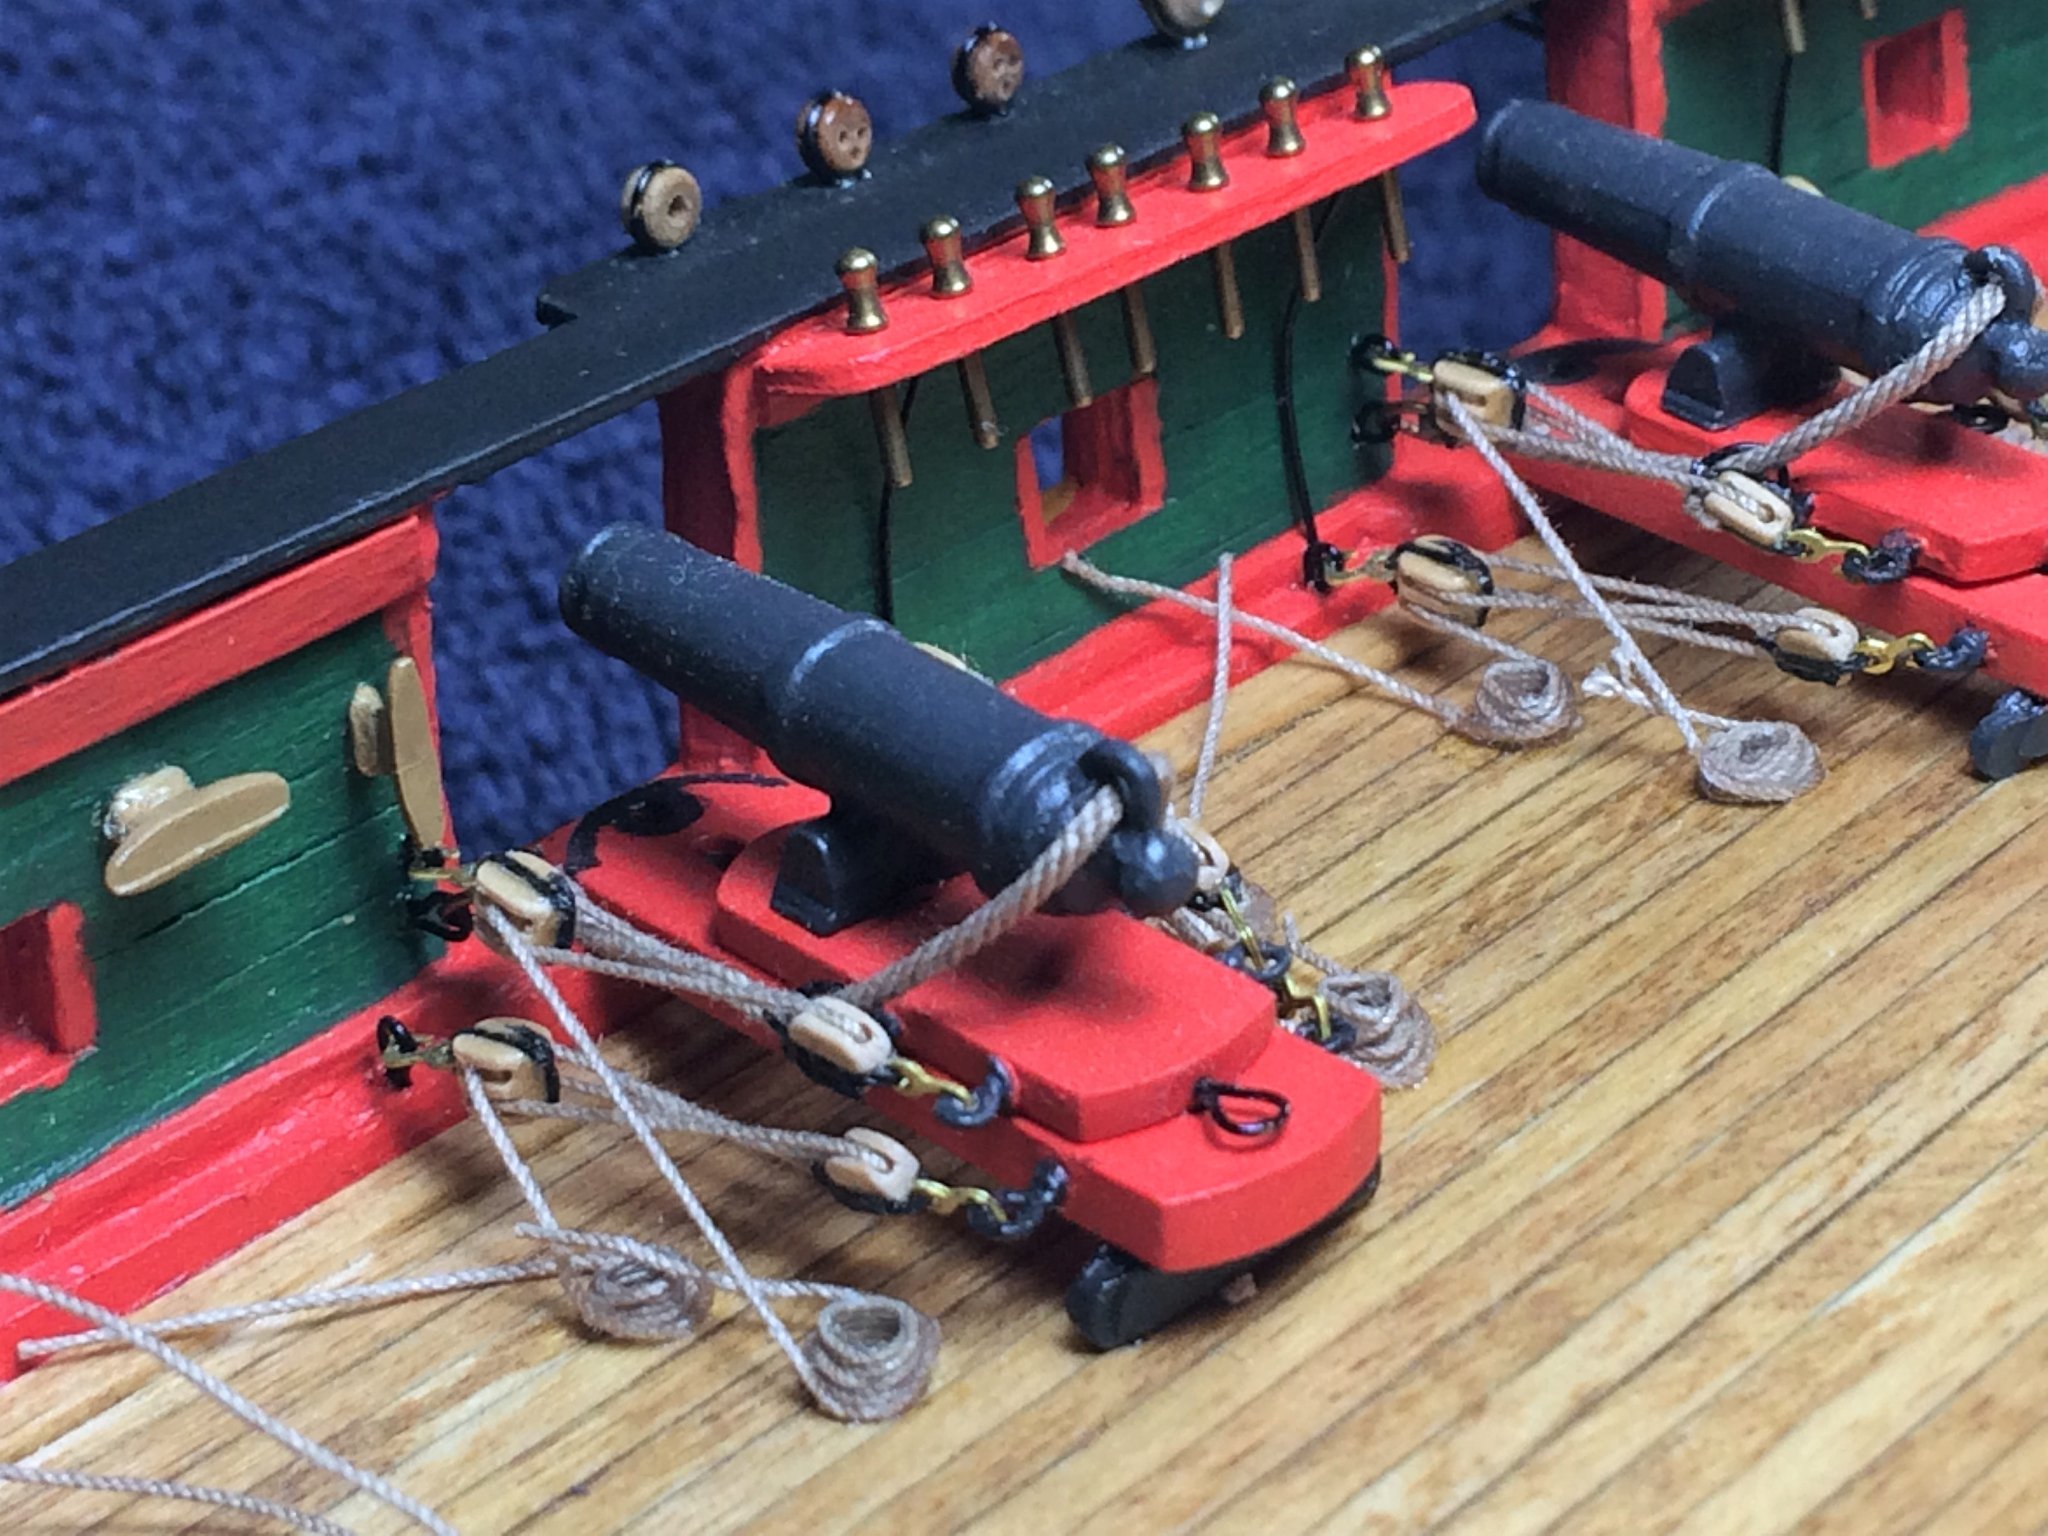
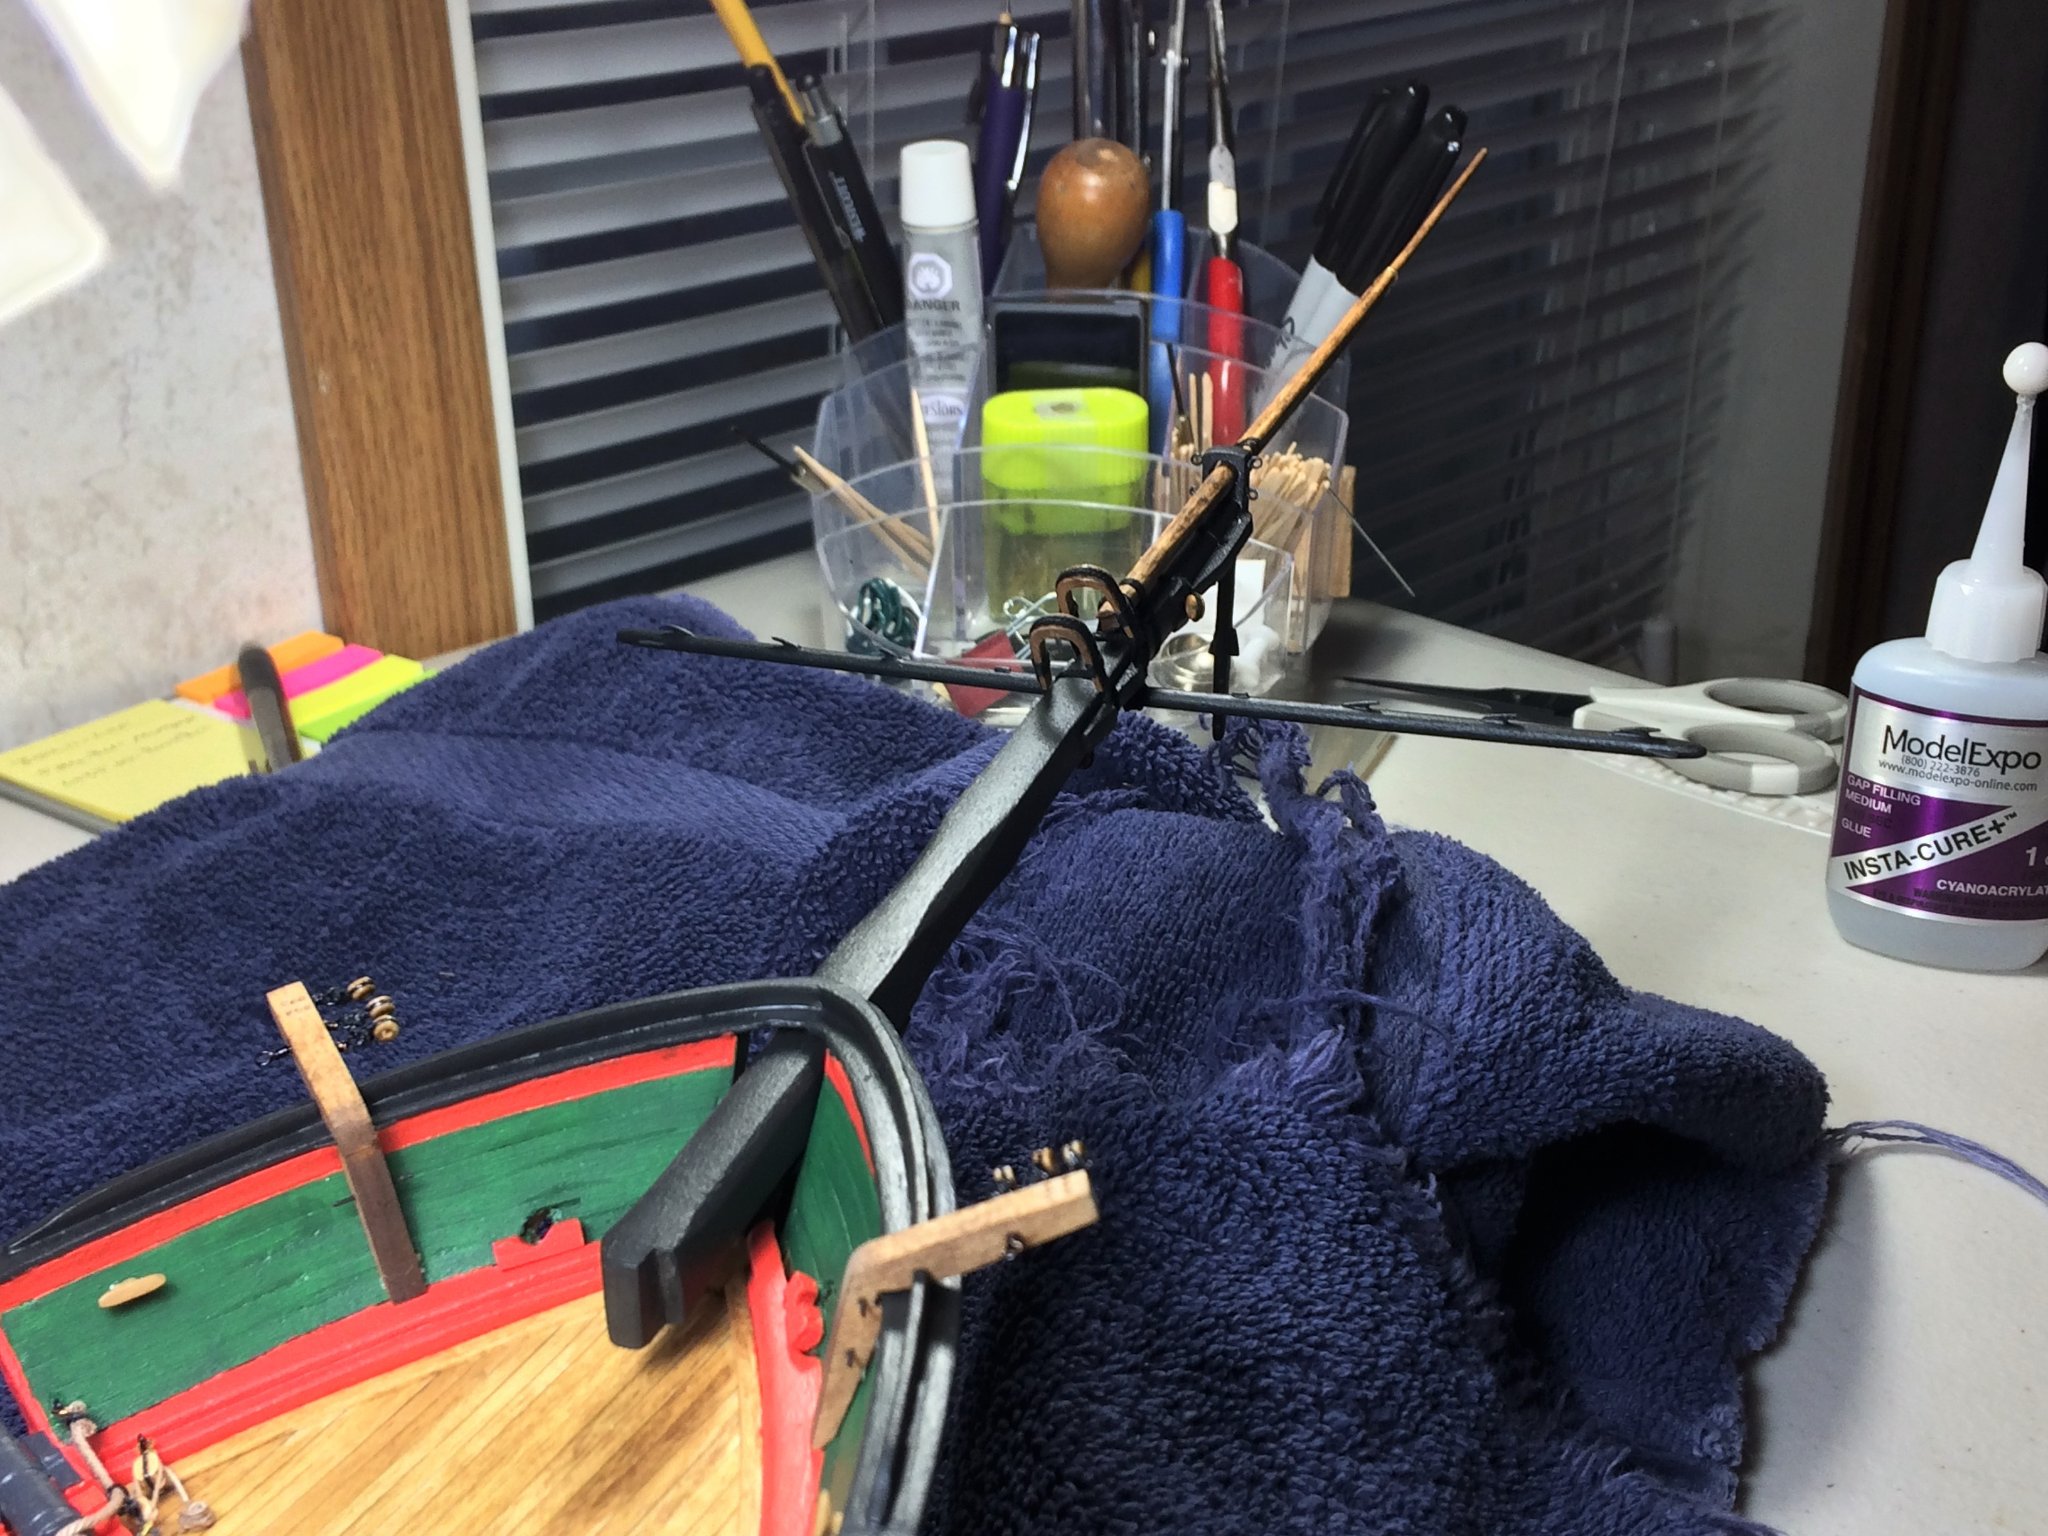
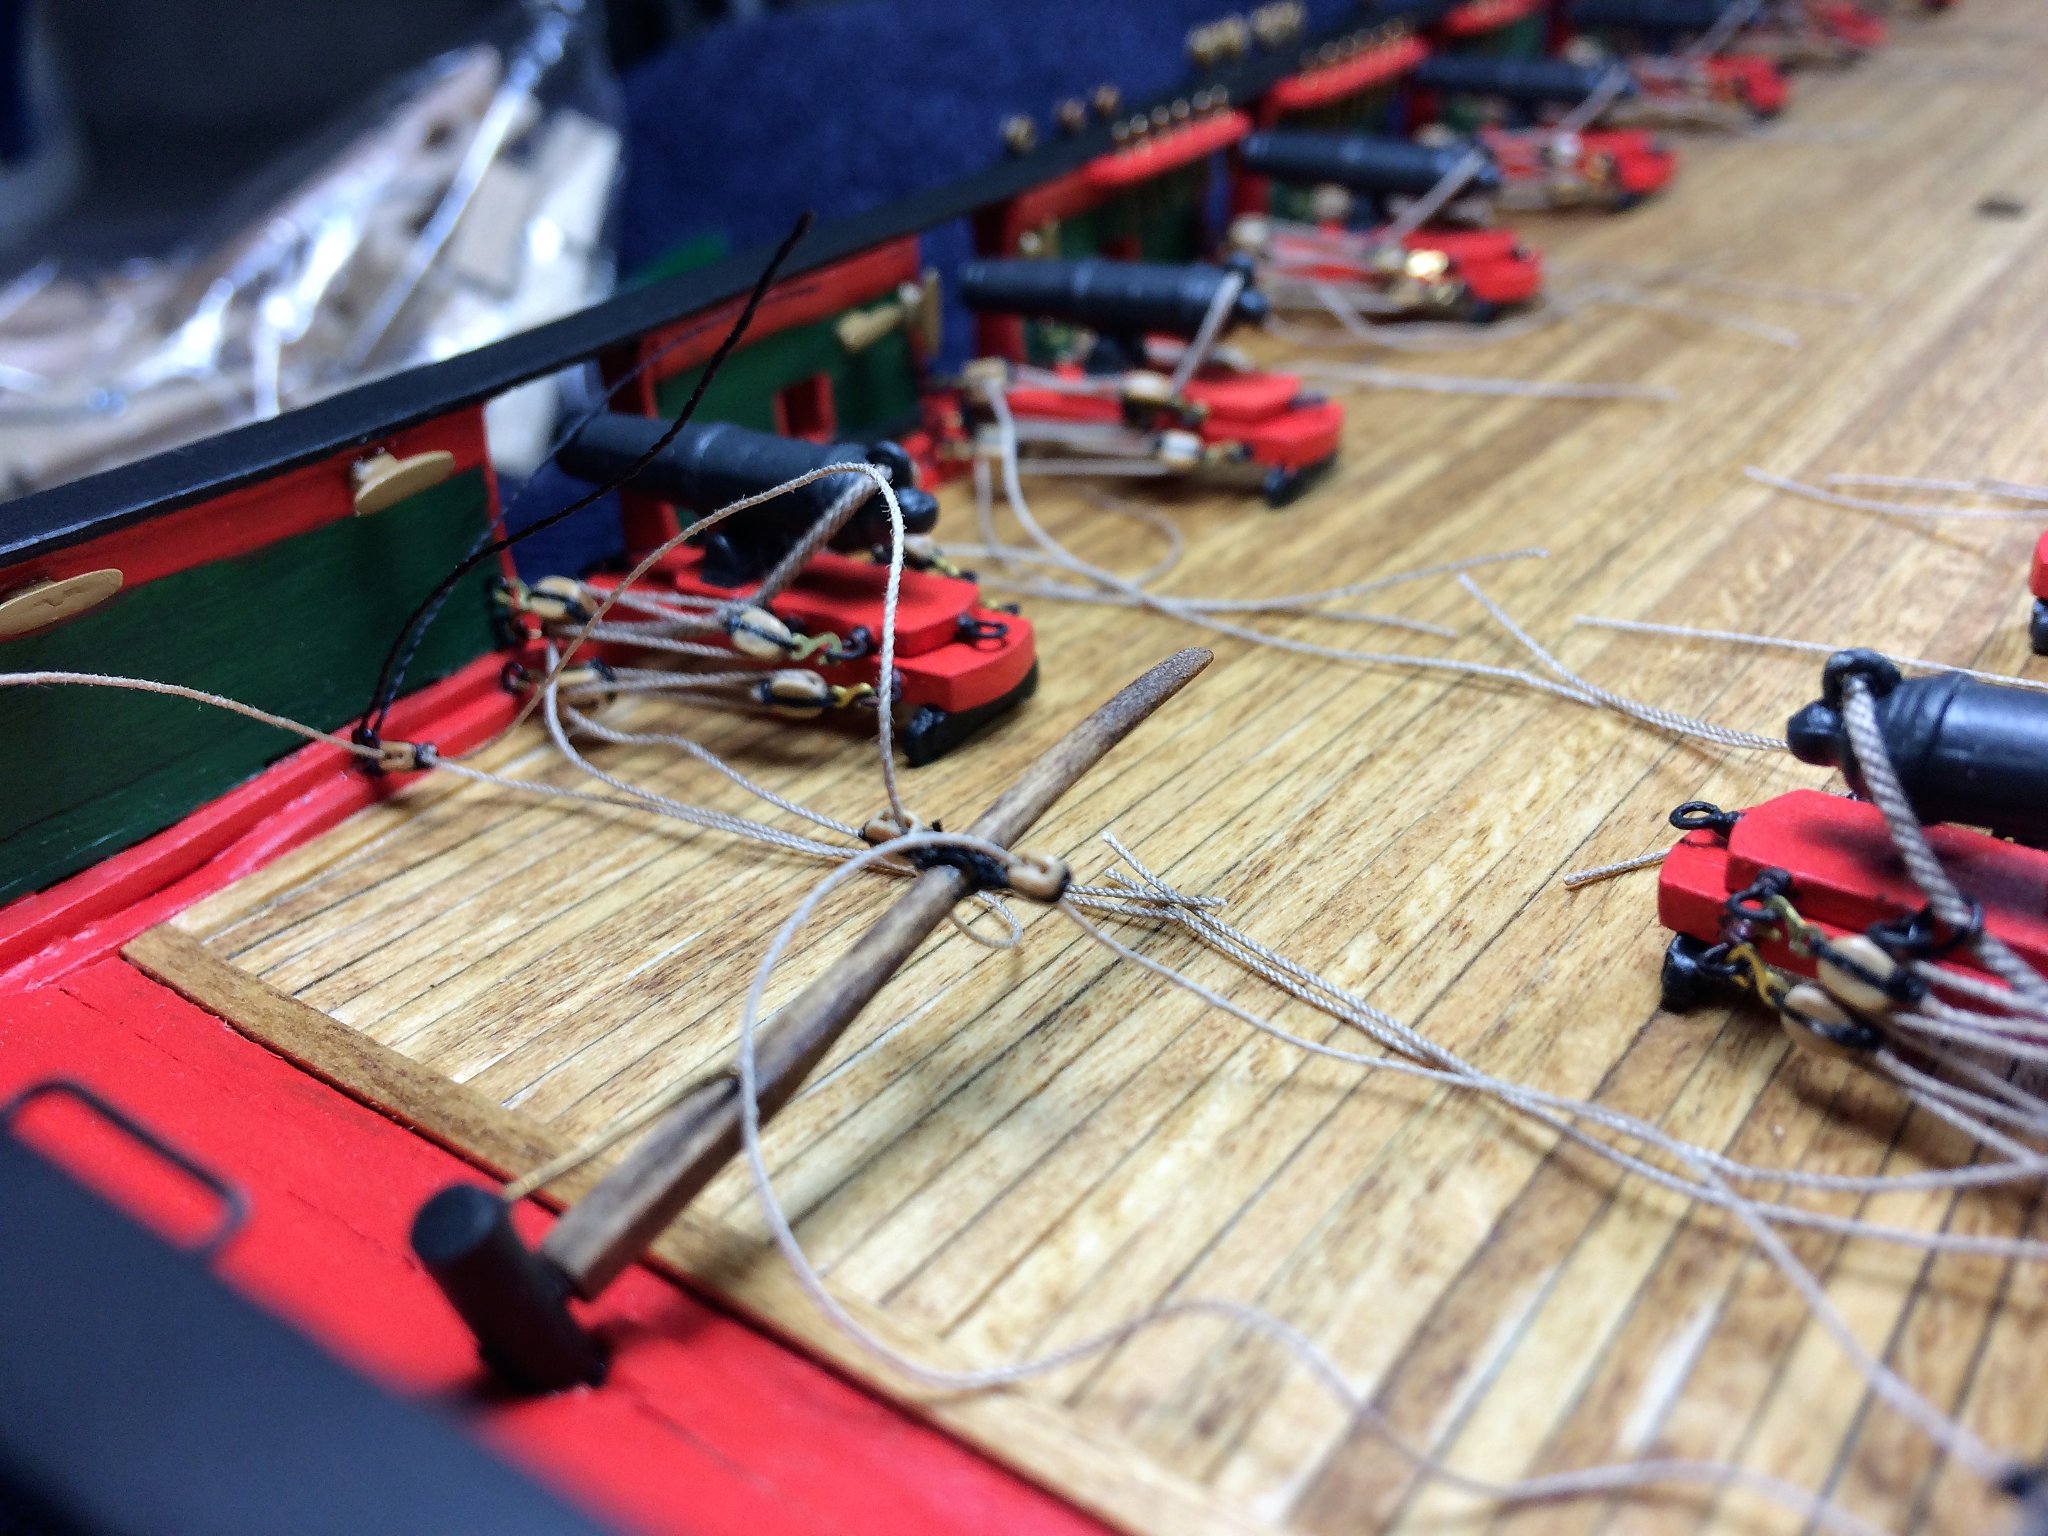
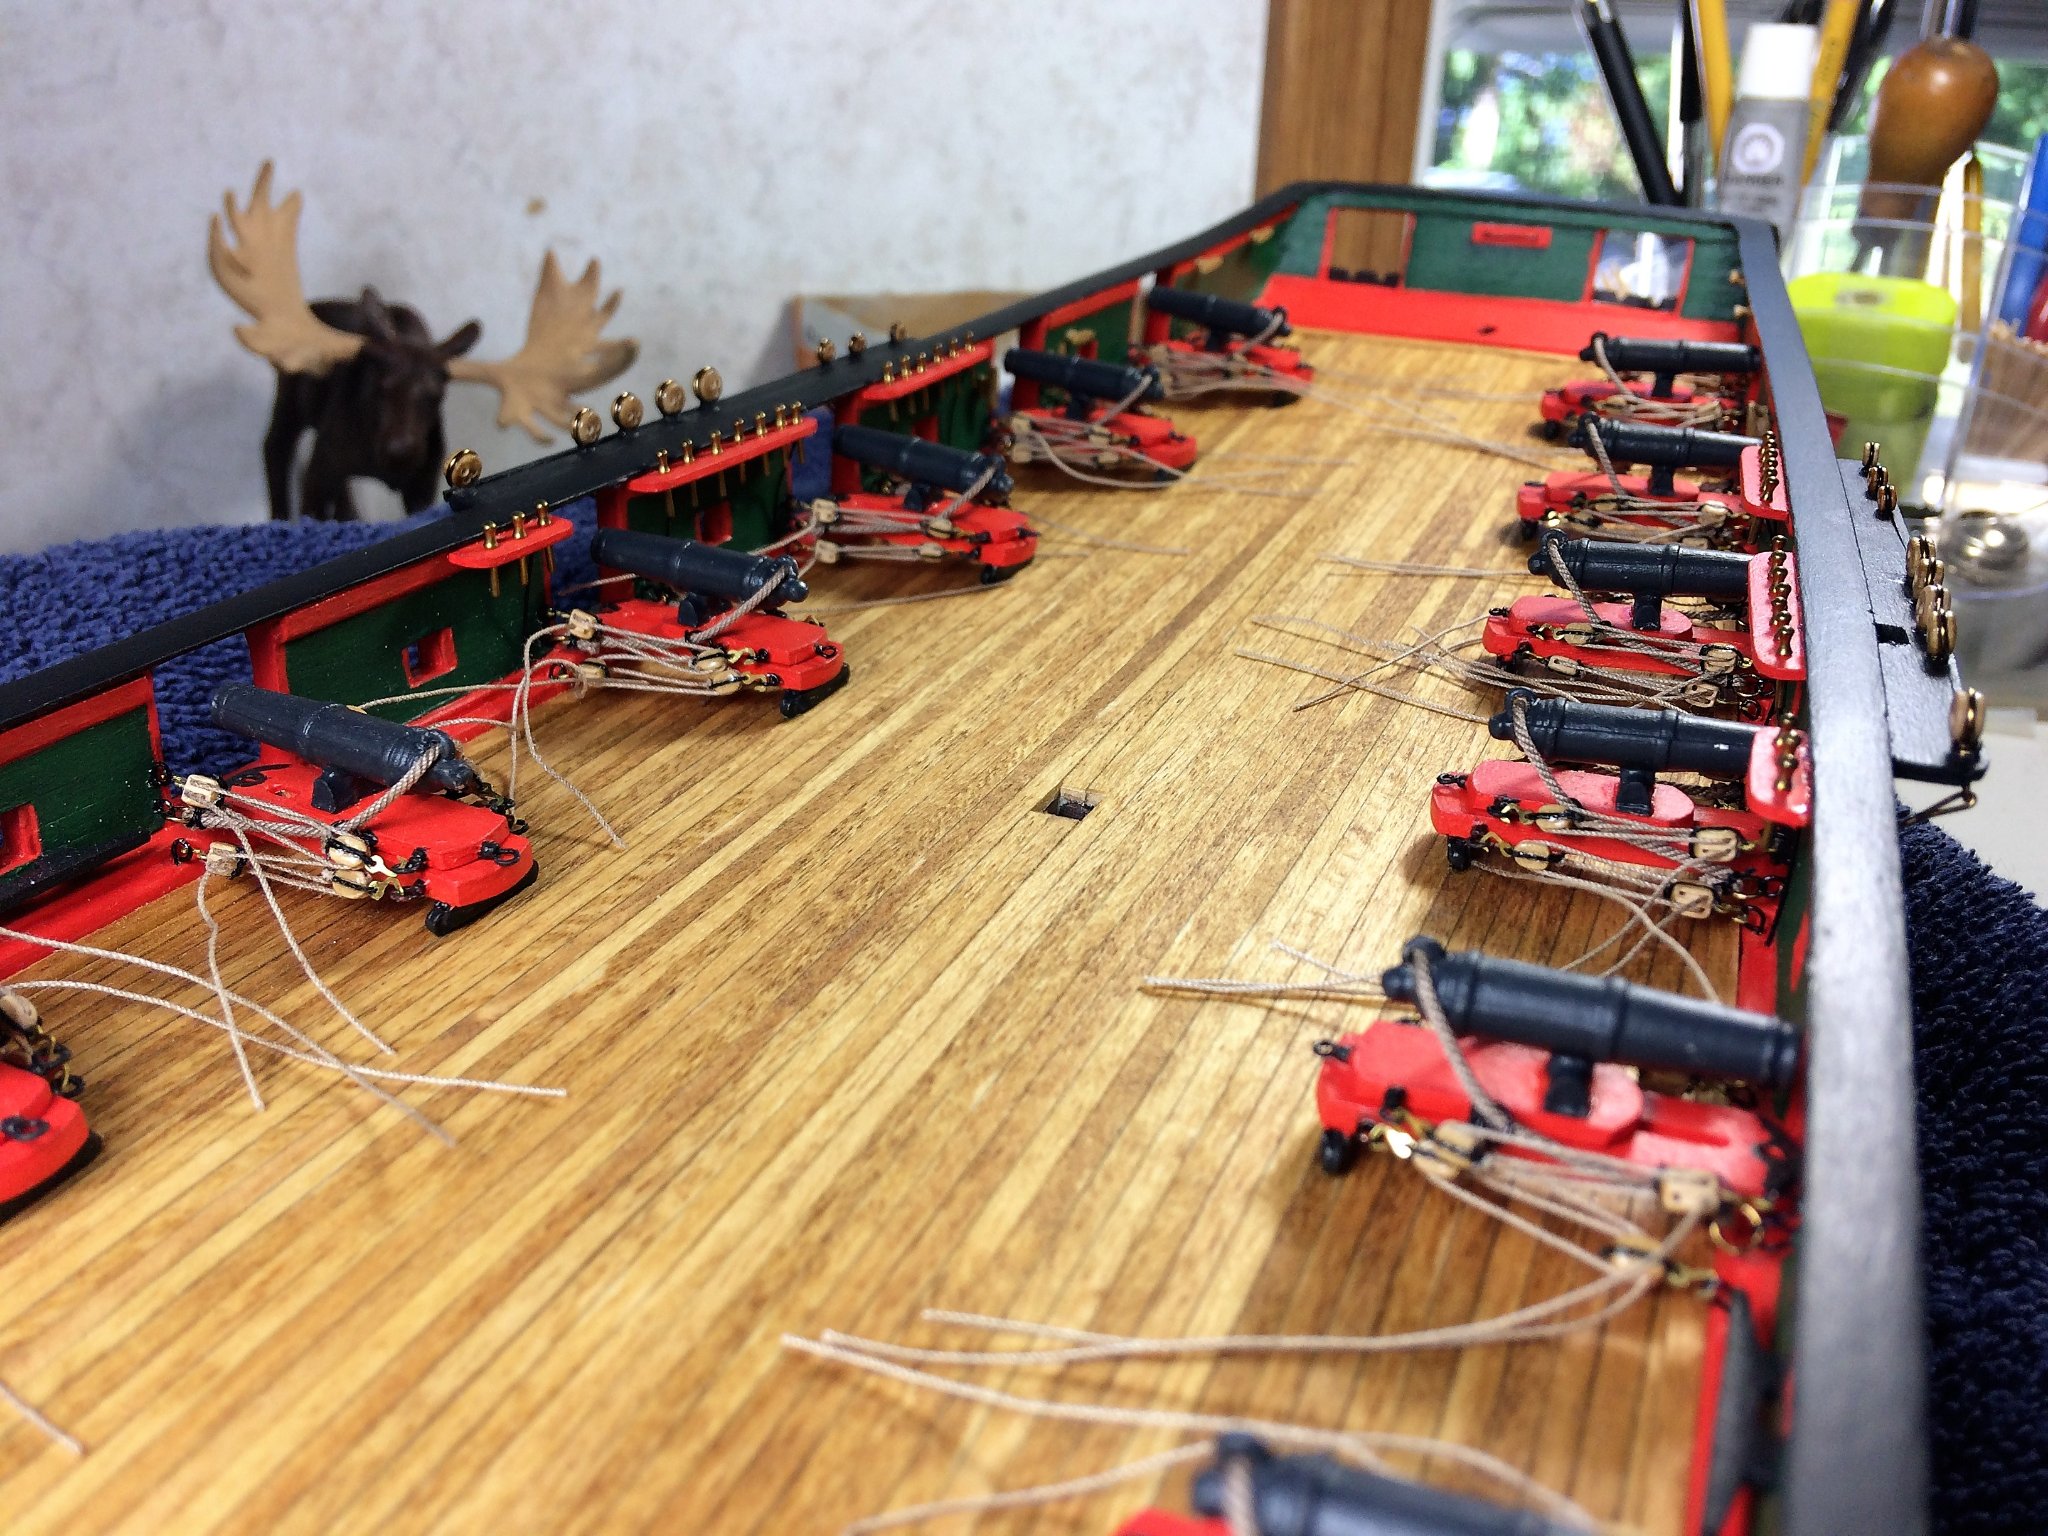
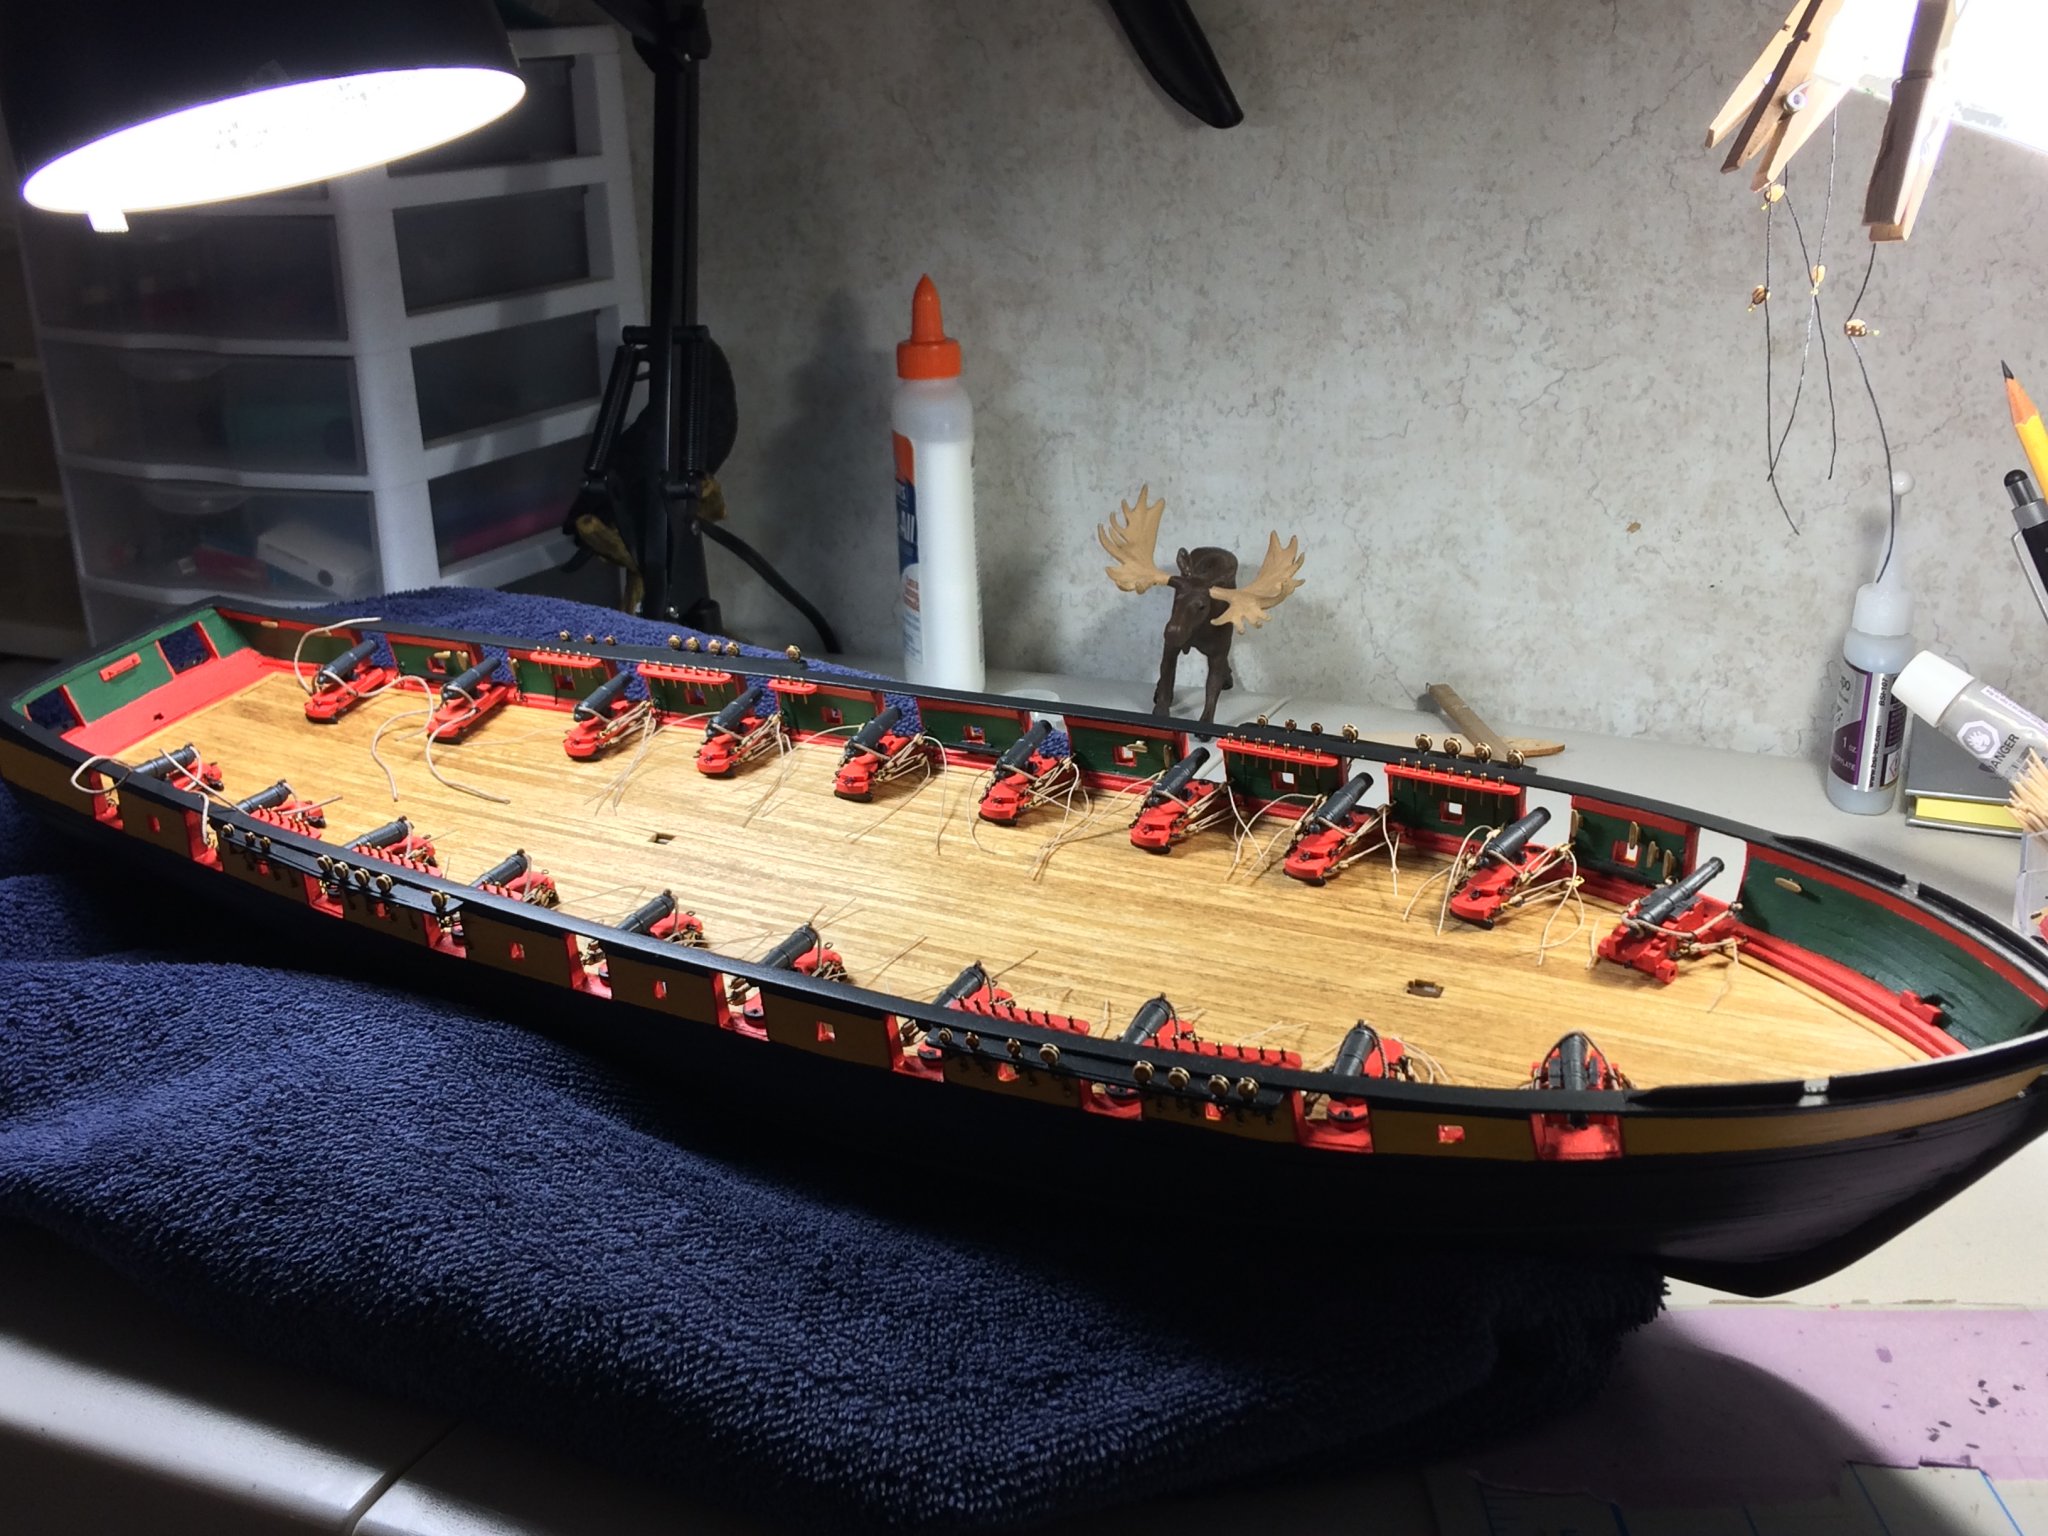
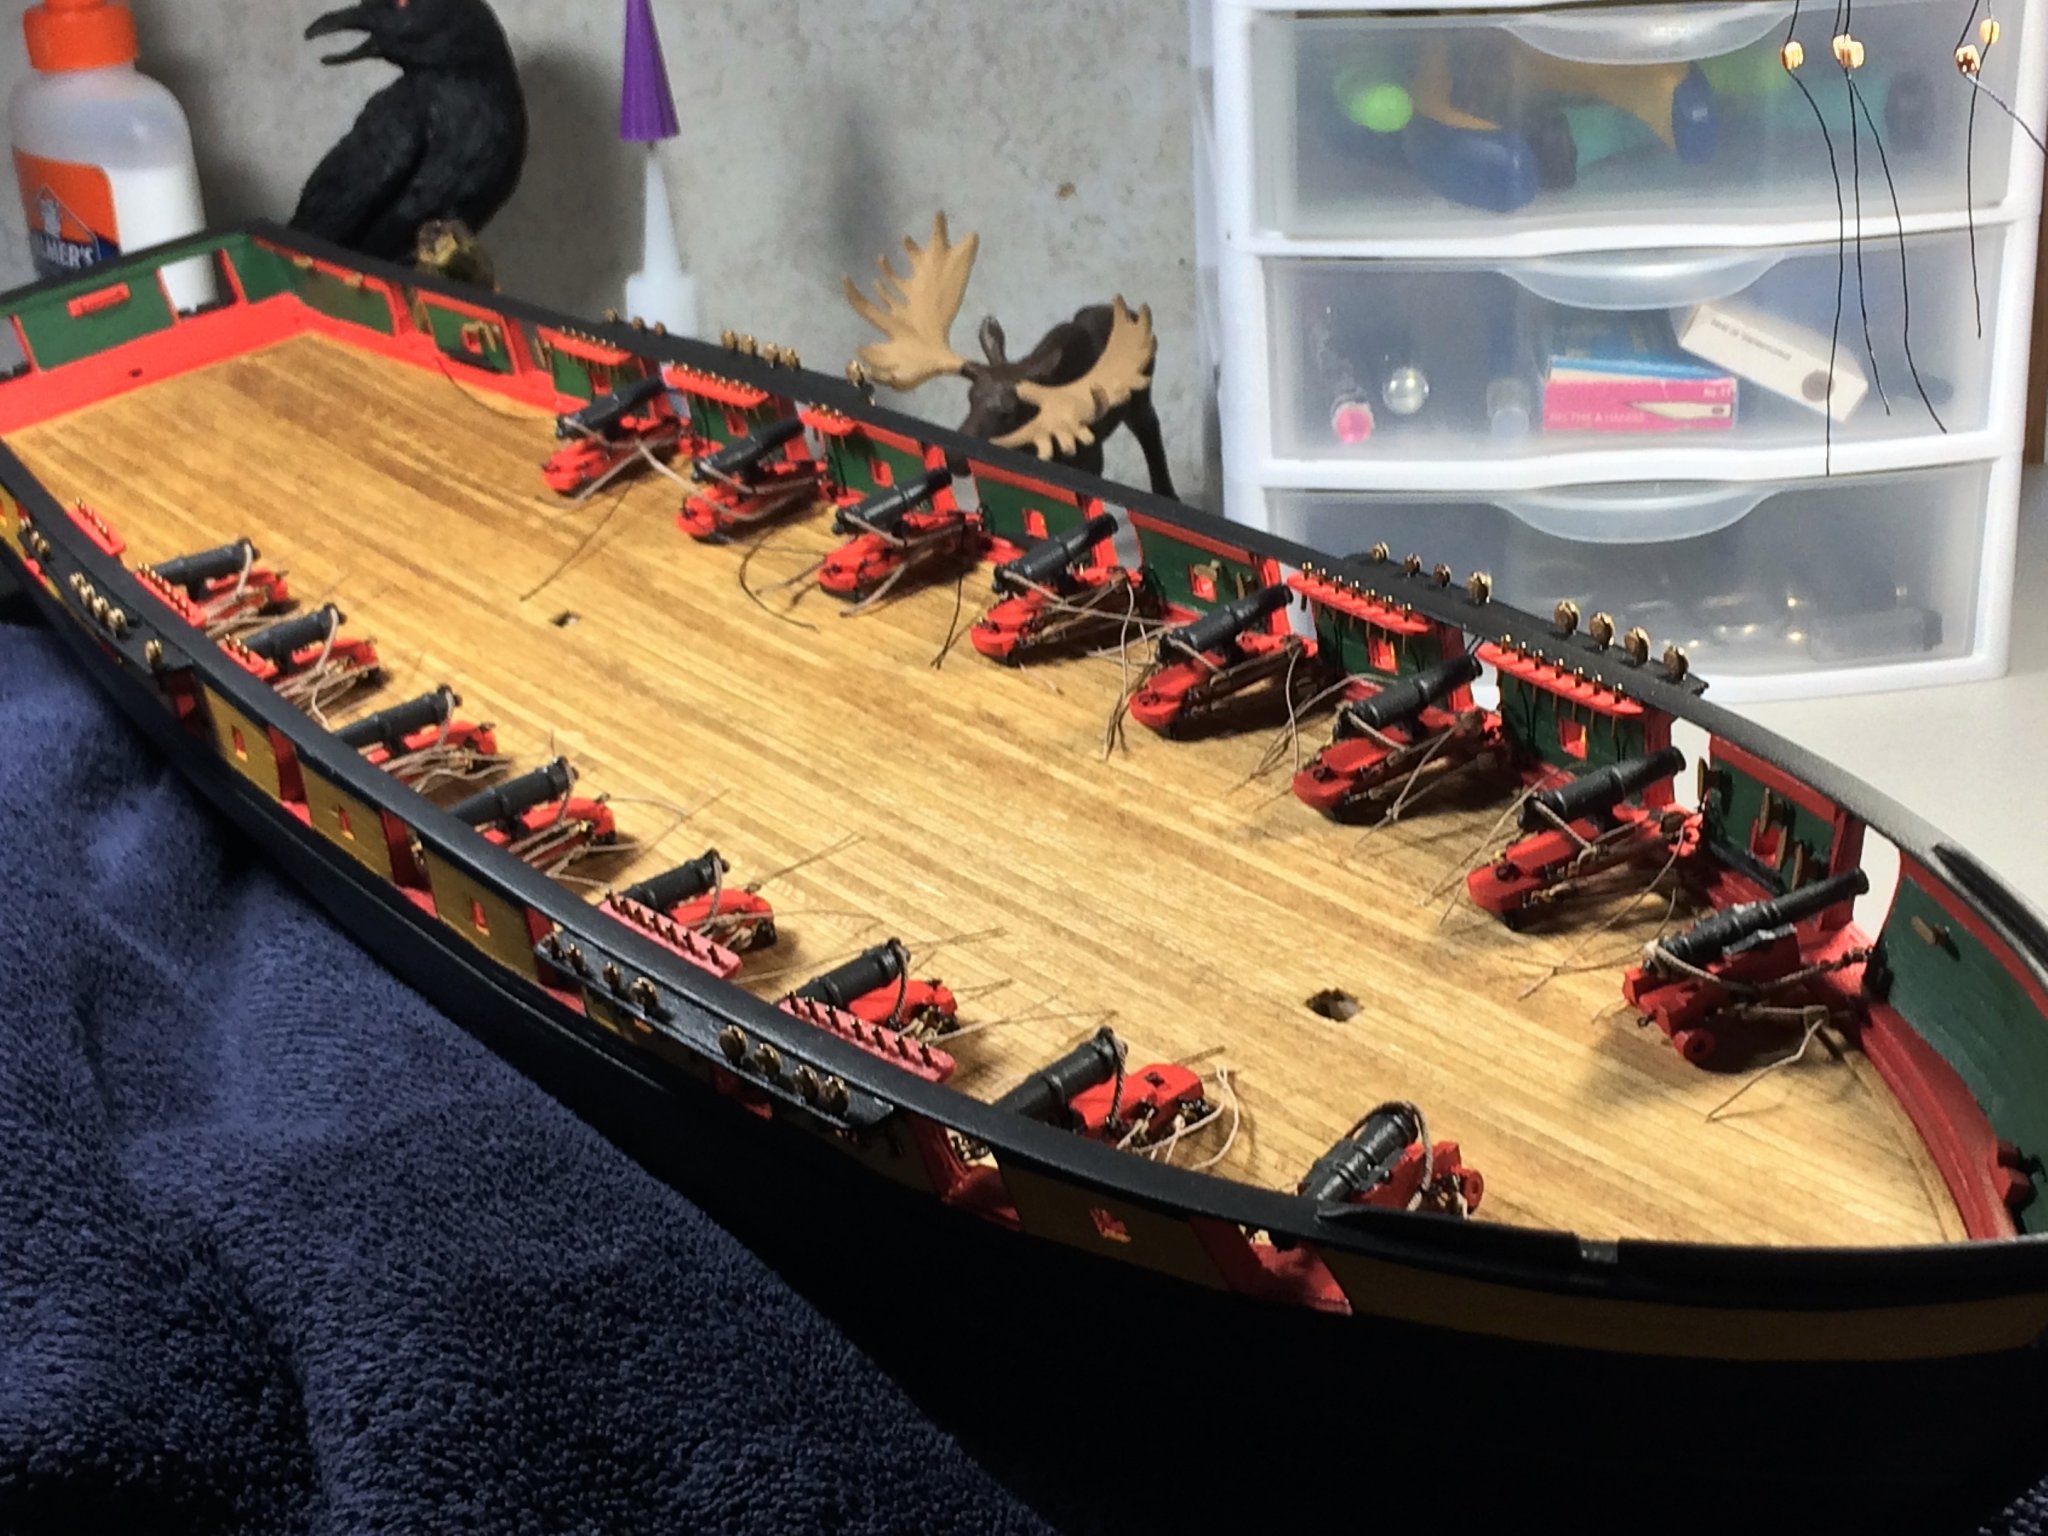
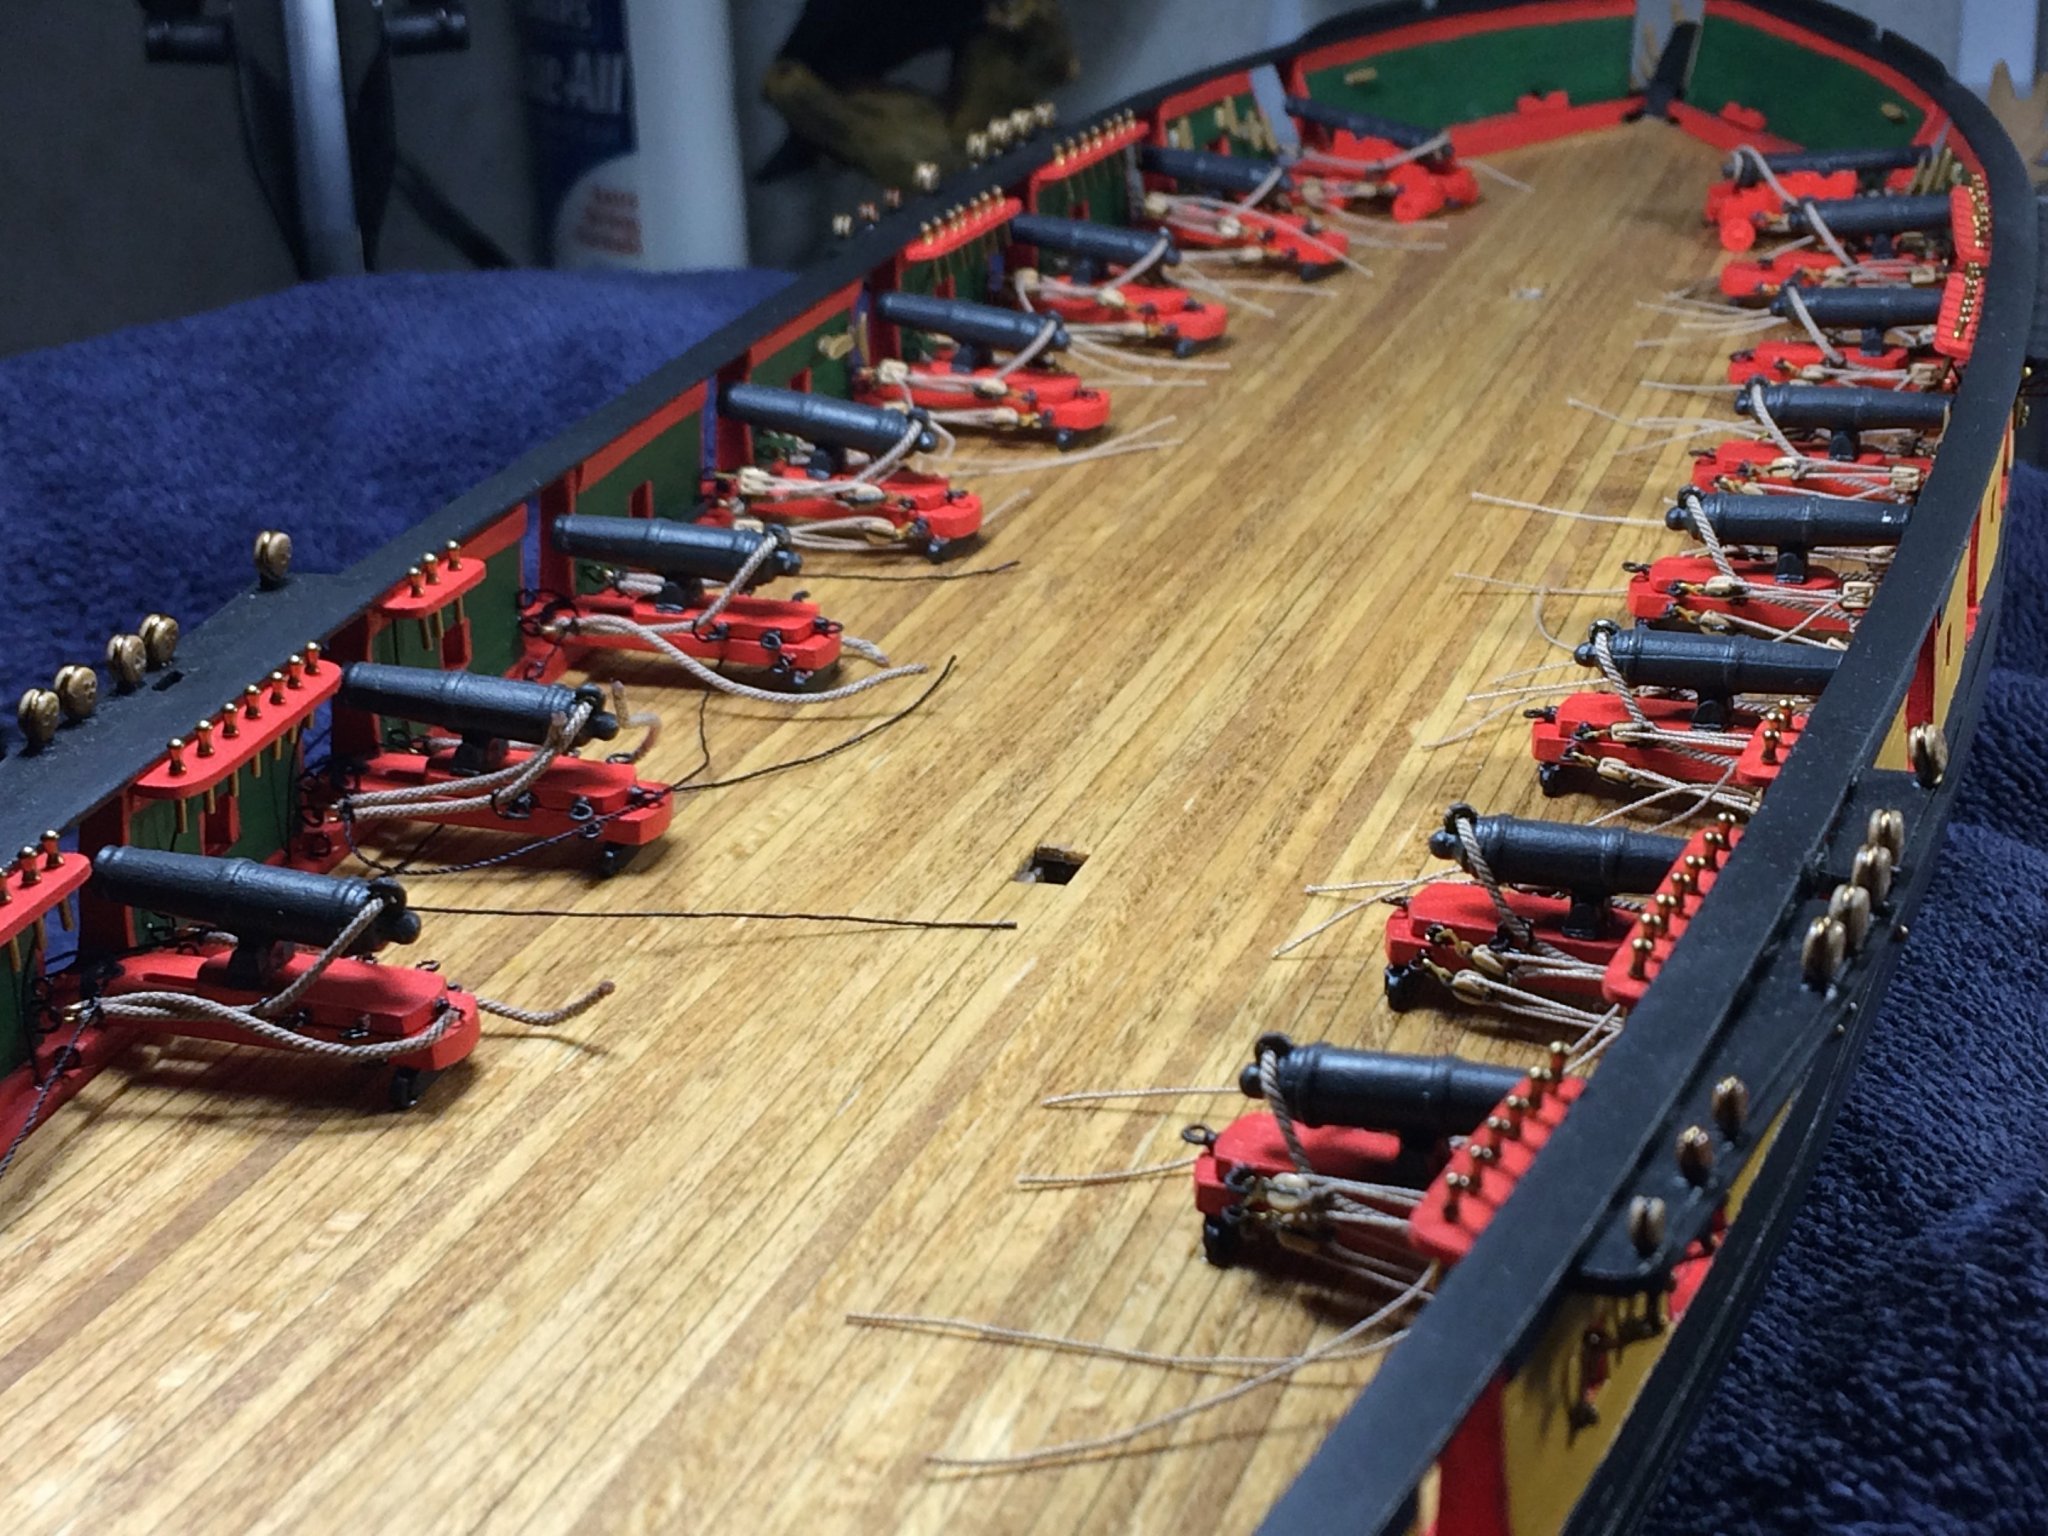
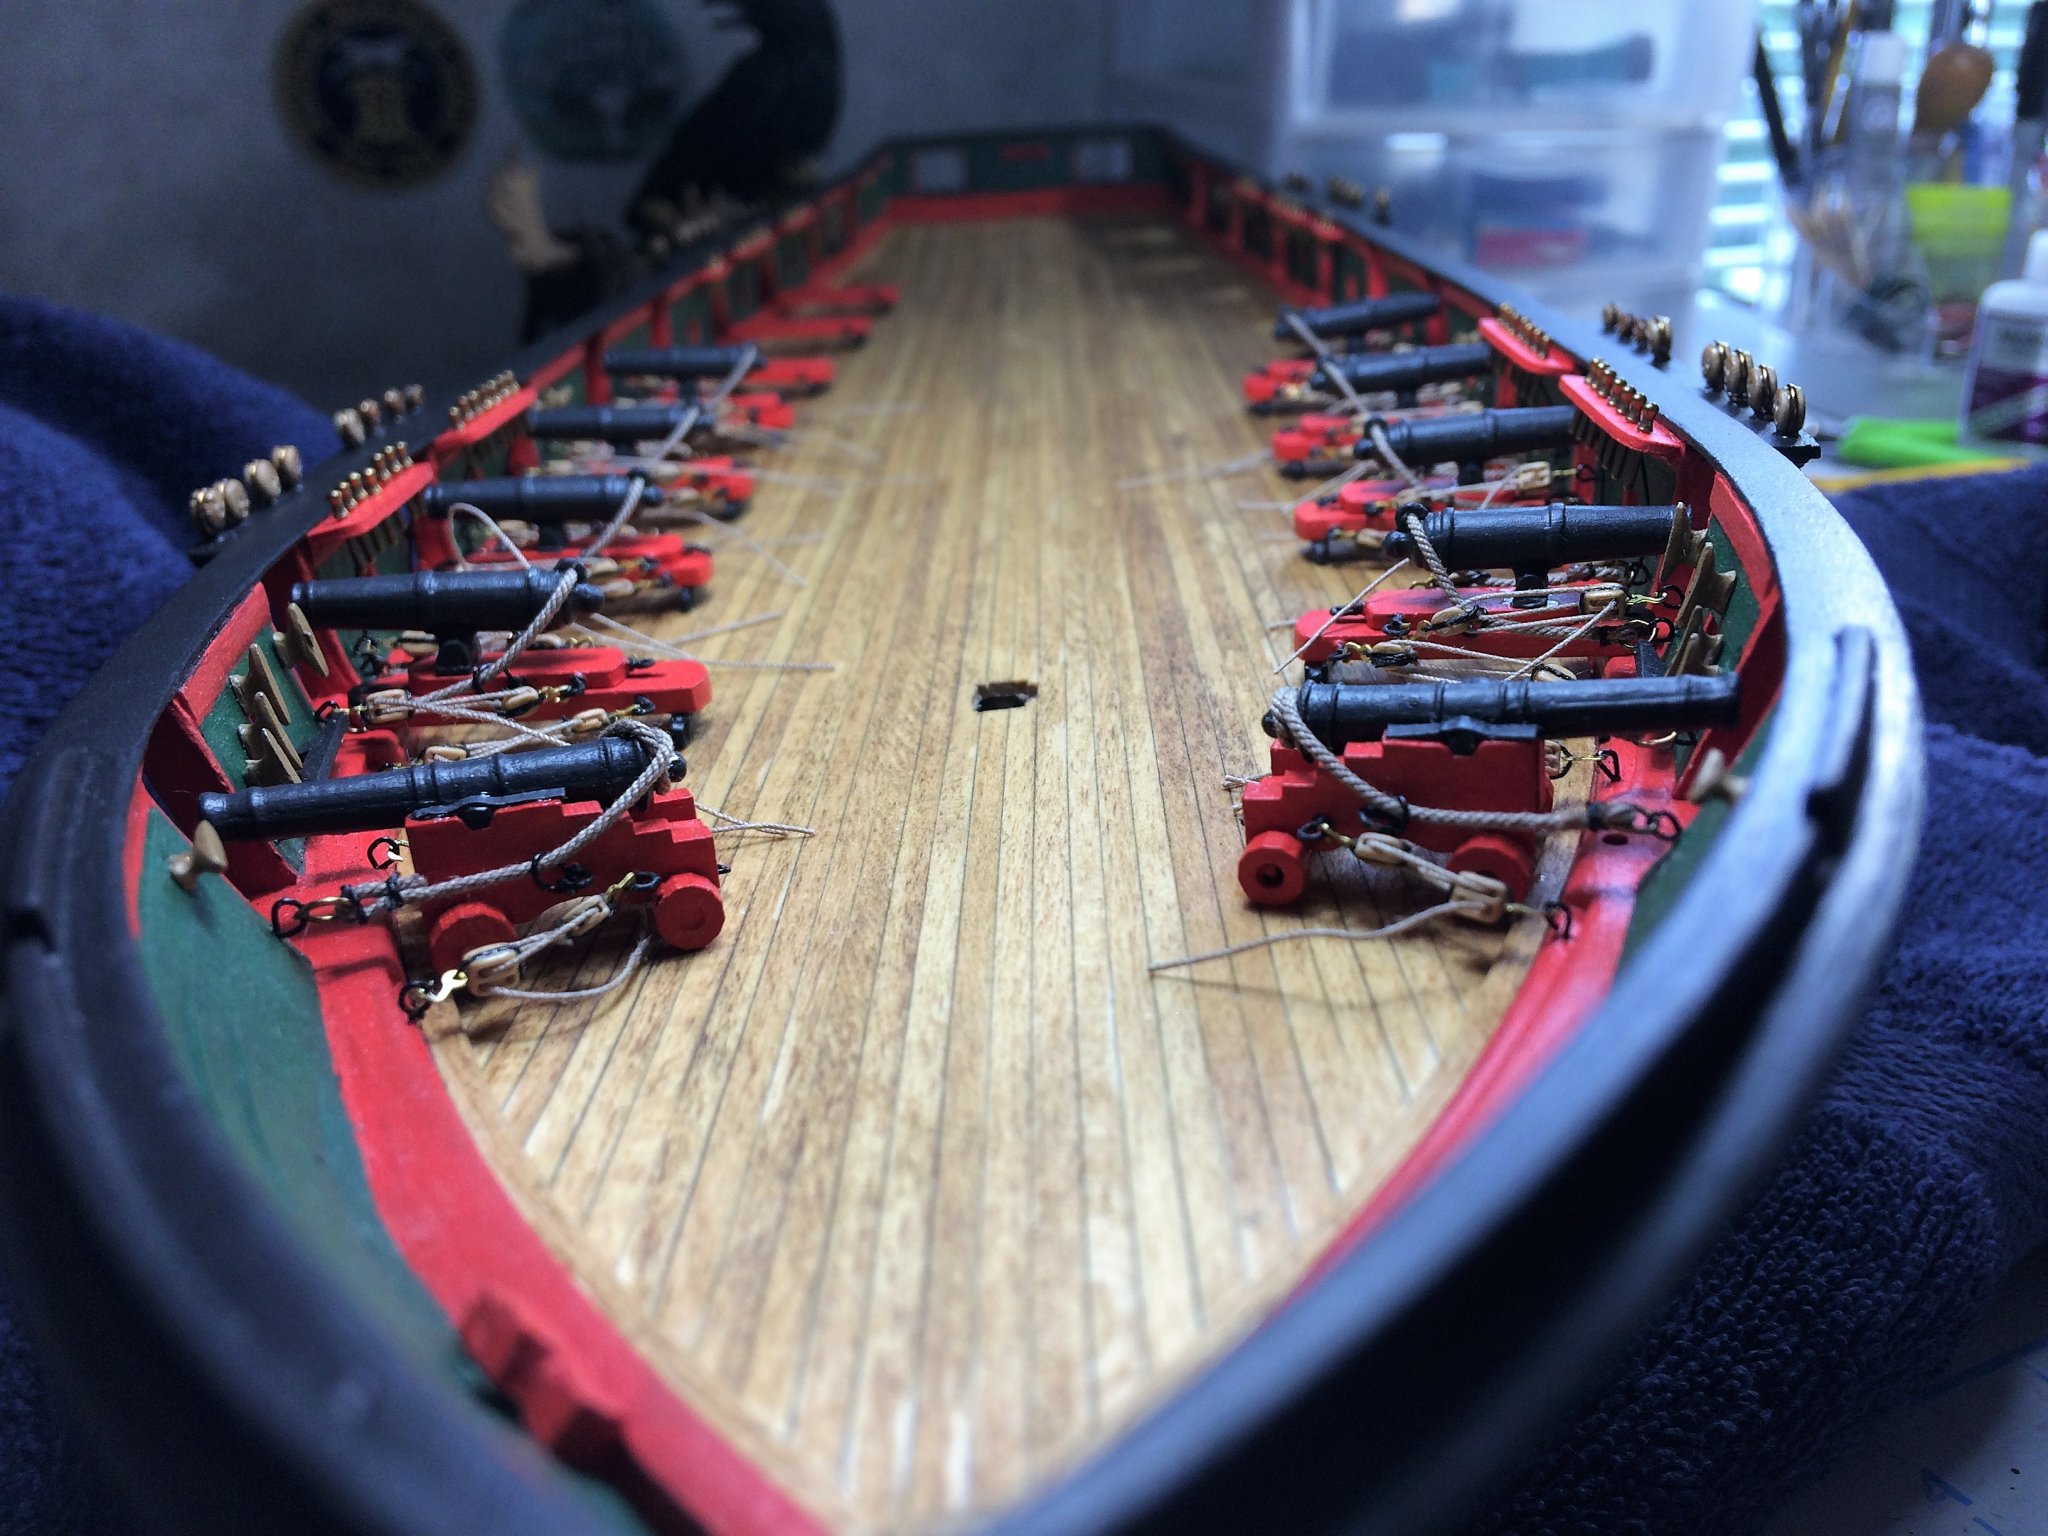
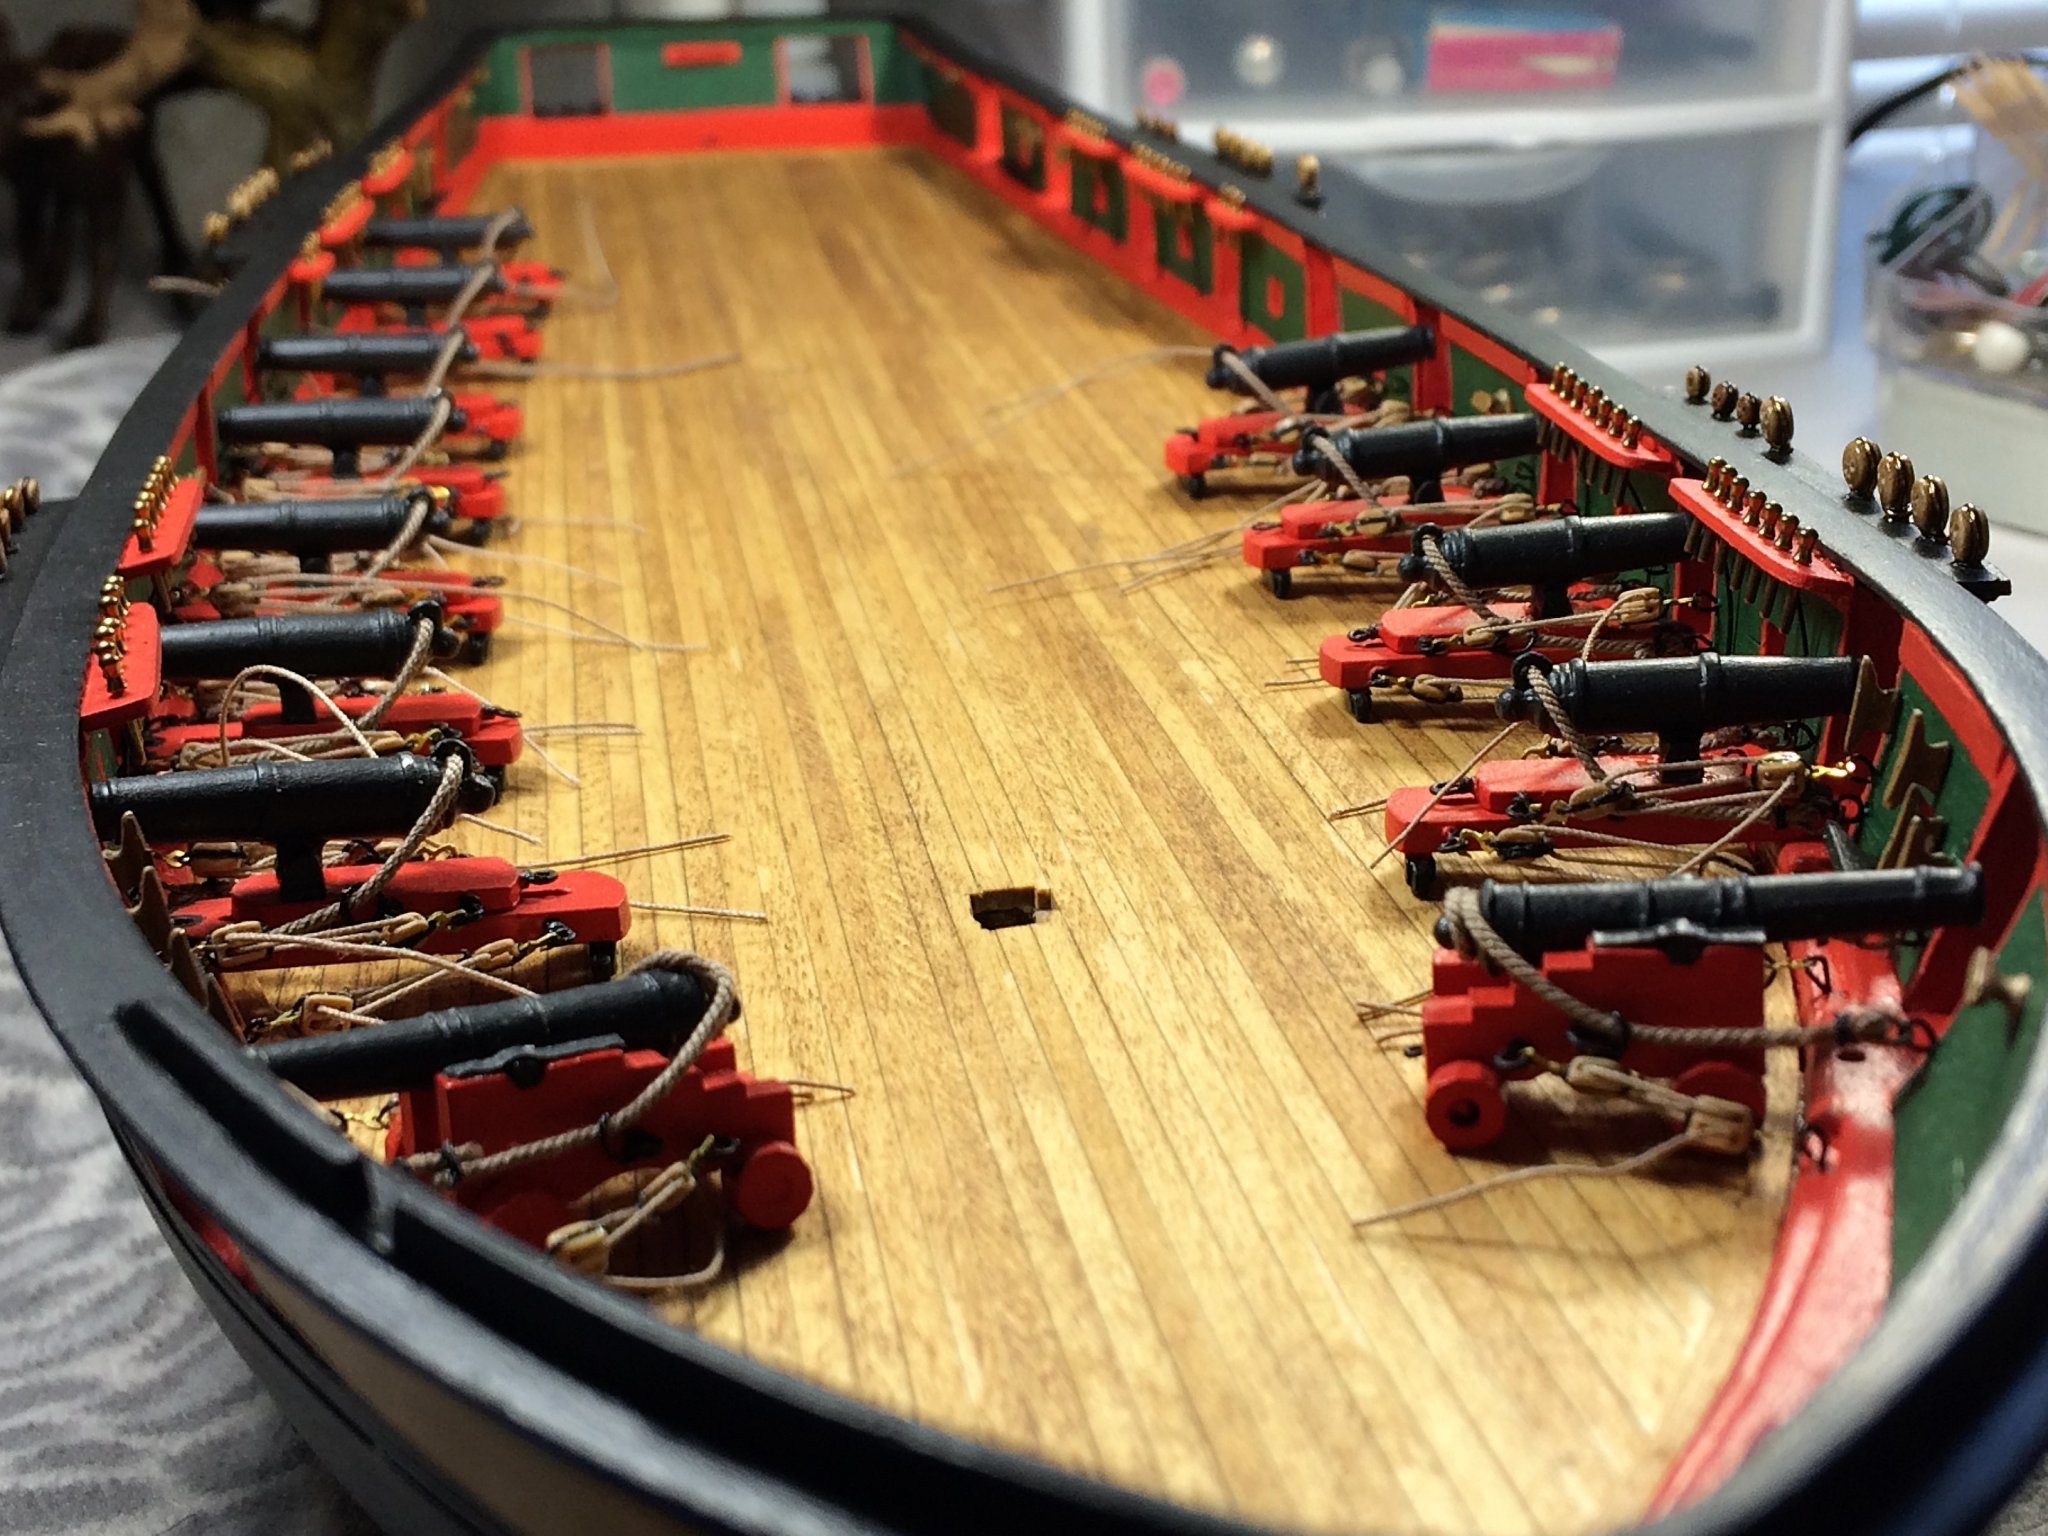
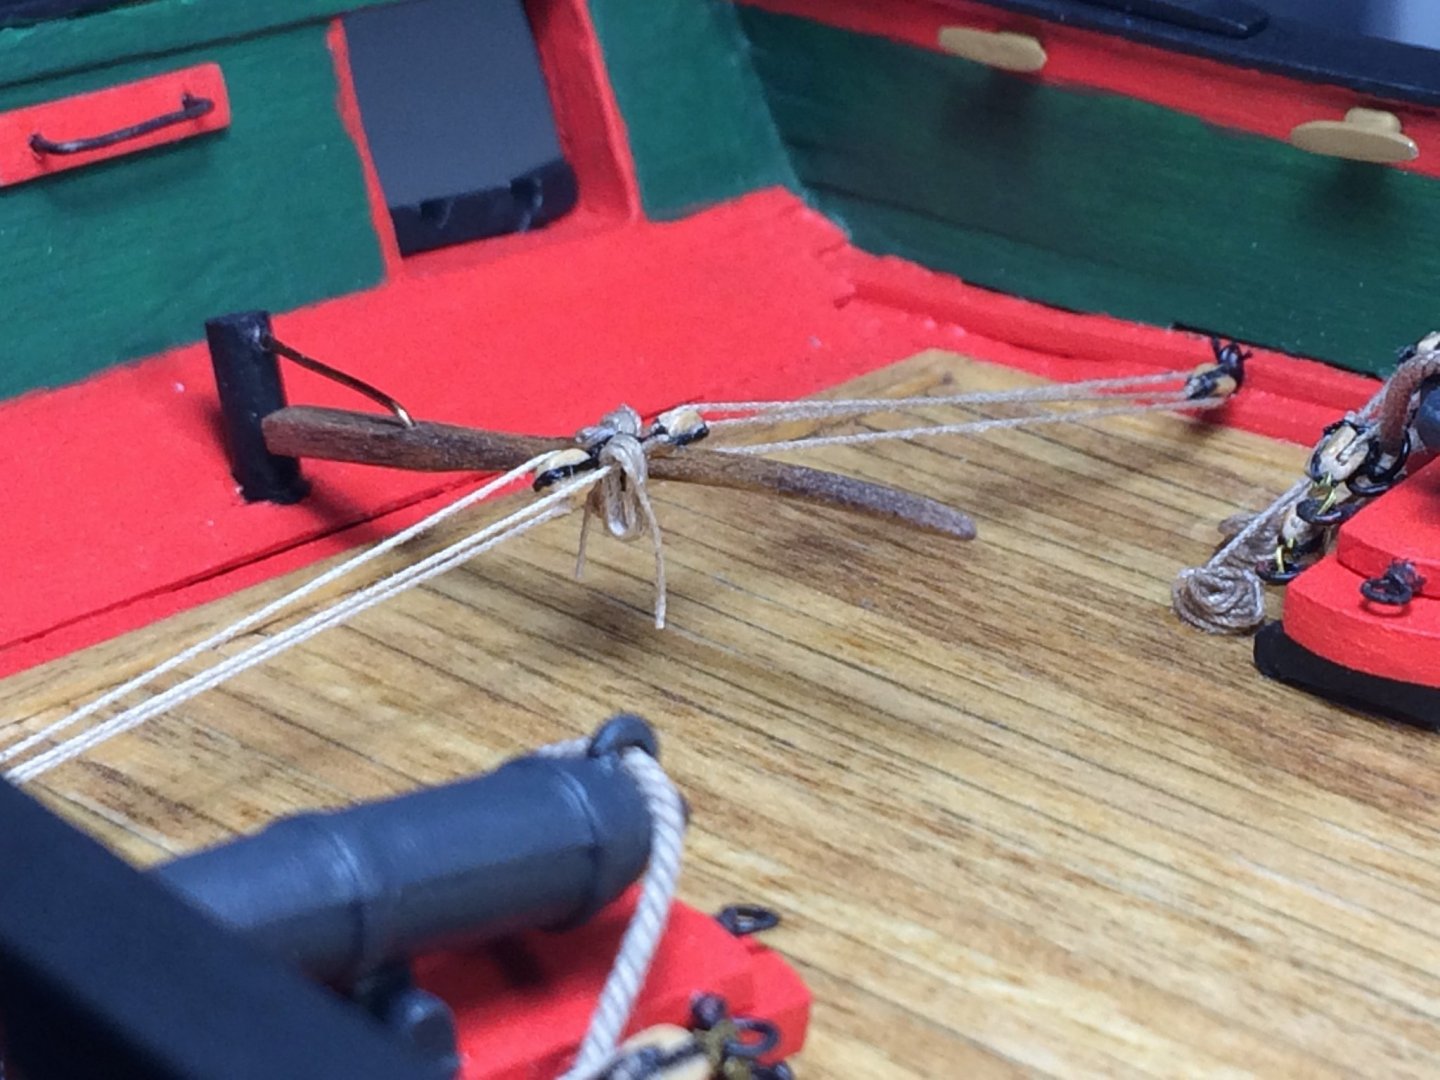
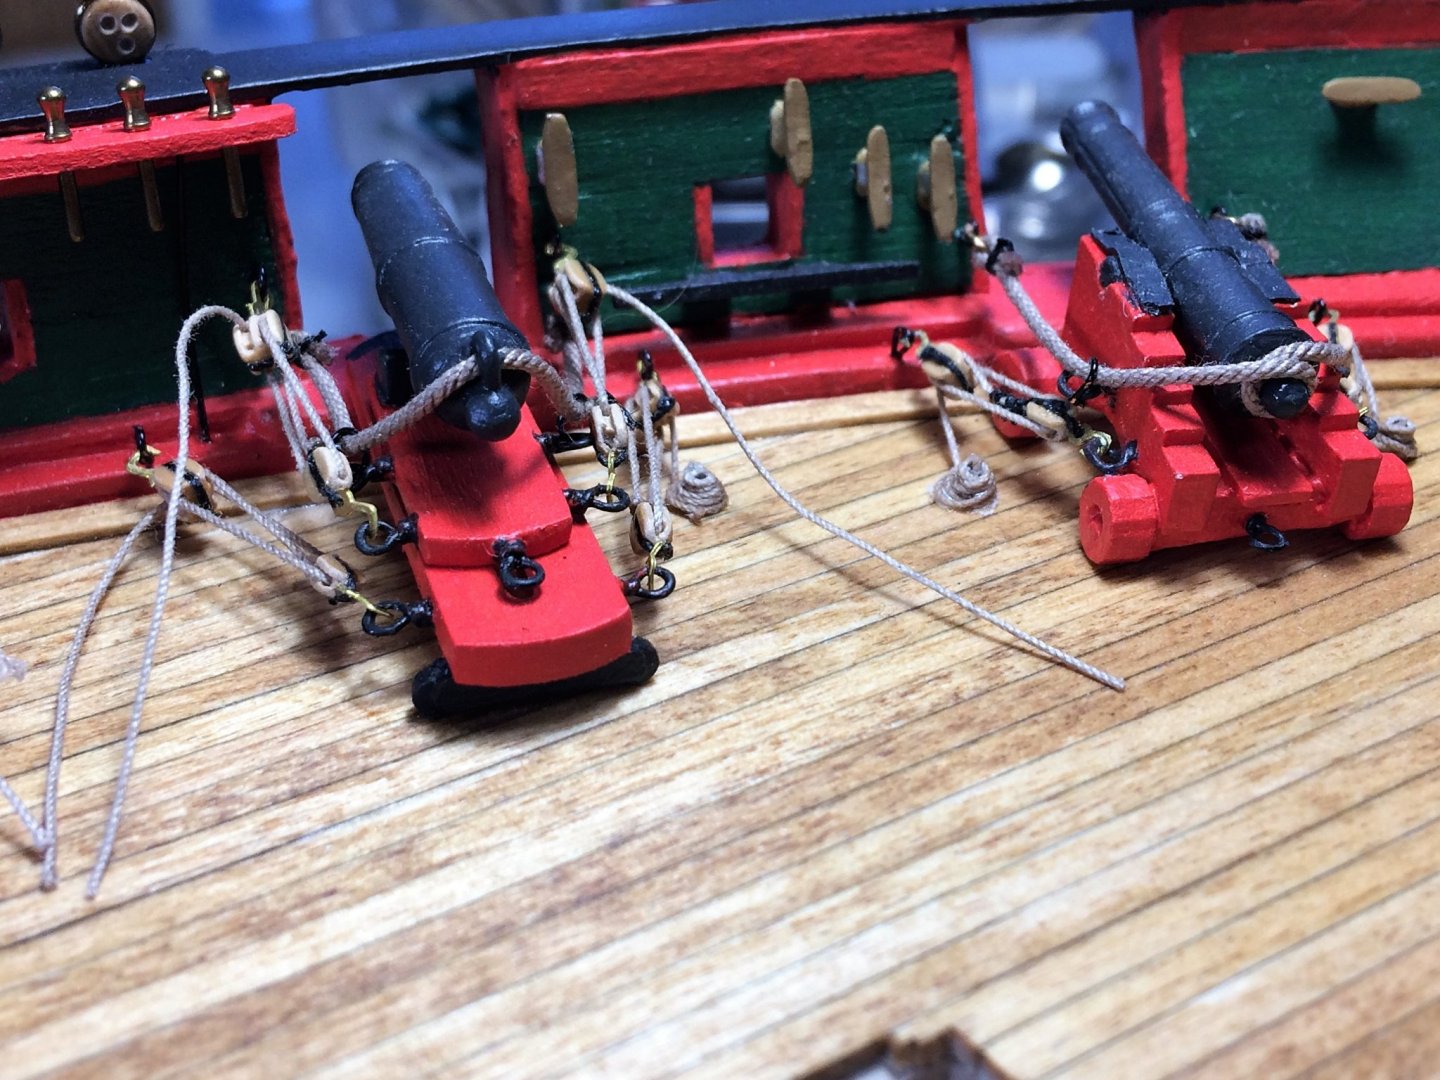
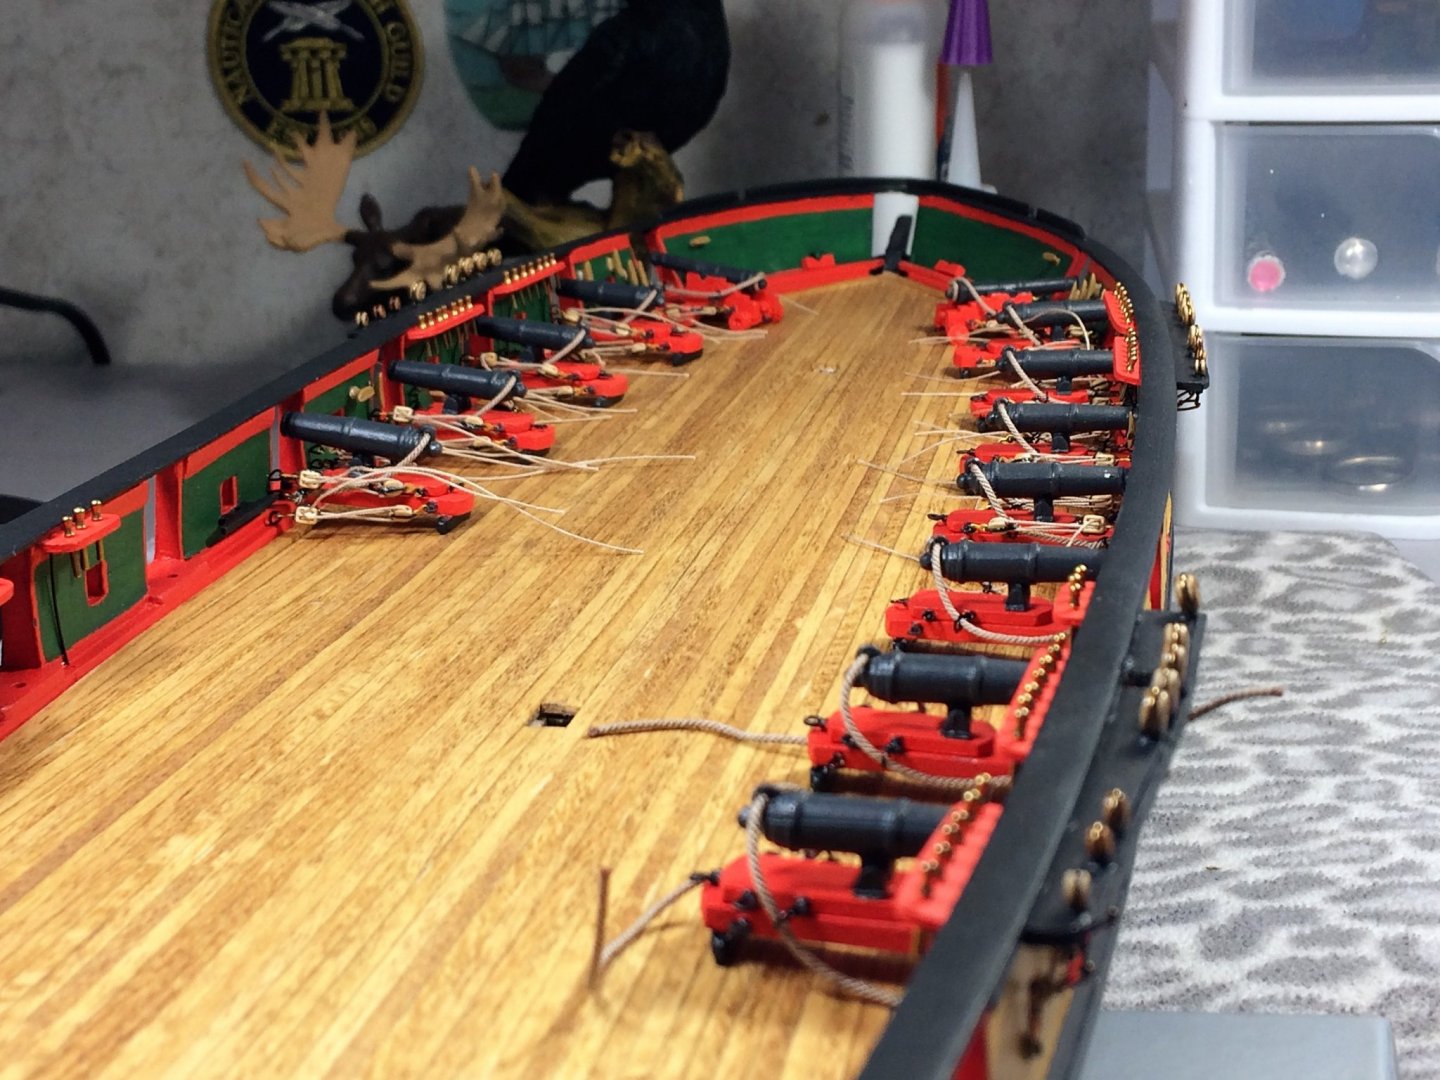
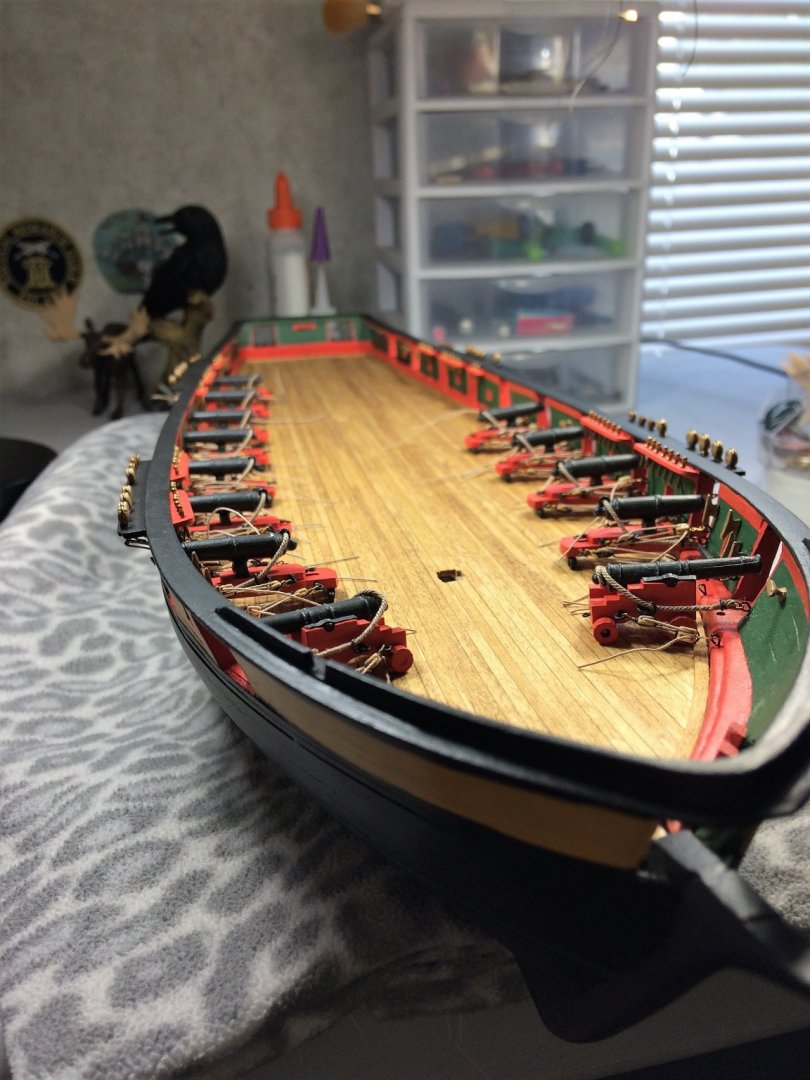
 Evening, It's finally Friday, work week is behind me, first snow storm coming in for tomorrow night, the cupboards are stocked..... I see a lot of modelling in my future! Small update for tonight. The rope coils are done! The cannon/carronade are finally done! There are still the Quoins, but to be truthful I kinda like the look of the carronade without them. I don't know, I'm still chewing on that. The coils may not be perfect, but not too bad for my very first time making them. I did want a used, just coiled up look. I feel I did get that, but there a little wonky looking! Oh well, I'll apply what I learned here to my next project. The Tiller is all rigged up. The rope isn't as bright as it looks in the pic. It's tan rope from Syren. This took a bit to wrangle together, but CA glue is a wonderful thing!!! She's getting there. Mask up and be good! Tom E
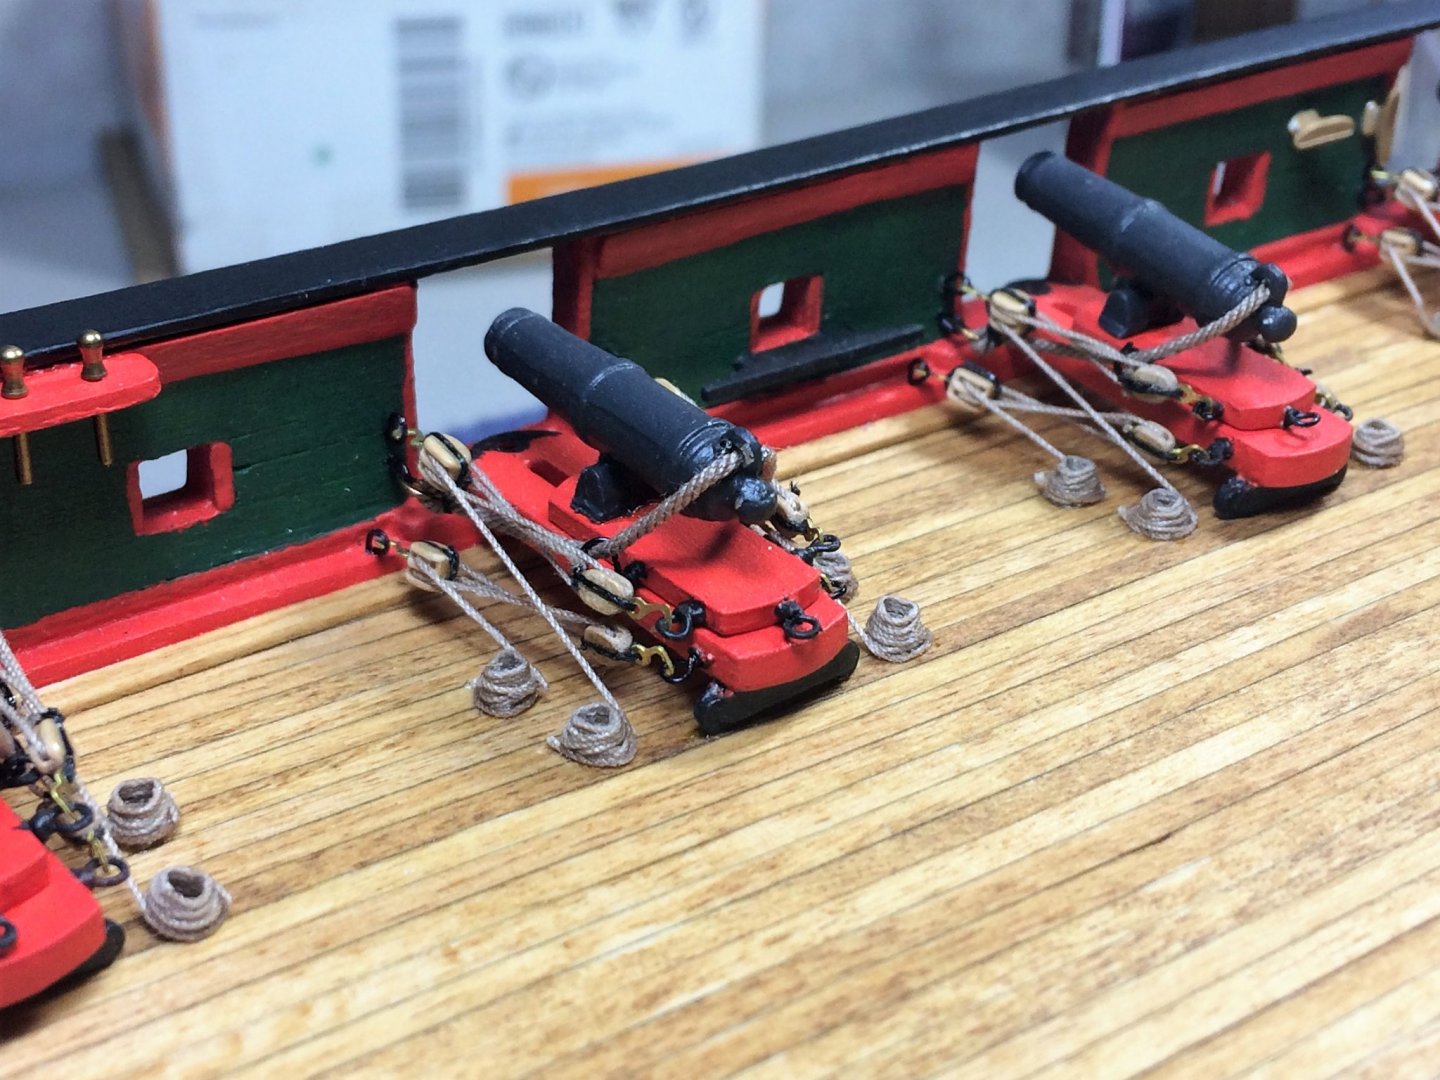


-
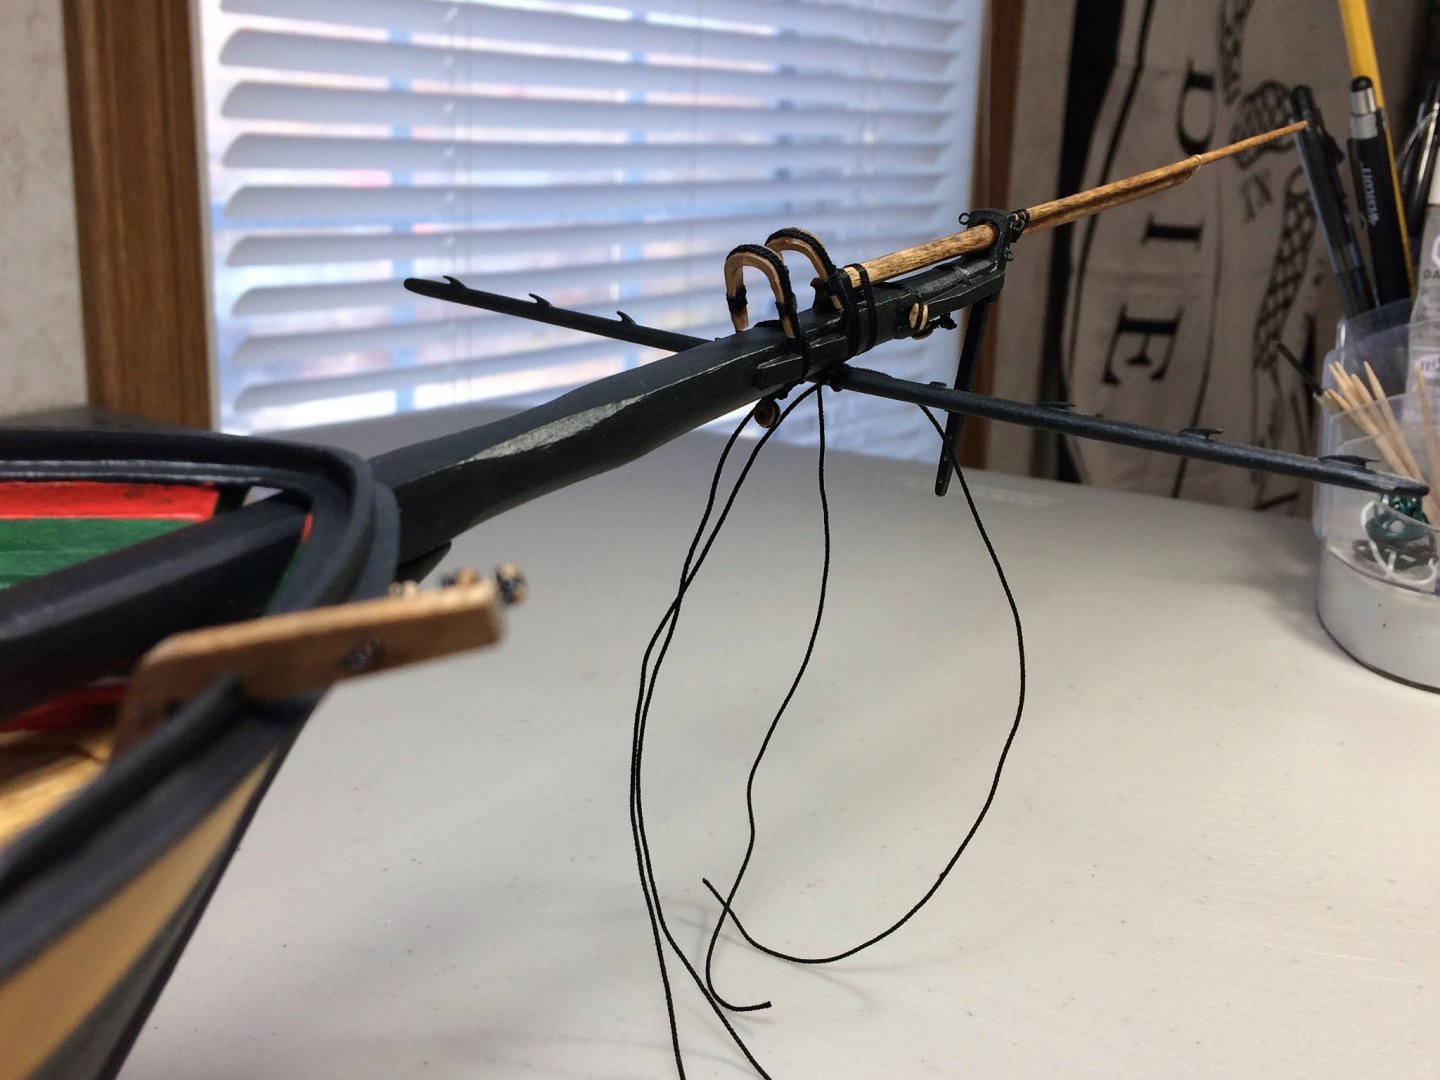
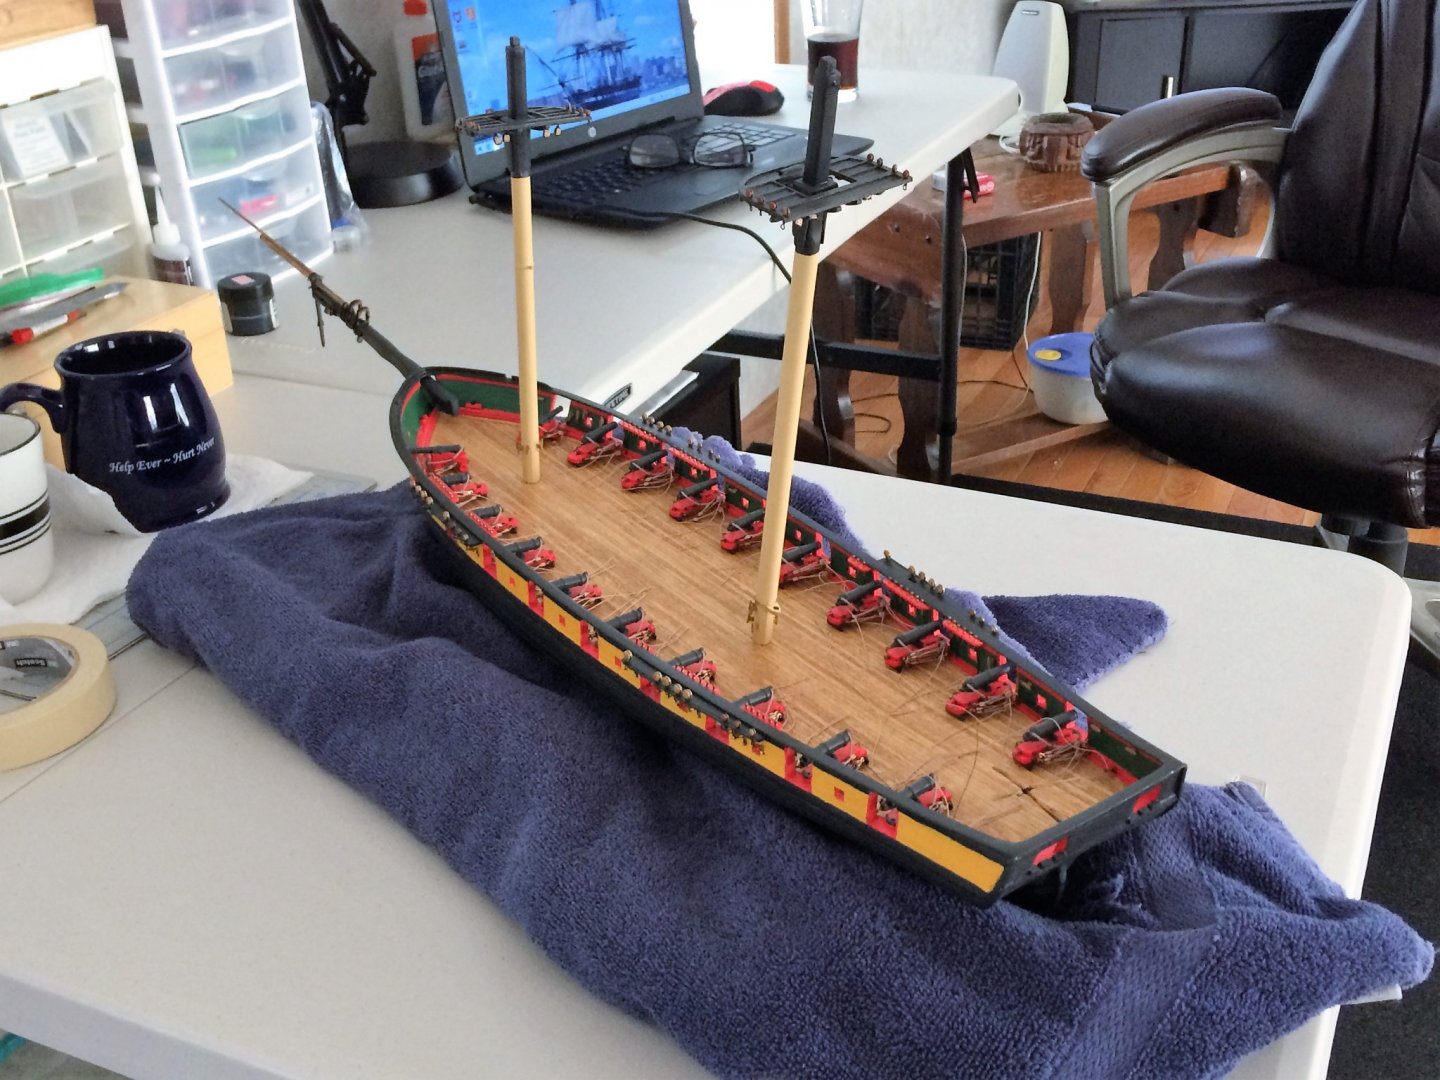
Evening, Thought Niagara needed an update. Plus, I just don't have the heart to watch the news tonight and feel like keeping the tv off. With all Thanksgiving plans cancelled and just staying home this year, I should have a good four days in the Shipyard. Very much looking forward to that!!! Hope I have enough coffee & creamer. The rope coils are almost done! Just have to install the last few. I'm getting a better "look" to these coils as I wrap more. The loose ends of the rope will eventually get trimmed. The Spritsail yard is officially mounted to the Bowsprit! I used some 1/32x1/32 square stock from the kit for the foot treads. These were primed and painted with Model Expo paint. There are more foot treads to install, but wont be until it's permanently mounted to the ship. And that should be soon! Happy Thanksgiving everybody! 🦃 Be safe! Tom E


-
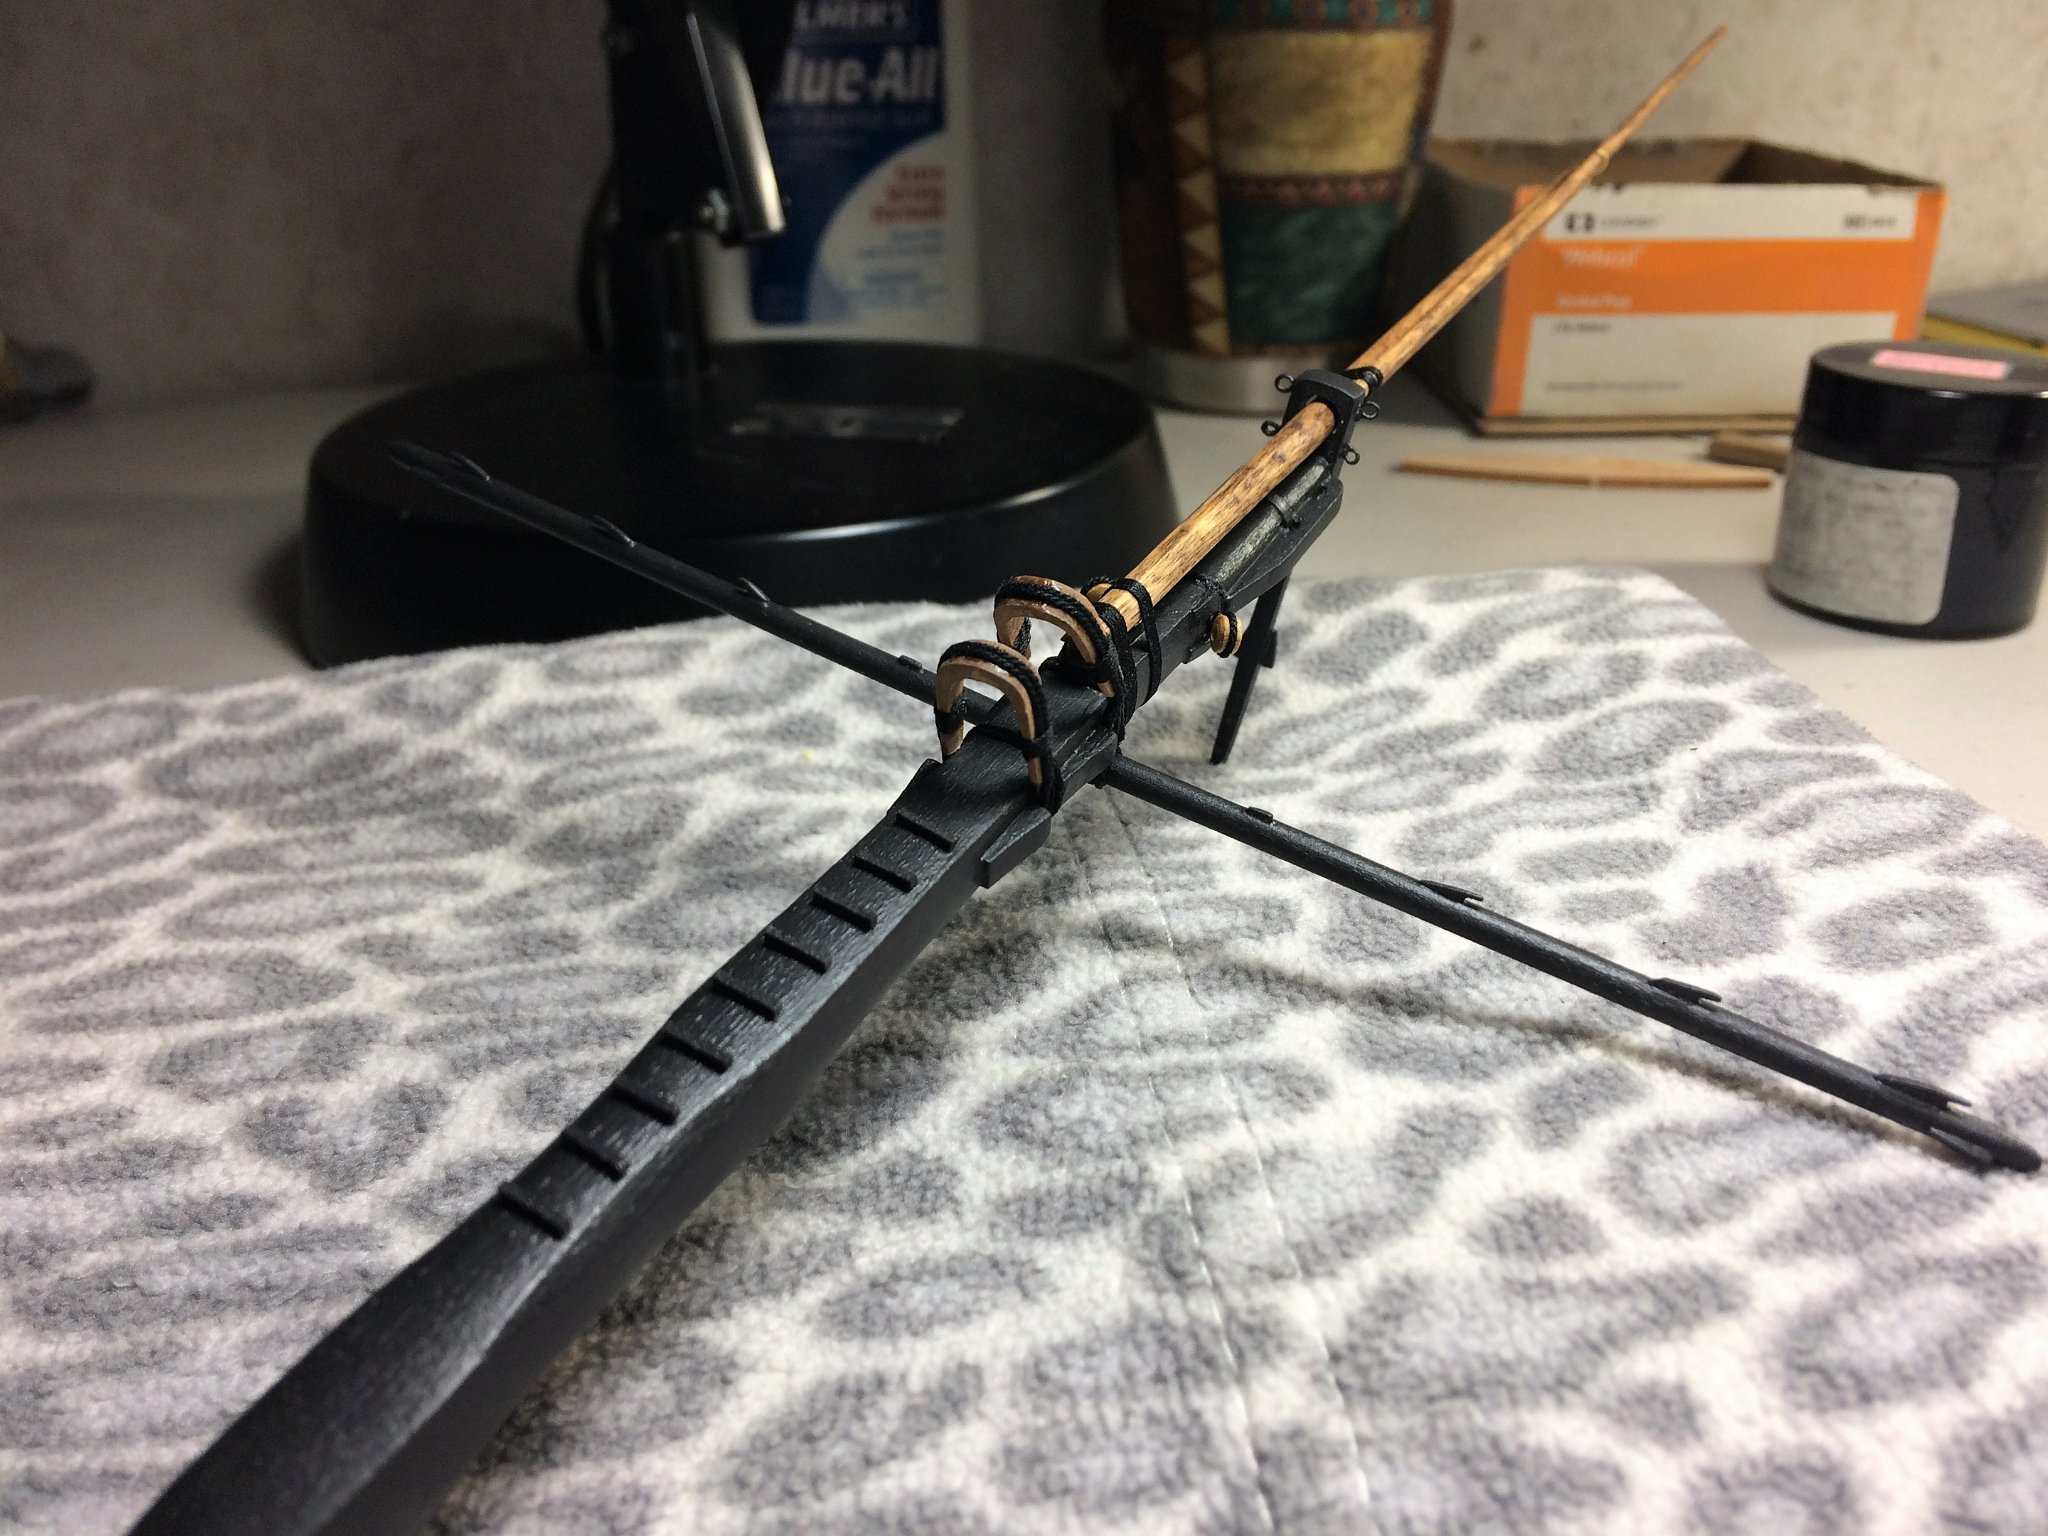
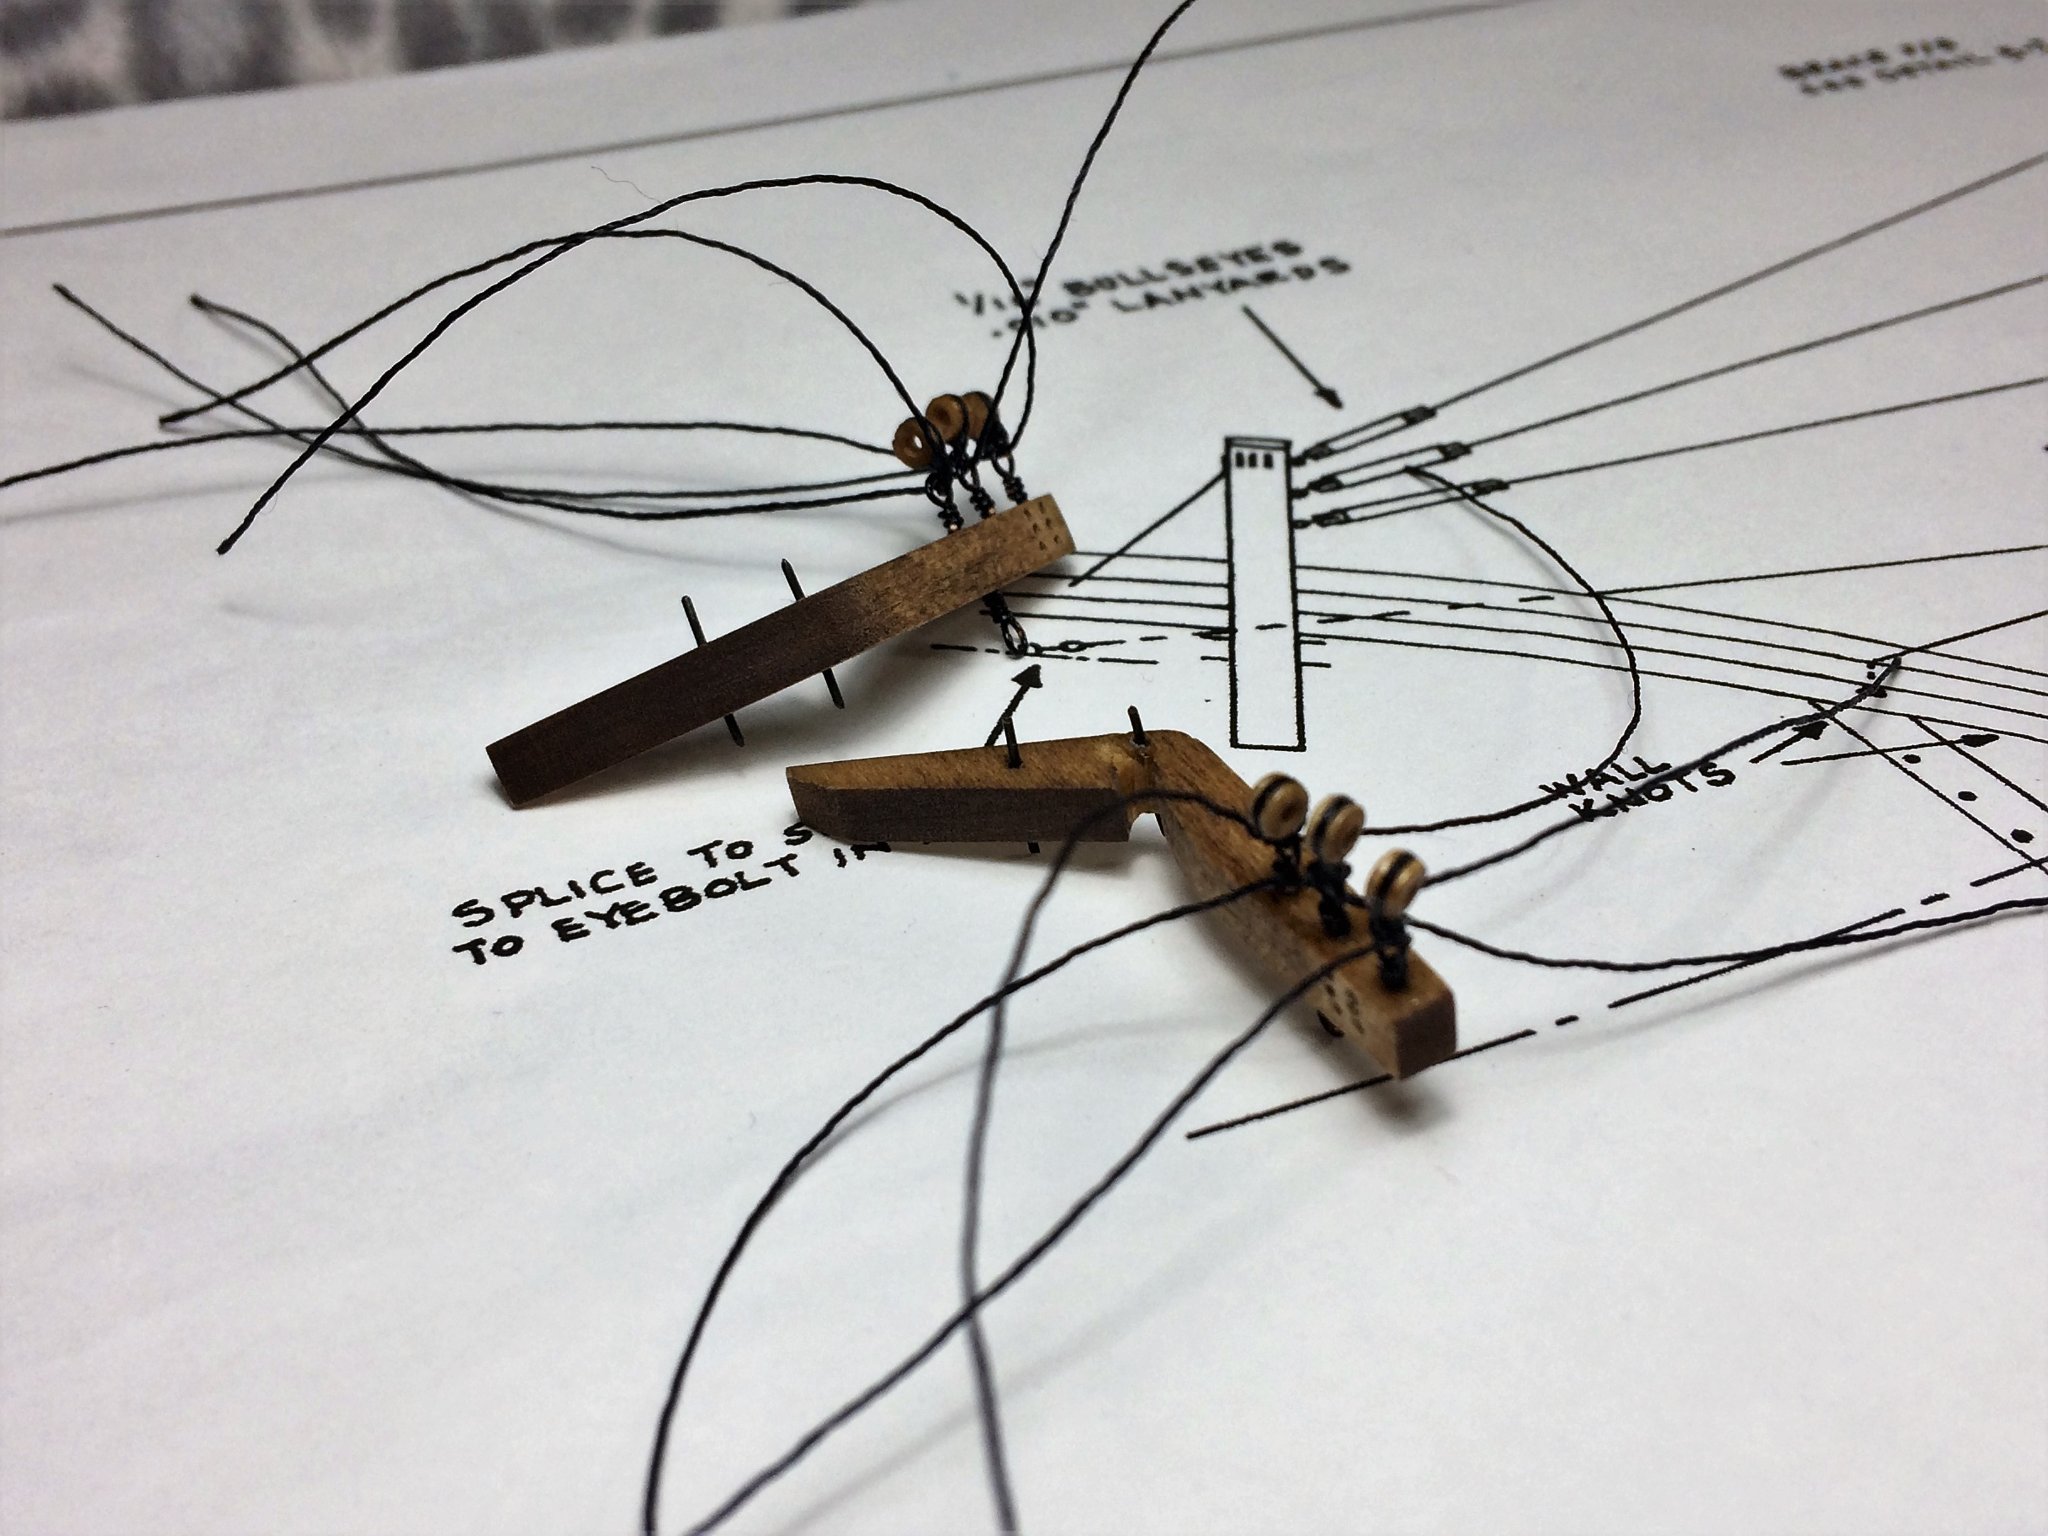
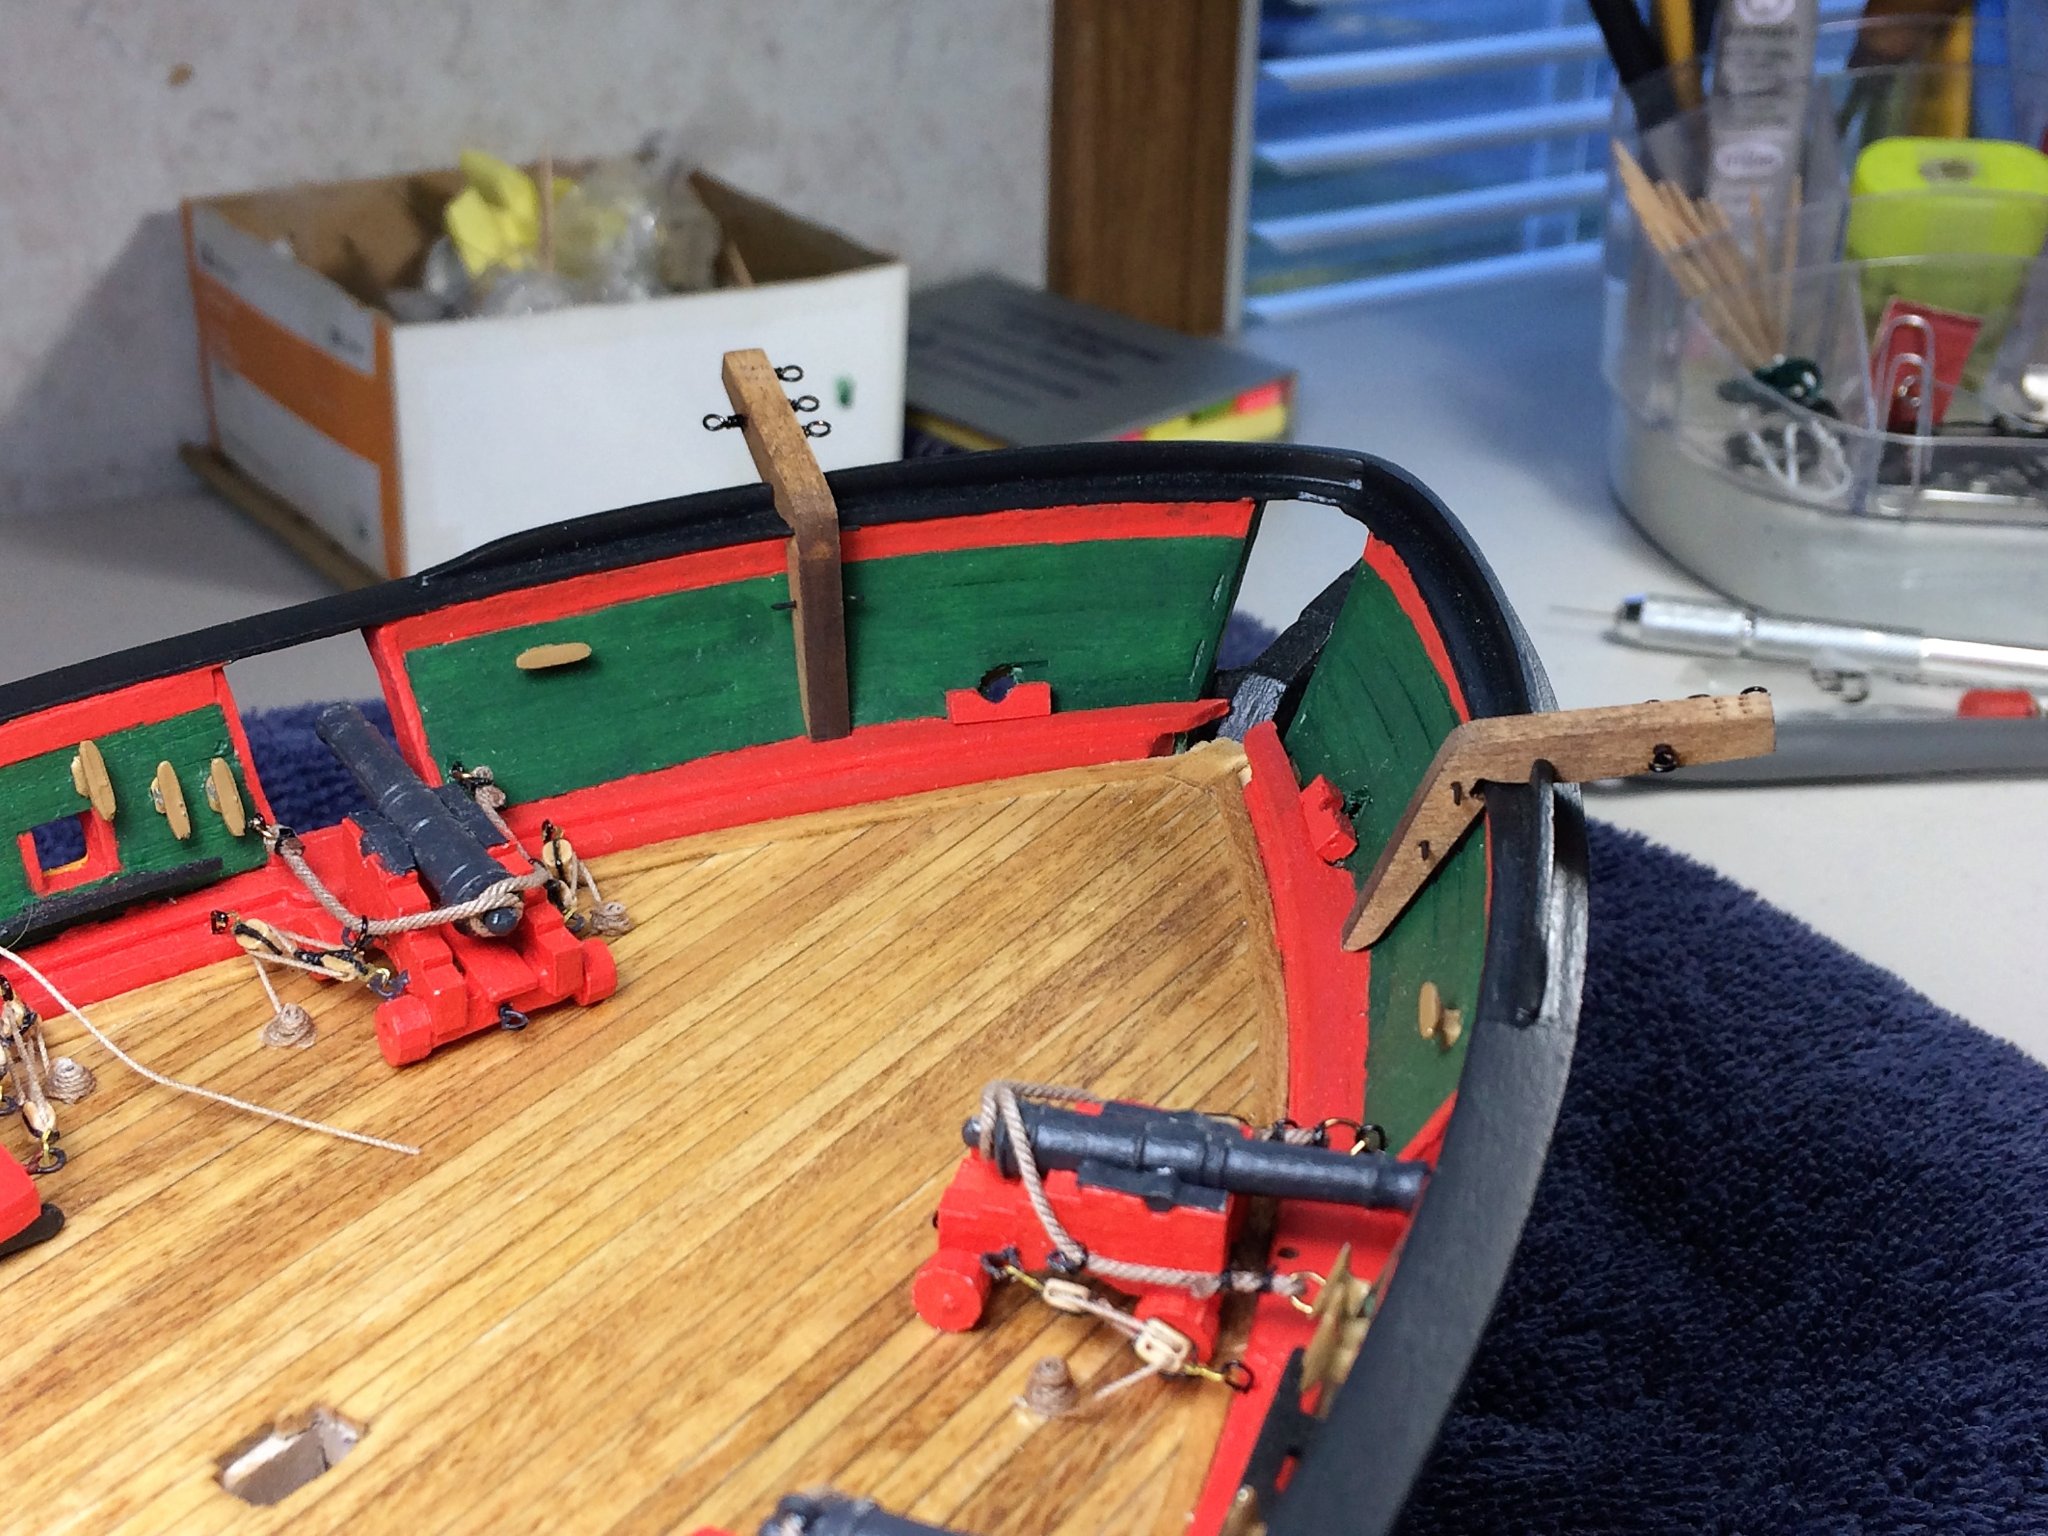
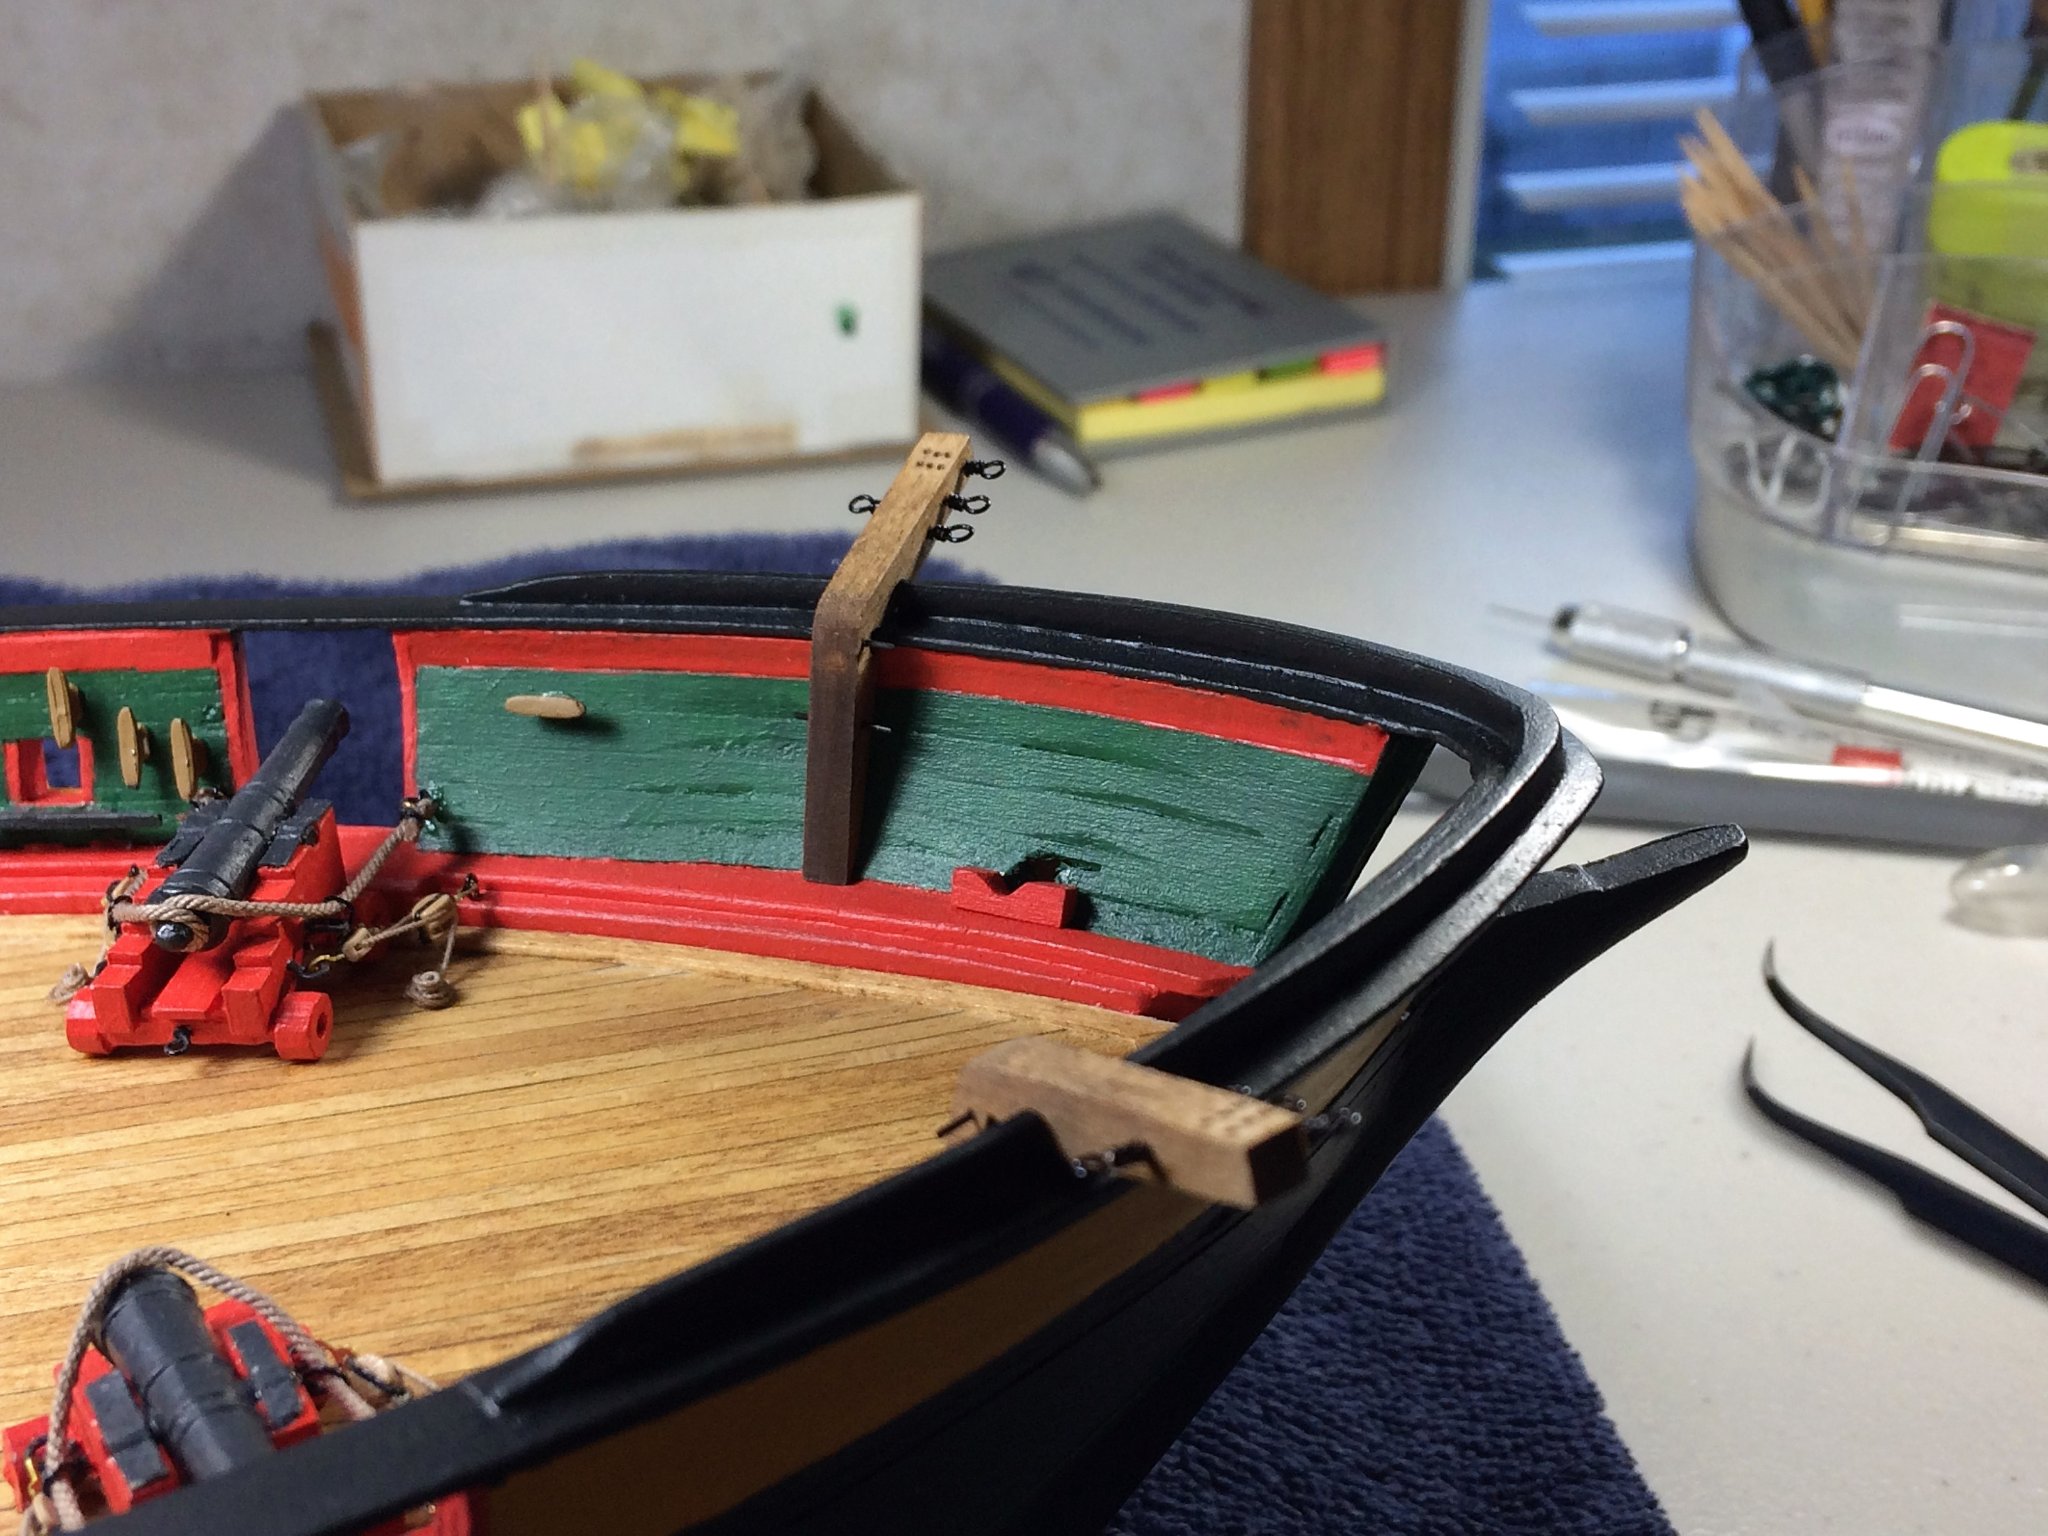
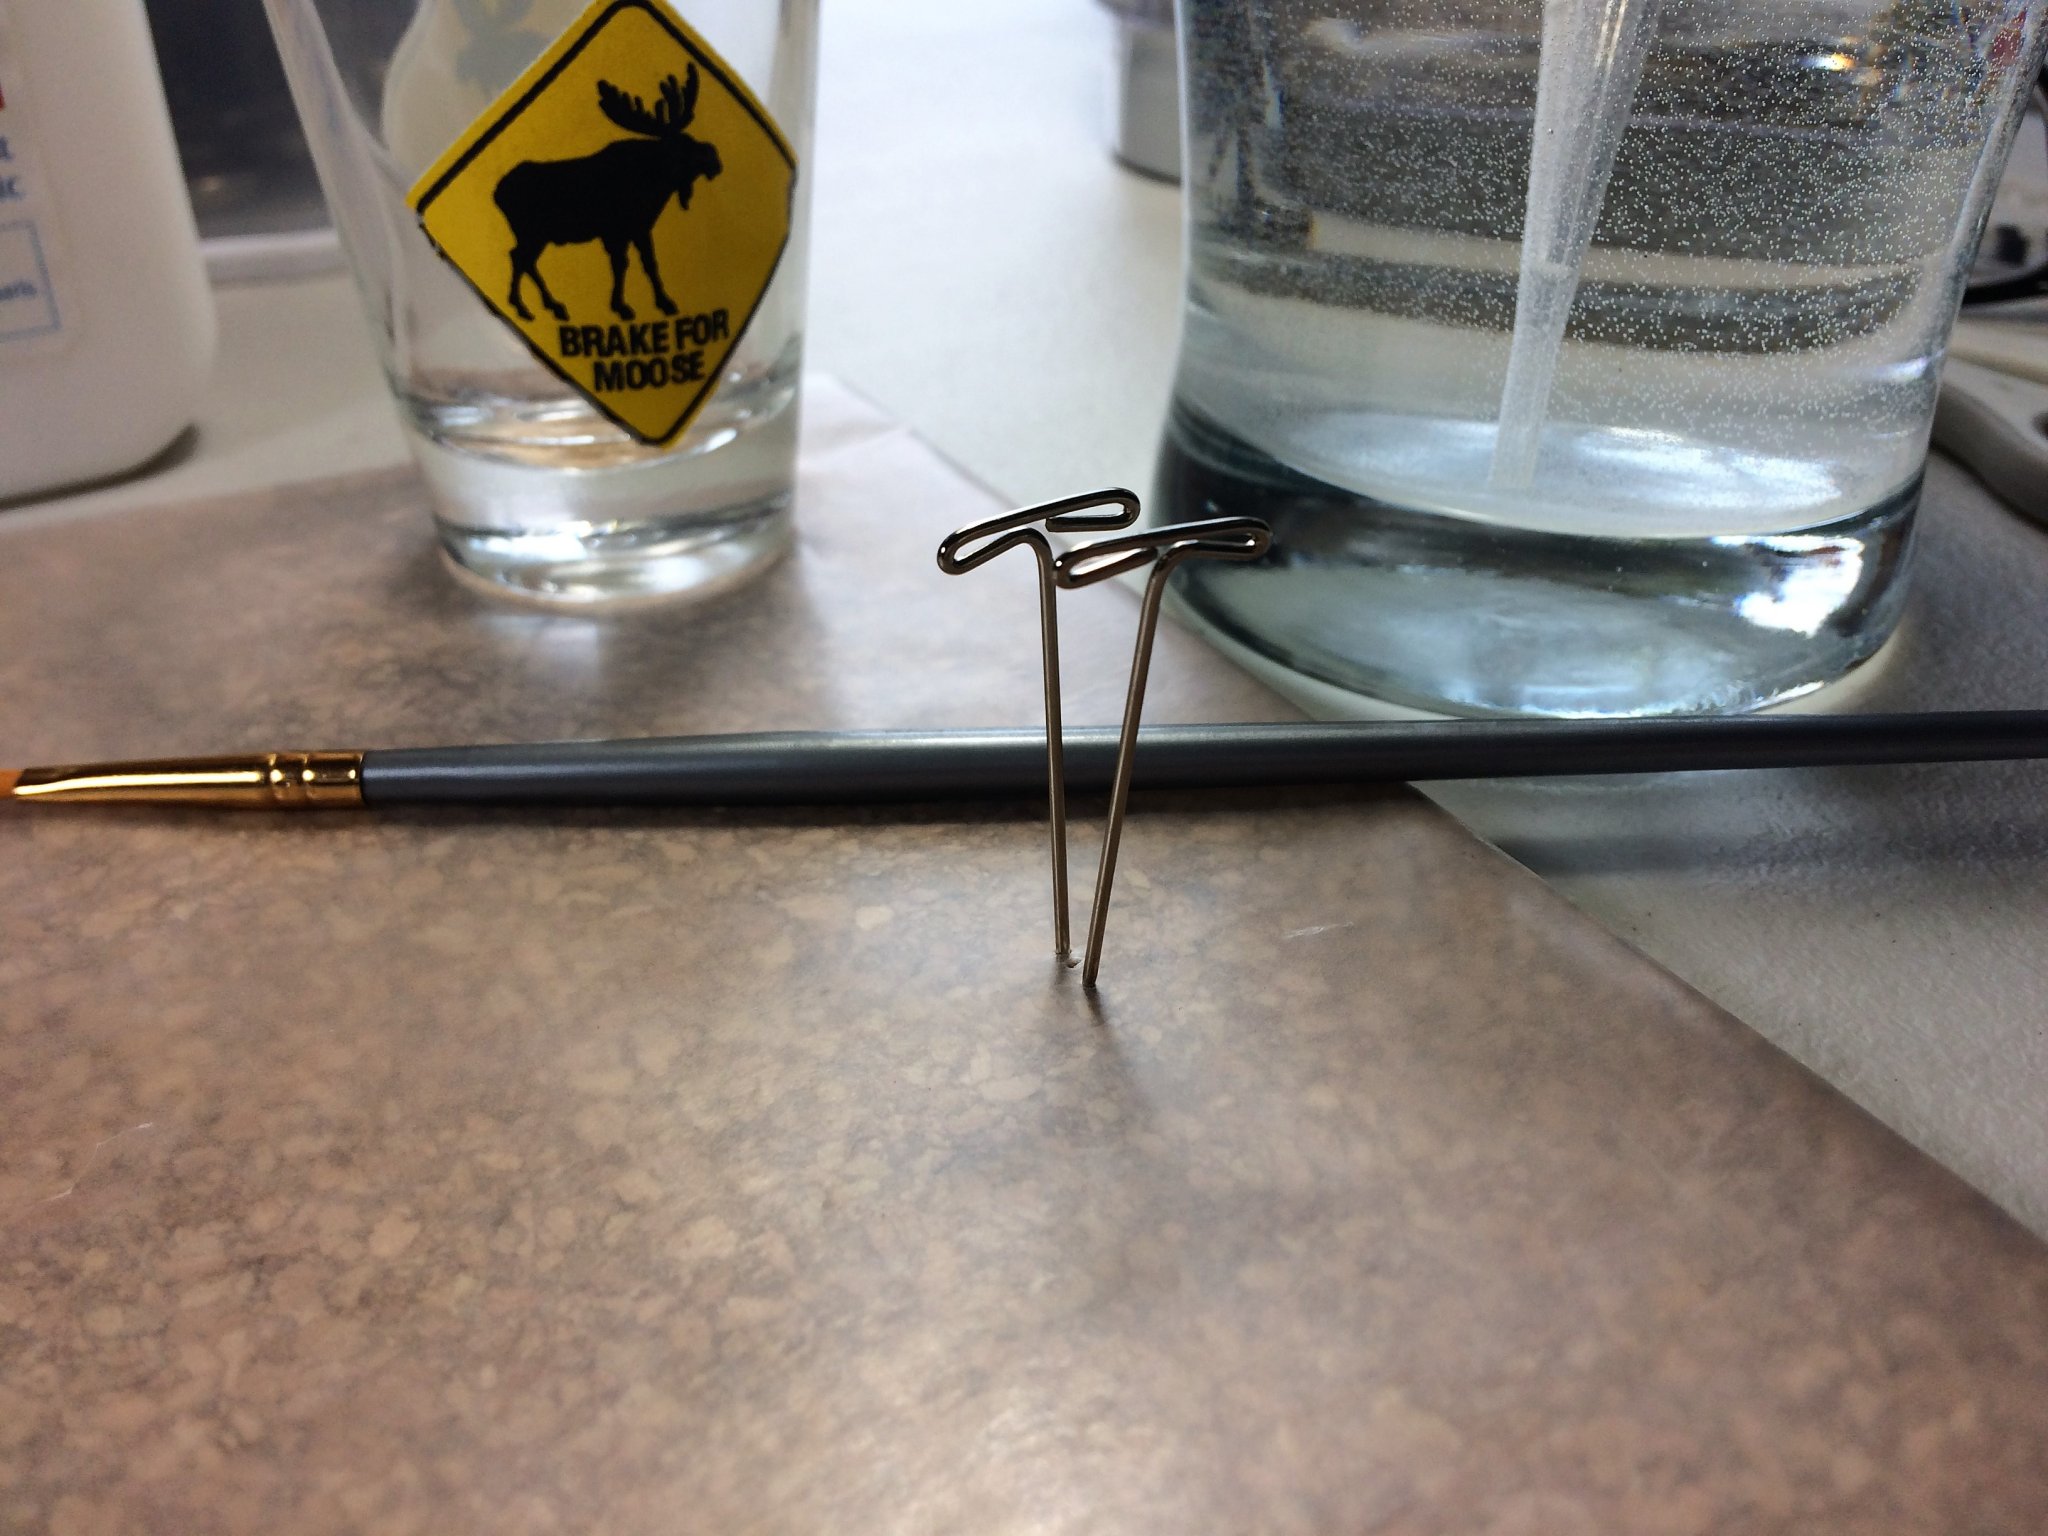
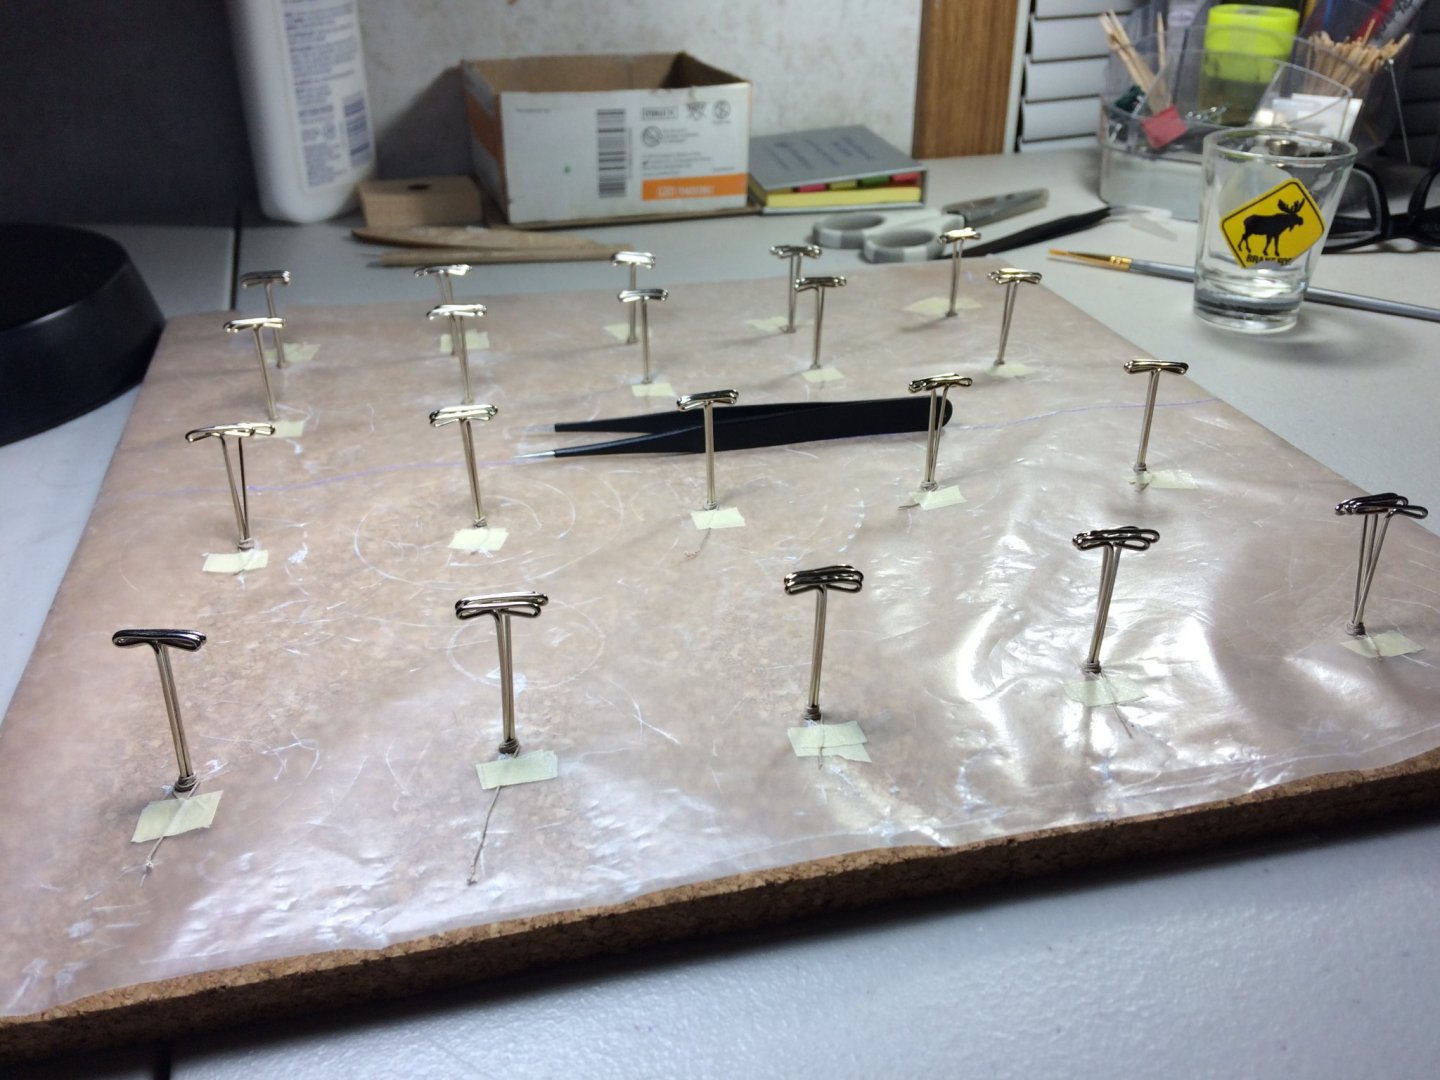
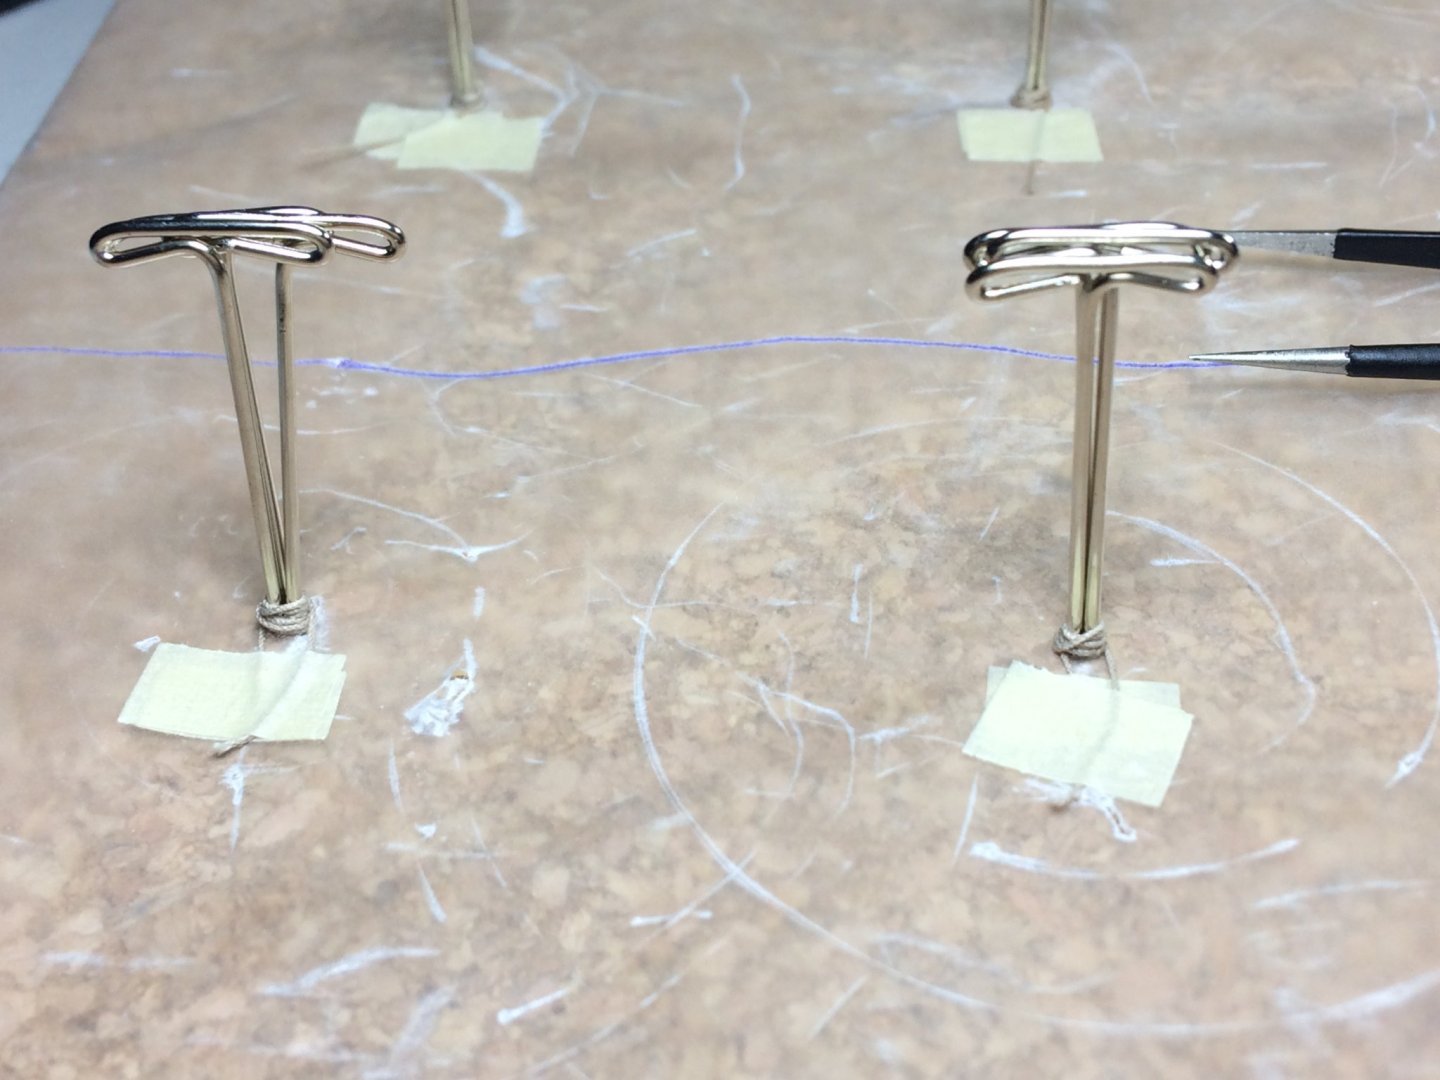
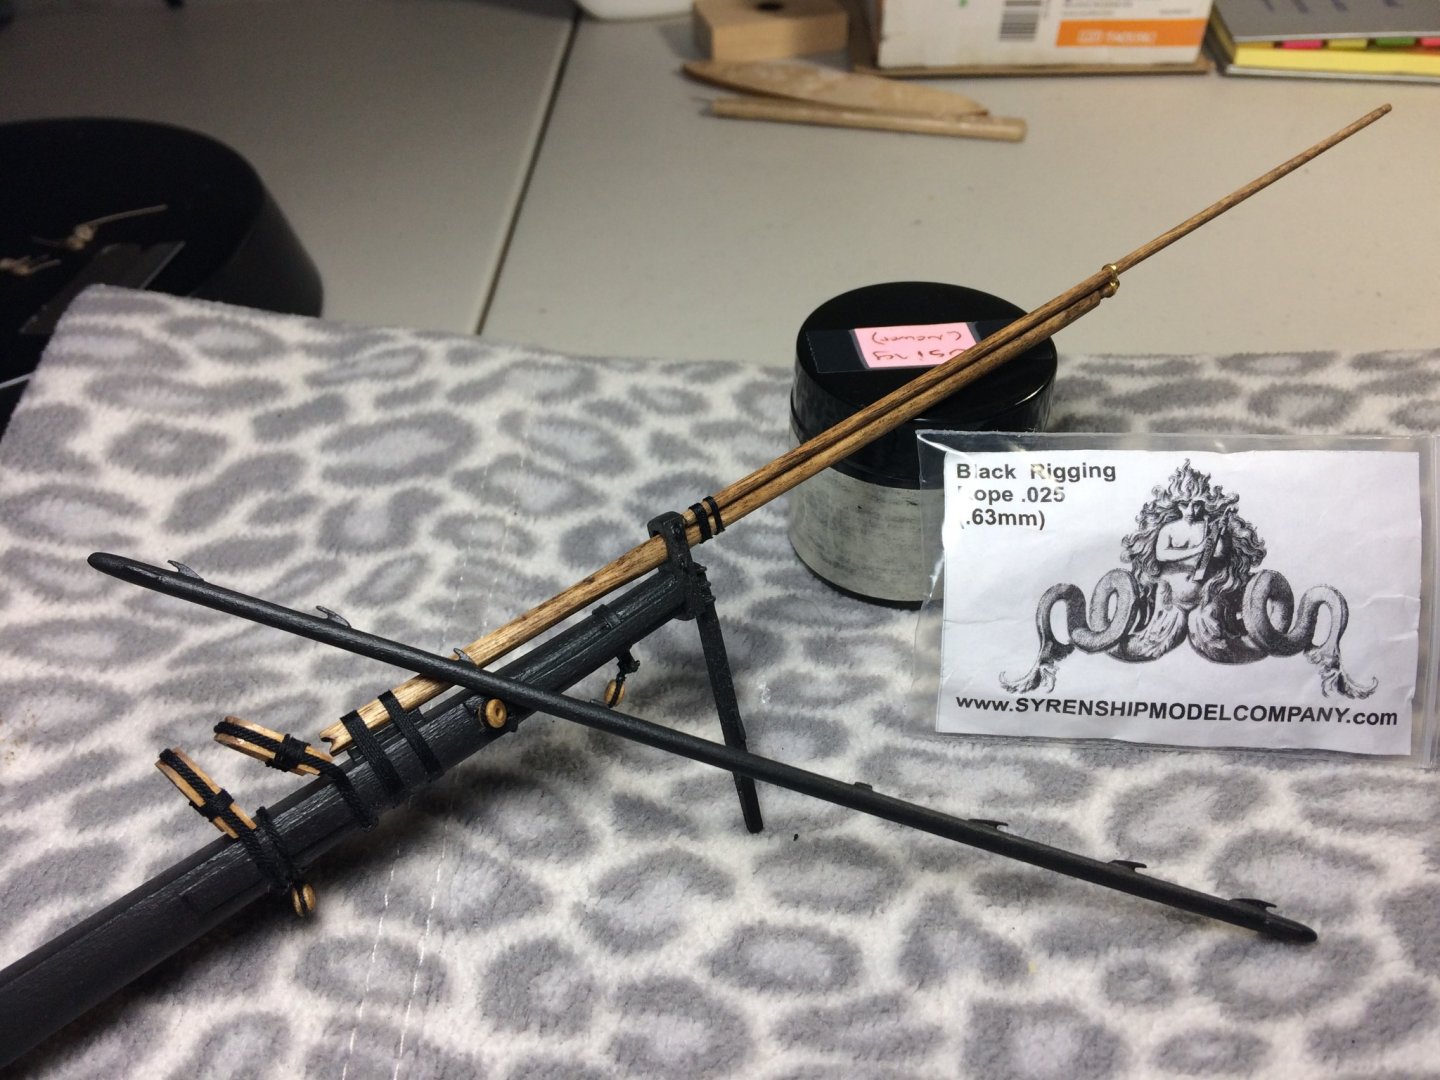
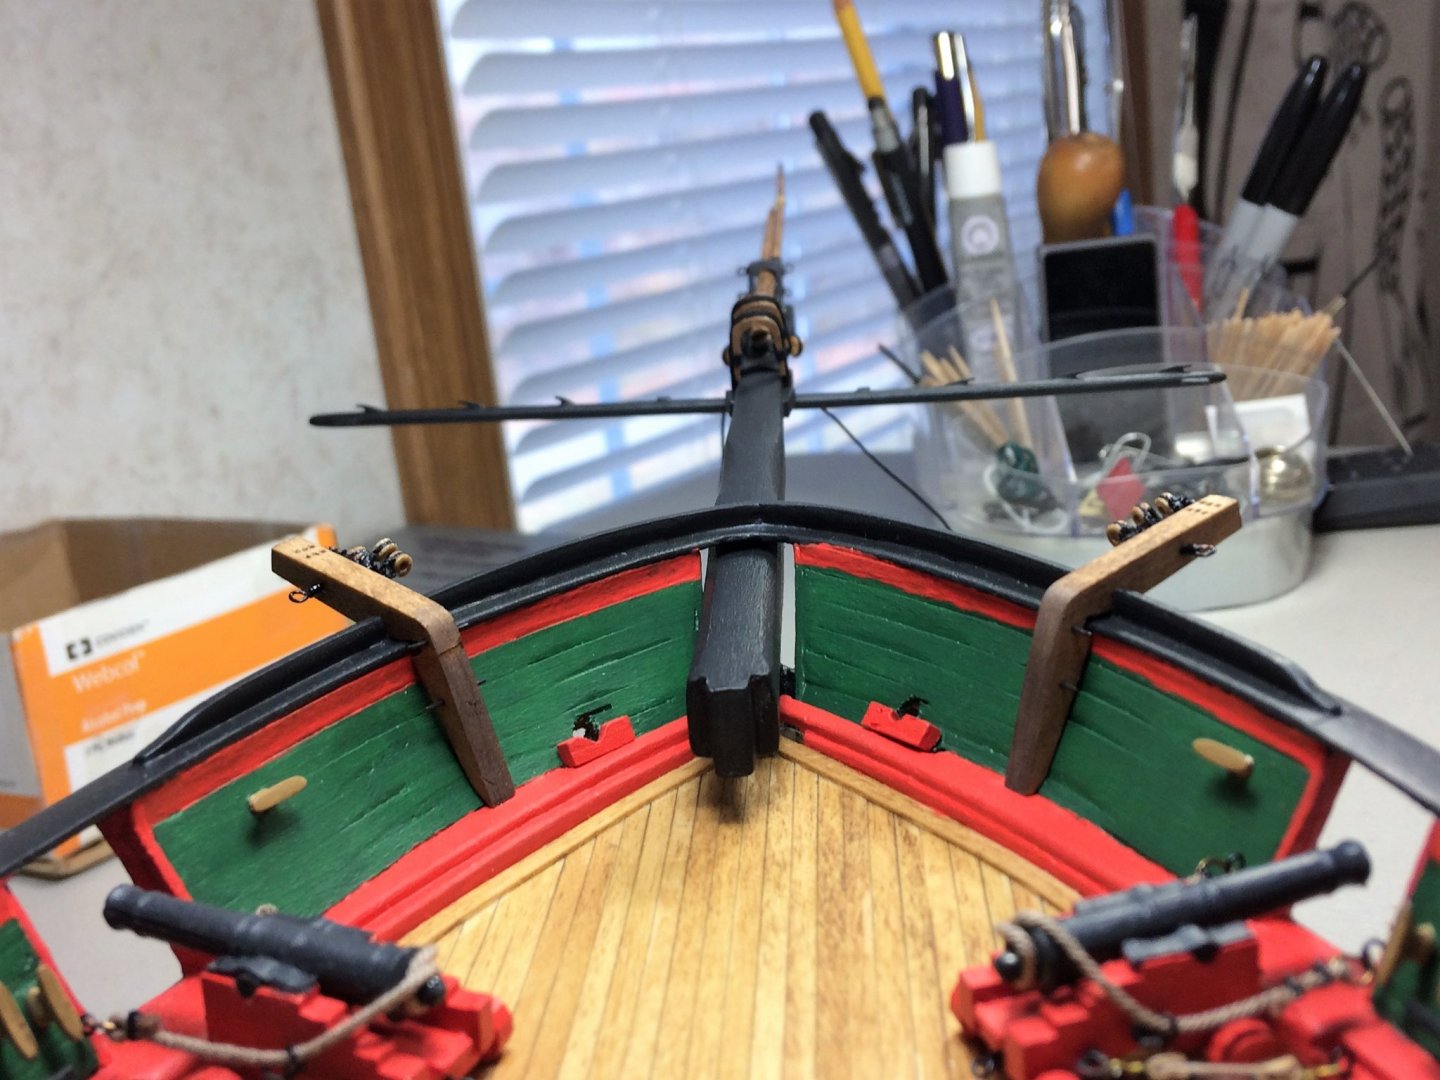
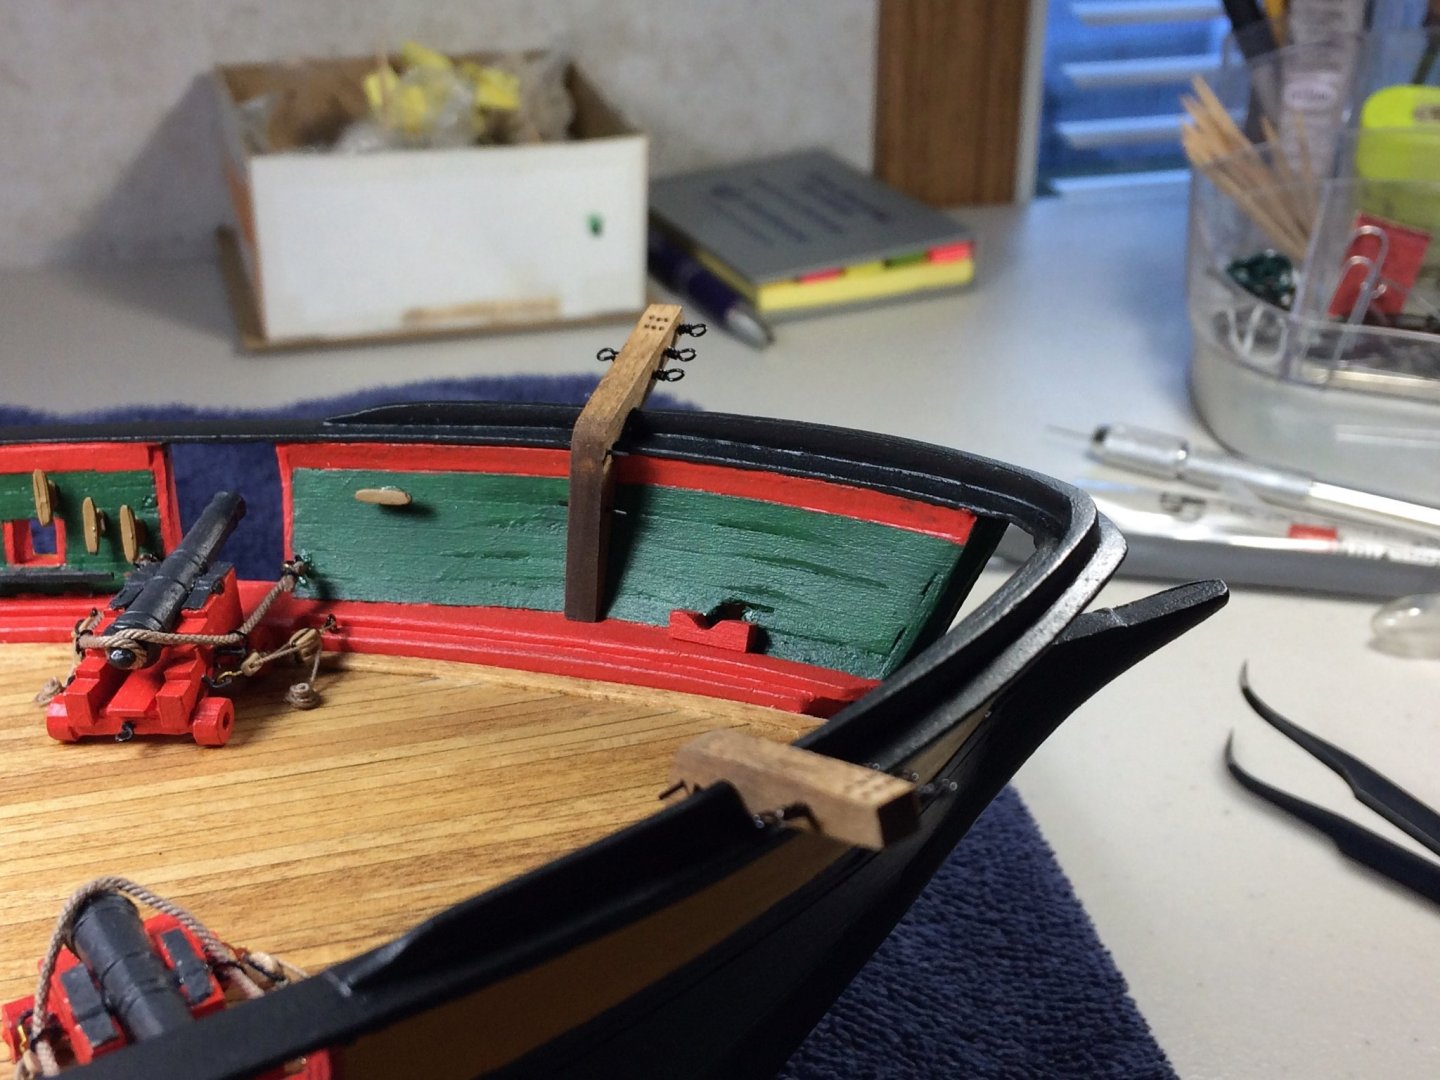
Evening, Hope everyone is well and safe during these crazy times. So glad every chance I get, when I can bunker down in my Shipyard and ignore the world for a few hours. Thanks Christos! As always, a pleasure to have you look in on my humble build. Thanks to all those folks hitting that "like" button as well! A mini update for tonight. I attached some Bullseyes to the Catheads. Supposedly these can be made by boring out kit supplied Deadeyes , per the instructions. I should have filmed that attempt! Any type of force from drilling would disintegrate the deadeyes. Maybe they were old and brittle. I ended up ordering some pre-made Bullseyes from Model Expo.....problem solved. The rope coils continue as well. I've got it up to about 20 coils per batch. Using Syren .012 Tan rope for these. Tape one end down, wrap the rope around the T-pins and tape down the other end. I paint on a 50/50 mix of white glue and water. I tend to wrap a batch and let dry for at least 48 hours. They do get a good soaking of glue water. When dry, the T-pins generally slide right out. The cork board underneath has a wax paper wrap around it, and the coils come off fairly easily. I can safely say, no two coils will look the same. With the Bowsprit now back on the table full time, it's ready for it's final touches. Starting with the Spritsail Yard. This will be attached with Syren .025 Black rope. I'll attach the rope to the yard first, then attach to the Bowsprit. The below pic has the rope attached to the yard but not the Bowsprit yet. Just using some clear tape, I wanted to see what it will look like. In respect to the angle of the Jib Boom Guys coming off the catheads, seems to be ok. Wont truly know until it's permanently attached. Stay safe! Tom E
-
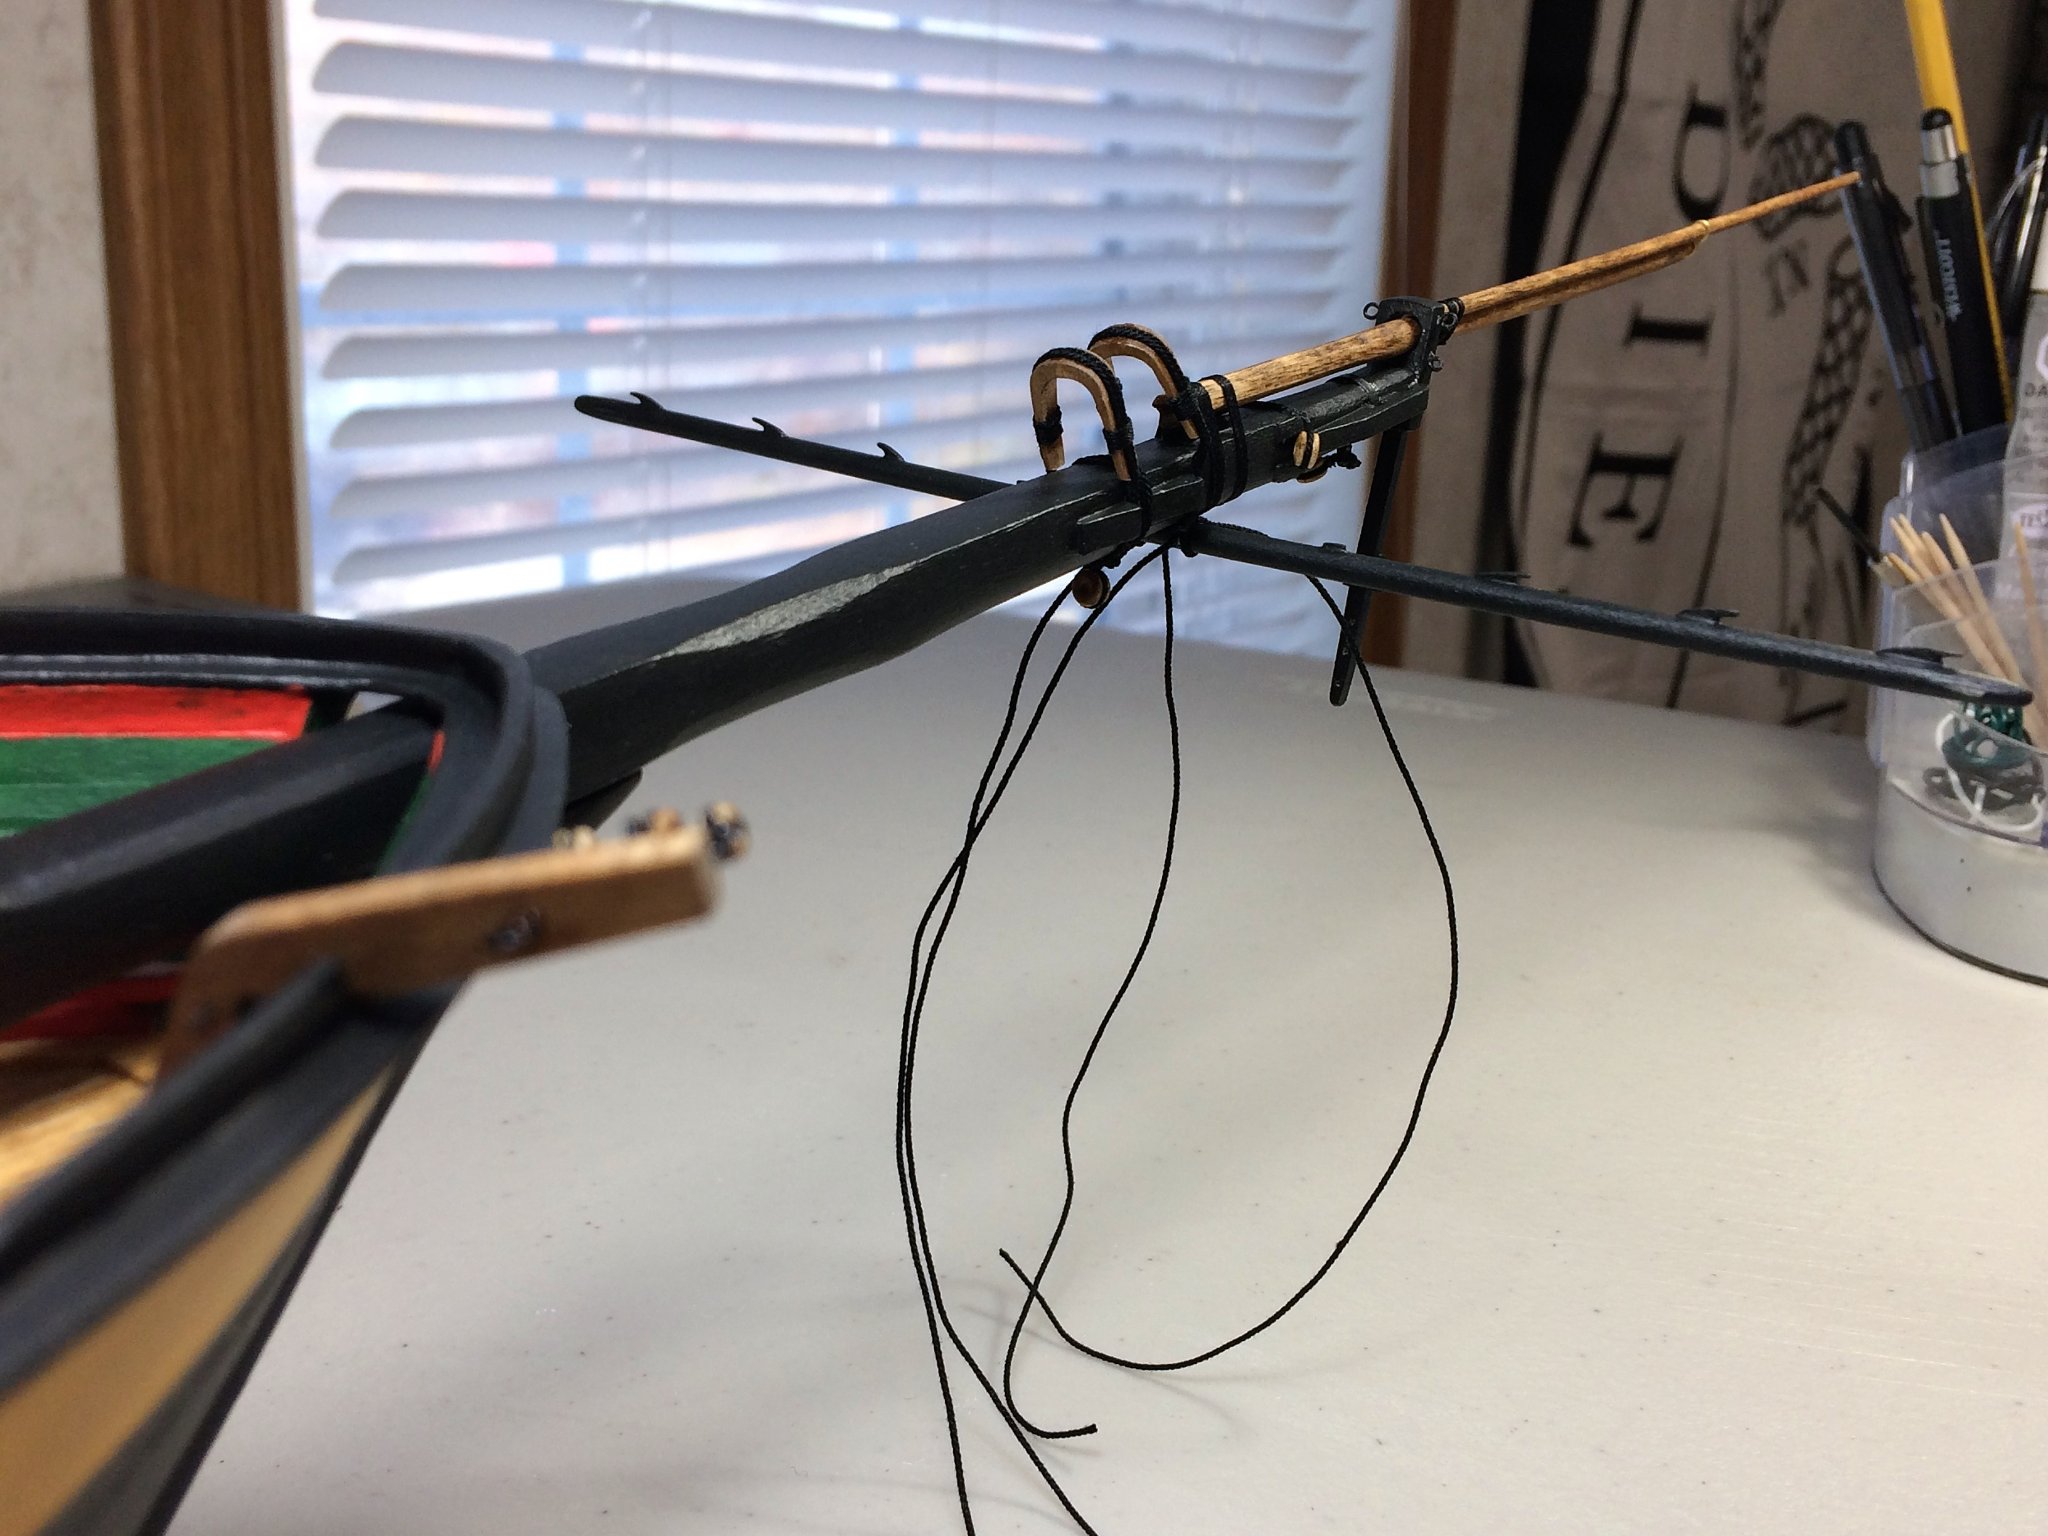
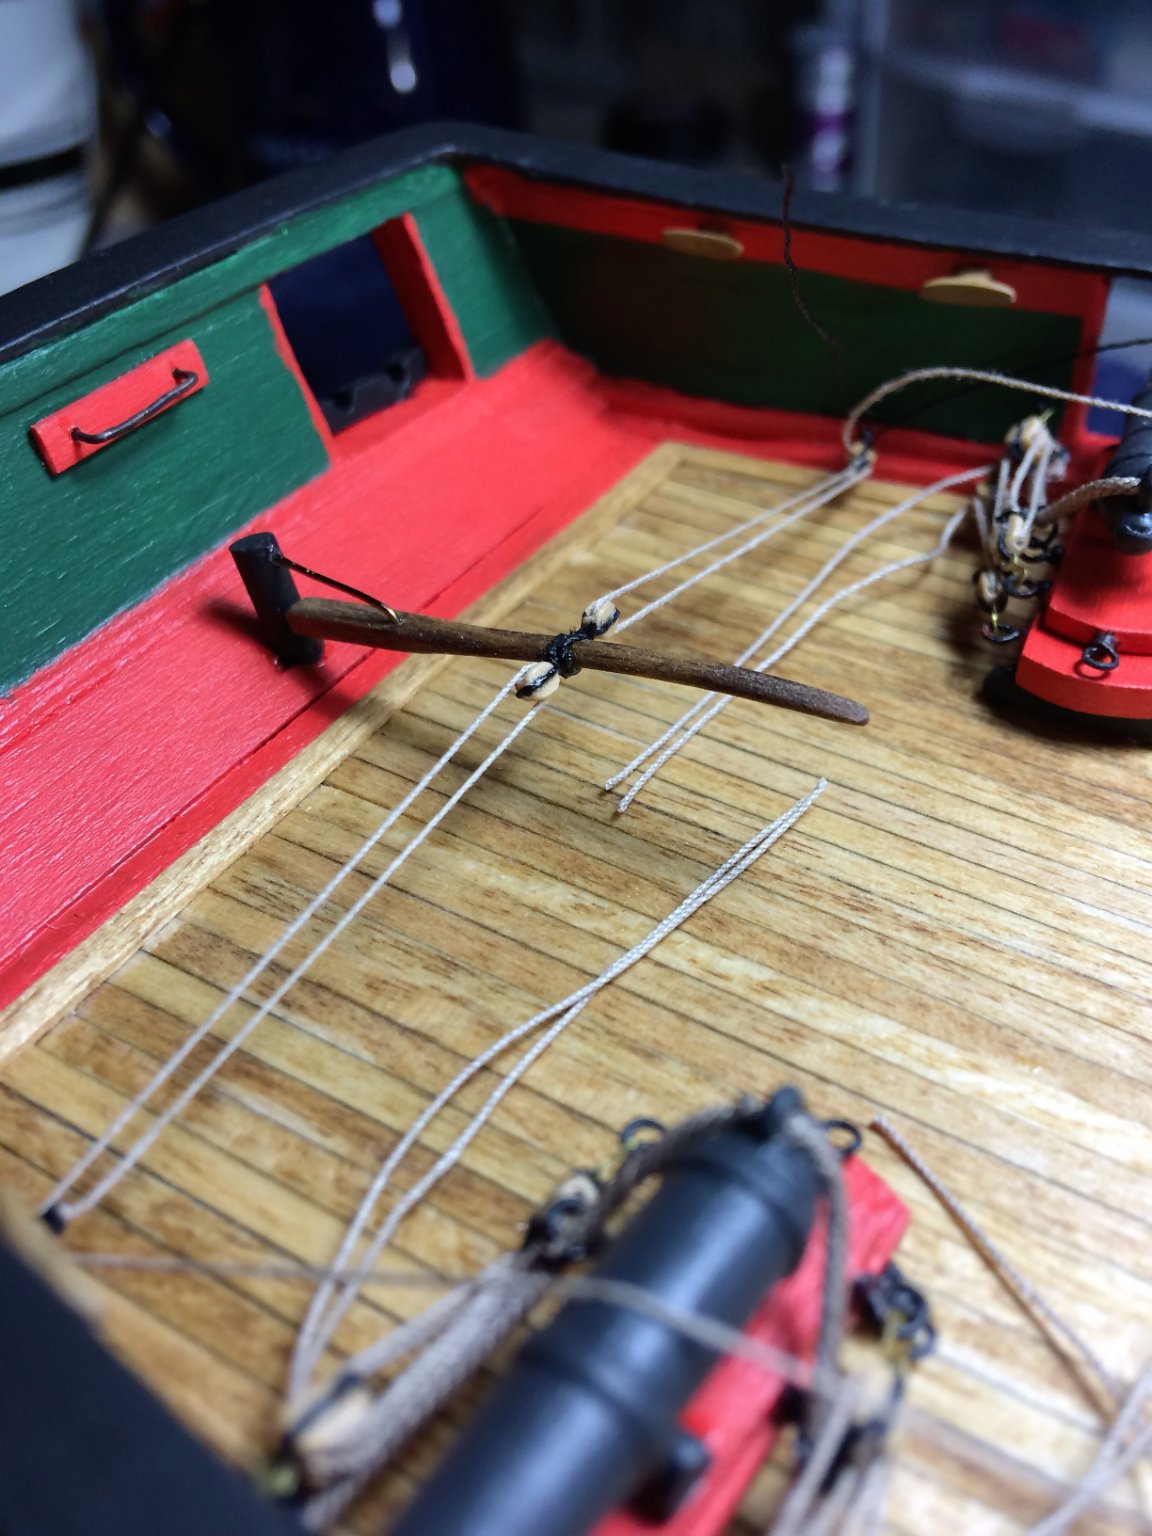
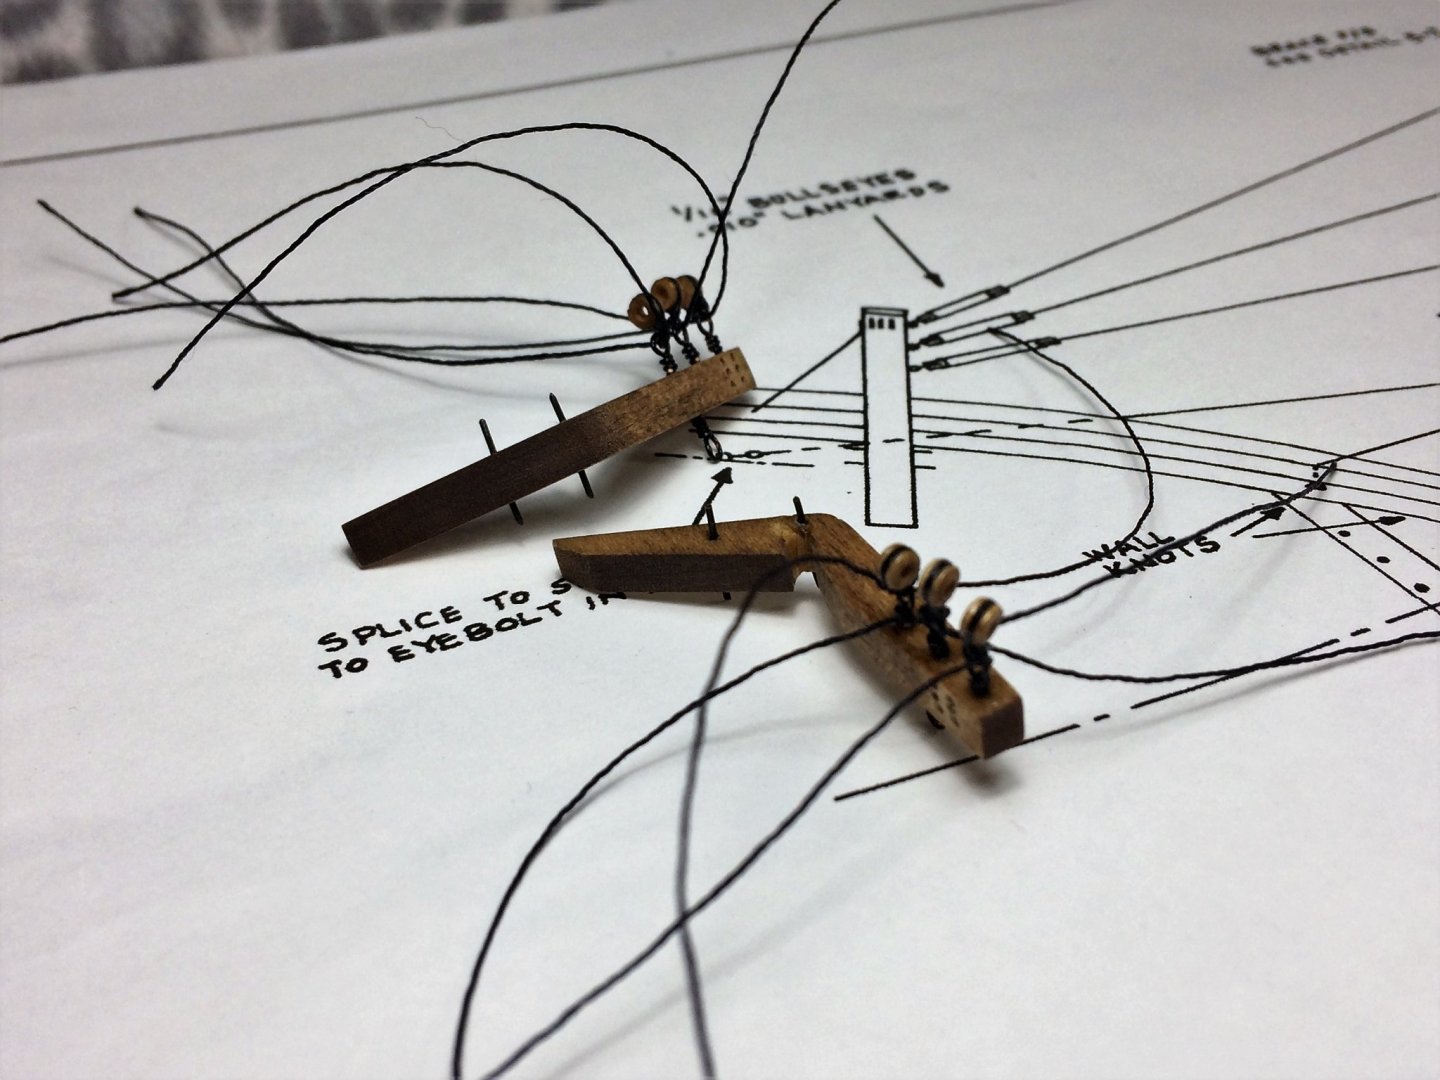
Evening, Hope everyone is well. Niagara is sorely overdue for an update. Although I haven't been online a lot recently, I have been building. The Tiller has been permanently installed. I pre rigged the ropes before gluing into the deck. The eyebolts in the deck for the tiller are a bit oversized on purpose. The rigging for the Spanker Boom has a block attached later on. With all of these lines every where....looks like a drunk spider had a great night! They do tighten up nicely. The Catheads are back on the build table. These need a little prep work before permanently mounting. I want to install some bullseyes on the eyebolts prior. A tension rod needs to be fitted as well. The rope coils are slowly coming along. I have experimented with so many different variations. I have been making them by wrapping them around T-pins and setting with a 50/50 glue water mix. But what I'm learning is exactly how many T-pins make a suitably sized rope coil. One is to small, four is too large, It took several "batches" but three is the magical number. The below pic shows what one T-pin produces...too small for my tastes. Although, I am getting the "look" I was looking for with the rope coils. Kind of disheveled, just used type of look. One day I had the Bowsprit out, thought I would see what she looks like with some masts in. I had the Bowsprit out as it needs some prep work. Once the Catheads are in, and rope coils done, the Bowsprit will be mounted on ship. She needs foot treads and cleats. Some of which cant be installed until mounted or it wont fit thru the opening for the Bowsprit. She's getting there! Wash your hands! Tom E


-
2021 CALENDARS ARE GOING FAST!!
Tom E replied to ferretmary1's topic in NAUTICAL RESEARCH GUILD - News & Information
Just received my calendars on Monday. These are pretty sharp lookin!! Very happy with the purchase! Huzzah to the NRG! Really great idea. Tom E -
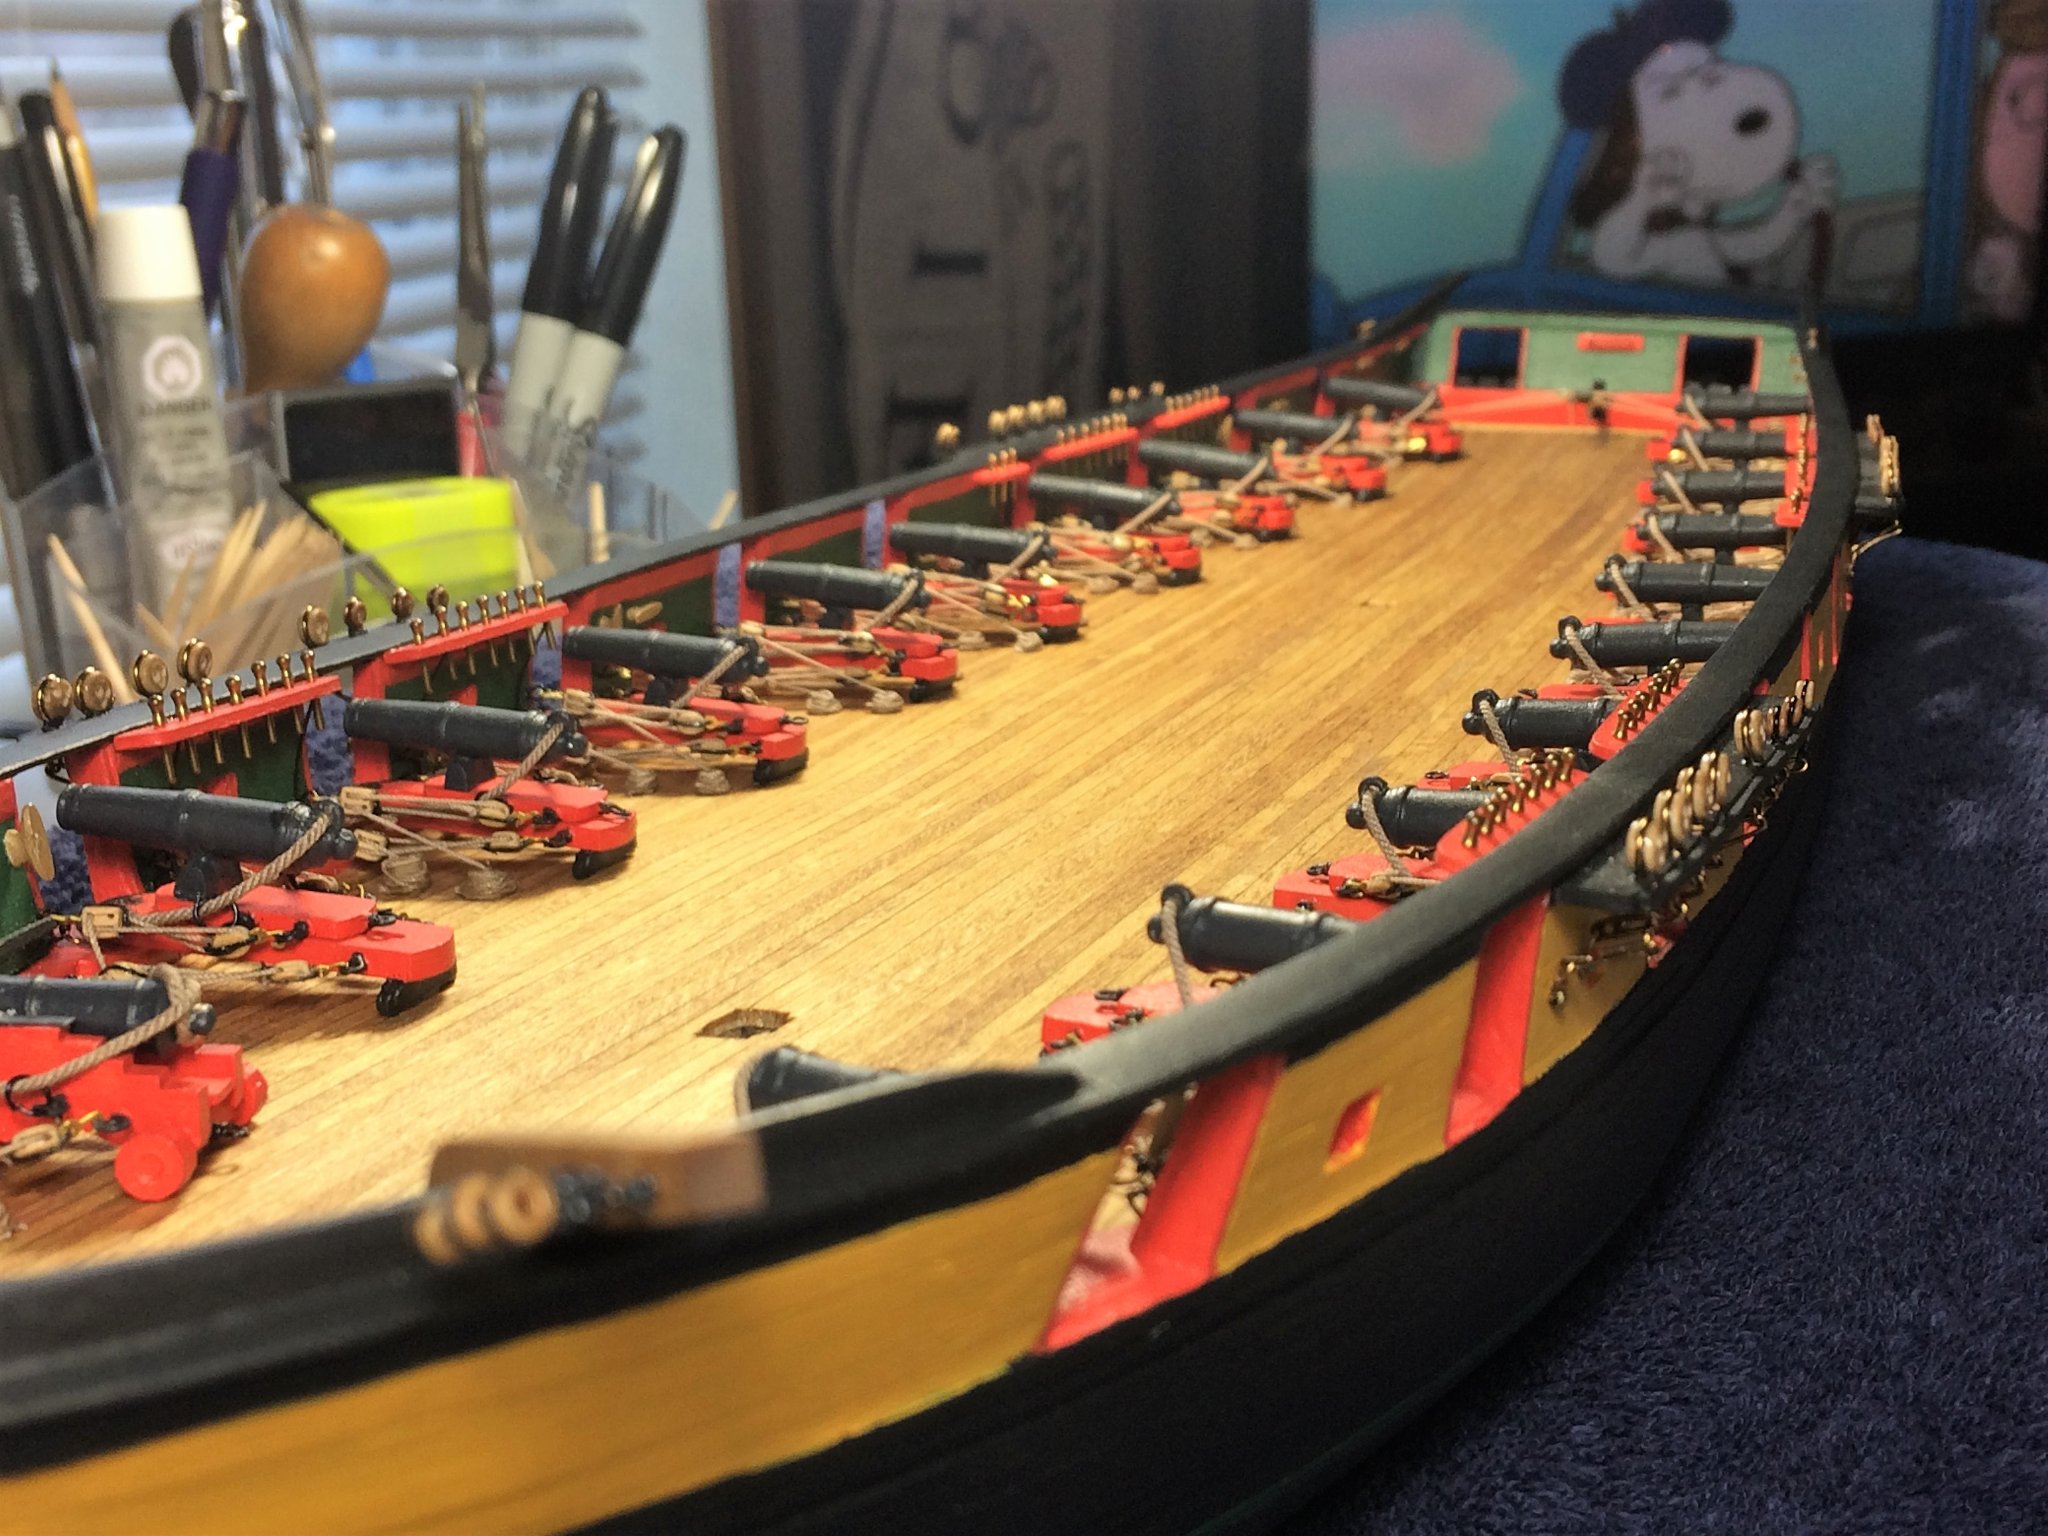
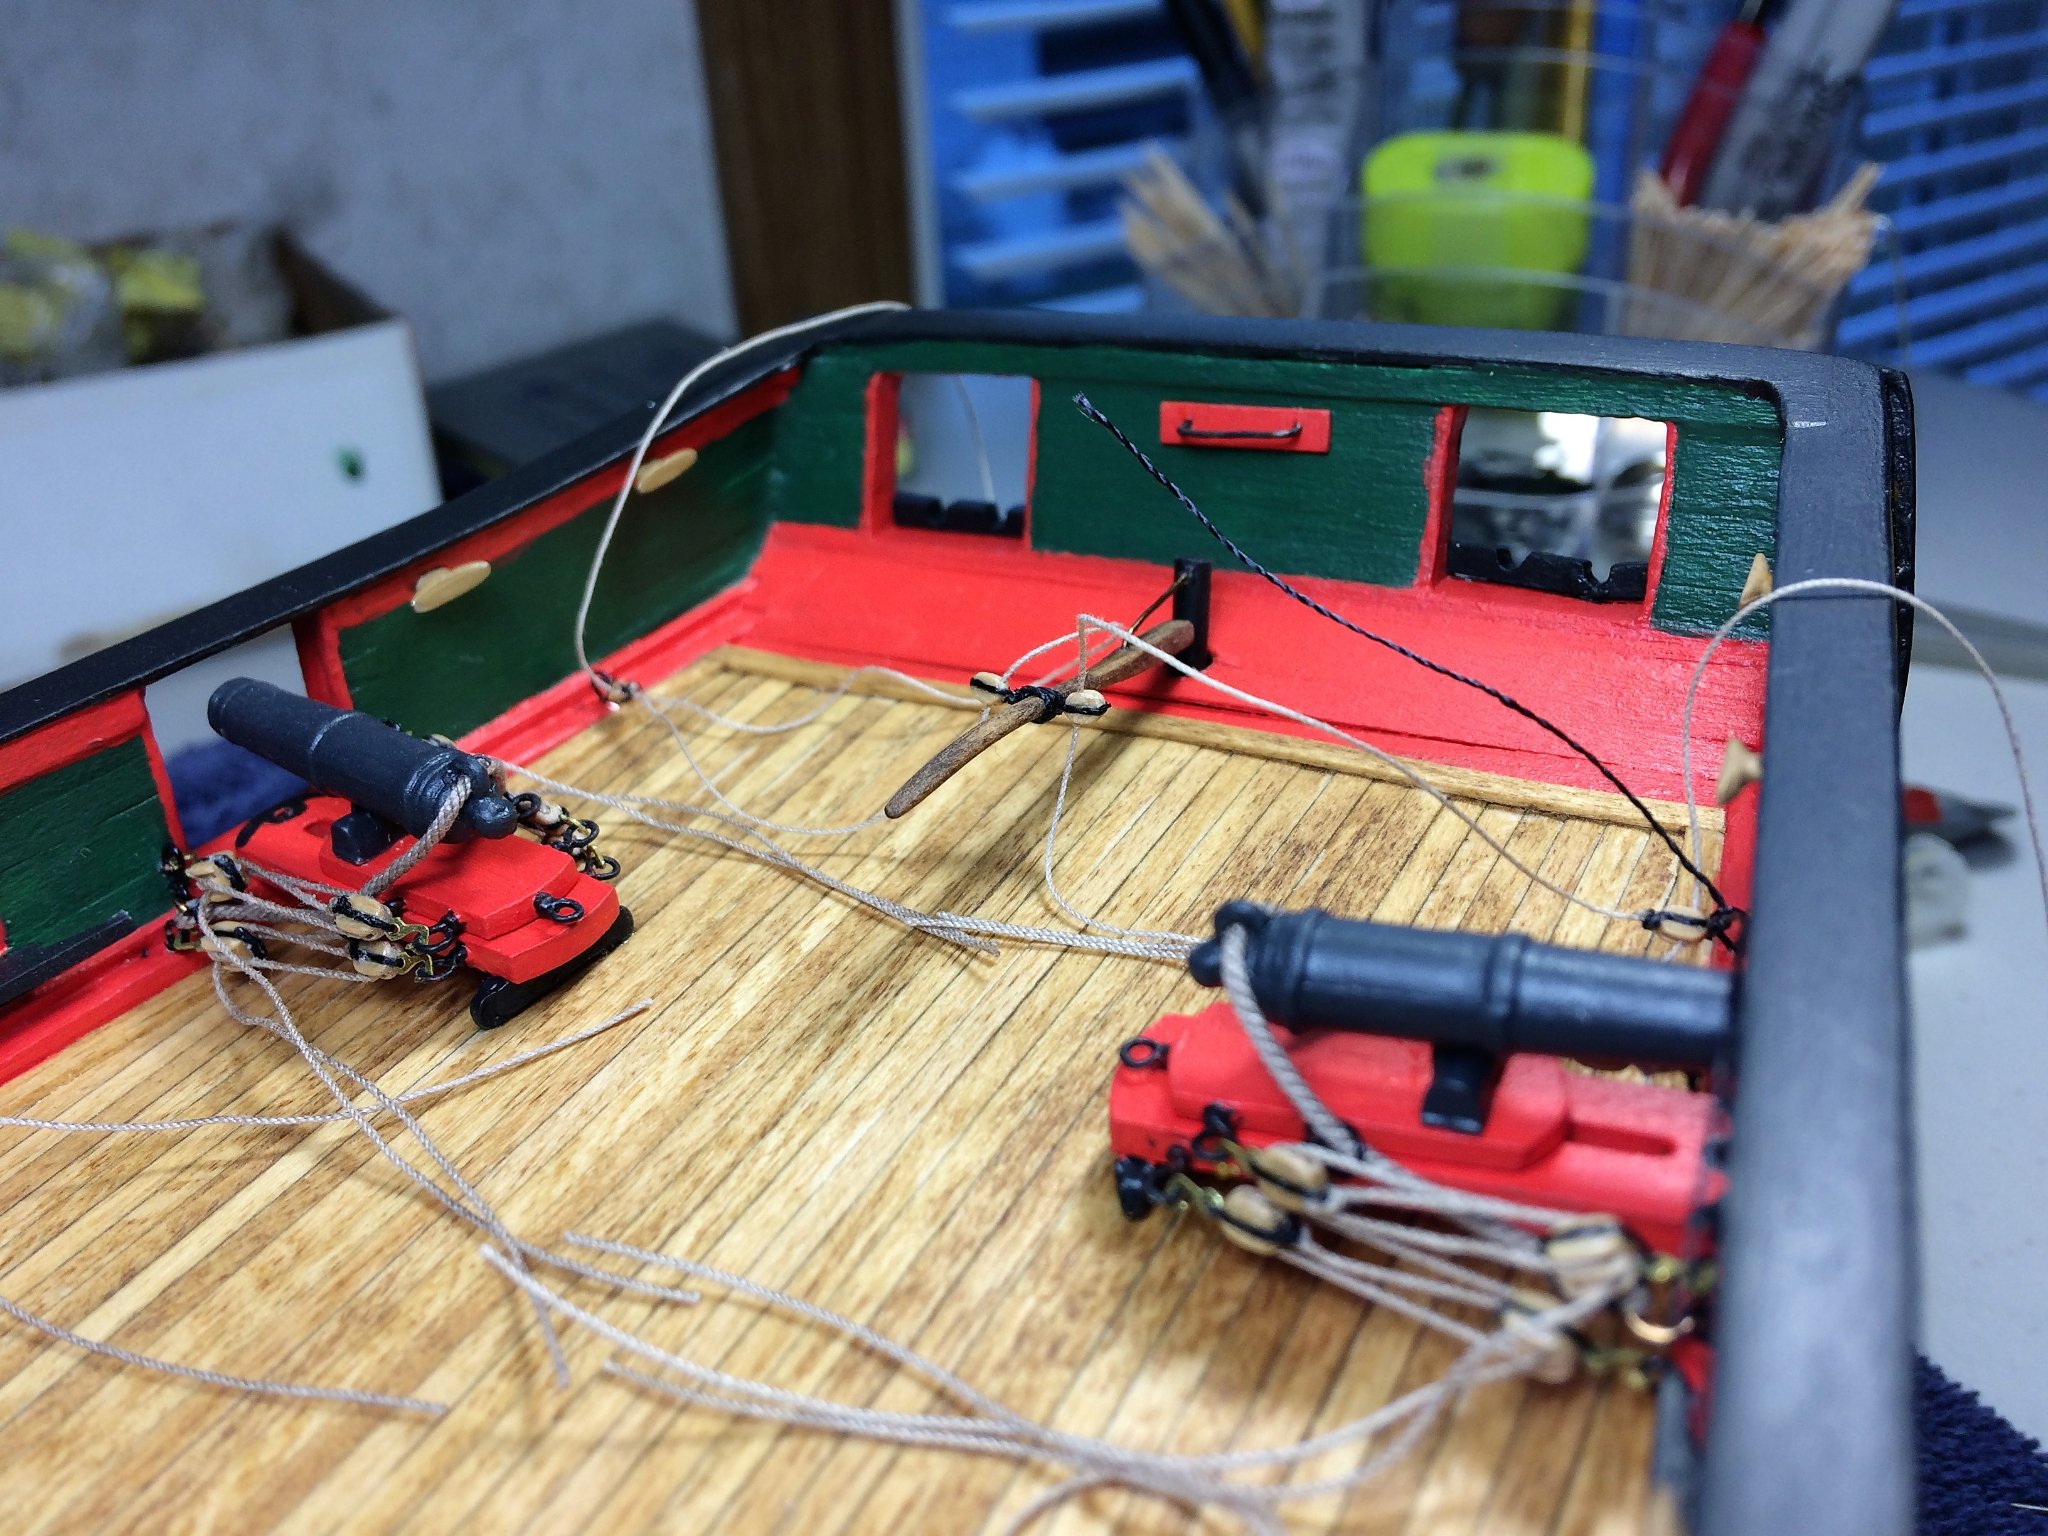
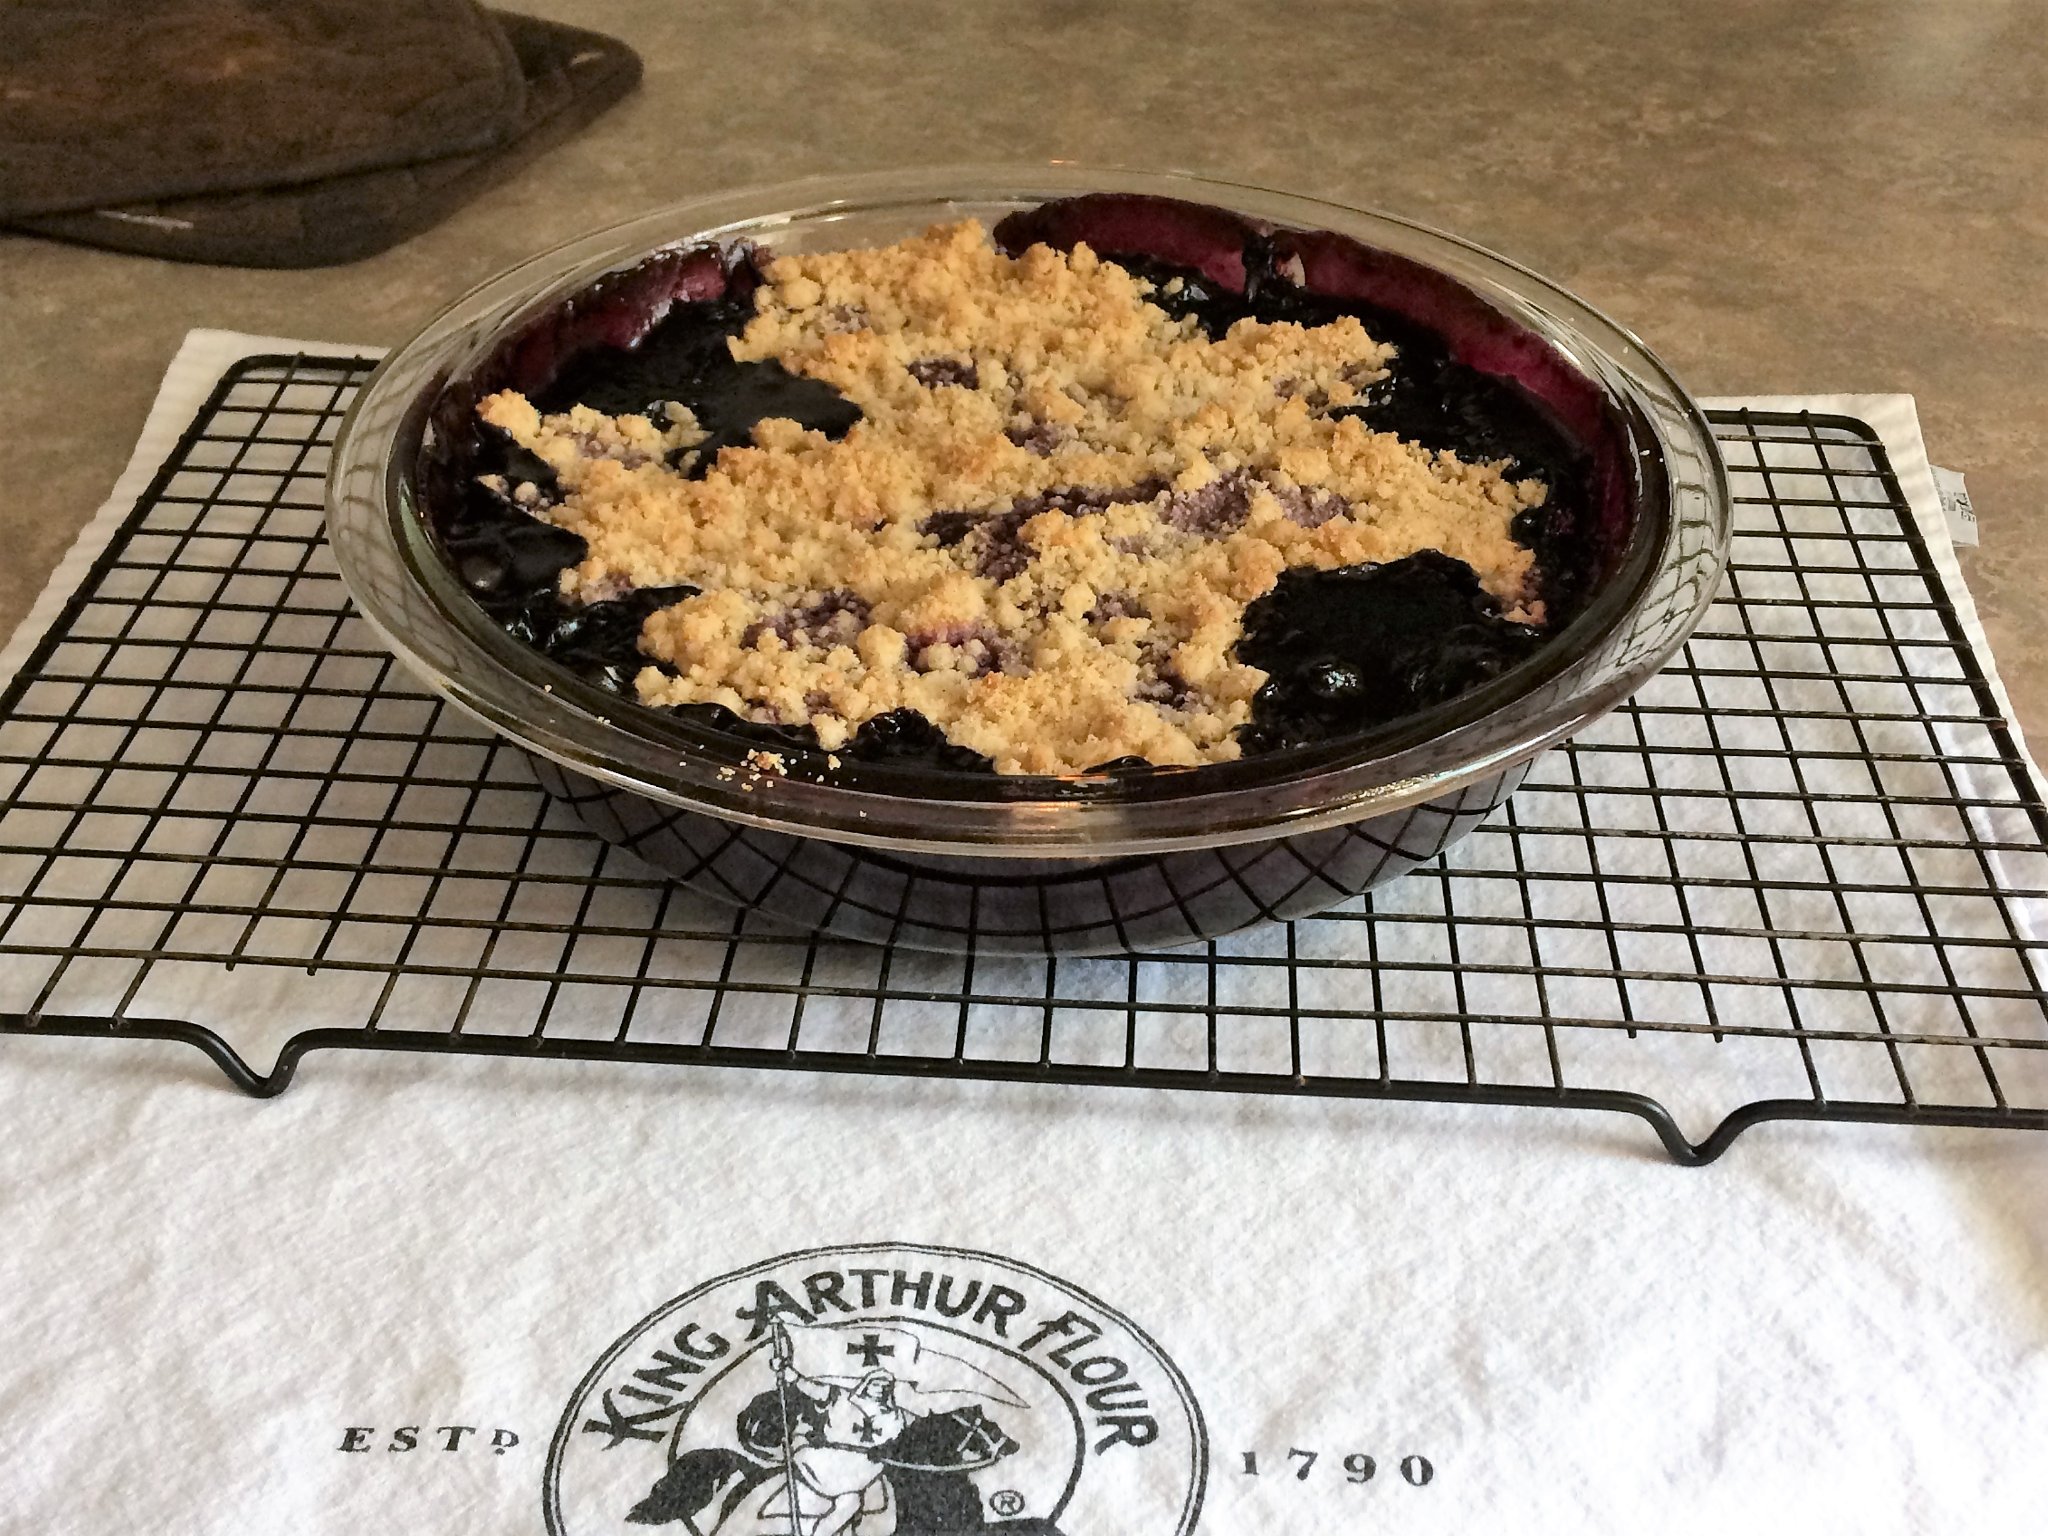
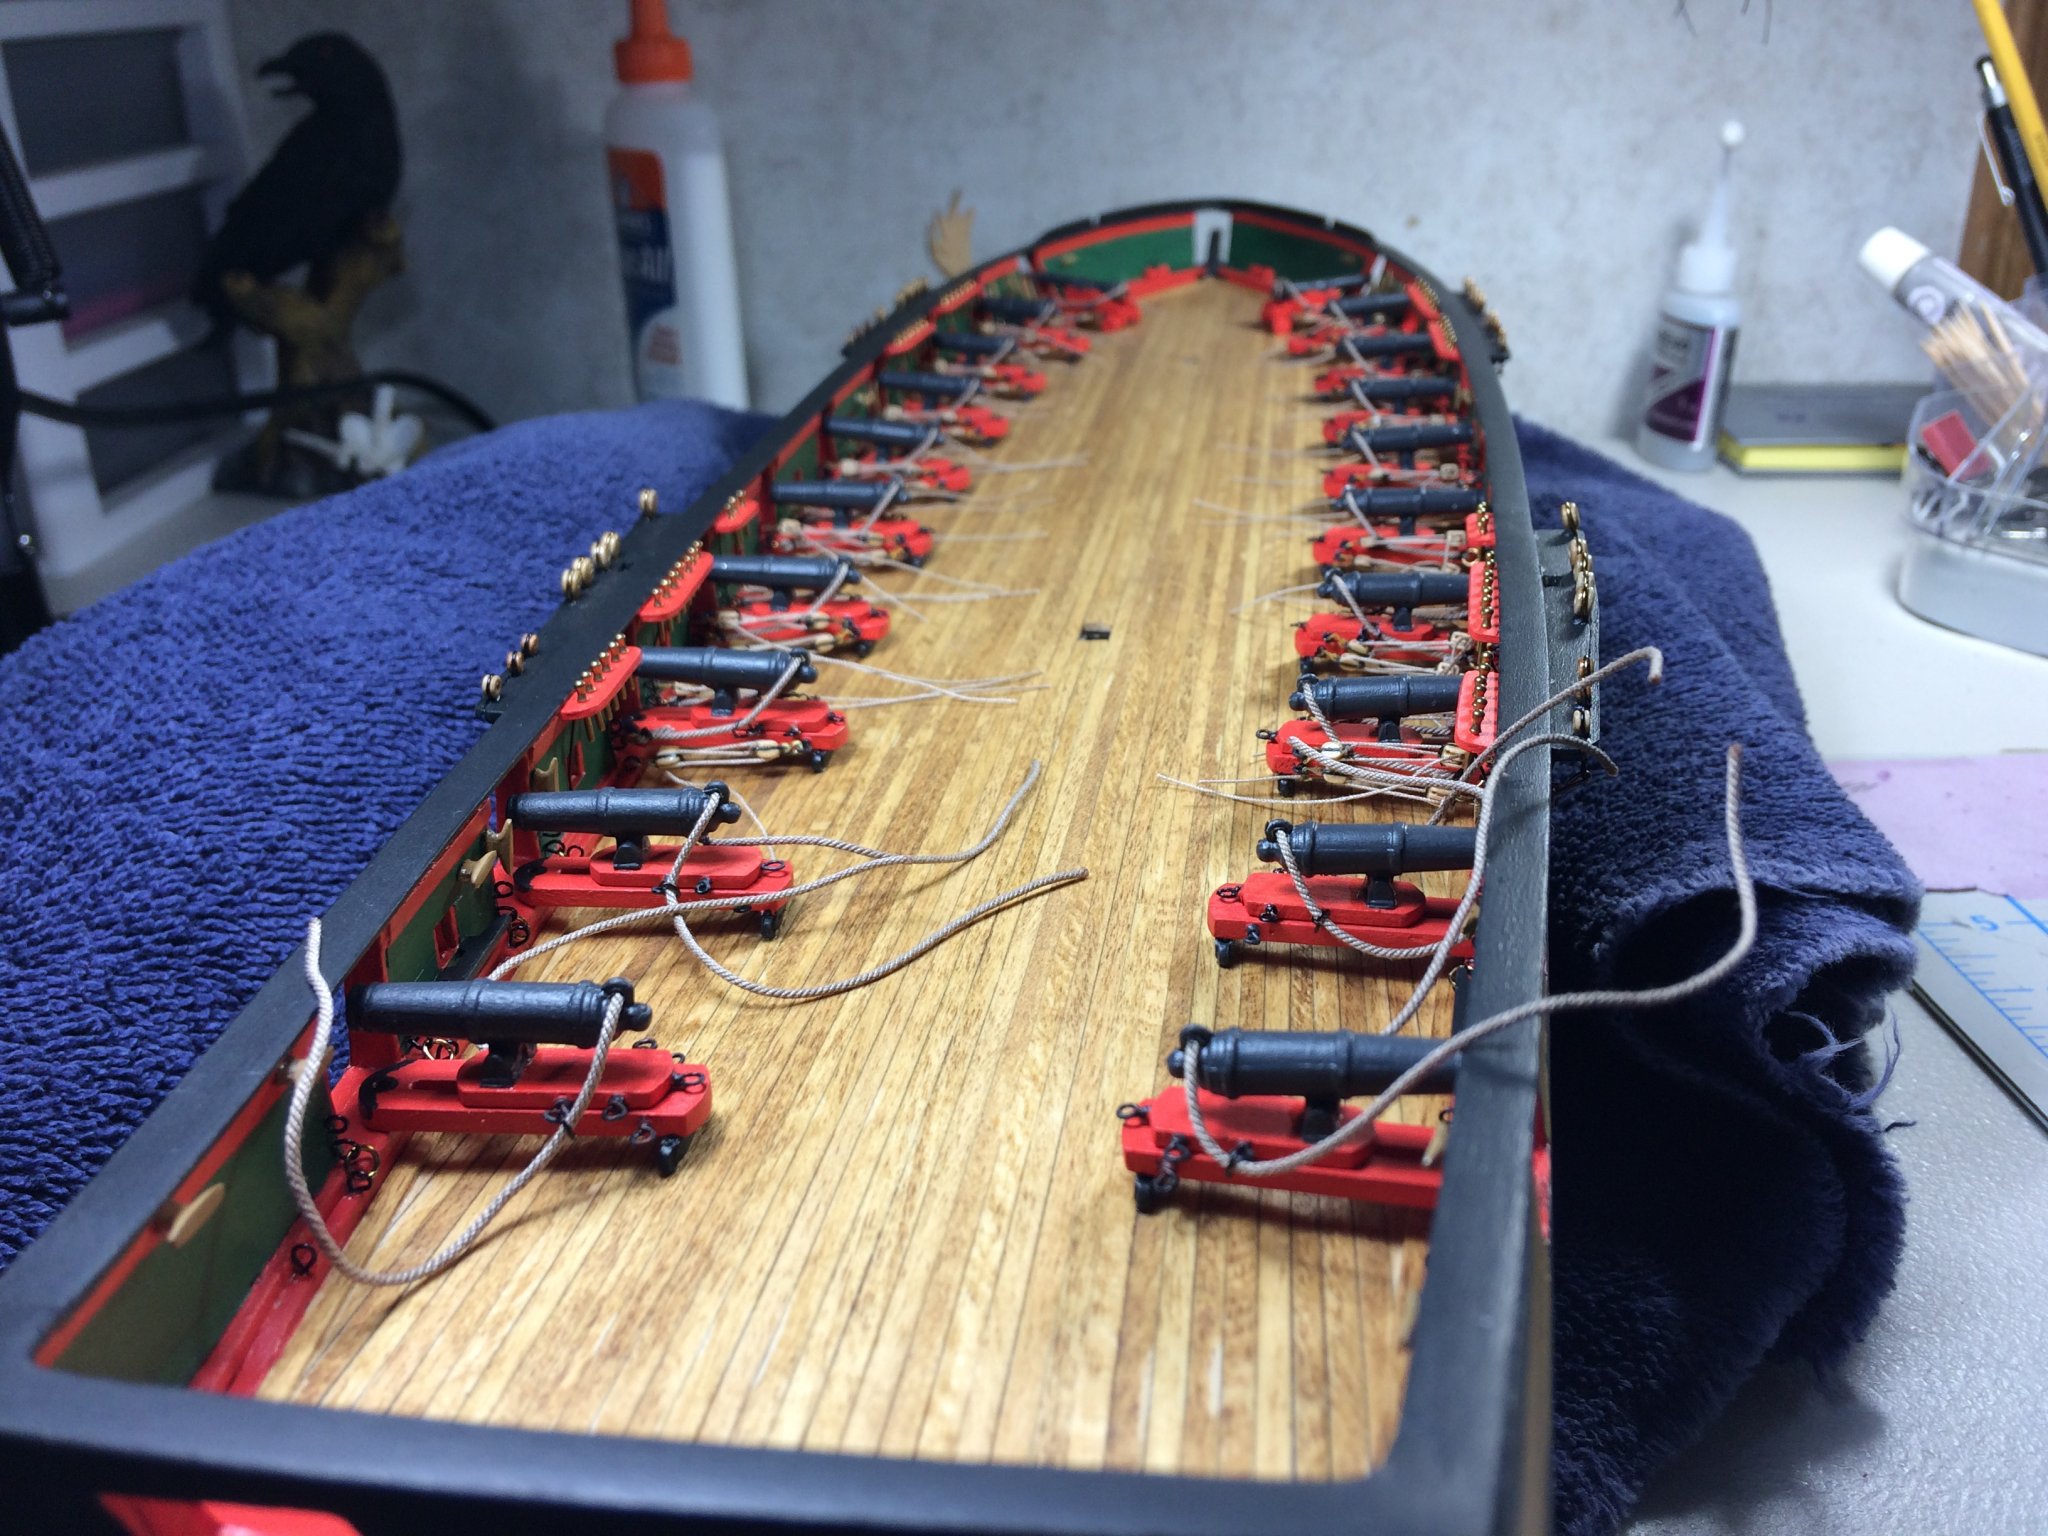
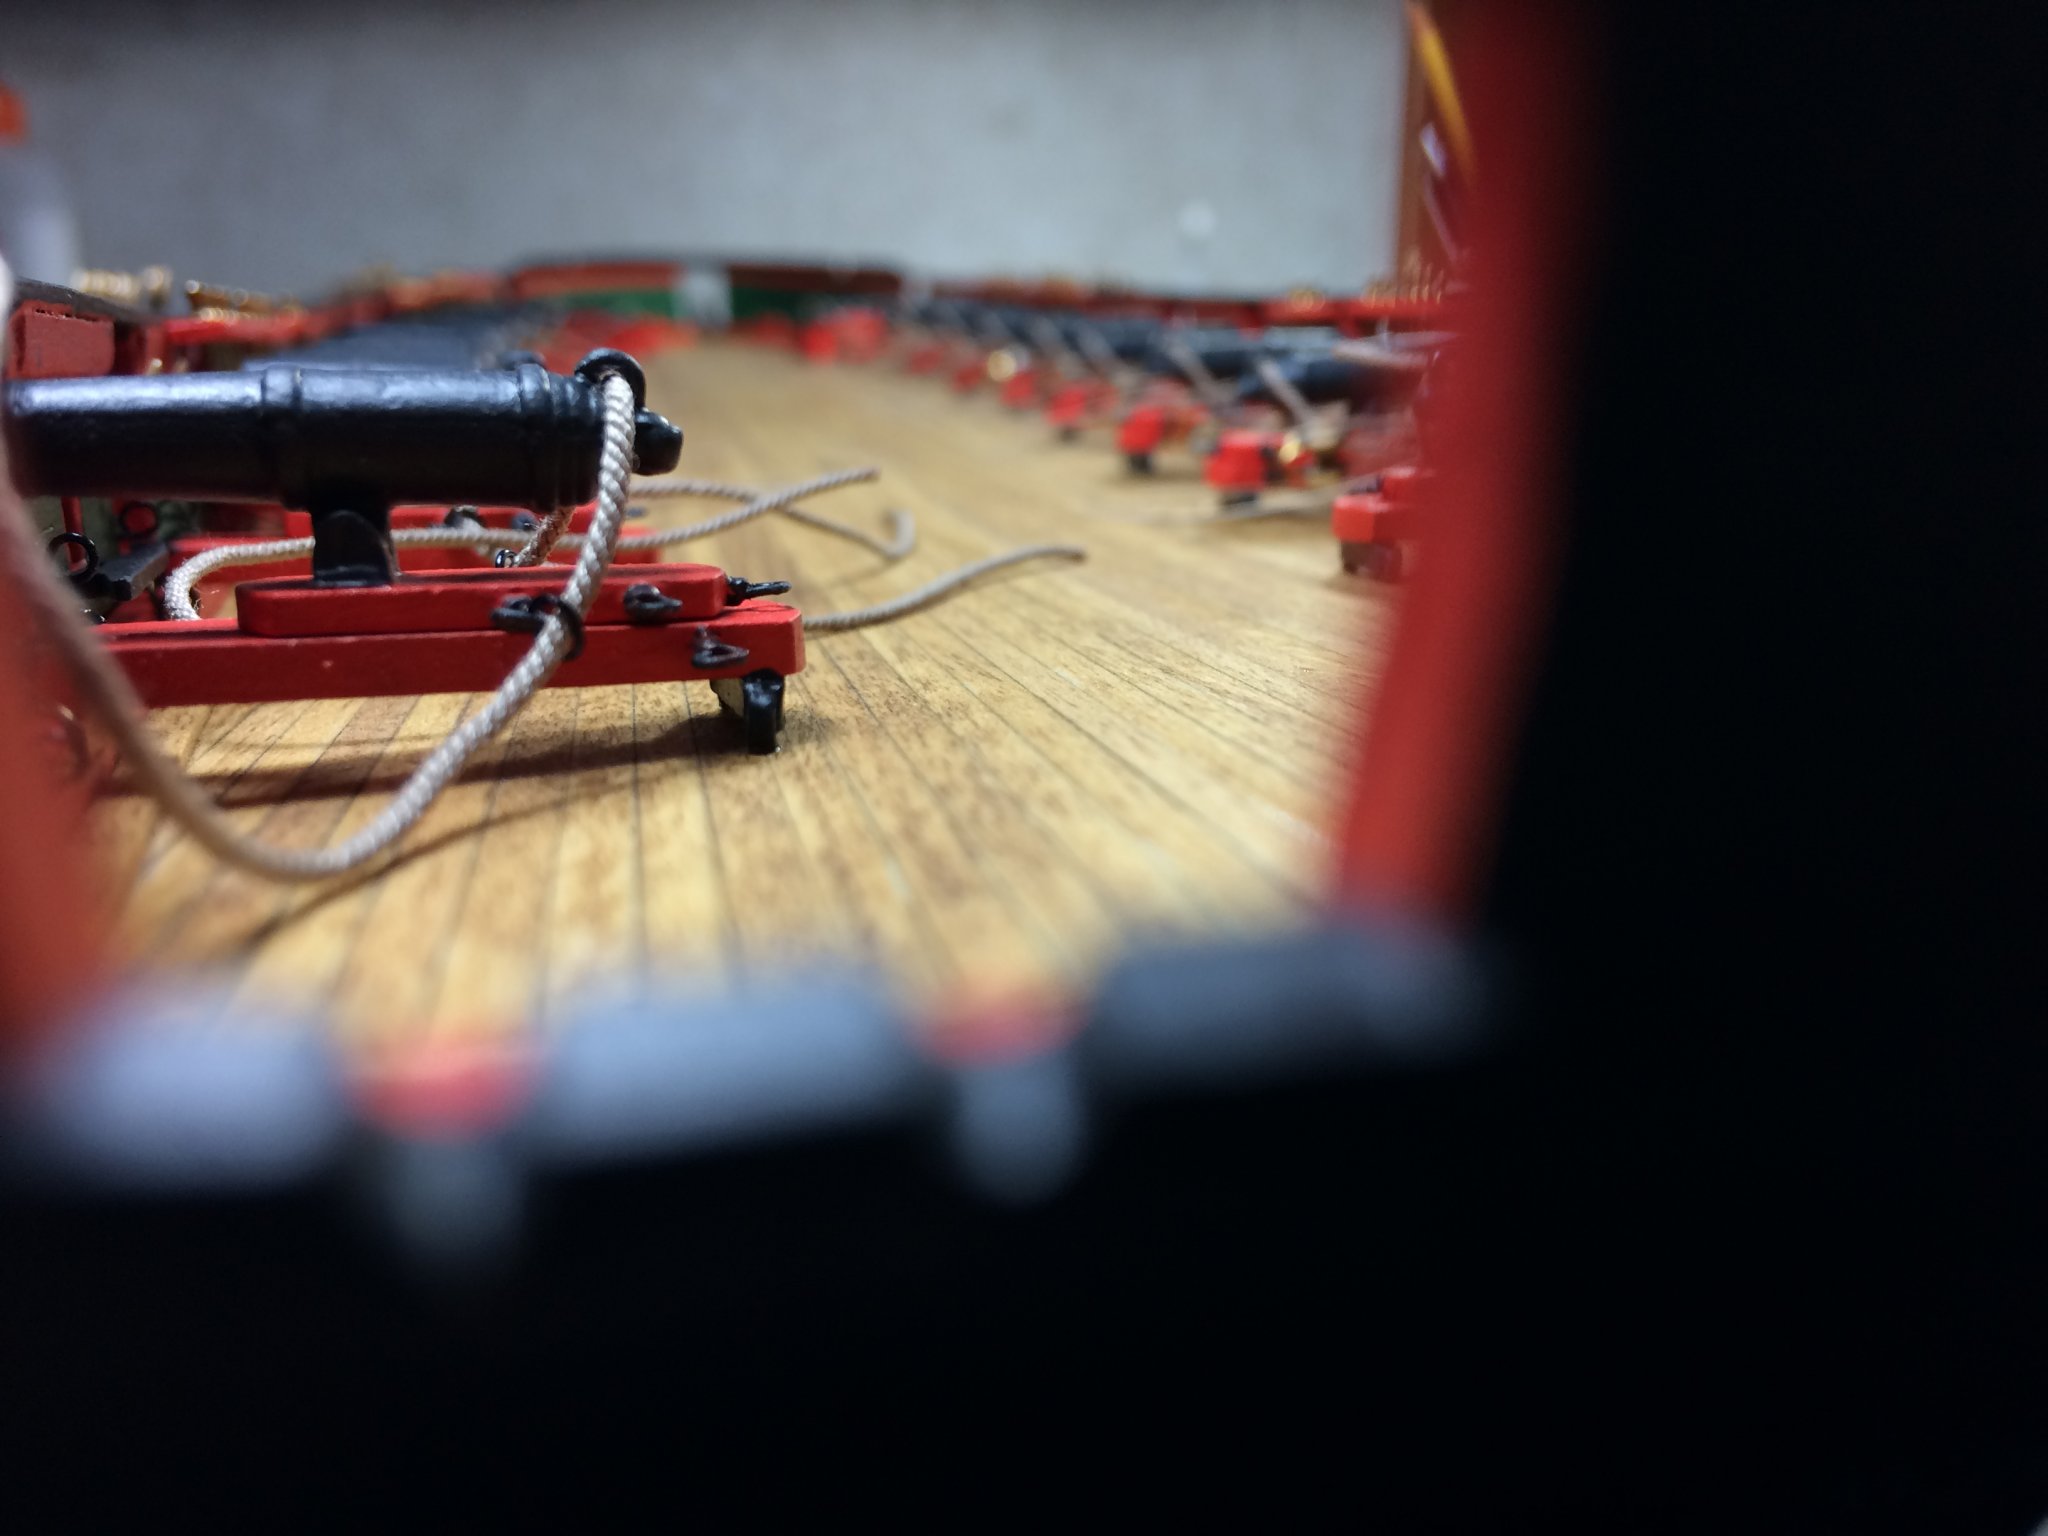
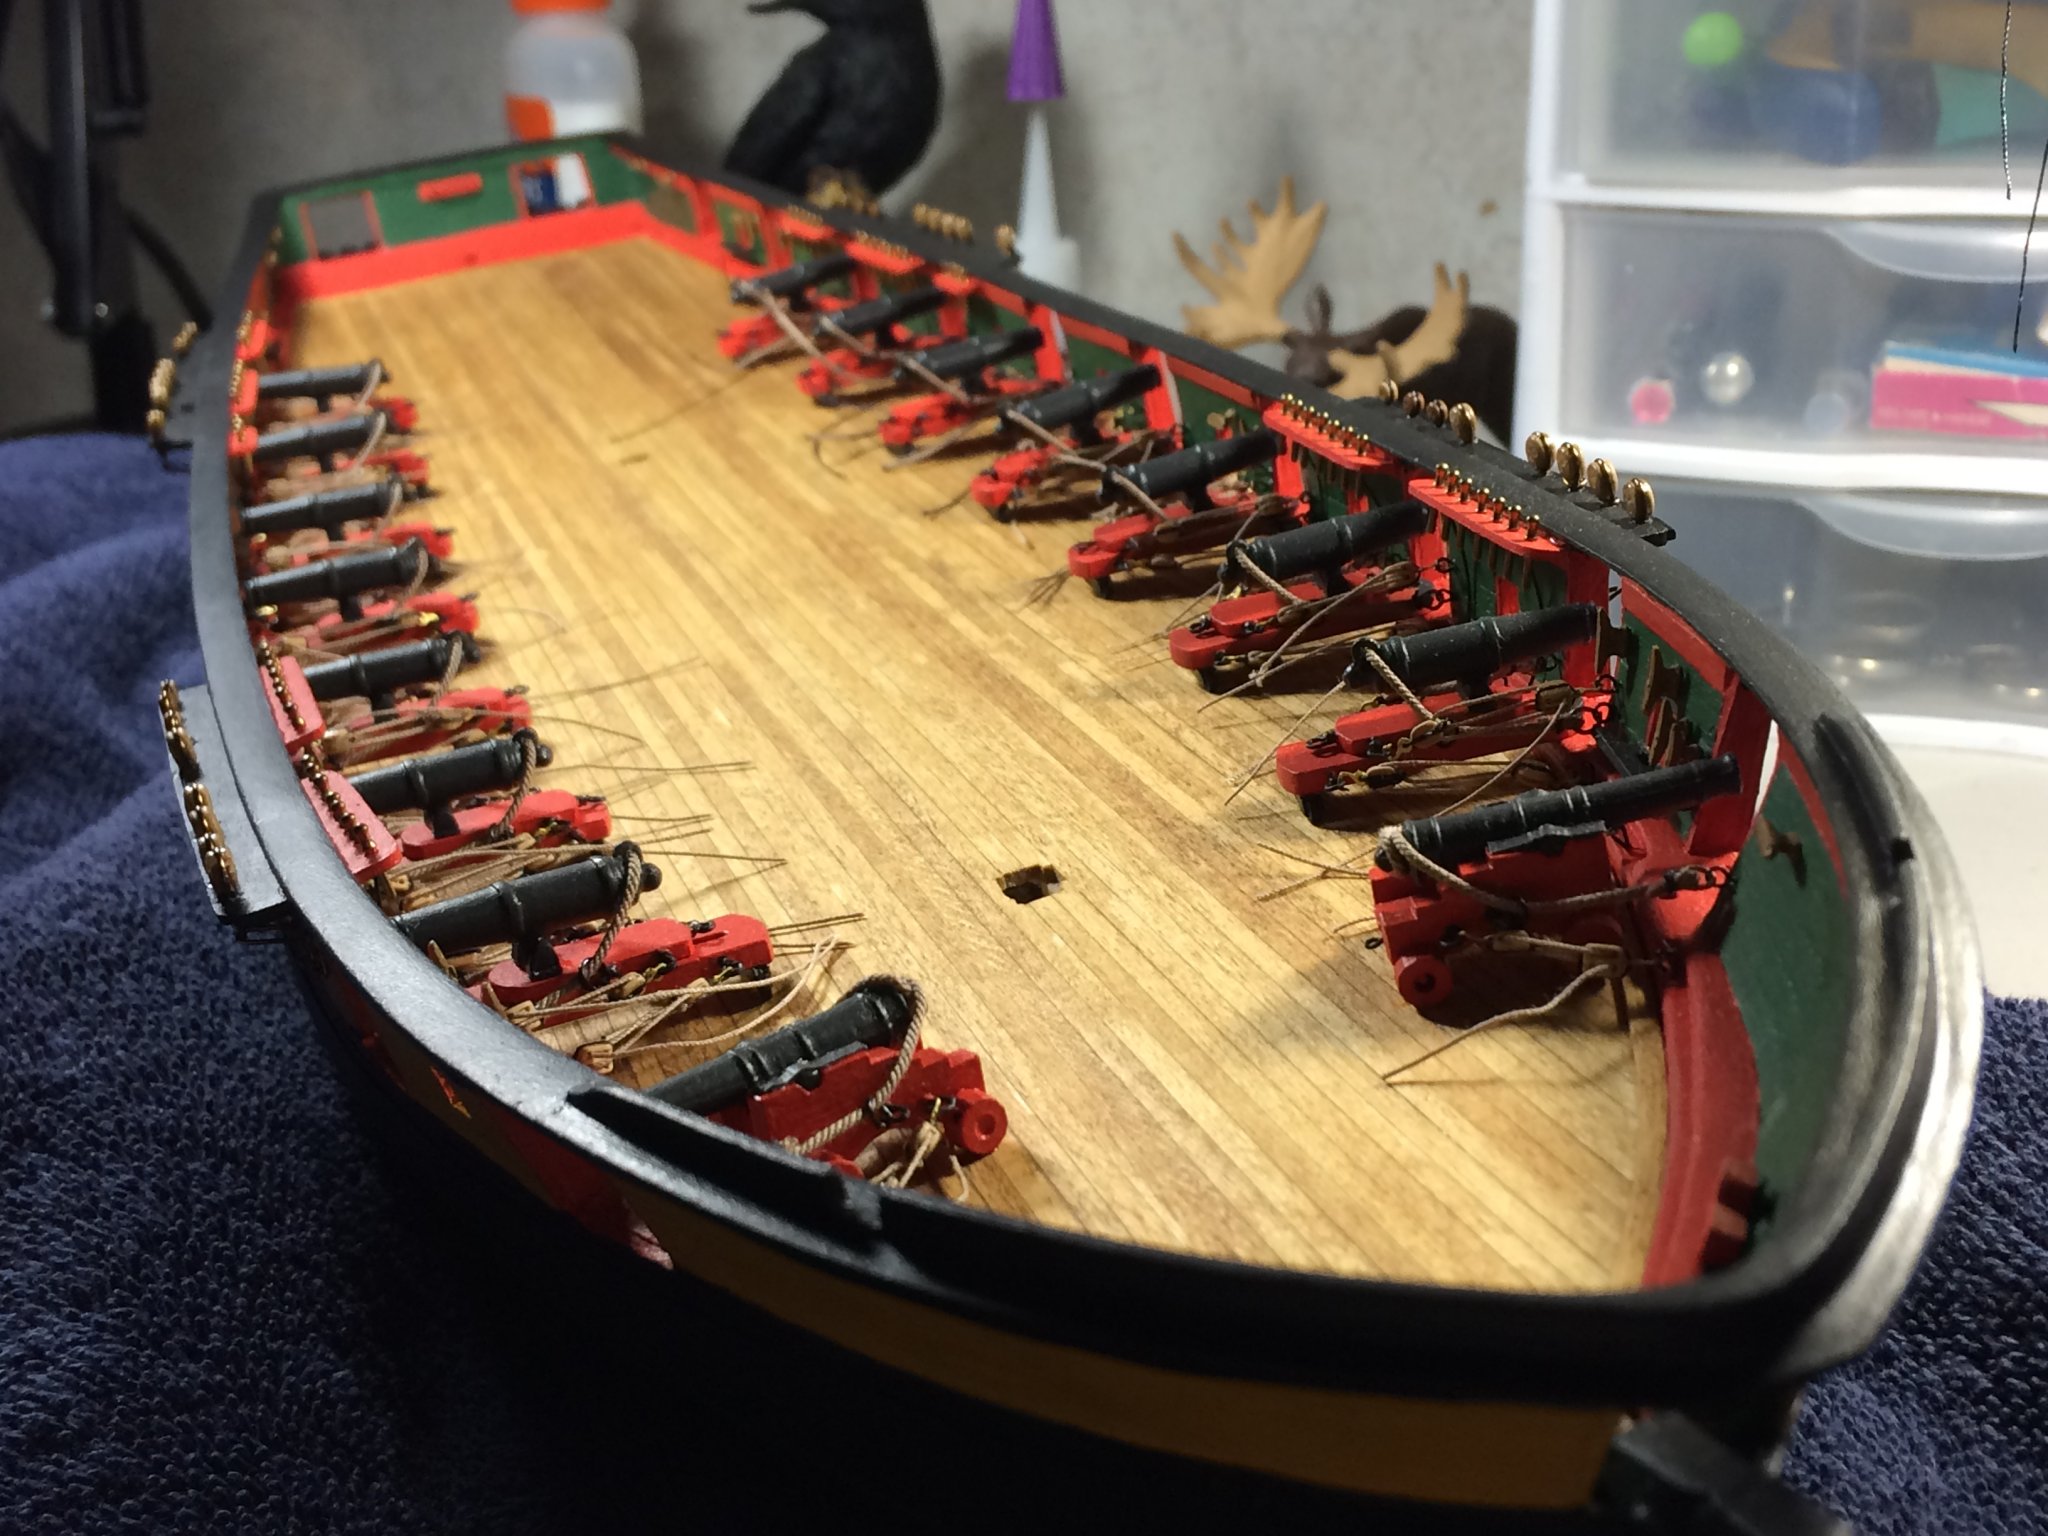
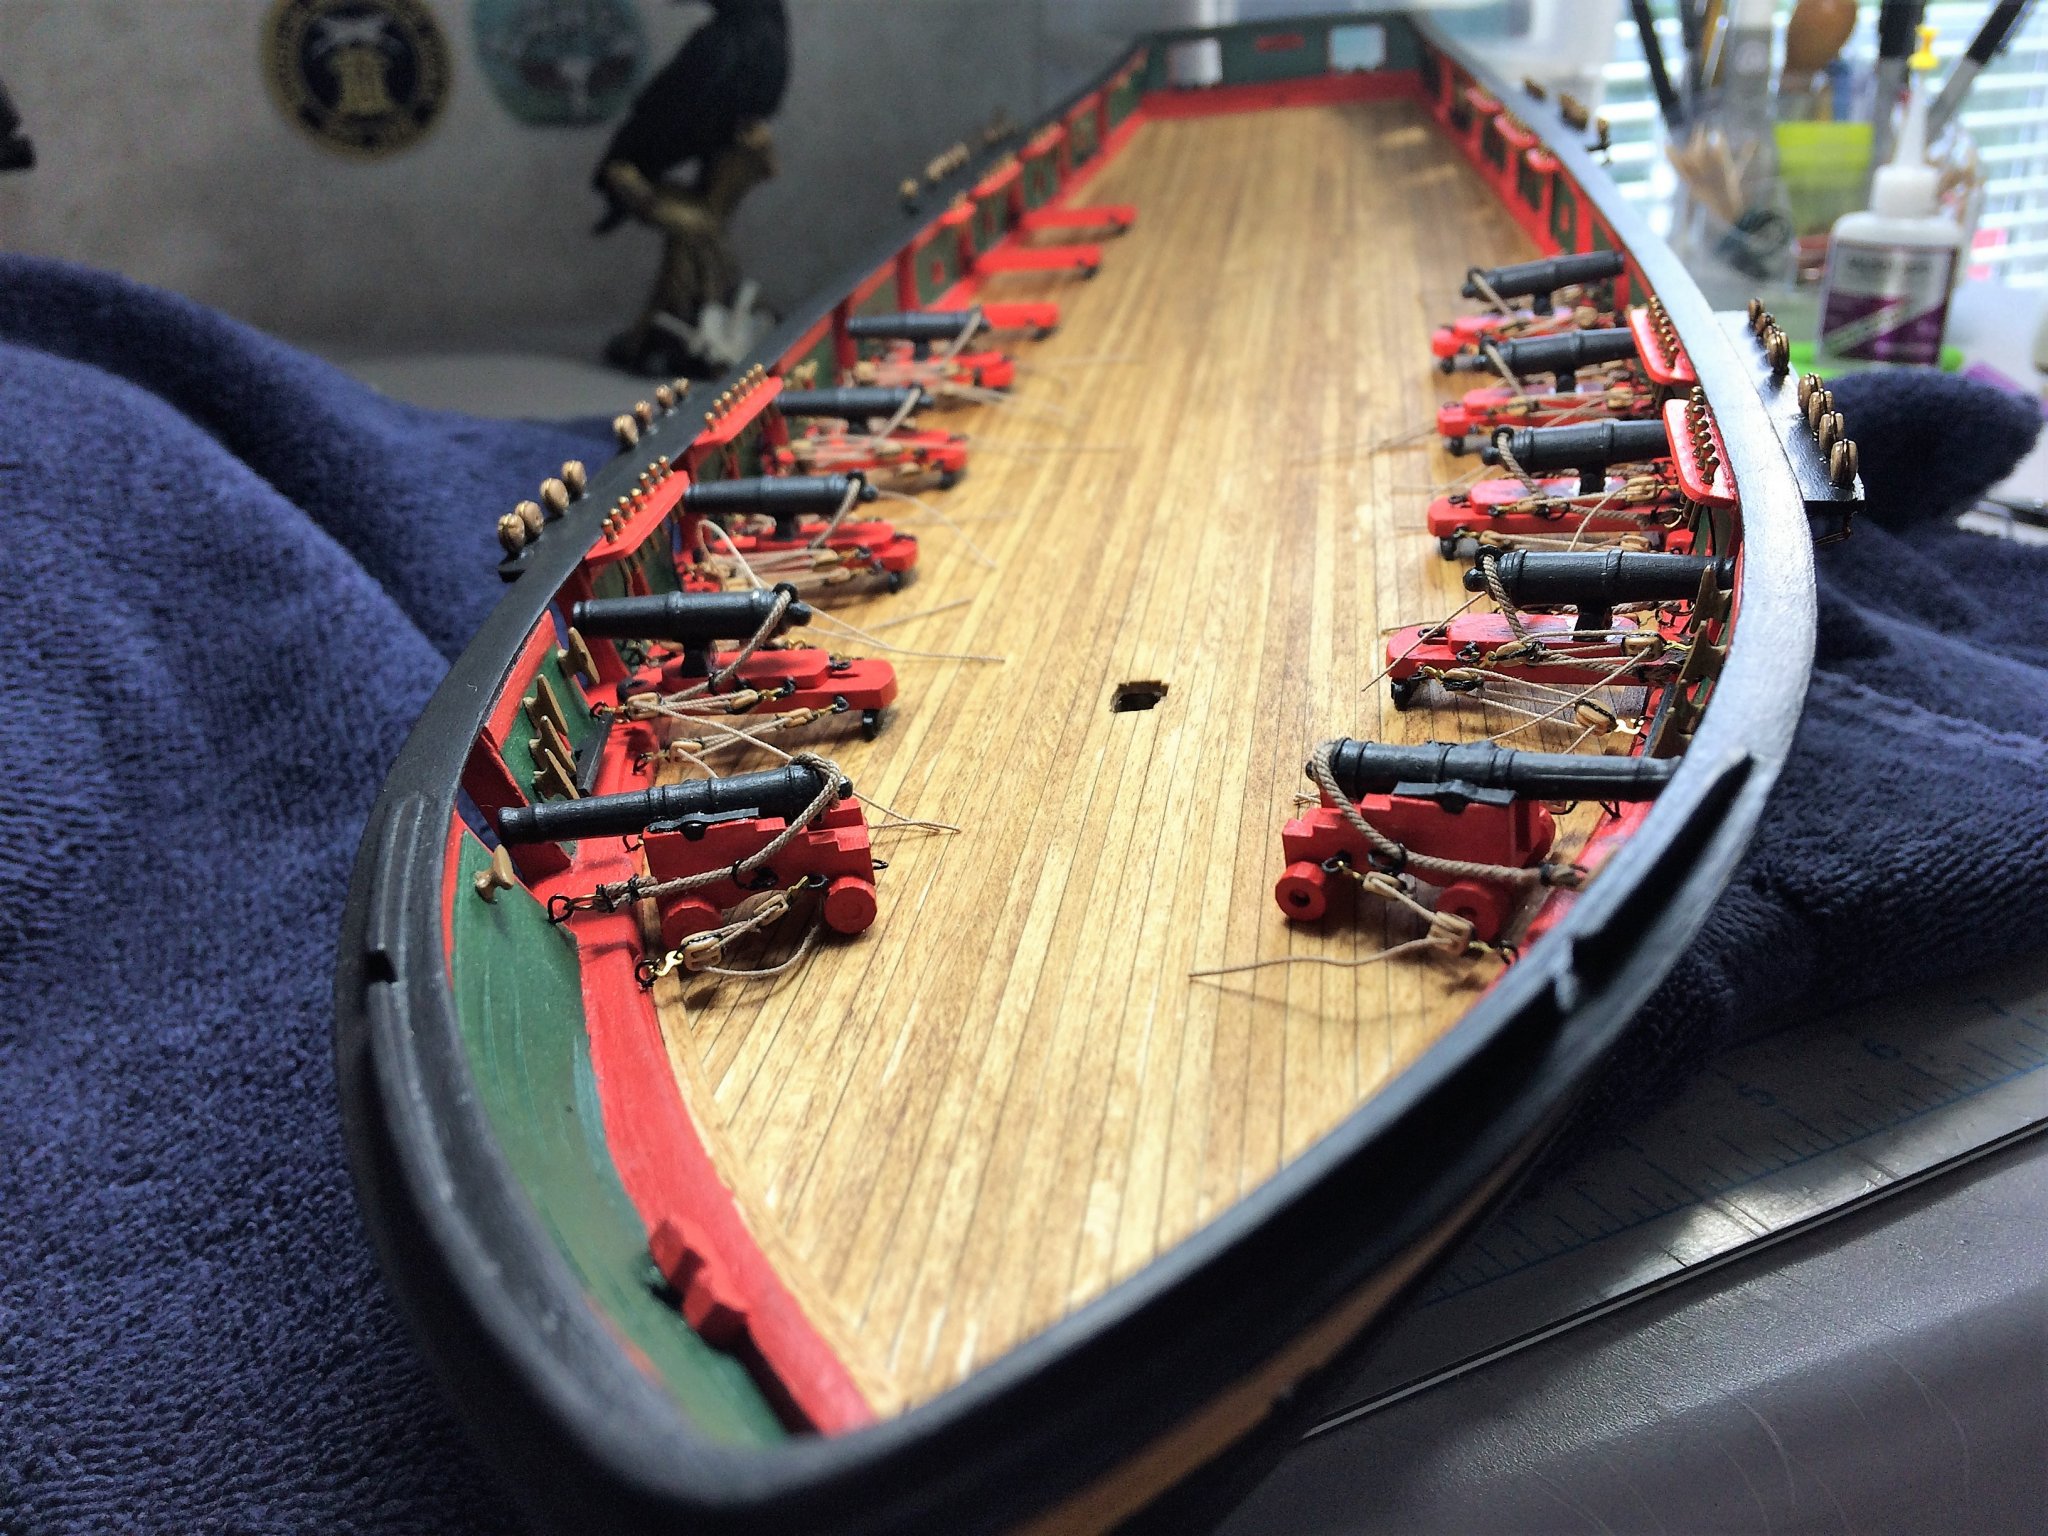
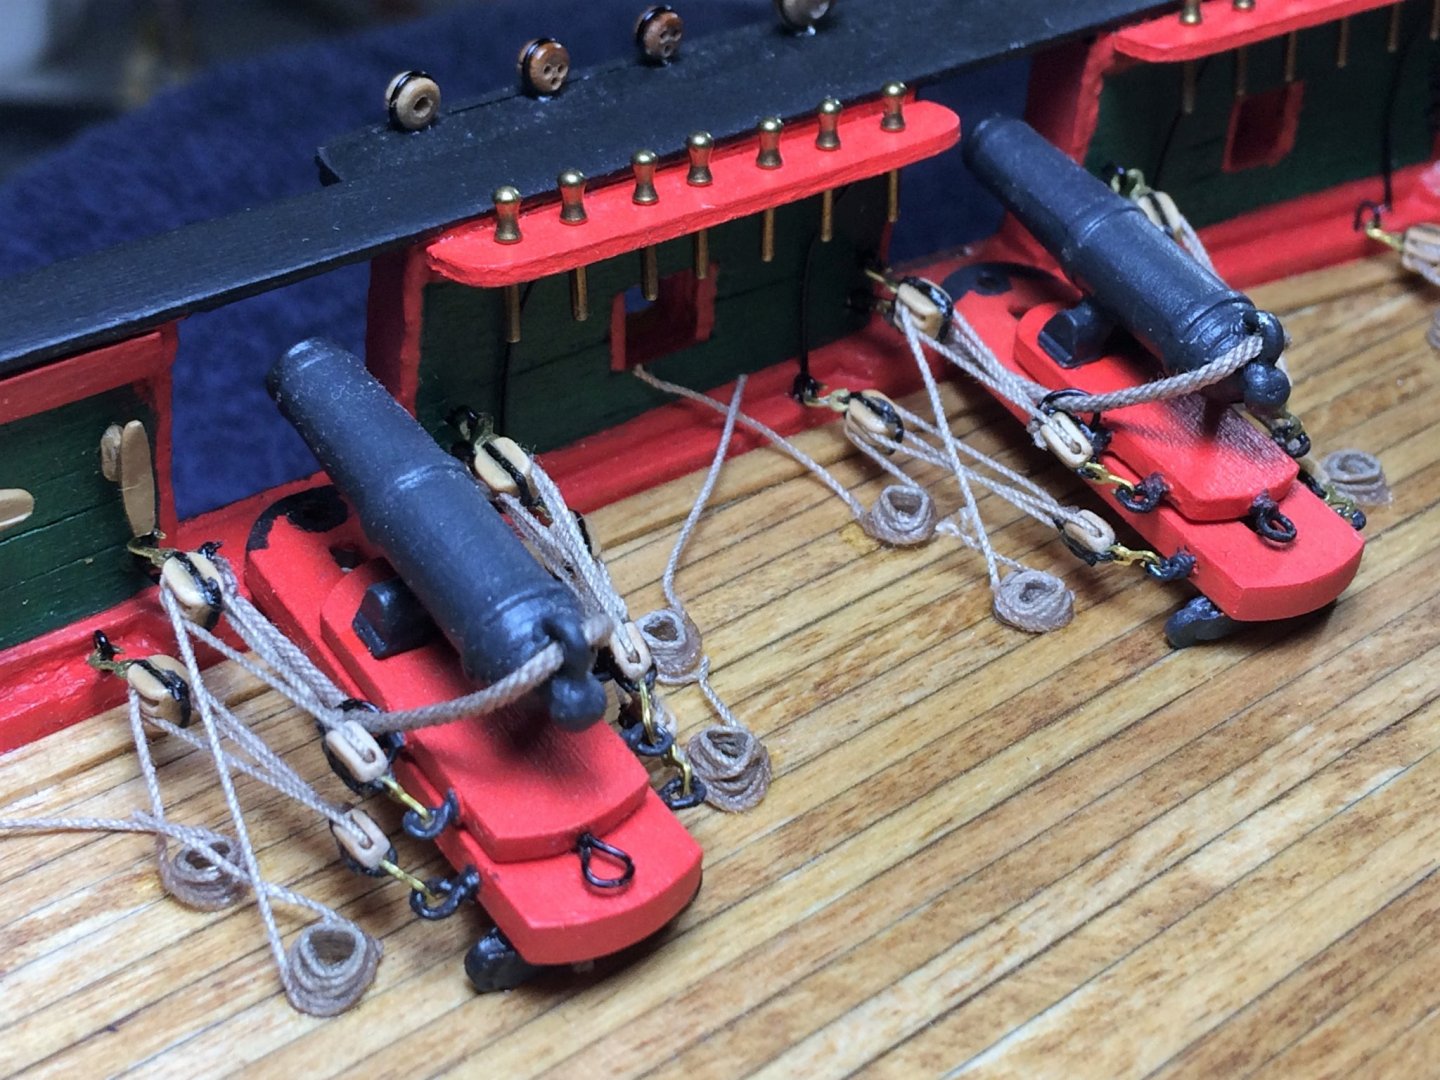
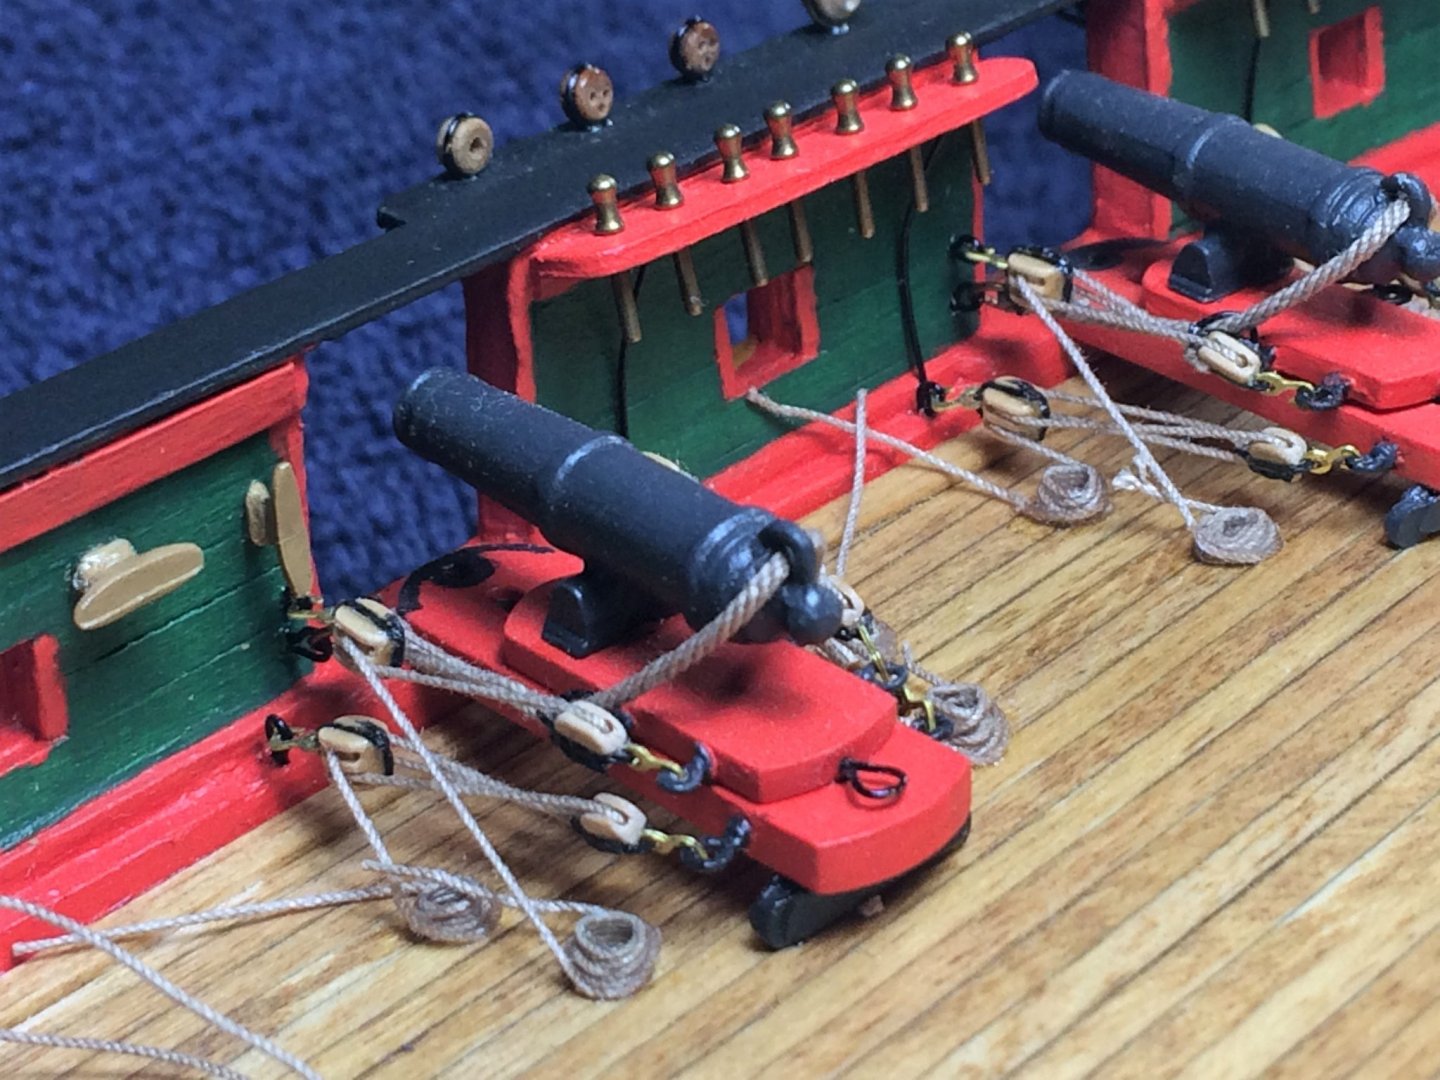
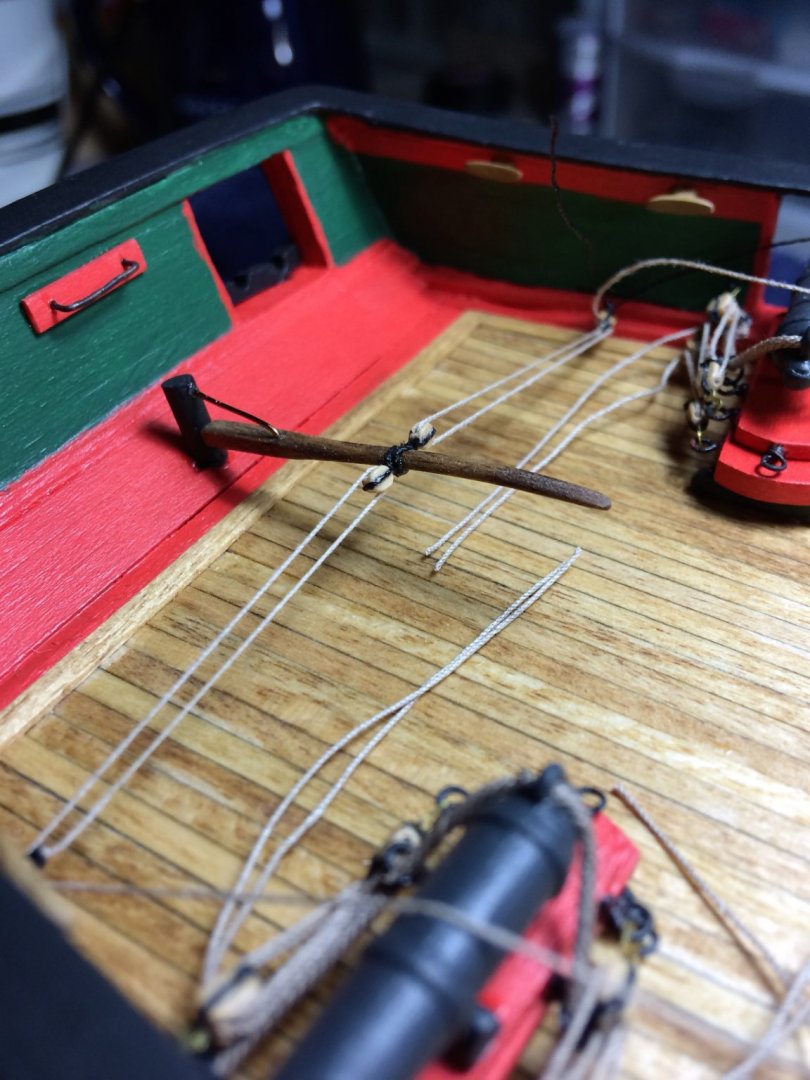
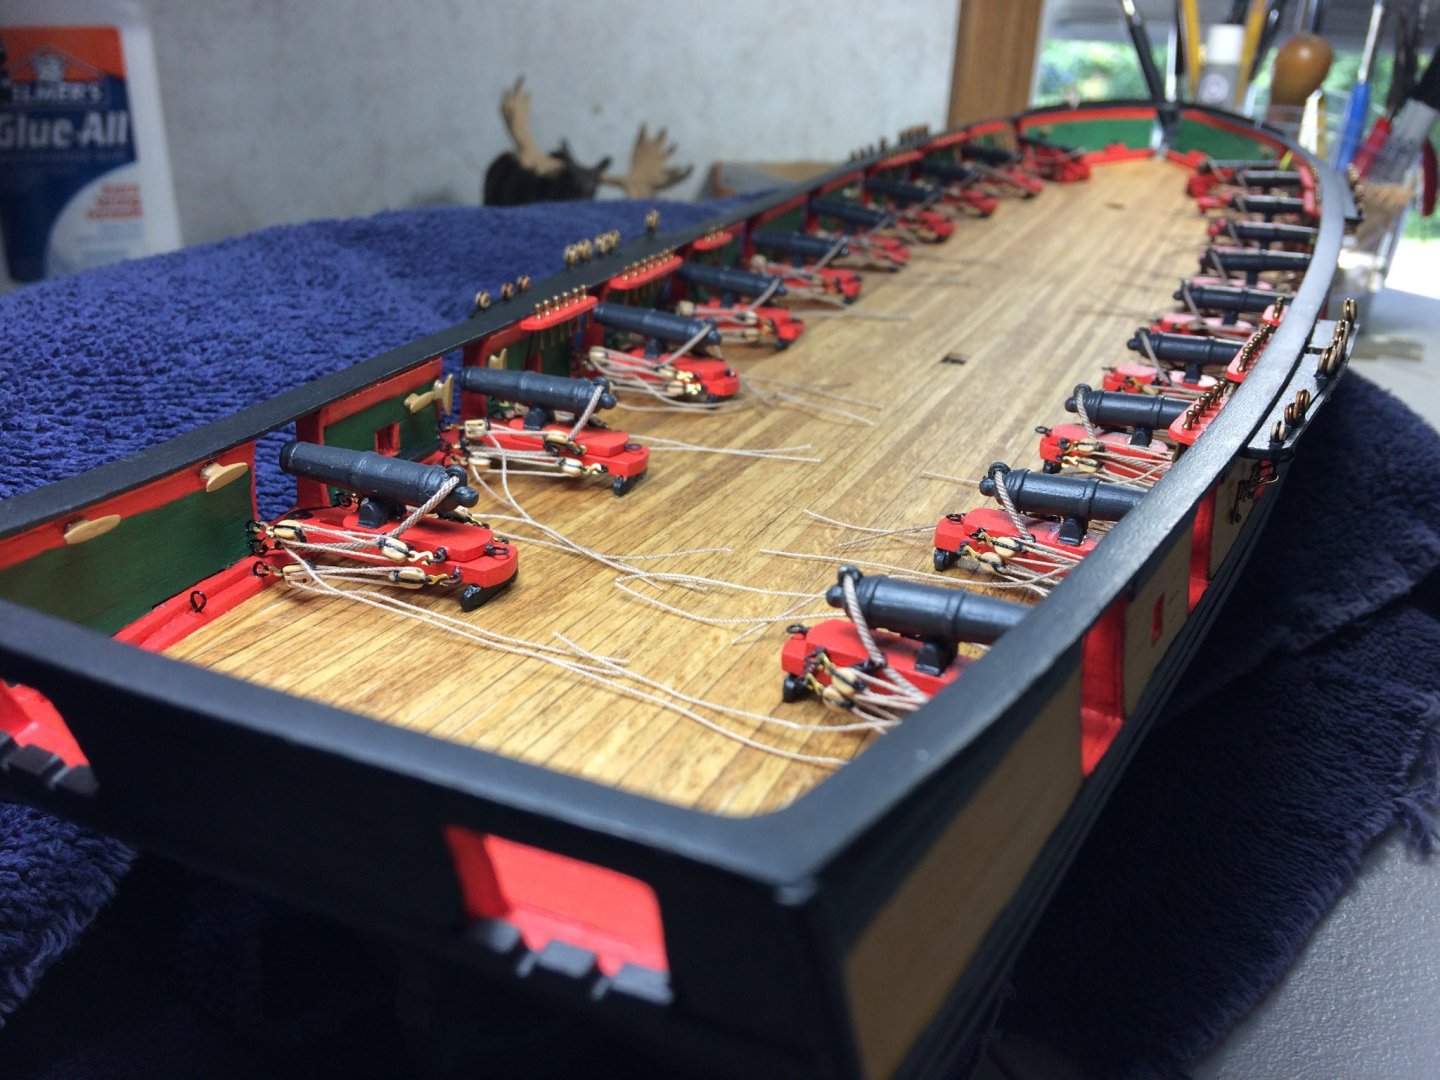
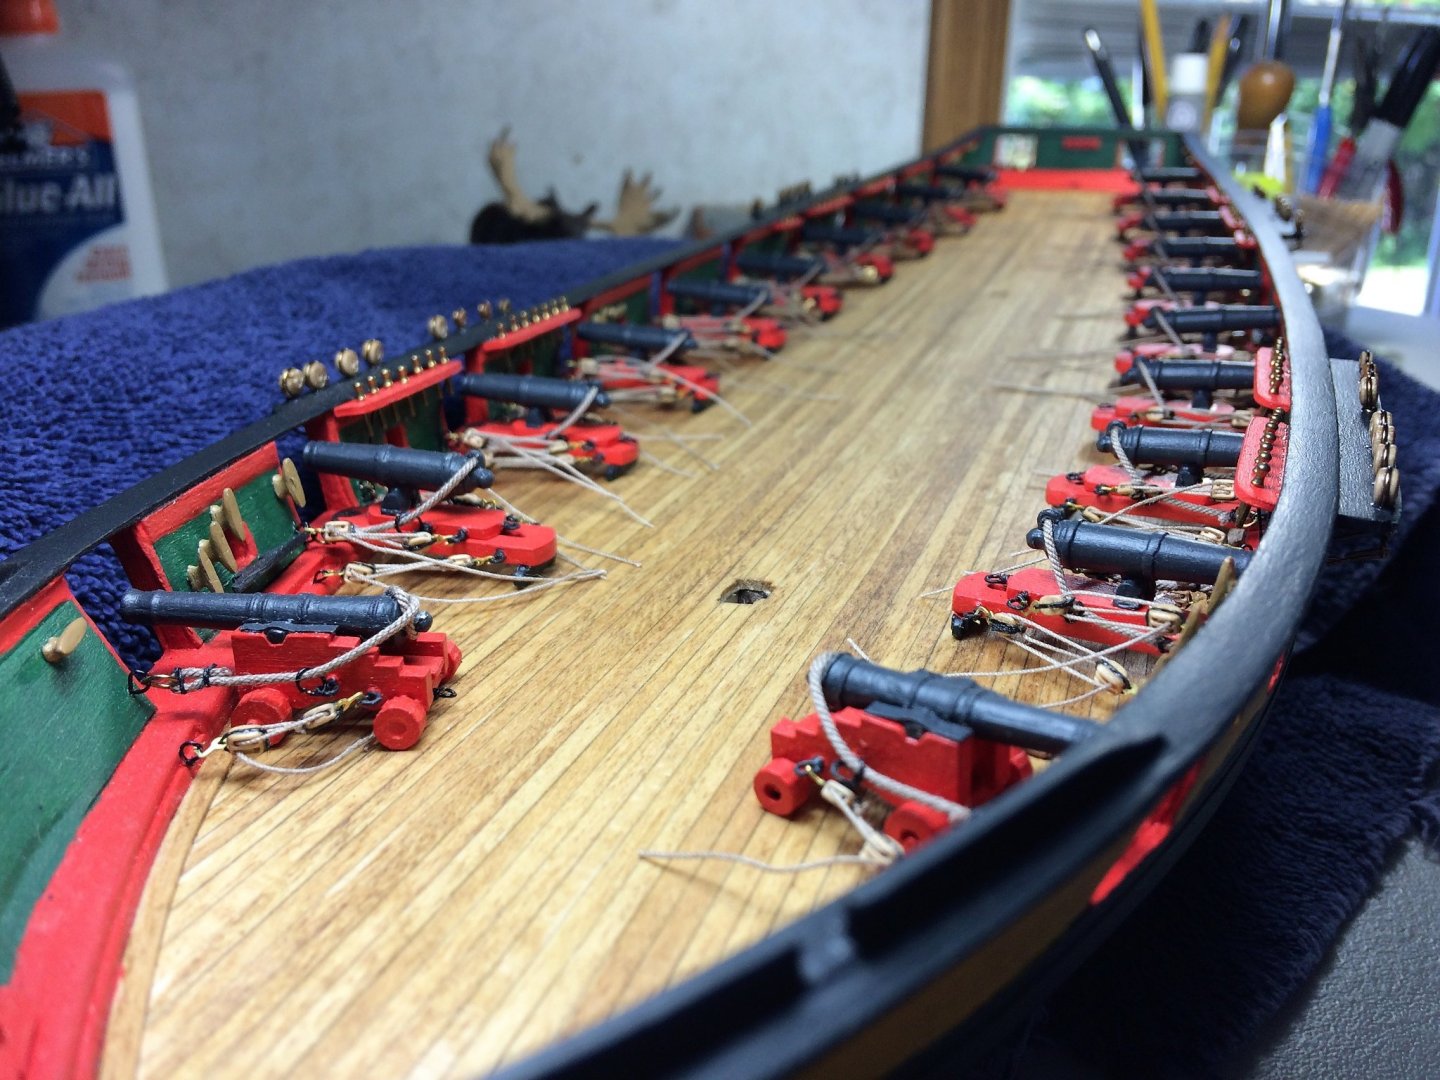
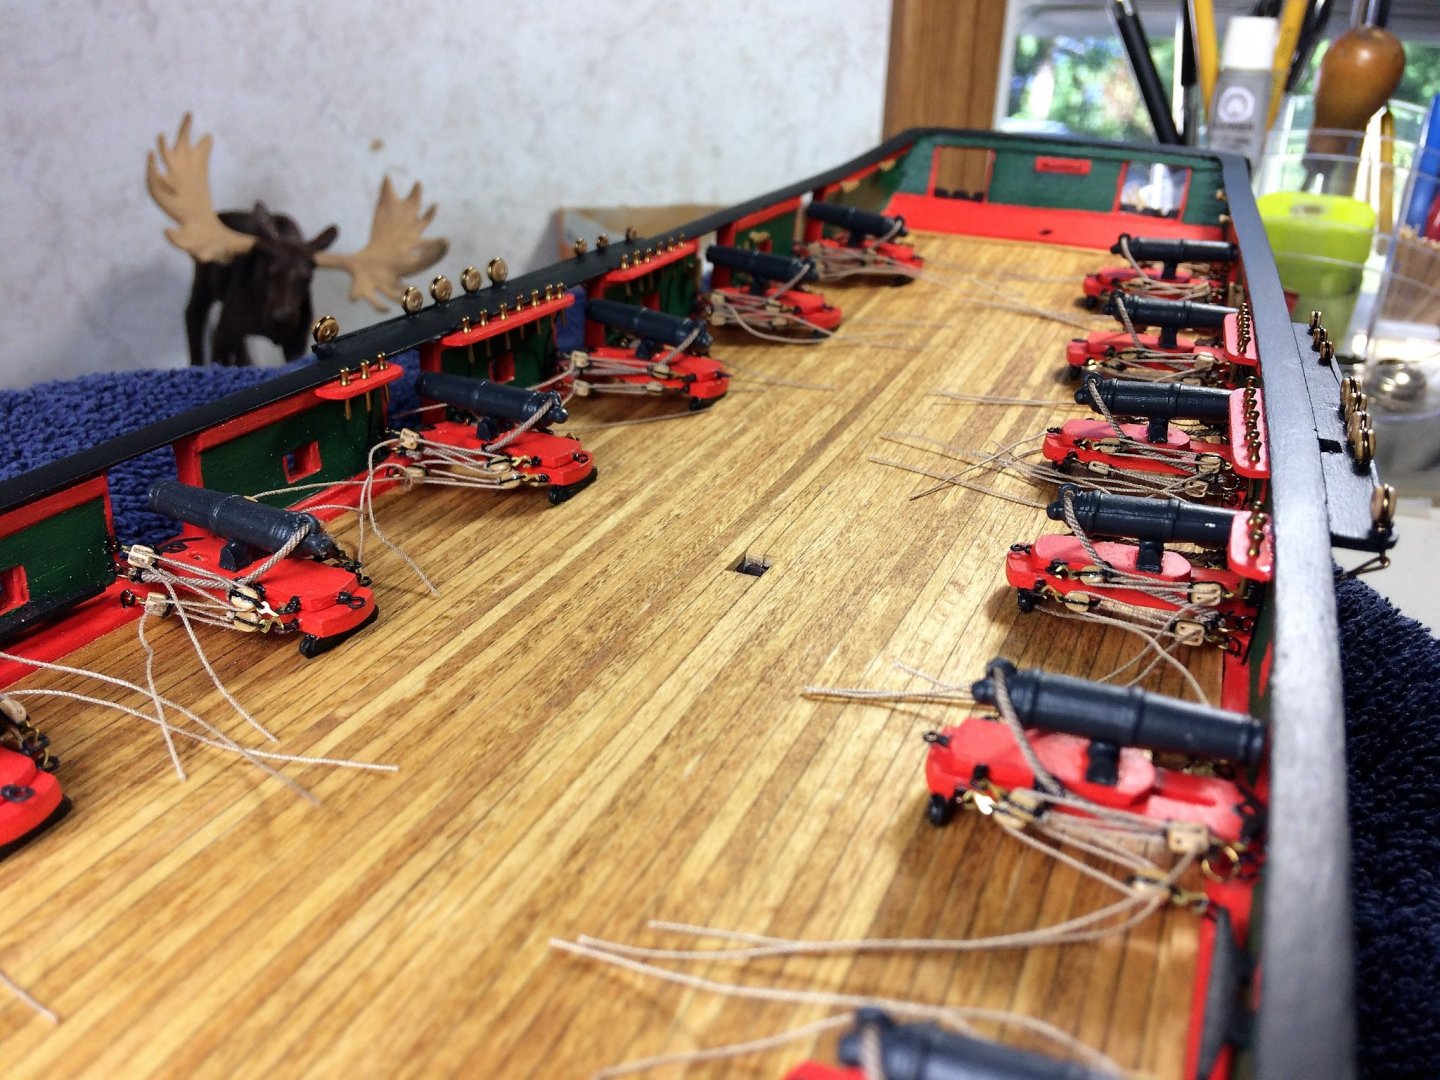
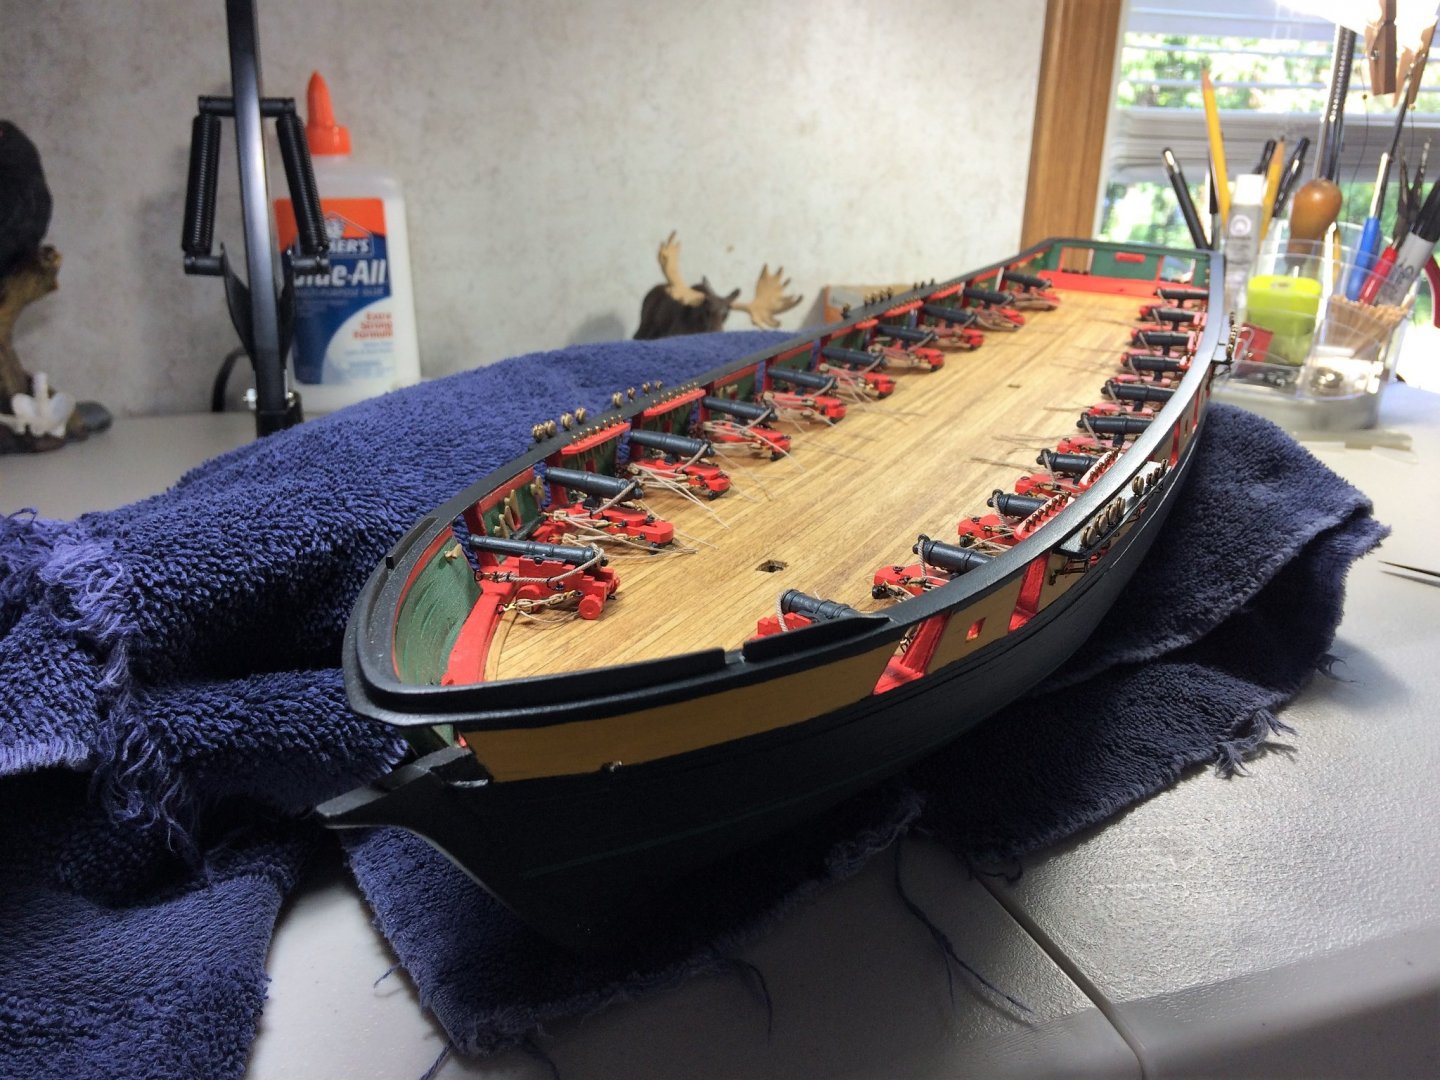
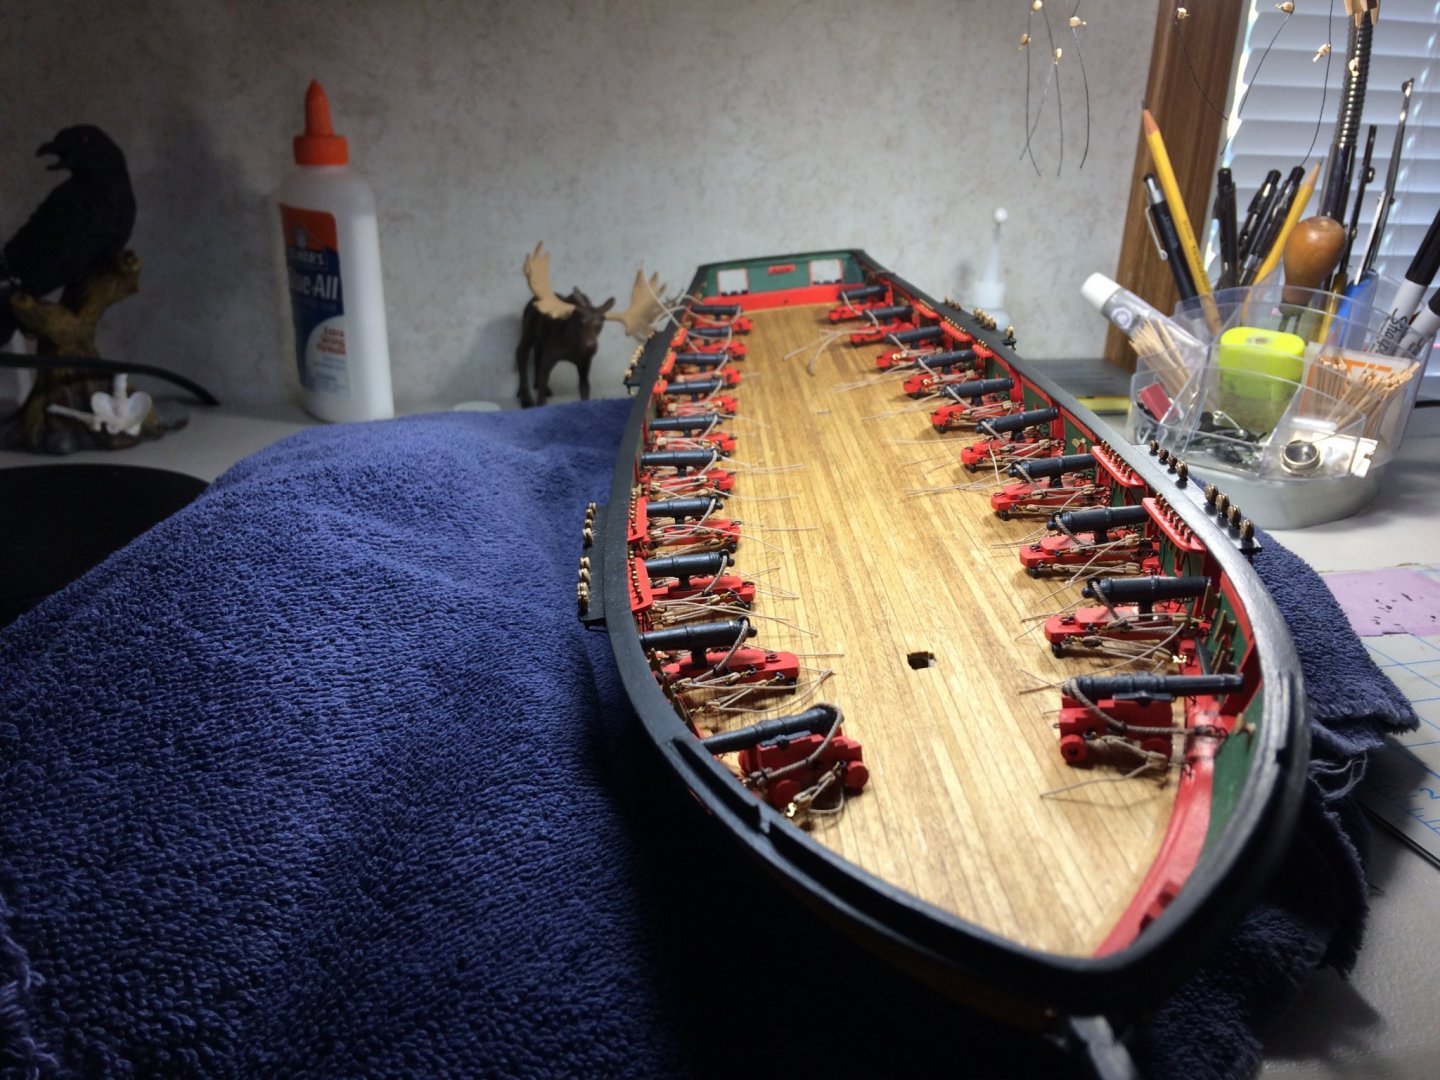
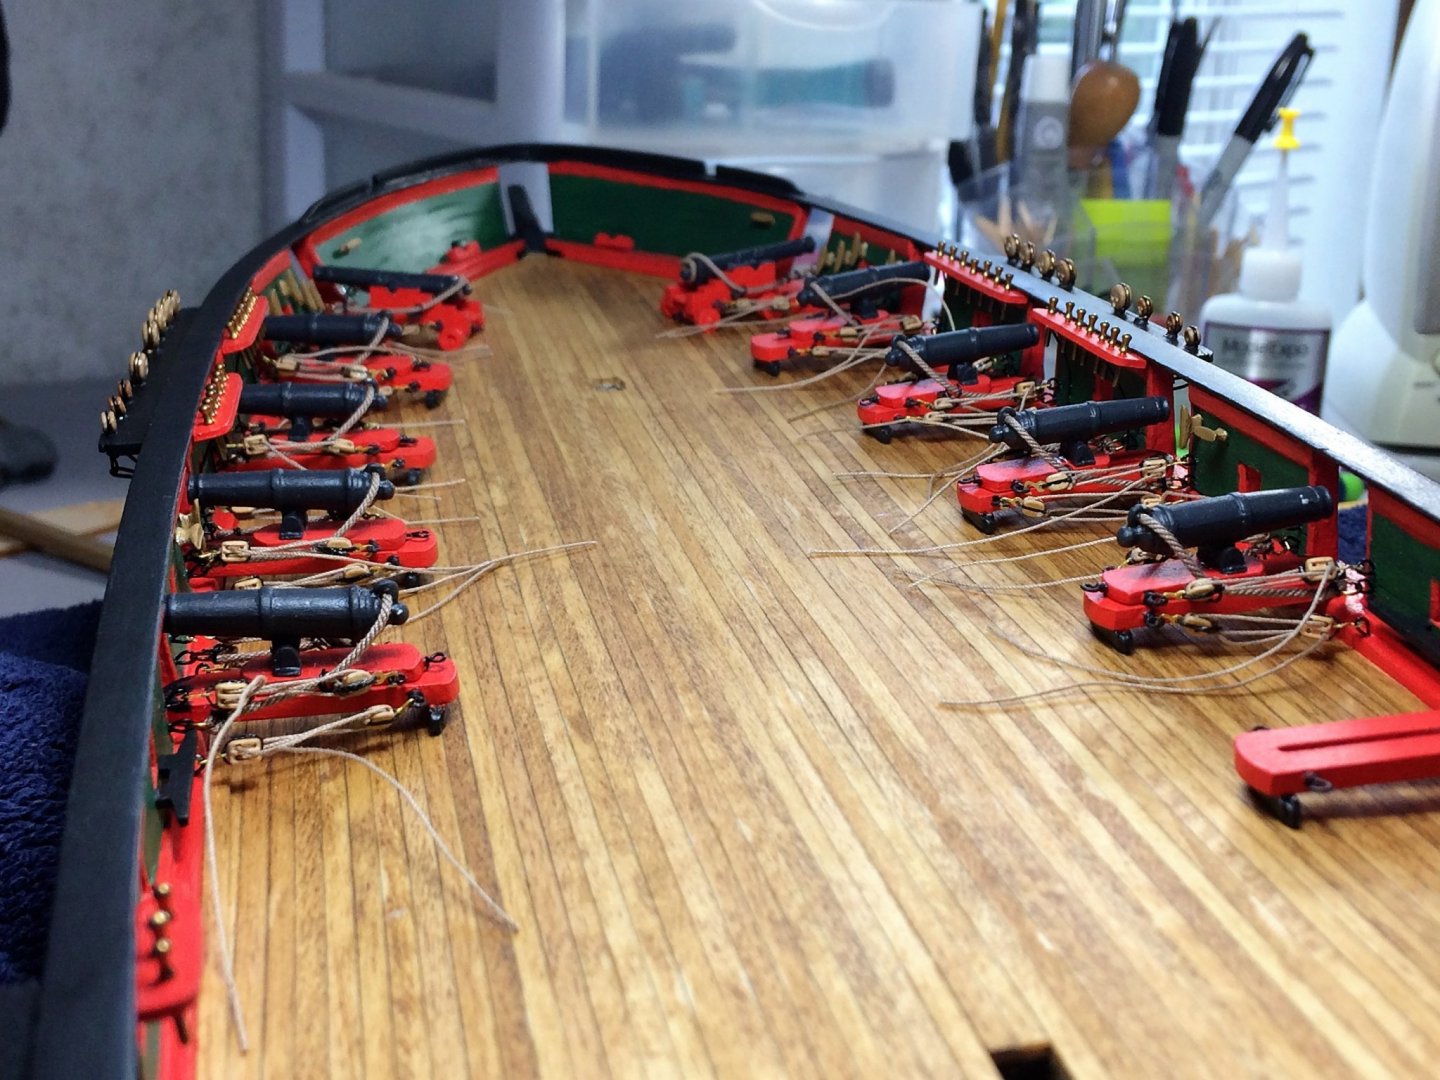
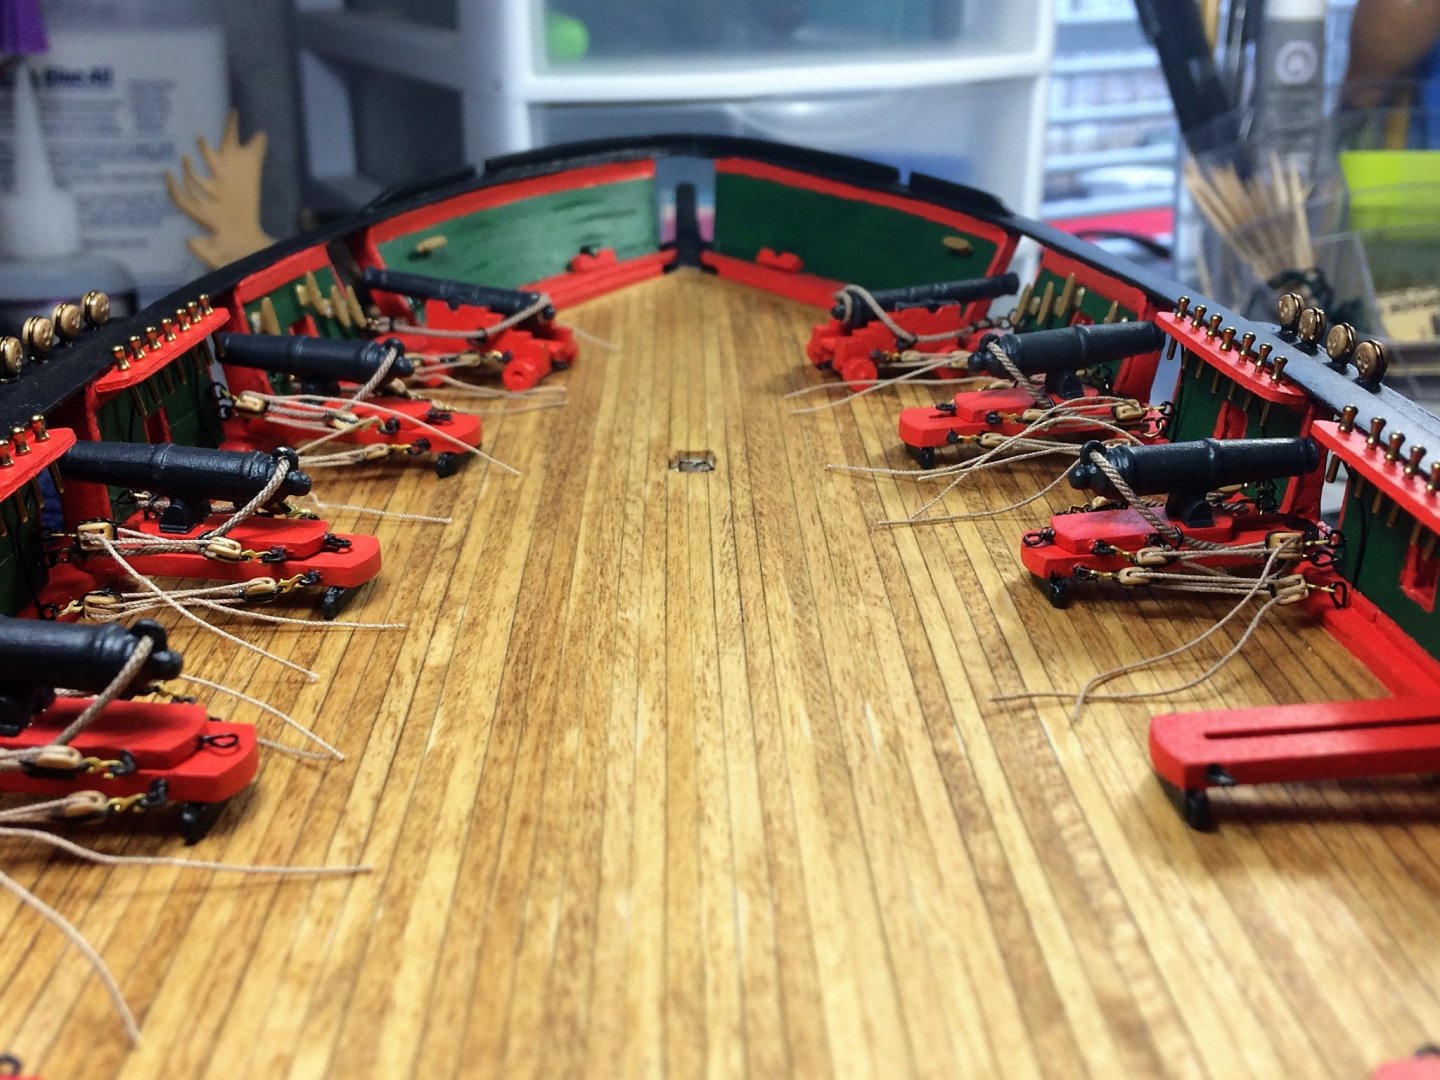
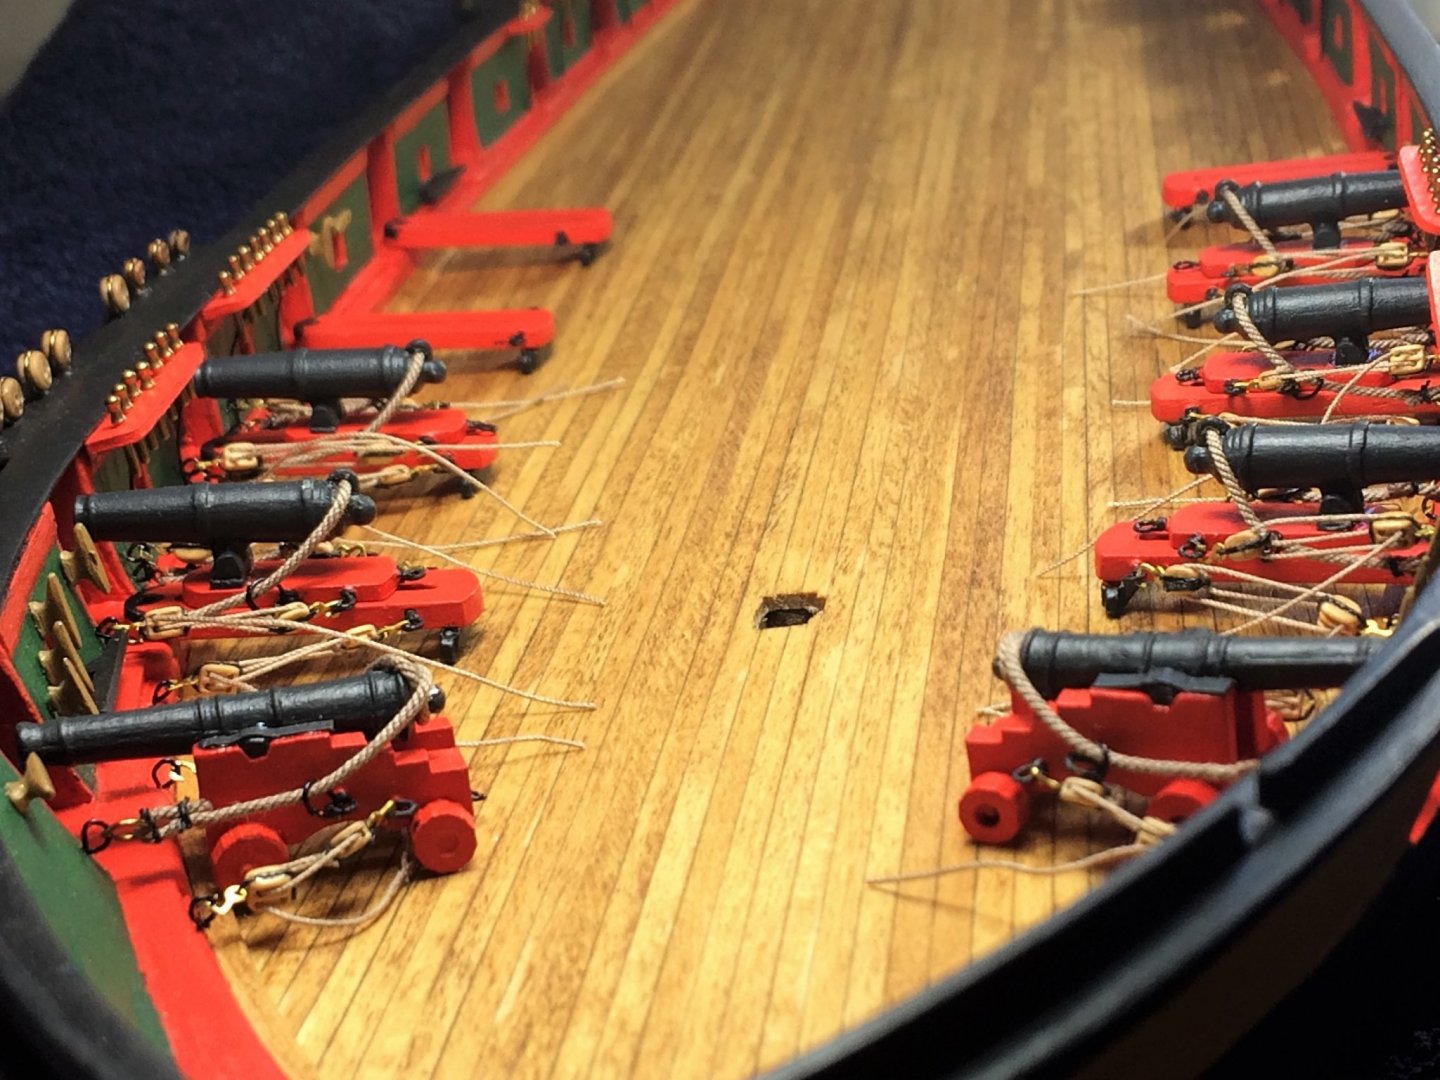
Evening, A quiet night at home, not really in the mood for building, so an update is in order. It's official, The Cannon/Carronade are all done, rigged and installed. Except for the rope coils, those beasts are next!! A symmetrical look. I was trying not to have cannon sticking out farther than the next. Minus the natural curve of the sides, not too shabby. A good flow. I never thought when I started this project I would get this far with it! I may not be the fastest builder, but I'm happy with the outcome so far. The Tiller is next. When I built the tiller and rudder, I realized I couldn't get the rudder thru the stern area and went with a two piece section. The rudder itself will be installed afterwards, probably after the deck furniture. The tiller has been stained and the tension rod installed. Two 3/32 Syren single blocks are stropped and ready to be installed on the tiller. Two other 3/32 single blocks with a lanyard have been stropped for the eyebolts in the deck. On a side note, A Fall chill has hit New Hampshire...that means baking season in my book! With some fresh local blueberries, made a Blueberry Crisp this past Sunday. Snacked on this thing all day long. Even brought some to work the next day for lunch. I see something with apples this weekend! Be good! Tom E

-
2021 CALENDARS ARE GOING FAST!!
Tom E replied to ferretmary1's topic in NAUTICAL RESEARCH GUILD - News & Information
Just took two more off your hands. One for the house, one for the office. Absolutely great idea! These will look awesome. Thanks, Tom E -
AIRBRUSH OPINIONS PLEASE...
Tom E replied to MadDogMcQ's topic in Painting, finishing and weathering products and techniques
Hello, I've seen many of these "which brand is better" strings, never thought I might have something to add. With that said, Over this past winter I was in the same position. Wanted to invest in something good, but yielding as I am a total rookie at this. I made the leap and bought a Harder & Steenbeck. Little bit of an investment, but once you get a feel for it, learn it, it really is a fine brush. I comes with a fine and extra fine needle and two different sized paint cups. As for the compressor, it's from Model Expo. Not high end, but surprisingly works really well and I can adjust the pressure. No troubles at all. Plus, they are known for customer service, and if things break down I trust them more than the big conglomerates. My 2 cents! Tom E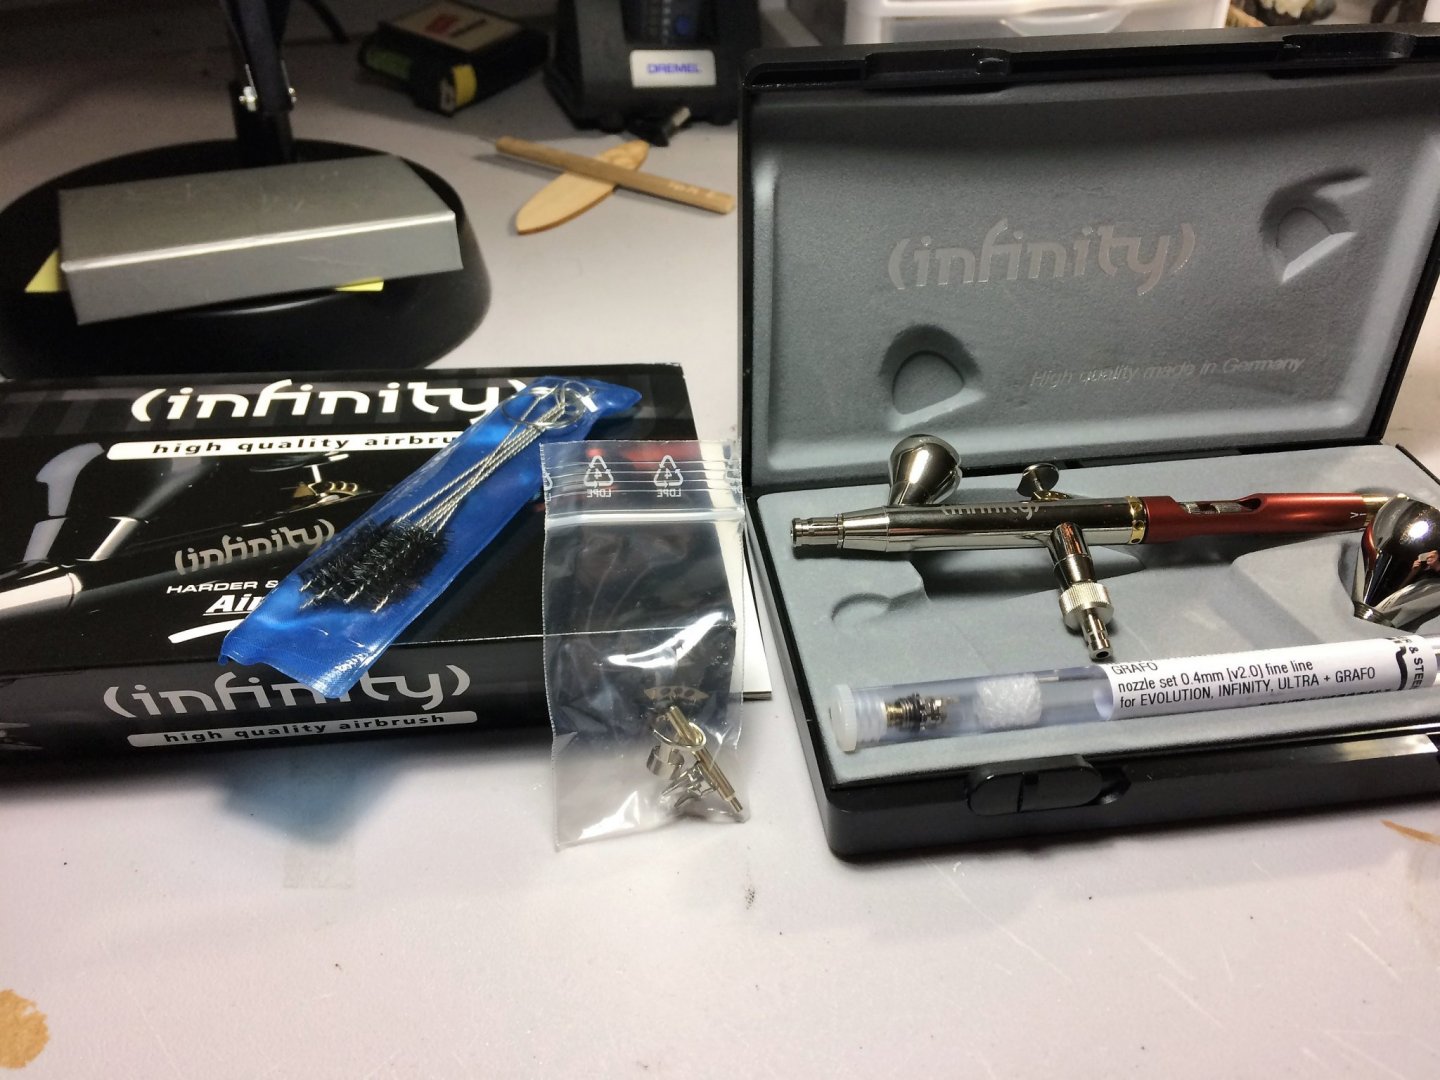
- 40 replies
-
- 7
-

-
- best airbrush
- compressor
- (and 1 more)
-
Wonderful ship Christos, Really enjoying how your wrapping history itself thru Homers descriptions with your ship. Feels like its coming to life right from the ancient scripts. Beautiful work. Tom E
-
Thanks fellas, I appreciate the kind words! Thanks to all the folks who hit that like button, much appreciated as well! Hopefully, the build should become a bit quicker moving forward. With summer time fun ending, there should be a lot more time for Niagara. With most of the repetition of the cannons behind me, should get a lot more exciting as well. Nothing more fun than watching a model that's currently in a hundred different little pieces come together. I forget sometimes that everything is truly built, just need to install. Tom E
-
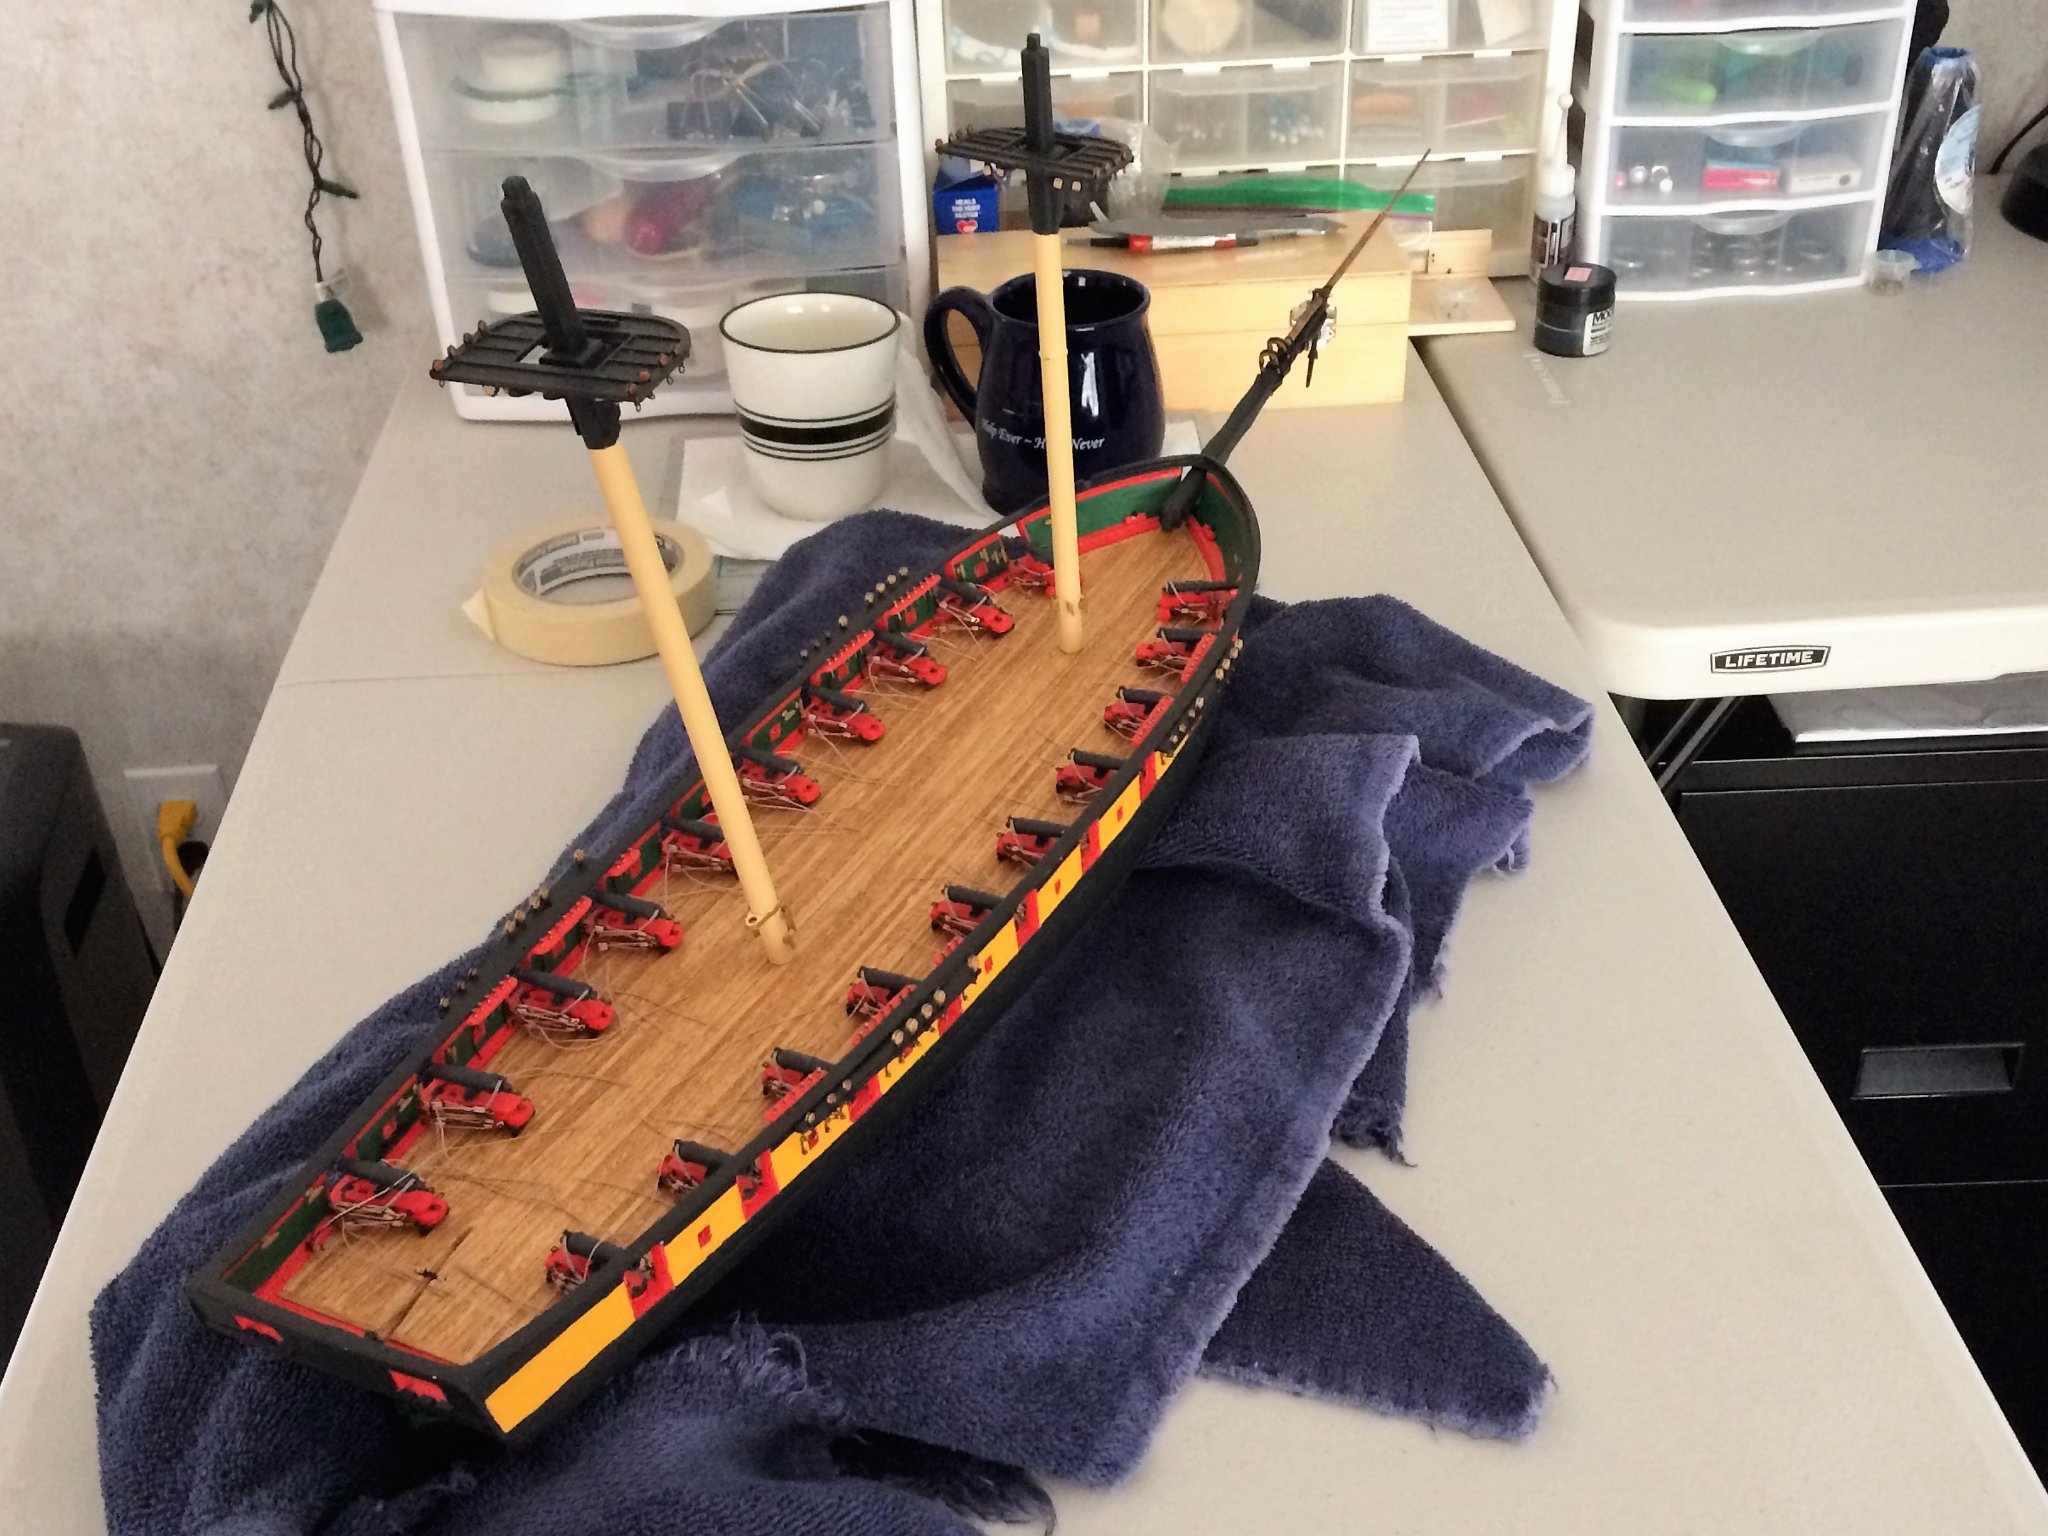
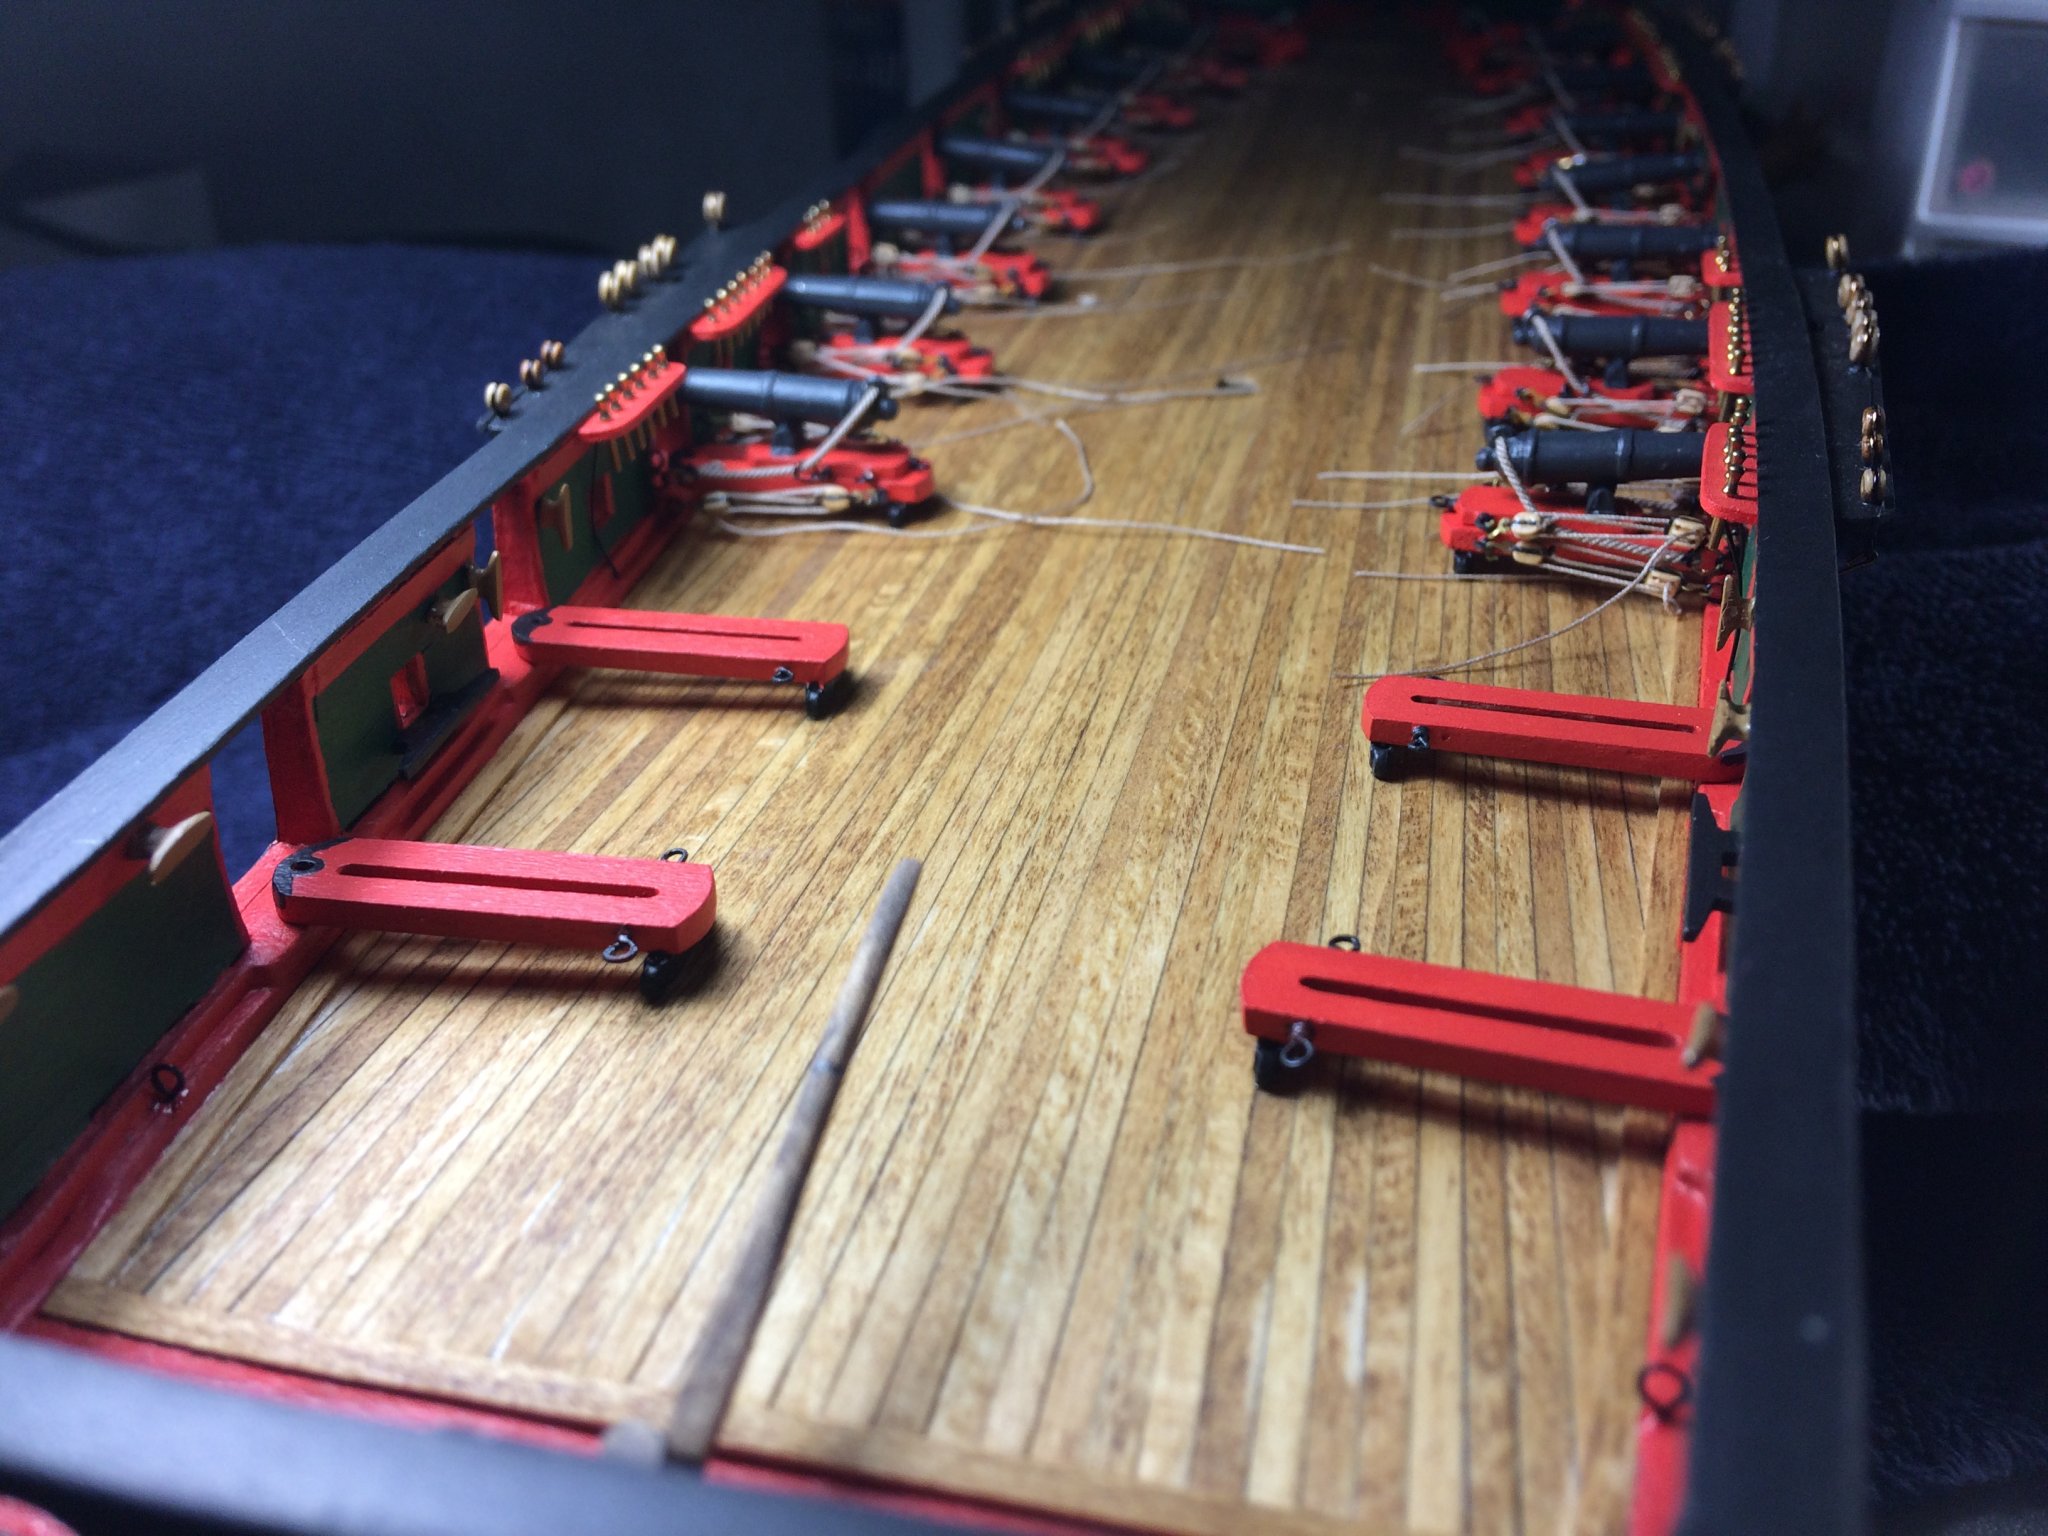
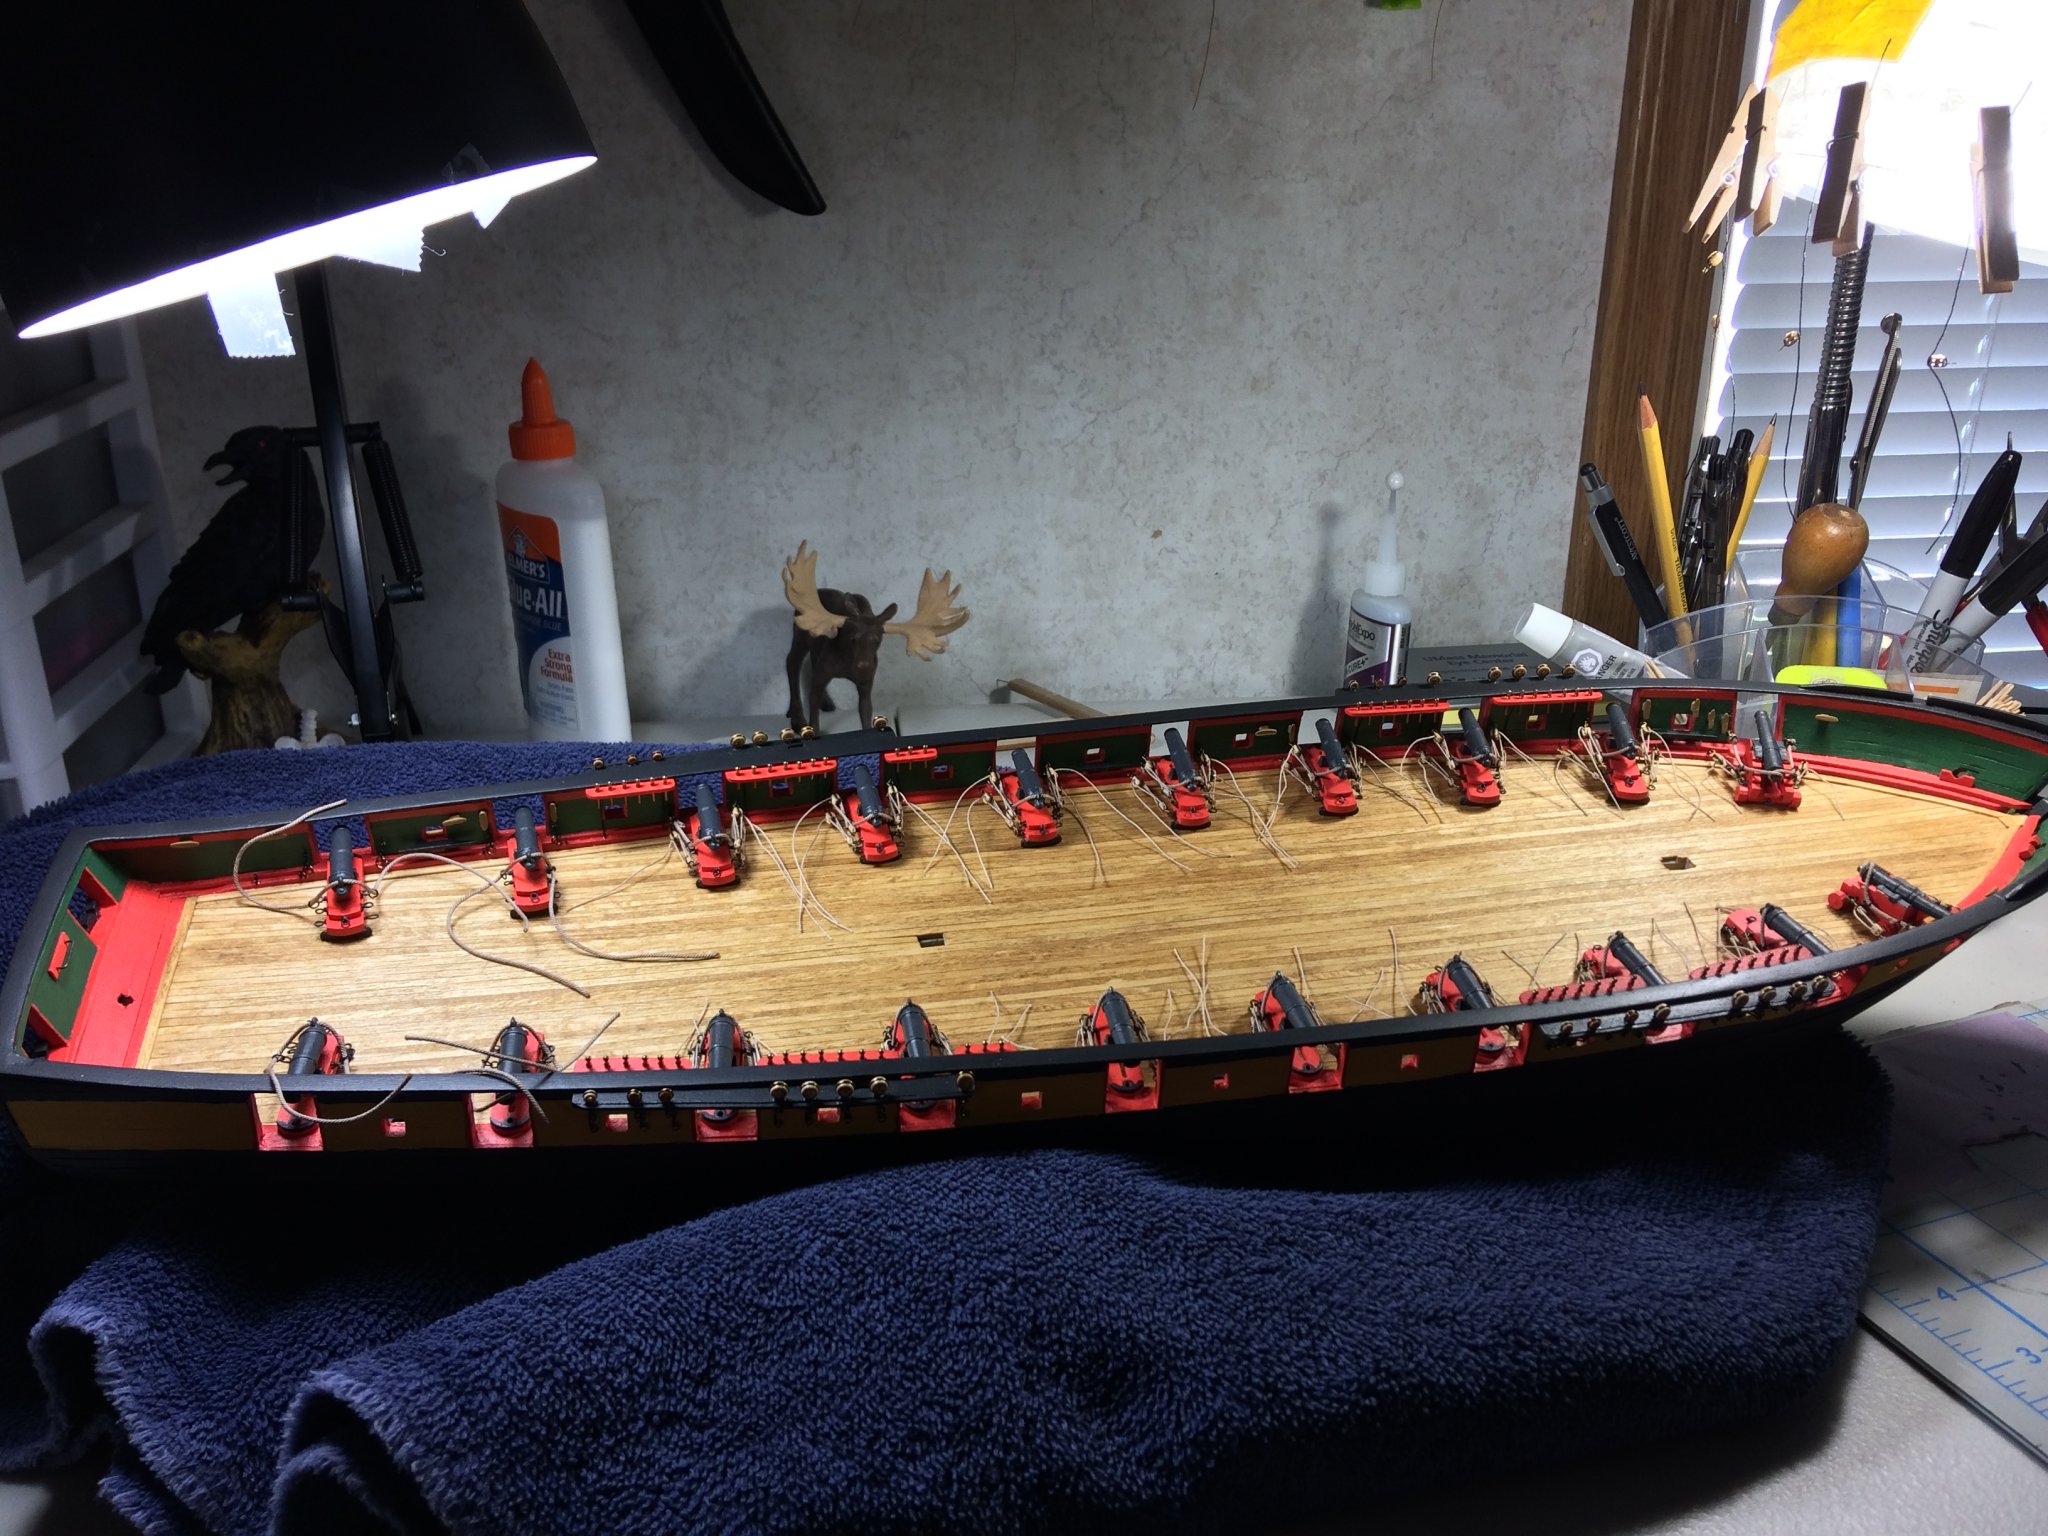
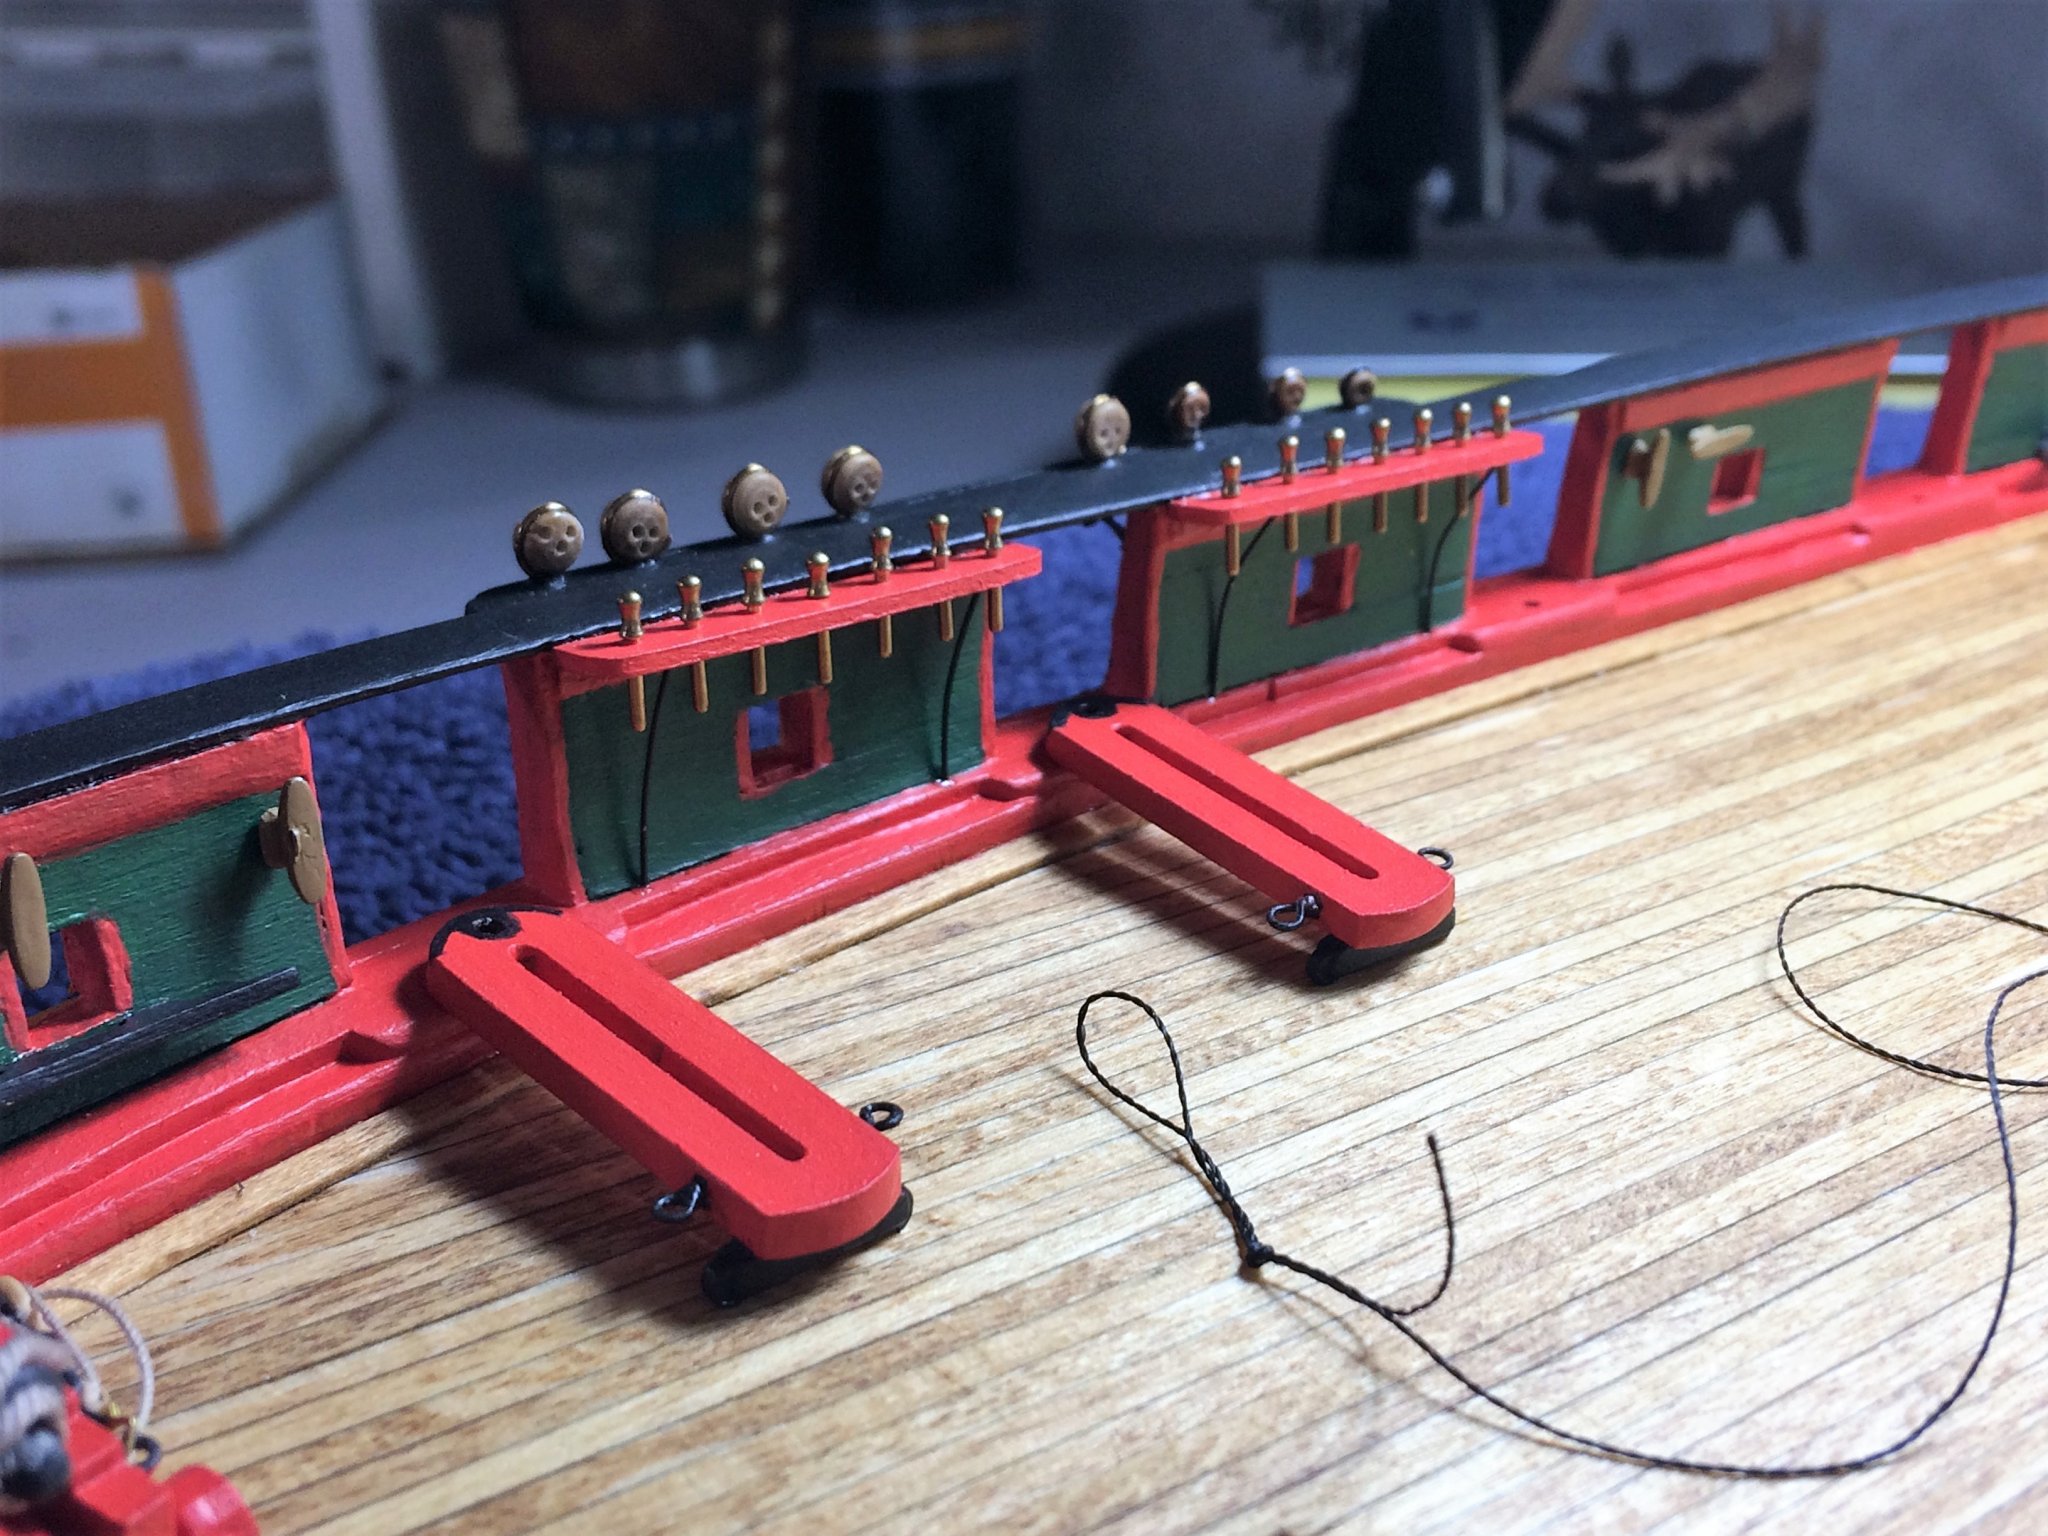
Evening, Well well, It has been a long time since I last updated the build! Sheesh...as weird as the year 2020 has been, it's been a pretty good summer considering. Lately, all the locally grown produce is every where!!! Patrick, I do plan on leaving the pins there natural brass color. I know it's not historical, call it modelers choice. But, I think It adds a little "glint" to the interior of the ship. I like it. Hopefully brighten up a rather darker color scheme I've gone with for the entire ship. The last four sleds for the carronade have been installed. The Tiller has made it's appearance on deck as well. It's not glued in yet. I'm marking off where the rigging needs to be and the eyebolts needed for the deck. It still needs a few small touch ups, like the tension rod on the top. I did remember to also consider the Spanker boom when marking the tiller. I'll rig as much of the Tiller prior to installing. It's official! The last four carronade are on deck. She officially has all of her teeth! Just need to finish the last block and tackle sets for these last four. It's funny, Looking at the below pic reminded me...I need to start some Quoins! She's had a "naked" deck for the longest time. It's starting to get busy now! Once the Tiller is in, the plan is to head to the bow next. Bowsprit, then work my way back installing deck furniture. I feel that I'll get better alignment with the furniture if the Bowsprit is in first. Wash your hands! Tom E


-
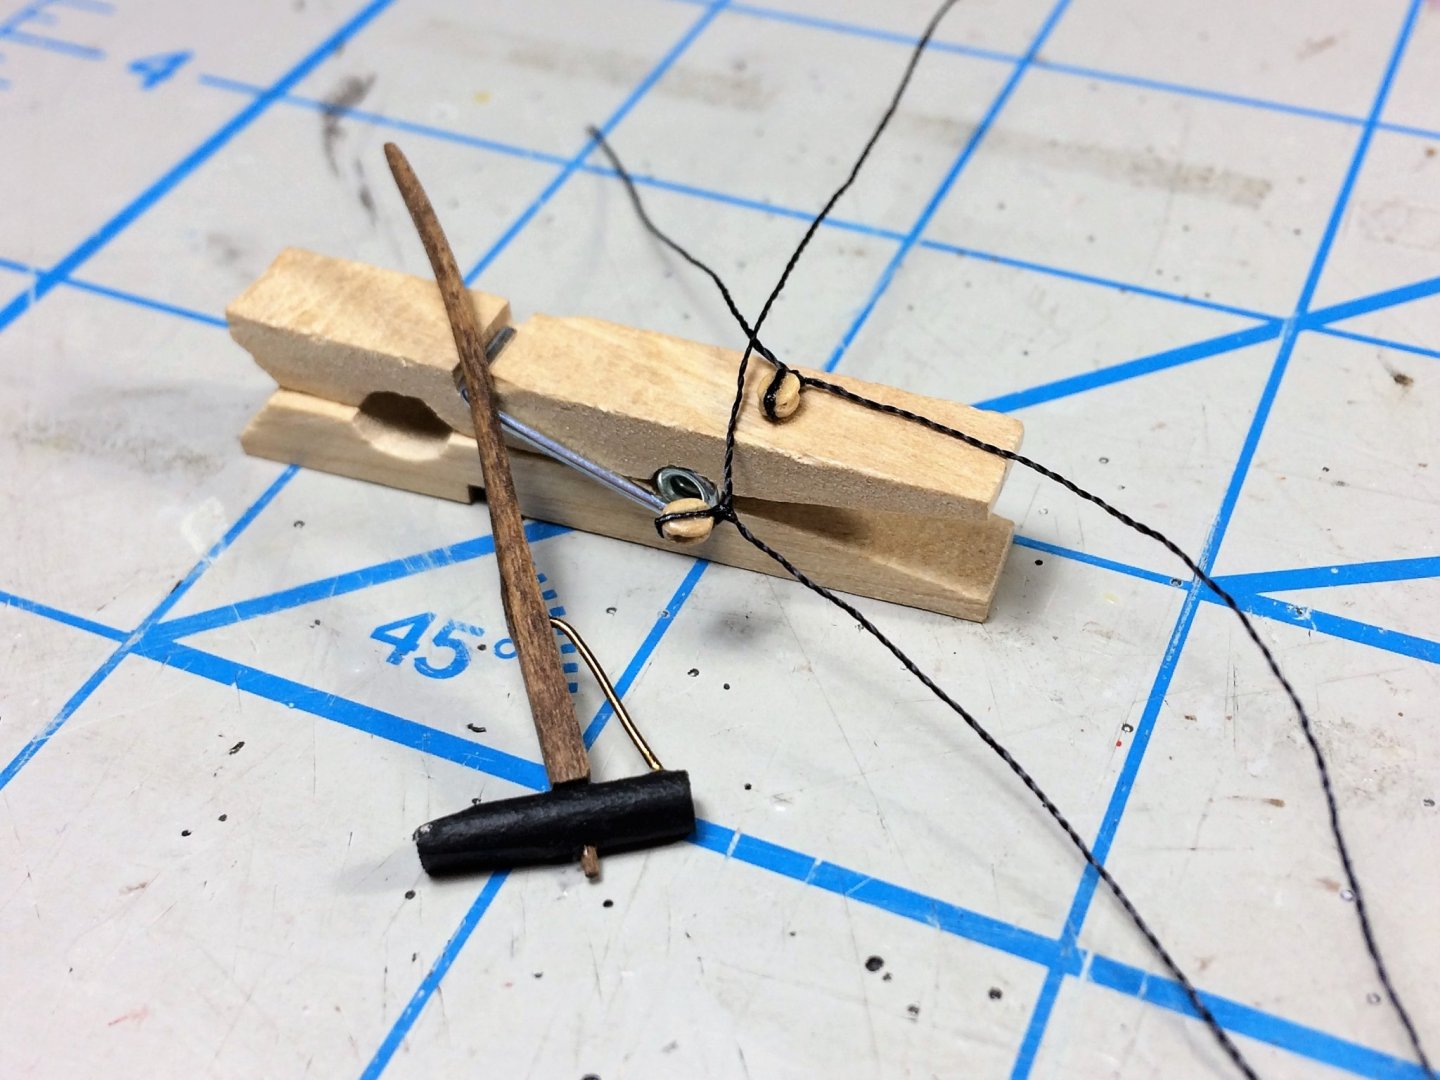
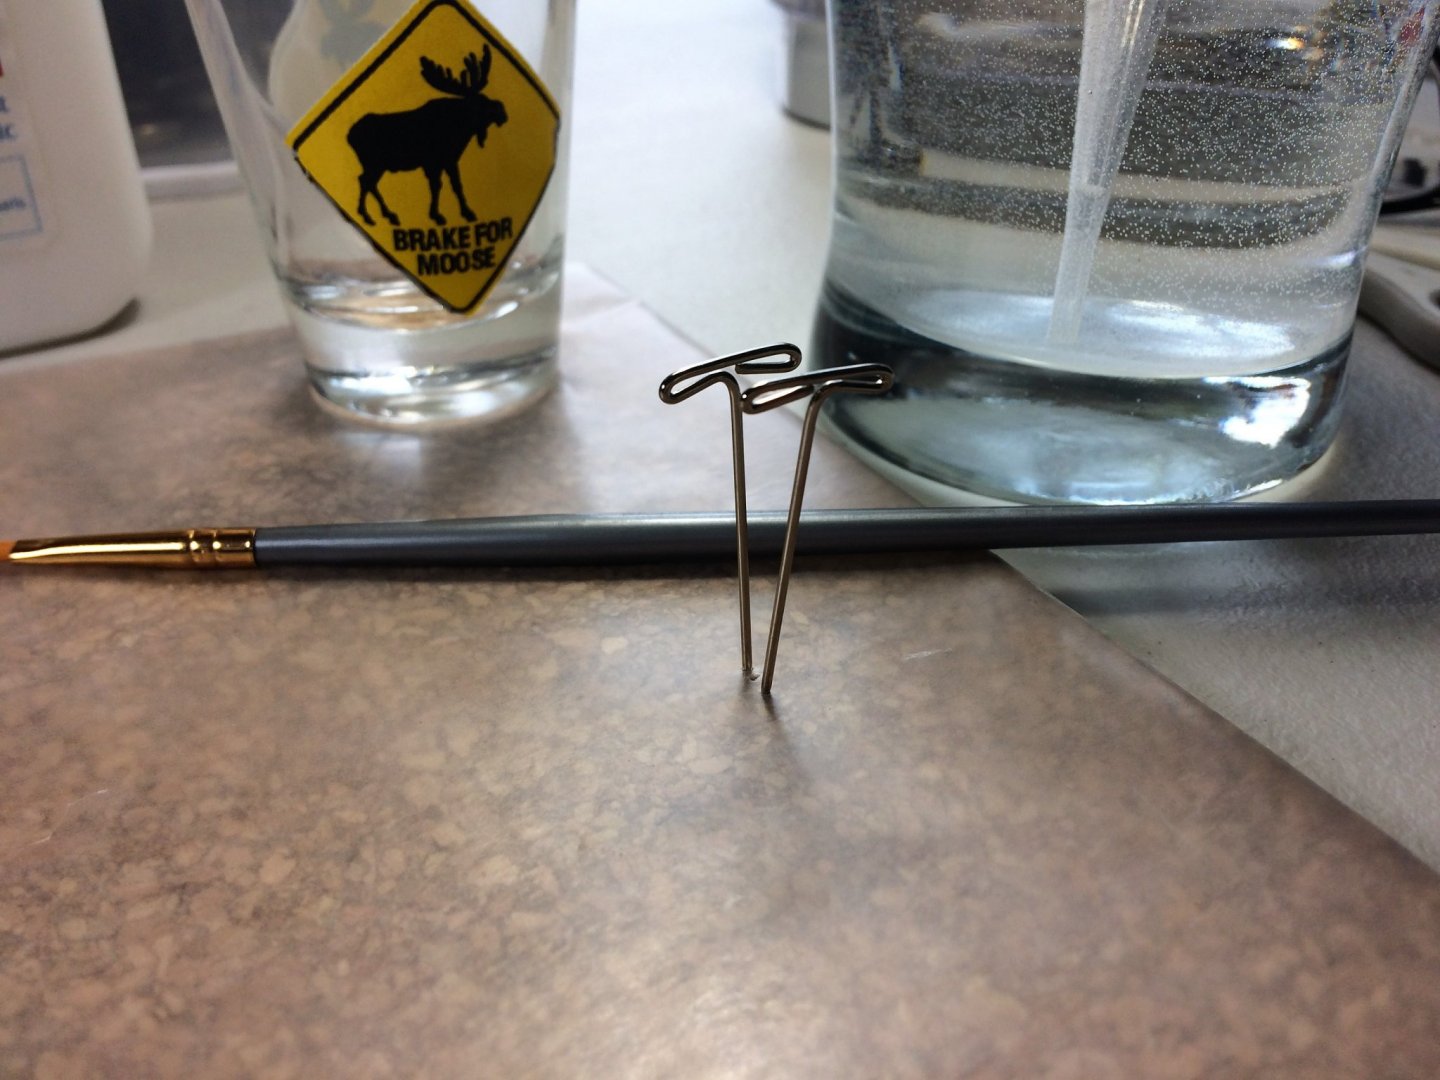
Evening, Hope everyone is well. It has been a while since I last posted. Some building has happened, yet seems more "summertime fun" has happened as well. It's been too nice to be inside this year. The fly-fishing was fantastic this spring, but cooled down quickly the dryer and hotter It got. The Largemouth Bass fishing has been OK, but they seem sluggish as well. It's like the dog days of summer are early this year. Anywho..... On the really unbearably hot weekends, I head to an air conditioned model shop. The cannon continue. There are now 16 cannon installed on deck. I'm hesitant about installing the last four cannon in back until I get a grasp on the tiller and its rigging. I want to avoid the tiller rigging fouling the cannon rigs. This really has been a robotic process. Rewarding as they accumulate on deck and it starts to look really cool........but robotic.... I'm thinking about rigging the tiller before the very last cannon. Should give plenty of room for my fat hands to move around! I really need to start wrapping rope coils........... So, I started the process of wrapping rope coils. There are a million different ways to do these, and I think I've hemmed and hawed over every single one. I'm sure my process will evolve as I learn. Going to use the 50/50 white glue, water set up. The moose shot glass is not available for shots sadly at this very moment! That will hold the glue/water mix. I'm going to use T-pins to gauge the size of the loops. The more T-pins, the larger the loop. In test rope, I found I only need one T-pin for a "to-scale" looking rope coil........mostly. Hope to have those pics soon, I have my first batch drying, and there going to dry for a ridiculous amount of time. I'm hoping in the end to produce a "messy" looking rope coil. Kind of disheveled, "just used" look. Be good Tom E


-
Evening, Absolutely beautiful summer day in New Hampshire today, too bad I was In work all day. Came home from work and finally mowed the lawn. Recent heat wave held me off that chore. With that done, heating up some left over Chinese food......I think Niagara needs an update. The carronade continue. Ten of the twenty cannon are in. The sleds for the next three carronade have been installed as well. I usually just do a couple at a time. The pace is really up to how quickly I can strop the blocks. With the sleds in, the carronade are secured with the Breech rope already installed. I should have tackle for all carronade on deck by this weekend. Should also have another three carronade installed on the Port side by this weekend as well...hopefully. The plan is still, once the cannon are done, the furniture (and Tiller) will be next. I figure the Foremast and Bowsprit will be after the Furniture. Tom E


-
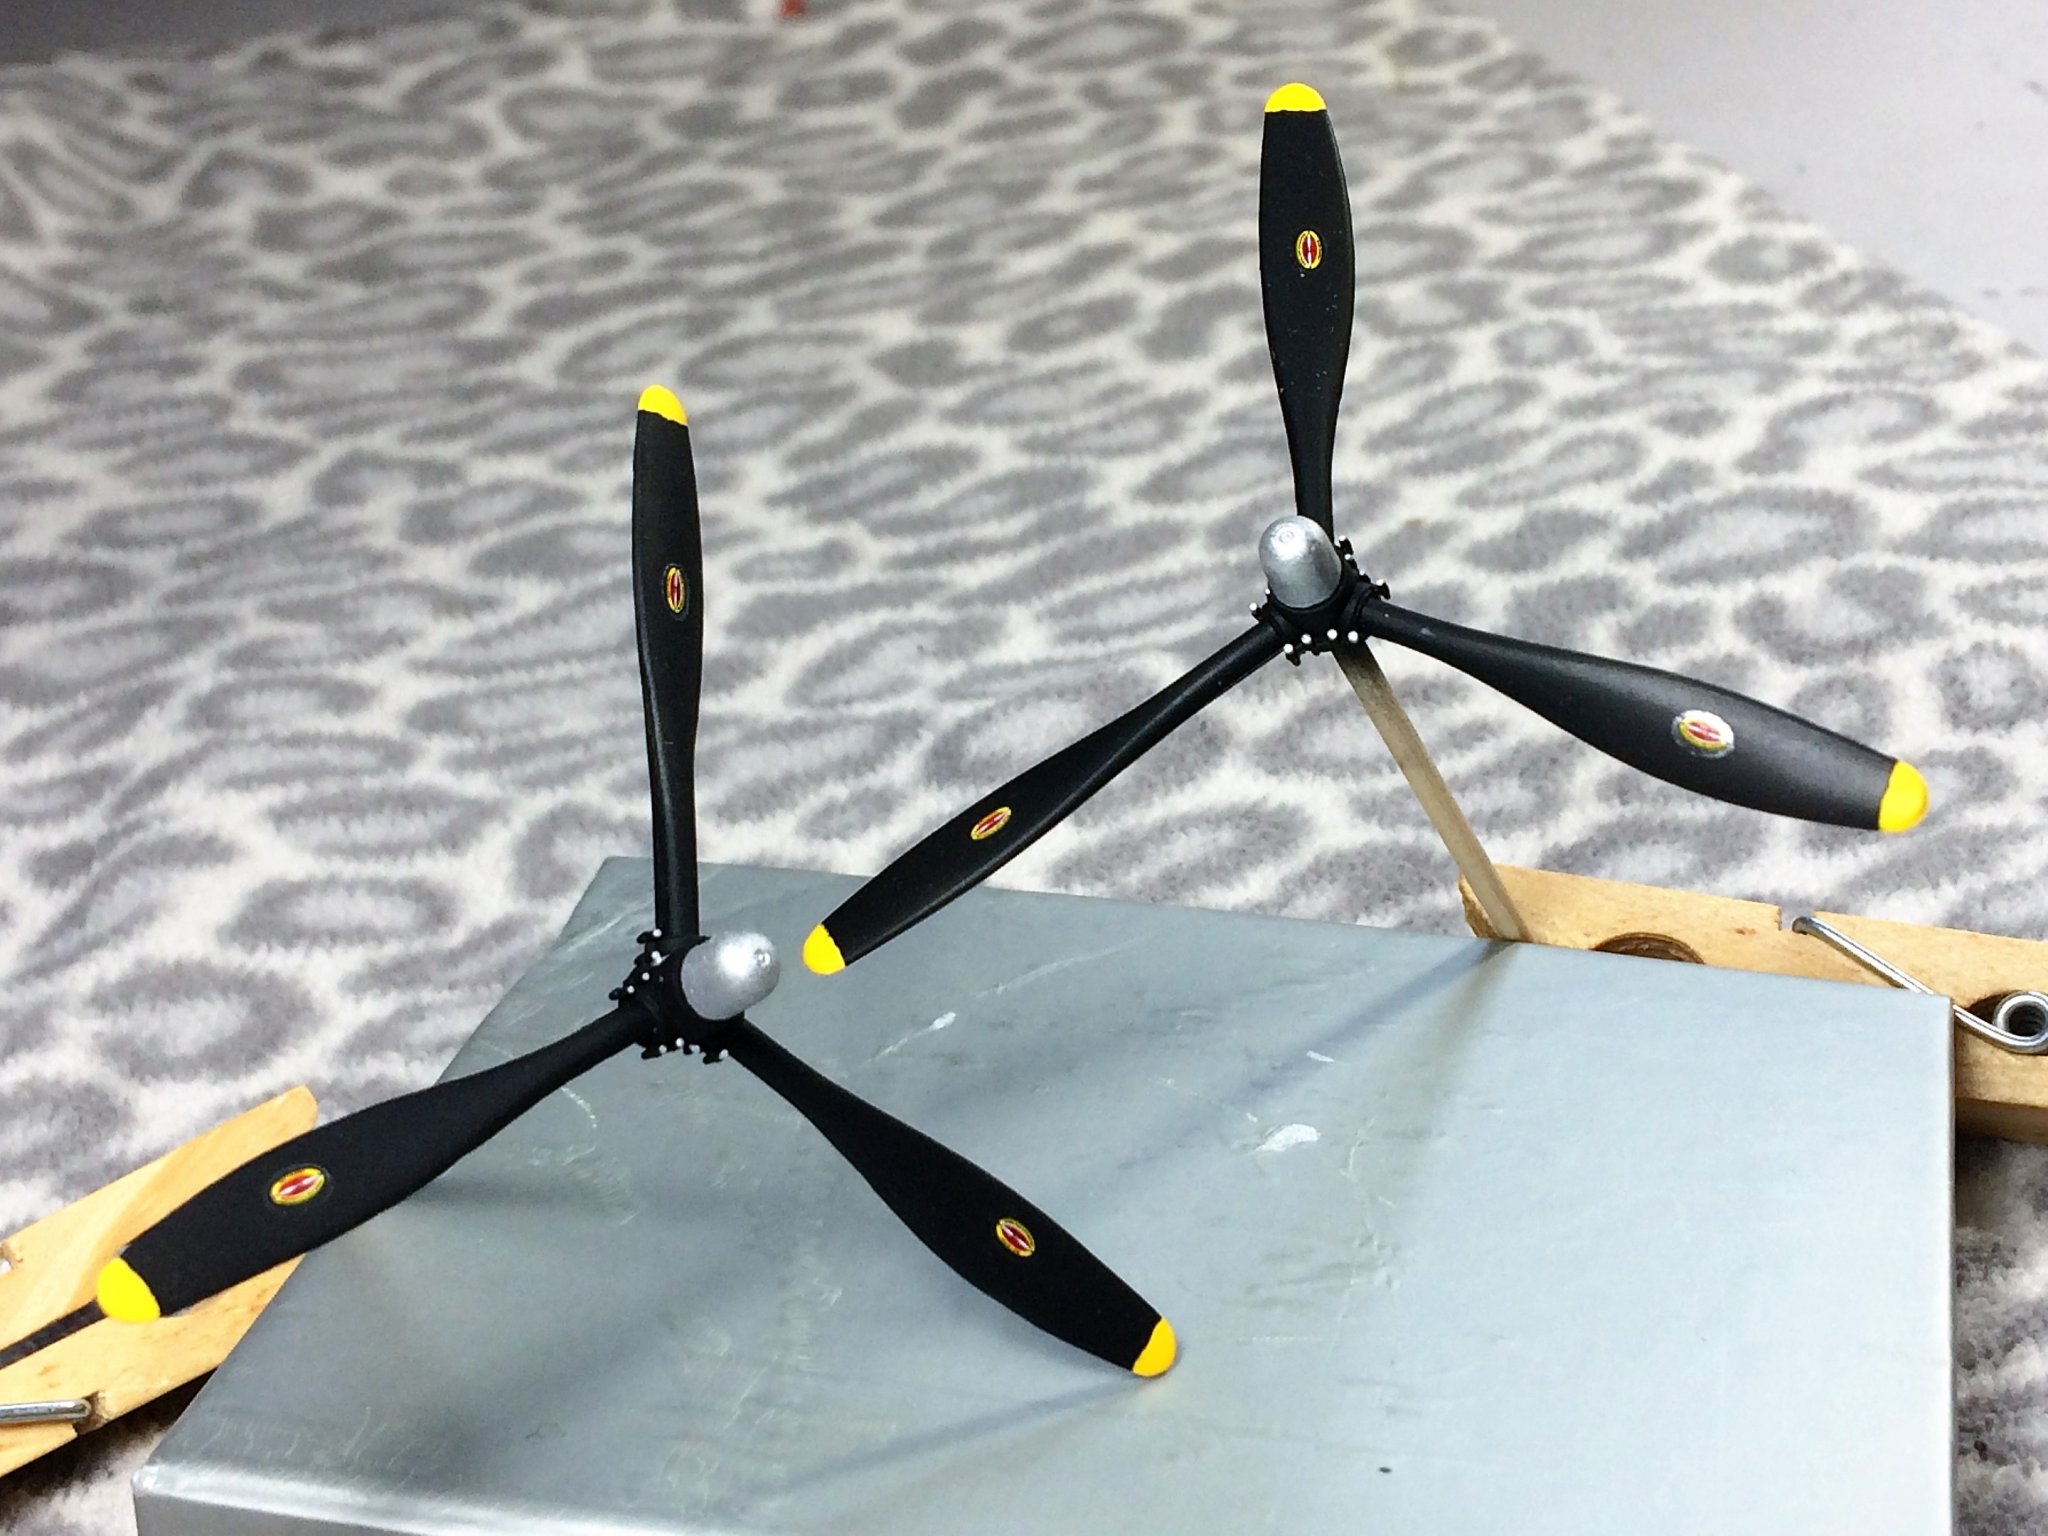
B-25J Mitchell by Tom E - Revell - 1:48 Scale - PLASTIC
Tom E replied to Tom E's topic in Non-ship/categorised builds
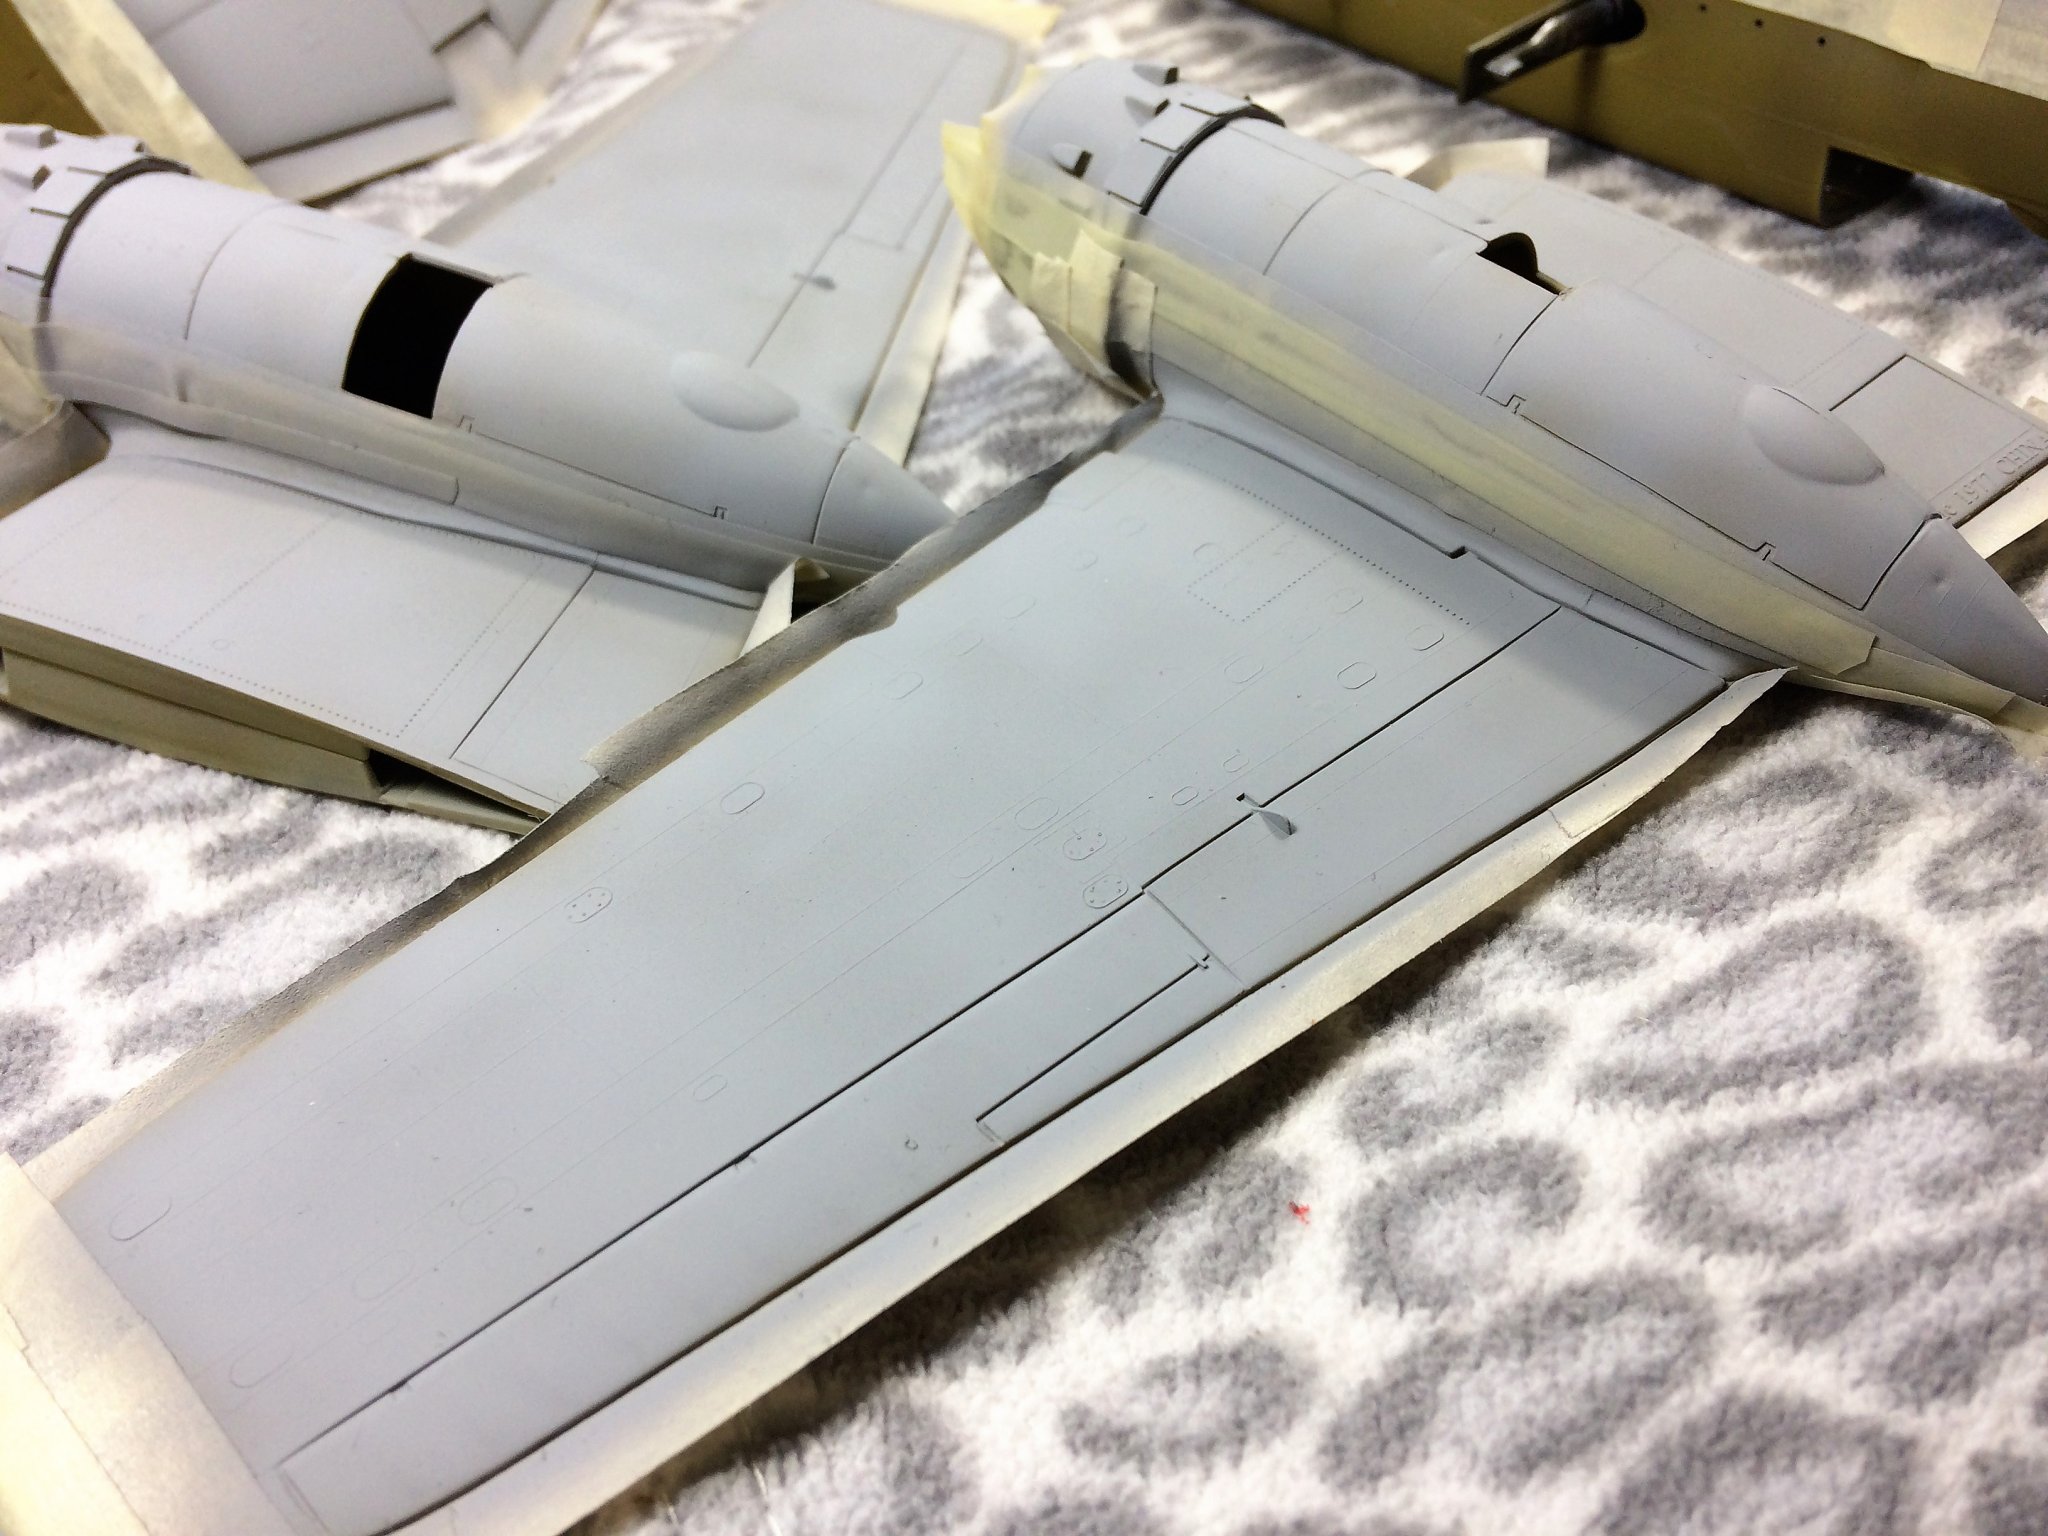
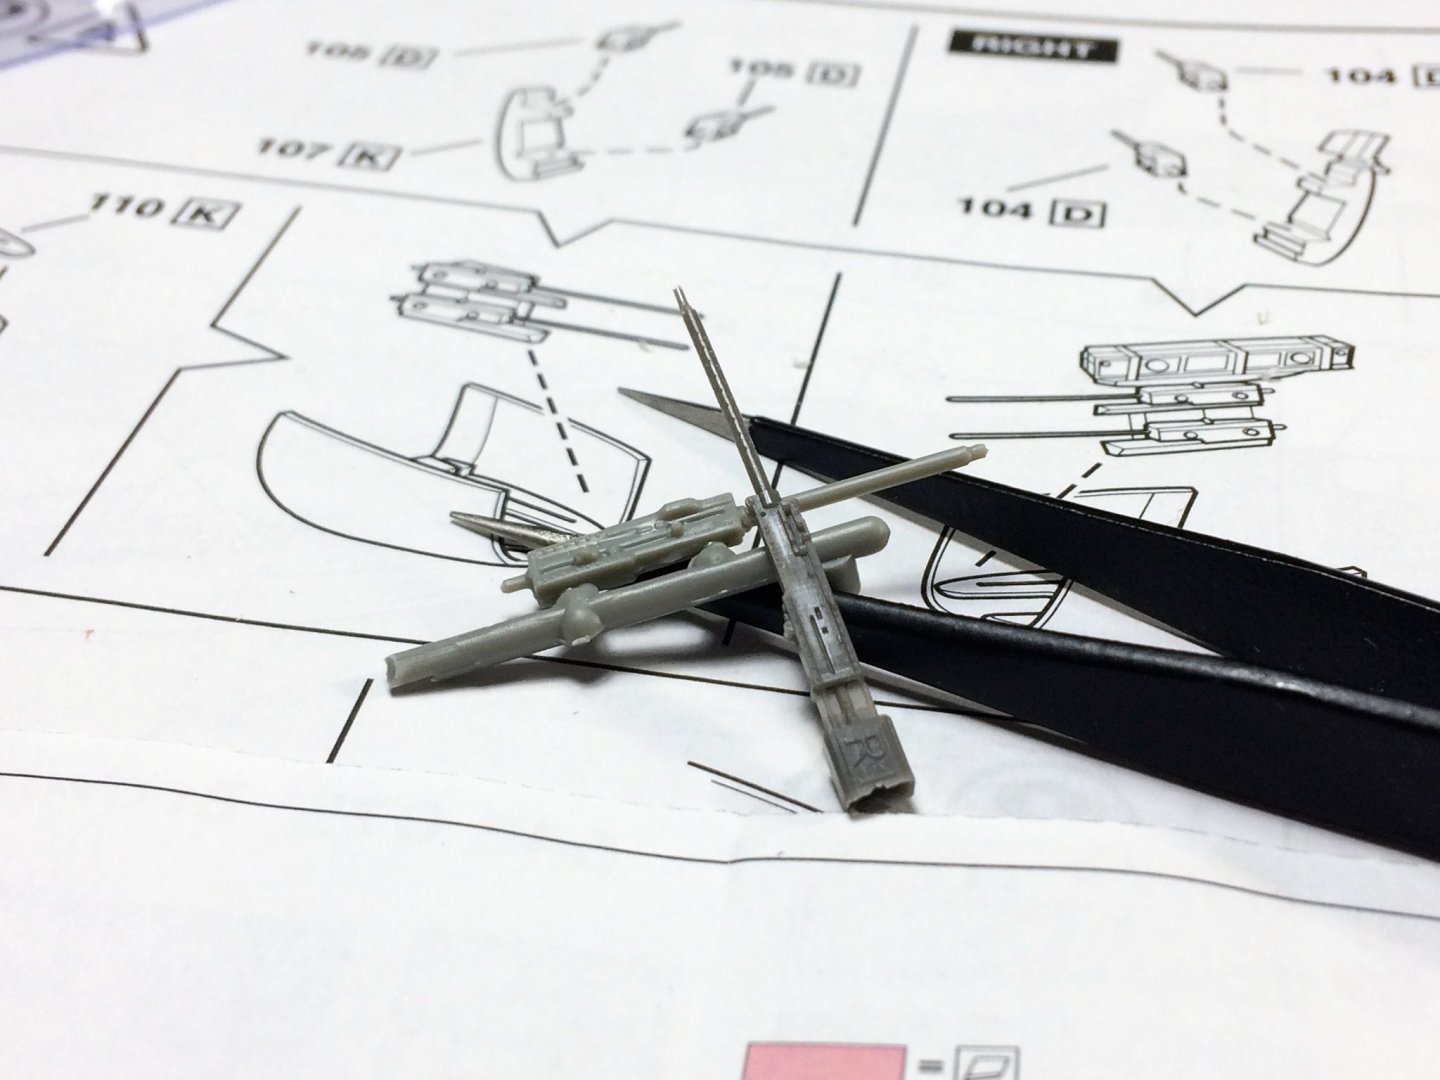
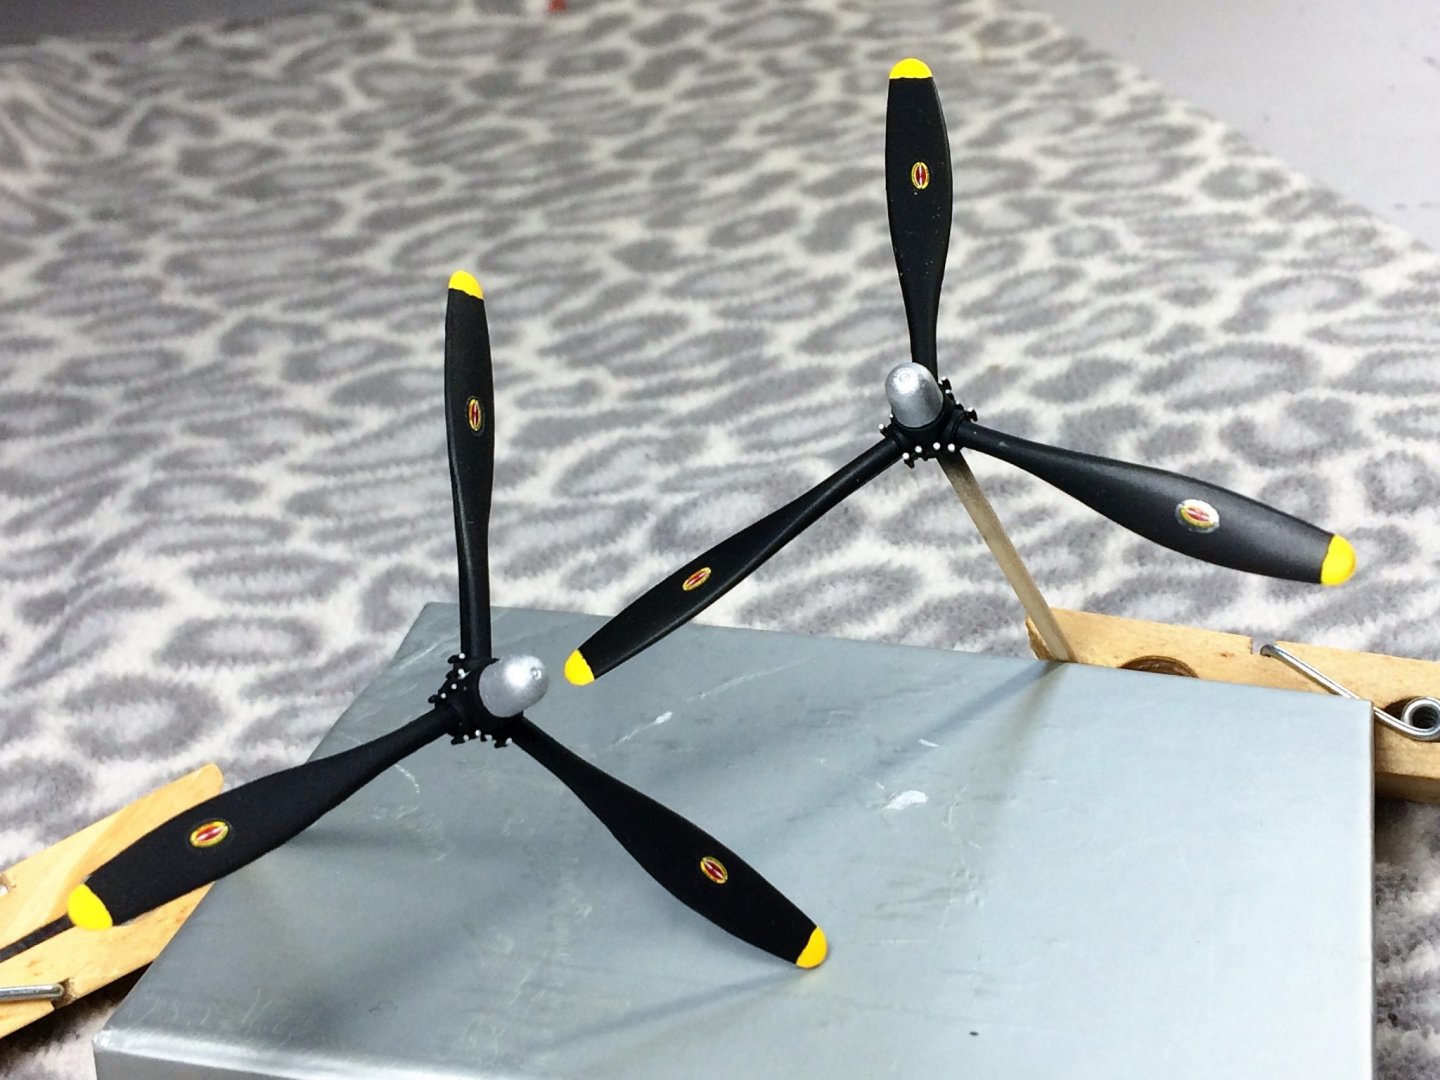
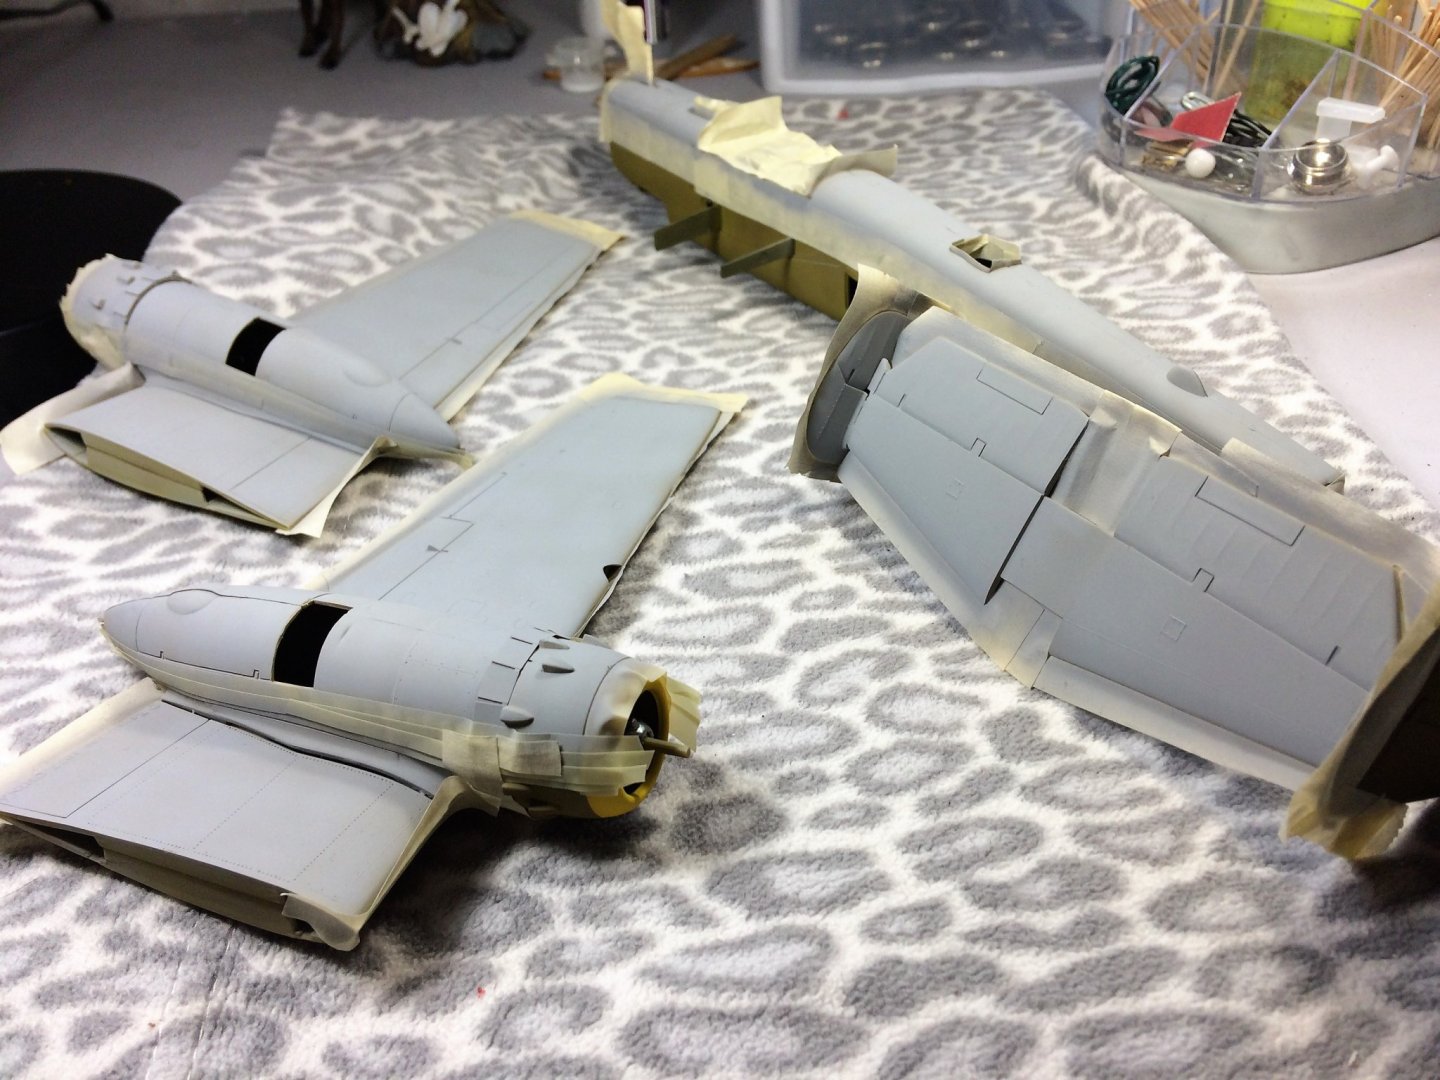
Evening, I do believe the Mitchell needs an update. There has been some progress, but during the summer months, even with quarantines........it's hard to stay off the back deck with a cold one!!! Any who...... I've started the front nose section. Since I'm building her as the Jaunty Jo version there are 5 machine guns in the nose. Four of these guns will be updated with resin guns. Clearly the kit supplied gun is on the left. These resin guns will look good after a coat of paint. Probably just stick with a flat black here. That gun metal paint I've used before is kind of shiny for me. I dabbled with the decal solutions. Figured I would start with some of the smaller decals for the propellers. Don't know if I used it correctly, but I think they look pretty good. There is one more decal for each propeller. But I'm going to let these dry for an unnecessarily long time. I also masked of the fuselage for its grey coating underneath. Used a Tamiya Sky Grey. I see I have some great panel line accent with the dark color being underneath the grey coat. I didn't know you could do that. Lesson learned. I'm going to let these set for a while before unmasking. Be good Tom E


- 120 replies
-
- 11
-
-
Edward, Thanks for the kind words, much appreciated. I never dreamed I would make it this far with this project. Not the fastest builder, but I'm getting there. Thanks to all the folks for clicking that "like" button! Darrell, I just took a look at that entry. Your results are awesome! I just realized it was "the puddle of glue" that I was missing. I would take a length of rope, soak it in a 50/50 mix, then wring it out when I removed it. It was nothing but a sticky mess that never stuck together. Even if I did let it dry overnight, it would eventually unwrap. I would love to say I could dive right into the great ideas you've given me, but with Fathers Day this weekend I'm on the road. Have to visit Mom and Dad. Haven't been able to pay them a visit since Christmas. Tom E
-
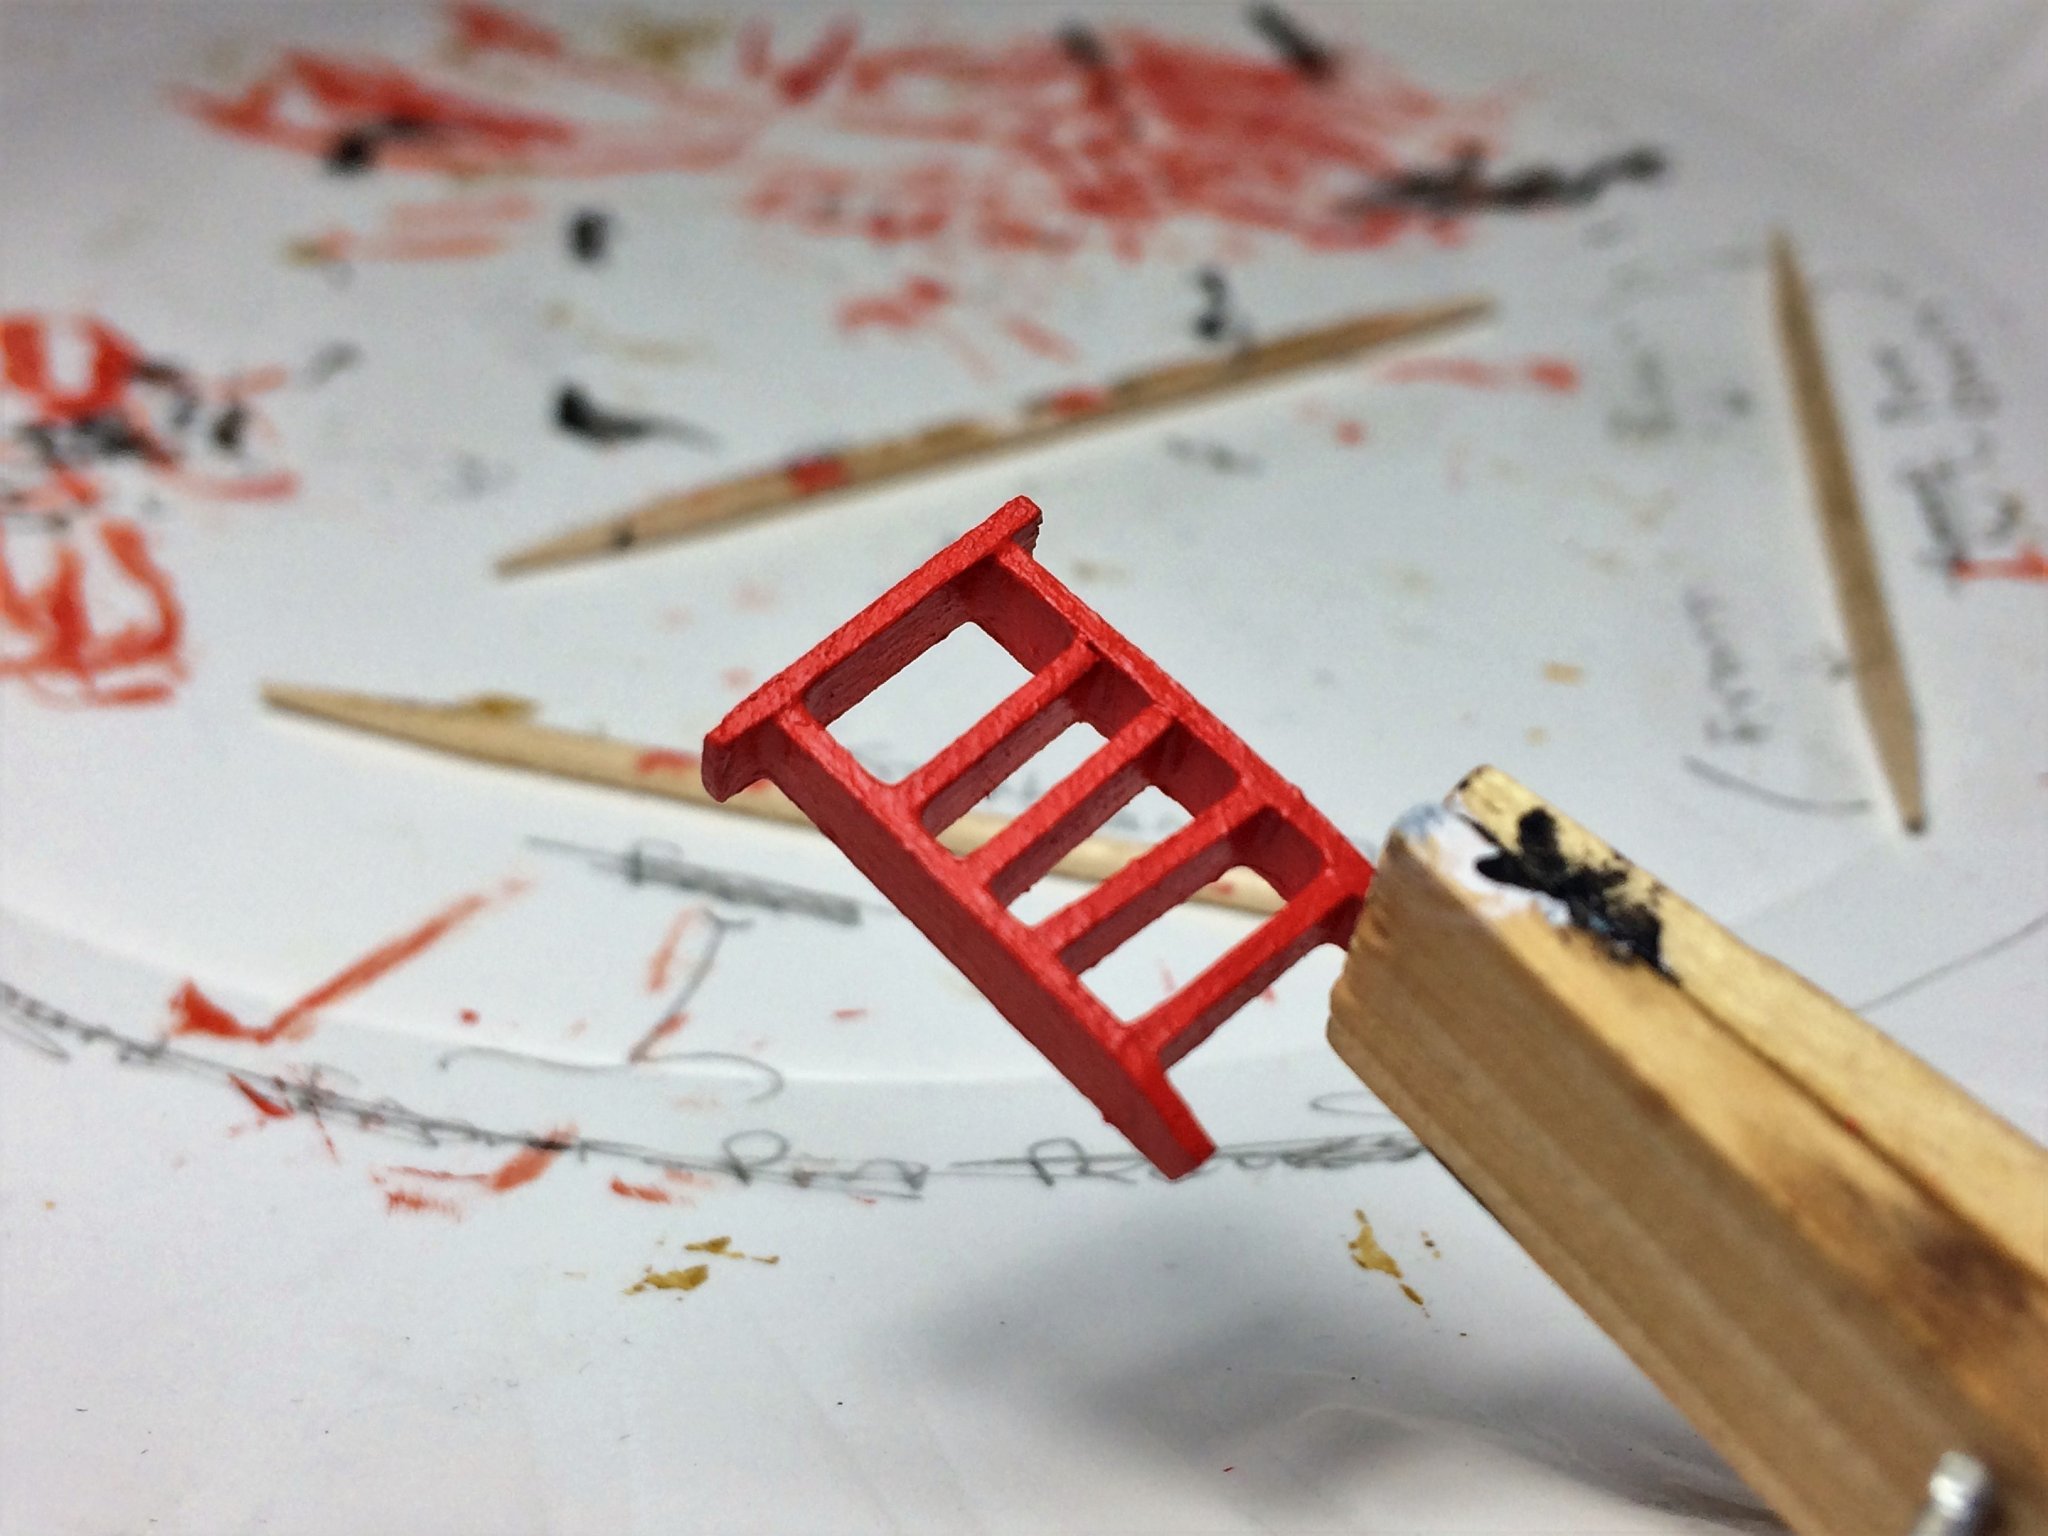
Evening folks, Hope everyone is well. Niagara is sorely overdue for an update. Progress has been made but slow and repetitive work. Mostly stropping blocks for the cannon rigging. As a side note, The Boarding ladder is done! Continuing on with the carronade. While blocks are being stropped, I usually get the sled installed first. It is anchored to the deck with a small dab of CA. Also off deck, the carronades are being prepped with the breach rope. With the sleds secured, I can figure out eyebolt placement. Using some simple thread with a loop in it I can get an idea where the eyebolts should be. Hopefully giving a pleasing look to the eye. Don't want these lines to low, high, or asymmetrical from the other side. With the rigging process getting better, and quicker, I was able to install another four carronade. You can see in the below pic the next three sleds are installed. The rope ends are still loose. I'm still working on how to make the rope coils. I've tried a few different varieties and should have some results soon. I'm using the white glue/water mix trick to make them. Just working out which "style" I like more. The proper Navy coils for an official inspection, or everyday kind of lumpy coils. I'm leaning to the more informal coils. Keep building! Tom E


-
B-25J Mitchell by Tom E - Revell - 1:48 Scale - PLASTIC
Tom E replied to Tom E's topic in Non-ship/categorised builds
Thanks OC, I can guarantee that I would have seen that and figured I screwed it up somehow. Tom E -
B-25J Mitchell by Tom E - Revell - 1:48 Scale - PLASTIC
Tom E replied to Tom E's topic in Non-ship/categorised builds
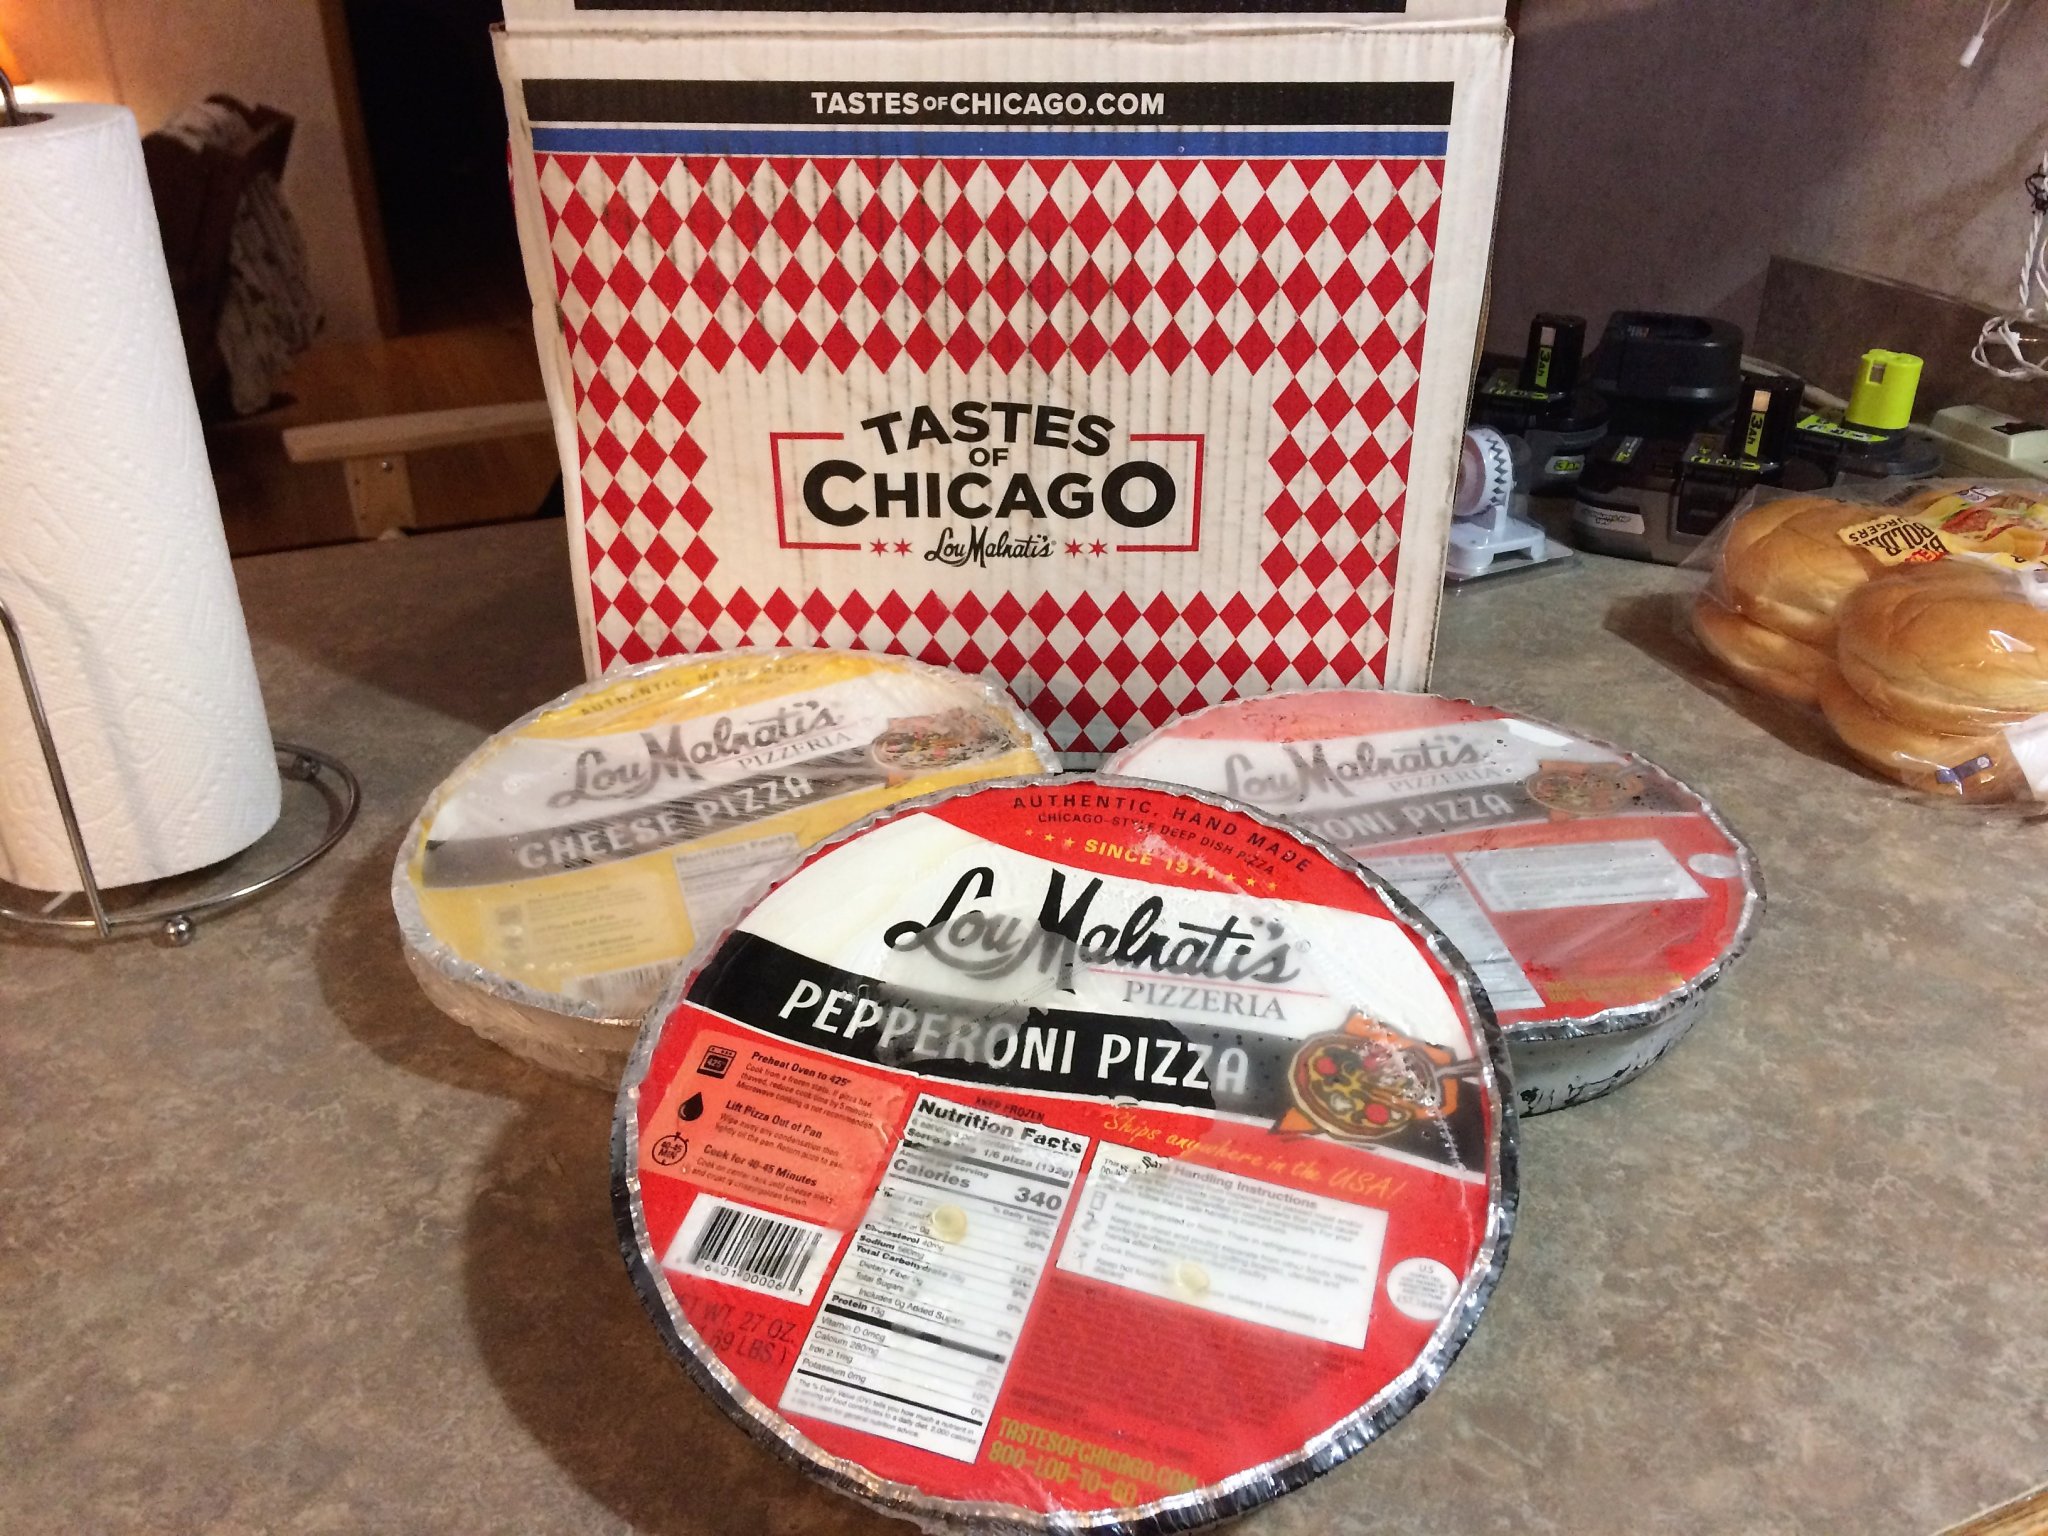
Evening, Not much of an update, but should encourage me to get the weekend chores done early so I can play with new stuff! Never used decal solutions before. Bought these from MicroMark. A five bottle set for about $24.00. I plan on trying these on some un-used decals to practice with. Reading the directions, seems pretty straight forward. As a side note...… It's been a good Friday! Splurged on some deep dish pizza direct from Chicago. Everything in my town is New York style. Good pizza, but sometimes you need a pizza where one slice fills you up. With a tall glass of Coke loaded with ice....ya cant beat it! I do recommend Lou Malnati's pizza. There should be a fourth pizza in this shot. The other is in the oven! Tom E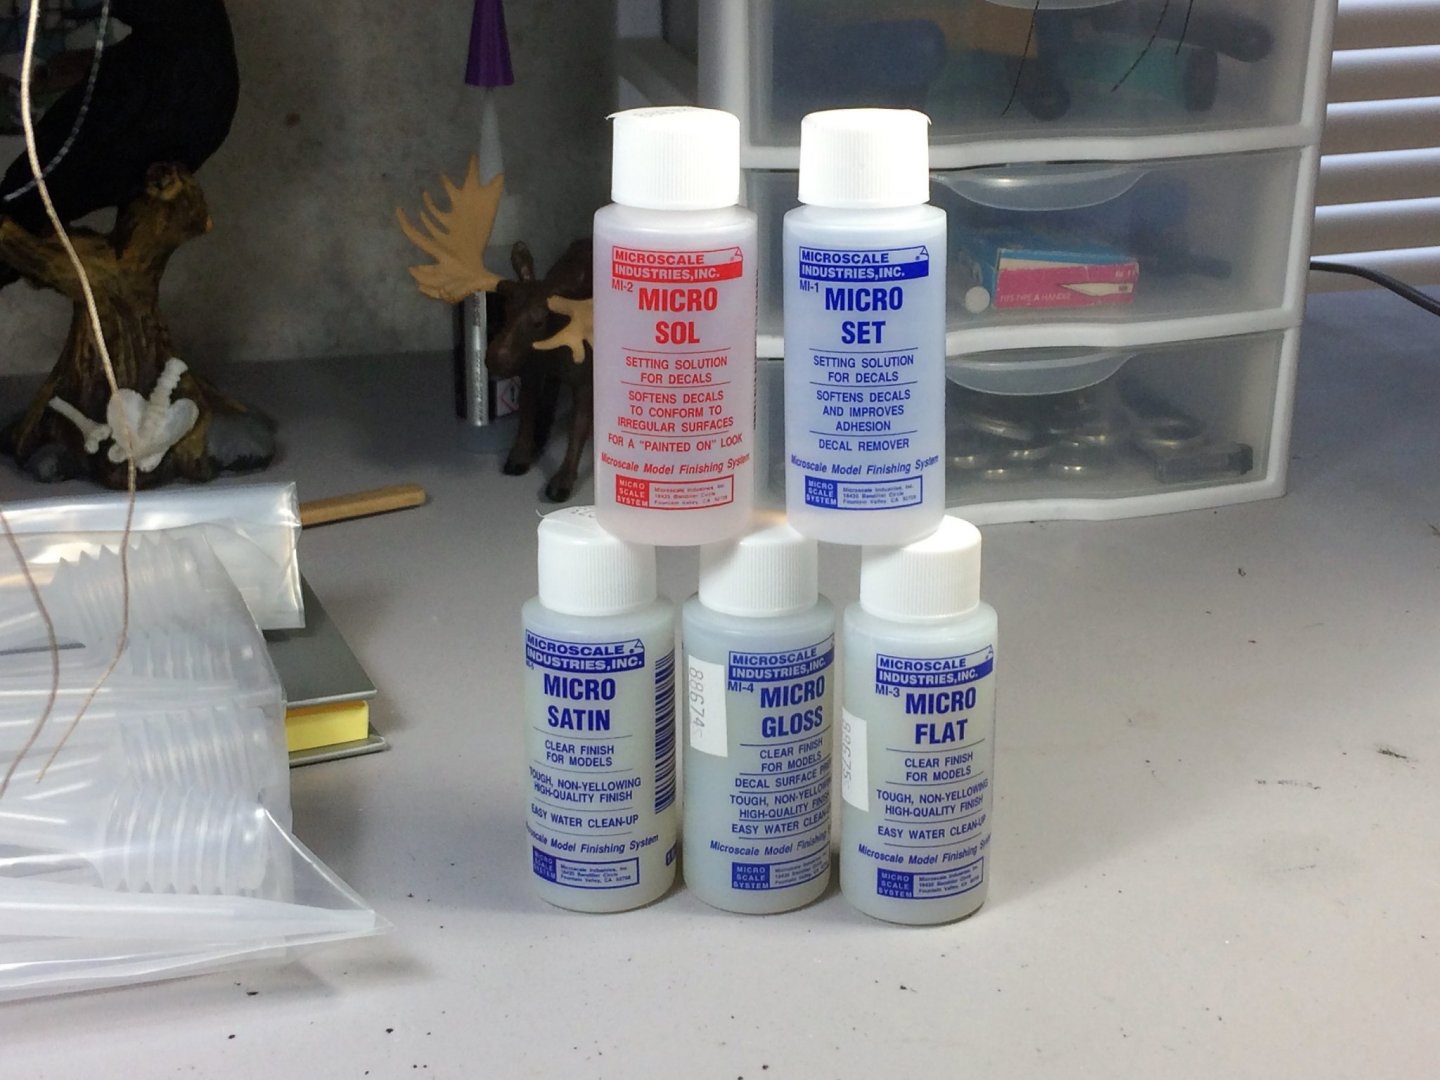

-
MRAP ATV by CDW - FINISHED - Rye Field - 1:35 Scale
Tom E replied to CDW's topic in Non-ship/categorised builds
That's awesome CDW! Should be a fine week. Maybe some weather mid week, but that's a ways off. Little bit of Florida tonight. Hot and steamy. Well hot and steamy for this pale New Englander! Where are you going to visit? I hear Hampton Beach area is somewhat open. Limited capacity I imagine. But I'm pretty sure the restaurants should be open with outdoor dining. June is a fine month for fried clams, lobster and some chowdah outside by the beach. Up north, things seem to be a bit more relaxed. Tom E -
MRAP ATV by CDW - FINISHED - Rye Field - 1:35 Scale
Tom E replied to CDW's topic in Non-ship/categorised builds
Jack, I can attest to scalehobbyist.com Never had one problem. Great selection. I window shop on the website whenever I can at work! I almost exclusively use them, almost. I do use Micromark, Syren, etc.... There in my state, so my money stays in state. Amazon has enough money, they don't need mine. Tom E -
B-25J Mitchell by Tom E - Revell - 1:48 Scale - PLASTIC
Tom E replied to Tom E's topic in Non-ship/categorised builds
Pledge? The furniture spray? Tom E -
B-25J Mitchell by Tom E - Revell - 1:48 Scale - PLASTIC
Tom E replied to Tom E's topic in Non-ship/categorised builds
Thanks Jack, I agree, sounds like the way to go. I'll set up an order shortly. Egilman, you mention the gloss overcoat as the medium. Is that the gloss coat from Micro set or a different brand? Tom E -
B-25J Mitchell by Tom E - Revell - 1:48 Scale - PLASTIC
Tom E replied to Tom E's topic in Non-ship/categorised builds
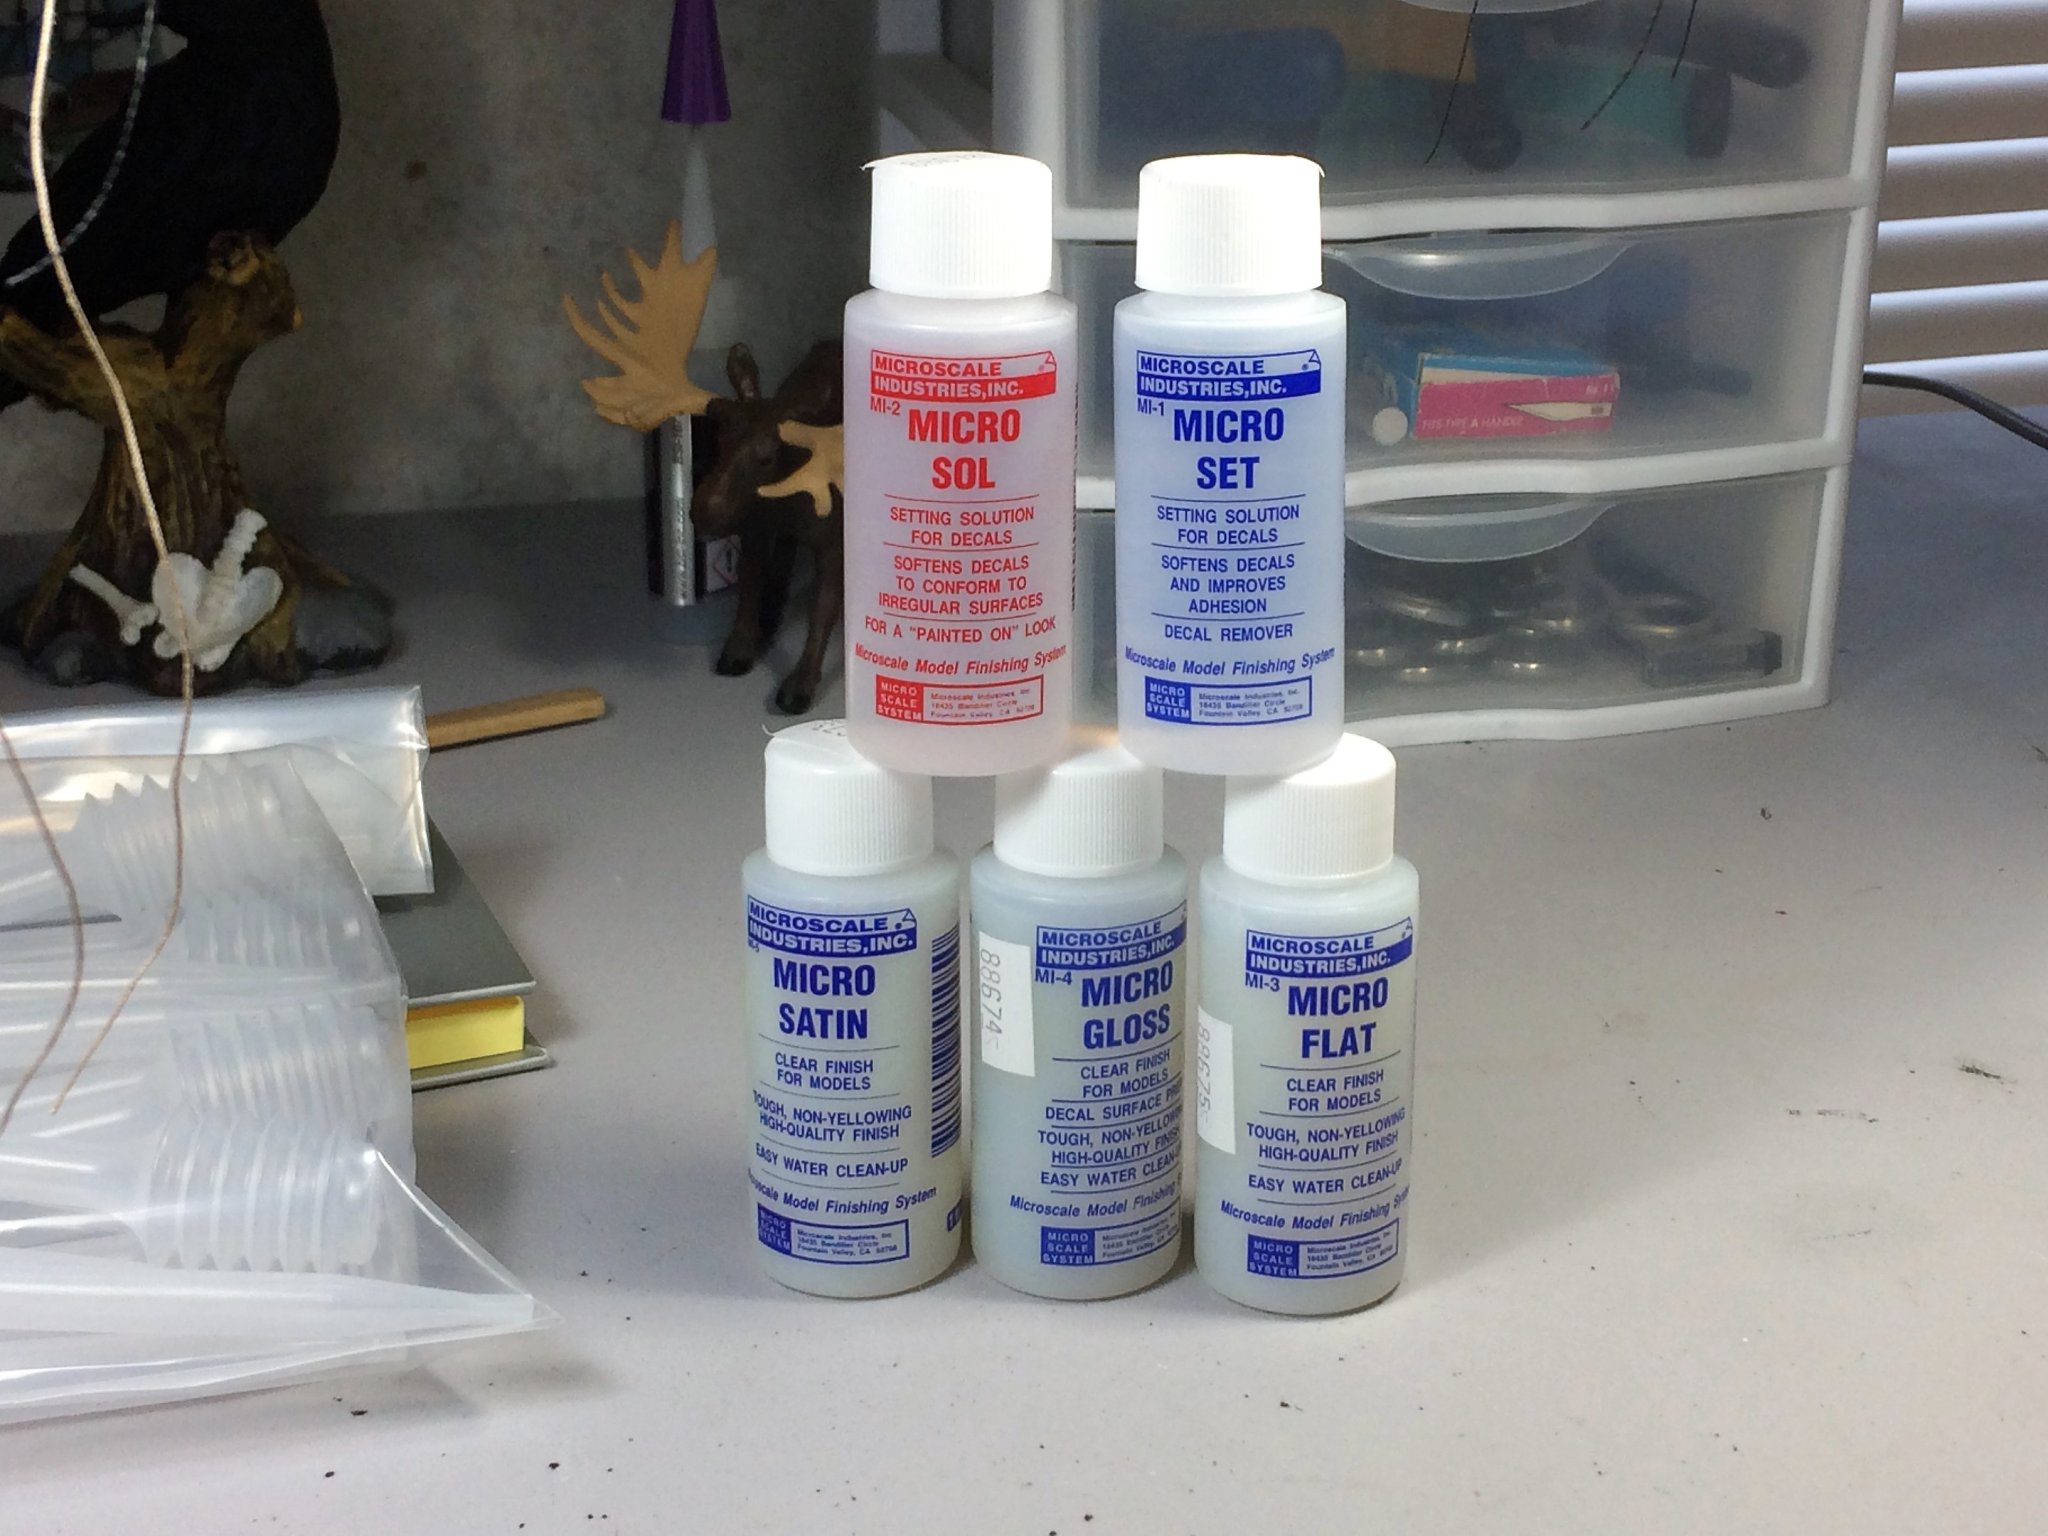
I have neither products. Honestly, never used them before. Last time I built a plastic model, nothing like it was being produced yet. Matter of fact, PE wasn't available last time I built a plastic model! But they do pique my interest. And I am at a point where I can start putting decals on the props and other areas. I have seen the Micro solutions online and do seem to be the "industry standard" for these types of solutions. May be time to take the leap and invest. Are they pretty straight forward to use? Tom E -
B-25J Mitchell by Tom E - Revell - 1:48 Scale - PLASTIC
Tom E replied to Tom E's topic in Non-ship/categorised builds
In person, The decals look brand new. Sure hope that helps. If I remember from when I was a kid, decals can be pretty finicky. Tom E -
B-25J Mitchell by Tom E - Revell - 1:48 Scale - PLASTIC
Tom E replied to Tom E's topic in Non-ship/categorised builds
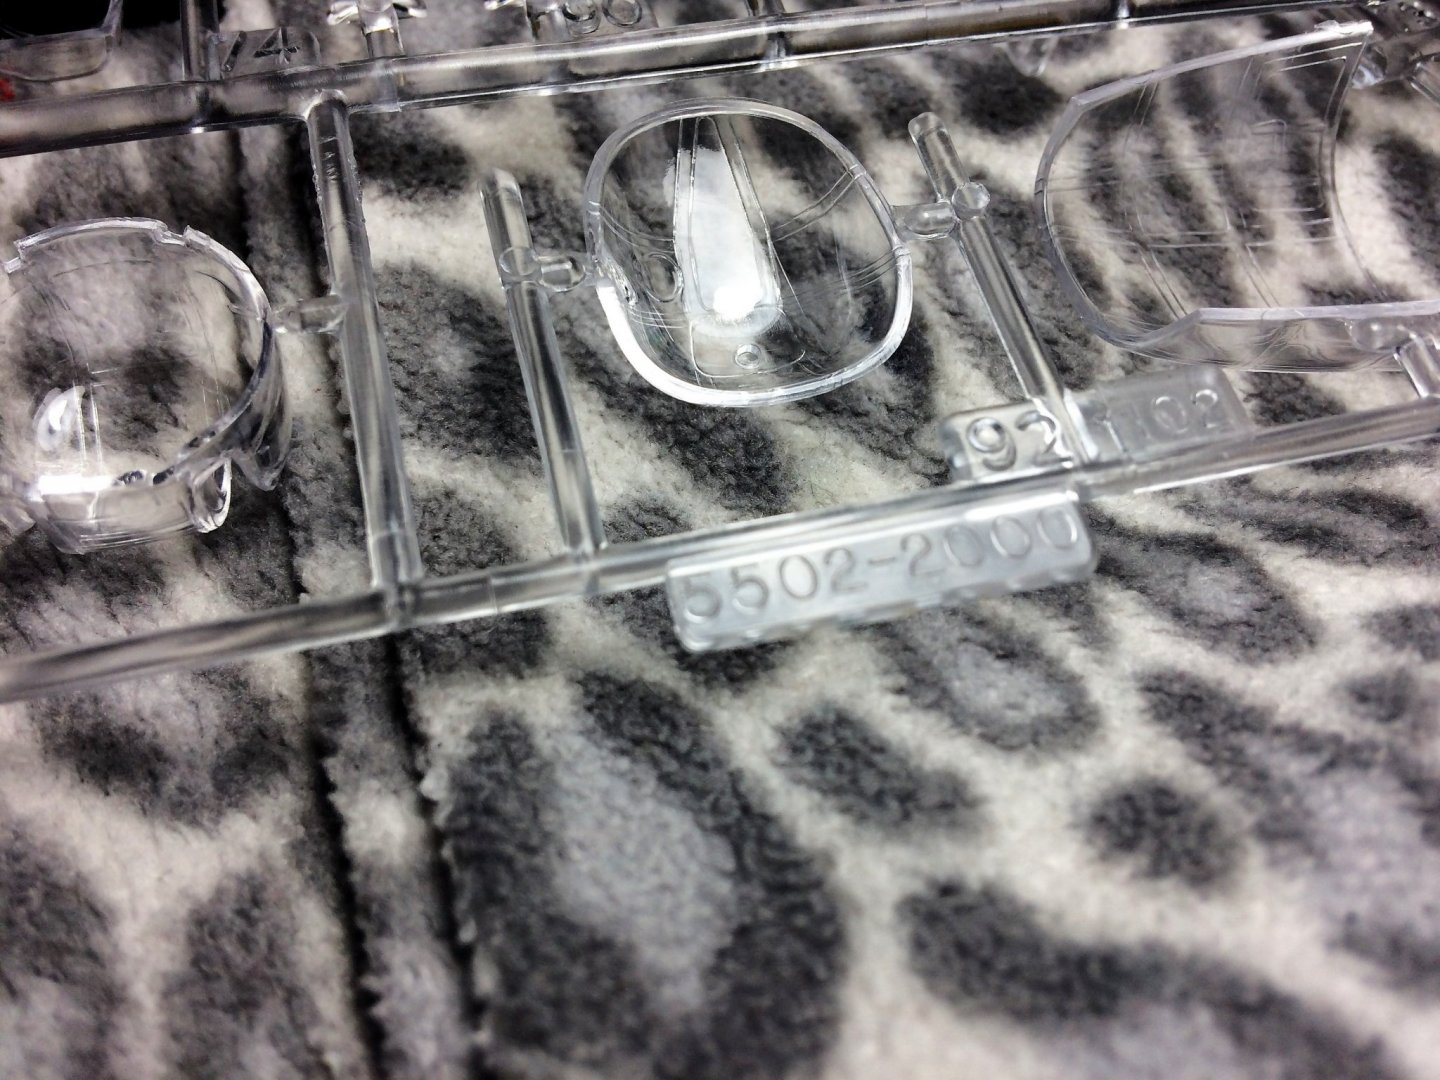
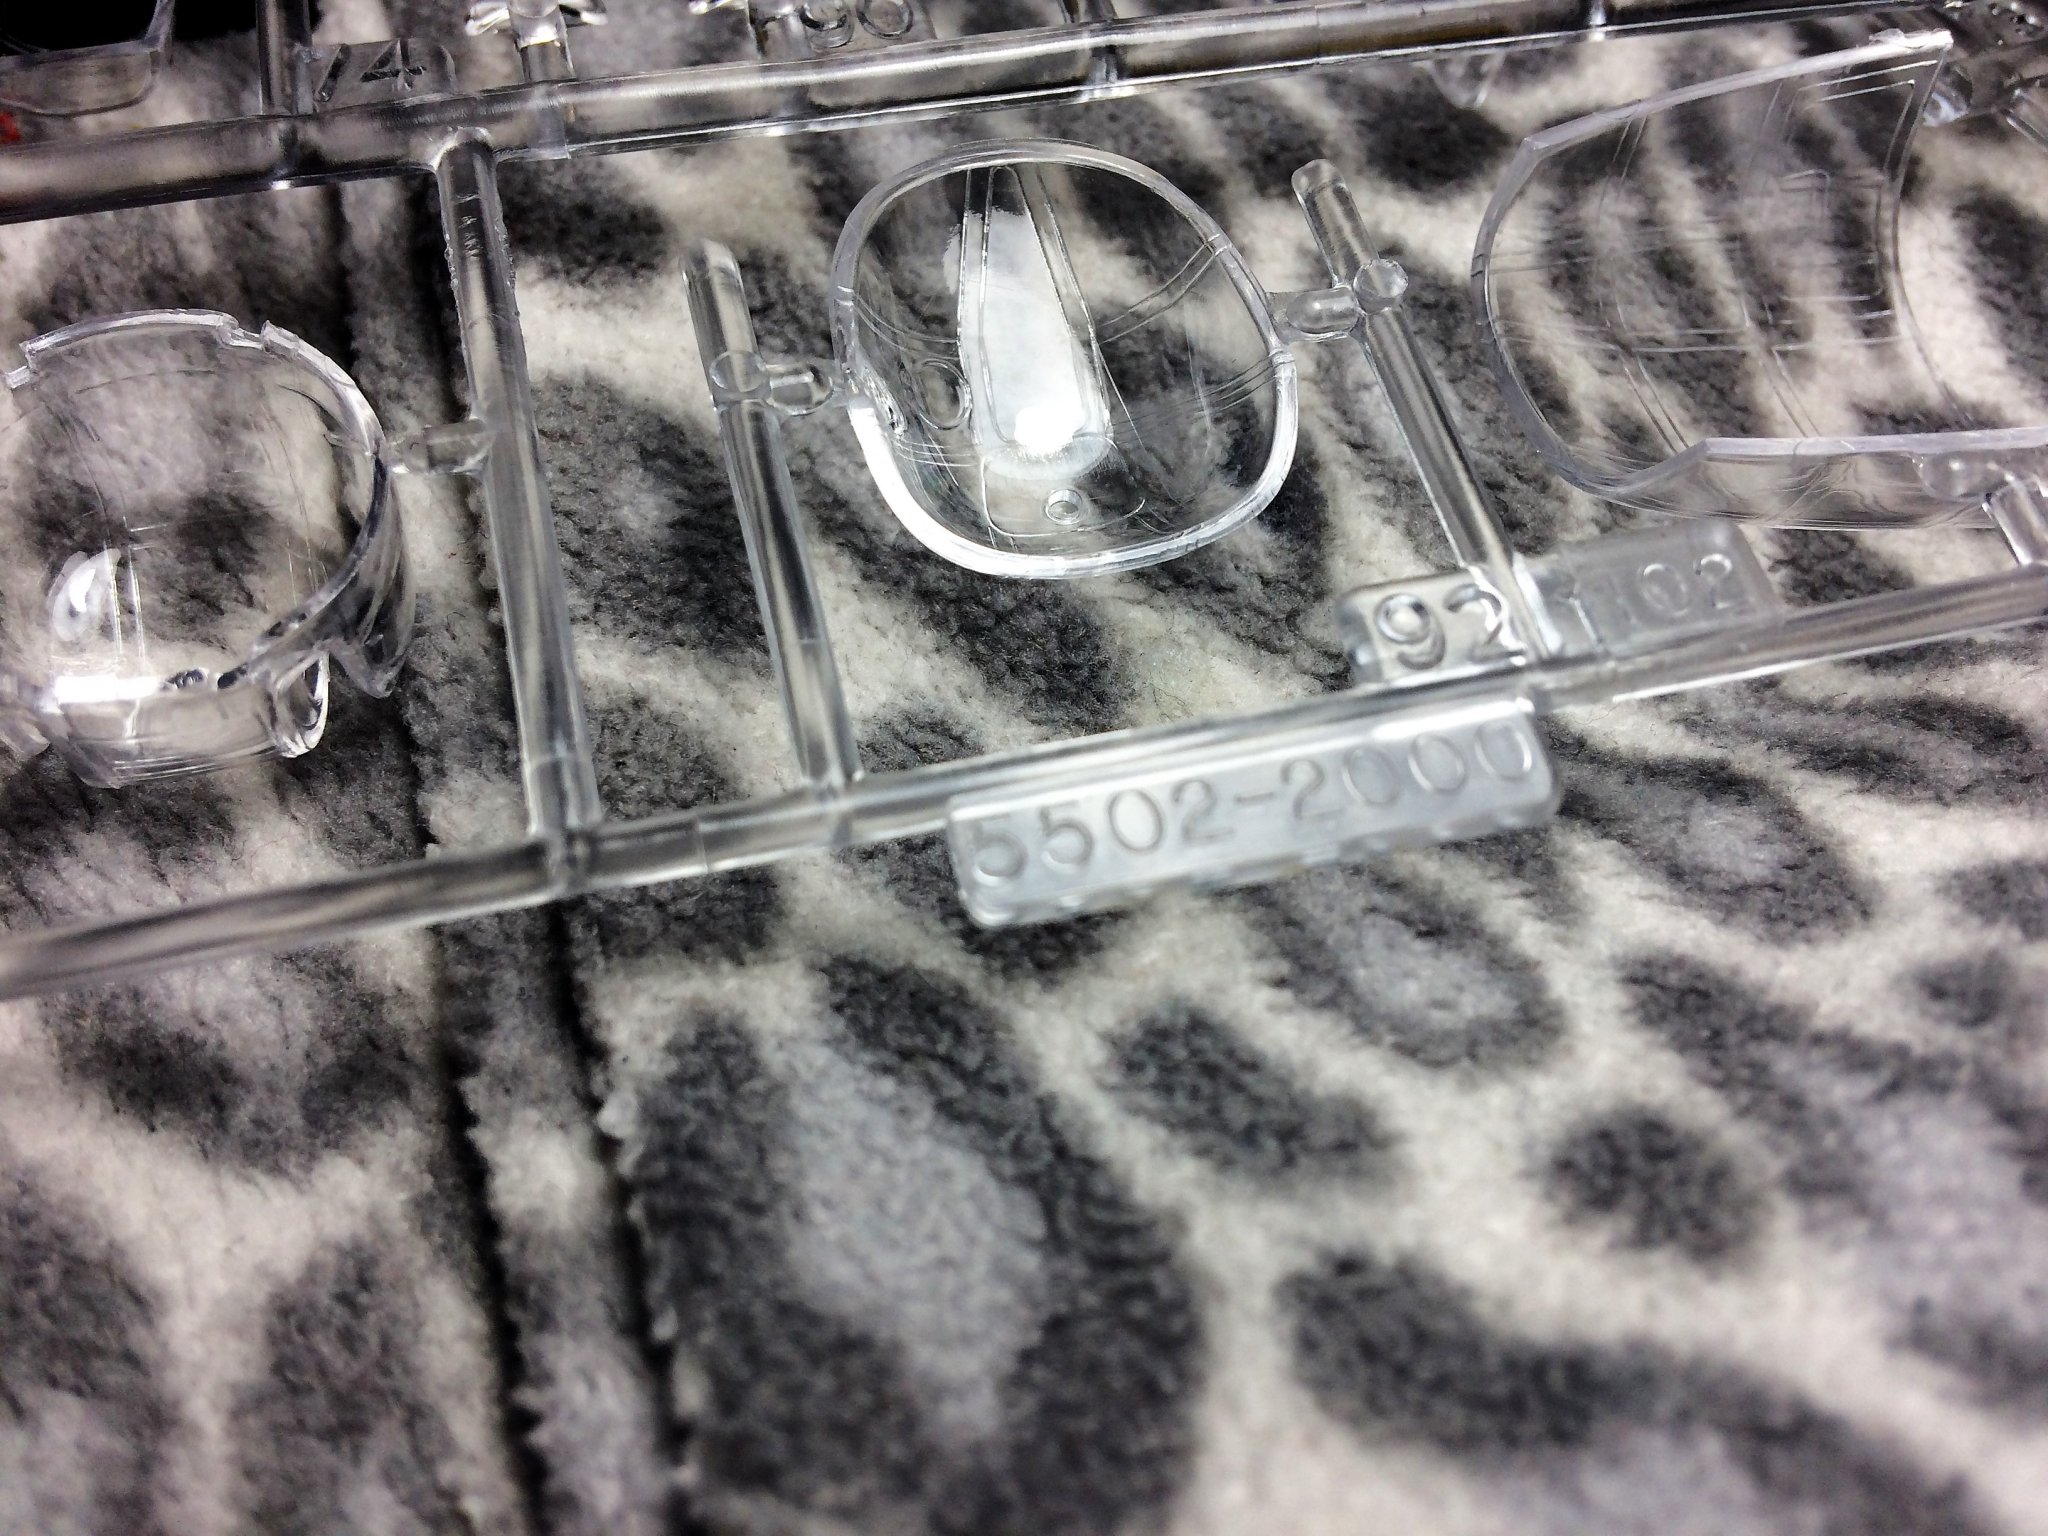
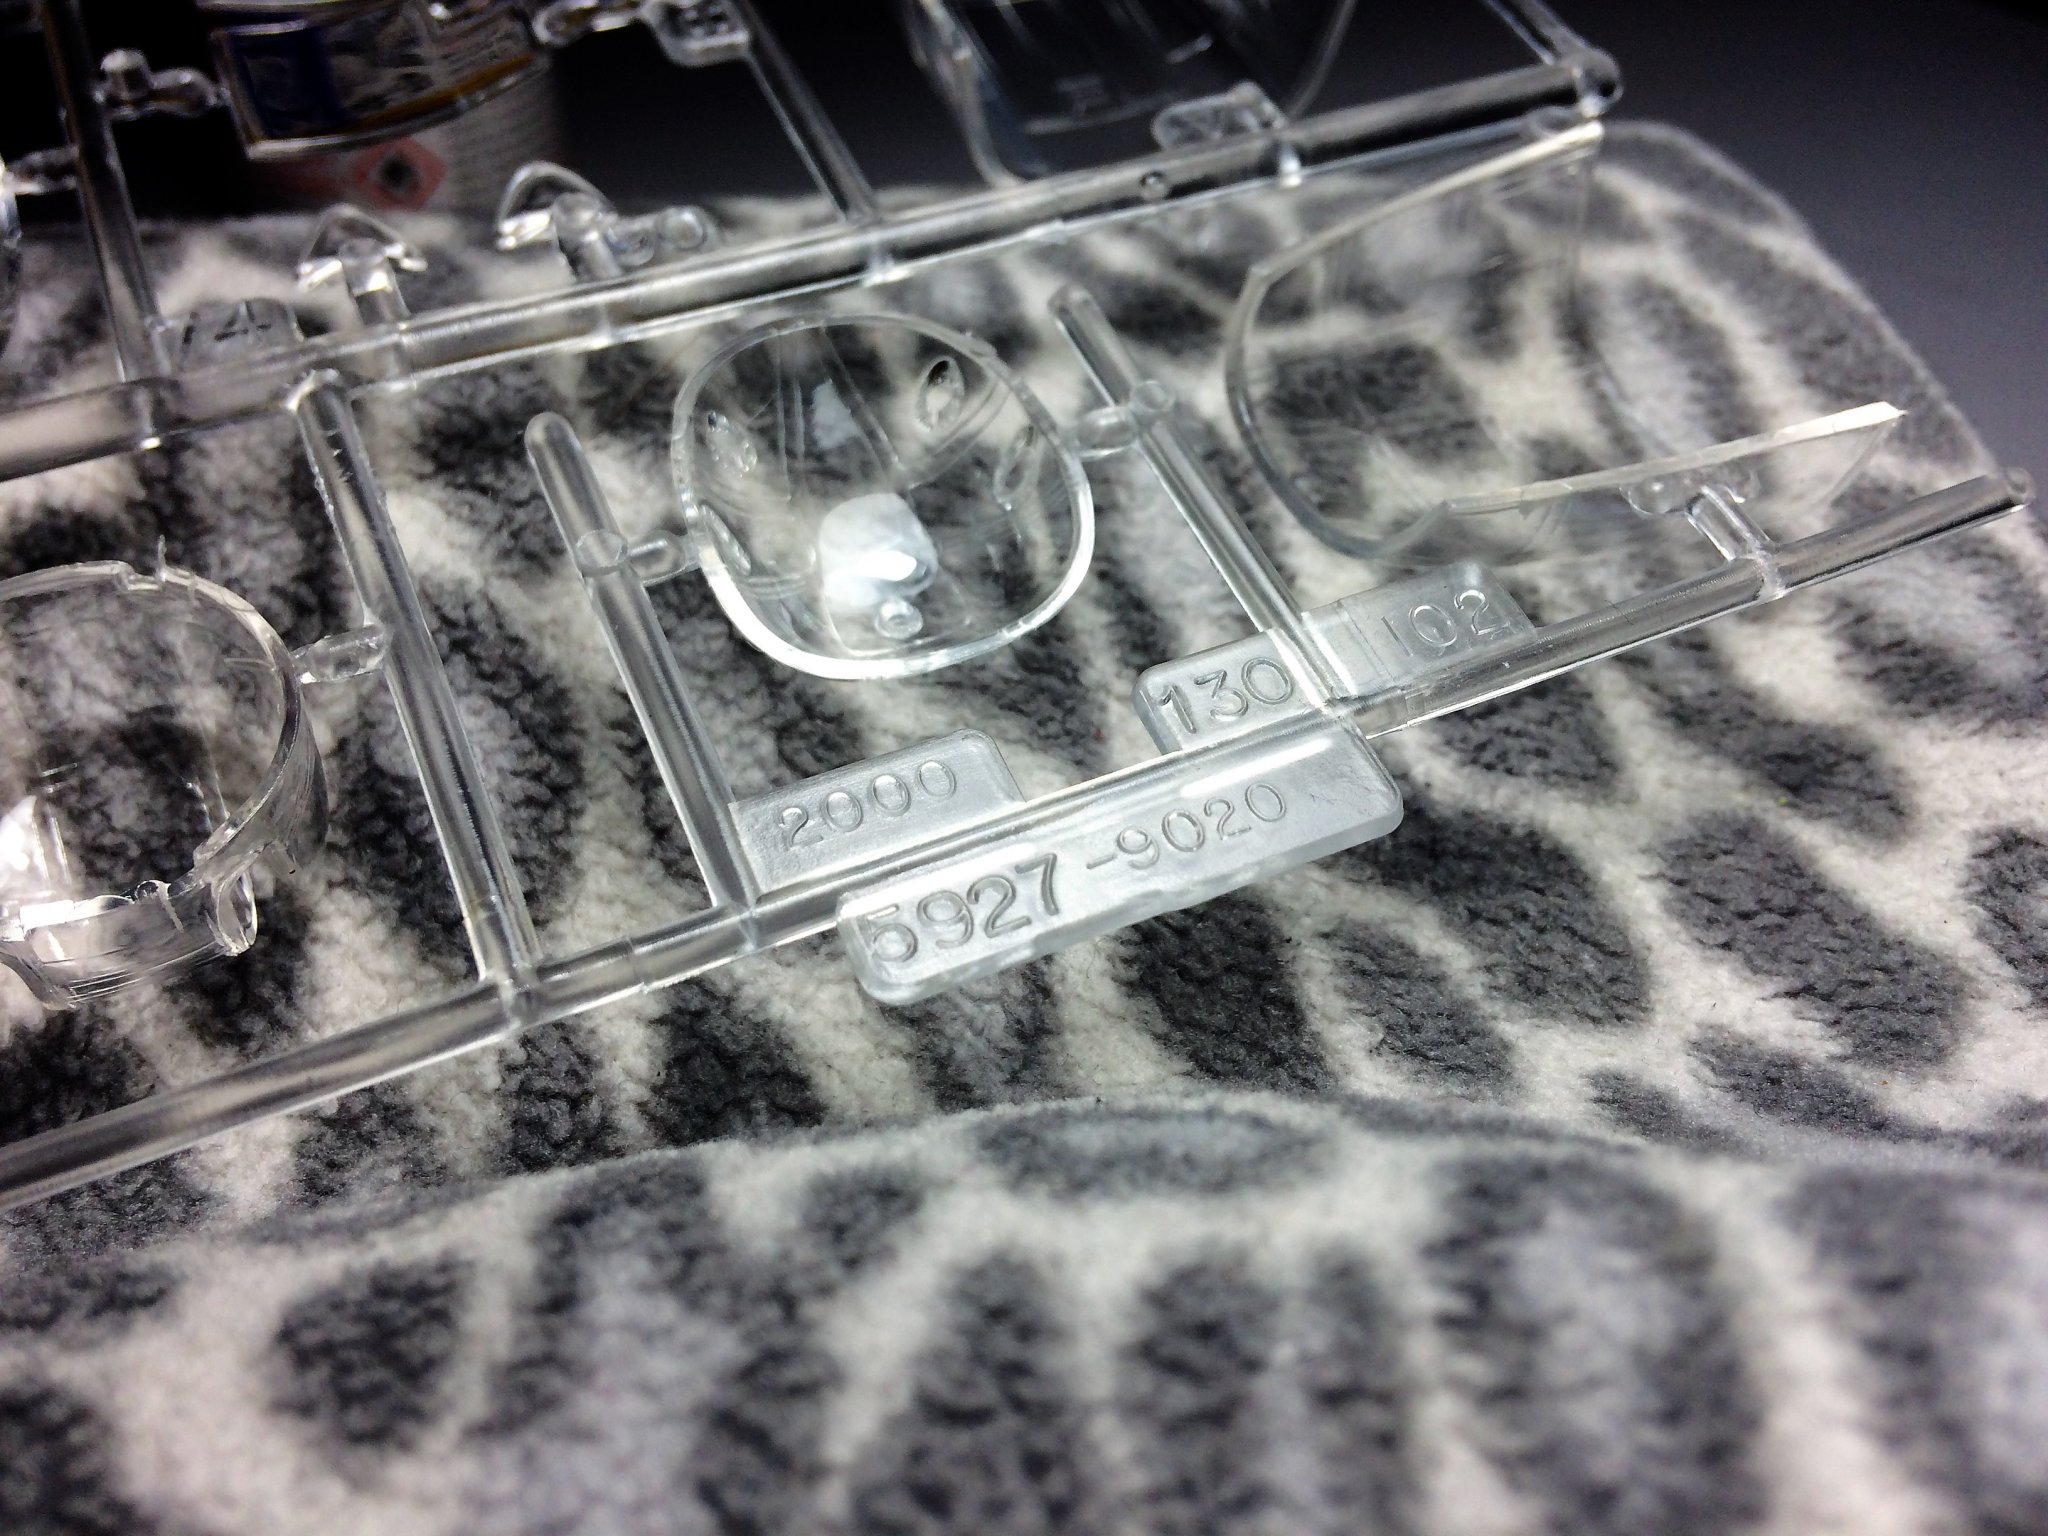
OC, Egilman, Your right about the feeling of accomplishment. I languish on a section or part, move to the next section, so on and so forth. When it finally starts to come together from a pile of painted pieces, it's a great feeling. Denis, Belle is looking awesome! Cant wait to see what you can do with the Mitchell! I looked at my kit about the decals and clear sprues. Initially, I thought I had two sheets of decals, but one turned out to be a wax paper like cover. I assume to protect the decals in some way. You must have had the FNG on the packing line the day your kit was put together. On the decal sheet I see a "1999". Is that a patent date, production date? Is this kit old enough to drink alcohol? But I do have two sets of identical clear sprues. They all have the same pieces except for one difference. One of your sprues should have a piece labeled #92. That's used for the Finito Benito version. Part #130 is for the Jaunty Jo version. That's the one I'm going with. All the other pieces should be the same. Seems excessive to give two complete sprues with one difference. That's not cost effective. Tom E