Tom E
-
Posts
469 -
Joined
-
Last visited
Content Type
Profiles
Forums
Gallery
Events
Everything posted by Tom E
-

B-25J Mitchell by Tom E - Revell - 1:48 Scale - PLASTIC
Tom E replied to Tom E's topic in Non-ship/categorised builds
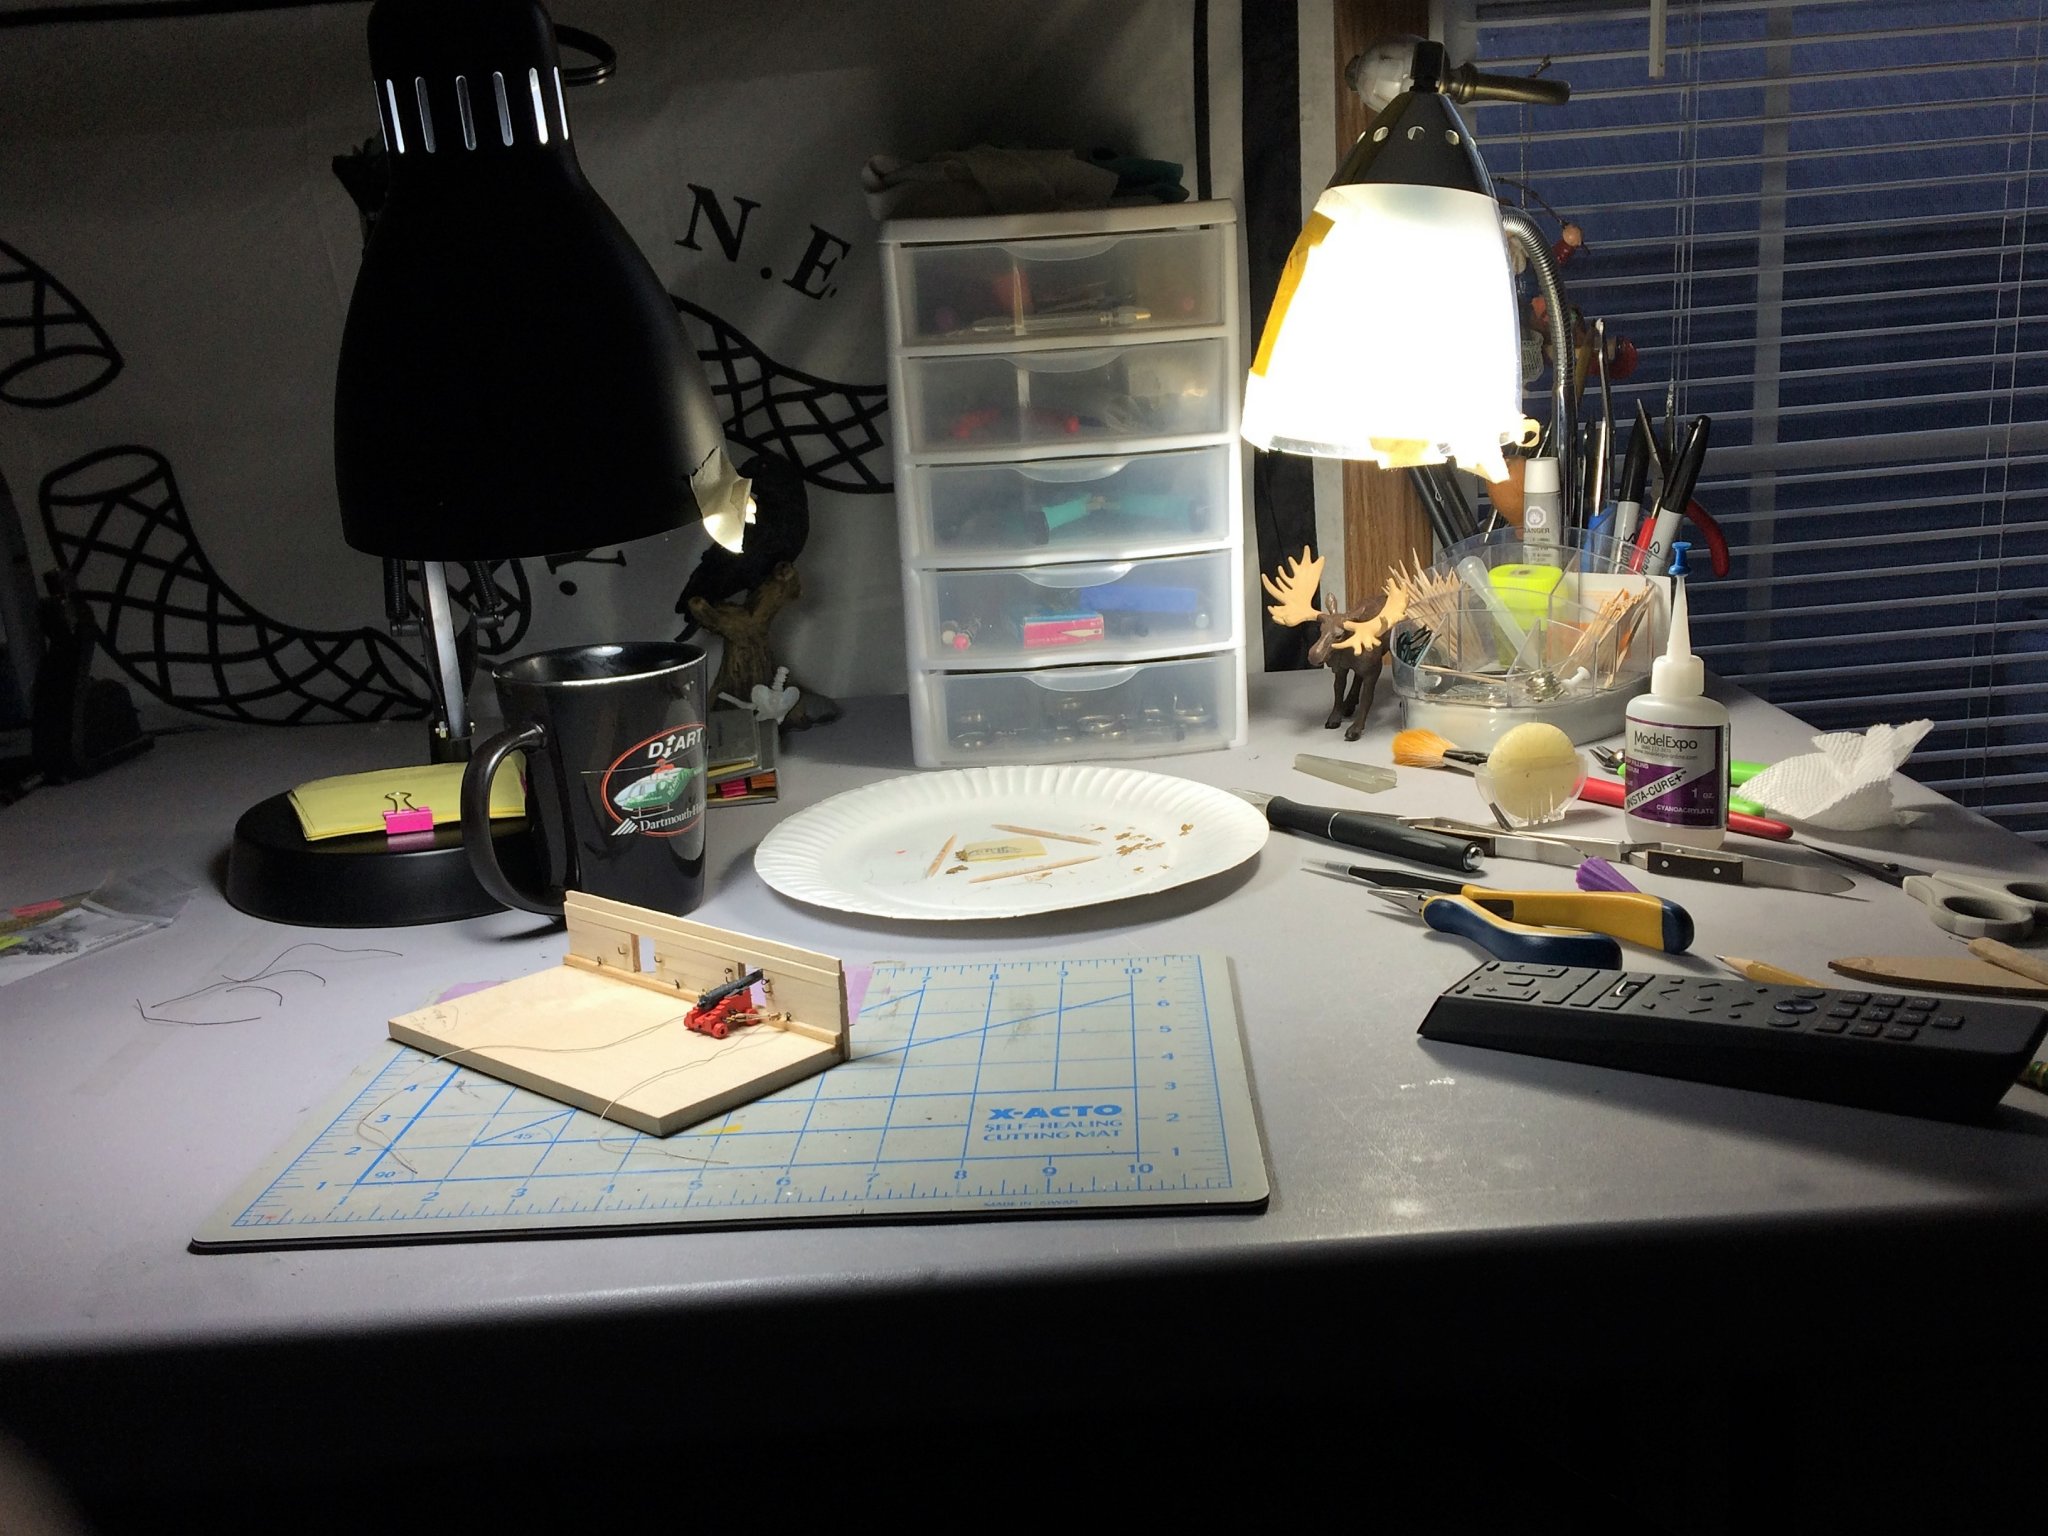
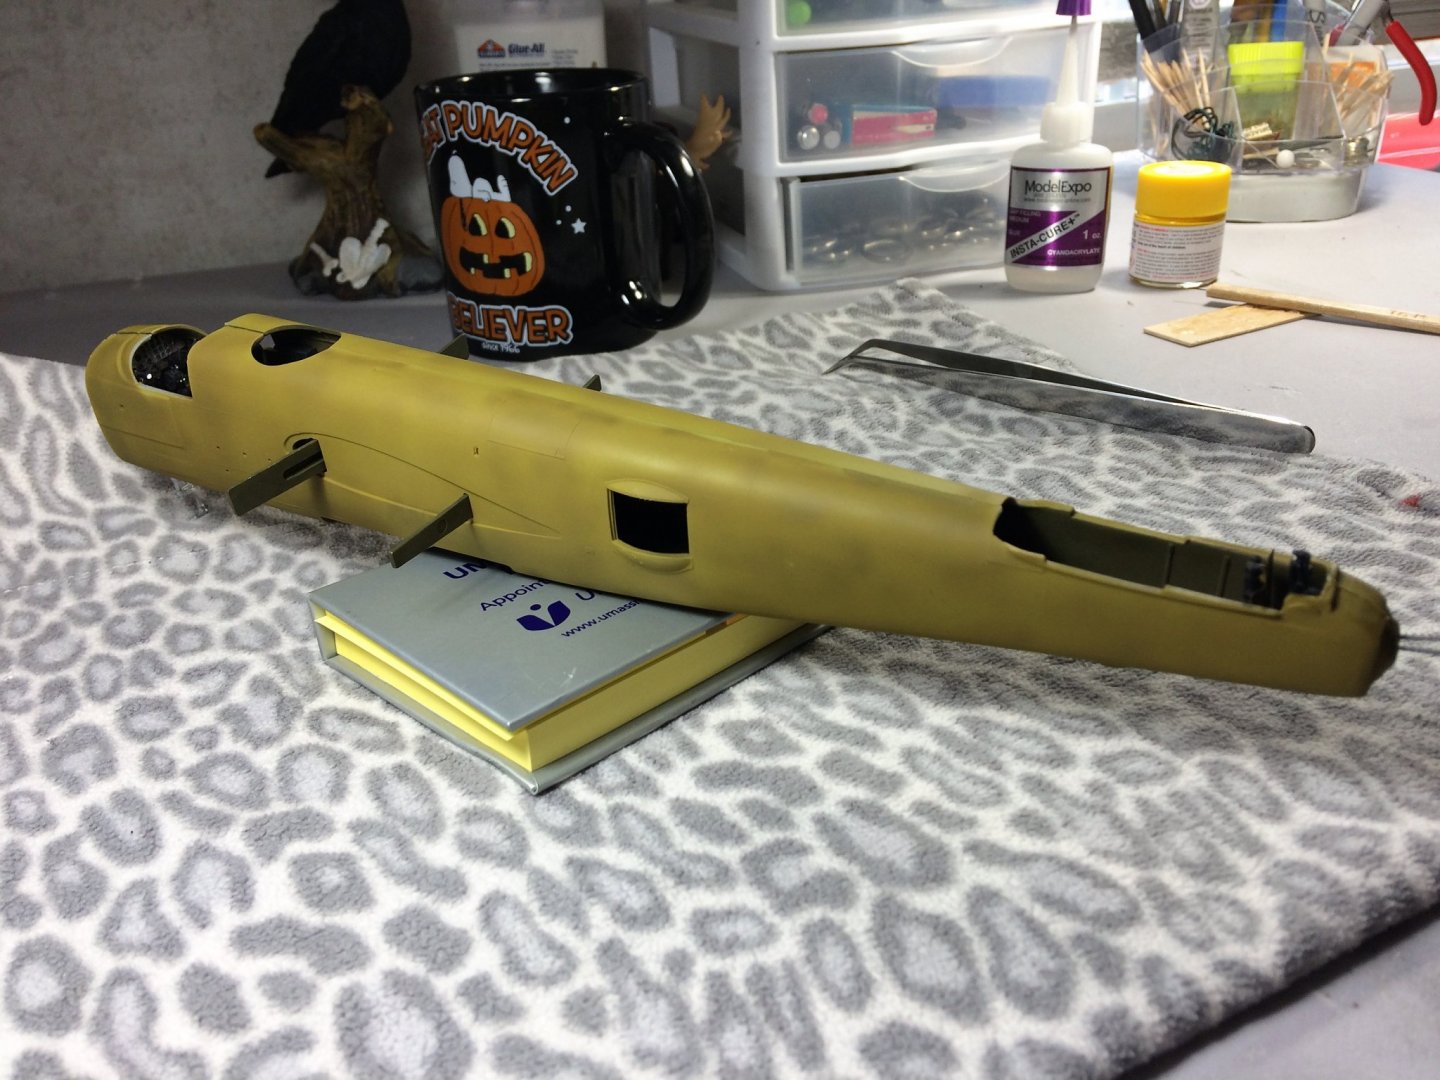
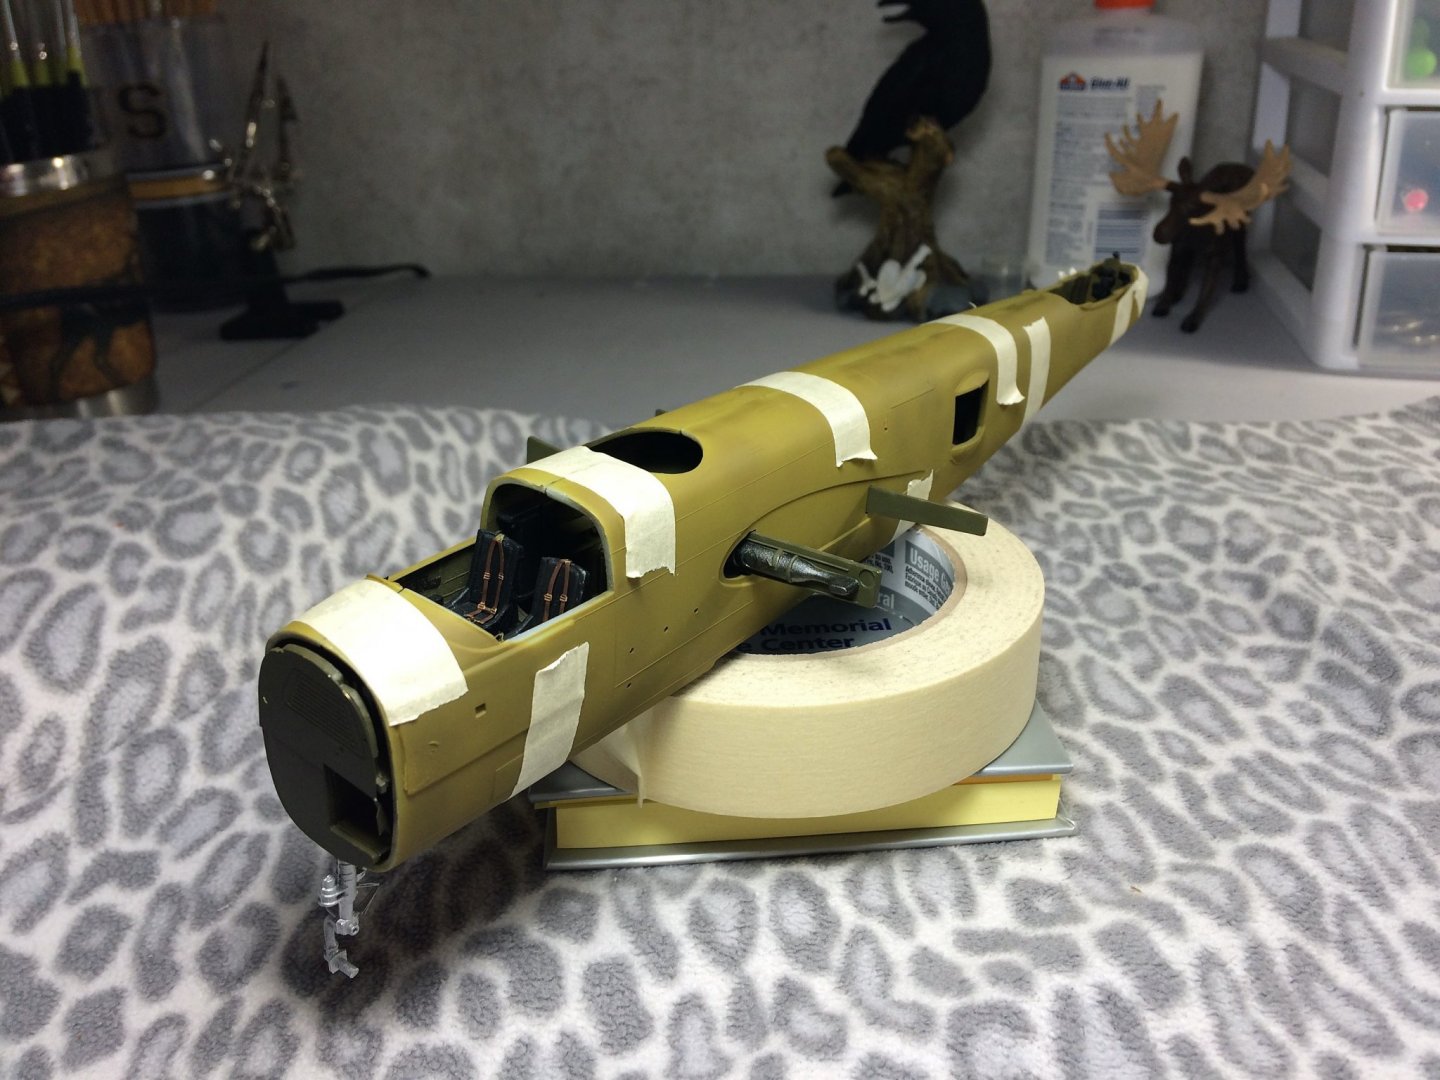
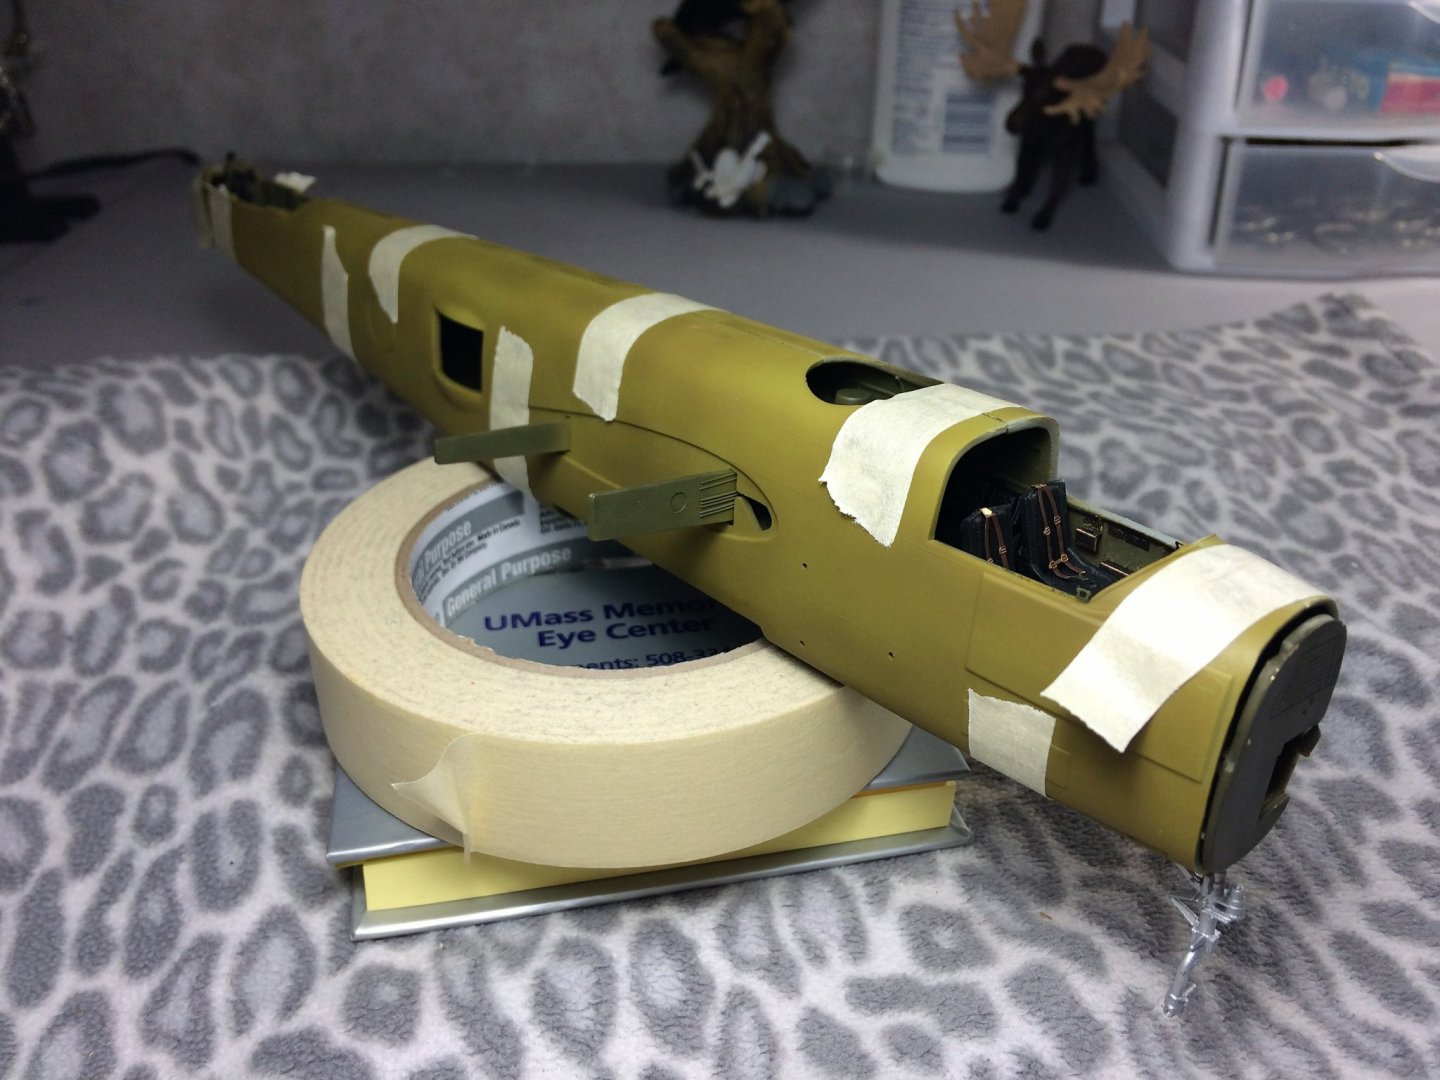
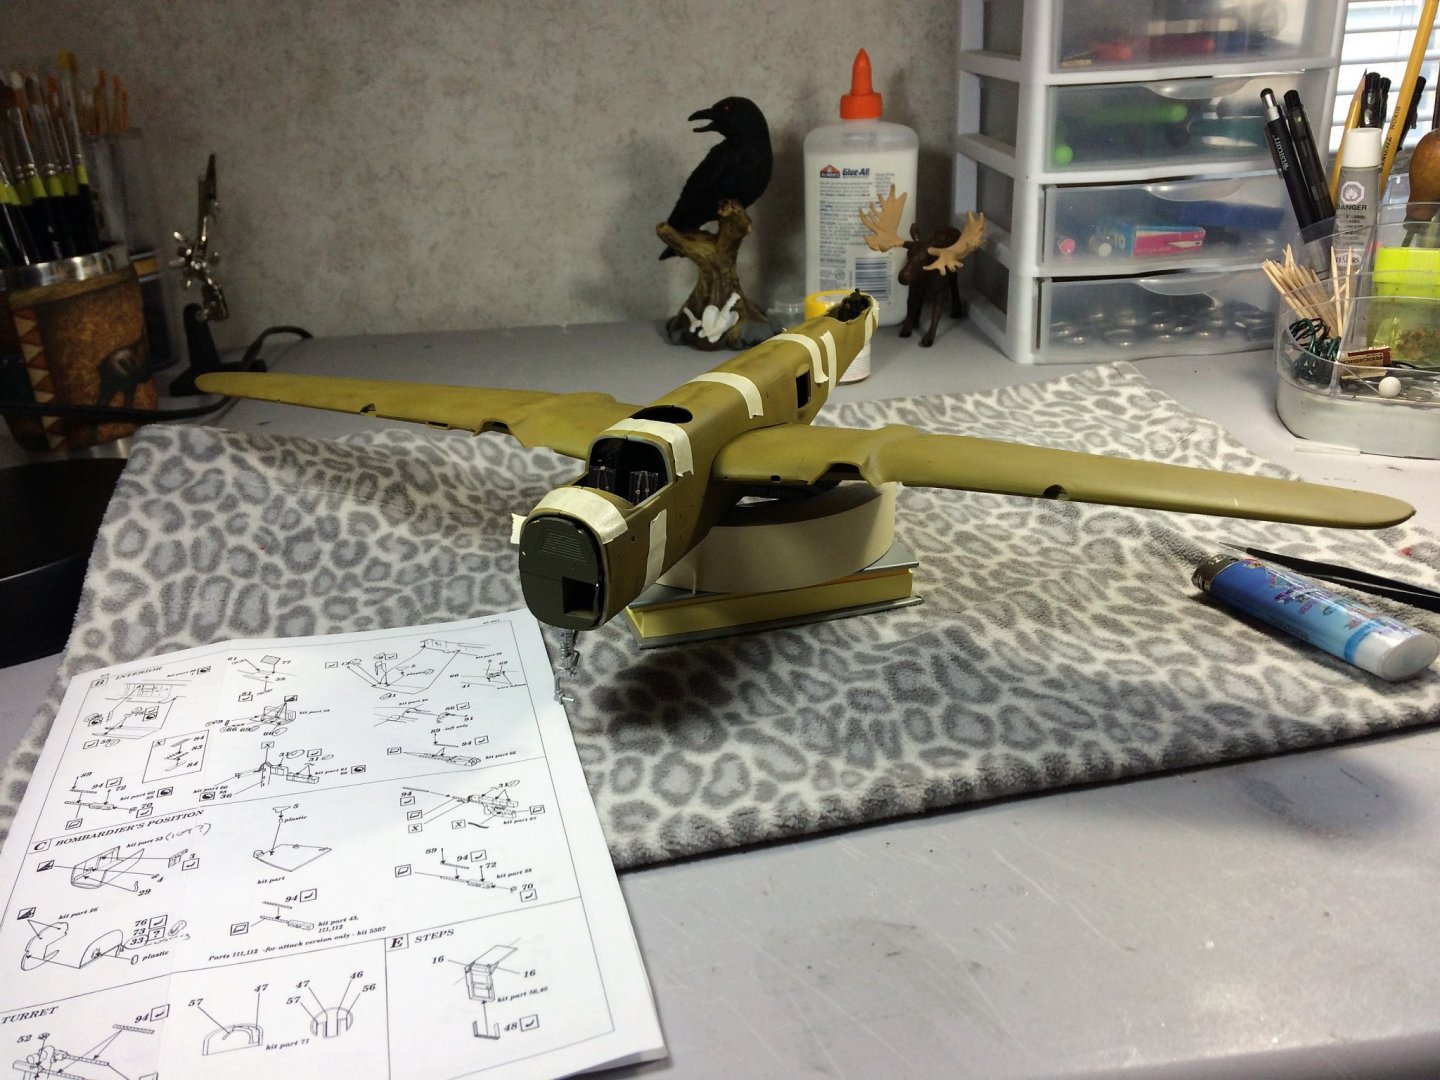
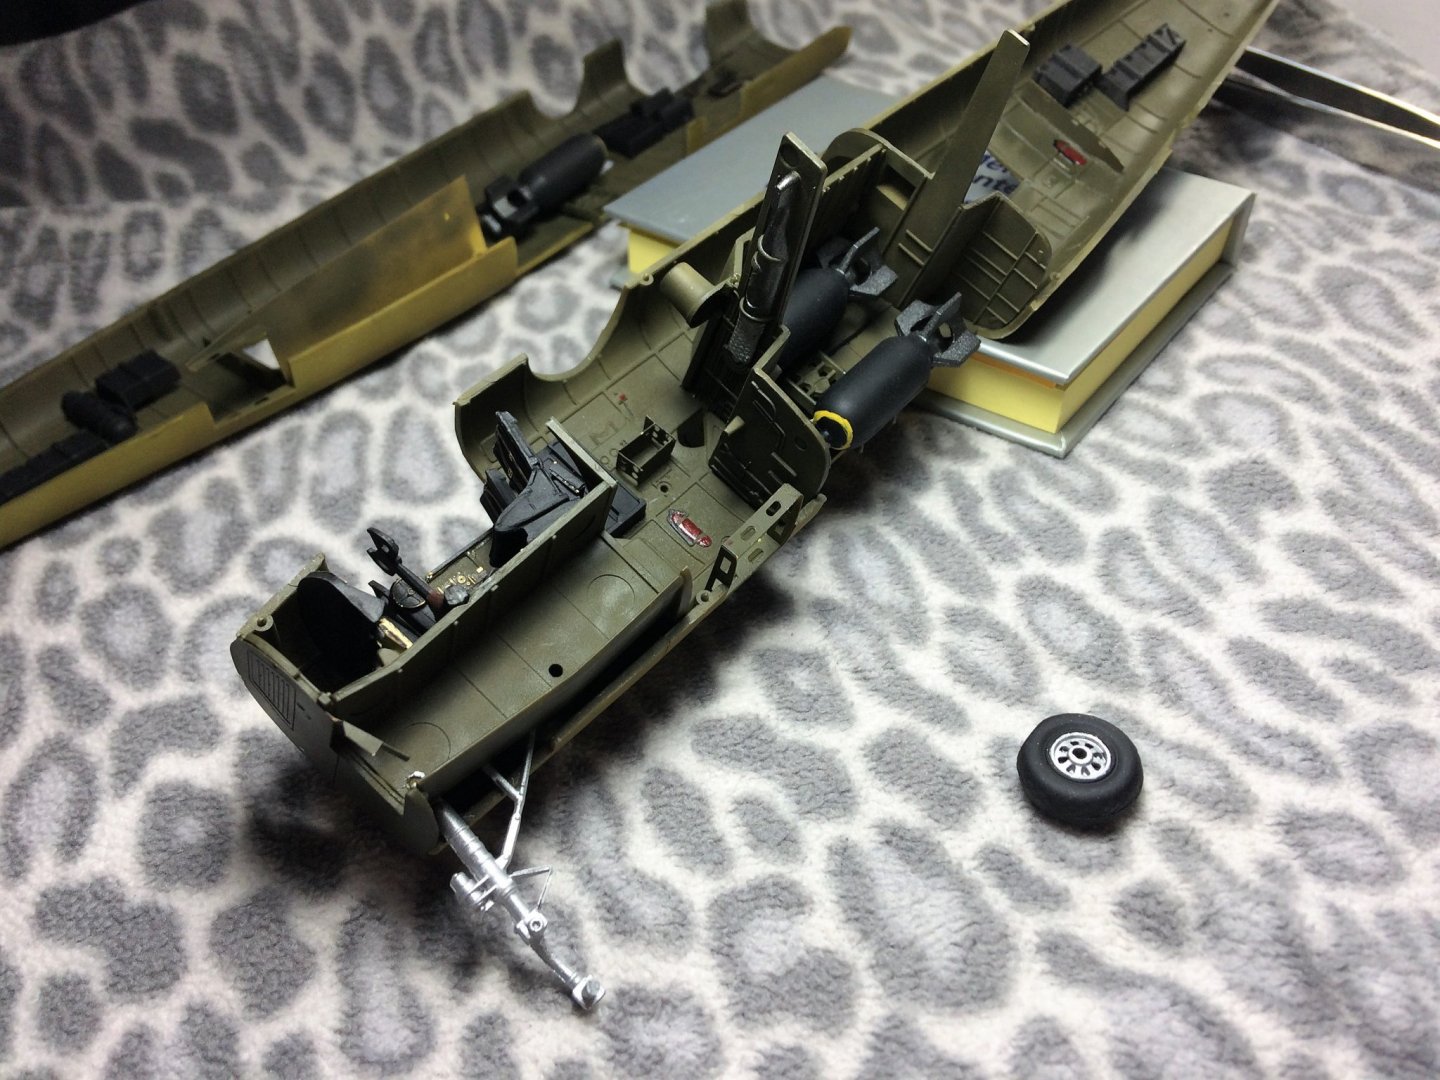
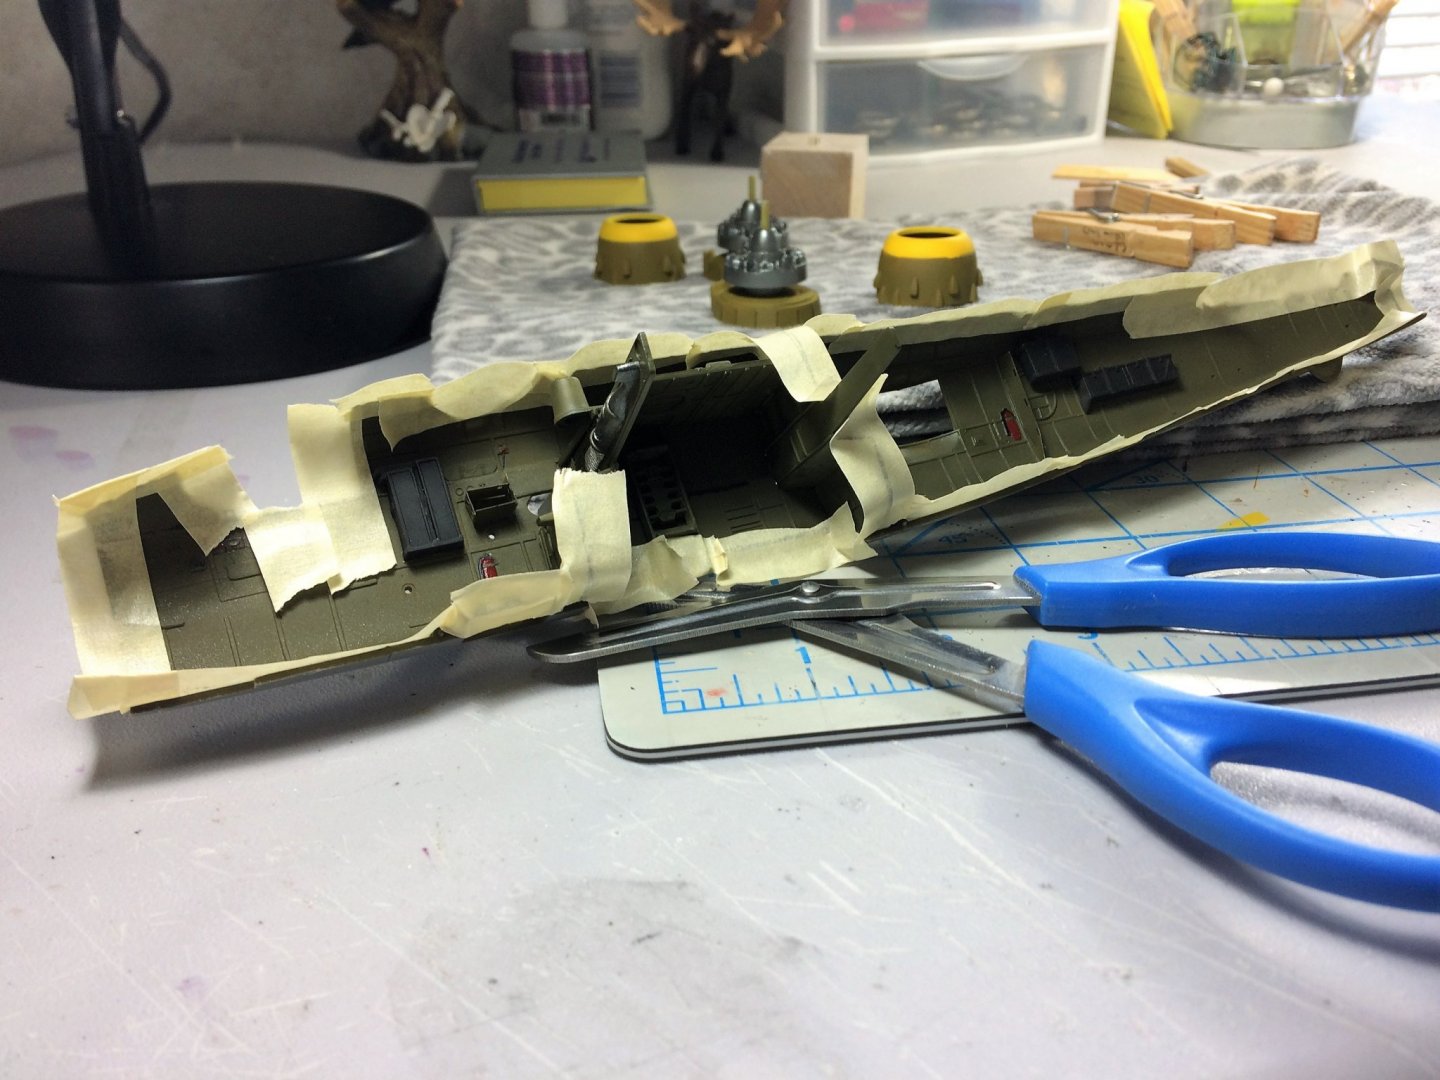
Evening, Hope everyone is well. Thanks for all the likes and suggestions! I'm humbled by all the suggestions. Never in my little head would I have thought of half of those. That's the best part of MSW!!!!!! Thanks fellas! As towards the weight issue, I could see that being an issue. As a kid, I remember the plane models where always so weirdly weighted. The nose would shoot straight up like the pilot missed the landing. I've always had a base in mind for this model. Michaels sells a variety of sizes of bases/blanks, usually basswood, cut horizontally with the bark left on. I used the same base for my James cannon build. I might even take it a step further and paint the base to make it look like an airfield setting of some type. But that's a ways off!!! Lately, I've been feeling pretty good about bringing the fuselage together. The below pic is just a test fit. That seam down the middle is not that big! I can see now why it's better to bring the fuselage together first, then paint. You can clearly see the two halves, I'll try and dull that down with a light coat of the same color once it's together. One last look at the interior. Think I have everything. But the "I think I forgot something" feeling is ever present!!!! Well, there she is. Taped up and drying. The fit was excellent. Even with everything inside needing to mesh together. I put the wings on temporarily just to see how she looks. I'm really enjoying this kit. She's a big bird! The engines will be attached next. I am going to paint a neutral grey on the underneath. That I'll do while it's still unassembled. Check in on your neighbors! Tom E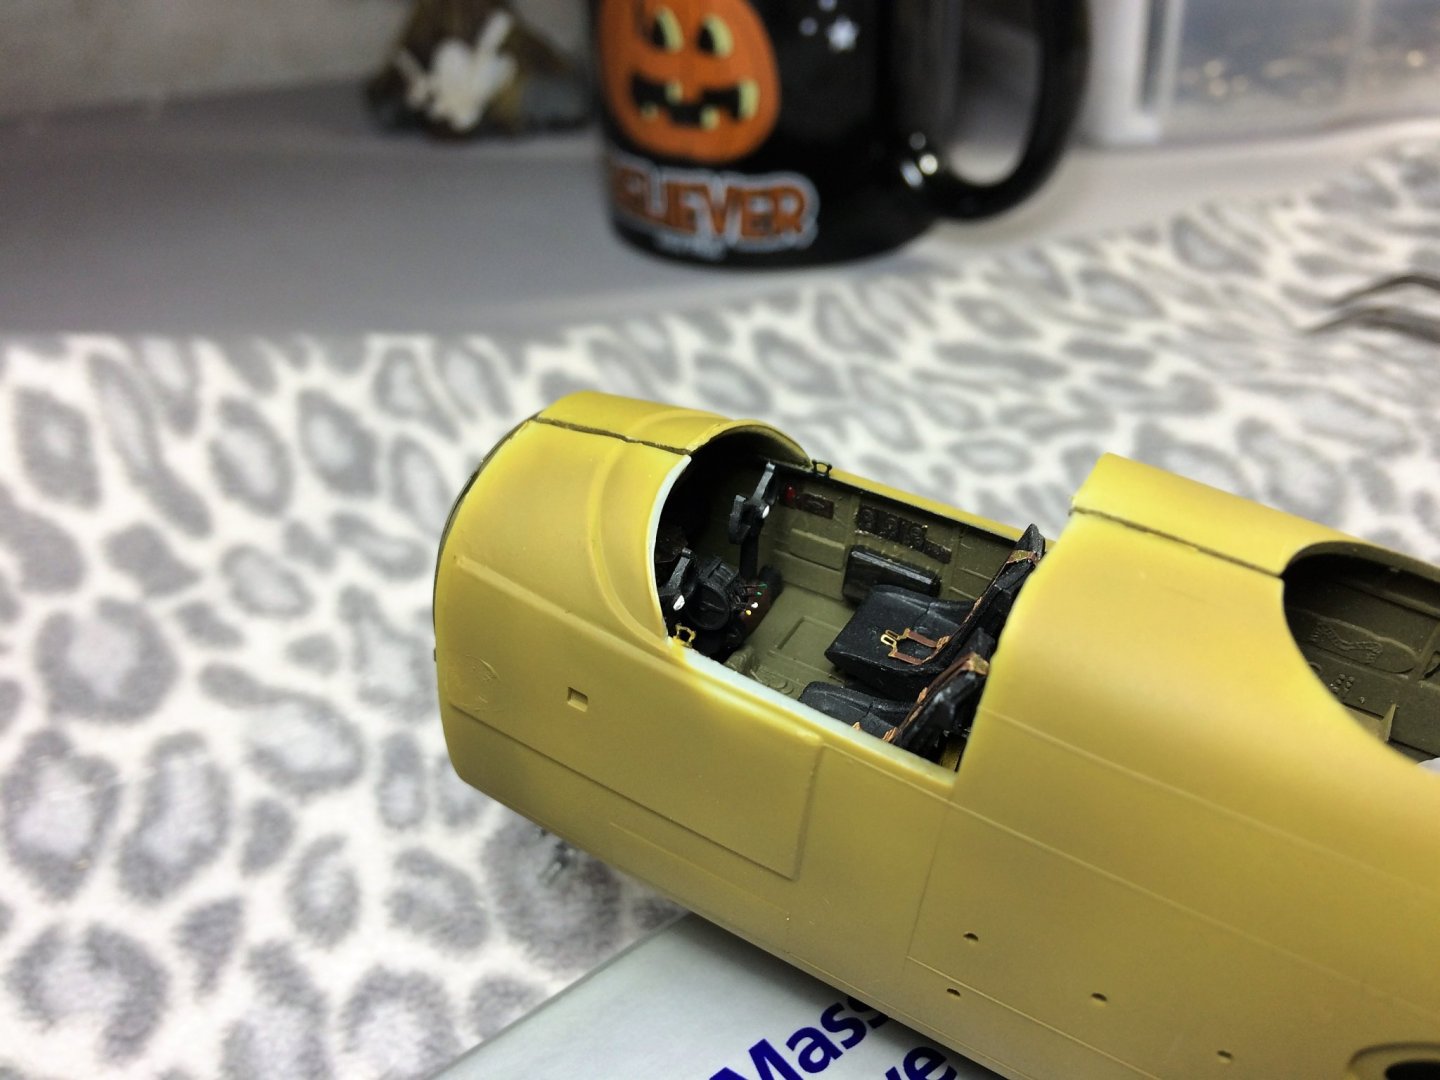


- 120 replies
-
- 11
-

-
B-25J Mitchell by Tom E - Revell - 1:48 Scale - PLASTIC
Tom E replied to Tom E's topic in Non-ship/categorised builds
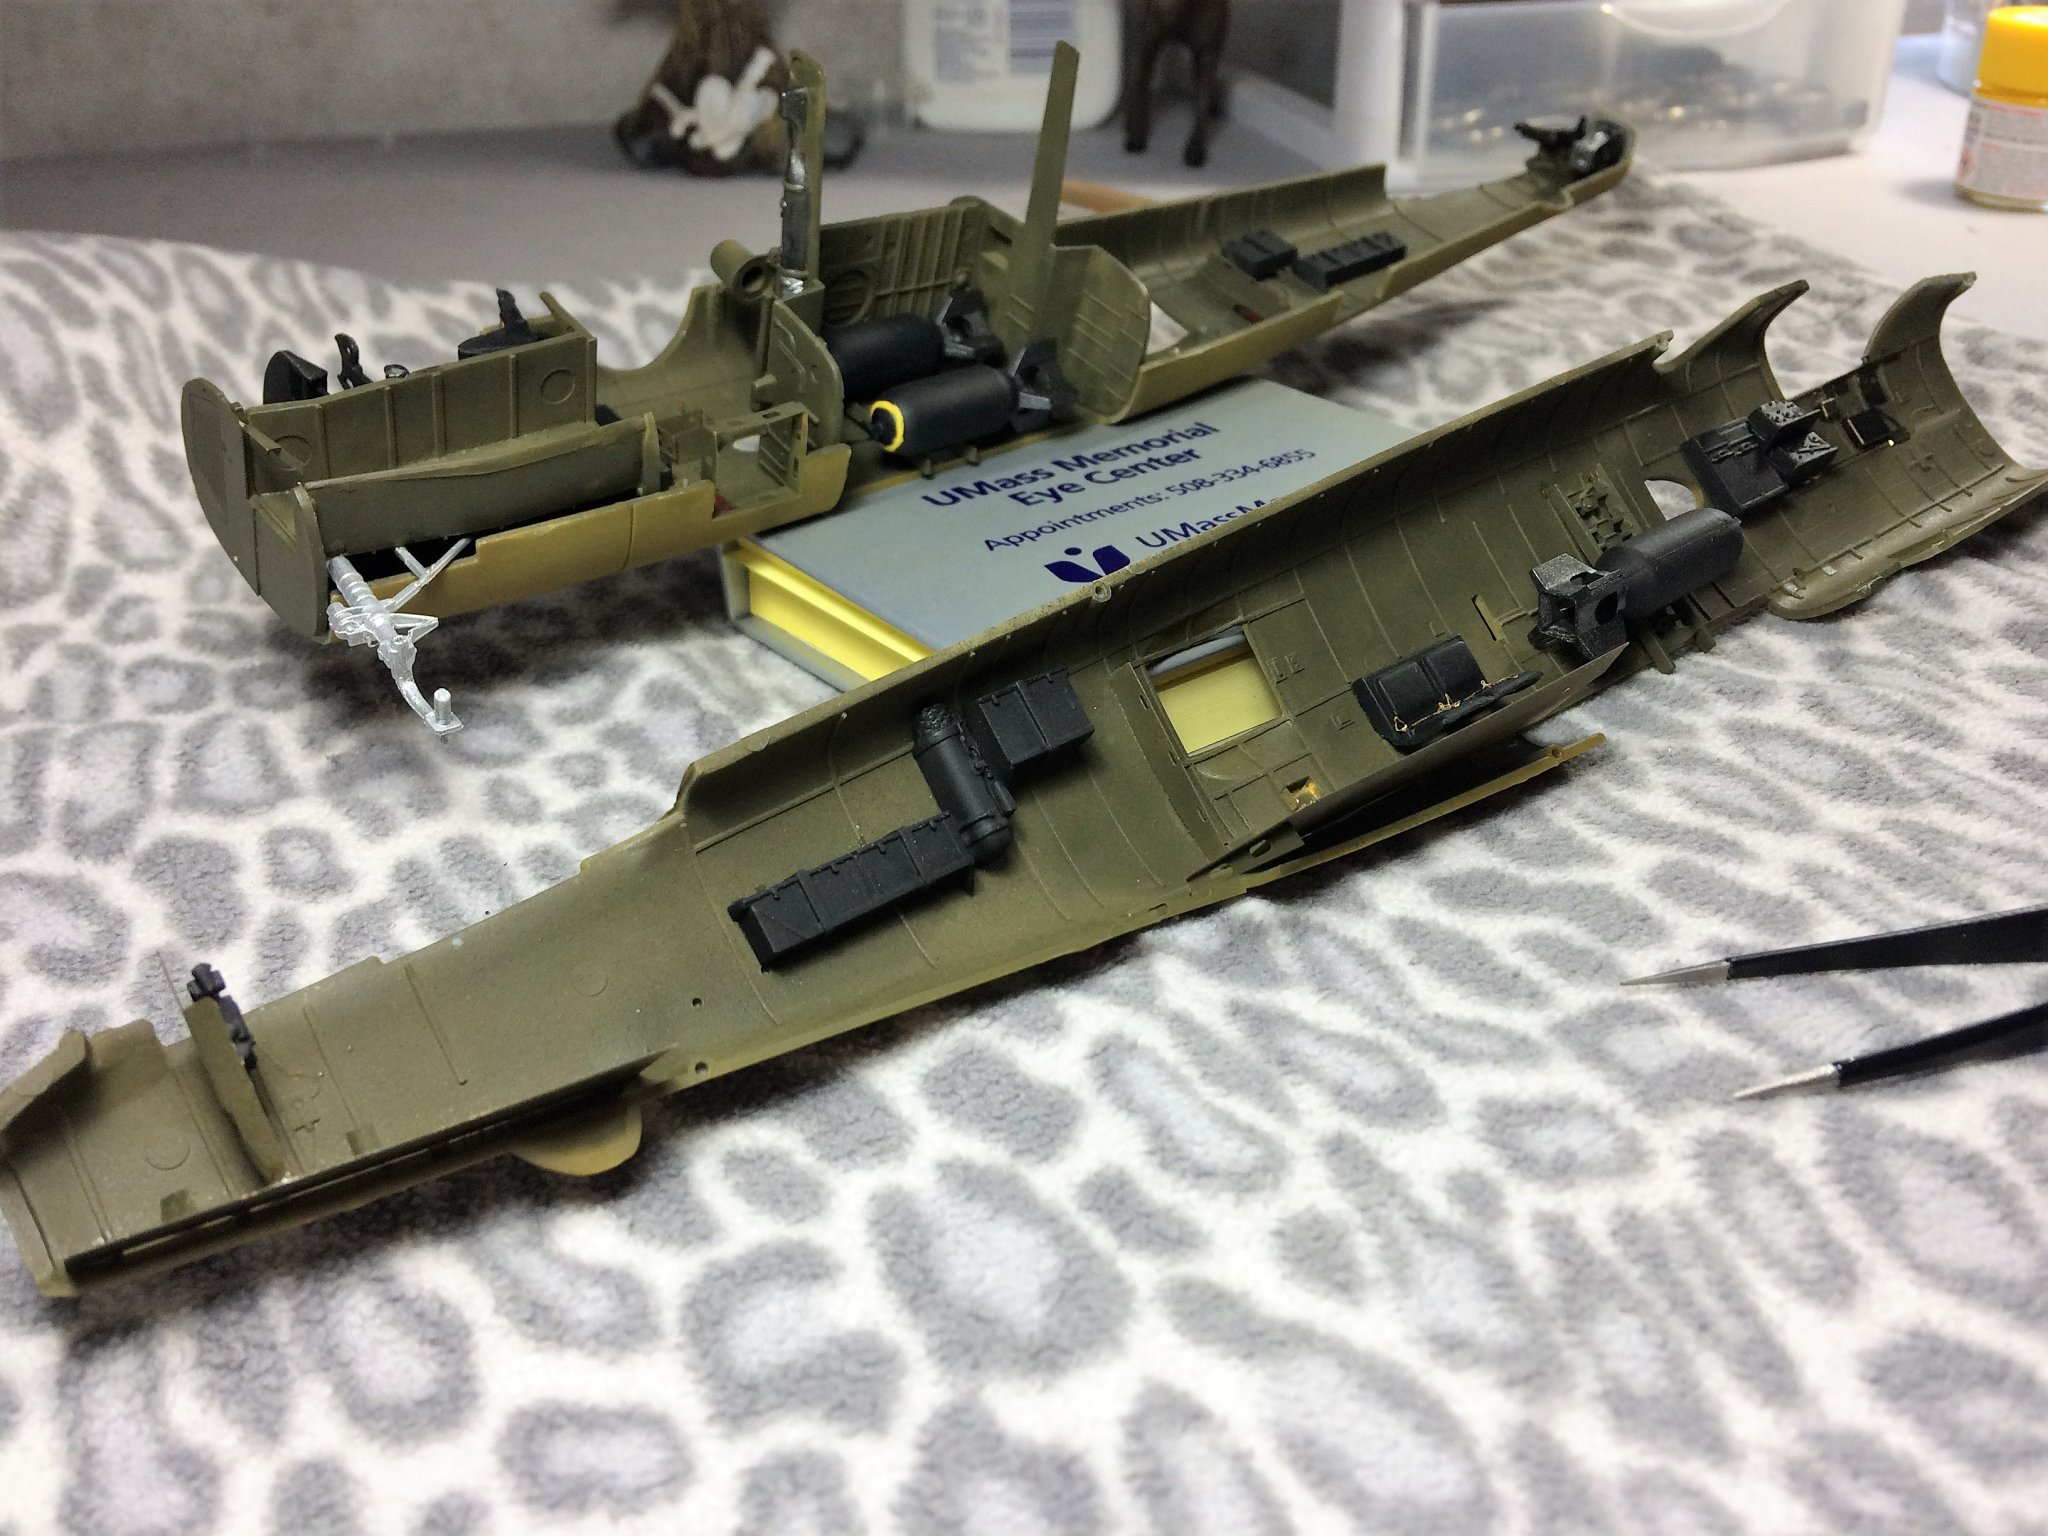
Evening, Thanks for all the kind words fellas! Much appreciated! Denis, you saw thru me...….had that color in my head the entire time !!!.…..I wish!!!!! I've been thinking about my painting and the thinner/paint ratio. It dawned on me, isn't that sort of how "oil canning" is done for ships? A lot of that technique is in the paint/thinner ratio....right? Or am I way off? The build continues. With the exterior mostly done, it's time to start to button up the interior so I can eventually bring the two halves together. The bombs have been glued in. I test fit these things once and they slid in perfectly. I just don't remember kits of my childhood doing that. Was always a struggle. One would fit, one would look like it goes to entirely different model. Nice to see the plastic kits have improved nicely. Once glued in, I test fit the two halves and the bombs folded in amongst each other perfectly. All of the landing gear are done. Nothing glued together yet. The cockpit has been glued in. It just slid right in. Some shaping done for a final fit, but not much. She's really starting to come together. There's a lot of interior detail. More could be done than I did. But this is a "learning" model......lessoned learned! The rear machine gun is glued in. The rear gunner seat, and other detail, are actually attached to the other half of the model. When I test fit this area with the two halves, fit perfectly. Although, I think I did break off a tiny piece of PE, which went right back where it was, and no problems since. Stay safe Tom E


- 120 replies
-
- 13
-
-
Peter, The hull and knees look great. Your planking is top notch. I so wanted this kit in my "to do" stash. I've heard Artesania Latina is out of business, the kits have become scarce and expensive. Tom E
-
B-25J Mitchell by Tom E - Revell - 1:48 Scale - PLASTIC
Tom E replied to Tom E's topic in Non-ship/categorised builds
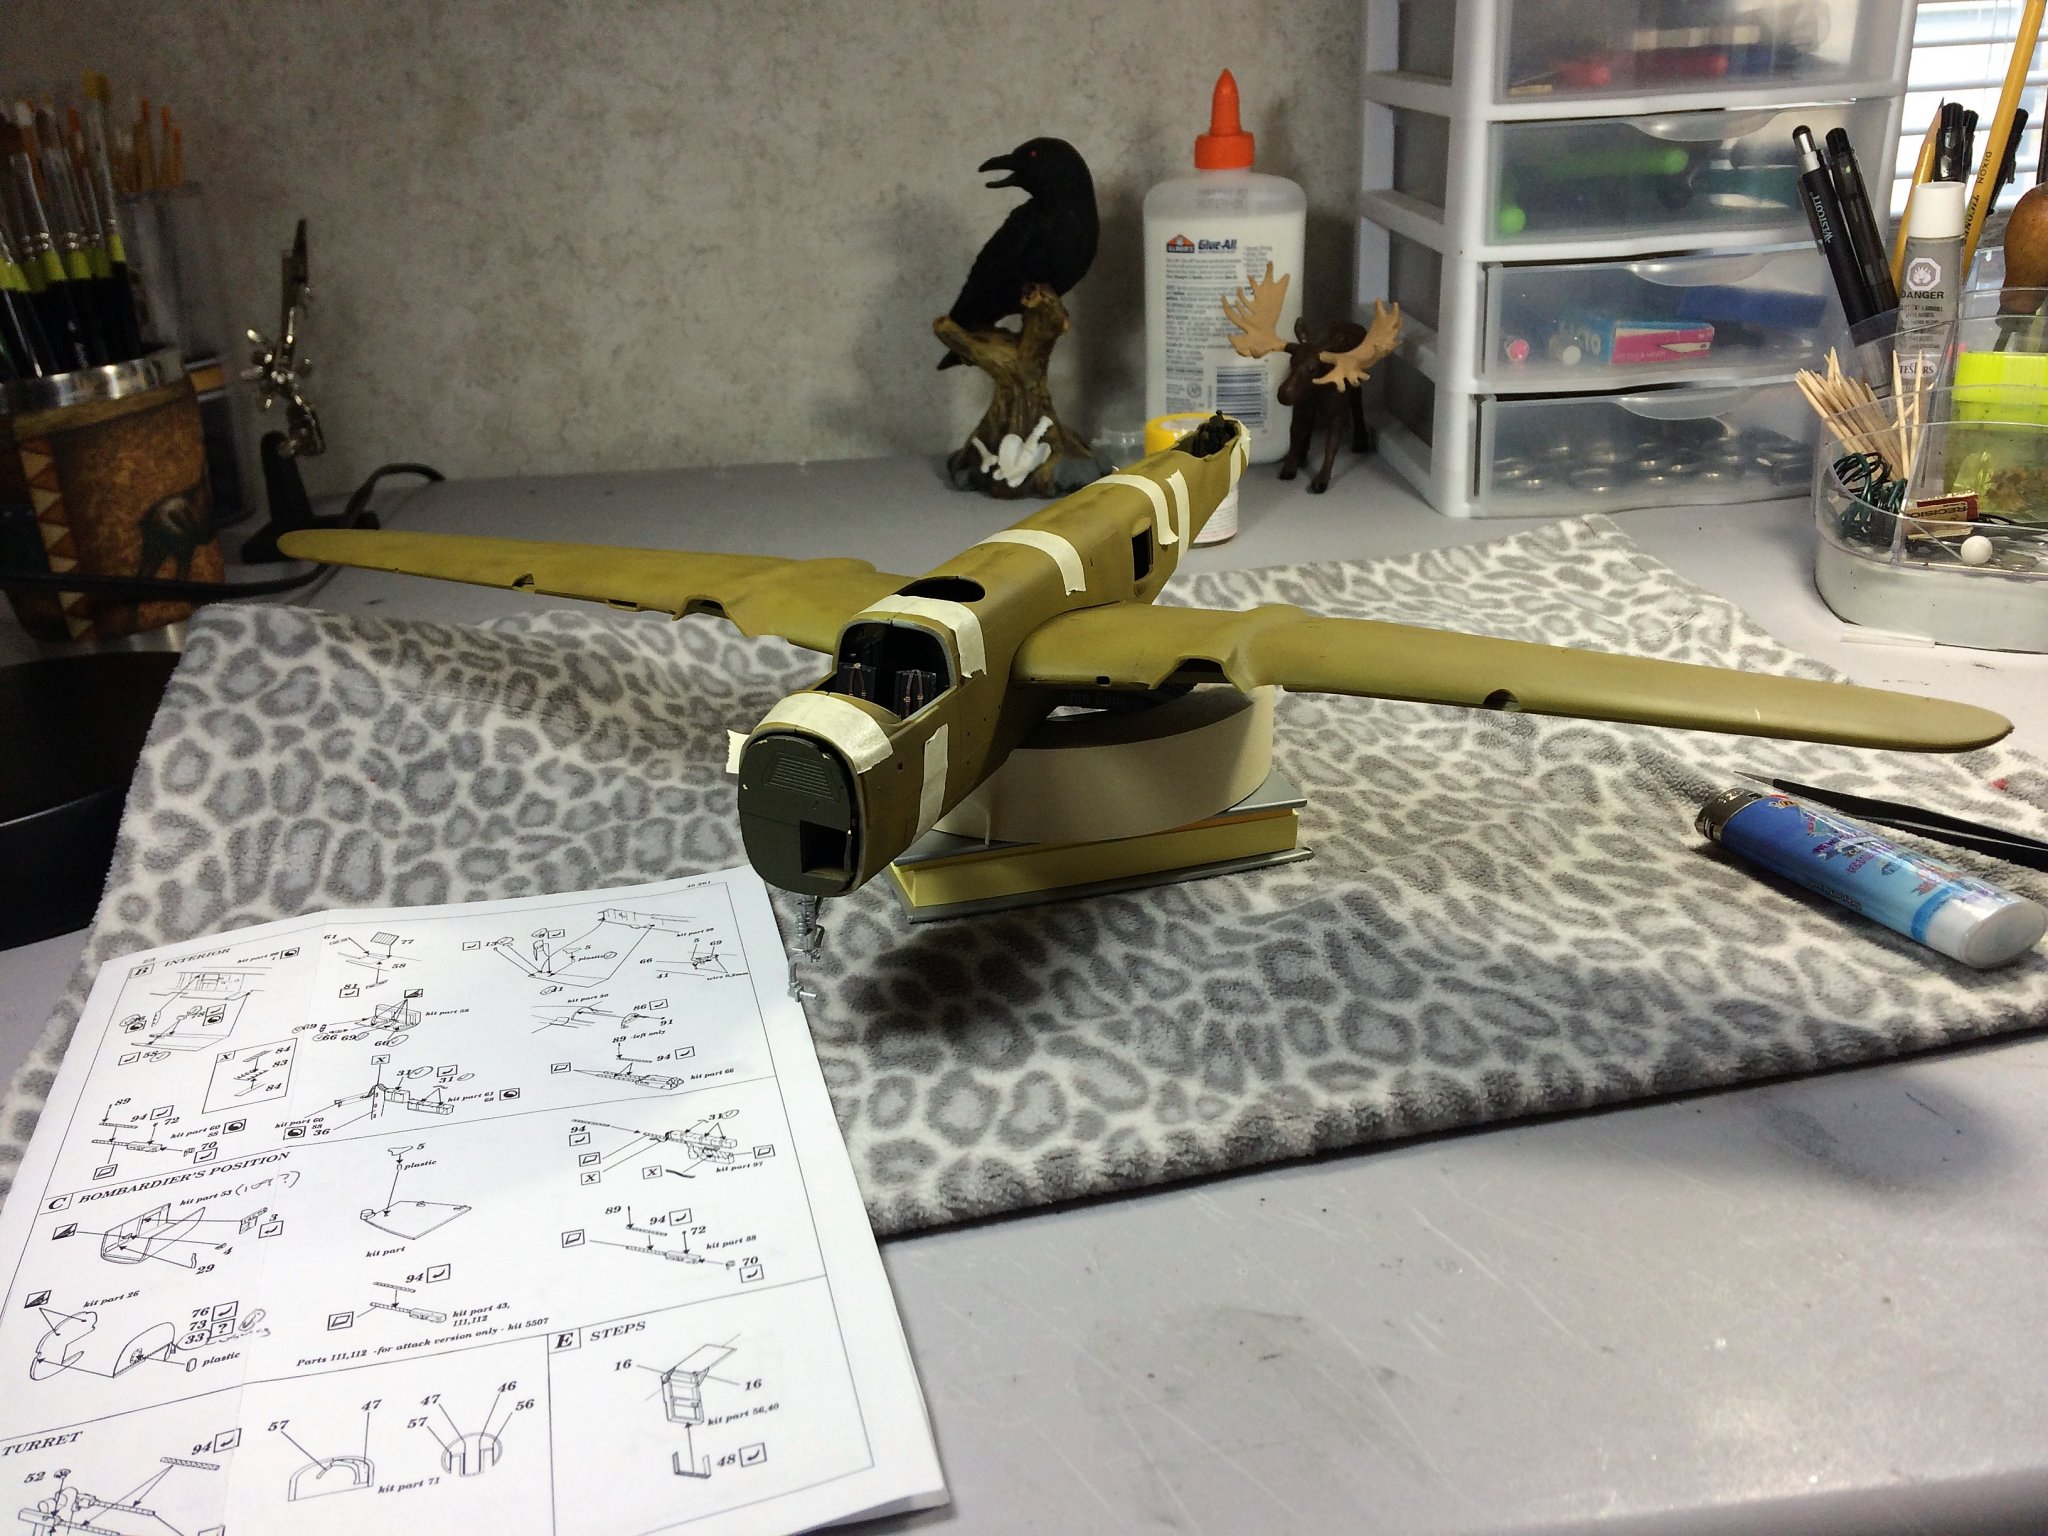
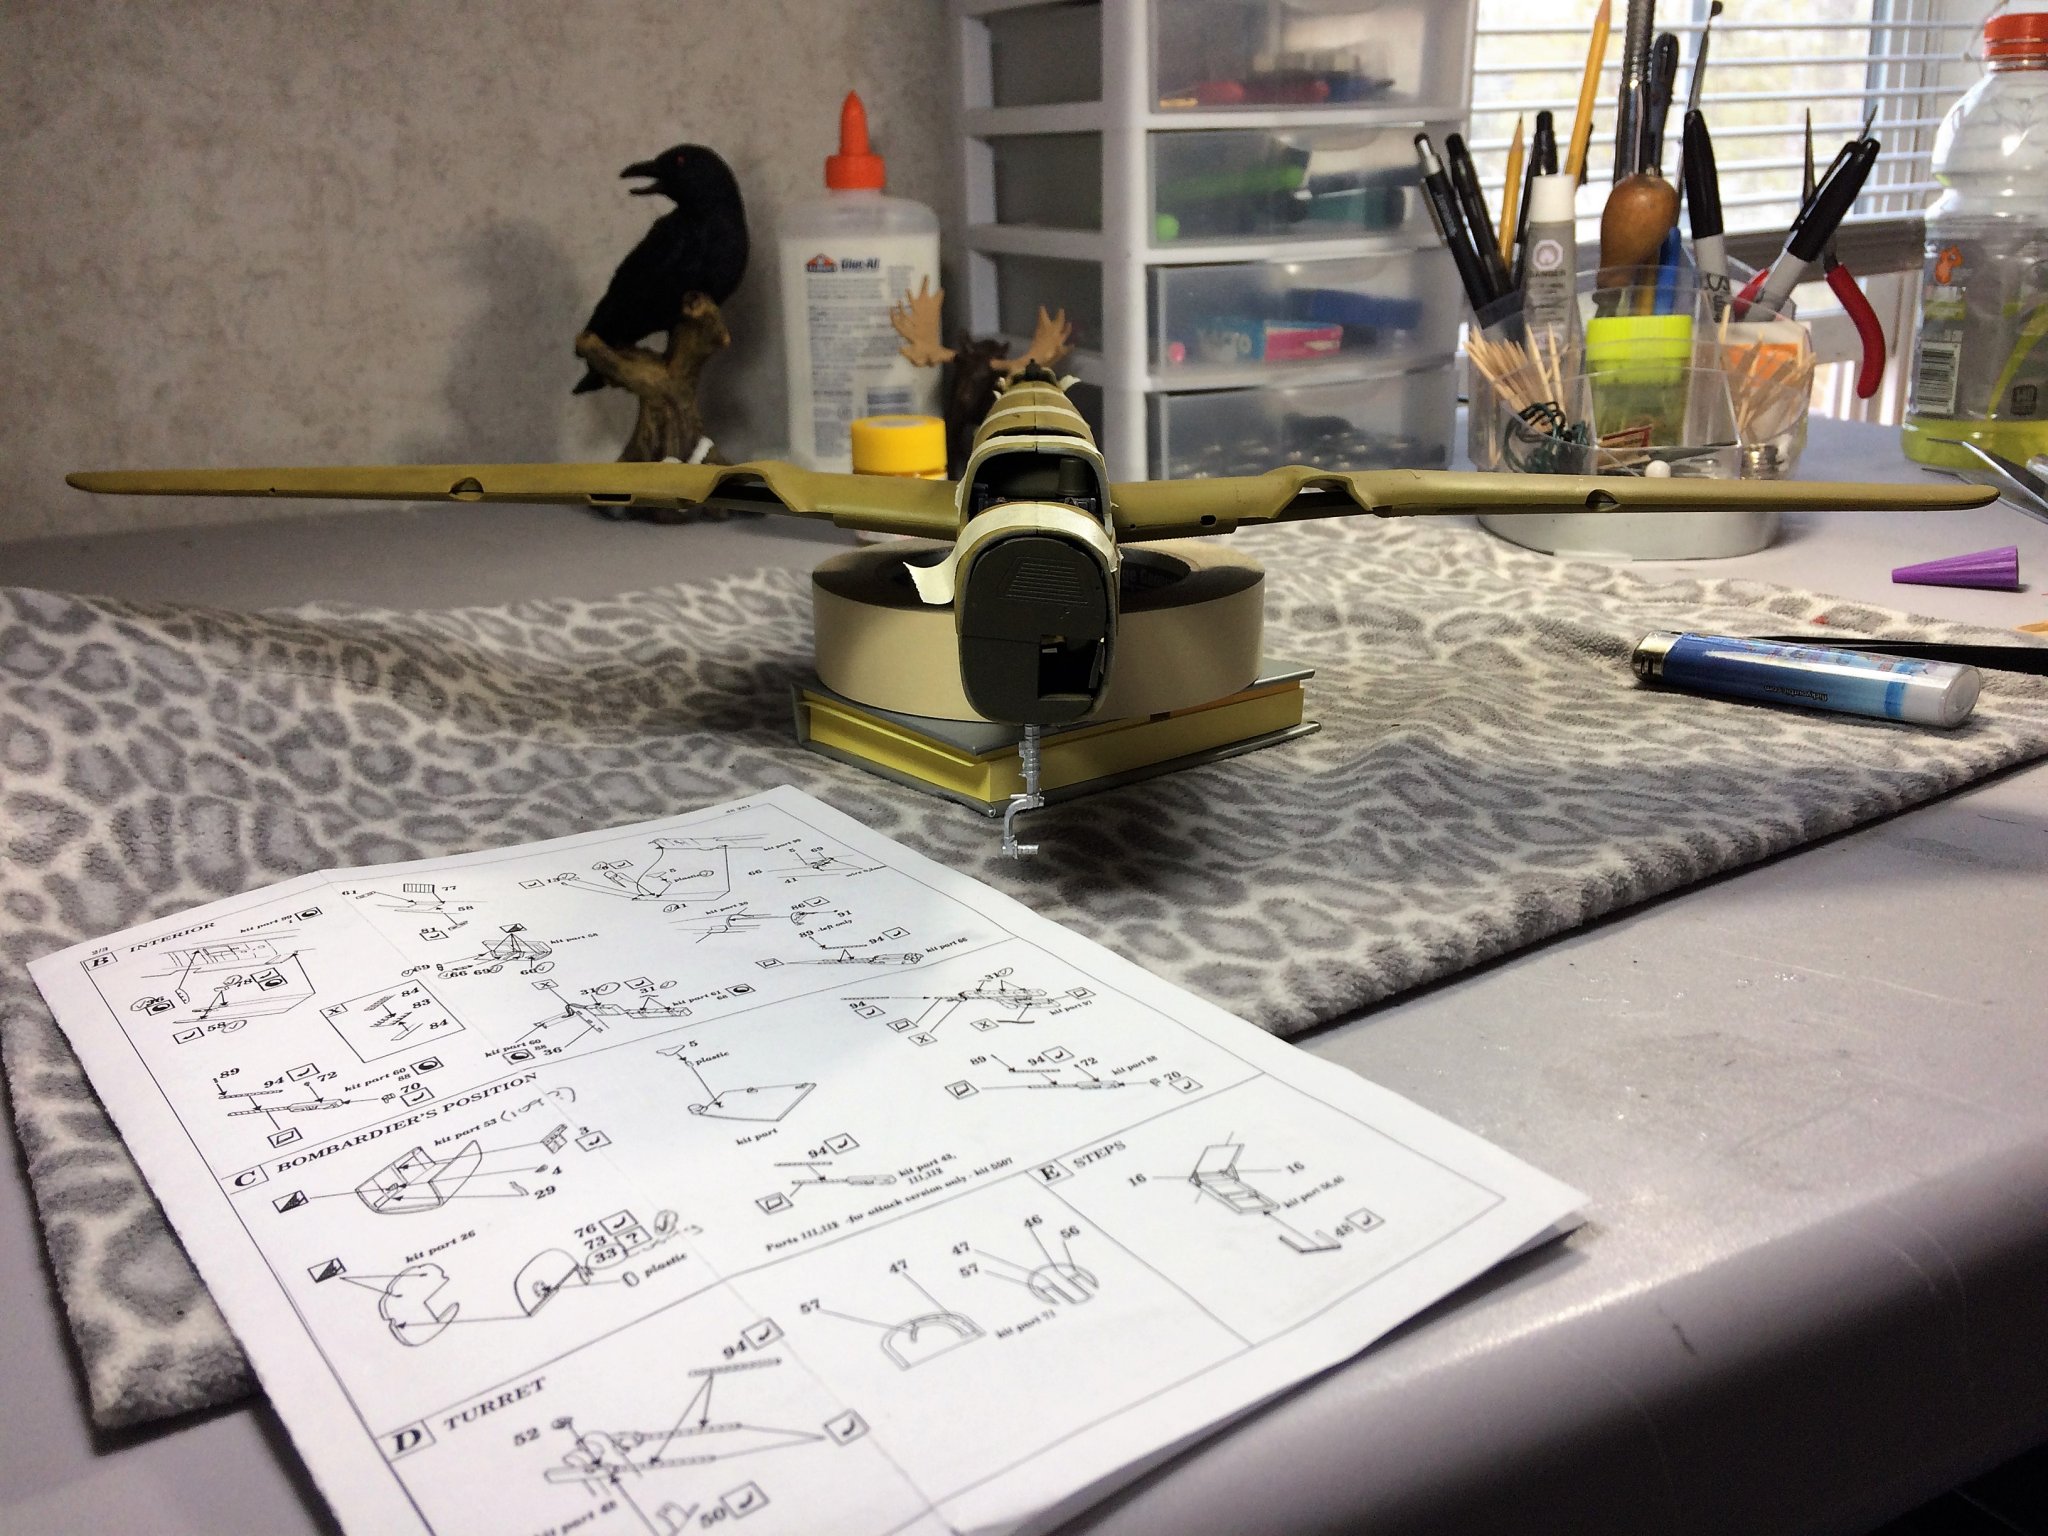
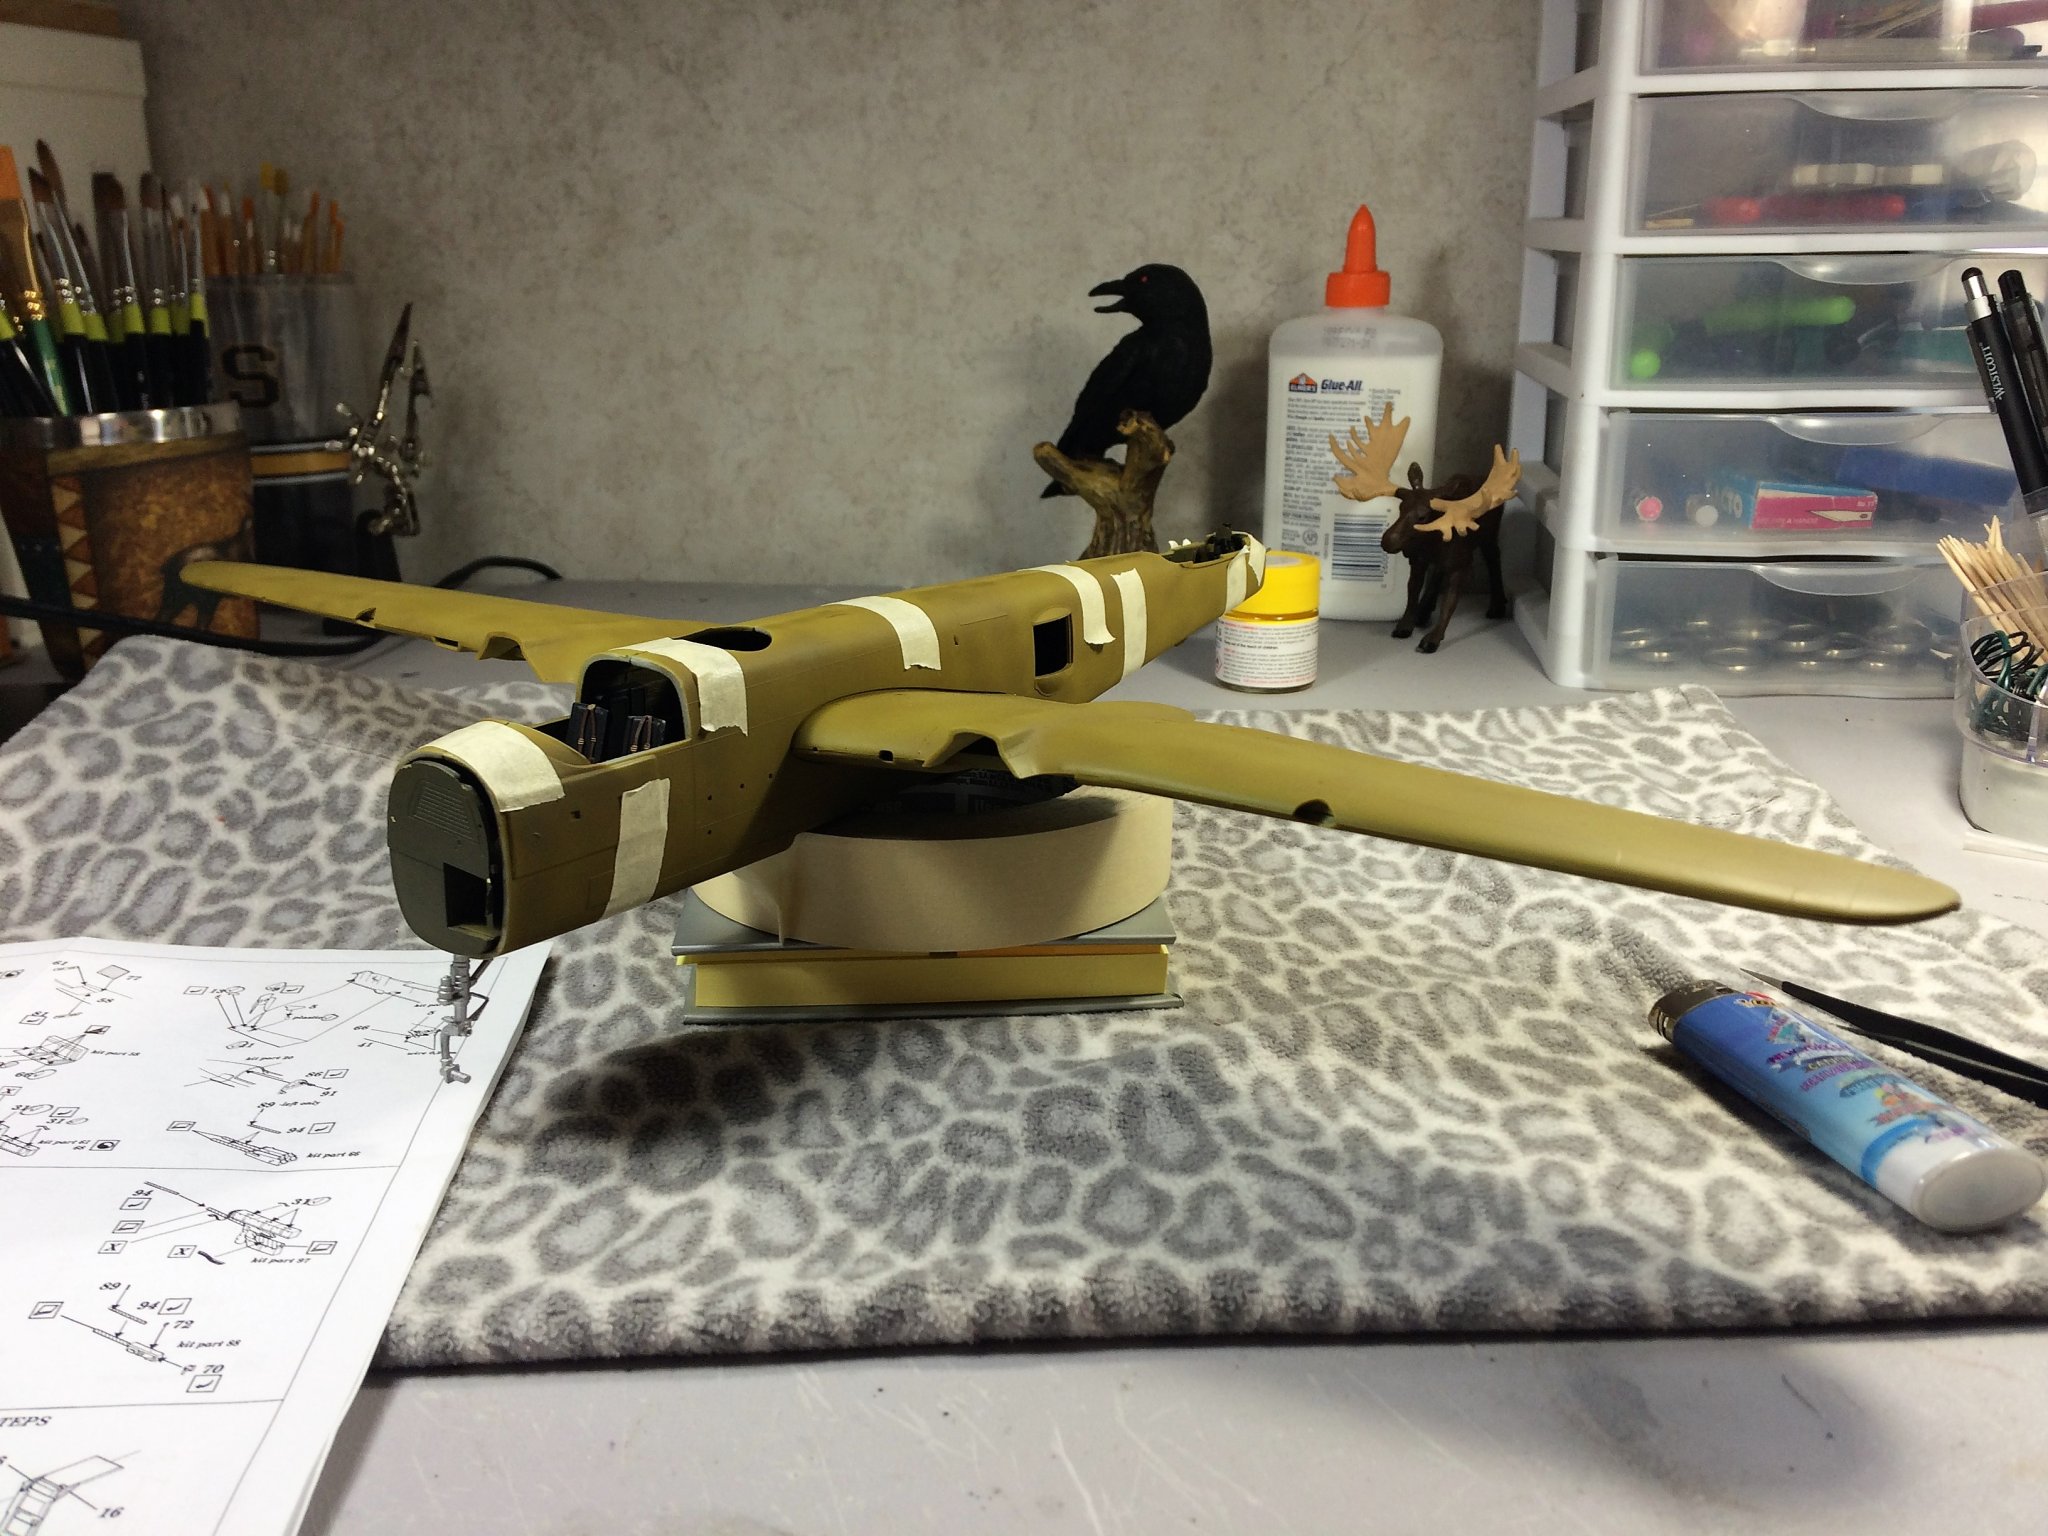
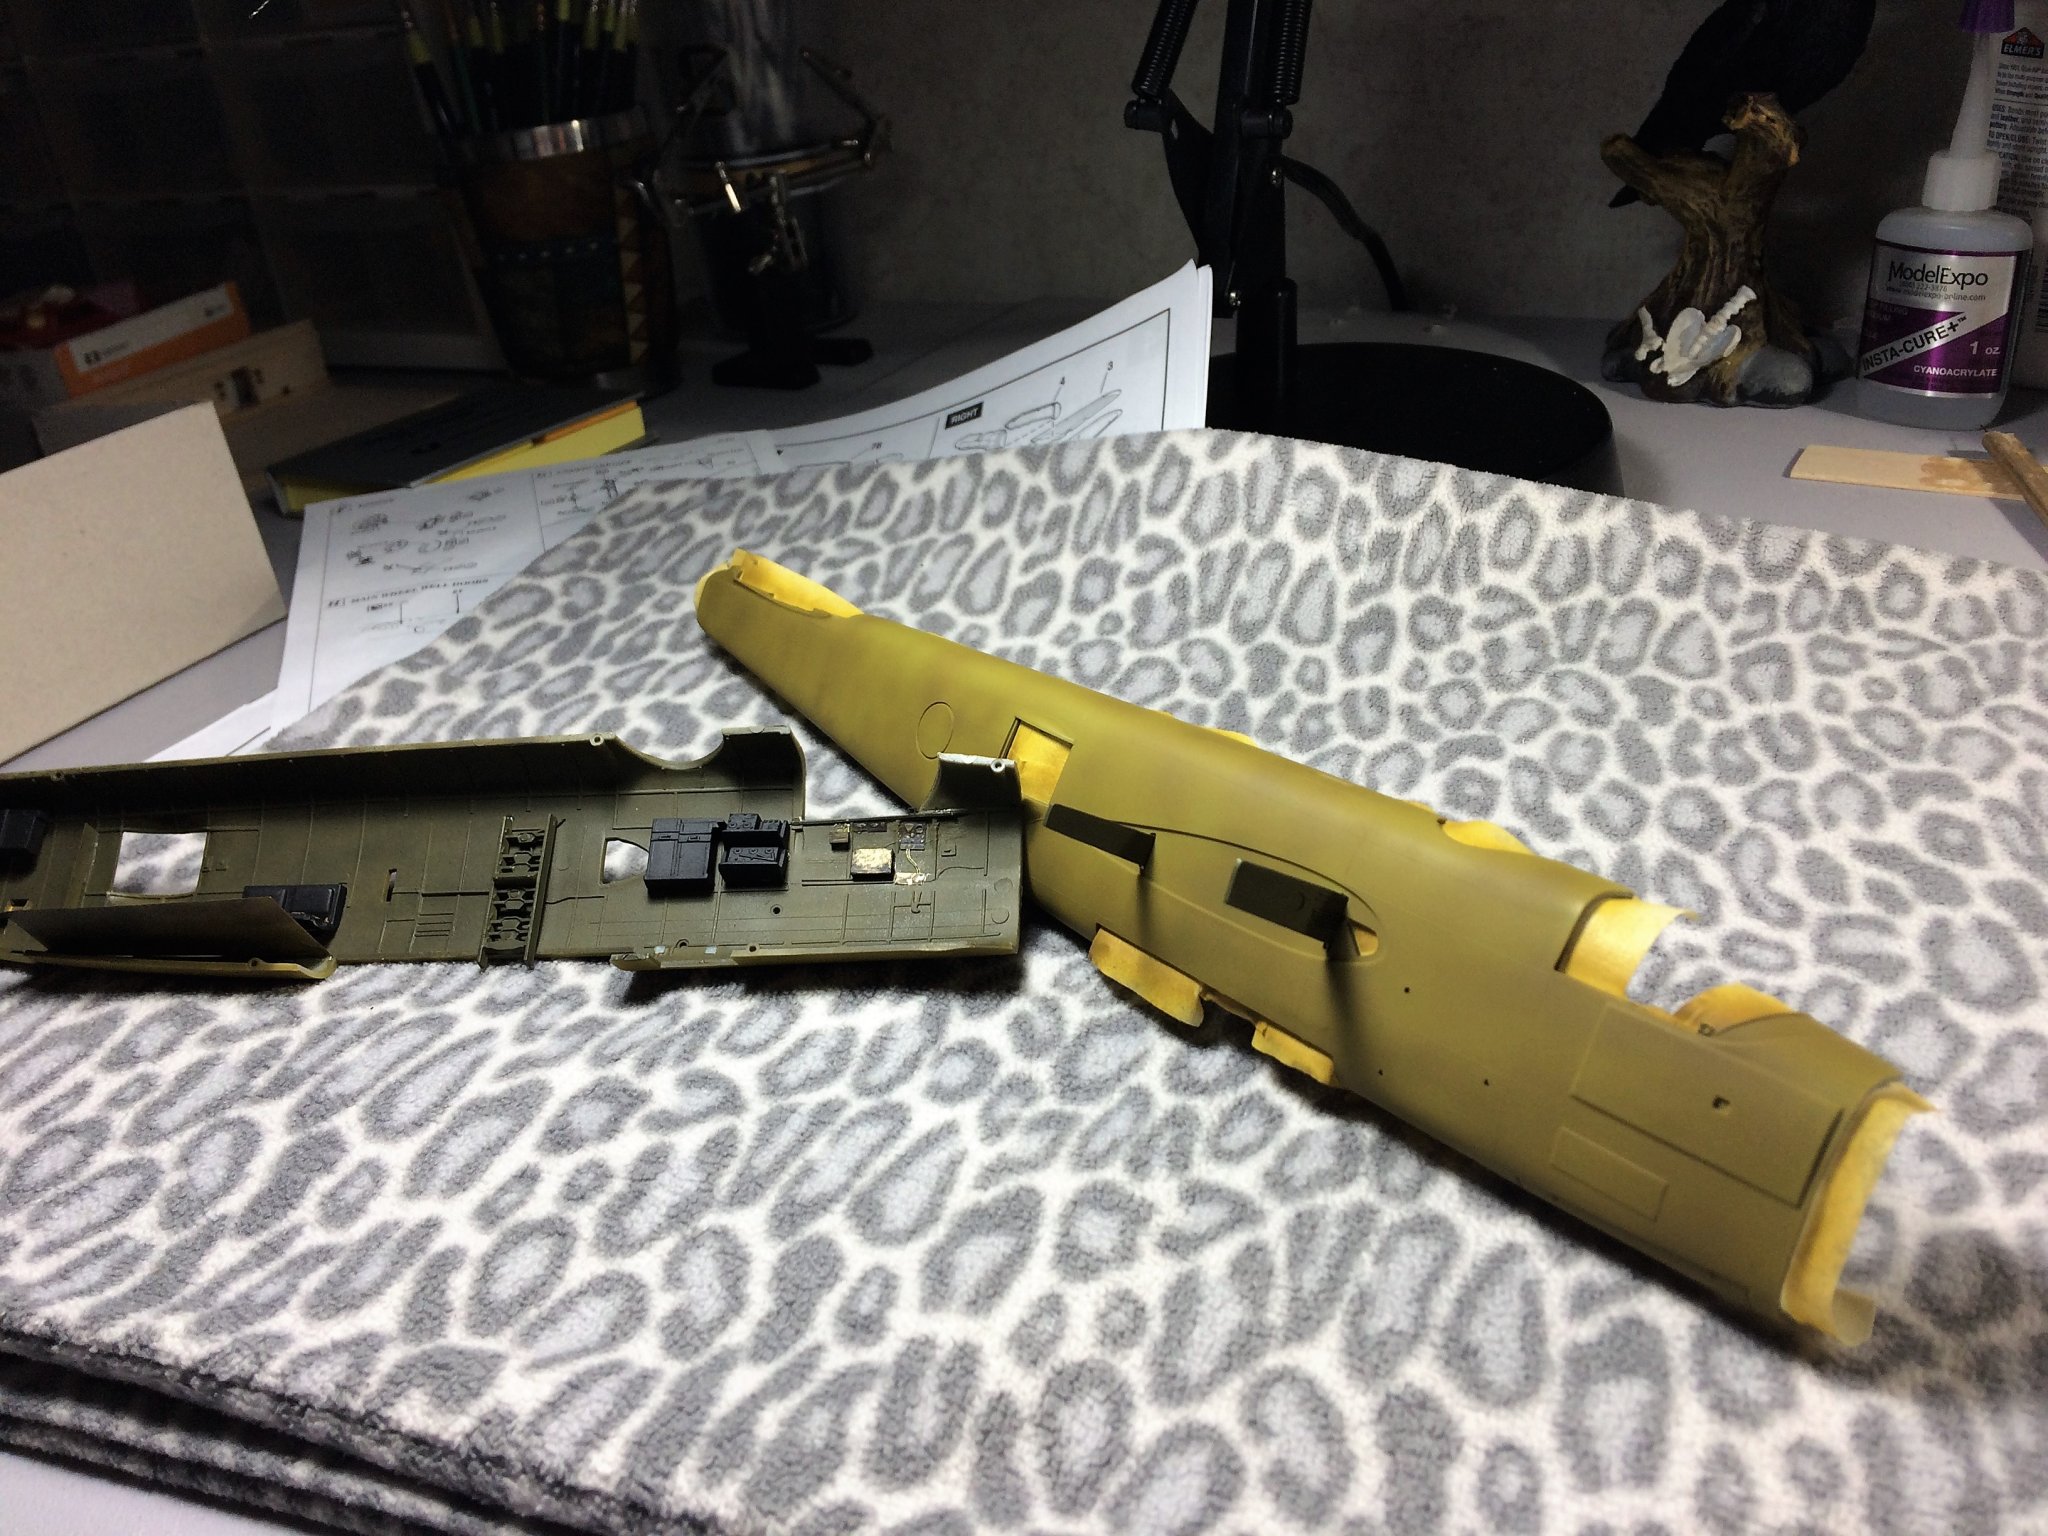
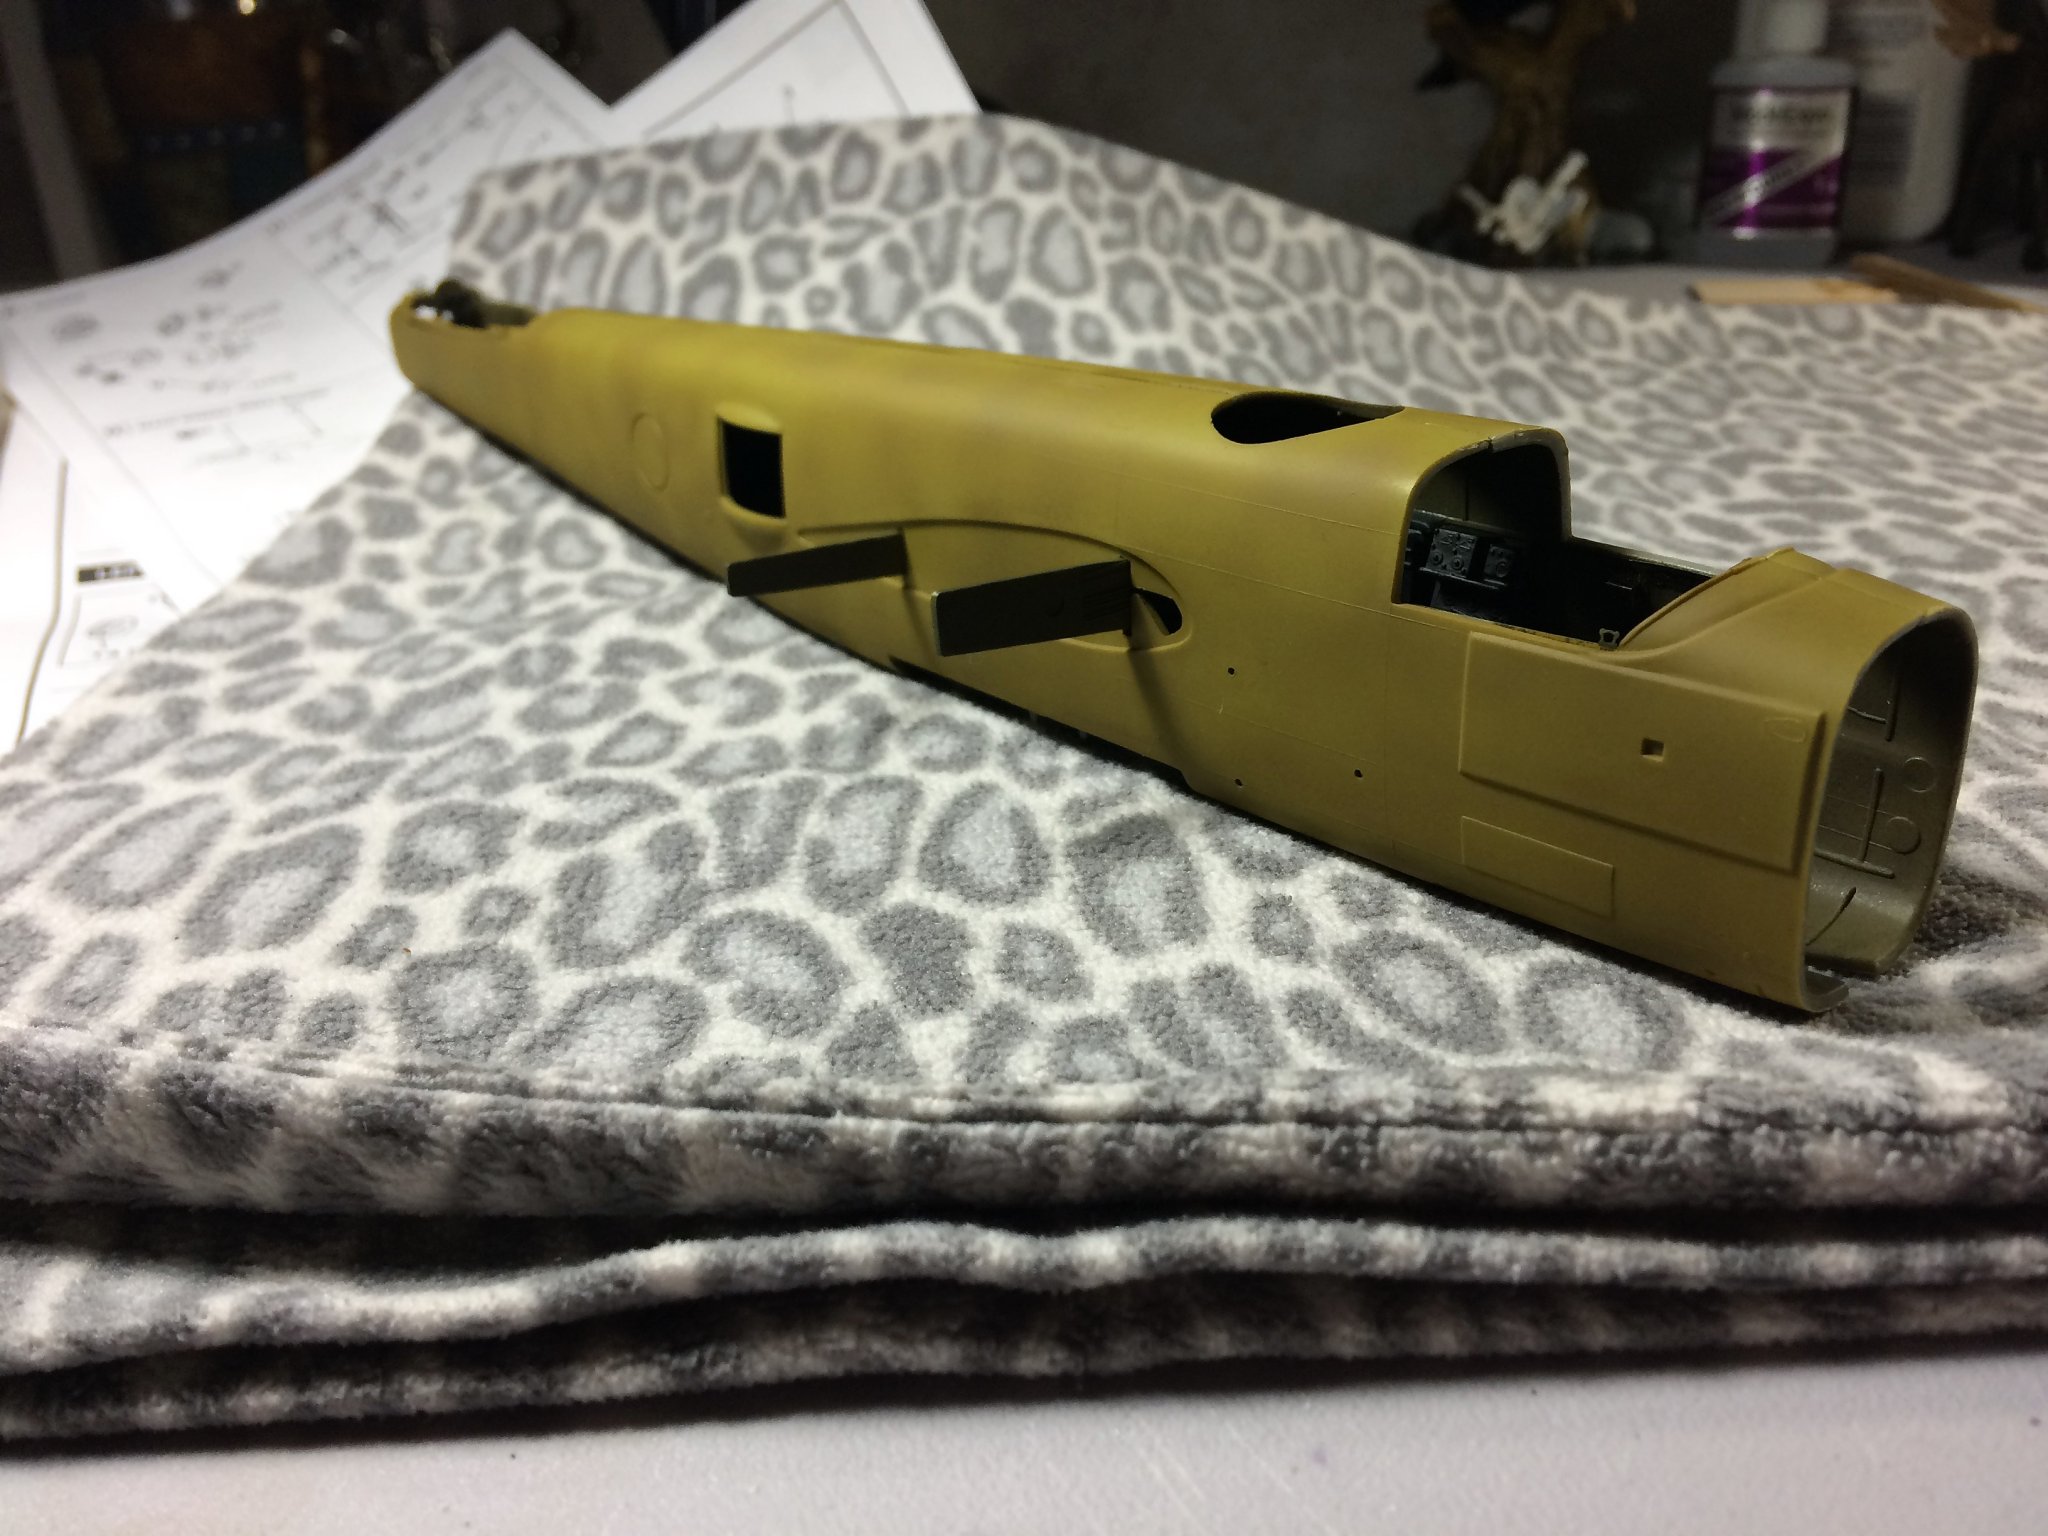
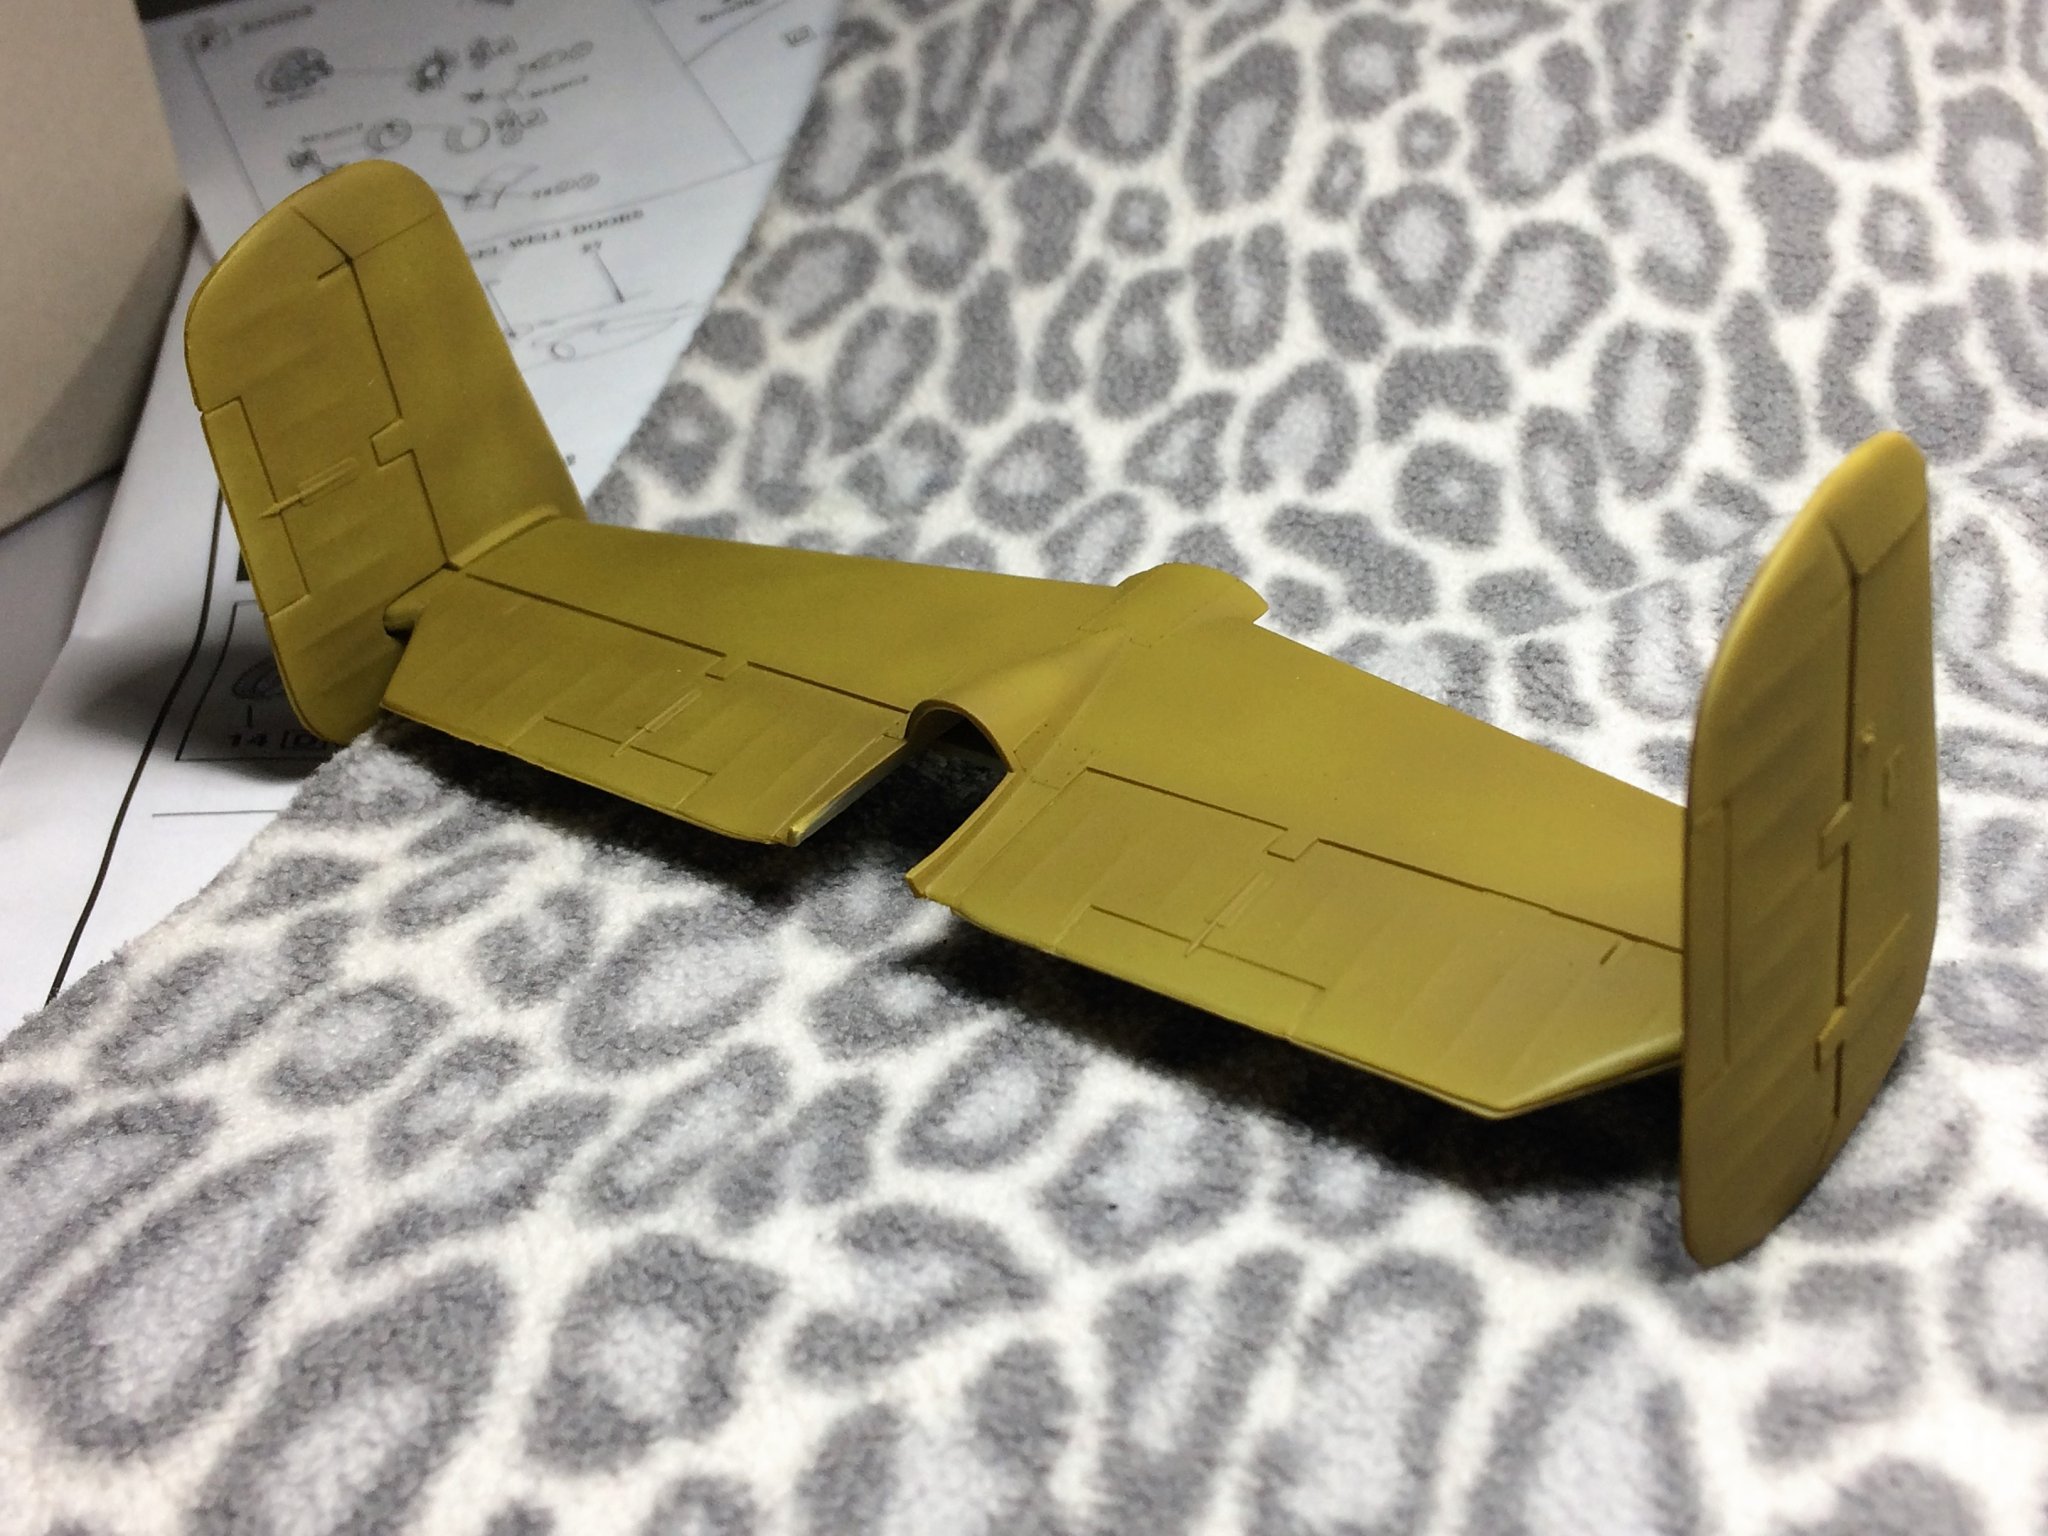
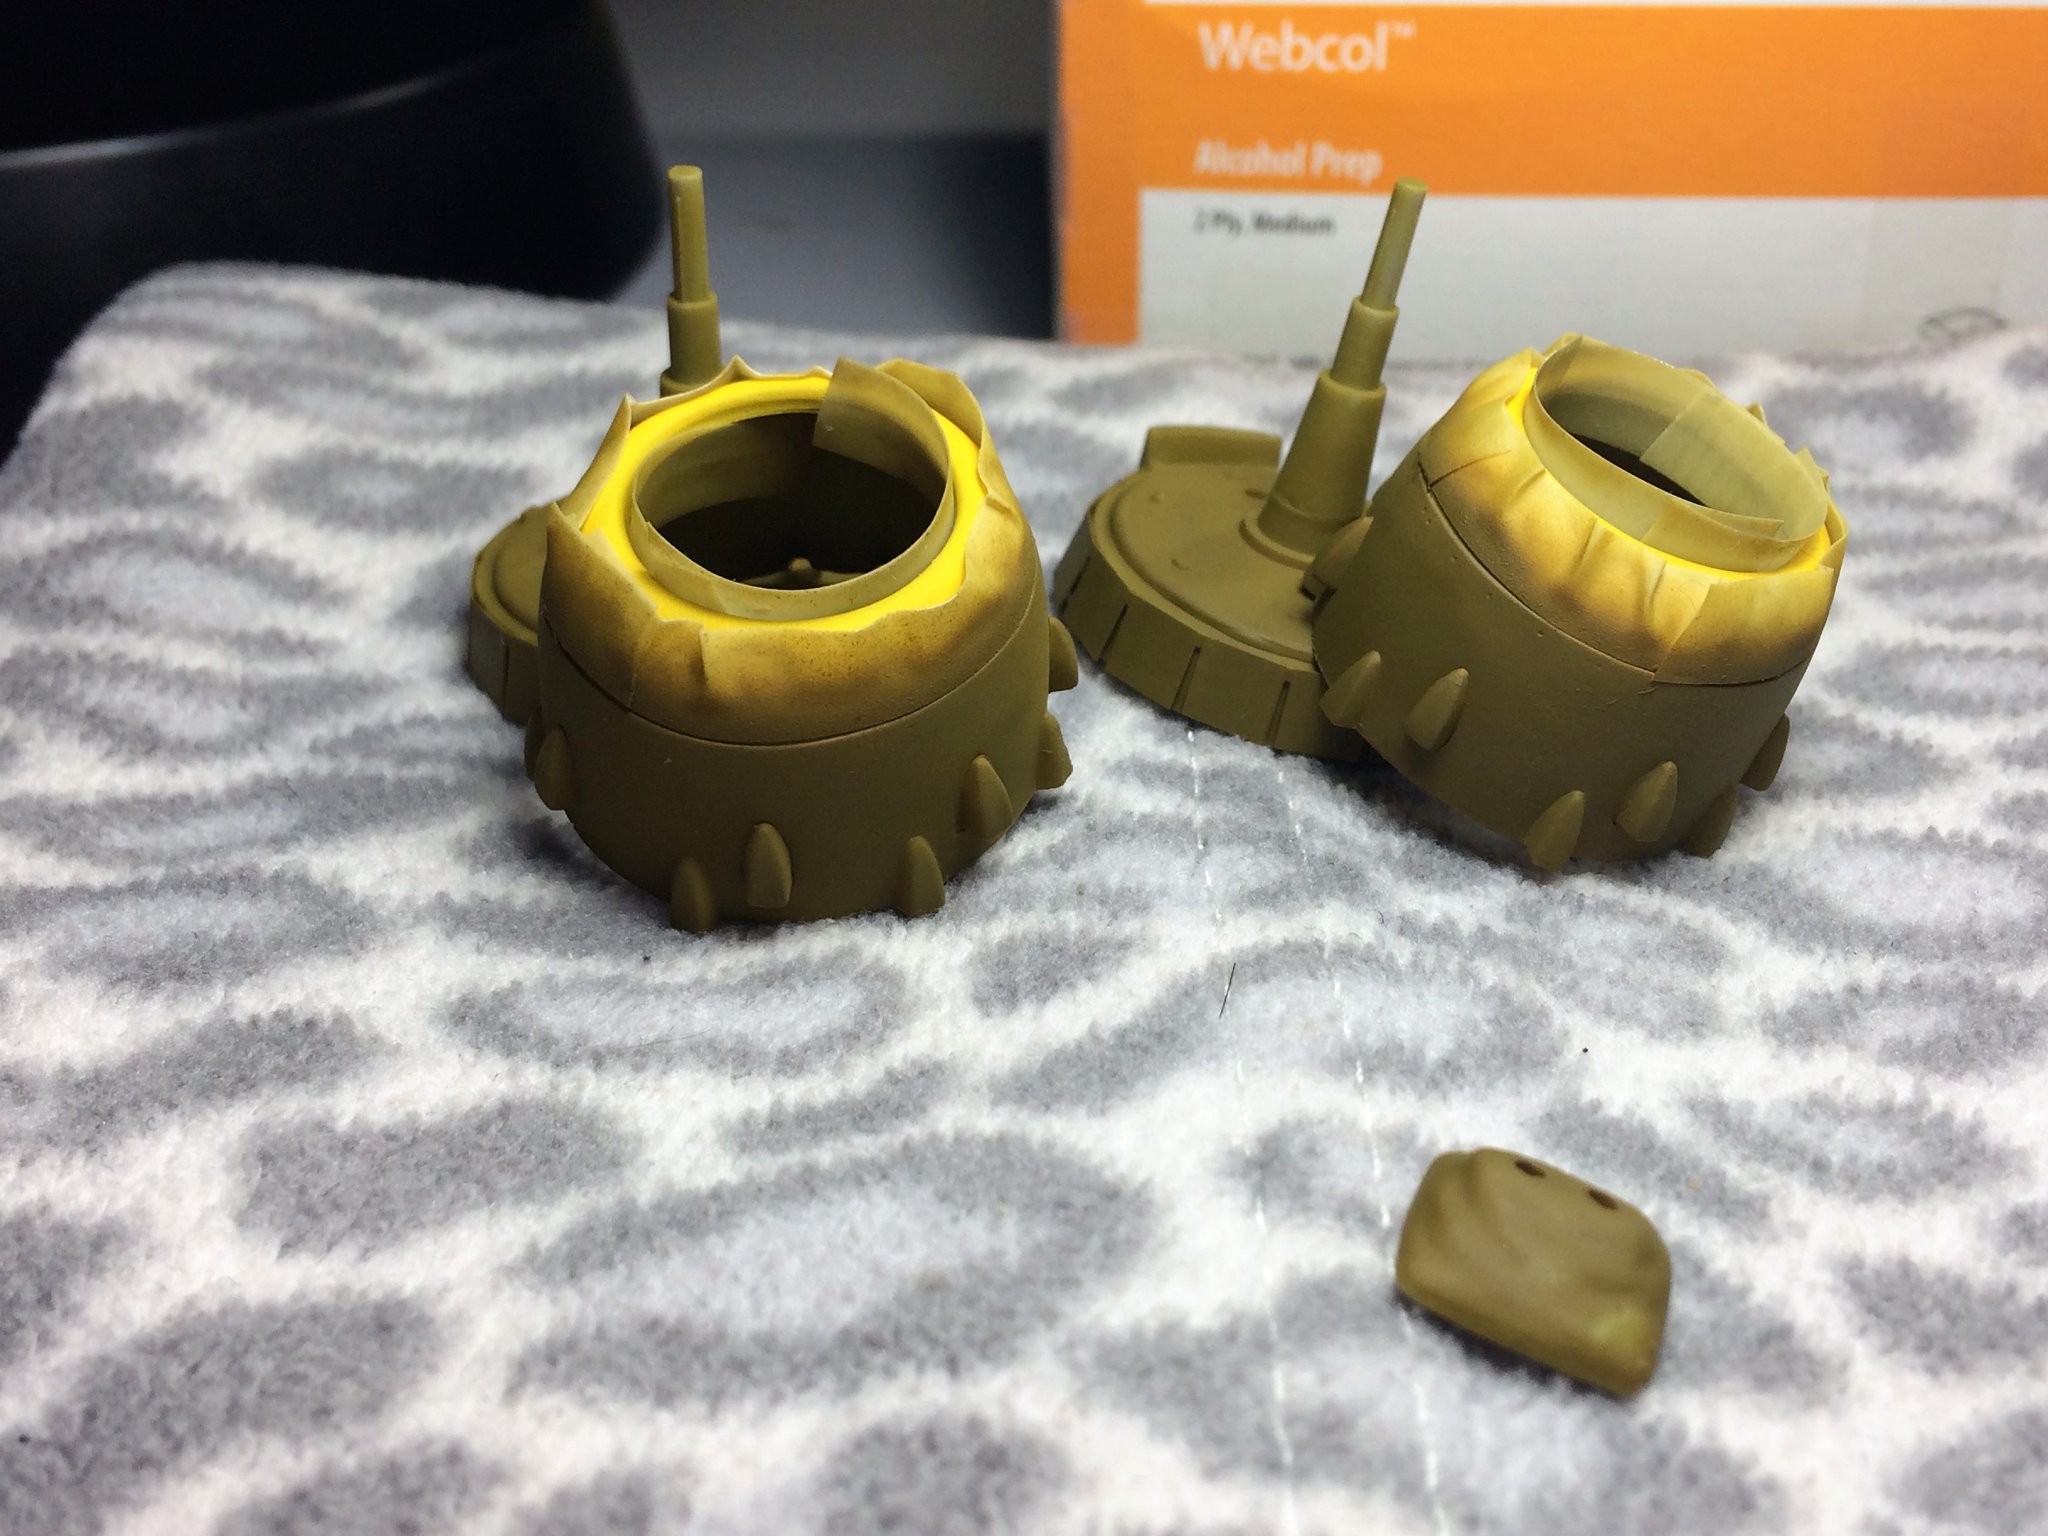
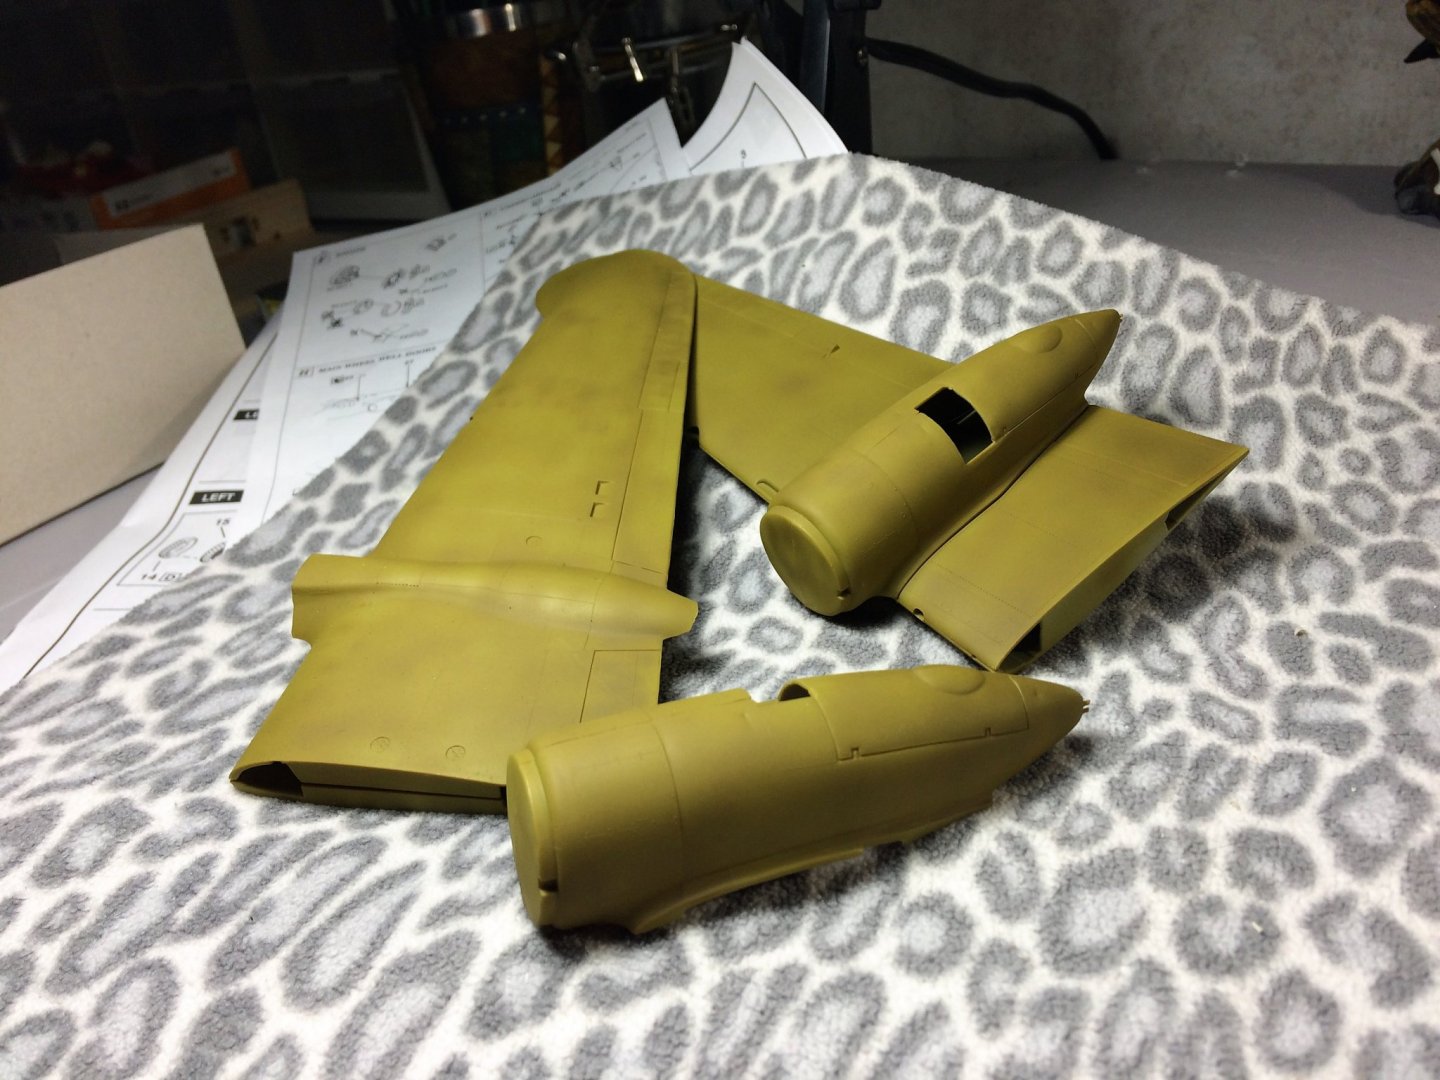
Evening, Just had one very quiet weekend...on purpose! Chores were done early, and modeling was on tap! Worked on both Niagara and the Mitchell. Mitchell seemed to get the fair share of attention. The fuselage has been painted with Mr Color Earth Green. Painfully obvious that I'm still learning the thinner/paint ratio. We'll call it camo shading! This will get another coat after the underside gets a coating of Tamiya Sky Grey. The two fuselage halves are not glued together yet. Just wanted to see how big this bird will be. The two halves do kind of fall into place with each other. I just don't remember that with kits as a kid in the 80's. I think the interior Olive Drab works well with the Earth Green exterior. Nice contrast, nothing too garish. The pics do make the Earth Green look brighter than it actually is. Rear stabilizers and rudders. Port and Starboard wings. The engine compartments aren't glued in yet. I doubt I'll go crazy with panel line accent on the wings and such, I have zero experience with it. Probably try it on the landing gear. No where close to being glued in yet, just wanted to see how the engines look so far. In the end, I'm happy with the PE for this kit. I think it adds a great extra dimension to, what was, a kind of drab engine straight from the kit. I'm hooked!!!!! Keep washing those hands people!!!! Tom E


- 120 replies
-
- 14
-
-
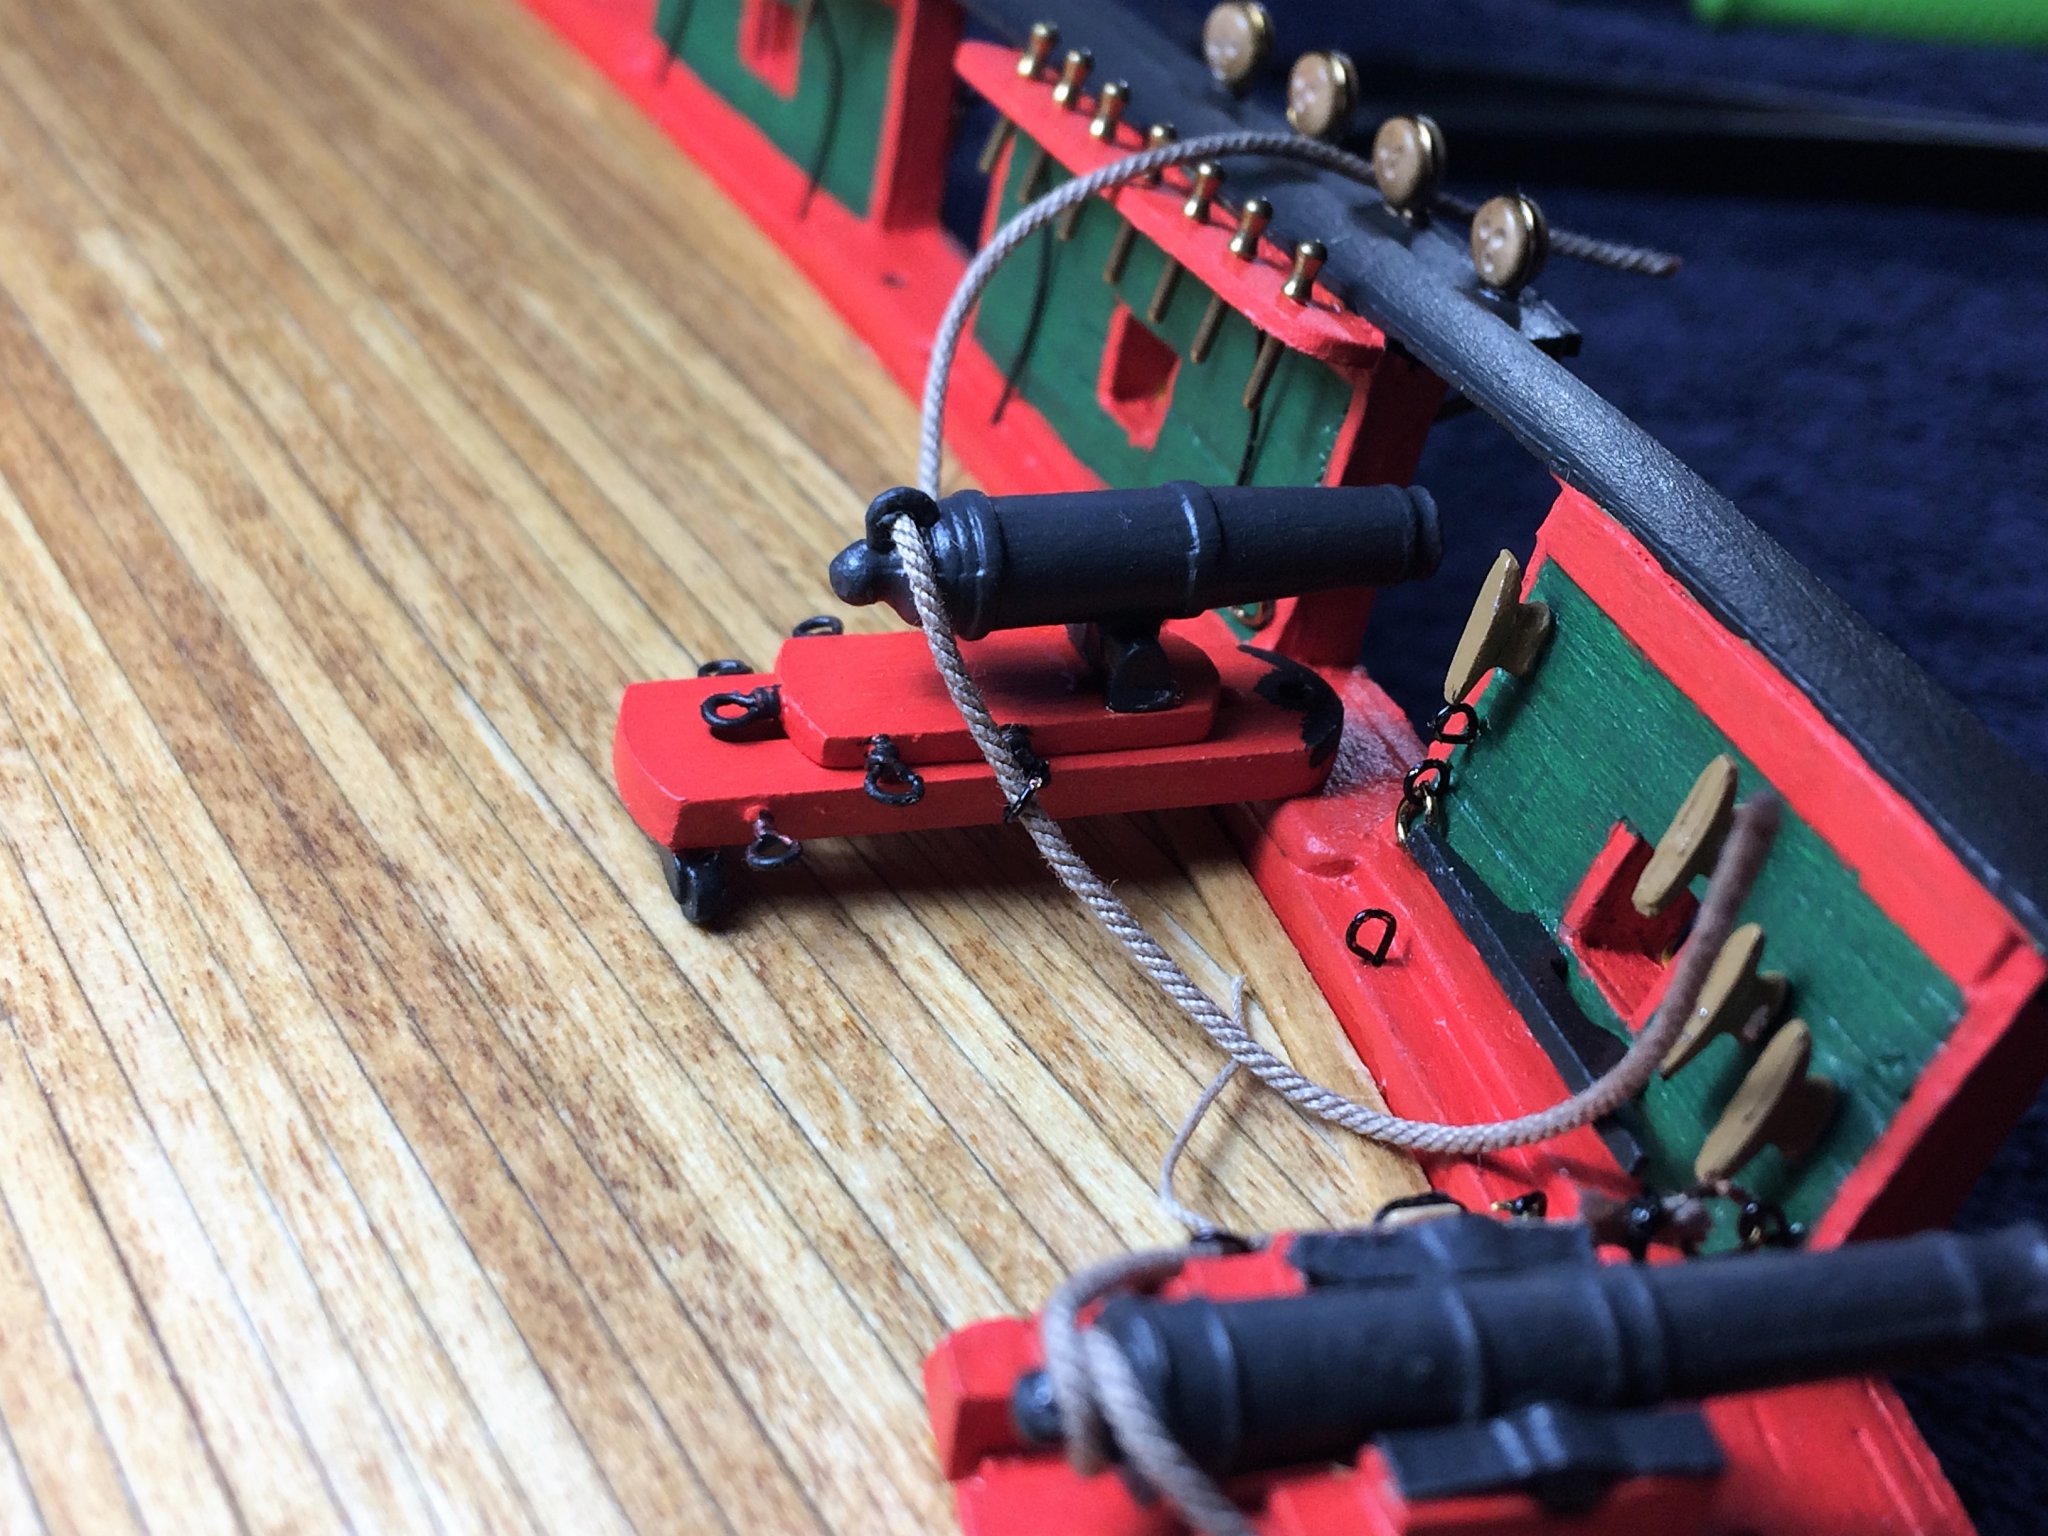
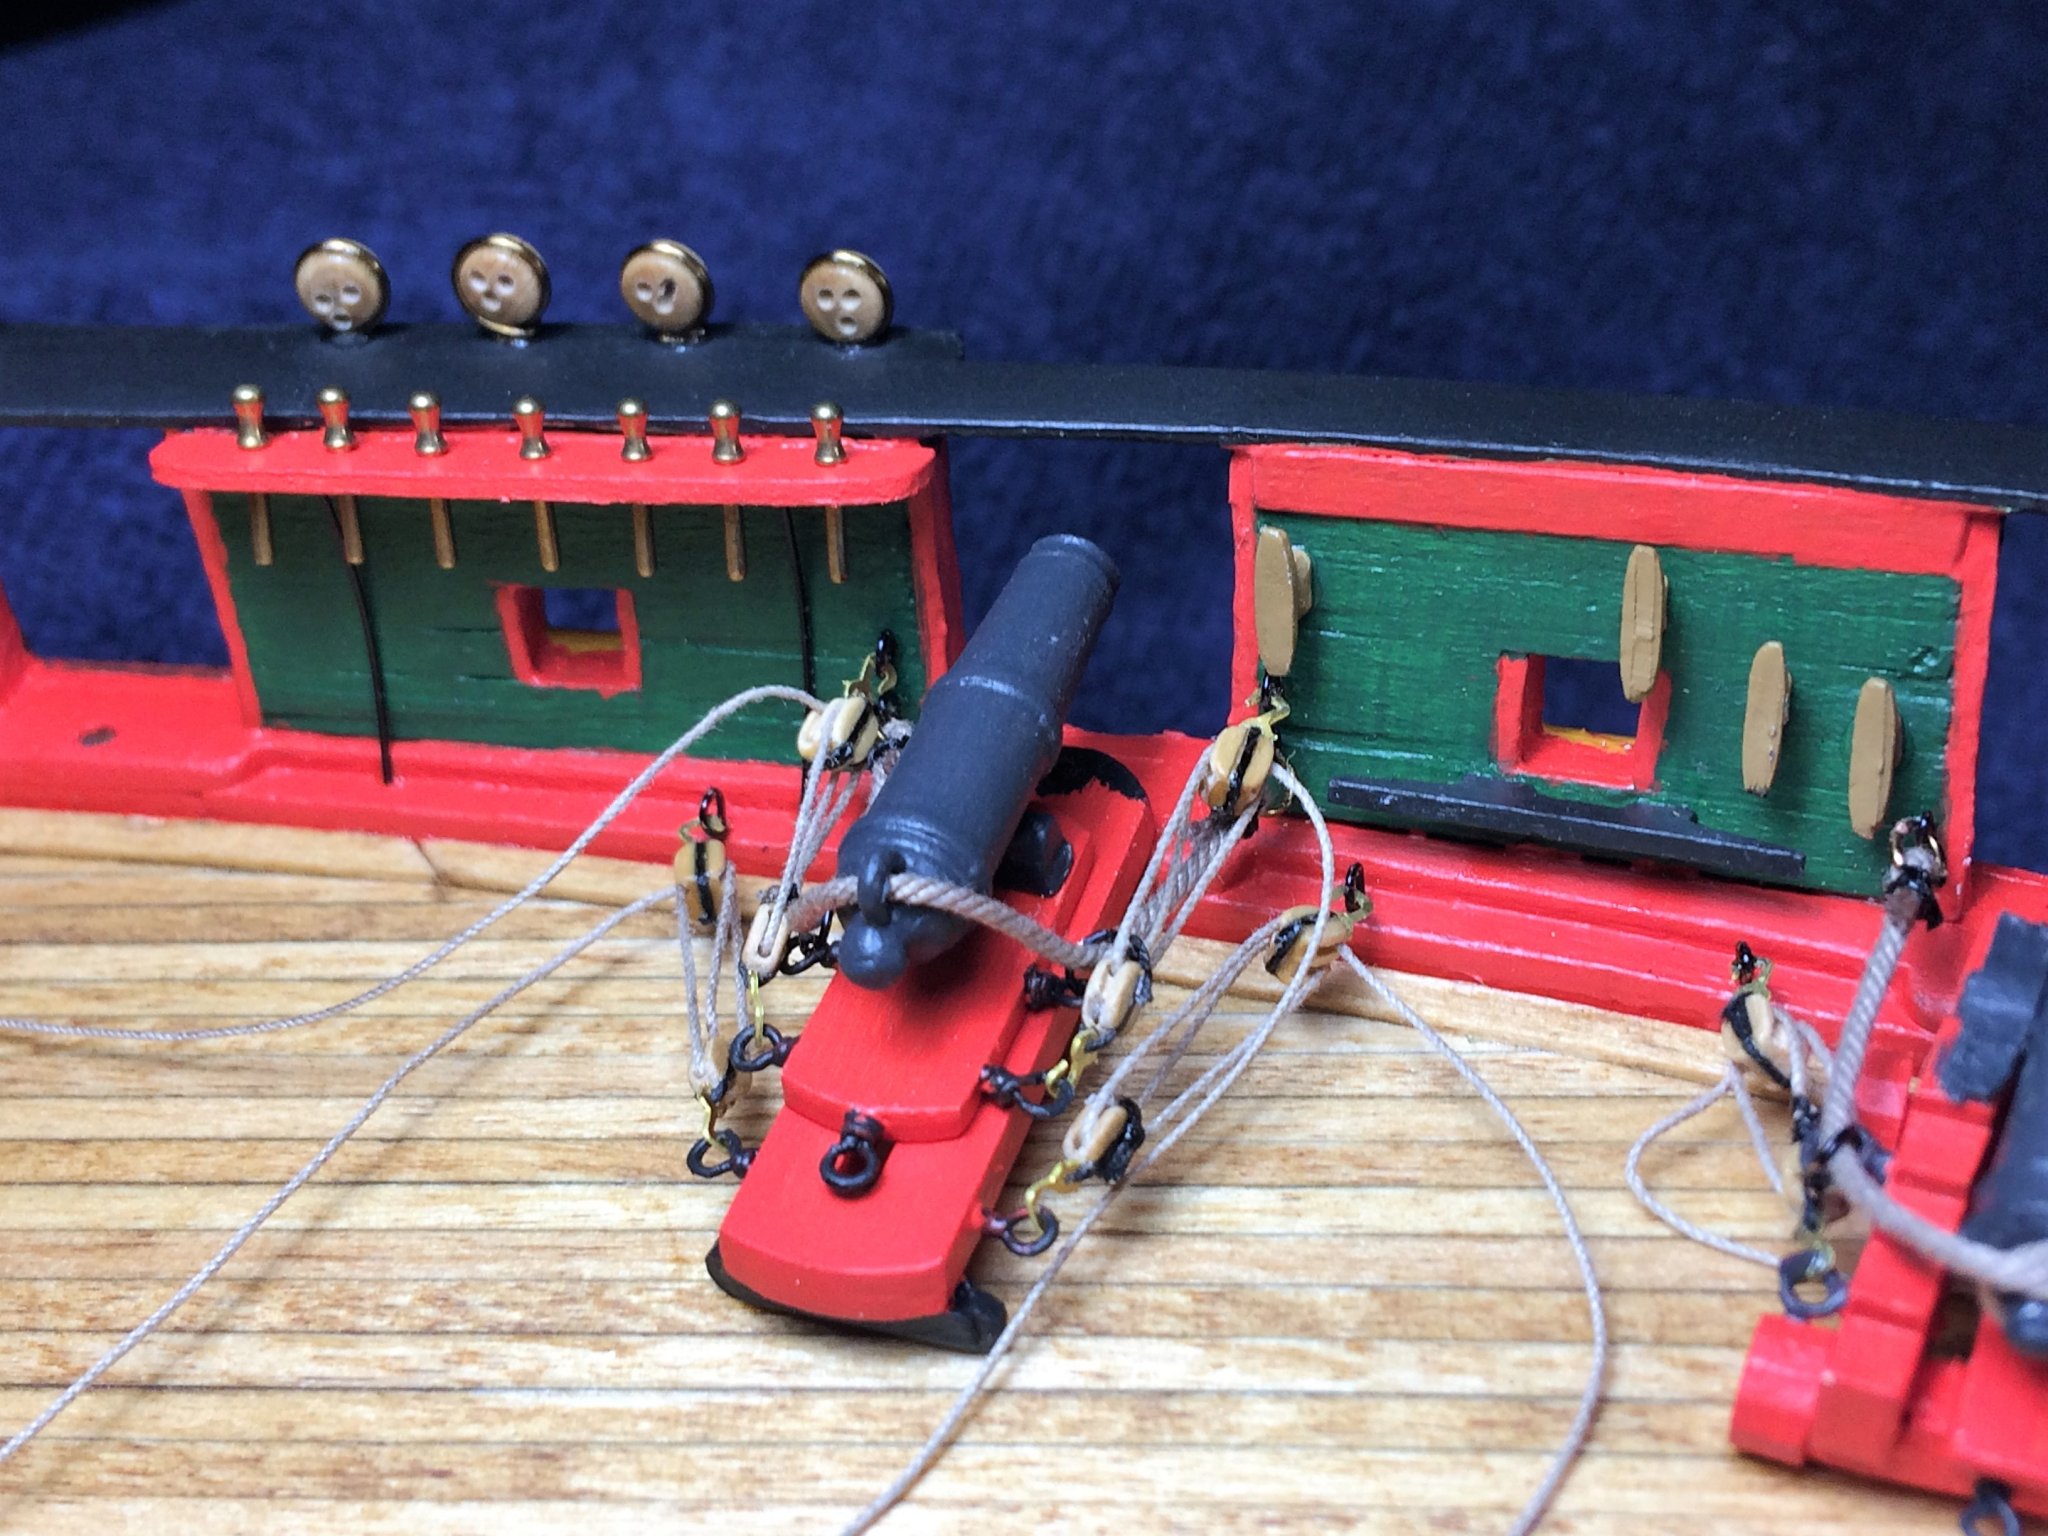
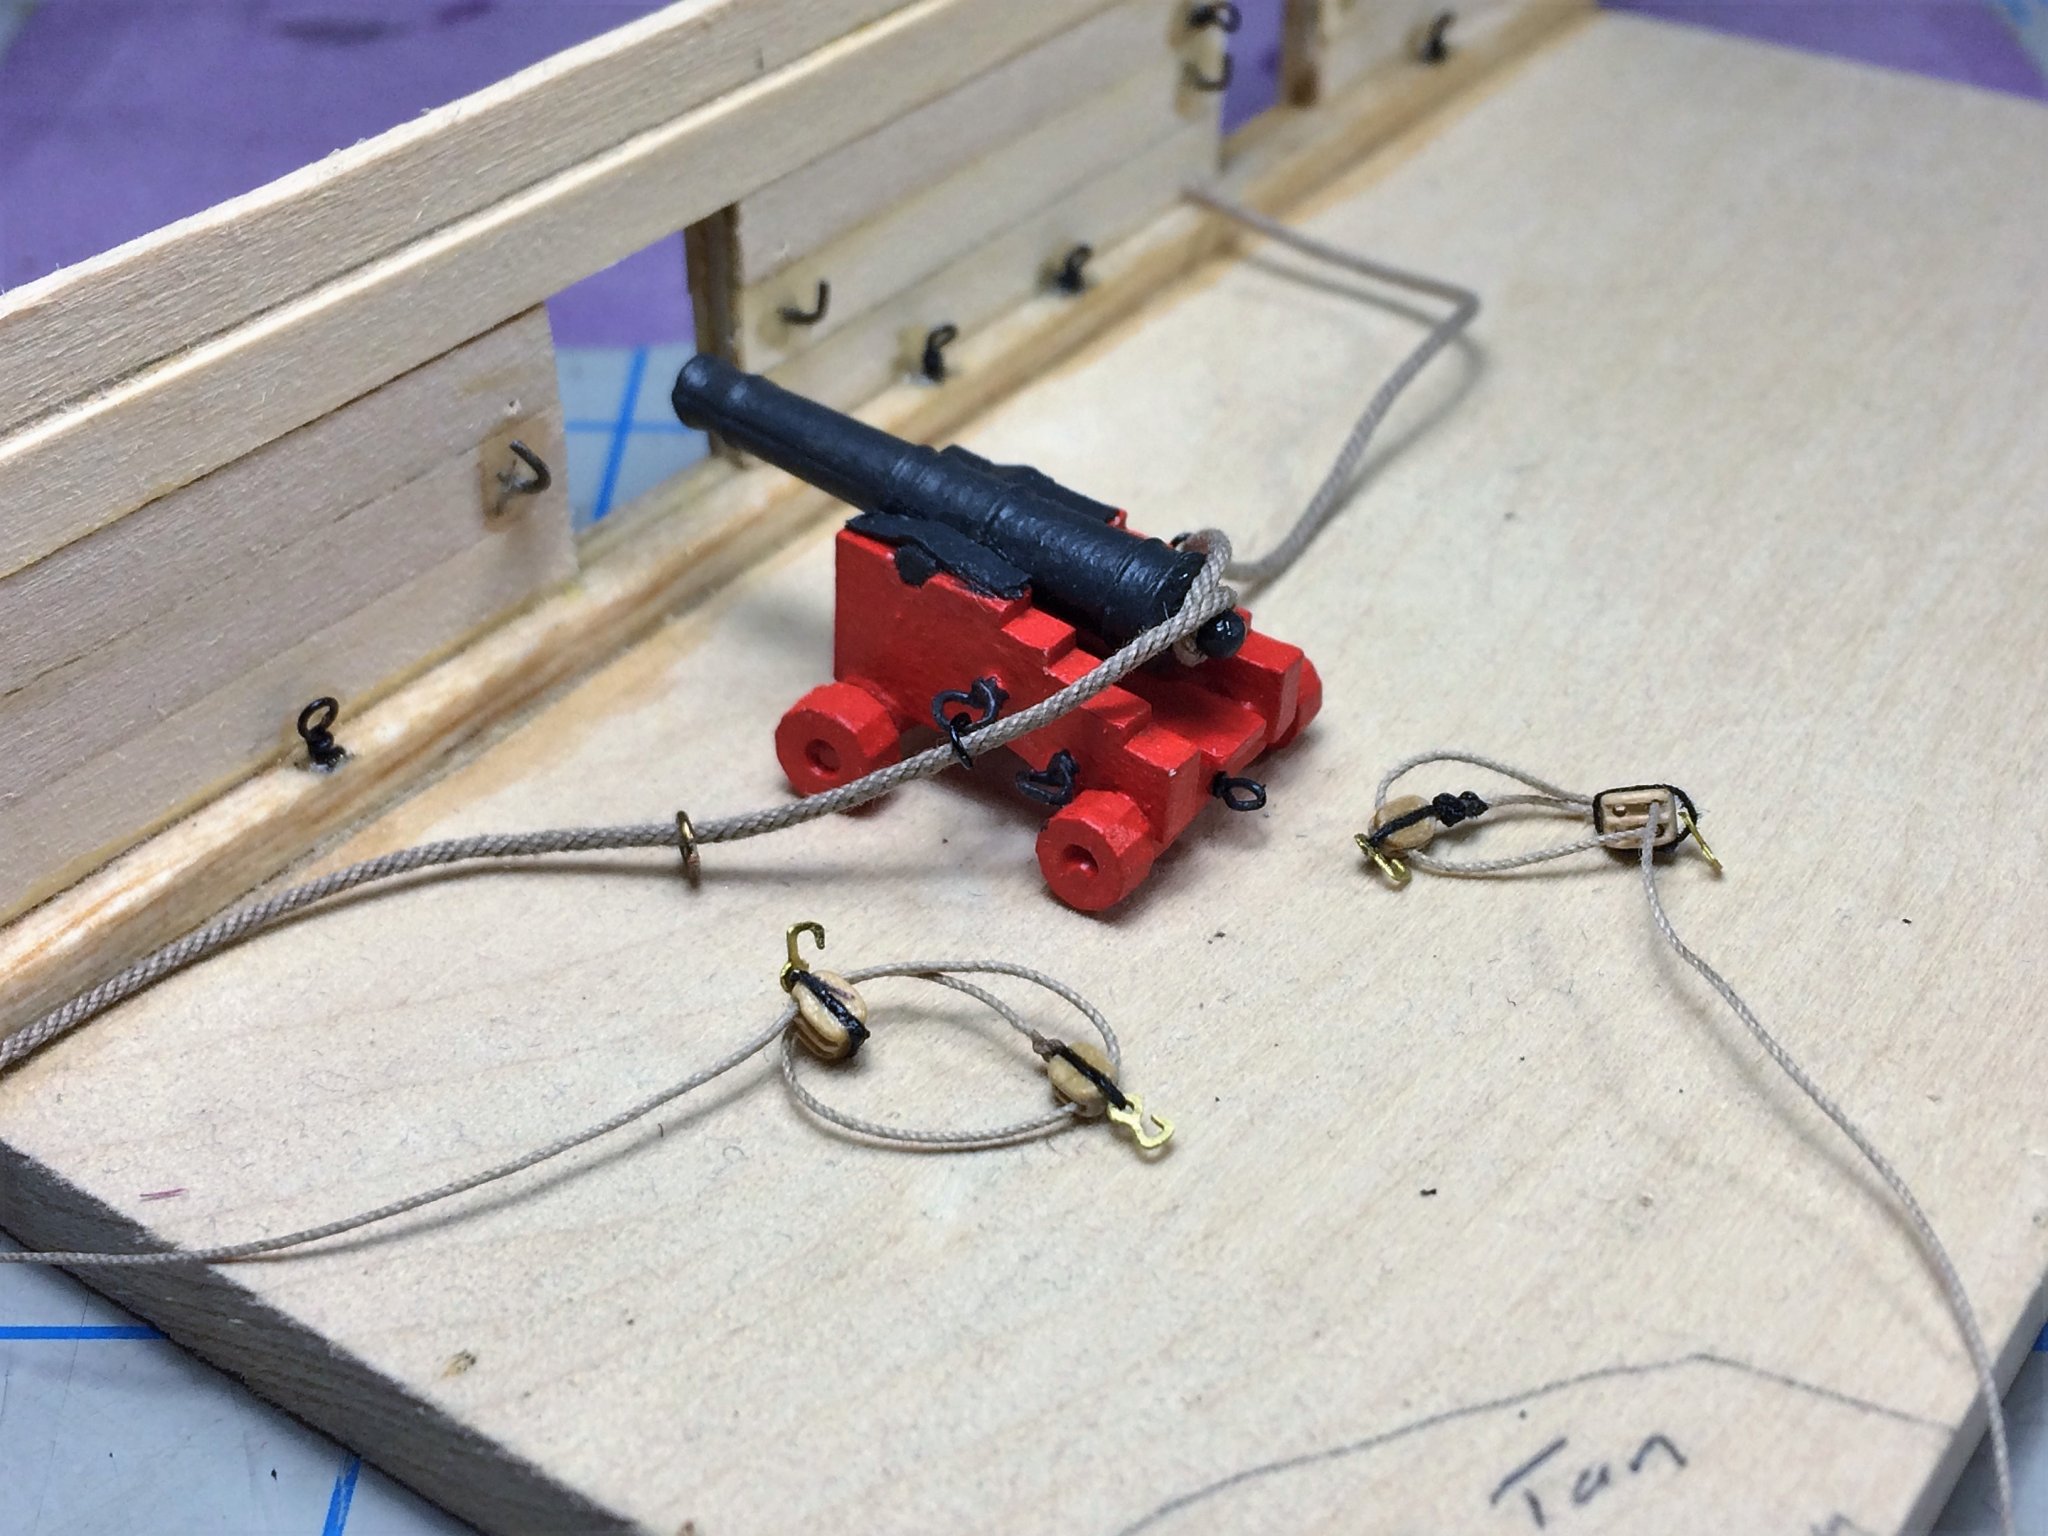
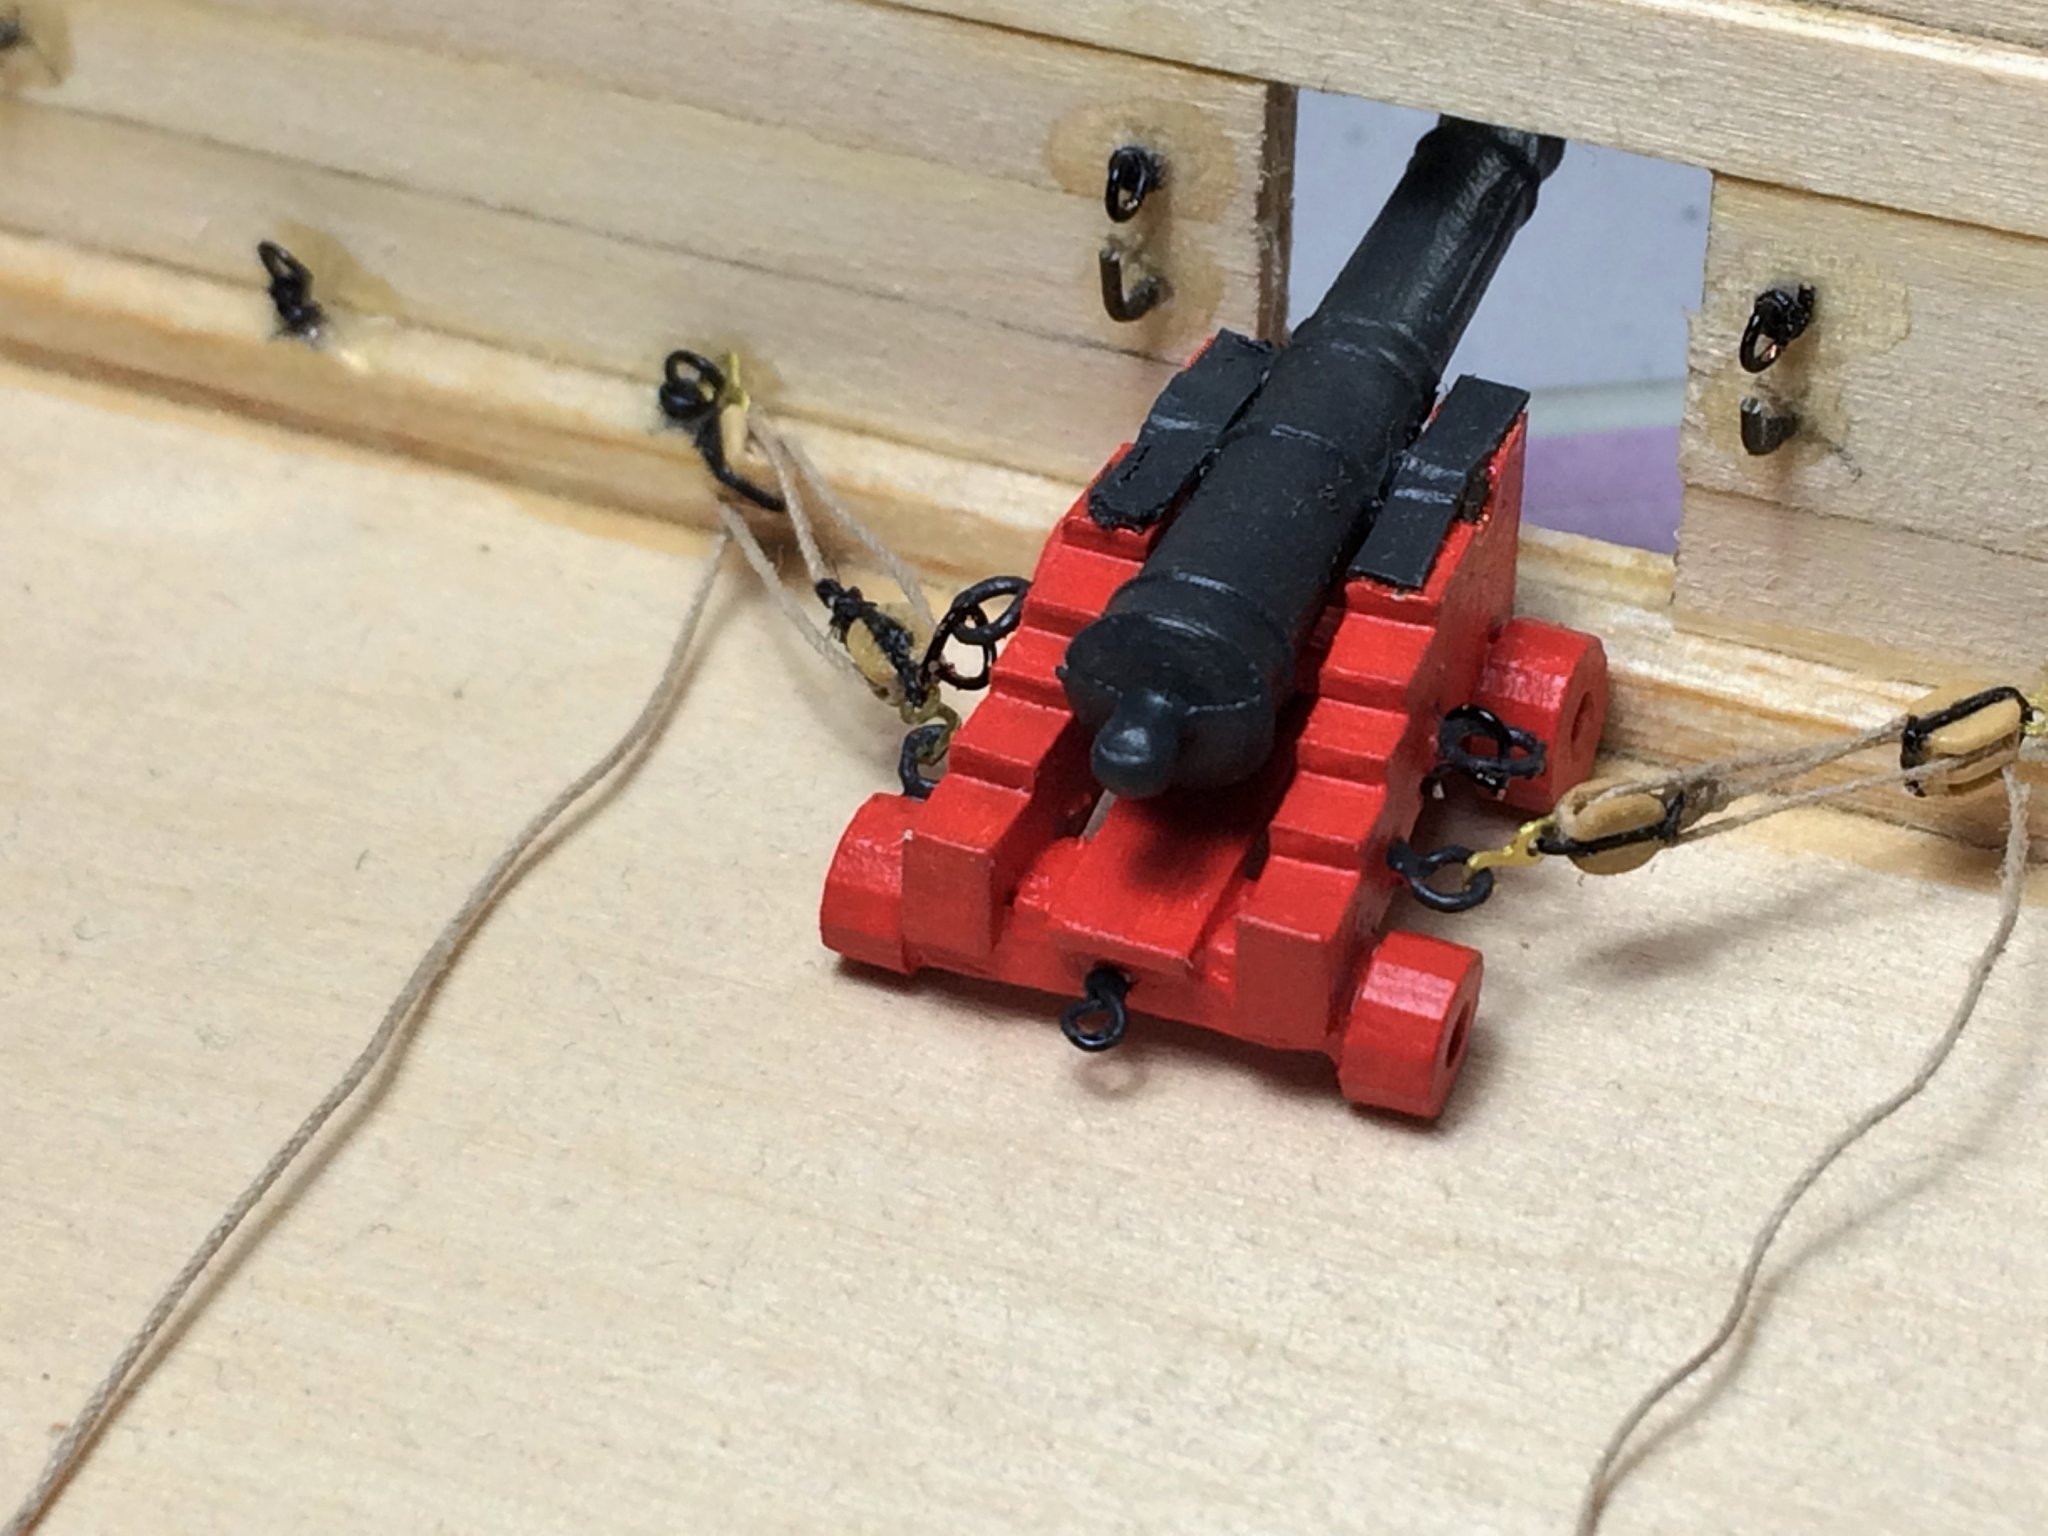
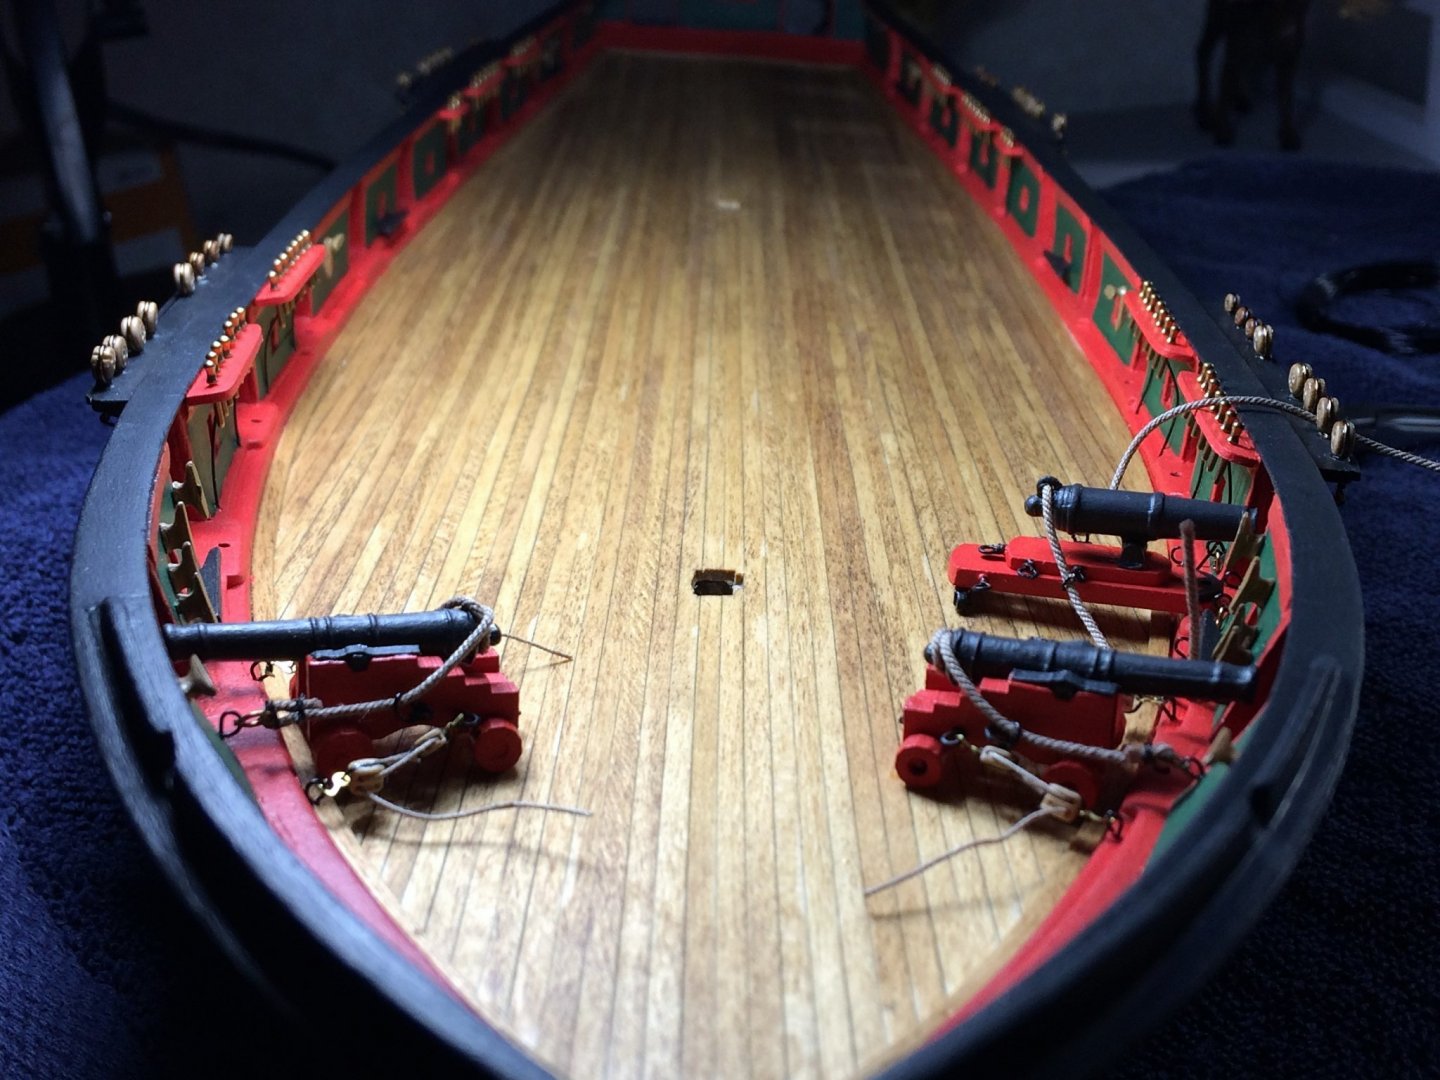
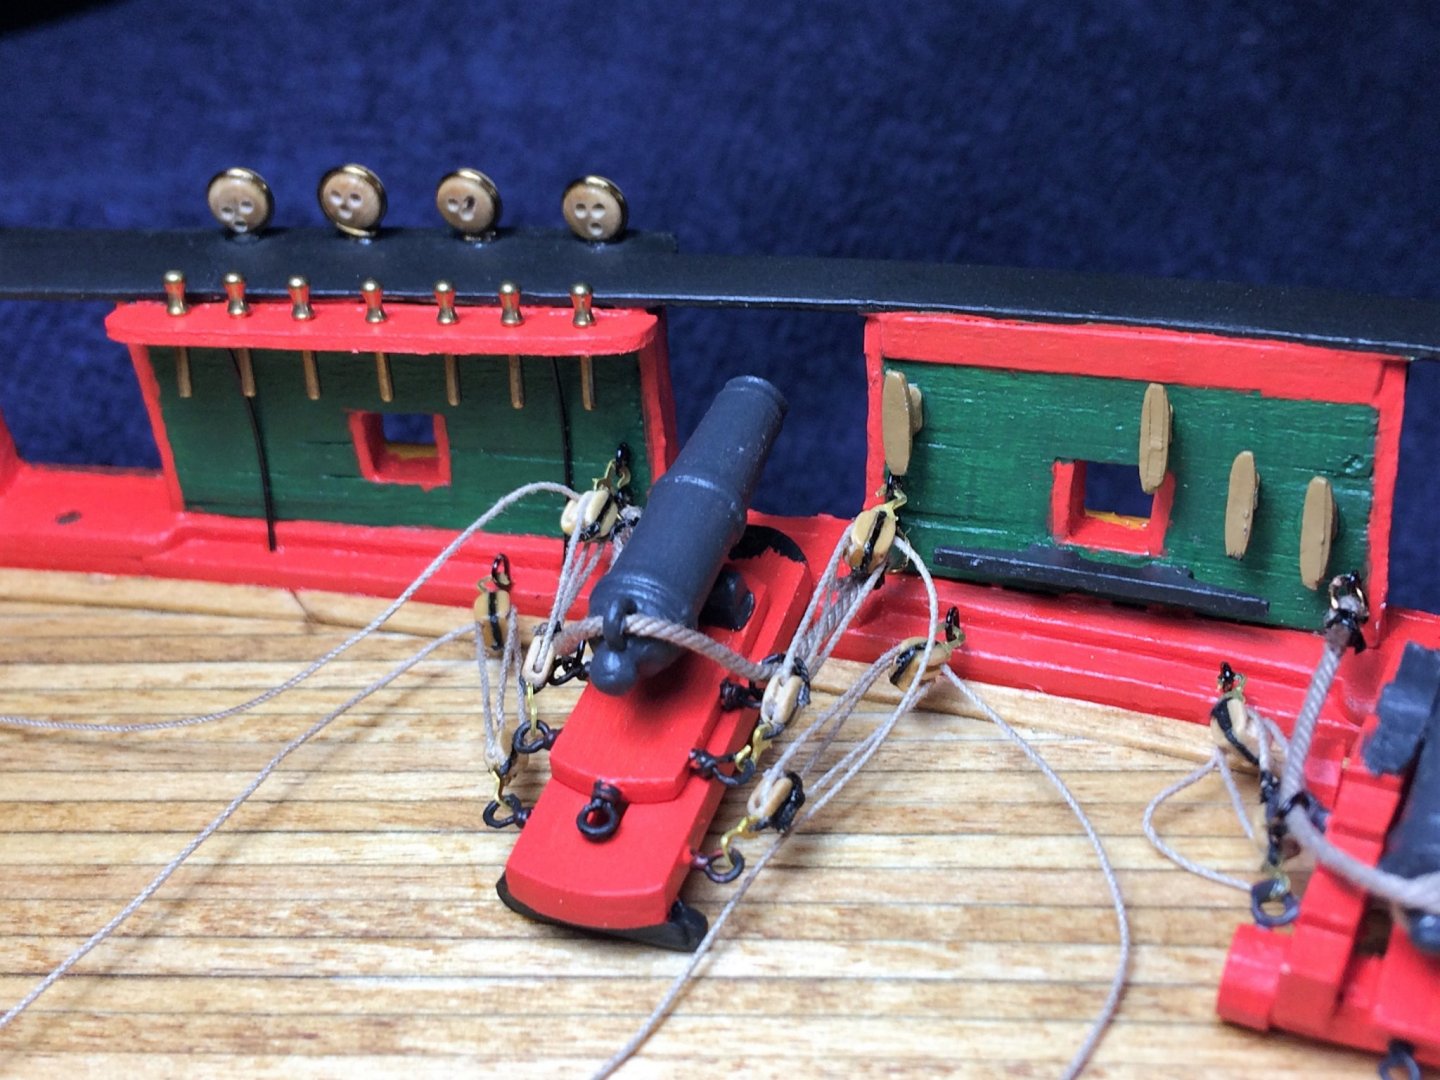
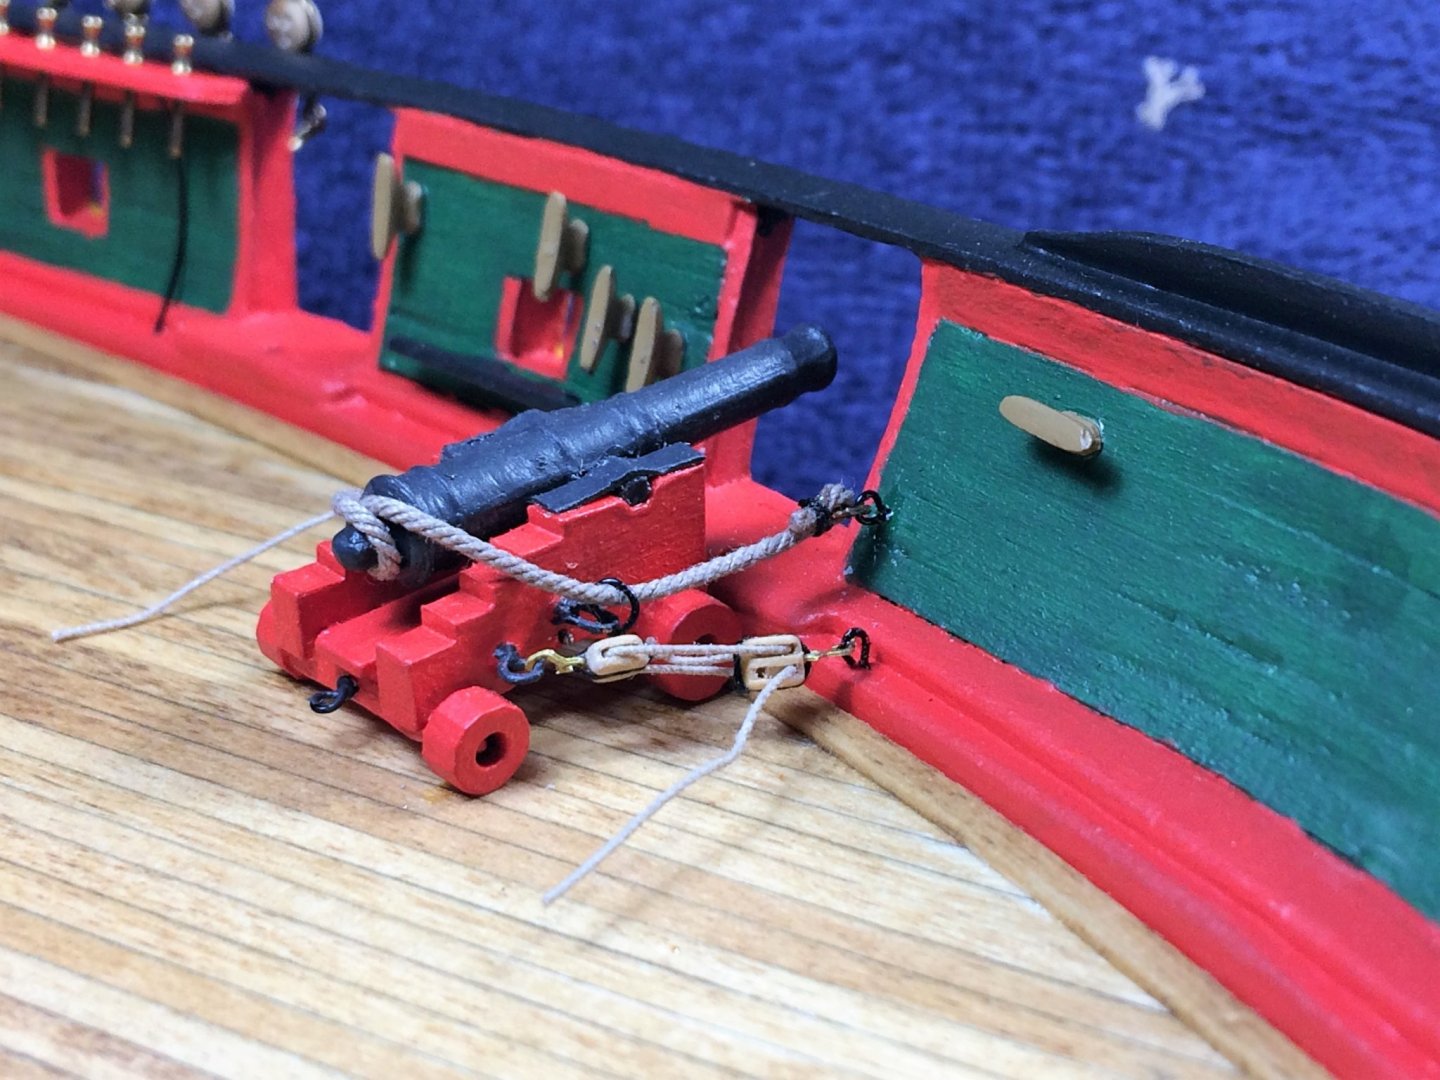
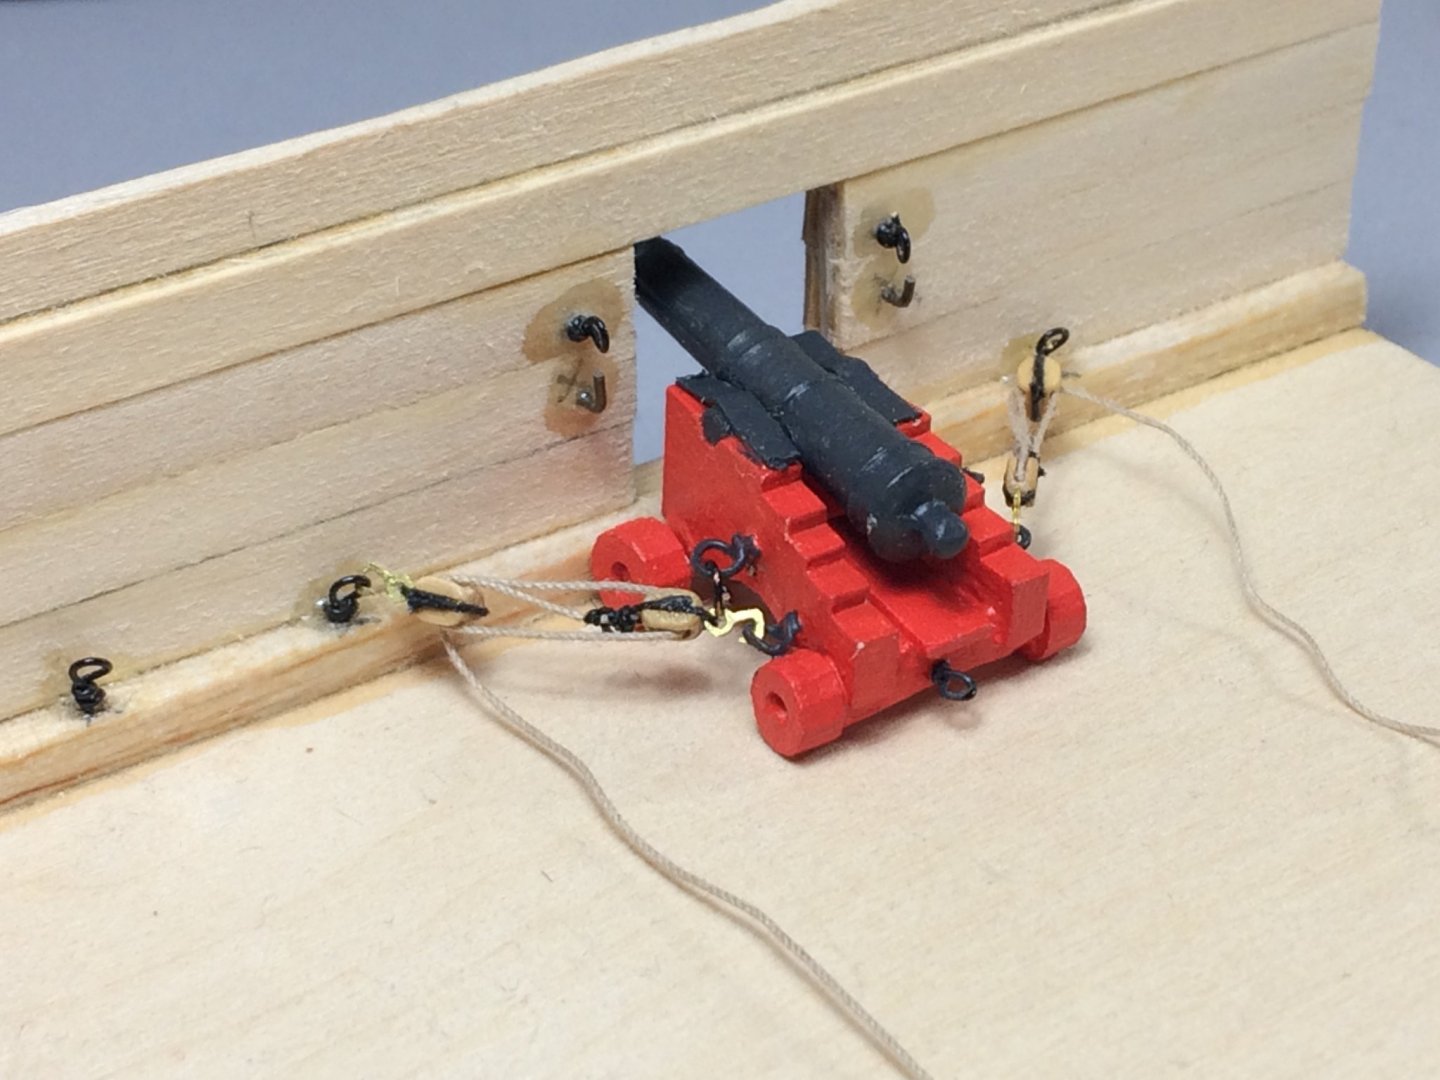
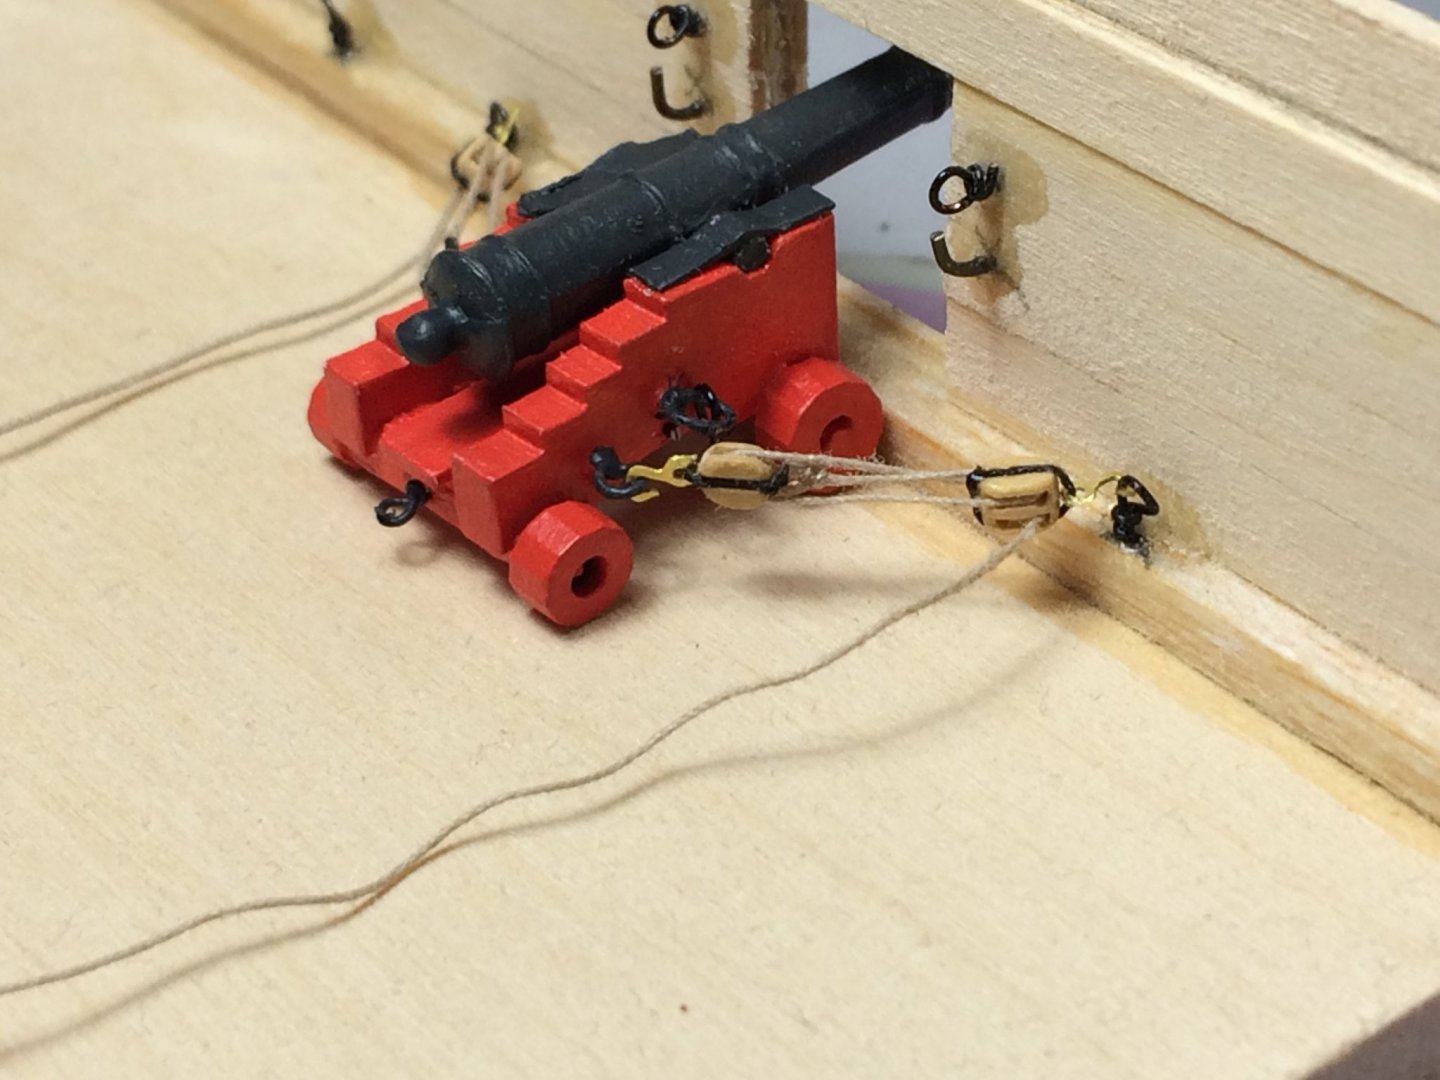
Evening, I'm a bit embarrassed that it's been almost a month since I last updated Niagara. Being back to work, it's been brutal. A lot of sick folks out there. Honestly though, I've worked in medicine for 15+ years now. I've never seen this industry, (pardon my language) get it's "poop" wired so tight so quick. Truly amazing how it's being mobilized. These folks are gonna need a drink after this, they've earned it. Anywho……. A well deserved retreat to modeling is just what's needed!!!!!! Plus the fantastically chilly adult beverage next to me is helping! With the two forward cannon done, the rope coils will be added later, I started with one carronade. I figured just doing one at first, I can wrap my head around the best sequence to install. One thing I did learn from the cannon, install the breech rope first. To be perfectly transparent, the cannon/carronade are glued to the ship/sleds. I know some master builders could probably rig these without anchoring them down...…..not this guy! I probably over did it with the extra length for the breech rope slack. I only have one package of the .035 from Syren. Don't think I'll run out soon, but I'm the type of builder that likes to have one extra package on hand. All in good time though. In the end, I still haven't got quite the right slack in the breech rope. I think what's happening is that when I tie everything off I use hemostats to help. I must be putting pressure somewhere on that set up that's giving me a "false" look. Thank goodness there's 17 more cannon to figure it out!!! All the block and tackle where rigged off ship and just set into there respective eyebolts. Little bit of a spiders web of rope. That's ok, looks like progress to me!!!! Very slow and deliberate method. At the most I wont install more than four carronade at a time. I don't like the "overwhelmed" feeling when installing all twenty cannons at once. Strop a few blocks, install a few cannon...…….all in good time. Wash your hands! Tom E


-
B-25J Mitchell by Tom E - Revell - 1:48 Scale - PLASTIC
Tom E replied to Tom E's topic in Non-ship/categorised builds
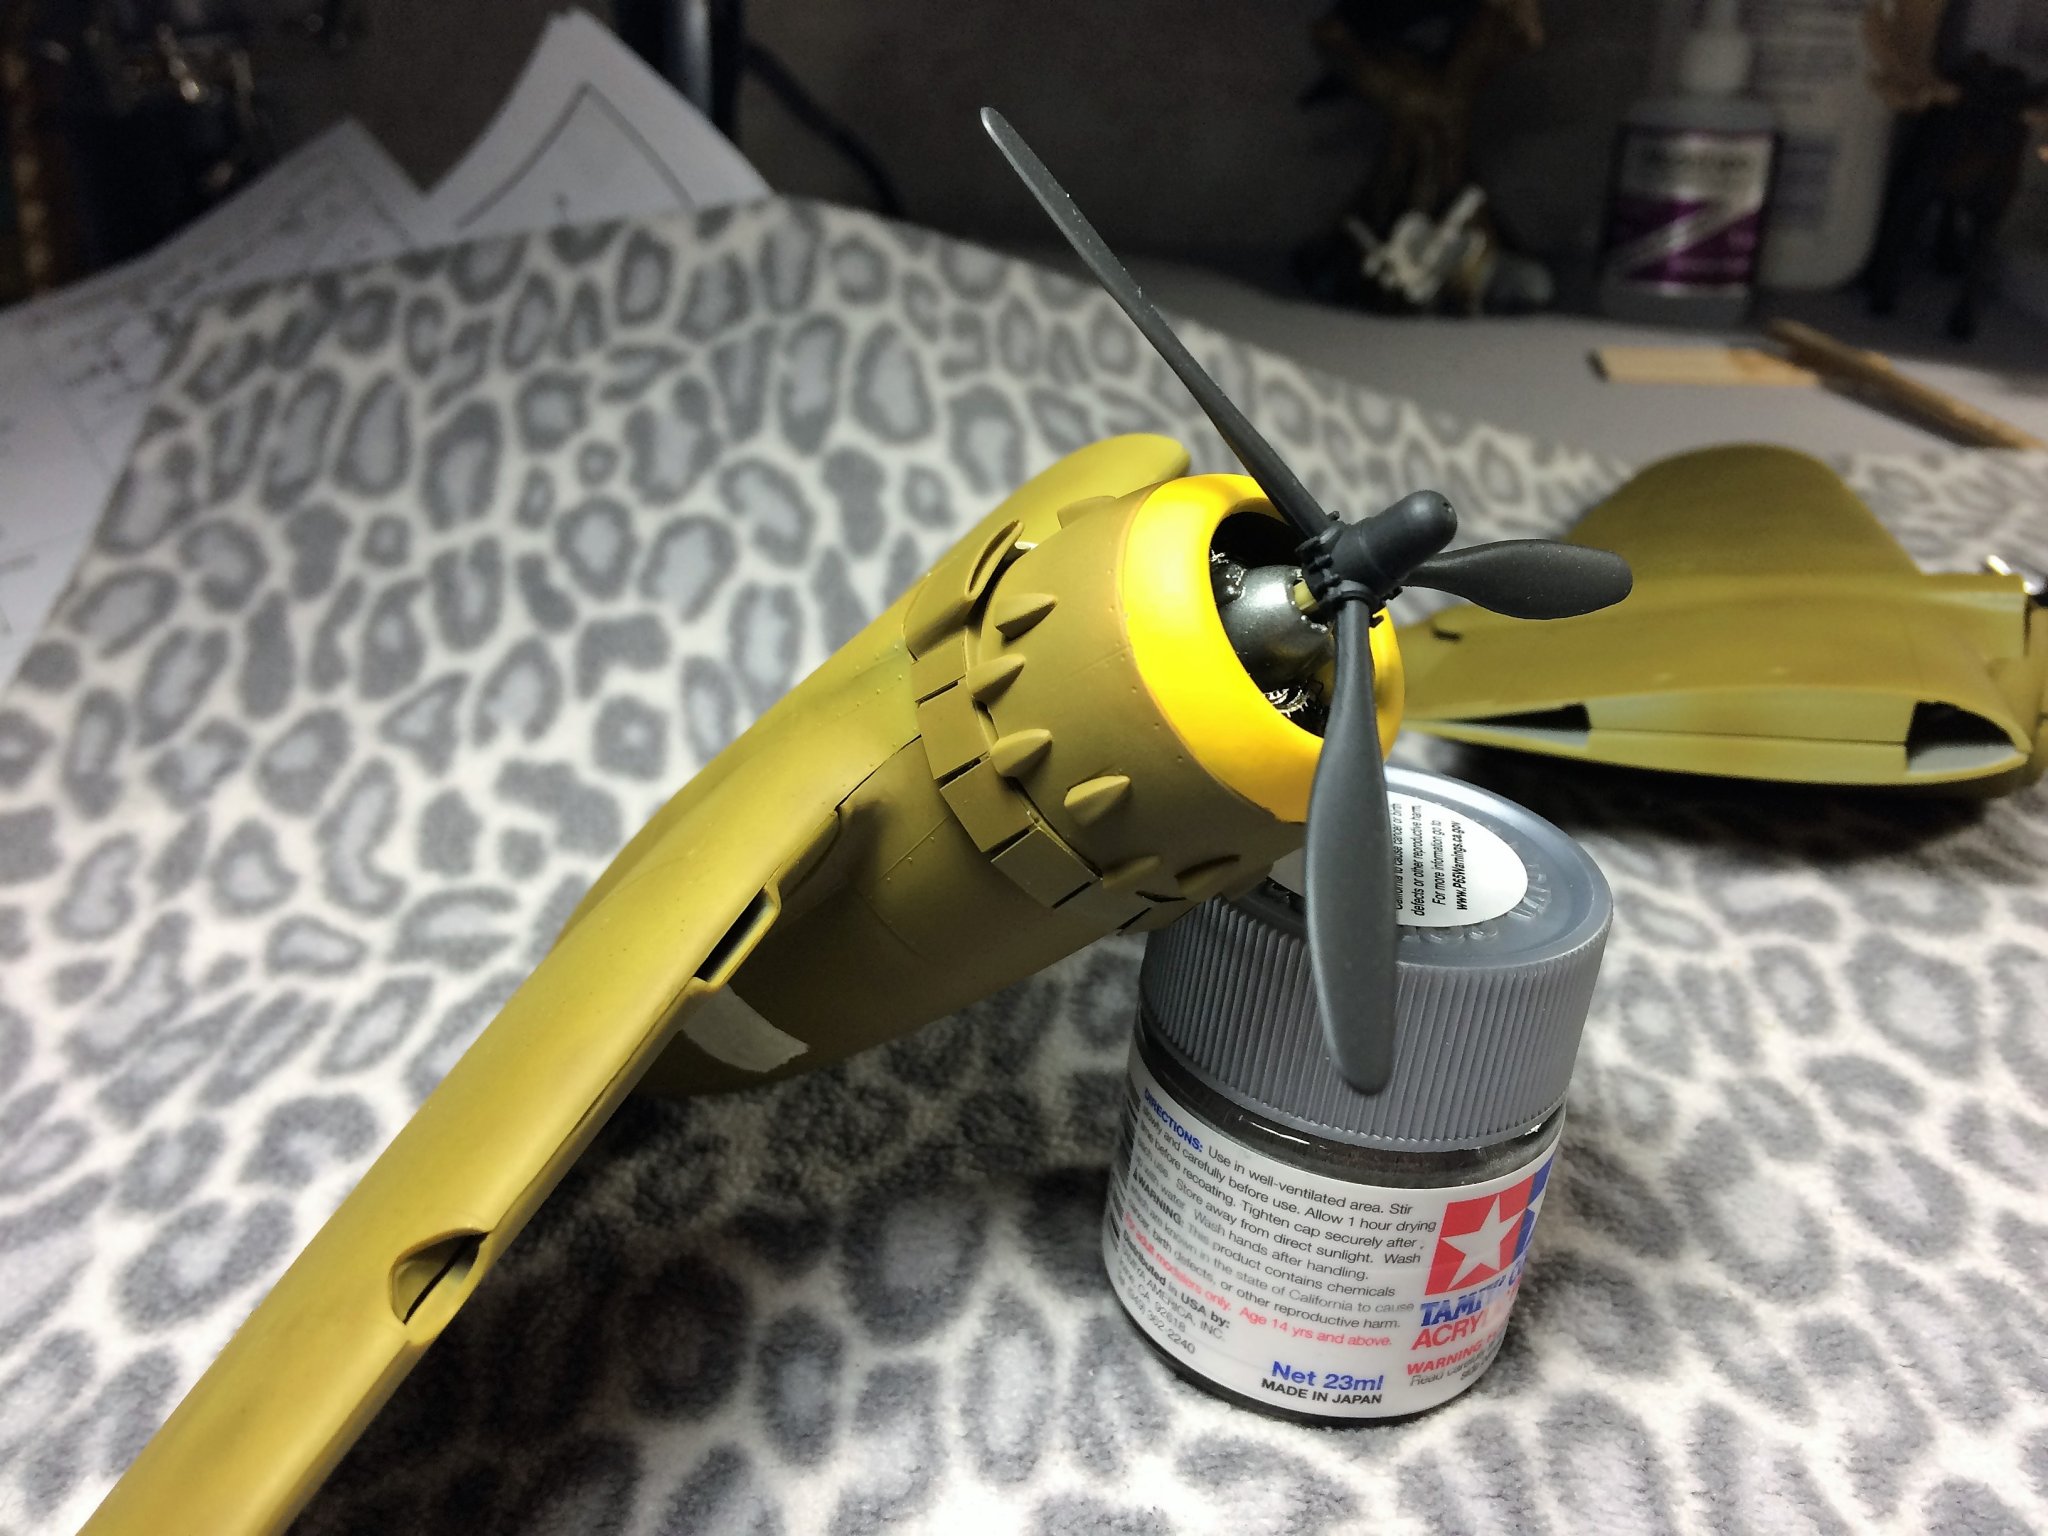
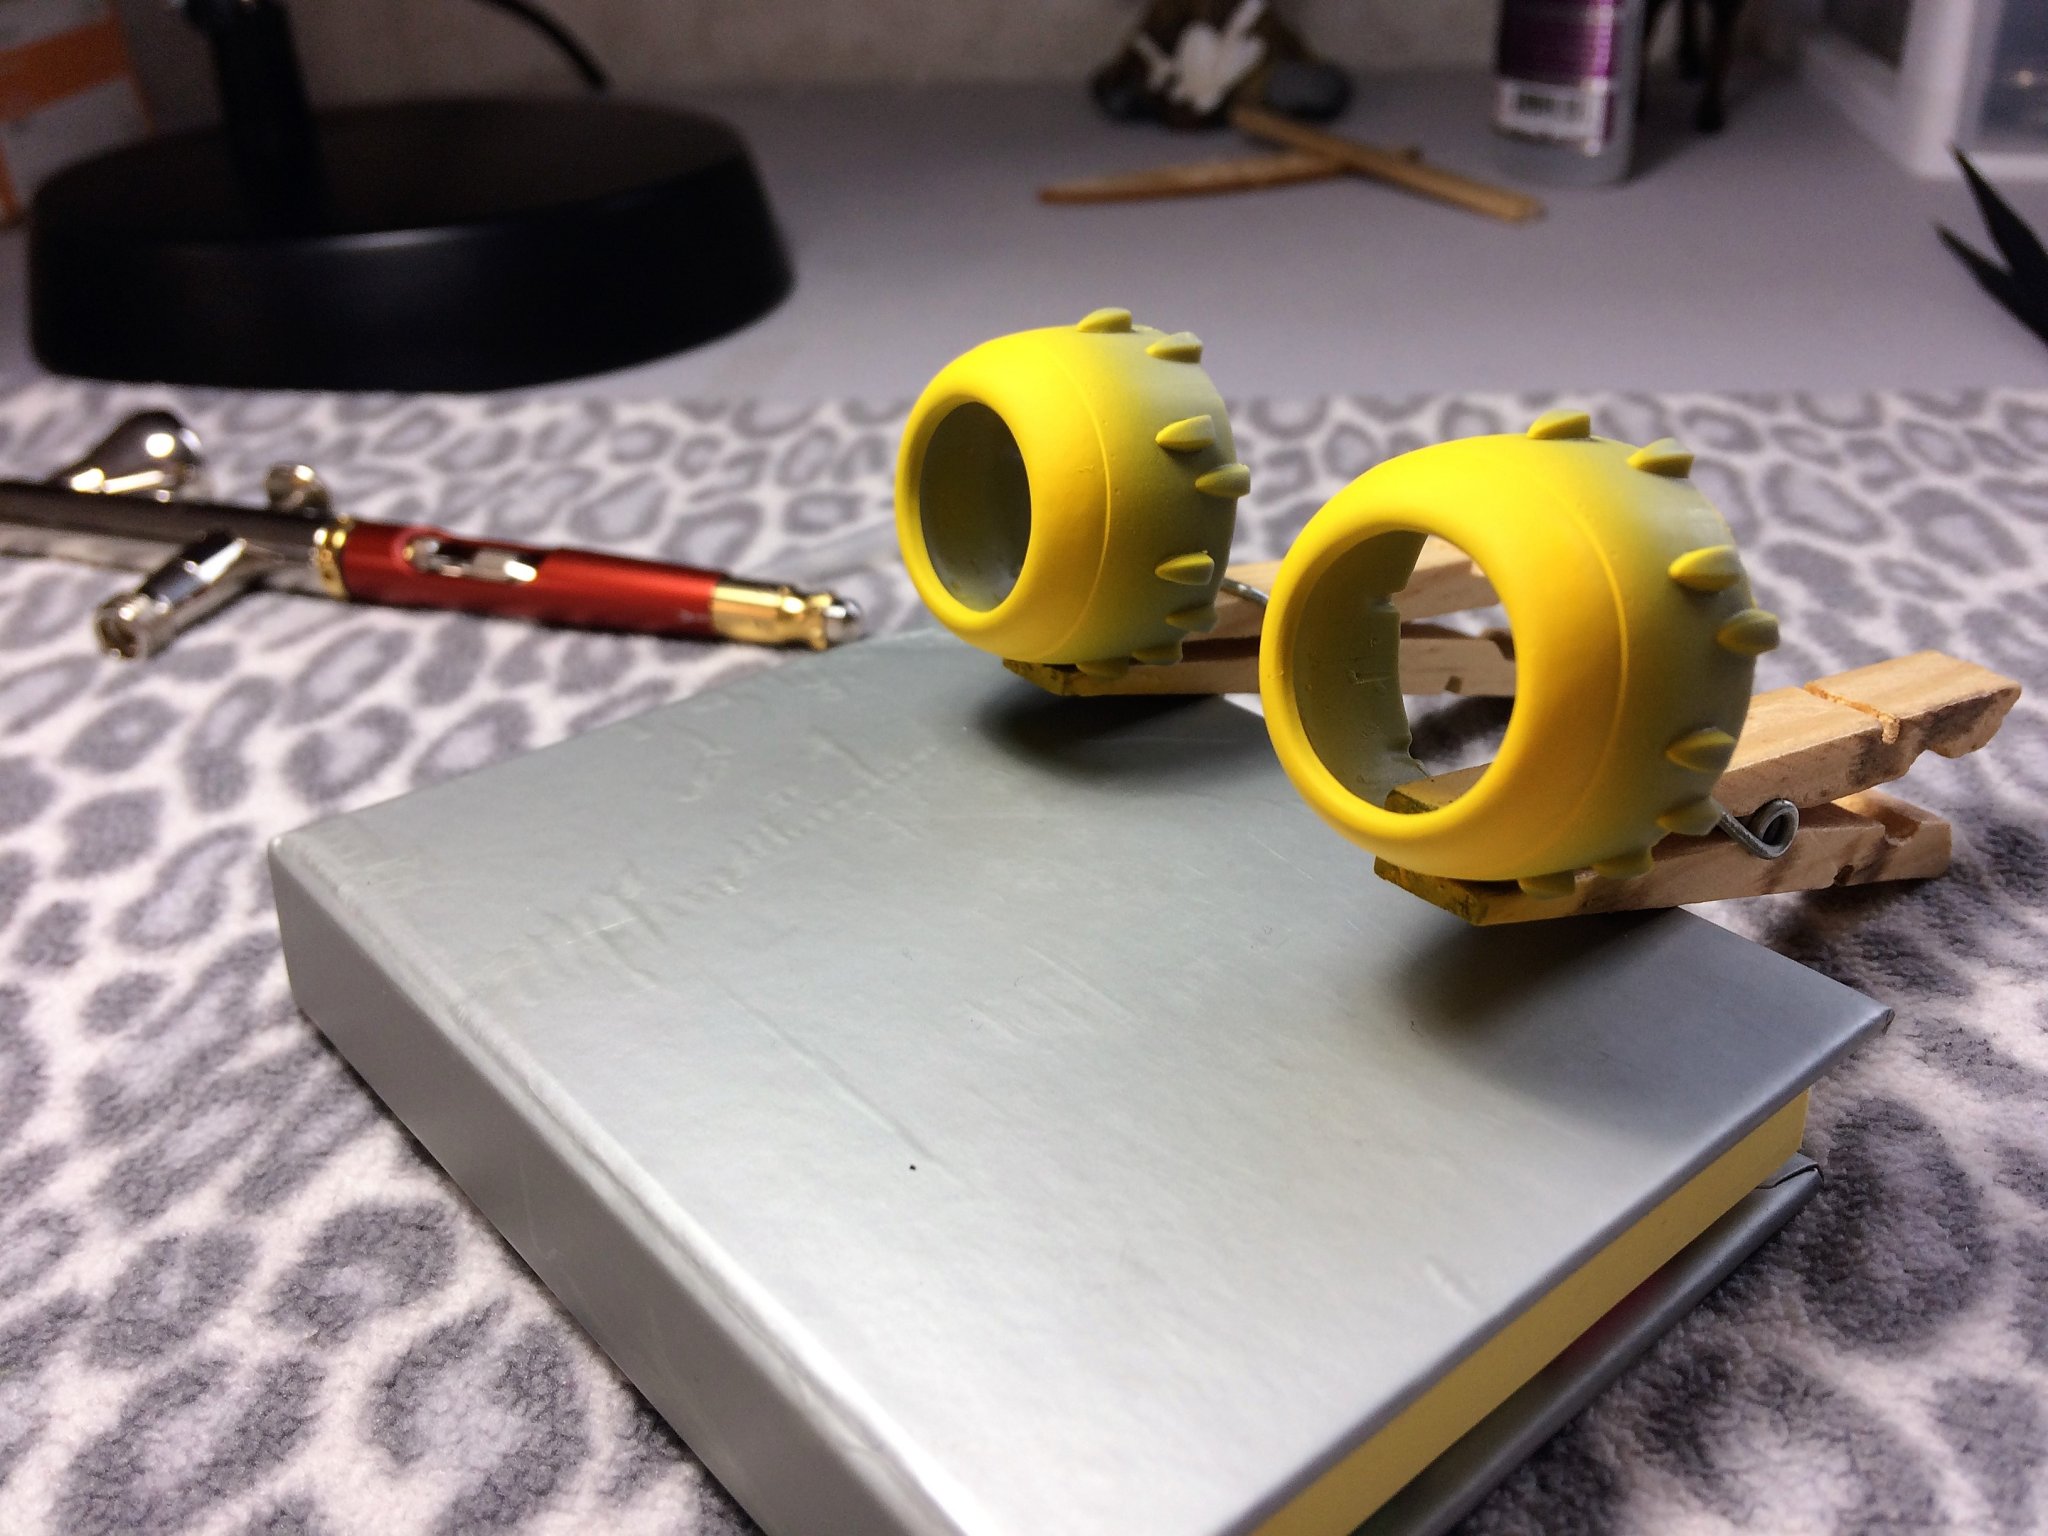
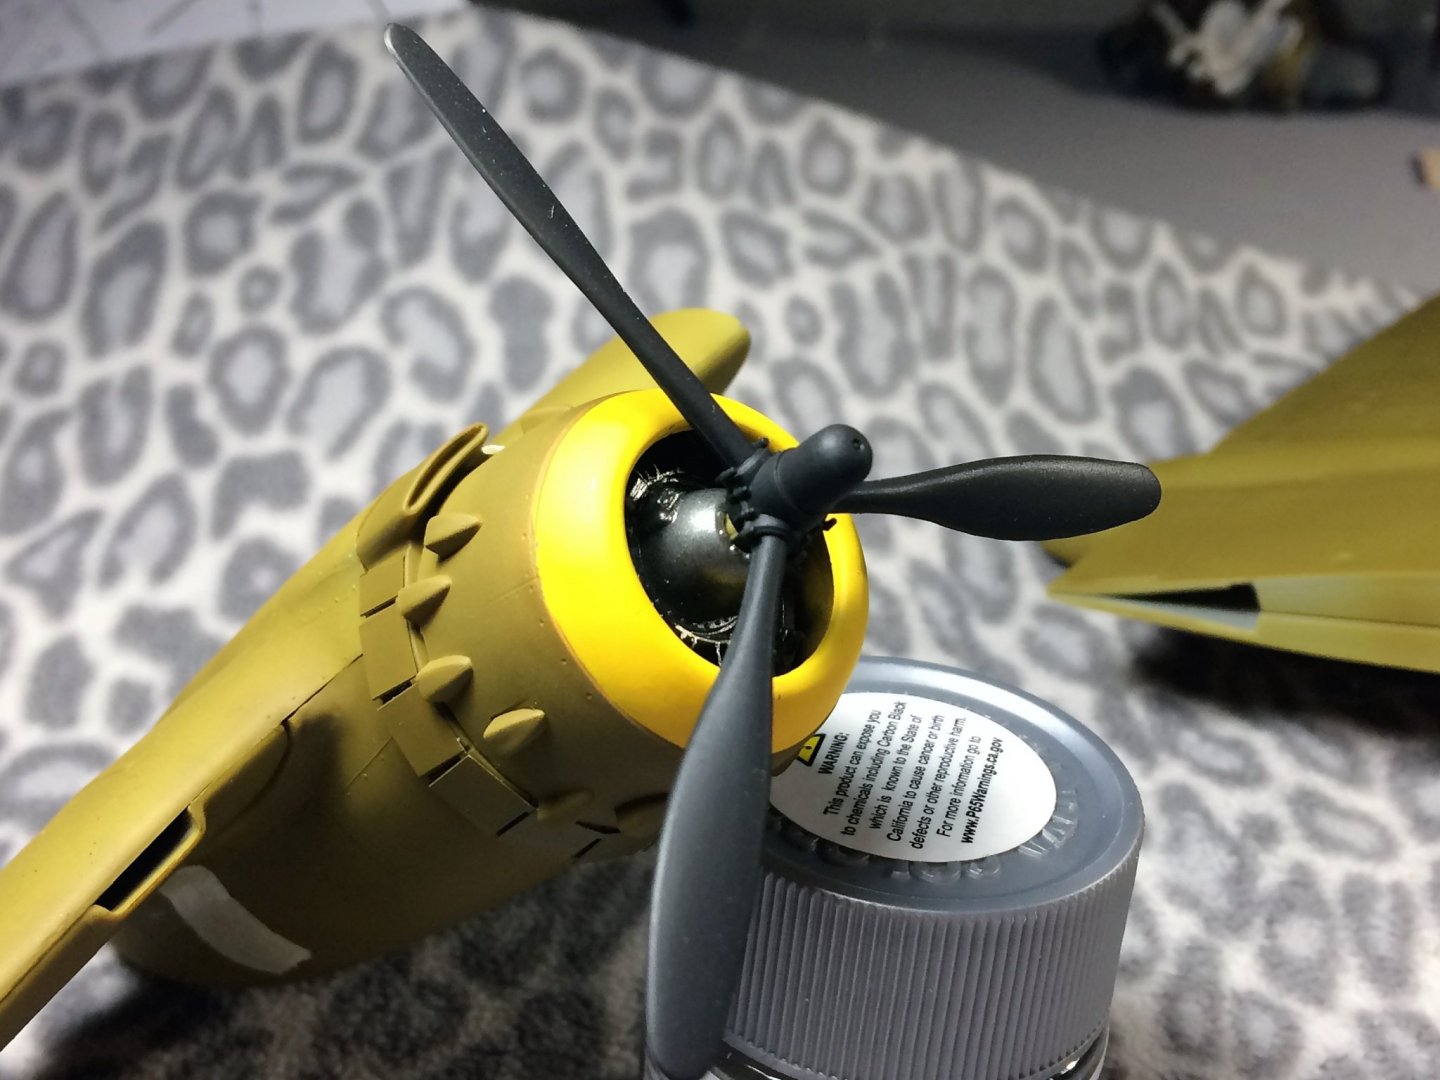
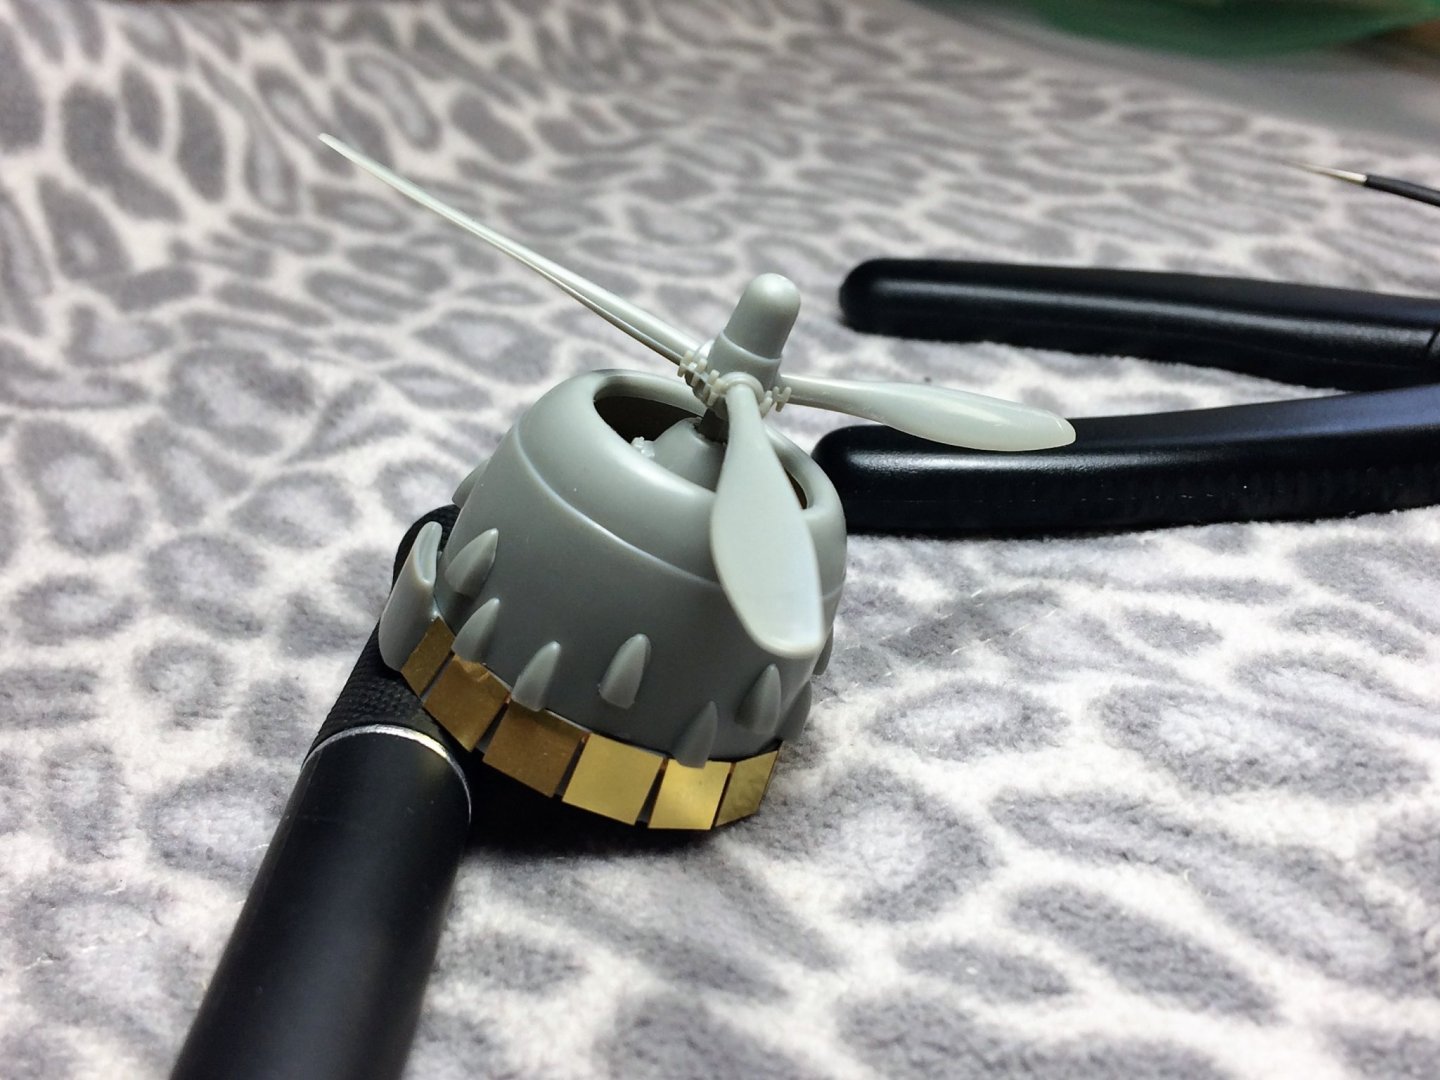
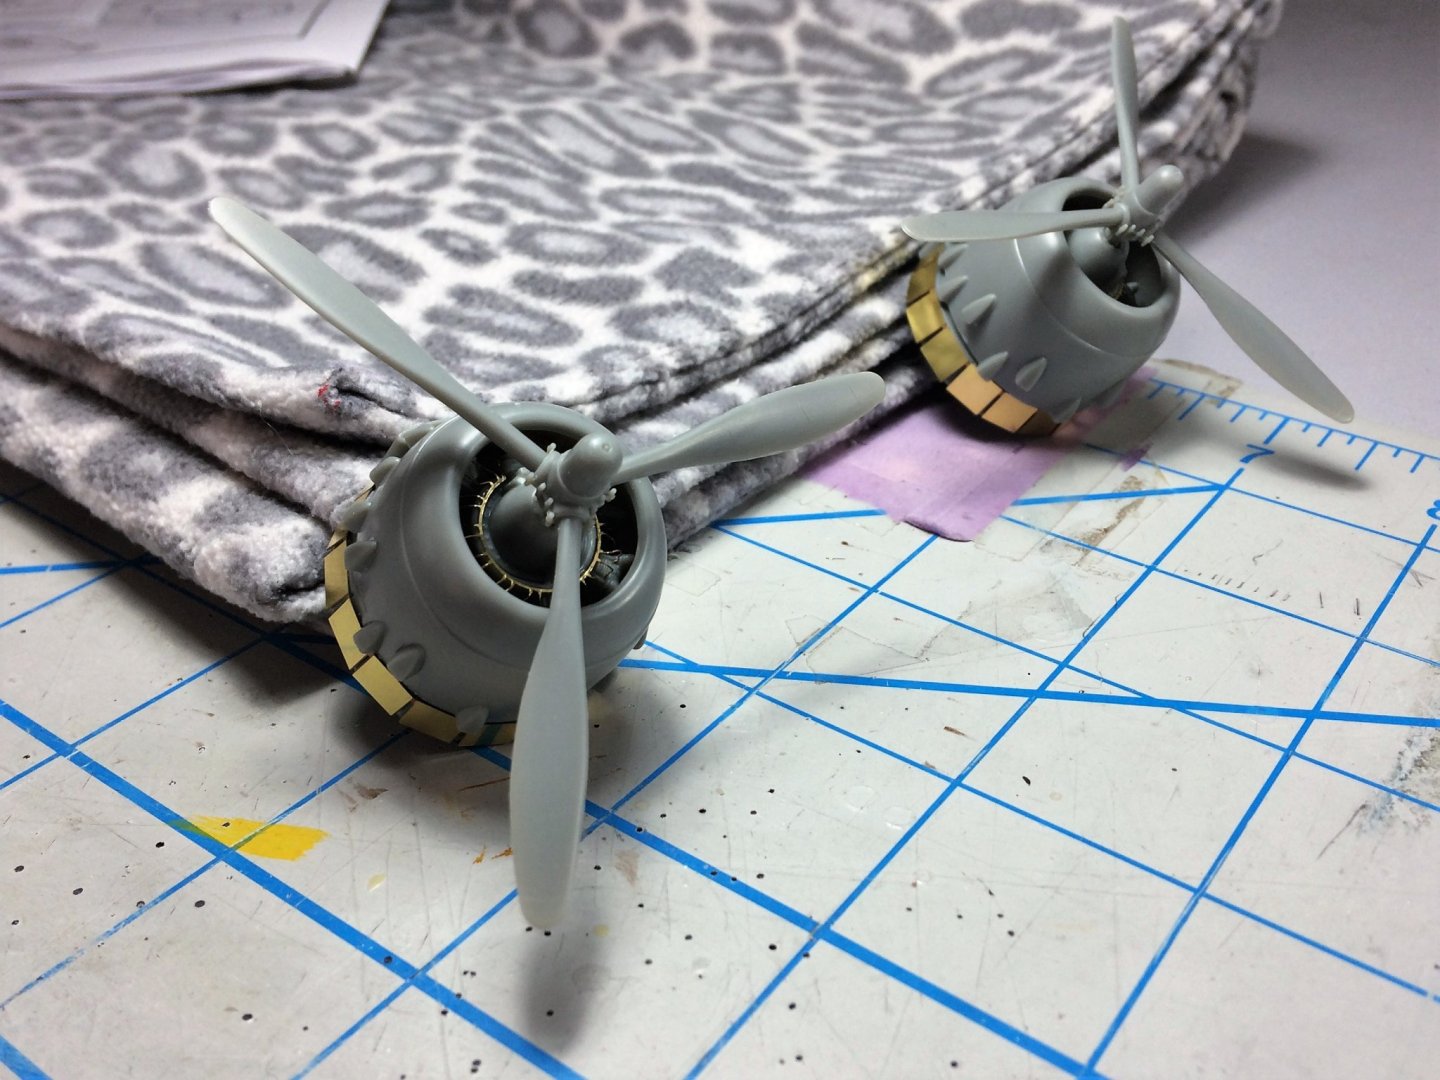
Evening, Thanks for looking in all the likes! Mike, I went with this model for learning because of it's size. It's not the biggest or the smallest model I've built, but just the right size to hide "first timer" mistakes! I figured bigger than 1/72 but no 1/200 battle ships yet. The tape has come off the engine cowlings. Not too shabby. Some leakage, could have done a better taping job. I must say the Tamiya brand masking tape works really well. Slowly coming together. I started taping the fuselage as well. It's next to get it's exterior paint. Being my first go around with airbrushing. Wasn't sure if it was better to paint interior first then exterior later. Taping wasn't too bad here, tricky, but not bad. Being that I needed something wider than Tamiya masking tape, I used a simple 3M masking tape. I also painted the propellers. Used a Mr. Color flat black. These will get there distinctive yellow stripe at the end of each blade and flat aluminum for the central hub and accents. I think there are some decals for these, I have to look into that. Well, as of today with the ban on some medical procedures being lifted, It was back to work for me. Cataract, Retinal, Glaucoma surgeries, eye injections and most other eye procedures, even simple basic everyday eye exams were put on hiatus. Some people get monthly injections in the eye for Macular Degeneration. Those people haven't been getting those injections. The injections delay vision loss. If folks miss these injections, essentially damage done and vision is lost. There's going to be a lot of desperate folks. It's going to be a mess! Models may not be on the top of my agenda for the next day or two. At least until our team finds it's rhythm and starts humming again like a well oiled machine. Tom E

- 120 replies
-
- 11
-
-
B-25J Mitchell by Tom E - Revell - 1:48 Scale - PLASTIC
Tom E replied to Tom E's topic in Non-ship/categorised builds
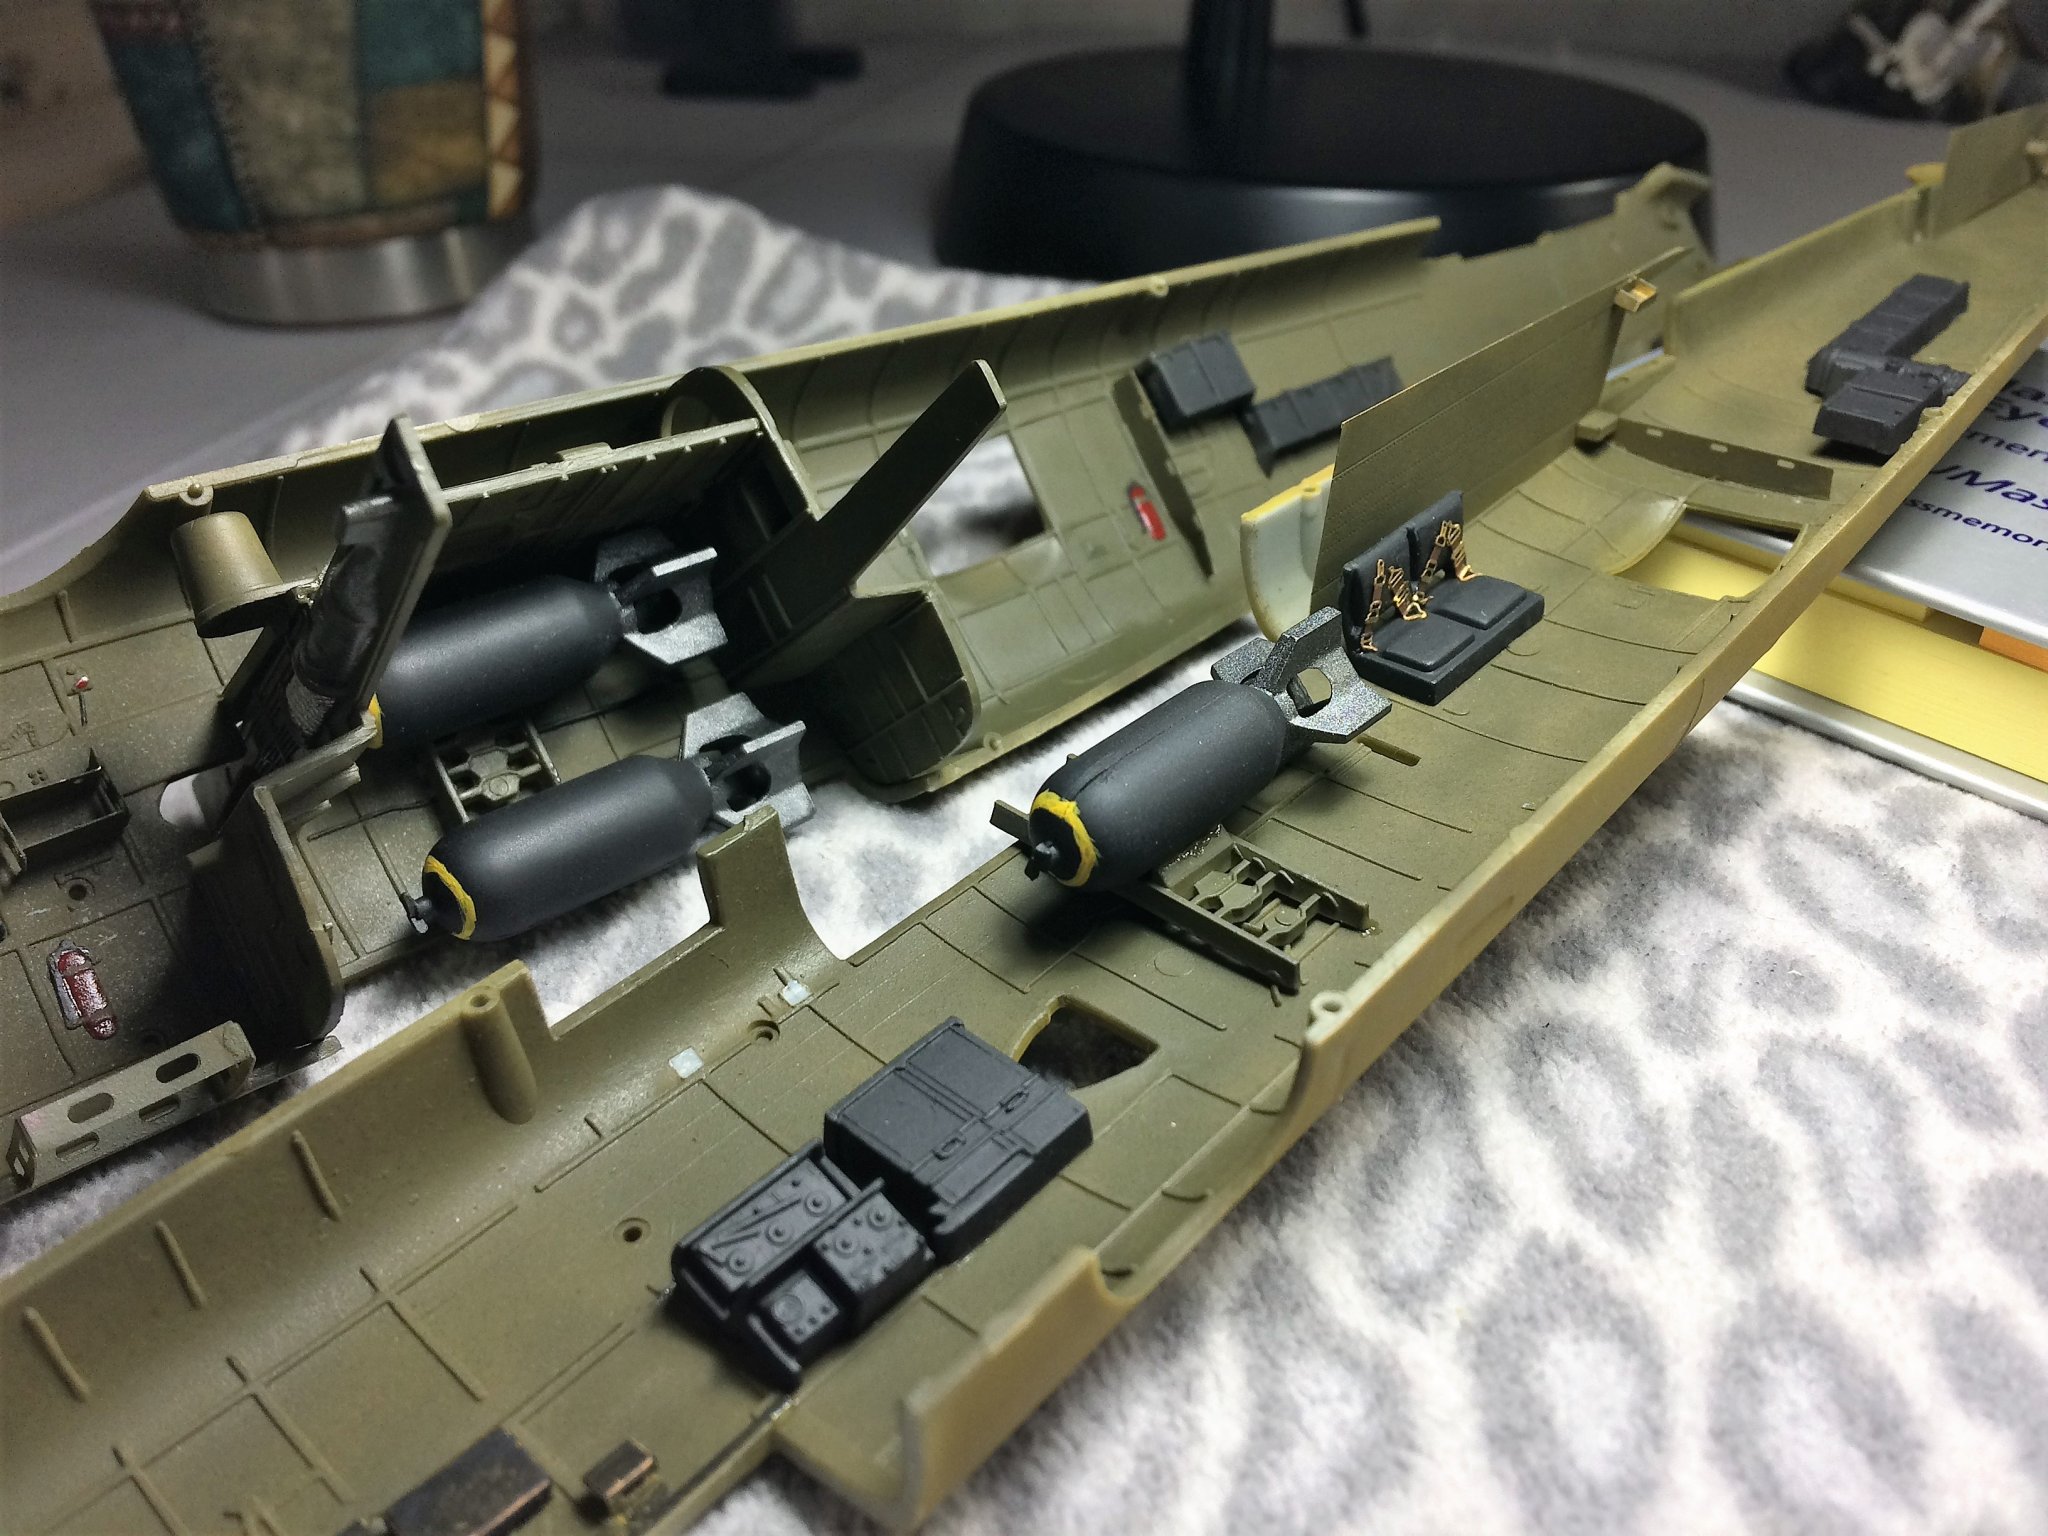
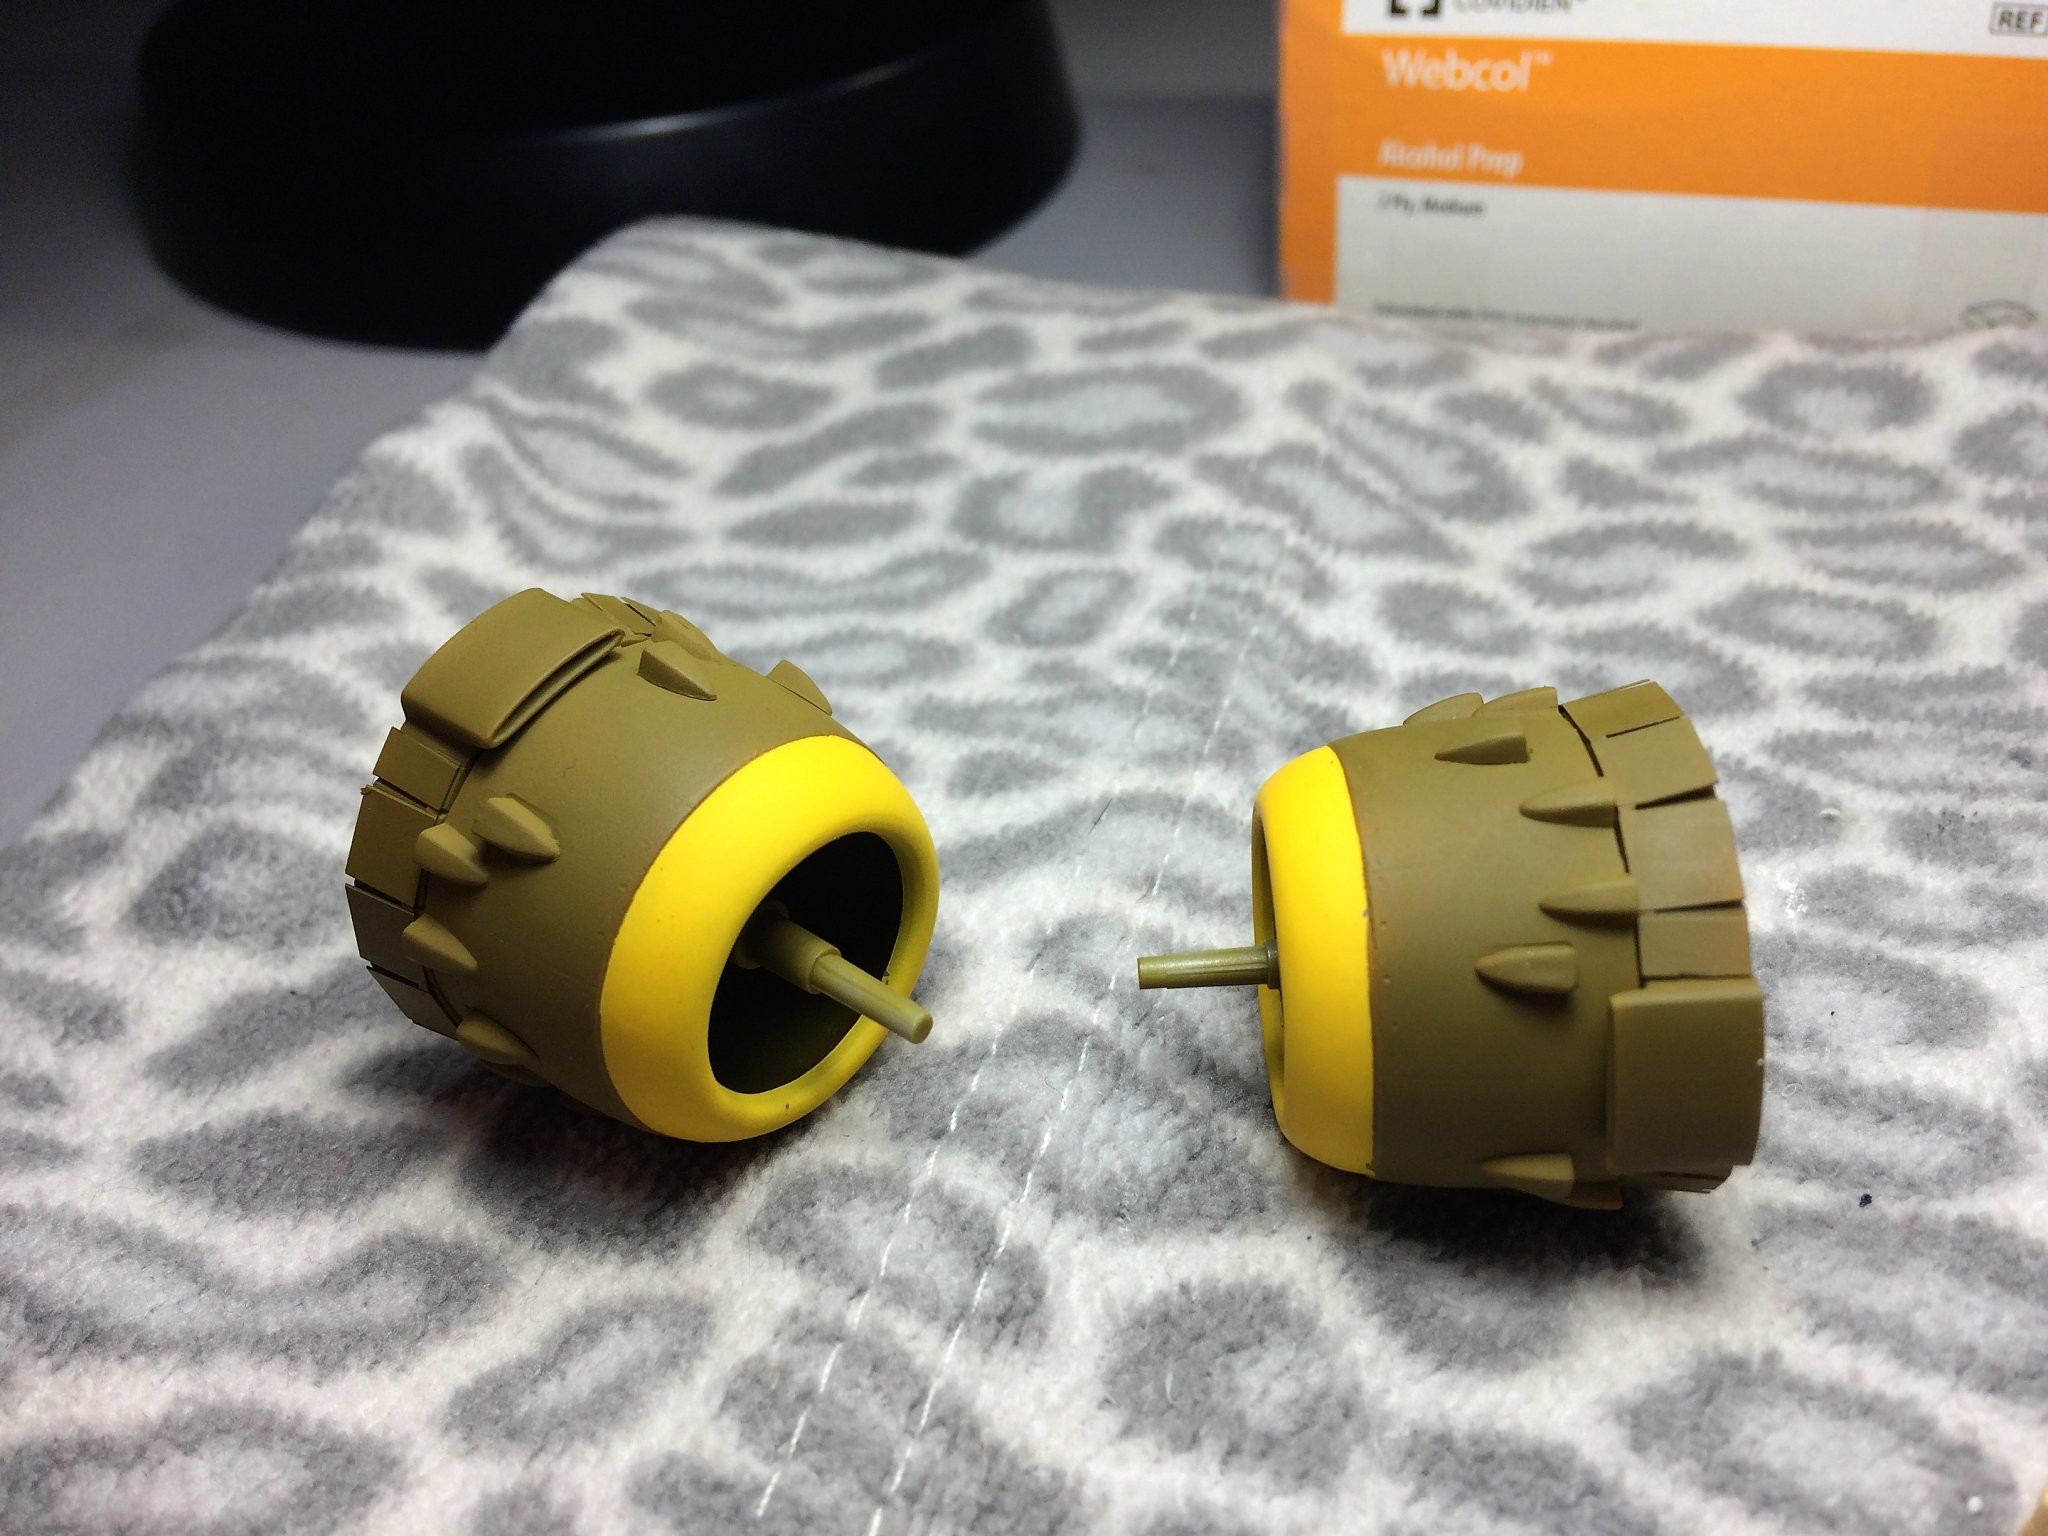
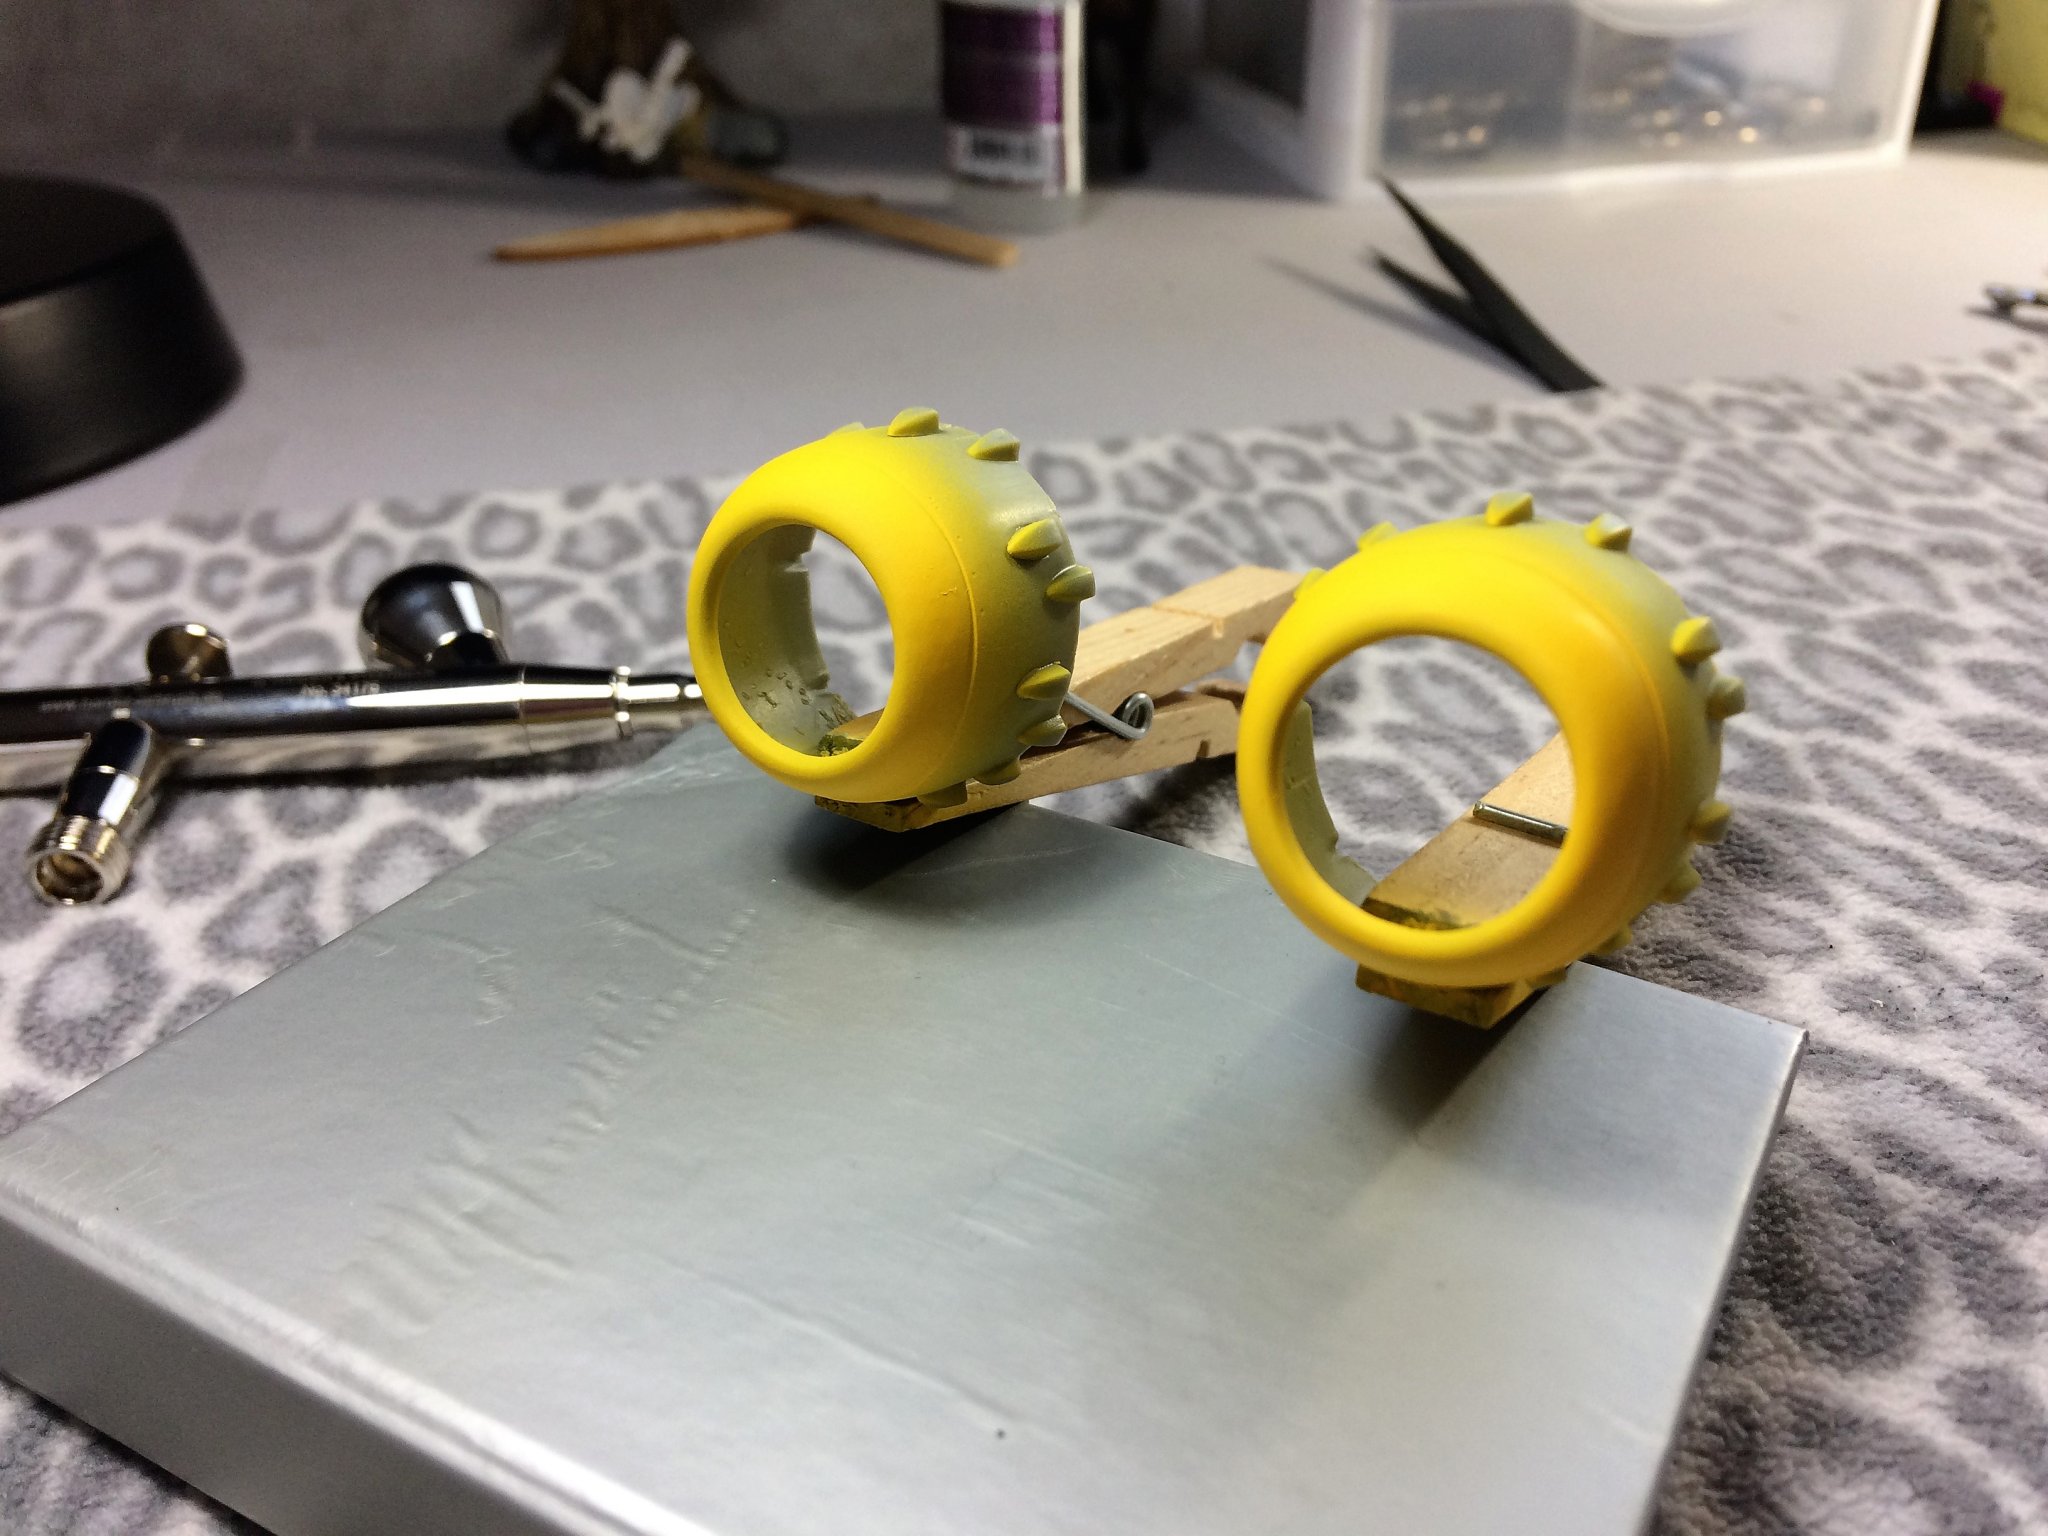
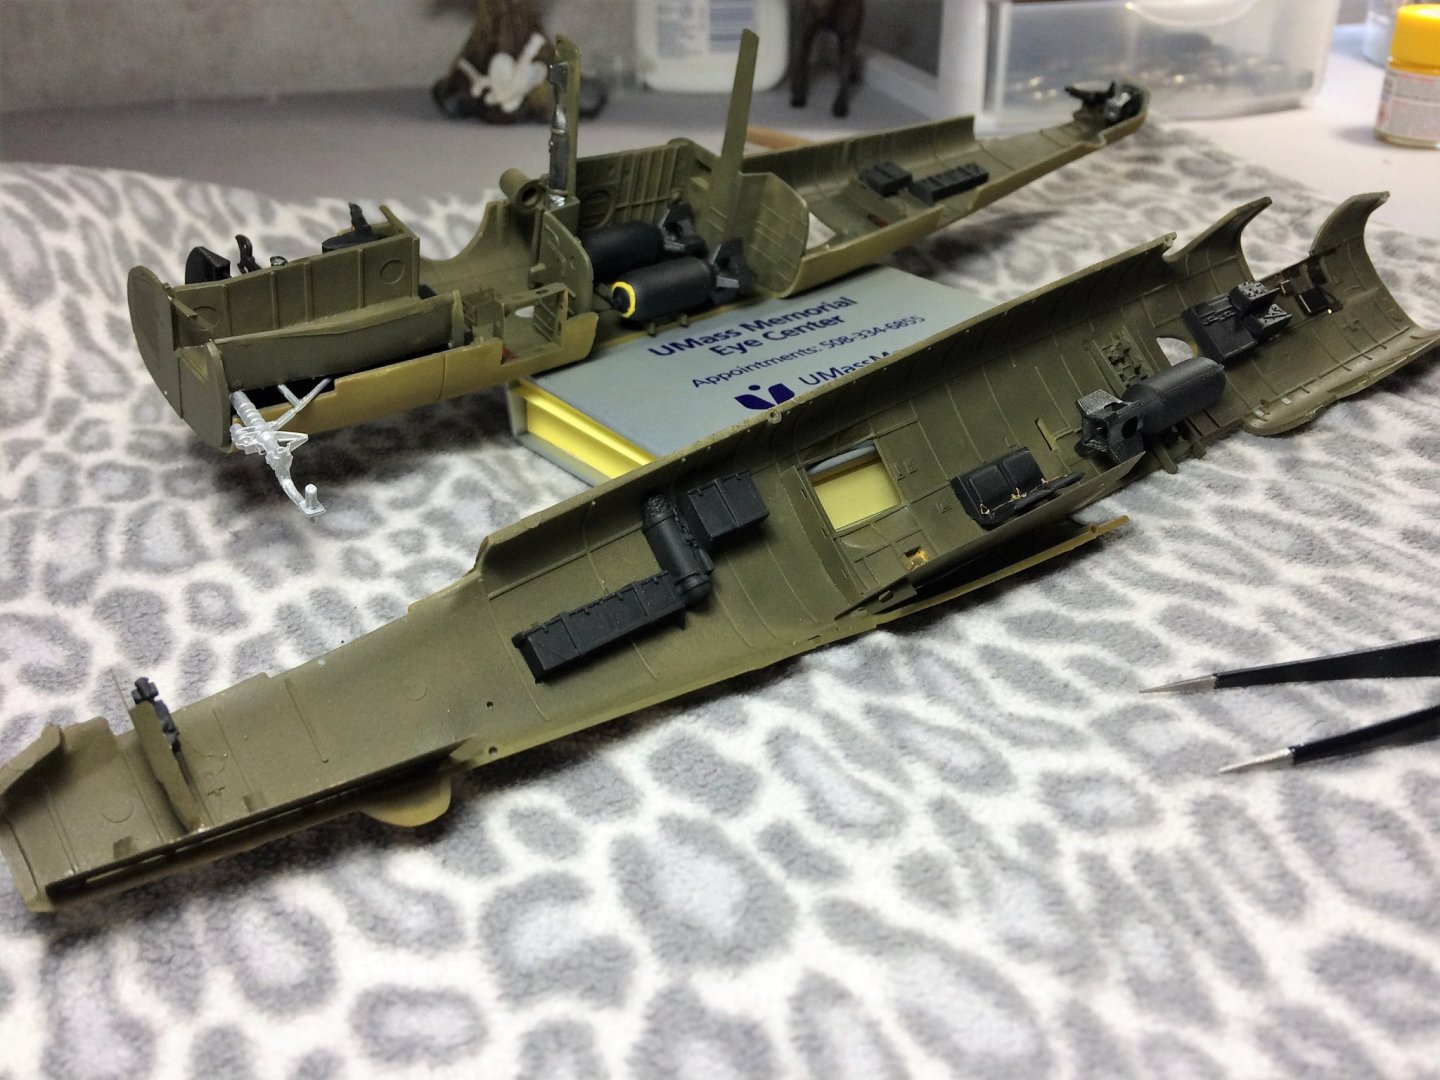
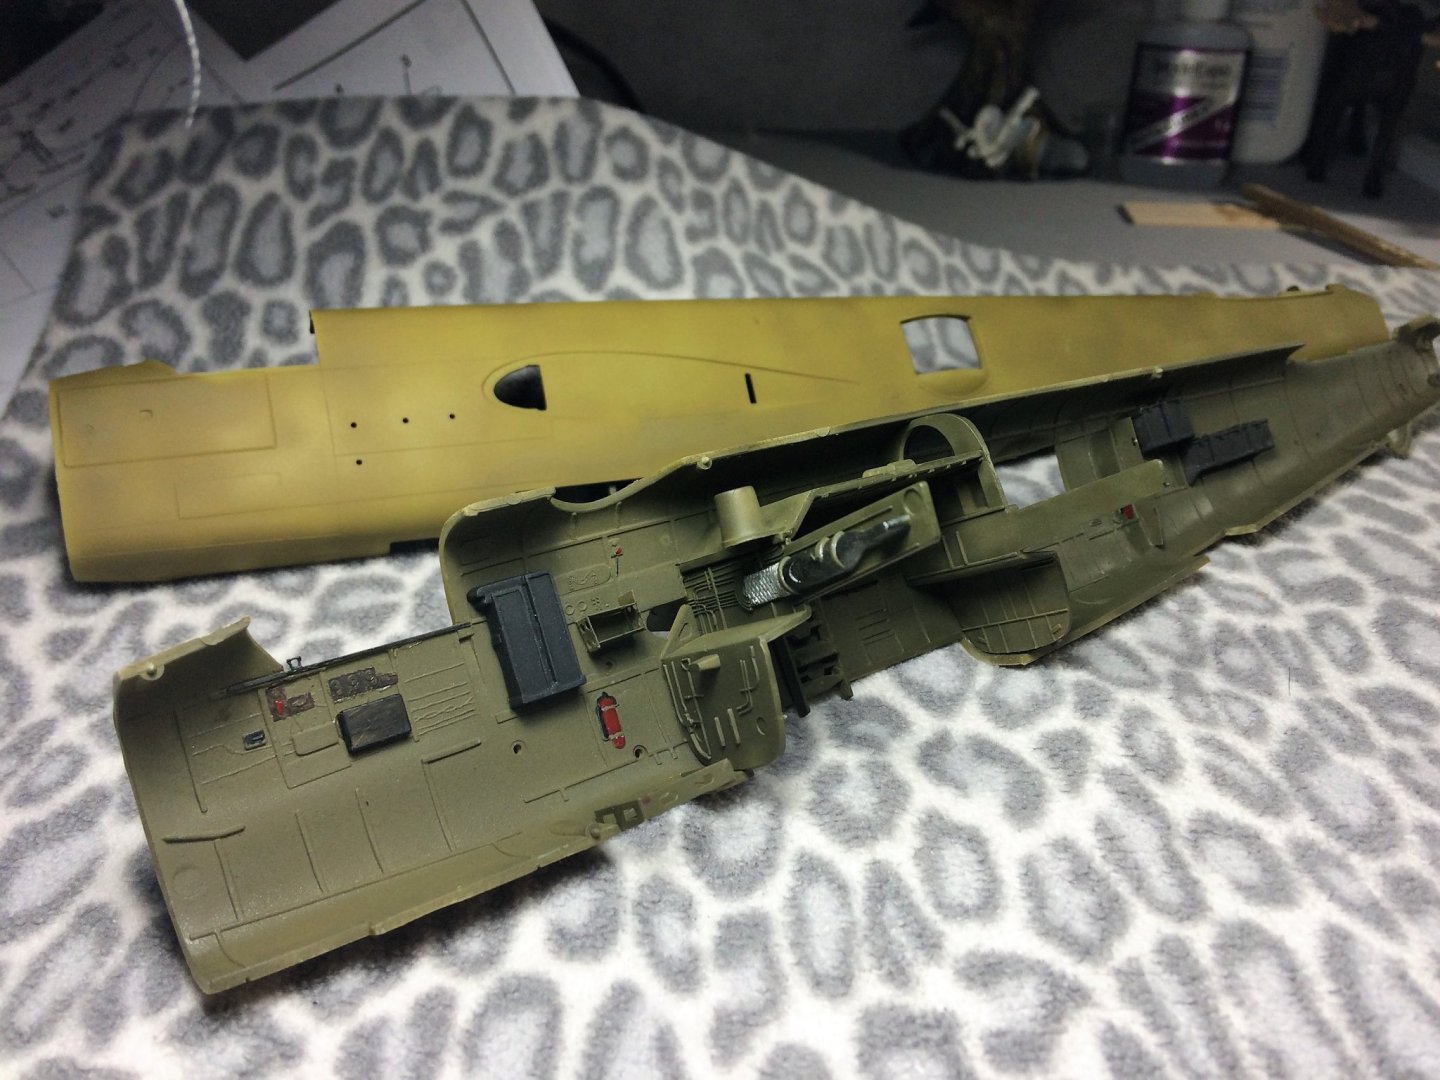
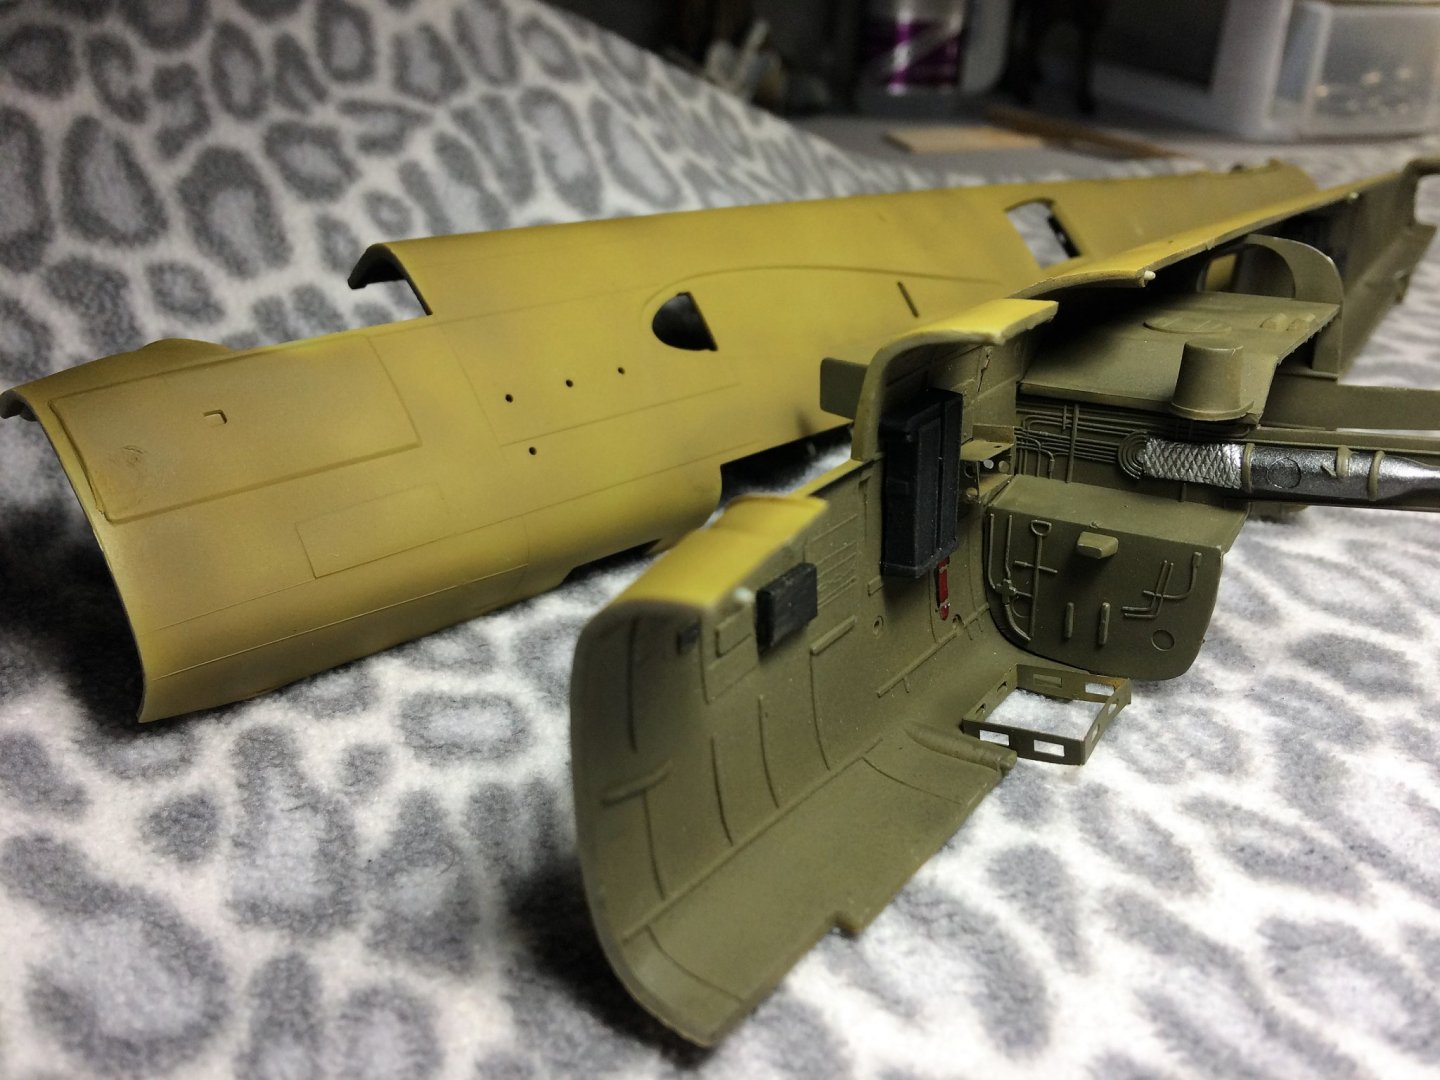
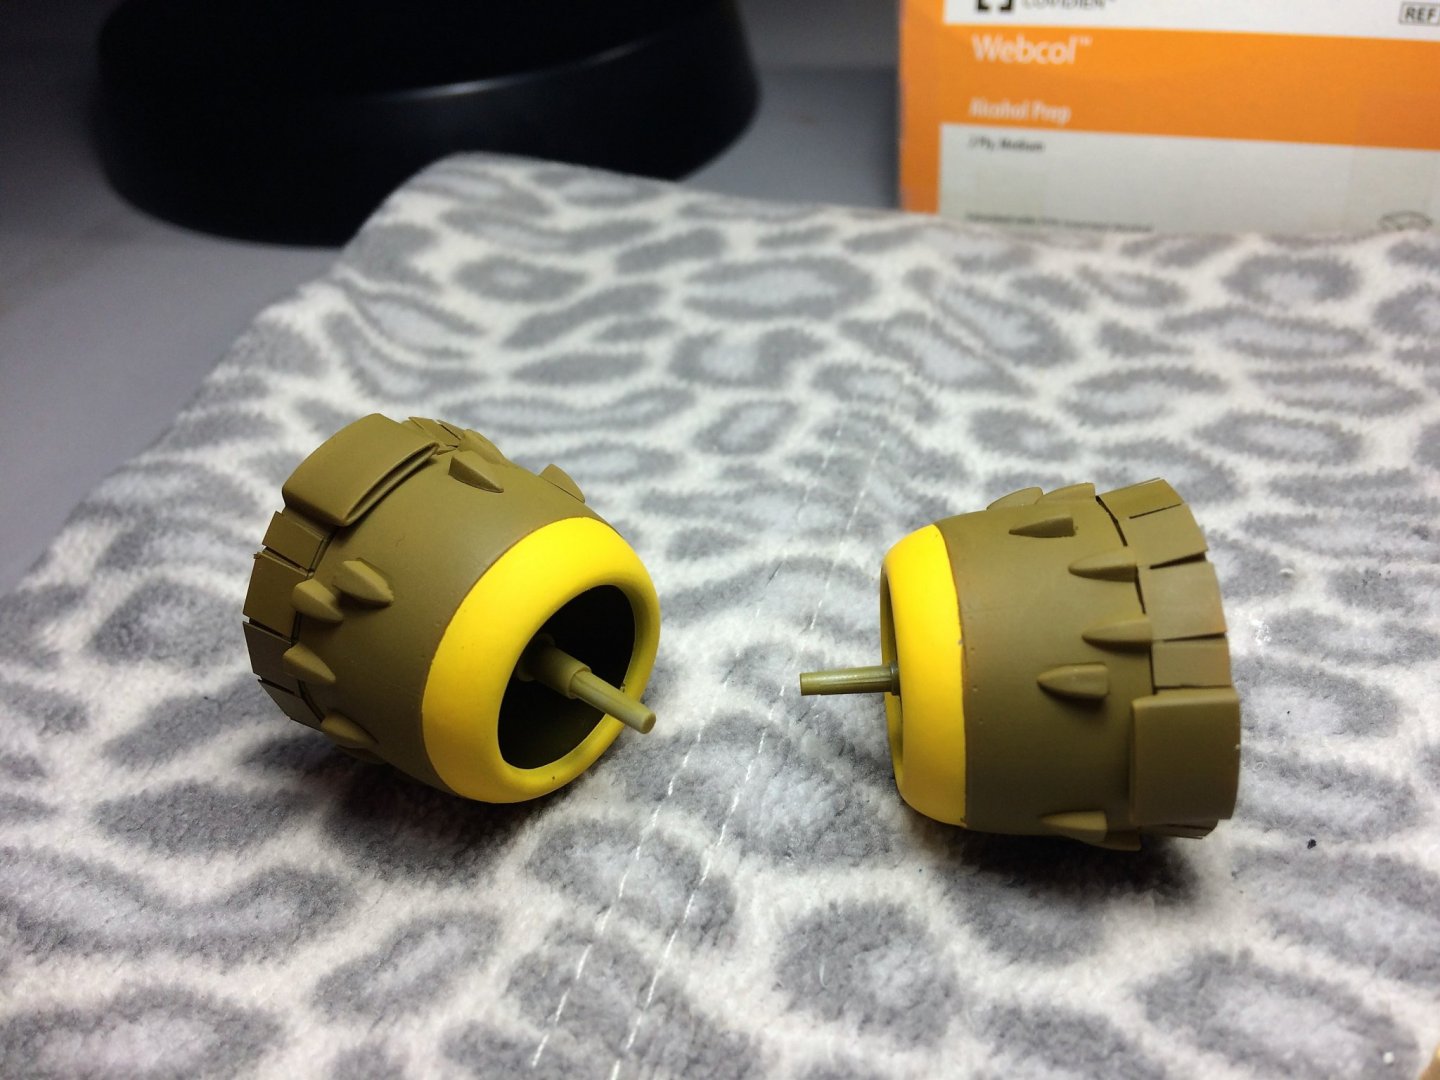
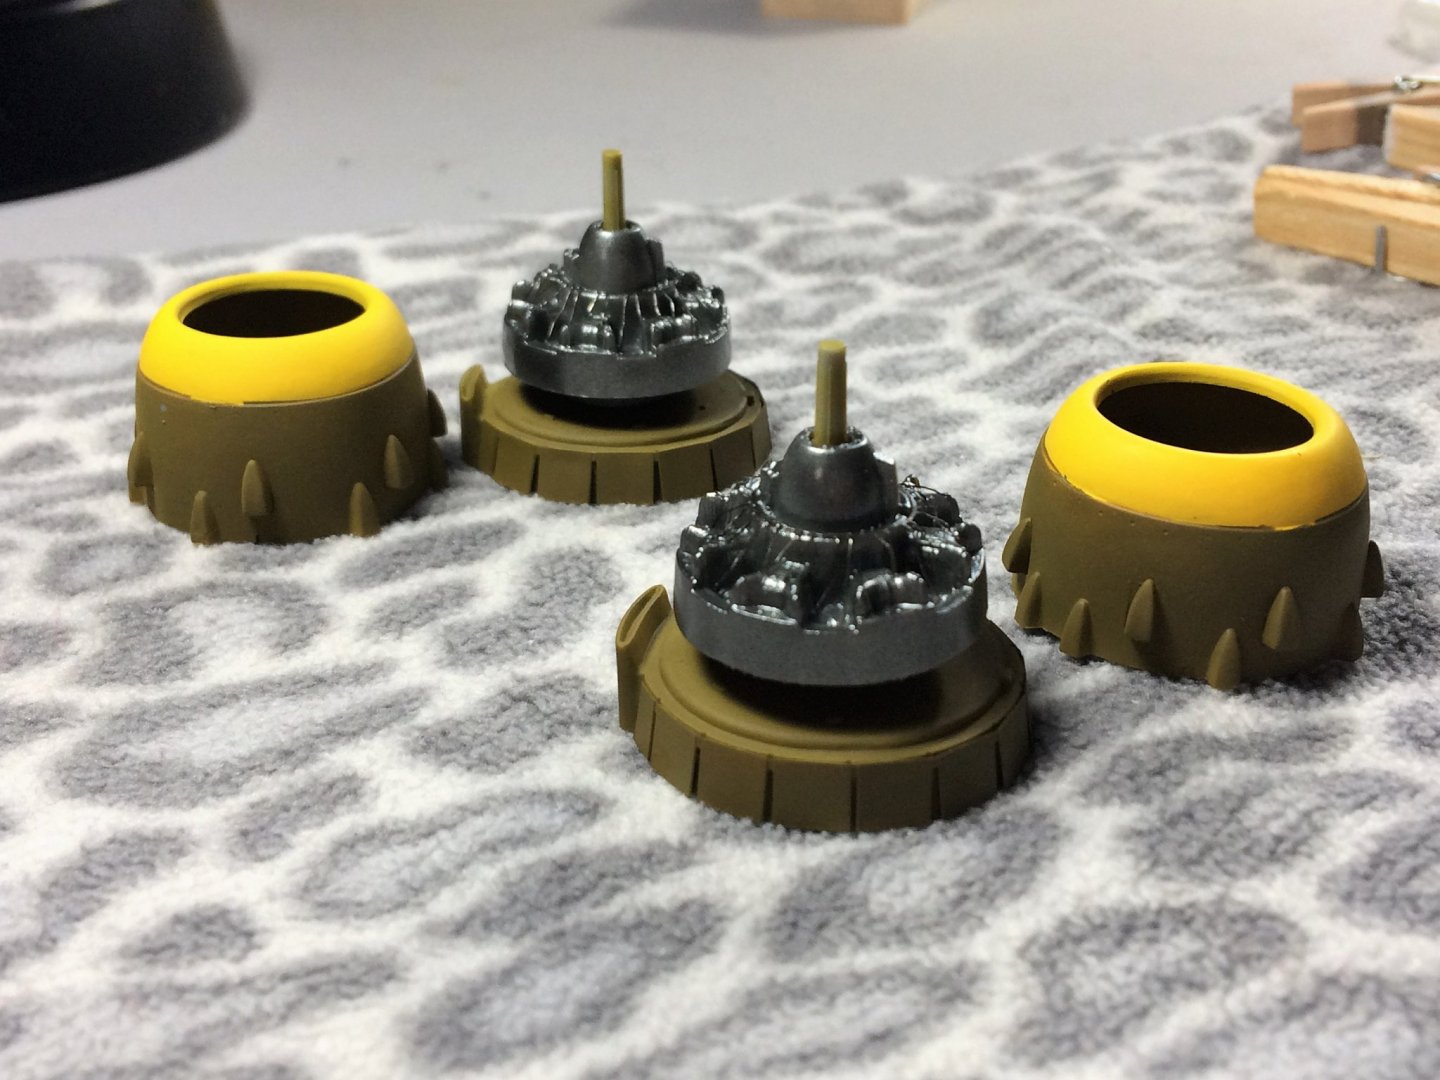
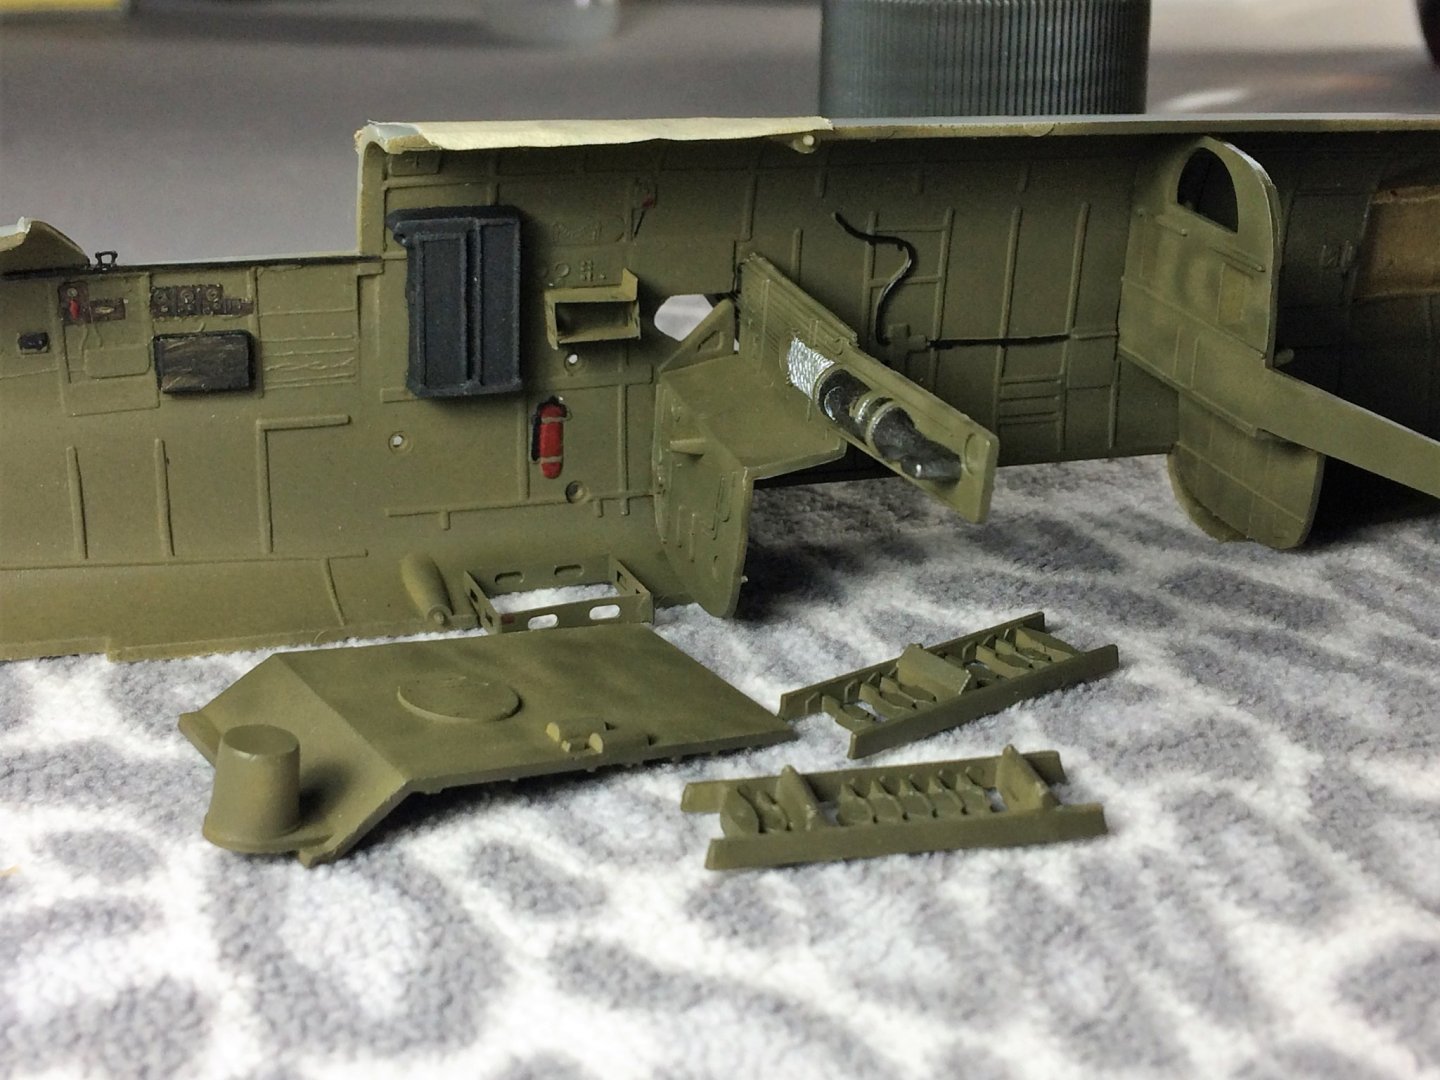
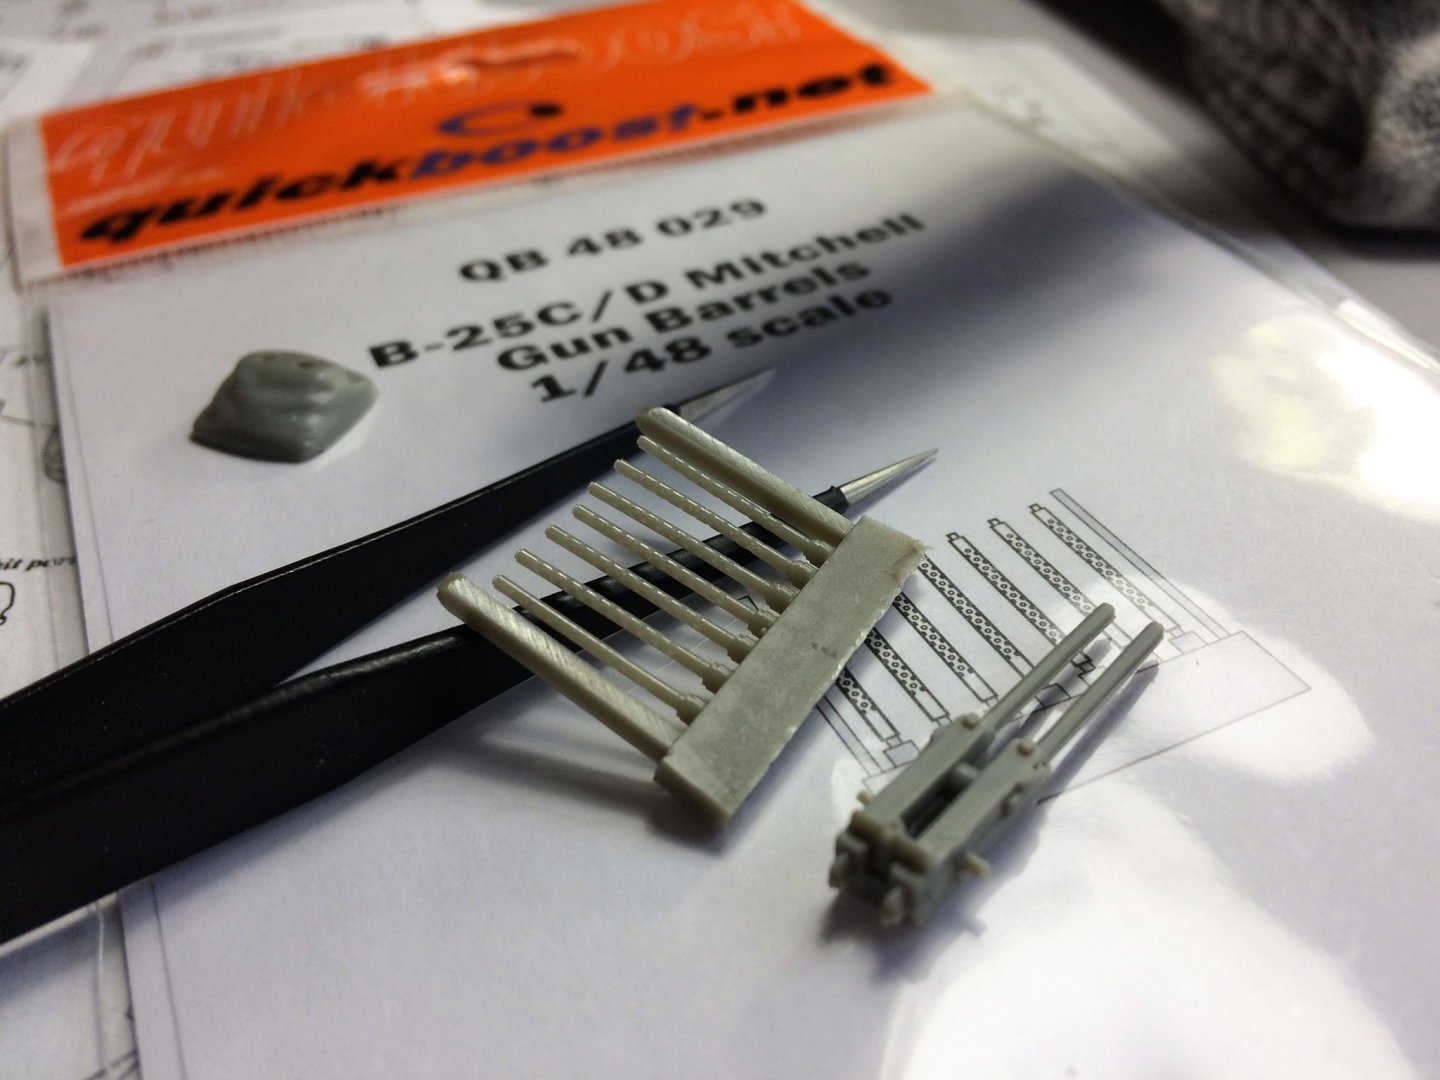
Evening, Cold, rainy night in New Hampshire. That means a good hearty dinner is needed. Some pasta, red sauce, Italian sausages and garlic bread should do it!!!! No grog tonight....tall glass of Coke loaded with ice. With a full happy belly, Mitchell needs an update. Popeye, Lou, I am very new to PE. This project is my introduction to it, never worked with it before. With that said, I'm very glad I did. It really looks good. I also have been using some resin machine gun barrels. I'm very happy I bought those. The bomb bay is all painted and ready to be glued in. After many trial fits, I decided to attach the forward and rear walls first. Everything fit really well, didn't need much extra work. Once the glue sets the top piece and bomb racks will go in. I have a backlog of painting to do. Started with that distinctive yellow stripe on both engines. Used Tamiya flat yellow with Tamiya thinner. I made sure the inside lip was yellow. The very inside will be painted an earth green. The engines have been painted with Tamiya gun metal. Kinda shiny, but since the engines are mostly covered, I'm not too worried about it. The rear machine gun has it's new barrels and was also painted gun metal. The resin barrels were tricky, a little wonky, but really look good! The engine cowlings have been taped up. I'll be using a Mr Color flat Earth Green. This will be used for the entire exterior. I tried to match the box art. Not too bad. The bases of the engine have been painted as well. We'll let these set up overnight. Tom E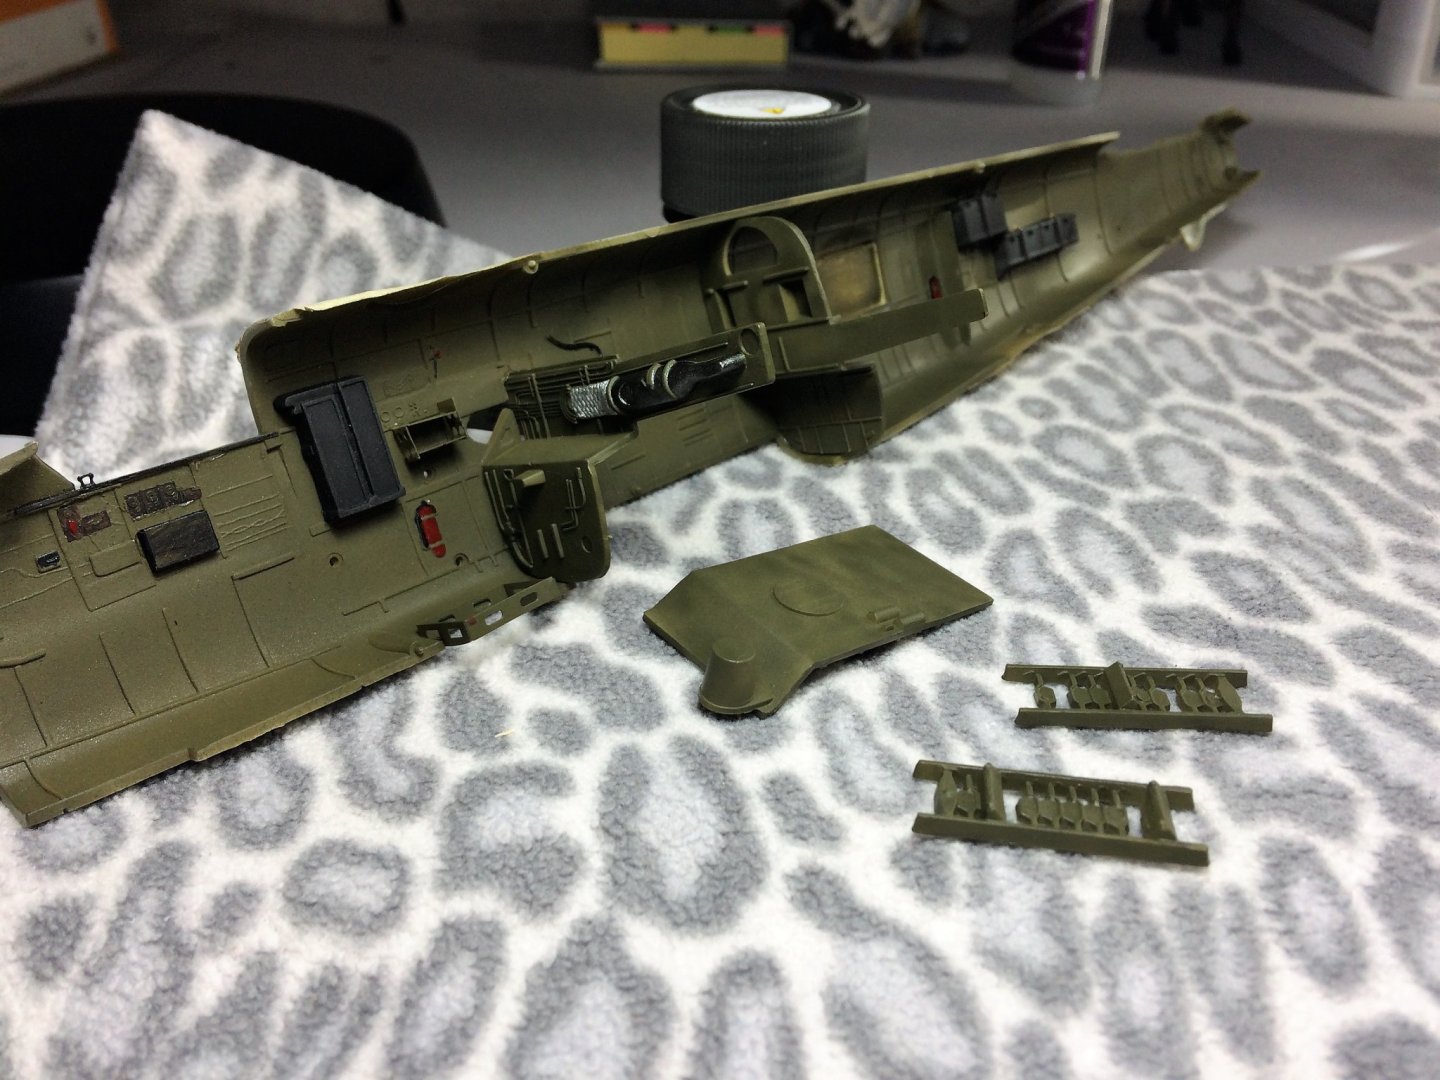


- 120 replies
-
- 11
-
-
She's a real beauty! Well done. No card projects while on the road this summer? Tom E
- 211 replies
-
- 1
-
-
- agilis
- steingraeber
- (and 1 more)
-
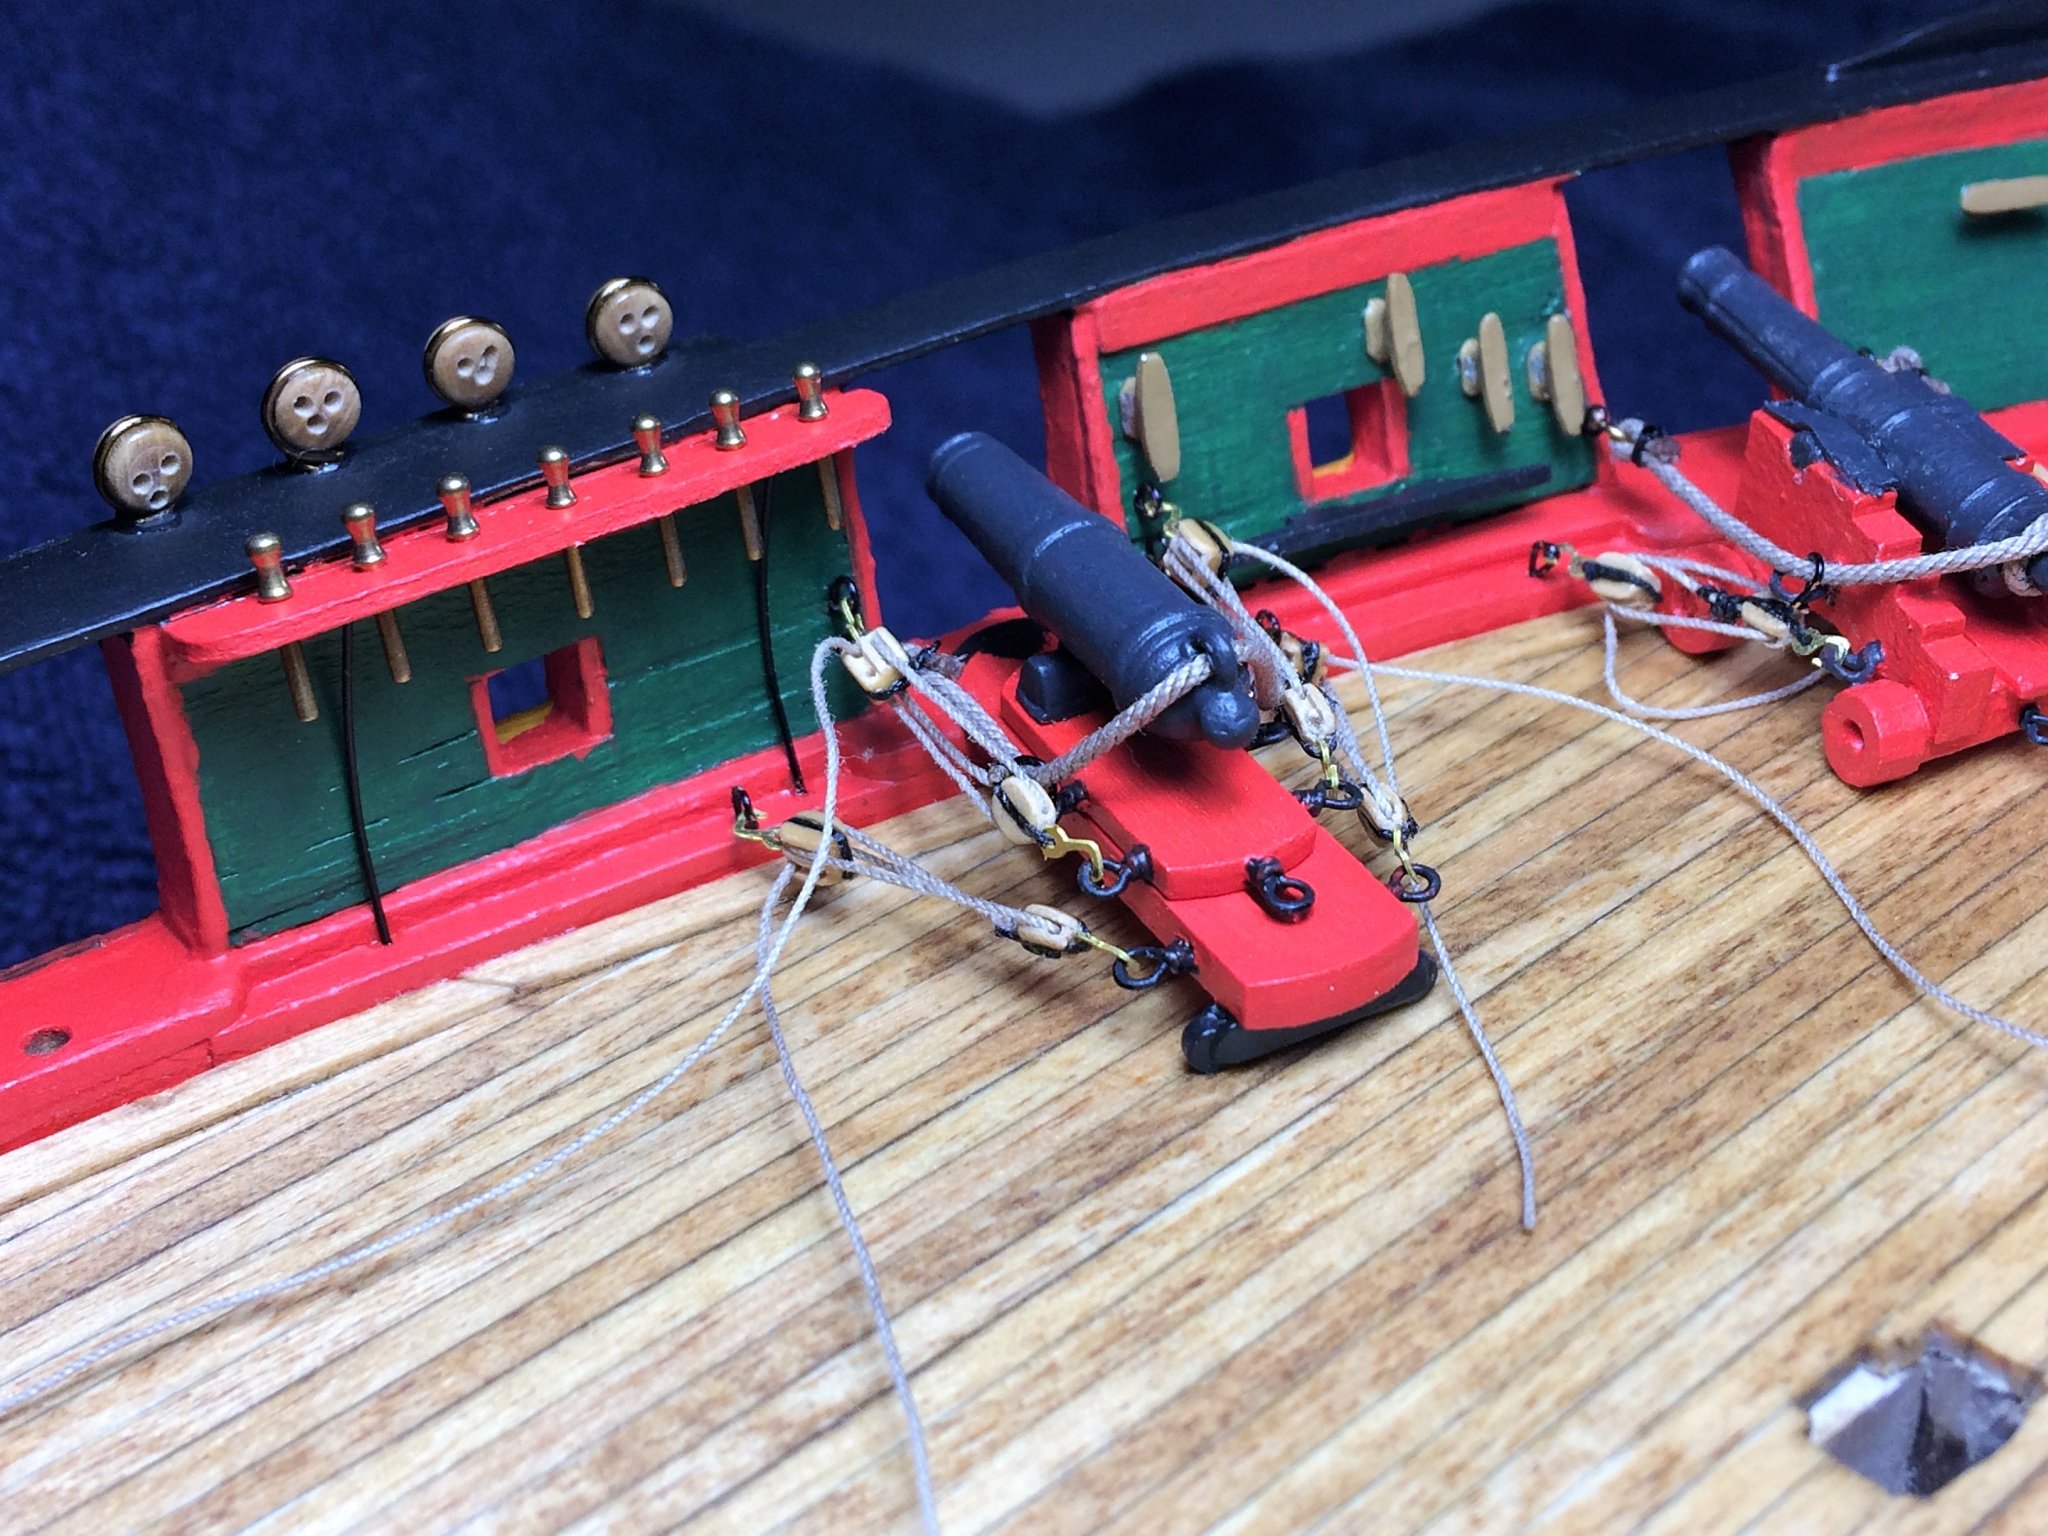
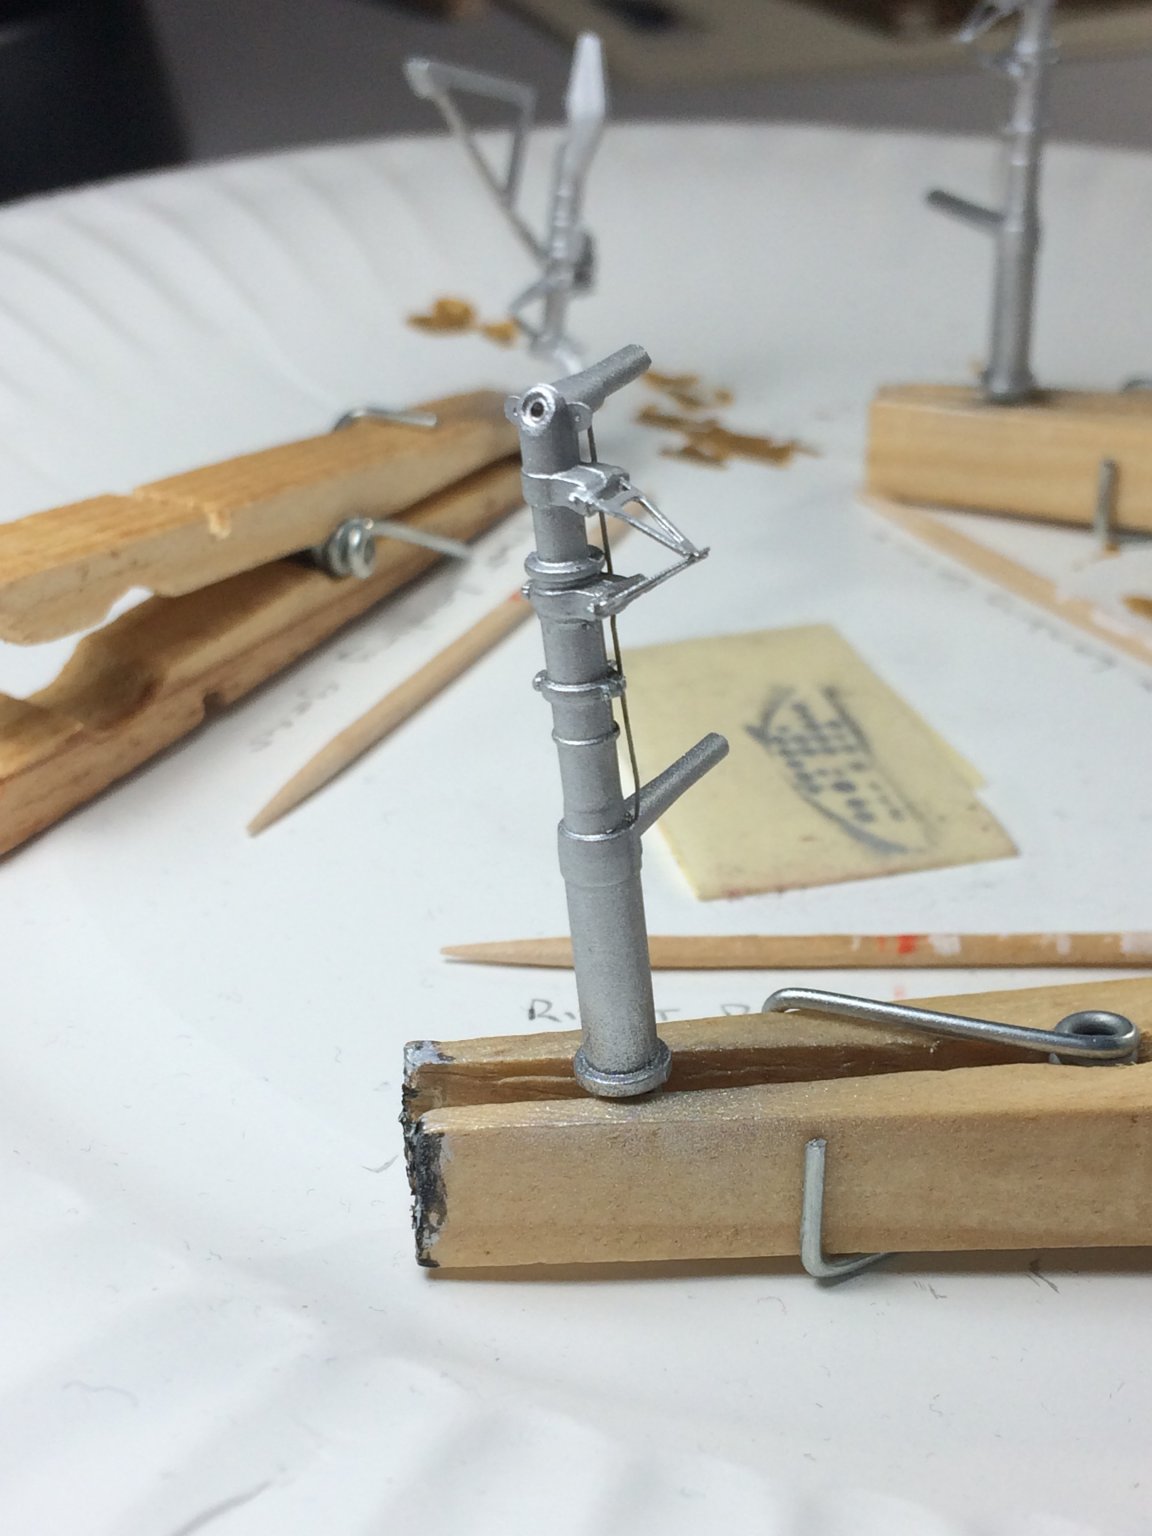
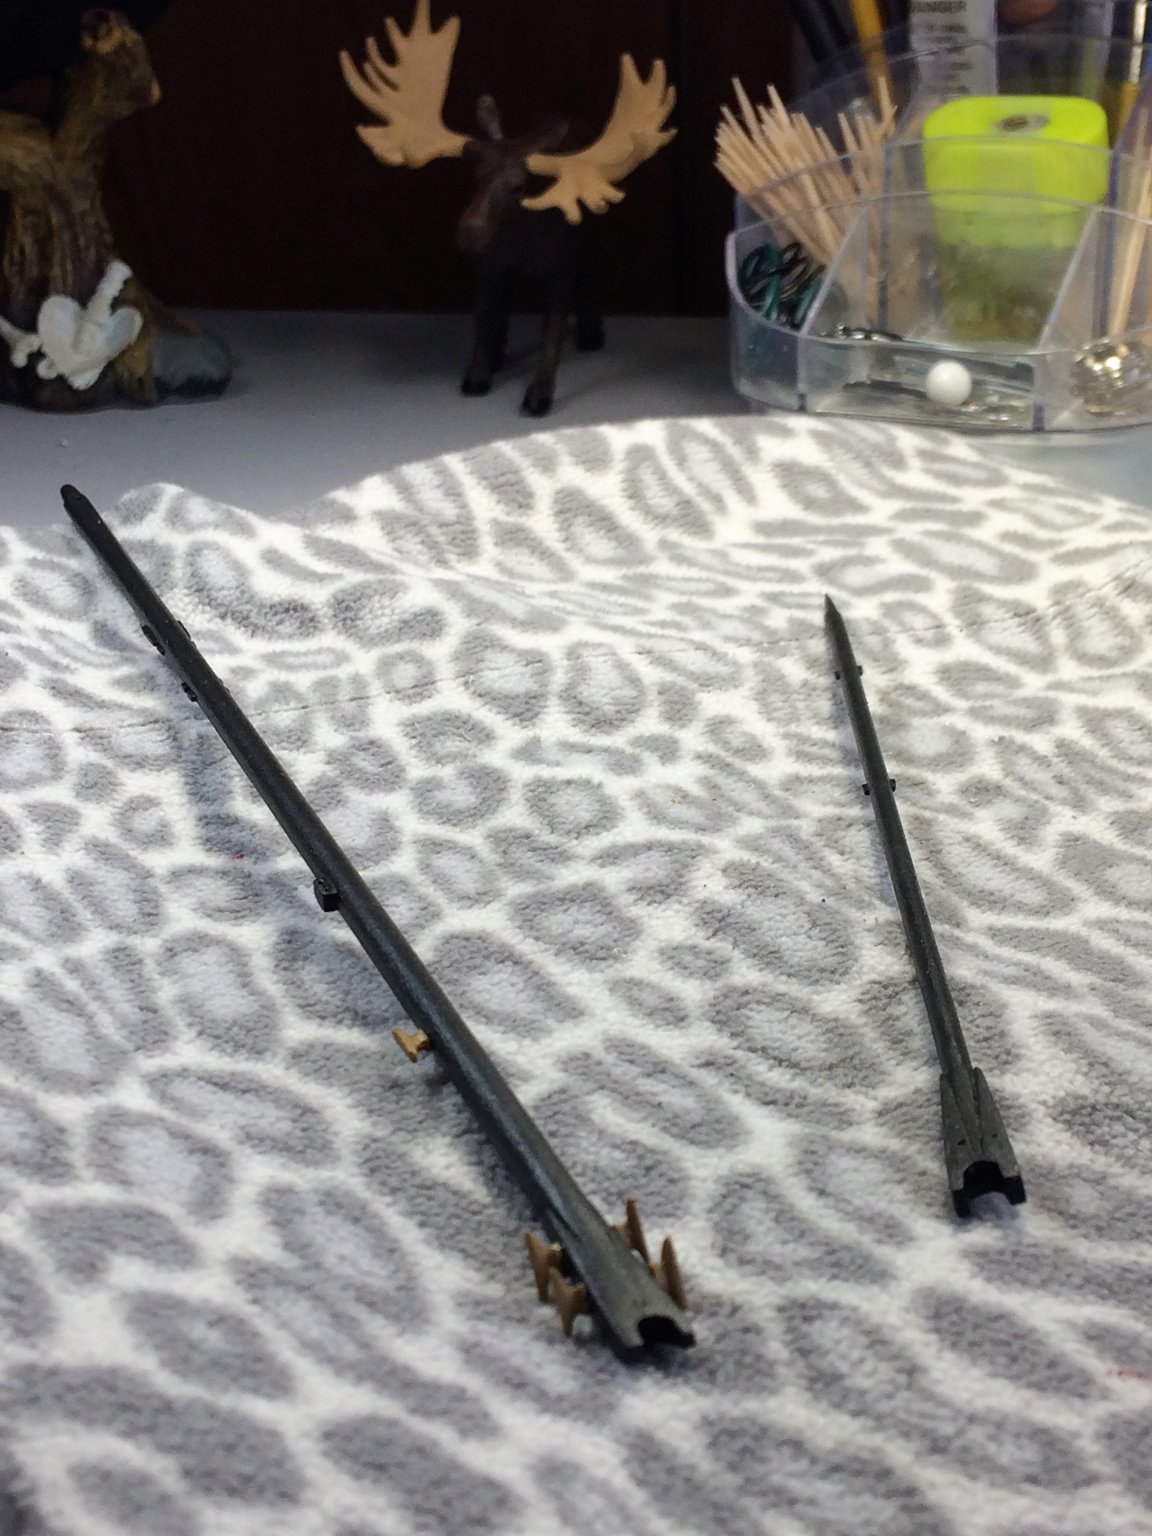
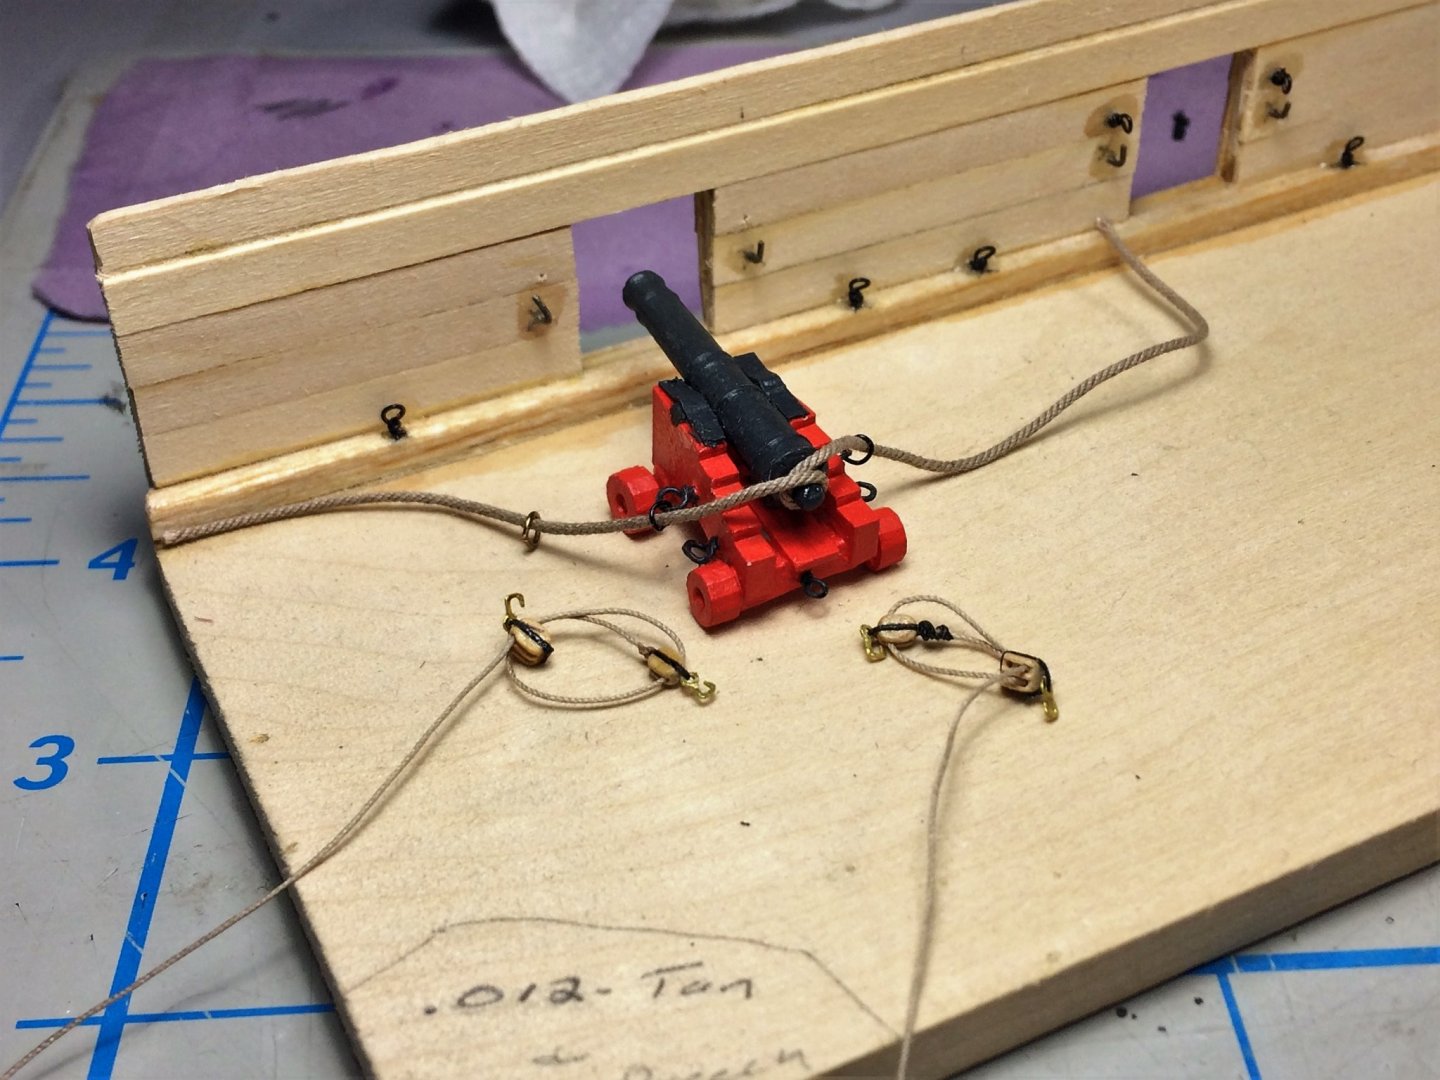
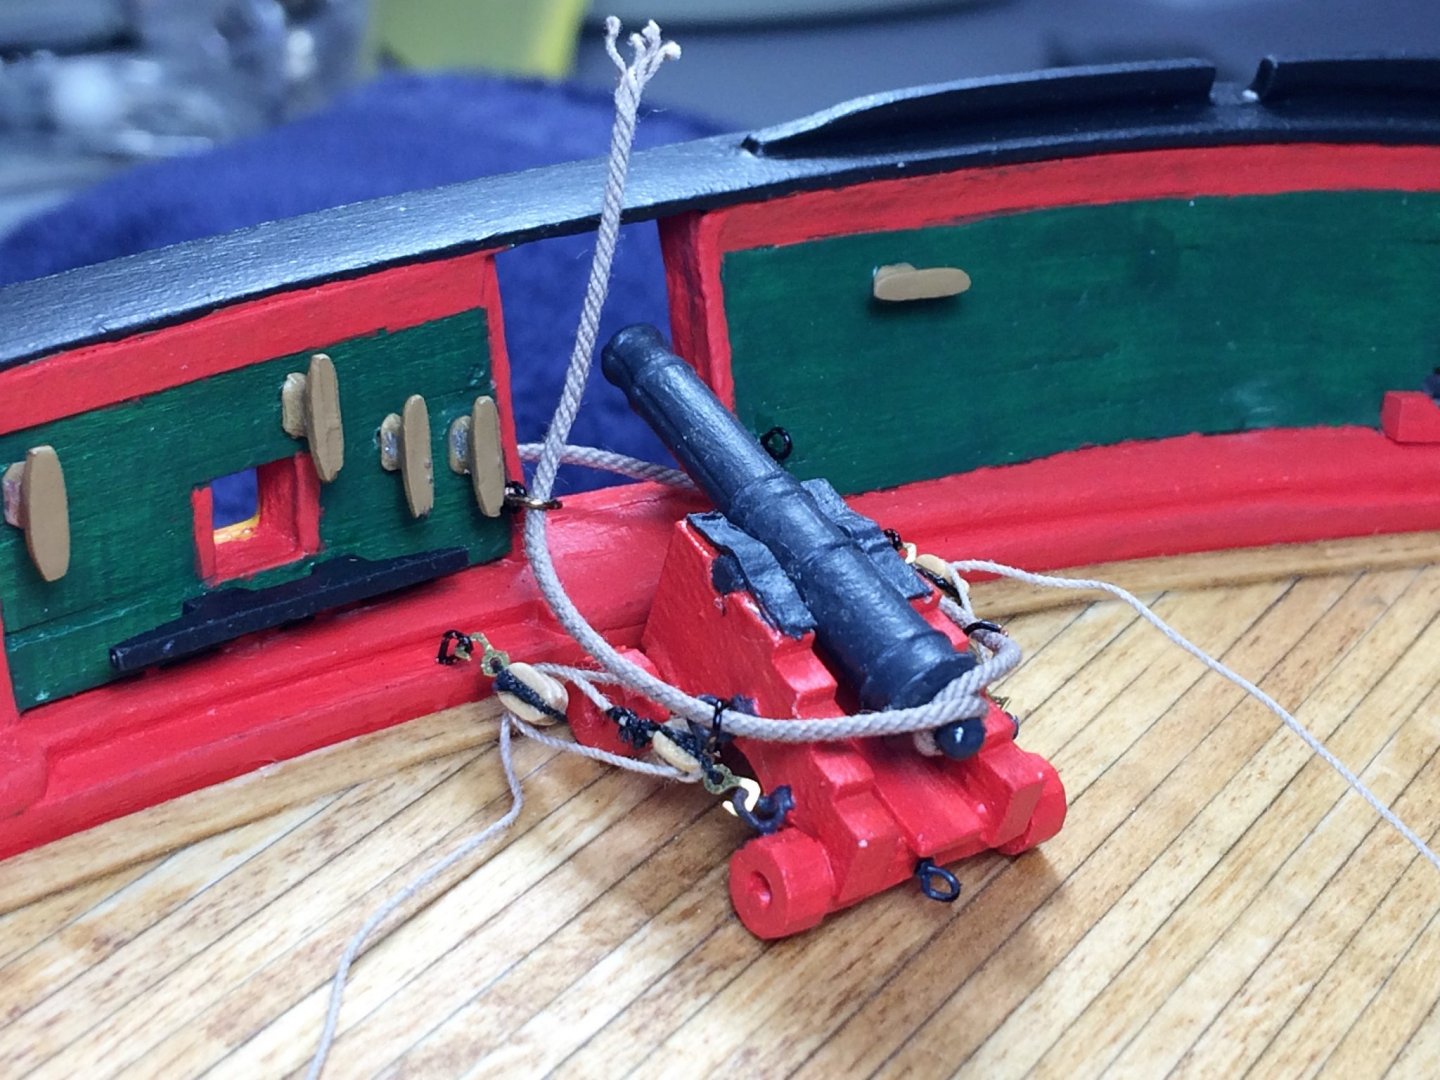
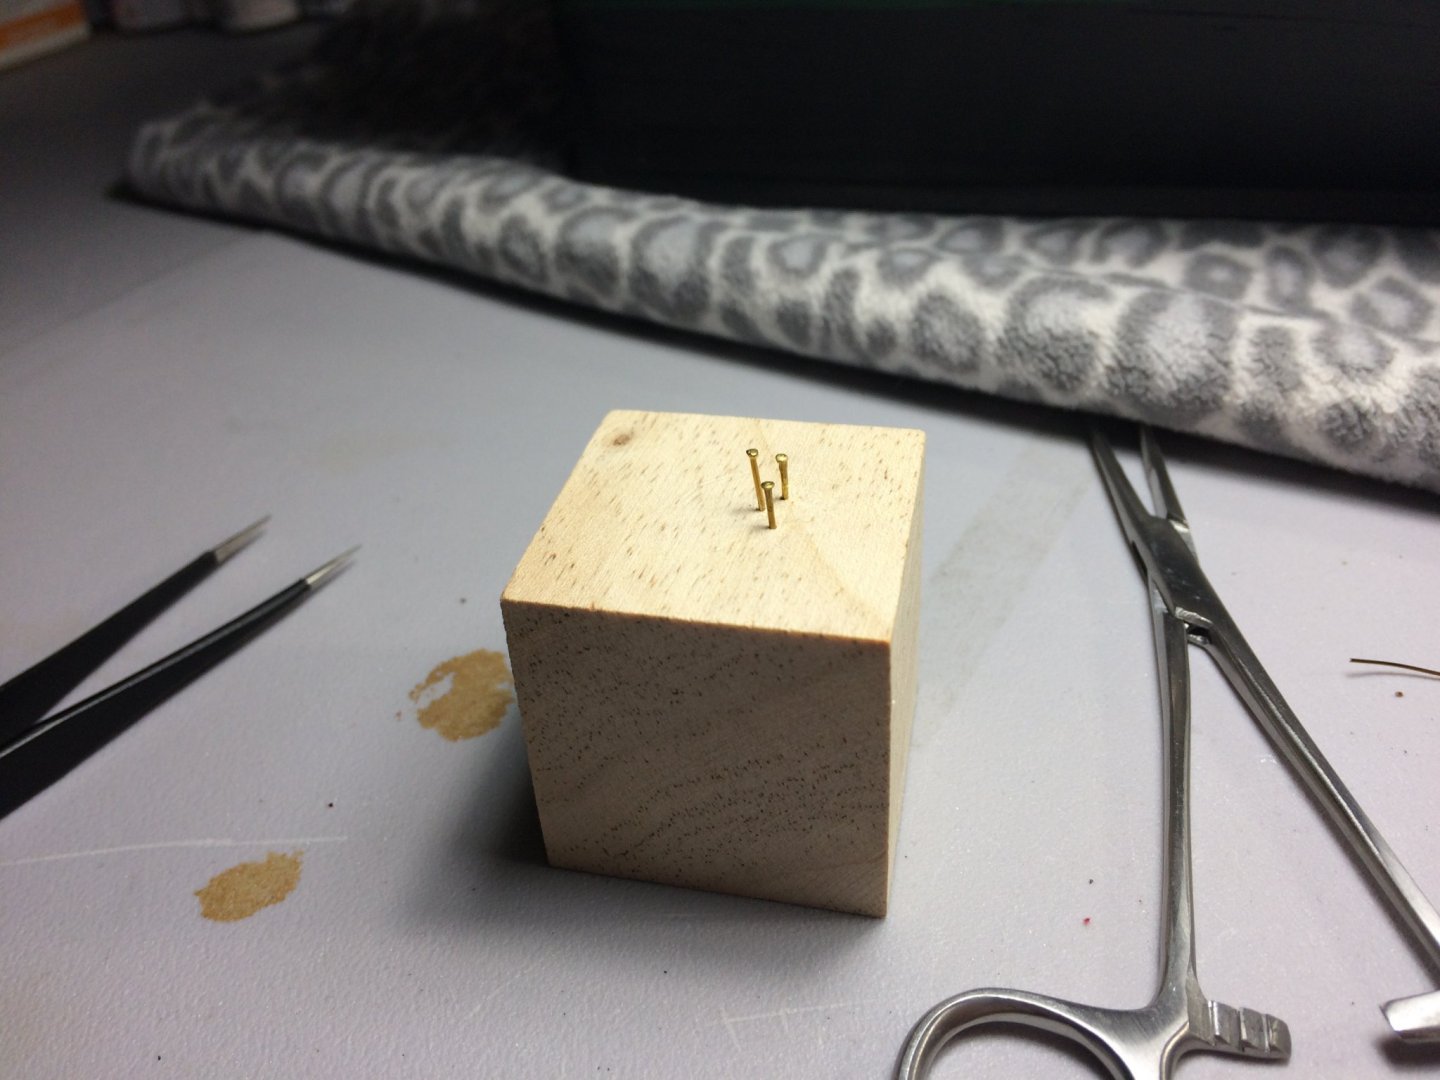
Hi Mike, Ya know, as I was posting those last pics I was thinking the same thing about the breech rope. They do need a bit more slack. But at the same time, the goblins in my head keep saying "not too long" or it'll look out of scale. By the time I get to the very last cannon....it'll be perfect. As I fine tune my "build sequence" for cannon, probably one of the first lessons I learned, is that it's way easier off ship!!! Way easier!!!! I've been using a cannon jig (pic below). Very helpful, especially when measuring out enough rope for the breech rope. Tom E

-
B-25J Mitchell by Tom E - Revell - 1:48 Scale - PLASTIC
Tom E replied to Tom E's topic in Non-ship/categorised builds
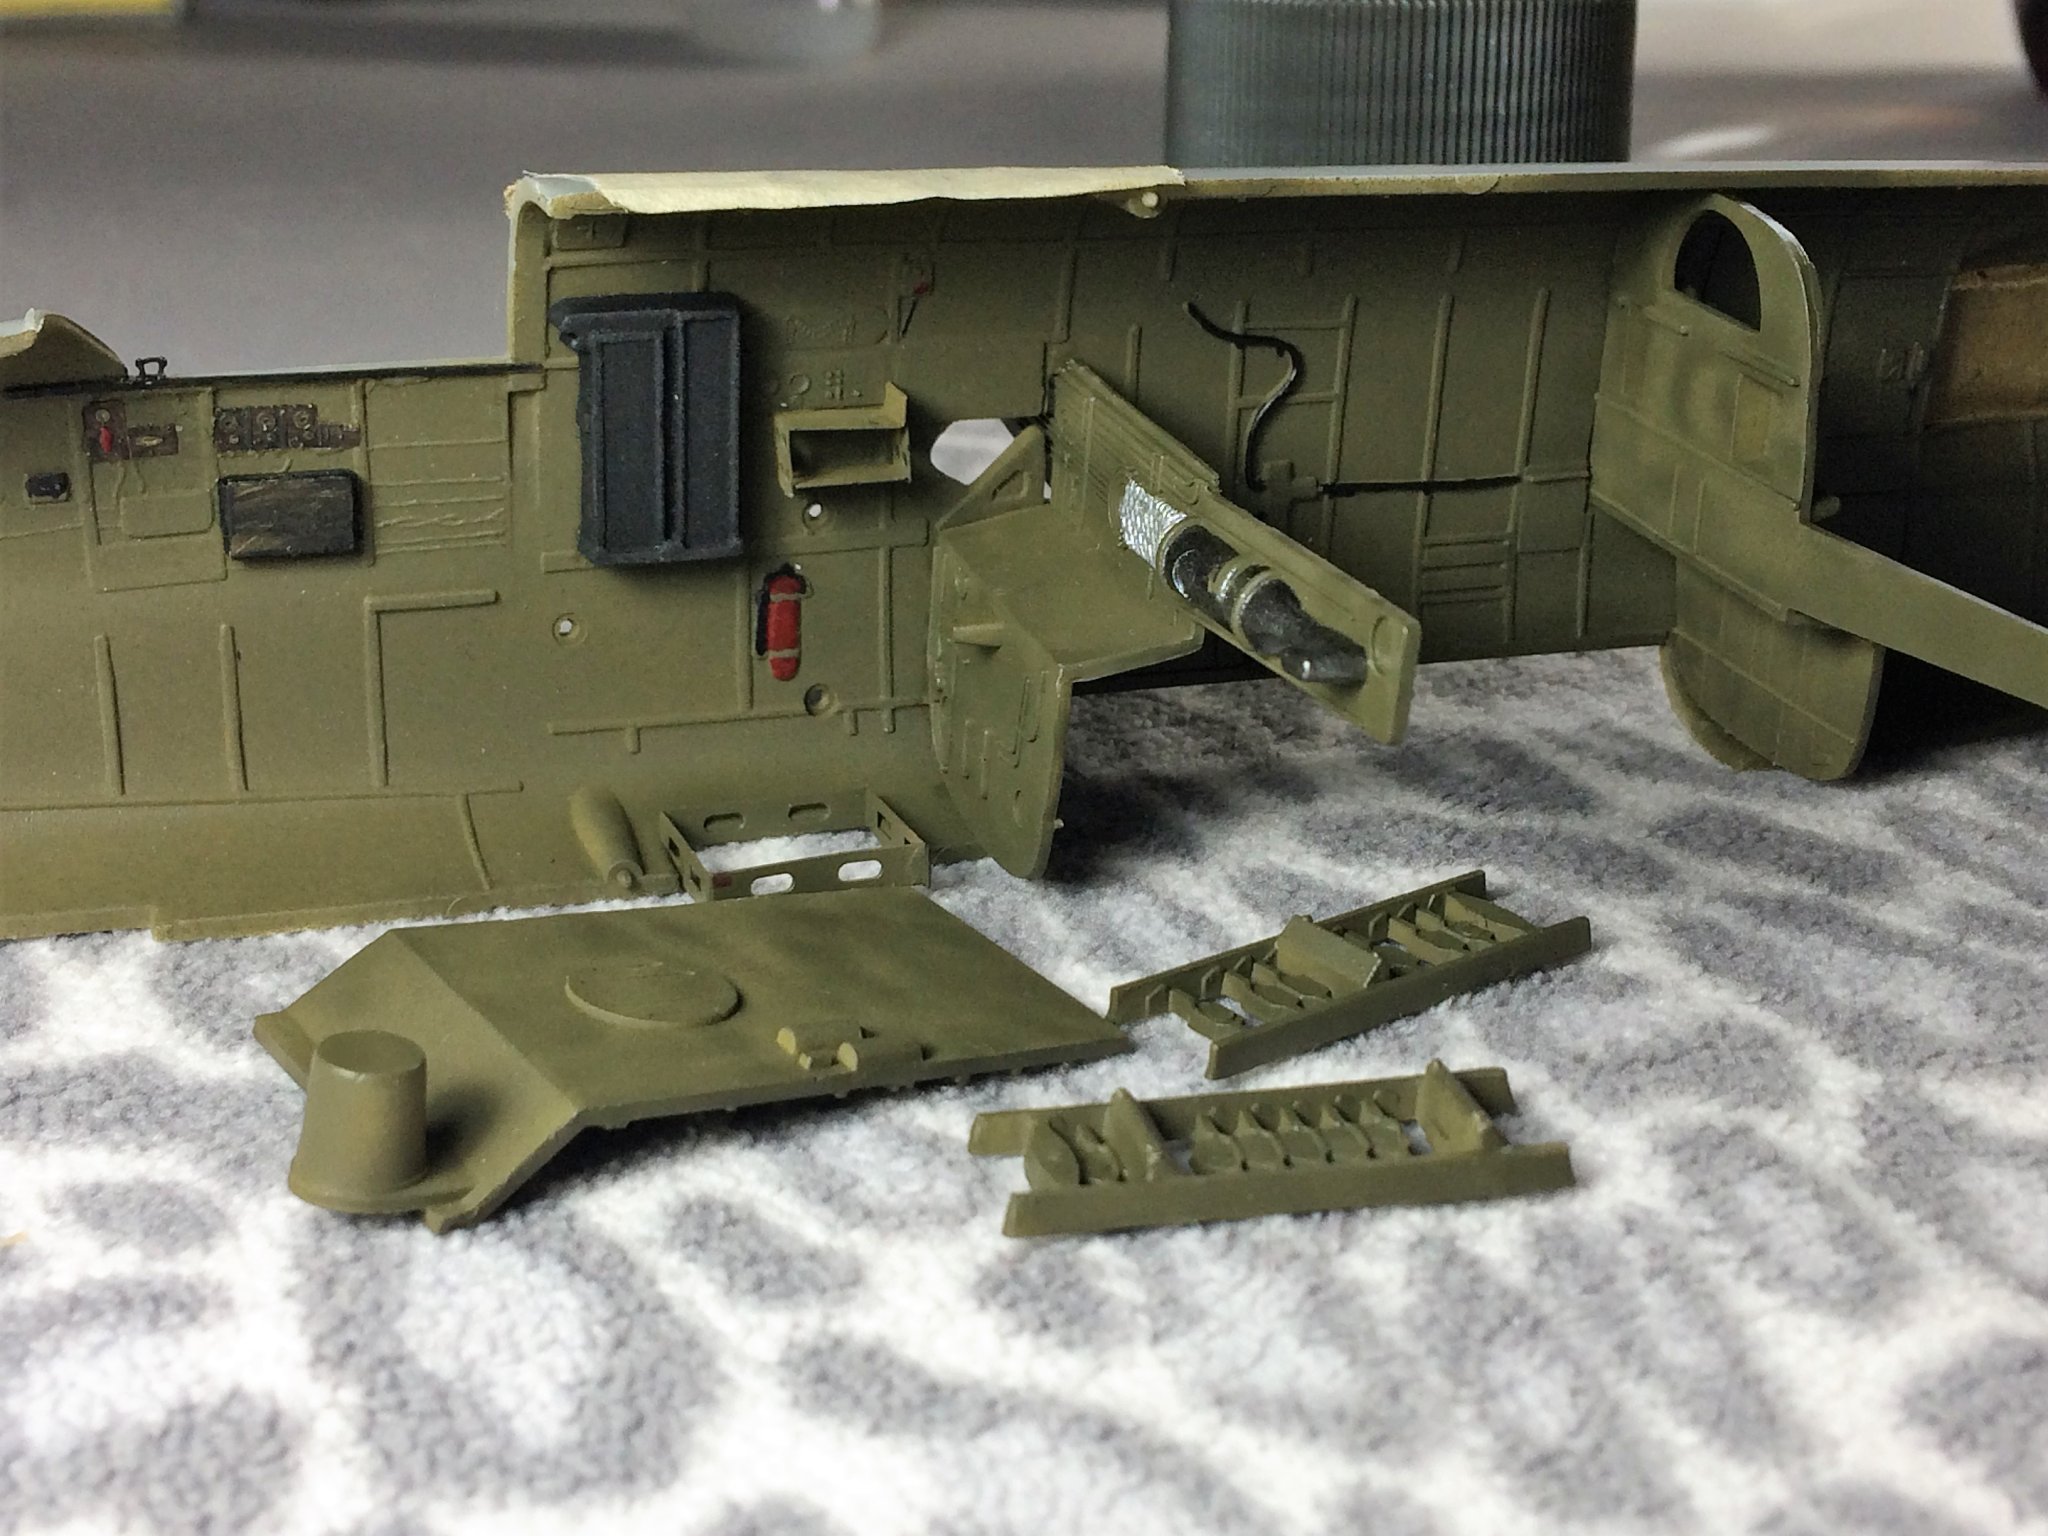
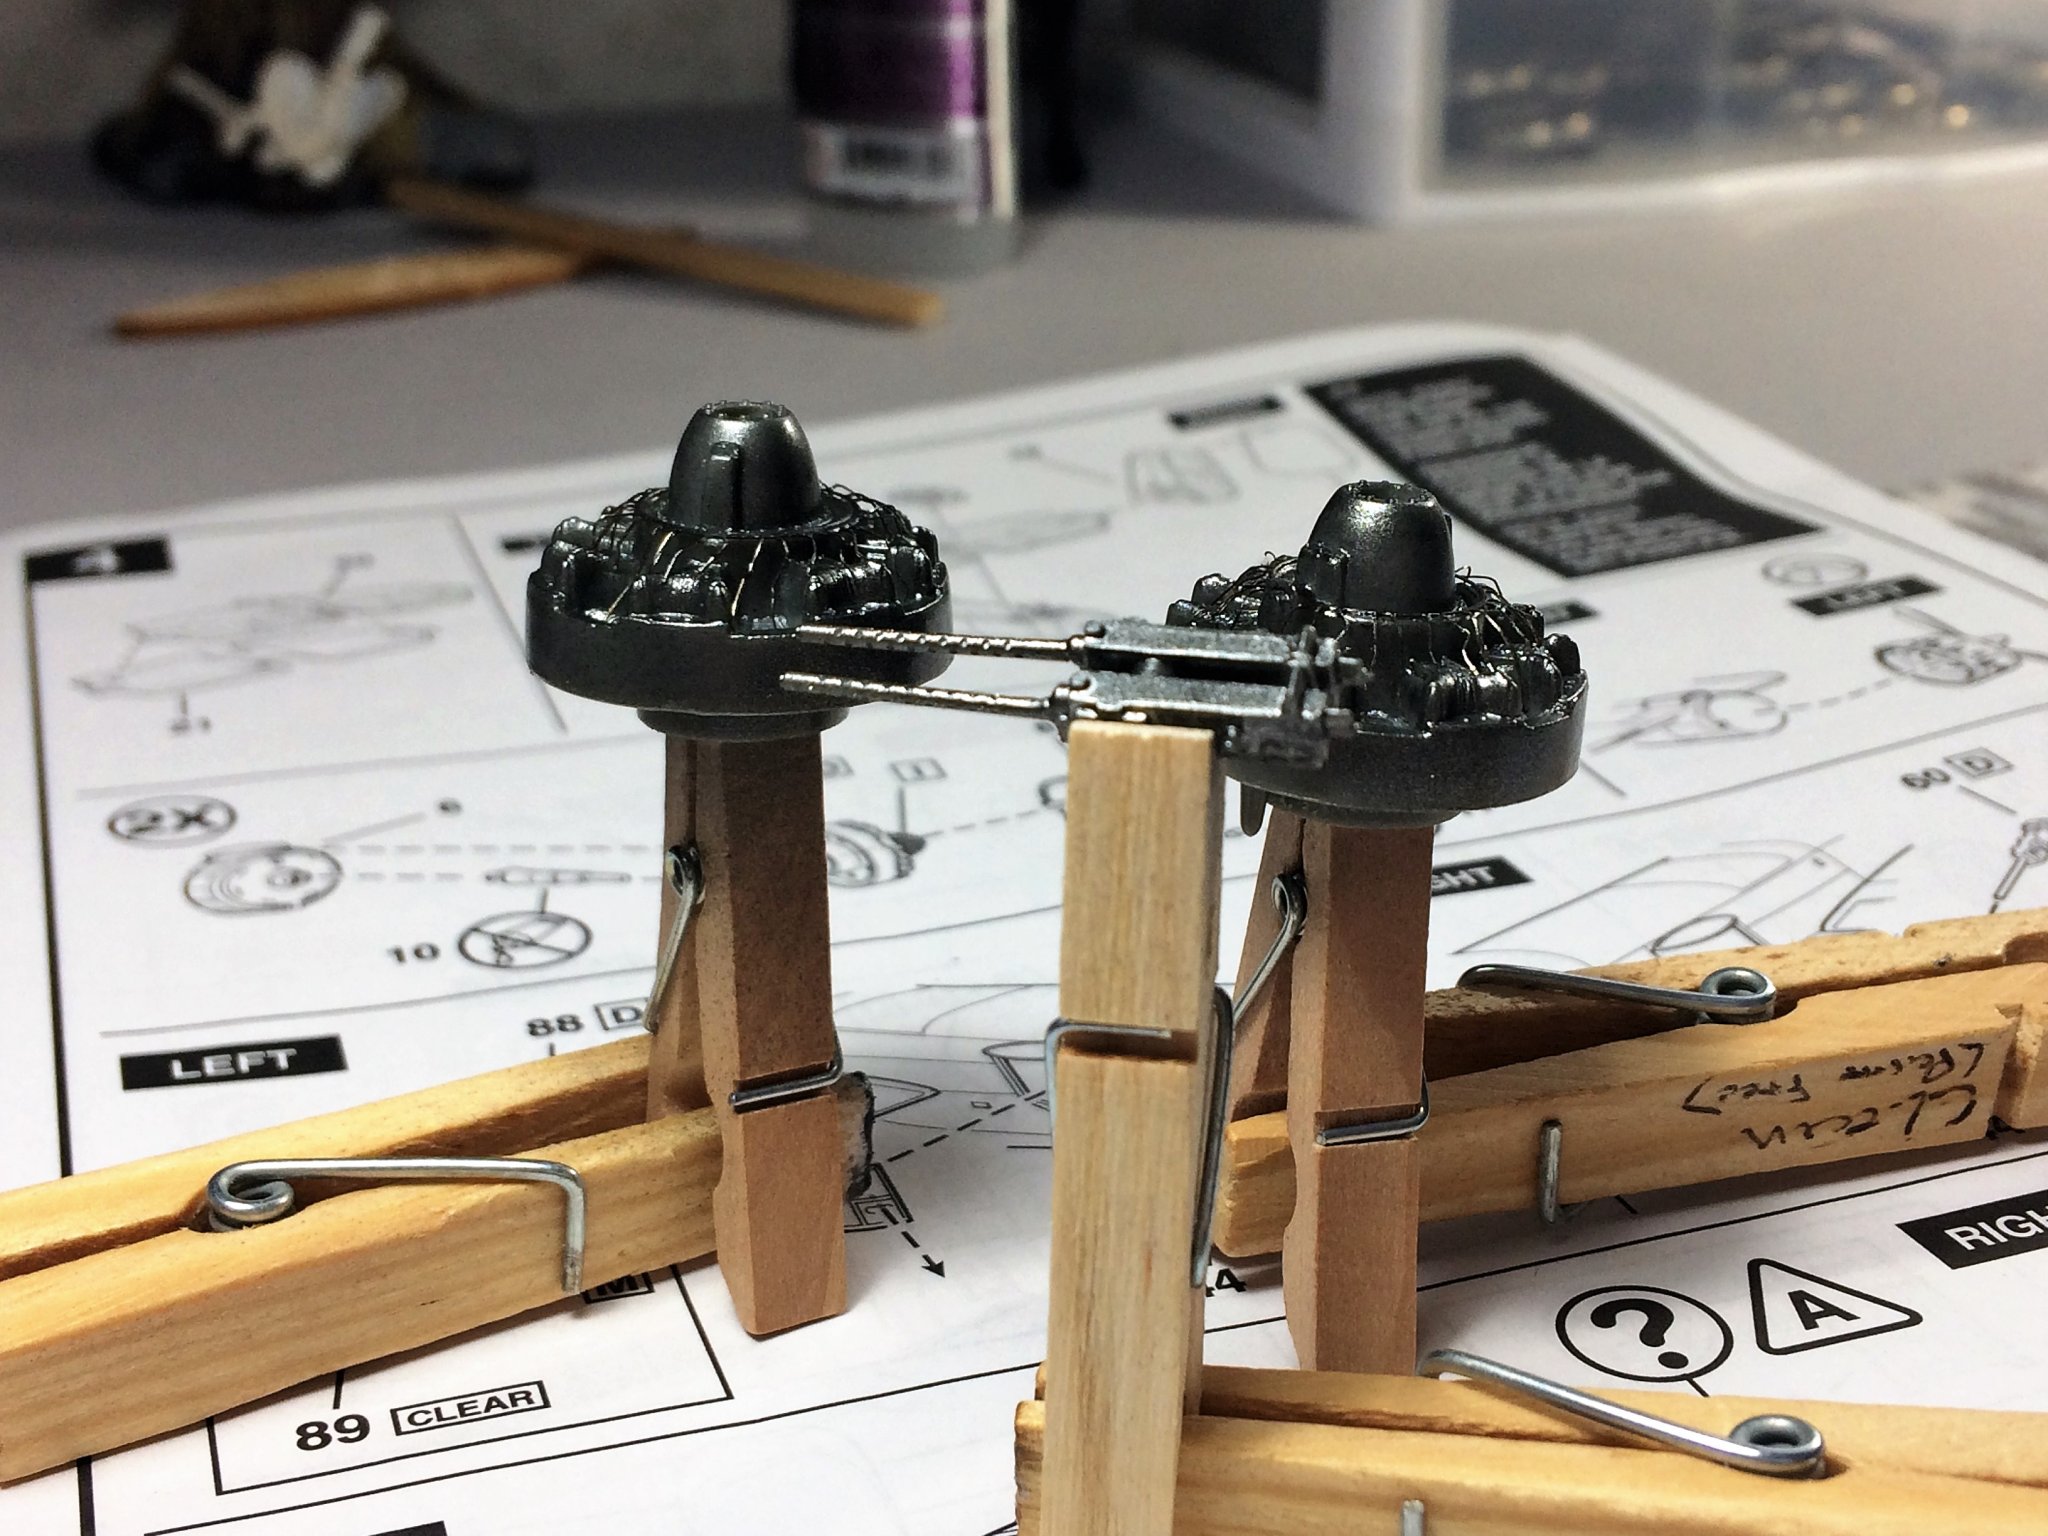
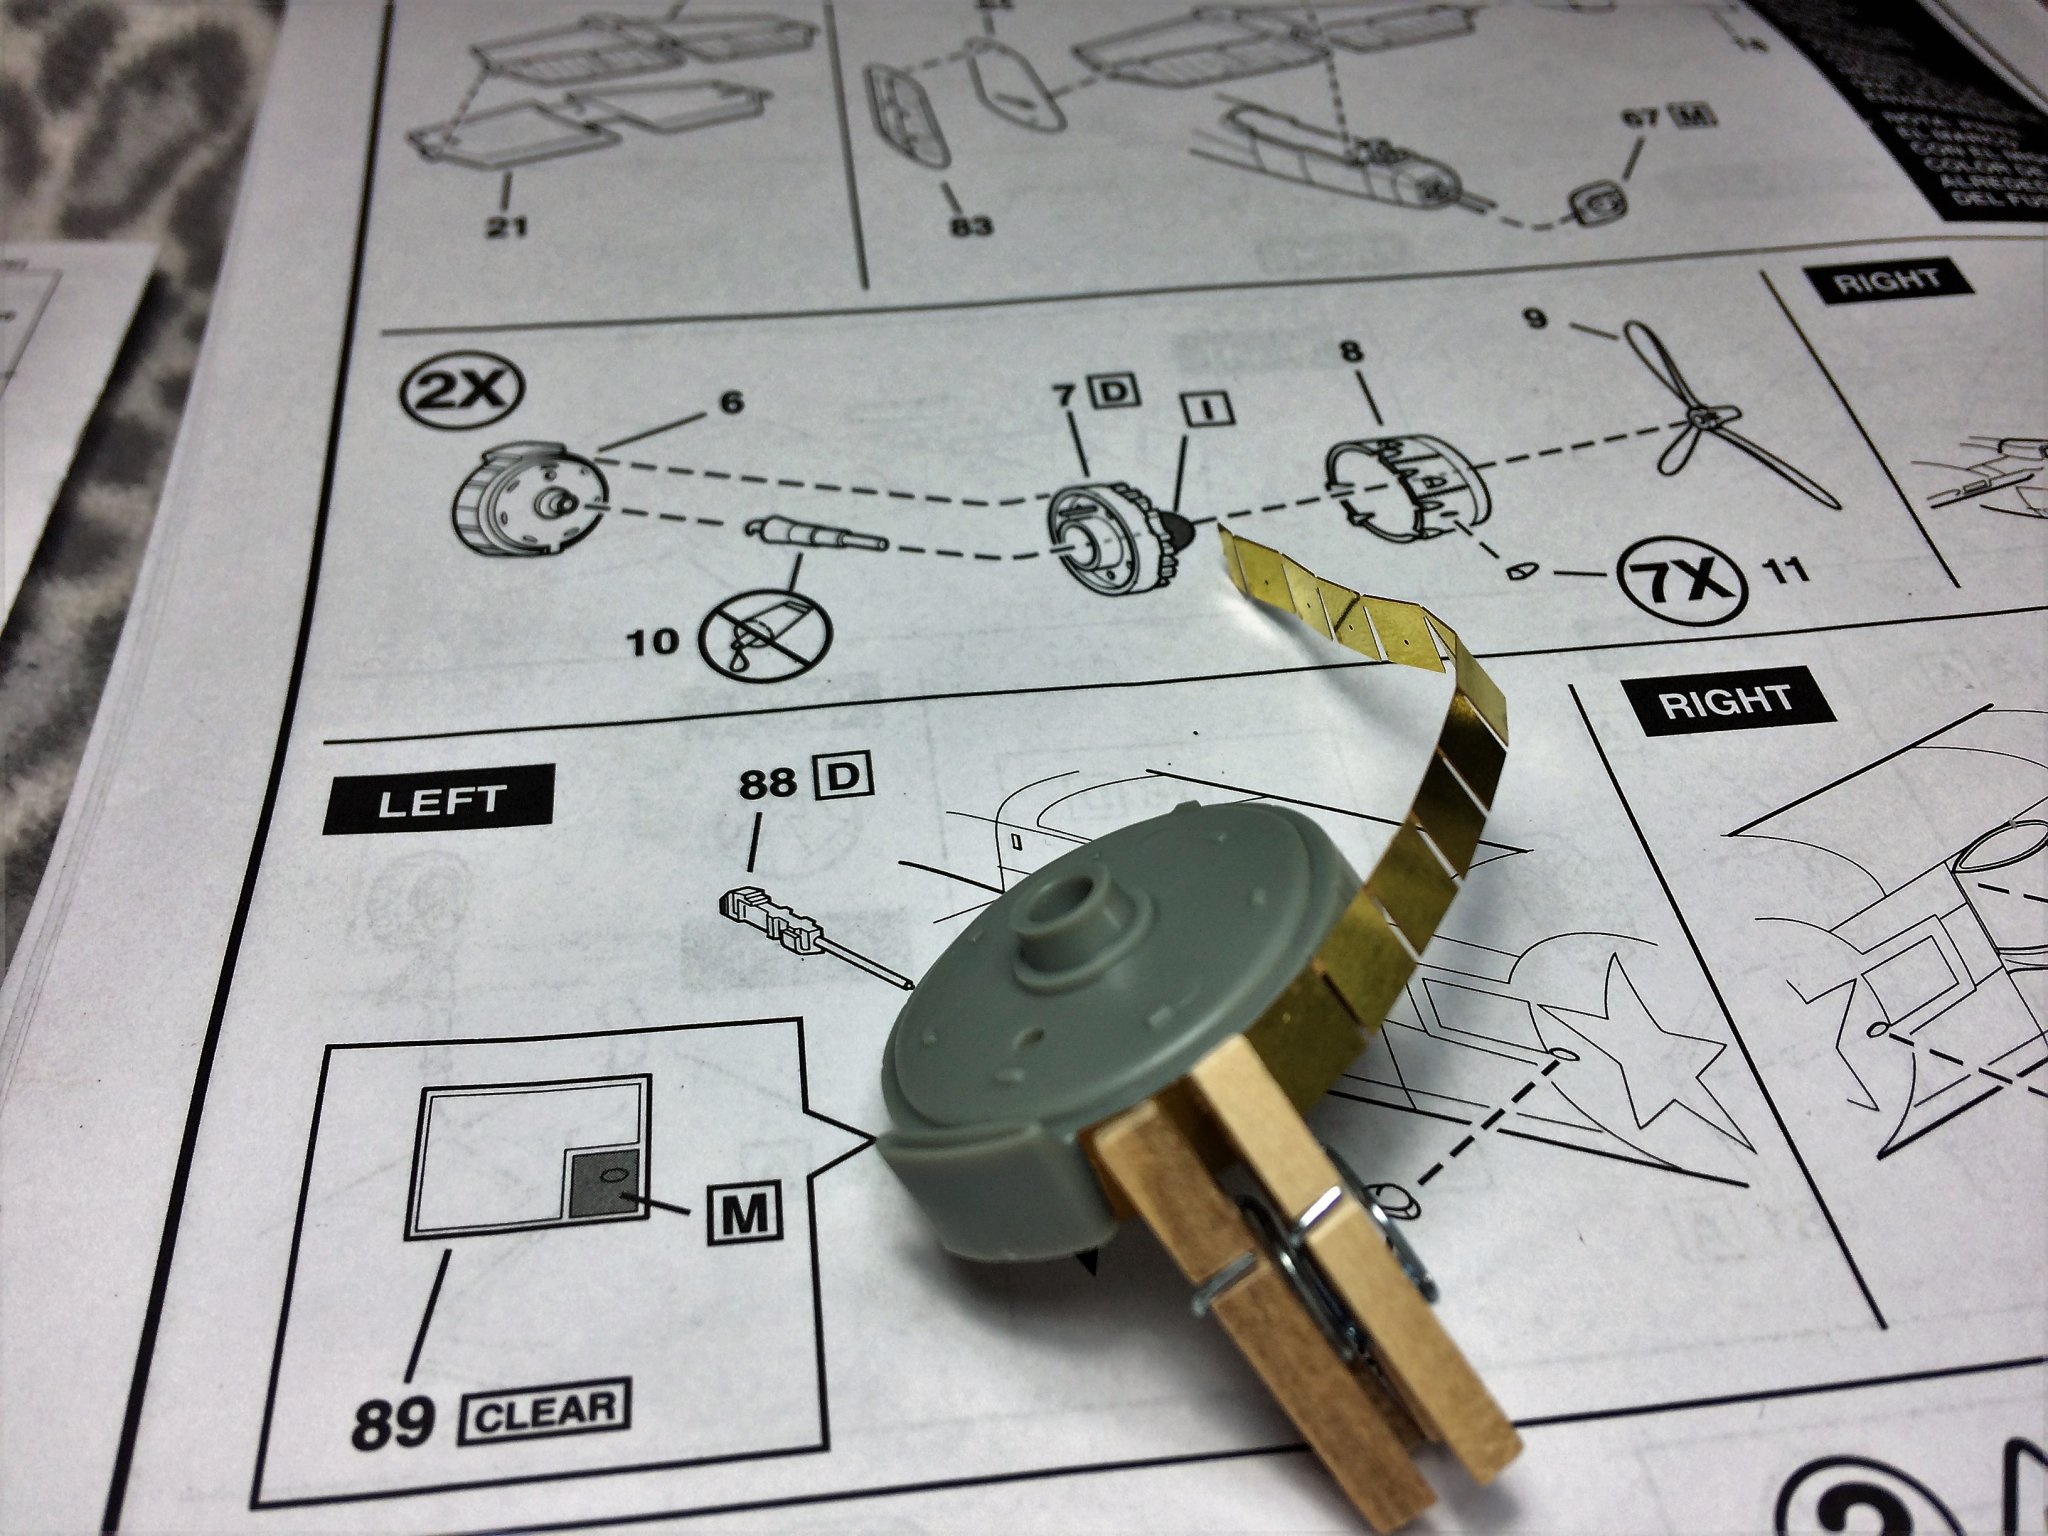
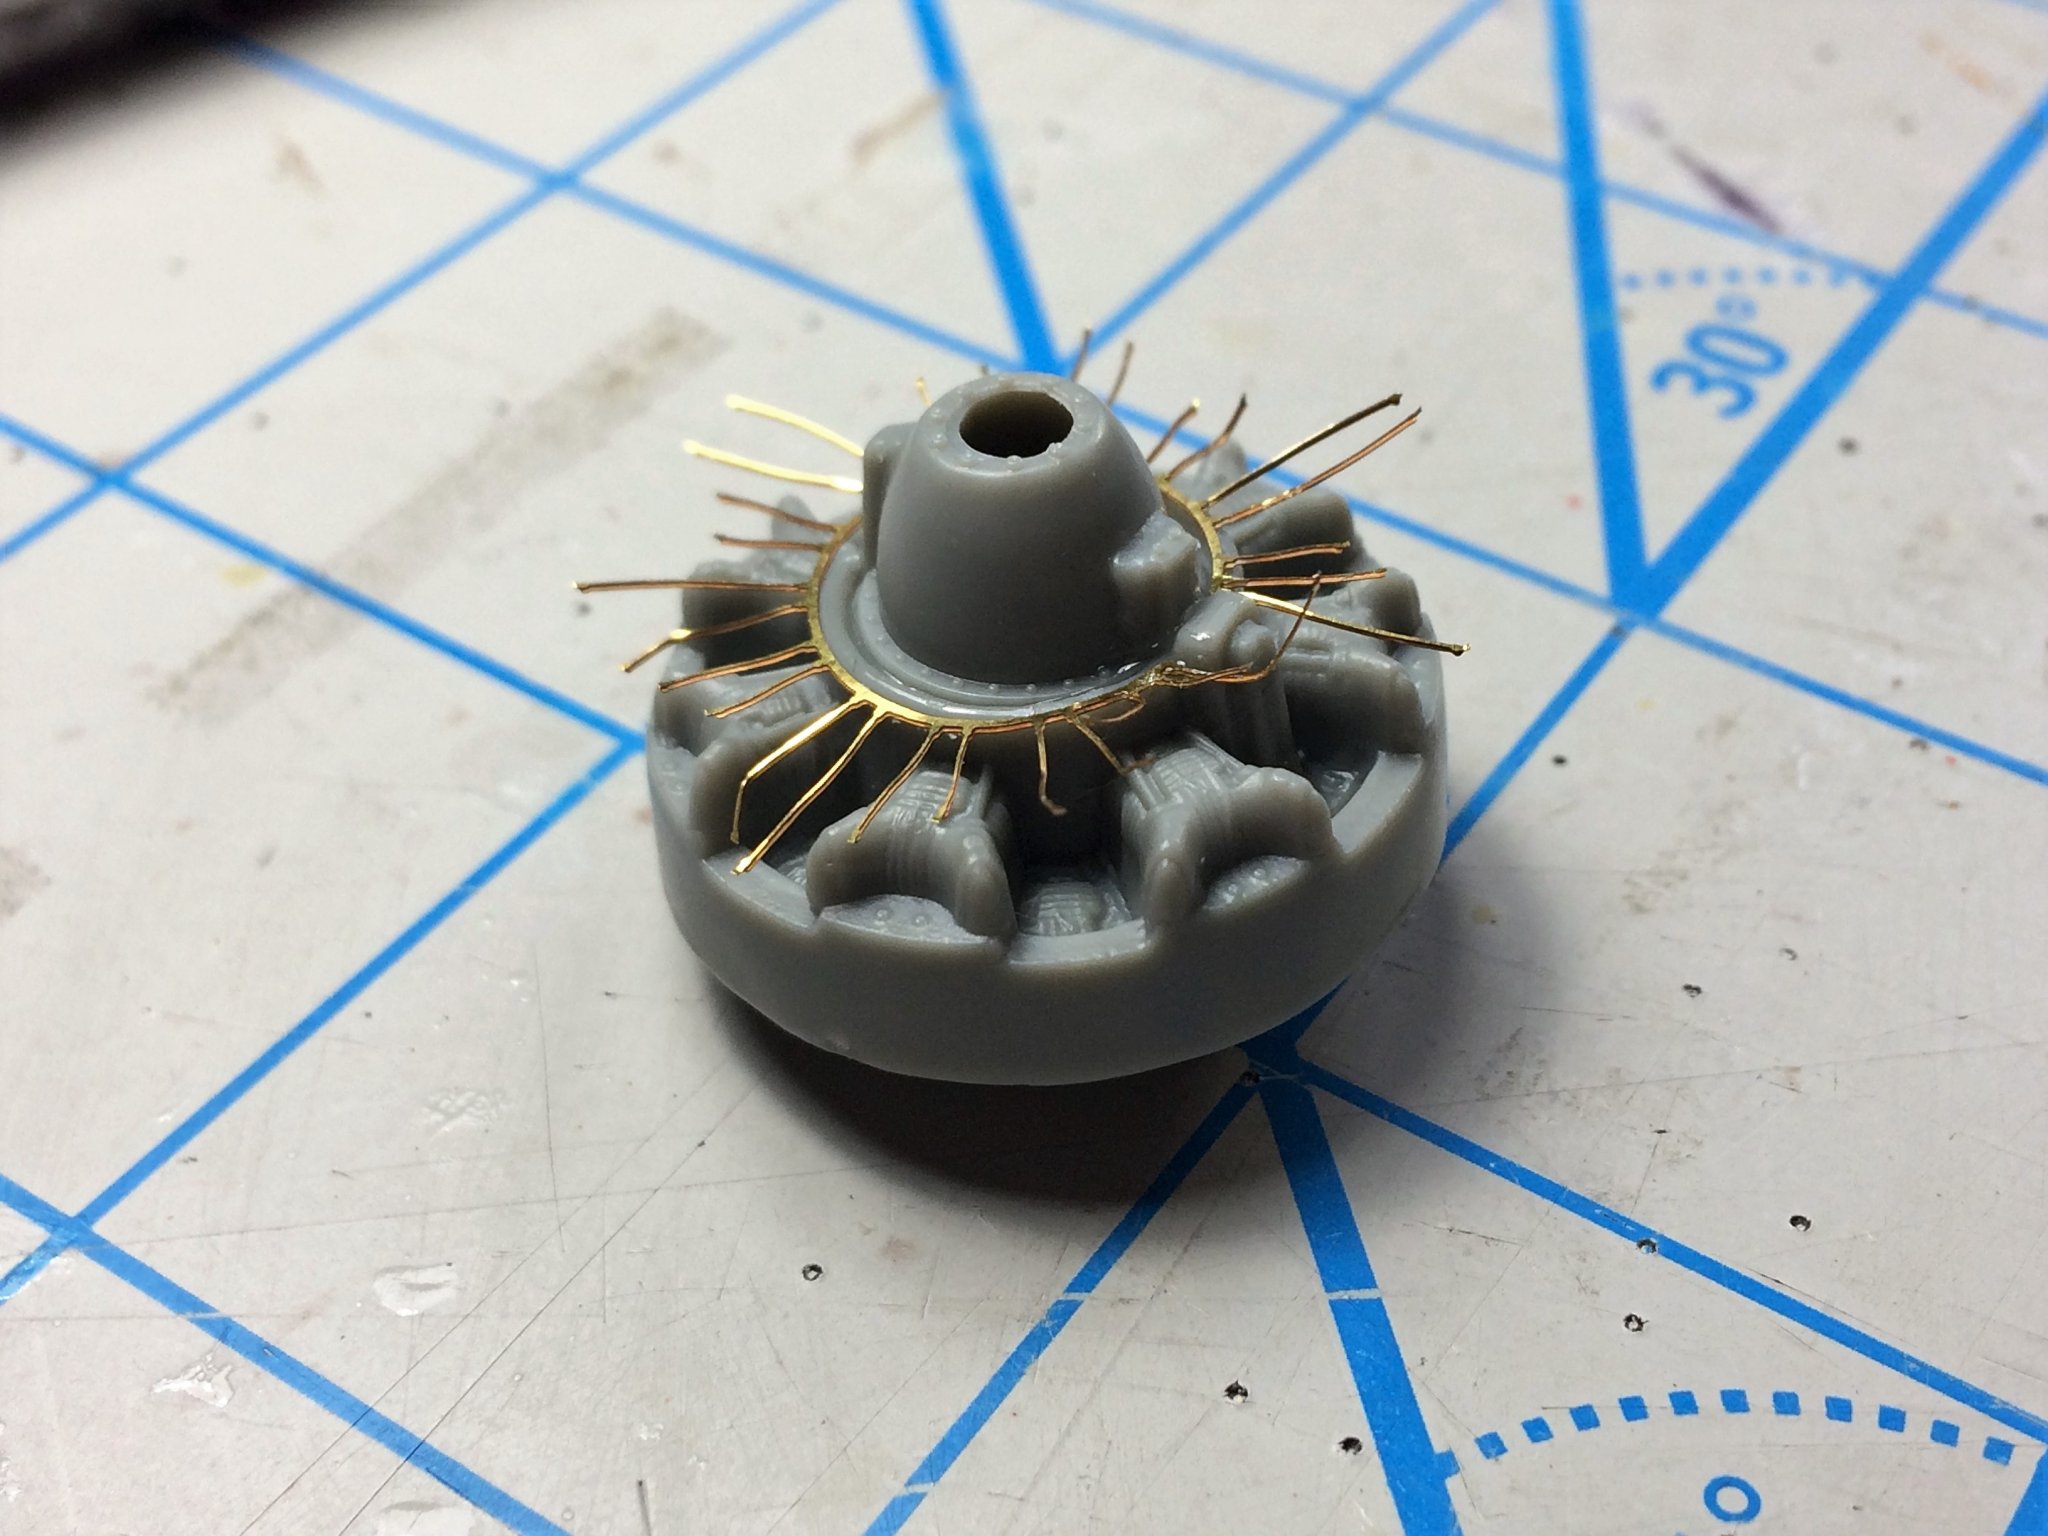
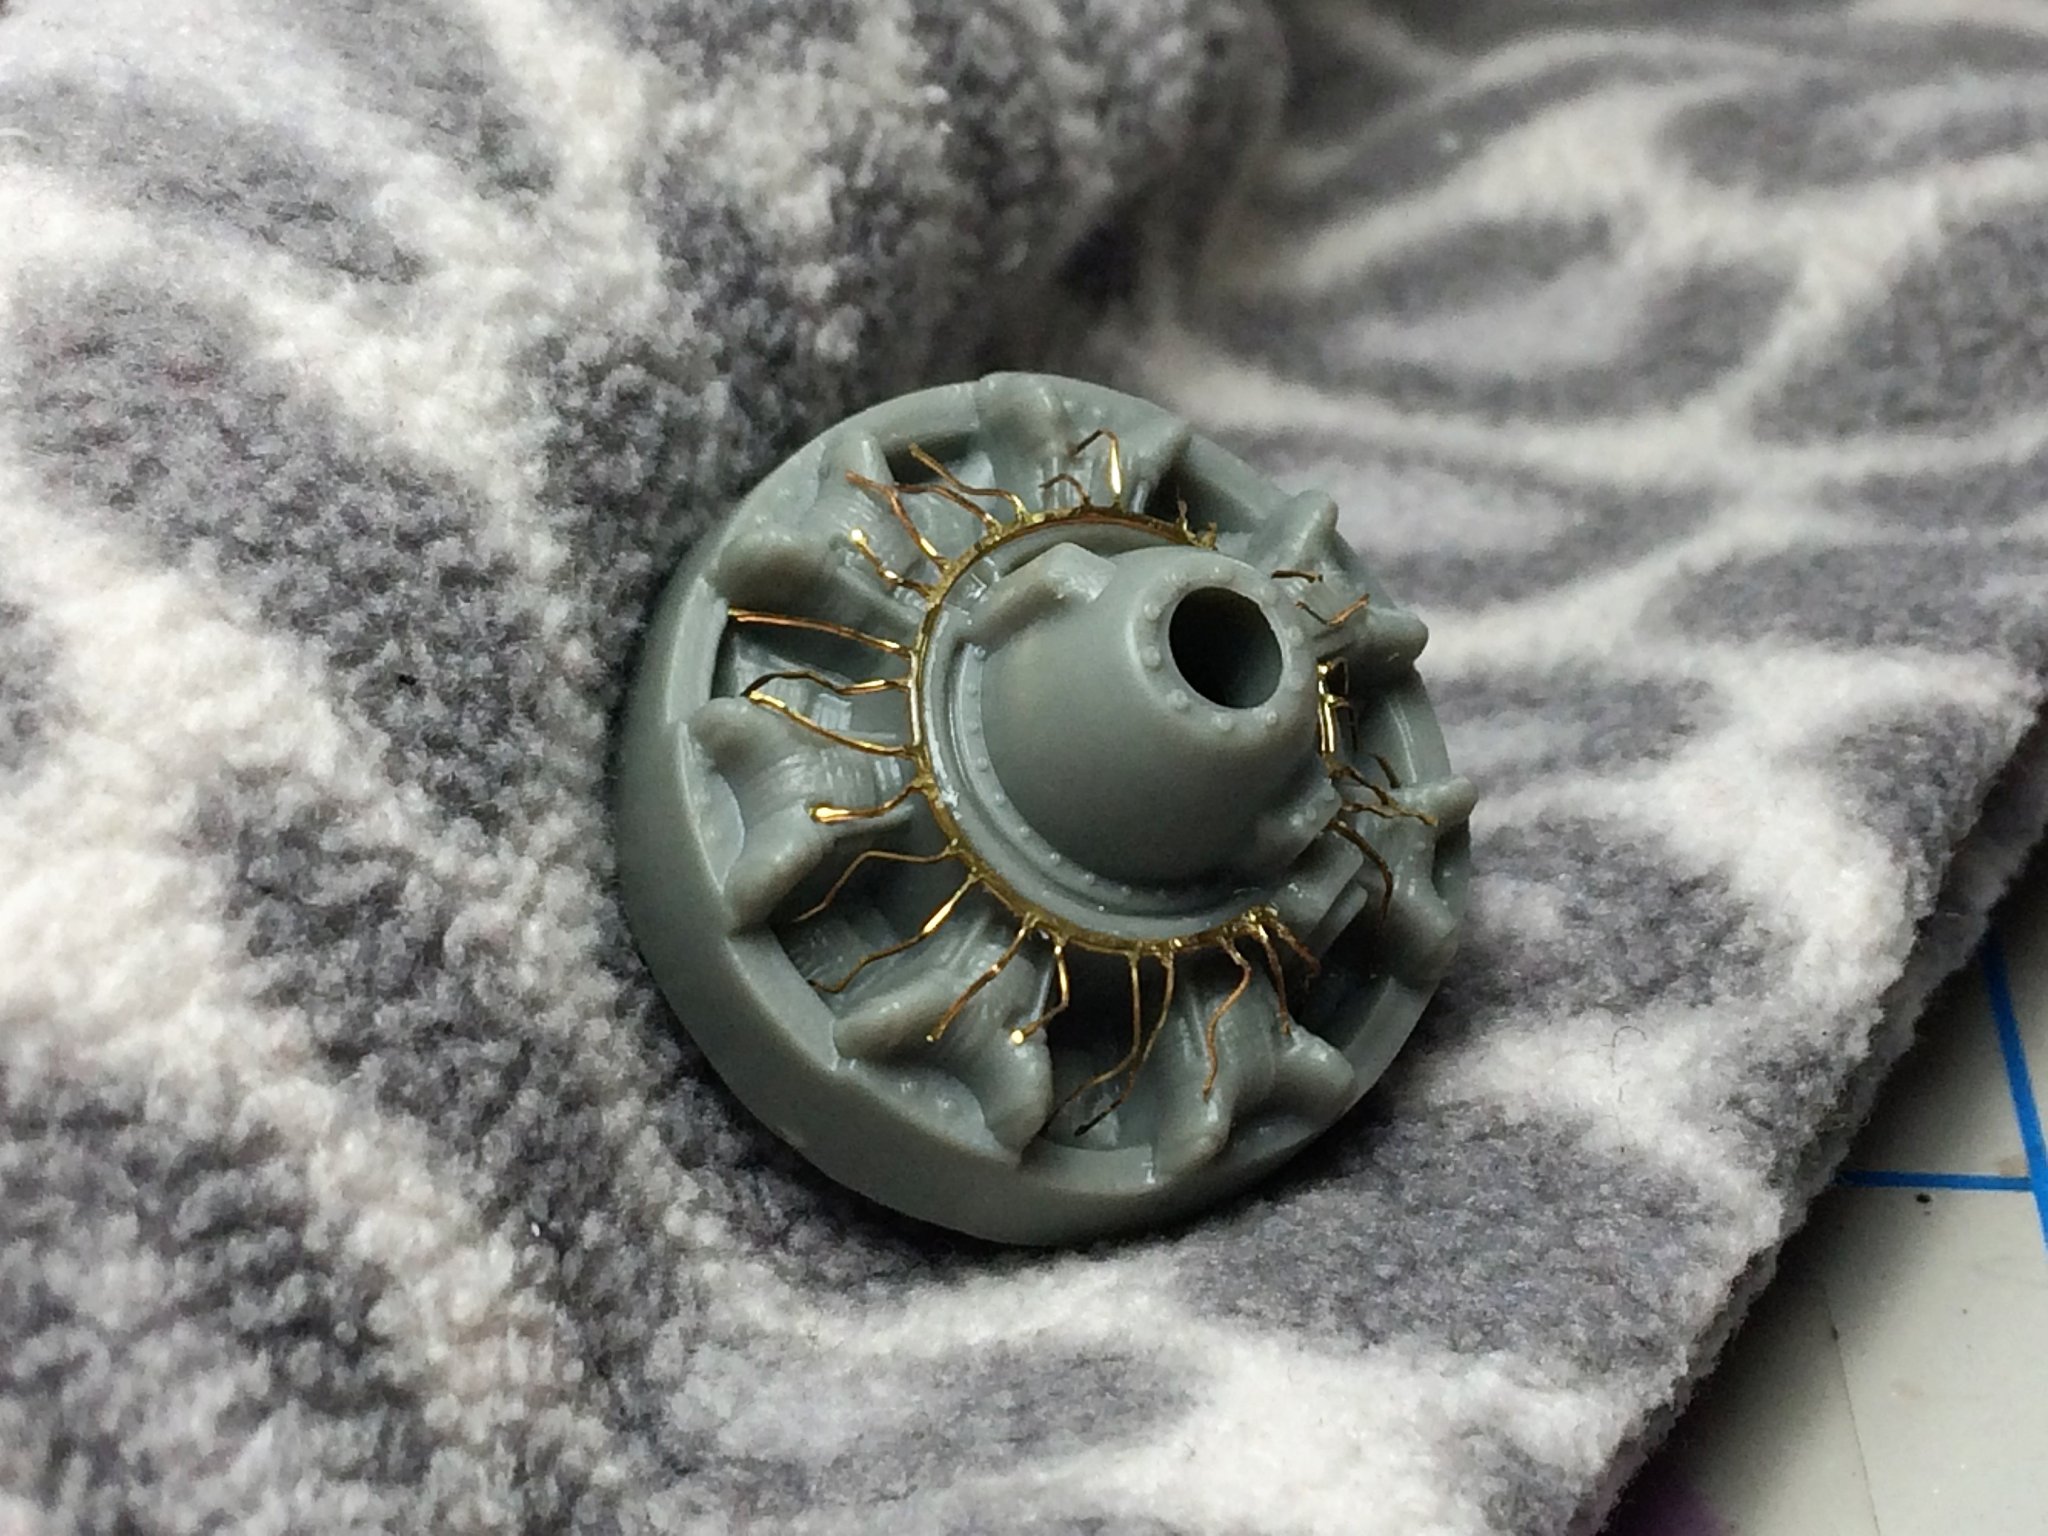
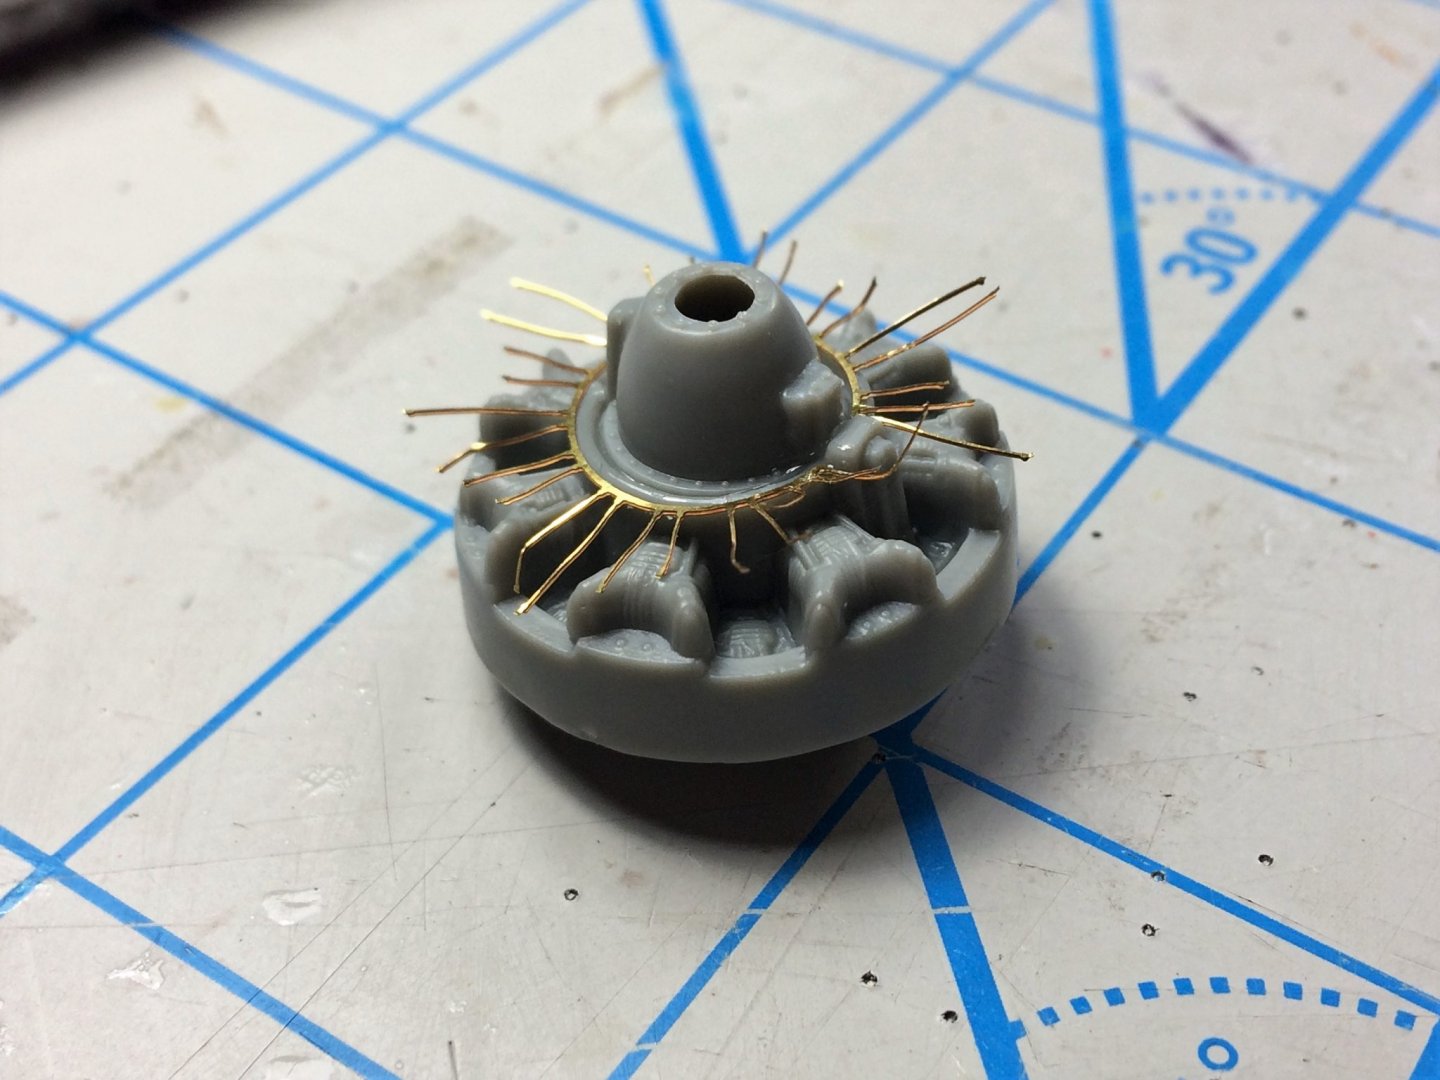
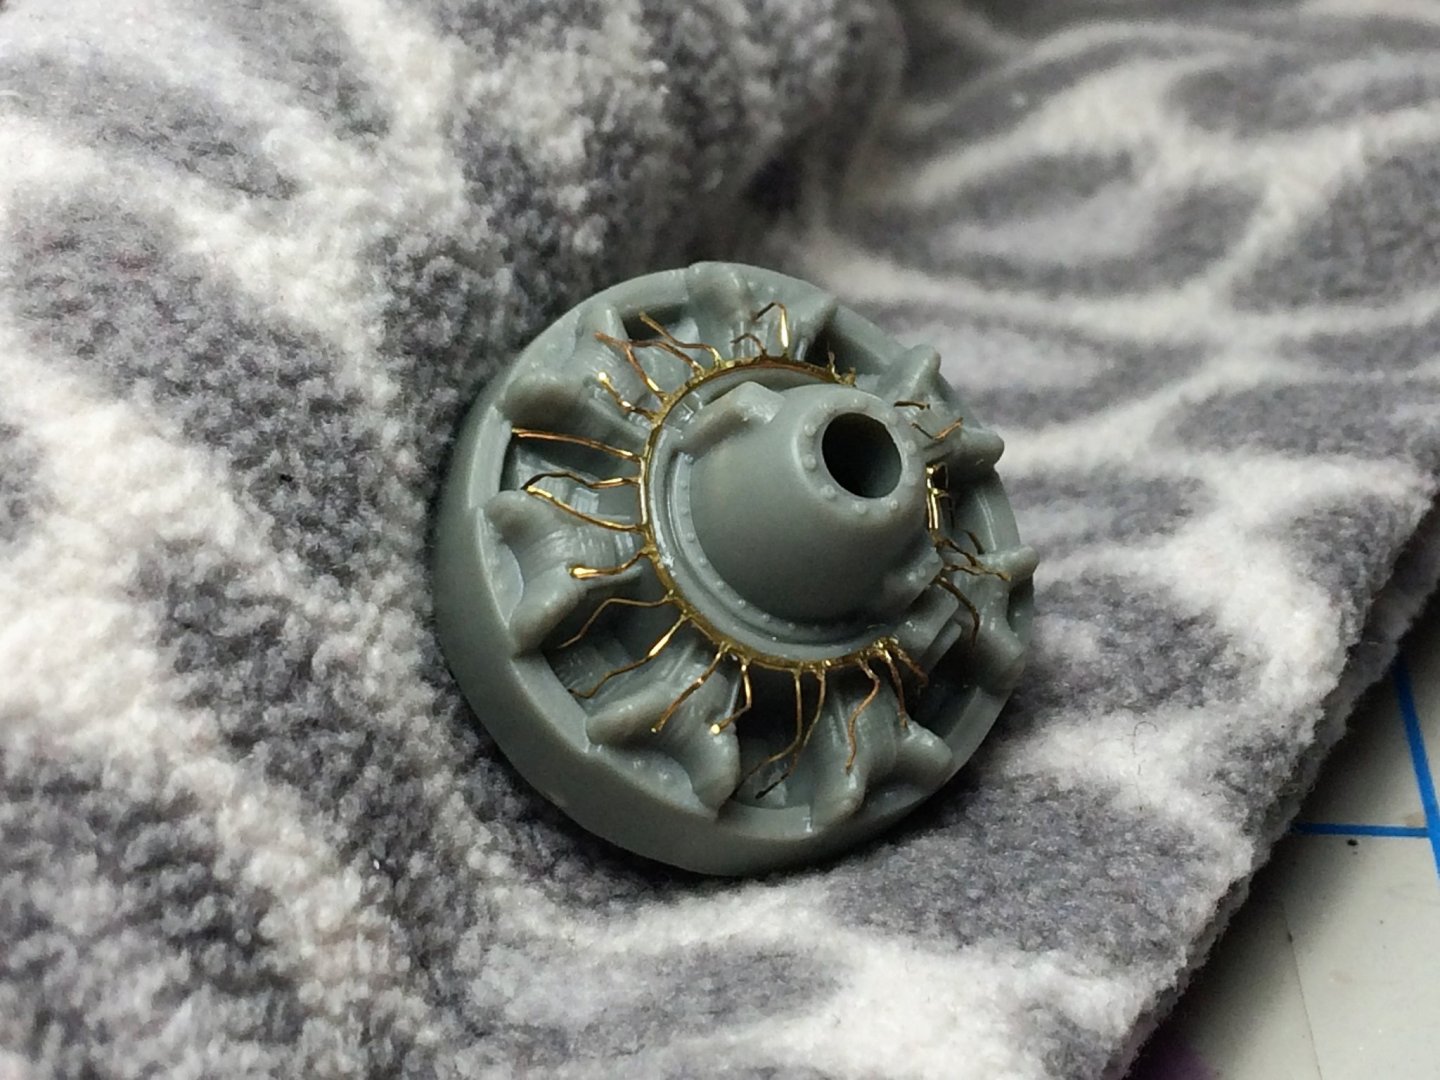
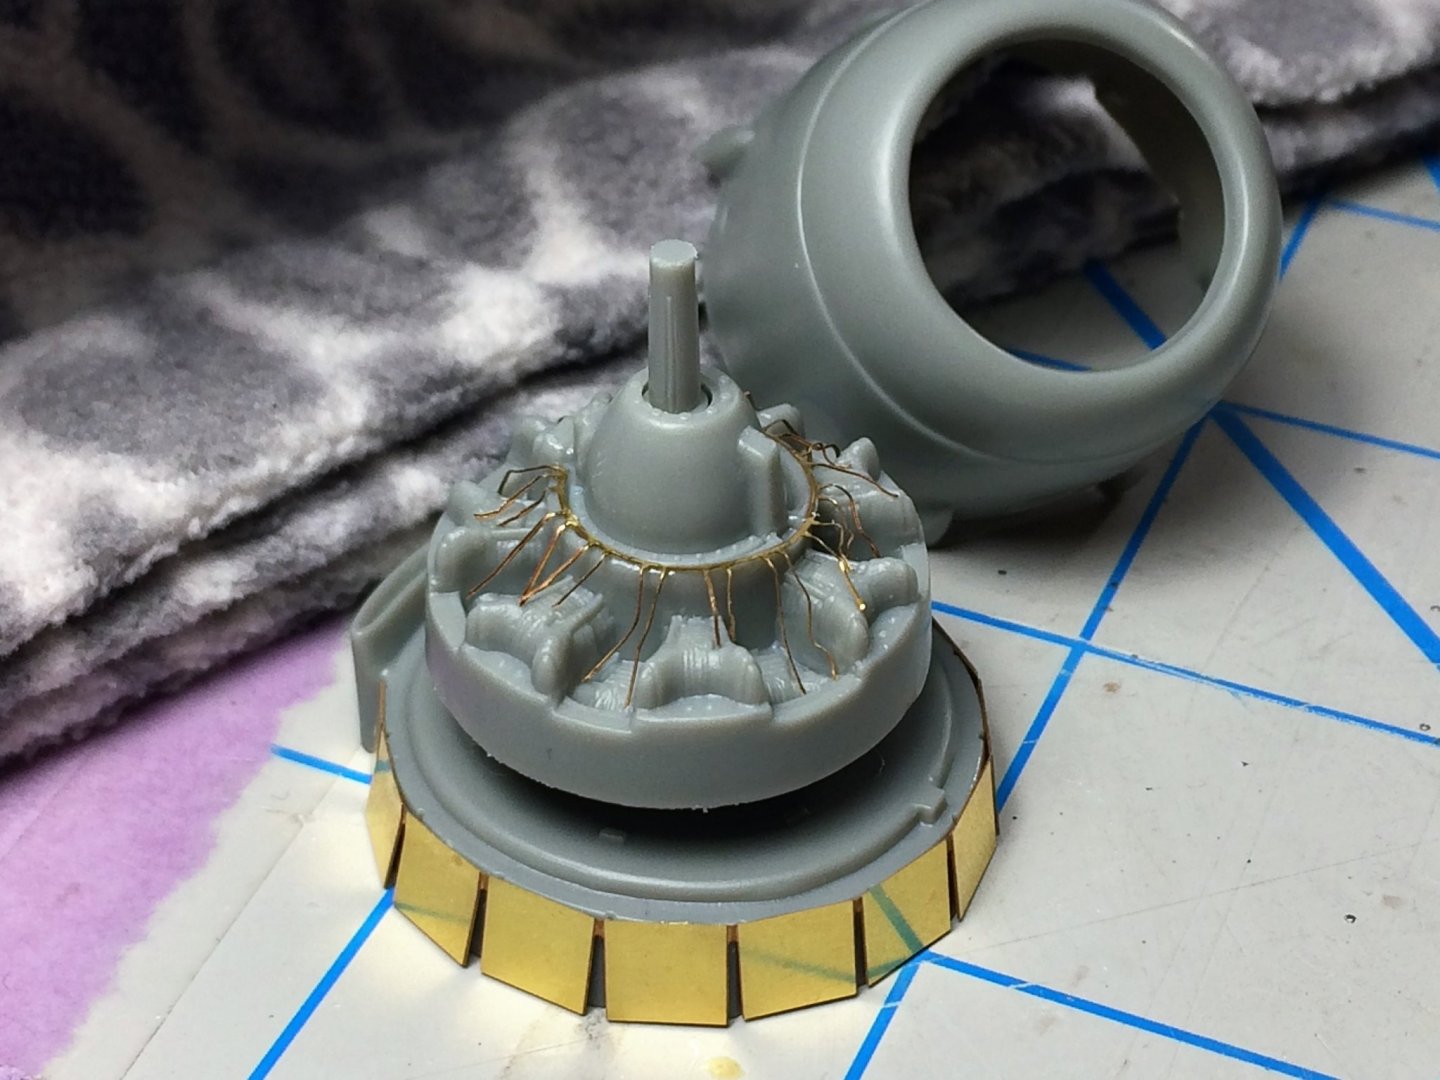
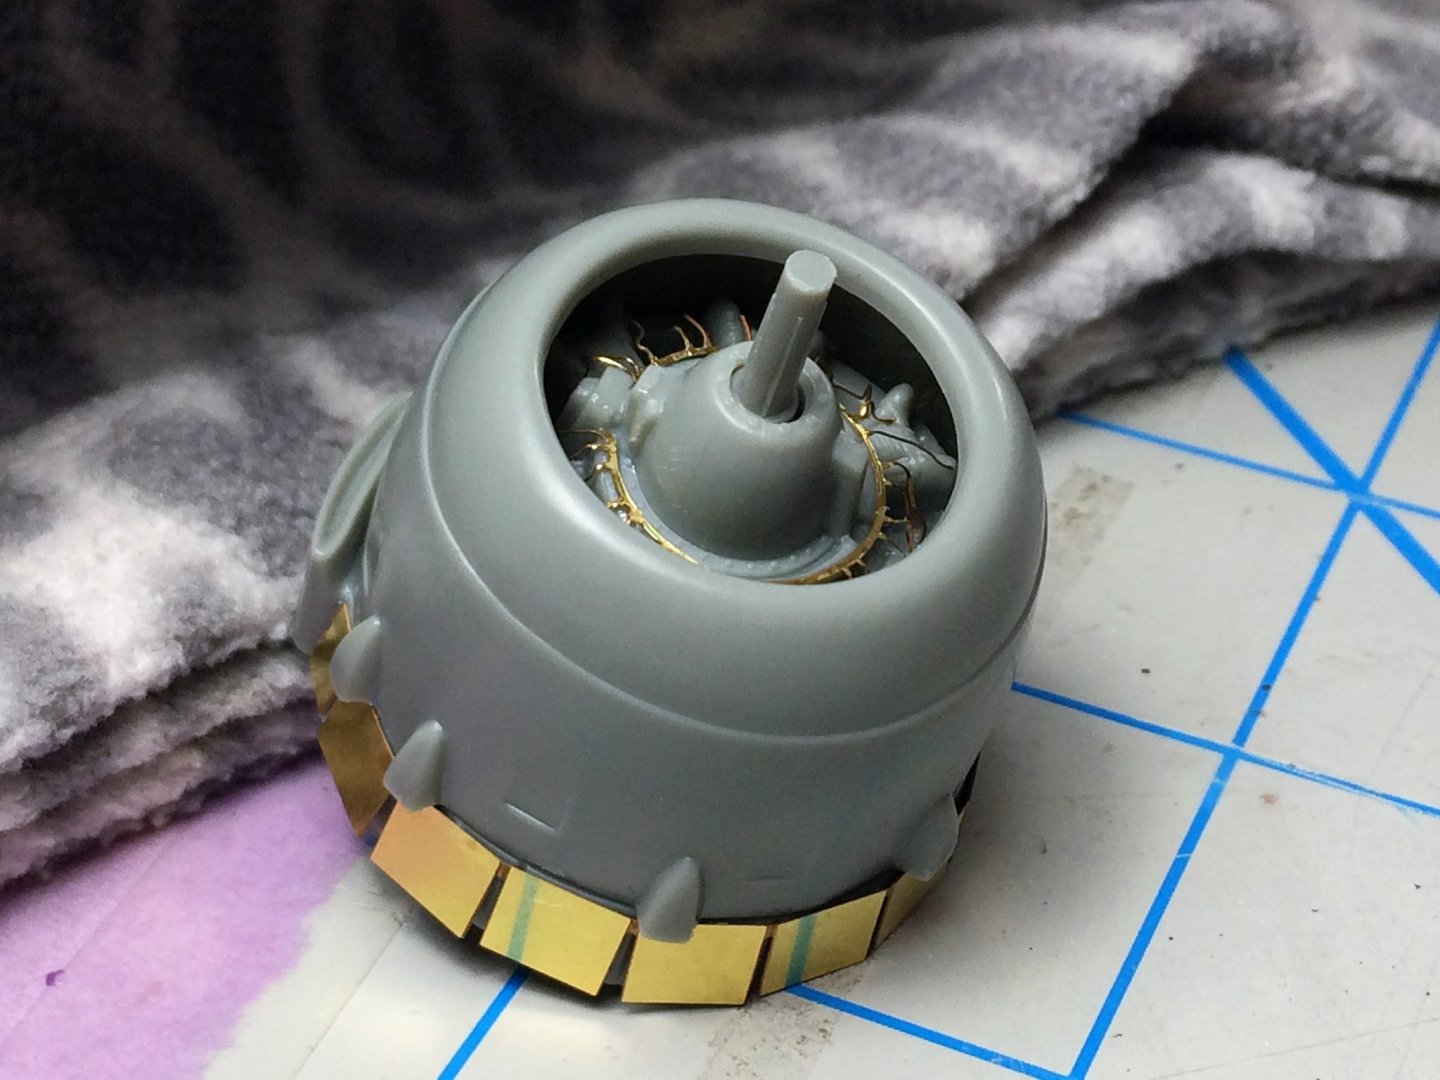
Evening, Full belly from dinner, house is quiet. Good time to update Mitchell. The engines have been started. There are a few pieces of PE for this area, not all have been used. The worst piece of PE I've had to do battle with was the below spider web of wires. It eventually fell into place. I realize the wires probably have specific areas where they should be attached. I'm not too worried about it as it will be eventually covered. Everything just sort of stacks on top of each other. The band of PE around the engine has tiny miniscule little brass pieces that go underneath to open the flaps up. I didn't use these. It looked like they were putting stress on the flap it self as I was bending it up to get the small piece in. I was a comedy of errors. Looks fine without it. All buttoned up, but not glued yet. The engine itself will be flat black. The outside of the engine will have it's distinctive yellow stripe. The rest will match the exterior. The propeller will be black with flat aluminum accents. Everything lines up well. No wonky prop. The second engine was assembled soon after. I have a lot of painting to do. Tom E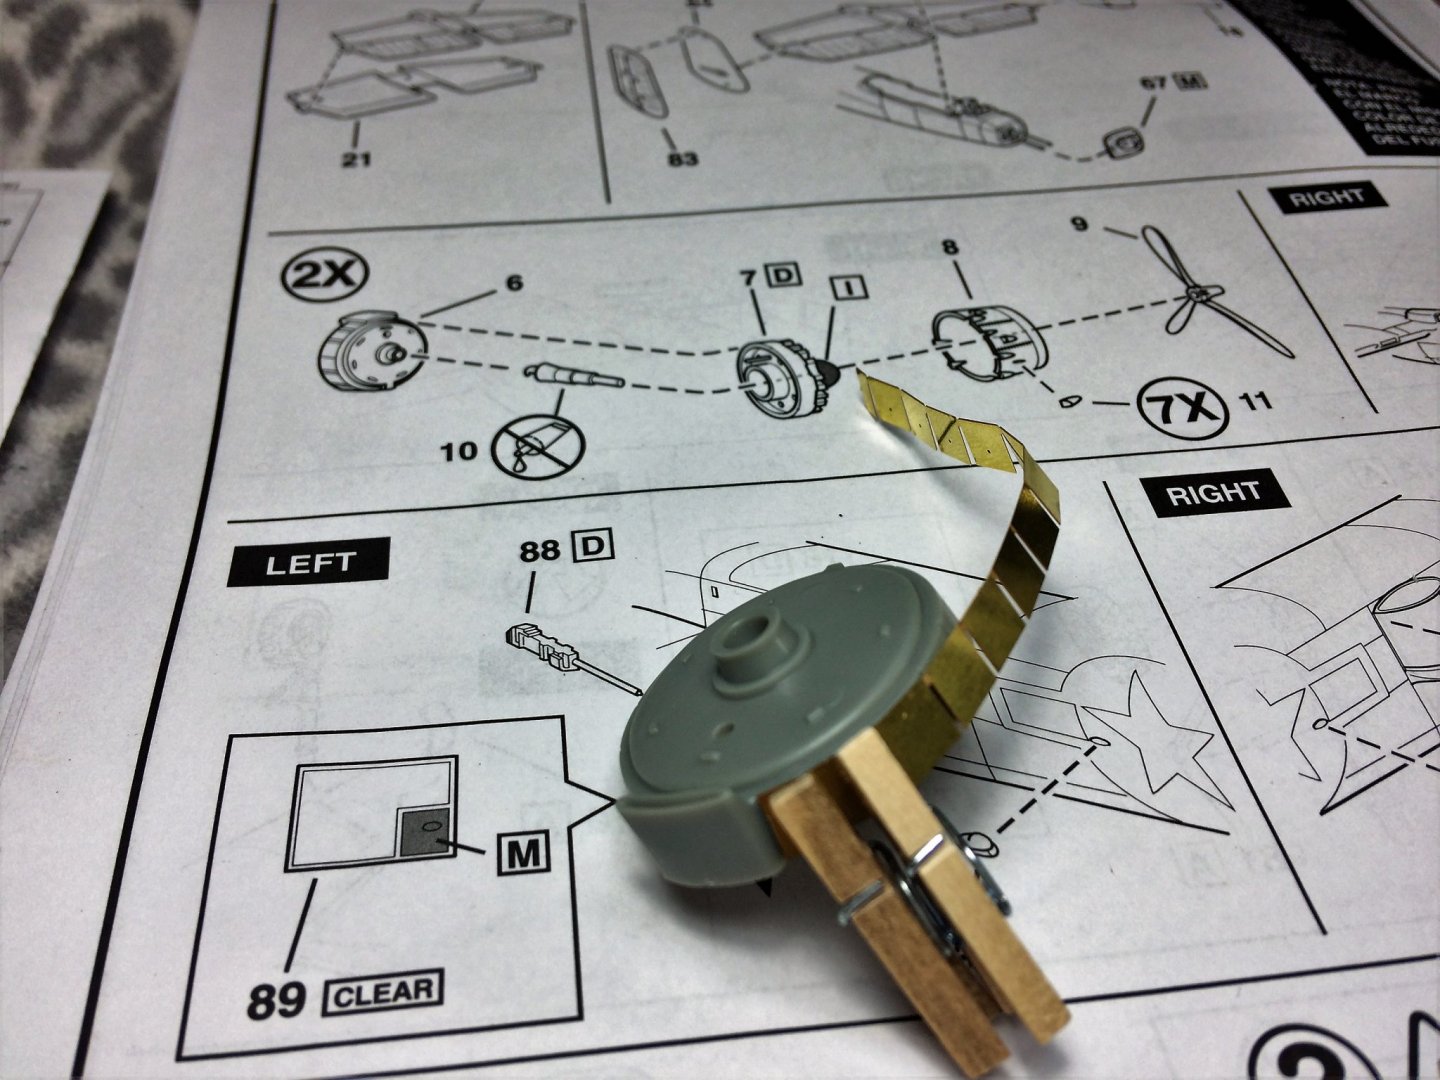

- 120 replies
-
- 11
-
-
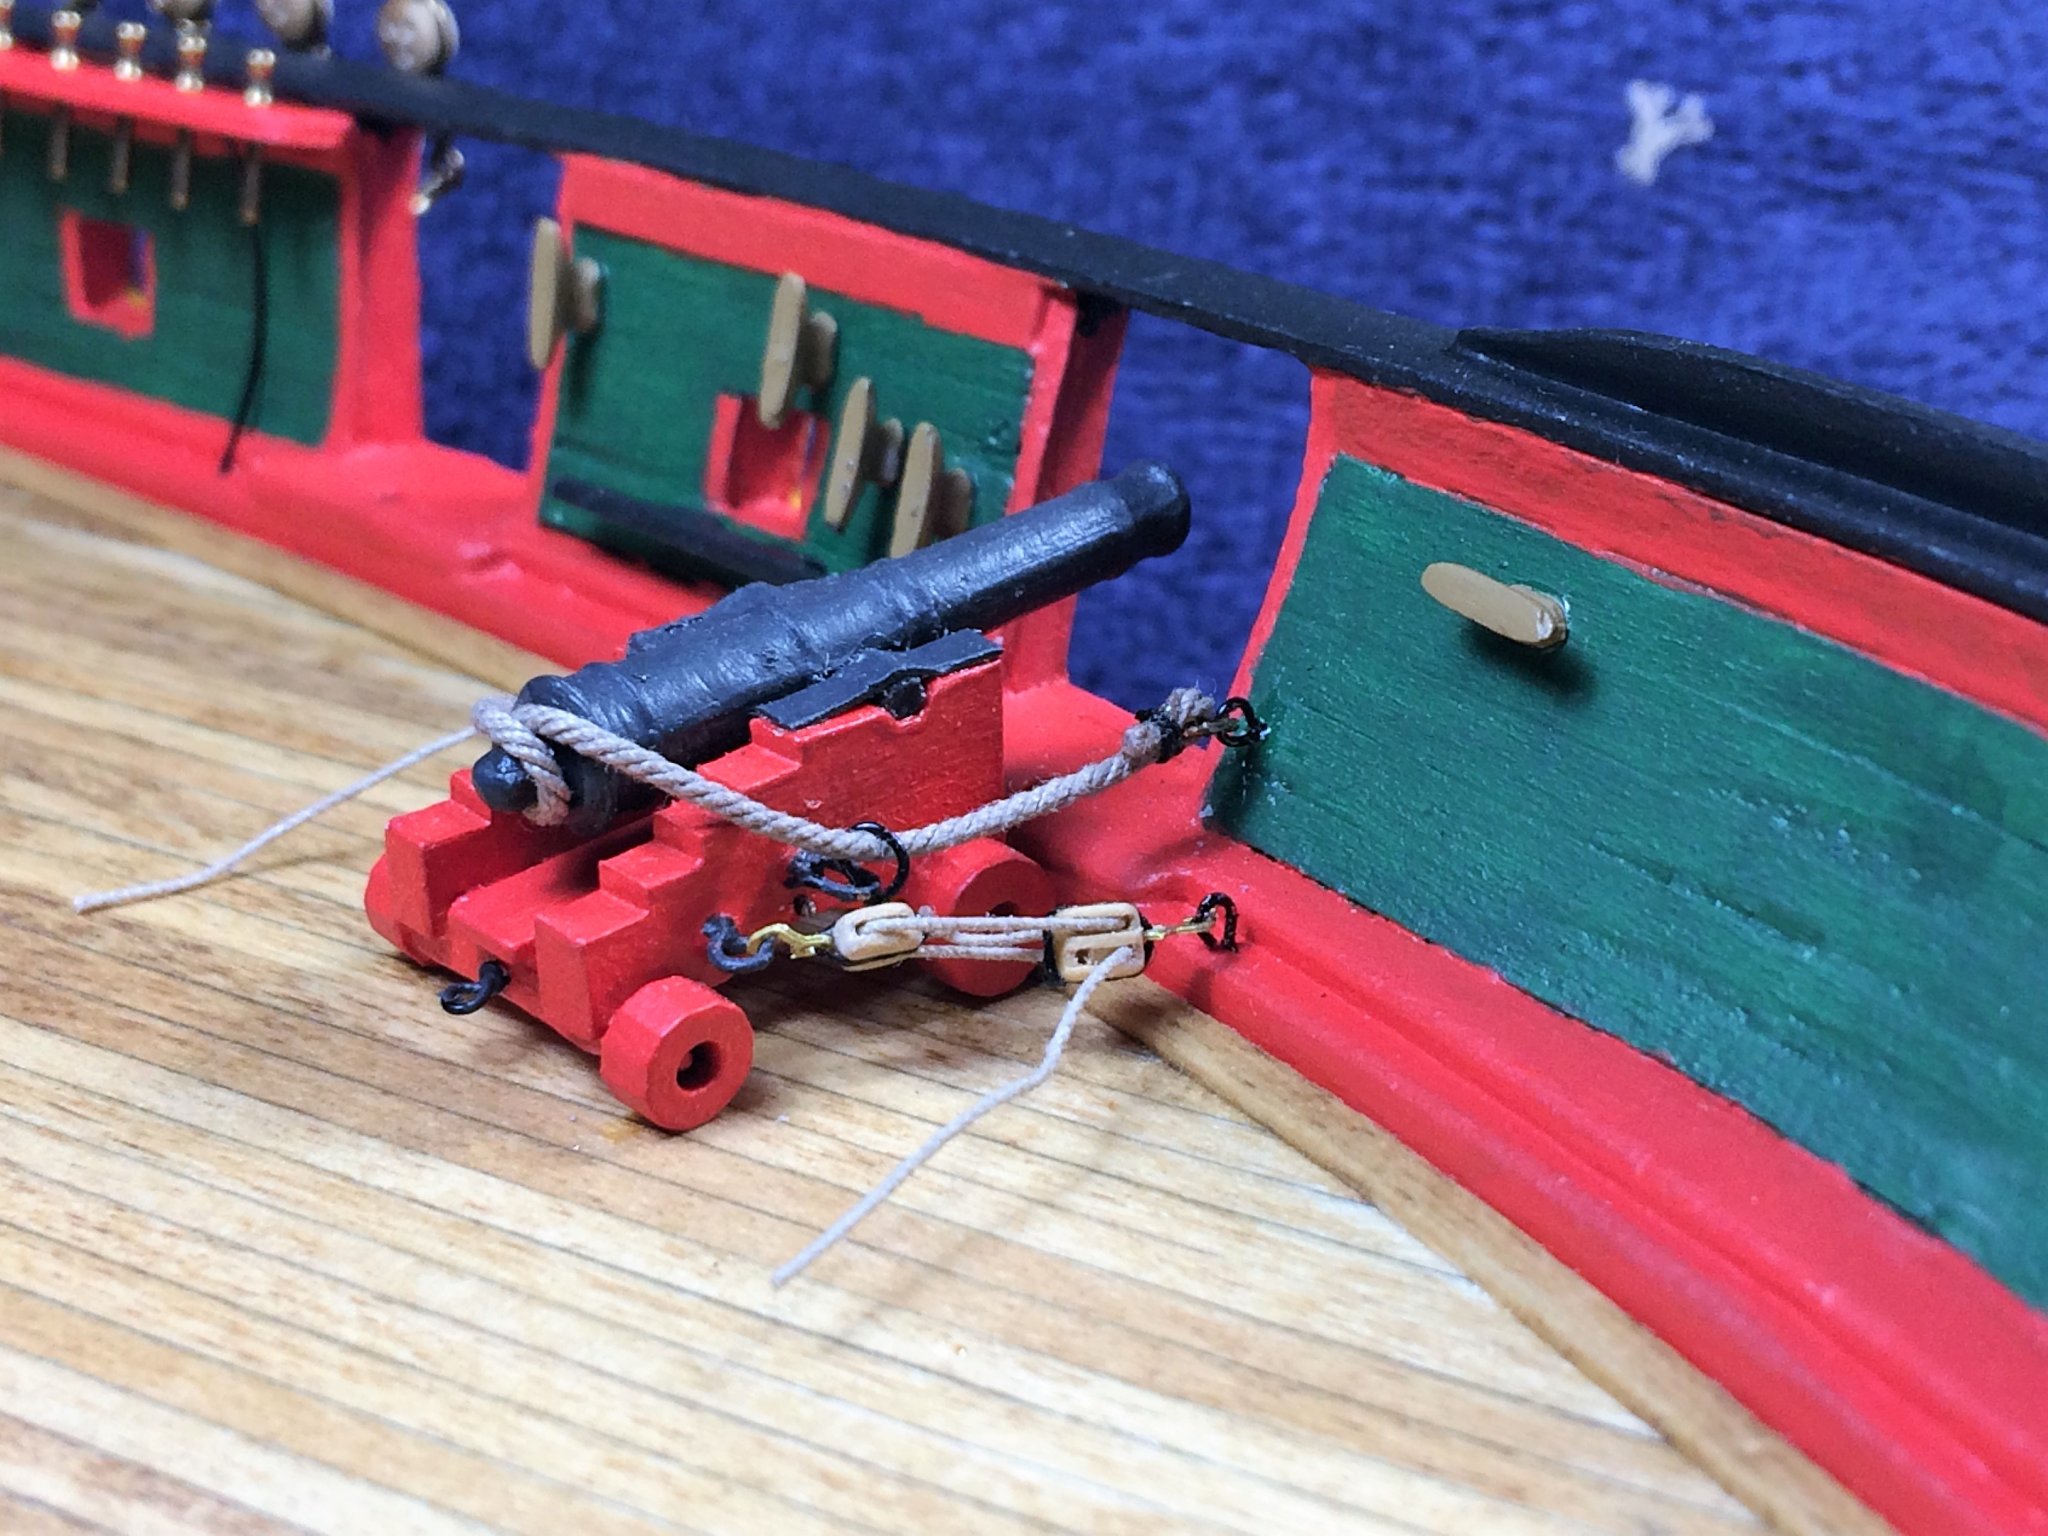
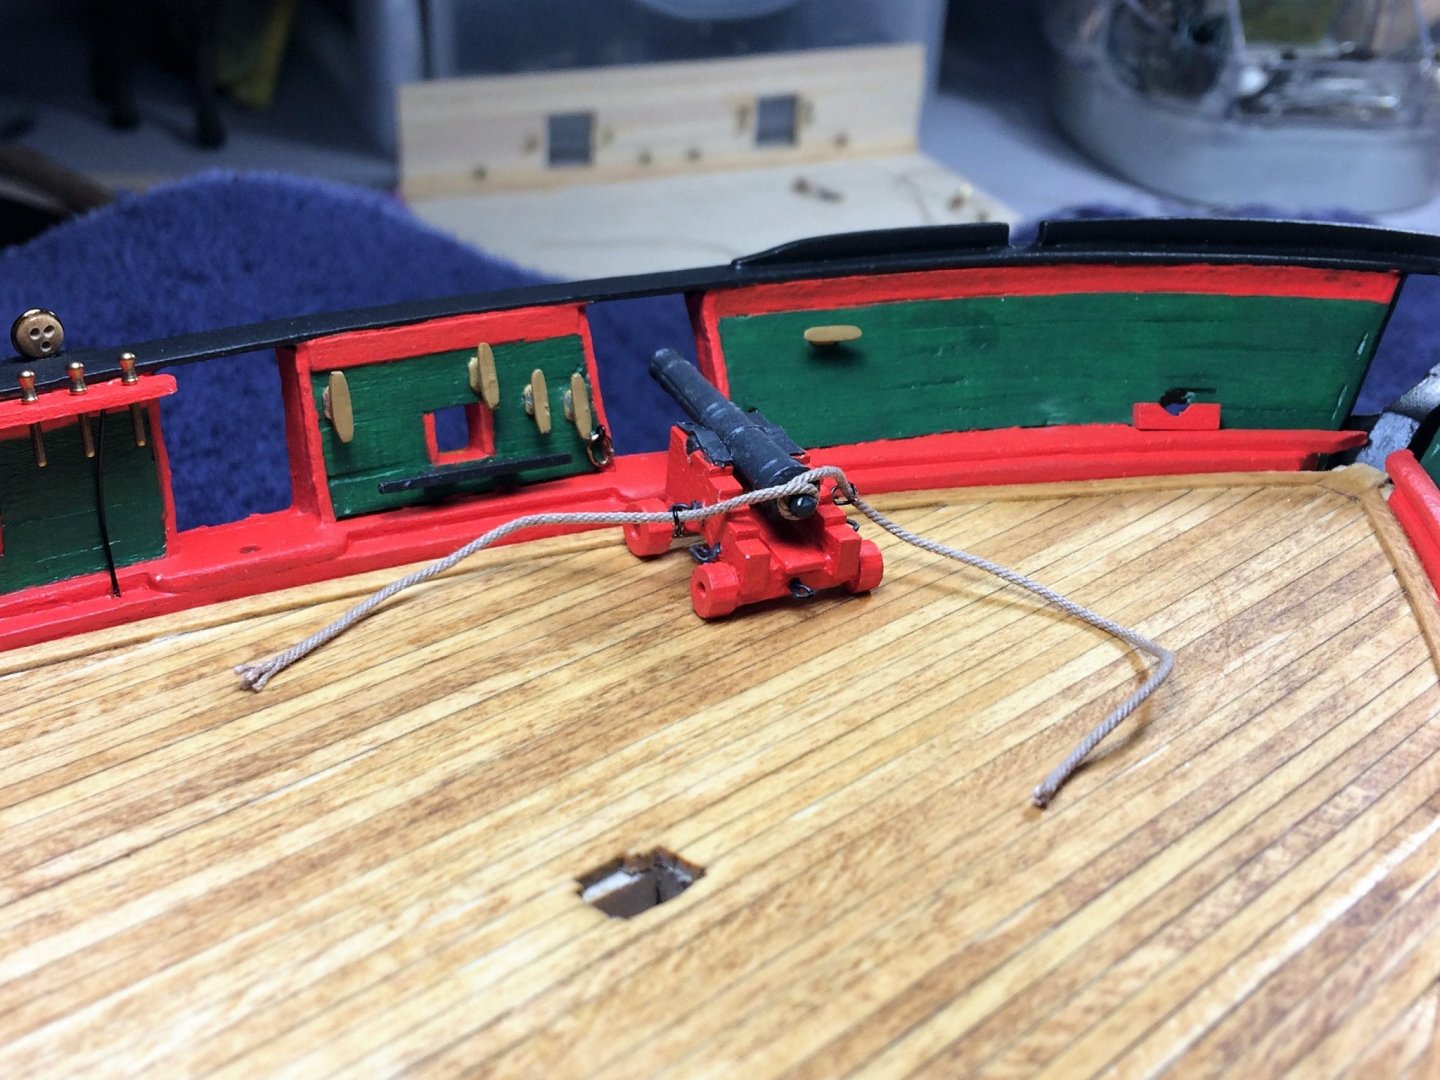
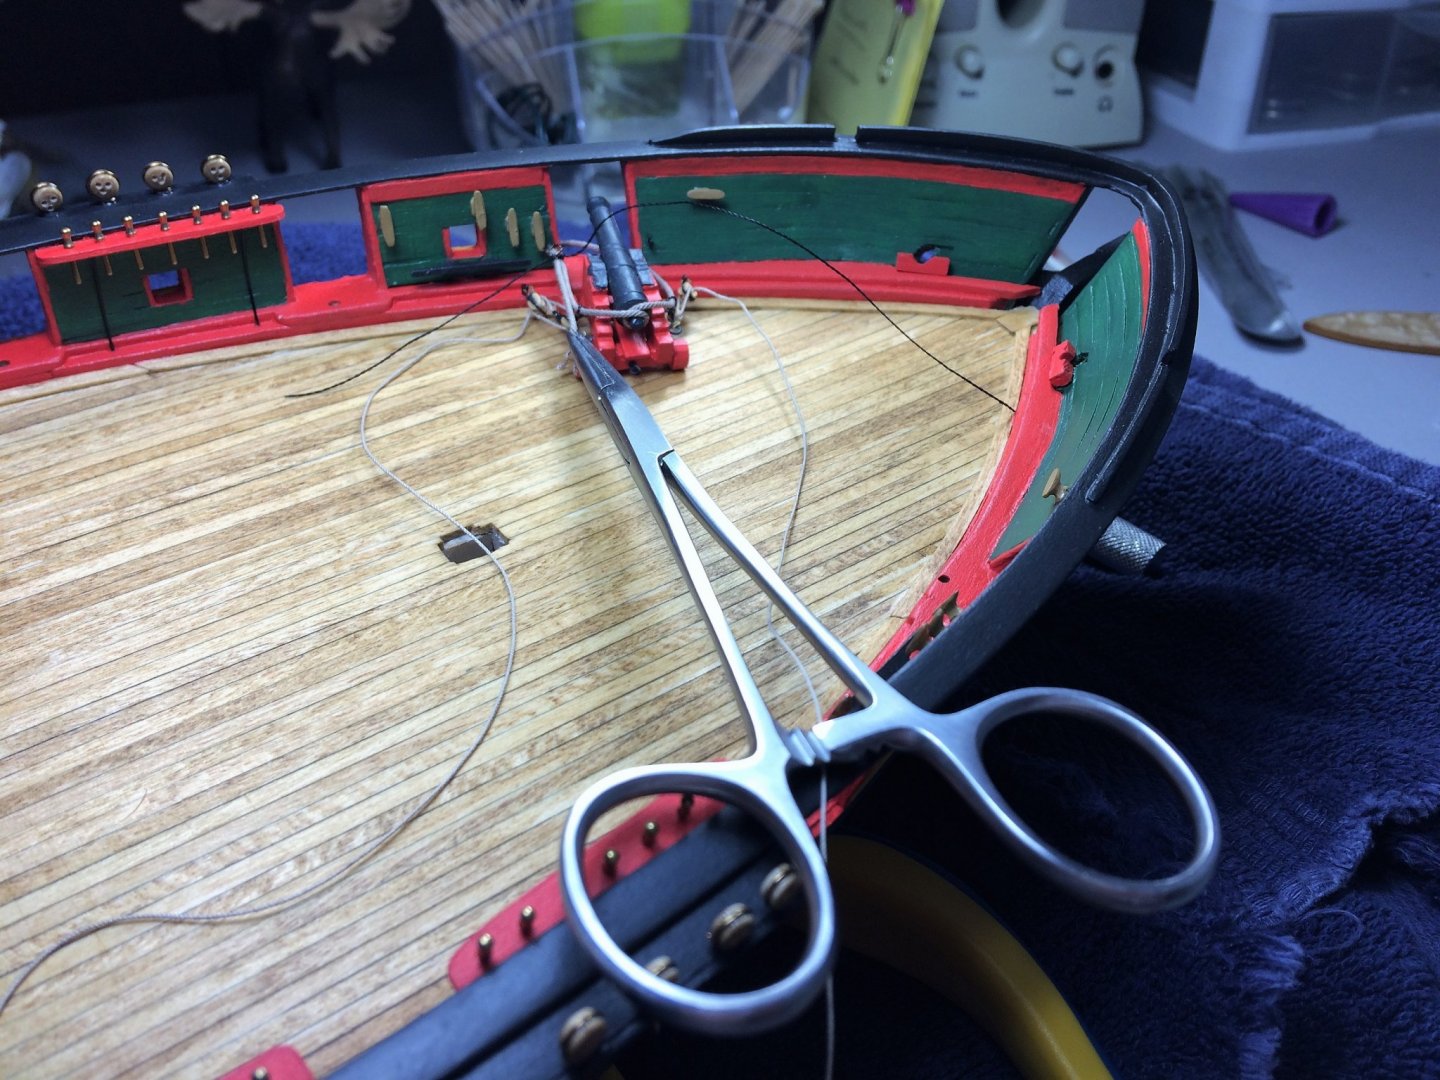
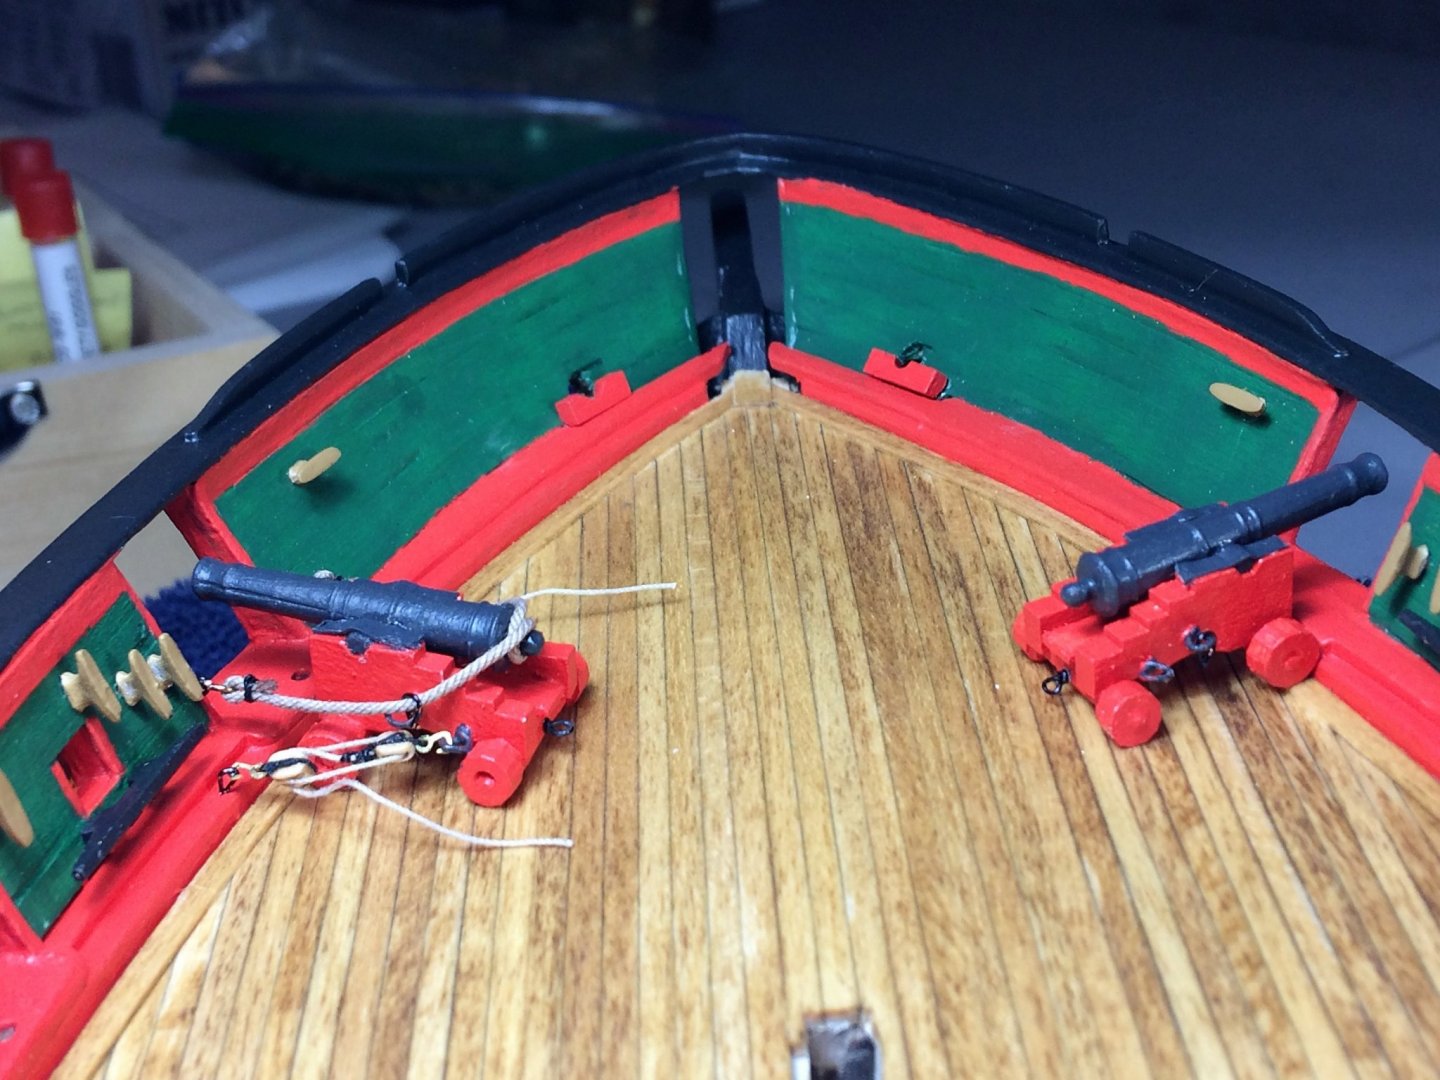
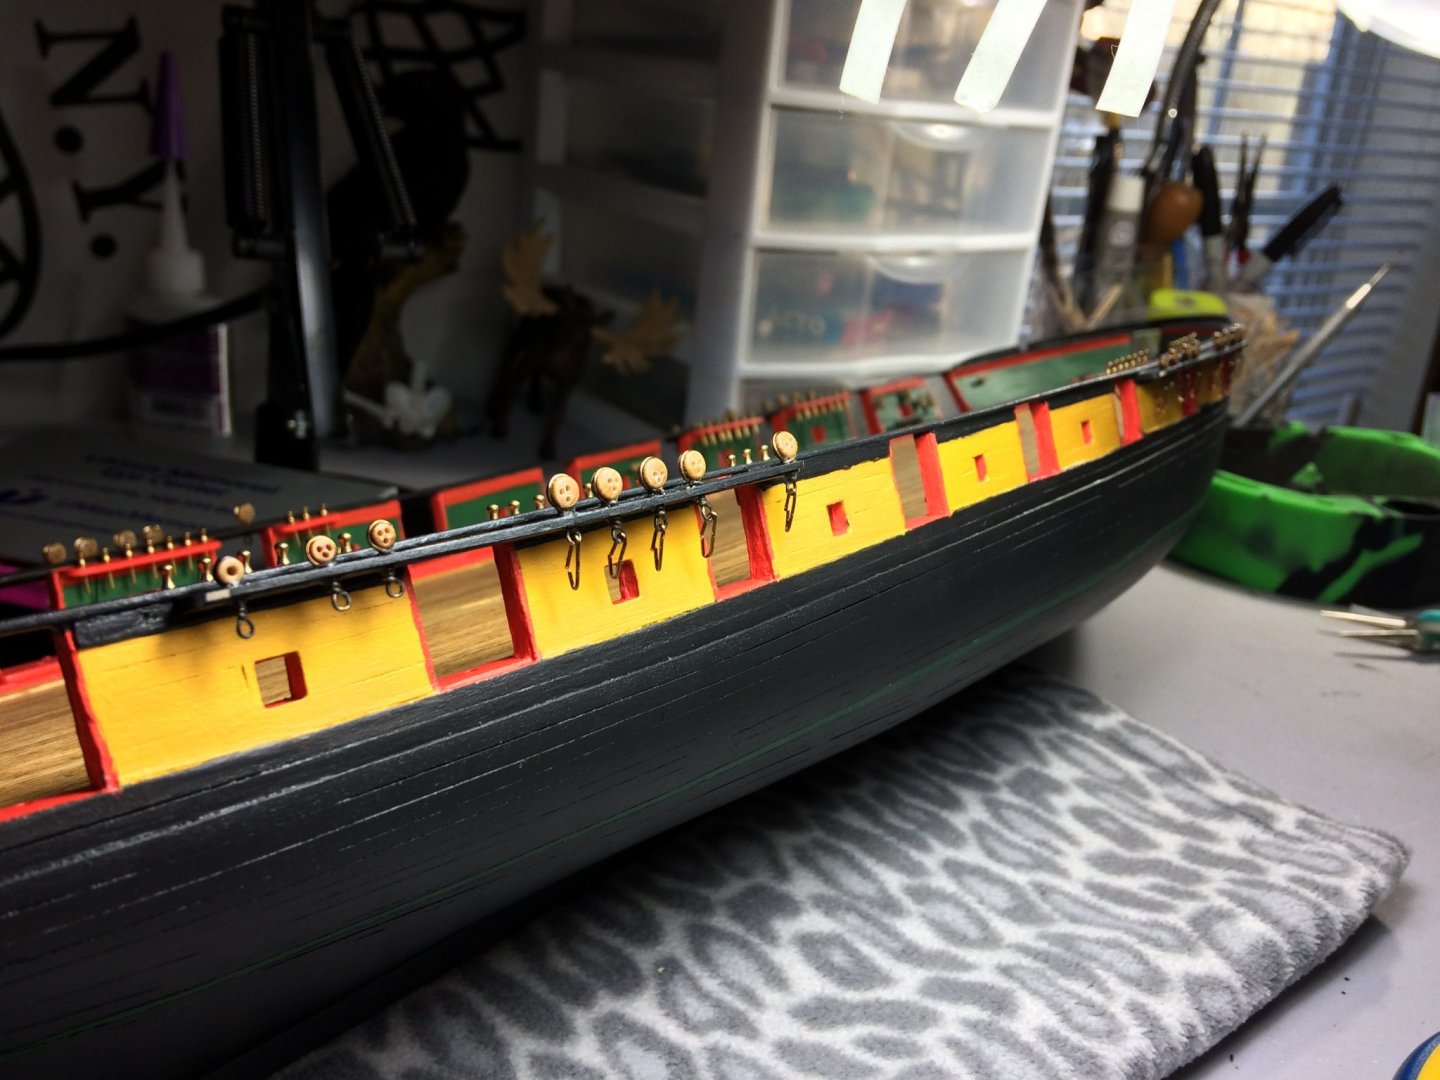
Evening, Hope everyone is well. Niagara continues, even with the Mitchell getting it's fair share of attention lately! I really have made a push to start installing cannon first, then carronades. With two sets of block and tackle and the breech rope ready to go, lets get her on the ship. Admittedly, I did cheat a bit with a small spot of CA to lock down the cannon. Probably easier to rig with out it bouncing all over the place. I also cheated with the breech rope as well. It has a small dab of CA holding it down. Without the CA, trying to place the breech rope was near impossible. Just kept folding and flipping. Everything is flailing around starting to unwind. These rigs need to be secured. Everything seems to fit well enough. Looks like I'm clamping an artery closed with catgut all over the operating area!!!! The weight of the hemostats alone was enough weight to bring the breech rope tight, which was then tied off and trimmed. Tah Dah!!!! My very first rigged cannon!!!! Never did I think the day would arrive. Little bit of a milestone in my book. Overall, I'm still working thru the build sequence for these and it's a slow process. It's getting easier and quicker as I do more. Rope coils will be made as these are finished. I wanna try the white glue/water trick. Never done it before, seems pretty straight forward though. The second cannon has been glued in place and ready for rigging. Cannon, deck furniture, rigging, done! Chip and a putt......easy peasy! Right? Tom E
-
B-25J Mitchell by Tom E - Revell - 1:48 Scale - PLASTIC
Tom E replied to Tom E's topic in Non-ship/categorised builds
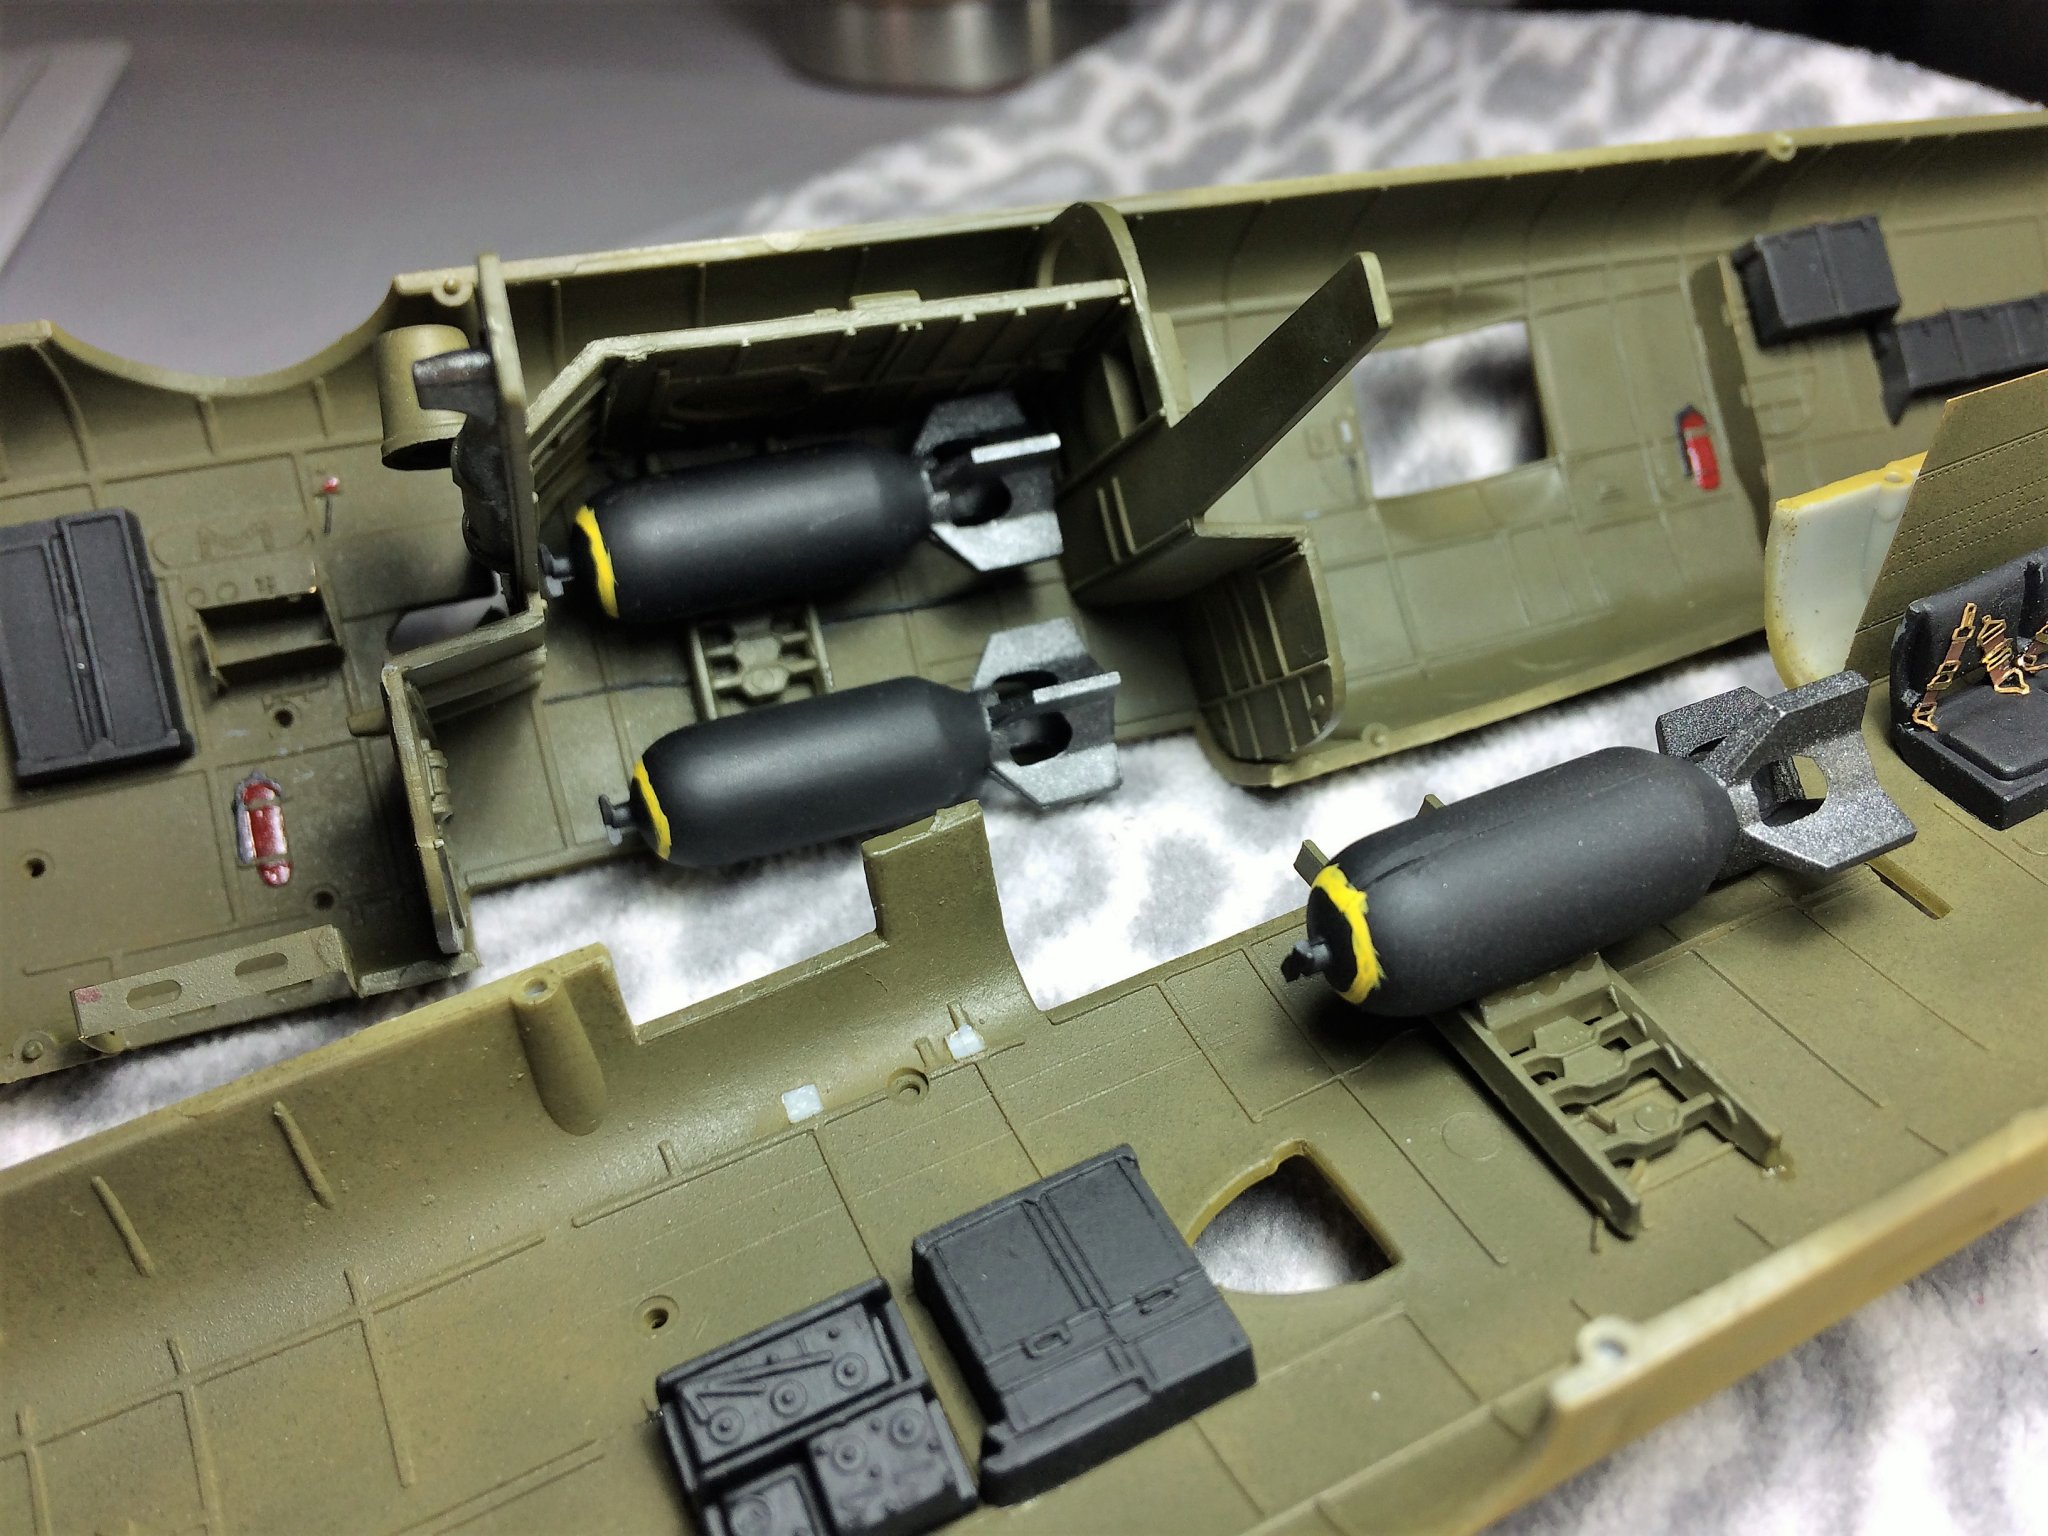
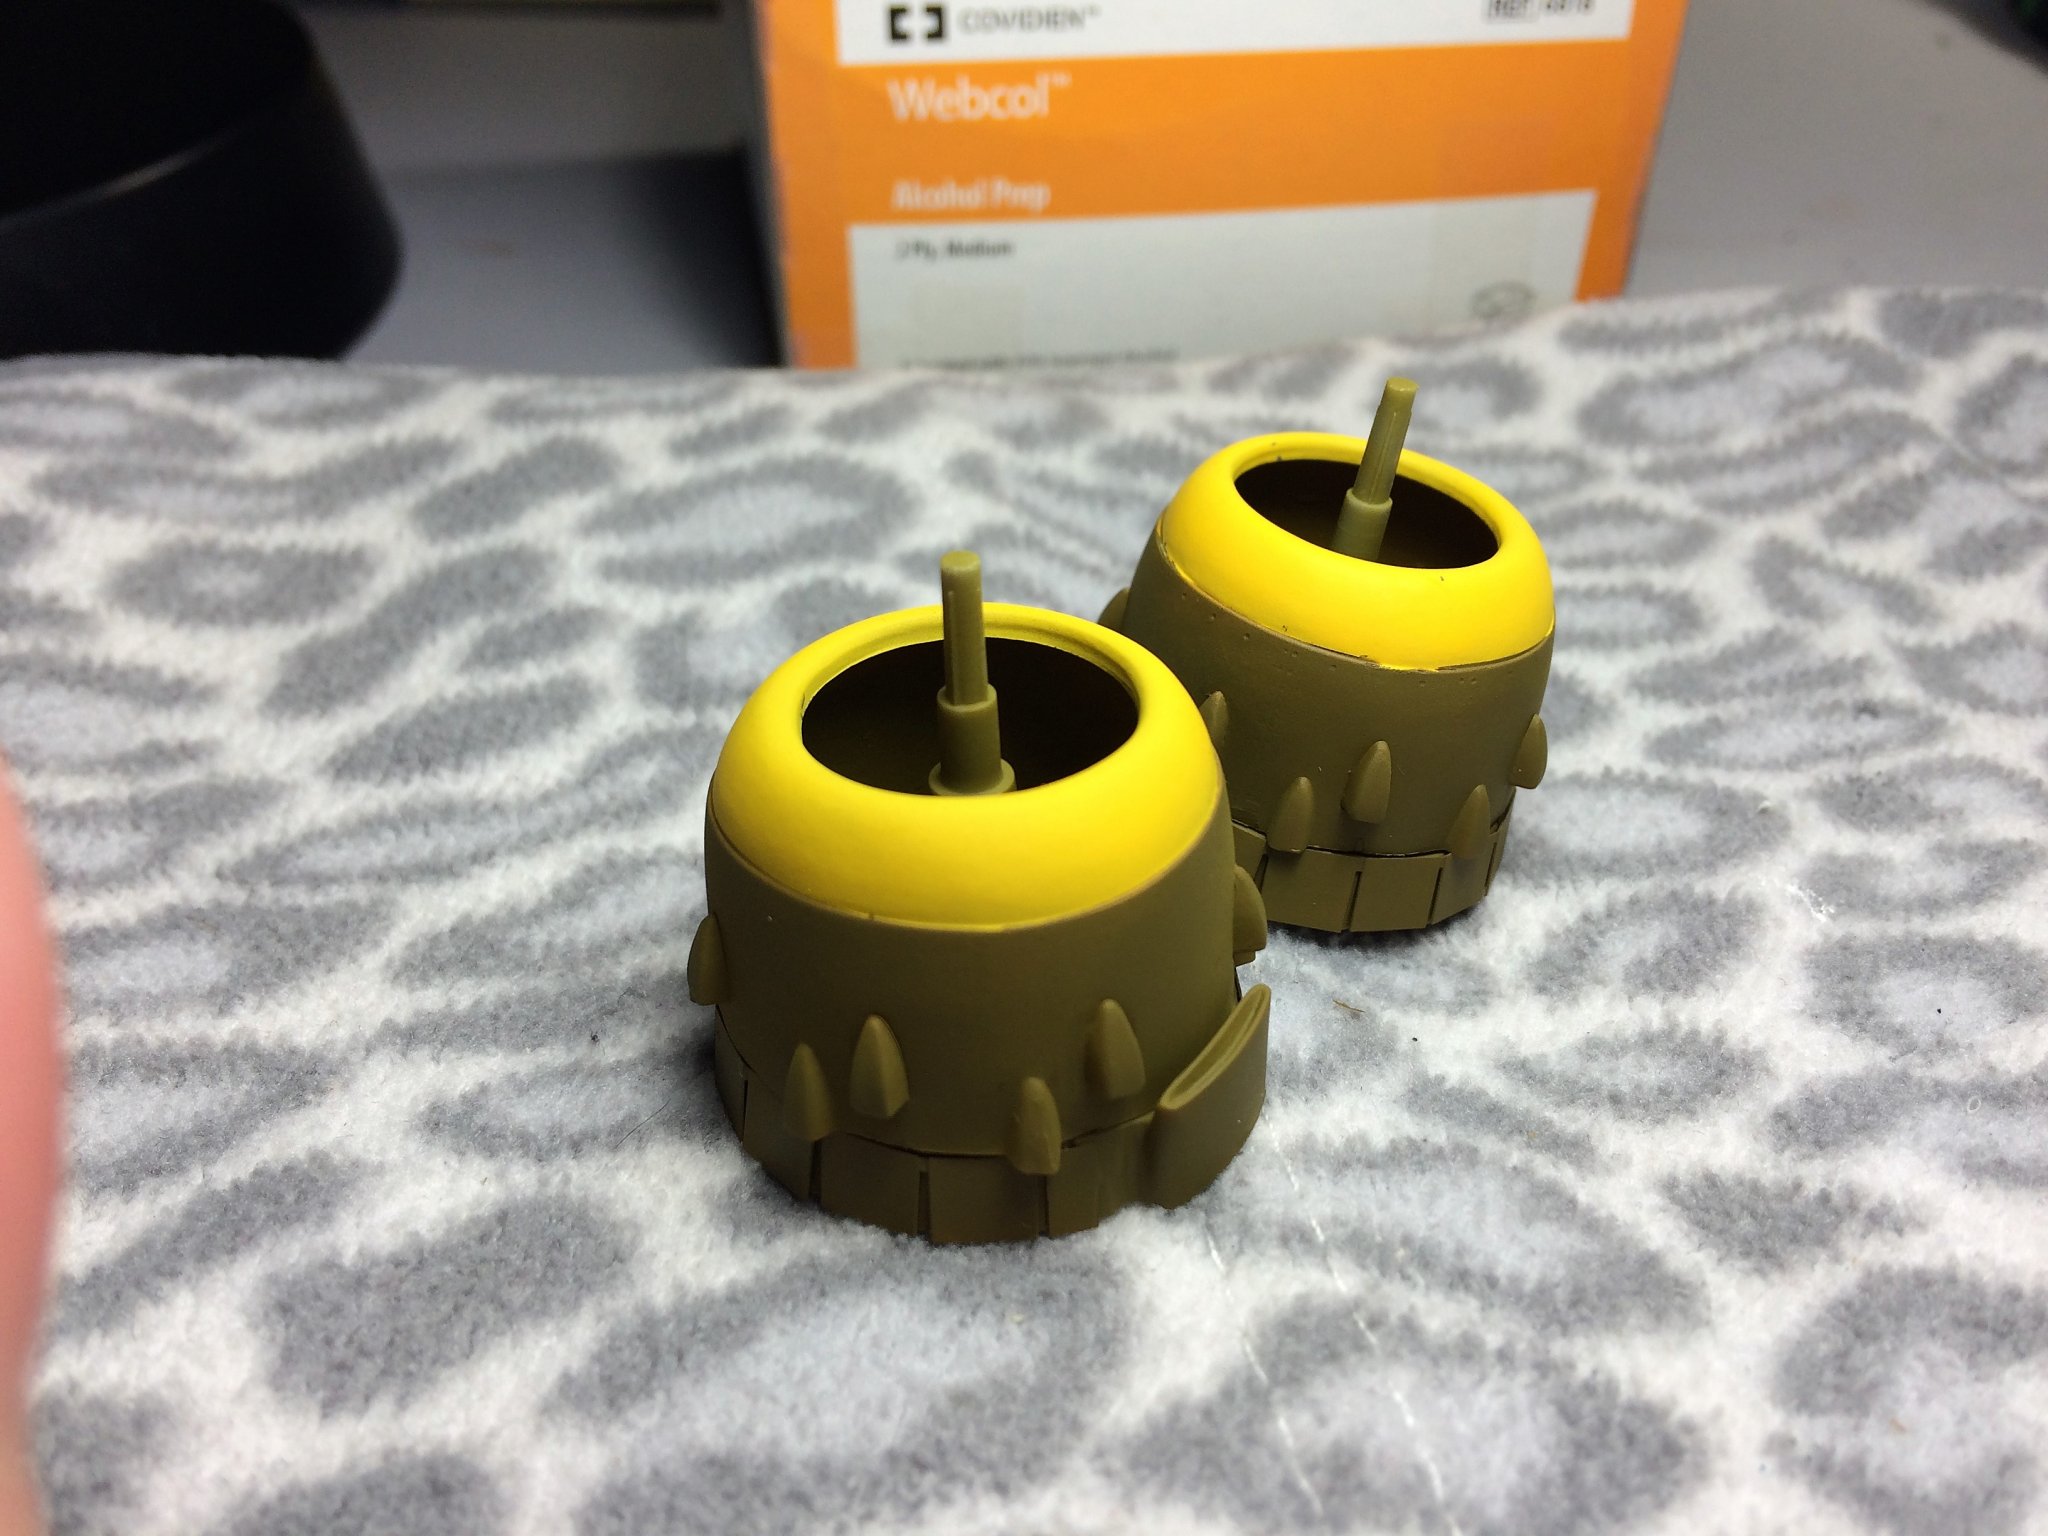
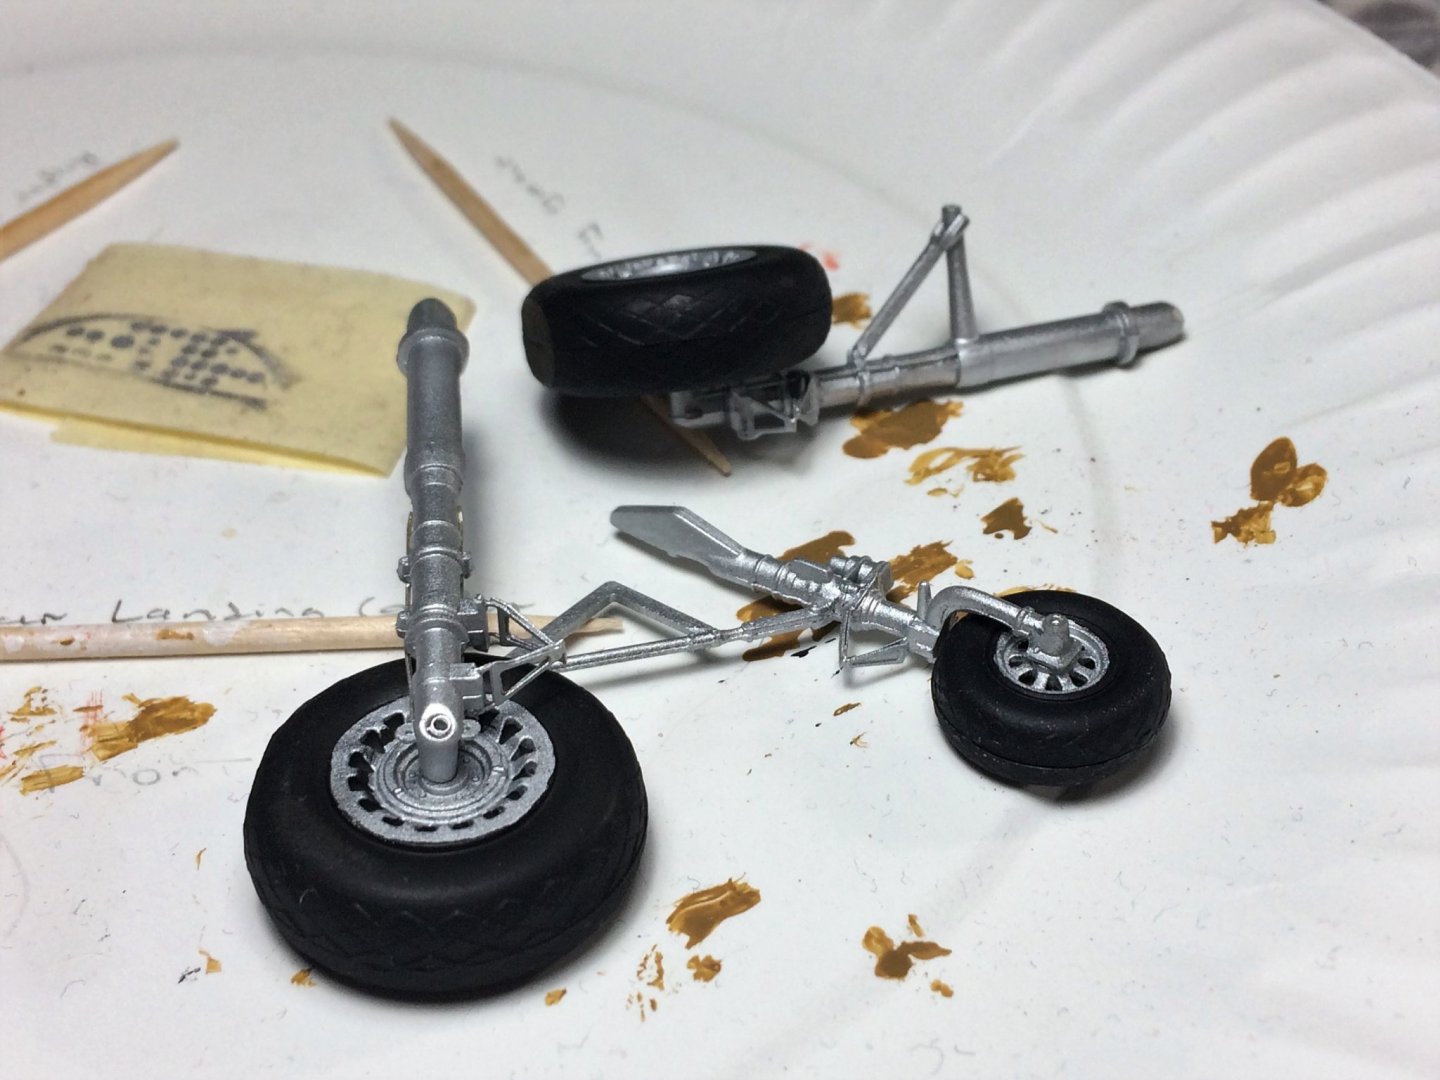
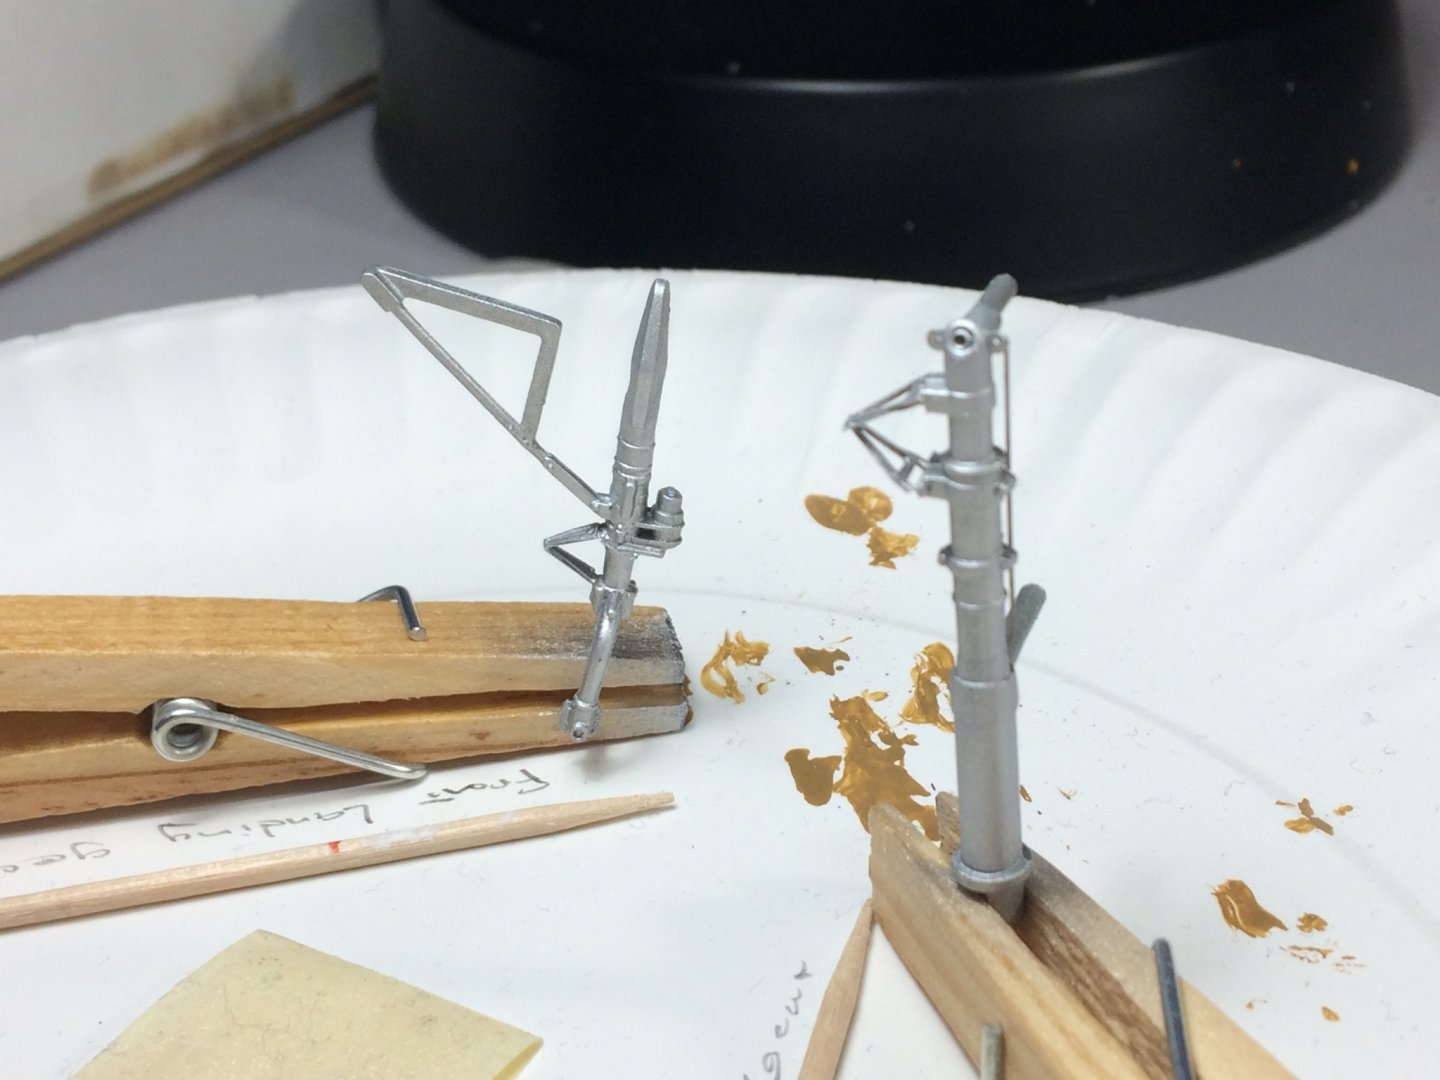
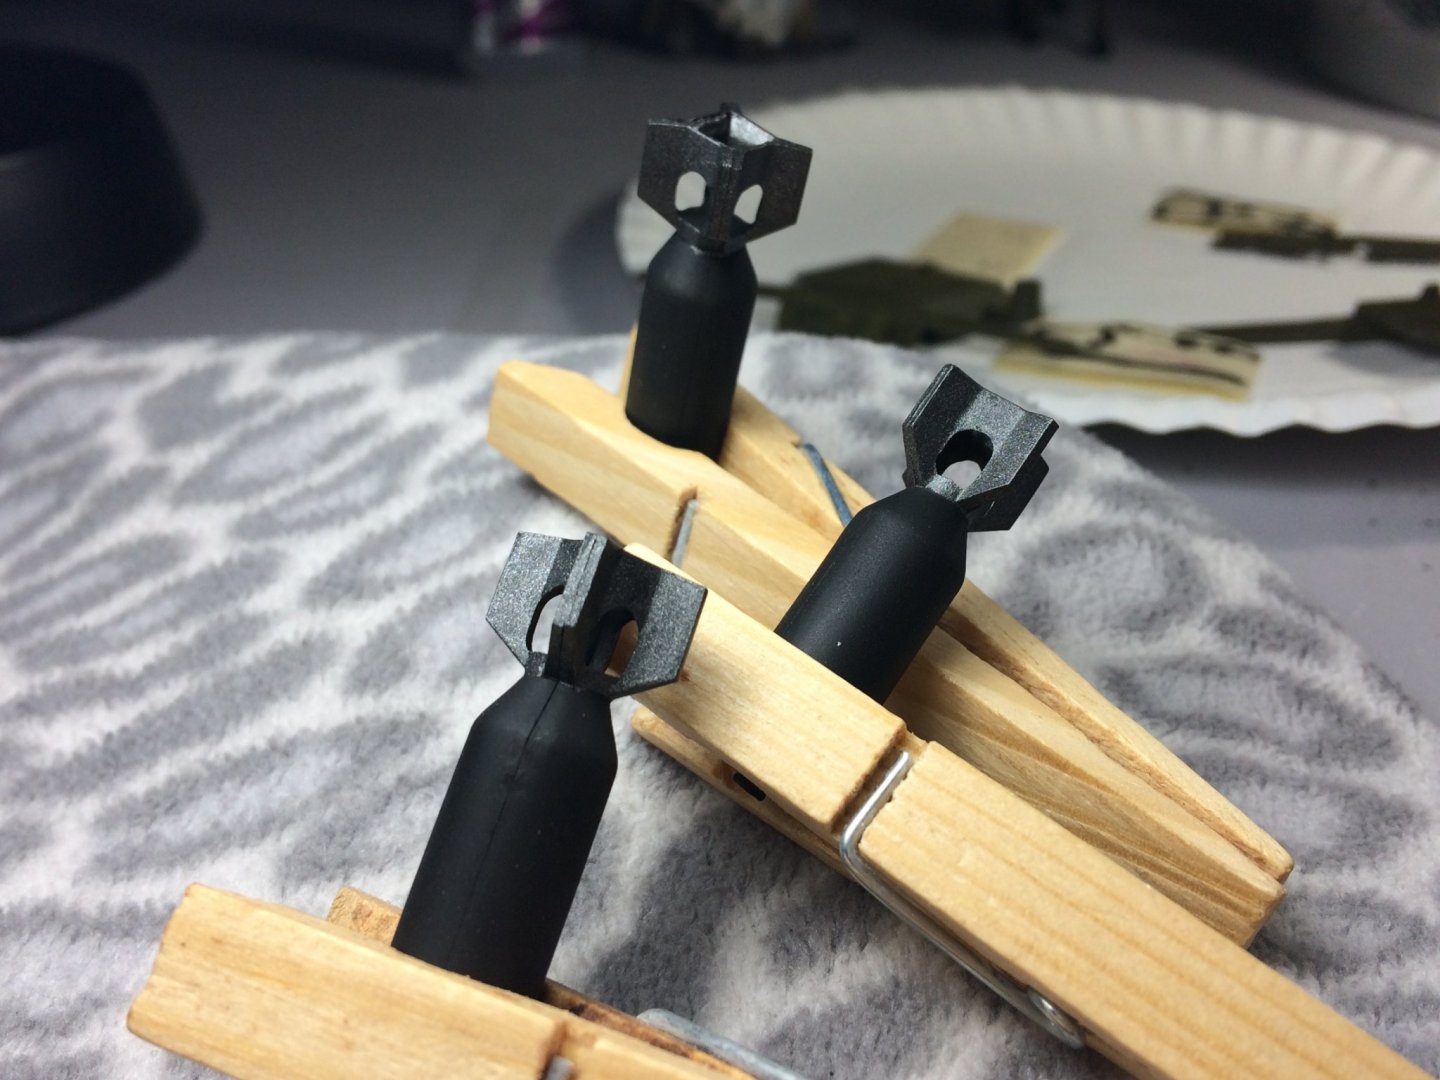
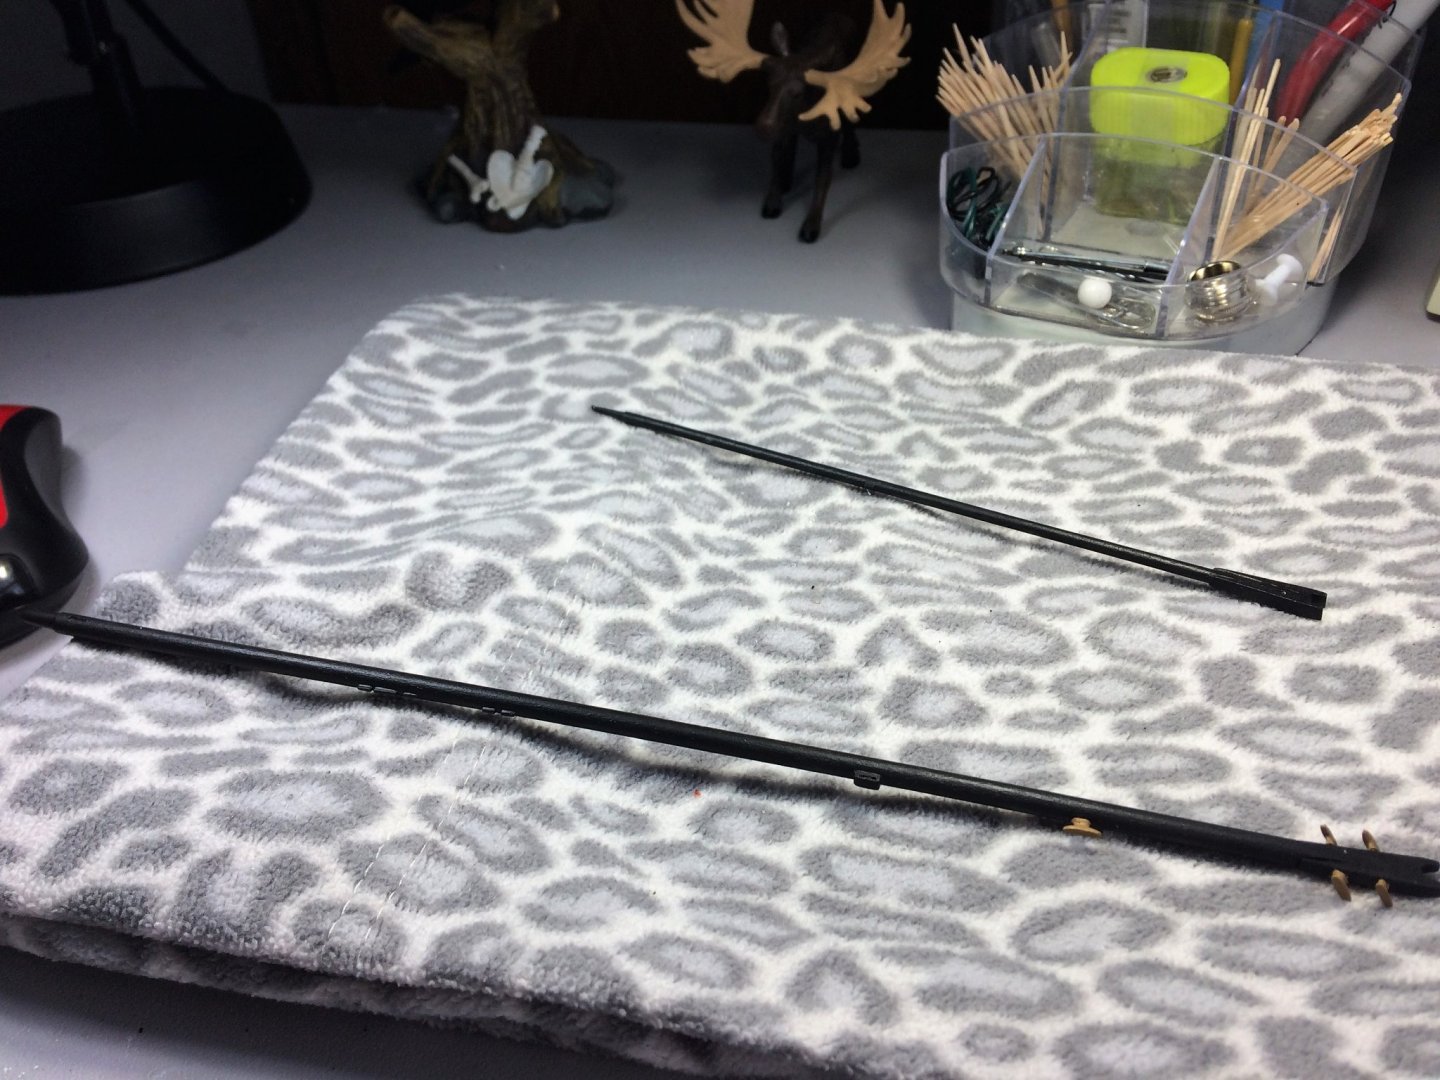
Afternoon, Hope everyone is well. The build continues! Started to piece together the wings and the engine area. The engines themselves are starting to come together. These were easy enough. Not too bad fit or flash wise. Some seams, I'll see if I can fill these. I do have a putty. All of the landing gear have been painted. A basic Tamiya flat aluminum with Tamiya thinner. There are some PE pieces for all three. I had some fun with it, see what I could do. I find myself gaining confidence handling PE. Not perfect, but fun. I finally realized I had forgotten to install support struts on both the rear landing gear. The fix is not seen in these pics, but has been done. Continuing with the "extra's", time to see what the resin gun barrels bring to the table. The kit supplied part is self evident. These should add a nice look. As for the yellow stripe on the bombs...…... I am not knocking myself out on these. Yeah, sure I would love engineered precision, but what ya gonna do! Found the longest, thinnest, finest brush I had and gave it a go! Meh...….. Looks like the bomb techs were out late at the USO the night before. And four feet away buried in an enclosed fuselage...…...they look perfect! Dinner time! Tom E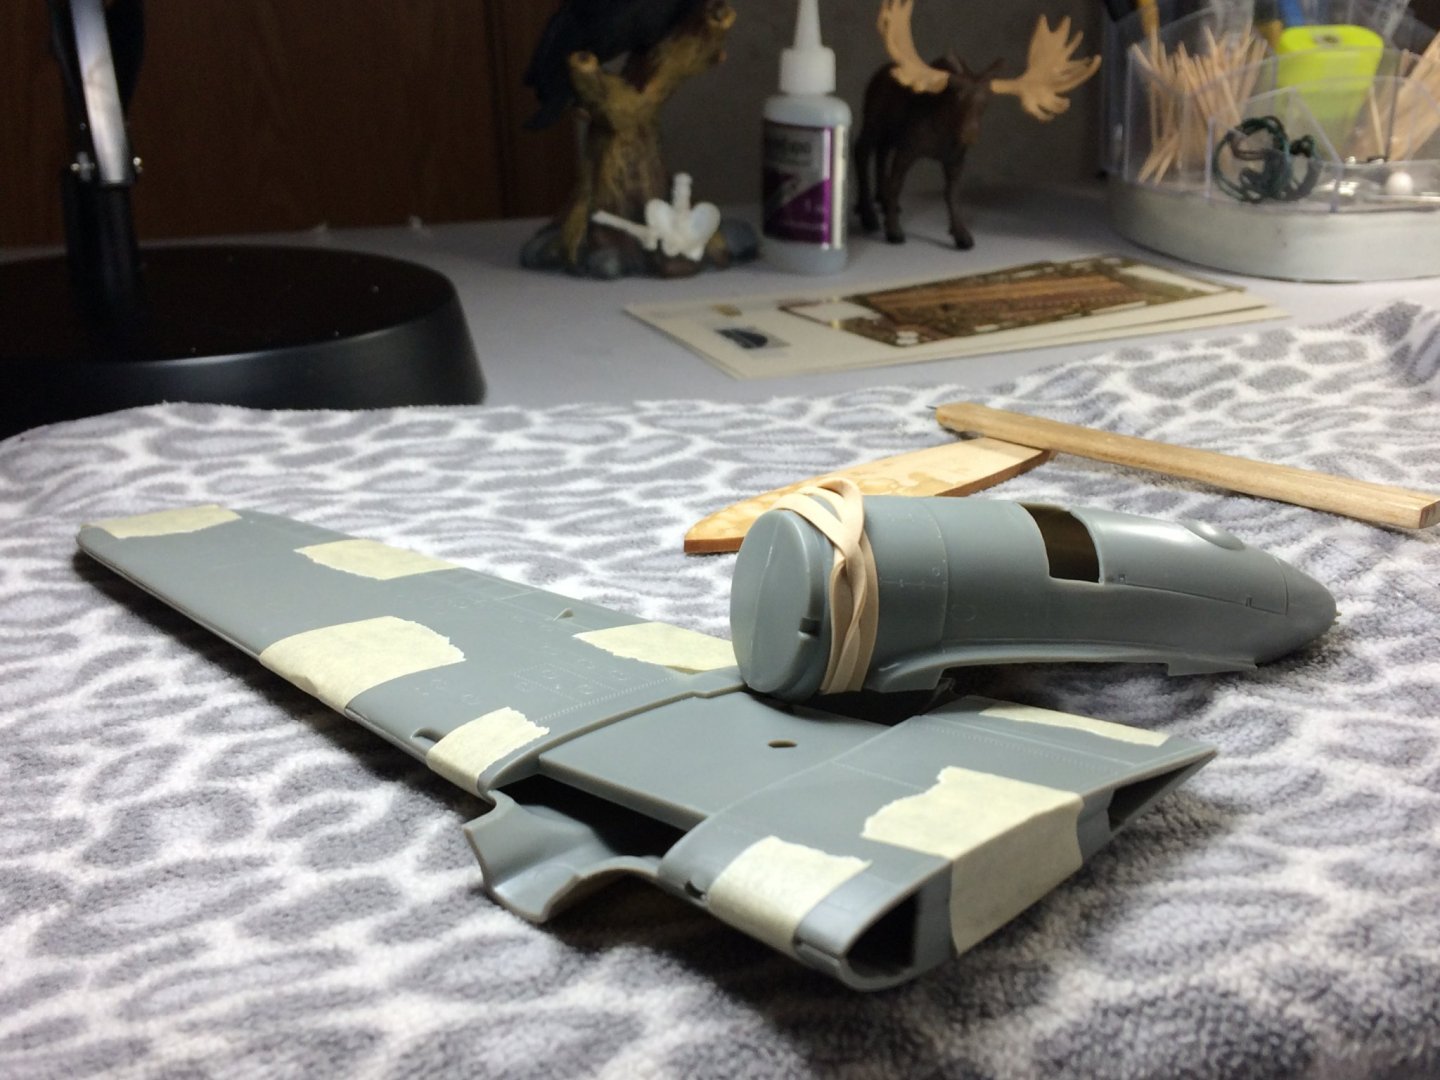
- 120 replies
-
- 12
-
-
B-25J Mitchell by Tom E - Revell - 1:48 Scale - PLASTIC
Tom E replied to Tom E's topic in Non-ship/categorised builds
Lou, OC, I'm wondering about that myself. If I could go back in time, I think I would have painted the area yellow, used my smallest Tamiya masking tape, then spray with the black. I'm kinda stumped. Originally I was going to paint the front dome of the bomb yellow, then paint the fuse. It wouldn't have been a small stripe but a larger area that would be a bit easier to mask then paint I could use a compass with the needle on the fuse and try to trace out a stripe with pencil for a shot at uniformity. Hmmmmmmmm……... Tom E -
B-25J Mitchell by Tom E - Revell - 1:48 Scale - PLASTIC
Tom E replied to Tom E's topic in Non-ship/categorised builds
Ken, Egilman, Thanks for looking in. The info is perfect timing. In my head I knew there was a yellow component to the nose, but the stripe looks better. I was going to paint the nose and fuse all yellow. Instead, that stripe looks much better and for the fuse I have a Tamiya flat aluminum. Tom E -
B-25J Mitchell by Tom E - Revell - 1:48 Scale - PLASTIC
Tom E replied to Tom E's topic in Non-ship/categorised builds
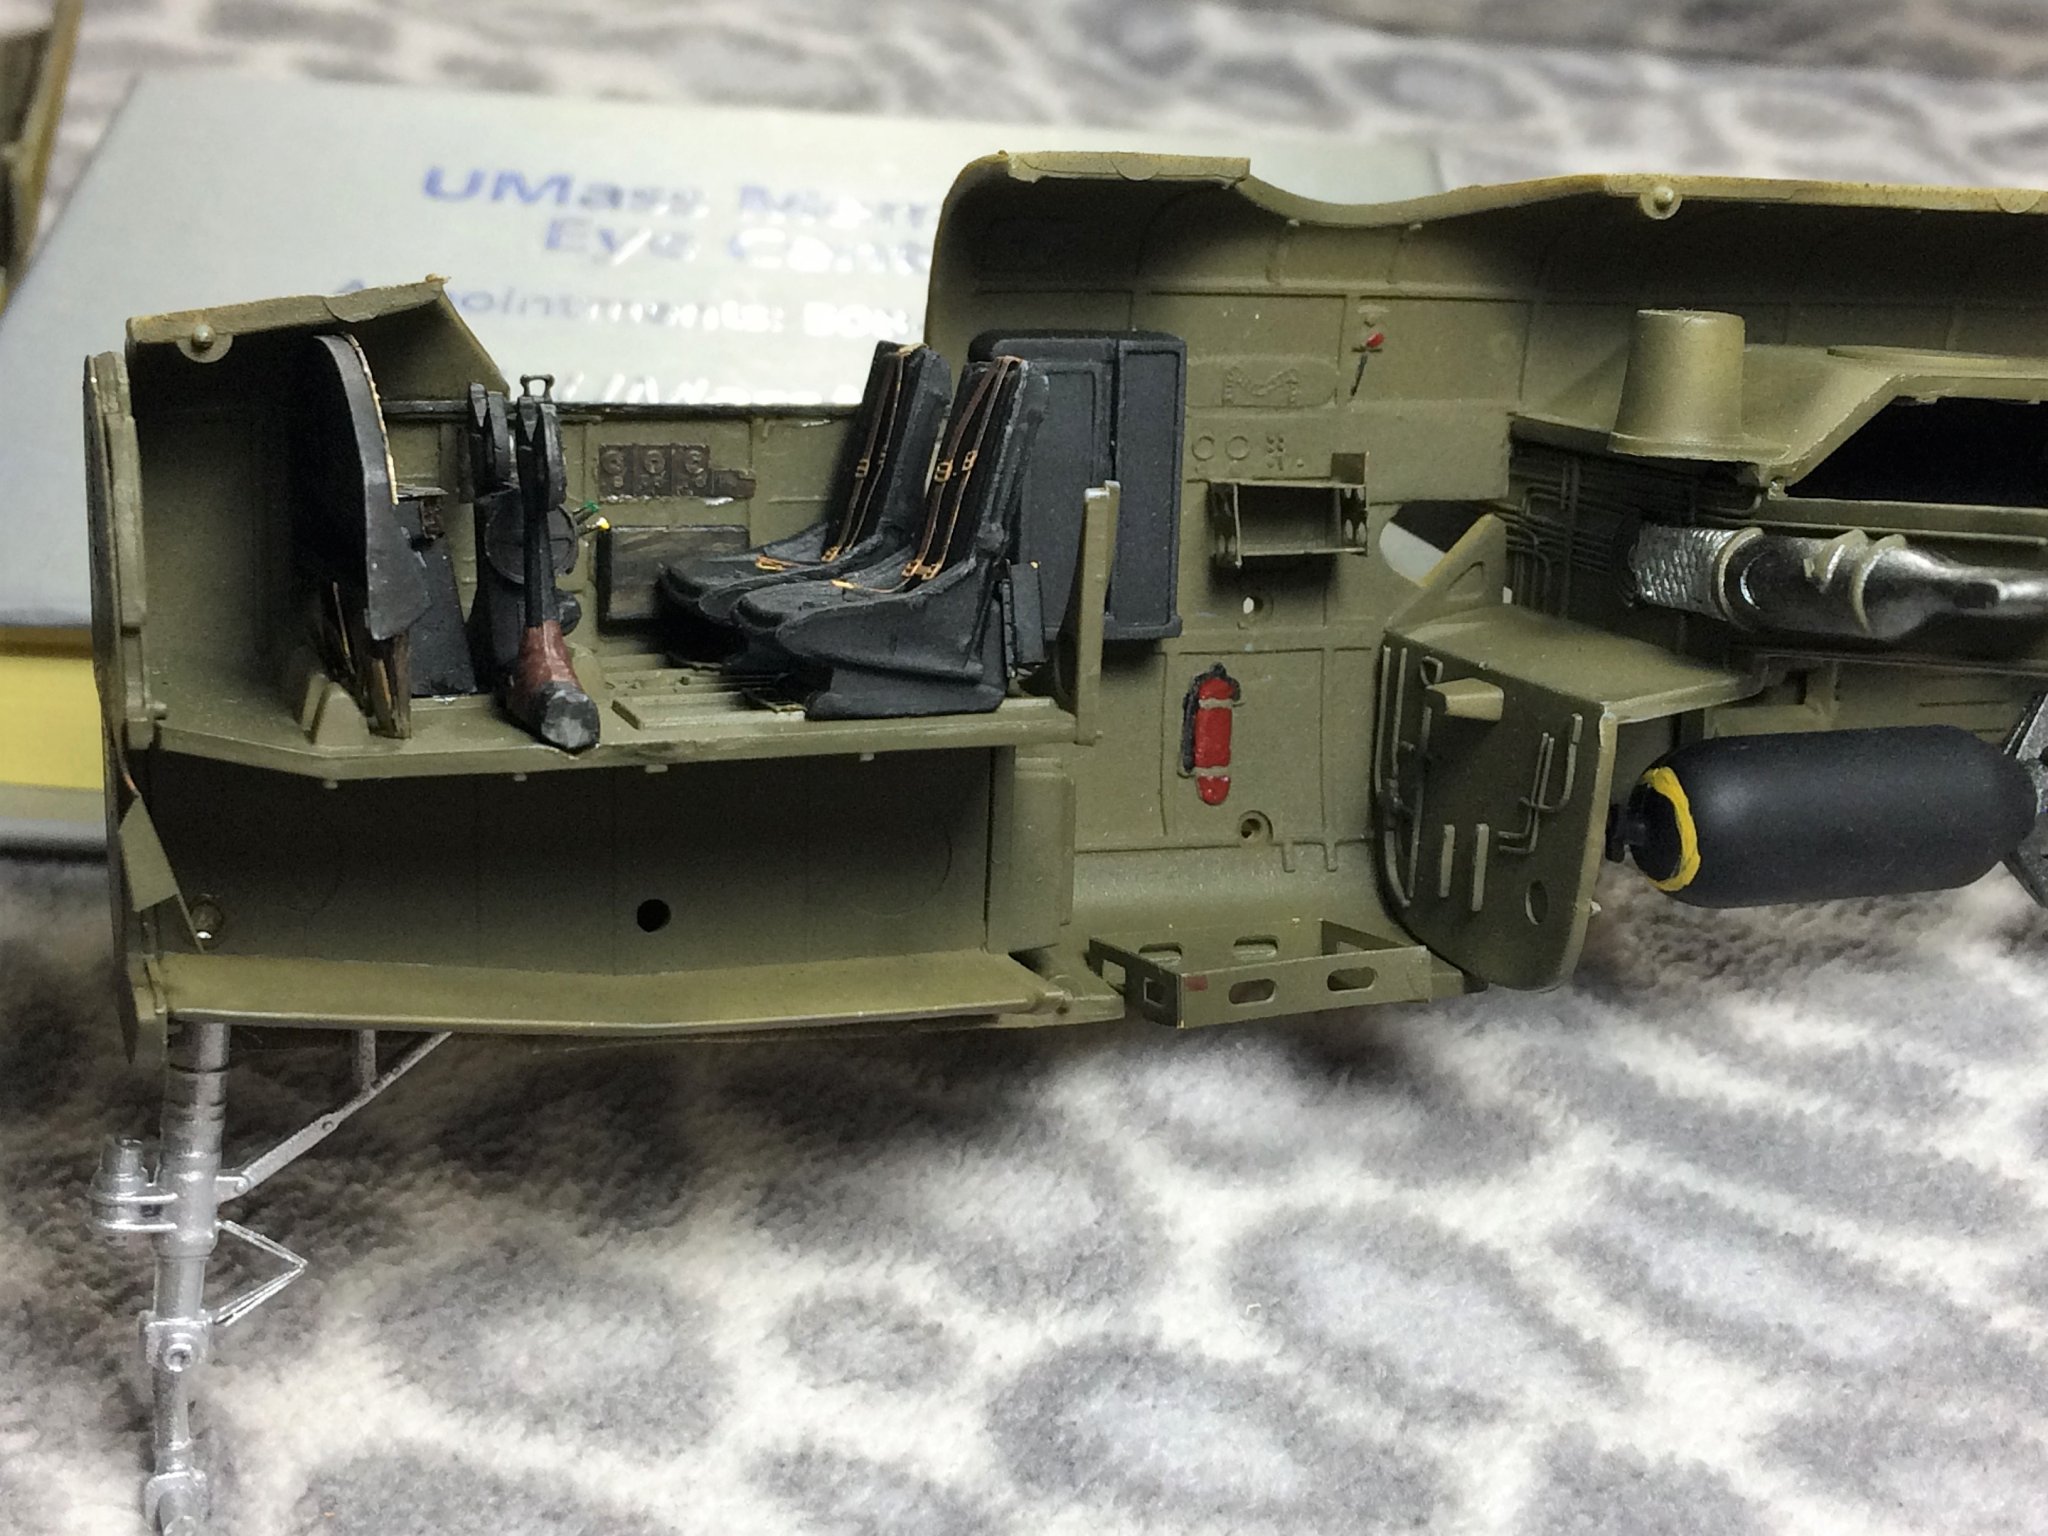
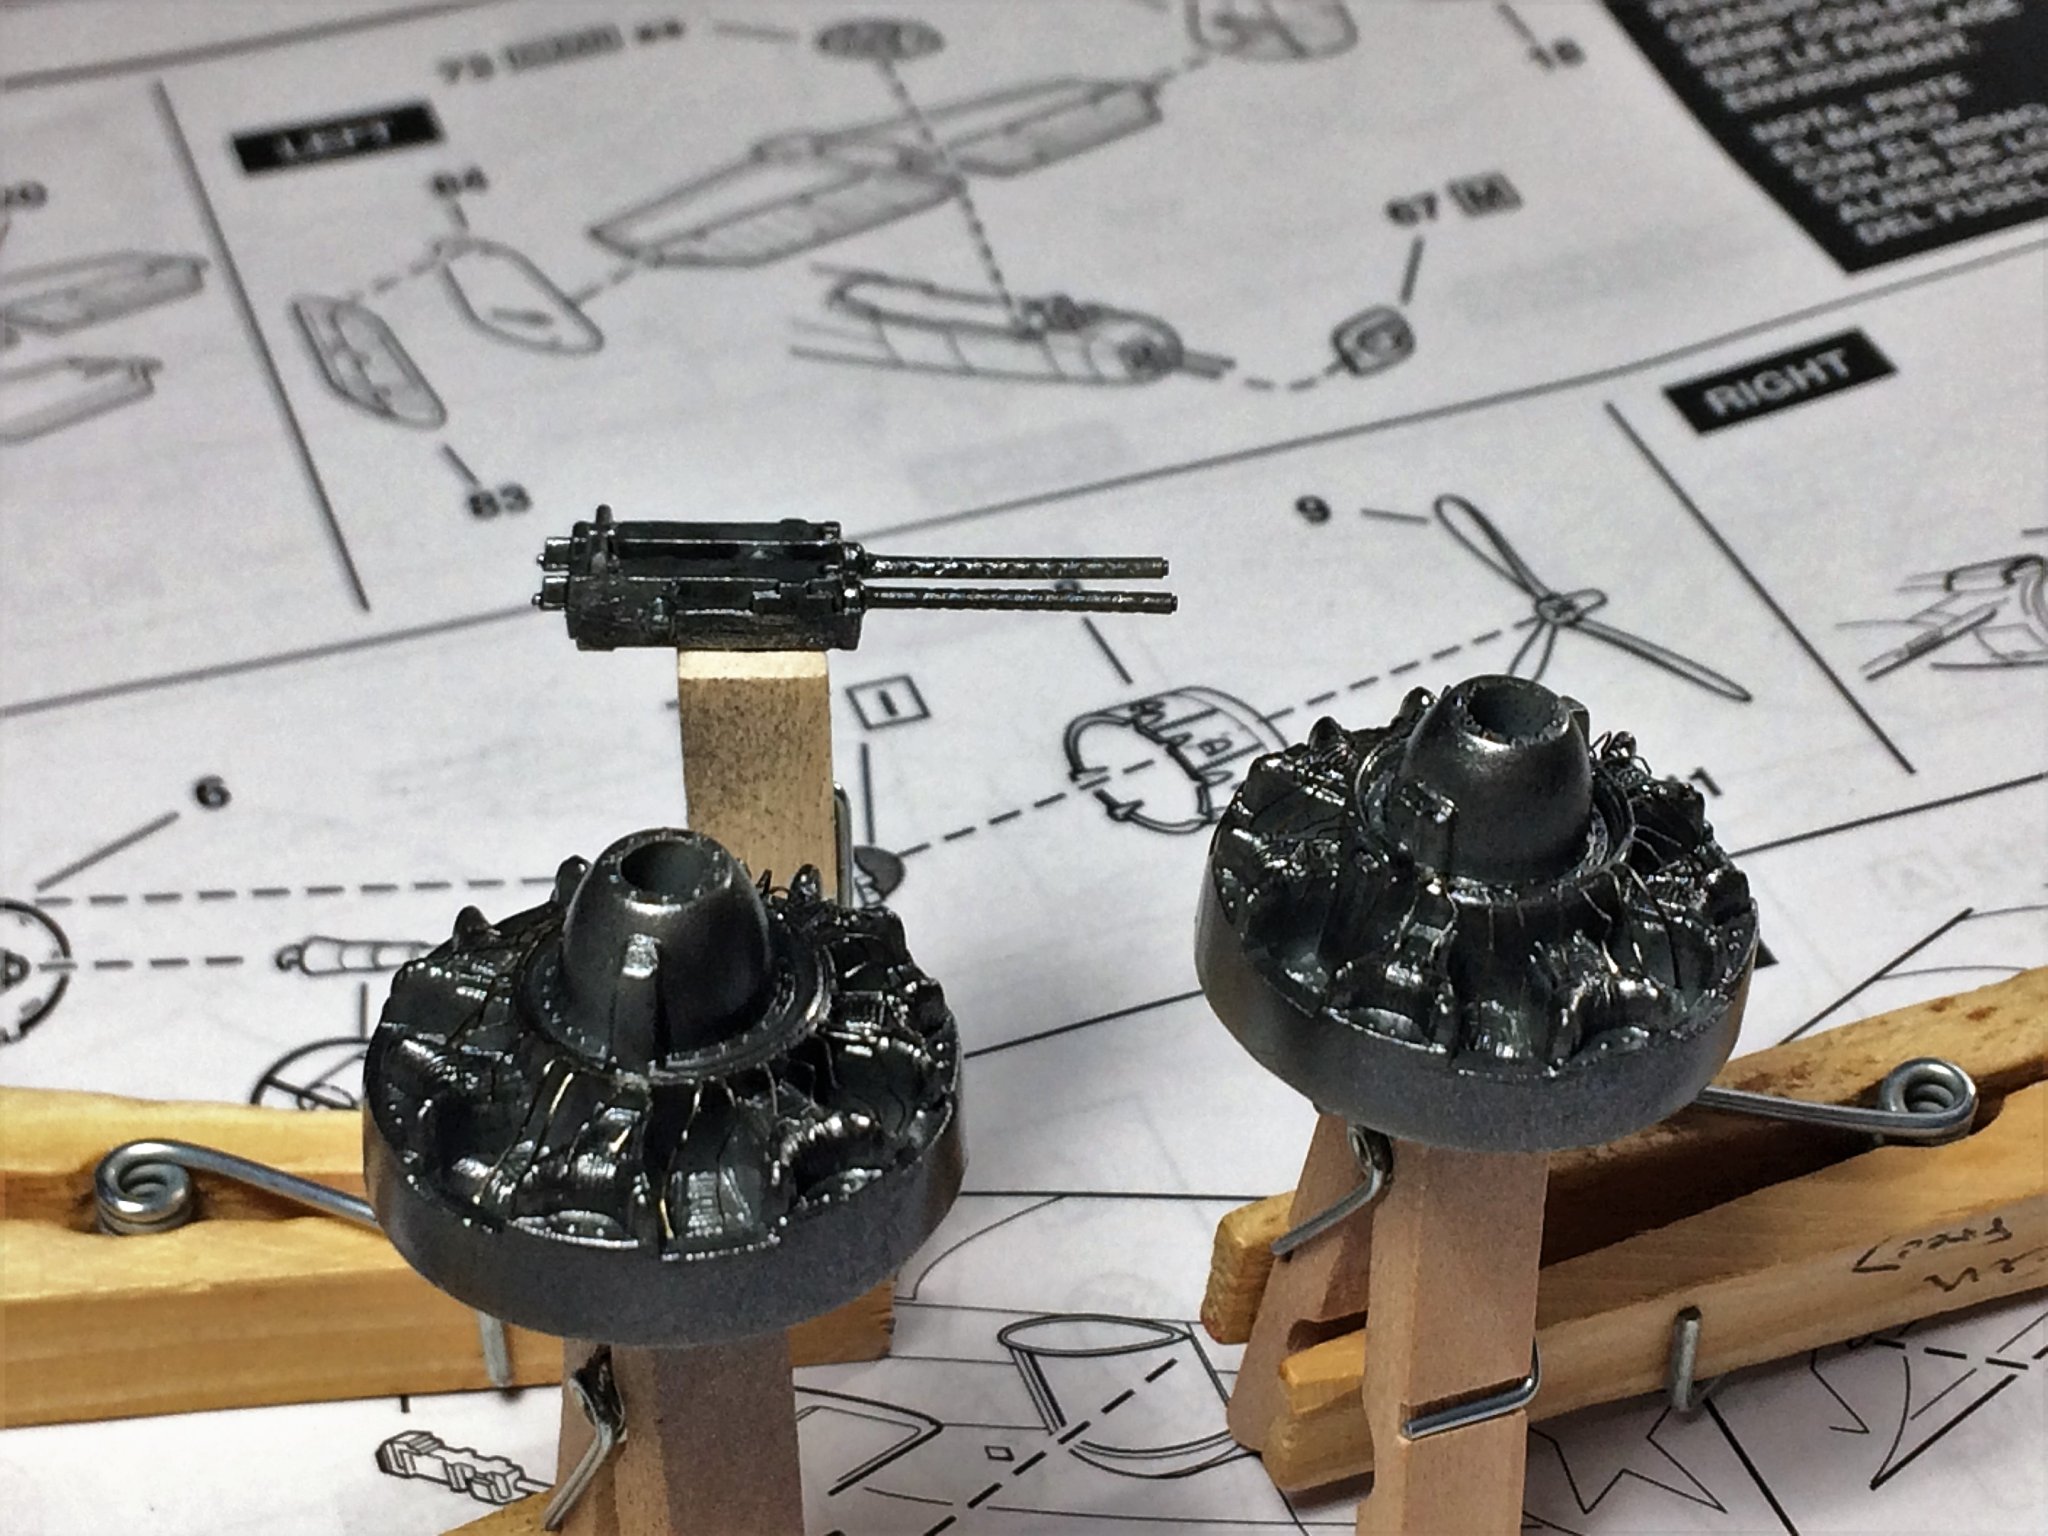
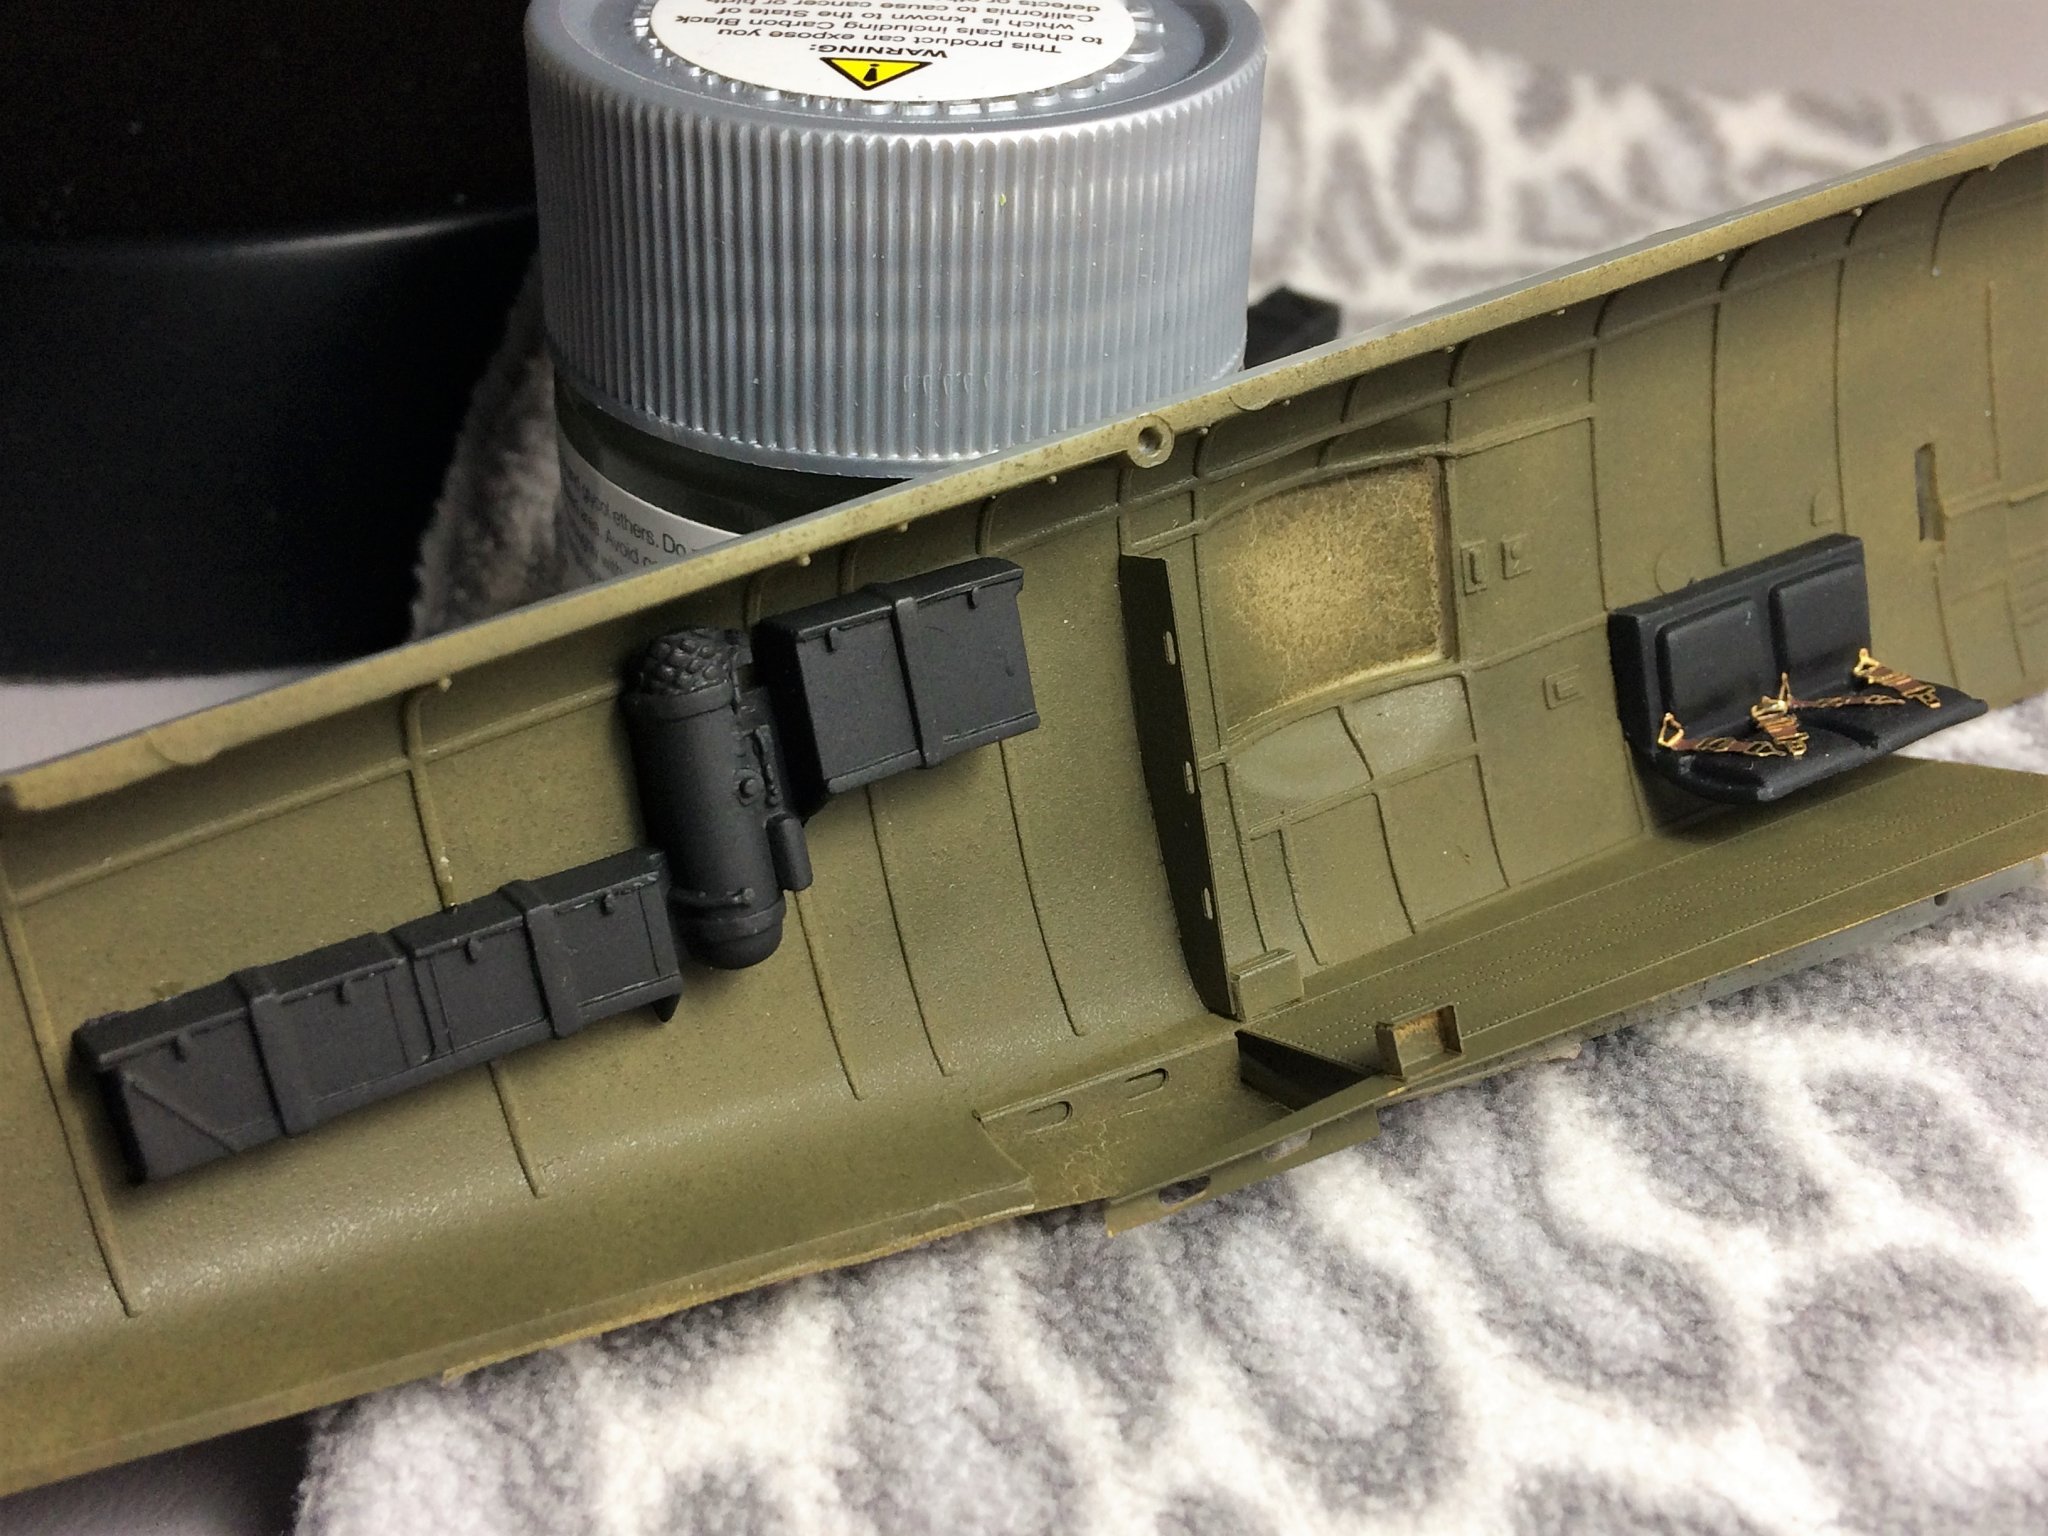
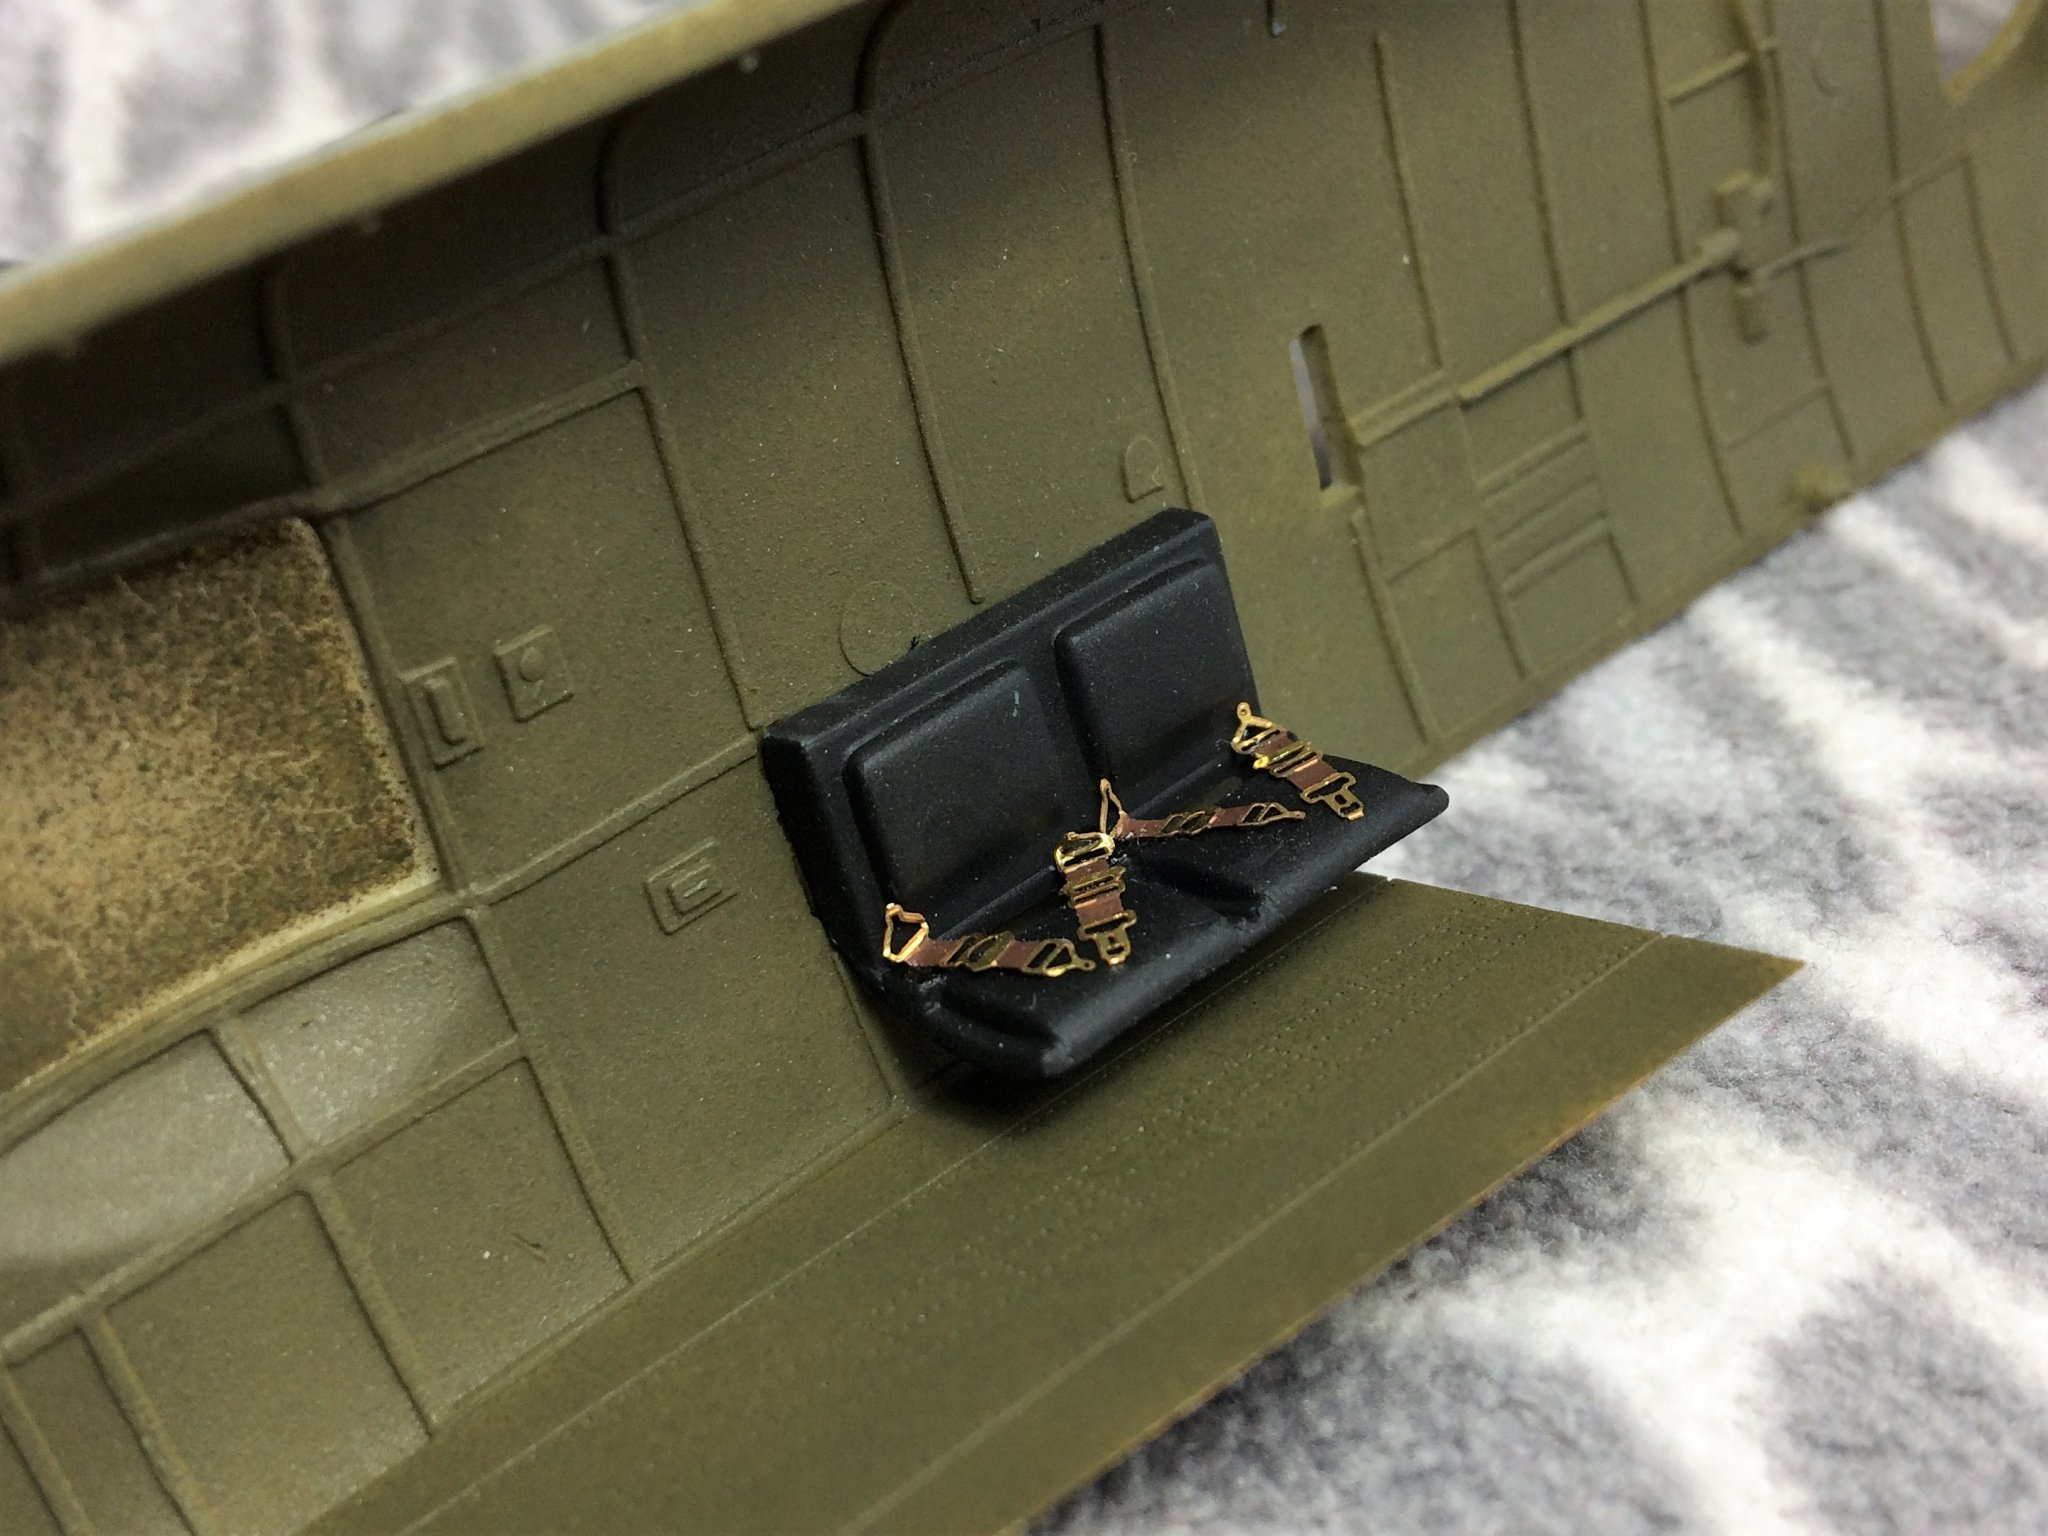
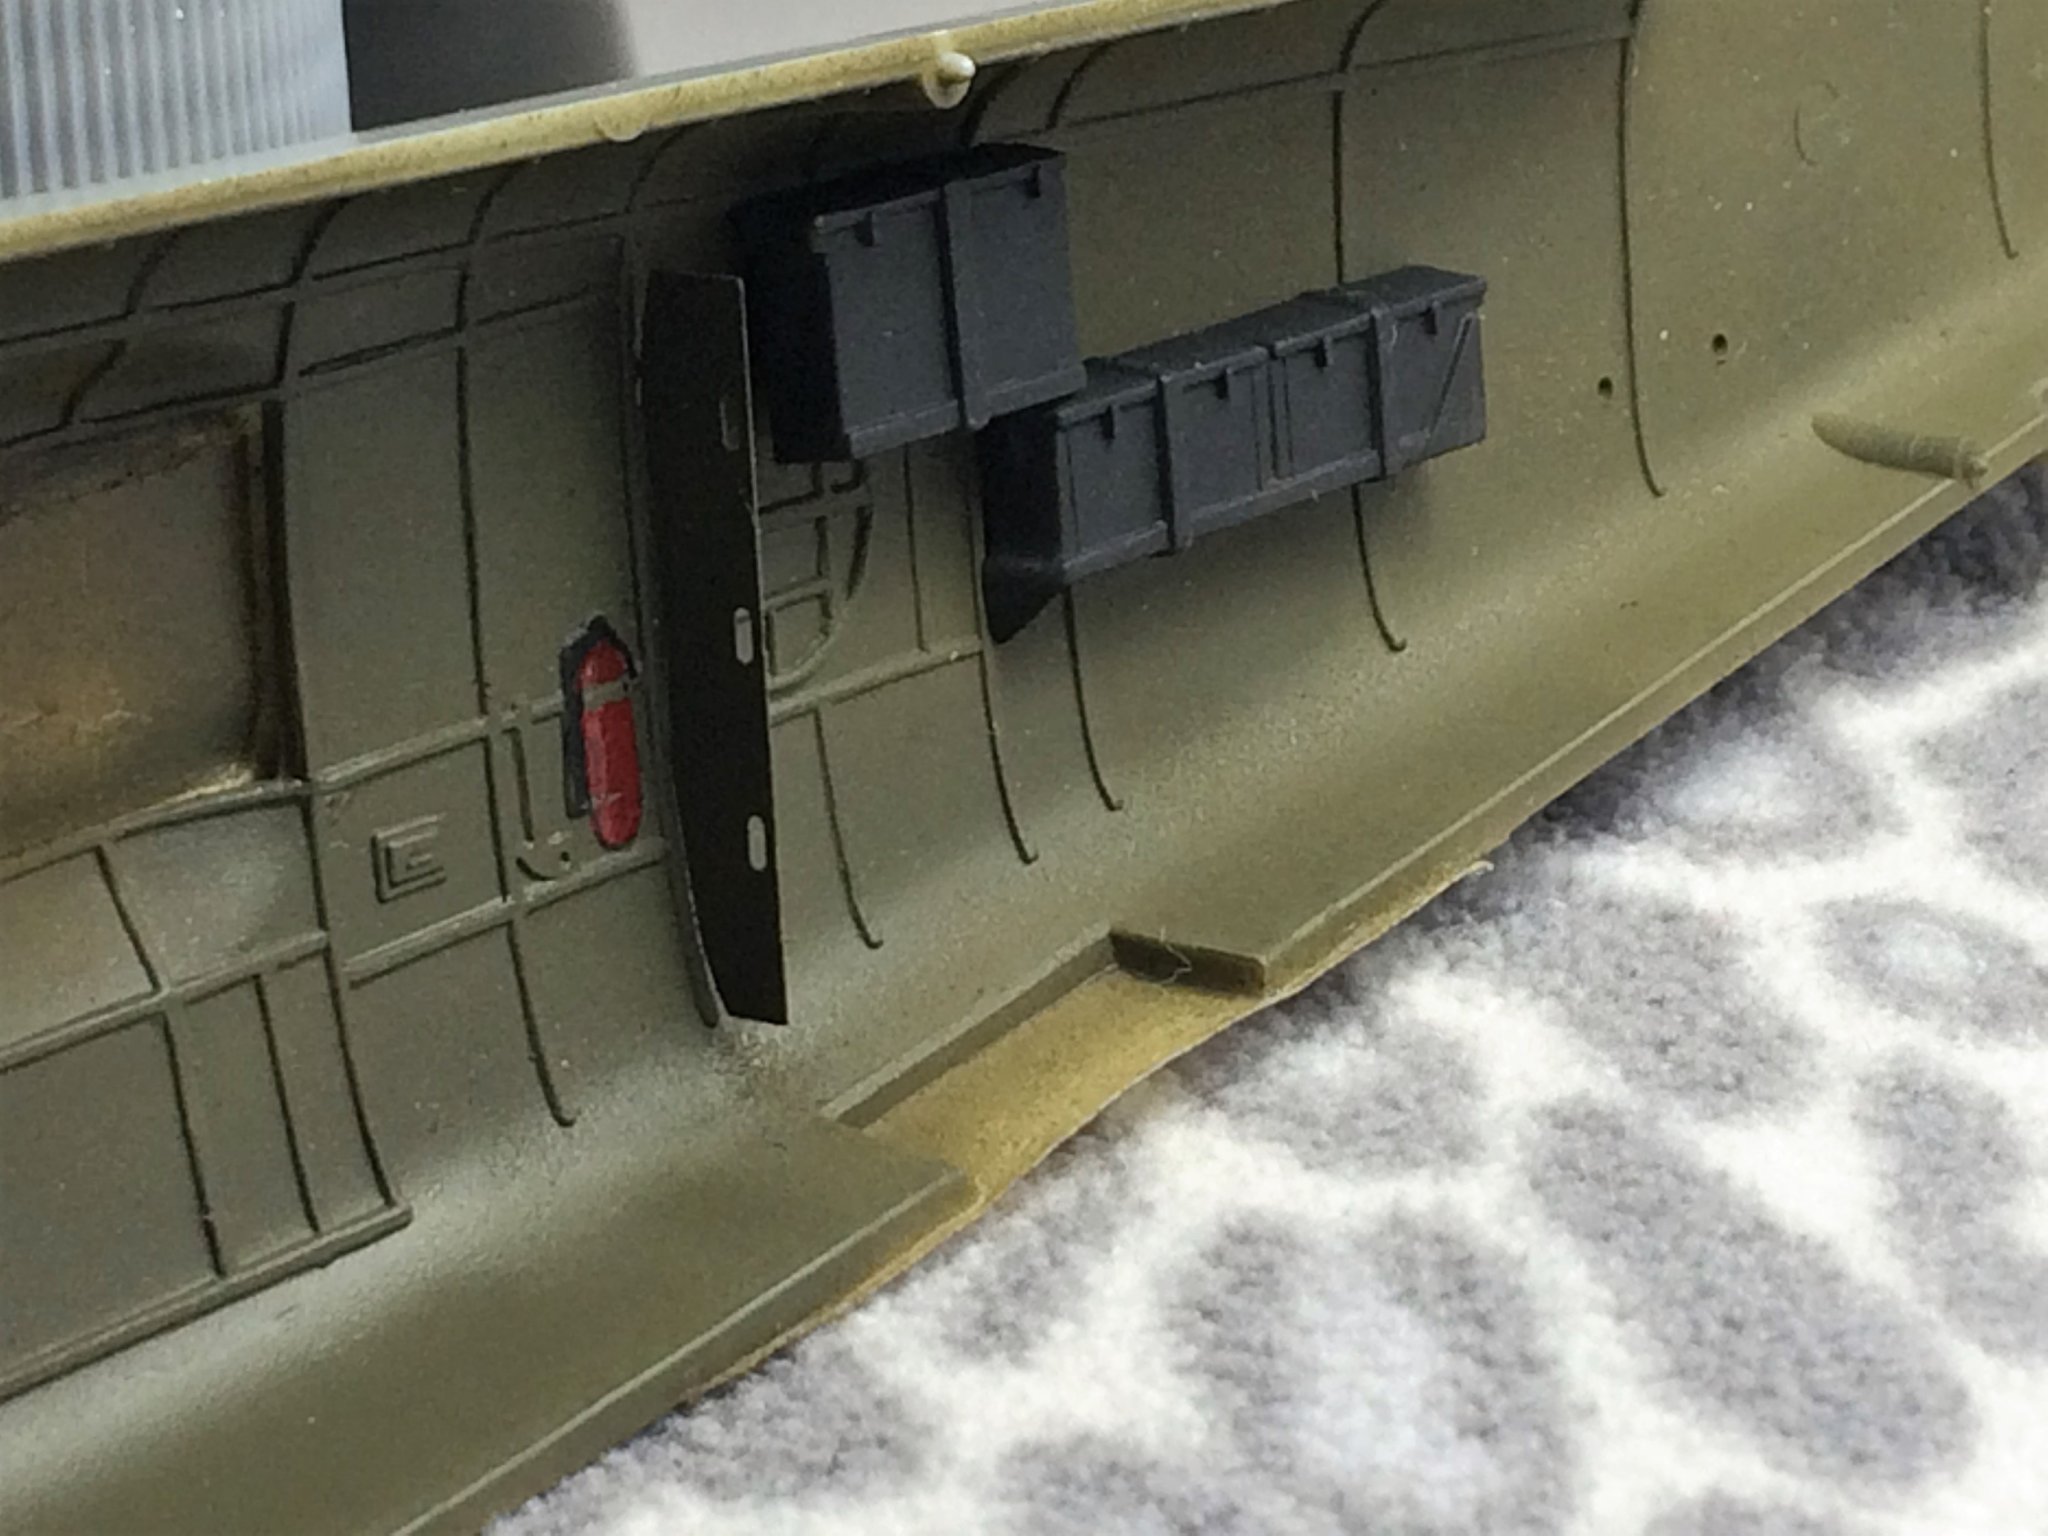
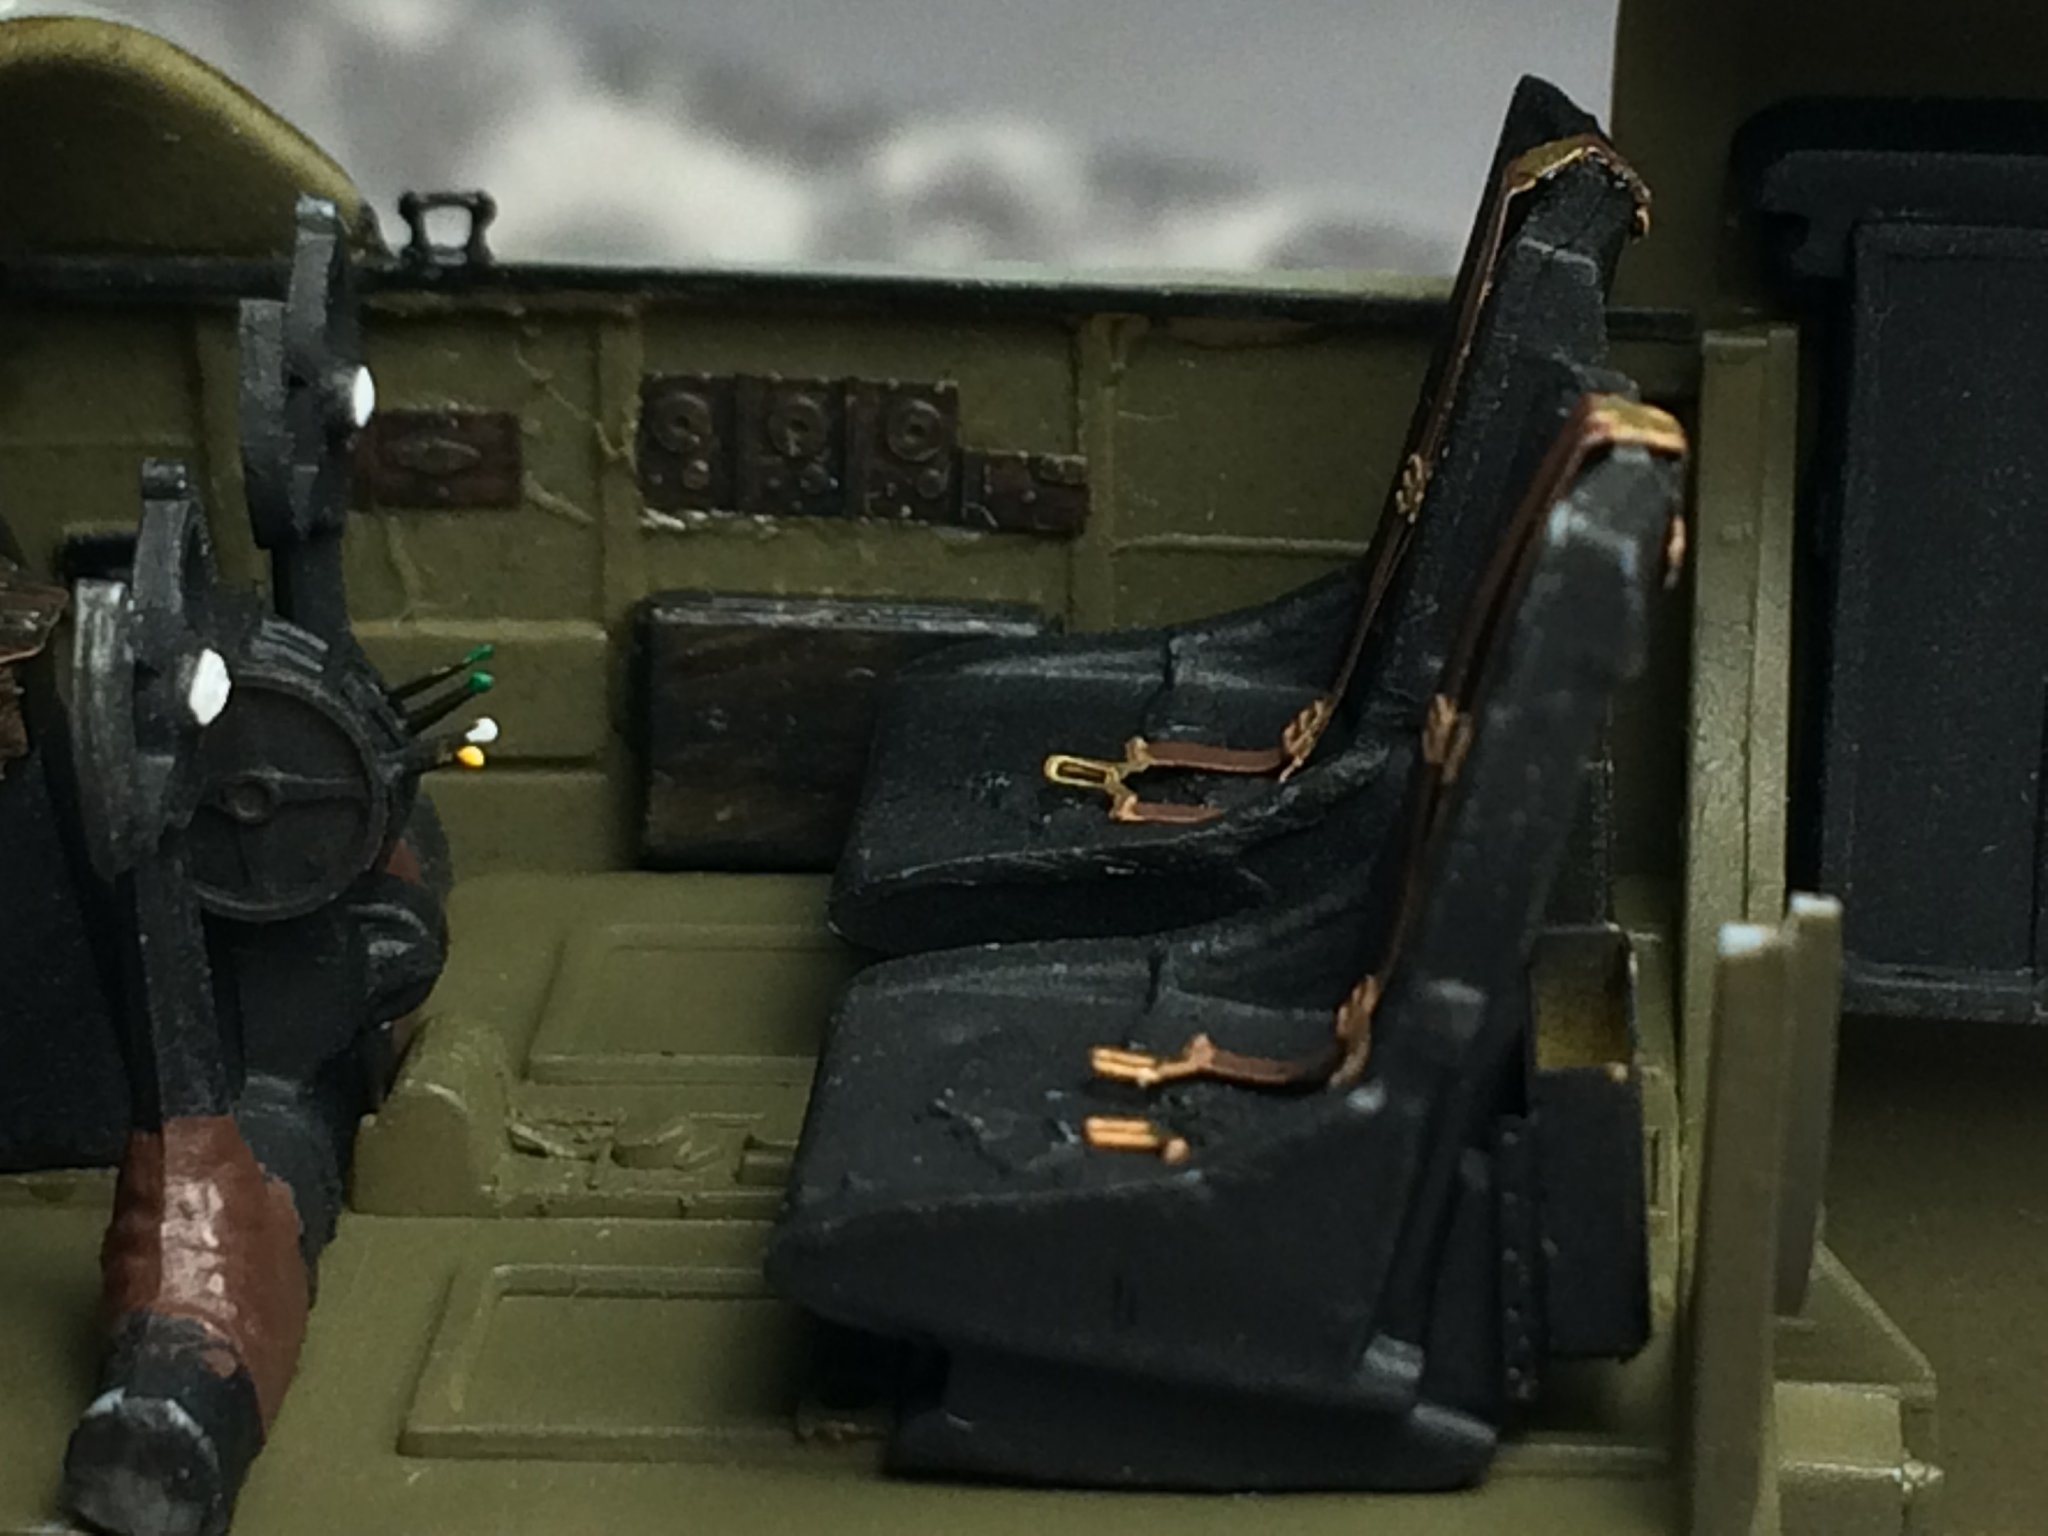
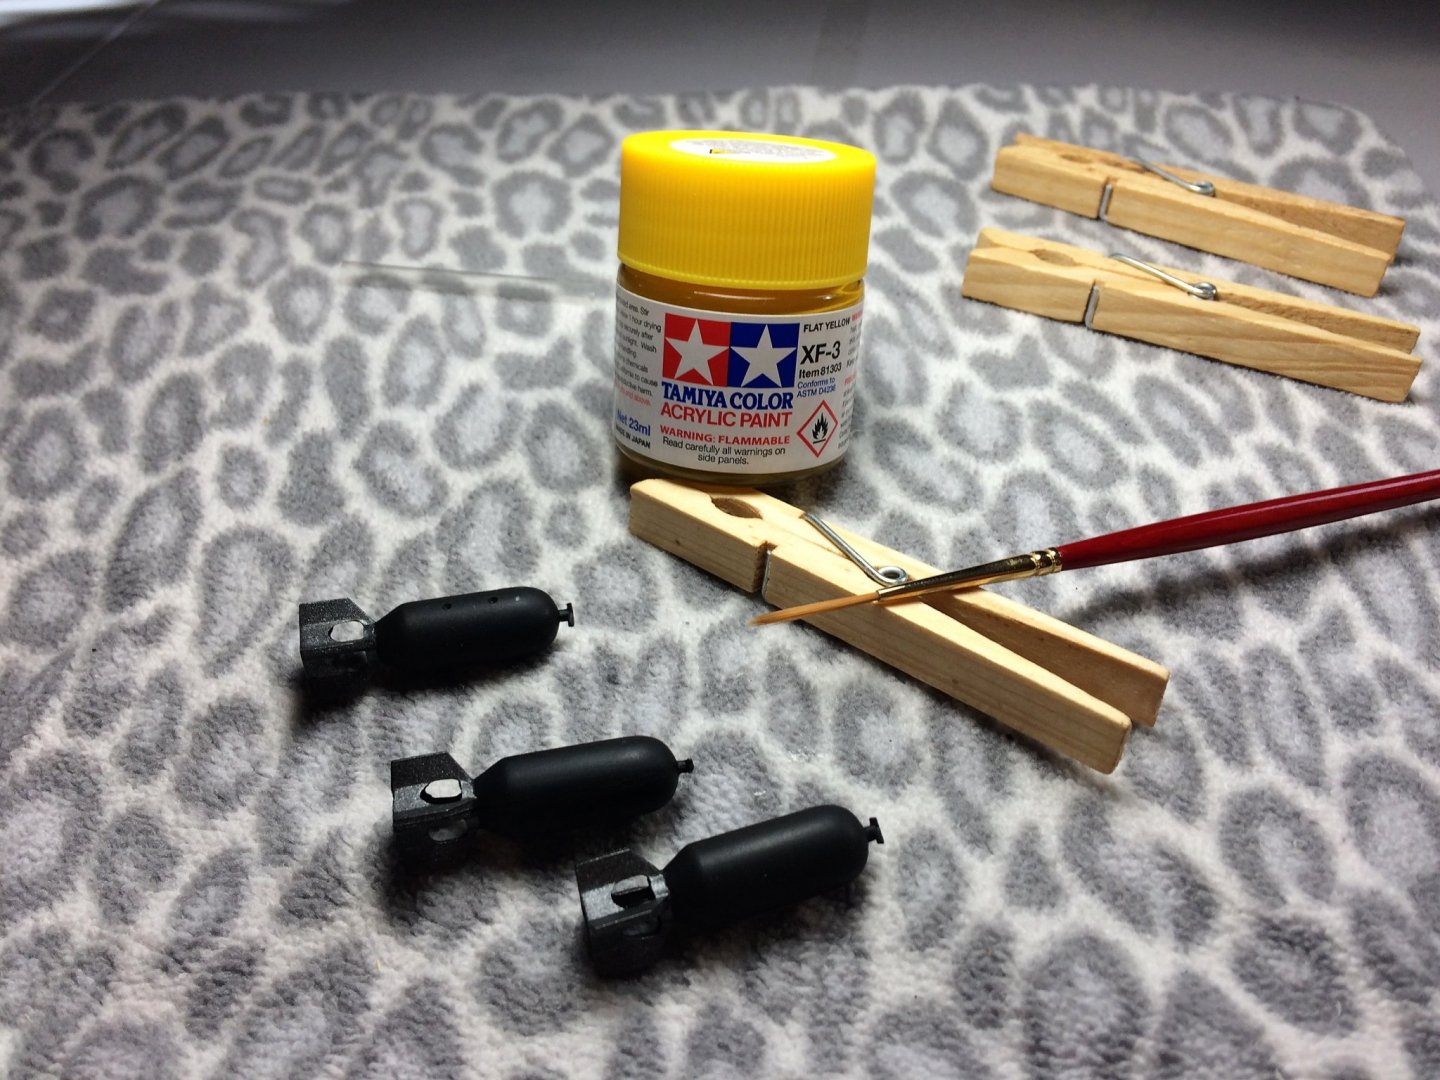
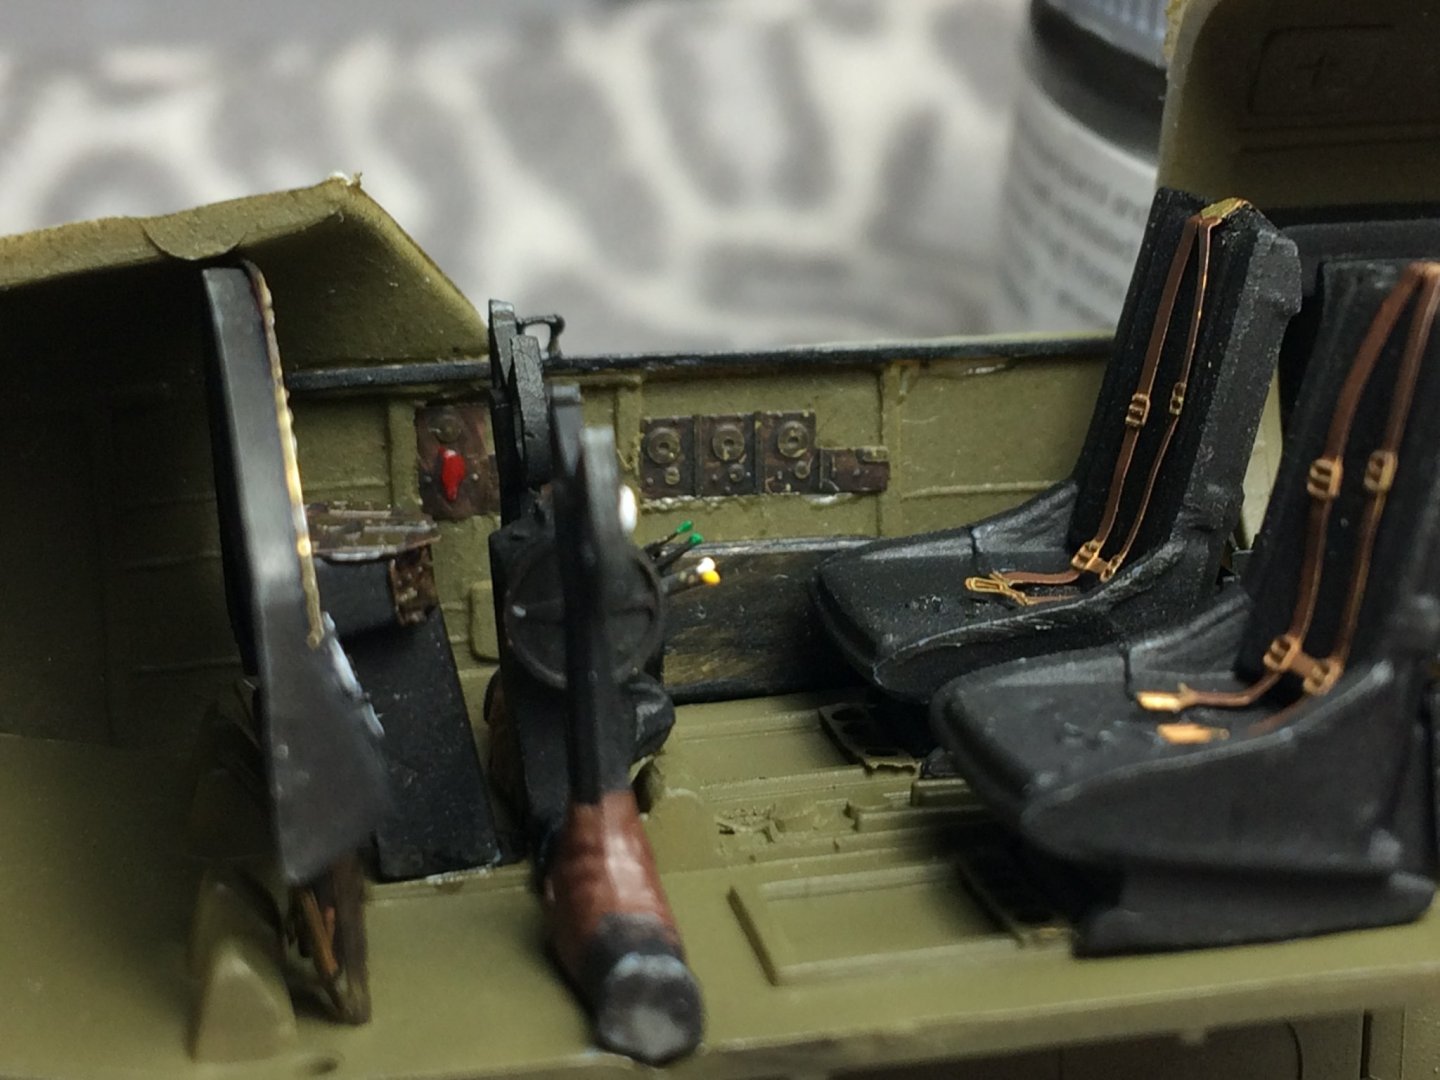
Morning, Thanks for comments and likes! Popeye, your right about the PE. It's a labor of love. The majority isn't seen, but it will bug the heck out of me If I don't do it!!!!! I seem to have found a little rhythm while staying at home. One day I'll work on my Niagara build, then the next day I'll work on the Mitchell. The crazy part is, while working on one project, I'm usually feeling guilty for not working on the other!!!!! Man! I've been at home WAY too long! Anywho….. The bombs were assembled, as well as some ammunition boxes, and airbrushed a Mr Color flat black. I've never used Mr Color paints before and I'm rather impressed. Since I've never airbrushed before, the learning curve has been visible. Yet, the combo of Mr Color paints and thinner still produce a quality paint job even while learning the craft. Easily installed. The rear seat has it's seatbelts and glued into place as well. I could have done a better job "burying" the rear part of the belts into the plastic. Both sides of the fuselage have ammo boxes. There is some PE ammo belts for these. They are a 3 part "sandwich" like construction. Should have some pics soon. Not going too crazy on the bombs, the fins were painted a Tamiya gun metal. Almost imperceptible, but it's there. The very tip of the bomb will be a Tamiya flat yellow. The same yellow ultimately used on the front area of the engines. Well see what becomes of these. Check in on your neighbors, Tom E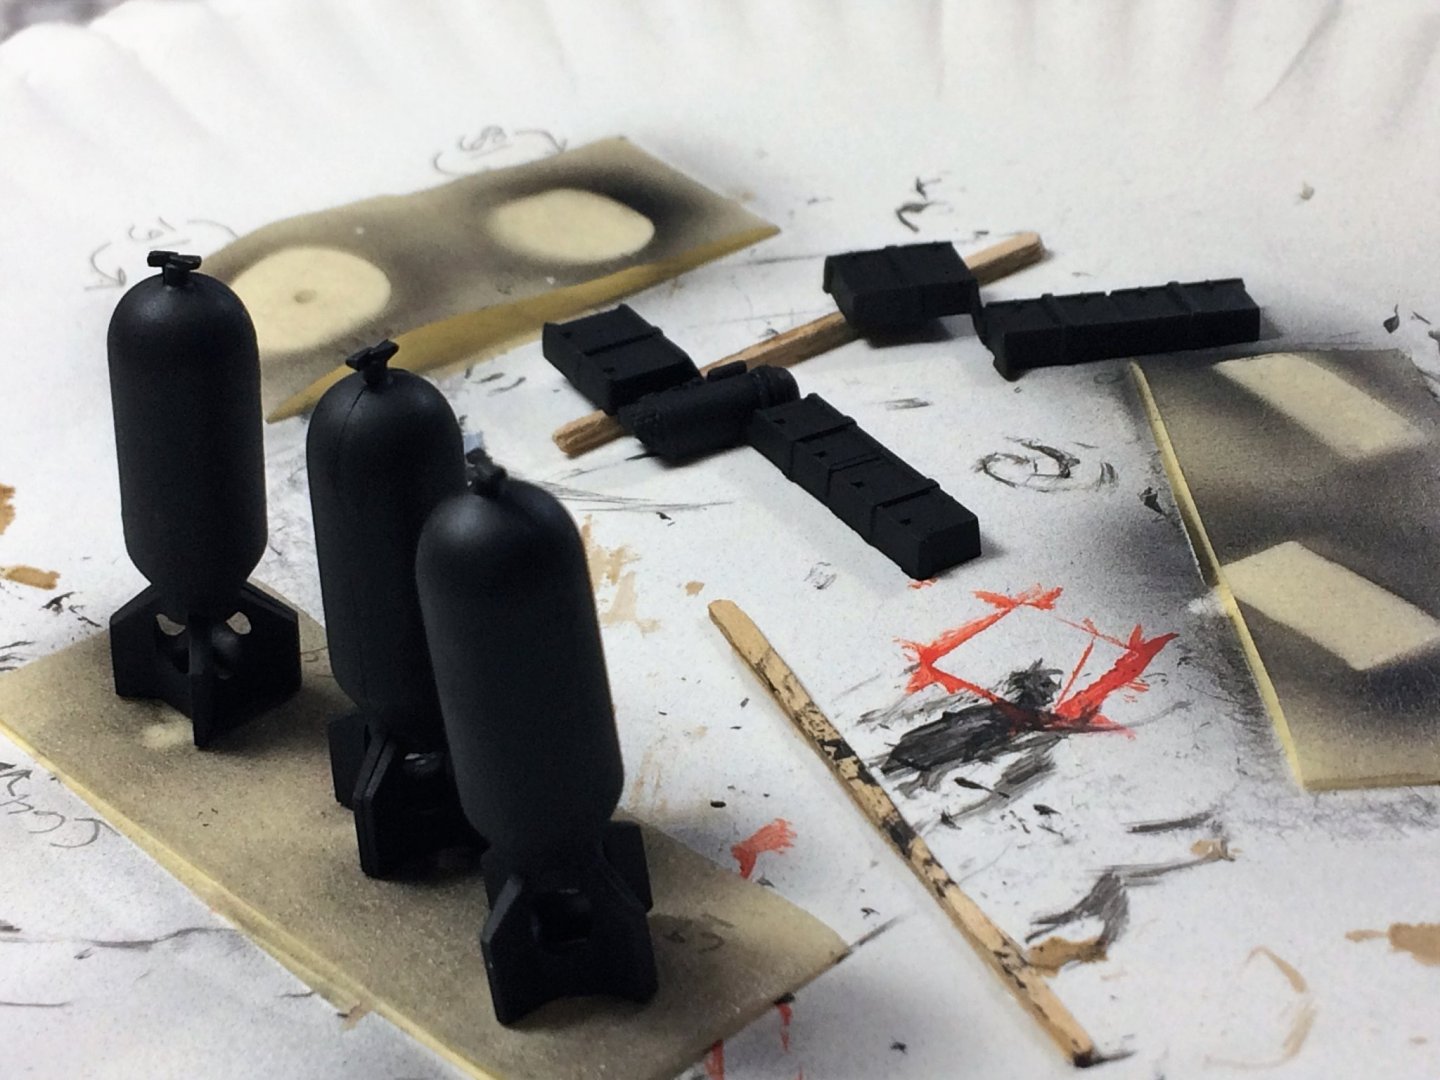


-
B-25J Mitchell by Tom E - Revell - 1:48 Scale - PLASTIC
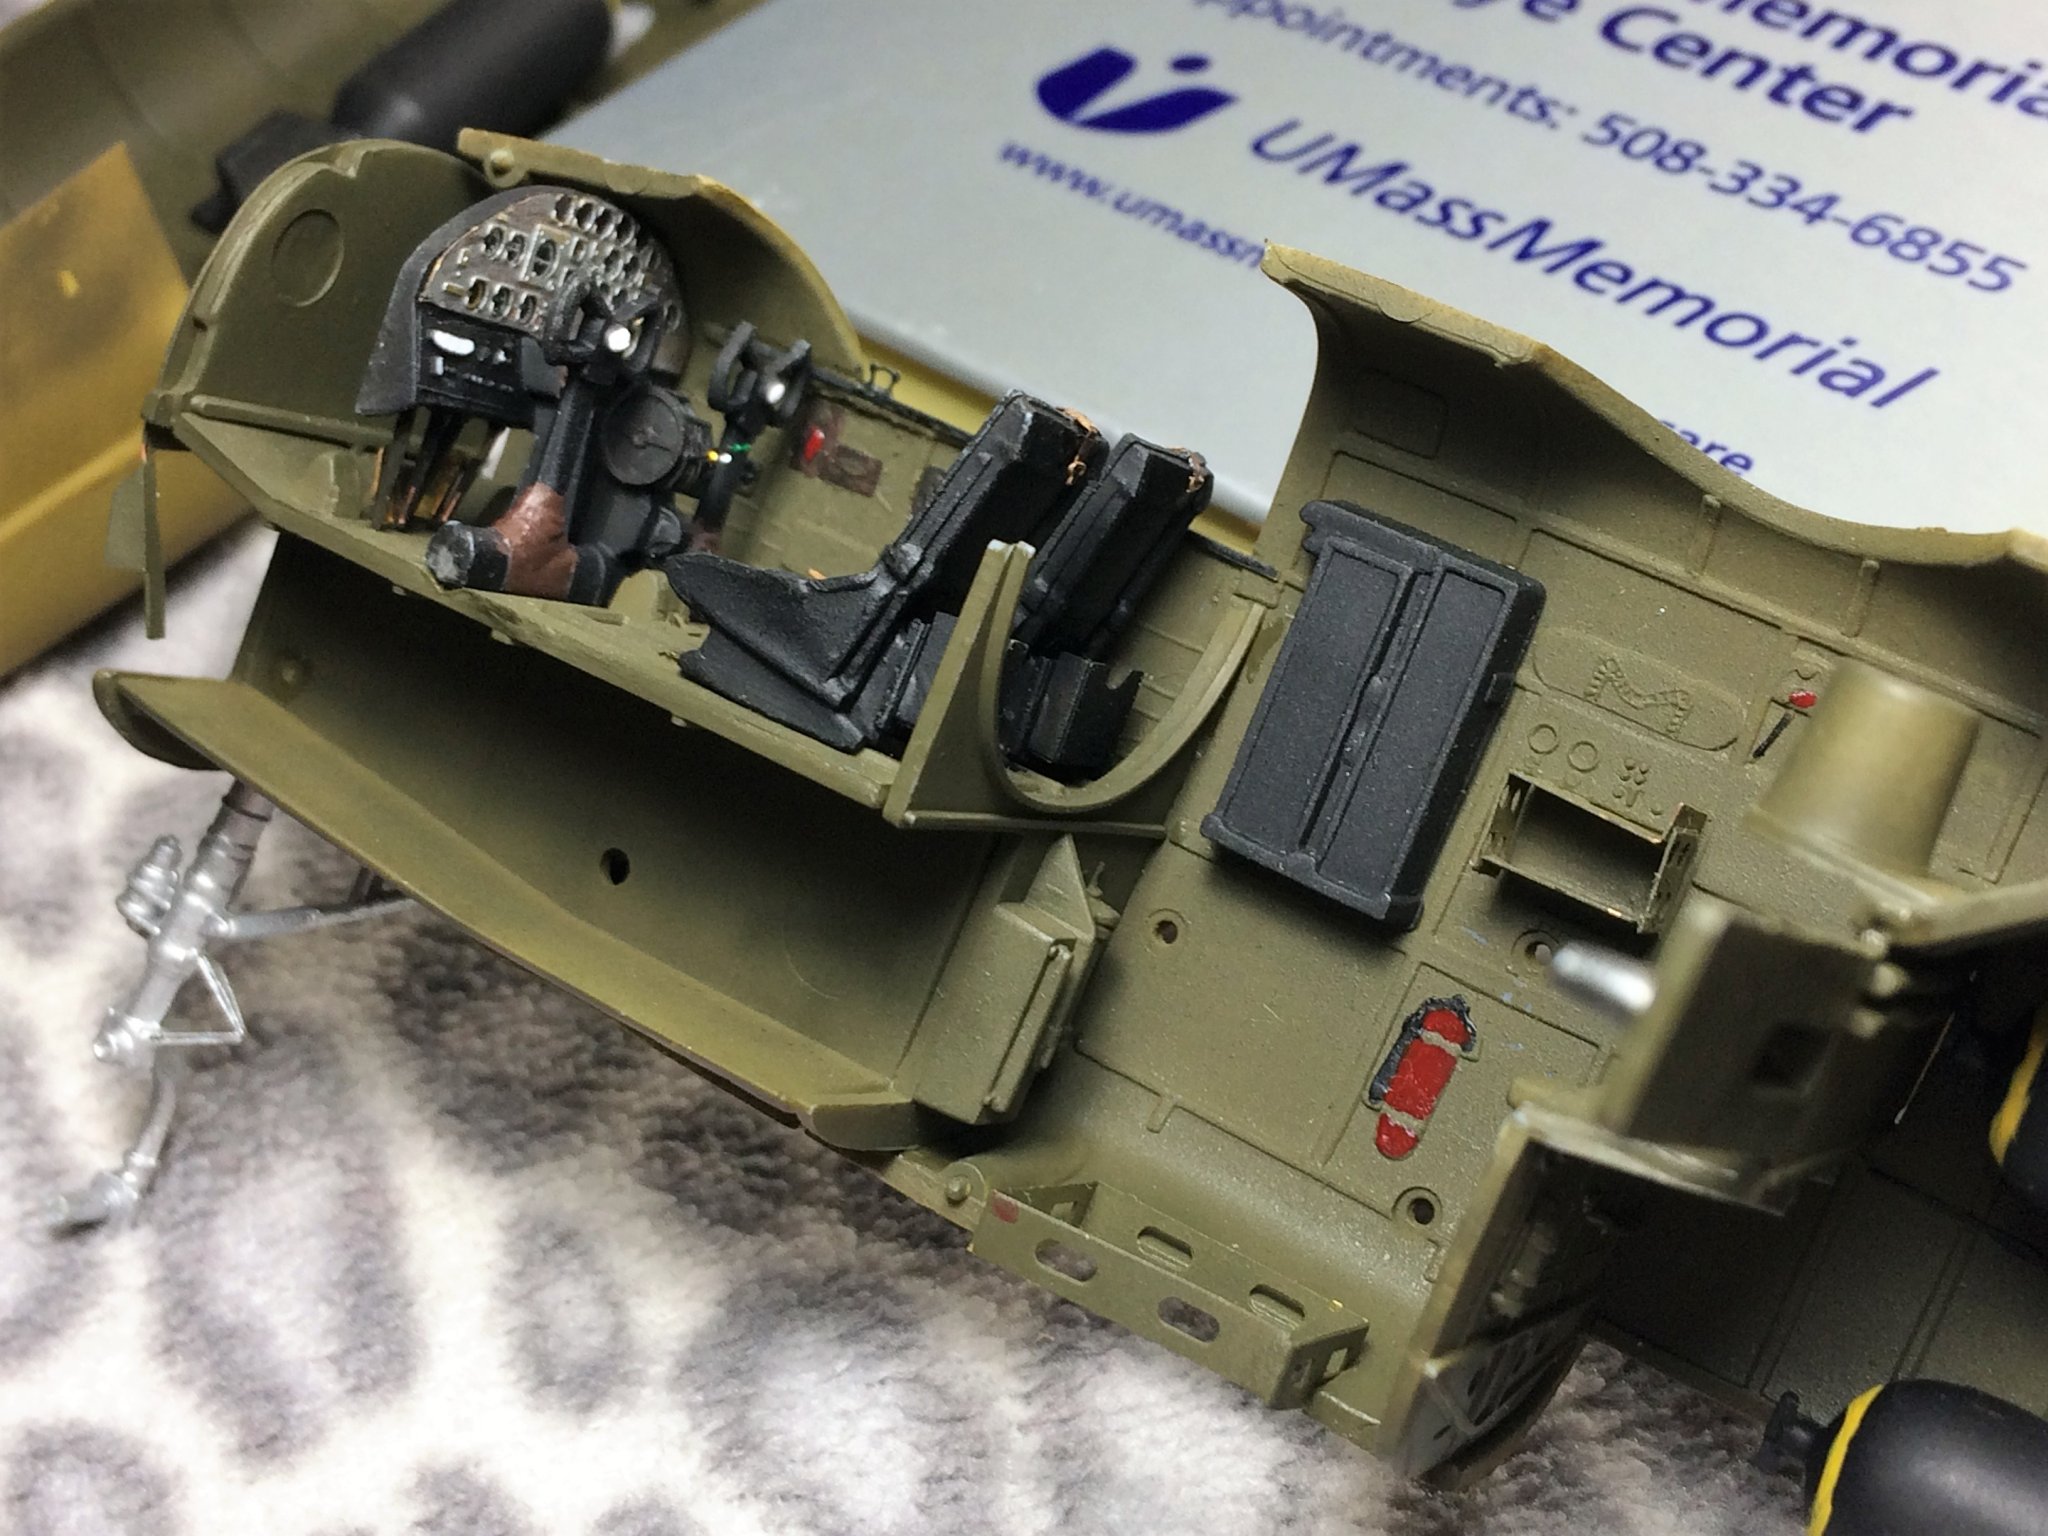
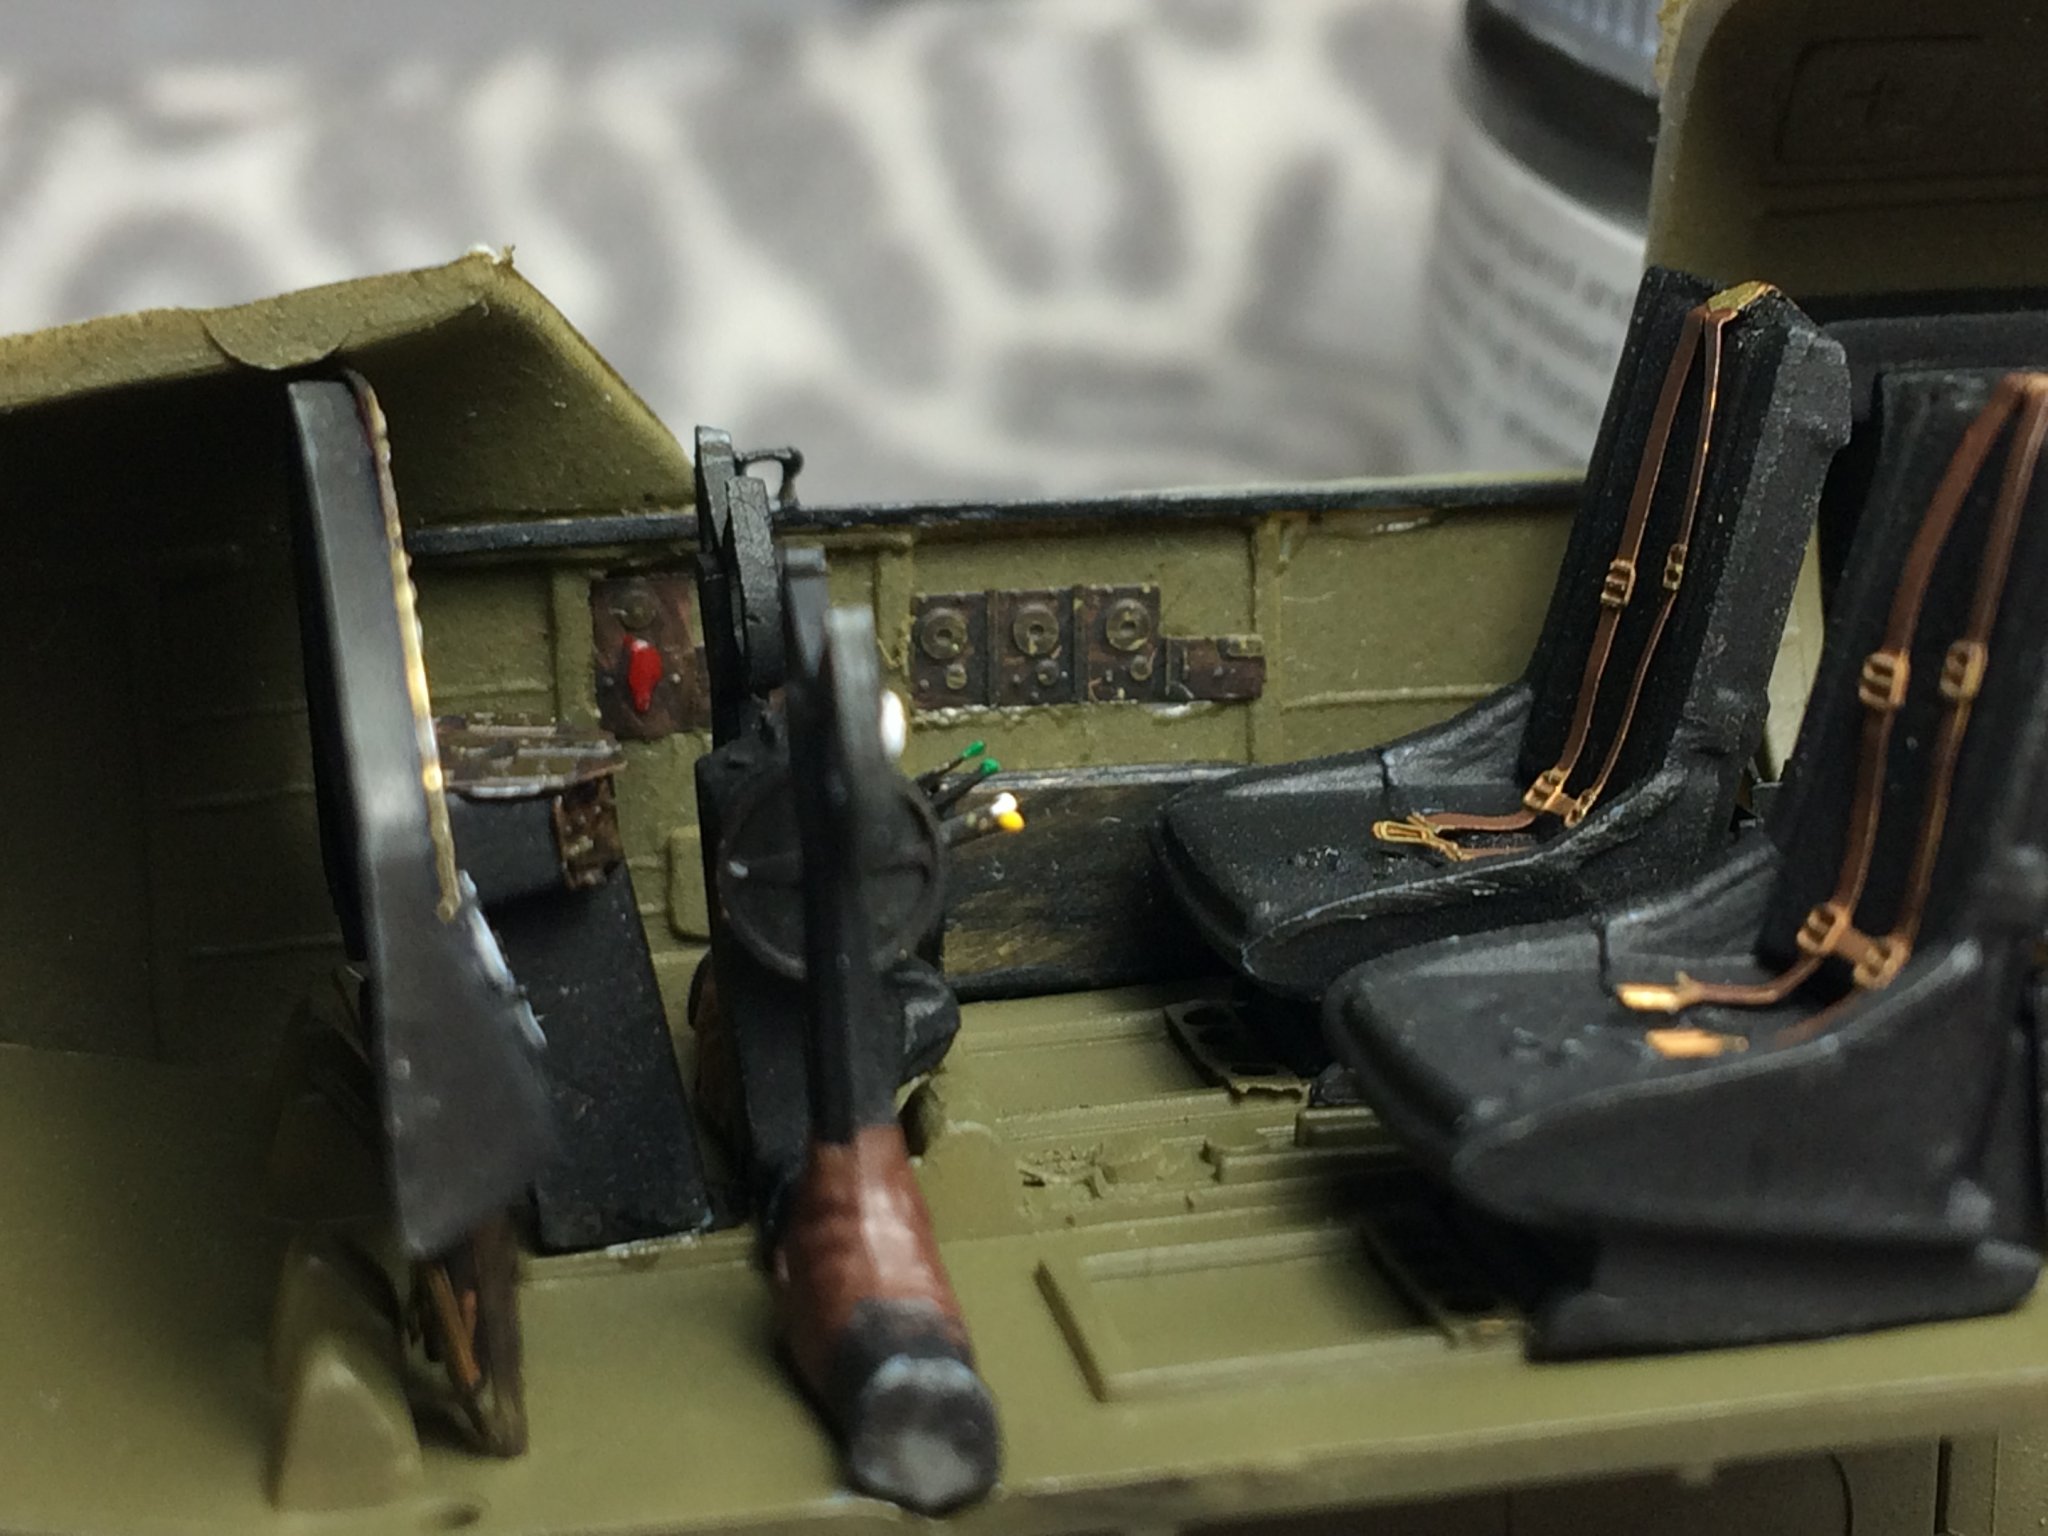
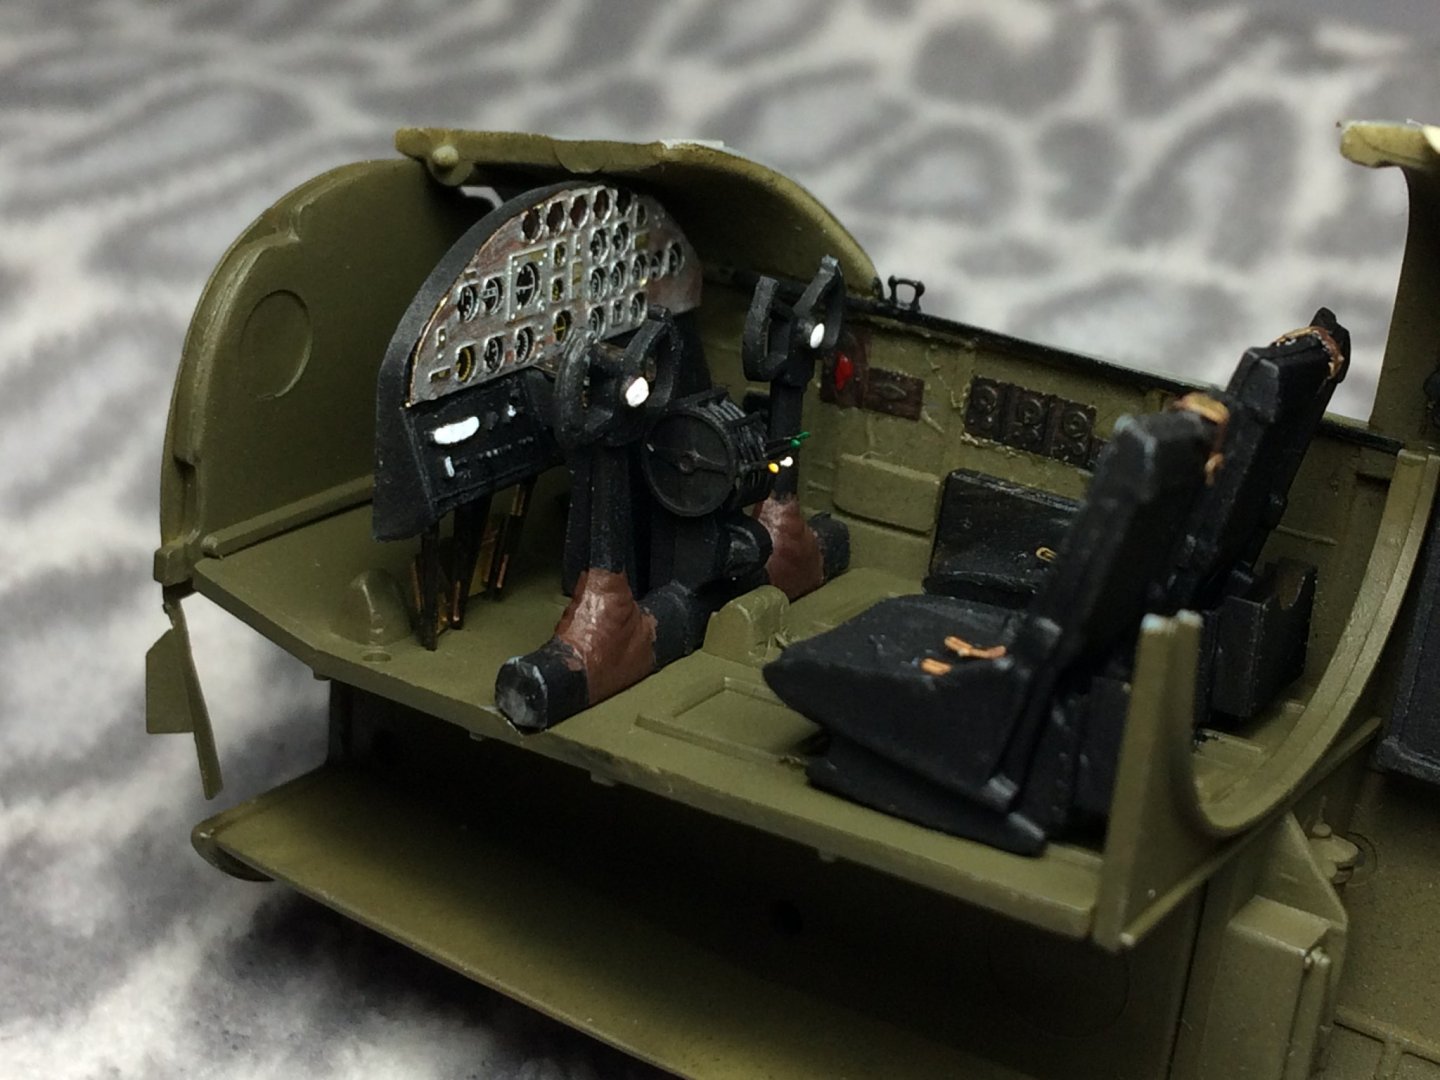
Tom E replied to Tom E's topic in Non-ship/categorised builds
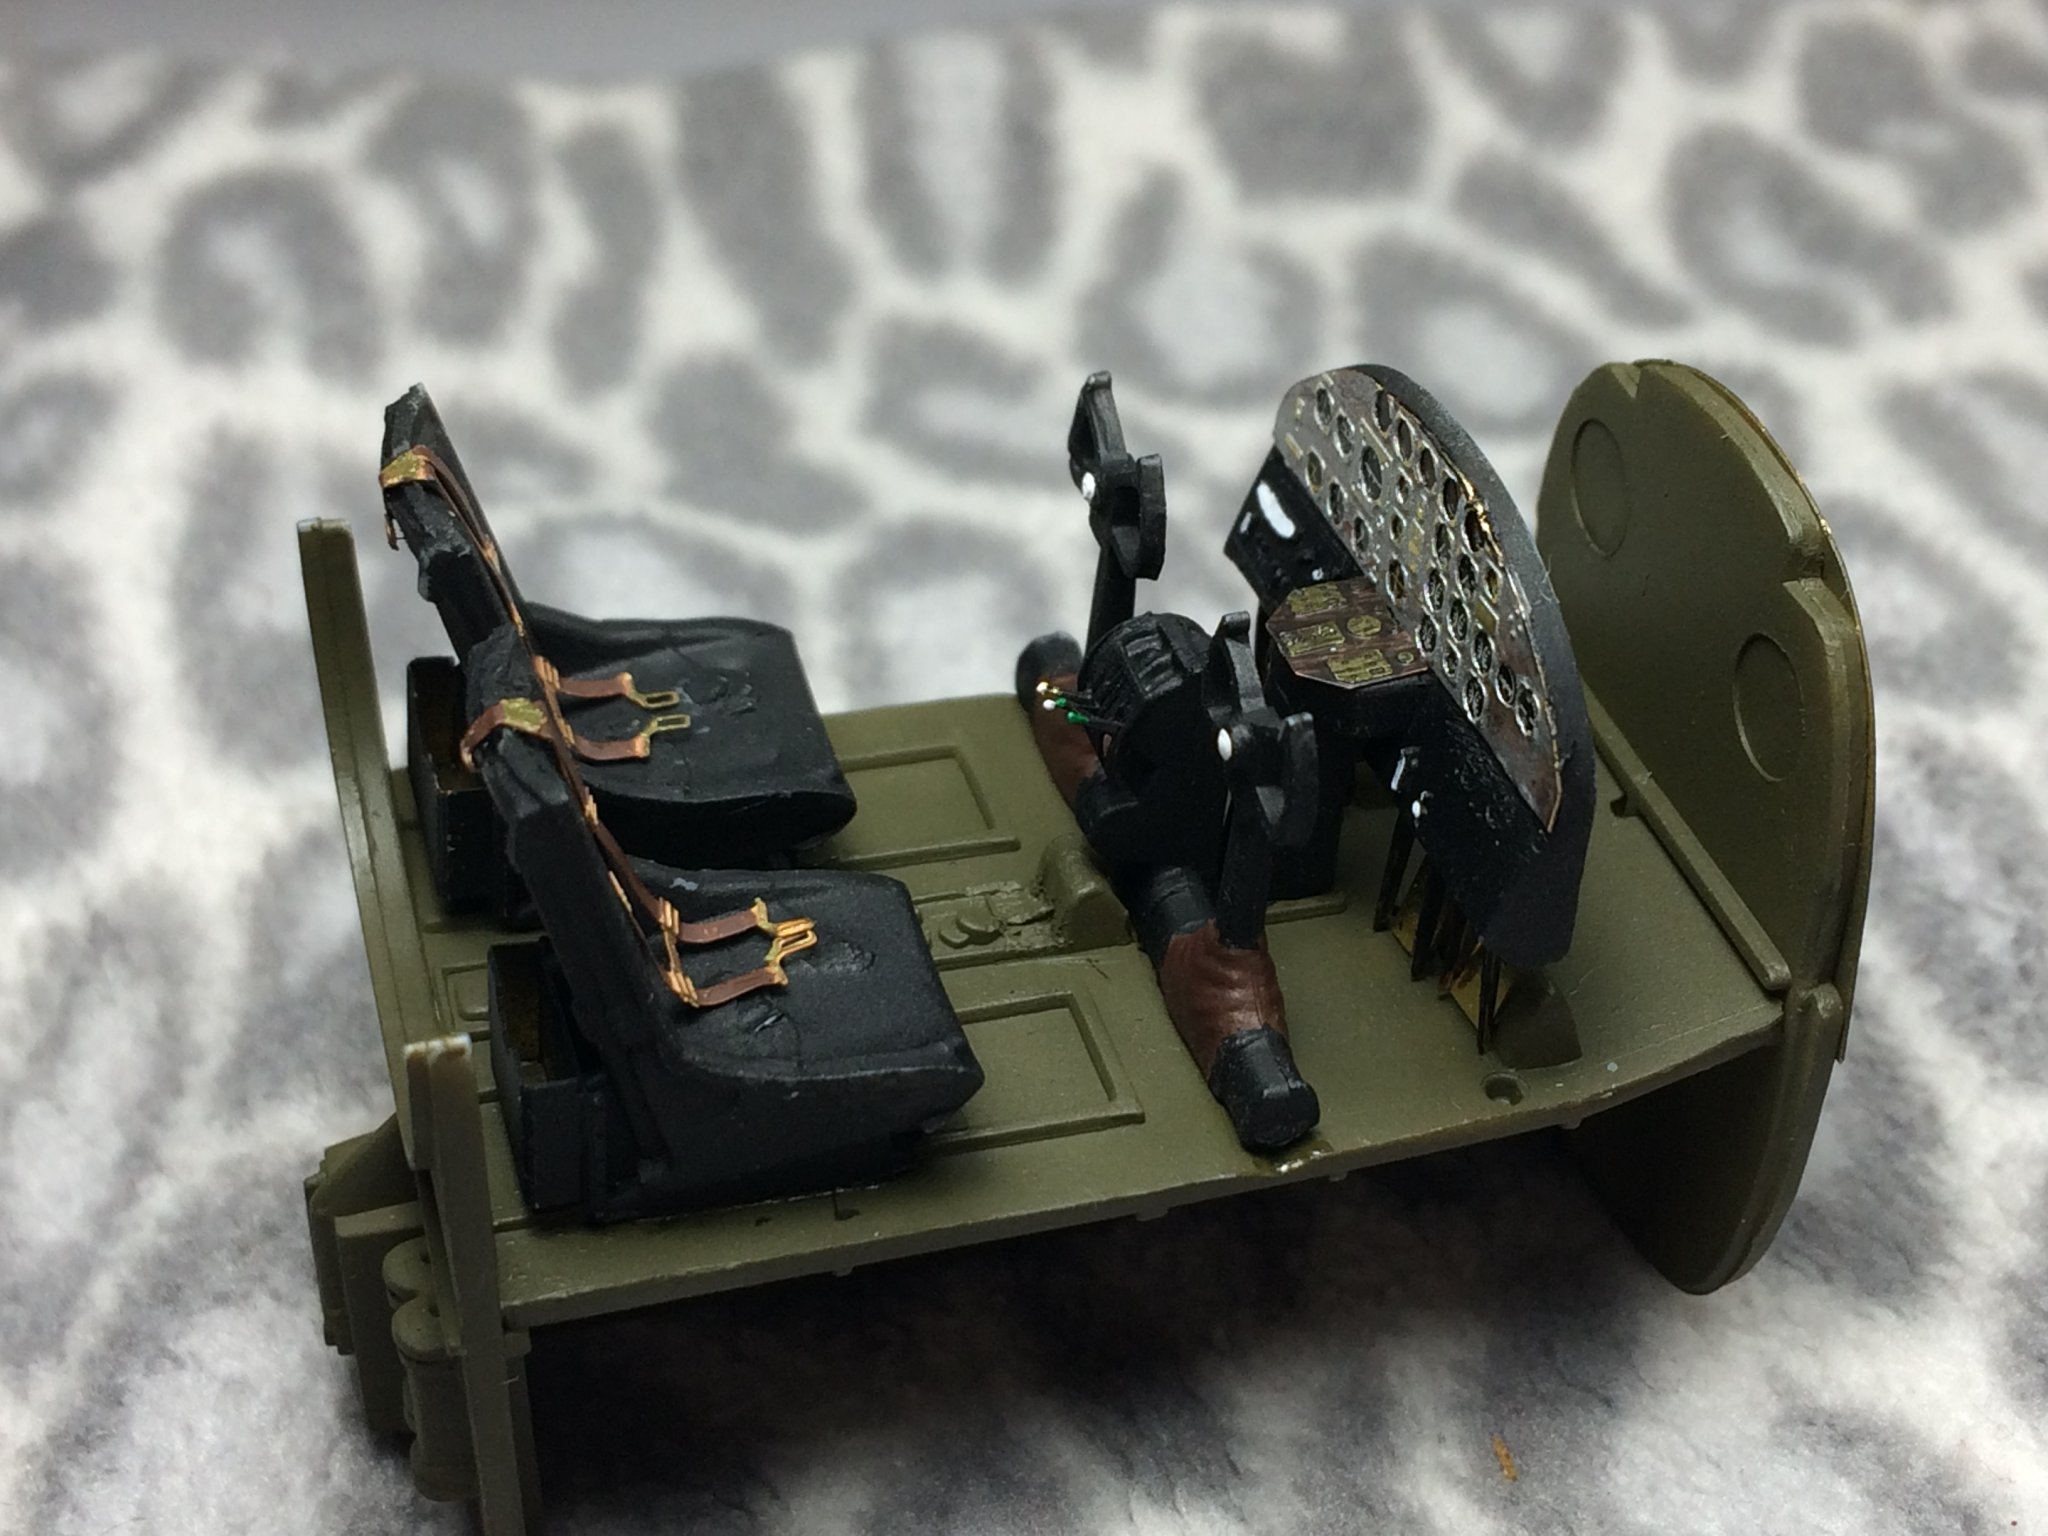
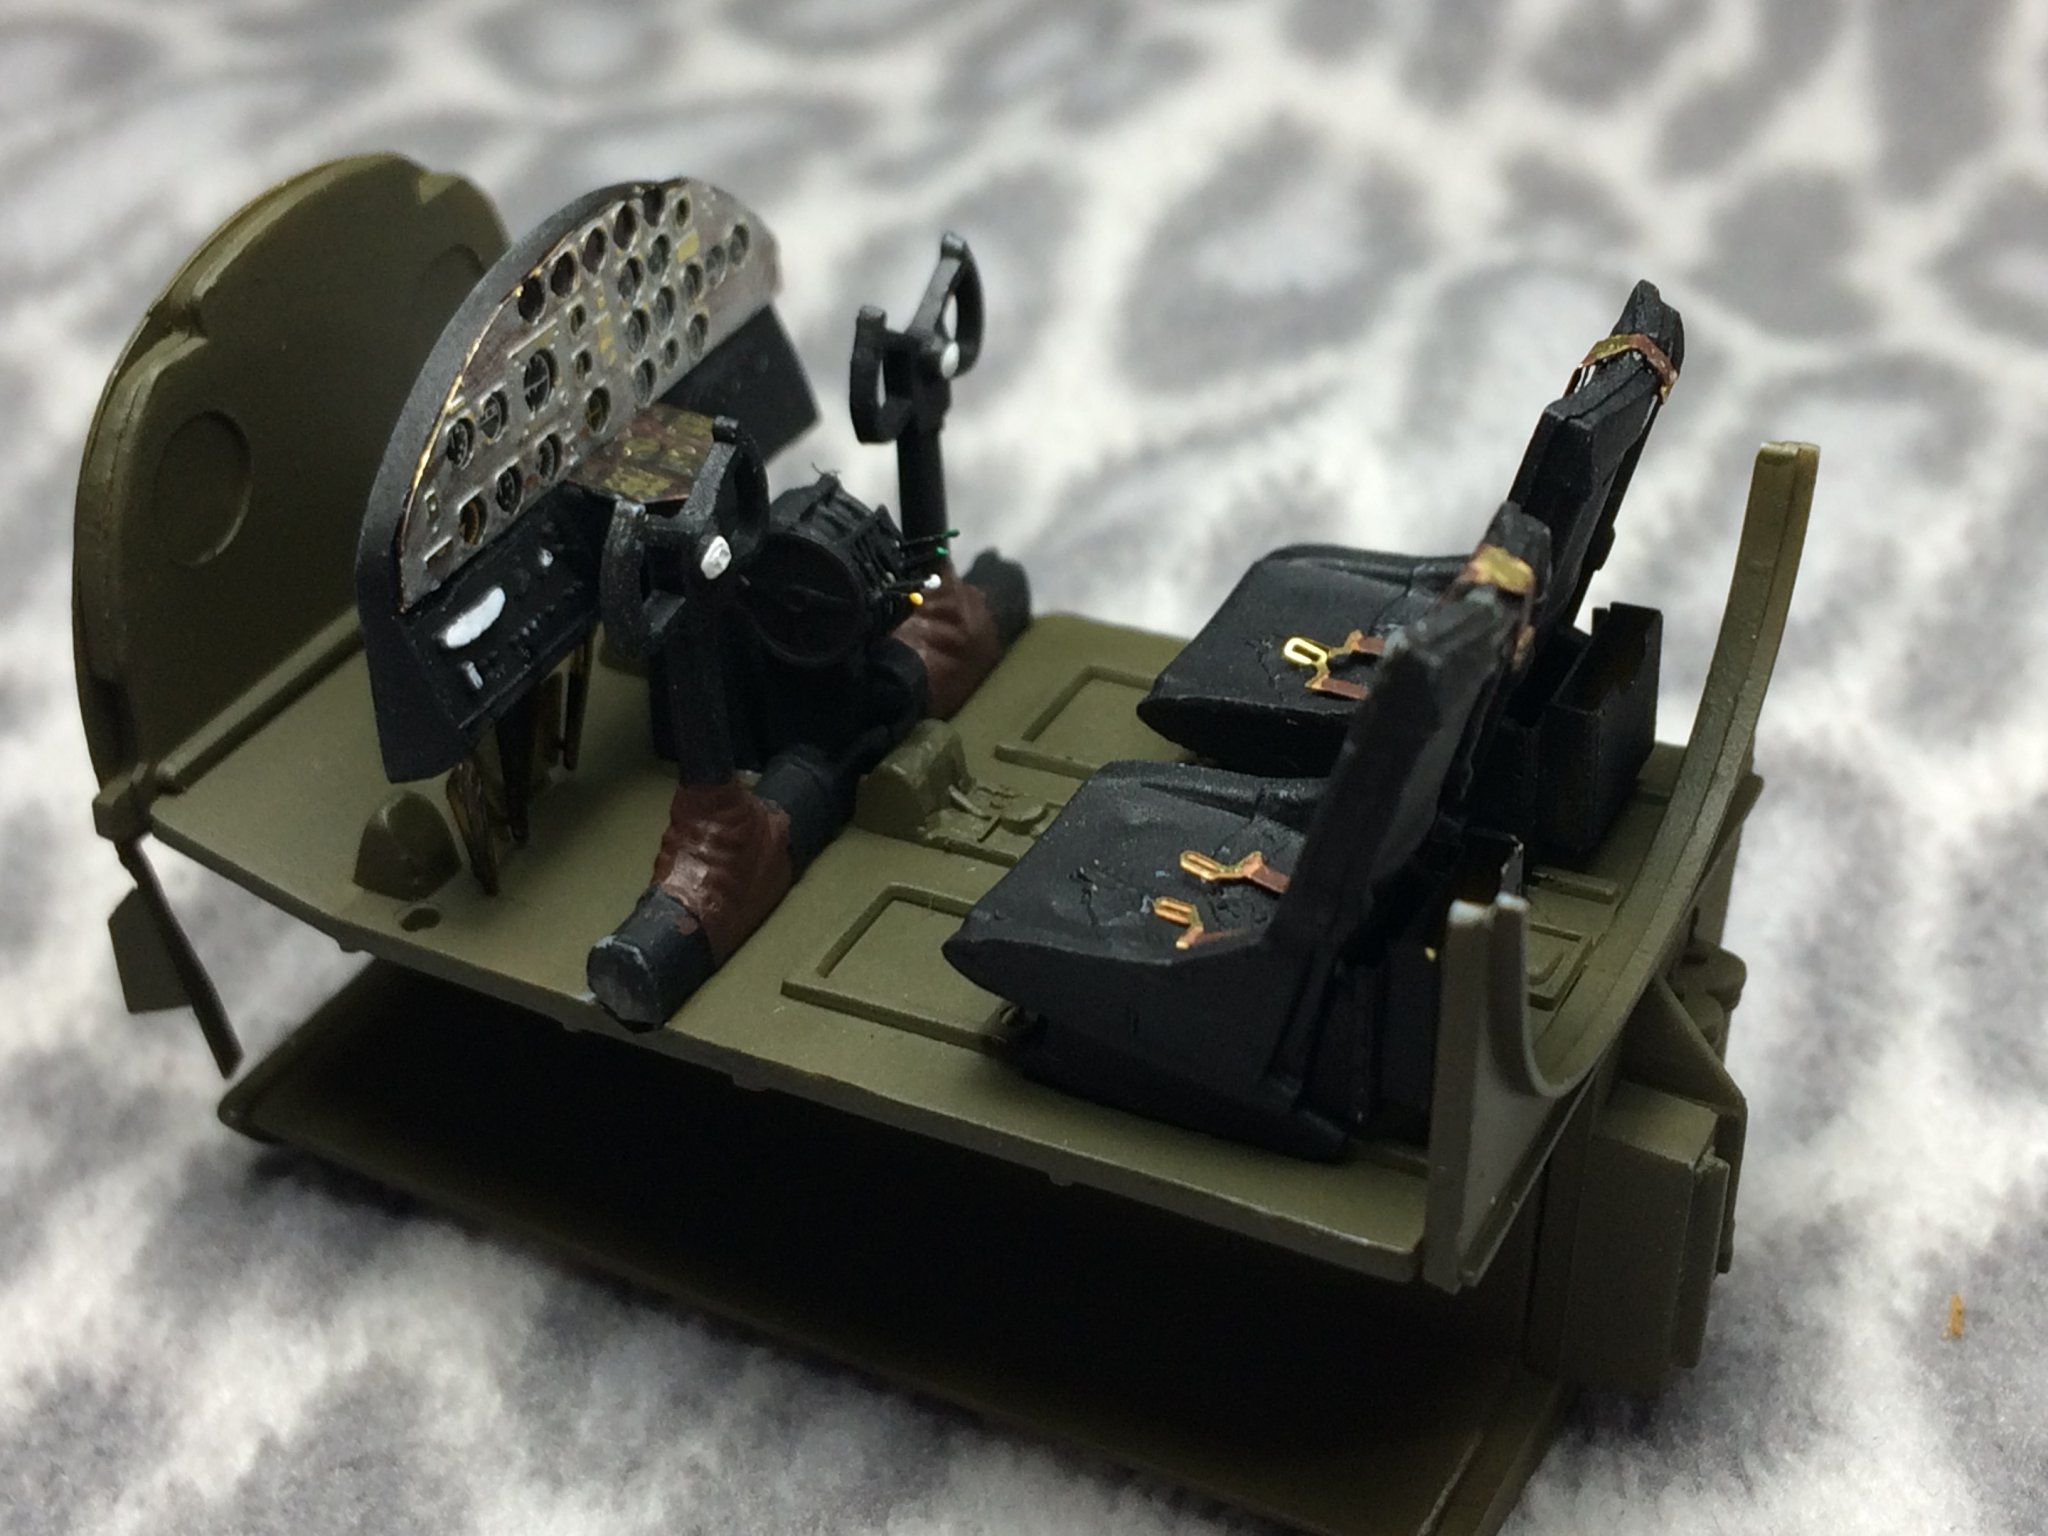
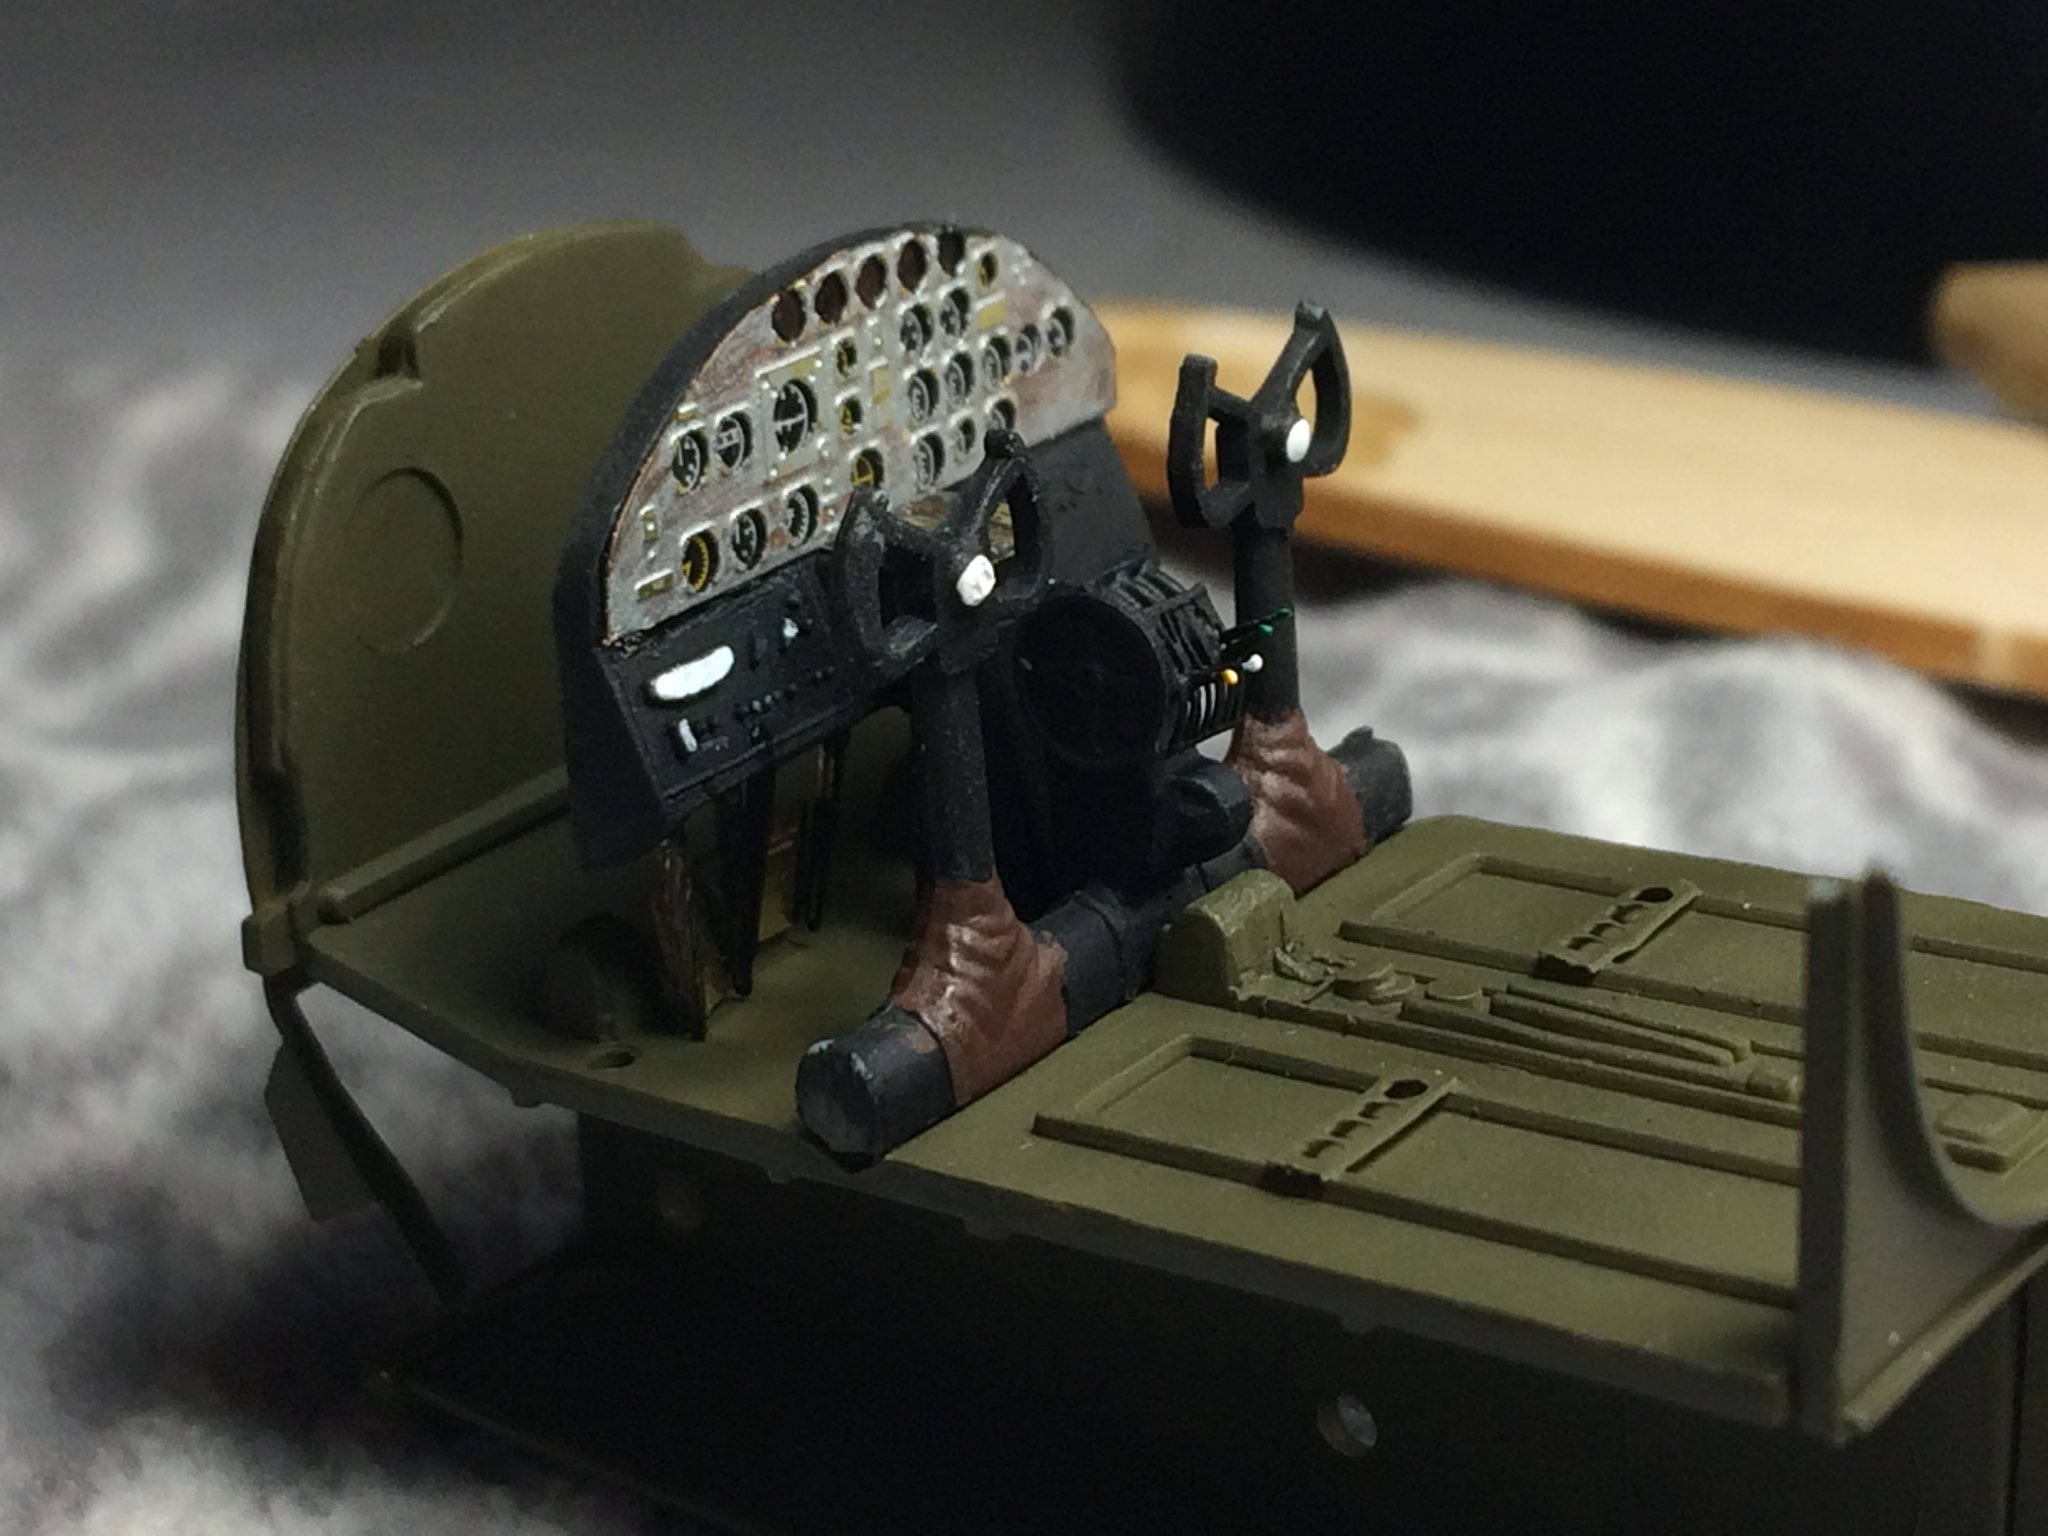
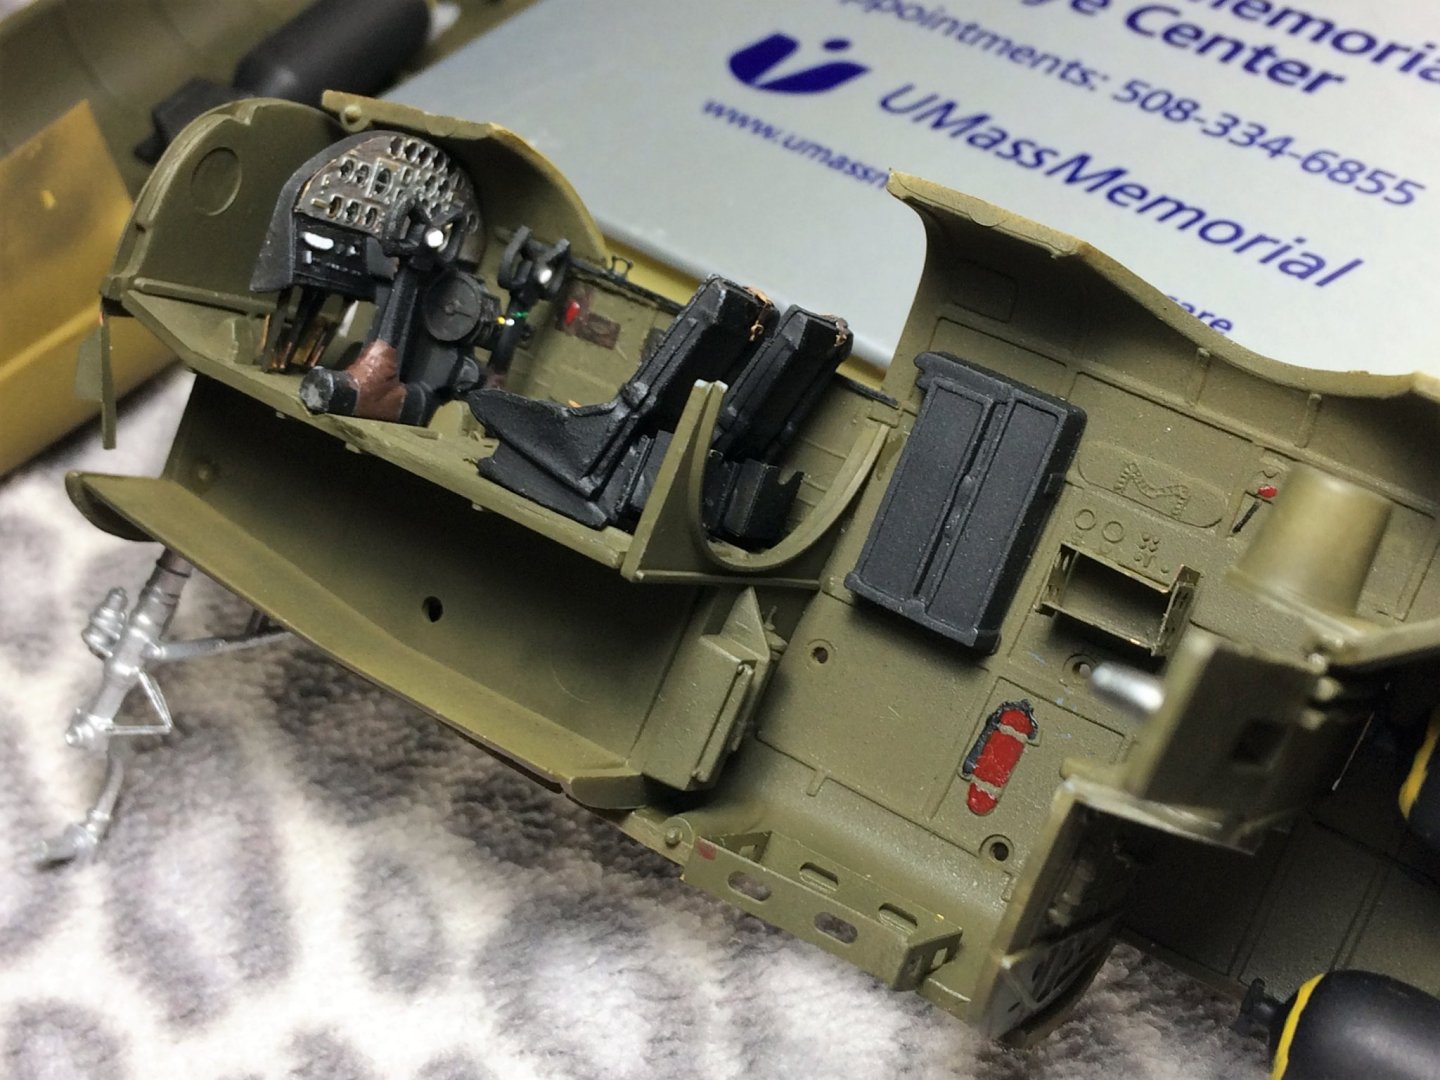
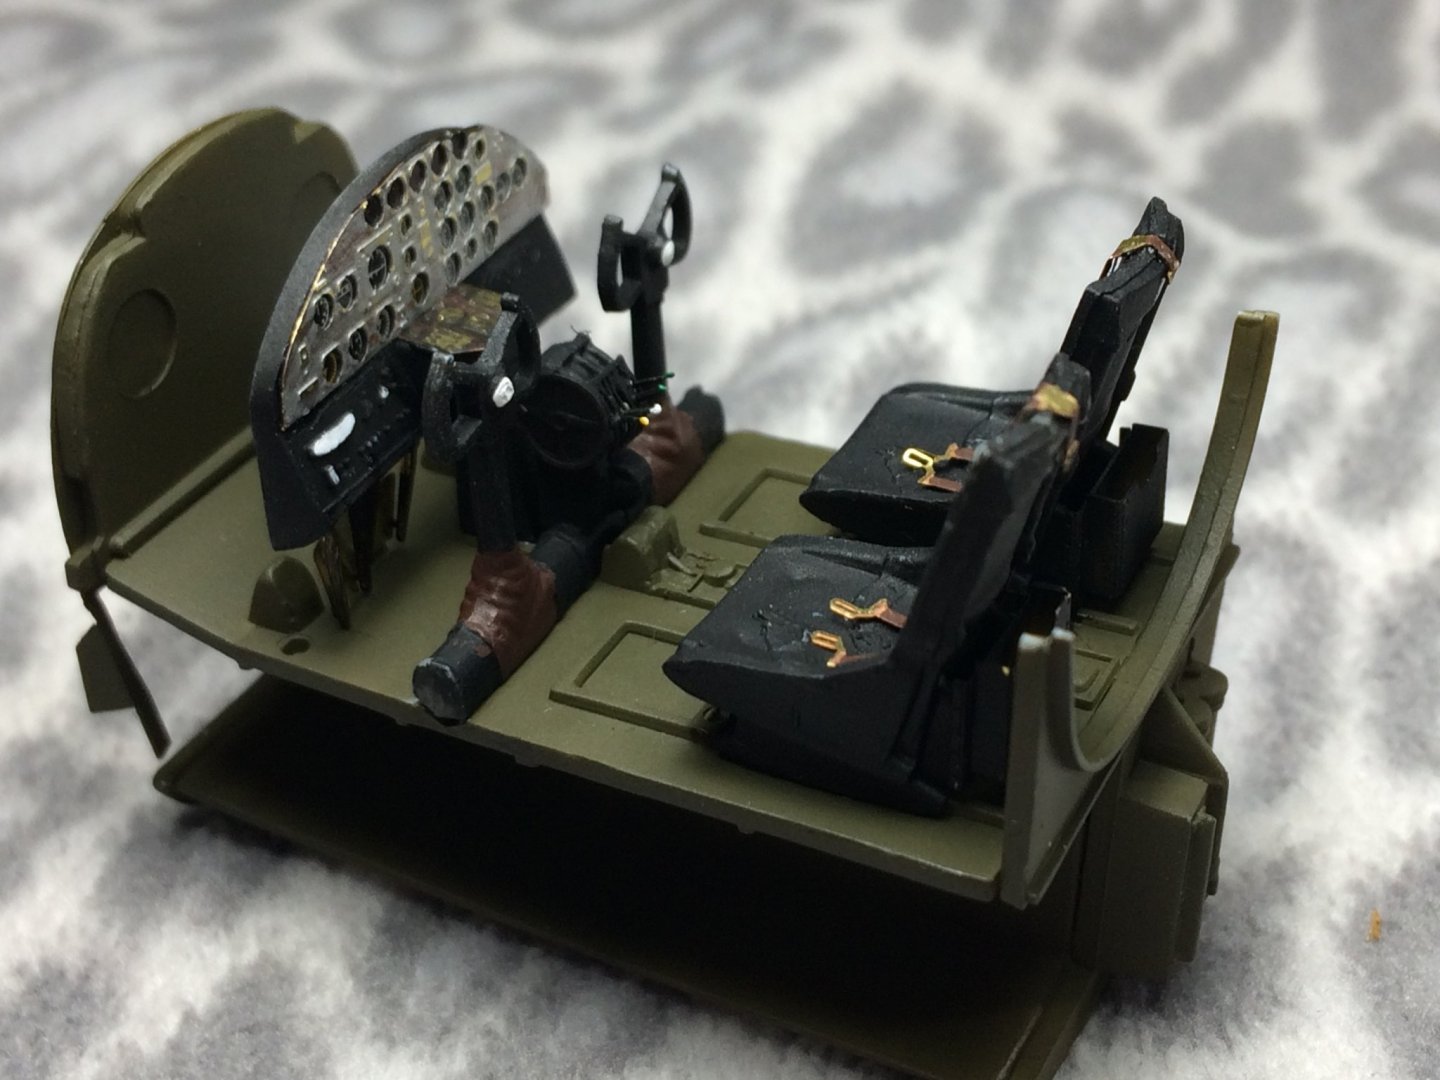
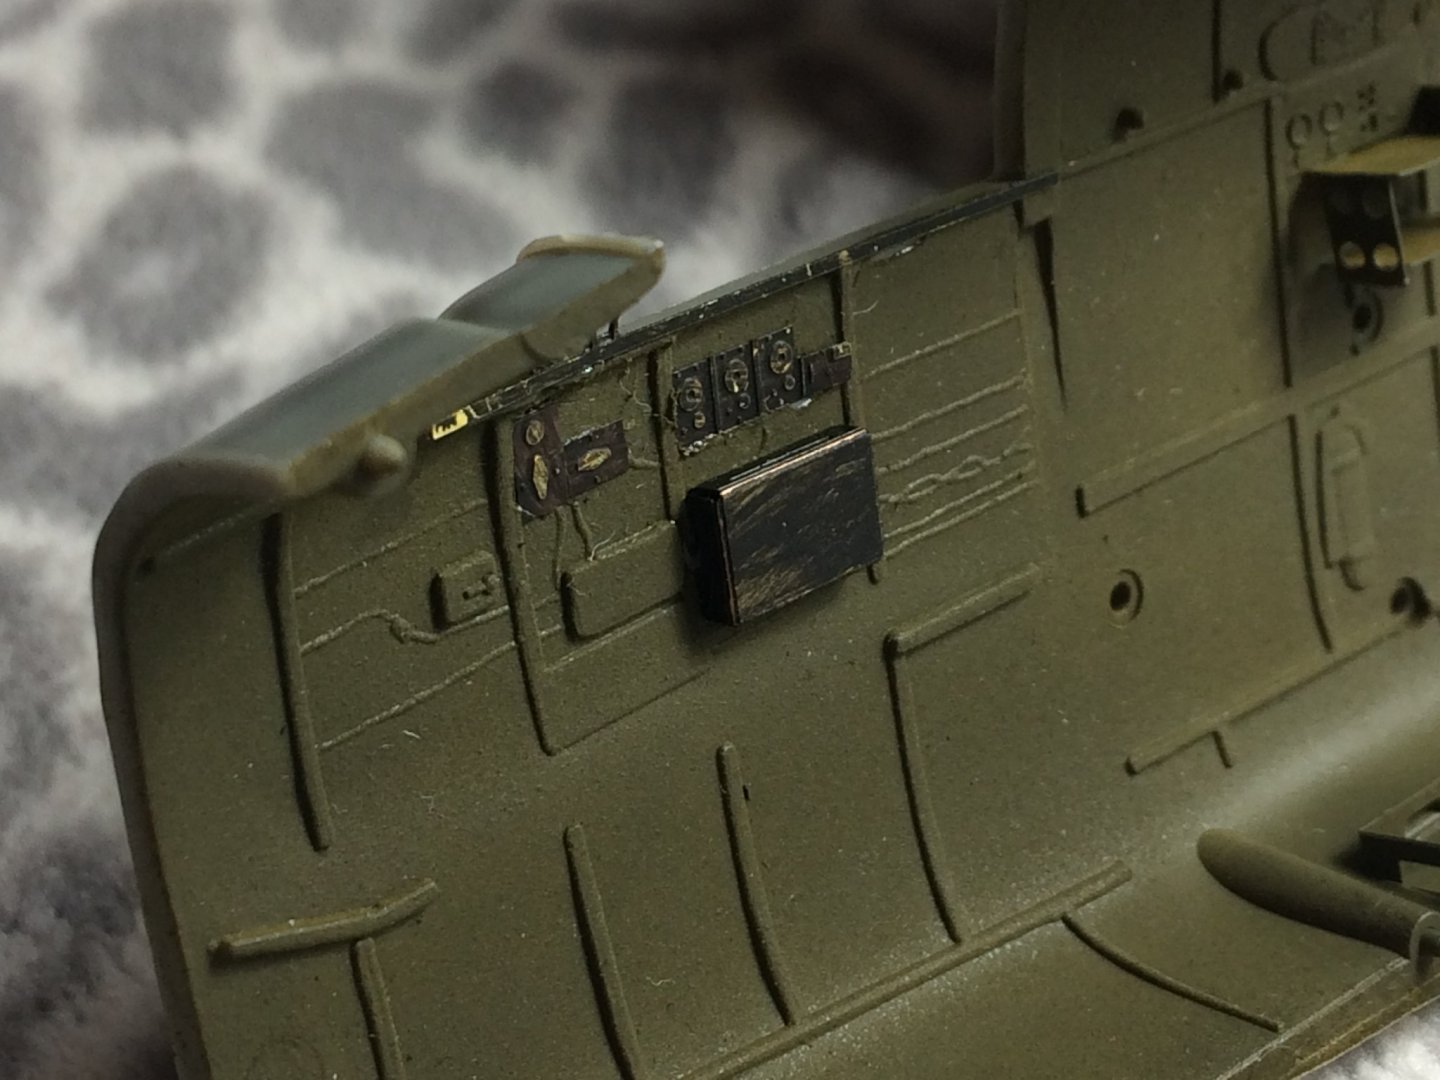
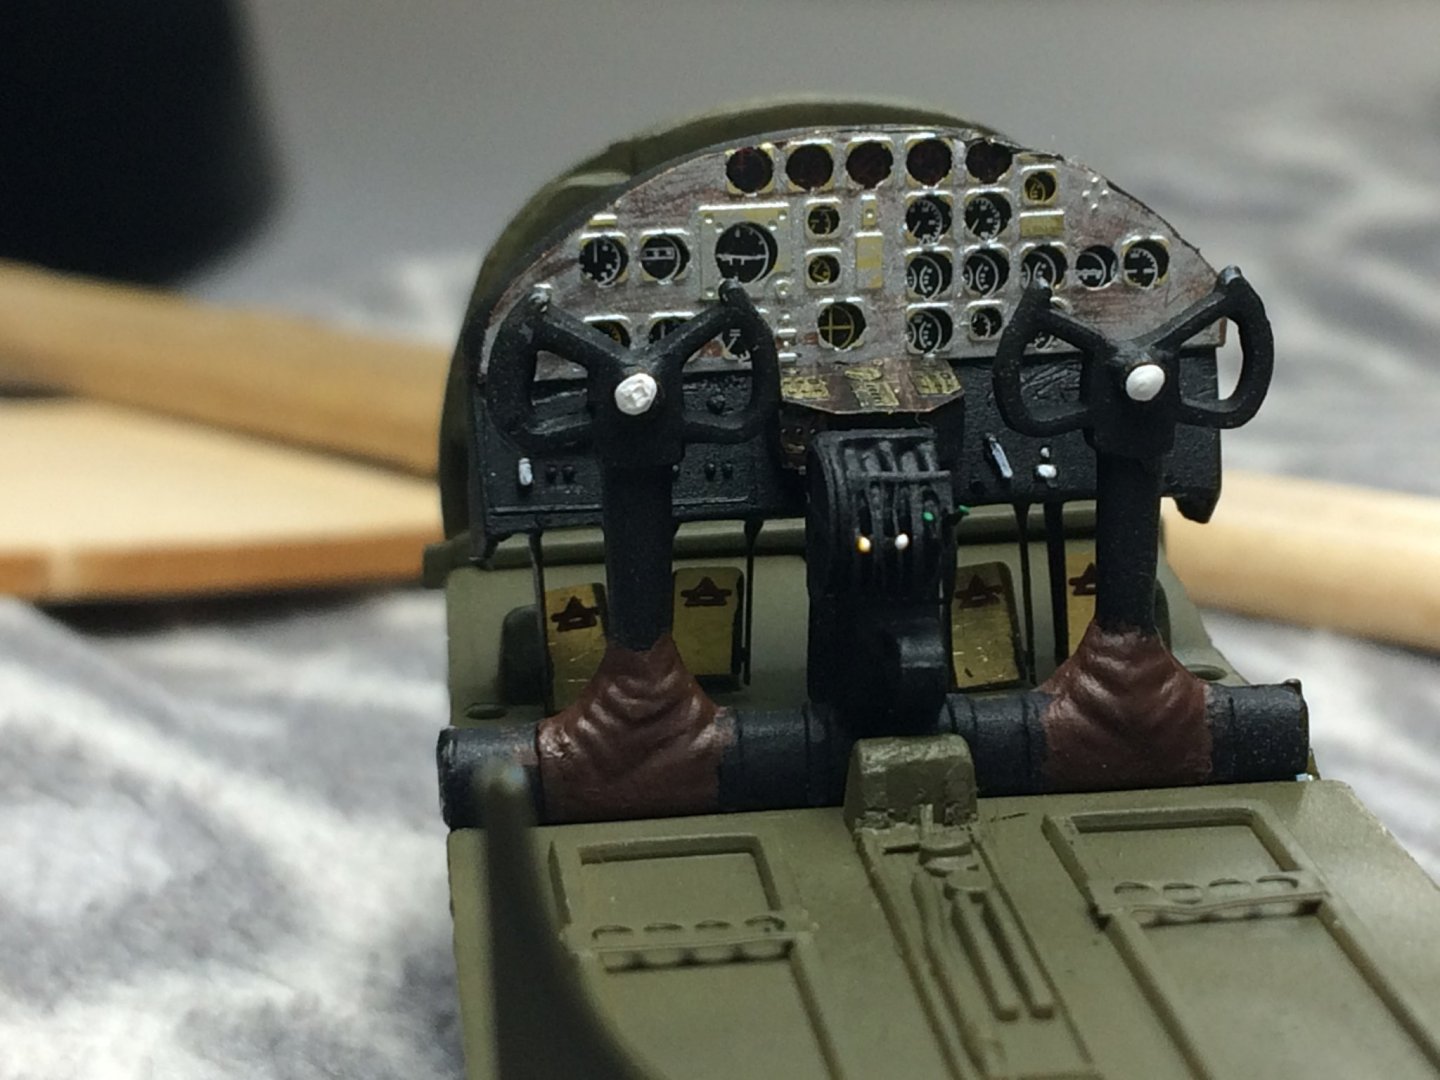
Morning, Hope everyone had a nice Easter. VERY quiet around here! Oh well, just a sign of the times. We gotta do what we gotta do these days! 🧻 Admittedly, not much of anything was done in this house yesterday. Most was done Saturday. The cockpit has it's seats. She's a bit snaggle toothed, but not bad for my first plastic kit in 15+ years. I've never used PE before. I've learned when working with PE, it's like deer hunting. When you have a deer in your sights, you start to control your breathing. When your working with really tiny PE, my breathing slows like I'm aiming a rifle. Could just be my Goblins!!!! I had an epiphany related to airbrushing recently. I realized that I have more control in the paint to thinner ratio than in the finger trigger it's self. I was using WAY too much paint and vice versa at times. Definitely a learning curve. Here's the cockpit in the Starboard fuselage. I haven't glued it in permanently yet. There's more to do. The fit of this kit has been good. Not perfect but not too bad either. The normal shaving and the like, and the parts eventually nestle into place. Port side. Not glued in yet. There were no fit issues on either side. All pieces were test fit multiple times before they were even painted. I think the one thing you learn with PE, is sometimes it's better to leave the original area as is. Don't get me wrong. Really liking the PE and what it brings. Looking back I may have left the cockpit instruments as they were originally molded. These PE pieces seem flat and add no dimension/depth to this area. Off to the kitchen for another cup of coffee! Tom E


- 120 replies
-
- 12
-
-
Mostly just kicking around the house right now. Soooooooo……... Took some soft corn tortillas, halved them, crisped them up in the fryer, covered with cheese and other goodies, and made some "homemade" nachos. Well, that's what I'm calling them! Plenty for everyone! Tom E
-
Darrell, That's exactly what I'm going to do with the carronades. Pre-rig and install the bases, then rig the carronade slide. I saw you use that on your build and it worked really well. Tom E
-
Thanks Edward! Not my trick, so borrow at will! I've seen other builders use it and it seems logical. So far I've had limited experience with it, I've only rigged the one cannon. Haven't tried a carronade yet. But it acts like a "third set of hands". Frees up both hands for tweezers and helped tighten up the tackle very easily. Get everything approximated, un hook it, transfer to the deck. Well, that's the plan! Hopefully, less chance of damaging the deck or bulwarks. Tom E
-
Was recently window shopping on the web and was looking at some armor. I've never built a tank before but they have always interested me. Count me in! Tom E
-
Outstanding work Darrell. She's beautiful! All of a sudden I'm thirsty? Tom E
- 648 replies
-
- 2
-
-
- niagara
- model shipways
- (and 1 more)
-
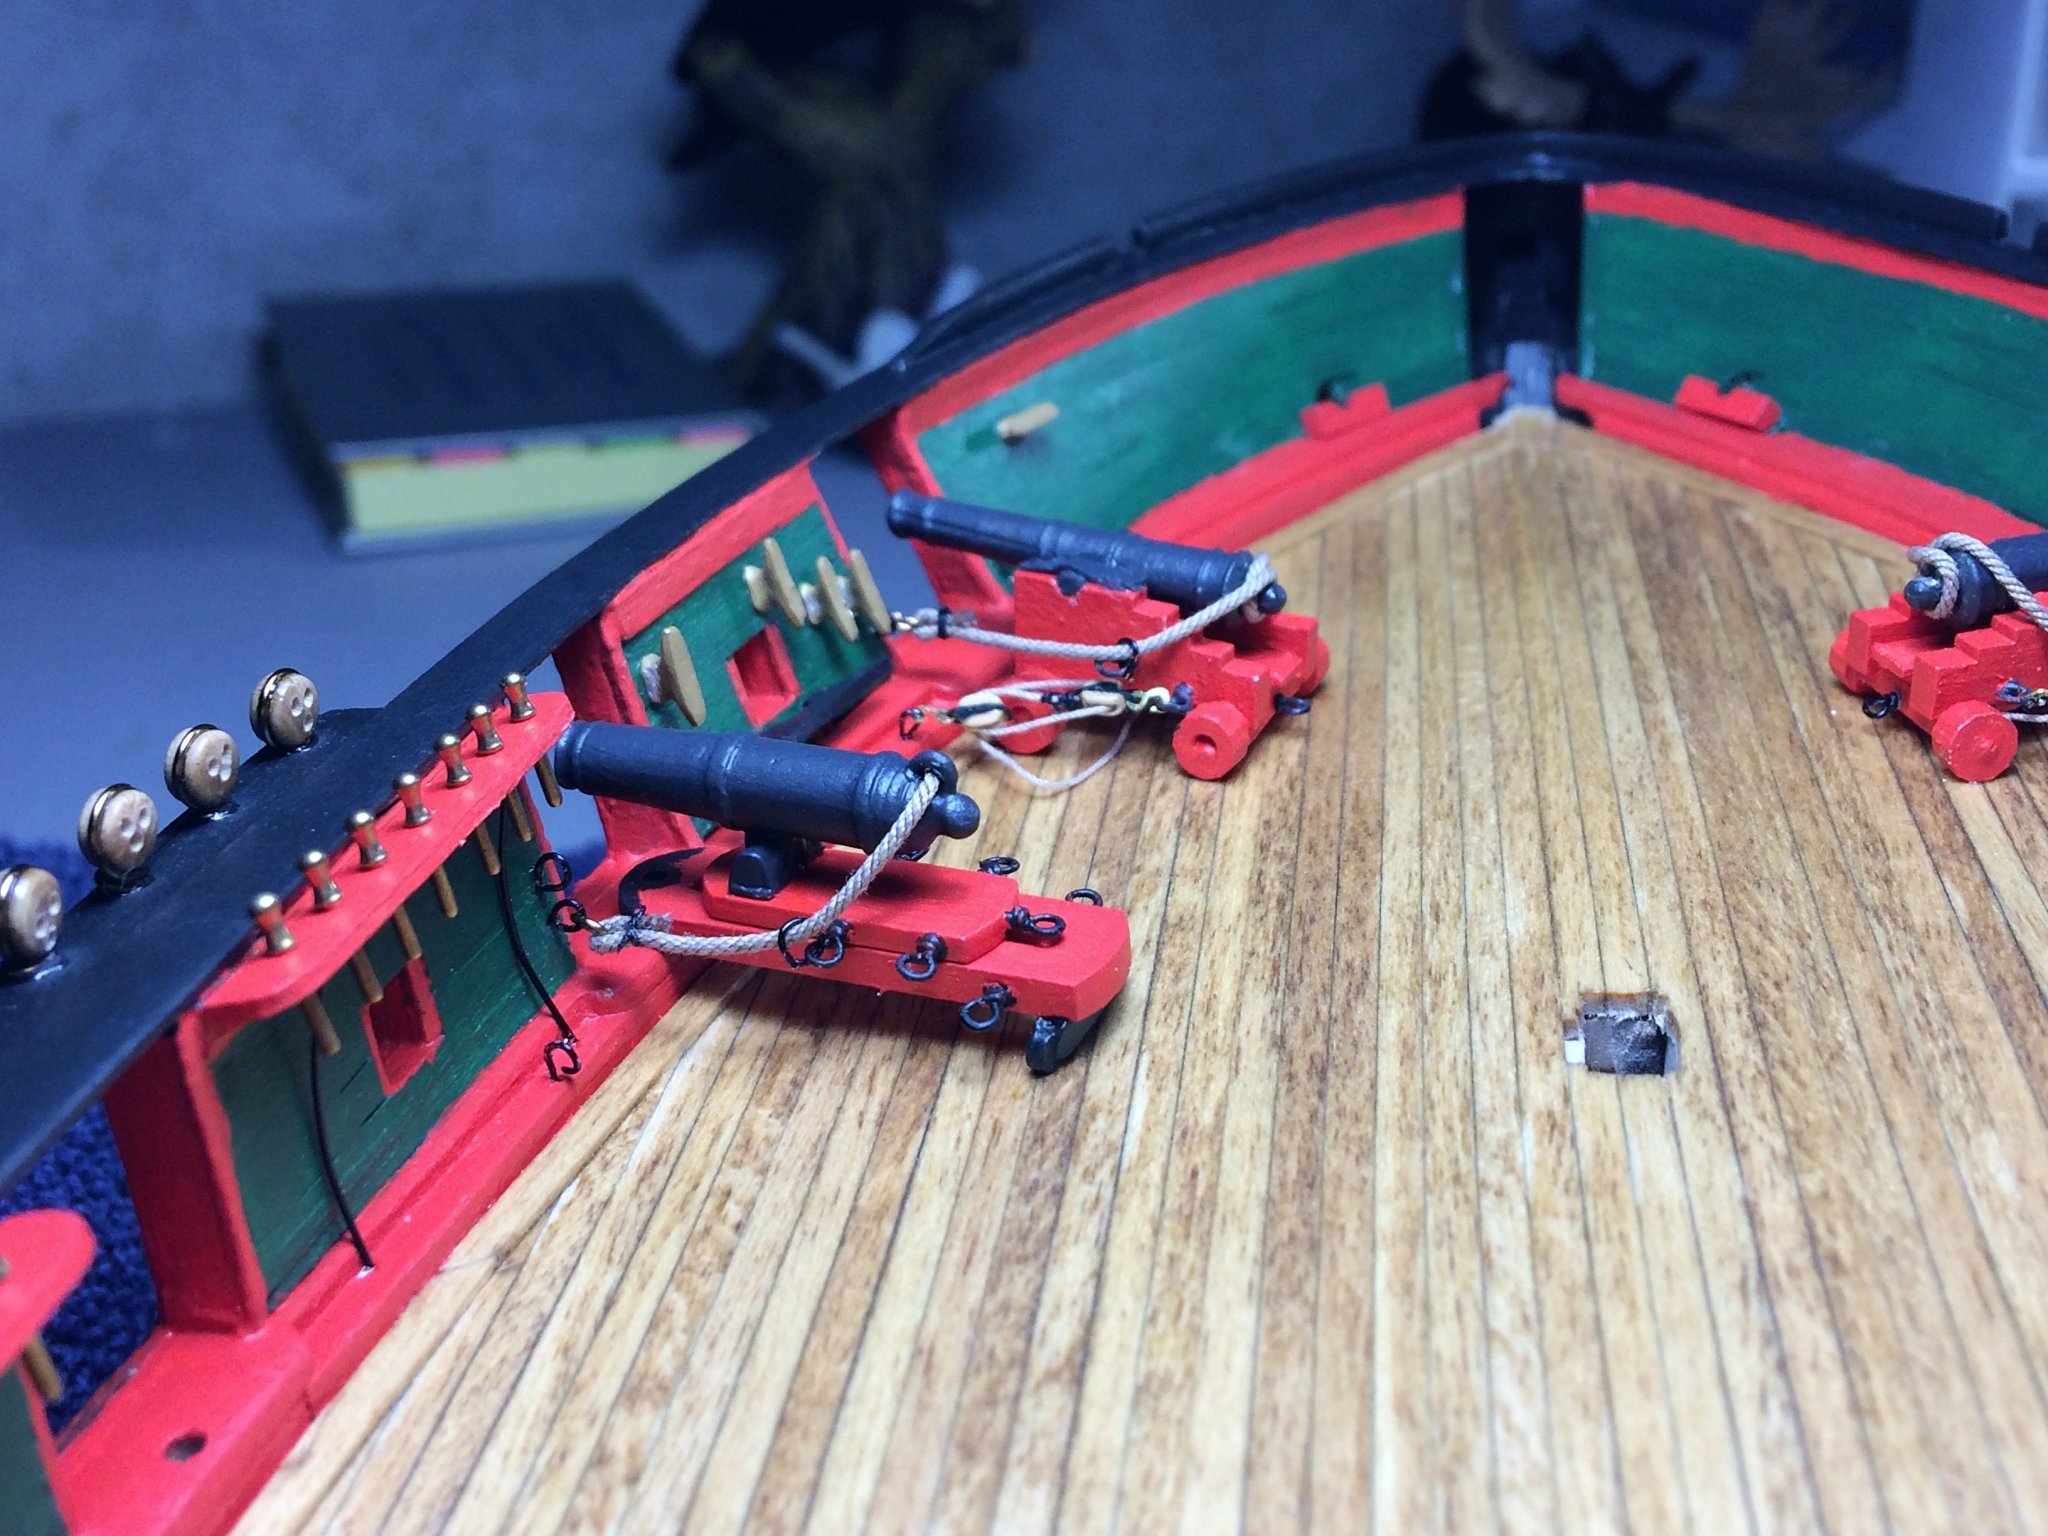
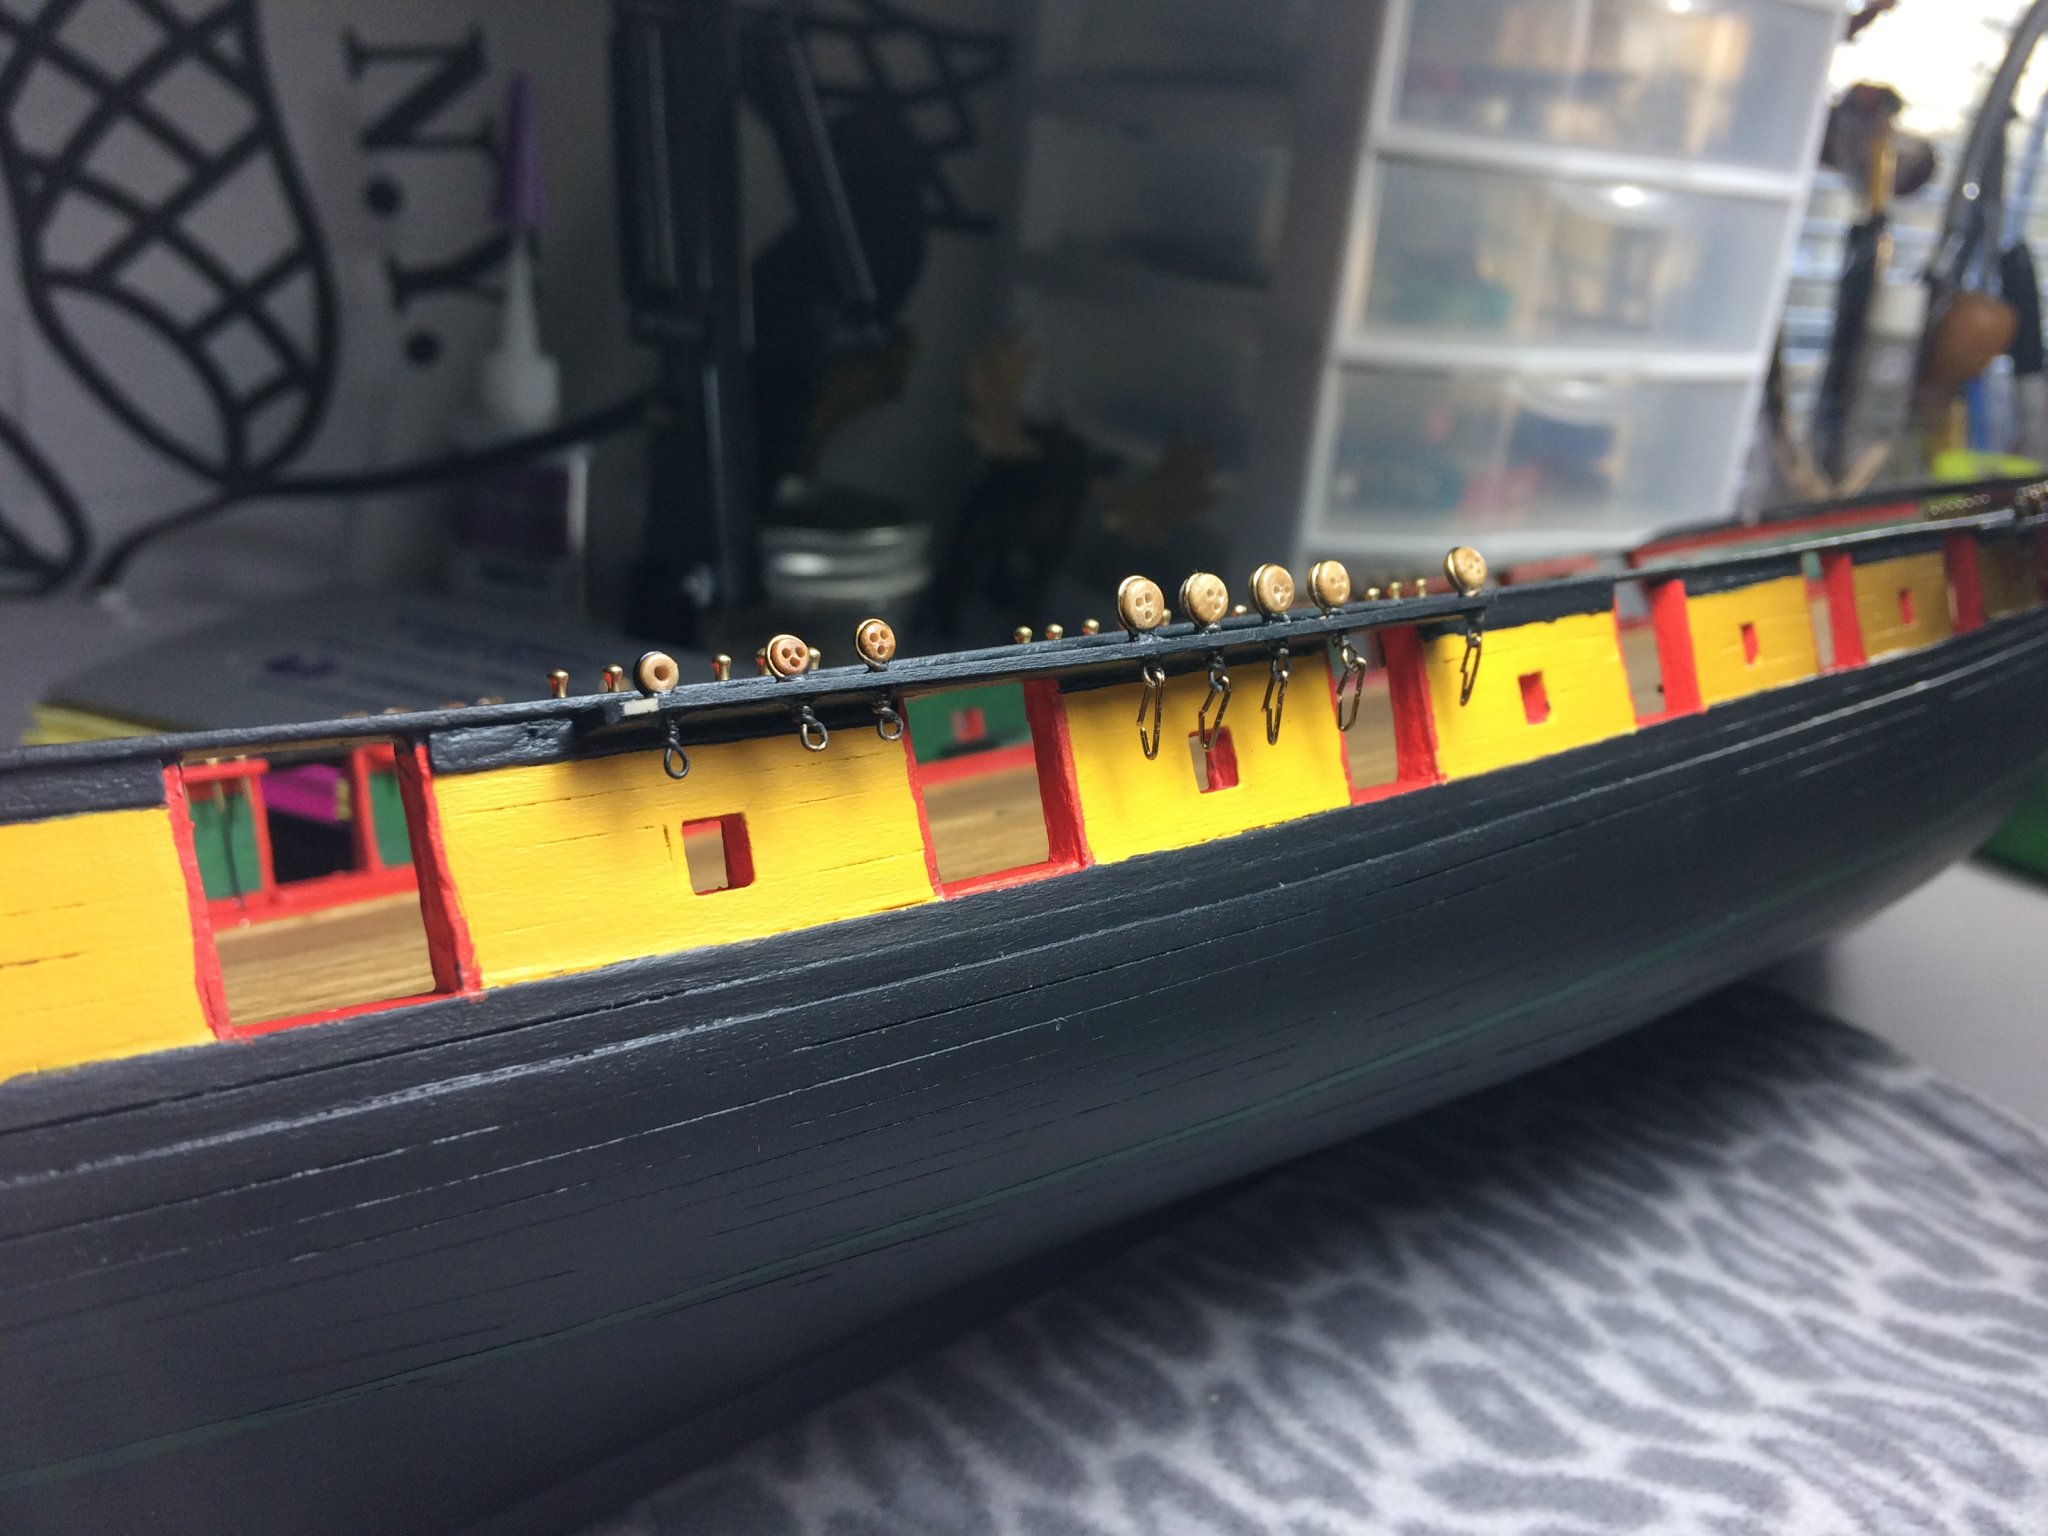
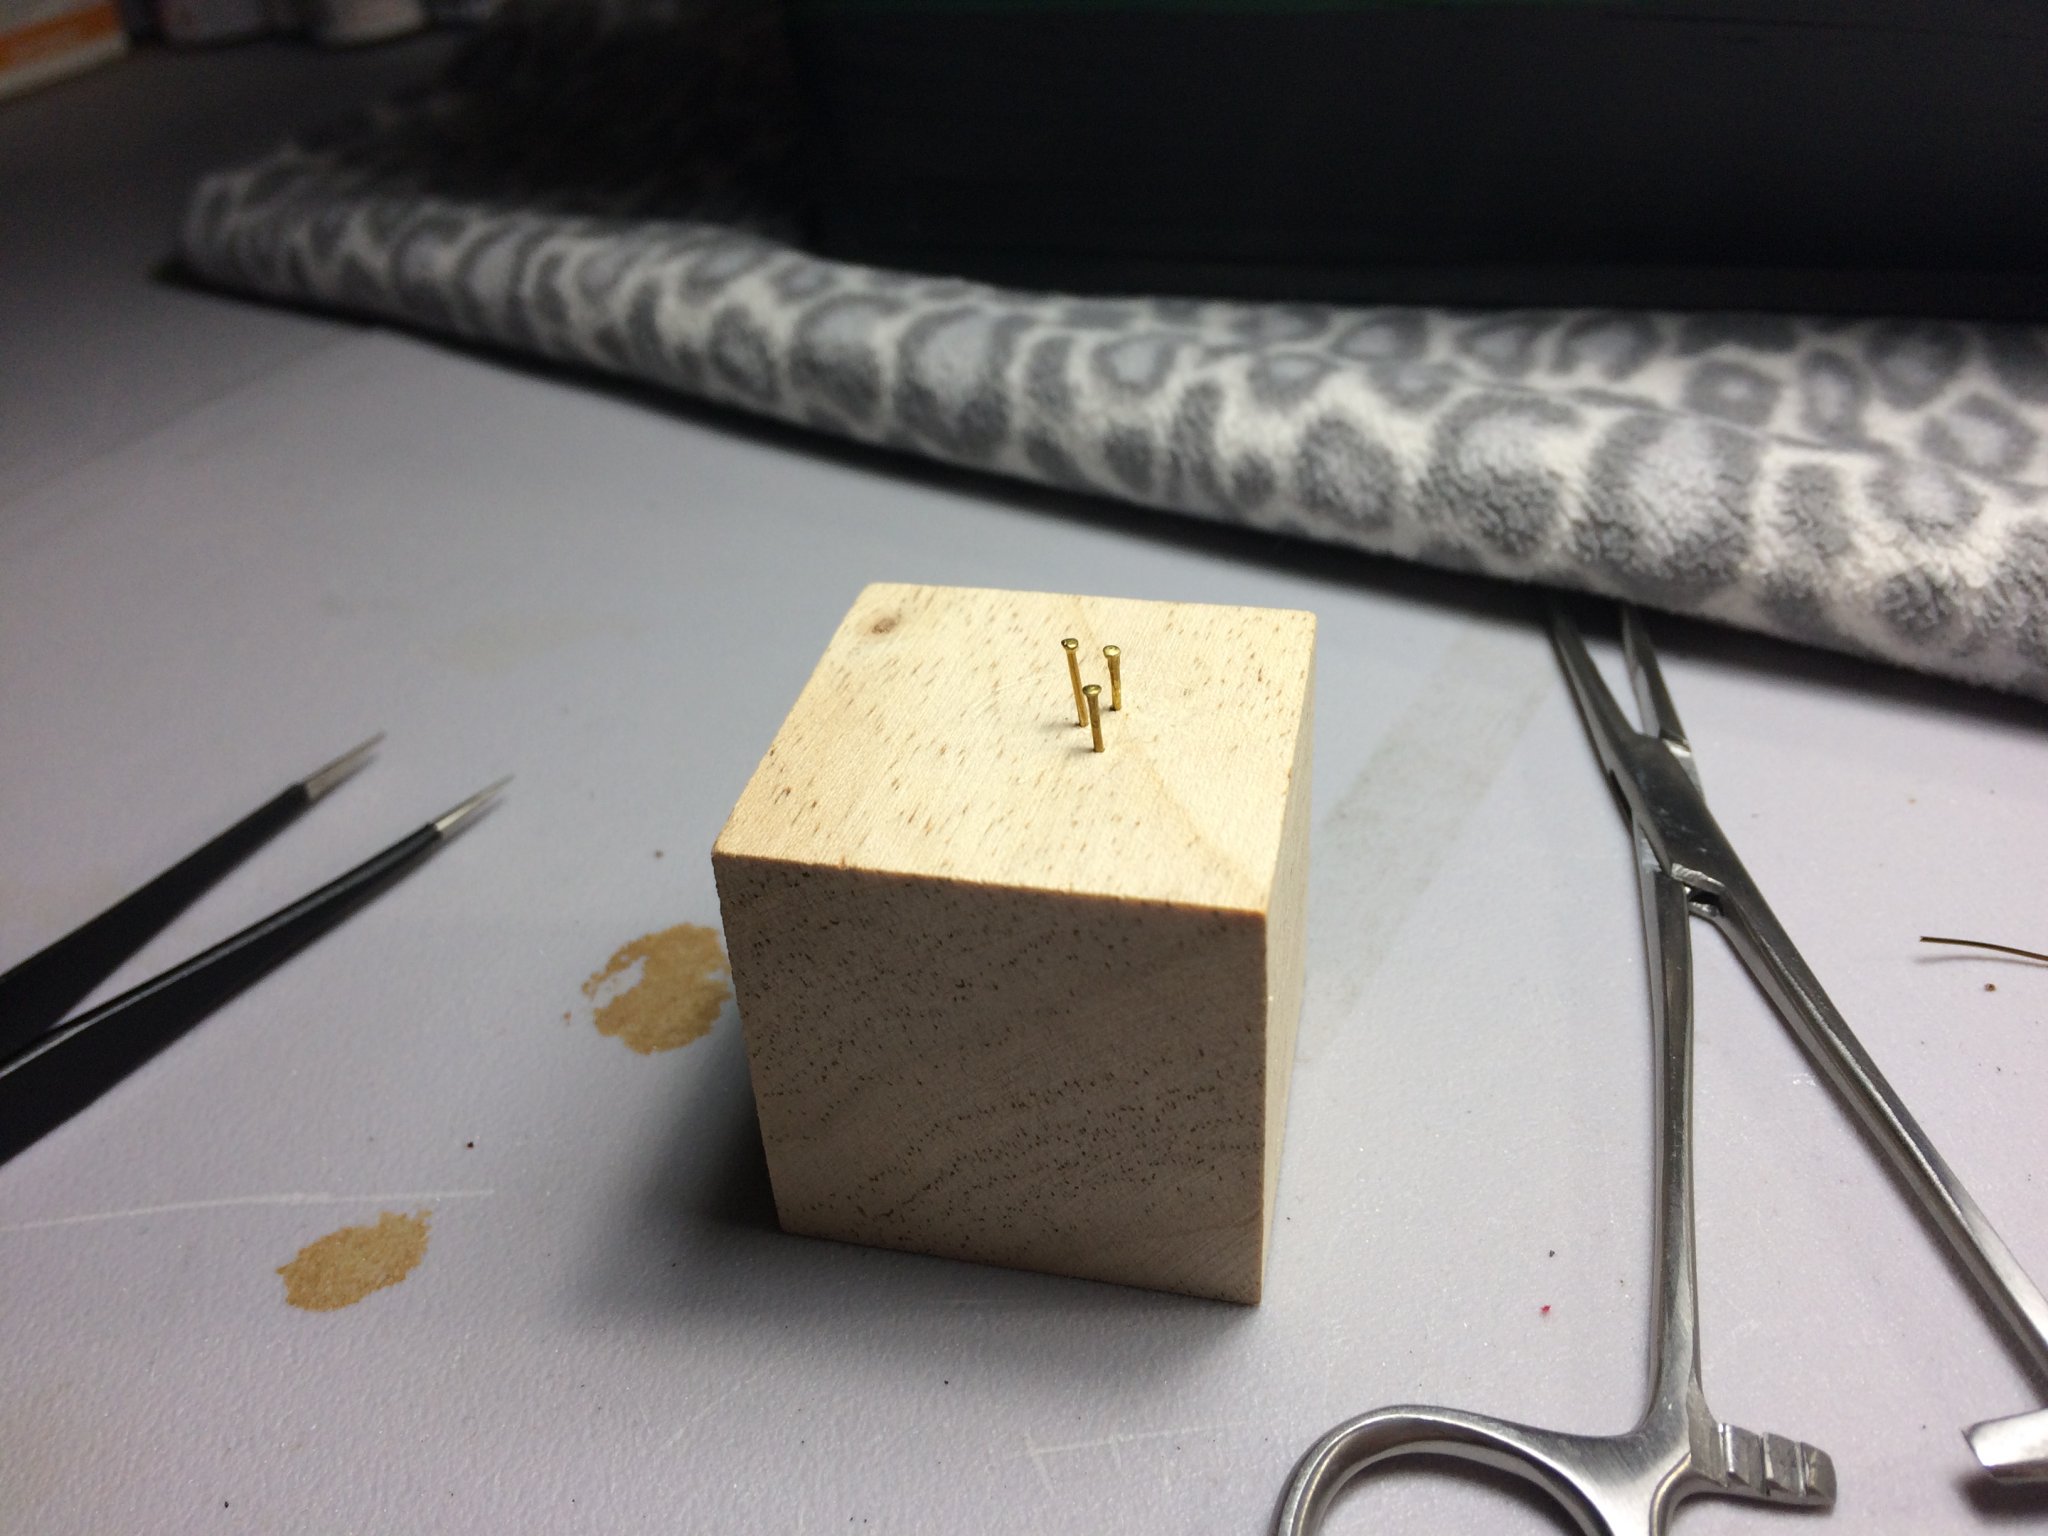
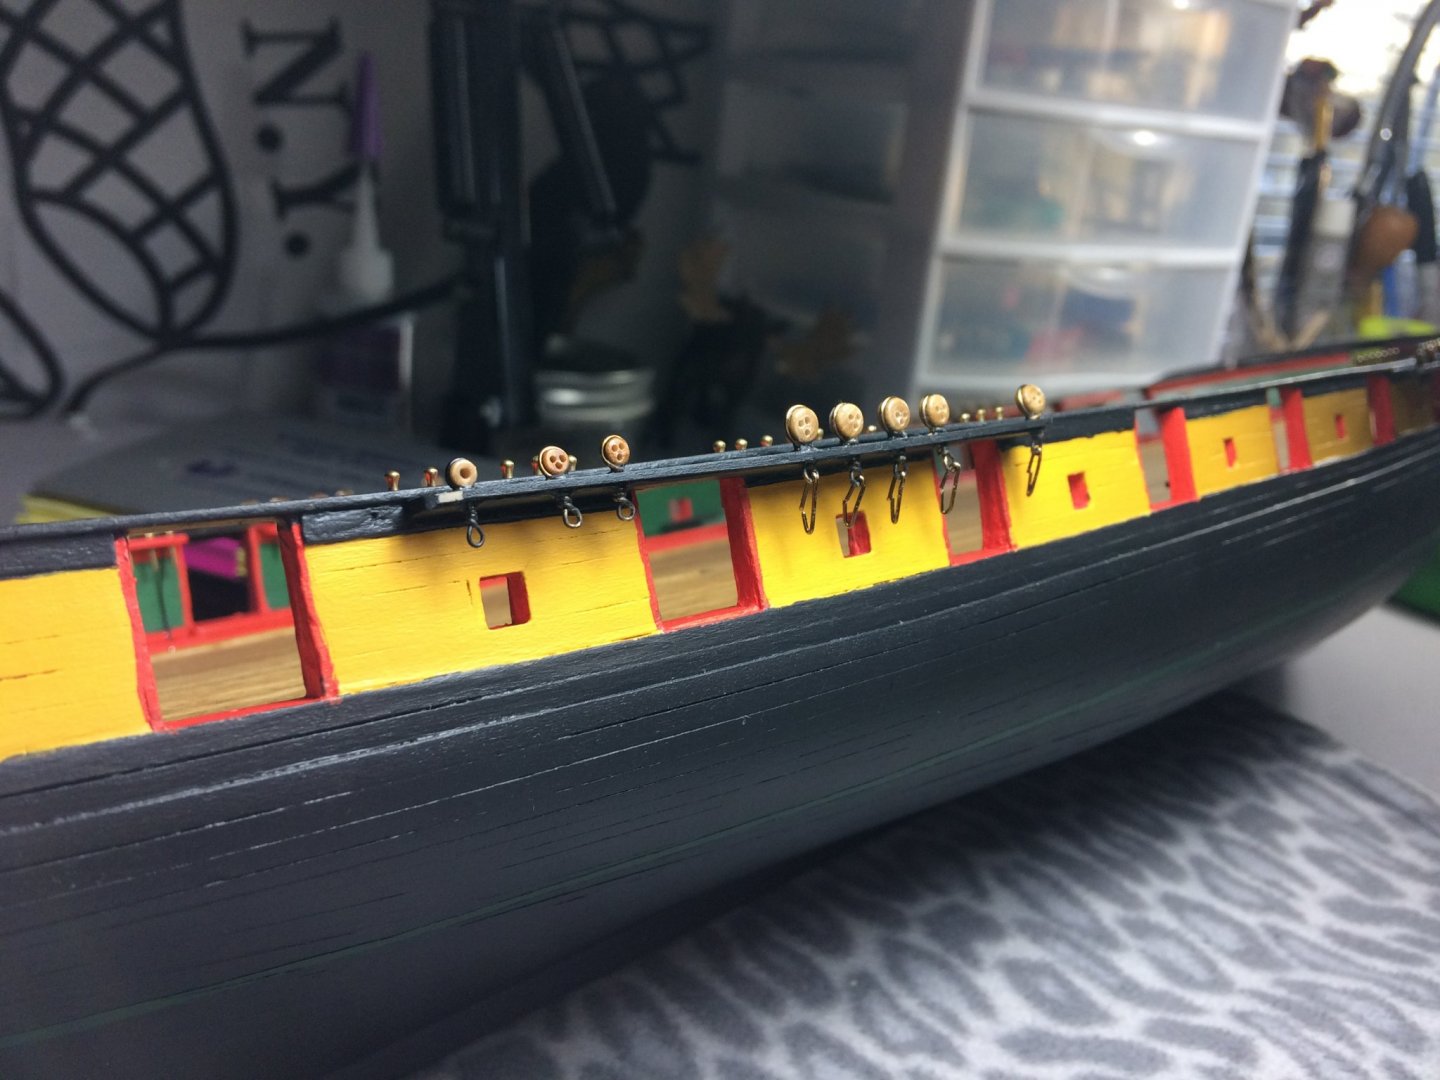
Afternoon, Thanks for the kind words Gents! Darrell, I saw that case you made for your Niagara, it's beautiful. The lighting is a wonderful touch. With a fresh cup of coffee in hand, or 3 cups by the time I'm done writing this entry, Niagara needs an update. The Spanker boom and gaff are done. I know there's supposed to be a flat bevel to the underneath of the boom. I tried. I also realized that when I installed the cleats, I had no more. There are still cleats to install on the Bowsprit, rear Davits, and likely elsewhere. I do have several Model Shipways kits in stash. I could just grab a few from there if the need arrives before I set up an order. Unlikely though. I started hanging the hardware for the Chainplates. Bear with me on this part. My metal work has been limited up till now on this build. As with everything else on this build. Once you do it a few times you get better. There a bit snaggle toothed! I threw together a simple jig to bend some 24 gauge wire to be used for the Chainplates. Sometimes I use it, sometimes I don't. I started hanging them "safety pin" style. The bottom metal part will loop thru, close the loop, trim top and bottom metal pieces then crimp tight. It sounds good in my head, well see how it works out. A brass pin will secure it to the hull. I've started to formulate my approach to installing cannons. Way back I built a faux cannon station to rig blocks and Breech lines before rigging on the model. This thing should prove invaluable. Pre-rig, move to the ship, secure it in. Easy peasy…...right? Below, the port tackle has Syren 1/8th double and single blocks with .012 Tan rope. Below, on the right tackle is Syren .008 Tan rope. A somewhat fuzzy batch of .008 rope. I have Bees wax around here somewhere. The hooks are from Syren. I'm leaning towards the .012 Tan rope. Looks just a touch beefier and looks appropriate for the use. Although, I have more .008 in the stash than .012. The Breech line will be .035 Syren tan. Quoins will eventually get done. I took the below shot when I came up for air from cannons. Think I'm right hand dominant?!?!?!? The coffee cup is on the left, gotta give left hand something to do! Stay safe, stay home, build a ship. Tom E


-
B-25J Mitchell by Tom E - Revell - 1:48 Scale - PLASTIC
Tom E replied to Tom E's topic in Non-ship/categorised builds
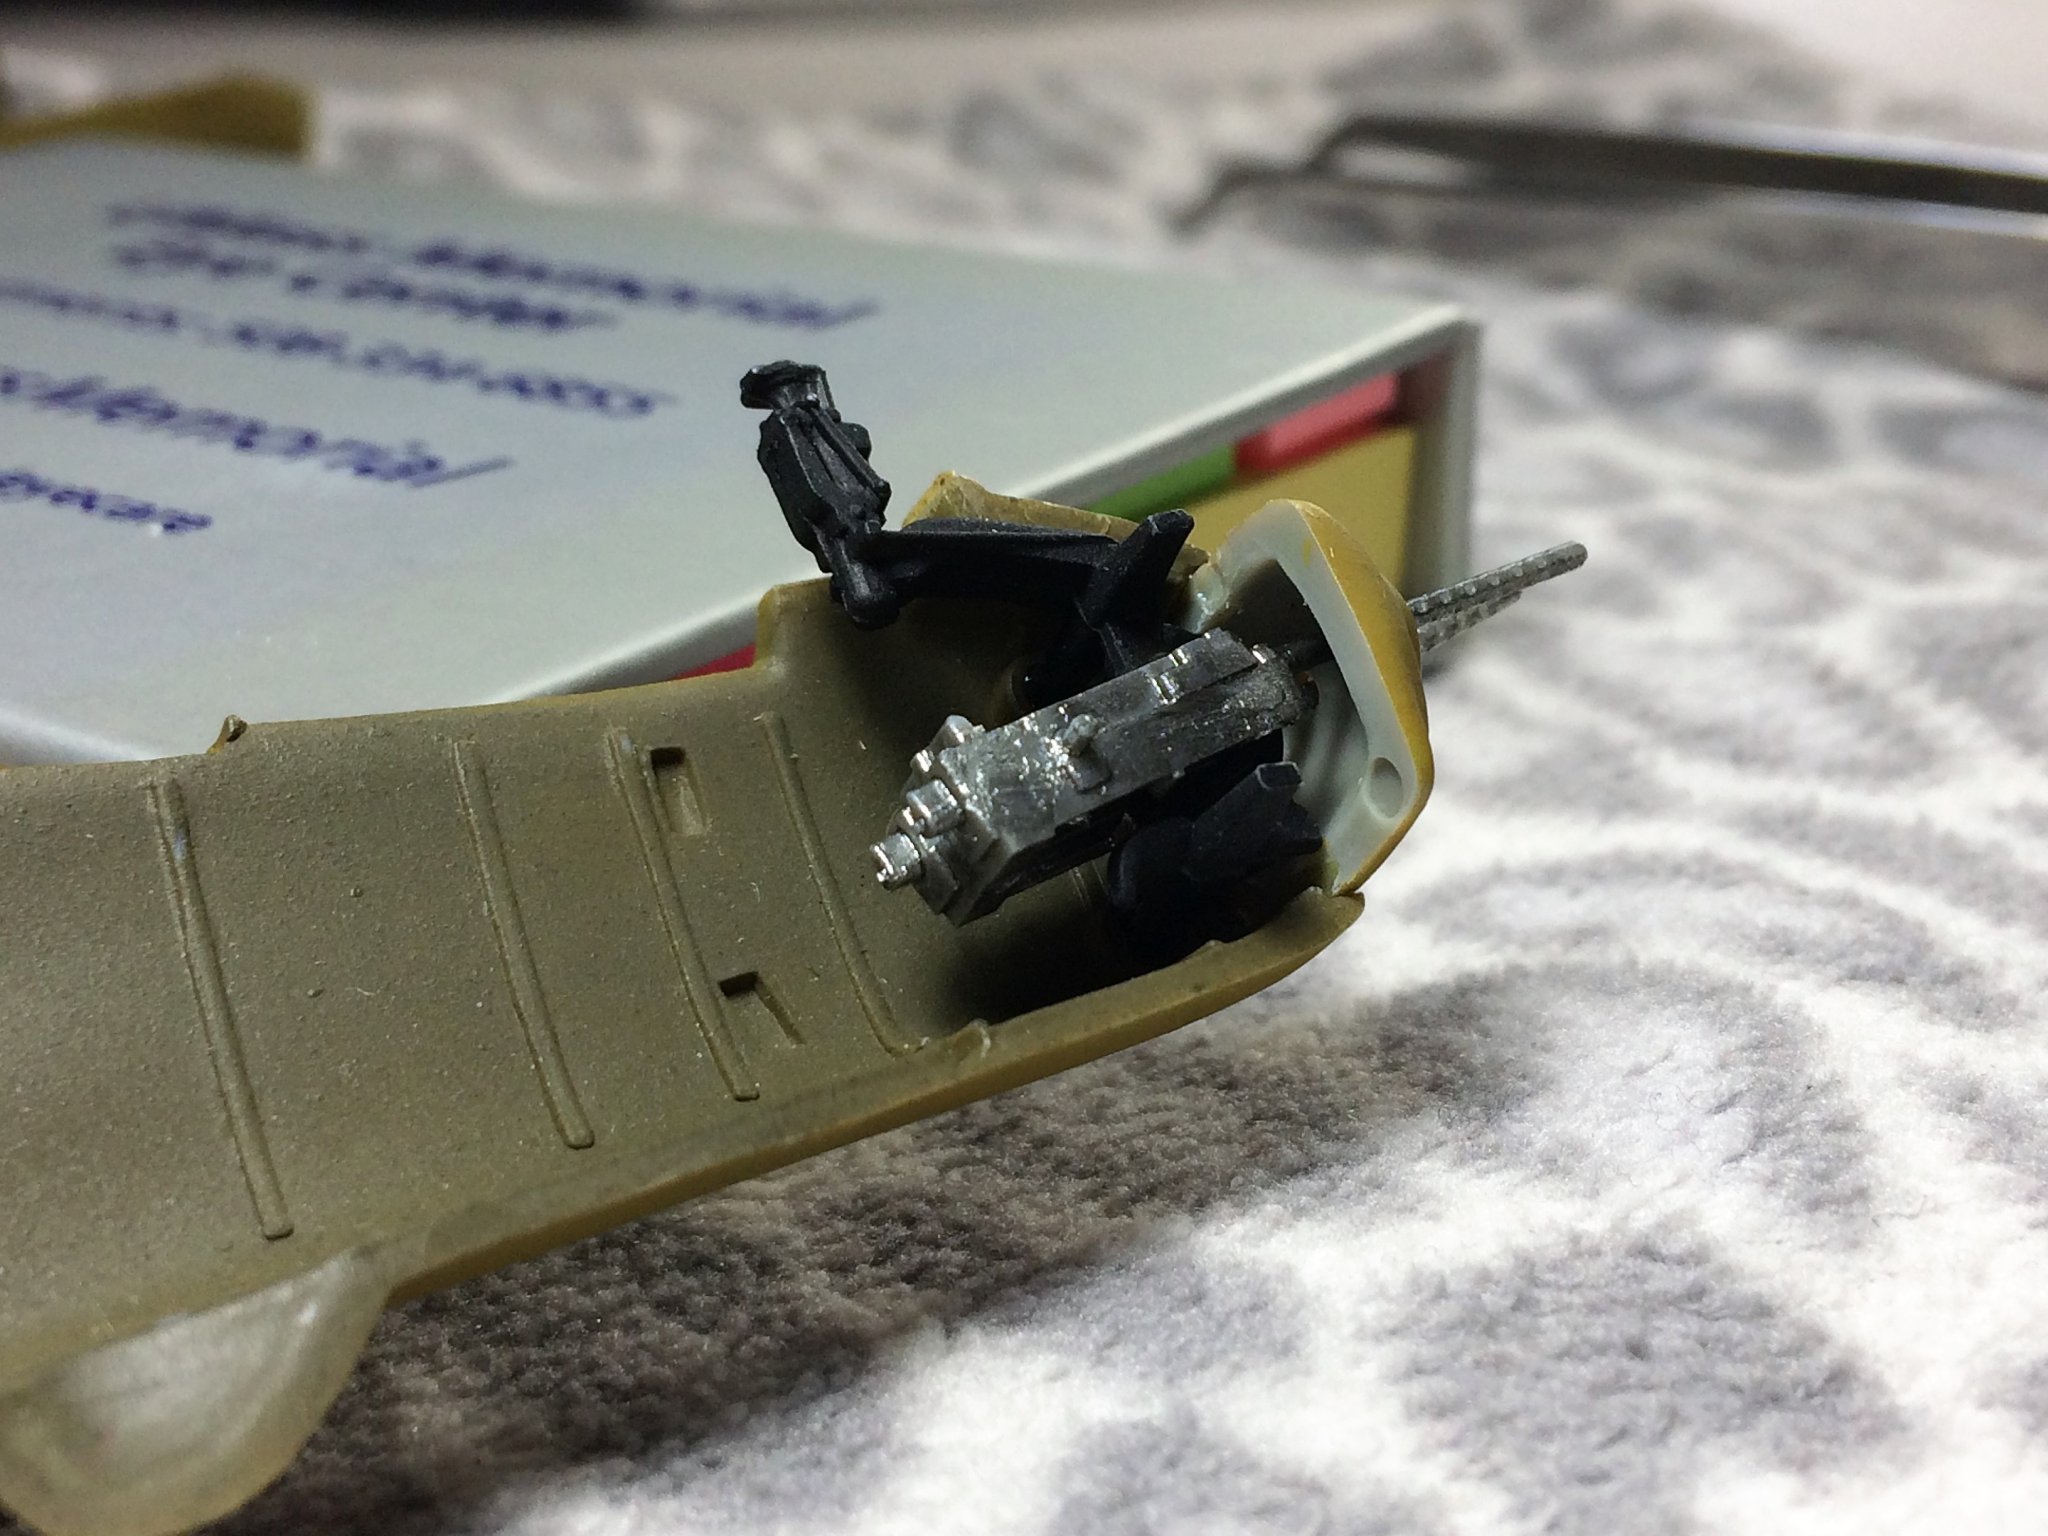
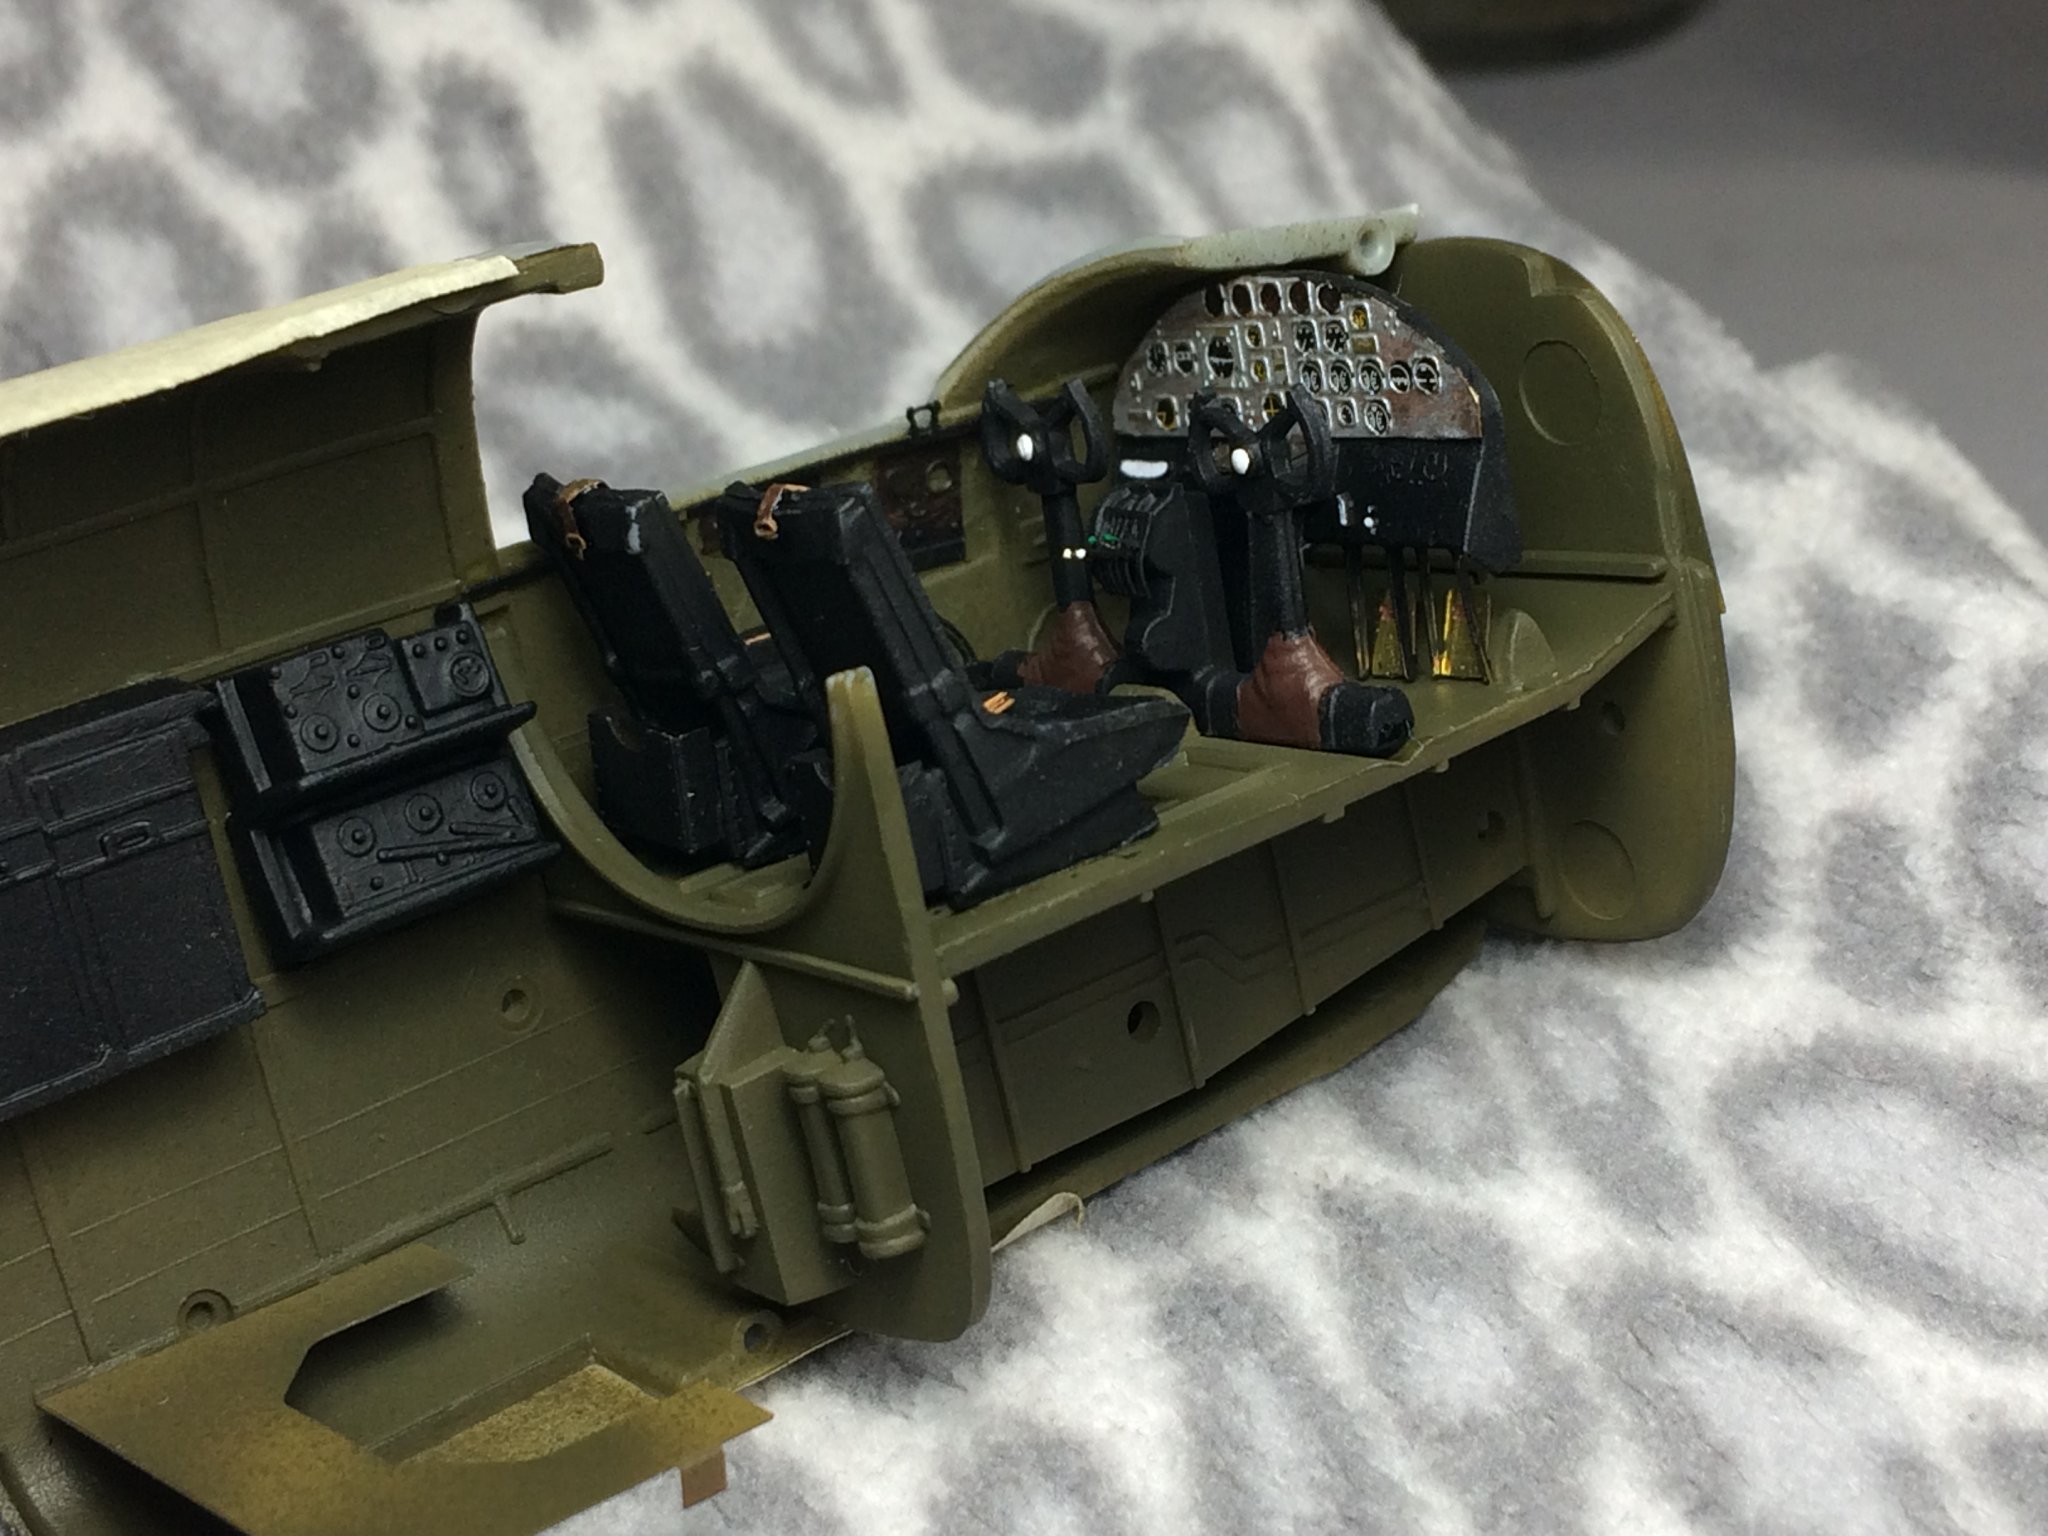
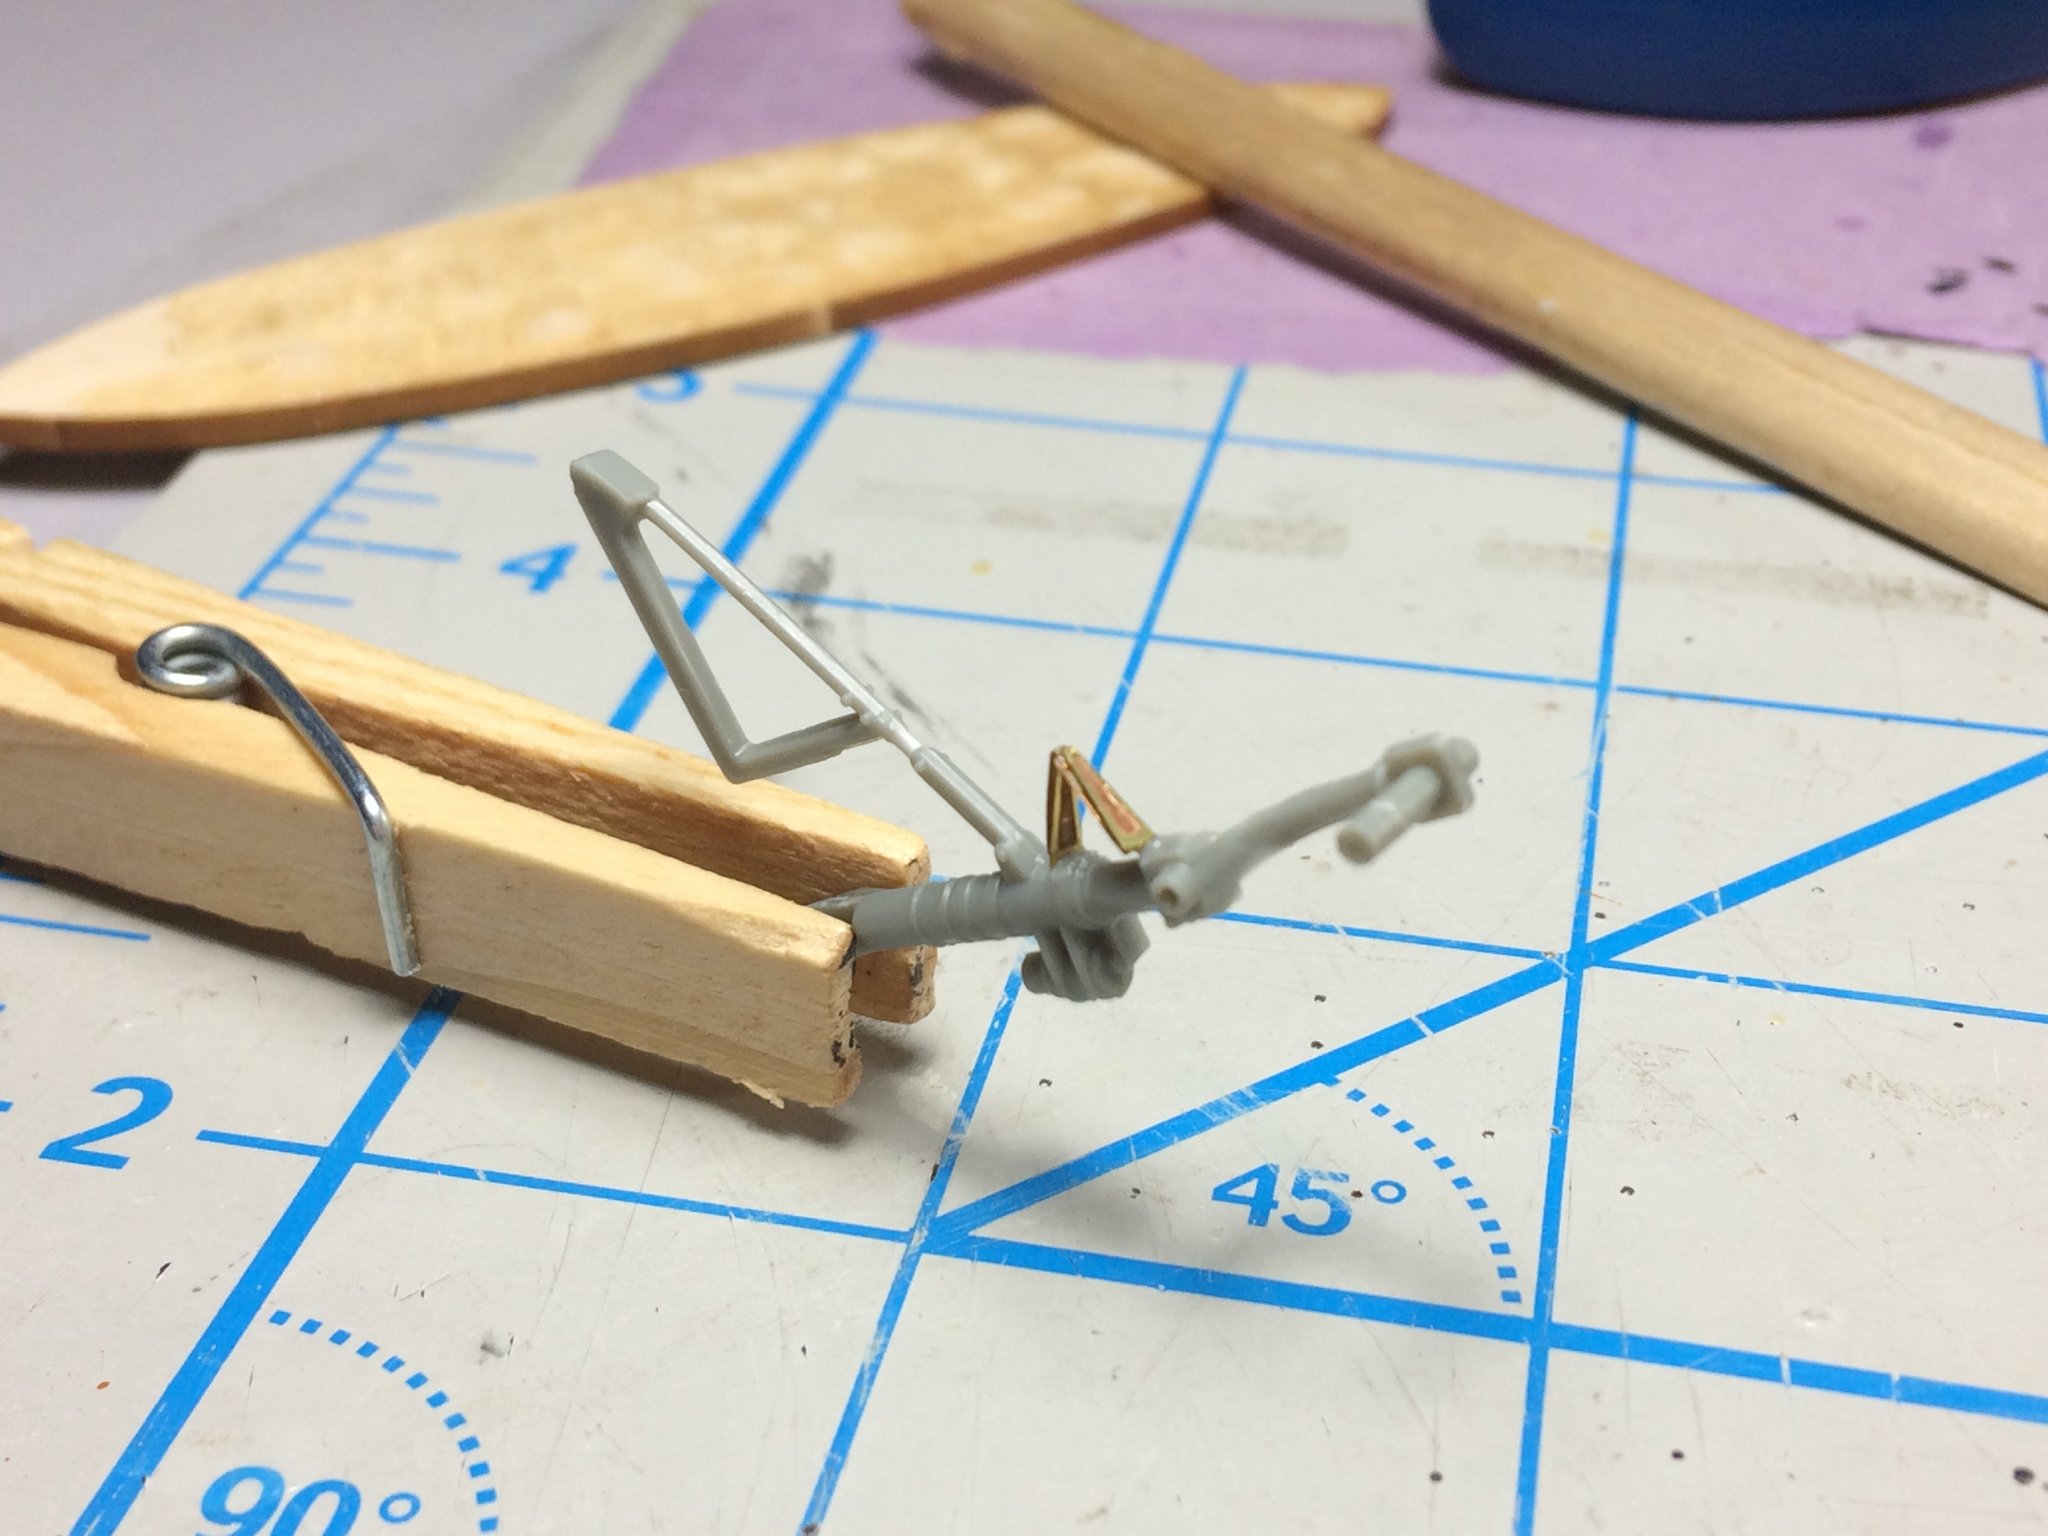
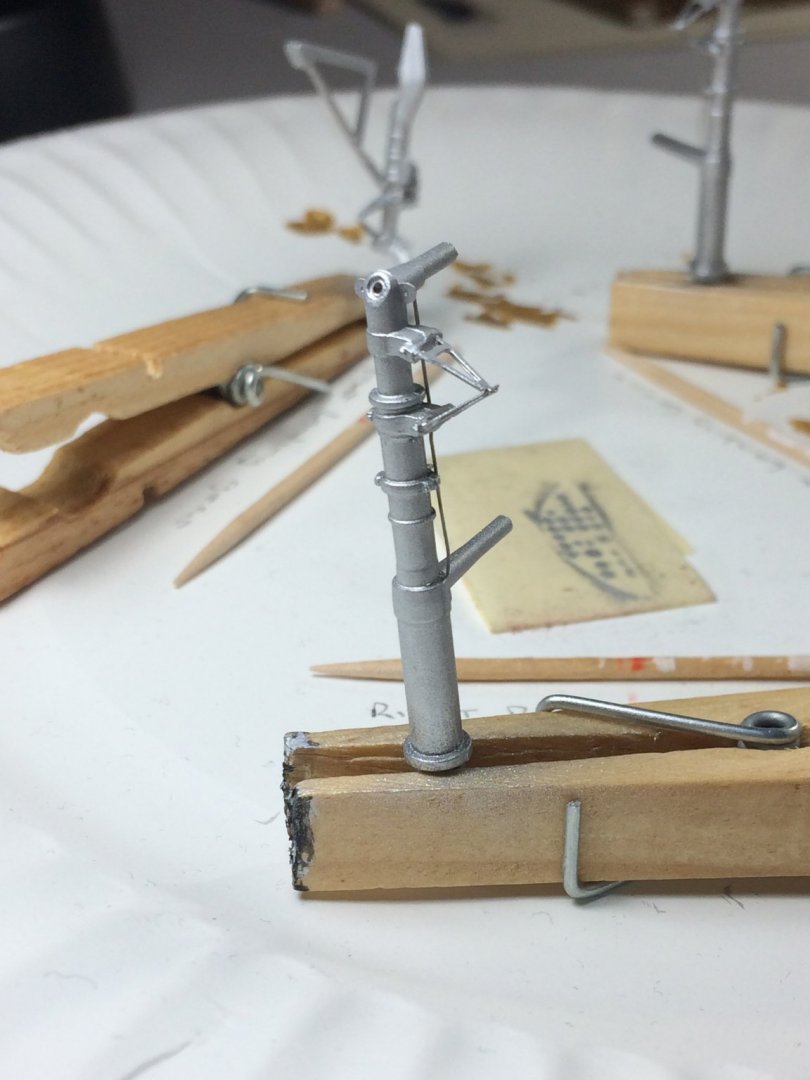
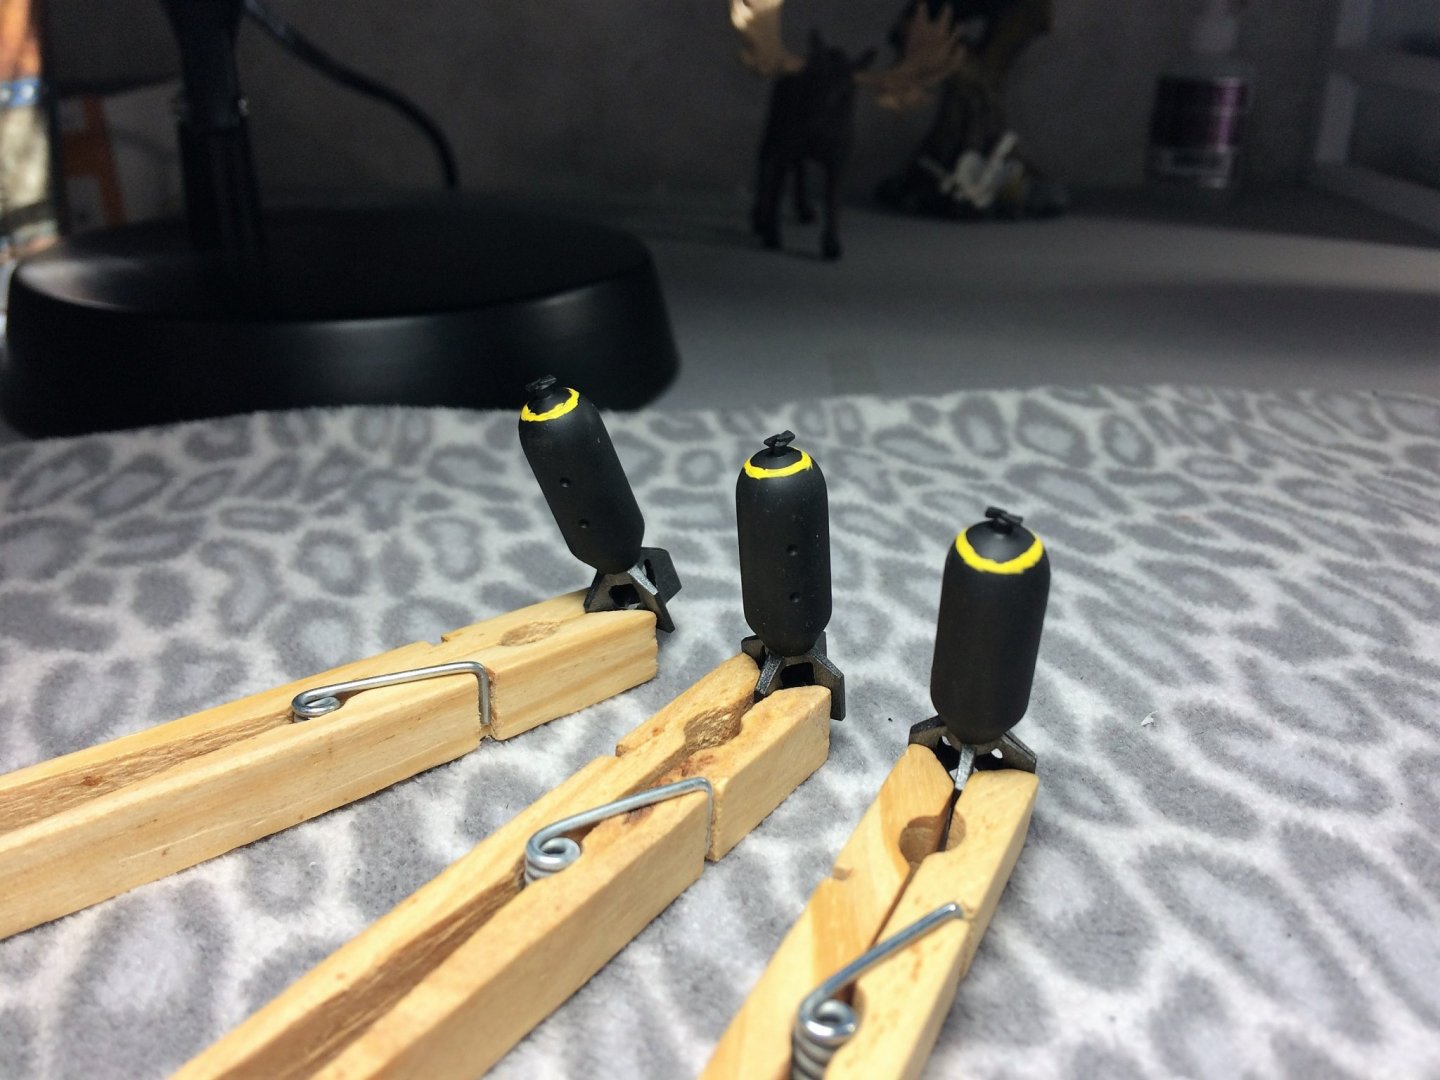
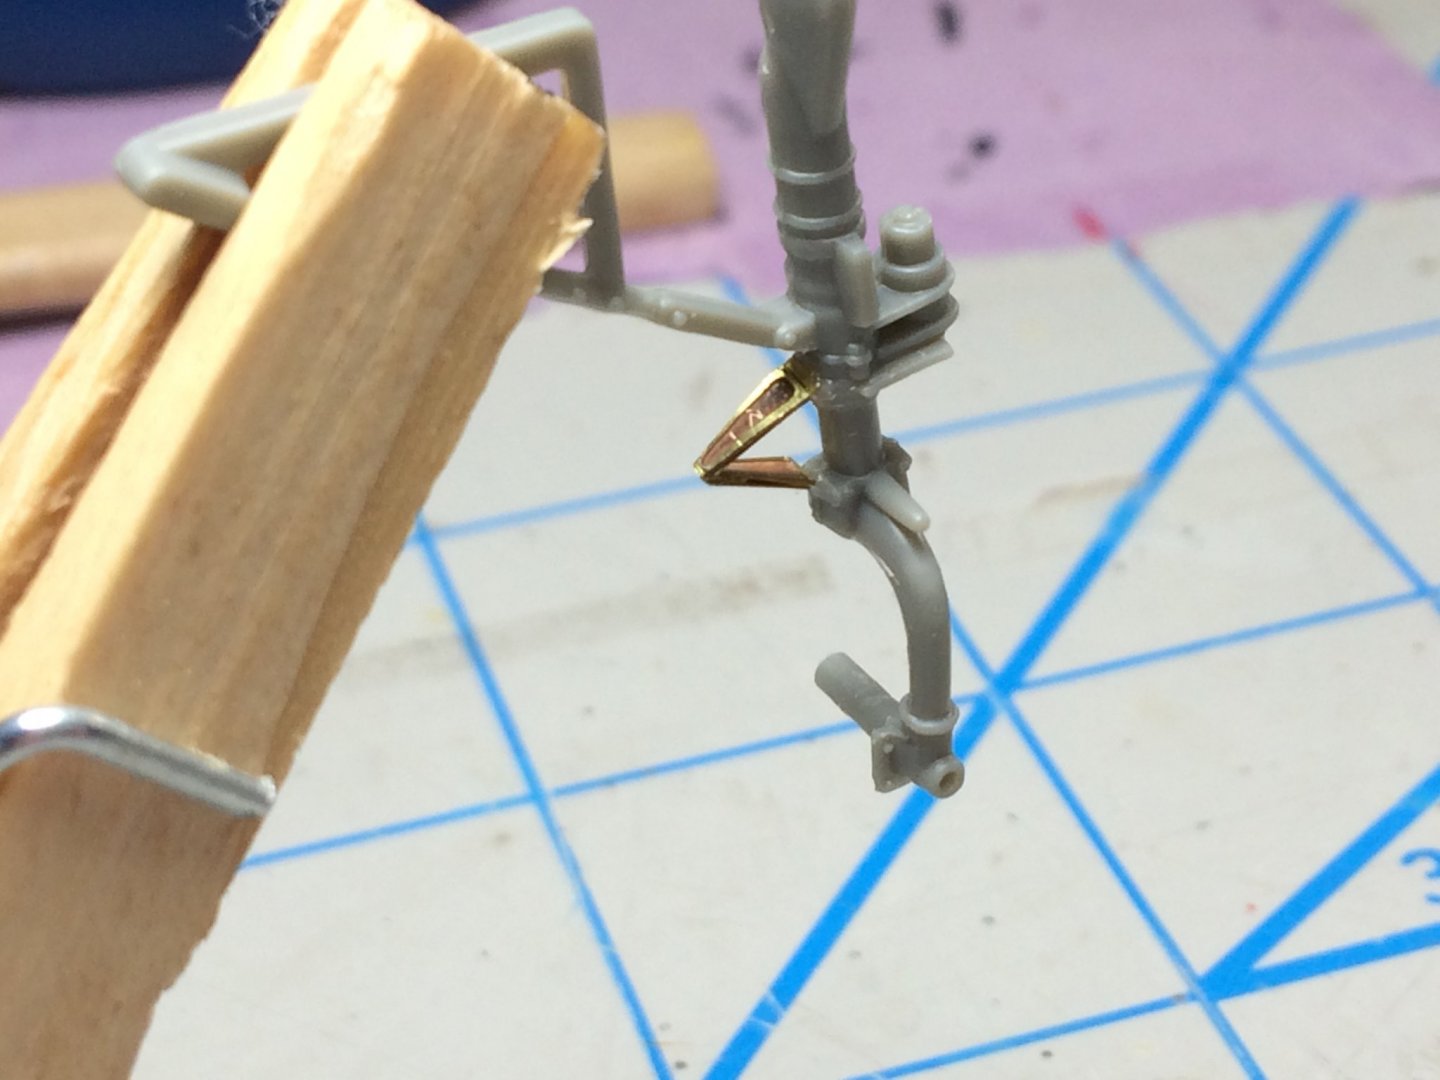
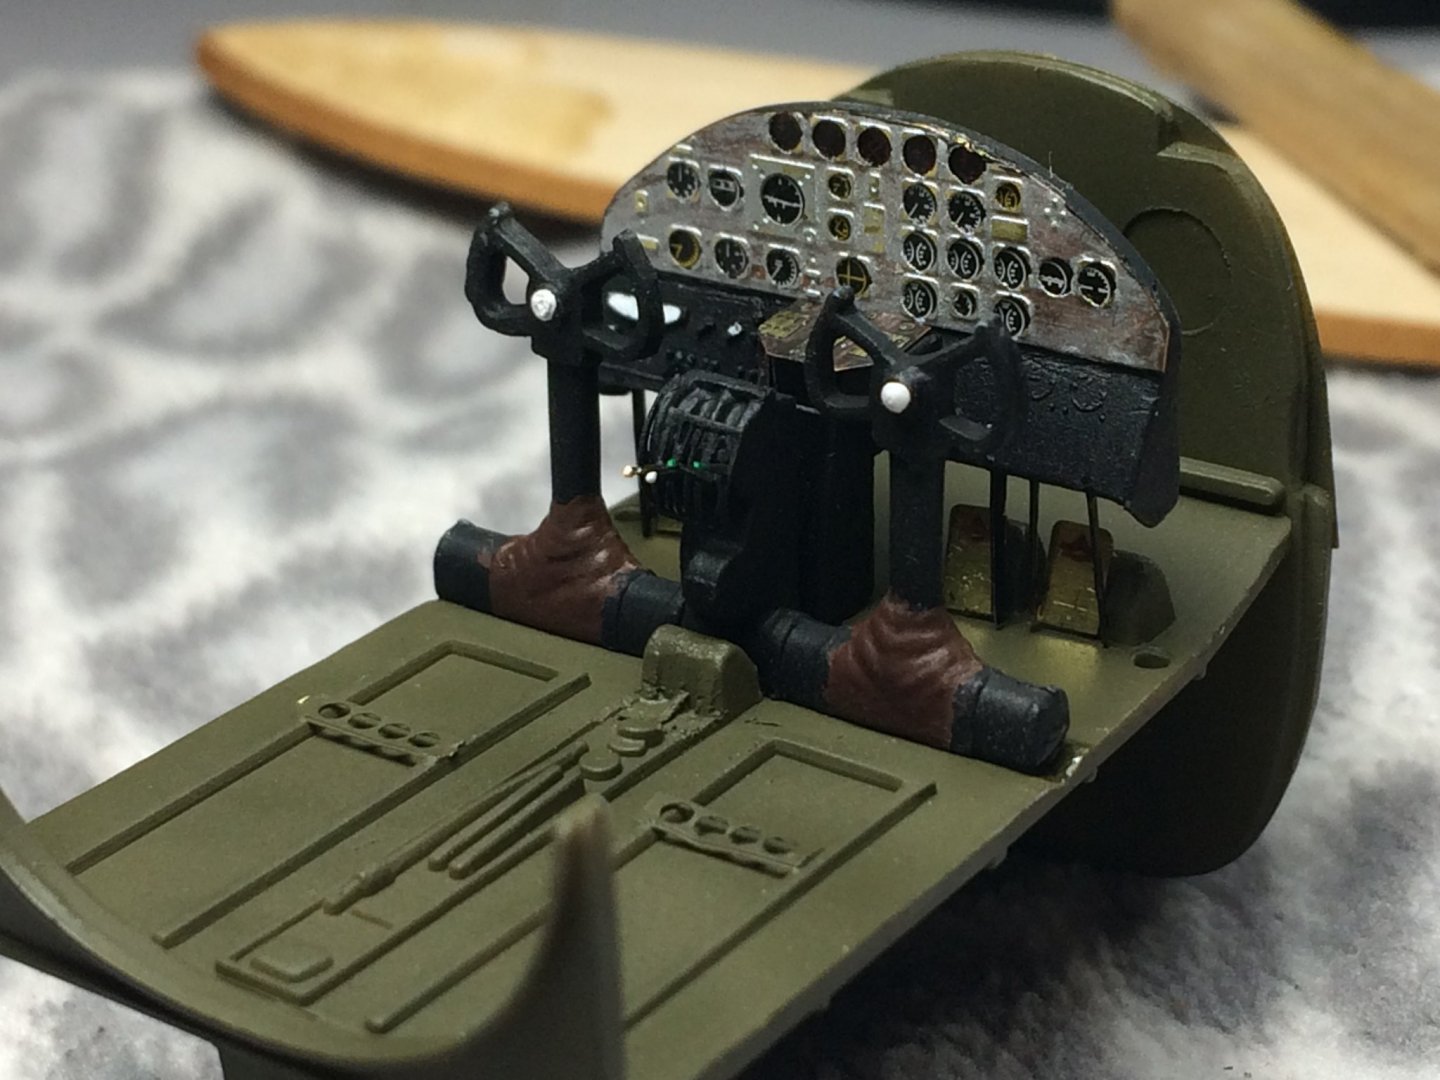
Morning, Mark, You can only get the really big clothespins at the really big, super size Wal-Marts. They work well for propping up a car for repairs! Well, the virus holiday continues....hmmmm...what to work on today....B-25 or Niagara...hmmmmmmm….plastic or wood.....hmmmm…..God I love modeling!!!! Maybe another cup of coffee and an update from yesterdays activities first. I am mostly following the instructions as for a building sequence. Under the cockpit is the forward landing gear. There is some PE for this area. I installed what I could. Some PE were painfully small. I tried, but, they ended up flying off the tweezers never to be seen again. These will be painted with a Tamiya flat aluminum. I may try some Tamiya panel accent in this area to give it a gritty/greasy look. I've never used weathering products, but this may be a good area to try. Any recommended products for weathering? I've seen powders and paints. I've heard that airbrushing metallic colors can be a bear. With that in mind, I'll prep the rear landing gear as well and then paint all at once. I gave the PE for the cockpit area one coat of Mr Color flat black. I was going to give them another coat but I kind of like the "beaten up" look. Boy, close up photography REALLY brings out the scratches in the plastic. Some of you more experienced modelers may have noticed my shaving plastic for PE skills are still a work in progress. Here's where we stand. Good from afar but far from good! I really need to stop zooming in too close to these pieces with the camera!!!!!! Those PE foot pedals were a beast to install. Basically had to hold them with tweezers until the glue started to grab. They were done before the control panel was glued to the cockpit. I hope to have the seats installed soon. I'm working backwards. Control panel, flight controls then seats. Wash your hands! Tom E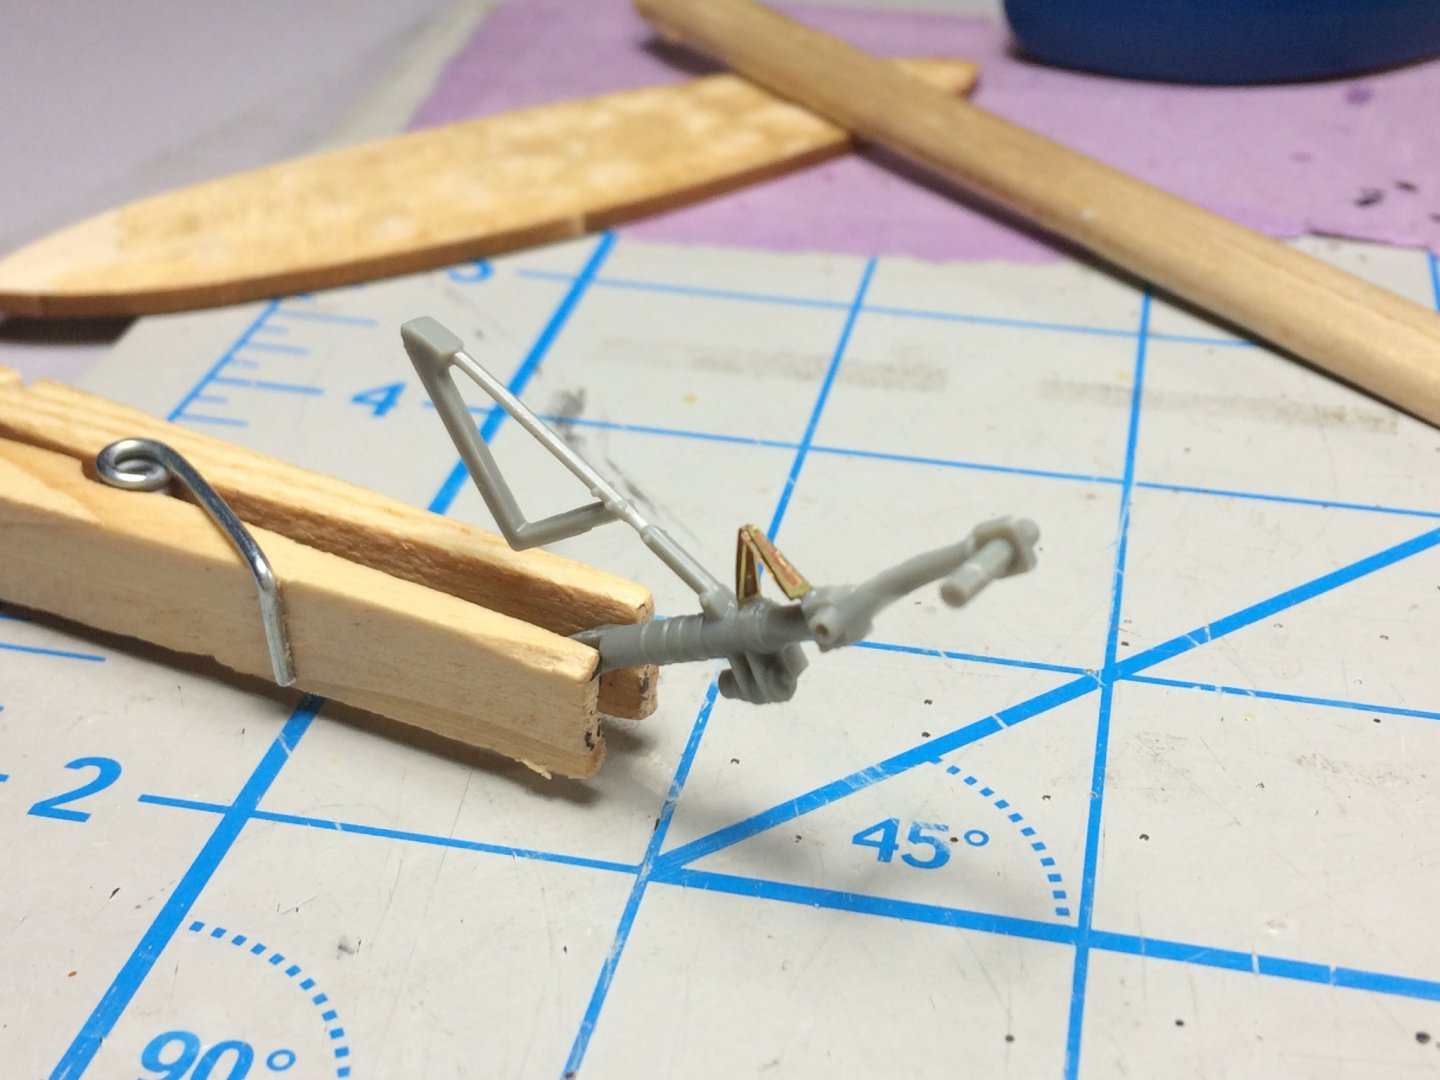

- 120 replies
-
- 12
-