Matt H
-
Posts
181 -
Joined
-
Last visited
Content Type
Profiles
Forums
Gallery
Events
Everything posted by Matt H
-
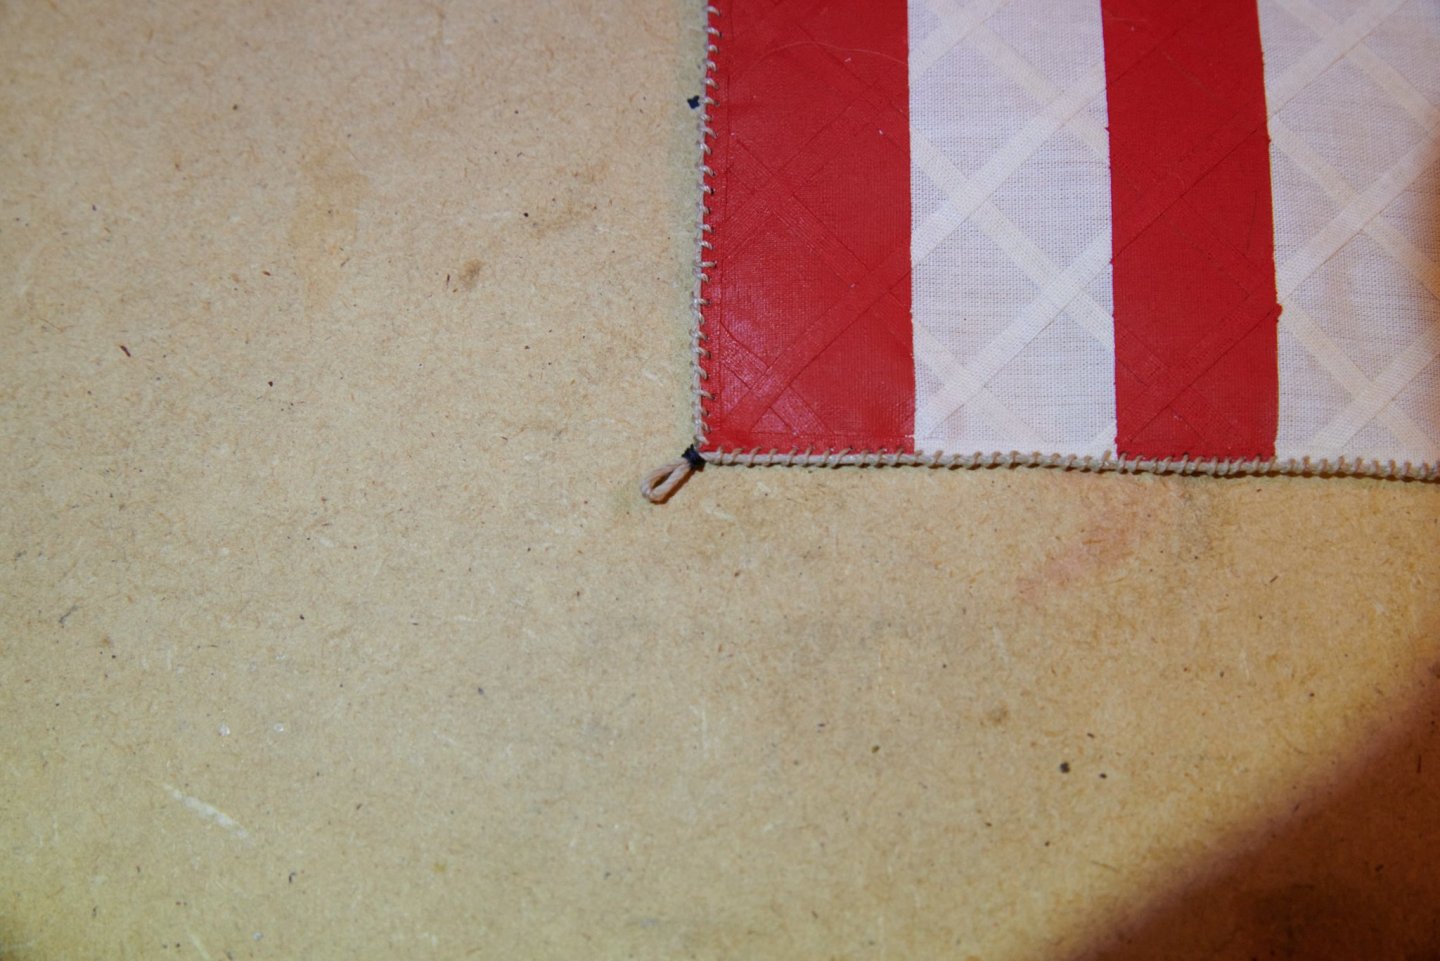
I found the answer to my question above and thought I'd come back and post it for others. Those ropes are called reef points and they go through the sail and are knotted on both sides leaving a length on both sides. The purpose is to roll the sail up from the bottom and use those reef points to tie it up, thus reducing the size of the sail. This is done for strong winds. There were multiple rows of reef points to reduce the sail to a variety of smaller sizes. This whole process is called reefing.
-
Wow, this is incredible work. I am very impressed and rather speechless watching part 9 on the first page making the weathered bulwark. I have seen mention of weathering effects, but never actually seen it done and certainly not in a video. I'll go back and watch more from the beginning. I am following and bookmarked this build for future reference. Keep up the excellent work.
- 358 replies
-
- 1
-

-
- occre
- santisima trinidad
- (and 1 more)
-
I'm assuming it has something to do with moving the topics to the new categories but some of them I cannot make a new post on, even my own topic. Example, I was looking through the various categories and went to the BC - 1500 and looked at my own Viking Drakkar log and I can't make a new post on it. Similarly I went down to the next topic for the same ship by Amfibious and I wanted to reply to it that I had found an answer to my question I had posted there a few days ago, I can't post on that topic either. I checked a random topic in another era category and I can post there.
-
Some of my photos rotate 90 despite looking correct in the thumbnail when browsing my photos. If you're on a Windows machine you can open the photo with the default photo viewer. This has some basic editing capabilities, just click on edit in the upper right corner. Even if your photo is currently displaying in the correct orientation in the photo viewer, it is sometimes coded into the image that it was originally taken at a different camera orientation, hence why it rotates in some applications. In that edit mode, there is a button to rotate the photo, again even if it is already displaying correctly, just rotate it 4 times to get back to normal. Then save it, whether you choose to save it as a new photo or overwrite the original, doesn't matter. The photo will now be coded to display in the orientation you see when you save it. Should display correctly when you upload to those applications or sites that have previously displayed it incorrectly. This is the easiest "edit" to do without actually editing the photo, even though the end result appears the same as the original you are modifying the coded data in the photo regarding it's orientation. As far as why or how it changed suddenly, that I can't say. It is possible the site got some soft of update or even the behind the scenes coding in the new theme that displays photos based on the orientation that is coded into the photo rather than "smartly" displaying it as intended. Meaning, I believe some software will recognize that if you turn your camera 90 degrees to switch from portrait to landscape, that was intentional and will display the image that way, despite the coding in the photo explicitly stating that the camera was rotated 90 degrees and should be displayed rotated. Here is an article on the subject that may explain it better than I as to why some software does this. https://www.howtogeek.com/254830/why-your-photos-dont-always-appear-correctly-rotated/
-
Laying out plans in a smaller workshop
Matt H replied to alde's topic in Modeling tools and Workshop Equipment
Thank you for this idea, design, and photos. I just built one for myself. I enlarged it by 6 inches both vertically and horizontally for both the top and bottom sections. I have prints currently that are about 47 - 48 inches long. This design worked great, put it behind my work table. The top of the lower section sits about 8 inches or so above the table top so I can easily grab one from down below and move it up above. Although my table is deep so I have to kneel on top of it a little bit to reach the top. Might have to get myself one of those extendable grabbers to set it up on the top. Anyhow, thanks again, this design worked great and came out considerably cheaper I think than other options, although my prices were a good bit higher than yours. All total I paid $48 for everything. The corner moldings were $4 a piece and came in 8 foot sections. Unfortunately because I enlarged it a bit, I couldn't cut those in half, I needed about 55 inches so I had about 3.5 feet leftover from each 8' stick. Tee's and elbows were more expensive than I thought, fortunately I found a bundle of 20 and 10 of each cheaper than if I had to buy them individually. Regardless, still worth the extra cost, great idea, minimal space, easy to sort and display what you need. -
Being a newbie
Matt H replied to Edwardkenway's topic in Using the MSW forum - **NO MODELING CONTENT IN THIS SUB-FORUM**
In this subject area and the people on these forums, I'd say the term newbie is something more people apply to themselves rather than another member applying it to another. This forum has proven to be a quite respectable, helpful, and kind group of people. I can't honestly say I've ever seen a scenario where someone was being insulted in any way. So I think we apply that term to ourselves when we don't feel confident in putting our work out there with what we would consider the intermediate, expert, master, or any category above newbie. I feel like I am still a newbie in the terminology and history of ships and ship building. But I think I have a natural ability to make things rather well. So I don't feel like I'm necessarily a newbie when it comes to the act of building and modeling. -
I have most of the rigging done. Not sure what it is called, but I have the 4 short sections of rope tied on the sides of the sail to rig up. And of course the oars, but as I mentioned earlier, I'll get those done eventually, they will be in the stored position anyway since the sail is out. Should have photos up late tonight or tomorrow. Thanks Matt
-
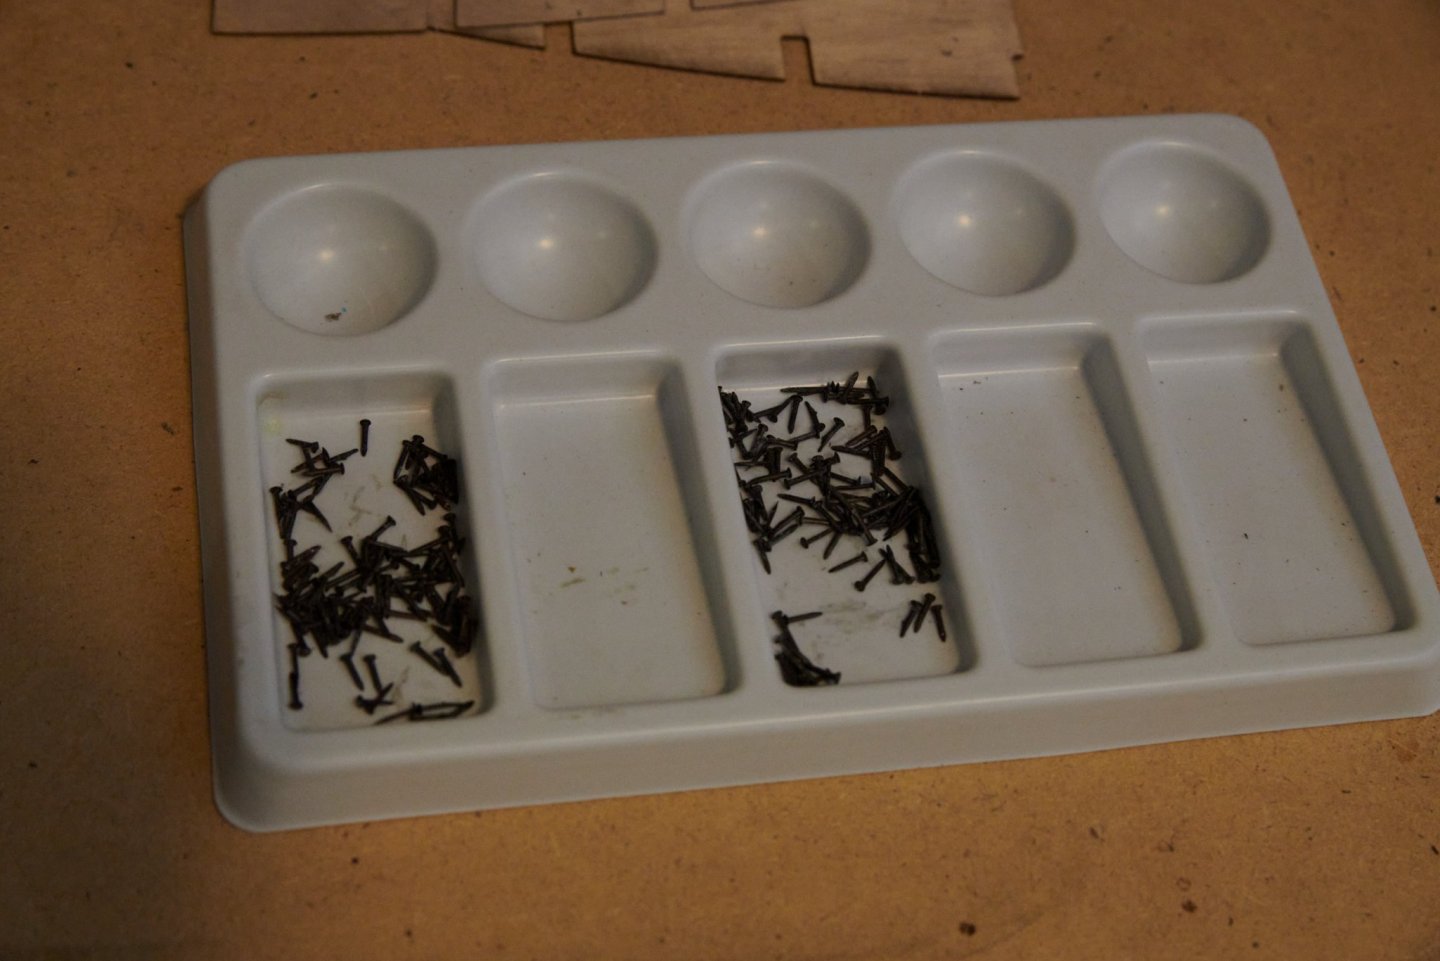
I use Lego's for keeping the bulkhead square, I use the 2x4 Lego pieces. You know they are square and easily accessible so they work great. Sometimes I can't use a Lego on each side directly across from one another because my clamp doesn't open up large enough. So if you look down at the keel and bulkheads from above and it looks like a cross with 4 quadrants. I put one say in the top left and on in the bottom right and a clamp in front and behind the bulkhead. In ship terms I would put one forward of the bulkhead and say on the starboard side, the other would go aft of the bulkhead and on the port side. Rather than both forward or both aft then where my clamp can't open enough. Hopefully that explanation isn't too weird. As to the nails I used Novacan Black Patina for Solder. They sell it on Amazon and they sell a three pack for a variety of metals. I bought that, but so far I have found the regular one I named here has worked best. The image I posted with the nails, I poored just a little of the solution in one of the round compartments above. Then dropped some nails in for a few seconds, stirred them around, then dropped them in the larger spaces where they sit in the image. I have since seen a suggestion from someone to have a water rinse available. I didn't but will in the future. I just let them dry and then dabbed the remaining liquid off with a paper towel once all the nails were done.
-
That email gets returned as a full inbox. I have successfully emailed Shipwrightshop.com, where I purchased the ship originally, without any returned emails, but I have yet to hear from them. I have not tried calling yet, I'm not exactly sure what the costs for a phone call would be with my service. My cell service charges a variety of rates depending on what type of service the receiving end has, which means essentially I won't know until I get the bill. Figured I'd give a bit more time for an email response before I go that route.
-
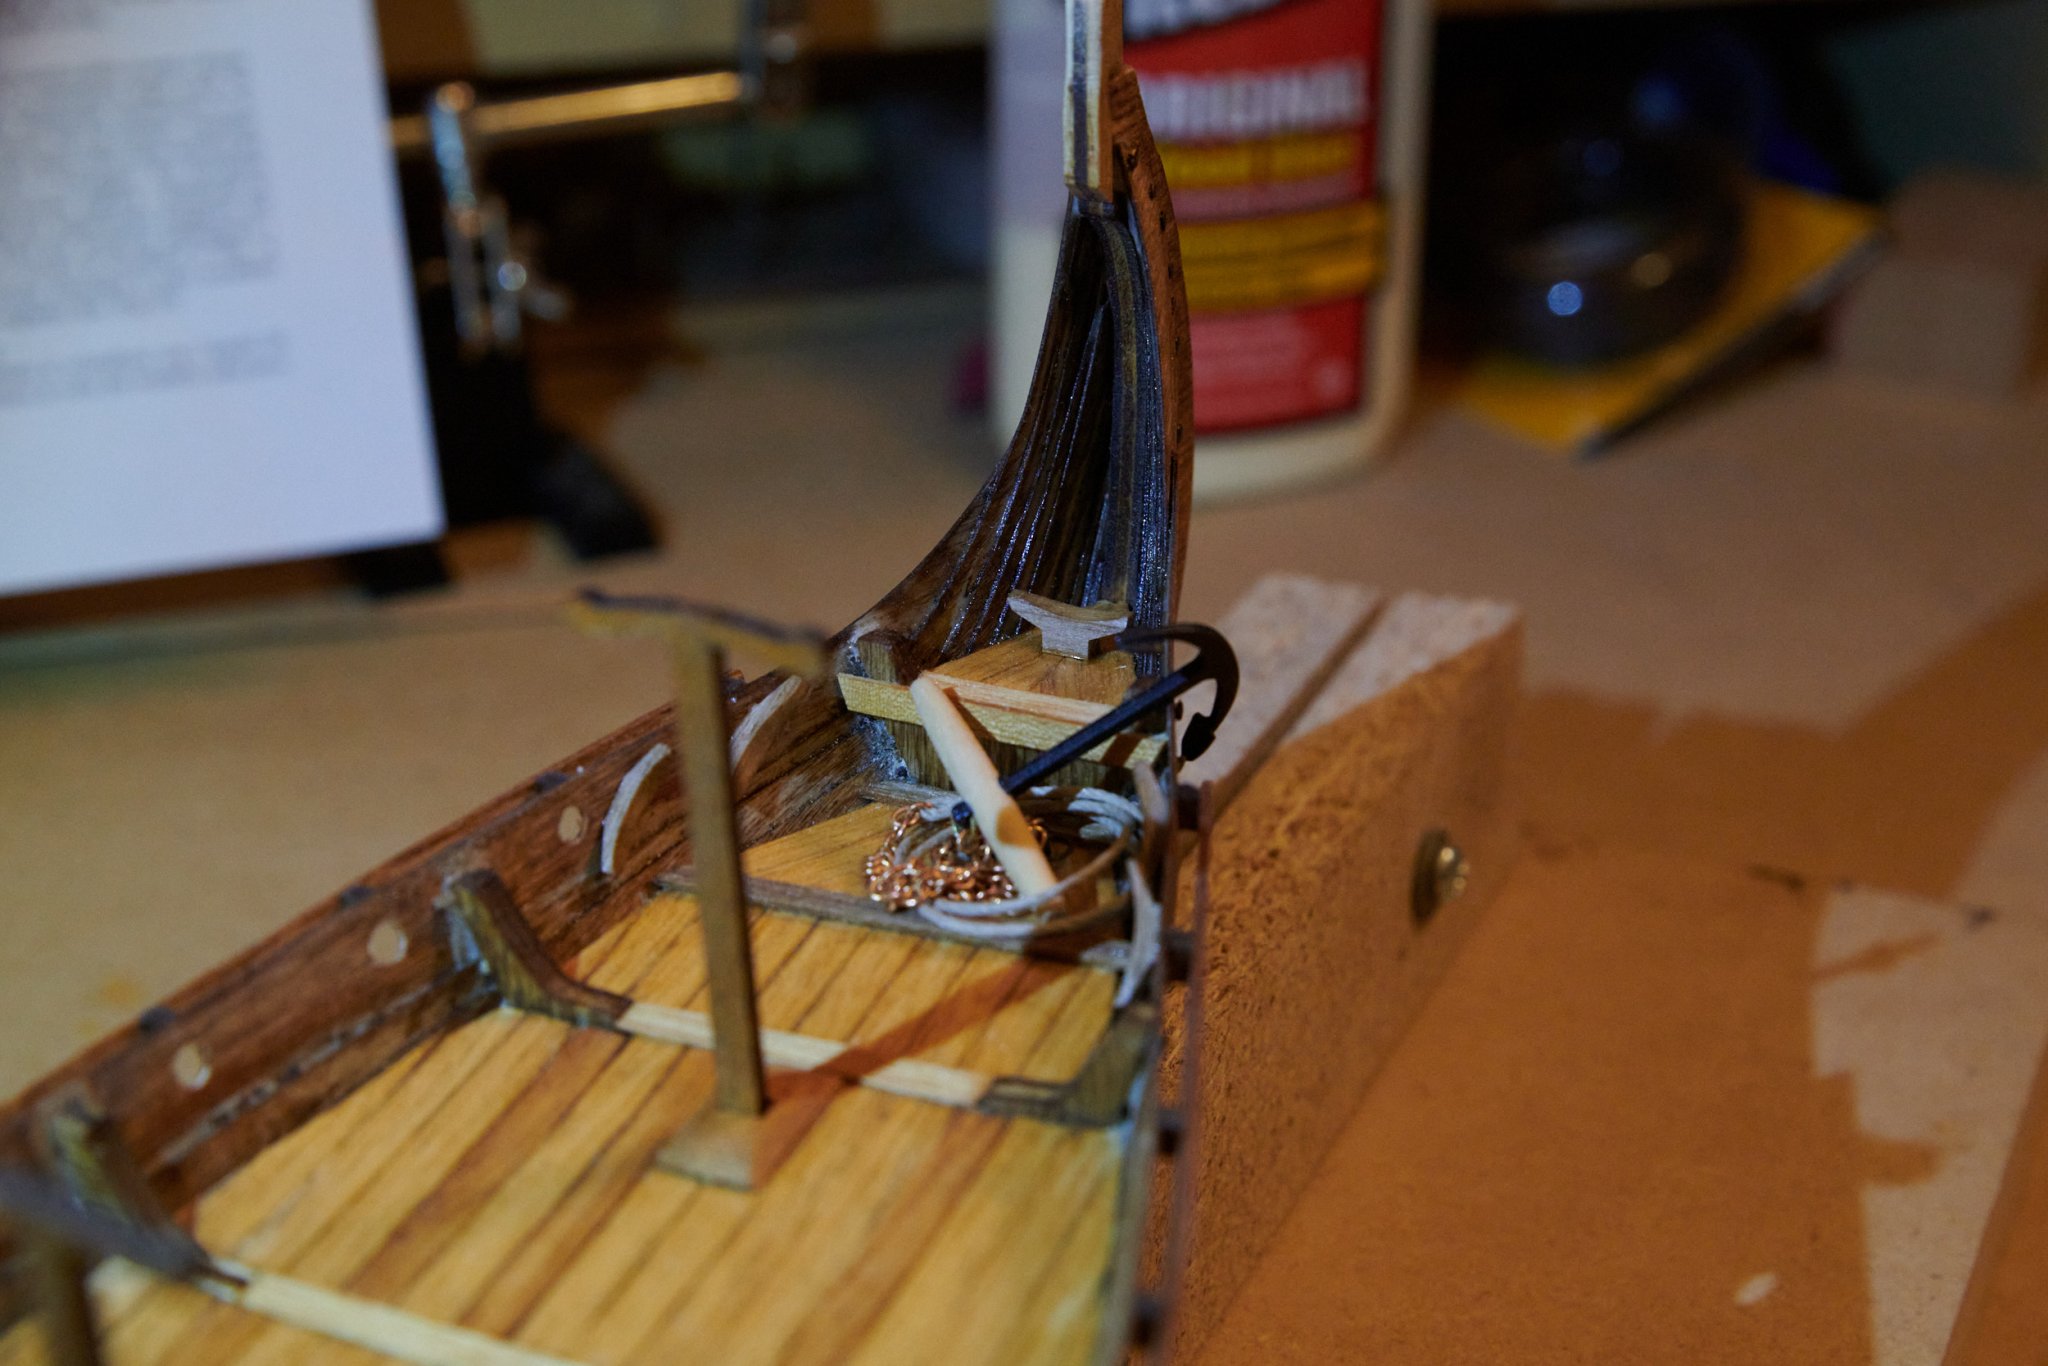
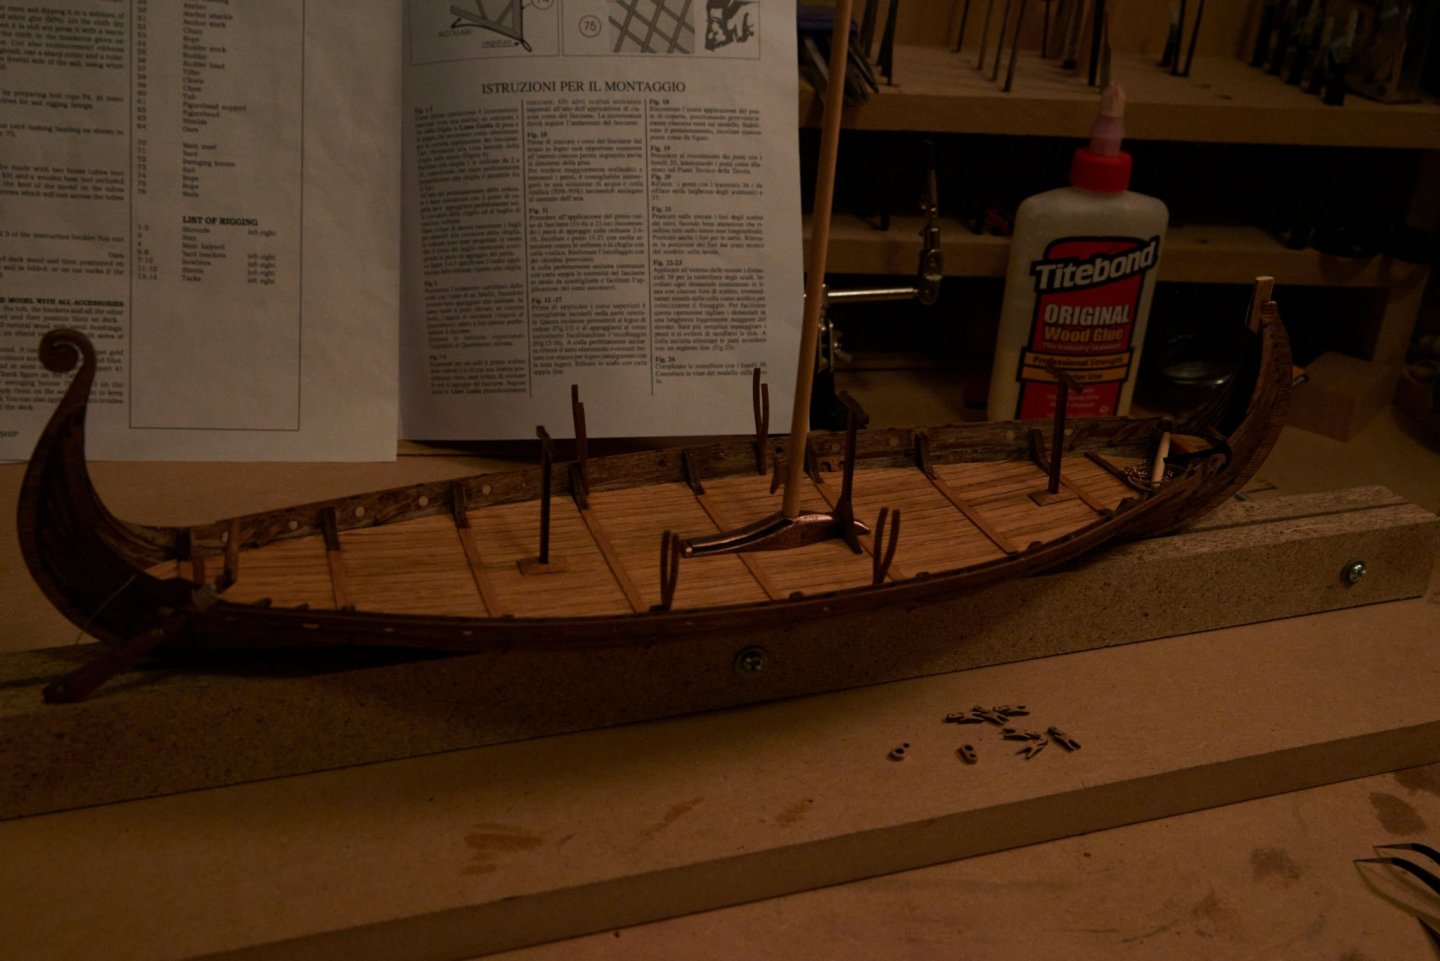
Text update only, I will upload pictures of the completed model after I finish the rigging. I have completed the rigging for the mast stay. This was the first time using cleats and it was neat being able to tie them up just like you would on an actual boat and they stay in place, I didn't have to glue it down, we'll see if it stays that way for the long term, I may have to glue the tail down behind the cleat but the wrapping around it stays just fine. I have created and hung the port side shrouds. I have attached the 4 dead eyes to the hull for both the port and starboard shrouds. I have also pulled the sail up to it's proper position and tied off the halyard to the cleat, then formed a coil with the remaining rope and hung it on the top of the cleat. I did attach the figure head and wrap the bow with rope under the figurehead. All deck furniture is made and ready to be placed down. I have also attached what I like to call "God hands" to the walnut base board I made. I found these really neat aged bronze fists as ship pedestals. I figured the Vikings believed in many Gods so I thought it fitting that I found these "God hands/fists" to hold the Viking ship up. That's where I am at now. Need to make up and hang the starboard shrouds then tighten all shrouds down to their respective dead eyes then on to the running rigging. I still have yet to make the oars, I have cut the dowels down to the correct sizes. I will likely make these up down the road as my next build is at a stage waiting for glue to dry. Should only be another day or two before I'm done with the rigging and will update with many more photos of the above details and the full ship.
-
Further update. I just realized that the email on both jotika and shipwrightshop have the same beginning part, but different ending. enquiries@jotika-ltd.com vs enquiries@shipwrightshop.com I have sent the email off to the latter and so far it has not been returned. Searching through the forum I found a similar thread from 2014 that sounds very much the same as mine. Emails not being answered and no responses, one suggestion was to go through shipwrightshop.com rather than jotika-ltd.com. That is what spurred me to look at the emails closer. I will update here if/when I hear back from someone.
-
I'm wondering if anyone has any contact information for the company Jotika, Caldercraft, or Shipwrightshop.com besides what is listed on their website? I purchased the Caldercraft Granado in late 2017 and am finally getting around to starting it. I was going through and doing inventory and am missing a couple of parts and was trying to get in touch with someone via email. I emailed the one listed for Nelson's Navy models, then the general enquiries, and finally every email listed on their website. All of them get sent back as undeliverable. It also appears that all those various emails are getting forwarded to a John Wright at johnwright@jotika-ltd.com. So anyone know how else to contact John Wright or the above mentioned companies? **EDIT** When I send directly to the john email I get an error back that his inbox is full. That is why the messages aren't getting through. Still the question remains other than calling and dealing with out of country charges any other way of reaching this person or company?
-
So it has been a while since I last updated, and in fact since I have done anything with this ship. I have since set this aside and began and am now nearly finished with the Viking Drakkar, that built is in my signature. I will update with photos soon, but I had a question I wanted to pose first. First I have installed filler blocks and smaller/thinner blocks outwards almost to the inside of the inner bulwarks. This will give me a good base for the deck. My question is how to drill holes for the masts. Unfortunately I did not think of this until it was too late. I would have followed some other build logs I have come across, where they marked and cut out the bulkhead former before the bulkhead were attached. It is must to late for me to do that, so any suggestions on how to get the correct angle and drill out the mast holes once the bulkhead and filler blocks are installed? I'd rather do it now than wait until chapter 12 and do it after the deck is finished.
-
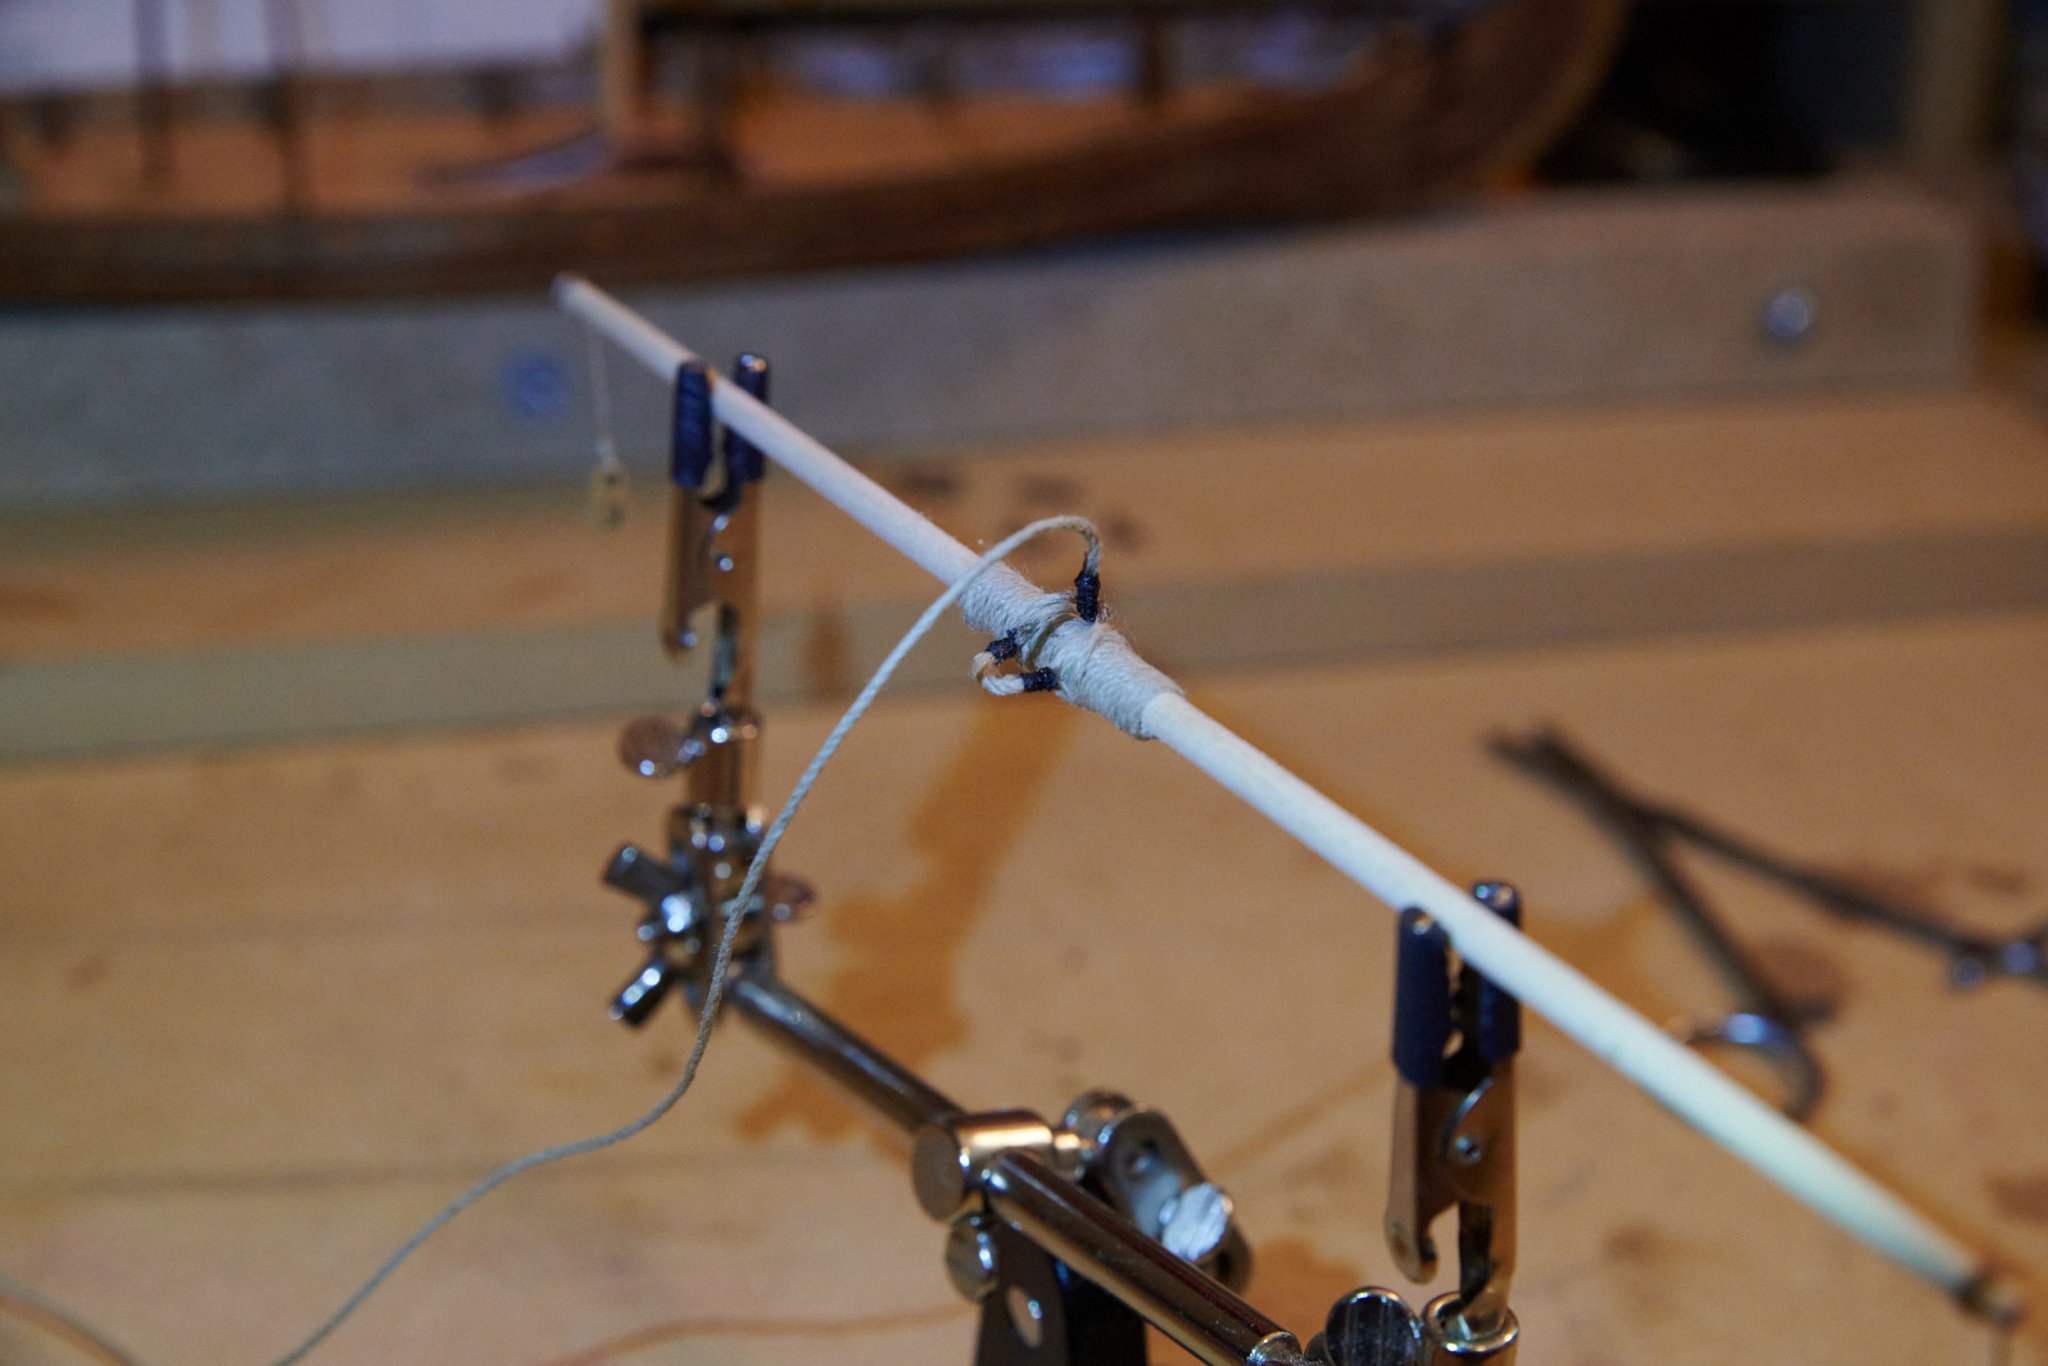
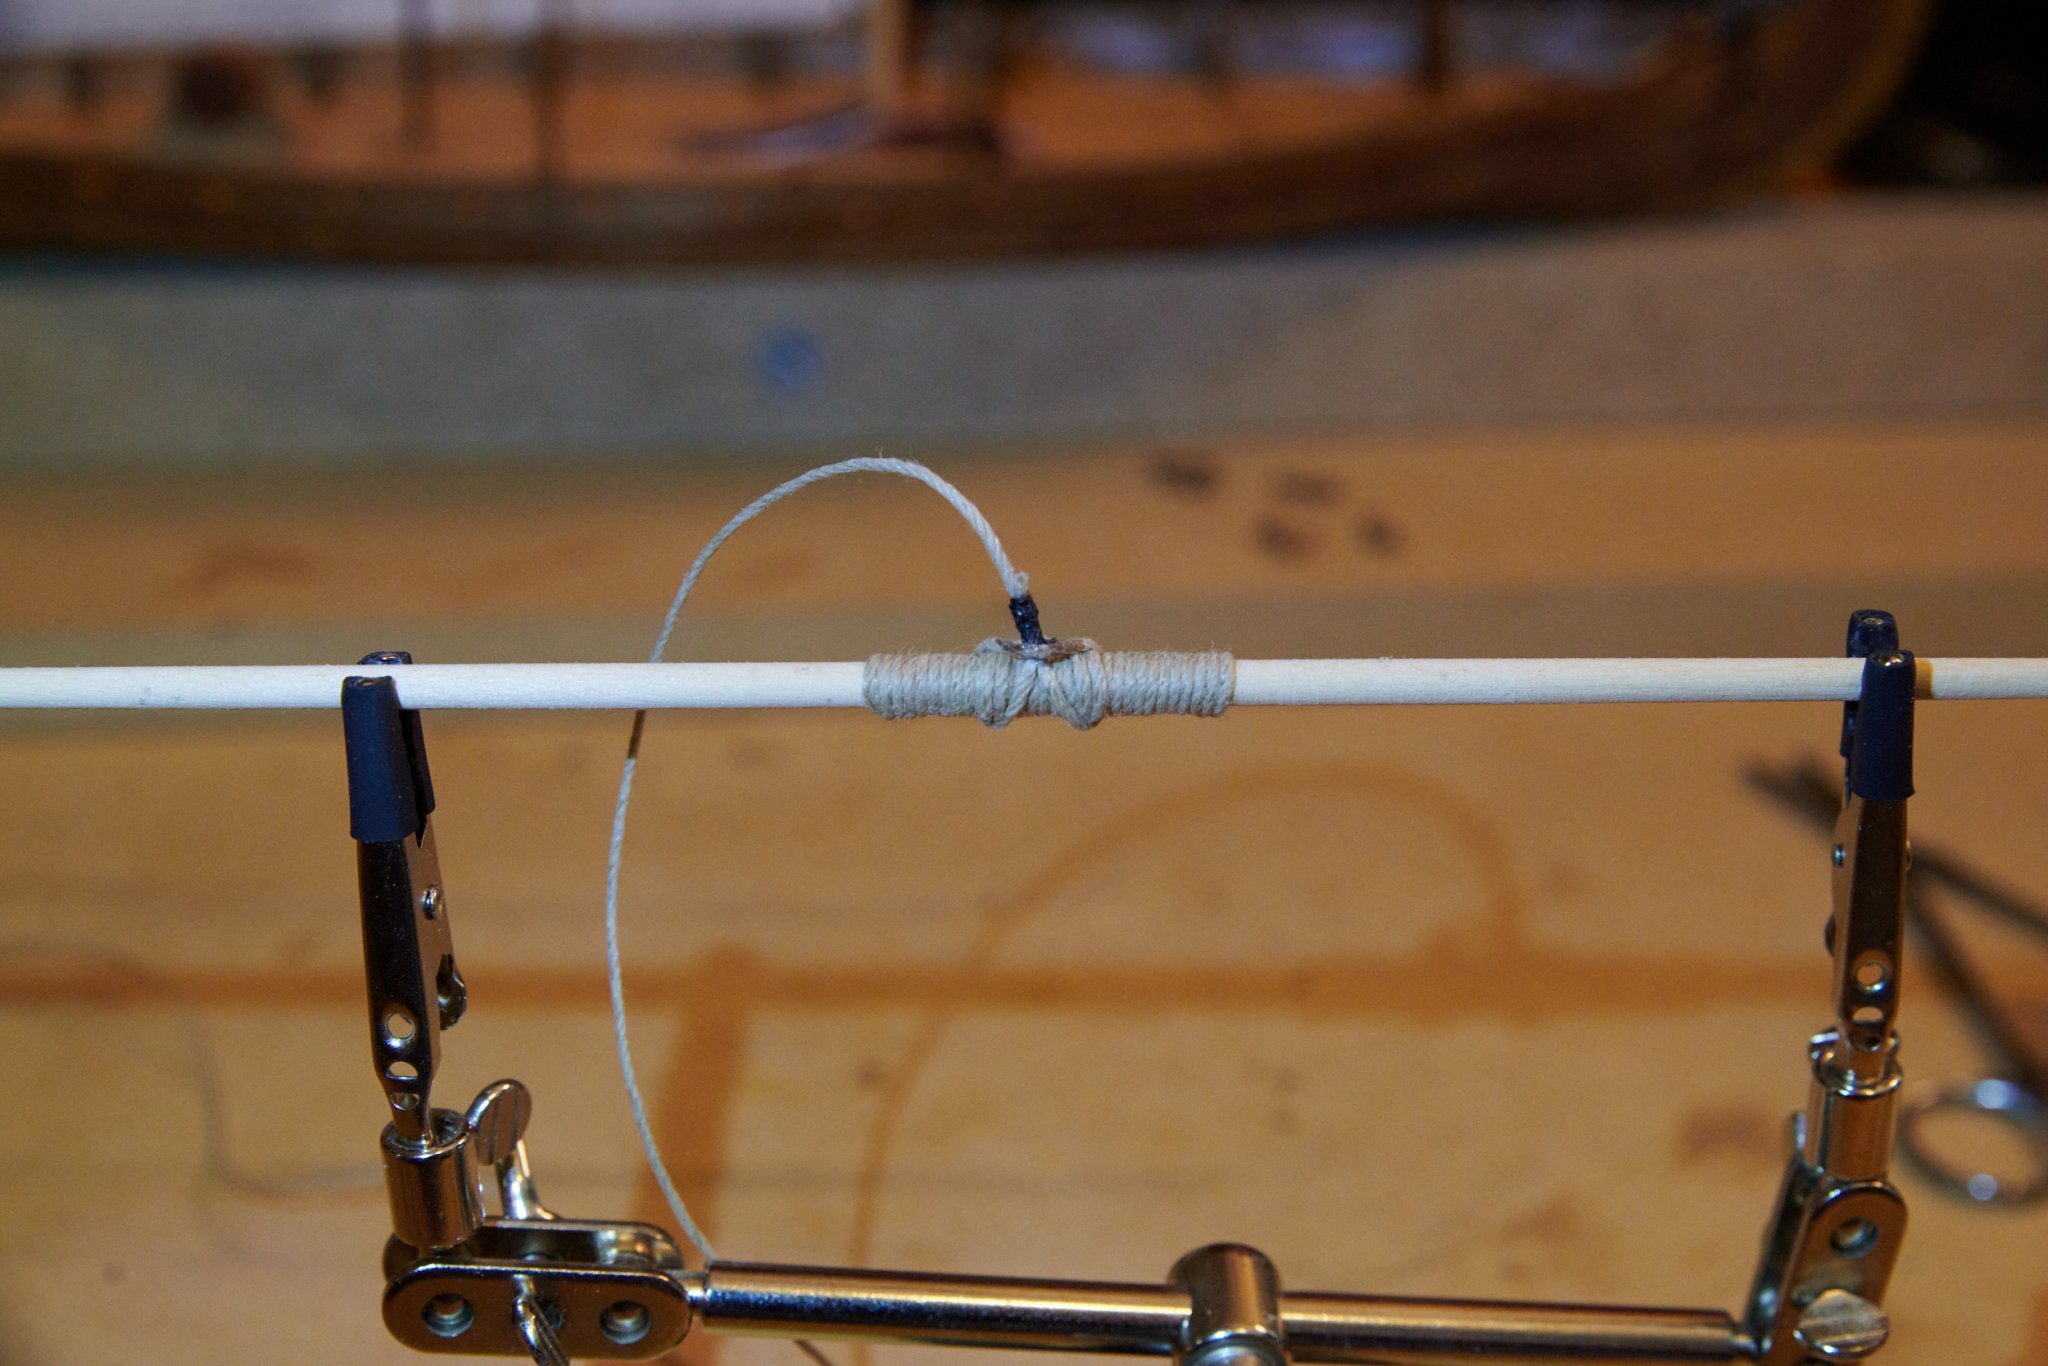
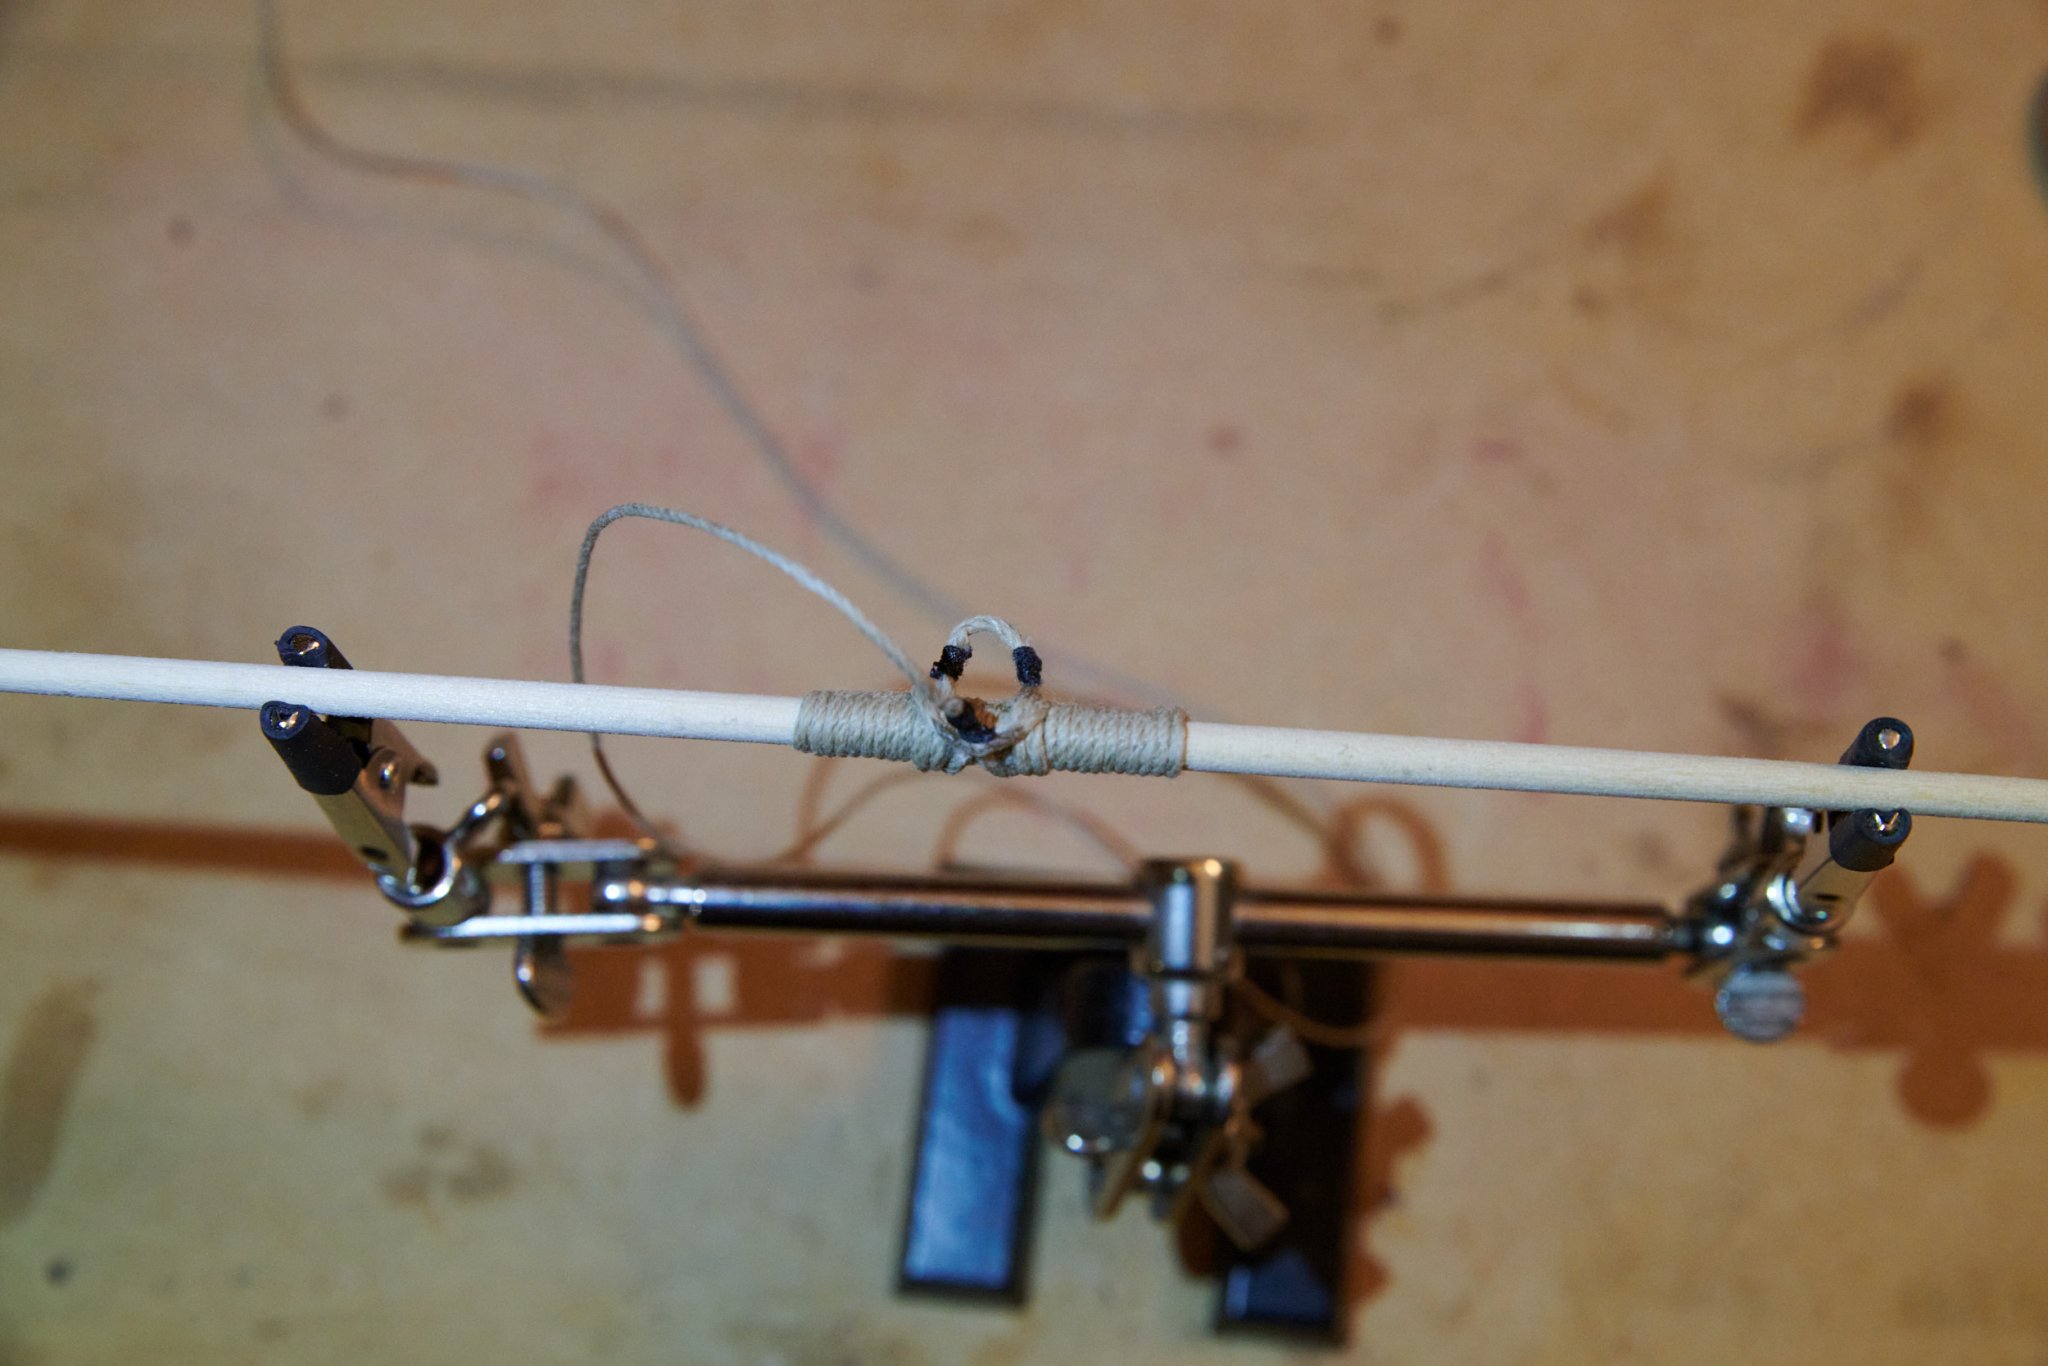
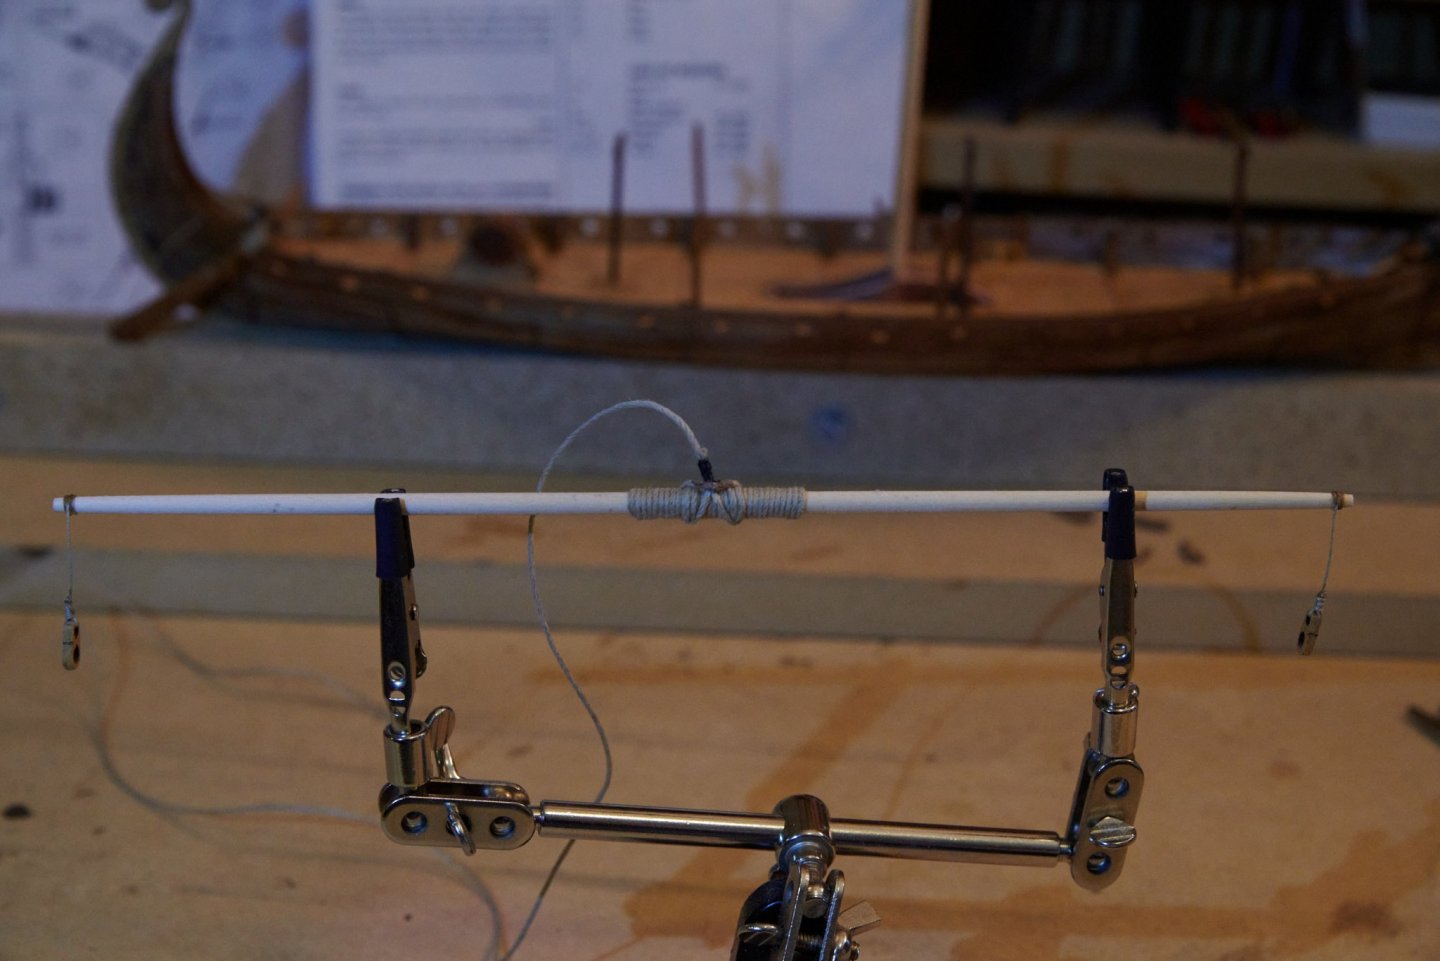
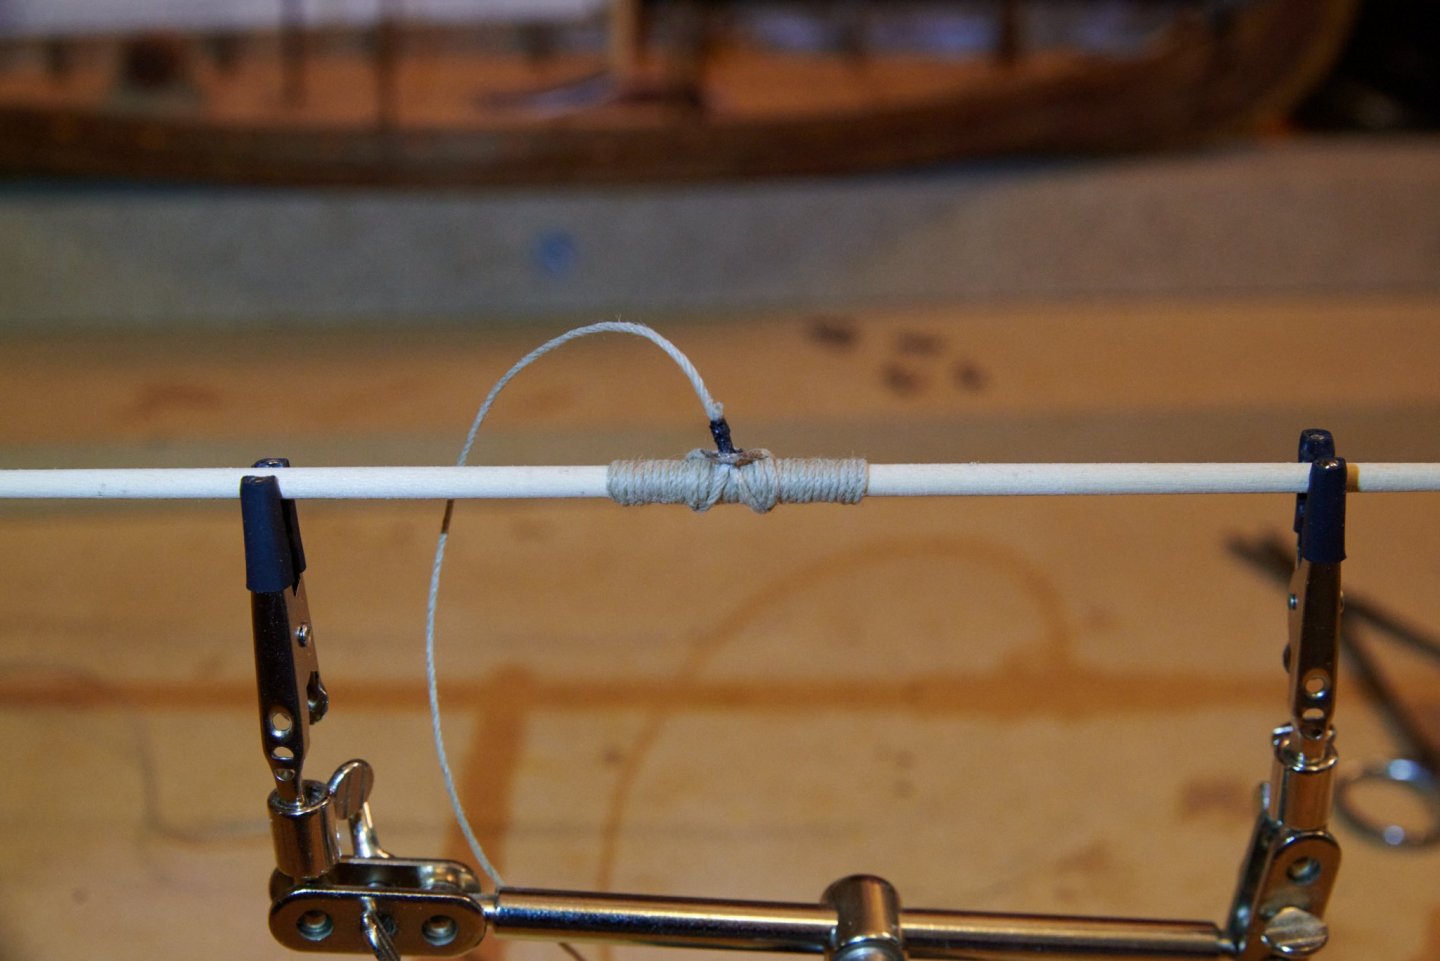
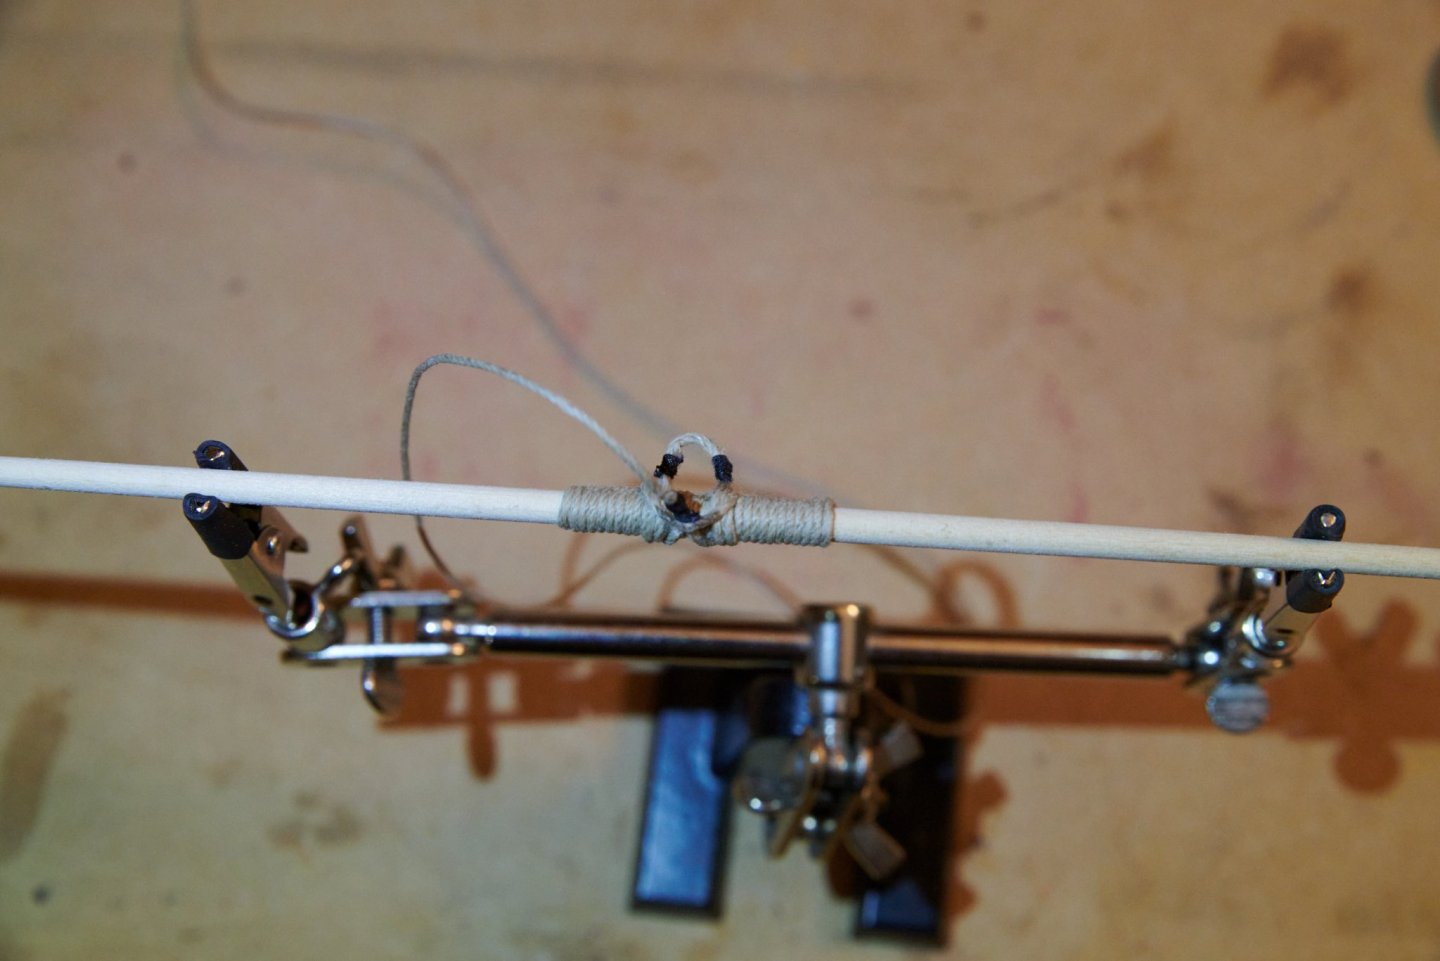
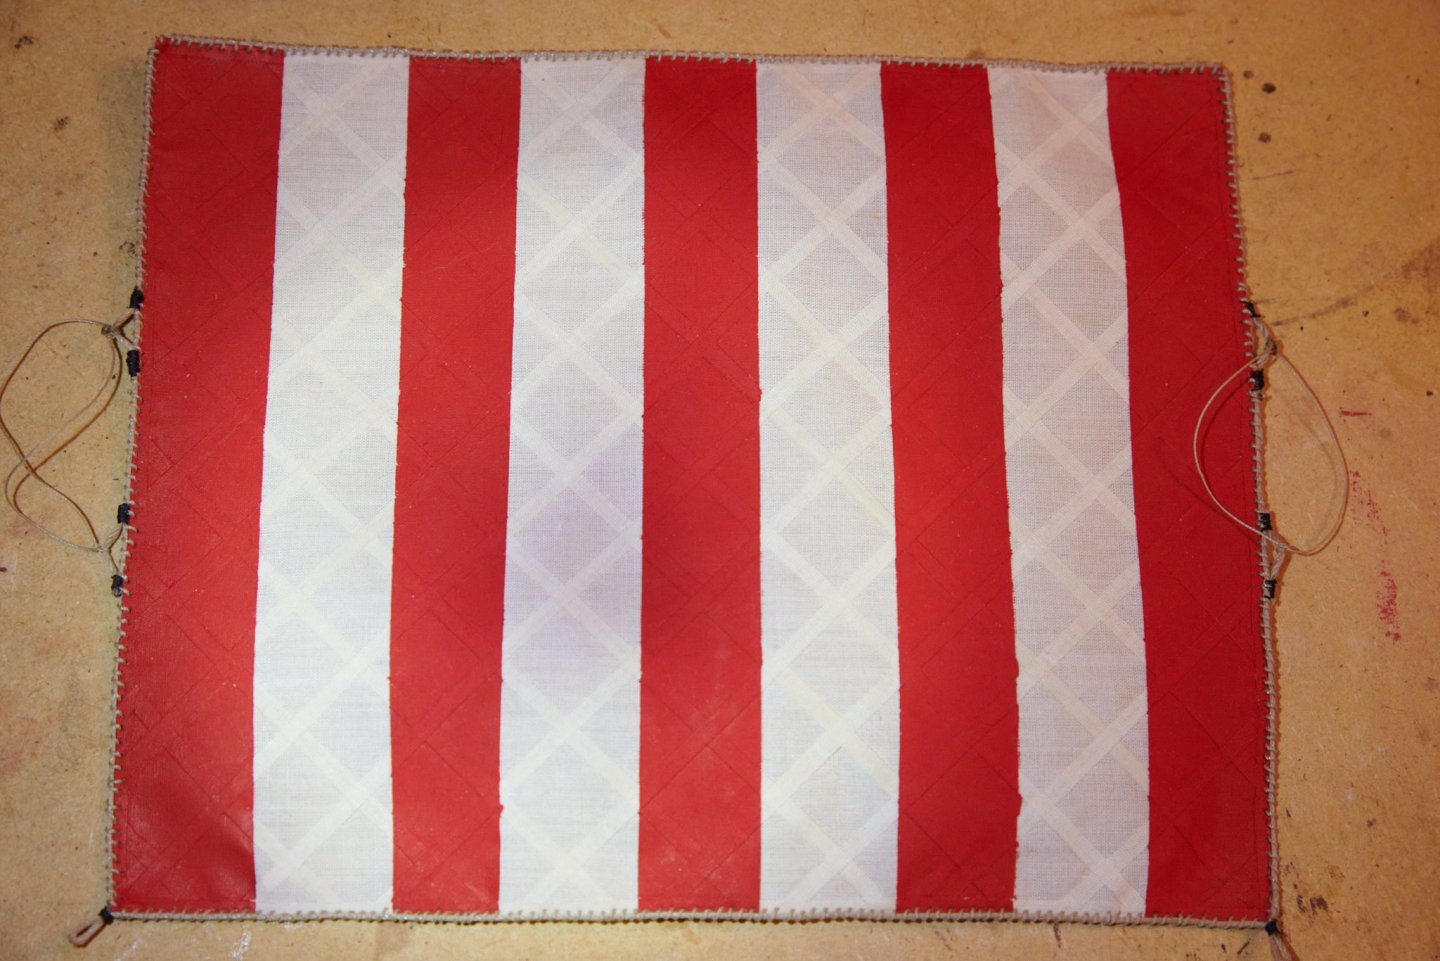
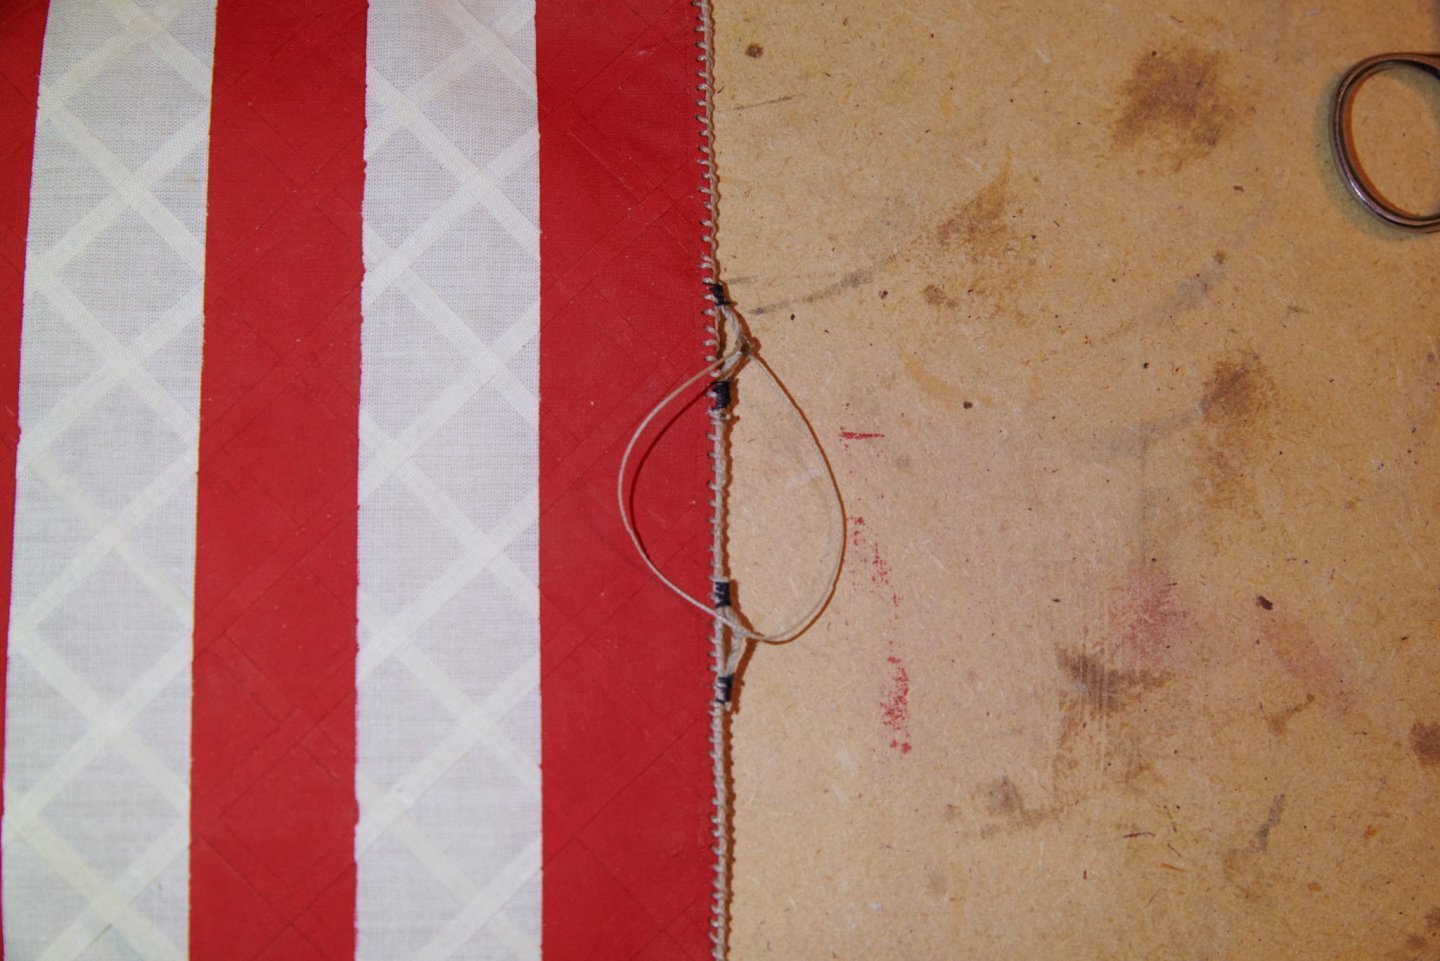
Well sewing the bolt rope and clews took a bit longer than I expected, all total about 3 hours. Then another hour and a half or so sewing the 4 small sections on the sides and the 4 smaller diameter ropes to those sections. Sorry, I don't know what you'd call those pieces of rope sewed onto bolt rope on the sides of the sail. The instructions don't actually mention these at all, you just have to follow the plans. I also finished tapering the yard, installing the parrel, halyard, and blocks to the yard. I have tested the fit of the parrel and the functionality of raising and lowering the yard on the mast. Next I will attach the sail to the yard install it over the mast and begin the standing rigging while the yard and sail sit at the bottom of the mast on the deck. Once the standing rigging is in place I will raise the yard and begin the running rigging.


-
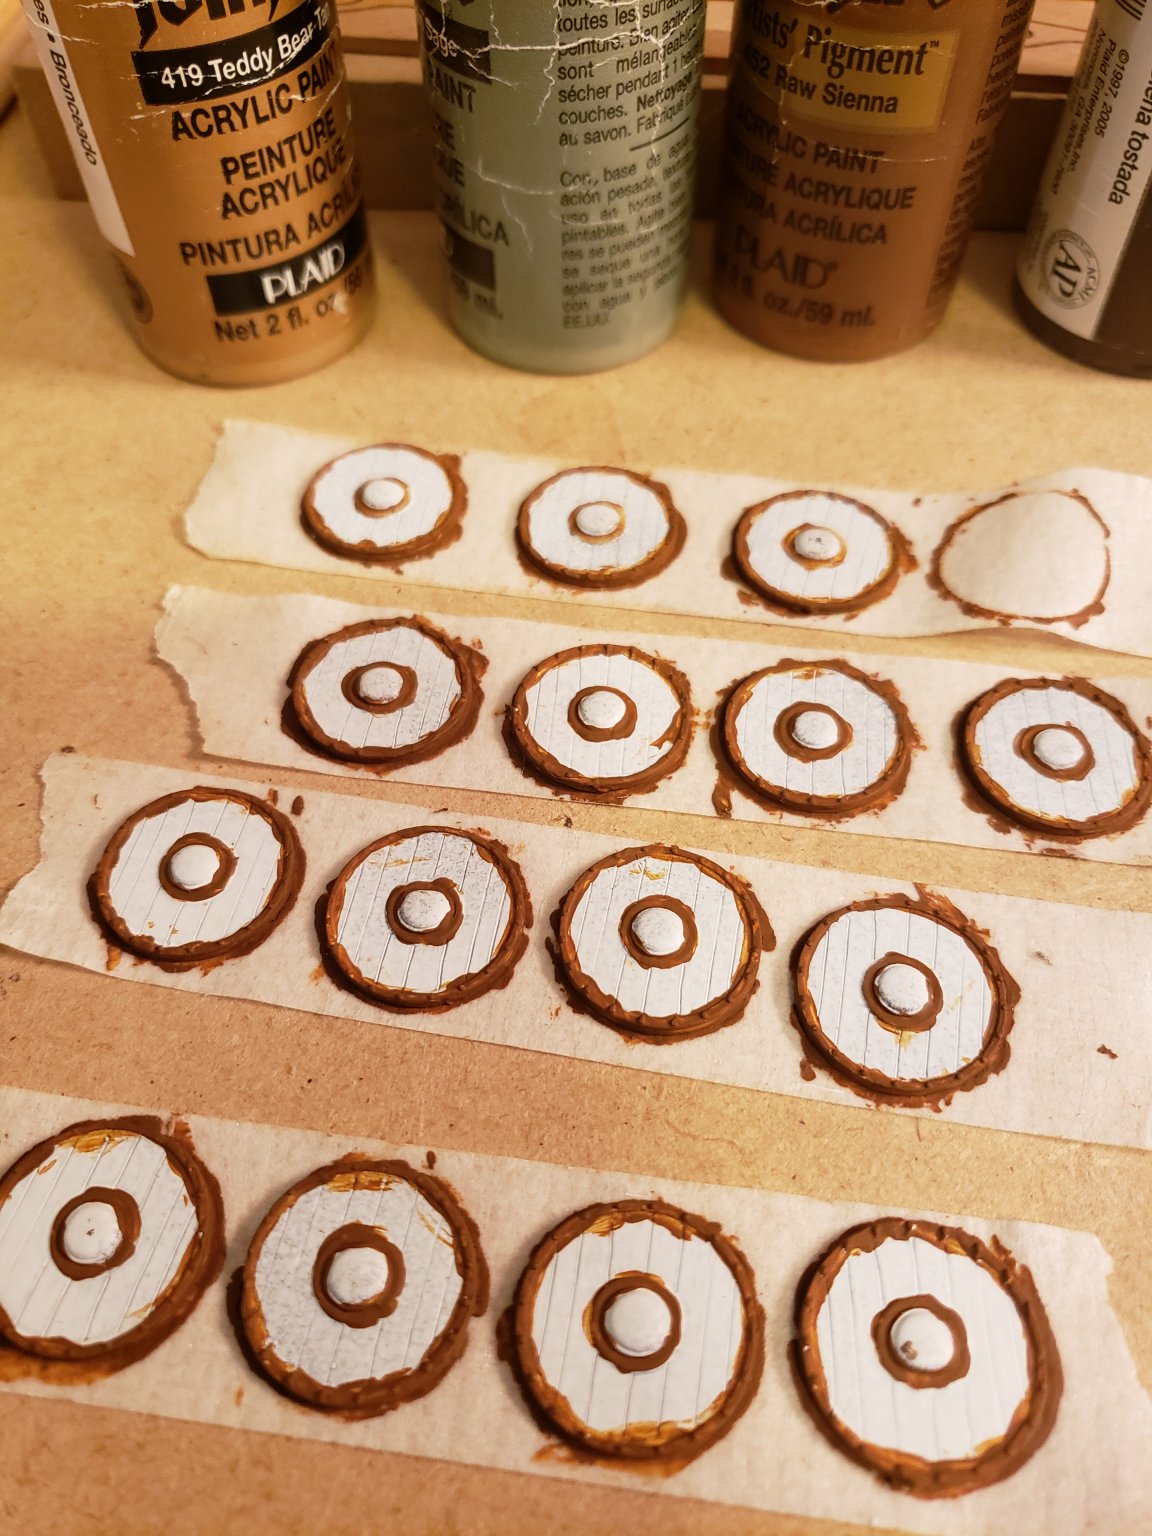
Thank you for the kind words Snowy. Those are excellent shields. I debated whether to do designs on them or not. I really like the variety and various colors. I have read that despite some portrayals the Vikings really did like color and incorporated it into their day to day lives and homes, so it is expected that they likely did in their ships as well.
-
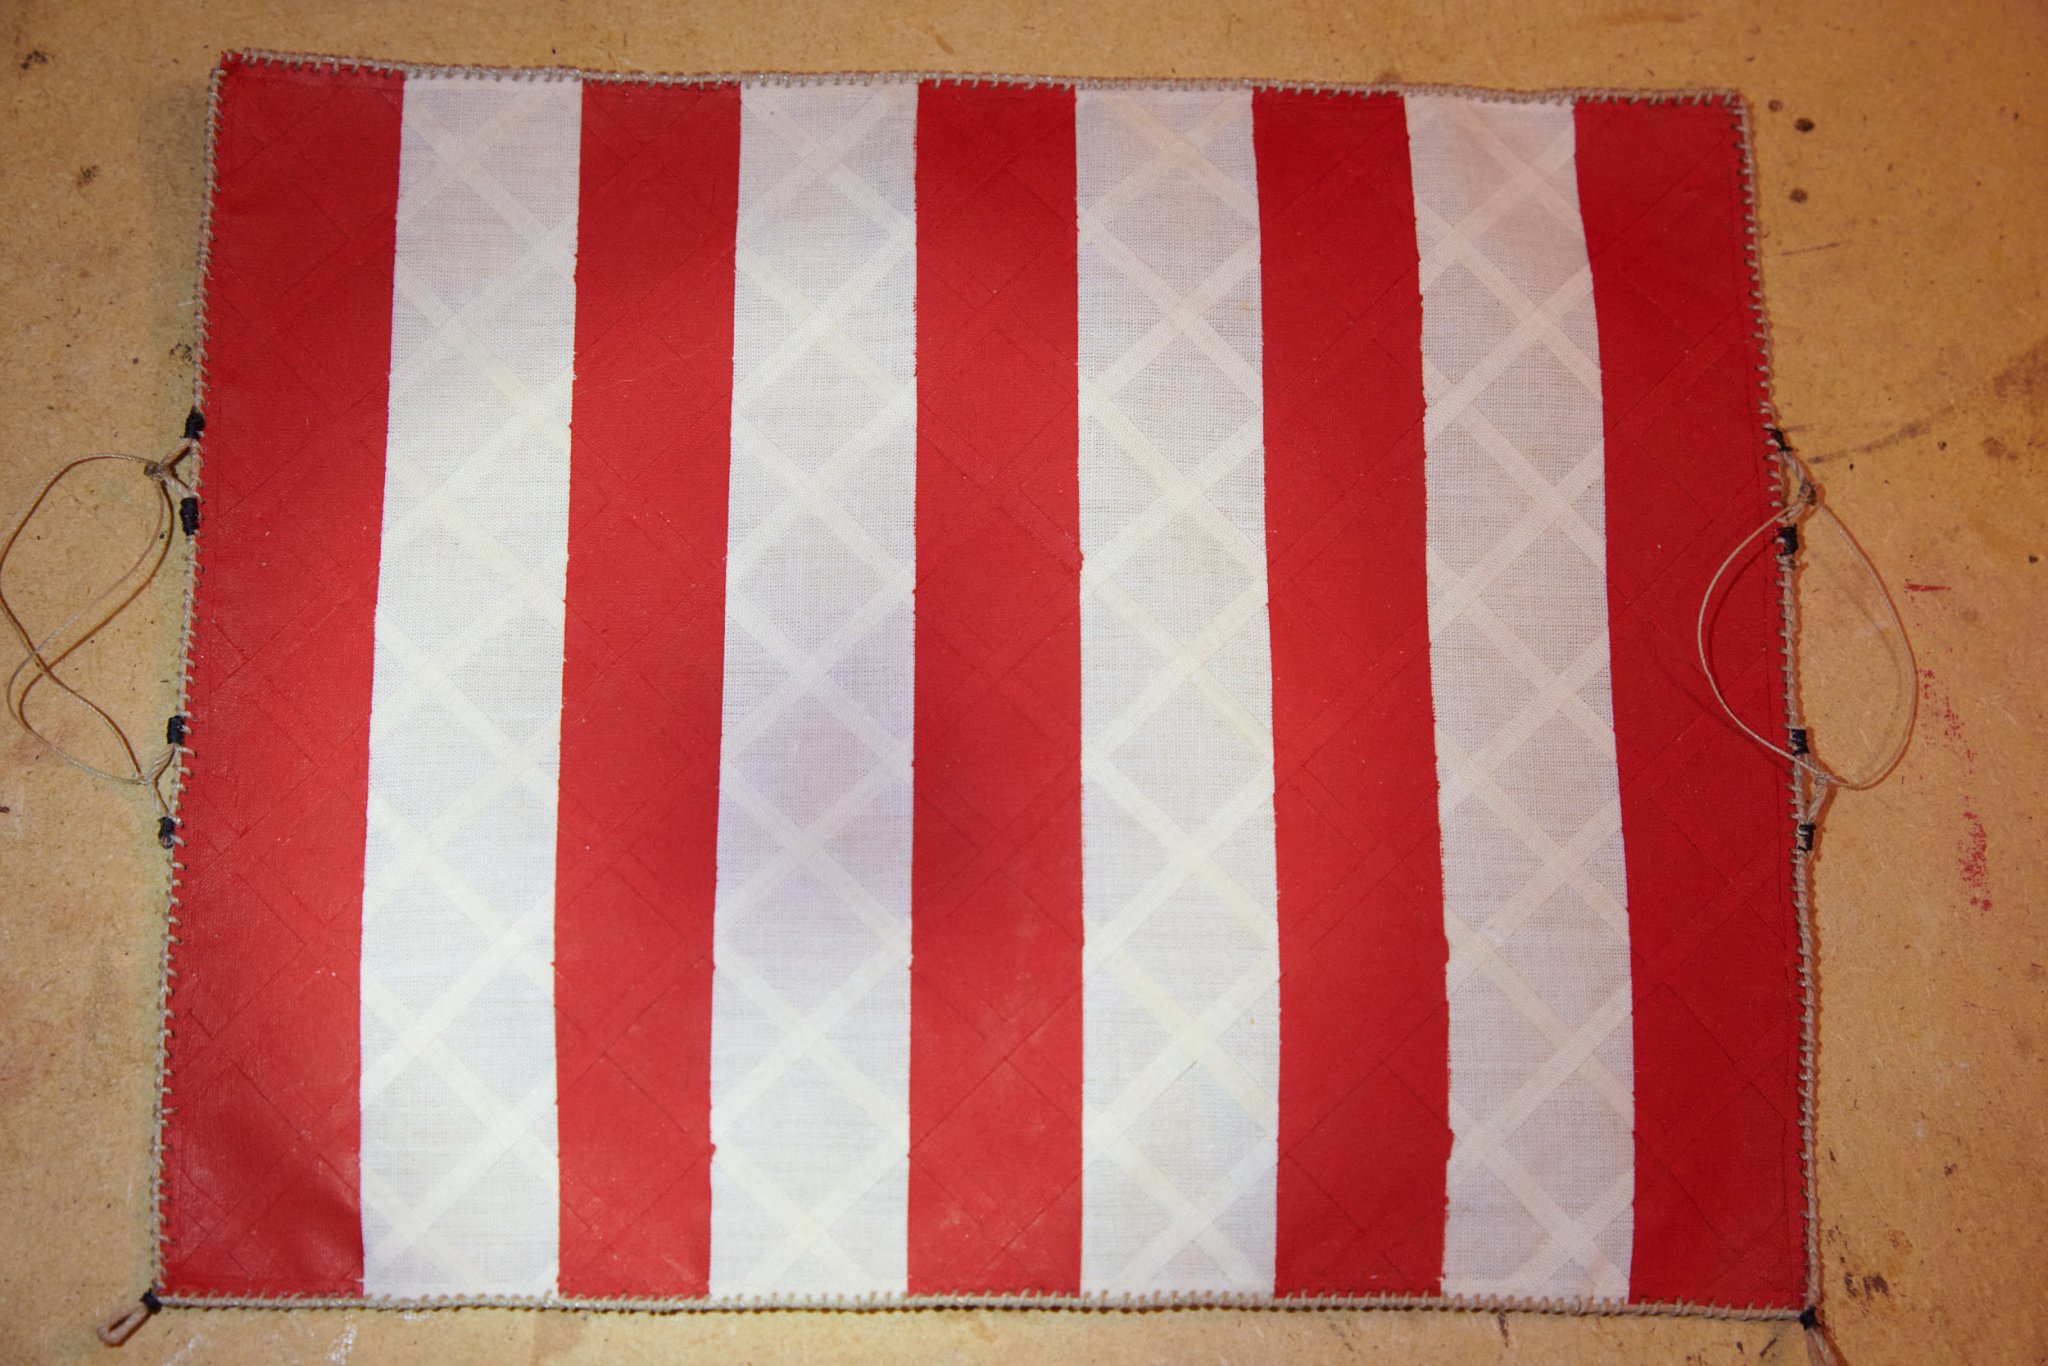
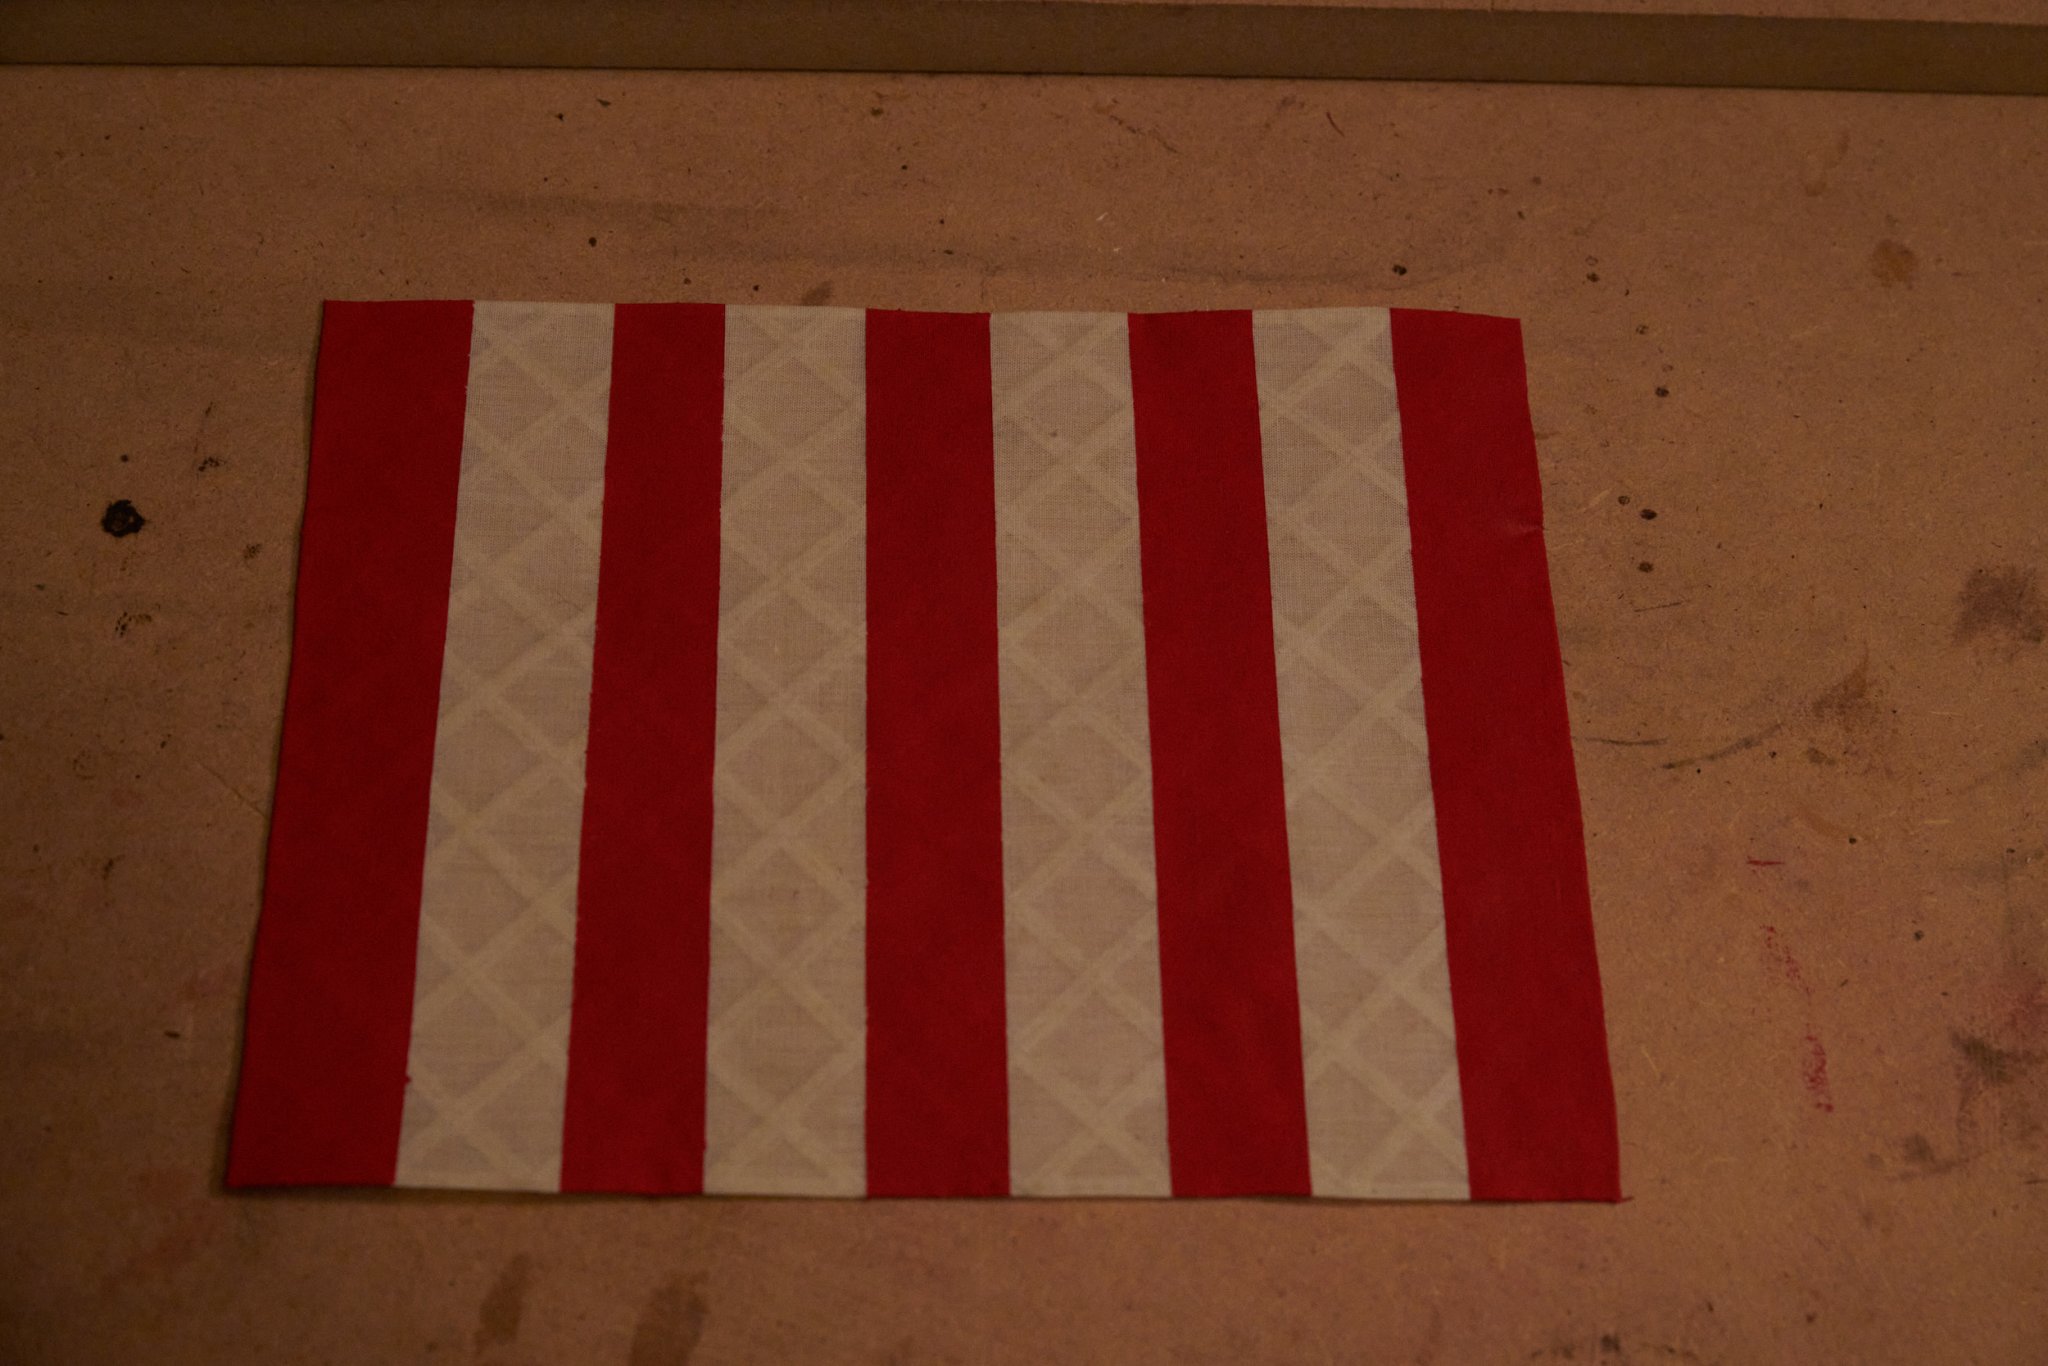
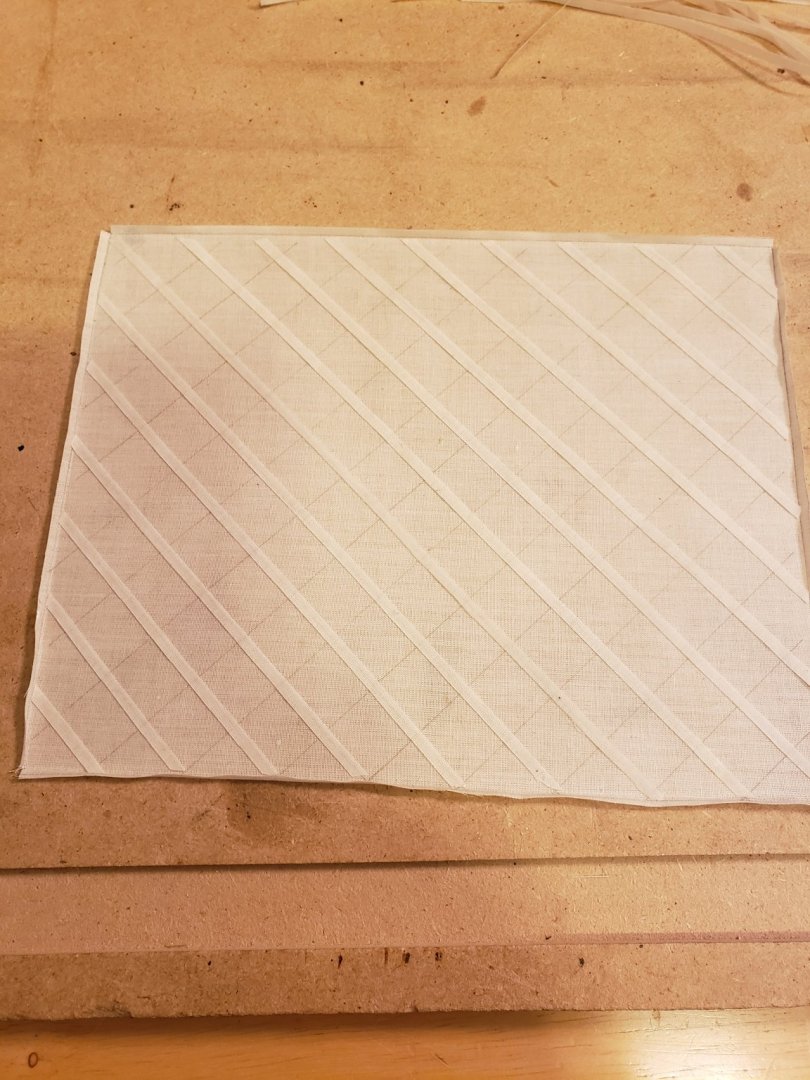
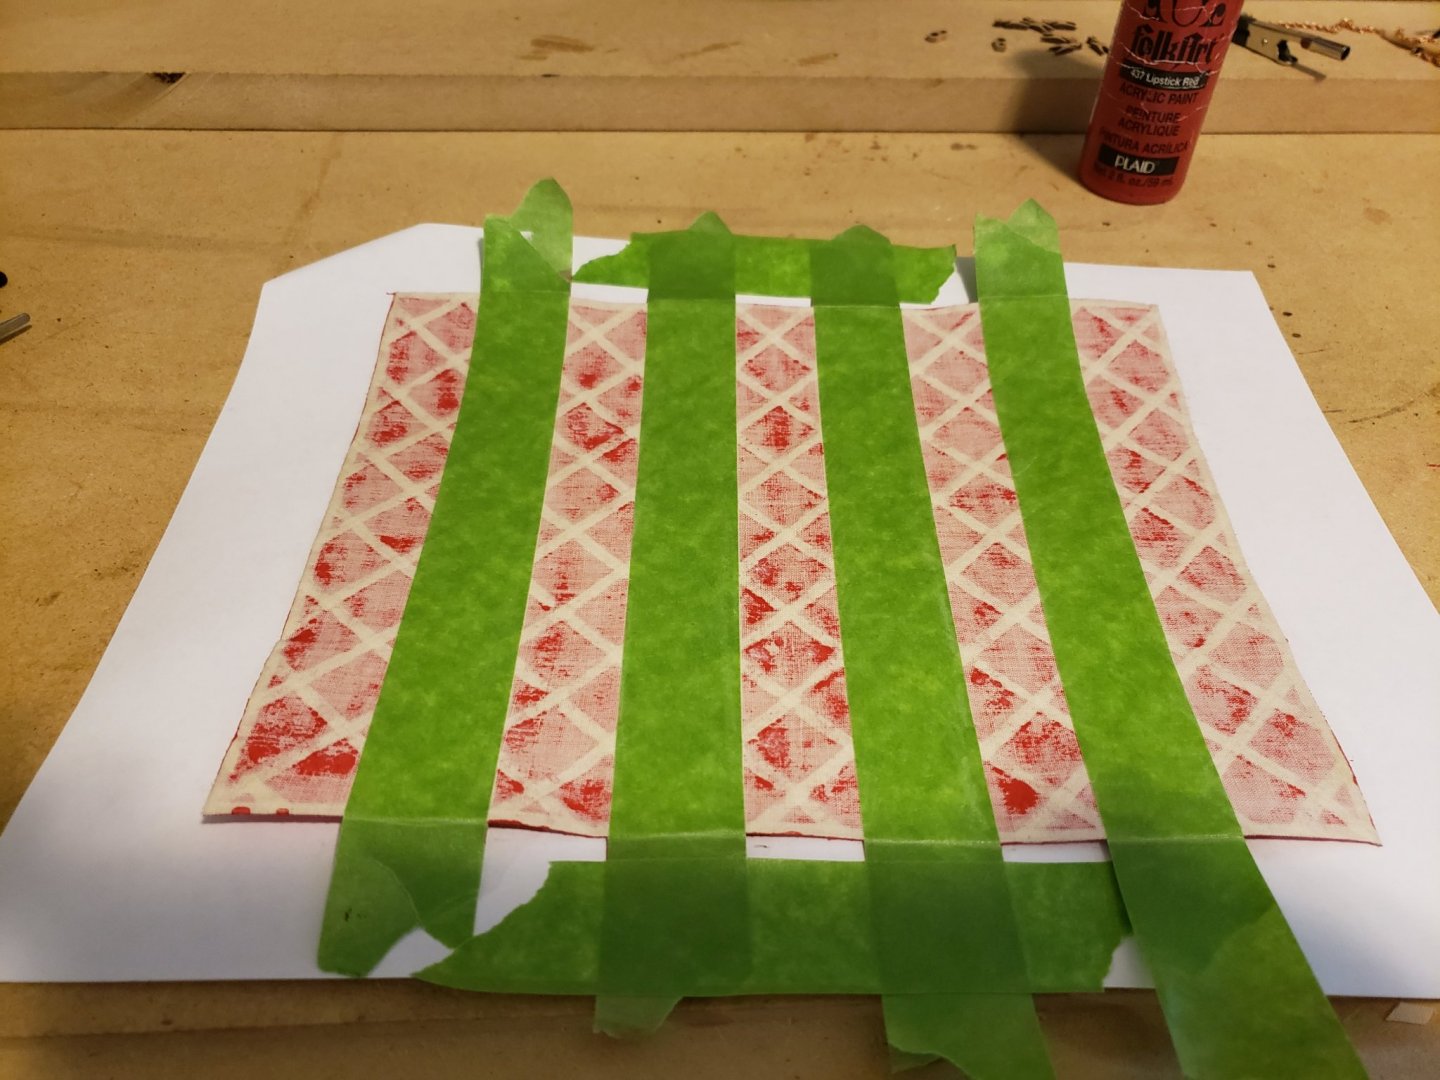
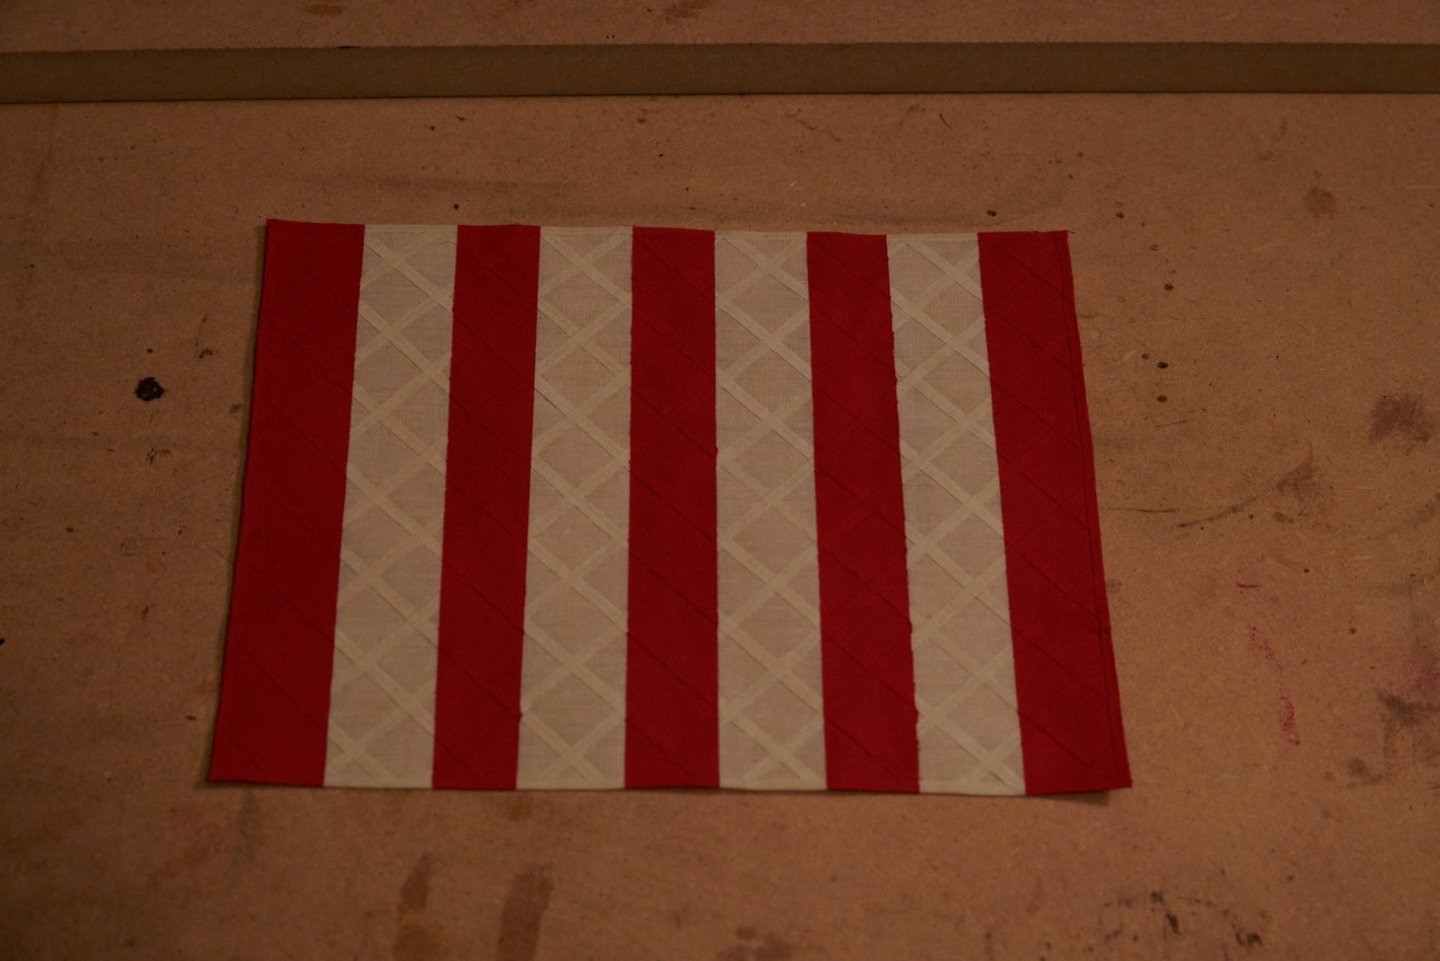
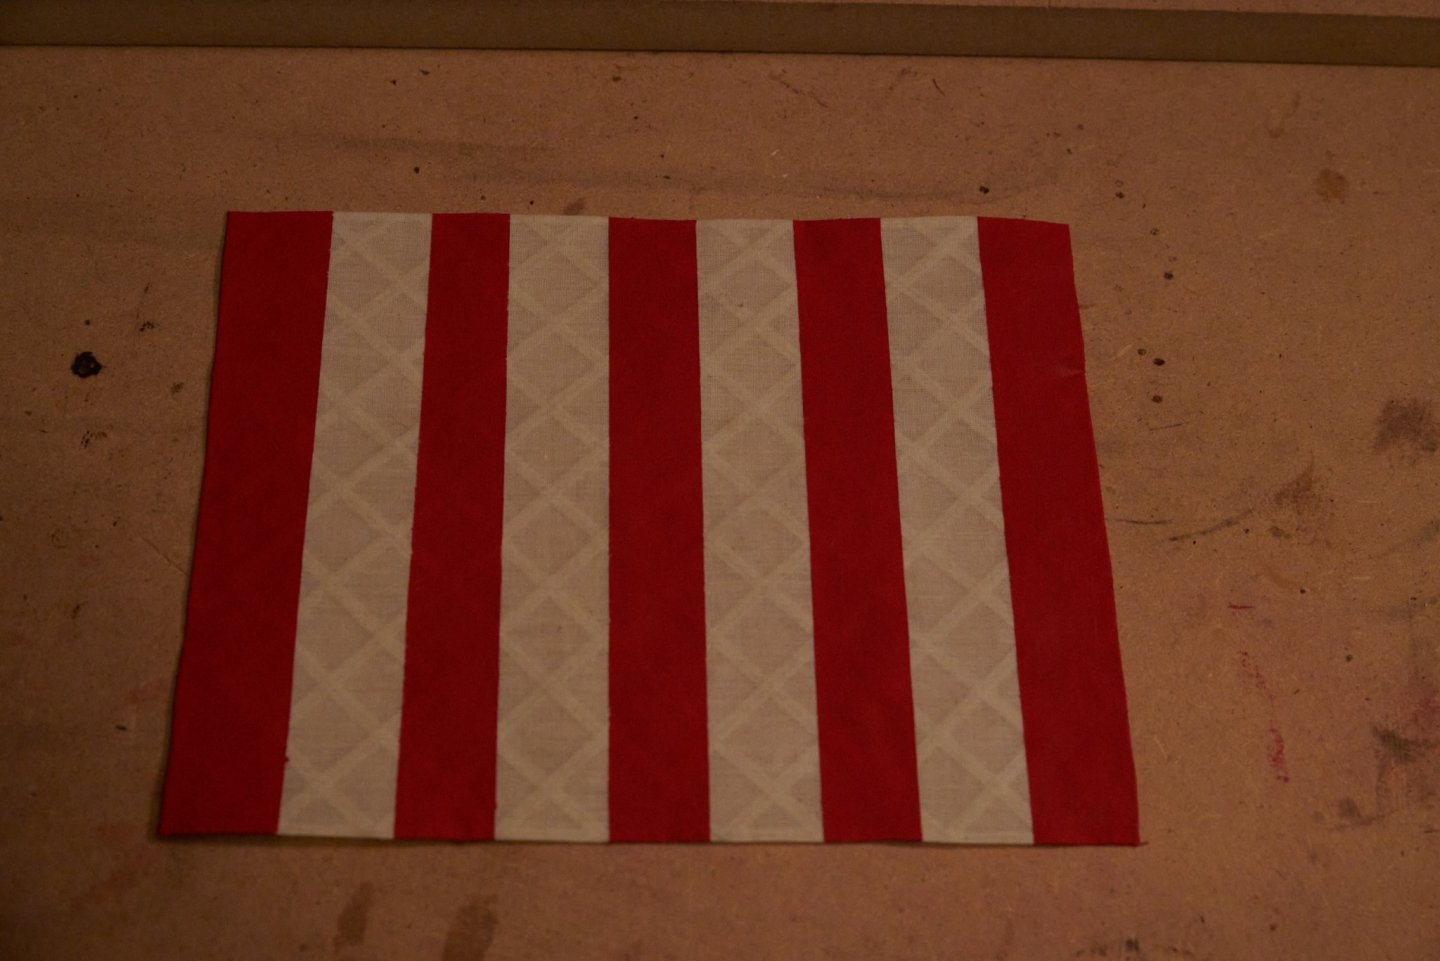
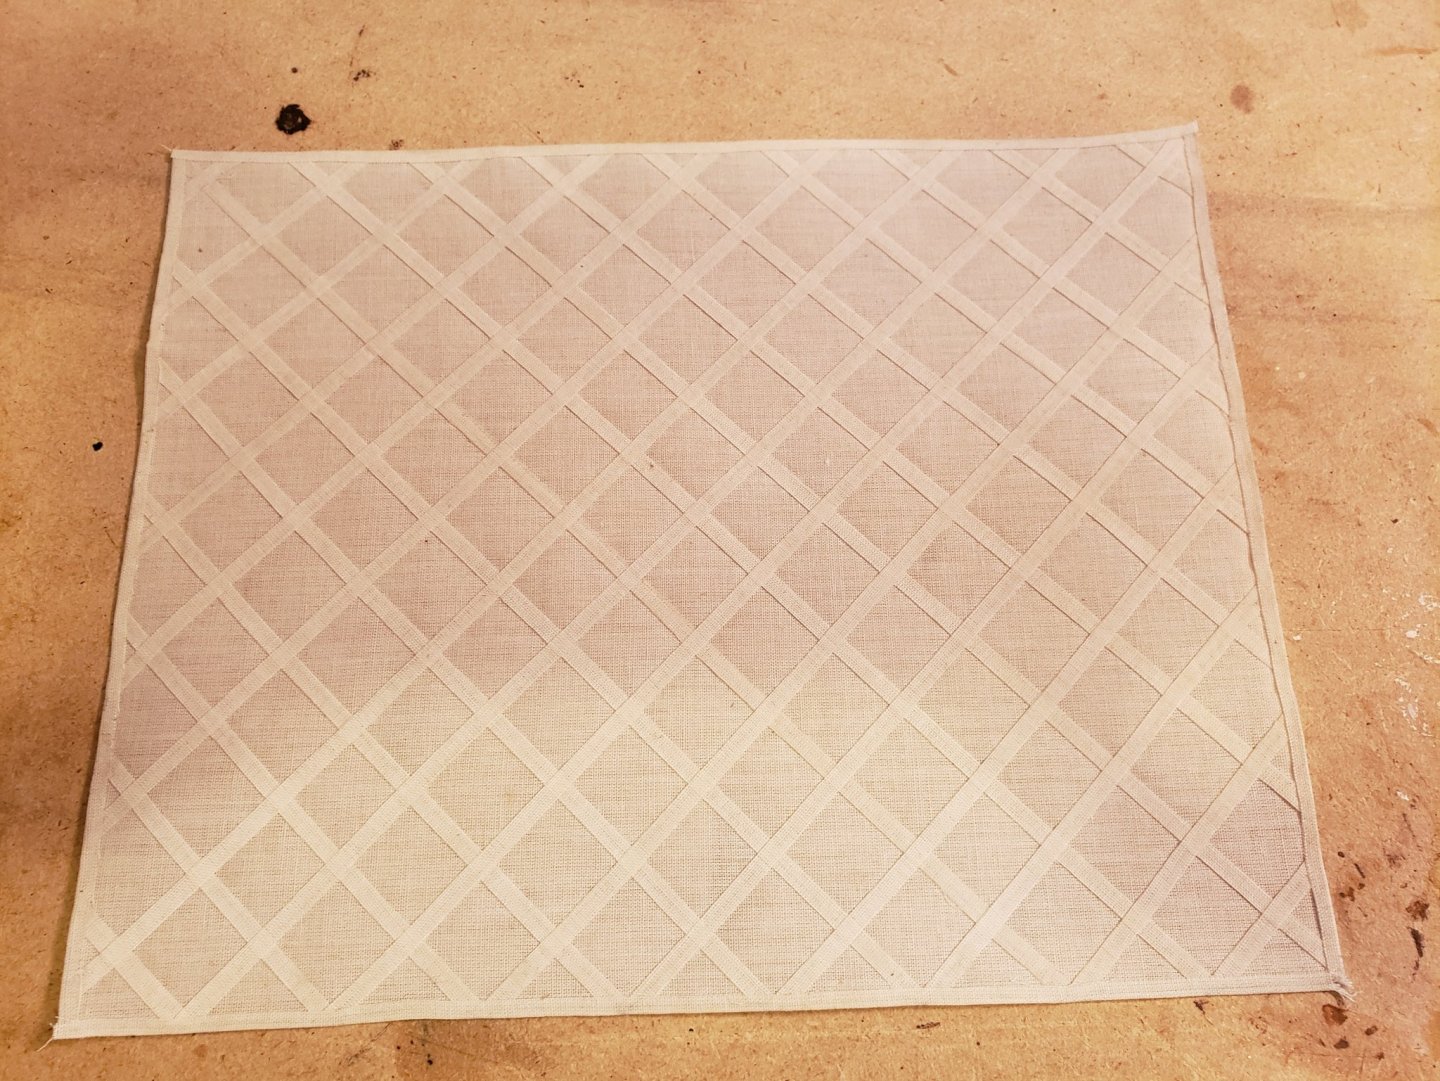
Next up we have the sail making. I first soaked the entire sheet of provided material in some tea for about 15 minutes and let it hang dry. It did dye it slightly, next time I may need to soak it a bit longer. I then soaked it in a 50/50 solution of water and white glue. It was then ironed and laid out over the plans. I very lightly, in pencil, traced out the pattern of the sail, leaving a slightly larger edge for the hem, and the criss cross pattern. Then I cut out the main sail and cut out several strips of the criss cross pieces. I took the left over water glue mixture and poured it into a small jar and then I laid one end of the strip in the solution grabbed it with tweezers and while pulling the soaked end up and out I pushed in the tailing end into the container. I continued to pull it through the mixture letting it slide along the inside edge of the container which acted as a sort of scraper or drain pulling some of the liquid off the strip so it wasn't completely soaked. I had previously tried to run it through my fingers but that ended up pulling too much off and it didn't hold after lying it in place. This is the whole thing done and the outside edges folded over and glued in place. The entire thing was then ironed again, which helped hold the edges in place. I did a couple of test runs on scrap before doing this on the sail. I taped it up and painted the red stripes. I was very careful to take the back of my tweezers at the handle and press down on the tape sealing the gaps around the strips so the paint didn't spread where I didn't want it. Also after seeing some other build threads here and seeing my own practice runs I decided I needed to paint both sides of the sail. The Vikings would have sewn together red cloth with white cloth, they wouldn't have used paint so both sides would essentially looked the same. So I tried to replicate that, and besides the paint soaks through just enough to make the back side look not all that nice in my opinion. Front side. Back side taped up but without paint yet, here you can see how it soaks through. I also didn't yet remove the tape from the front, I used it and what was visible through the sail as guides for applying the paint on the back side. Finally the completed paint job, front side. Back side. This is where the ship sits now. I need to sew the bolt rope around the sail and make the clews in the corners. I need to shape the yard, make the parrel, do all the rigging, and make the oars. I intend on attaching the sail to the yard before attaching to the mast so I need to wait until that is done before attaching the standing rigging. I intend to let the yard and parrel sit down on the deck and not hang on the mast until after the standing rigging is in place. But I need to slide it over the top of the mast, so standing rigging must wait for now. I plan to park it in front of the TV tomorrow and watch a movie I've seen already so I don't have to focus too much, while I sew the bolt rope and clews on. I will update once I have some more done, it shouldn't be too long, I expect to have the rigging done in the next couple days or so. The oars I'm not sure when they'll get done, but they will. Fortunately, I'm a teacher and this is summer break so I have a lot of time to work on ships right now. I'm hoping to have my next model well on the way before summer is over and the next year begins.

-
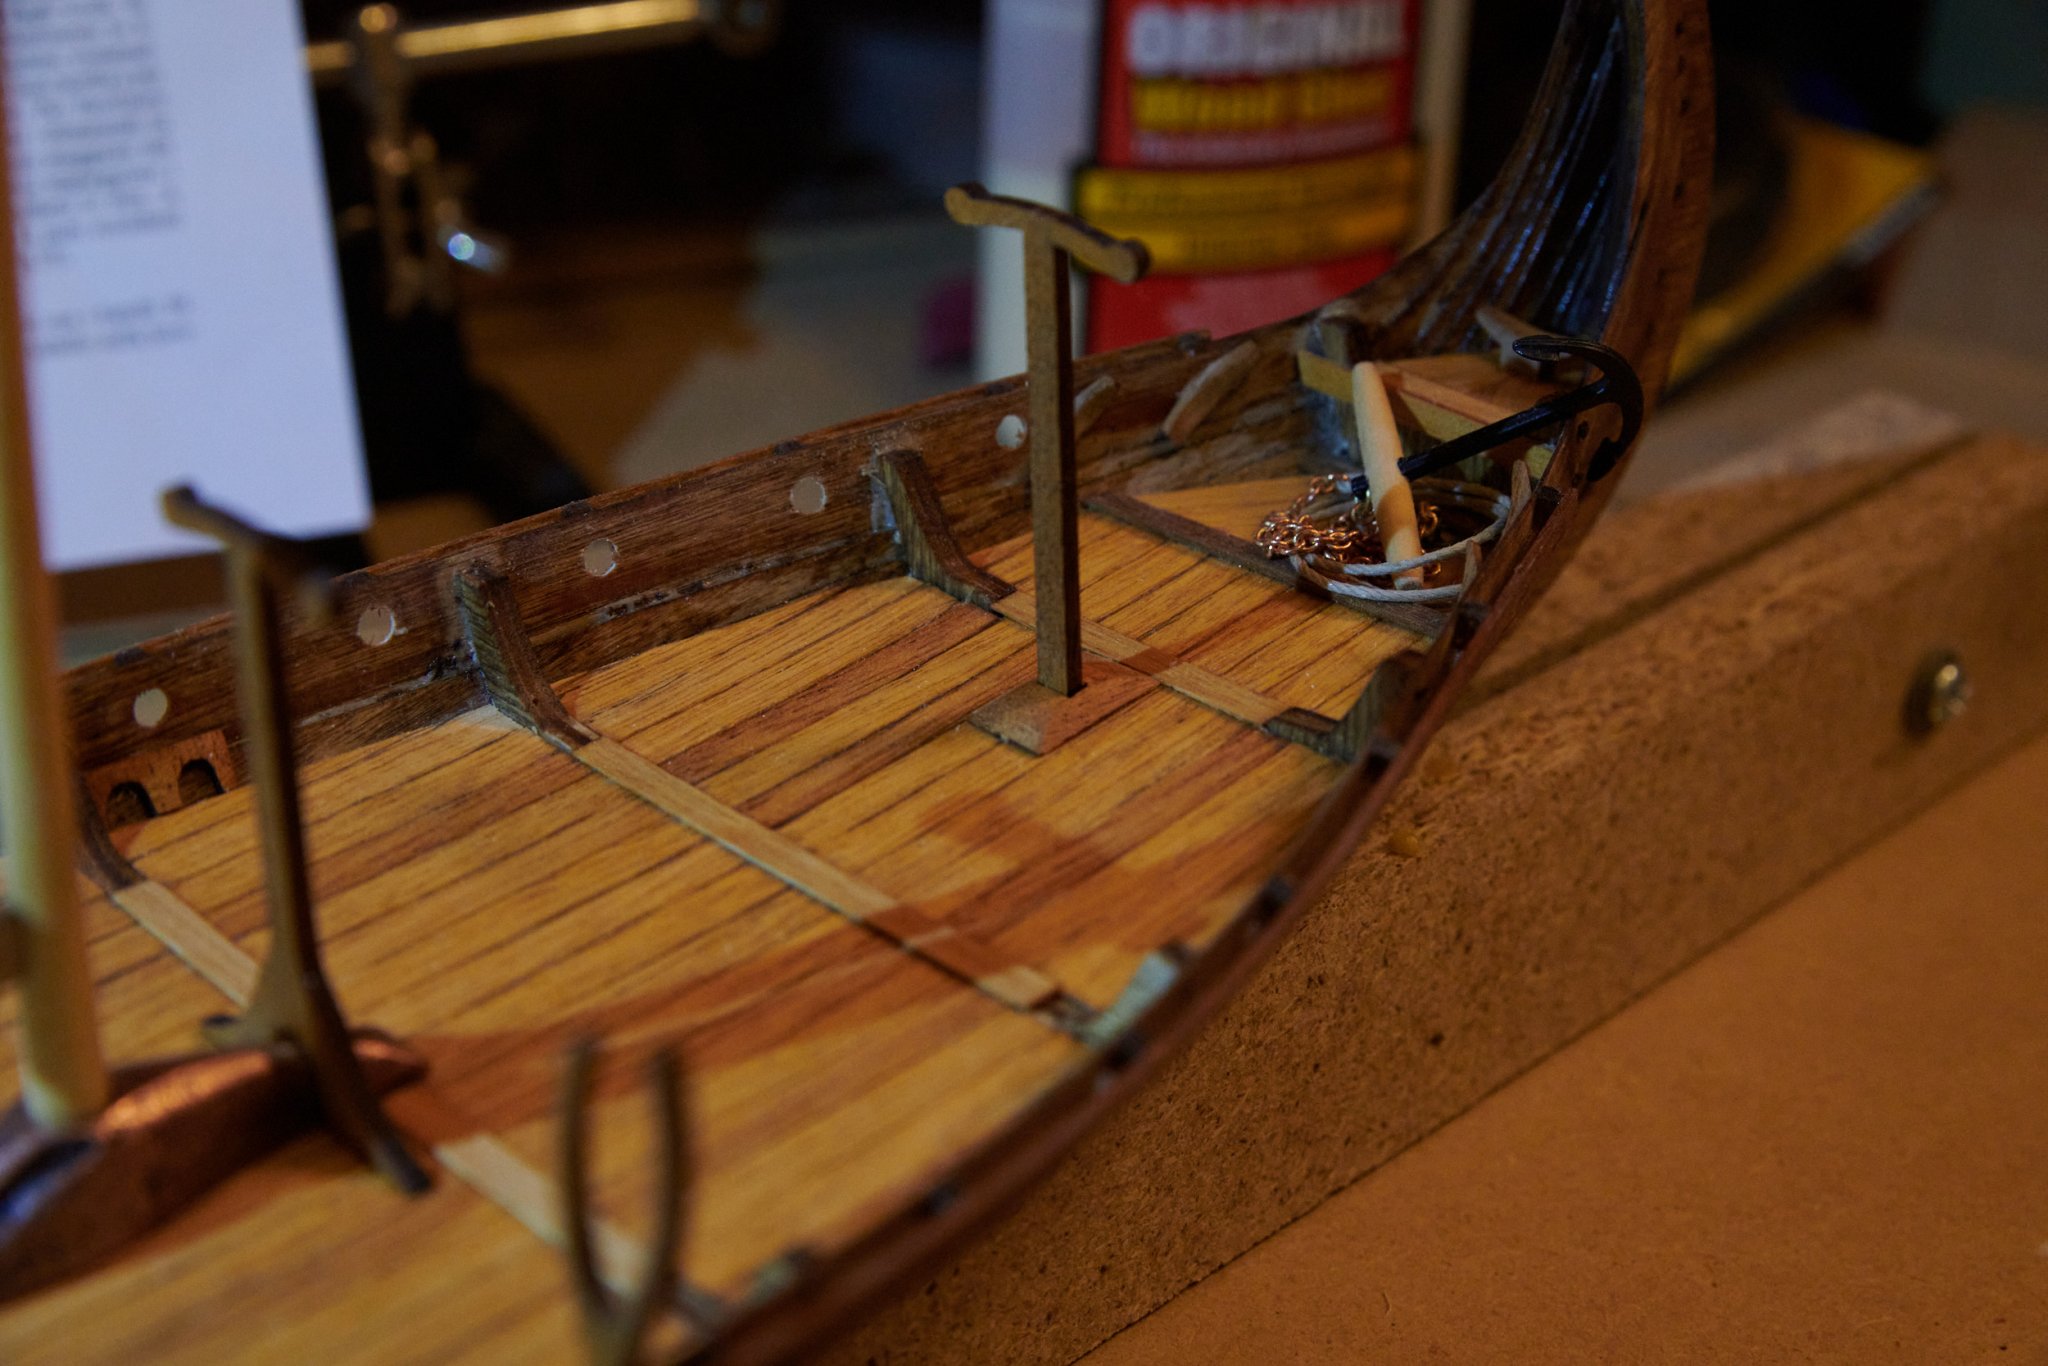
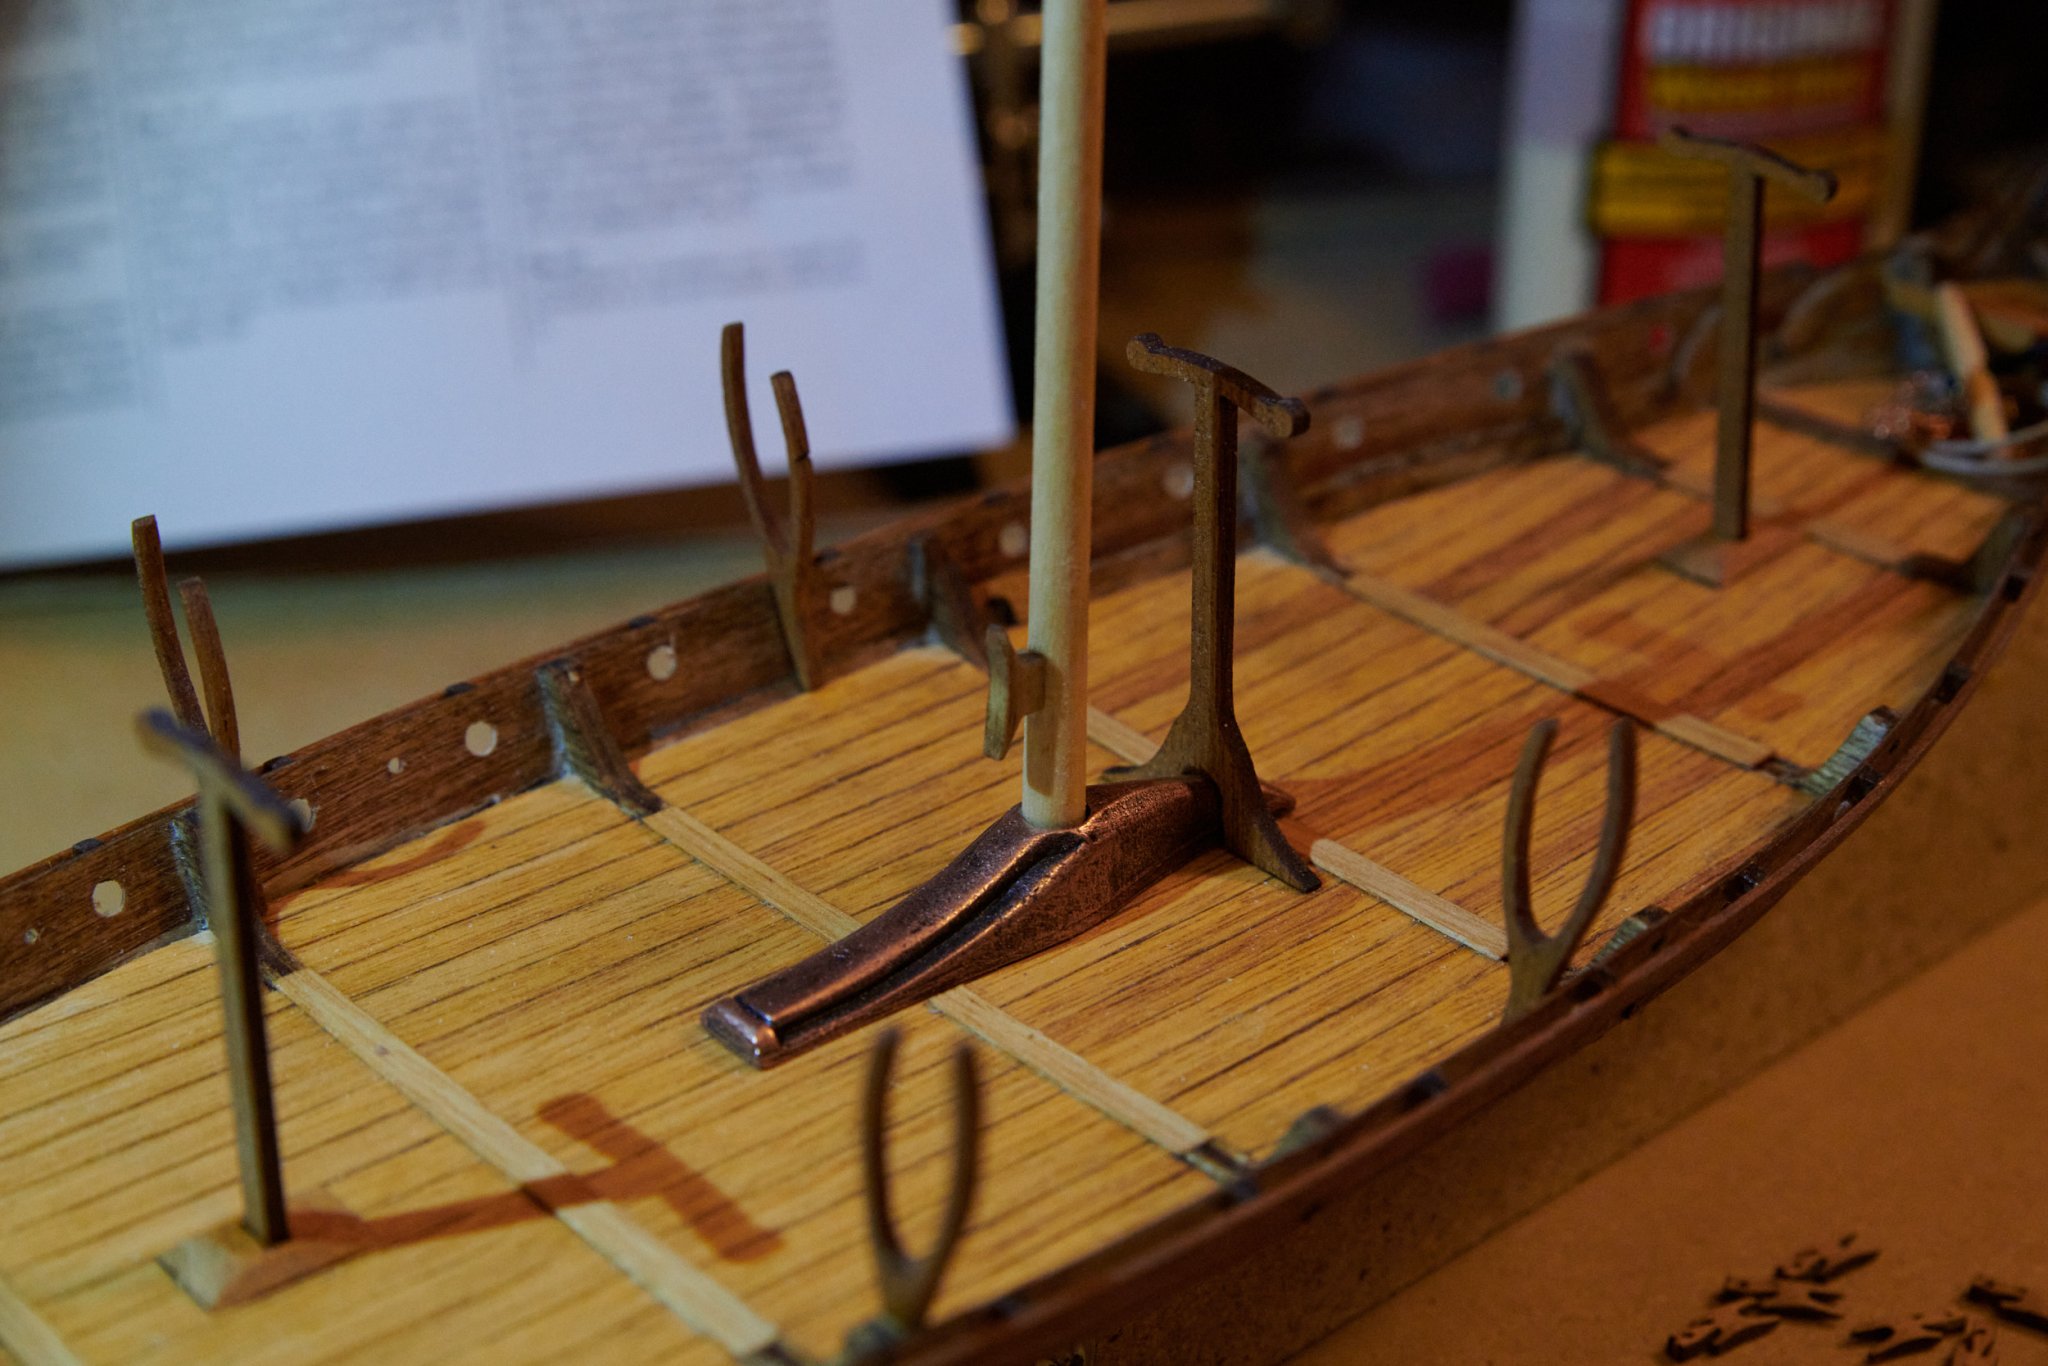
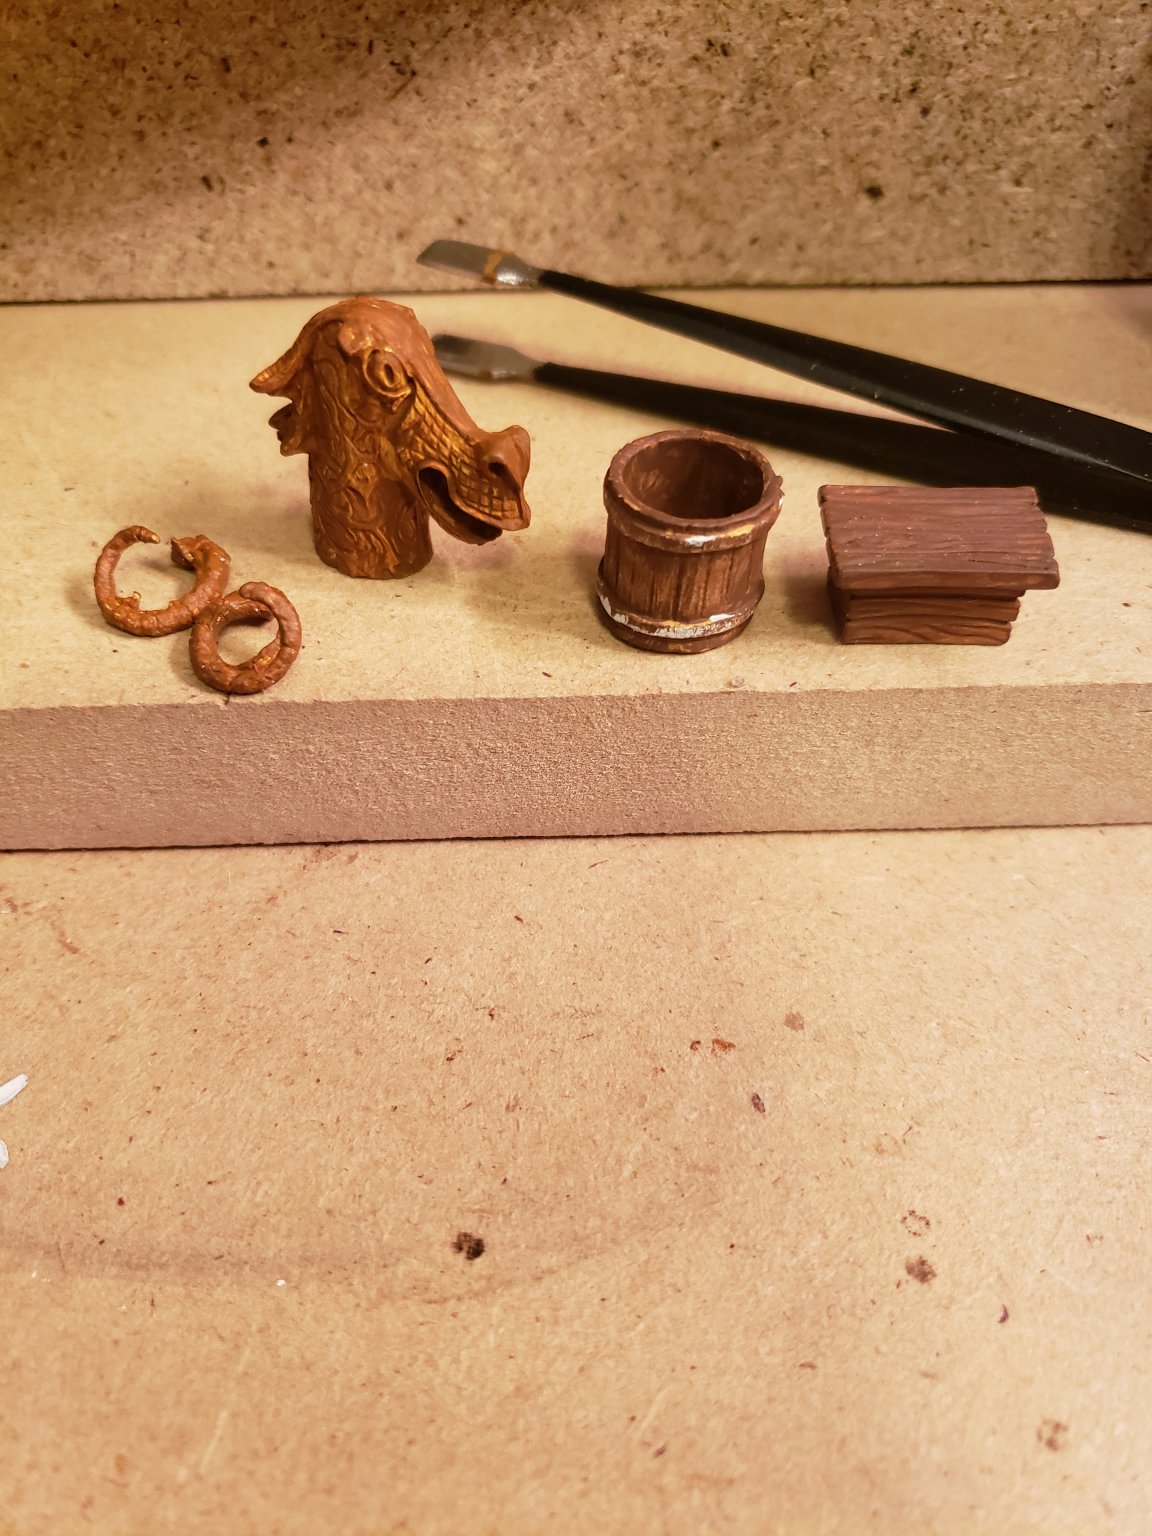
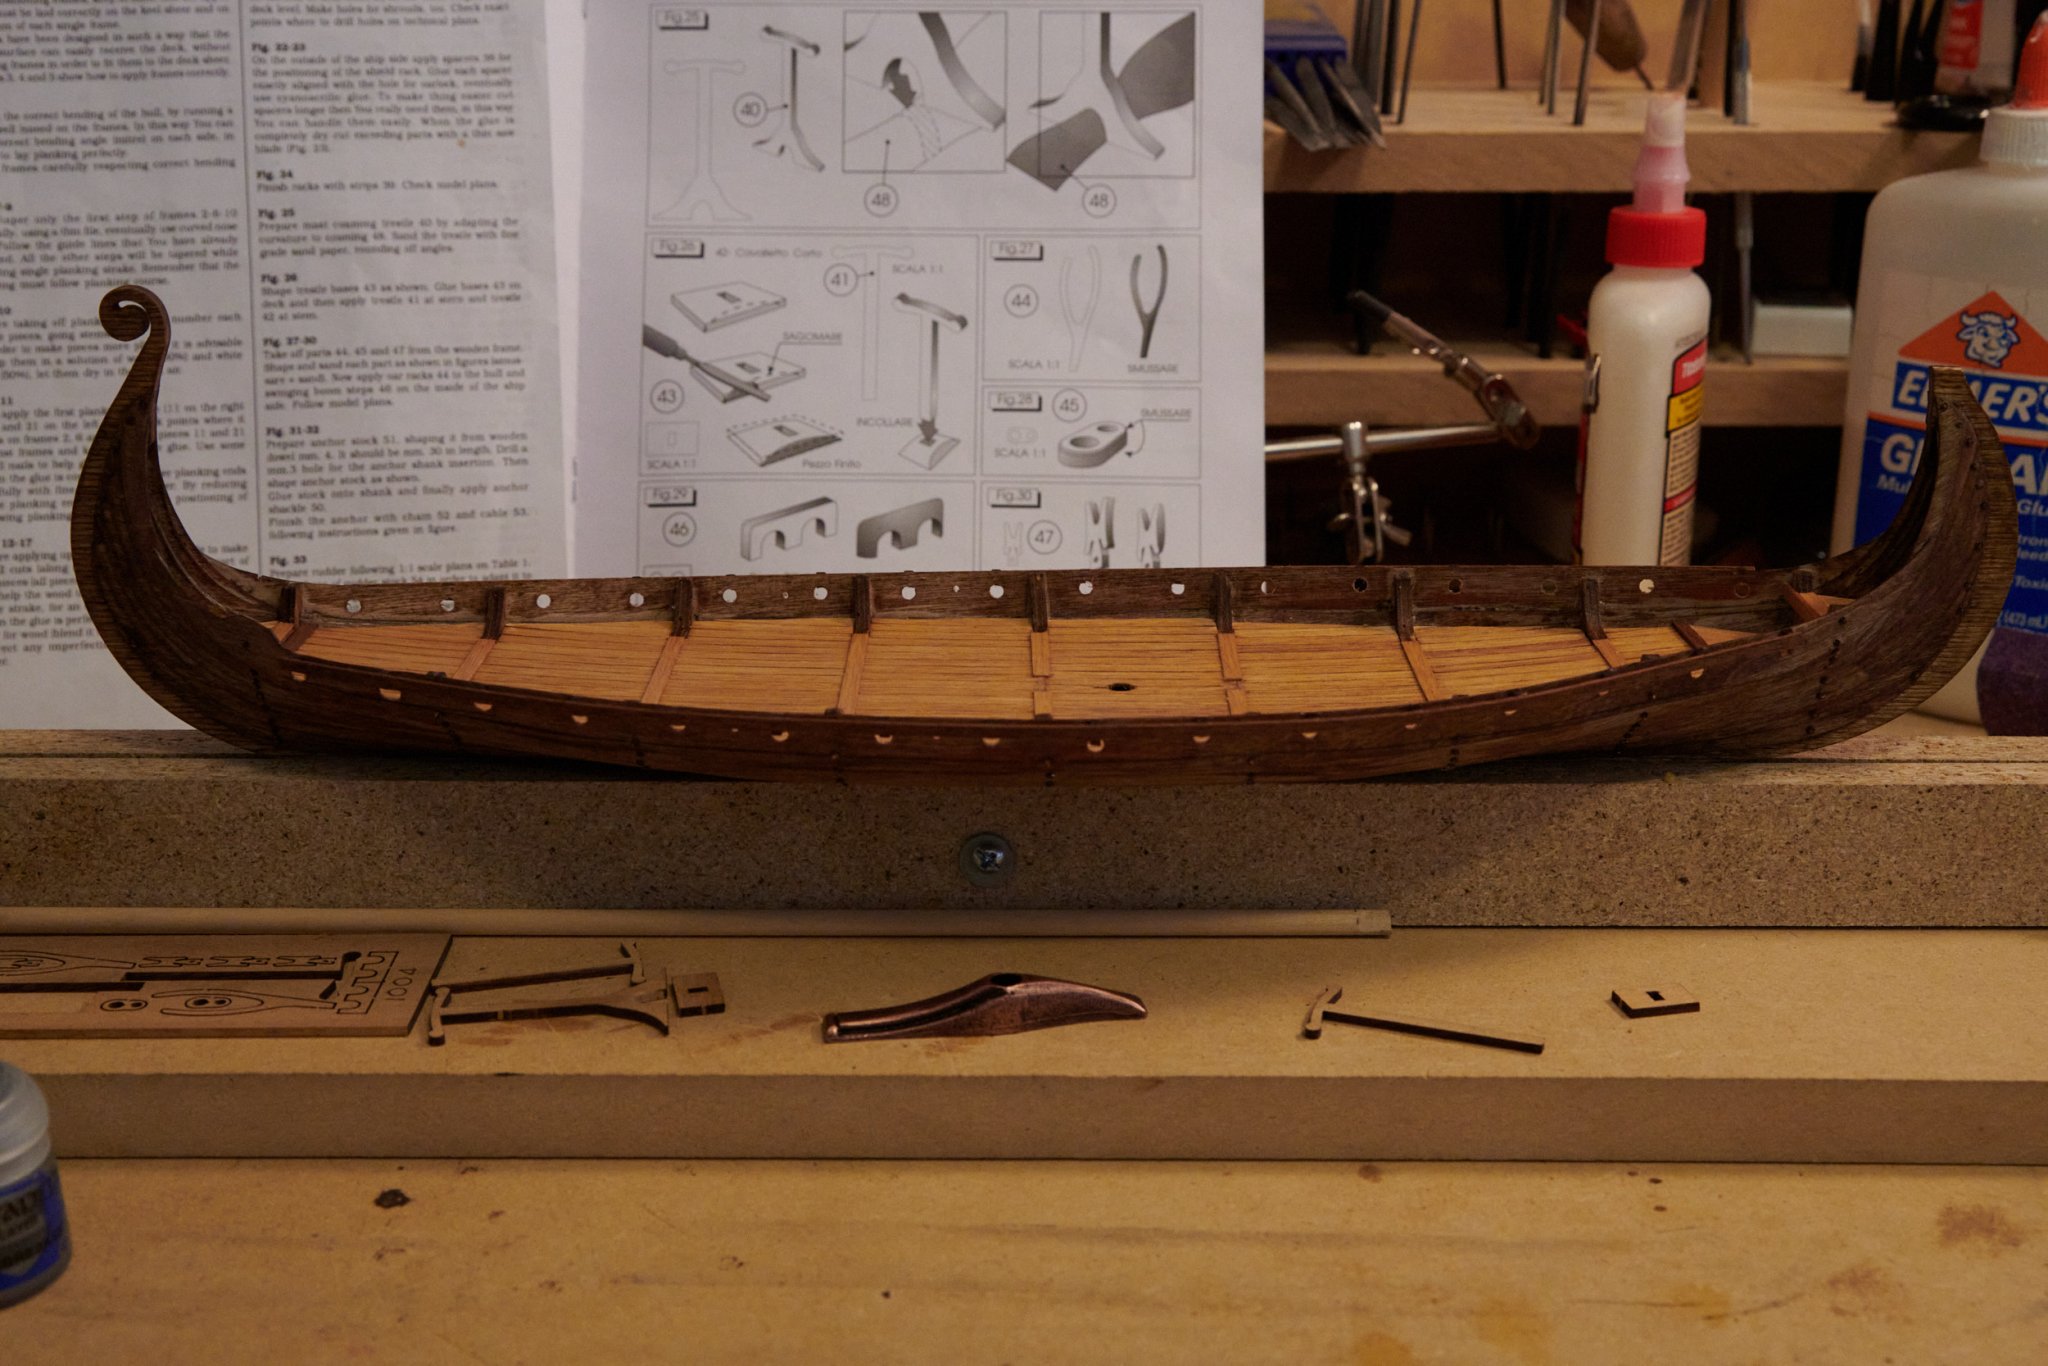
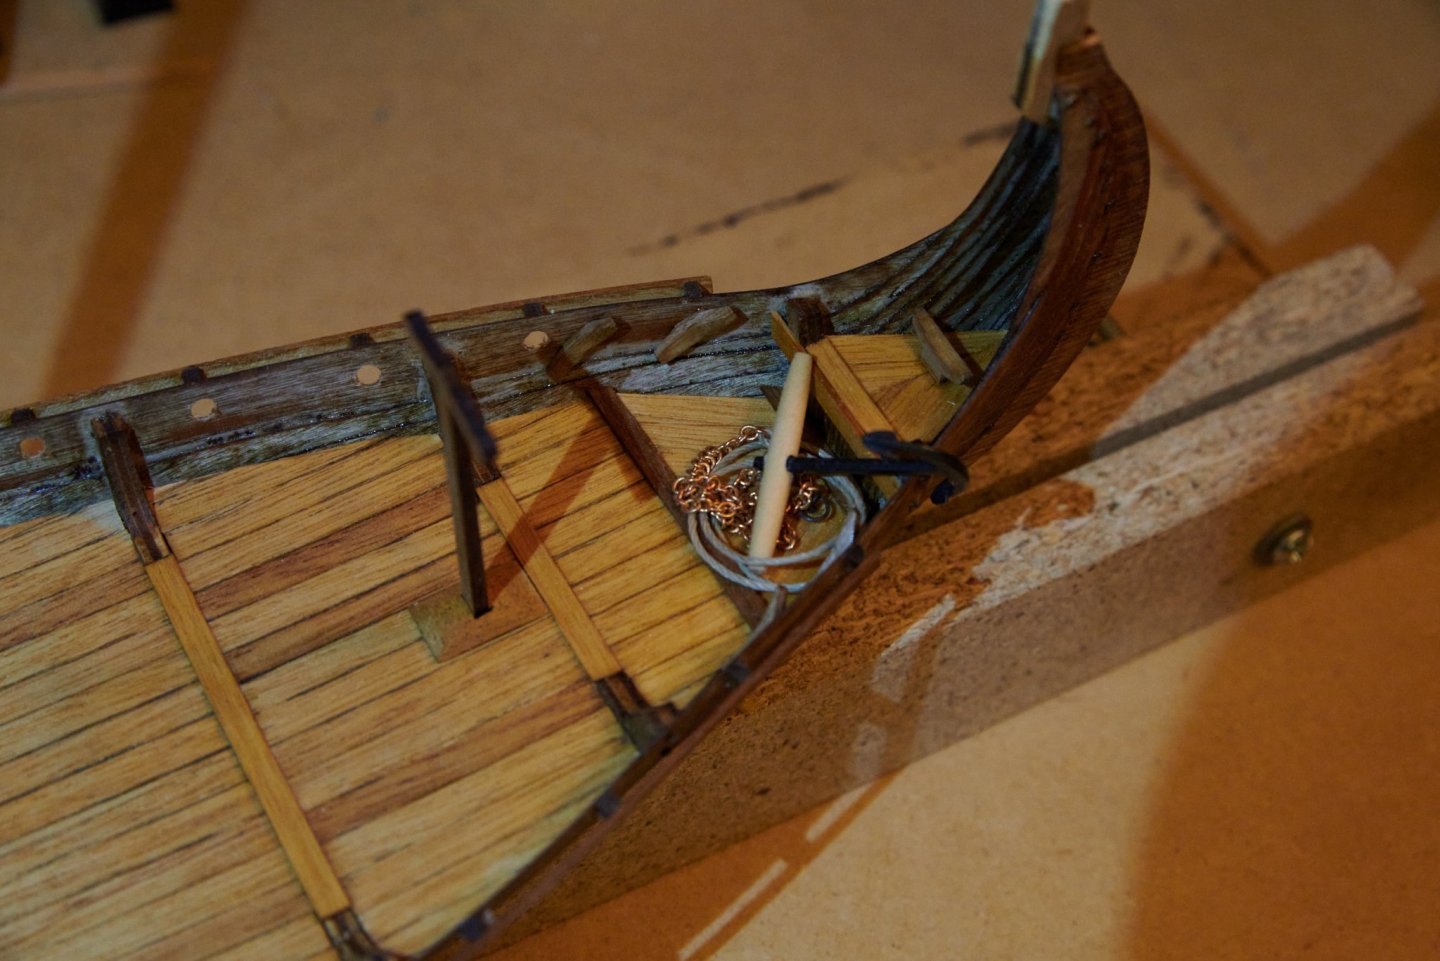
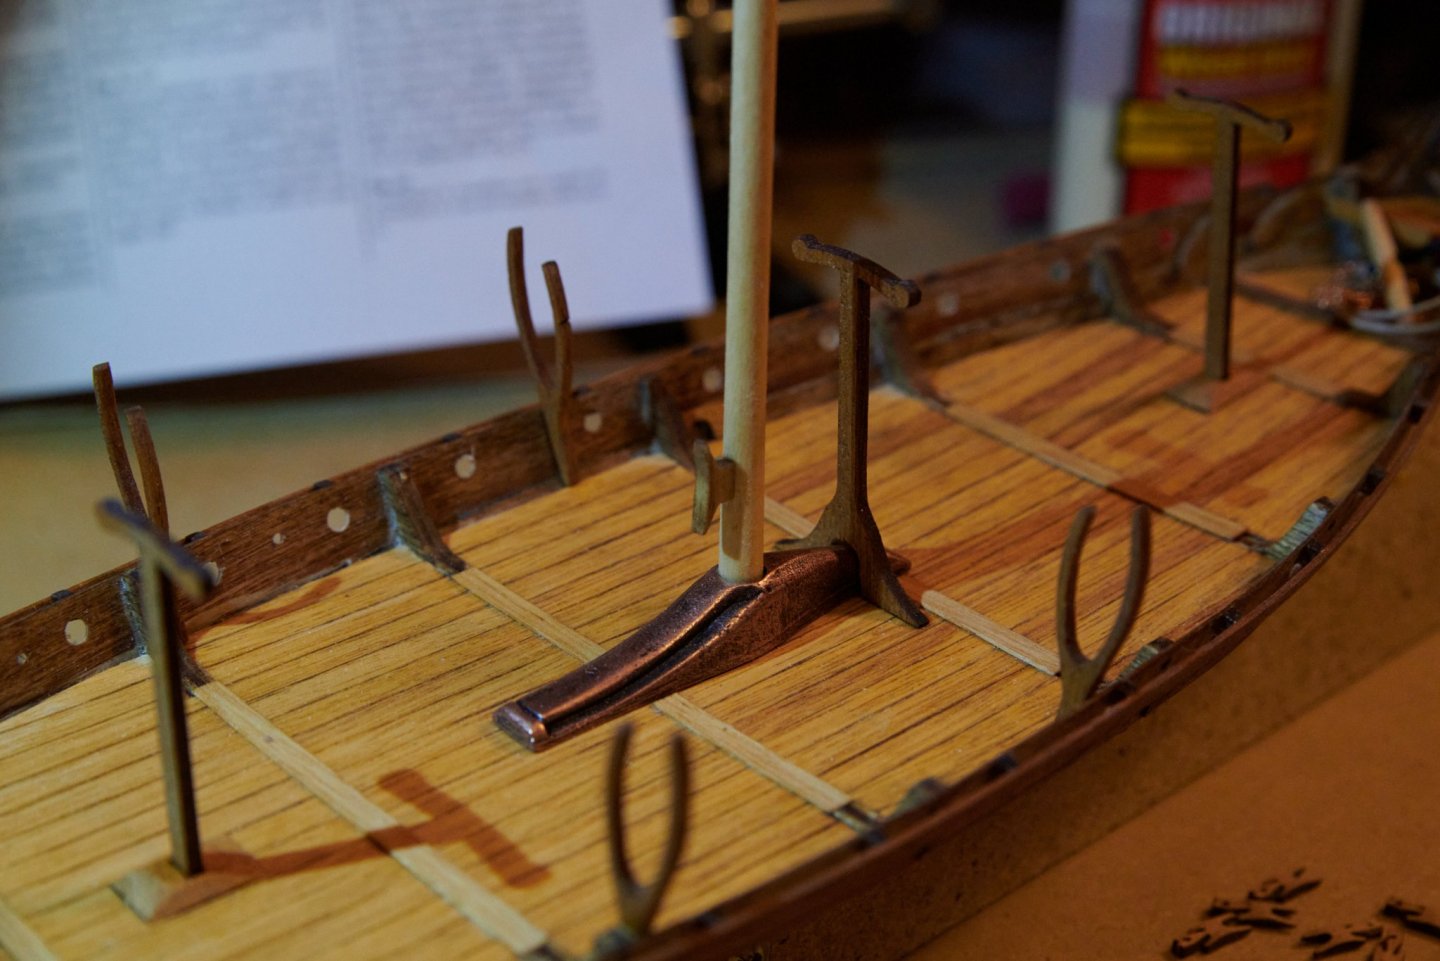
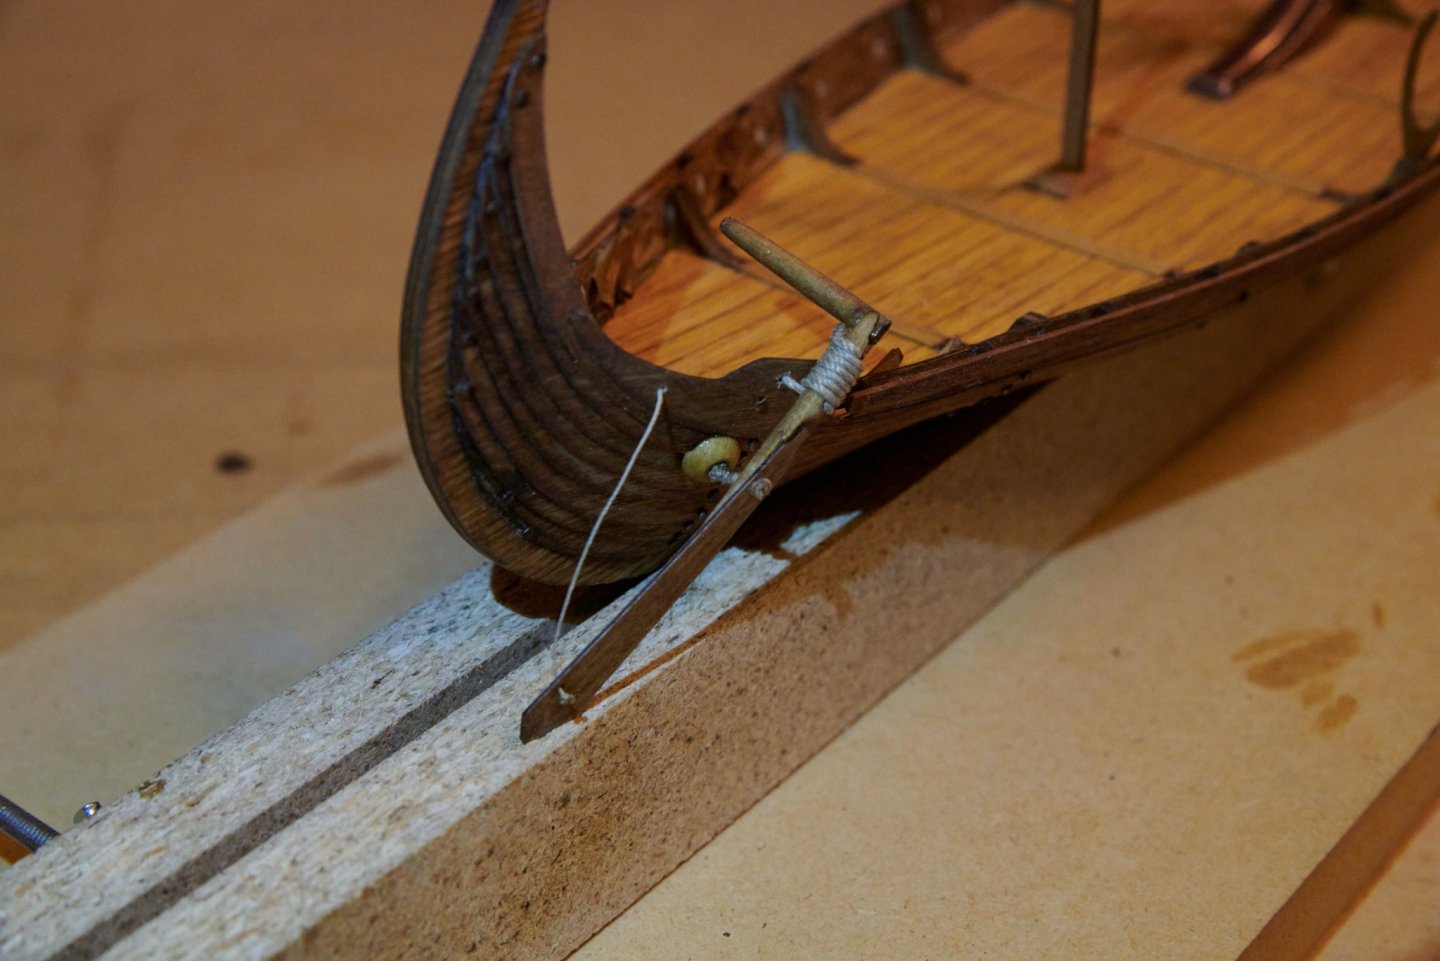
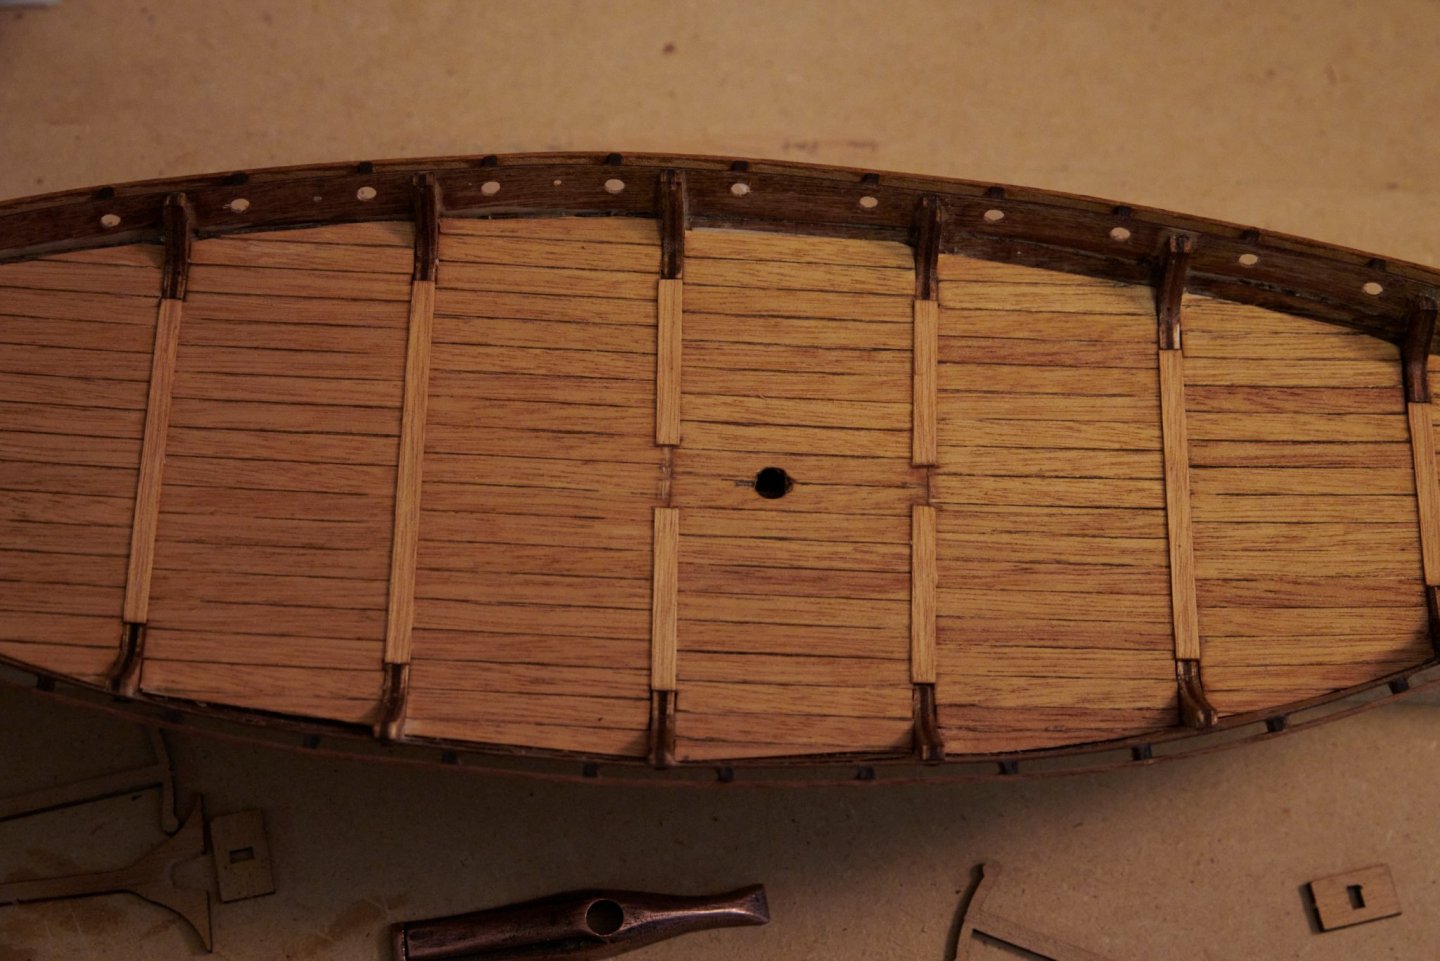
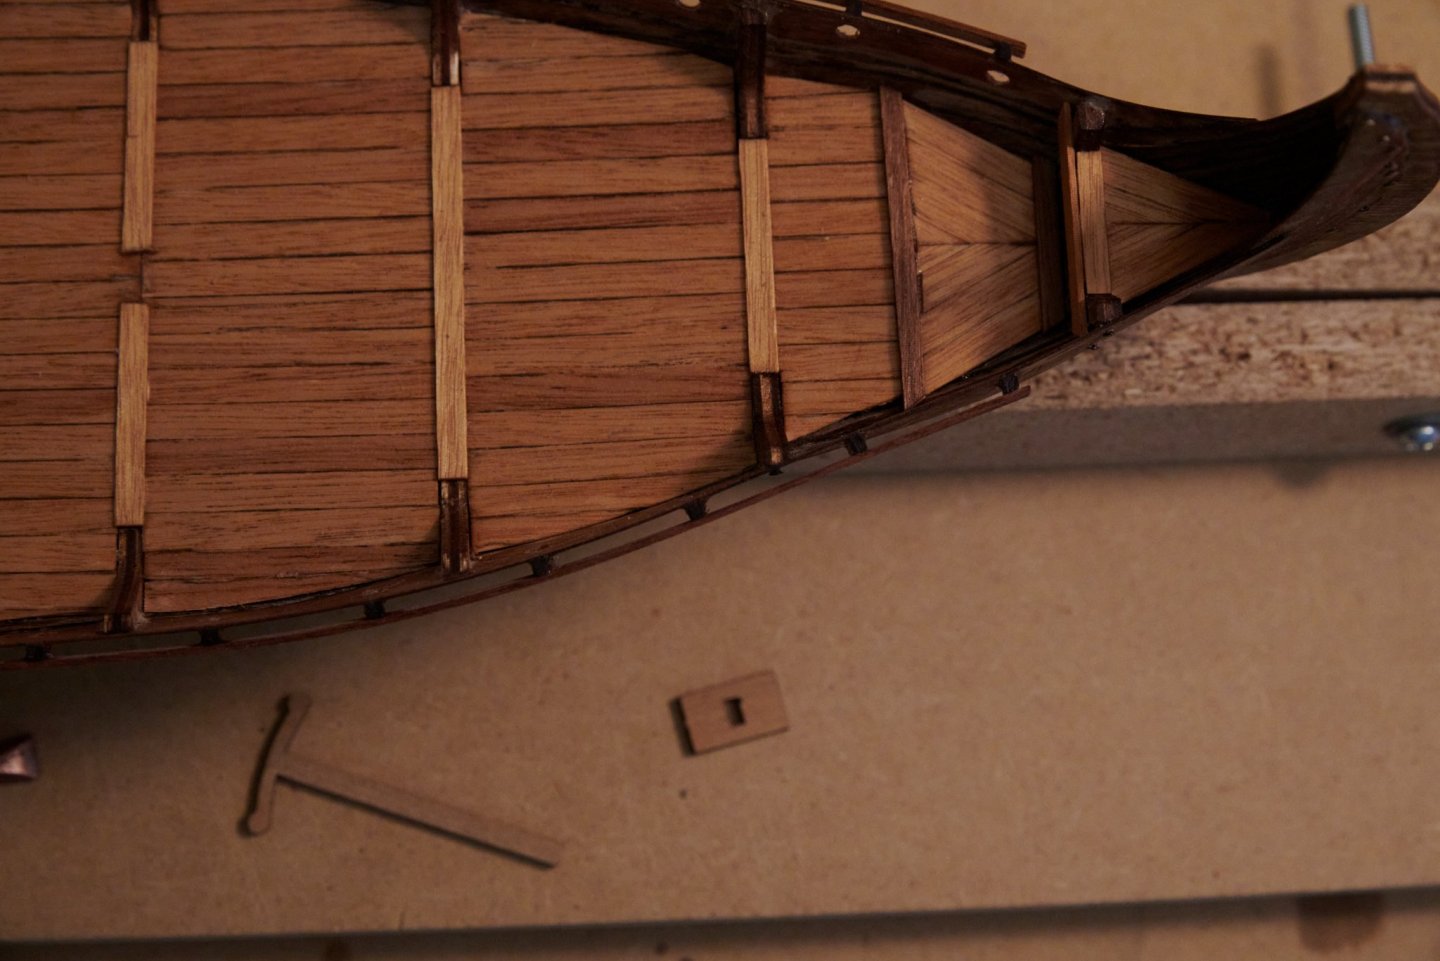
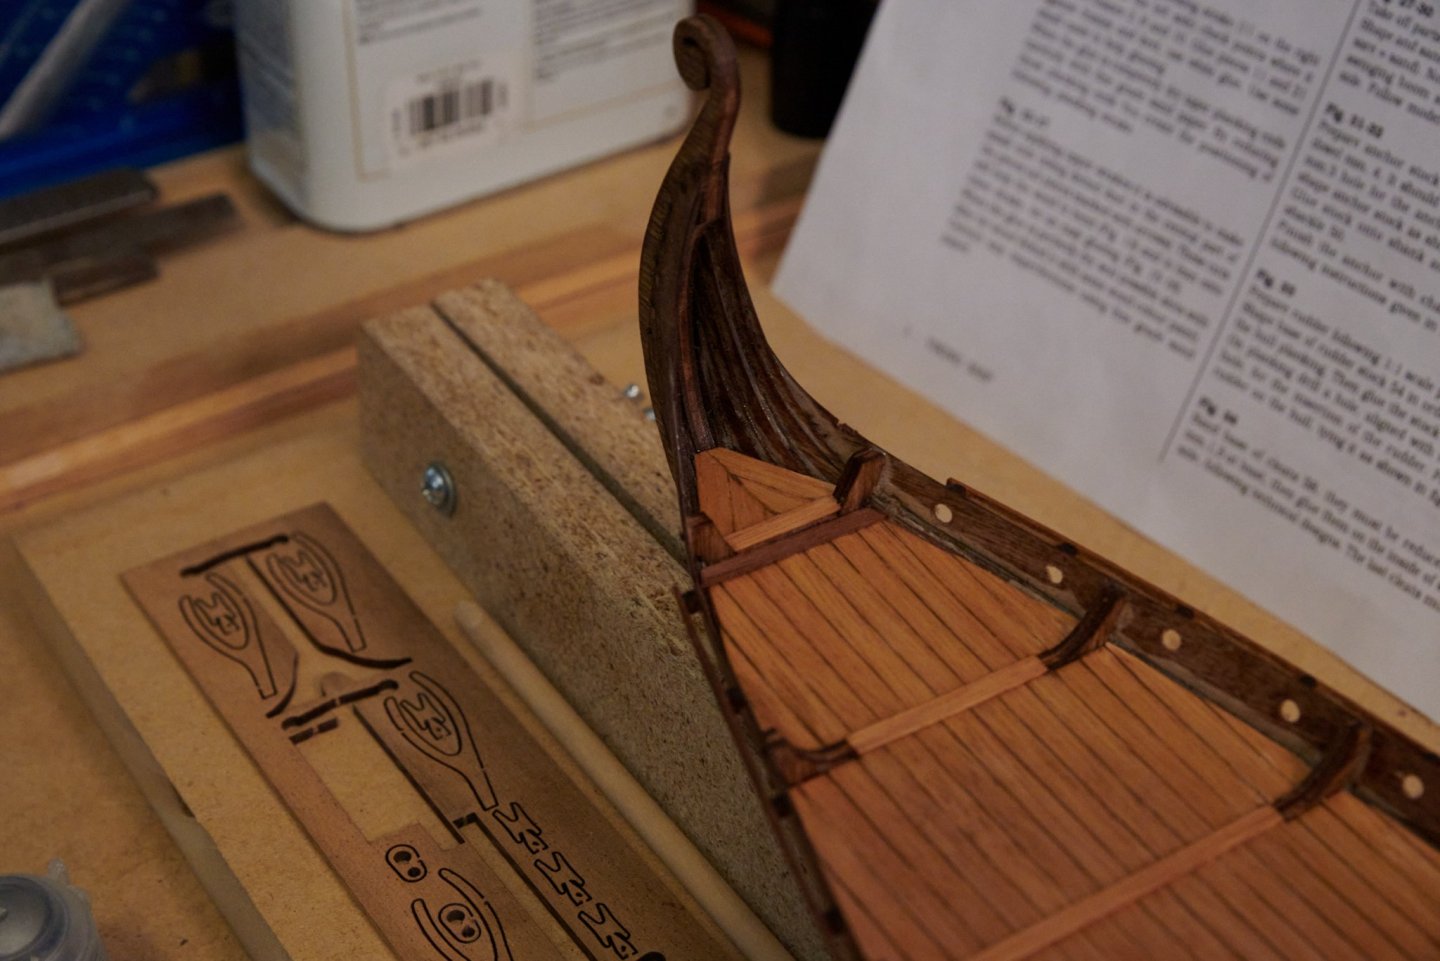
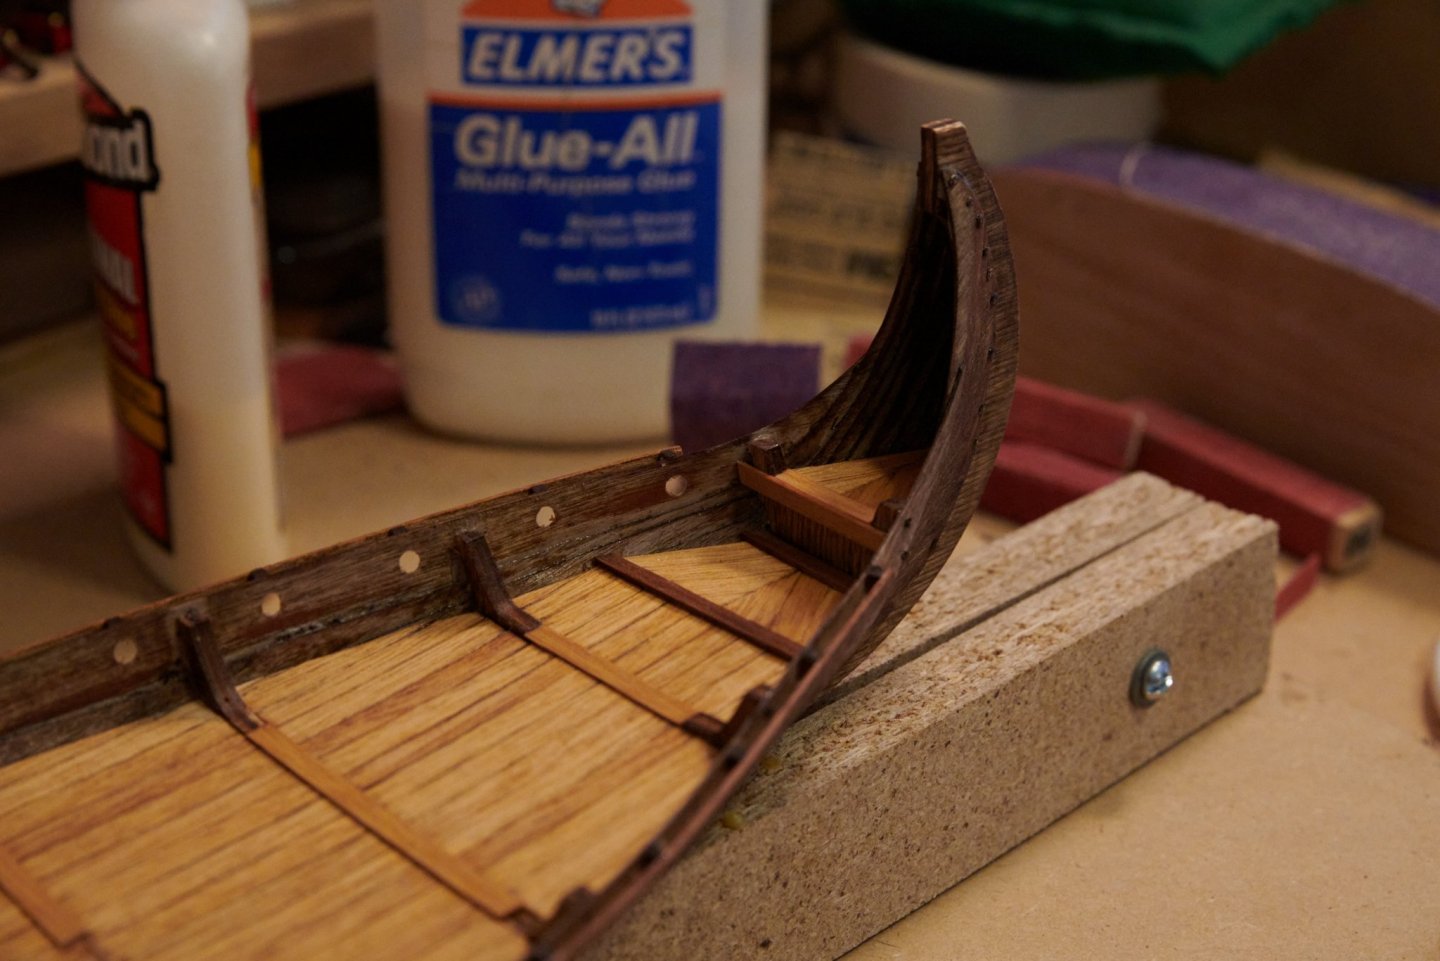
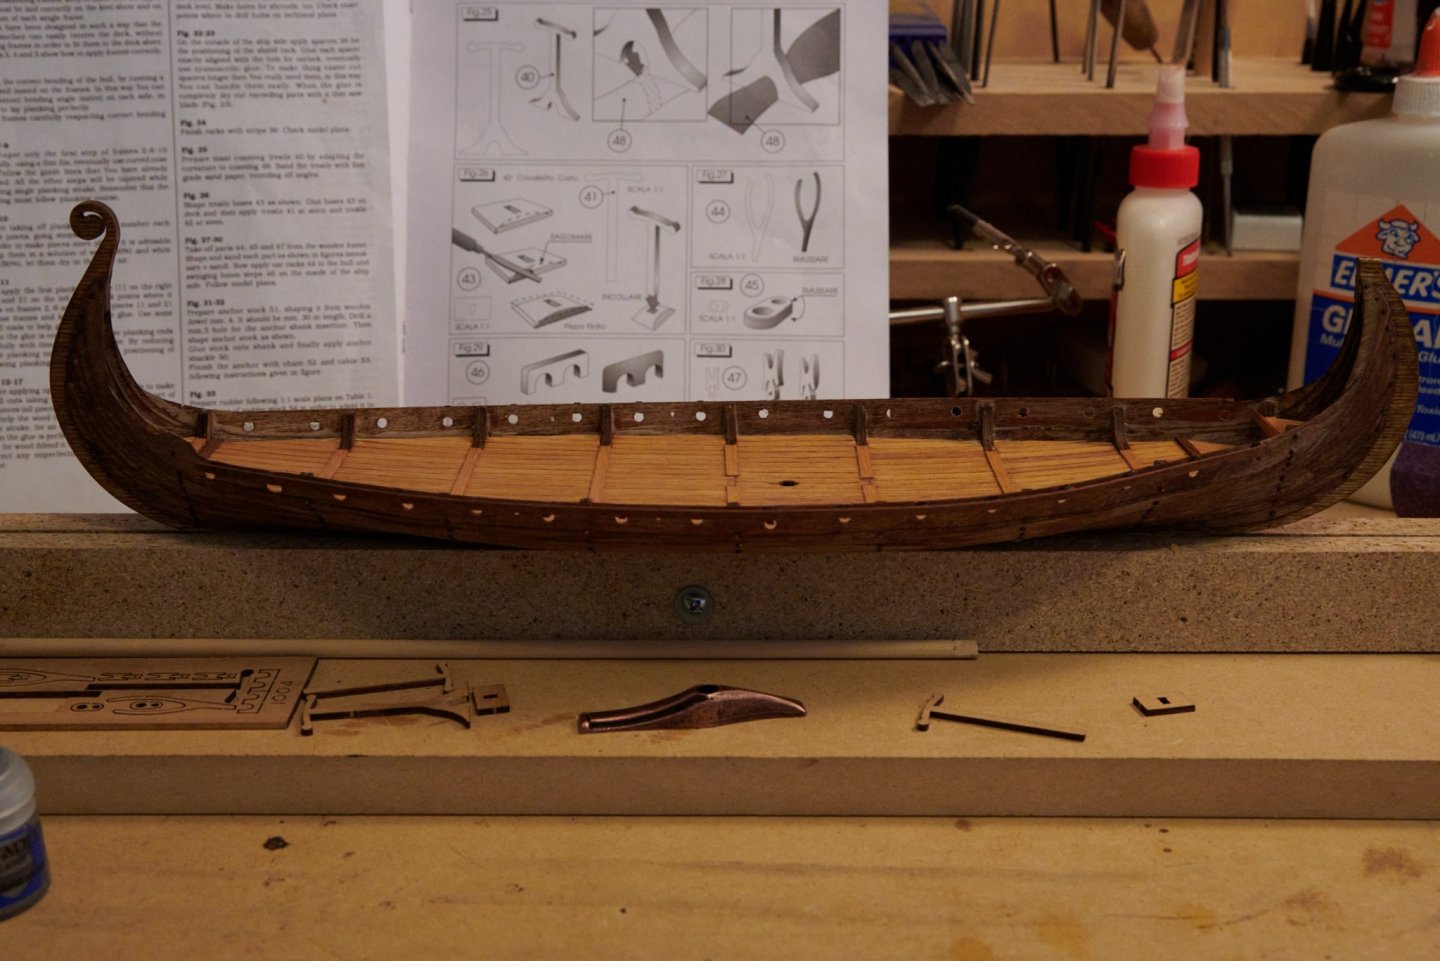
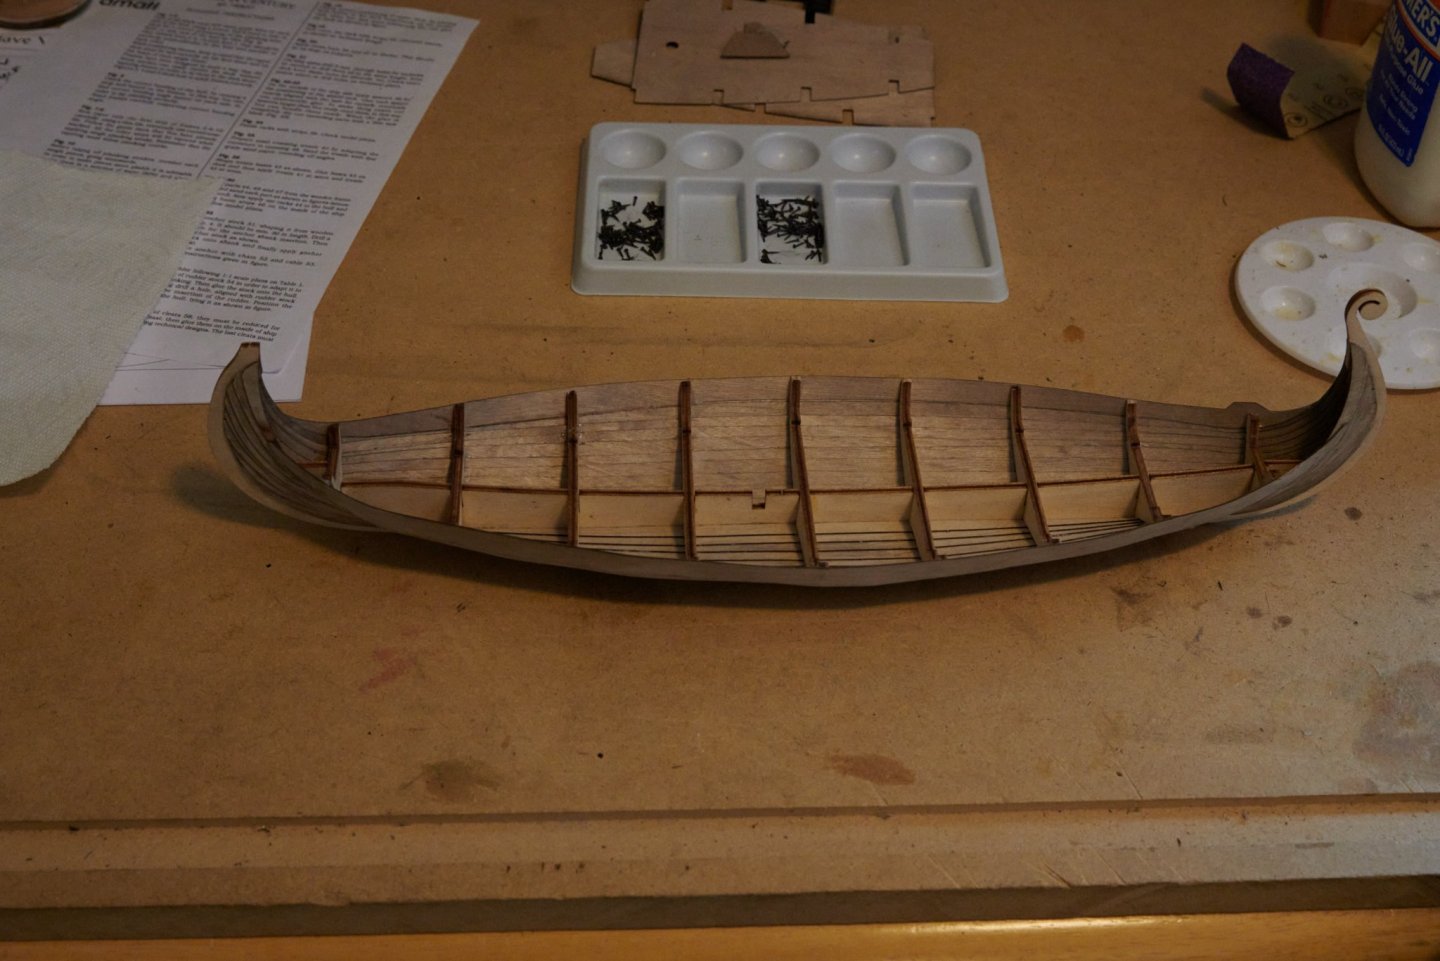
Next up I started attaching the rest of the items to the deck. There are 2 trestle bases, and one mast coaming trestle, which is centered over the antique bronze mast coaming centered on the deck. On the port and starboard sides are two oar racks each where the oars will be stored when under sail. There are 5 cleats attached on the side walls of each side of the ship as well as one at the bow and one on the bottom of the mast. I also build the rudder, it is made up of 4 pieces and I wish I had gotten a photo of those pieces before assembly. In the photo below it is still sitting in my keel clamp and that pushes the rudder up slightly, it will hang down just a little bit more. The part that is touching the keel clamp is pre-made and is the same thin material the planks are made from. Moving up and to the right from the bottom of the rudder you will see a small lighter colored round piece behind it, that is the rudder stock and it has a hole through it with a piece of rope running from the rudder to the inside of the ship. It happens to be under the decking so I made a small wire eyelet to attach the rope to and the eyelet is bent in an upside down V shape. When pushed through the hole it expands slightly preventing it from pulling out. The loop in the eyelet is inside the hole in the rudder stock and then the rope is knoted on this side of the rudder. Moving just slightly up from there we come to the end of the pre-made rudder and to the two parts that were both made from 4mm dowel. They were shaped according to the images on the plans and a tenon was made to attach the handle. The plans called for a hole in the raised section of the top plank for another rope to go through to the rudder. This rope combined with the above mentioned rope kept it attached and in the proper position for functionality. However, the plans weren't very clear on how to attach the rope or the rope wrapping. So what I did was drill two holes through the center of the rudder. The hole on the top right closest to the handle has the rope knotted in the back of the rudder, then I began the wrapping and went through the hole in the bottom going towards the ship. This is the line that went through the hole in that raised section of the top plank and is knotted behind it. The anchor was another thing I debated with, unfortunately I didn't start this debate until after it was partially assembled and I didn't want to take it apart. The kit supplies the short length of chain seen here, but then the instructions say to attach a section of rope to that chain. I debated on using the chain at all, because it seemed odd to me that they would use two different materials. I would have thought either use a longer chain or just use rope. Maybe someone can chime in as to why this is. In the end I already had the chain attached to the anchor and one end of rope attached to the deck. They didn't supply an eyelet or any suggestion to attache the rope to the deck so I made an eyelet out of some black wire, drilled a hole in the deck, and glued it in. I then made a ring from the same wire, then I made a loop in the end of the rope, seized it and attached the rope to the ring and the ring to the eyelet in the deck. I later did the same on the other end, ran the rope through the chain, made a loop, and seized it. Last we have the blocks and dead eyes. They are of a different design than most ships have, but you have to remember this is a 9th century ship so things are bound to be different.


-
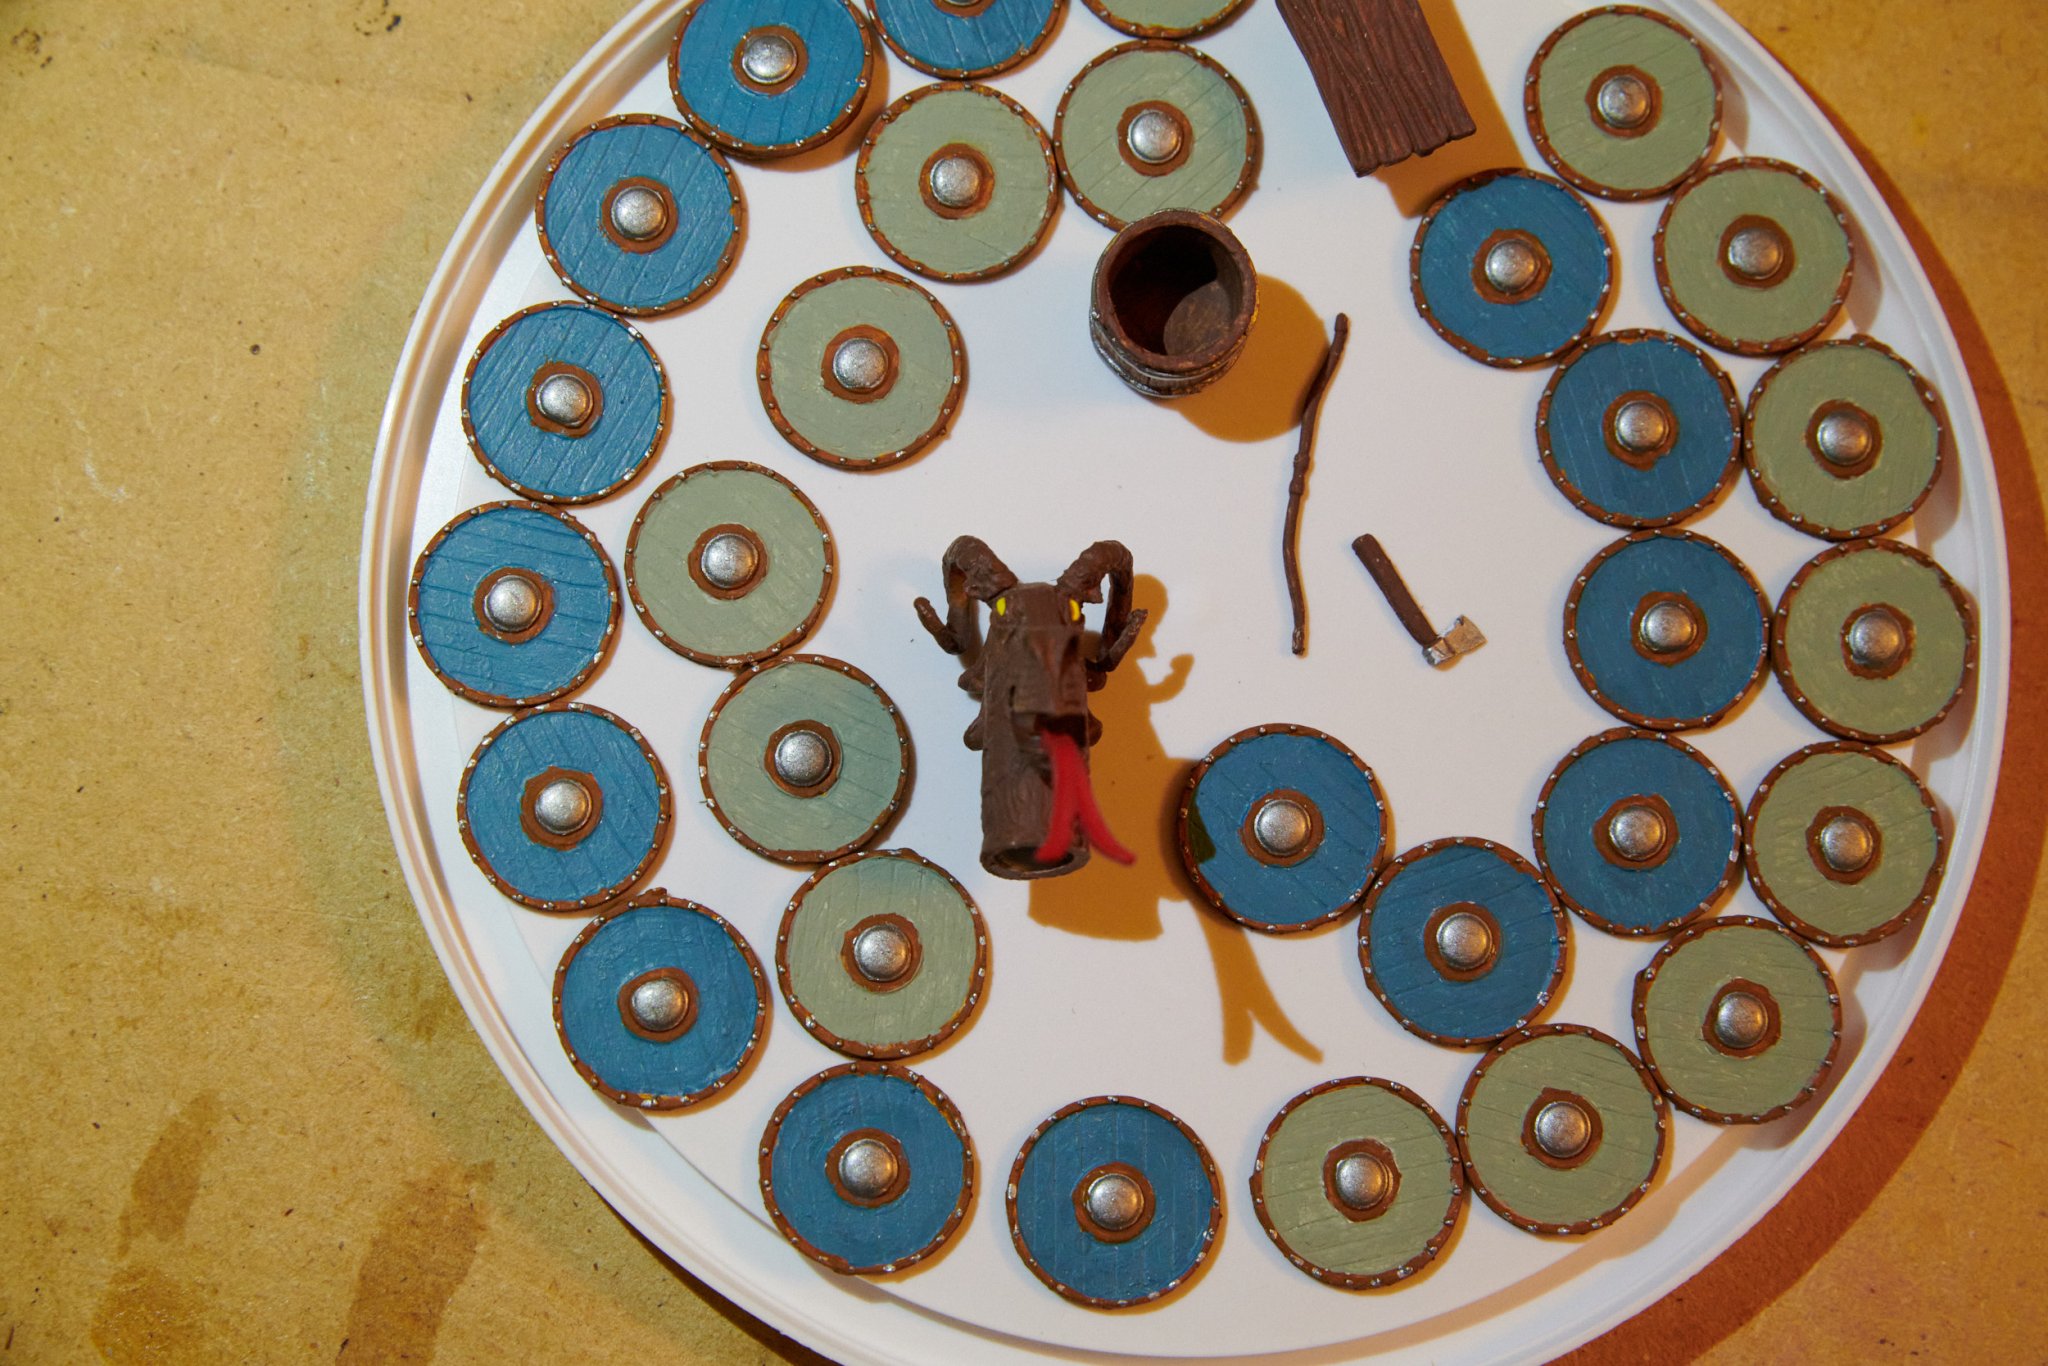
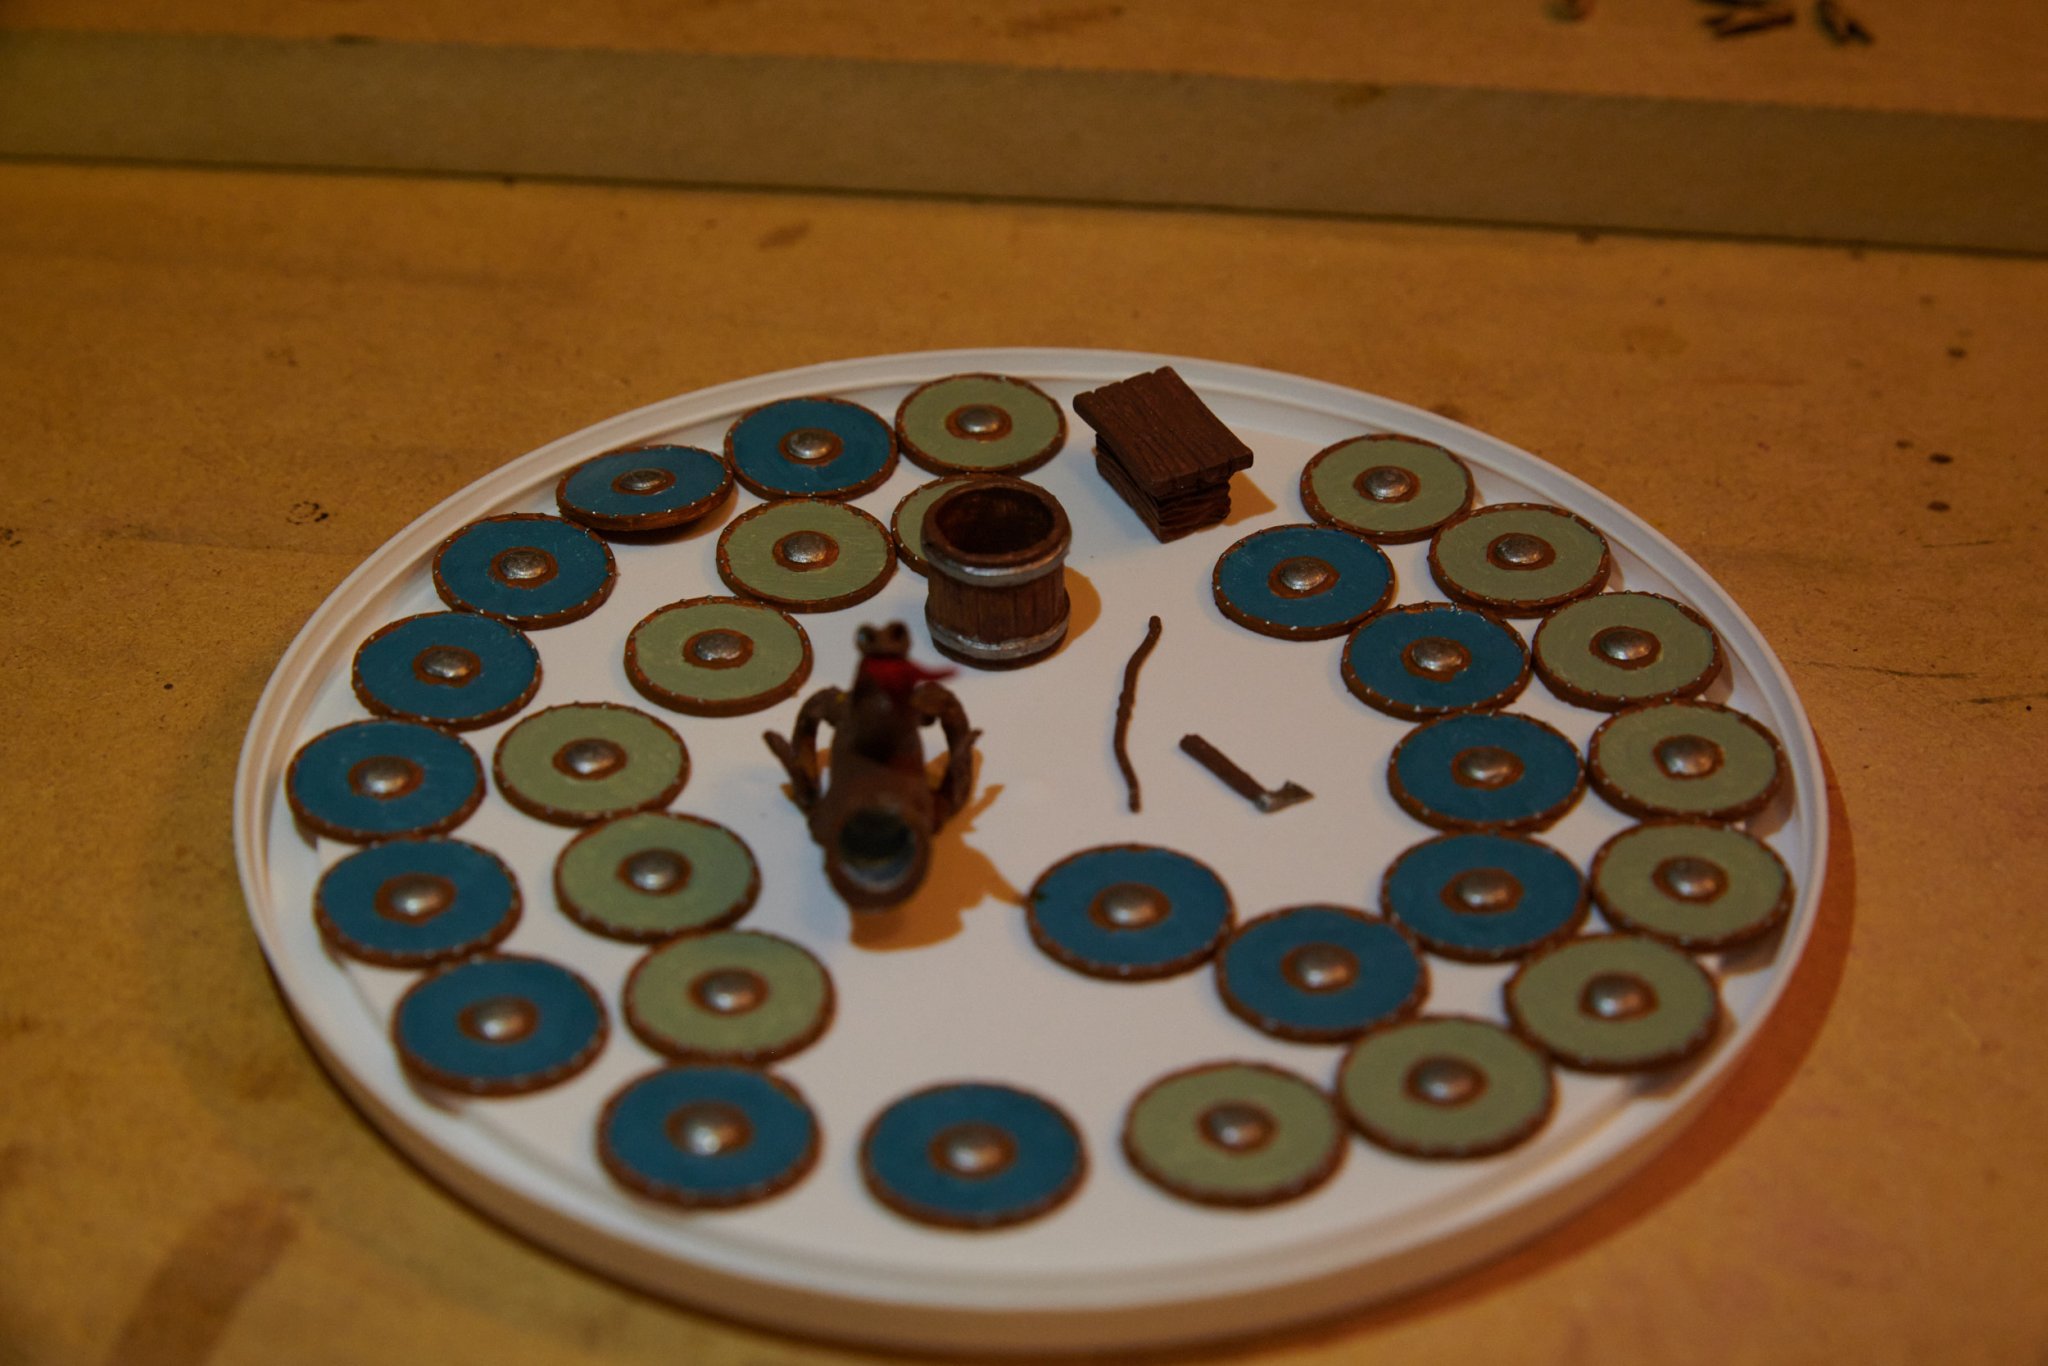
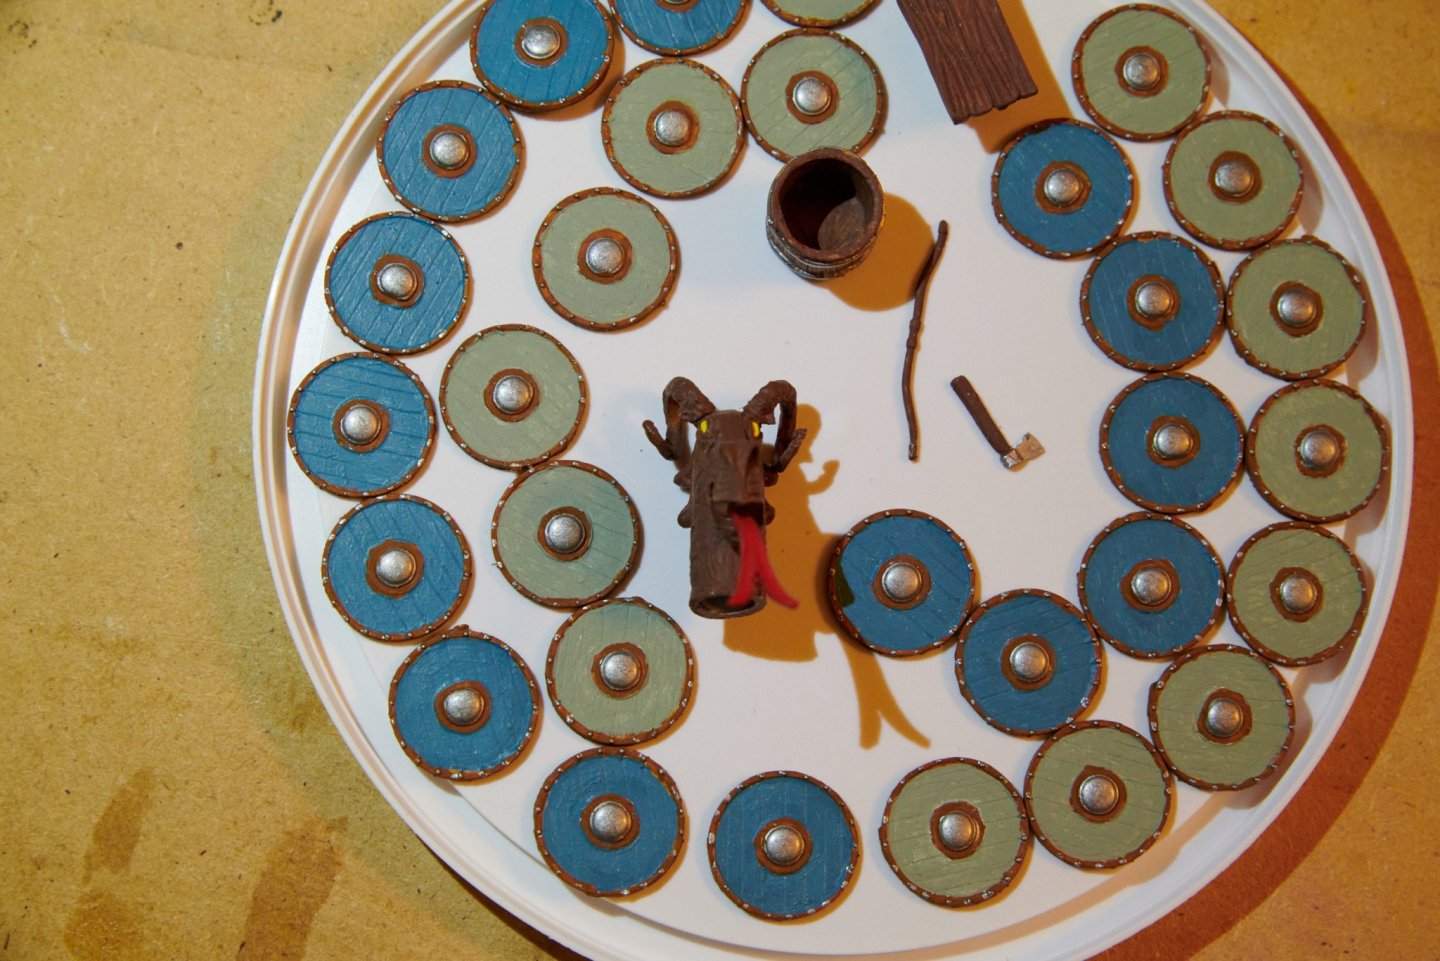
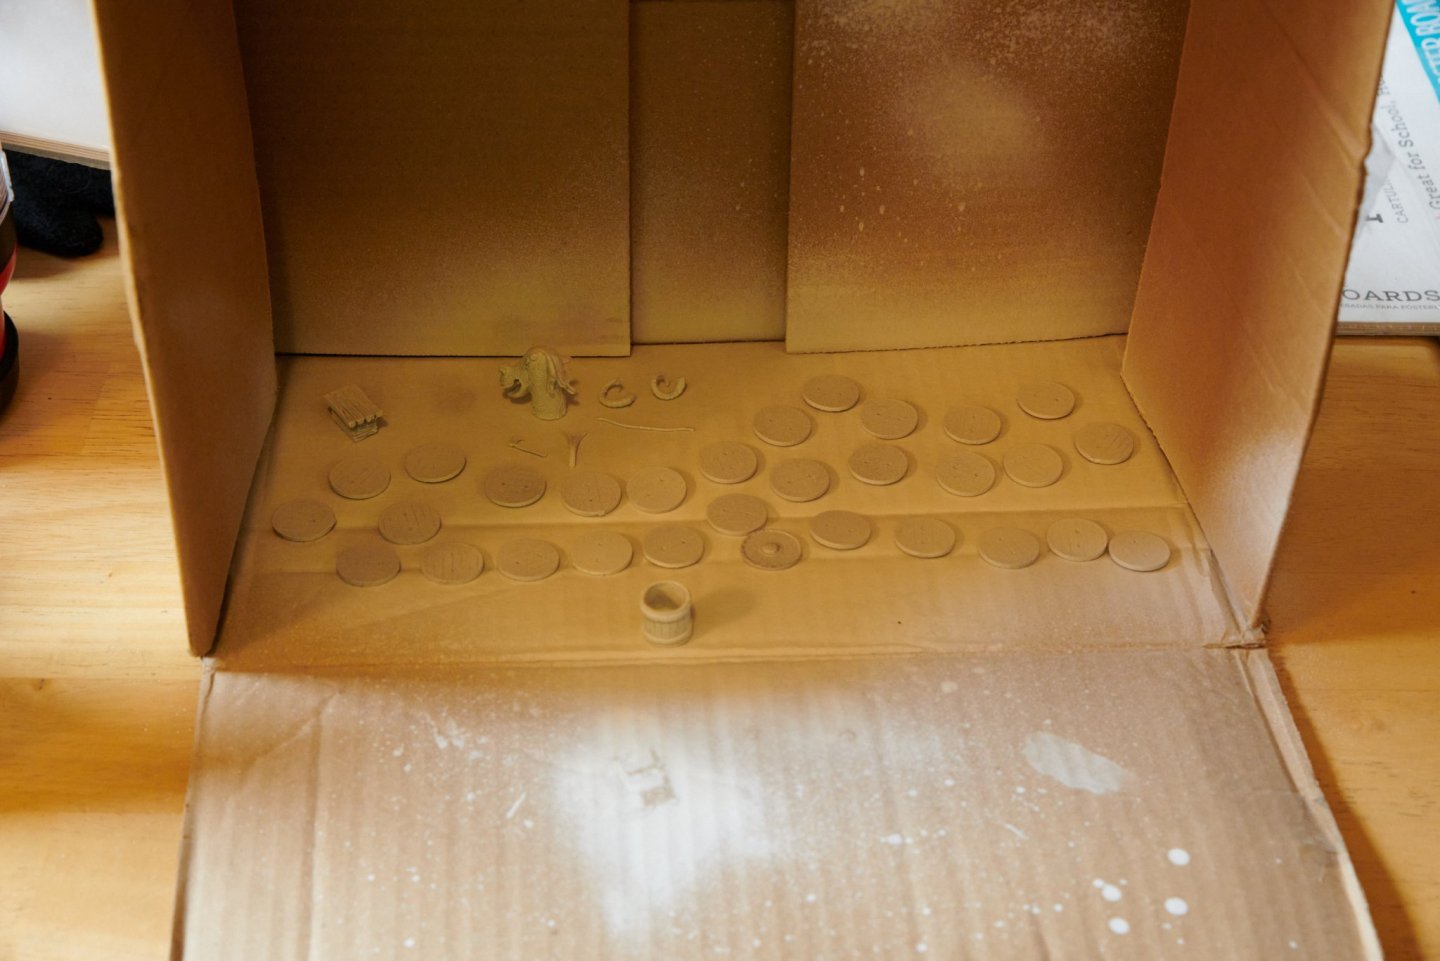
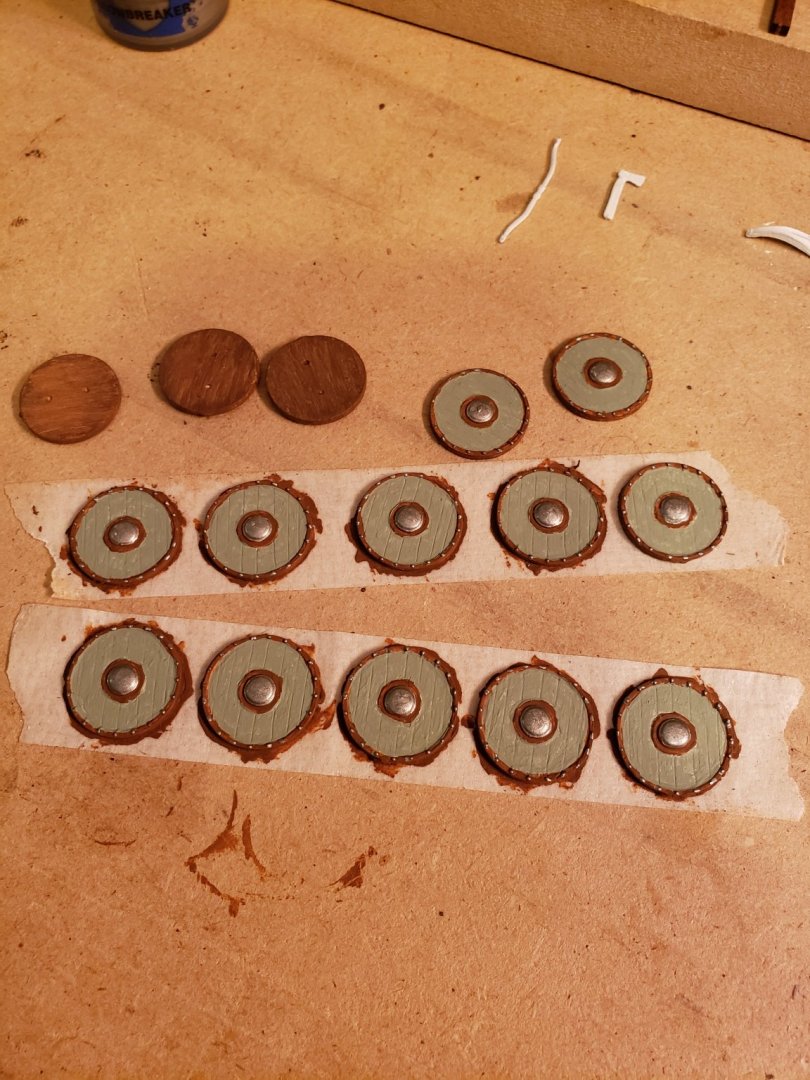
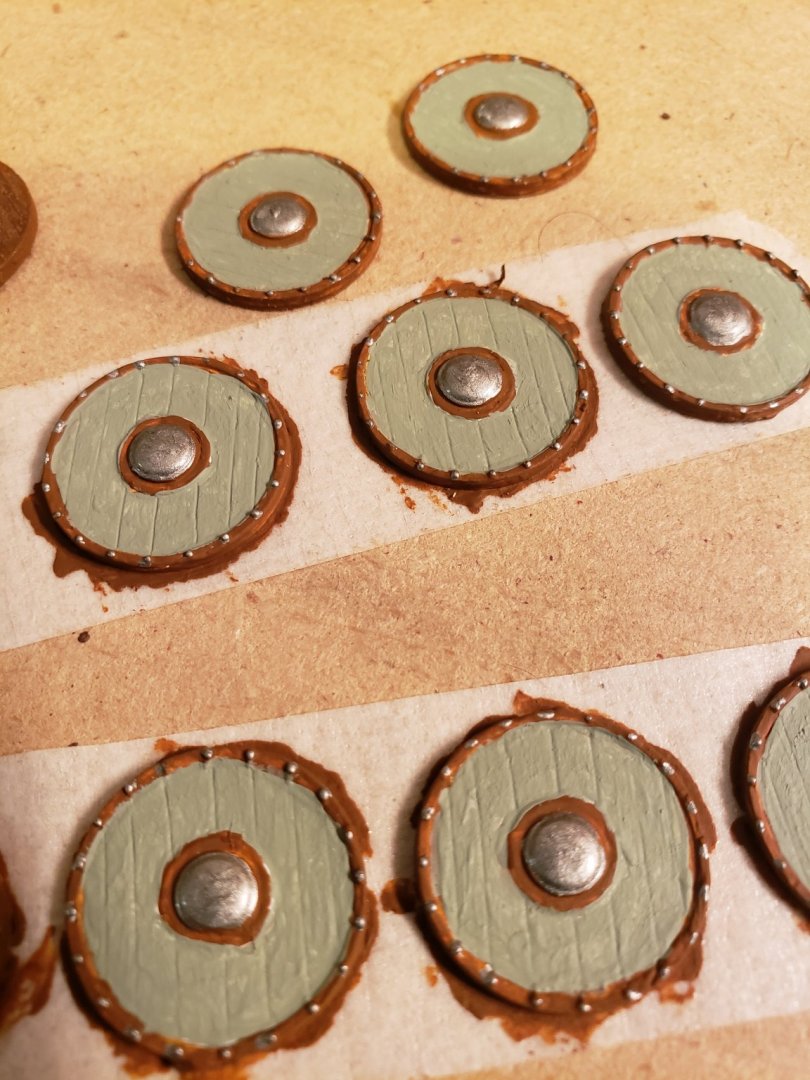
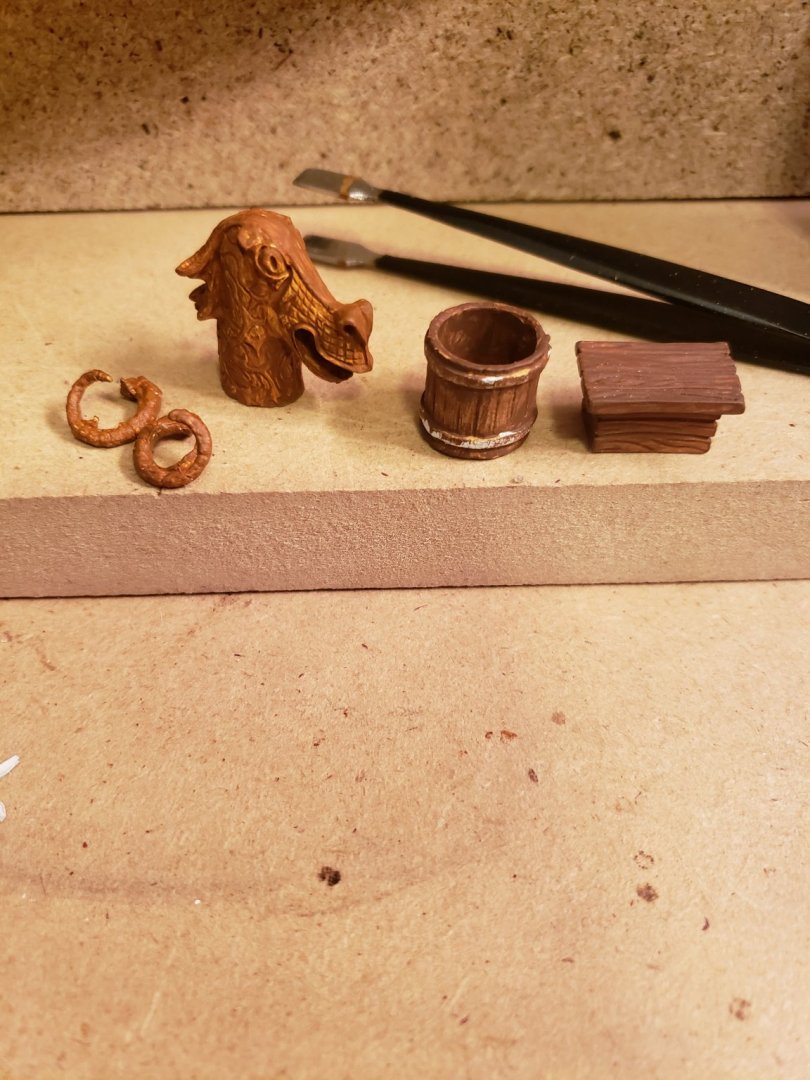
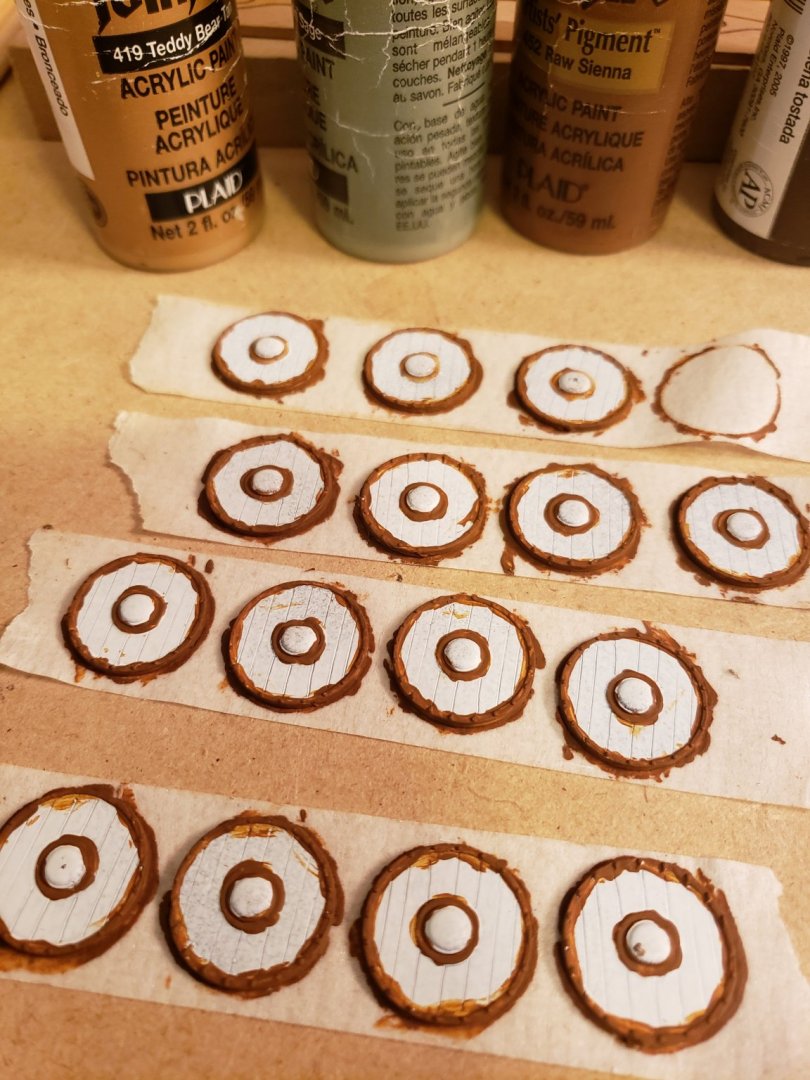
At this point I went ahead and applied some primer to all the metal parts that needed painting so I will also include some photos of the completed items. I decided I wanted to do something different from red or black and yellow for the shields so I opted for some colors I like. Also the shields aren't really designed accurately to what we know of Vikings historically. The shields supplied in the kit here have a metal banding around the outer edge of the shield in addition to the center boss. From what I have read there isn't a lot that has survived the years from the age of the Vikings, but what we do know is that there isn't often much found with their remains of the shields. Meaning it wasn't likely that they had a metal banding around the outside edges of theirs shields otherwise remnants of those metal bands would have been found. Instead it is thought that they may have wrapped leather around the edges or sometimes all across the front of the shield to counter splintering when the shield was hit from an enemy weapon. The metal boss in the center is something that was present in Viking shields. So what I decided to do was to paint the backs of the shields brown like wood, the edges of the shield a slightly different shade of brown to simulate a leather wrapping around the edge. There is also a layer of something between the center boss and the wood shield, presumably metal that is part of the boss. However I decided to make that in between layer also a layer of leather so I painted it the same color as the outer edge. Then of course the center boss is a metal iron color and the two different colors I chose for the wooden front of the shield. The shields were also designed with what I presume are nails holding the, as designed, metal banding around the edge on. So I made those out to be nails holding on "my" leather edge banding on so I applied just a dab of that same metal iron colored paint. The kit also came with the chest, barrel, axe, and bow as seen. I will tie a small black string on the bow before I'm finished.

-
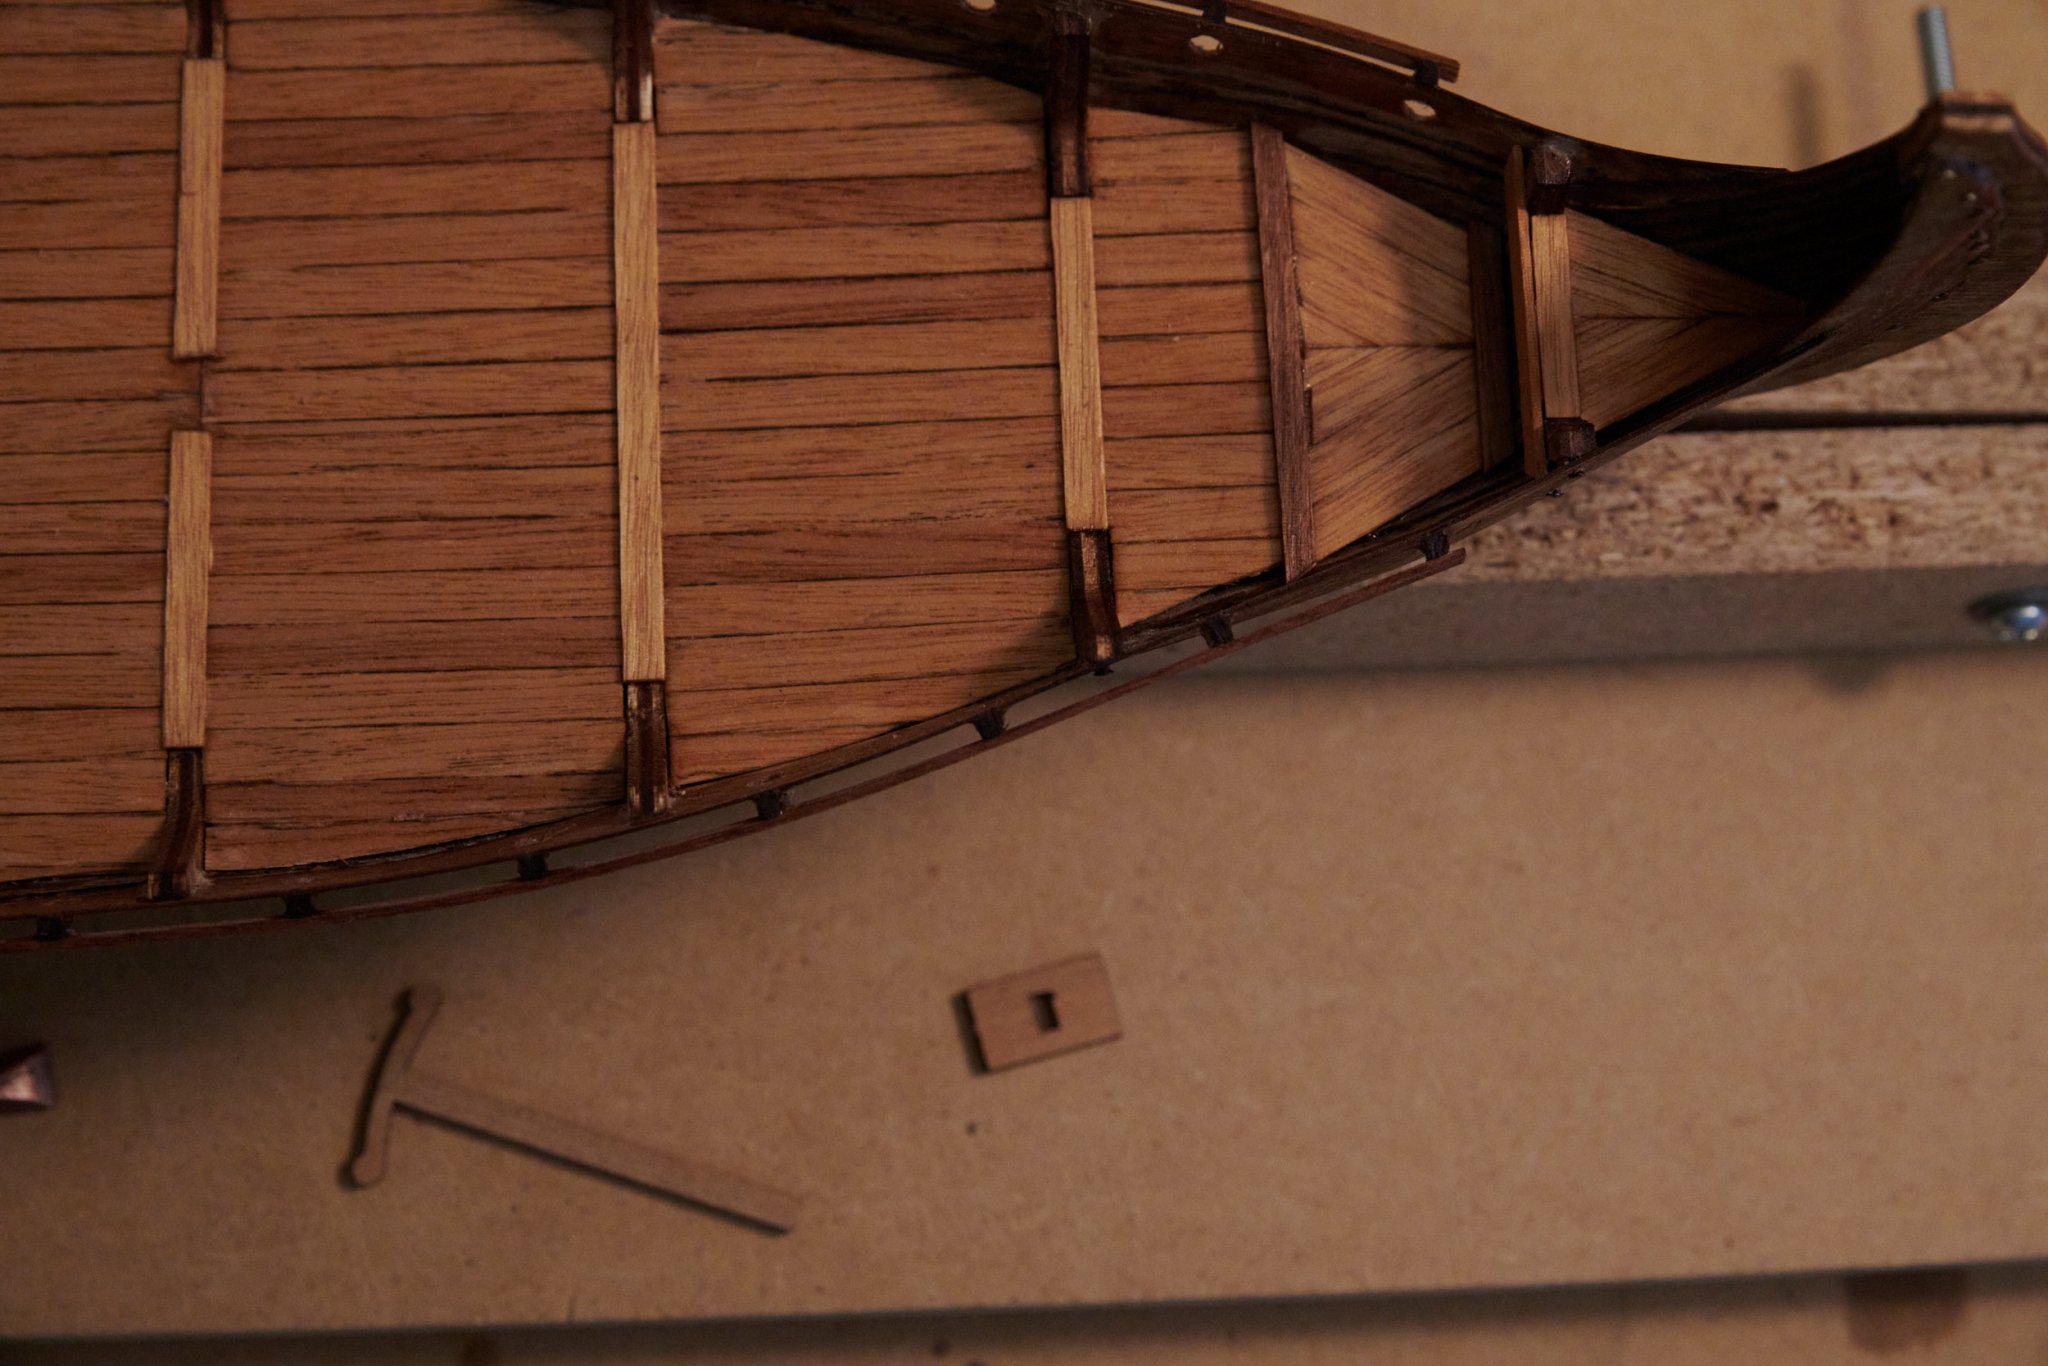
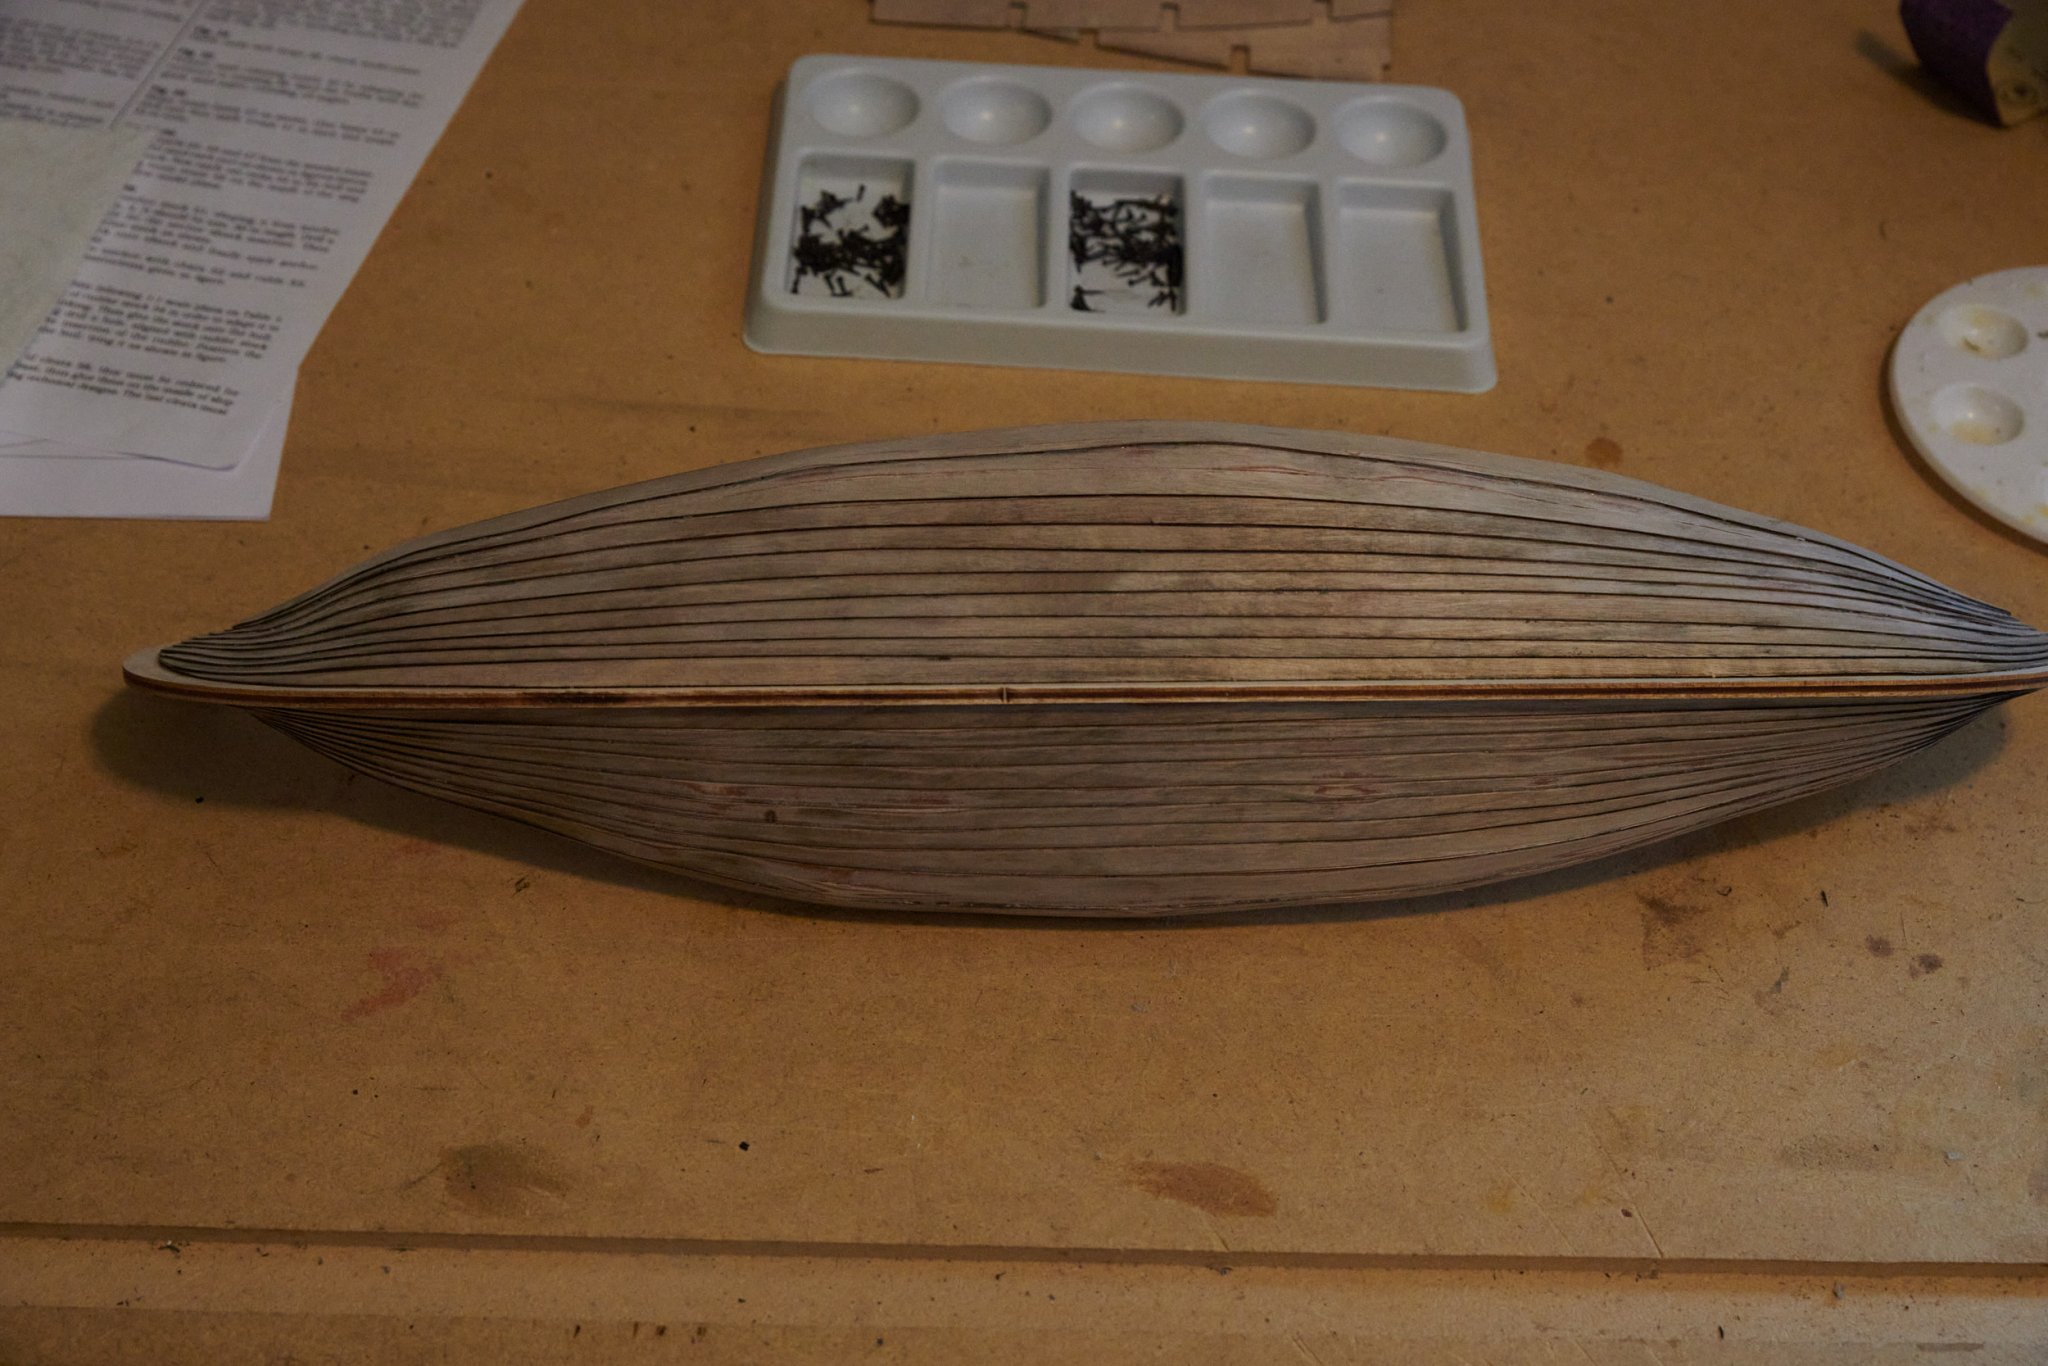
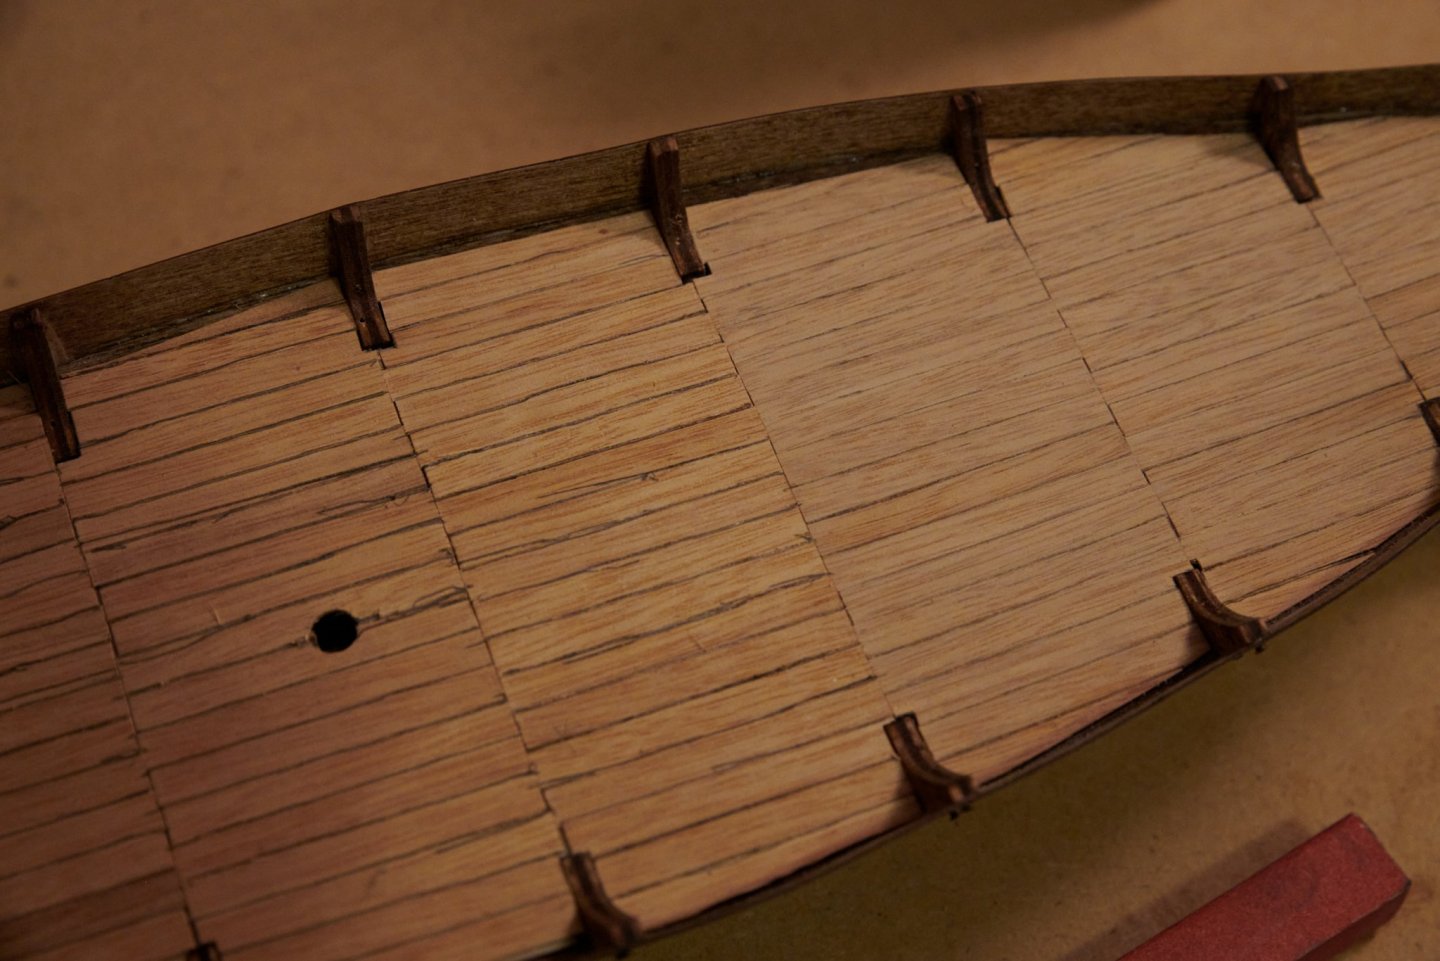
Next up I worked on the deck. Between each set of bulkheads we alternate the pattern of the deck slats. On one set of bulkheads two slats but up against one another with their edges running down the center line of the ship running stem to stern. In the next set of bulkheads a single slat is centered on that same center line. So each set of slats from bulkhead to bulkhead alternate by half a slat. Running across the ship from one side to the other is another slat of a slightly different size and material from the main deck that covers up the ends of these short slats. In between each slat I ran a pencil line down the seam. On the right side you can see it after sanding as opposed to non sanded on the left. You can also see the hole for the mast cutout and there is a pre-cut slot for the mast in the keel. The frame of the ship, bulkheads, keel, and plank have all been coated in a dark walnut danish oil, 3 coats. The deck has regular natural danish oil applied. There are some spots inside on the planks above the deck where some glue didn't get cleaned up well and you can see the result with the danish oil not penetrating through that glue.

-
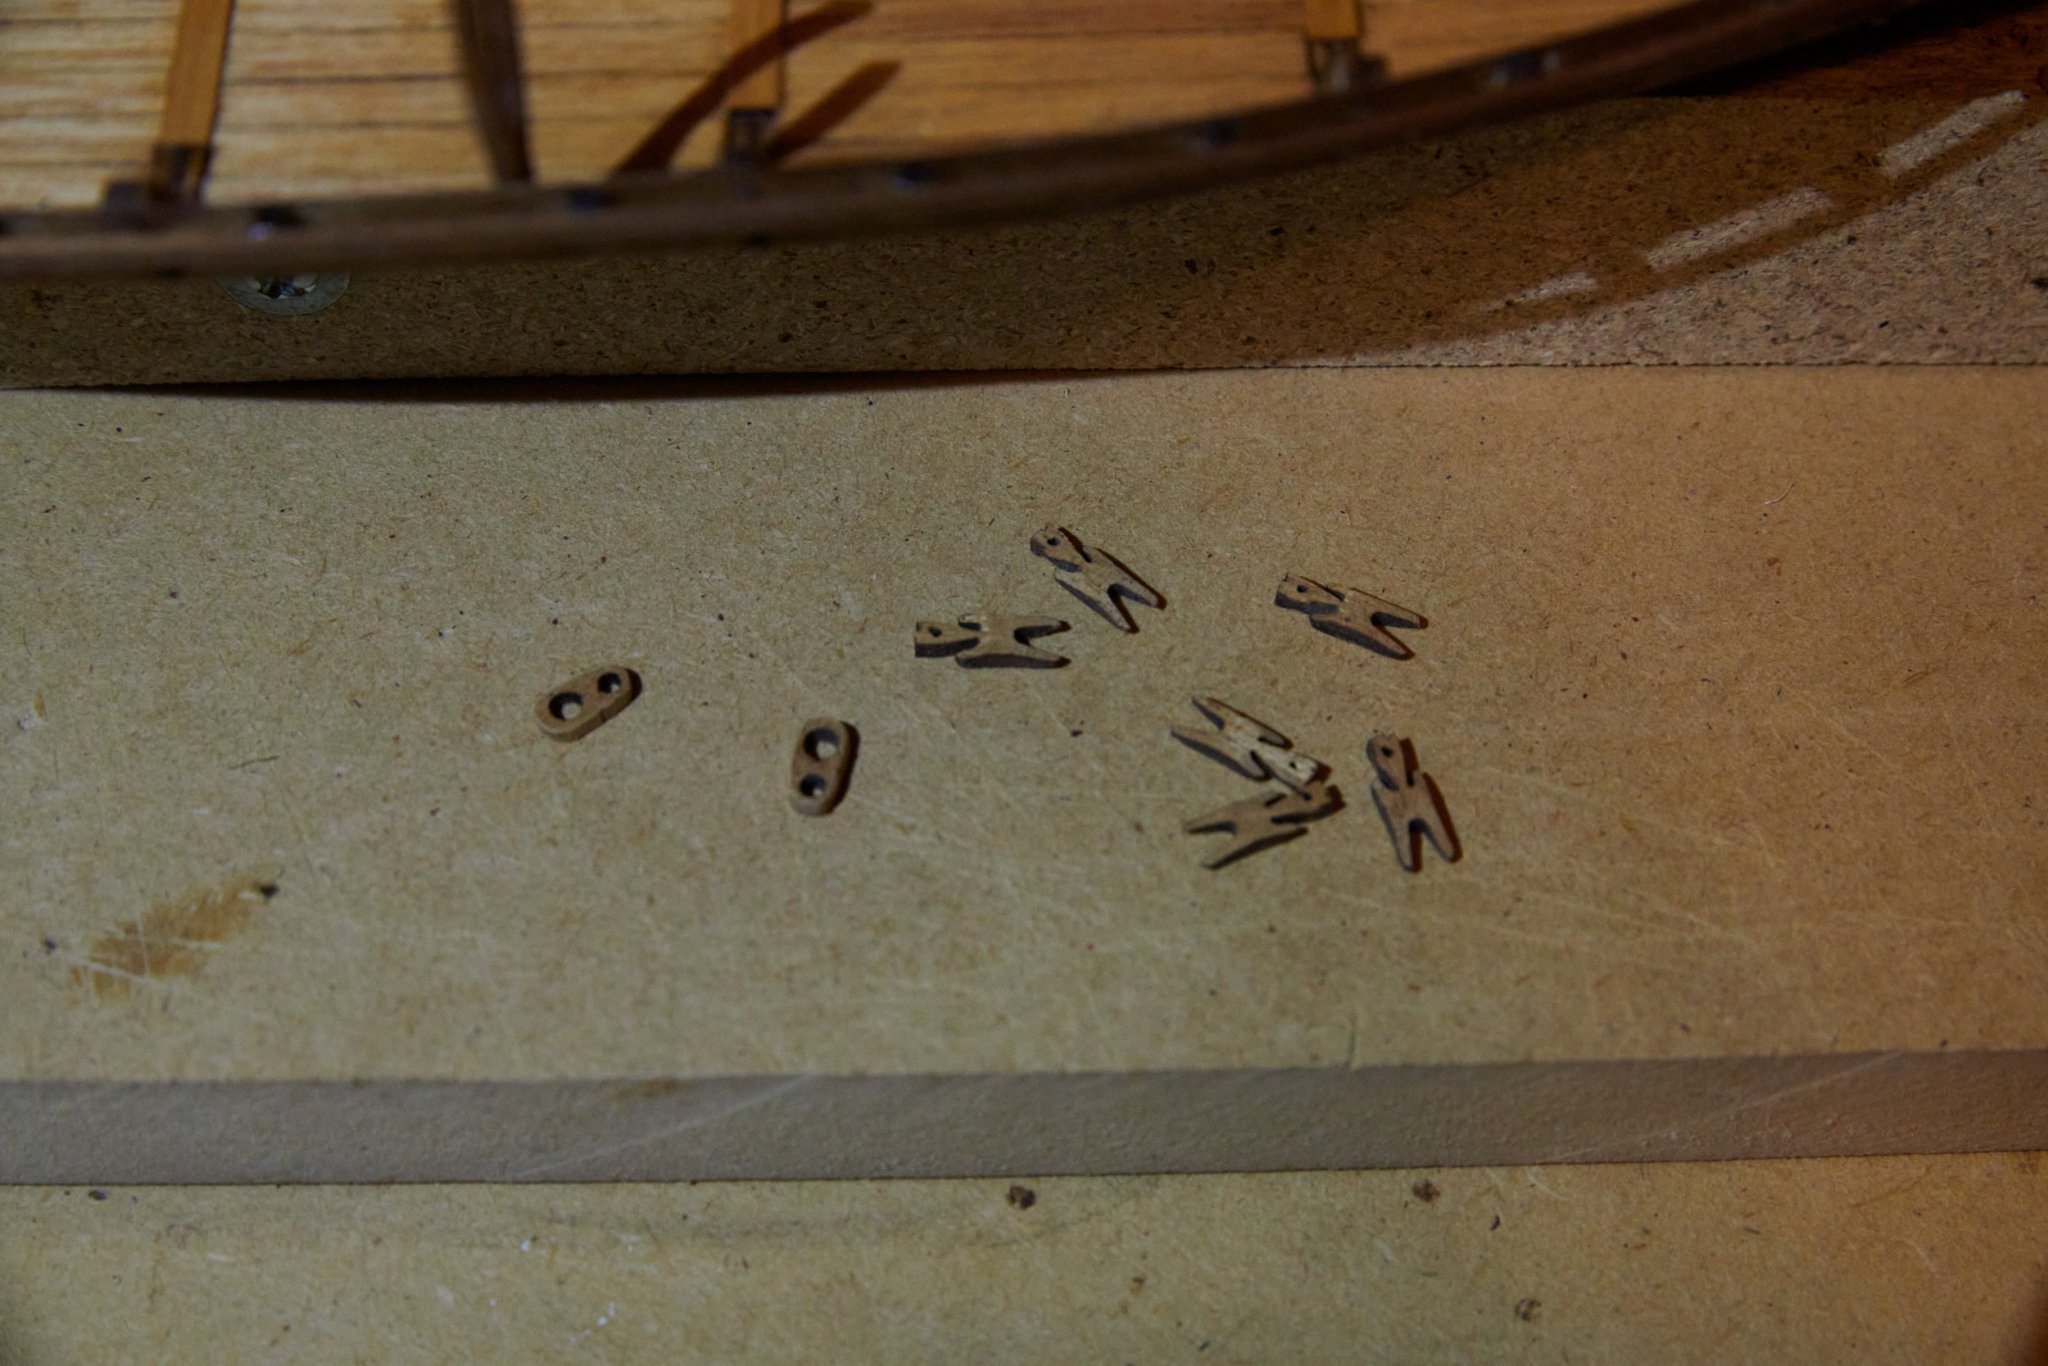
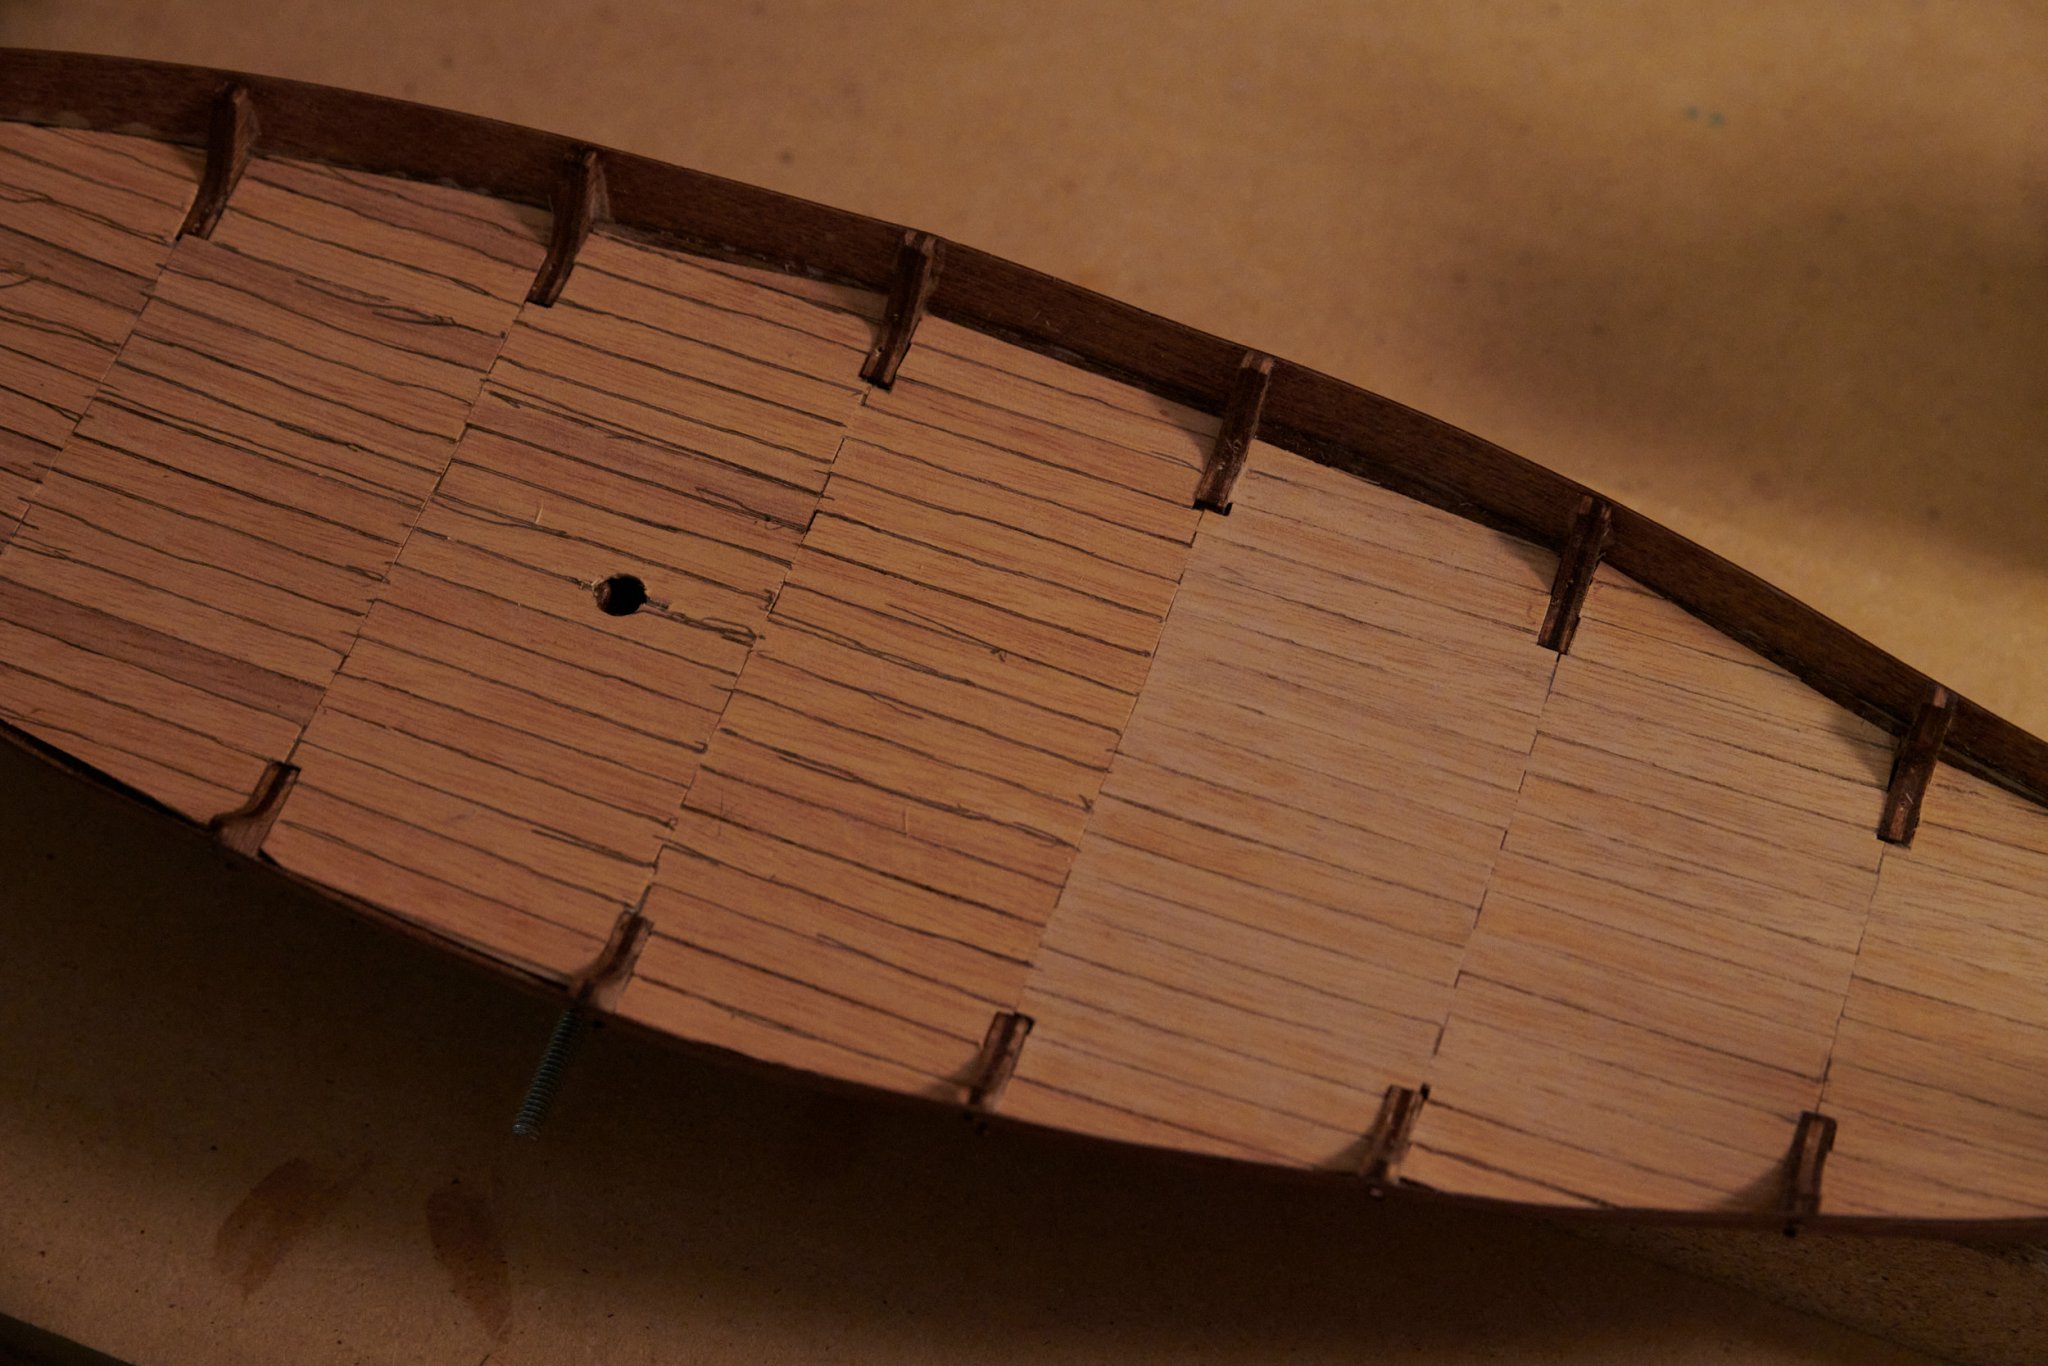
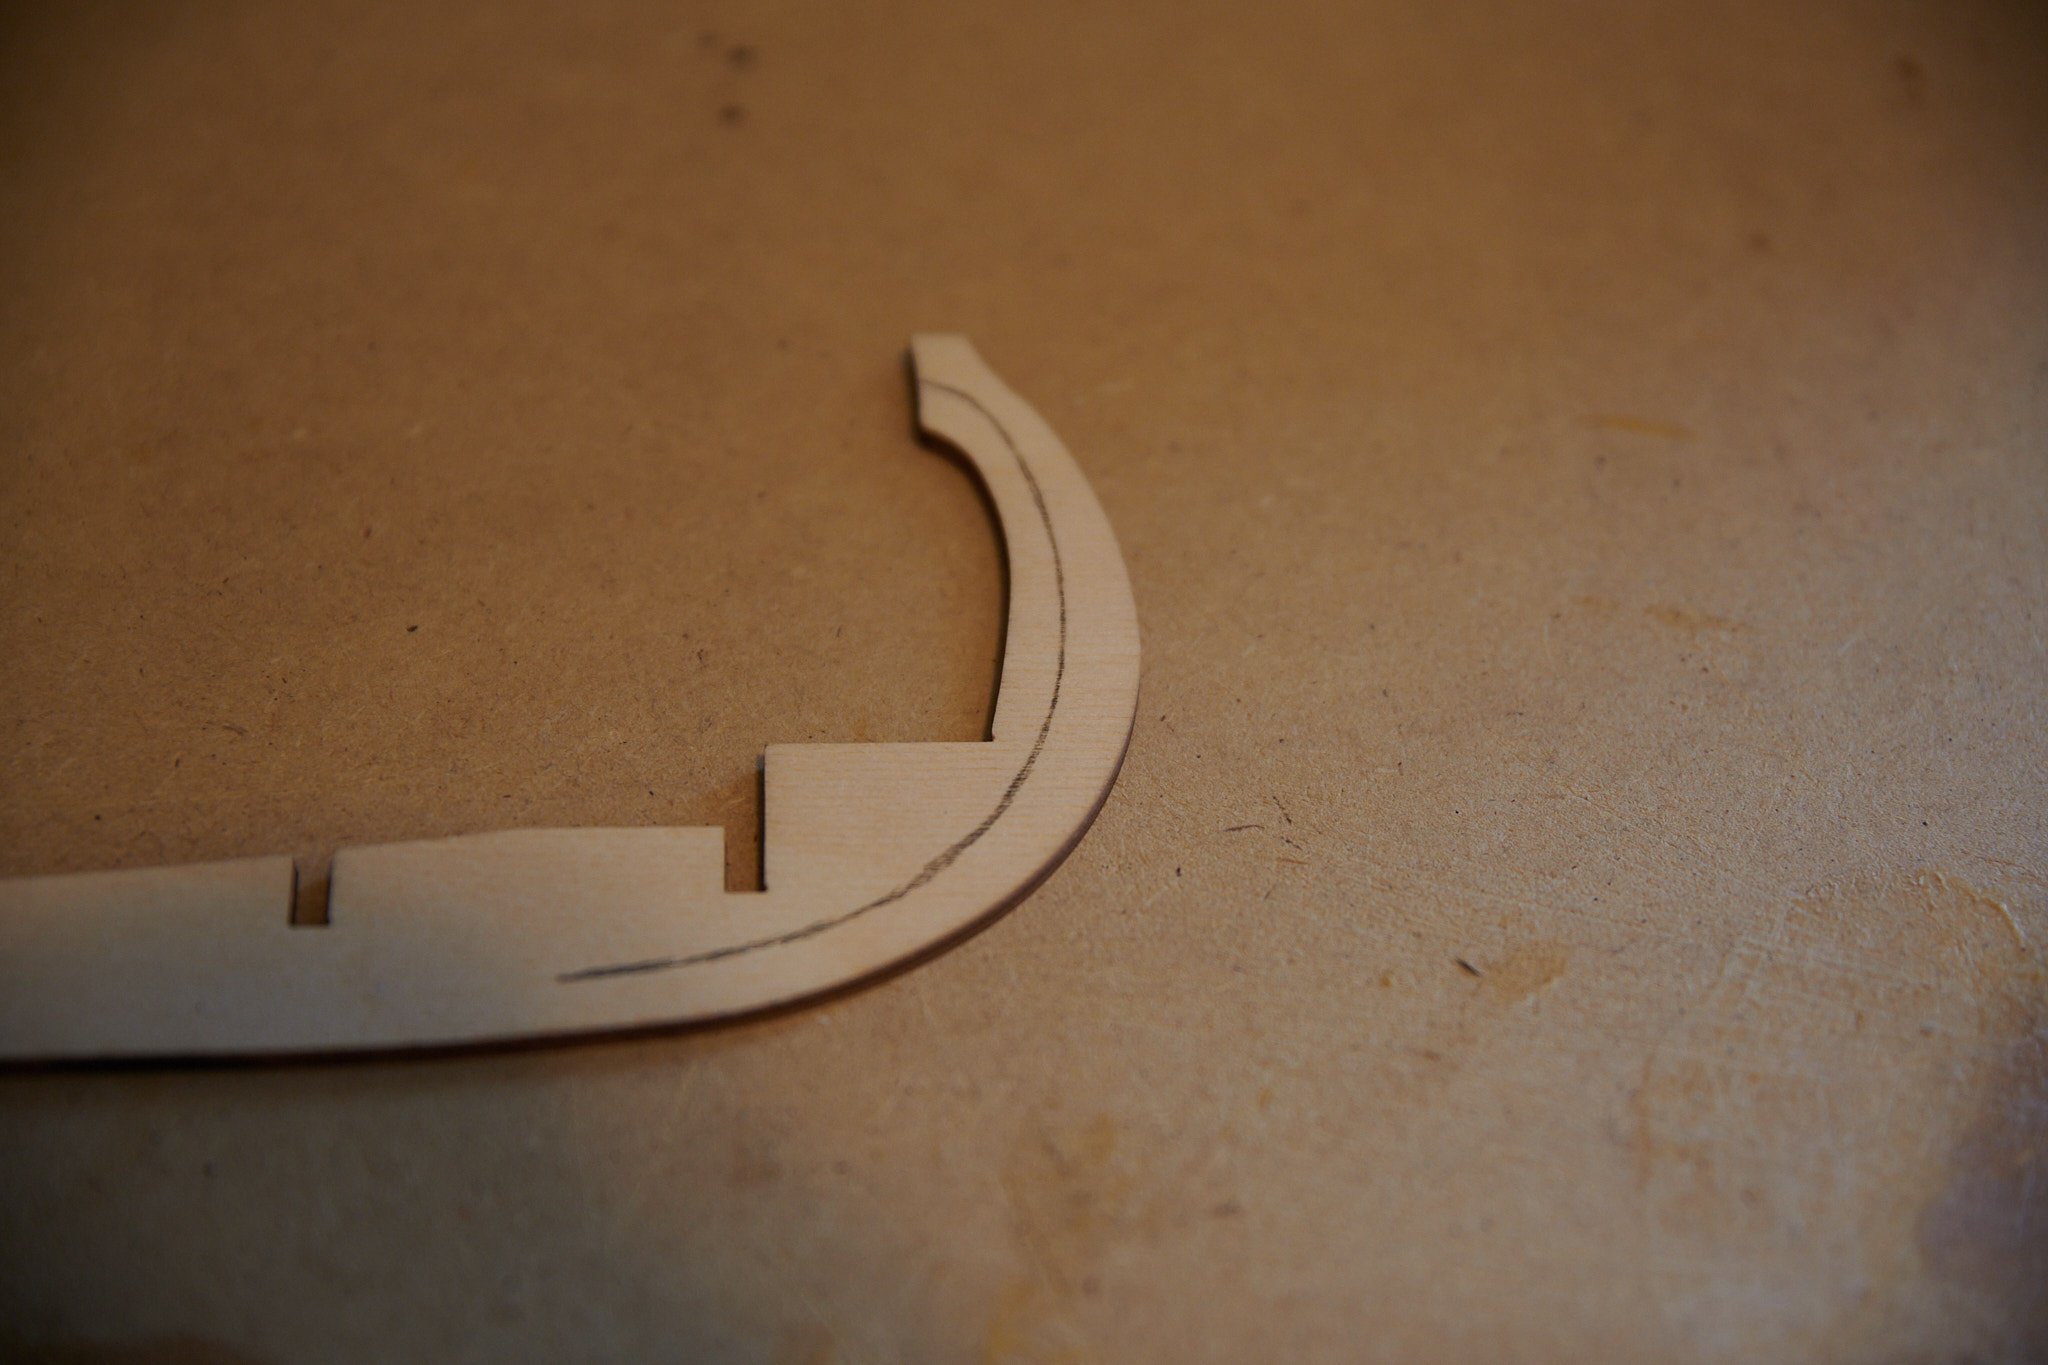
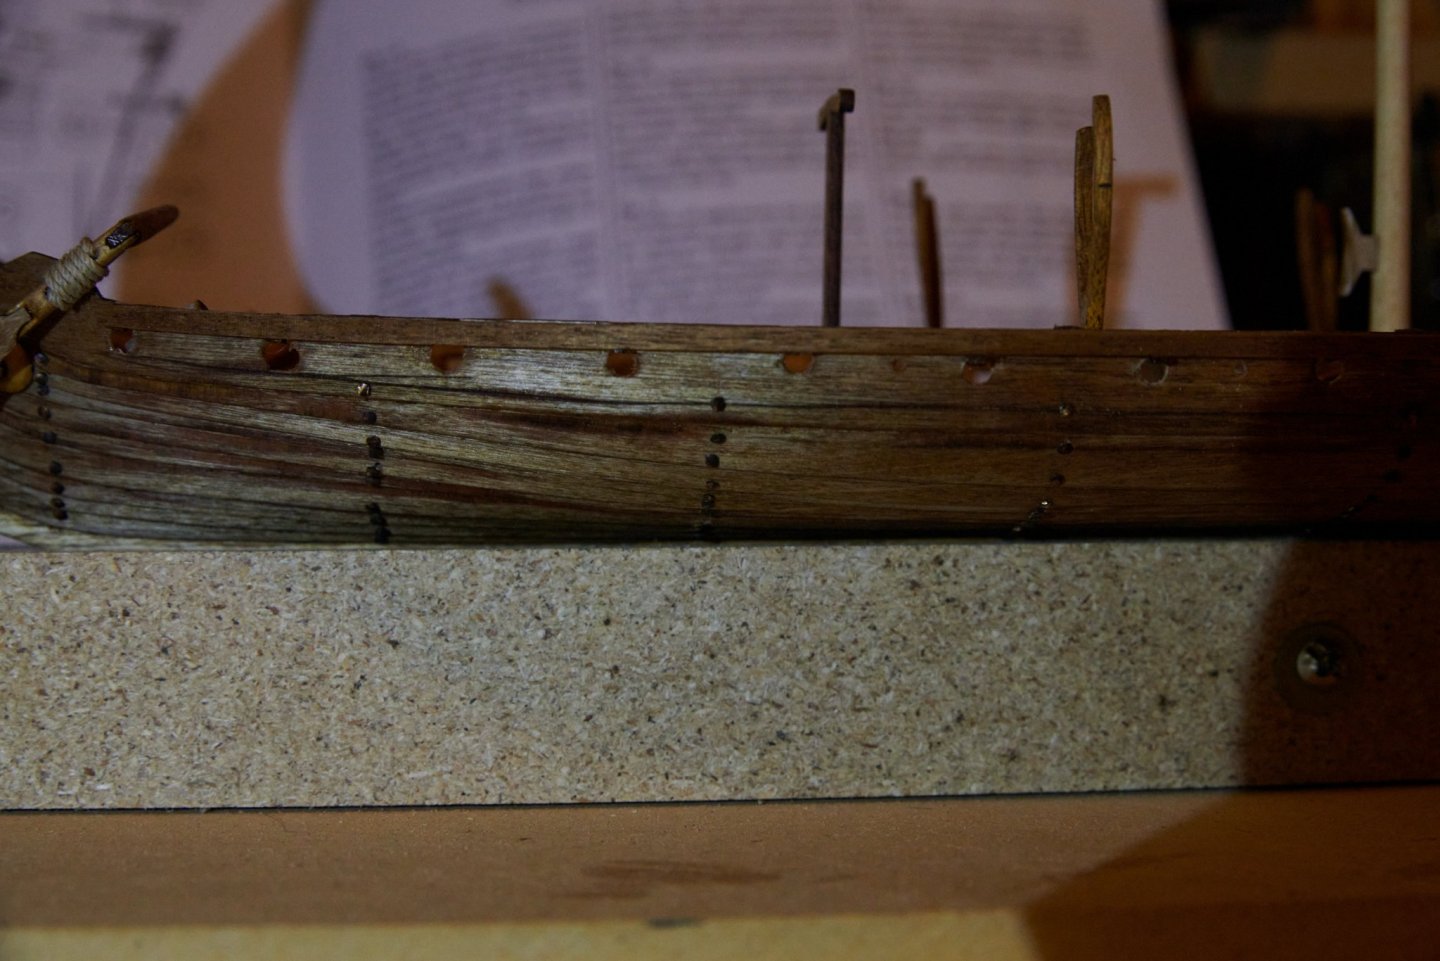
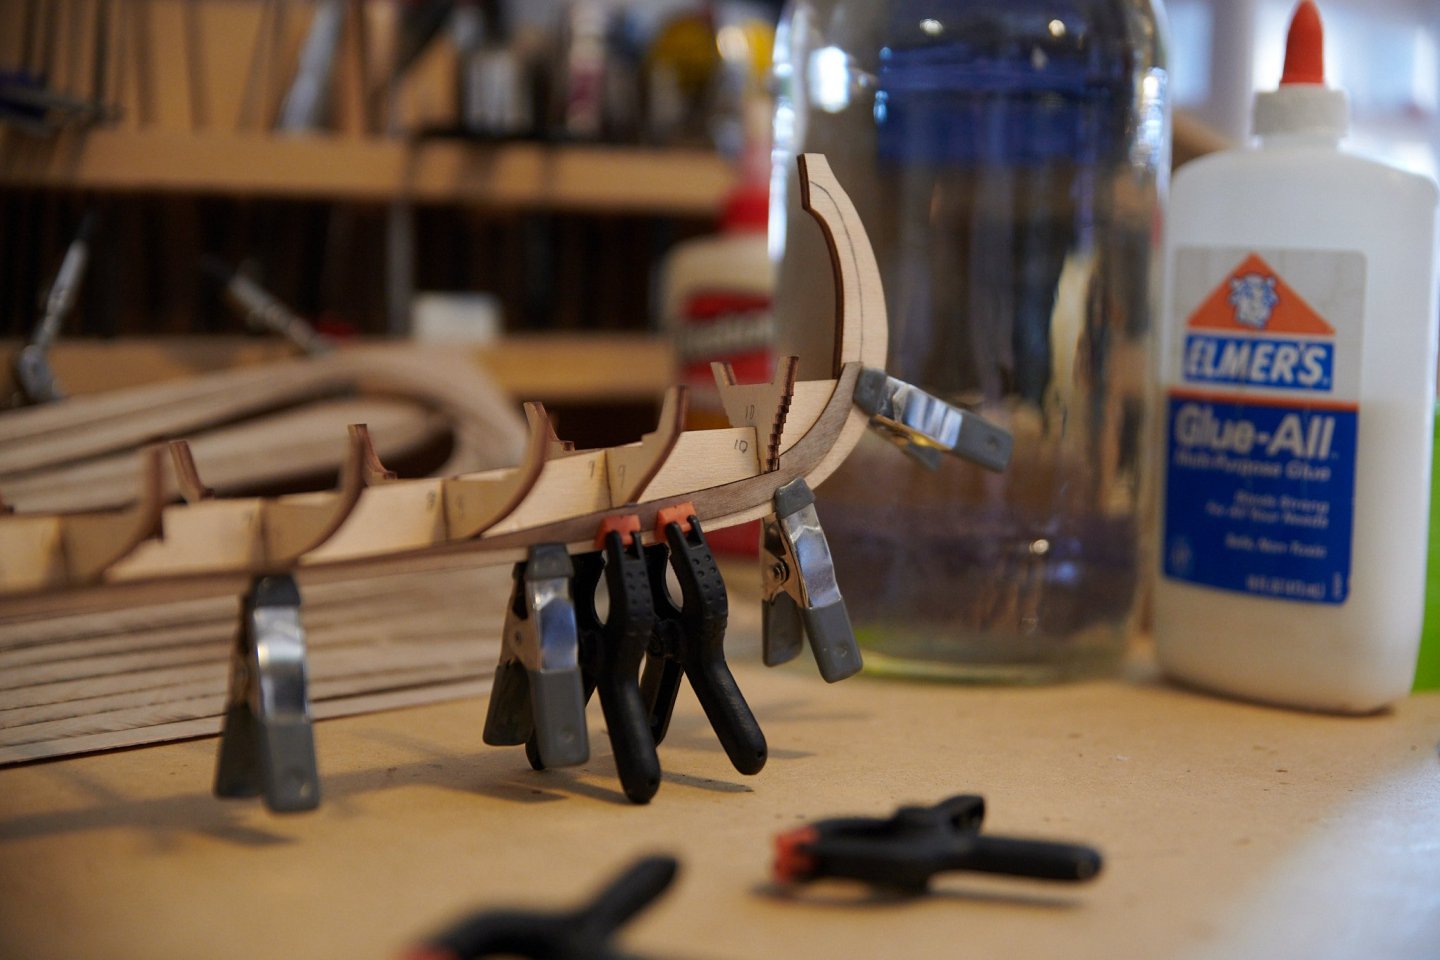
Next up we have the planks complete and I chemically blackened the brass nails that were included. Although there were not enough to put in every plank at each bulkhead as well as the stem and stern, I had to order an additional bag. I forgot to get some photos of the nails after they were installed, so I got some later in the build. In these photos you can also see that I have drilled out the holes for the oars and attached the shield racks. Each of these nails I predrilled the hole and then placed the point of the nail in and then pushed the head of the nail until it was completely set.


-
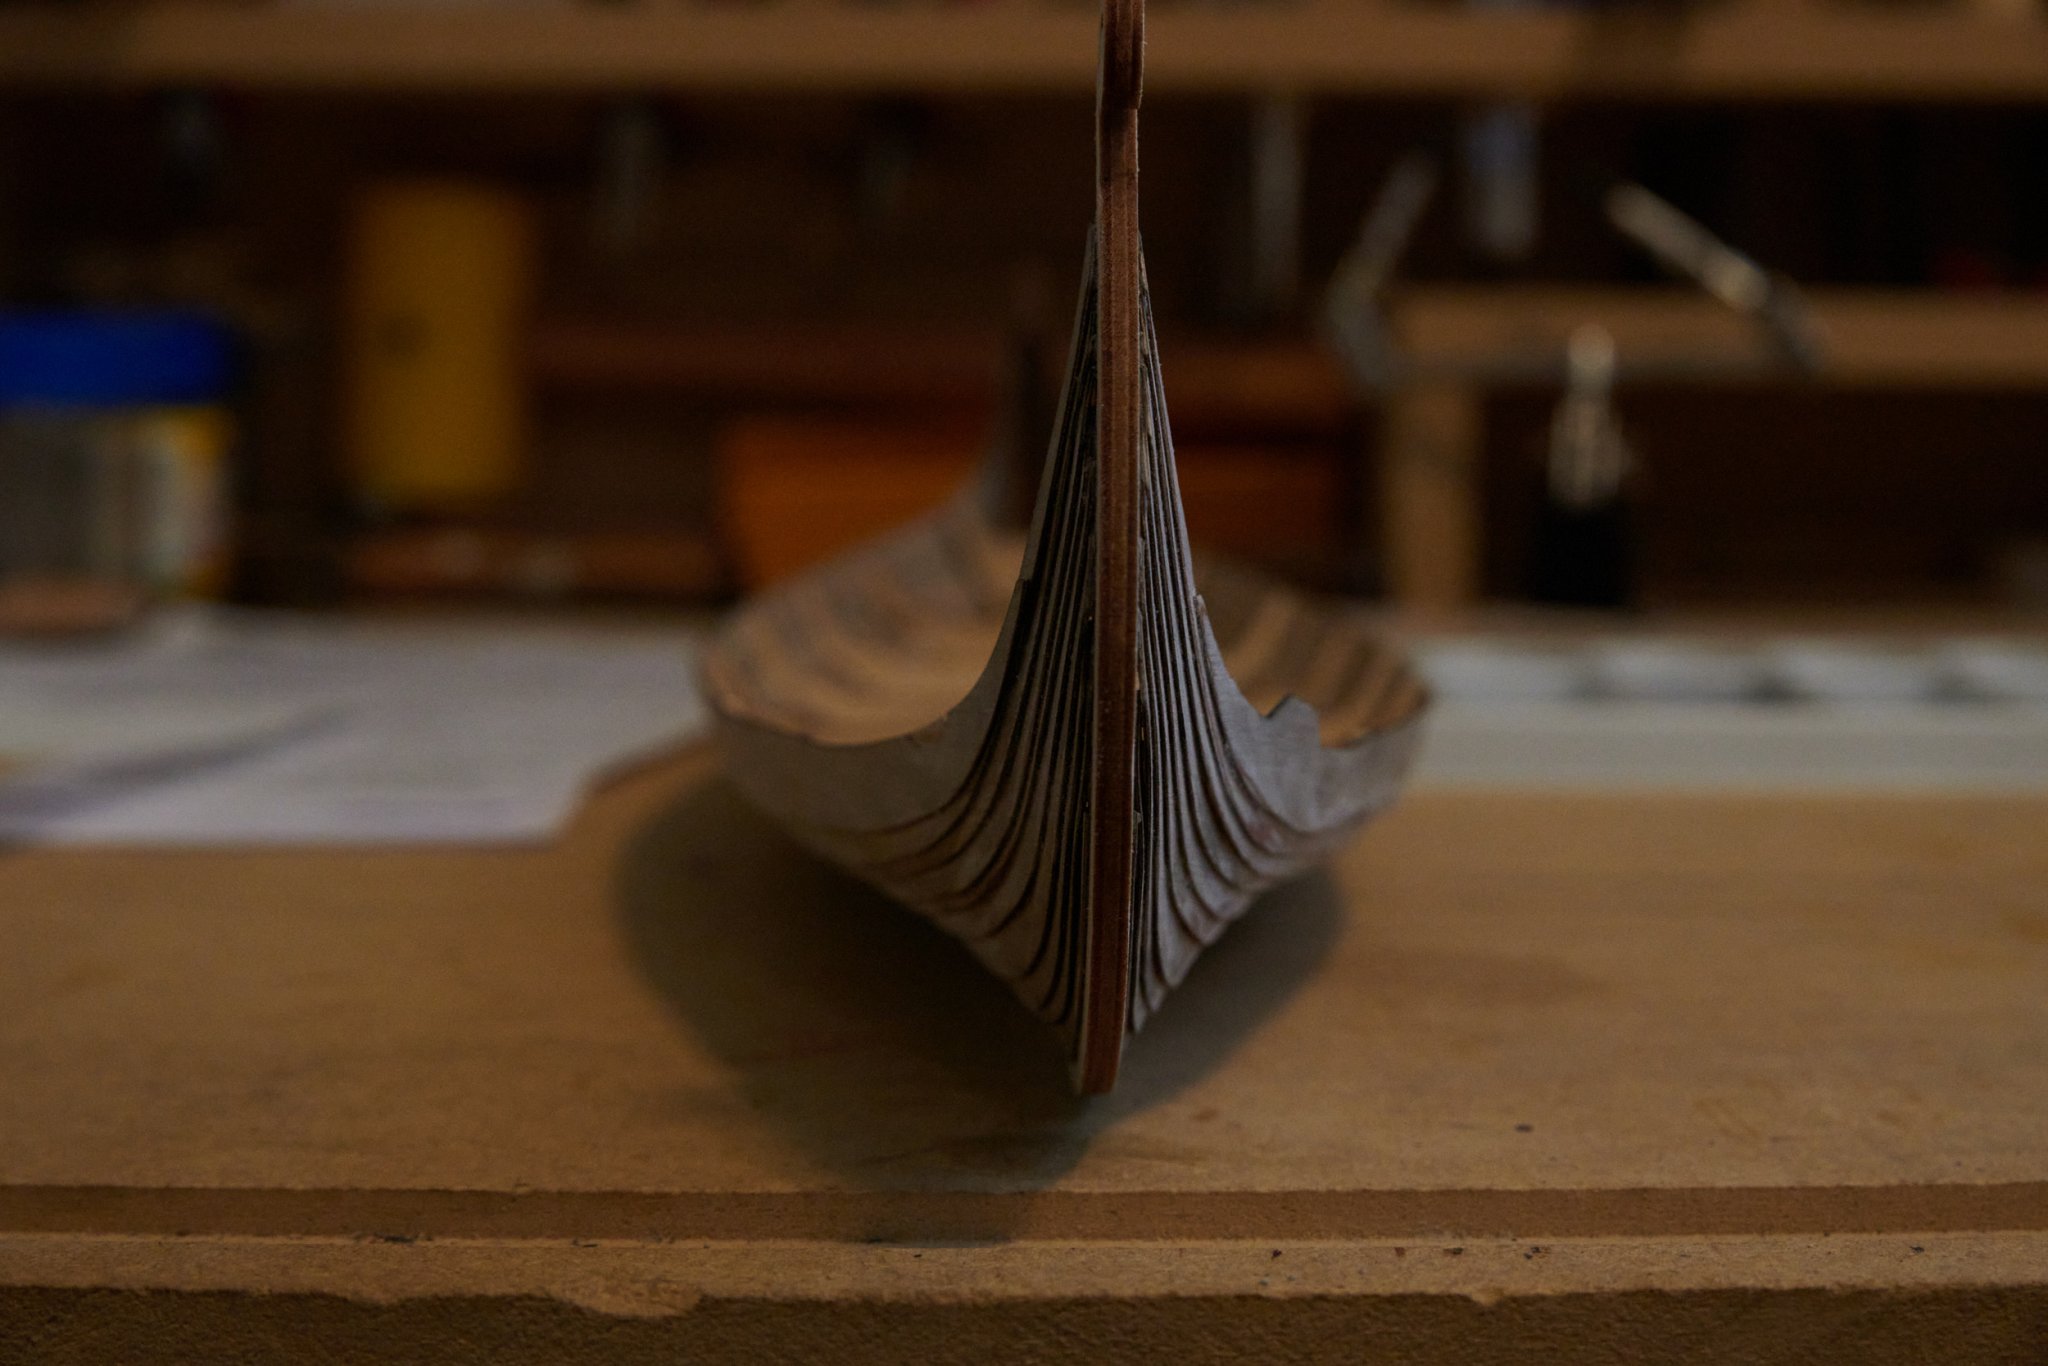
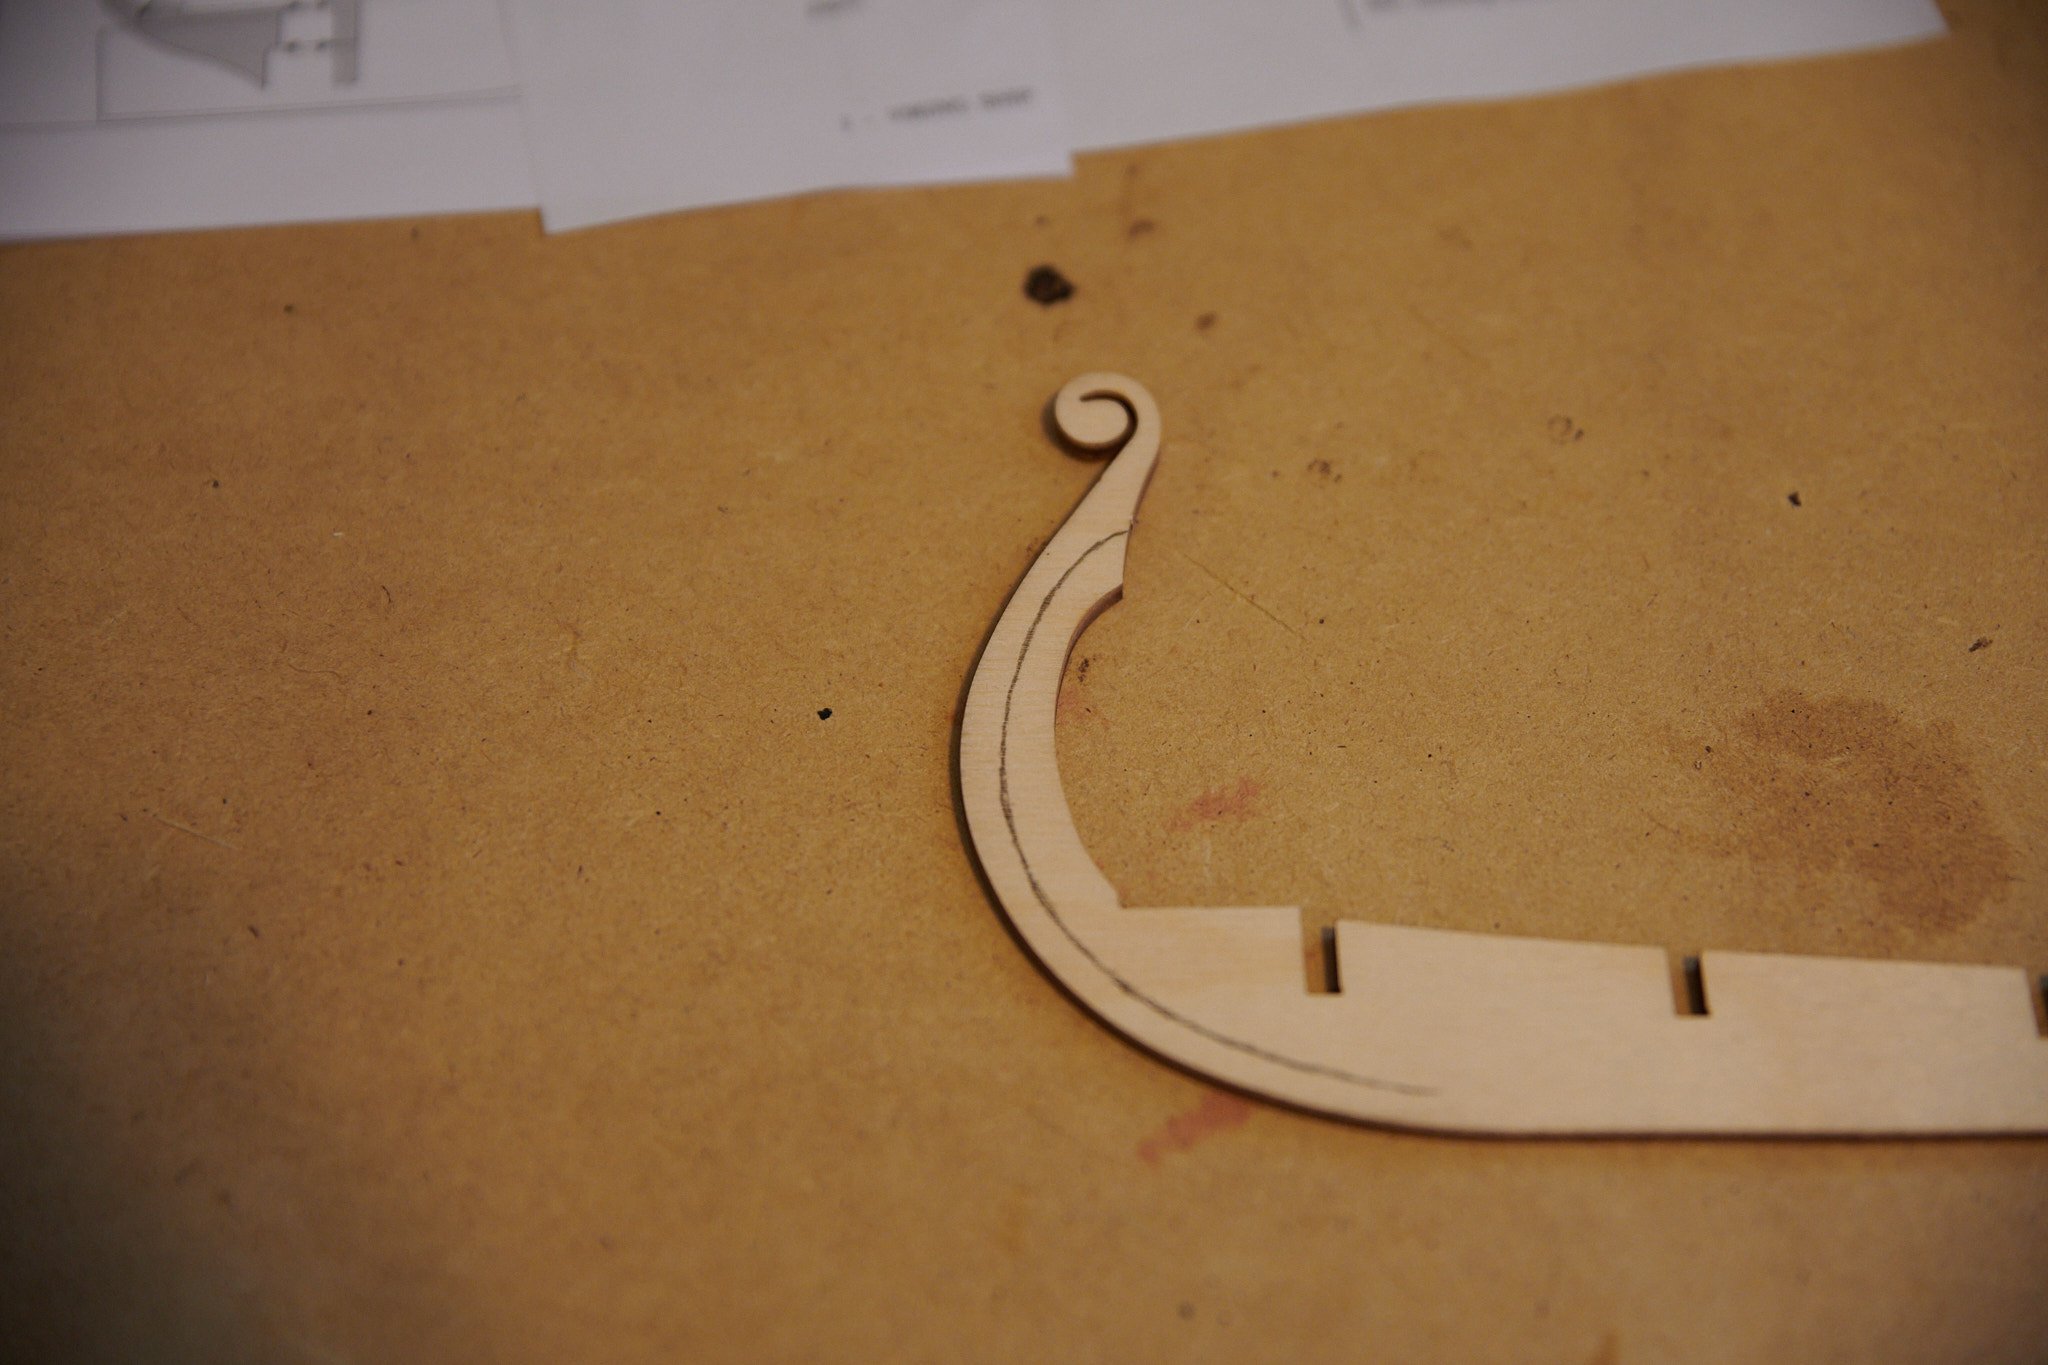
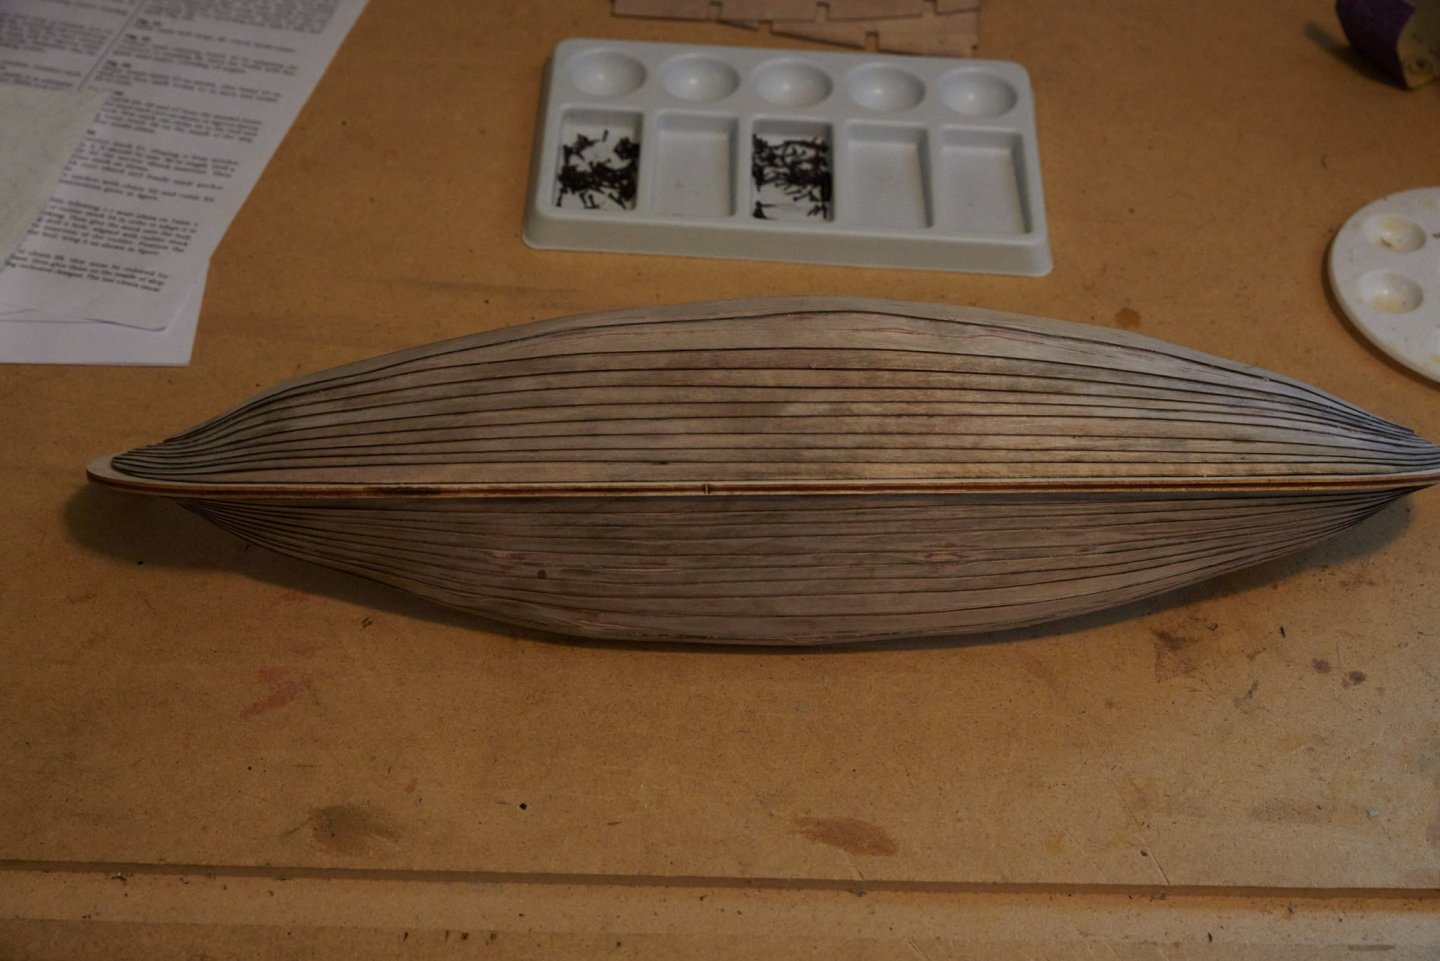
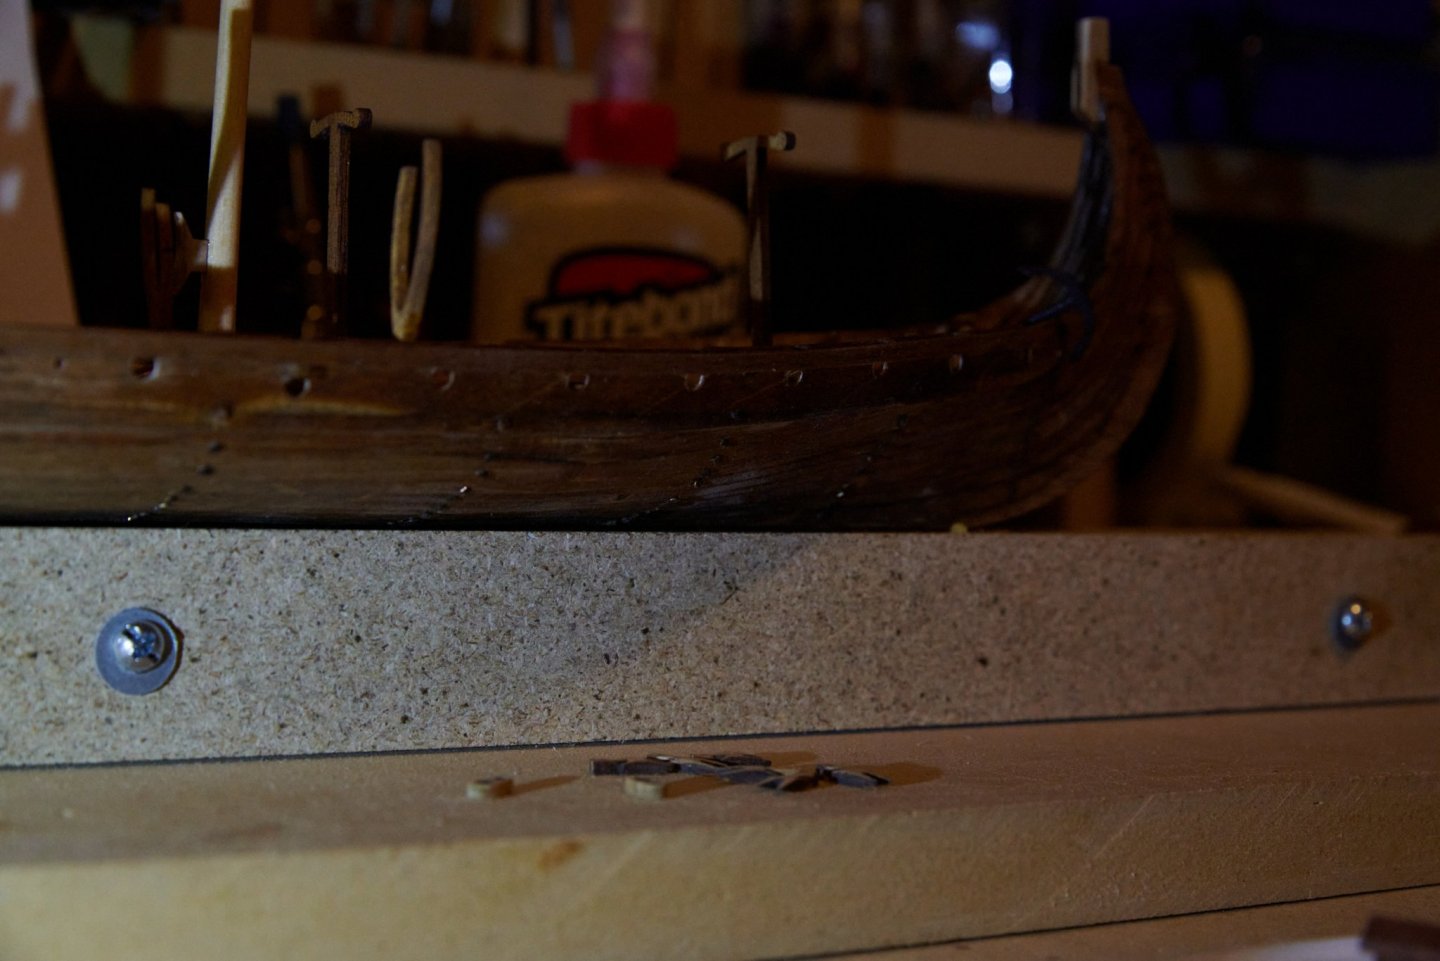
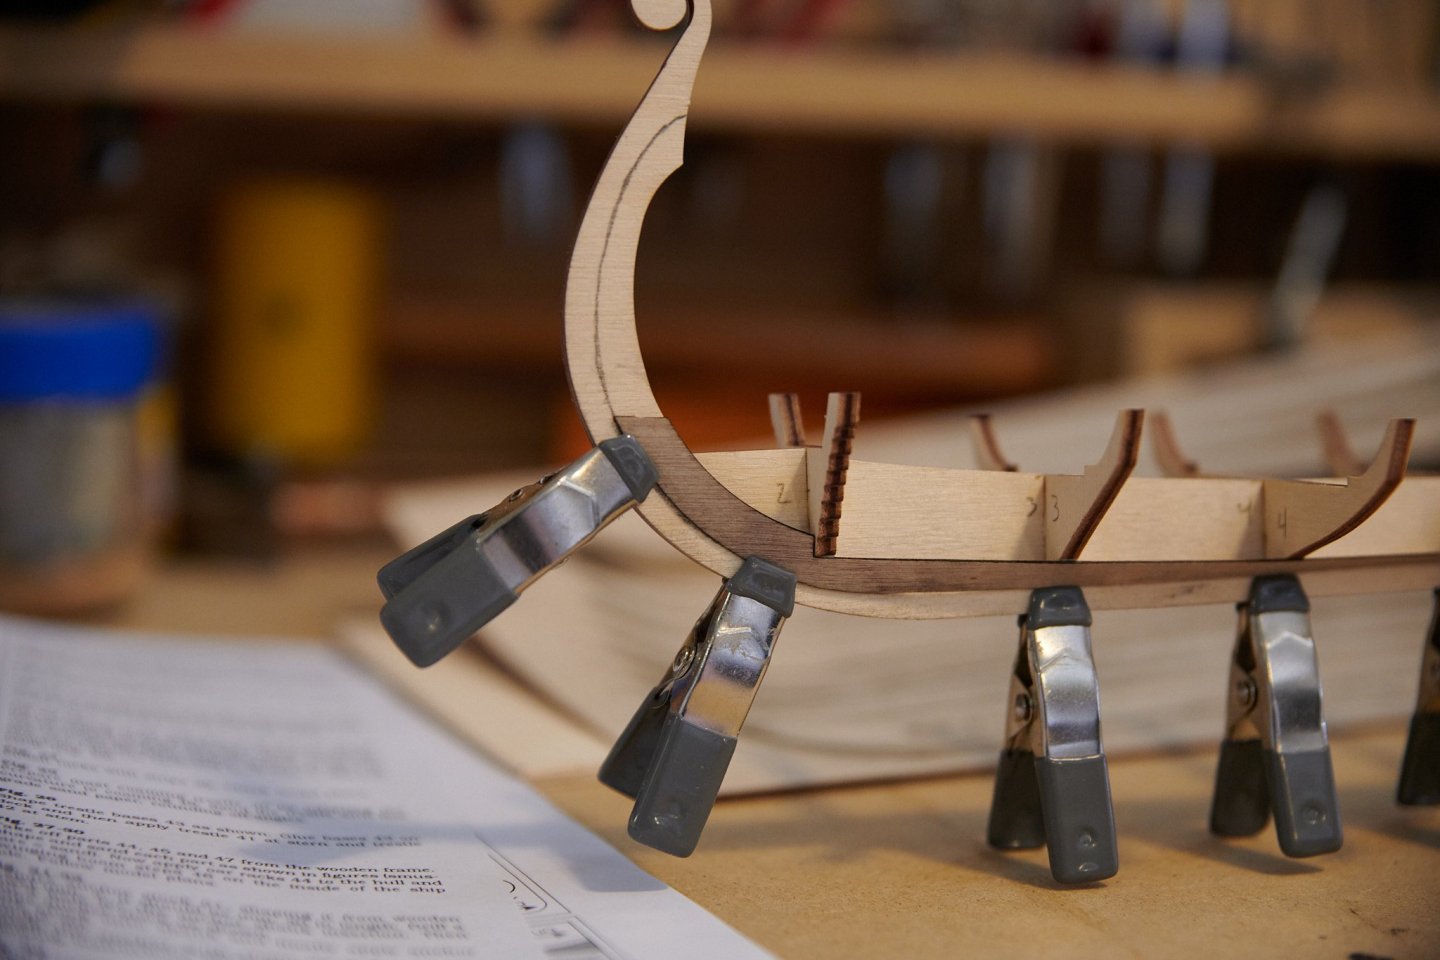
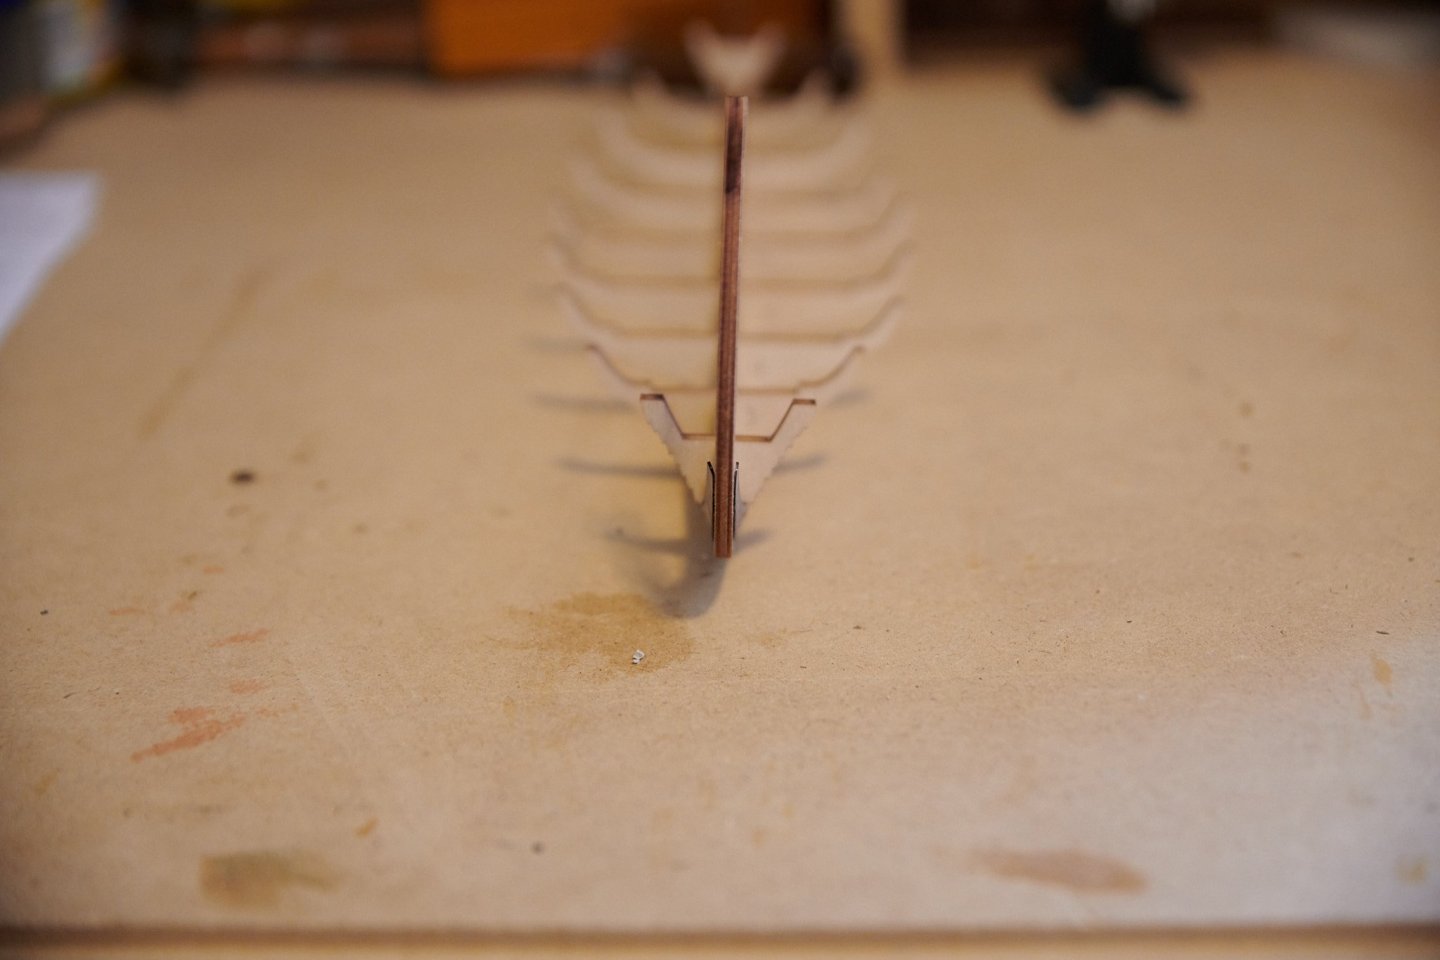
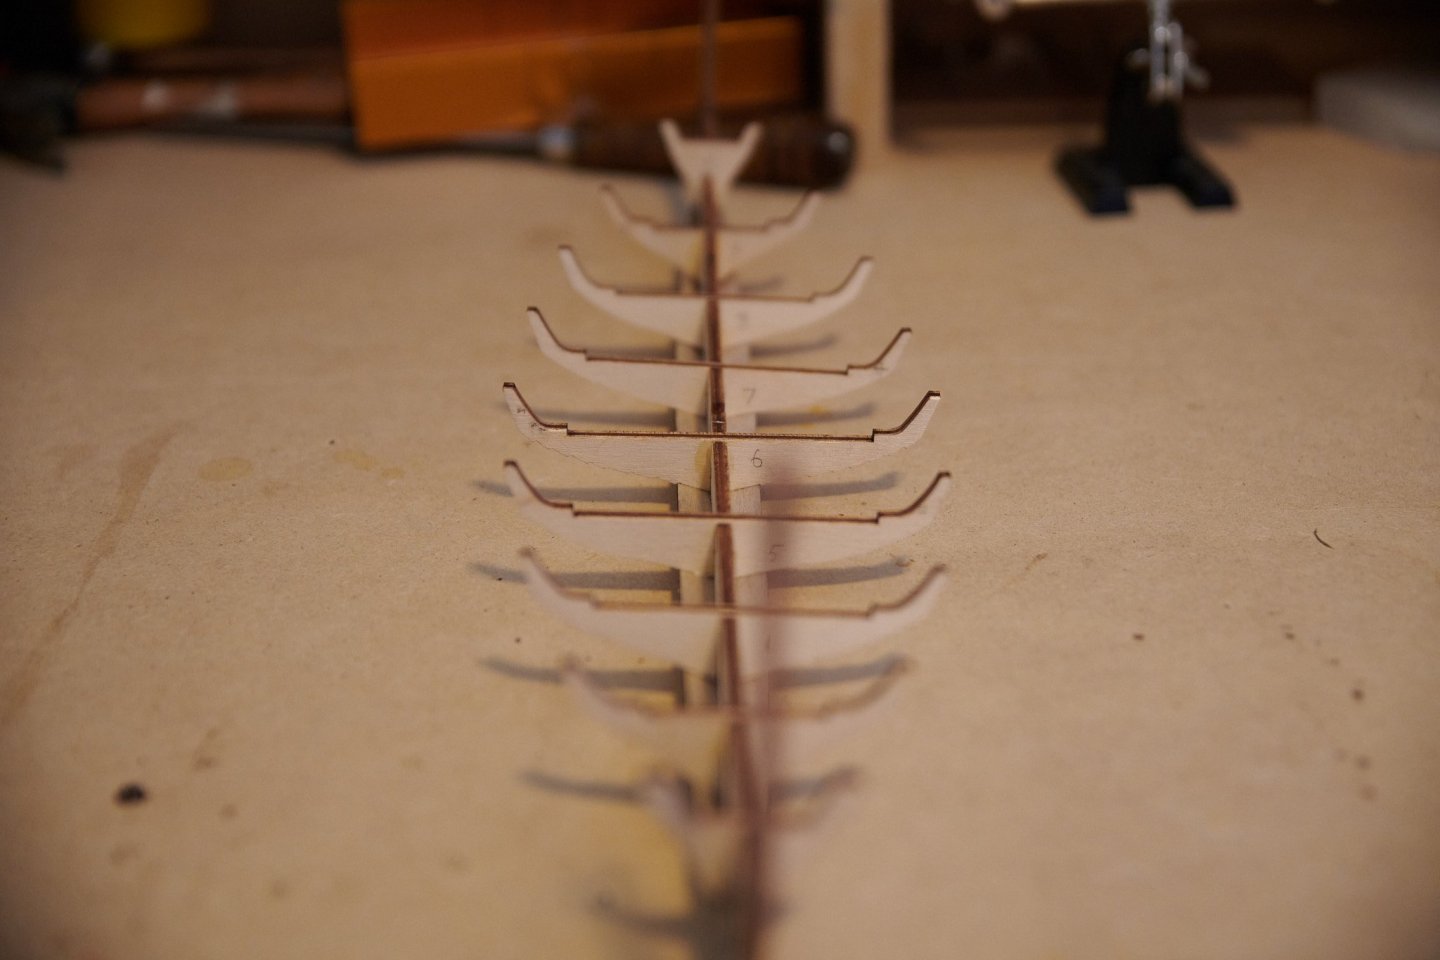
Moving on to the keel and bulkheads. The first photos here show the guide lines on the stem and stern for the planking to follow. This ship is a clinker ship so the planking is unique compared to most other ships we see here. I never got a photo of the bulkheads without any planks on so here you can see the first plank going on. The clamps along the bottom are pressed just up against the plank holding it against the bulkhead, rather than pinching it against the bulkhead. These planks are also pre-made and each row is a specific plank to be placed down, each one slightly overlapping the previous one.


-
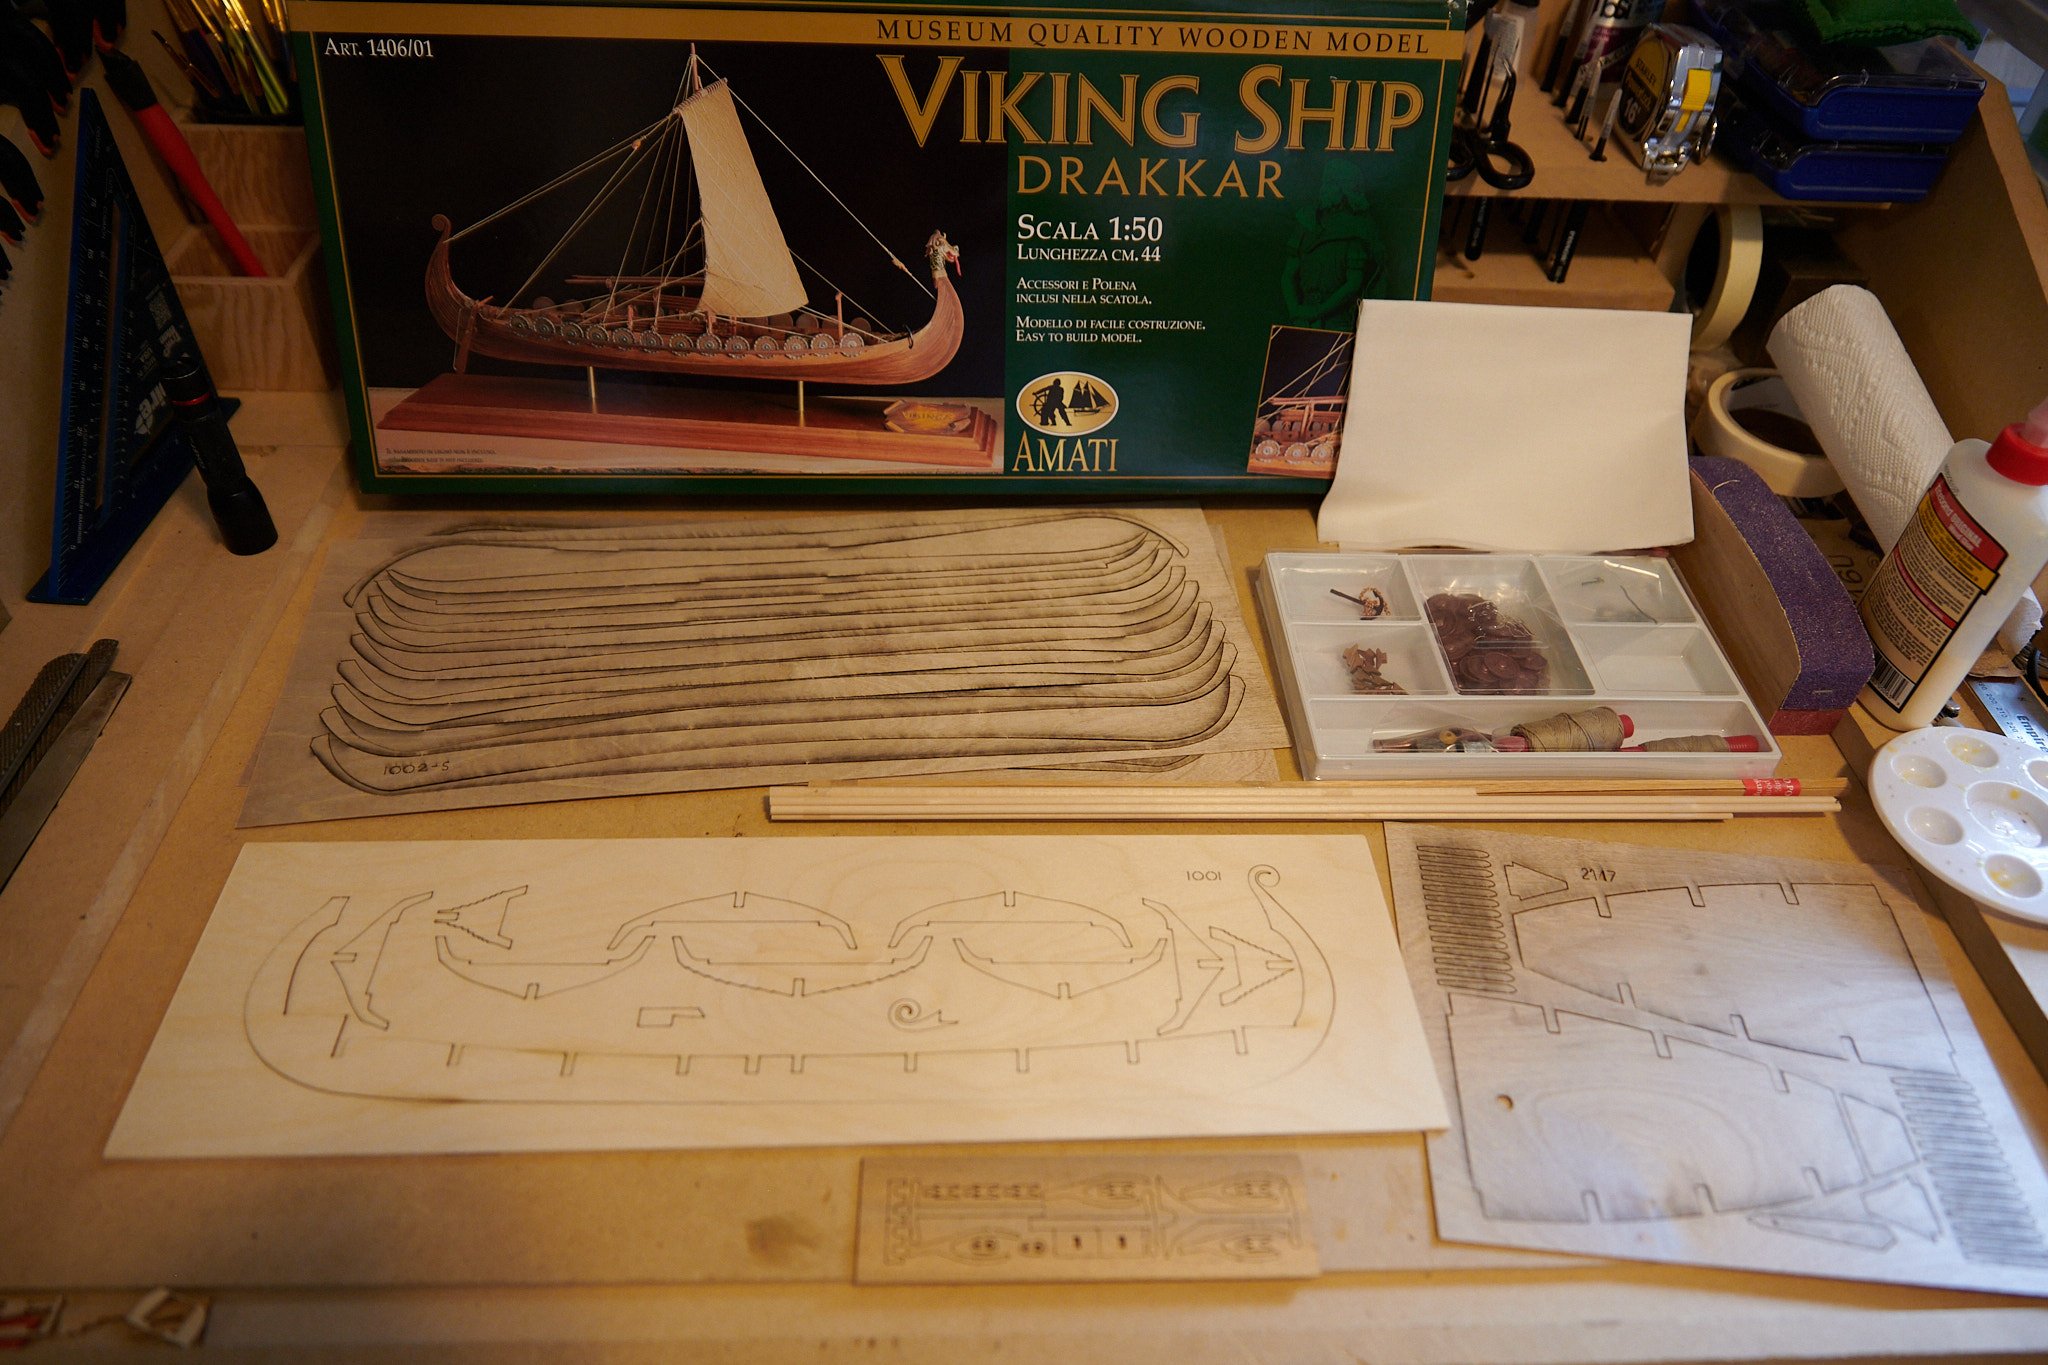
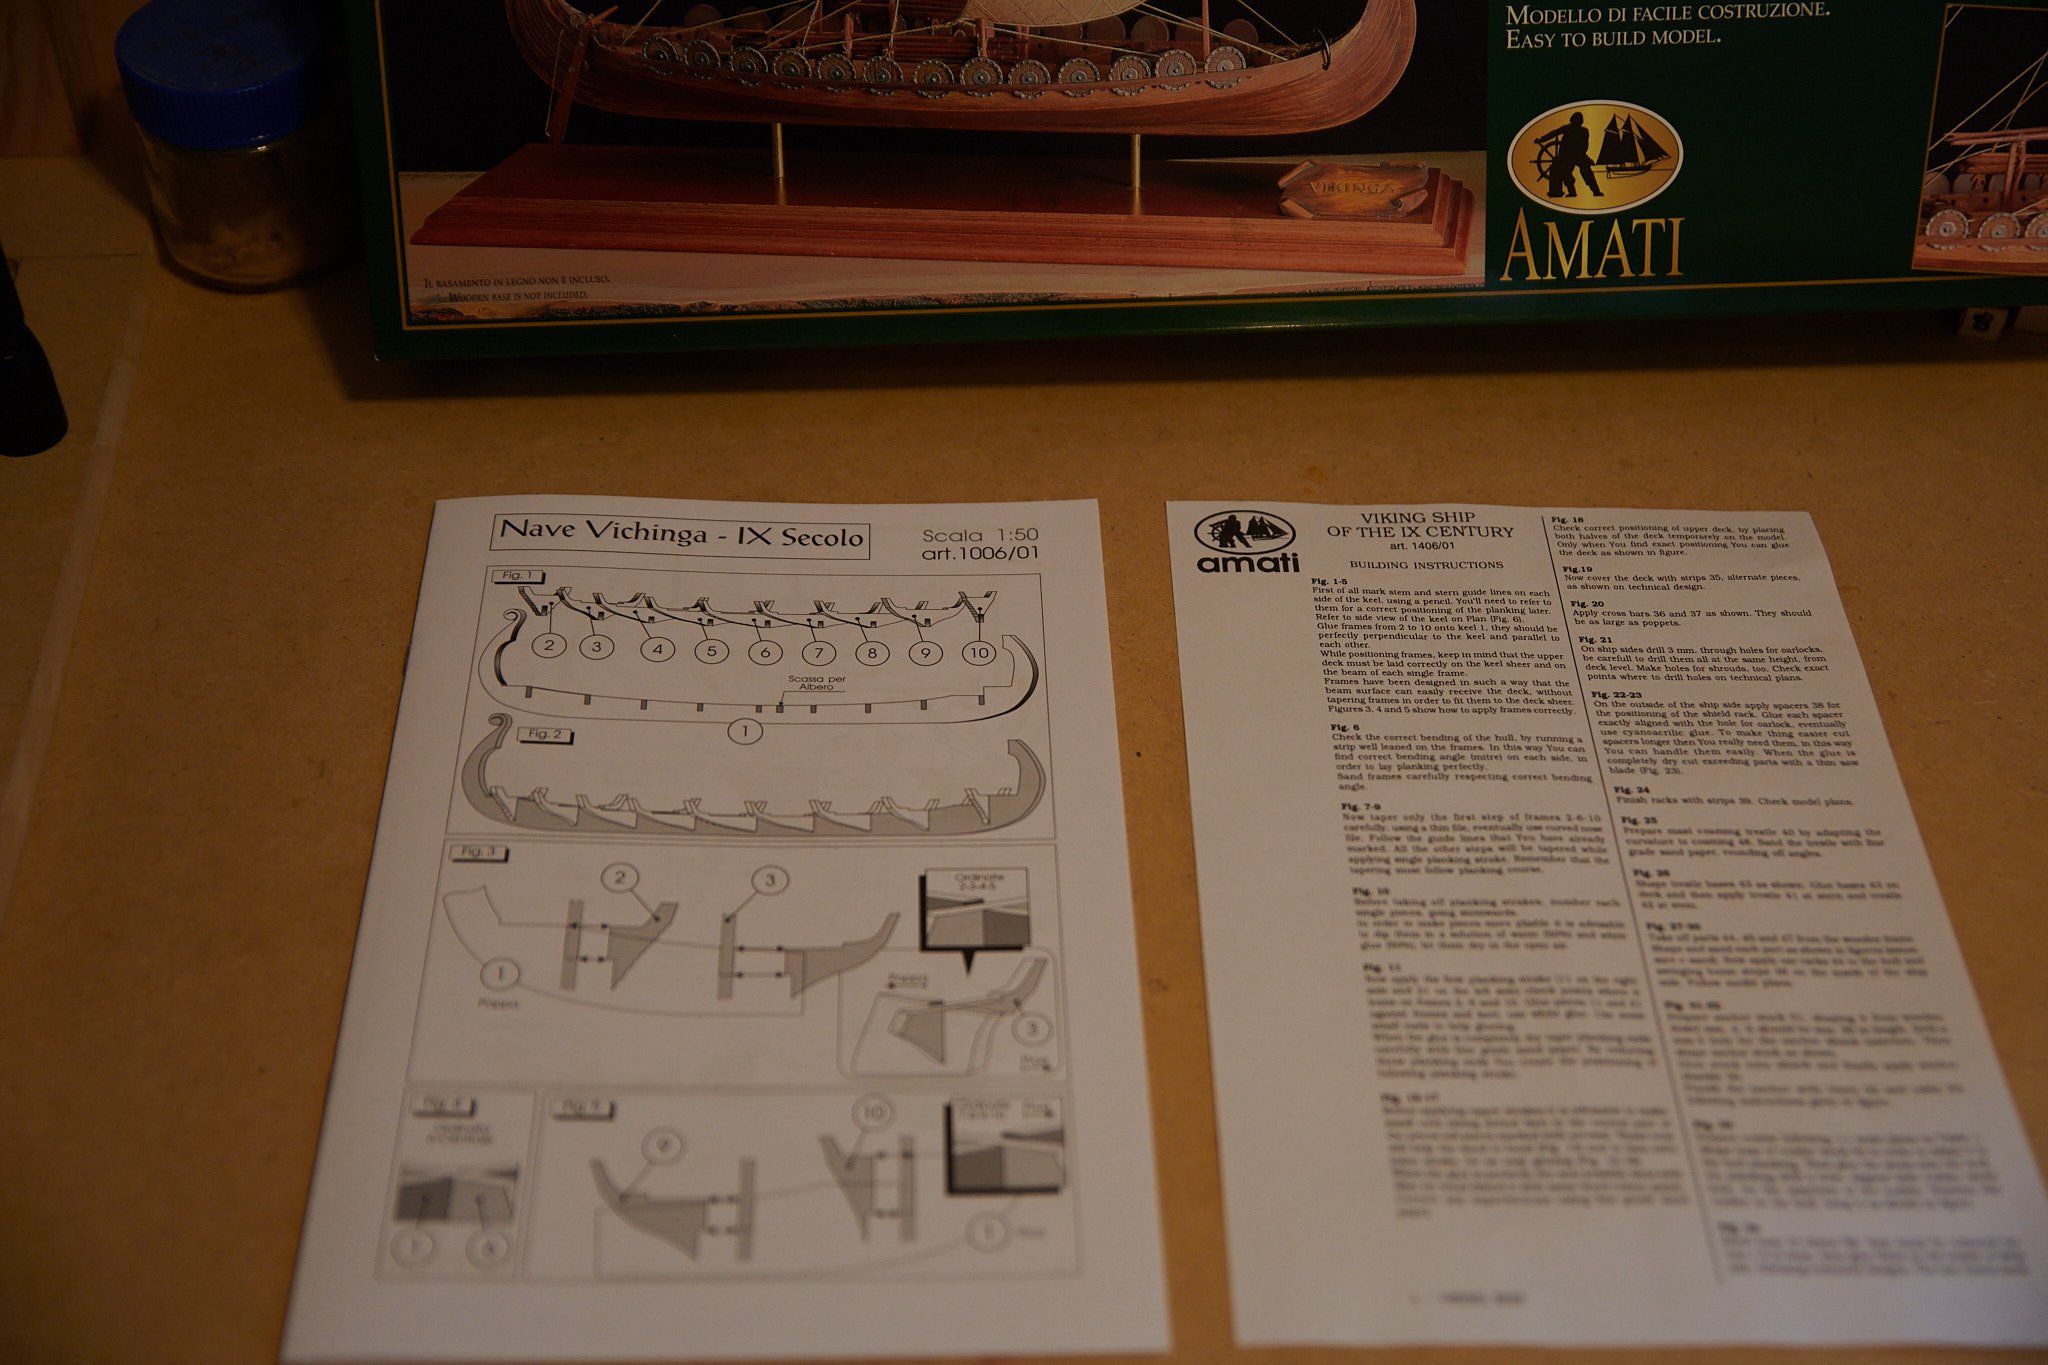
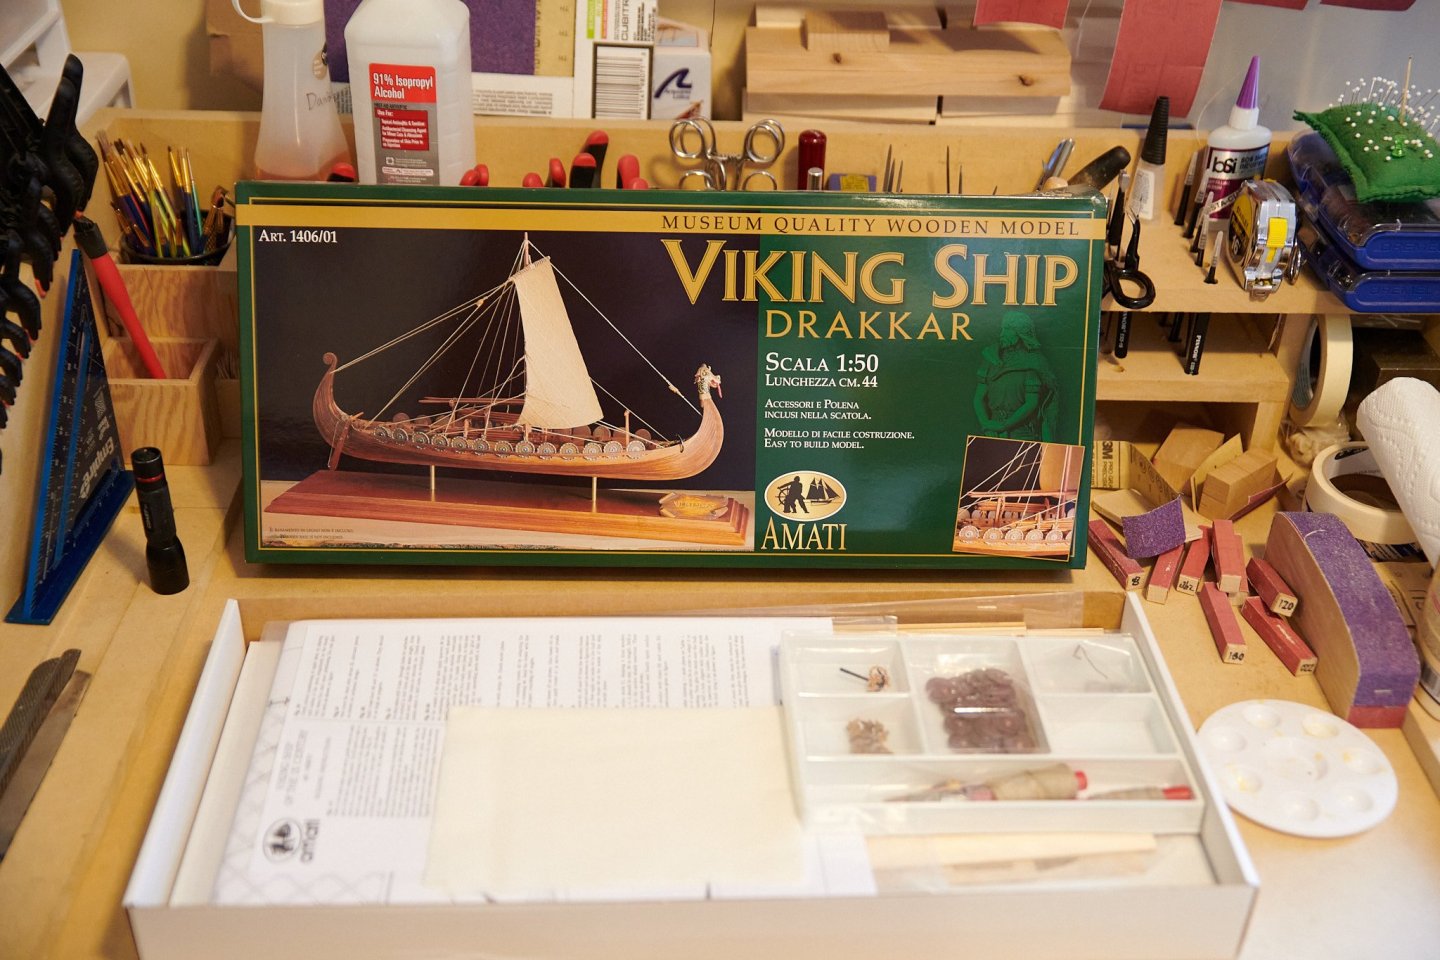
Here is my most recent build. I have historically started ships and not finished them, or sidelined them and start something new, so this time I decided to wait until I finished the build before I posted my build log. Although I am not quite finished, I am almost there and will have it completed within a week or so, depends on how long the oars take me. I have not abandoned the other builds I have started, but decided to put them on hold while I work on some slightly smaller projects before moving forward with them. As usual here is the required box opening and contents photos. Everything was well packaged. There is a single sheet of plans that were in Italian, some picture instructions with a few words in Italian. The text instructions had a separate sheet in English. I did have to get my phone to look up some Italian to English translation on a few words in the images and plans, but overall the instructions were adequate. I will make several smaller posts of my progress rather than one large one. More to come shortly.


-
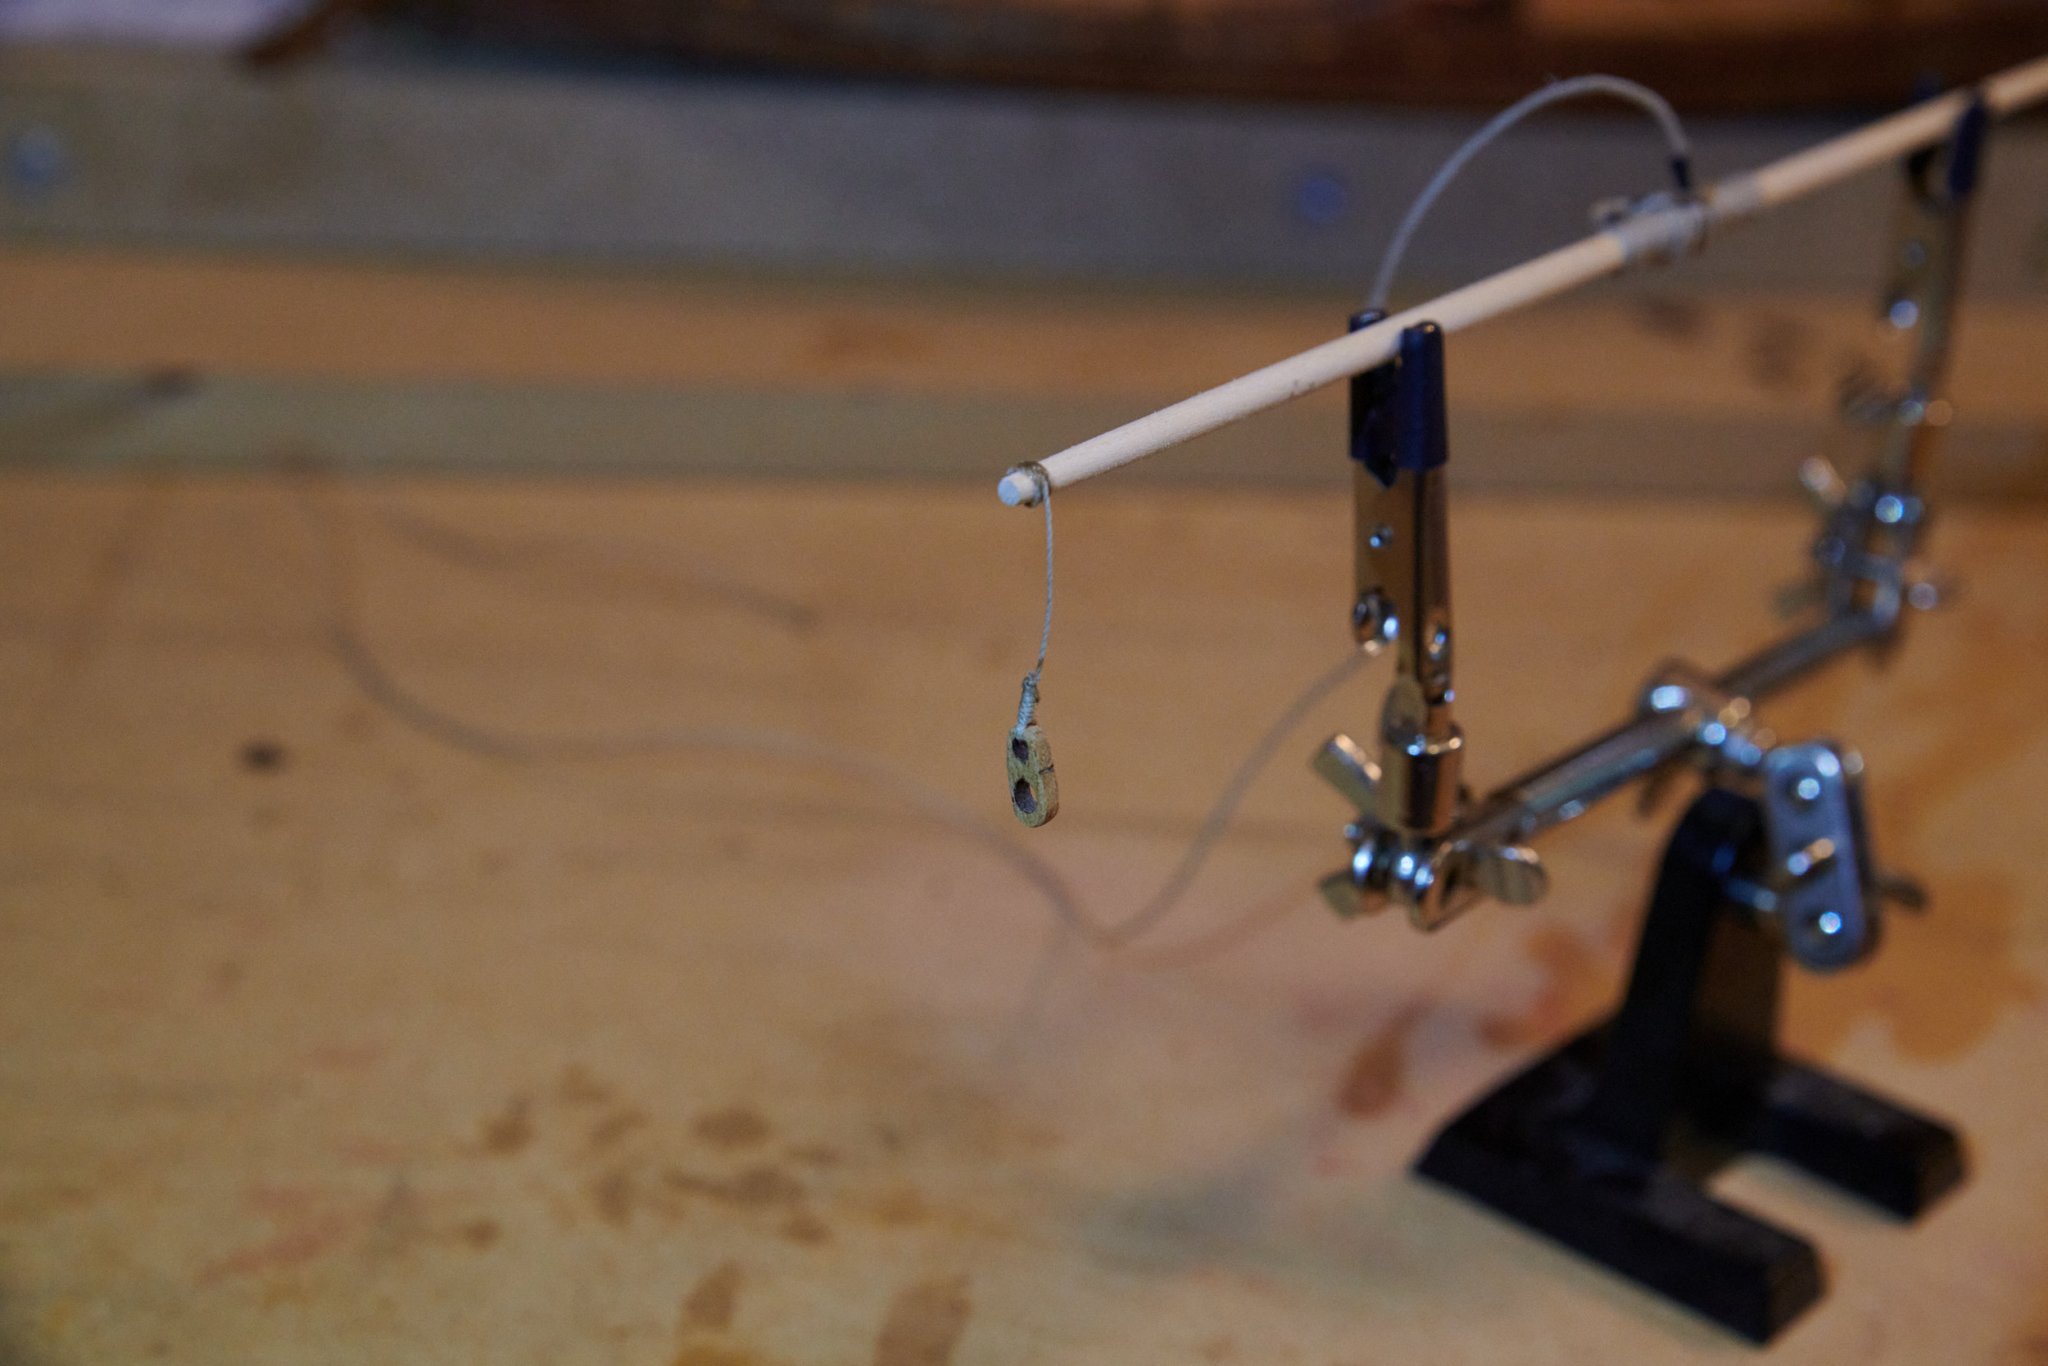
Question for you, those small black cross shaped thread/rope patterns with the short bit hanging down from the sail. Do you know what those are called and what significance or purpose did they serve? I swear I've seen those before but I don't know where, nor do I know what to call them to try to find out any information.
-
I can't speak to that specific kit and I am still relatively new at this hobby but I'll give my input regarding DeAgostini. I started their subscription service for the Sovereign of the Seas almost a year ago. After month 1 there were some apparent issues with payment and I stopped receiving several months, once that was corrected I began receiving month 2 and so on. I am due to receive month 5 here soon, it just shipped. I have put the keel and bulk heads together and part of the stern and bow. I have put together a couple of the cannons. I should have waited until I was ready to move forward with the entire build before doing this as now I have to store the assembled frame until then. I intend on this being something I complete years down the road after I get more experience with some other models. My knowledge of materials is limited in experience, but from what i have seen so far I have not had any problems with the quality of materials. The only issue I have found is that the rib frames and bulkheads are sometimes warped a little to where they curve fore or aft. I considered ordering replacements, but I'll get into their customer service or communication in a minute, but I realized that I can flex them back into position by hand. Forgive my inexperience and lack of correct terms, but the horizontal braces between bulkhead/rib frames, that will frame out the gun ports will eventually be placed and straighten those frames out to vertical. So I am confident that that slight warping issue won't be a problem down the road. As far as straight and true the keel seems to be fine. I will say the SotS kit is very well organized. As I said I have put together a couple of the cannons because they like to spread the work out in various areas of the ship from month to month. So instead of at some point down the road building 100 cannons, you get a few cannons every shipment to put together and give you something else to work on besides the typical order presented in instruction manuals. Back to their organization, each month I believe has 12 steps and each step has it's own bagged package of parts. So instead of getting a box full of parts for the whole month, you get 12 different bags of parts unique to that specific step. I haven't put much together, but I have yet to see anything missing. Each bag is numbered with the numbered step and at a quick glance you can take inventory of the bagged step of parts. One of the selling points for me on this kit was the instruction manual. Despite my inexperience I think someone with little experience, a bit of internet know how, this forum, and these instructions could put this kit together quite well. The instructions are full color, English, and the first half of each months issue has historical information about the ship and era. You can look up pdf versions of the SotS instructions on their website. The problem I have had with them so far, is communication, or lack their of. My first month arrived without any instructions. I found out soon after that they may be phasing out those printed instructions and going to digital only. I was told this was on specific kits, and the SotS is still advertising physical, fully colored, instructions. There isn't much in the way of contact info on their website, a contact form, but no email address. I used the form and got nothing back for several days. I went to the forums and posted a question on the SotS section. It disappeared one day, and I assumed it was deleted, which made me mad. So I finally called them. That's when I was told about the digital instructions. I explained I didn't want digital, I don't want to use my phone to look at instructions, nor do I have a computer that can sit near my work area. I forget exactly how the sequence of events went from there, but I got the first month free, only paid shipping. I was considering canceling after all this. Finally I found my post on the forums had been moved to a complaint forum instead of the SotS forum. I believe I was given an email to contact. I did, was still several days, then I finally got a response that it was an error with their US shipping department or it was out of stock at the time. They would send a replacement out. Long story short, I don't usually get a response from anyone before at least a week has past. I have since also not received the instructions for month 3. I emailed that same email from before, was told a new one would ship on April 19th, and would take 2-3 weeks to arrive. I then received month 4 early May, still no instructions for month 3. Finally on June 1st I emailed them back. Was told the month 3 instructions are out of stock and that the order is in the system and would be sent out when available. At this point I am 5 months into this payment wise, I am not going to cancel now and have parts to a ship I can't finish and waste that money. It may be possible to send it all back and get a refund, but who knows what that process would be like. I still want the kit, and will deal with the missing instructions from time to time. I think it is a good quality kit, good accuracy, comparable price to other SotS kits, and when present, great instructions. If they can improve their customer service, response times, sending everything that is supposed to be sent, etc I think they could be a good company. Also as a side note, there is no way to cancel online, you must call them. The online account is very lacking in details. When I look at my past orders, all I have is an order for the SotS monthly subscription for $9.99. The first month was free so all I paid was $9.99 shipping. There are no details on monthly shipments, monthly payments, dates, nothing. You do get an email when they take a payment and ship a month, but no tracking and nothing in the account records from the customer perspective. So don't delete your emails, those are your best source of information.
-
Is running rigging smaller in diameter than standing?
Matt H replied to Matt H's topic in Masting, rigging and sails
Thank you both for the information. Jan, what you said about the ropes being smaller as they work their way upwards makes sense. As the mast gets taller it gets smaller and thus the rigging doesn't need to be as large as the lower mast rigging. In this case the model in question is the Amati Greek Bireme. I recently bought 3 Amati models, the Viking Drakkar, and the Greek Galley. I am almost ready to start the deck furniture and mast for the Viking Drakkar. After planking I ran out of the provided nails so started looking for more and went back to agesofsail.com. They have some, but their shipping is quite expensive $8 for a $2 item. So, I thought I'd look through the other 2 kits in greater detail and see what other items I might want to order. I decided to order more rope because you can never have enough and I don't like having to be stingy with what I use to ensure it lasts through the entire build. That's when I found the lack of instuctions for the Bireme, hence the question. The instructions are very minimal only a few one line items and no specification on which of the 2 thread sizes to use on the various rigging. It's only a single mast, single square sail. Not too complicated as far as masts, sails, and rigging goes. I do have the bottom 3 of those listed books, the bottom two I have the physical books the other I have digital. I really need to take time to go through some of my books and learn what's in them to better find information. Thanks again to you both.