

Blackie
-
Posts
102 -
Joined
-
Last visited
Reputation Activity
-

.thumb.jpeg.fc5d633a7b34428fcf19419a73d56d55.jpeg) Blackie got a reaction from EricWilliamMarshall in Harvey by Blackie - FINISHED - Artesania Latina - Scale 1:50 - Baltimore Clipper
Blackie got a reaction from EricWilliamMarshall in Harvey by Blackie - FINISHED - Artesania Latina - Scale 1:50 - Baltimore Clipper
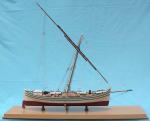
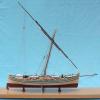
Time to update the log after a small amount of work. I am slowly working on the rigging and starting on the deck fittings as shown in the attached. Rigging is not yet trimmed or fixed for the last time as I might need to rejig it just to get in something else such as braces for the yards yet to be fitted.
-
 Blackie reacted to GuntherMT in Armed Virginia Sloop by GuntherMT - FINISHED - Model Shipways - scale 1:48
Somebody has to keep my head from expanding to fill the room Alistair!
After dinner I couldn't wait until tomorrow, so I moved on to the port side. I did a much better job of keeping the planks aligned on this side, and used no stealers or drop planks at all! I probably should have used a single stealer at the stern, but even there, the only reason I needed one is the gap left because I accidentally trimmed the 2nd to last plank off too narrow - I got too aggressive shaving it and broke the full width off at the stern, and didn't feel like starting over on that plank. I thought I might be able to completely close the gap by using a section of 1/4" plank at the stern to finish, but it came up just short so there is a small triangular gap there, but I don't think it's enough to affect the second planking.
Here is the hull with only a single plank gap left, and the 1/4" plank section placed at the stern. The gap that's left is exactly the same width for the entire length (pats self on back). Well, the digital calipers could find variations, but a marked strip was on the same pencil mark for the entire length, so close enough to exact for me!
And a bunch of different shots showing the completed first planking, ready to move on to.. whatever is next!
Actually, what's next it the Wales, and inner bulkwark planking, black strake, etc., before moving on to the second planking.
I'll decide after the second planking whether it gets painted or not, but my plan is to leave it natural below the black strake if I can do a good enough job at the planking.
-
Blackie reacted to GuntherMT in Armed Virginia Sloop by GuntherMT - FINISHED - Model Shipways - scale 1:48
Today I moved on from the stern. I'll revisit it later once I decide what I really want to do as far as trim, paint, name, etc.
No warship is complete, not even a small sloop, without gunports! So today I did upper bulkhead outer planking, first layer. I quite enjoyed this part of the project, and other than the fact that it's apparently completely impossible to eliminate all the fuzz from basswood, I'm pretty happy with the outcome.
I took a ton of pictures, but when I started to edit them to post I realized that they are all really pretty much repeats of each other just on the next section, so I cut it down to just a few.
First section, and then with three sections completed:
The stern required a bit different approach, as I there is no way to get clamps on the planks, so I used some pins.
One of the things I may possibly have spent a fair chunk of that money mentioned earlier on, a little bit at a time, is clamps. For the first month I was doing this new hobby, I would grab every clamp that looked like it might possibly be useful, and that I didn't already have. Some people would say I now have far too many clamps, but I say, there is no such thing as too many clamps!
Cut to the chase, as it's past my bedtime now, and nobody likes a grouchy ship builder at work on Monday morning.
Hrmm.. looking at that last picture, I didn't get the earlier planks on quite even at the bottom. I'll have to measure and fix that before I begin lower planking.
Until the next time, happy modeling everyone, and thanks for the looks, likes, and comments!
-
Blackie reacted to russ in Armed Virginia Sloop by GuntherMT - FINISHED - Model Shipways - scale 1:48
Brian:
The damage to the subdeck is really not that big a deal. It just needs a patch and it will not matter how it looks so long as the deck planking lays flat.
On the stern frames, do the laser cut windows have an angle to them that they will fit between the angled stern frames as shown in the plans? If they do not, then you would not be able to fit them in between the frames if you installed them on an angle.
If you are going to install the stern frames on an angle, then it is a simple matter of properly beveling the upper and lower ends of each frame. As for the two that are next to the false keel, there is little to be done there. It would be difficult at best to try and bevel their outboard faces to get kind of angle you want.
I would let the laser cut window frames guide you on this issue. If they are not angled, then install the stern frames perpendicular and build the stern up accordingly.
Russ
-
Blackie got a reaction from EricWilliamMarshall in Harvey by Blackie - FINISHED - Artesania Latina - Scale 1:50 - Baltimore Clipper
Slow and steady, but I have finally fitted the boat to the stern davits. The photos are a bit rough but show the work as it progressed. The gripes are made from an old handkerchief which the boss surrendered. It was stained in cold tea and rinsed in diluted PVA glue. After drying I cut some 2mm wide strips which were still reasonably flexible and added some brass rings to tie them to eye bolts in the stern rail. There is a gripe rail with padding between the boat and the transom but the photo of that was out of focus. The gripe rail is required to keep the boat off the rudder pendants and to pull the gripes against, same as for boats fitted to davits along the bulwarks.
-
 Blackie got a reaction from robin b in Harvey by Blackie - FINISHED - Artesania Latina - Scale 1:50 - Baltimore Clipper
Slow and steady, but I have finally fitted the boat to the stern davits. The photos are a bit rough but show the work as it progressed. The gripes are made from an old handkerchief which the boss surrendered. It was stained in cold tea and rinsed in diluted PVA glue. After drying I cut some 2mm wide strips which were still reasonably flexible and added some brass rings to tie them to eye bolts in the stern rail. There is a gripe rail with padding between the boat and the transom but the photo of that was out of focus. The gripe rail is required to keep the boat off the rudder pendants and to pull the gripes against, same as for boats fitted to davits along the bulwarks.
-
 Blackie got a reaction from qwerty2008 in Harvey by Blackie - FINISHED - Artesania Latina - Scale 1:50 - Baltimore Clipper
Time to update the log after a small amount of work. I am slowly working on the rigging and starting on the deck fittings as shown in the attached. Rigging is not yet trimmed or fixed for the last time as I might need to rejig it just to get in something else such as braces for the yards yet to be fitted.
-
 Blackie got a reaction from fnkershner in Harvey by Blackie - FINISHED - Artesania Latina - Scale 1:50 - Baltimore Clipper
Slow and steady, but I have finally fitted the boat to the stern davits. The photos are a bit rough but show the work as it progressed. The gripes are made from an old handkerchief which the boss surrendered. It was stained in cold tea and rinsed in diluted PVA glue. After drying I cut some 2mm wide strips which were still reasonably flexible and added some brass rings to tie them to eye bolts in the stern rail. There is a gripe rail with padding between the boat and the transom but the photo of that was out of focus. The gripe rail is required to keep the boat off the rudder pendants and to pull the gripes against, same as for boats fitted to davits along the bulwarks.
-
 Blackie got a reaction from mtaylor in Harvey by Blackie - FINISHED - Artesania Latina - Scale 1:50 - Baltimore Clipper
Slow and steady, but I have finally fitted the boat to the stern davits. The photos are a bit rough but show the work as it progressed. The gripes are made from an old handkerchief which the boss surrendered. It was stained in cold tea and rinsed in diluted PVA glue. After drying I cut some 2mm wide strips which were still reasonably flexible and added some brass rings to tie them to eye bolts in the stern rail. There is a gripe rail with padding between the boat and the transom but the photo of that was out of focus. The gripe rail is required to keep the boat off the rudder pendants and to pull the gripes against, same as for boats fitted to davits along the bulwarks.
-
 Blackie got a reaction from HIPEXEC in Harvey by Blackie - FINISHED - Artesania Latina - Scale 1:50 - Baltimore Clipper
Slow and steady, but I have finally fitted the boat to the stern davits. The photos are a bit rough but show the work as it progressed. The gripes are made from an old handkerchief which the boss surrendered. It was stained in cold tea and rinsed in diluted PVA glue. After drying I cut some 2mm wide strips which were still reasonably flexible and added some brass rings to tie them to eye bolts in the stern rail. There is a gripe rail with padding between the boat and the transom but the photo of that was out of focus. The gripe rail is required to keep the boat off the rudder pendants and to pull the gripes against, same as for boats fitted to davits along the bulwarks.
-
 Blackie got a reaction from GuntherMT in Harvey by Blackie - FINISHED - Artesania Latina - Scale 1:50 - Baltimore Clipper
Slow and steady, but I have finally fitted the boat to the stern davits. The photos are a bit rough but show the work as it progressed. The gripes are made from an old handkerchief which the boss surrendered. It was stained in cold tea and rinsed in diluted PVA glue. After drying I cut some 2mm wide strips which were still reasonably flexible and added some brass rings to tie them to eye bolts in the stern rail. There is a gripe rail with padding between the boat and the transom but the photo of that was out of focus. The gripe rail is required to keep the boat off the rudder pendants and to pull the gripes against, same as for boats fitted to davits along the bulwarks.
-
Blackie reacted to GuntherMT in Armed Virginia Sloop by GuntherMT - FINISHED - Model Shipways - scale 1:48
Thank you Slog.
I've finished the reinforcement blocks finally, although I chose to completely fill the final two gaps at the bow rather than use the blocks, in order to help me see the 'flow' of the hull up there when I get to fairing.
While doing the reinforcement blocks, I used the opportunity to correct any minor out of square issues with the bulkheads. I did this by measuring at multiple points along the top of each bulkhead, always taking my measurements off of bulkhead 'O' which I took great care to square up with all the stern bulkheads and the keel.
After measuring to determine if I needed any adjustments to the bulkheads, I would cut individual blocks and then fine tune them until they caused the measurements from bulkhead 'O' to be right where I wanted them, and equal on both sides. I was having some issues where the addition of the glue prior to final fitting would actually change my measurements slightly, so I devised a technique to apply the glue after fitting the blocks in place, so that I did not need to compensate for the glue thickness on the ends of the blocks.
After my final measurements and test fitting was complete, I cut a 'cross' into both ends of the block with a razor saw.
I would then slightly widen the leg of the cross that would be 'outboard', and then place the block without glue, and hold it in place (if needed) with needle nose pliers, while I used a syringe to inject the glue into the cross via the slightly wider leg.
As can be seen here, the glue would flow through the cross, and would almost always bubble out of each of the other three points almost equally.
This method seemed to work quite well, and I had no measurement changes between the final test fit, and the glued in blocks after starting this system. After the glue had set for a couple minutes I would then use the syringe to lay a 'bead' of glue around all four edges of the block where it laid against the bulkheads. Testing several blocks that were completely dried shows that they have plenty of strength with this system.
After inserting the last two spaces with filler blocks, this is where I'm currently at.
Every bulkhead is even with bulkhead 'O' along at least 3 points on each side, to less than 0.5mm now with all reinforcements in place.
Next I'll begin to work on the sub-decks braces and sub-decks for fitment, and the bow fillers I think.
-
Blackie got a reaction from EricWilliamMarshall in Harvey by Blackie - FINISHED - Artesania Latina - Scale 1:50 - Baltimore Clipper
Help please.
I was about to start rigging my longboat which is hung from davits over the Harvey's stern when I began to question my proposed rigging.
I propose to use hooked double blocks with falls up through the davits and hooked onto eyebolts within the boat. This is the usual rigging for boats later in the 19th century, say steel baques, schooners, etc.
Does anyone have an opinion on the size of the blocks and diameter of the falls for an early 19th C timber Baltimore schooner?
The boat will require some gripes to stop it swinging and banging into the transom so I was also proposing to fit some type of gripes and gripe rail. Mondfeld's Historic Ship Models has the info shown on the sketch but it has no rail. In my case I have rudder pendents which might foul the rail and gripes. Any comments on gripe layout?
-
Blackie reacted to fnkershner in Endeavour by LMDAVE - FINISHED - Amati - 1:80 - J-Class Yacht
Dave - I hope you will not be offended by the question - but have you sailed on a real boat?
I can just see my sailing instructor turning in his grave the Hypot of what!!!
Let me humbly offer a quick lesson which has been drilled so permanently into my brain.
Triangular sails have 6 parts - 3 corners and 3 edges. The names of the corners are Head (can you guess which one this is?) Tack (the tack never moves & Clew. The edges are the Foot, the Luff and the Leach. I think everyone will know the Foot. The Luff is the first edge that will luff. ie the edge that meets the wind first.
For the main sail power is derived by having an airfoil shape. so yes the Leach will not be straight and the sail will not be a flat triangle.
Careful tuning of the air foil is what wins races. Which is why this boat has so much tackle on the boom. This boat has an aluminum boom. This was a huge advancement in technology for the time. Also the boom was allowed to flex which also helped with the air foil shape in certain conditions.
-
Blackie got a reaction from EricWilliamMarshall in Harvey by Blackie - FINISHED - Artesania Latina - Scale 1:50 - Baltimore Clipper
I have rigged the boom, main sheet, topping lifts but can't take a photo of it just yet. I thought that I had settled on a main sheet/block arrangement but found that when I rigged it the blocks clashed with the top of the rudder stock. Then I decided on another arrangement and cut off one of the blocks and moved the second one towards the outer end of the boom. Big lesson here - never remove something until you really, really must! I redid the main sheet and realised that while I would change the direction of the sheet through the blocks, I needed to original configuration even if they had to be shifted aft. So I remade the cut strop and refitted it which meant removing the boom from the mast and all of the unnecessary messing about that went with it. I'll think longer before next time I think that I must change something.
Anyway, to do something different I thought that I would make a few oars for the ship's boat. The first two were way too short but good practice. With the longer loom and shank I needed a longer slot to take the blade and it was beyond me to do it by hand past about 6-7mm length used on the shorter versions. My blade in the electric saw cuts a wide slot which in the 2mm shank is too wide and leaves little of the narrow shank to fit either side of the blade. I then decided that as the oars would all be fitted flat onto the boat's thwarts I needed only one side of the shank and have proceeded with that Idea. The part finished oars are shown. I'll probably only fit 6 oars into the finished boat so can choose the best of the lot.
-
Blackie reacted to themadchemist in Carmen 1850 by GuntherMT - FINISHED - Constructo - Scale 1: 80 - pailebote (Schooner) - first wooden ship build
That's common I think. It's tough to go from pre-formed styrene parts to (as a friend put it) "a box of sticks".
and many of us started with plastic models, typically modifying them.
Building a 68' mustang like my first car, was what got me thinking about the step up to wood and I still have a Z28 and B-17 on the shelve that will be fun projects. I mistakenly looked down on plastic kits when I first started building, then I saw what some people here were achieving with plastic and card.
I've never looked down on any type of medium, after that. Evergreen styrene has many uses on even a wooden kit, as does card stock.
Check out Dee Dee's use of dollar bills to form mast hoops and you soon start seeing everything as potential building material.
I remember showing a friend my build and they mentioned "oh that looks fun", then I opened the box and got the above reply.
They just couldn't believe that most everything came as rough timber and required building/making/shaping every piece by hand.
I also remember a "but they're all straight pieces, how do you make the curvy pieces" that is when explaining this hobby lost them.
This hobby seems to draw a higher developed mind that is seeking something real and tactile, you know the kind of real that isn't on "reality" TV.
The type of people that tend to not see TV as a hobby but a diversion. Personally next year will mark my first decade without TV and yet I just found this hobby less than 2 years ago. It has changed my life. I think I'd only go back to TV if there was a model ship building channel
Someone call discovery channel Just Kidding.
It's almost strange the satisfaction one gets when, as you mentioned when you made the bitts and said
"I was ridiculously pleased with myself when I finished my first piece of pin-rail. It was about as perfect as I could have hoped for"
That feeling has never stopped for me since I started building and when you consider all the types of ships, you know Life just won't be long enough to get to everything we want to achieve. I always revel when I see others cross this bridge into the pleasures of this hobby.
Its a dying art-form that strangely the internet has made more accessible to us usually land locked builders.
The community of MSW, can never be given too much credit for their advancement of this hobby. Together we all learn more and as with any activity, the human aspect of belonging to a support group makes the undoable seem not so daunting.
I'm not saying ship builders are smarter or better, just a bit more eccentric in their tastes towards what is fun.
I'm glad you received a quick reply from constructo. Waiting forever is isn't any fun.
-
Blackie got a reaction from GuntherMT in Carmen 1850 by GuntherMT - FINISHED - Constructo - Scale 1: 80 - pailebote (Schooner) - first wooden ship build
Hi Brian
For a first time timber model you seem to have got the hang of it very well.
From my own experience I would hold off glue fixing the deck houses etc until you have the masts i and set to the angle that you want. I have found that I am only now beginning to fit the deck furniture after the masts, shrouds, gaffs and boom. It has been a lot easier to tie the ratlines to the shrouds without the yards getting in the way. I guess that you will find the best way to suit you but start with the masts and take it from there as everything from here on is built up to and around them.
Good luck
Blackie
-
Blackie reacted to aliluke in Armed Virginia Sloop by aliluke - FINISHED - Model Shipways - 1:48
Just a couple more...
Cheers
Alistair
-
Blackie reacted to aliluke in Armed Virginia Sloop by aliluke - FINISHED - Model Shipways - 1:48
This will be the last lot.
Cheers
Alistair
-
Blackie reacted to aliluke in Armed Virginia Sloop by aliluke - FINISHED - Model Shipways - 1:48
Hi
More photos.
Cheers
Alistair
-
Blackie got a reaction from GuntherMT in Carmen 1850 by GuntherMT - FINISHED - Constructo - Scale 1: 80 - pailebote (Schooner) - first wooden ship build
Brian
You really are getting into this model. I think that part of your problem with the rudder is that the hinges are way too big for the job. Anyway they are on and look OK. The bits that you are calling davits are catheads and the attached image shows you why and how the anchor tackle works. You will find lots of info online about these beams which come in a multitude of shapes and sizes.
You will see them on my log.
Blackie
-
Blackie got a reaction from HIPEXEC in Harvey by Blackie - FINISHED - Artesania Latina - Scale 1:50 - Baltimore Clipper
Time to update the log after a small amount of work. I am slowly working on the rigging and starting on the deck fittings as shown in the attached. Rigging is not yet trimmed or fixed for the last time as I might need to rejig it just to get in something else such as braces for the yards yet to be fitted.
-
 Blackie got a reaction from Nirvana in Harvey by Blackie - FINISHED - Artesania Latina - Scale 1:50 - Baltimore Clipper
Time to update the log after a small amount of work. I am slowly working on the rigging and starting on the deck fittings as shown in the attached. Rigging is not yet trimmed or fixed for the last time as I might need to rejig it just to get in something else such as braces for the yards yet to be fitted.
-
Blackie got a reaction from mtaylor in Harvey by Blackie - FINISHED - Artesania Latina - Scale 1:50 - Baltimore Clipper
Time to update the log after a small amount of work. I am slowly working on the rigging and starting on the deck fittings as shown in the attached. Rigging is not yet trimmed or fixed for the last time as I might need to rejig it just to get in something else such as braces for the yards yet to be fitted.
-
Blackie got a reaction from EricWilliamMarshall in Harvey by Blackie - FINISHED - Artesania Latina - Scale 1:50 - Baltimore Clipper
Hi Floyd and Russ Thanks for comments.
Floyd, now to try and answer your queries.
The planking was a long time in the making. I divided the hull into 4 and then used a flexible tape and proportional dividers to determine each plank width at each bulkhead/frame.
I agree with you about the pump location. It must be as far aft as possible to get into the lowest depth of the bilge and just behind the main mast seems the correct location for the Harvey model. I have attached shots of the binnacle, cabin, pump and galley stove pipe. The binnacle is from Karl Heinz Marquardt's book The Global Schooner p201. It is 3 compartments, each with vertical sliding panels; the centre section is for a light and so the ring on top is the "chimney", the outer sections had compasses in them. Charles Davis in The Built-Up Ship Model also shows a box-type binnacle.
The cabin is my version as I did not like the clumsy kit one. I believe that the companionway covering/hatch would be better integrated with the companion light.
I do not have any gratings though I did make them from the kit and have retired them to the "extras" box. I don't believe that a single deck vessel such as the Baltimore clipper with low freeboard would be fitted with gratings over the hatches even if they could be covered and battened - why not just fit solid hatch covers to keep the hold reasonably dry, which can be removed relatively easily at anytime for ventilation compared to canvas covers and battens?
Yes, it is a stove pipe and a small hatch ahead of it to get some air in over the stove.
Cannon shot will be fitted into racks alongside the main hatch. I have bought some smaller shot (2mm balls) to fit better with my idea that the cannon are 4 pounders. I agree with your comment about moving the aftmost cannon forward. Its a pity that when I built the bulwarks a few years ago, I did not know as much about Baltimore clippers as I think I do now. I am thinking about cutting in cannon port up forward about inline with the foremast or perhaps just forward of the foremast channels.
Finally, my date of 1820 was a bit of guesswork based on Howard Chapelle's The Baltimore Clipper Its Origin and Development in which he talks about the design being used by slavers after the 1812 war as it was very fast and could sometimes outrun the Royal Navy cruisers. On reflection my deck layout might be a bit influenced by Chapelle's comments on slavers which went for unencumbered decks with smaller and fewer openings. That said Chapelle's book has a number of drawings of clippers and similar vessels which all show few deck fittings and dates of 1811, 1815, 1816, 1817, or so.
Hmmm. these fittings look OK in real-life but a bit rough under the macro lens.