HOLIDAY DONATION DRIVE - SUPPORT MSW - DO YOUR PART TO KEEP THIS GREAT FORUM GOING! (Only 24 donations so far out of 49,000 members - C'mon guys!)
×

PhilB
-
Posts
71 -
Joined
-
Last visited
Content Type
Profiles
Forums
Gallery
Events
Everything posted by PhilB
-
 Thanks for the kind words, Mark. But it's hard for me to use the word "jealous" except in refering to my own awe when looking at the models made by real ship modelers on this site. It almost feels like my balsa and basswood monstrosities are a blasphemy to serious shipbuilding. Almost. I'm actually pretty pleased at how this my 3rd ship effort is progressing. The next one though will need to pay more serious attention to the hull shape, instead of continuing to be fixated on the acute bow and stern angles of longships.
 -
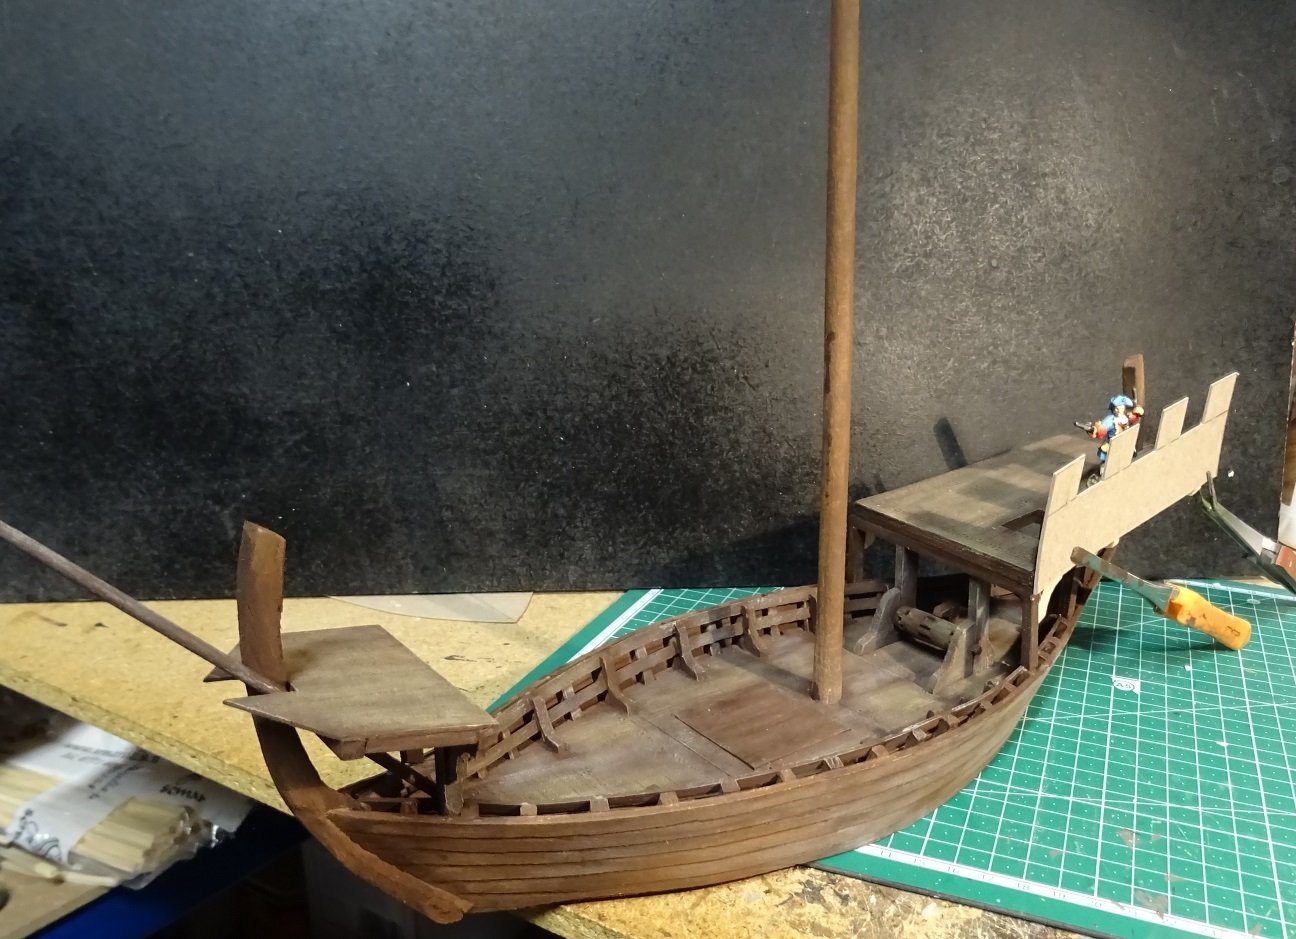
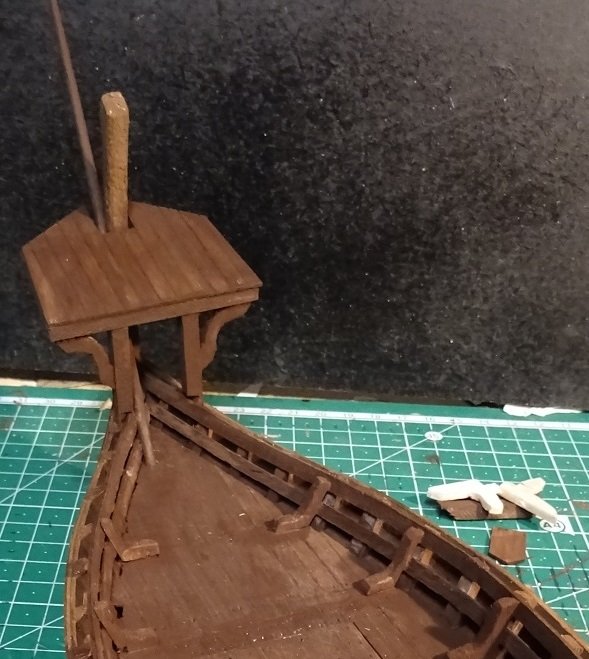
Thanks for the vote of confidence. I am truly making it up a I go along. Just one thing: the rudder is on my to-do list. The things I have completed are the curved braces under the aftcastle, the windlass under its leading edge, and now the planks for the walls of the stern castle. I realized as I was scribing the planks that when you scribe both sides of a 1mm sheet of balsa in the same place, it becomes very thin indeed! The bracing on the inside of the castle walls should hold everything together nicely, though.
-
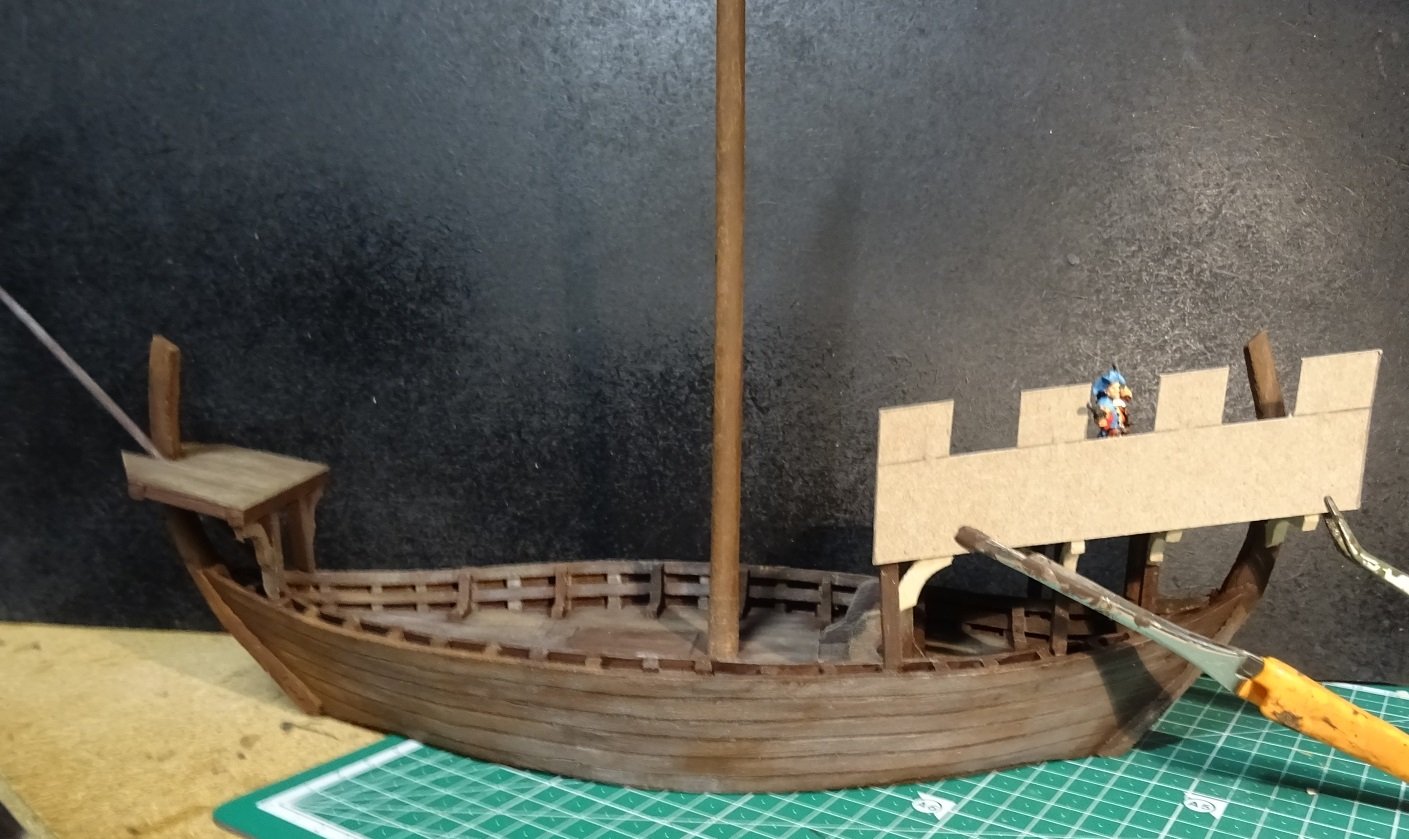
Almost ready to cut wood for the aft castle. I decided the crenelations needed to be slightly more widely spaced, turns out that 17mm was just right. Also raised the level slightly, so that the tops of the crenelations would be just above head height for the figures. They're supposed to be a protective measure, after all! So the curved braces are in place under there, and once the four sides of the aft castle and the five sides of the forecastle are in place, I'll have two ladders to build, and the side rudder to craft, and be one step closer to completion. I'm thinking of putting a bit more detail into the hull. exposed beam ends seem to be a theme on all period vessels, perhaps 5 or six on each side of the ship. And then there are those lateral braces alongside and just aft of the mast, along the outside of the hull, which can serve to anchor the rigging running up to the top of the mast. I realize now that I made things difficult for myself, since I'll want to wrap some rope around that windlass, and it would've been easier before installation. But I don't have any rope yet, and couldn't wait. I'll just have to make do.
-
Well, you've got me pegged! I am a gamer at heart. But if I stop and think about the other gamers, it's not going to matter one way or the other. They'll look at it with goggle eyes and say "it's cool, but how long did you take for that thing?" Given that I decided from the outset I wanted to make an early ship, a "pre-cog" as it were, with a side rudder, I'm going to stick with that, and dump the skirt idea. I'll add more curved supports like on the forecastle.
-
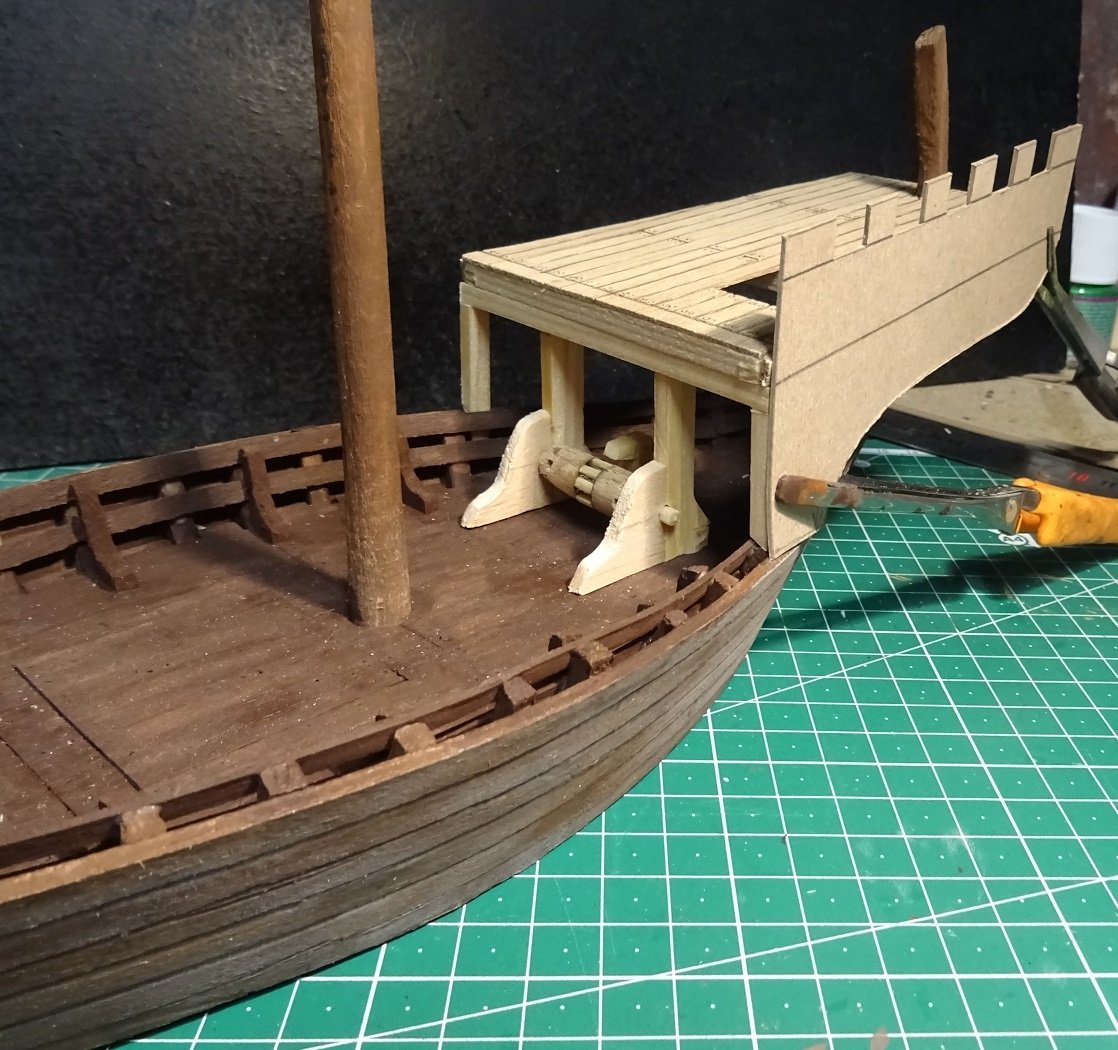
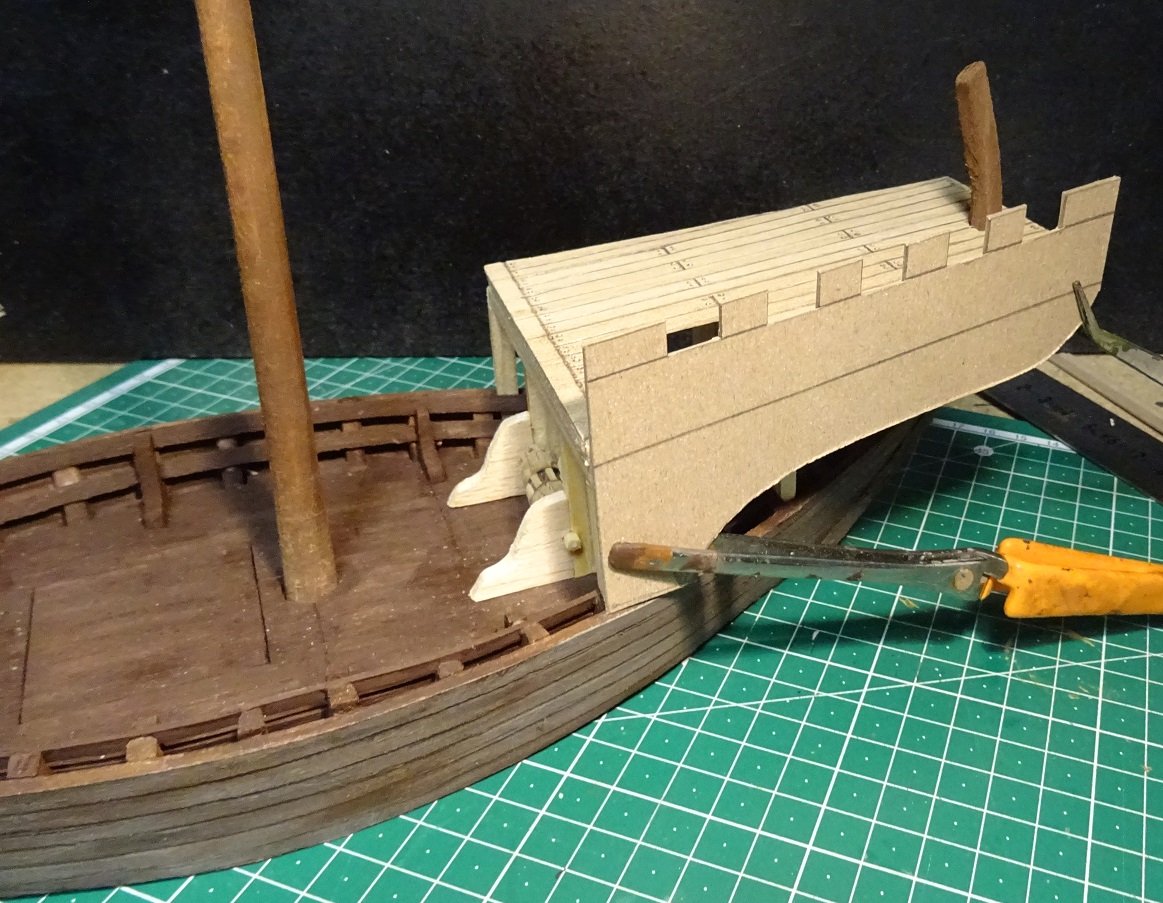
The aftcastle is proving to be a difficult project. Tentatively, I'm basing it on verticle beams rising from the edge of the hull, with a plan to have curved arches supporting the overhang (progressively larger towards the stern). As you can see from this first photo, the windlass is built integral with the leading edge of the forecastle, which seems as good a place as any for it. Everything is dry fit for now, so some of the supporting posts have a bit of lean to them, but once glued in place, they'll be as vertical as I can make them. Now, I toyed with the idea of enclosing the lower section of the aft castle completely, then remembered that I have to leave space for the side rudder on the right side. Rather than have a sort of "window" for the rudder (which feels odd) I'm thinking about having a partial "skirt" under the aft castle, and have made a cardboard template to test the idea (actually my third such template, after rejecting the first two). This will leave space for the right side rudder, without having dissimetrical sides. Now, none of the period artwork has such a skirt, although some of them do have fully enclosed aft castles that overhang the hull. But this skirt does seem to tie things together nicely, on a purely imaginary visual level. So I'm asking for advice: does the skirt look appropriate? Or should I leave the underlying beams exposed, and just tart up the (as yet unsculpted) arched supports spreading out to take the weight of the aftcastle deck? Second question: should I use a horizontal planking pattern on the lower part of the skirt, and then a veritcal planking pattern on the crenelated upper part? Or can I get away with running vertical planks over the entire surface? I still haven't figured out if I can successfully make the deck of the aftcastle removable so as to place figures underneath. I would certainly be a *lot* easier (and sturdier) to simply glue it in place, but all things are still possible at this point. Thanks for all the help.

-
Brilliant work on the sails and flag, not to mention the cleverly carved sailors climbing the lateen mast. This baby looks very, very close to completion.
-
Surely the "banana shape" is merely an artifact of the artists who often had to fit the ship on a circular medallion. It seems much more likely that these nefs, hulcs or urca were built in similar fashion to longships and knarrs, with a curved bowpost and sternpost that lent itself to stylish renditions of the banana shape by artists. That's my take on it, after having another look at all the art posted on this and nearby threads. I'd go with your "long and wide" version, but perhaps keep the keel more flattish over more of its length before curving up into the bow and sternposts. That's what I did, even if I mistakenly labelled by latest model as a "cog" before being (quite rightly) corrected by the medieval ship scholars here. I'm going with the "nef" label, as an intermediate step between William the Conqueror's ships, as shown on the bayeux tapestry, which look very much like knarrs, and the "white ship" and later similar vessels which keep the curved bow and sternposts, and a side rudder, while adding raised fighting castles.
- 186 replies
-
- 2
-

-
- keelless
- reverse clinker
- (and 4 more)
-
I didn't have much modelling time today, but I decided I had to take a shot at the windlass. Lacking a lathe, I chucked a section of dowel into my drill and stepped towards my workbench. Previously, I'd tried to hold the drill in a static position, and apply a file, or sandpaper, to the wood as it turned on the drill. But this time I thought, what if I clamped the file into a fixed position, and maneuvered the dowel over it to get the desired results? It worked much better than before. I marked off the ends of the windlass and shaved down the dowel a bit on each end. Then I switched the file around and put a groove in the middle, deep enough to hold some very small squares of wood to make the central "cog" section of the windlass. I cut a very short square off the end of a basswood beam, then cut that square into thirds, each way, making nine (mostly) square bits to superglue into the groove in the dowel. I was skeptical at first, but it turned out better than I'd expected. Now the really tricky part will be making square holes (!) at both ends of the capstain for the spars that are used to turn it. My best guess is that I should drill shallow holes and then try to square them off with a very sharp xacto blade. More soon.

-
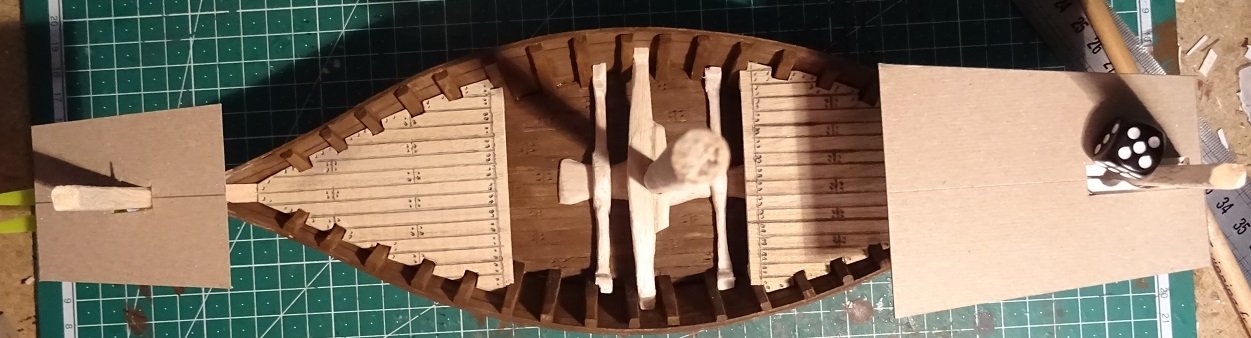
Louie, I was also skeptical about "reverse clinker" construction, even if there are some examples of this in SE Asia. So I'm going to stick with the "Nef" designation, and assume this ship is more or less contemporary with the White Ship. I have put two rows of narrow planks along the inside of the ribs (not sure what those are called) as well as corner braces along the deck on both sides. I also did a speculative build of the forecastle, and I think it looks good enough to keep. The aft castle is going to take longer, since I've got to put a capstain in there, and without a lathe, that's going to take a bit of work. The front part of the forecastle isn't glued in place yet, since the forecastle is just dry fit in place. Of course there will be low walls and crenelations, as well as some lateral braces from the bow post. I'm quite pleased with the lateral braces at the back end of the forecastle, I'll probably do something similar on the stern castle. In the second picture, to the right of the ship, are the missing pieces for the underside of the forecastle. My main material (except for the hull itself) is balsa, and when I'm doing small detailed work, it becomes very fragile. Several of the L-shaped braces along the deck broke as I was shaping them, but superglue saved me. I'm really going to have to graduate to a sturdier, more resiliant wood for future projects, even if that means shelling out for some proper tools, like a table saw and a lathe. At some point soon I'll need to go over the deck and hull with a grey drybrush. This dark brown is far too dark for the weathered look I'm shooting for. More soon.

-
Thanks for this, Chuck. My ship design certainly is much closer to the lines of a longship or knarr, and has curved bow and stern posts, and a more acute bow angle than the straight bow and stern post, stern ruddered cogs, the models of which all have a much more rounded, buff shape to the bow and stern. So, taking your advice, I've renamed the entire thread. I'll have to try and build a proper cog once I've got nef 2 and nef 3 under my belt. It was interesting reading about the White Ship of 1120 in wikipedia, especially since the father of the captain of this ill-fated vessel sailed the ships we see on the Bayeux Tapestry, notably William's flagship, the Mora. The depiction of the White Ship shows diminutive fore and aft castles and very high bow and stern posts rising above those castles. Not much stock can be placed in the details of the artist's rendering, I'm sure, but it leaves free reign to the imagination of model builders wanting to emulate this early period.
-
I was under the (perhaps mistaken) impression that early cogs had the side rudder, and only later moved definitively to the stern rudder. Some of the period illustrations show cog-like ships with fore and aft castles and the side rudder, like the seal above (1305 Dover seal), or the left side ship in this pic from the Maritime Museum in Hamburg, which doesn't appear to have a stern rudder, and so must have a side-rudder on the side away from the camera.. What do you call a "pre-cog"? Is that different from a hulk / holk? Where is the transition from a knarr to a cog situated? I also found this seal of Sandwich (also part of the "cinq ports") dated around the 13th century, with the side rudder and heavy bow and stern posts.
-
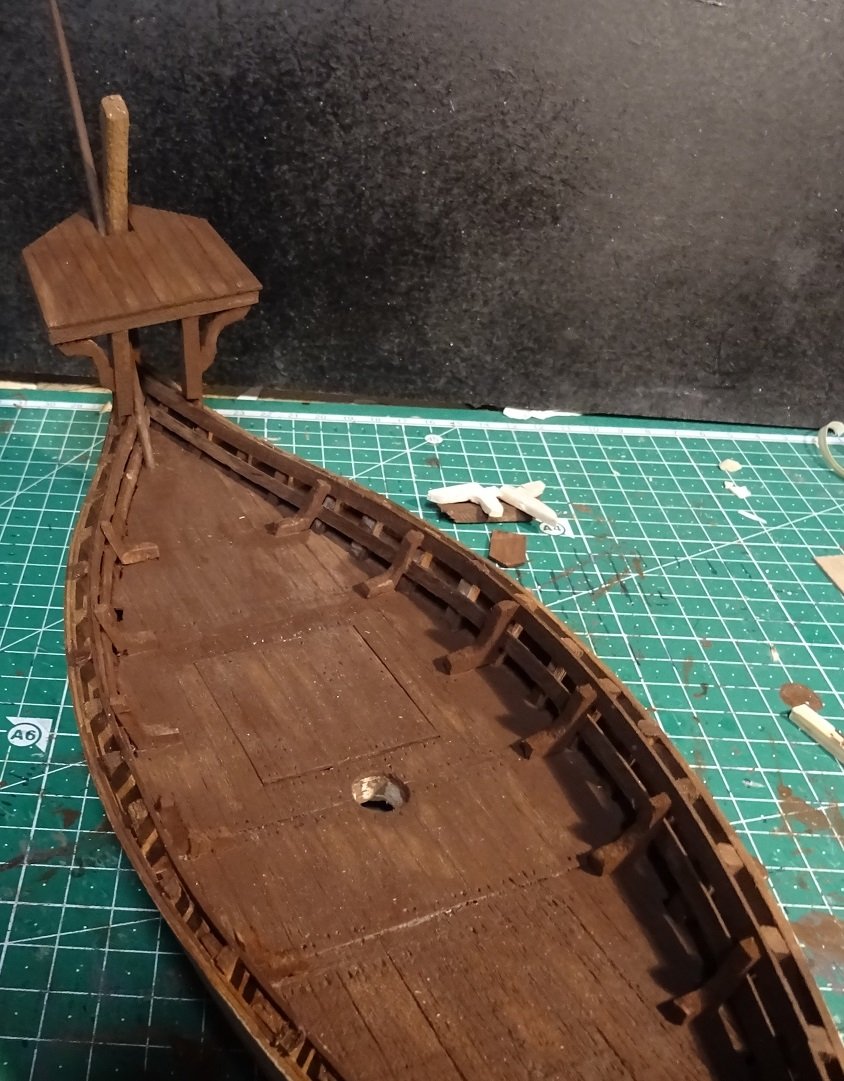
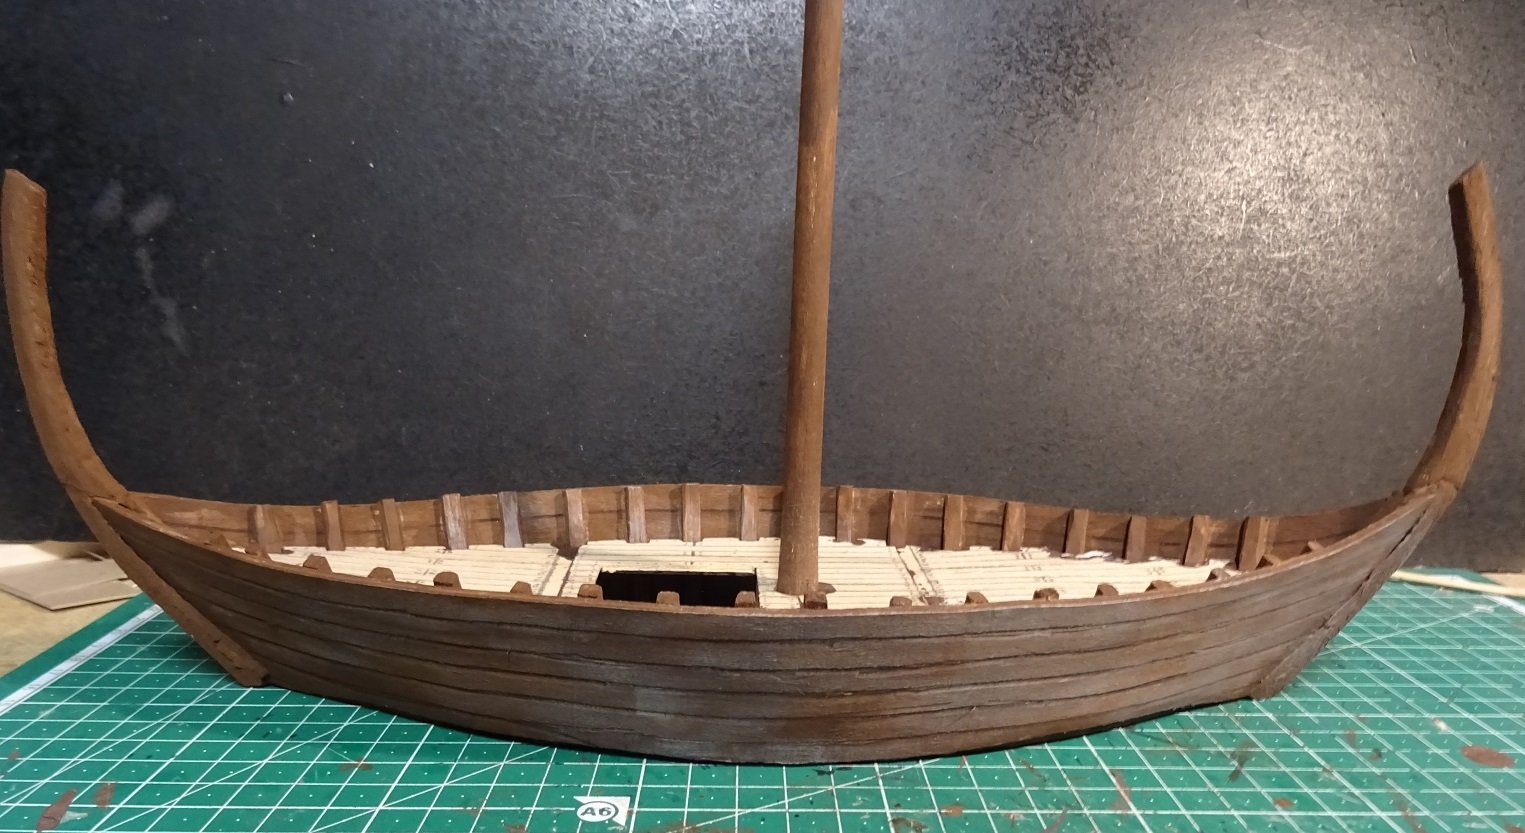
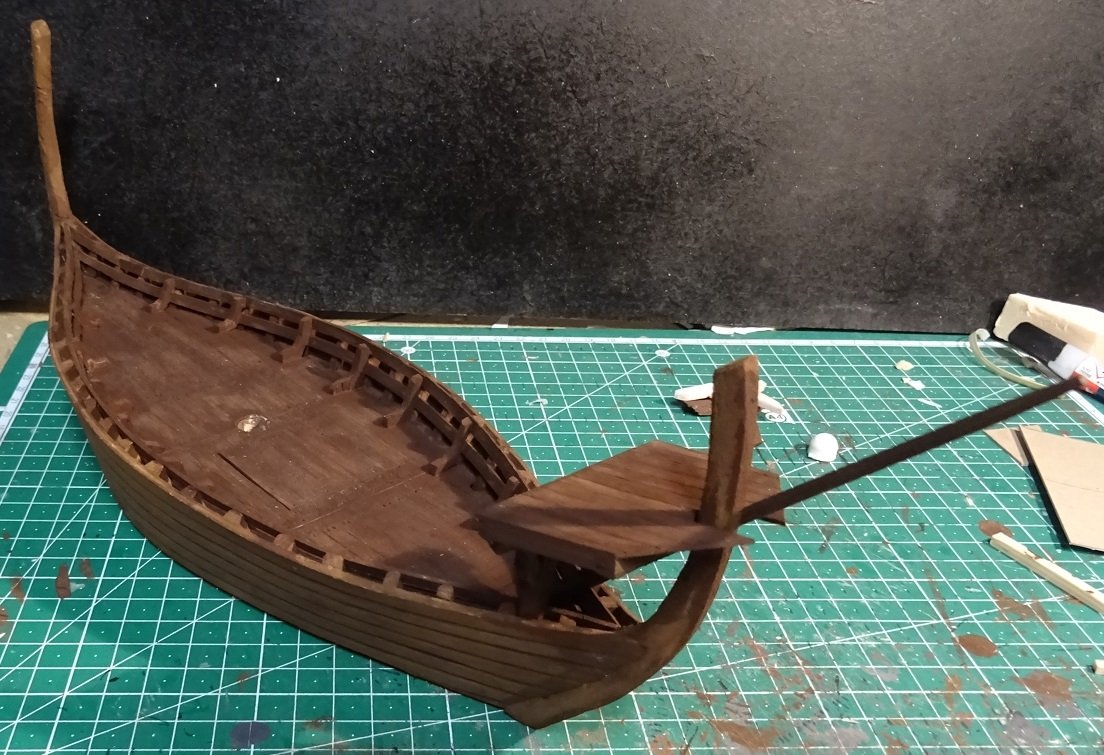
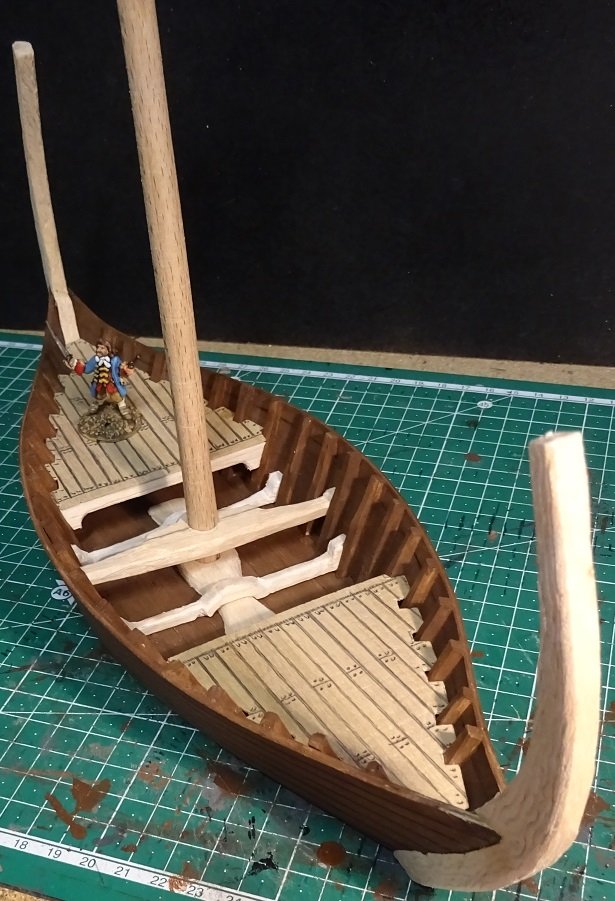
Louie, thanks so much for following my project and offering so many helpful suggestions. I shaved down the bow post and the stern post to something a little over half their previous width, and that looks much better. I also slimmed down the mast by about 30%. I jettisoned the funky bracing around the lower part of the mast, and made the upper deck to cover the entirety of the ship, except for a largish hatch, through which one can still glimpse the lower deck, which got some greyish drybrushing prior to gluing on the upper deck. I'm just waiting for the glue to dry before putting on some more dark brown paint and doing some grey drybrushing over the whole thing. Of course, it was not without mishaps. While trimming down the sternpost, I broke it right off, you can still see the break where I hastily reglued it in place. Both the bow and stern posts got trimmed back considerably in length, and once the castles are in place they'll get trimmed back further, so they just barely peek out. I think you're right about the forecastle - it needs to be shorter and narrower, with more of a narrowing trapezoidal form. More soon!

-
I did some initial planning for the fore and aft castles. Many of the models and paintings I've been looking at have a larger aft castle, so that's the plan. The forecastle looks slightly oversized, but it will allow placing four figures there, when occasions arise, say with archers. If it's really too big for the ship it's on, I could trim it down some... have to give that a good think. I tried scooting the aft castle back a bit, but it didn't look right hanging even further over the stern. I think its current position is a happy compromise. So what about that fore castle? Too big? Going to make the ship capsize?

-
Thanks for the multiple suggestions and pics - a great help. I've had to spend most of the last couple days putting stain on the wood beams of our new carport, but I'm looking hard at how to do the castles. I agree, the triangular ones (on that otherwise excellent model) don't look right, and I also want enough playable space to be able to put several figures with a 25mm round base there. So I'm looking at making the aft castle slightly trapezoidal, 10cm long with an 8cm wide fore and 6cm wide aft end. 8cm is about the width of the hull at that point, but the rest will seriously hang over. The forecastle will by much smaller and be placed further beyond the stempost (thanks for the terminology lesson) but still have a trapezoidal shape. More or less like this pic you posted, Louie: I'm thinking of putting in a central section on the upper deck, but have it be removable. I'm also serious considering removing the cluttered lower transverse beams and mast foot (is the proper word "mastfish"?) which were inspired by a longship model I saw, but probably irrelevant for this sort of cog / nef) They are not yet glued in place, so I can still decide to remove them without mucking up the lower deck. I'm also trying to work up my courage to try proper planking on a future model - even though that means using harder wood, acquiring a table saw and other woodworking tools, and doing a *lot* more advance planning so that I can assemble a jig for the ribs before bending on the planks. Don't hold your breath, though. Baby steps.
-
A brilliant project! So much fine detail. The hull sewing is simply amazing. The mast details are stunning too.
- 158 replies
-
- 4
-
-
- byblos ship
- Egyptian
- (and 1 more)
-
Thanks a mil for those detailed rigging photos and drawings. They will help immensely with my own project. Great work on the tiny, tiny block and tackles! I'm green with envy.
-
The aft section of the upper deck is done, as are a few additional braces. This first pic shows the new ship (cog 2) next to the first one (cog 1), with my initial test boat in the foreground. Also with a few pirate figures for scale. One thing I've realized after looking at these photos is that the fore and aft keel sections are far too thick - monstrously so, even for a "fantasy ship". Fortunately, balsa is a very forgiving material, so I should be able to trim those down without completely wrecking them. Here is another photo of cog 2. From this angle, the bow section of the keel is really apparent. I'll need to trim it down both front and back, probably on both sides as well. Next step is to put a railing along the tops of both sides of the hull, as well as a plank on the inner side of the ribs, slightly below that railing. I expect I'll need to paint all the pieces you see here before that, and after long consideration, I think the fore and aft sections of the upper deck are going to be glued in place rather than made removable. There just isn't enough headroom under there to use it as "playable space" in our games. 2 years ago I managed to visit the martime museum in Sydney, and was struck by how little headroom there was on the lower decks of a sailing ship. I was crouched down like a dwarf, I'd guess there was barely 4 to 4 and a half feet of ceiling height there. so the low headroom of the deck doesn't really bother me as much as it could. The big question now is whether I should add fore and aft castles to this ship or not. I planned all along to trim the bow and stern segments of the keel to a more reasonable height once I got round to the castles... I think I may need to make a cardboard mock-up of the castles to see if I like the ship better with or without. One last question: my gut feeling is that the mast is too thick. I already thinned it a bit by putting it in a drill chuck and sanding it down, but I suspect I may be better served by repeating the process. Any comments or suggestions will be much appreciated.

-
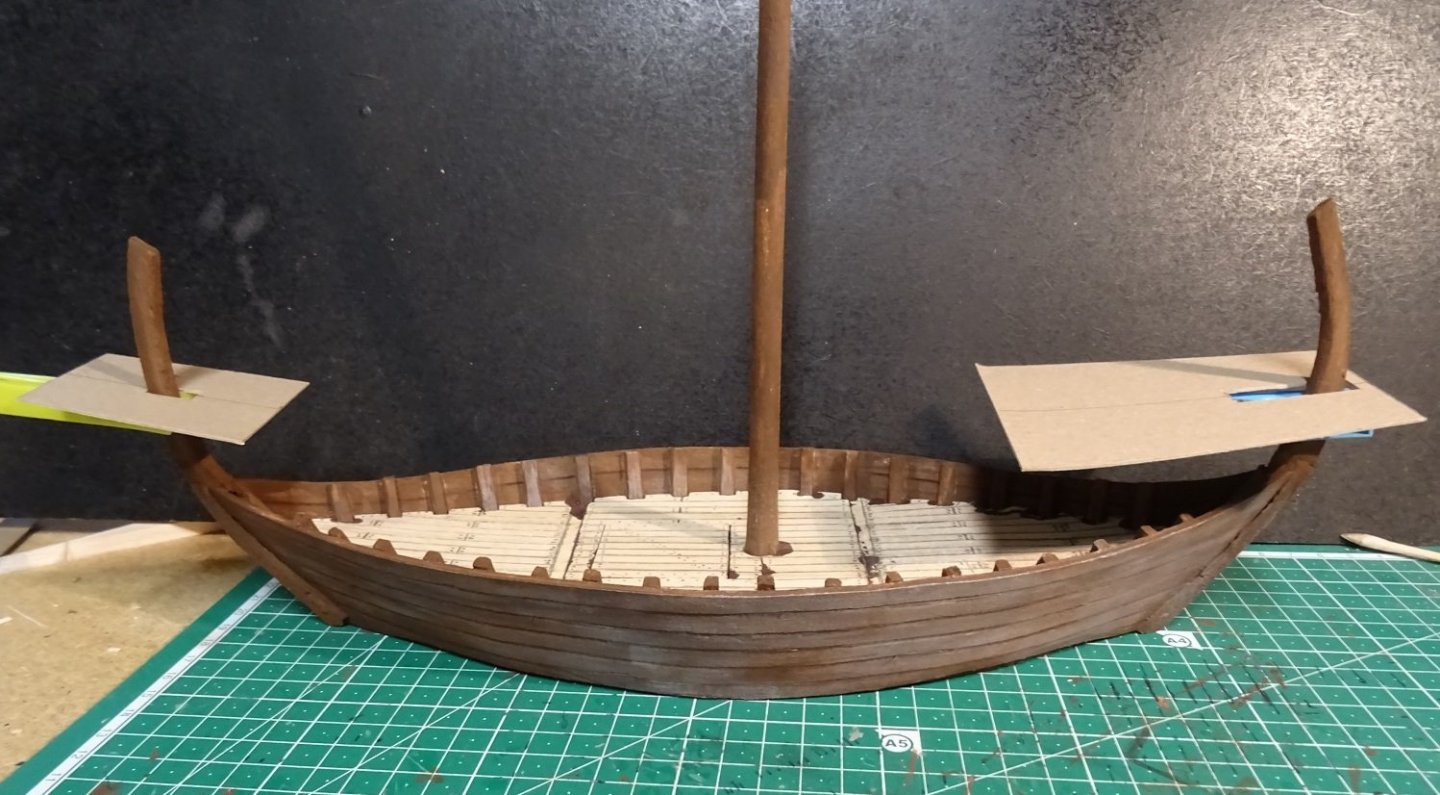
Construction continues. I gave Cog2 an initial coat of paint, fairly dark, but it will get a lighter gray-brown drybrushing once everything is in place. I made a cardboard template for the fore and aft keel segments, and the fore segment is already glued in place. I made it extra long, but once I figure out exactly where the fore and aft castles go, that will get trimmed down. I also made a cardboard template for the forward deck before cutting it out of balsa and scribing planking details. Once the aft keel segment is in place, I'll need to do the same thing for the aft deck, since despite my best efforts the placement of the ribs is ever so slightly irregular.
-
It's fascinating to see this laid out with CAD software. My primary tool is the mark one eyeball... which is another reason the lapstrake hull gives me the willies.
-
The side castles look much improved! Great work! This ship is getting close to completion! So, dare I ask... what's next?
-
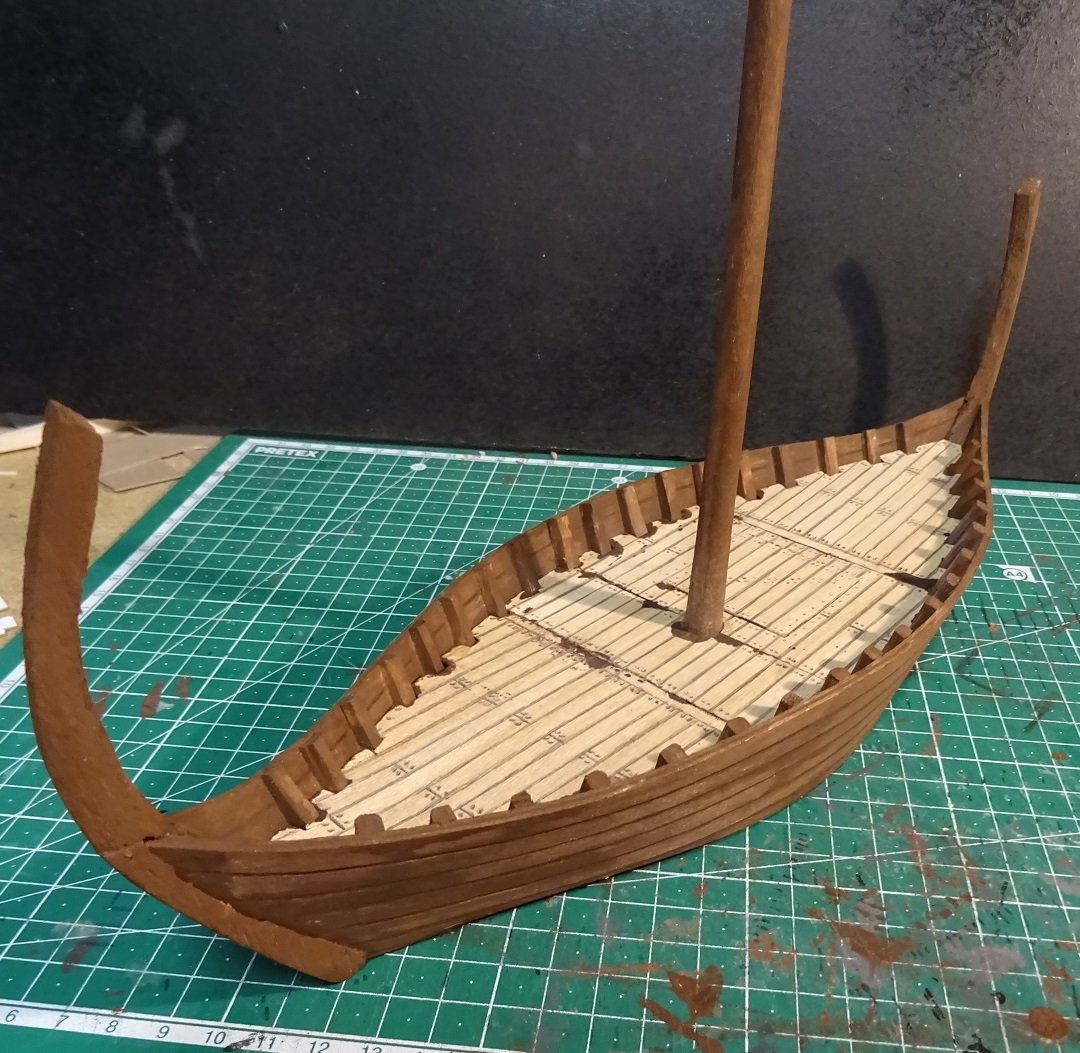
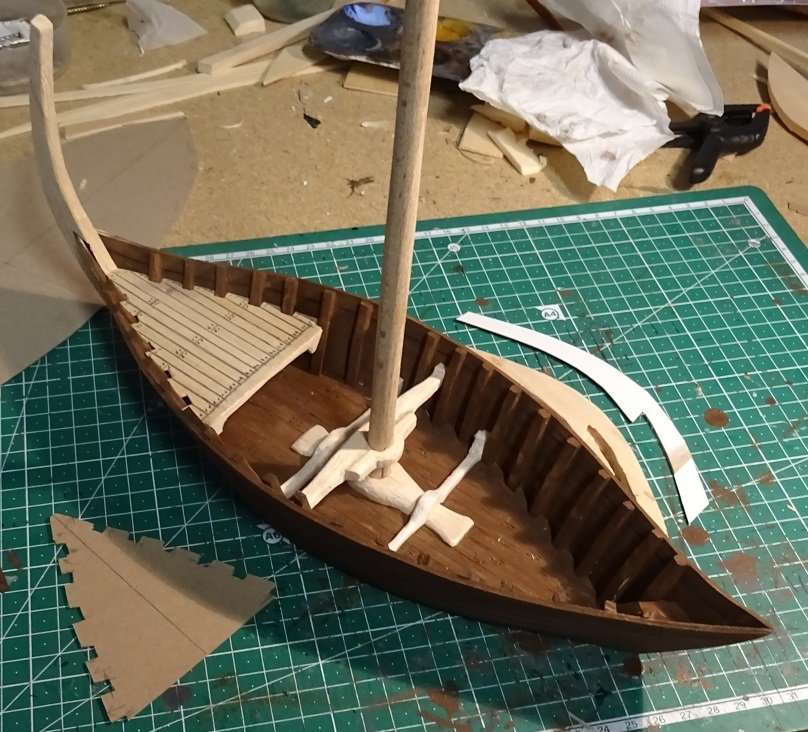
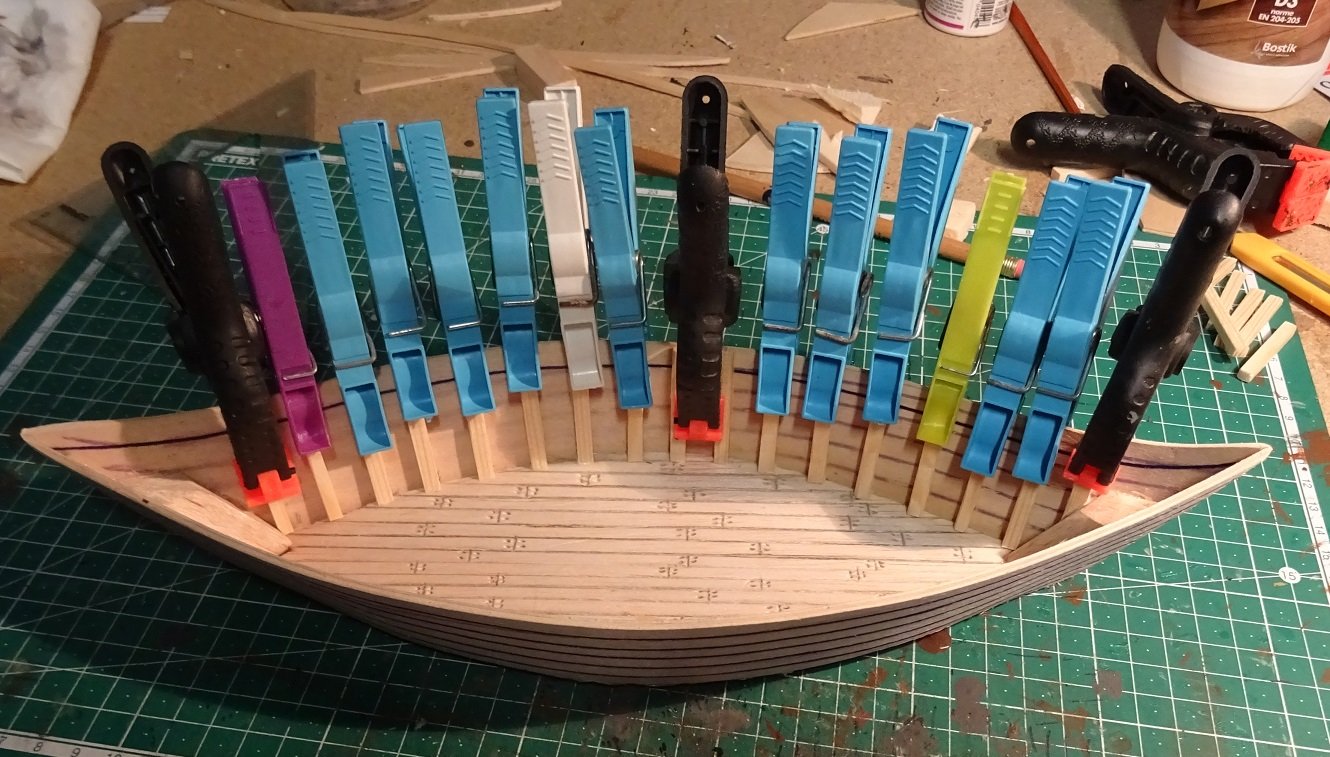
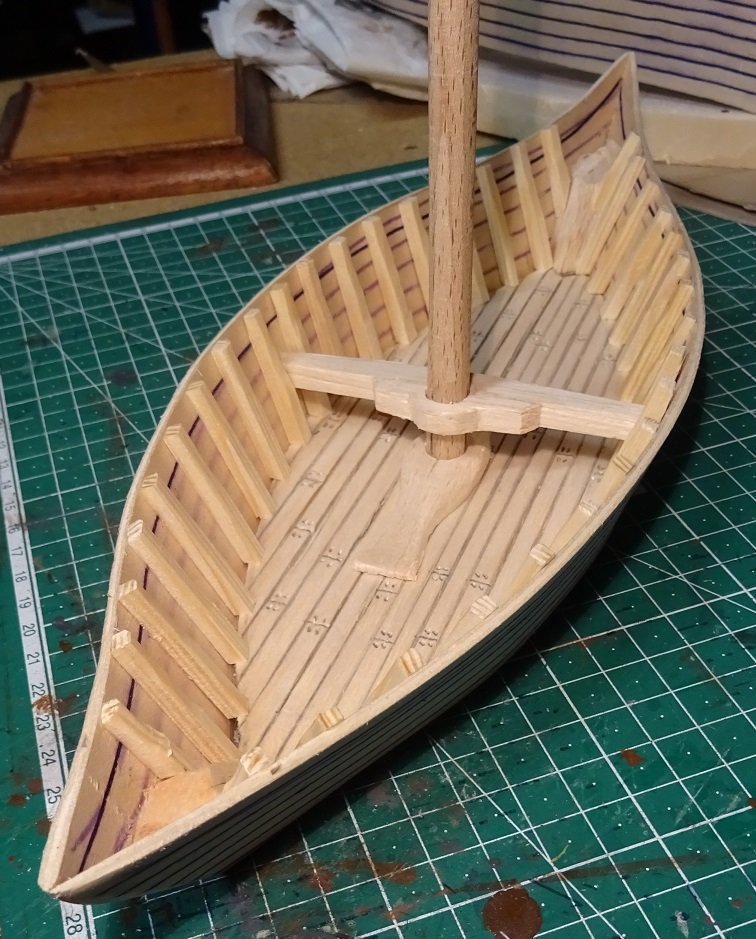
Here are some more pics. The first one is from Monday, when the ribs on one side had just been glued and clamped in place. The larger pieces of balsa at bow and stern were necessary to solidify the gluing bond with the hull flanks, and they will be covered by upper decking, so no worries there. The second pic is today, after shaping the mast foot (modeled on a plastic drakkar kit) and the first lateral beam meant to hold the mast in place. After painting, it will get iron straps (cardstock) on both sides of the mast, ostensibly to hold the beams around the mast. I have already realized that when scribing the plank ends and the nail heads in the lower deck, I should have lined them up to correspond to the underlying beams they were nailed to - another mistake/learning moment. I also don't really know if this sort of ship should have a mast foot like on a longship, but it seems plausible to the neophyte like me. Next step will be to add in additional lateral beams, add in a few missing ribs at the bow and stern, the decking (probably just fore and aft decking sections, with the central section left open) then add the fore and aft sections of the keel. This ship (cog 2) will feature a side rudder, and (probably) a raised stern and bow castle. Any and all suggestions would be greatly appreciated.
-
Looks great! I'm always impressed by cool planking. Great job! One of these days I'm going to have to try my hand at it. I'm curious how you're going to arrange the decking... but I guess I'll just have to be patient.
-
Construction continues (pics soon), mostly on cog 2. I've put in a lower deck, at water level, and am currently adding the ribs along both sides. I was originally thinking of having a full-length upper deck, with just a hatch or two open to show a glimpse of the lower deck, but some models I've been looking at (like this brilliant model) have the lower deck exposed over most of the central length. I'm unsure which way to roll on this, but don't have to decide right away, since I'll be doing the lateral bracing in any event before deciding on how to do the upper deck. One thing to put in the learning box is that I think I would've been better served by having the bow and stern be less pointy, and more buff and rounded. Period paintings could go either way, so I'm going to roll with the current disposition for both cogs 2 and 3, but subsequent models will need to adapt their shape to be more of a "round ship", I think.
-
It's a quandary, all right. Option 1: keep it as is, despite the slight obstruction to the rowers. Nobody else will even notice, but *you* will know, and that might disturb your enjoyment of the model. Option 2: re-build the side castles from scratch with better measurements. More work, a real shame for the beautiful side-castles that you won't use, but *you* will know you went the extra mile. I don't envy the decision you've got on your plate.
-
Ah, at last I can add something substantive to the discussion. "Les gueux" is used today as a derogatory term to refer to someone as uneducated, simple-minded, impoverished and with questionable sanitary habits - exactly what you'd expect from a snobbish noble speaking about peasants. And if you look at historical quotes using the word "gueux" you can see that it is used to refer to the "common people" who are necessarily so far inferior to the educated and cultured aristocracy. So it's a word deeply anchored in historical concepts of class and culture. But if I've understood your discussion of poetry, y'all are talking about French words strung together to have a vague consonance of English nursery rhymes and such. I think Desnos was fond of that sort of thing. And it works in English too: "Wants pawn term, dare worsted ladle gull, hoe lift inner cordage..." nonsense, but when pronounced out loud takes an approximate sonority of the story of Little Red Riding Hood - Ladle Rat Rotten Hut. Now, as far as your dromon is concerned, I'm amazed, envious and in awe. Such fine detail! A real masterpiece. And as you can see, I've got entirely too much time on my hands. <g>