HOLIDAY DONATION DRIVE - SUPPORT MSW - DO YOUR PART TO KEEP THIS GREAT FORUM GOING! (Only 24 donations so far out of 49,000 members - C'mon guys!)
×

PhilB
-
Posts
71 -
Joined
-
Last visited
Content Type
Profiles
Forums
Gallery
Events
Everything posted by PhilB
-
 Druxey, if this were a food & wine forum, I could wax lyrical on the "bon vivant" front. Let's just say that French food is one of the reasons I moved here some 35 years ago. I guess I've answered my own question about the deck being level or not. After examining a ton of pics on google, and a fair number of cutaway drawings of early sailing vessels (almost all of which are from centuries later, but still) it looks to me like I should do it this way: - If I mentally divide the ship into thirds, the center third will have a flat deck. - The forward third and the rearmost third will rise very slightly, so that they would be flat if the ship were pitched forward or backward, say. - It appears that sometimes the foremost 5 or 10% of the deck surface rises at a steeper angle. I'm just making this all up as I go along, based on a plethora of pics, in lieu of any proper plans or research materials.
 -
Thanks, Louie. As it turned out, the soaking was fine after 8 hours, so I clamped the pieces along the inner edge of the brie box lid, and this morning they had a perfectly serviceable curve to them. In fact, it's such a nice curve, and the template turned out to be so spot on, that I think I'm going to be able to build them without the foam core at all. Since the idea is to make a waterline model for use on the gaming table, I think I can go straight to internal bracing. I'm taking great inspiration from the "Wütender Hund by ccoyle" even though my models will have a more pointy brow and stern, more reminiscent of a knarr, but this seems well within the range of ship shapes possible under the general label of a cog. One question: should my main deck be flat over the length of the ship, or should it have a slight rise towards the bow and the stern? My original plan called for it to be flat, since I was using a foam core. But now that I'm thinking of dumping the foam core, I could quite easily have it rise. Ccoyle's kit appears to have a flat deck over the full length of the ship. Which will look better?
-
Hey, I just discovered this great project. Thanks for the many pics of your work in progress. I'm just about to start on the rib work of two similar ships and I could do (and have done) a lot worse than follow the example of your amazing project. Keep up the good work!
- 179 replies
-
- 6
-

-
- shipyard
- wütender hund
- (and 1 more)
-
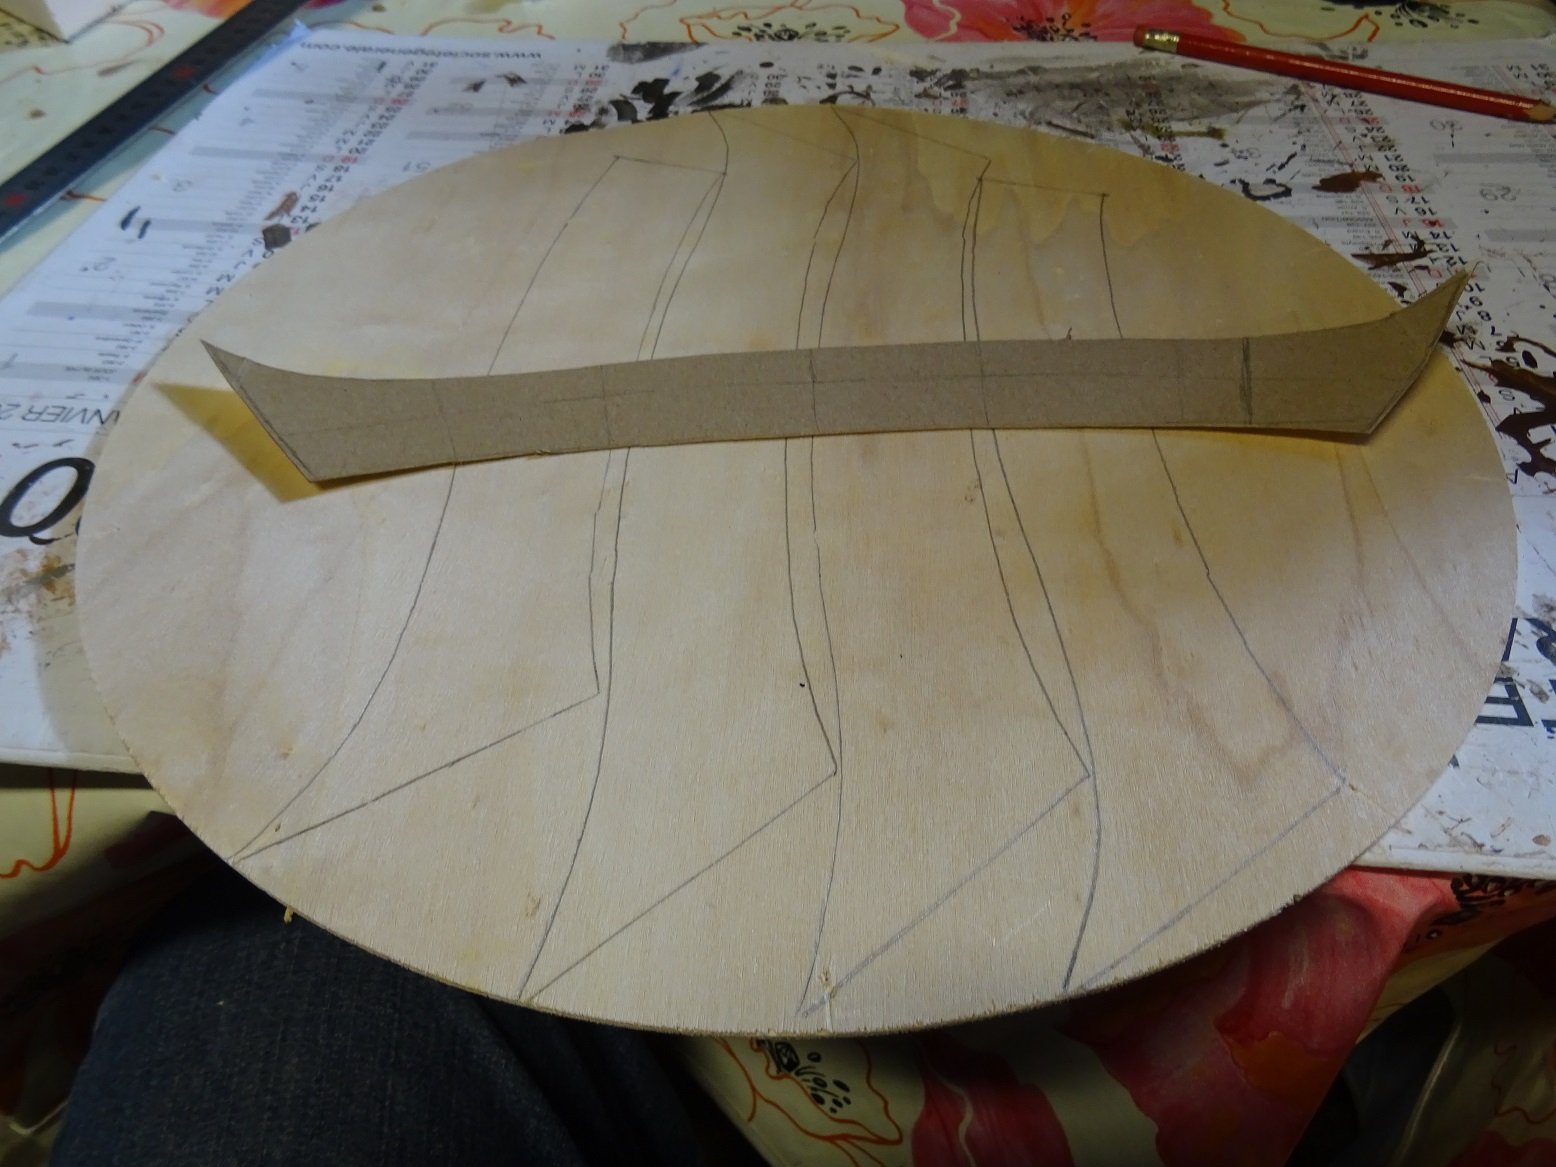
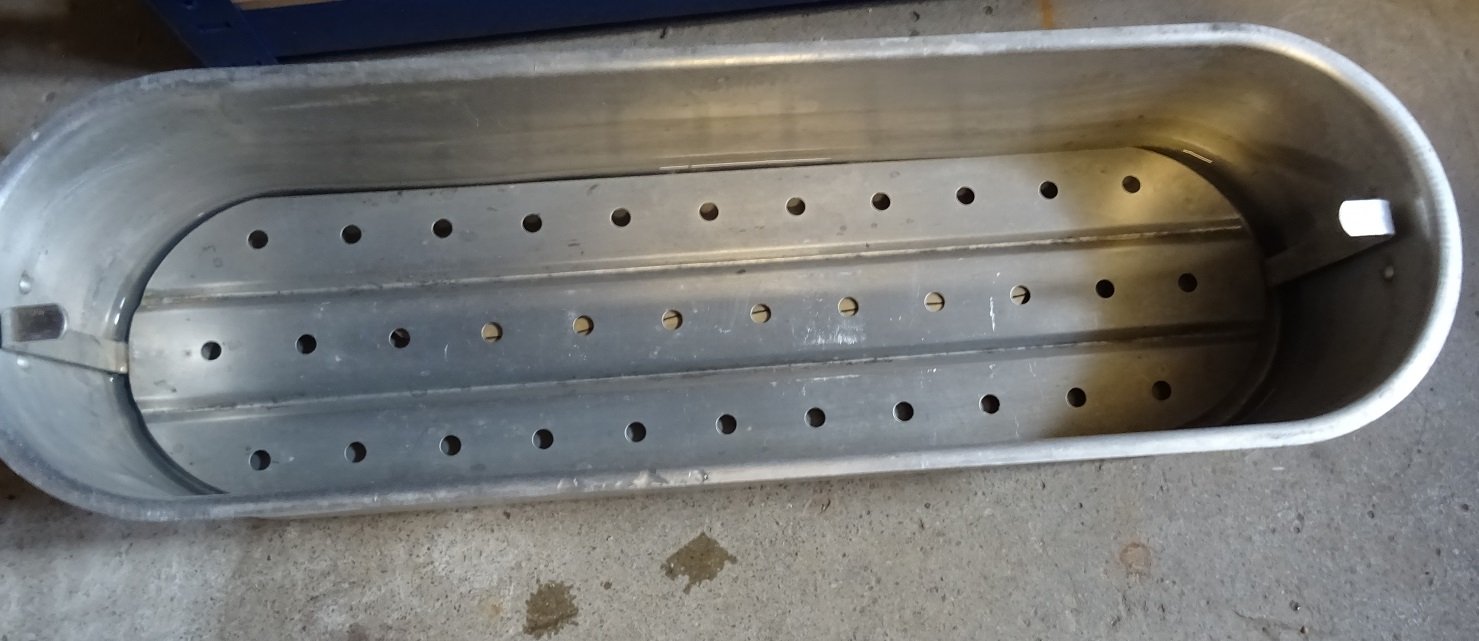
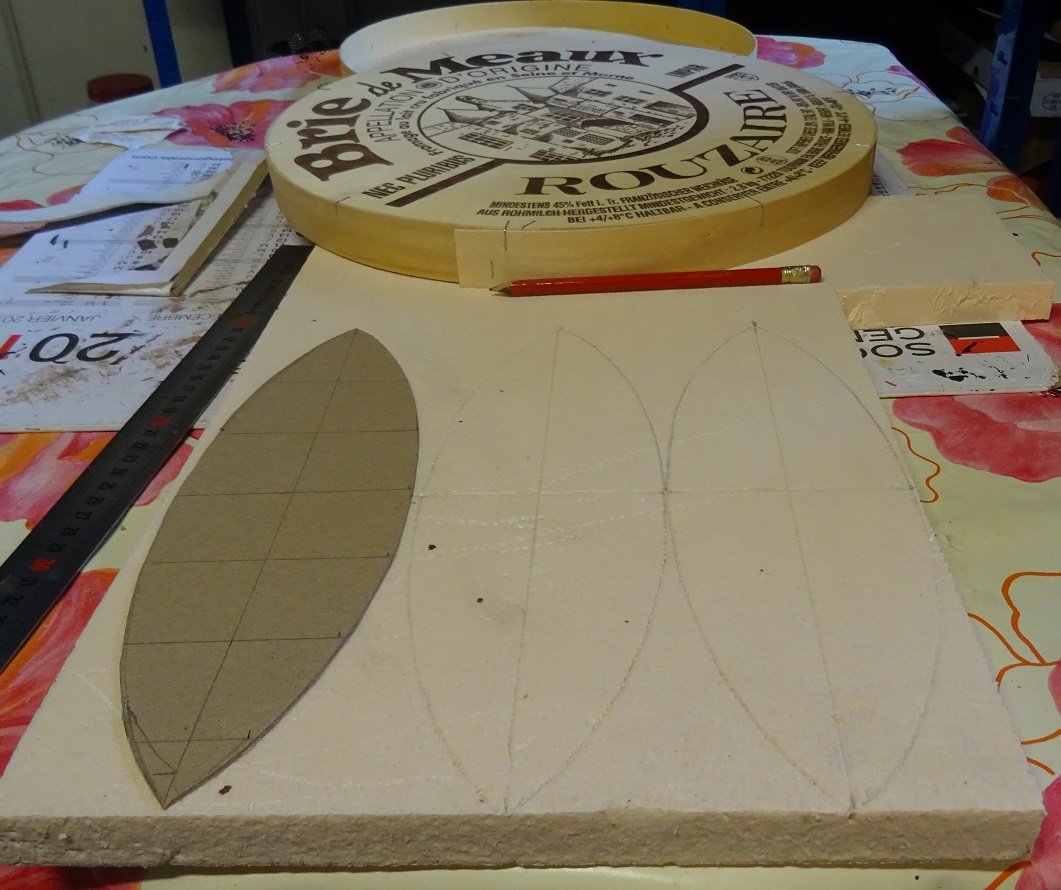
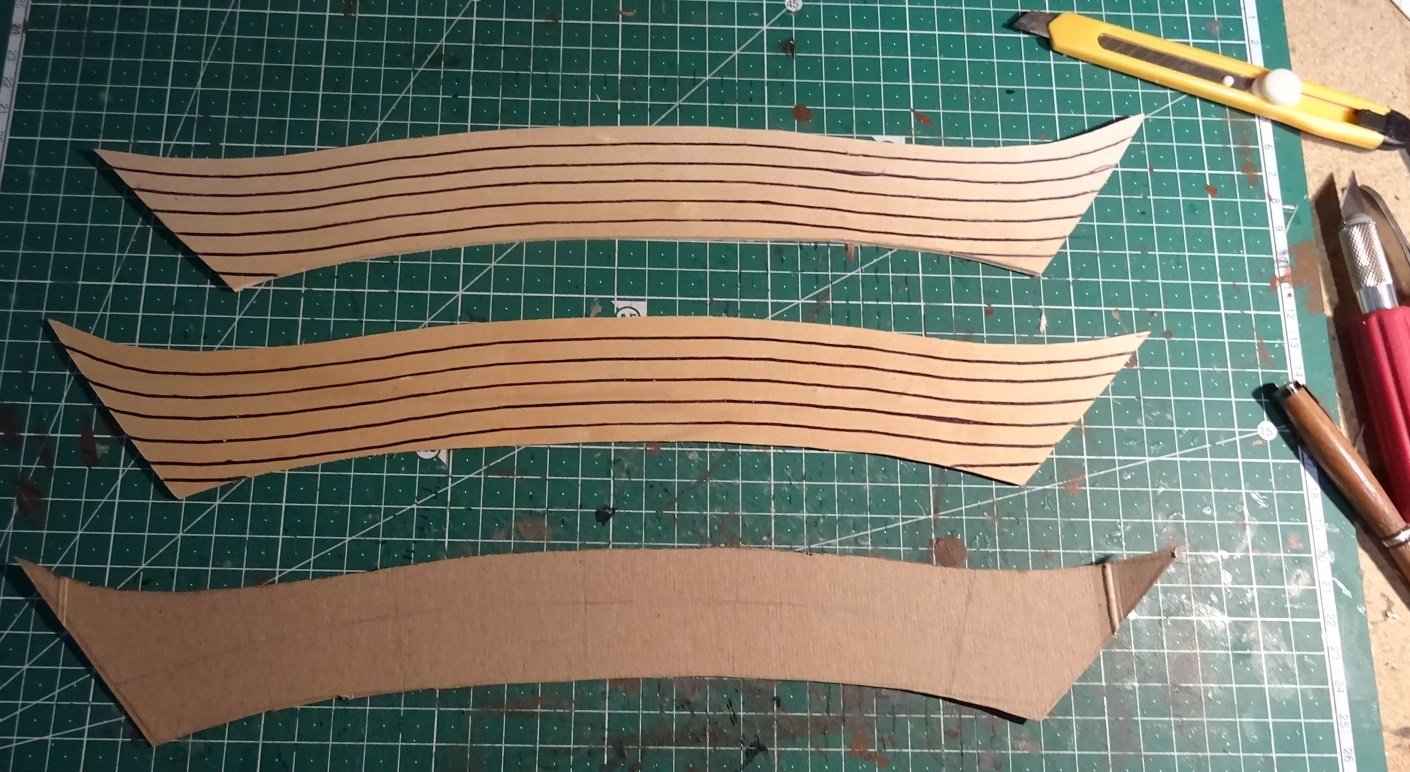
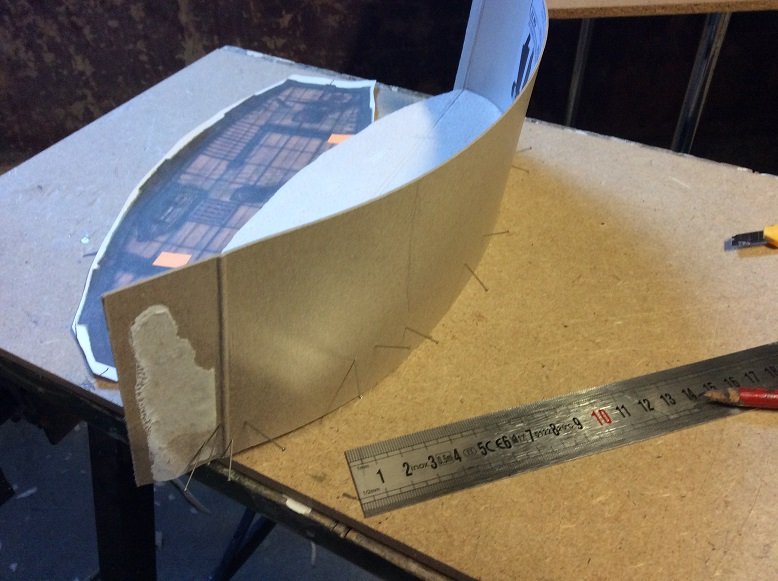
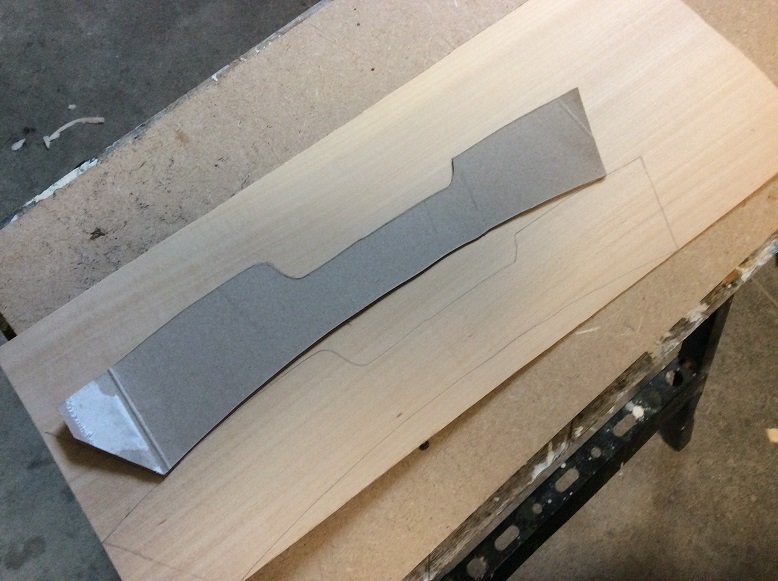
The rigging on cog 1 is on standby, and I'm working on two additional very similar ships. I thought about starting a separate build log, but they should come together in a very similar fashion, so I decided to continue here. The main difference with cogs 2 and 3 are that I've changed materials. Rather than using balsa for the hull, I'm using a 1mm-thick veneer from a brie package (a French cheese). Here you can see my raw materials: a sheet of dense insulation foam for the hull core, the cheese "box" in the background and a deck template that I sketched out freehand on some scrap carboard. I'm not using the top part of the package, since it has all that printing on it, but the bottom is thankfully featureless - perfect for my project. I decided to make cog 2 with pointed hull and stern, and cog 3 with a flat stern, for a bit of variety. So after a few trials and errors, I created a single template for the flanks. It isn't flat, of course, because the curved waterline and the slight angle of the foam core leads to this odd shape. My project was long delayed, since I spent several months building several 28mm (about 1/50 scale) half-timbered houses for our much-delayed RPG sessions. If that interests you at all, I have a similar build log for the latest building here. So this morning I got back to it, and cut these four pieces. I think it's probably basswood, as its still fairly soft, but much harder and more fobrous than balsa. After initial cutting and a little sanding to get both flanks of each ship to match up, I scribed lines in each flank (using my cardboard template as a guide) to represent the planking. I'm counting on the final paint job to give a slight impression of clinker construction. I also sanded a bevel into the bow and aft of each flank, so as to facilitate bringing them together around the foam hull core. Of course, this wood isn't flexible at all along the grain. Quite rigid in fact. So all four pieces are currently soaking in an old fish-steaming pan, which conveniently has an inegrated inner shelf structure that works perfectly at holding the pieces under water. I figure by tomorrow morning they'll be flexible enough for me to clamp them around the top of the cheese box, so as to give them just a little bit of extra curve. Another day or two drying, and I should be able to proceed with the build. IF you look closely, you can just see the scribed planking peeking through the holes in the middle. I like the idea of making these models from scrounged materials. I know that this project is far, far below the usual level of building y'all are used to on this forum, but it's fun and gives reasonable results for use on our gaming tabletop. For one or two hundred euros or so I could buy a resin model of a pirate ship ready for paint, but this is more satisfying. And it allows me to satisfy my desire to set my fantasy medieval world a bit further back on the timeline. Most pirate-themed RPG products on the market are more 17th-18th century, while I'm aiming for 14th-15th century.


-
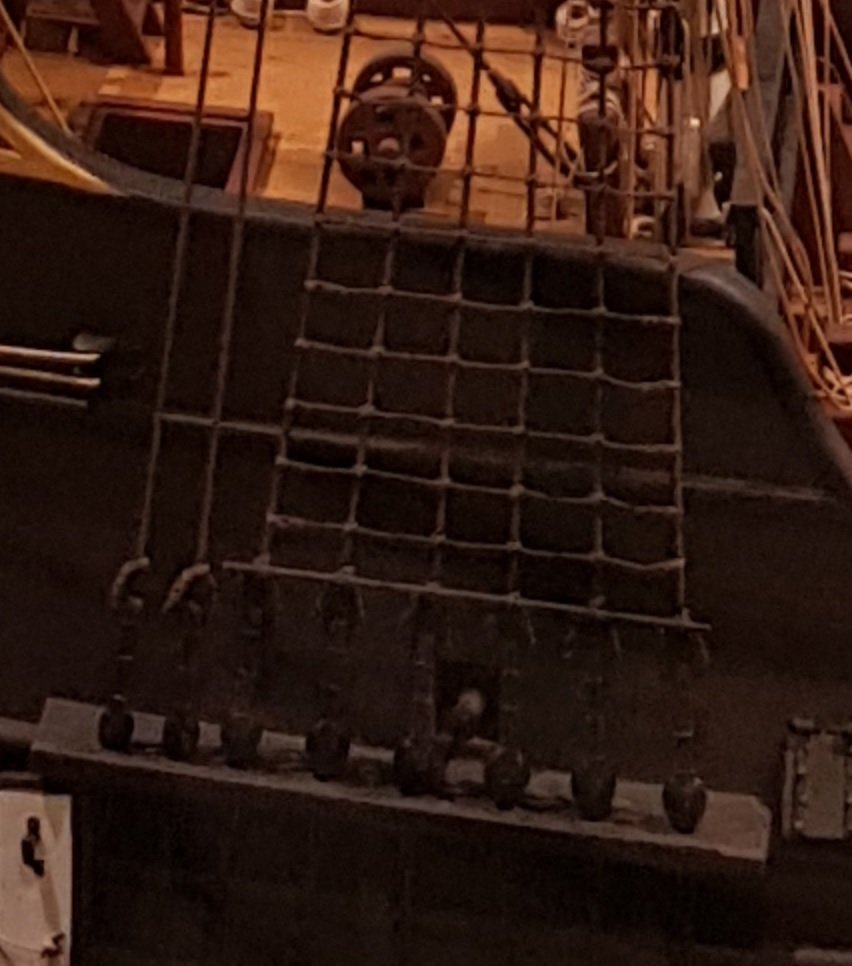
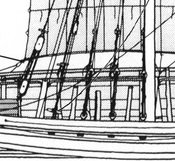
Thanks for these suggestions! I was thinking I'd need to do deadeyes, something like this: But on closer inspection of the pic that Ekis posted, it looks like the shroud goes down around an open iron ring, through which a smaller line is wound perhaps 6 to 10 times. Much easier for me to deal with. I found another pic, I think it's of the rigging of a knarr: The 3 foremost shrouds seem to use a similar system, but the 4th (from right) appears to use some sort of toggles or cleats, also fairly easy for me to model. This project has sat on the back burner for nearly a year, but perhaps now I'll get motivated to add rigging and more details.

-
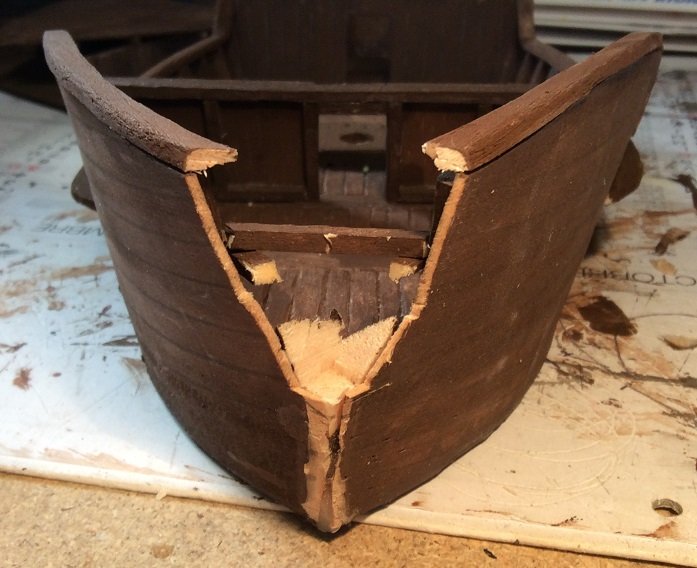
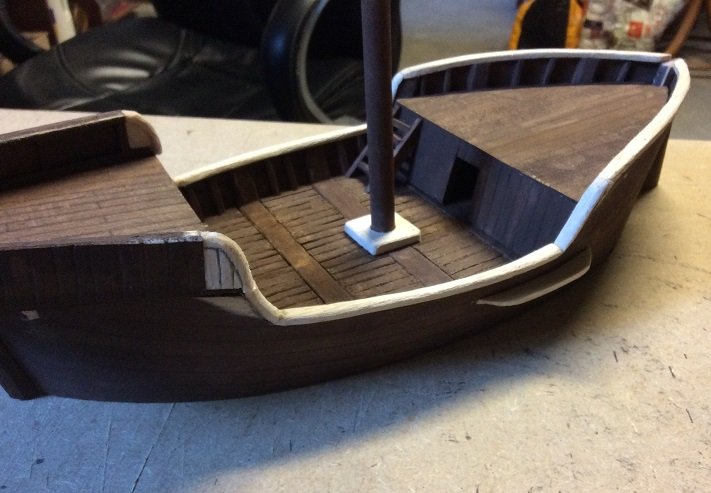
All things considered, I would prefer to avoid too many anachronistic gaffes. So, would the shrouds (that's what the lines that run from the hull to the mast top are called, right?) just be cleated directly into the hull? Would they use one of those funny-looking X-shaped cleats? I figured I would need 4-5 shrouds on each side. What I should really do is spend a few hours reading through the rigging subforum. I have a serious terminology deficit going here. <g> Here is another photo showing most of the deck:

-
FWIW, I stumbled across these roman oarsmen in 1/72. There is also these dark ages oarsmen in 15mm. But hey, your carved figures look fine. A lot of work, but no doubt worth it.
-
Hey back atcha, Louis. My shipbuilding antics took a back seat there for a while, but I still intend to do some rigging on this ship, and have two slightly smaller ones on the drafting board. I think my next step is to find several weights of thread/string and either buy or make a pile of those 3-hole blocks whose name I can't recall offhand. I do have a better photo of that partially-finished ship, which I used on the cover of a self-published RPG adventure: And if anyone is interested in non-ship scratchbuilding, I'm currently working on my 4th half-timbered house.
-
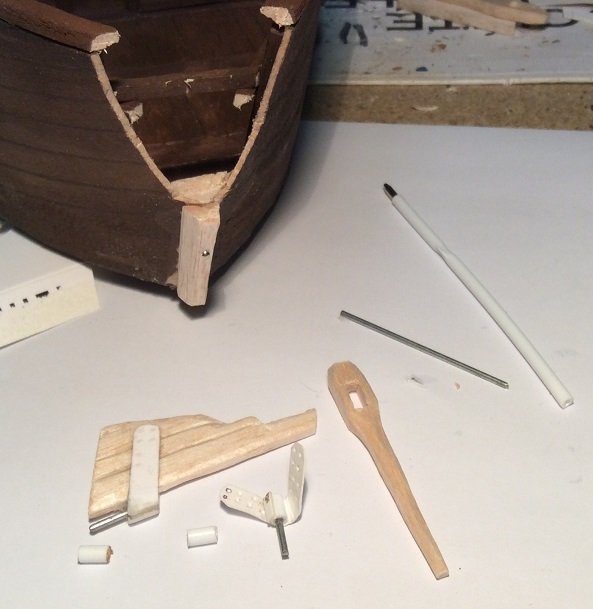
Thanks, Steven. My plan is to put in a sort of sill to bring the opening up to the level of the tiller, and to put some trim around the sides and top. Now that the hinges are done, I'm disappointed at how bulky they are. I don't think I'll redo them, but the next ship will need a more elegant solution. Maybe I can source some really small brass tubing. There are no hobby shops round these parts, so whatever I can find in a big hardware store is the best I can do. I'll give the toothpick idea a whirl. I expect I'll have to make a kind of jig to hold the drill properly. Using toothpicks as-is feels like it would be too bulky, and it'd be nice to have the railing look good. I see you have some experience with a "poor man's lathe" yourself, that dromon project is amazing. I can see I'll have to up my game.
-
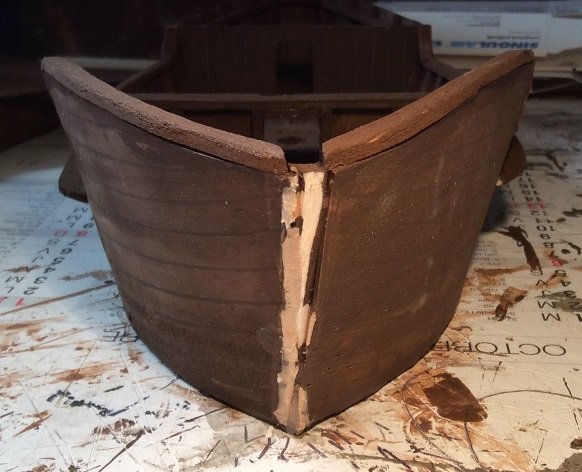
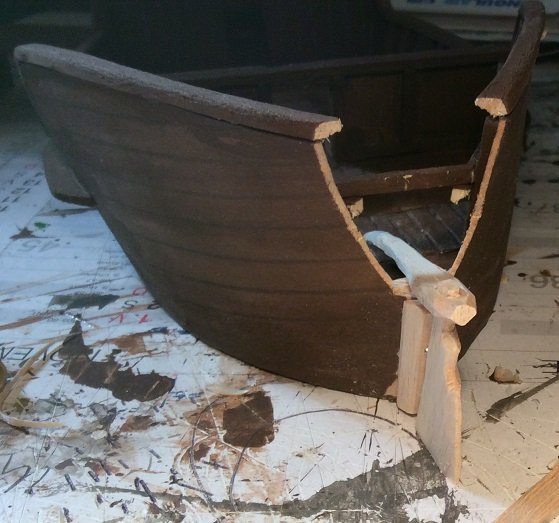
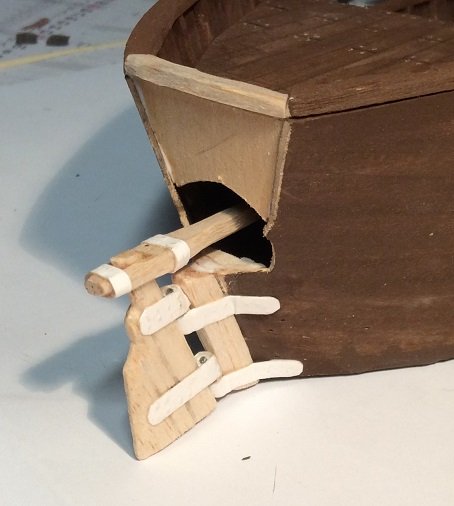
And so that's what I did. Thanks for the advice, guys. That's why I came to post on these boards, to have the benefit of your sage advice. This also resolved a niggling problem that wasn't visible in earlier photos: I slightly bungled the right rear section of the hull, leaving a gap with the original stern post. Time for major surgery! I whacked off the stern post... Then calculated where the tiller should go, and whacked off a bit more. After cleaning up the hole a bit, I carved a new stern post, rudder and tiller out of balsa. And then faced the conundrum of how to fix it in place. I couldn't resist the idea of having a working hinge, and since I don't have any brass, or tools to work it, I got my Macgyver hat on and scrounged up the inside tube of an old pen, a piece of wire (leftover from spearshafts) and some thin cardboard from a medicine box. It all came out a bit large for scale, but now that it's done I think it'll have to stay. Of course, it all needs paint, and the strips of cardboard will become iron. I still need to do a bit of filing and sanding and painting, and then do a serious grey wash to weather the whole thing, but progress has been made. Next steps will be railing along the fore and aft castles (tricky since the aft castle deck is removable but the gunwales aren't) and some minimalist rigging. Regarding the railing, I've got a question. I don't have a lathe, but if I manage to clamp a power drill in place, is it feasable to shape toothpicks (or barbecue skewers) for the posts, or will they just break every time I try to shape them?
-
Hmmm. It would indeed be more logical for the tiller to come out on the level of the main deck. But if I do that, there can be no more stern post above that level. I will need to whack off the back point from the hull, leaving a small but significant blunt stern. This is what I get for not working from a single model or source. This sounds like a good plan, maybe the best option for finishing this model. I have a feeling it's going to end up looking more like a caravel than a cog. Thanks for the detailed suggestions, Fabio. And thanks to Steven. I had indeed seen those sites on cog research. I think you're suggesting to continue the stern post up to the second level on the model, the raised aft deck. That was my original idea, given that I'd built the stern post to rise the full height of the hull, but Fabio's suggestion is attractive too. One thing's for sure, once I whack a bit off the stern, there's no going back. Fortunately my materials (foam and balsa, mostly) are very forgiving.
-
Thanks, Luponero. I don't quite catch your meaning when you say, "can't you open a small hole in the stern wheel prepare a rudder with the bar and stop it inside?" Here are my three options for the rudder, as I see them: 1) The original plan was to have the rudder top come up to the top deck, and have the tiller be exposed and visible there. 2) Ideally, the lower level of the main deck would be better for steerage, but since I decided to have a pointed stern instead of a flat, trucated stern, I don't think that would work out on this model. 3) Since this model is intended for gaming, I could just leave the stern bit of keel as it is with no attempt to simulate the waterline portion of the rudder at all. Just call it an abstraction and call it a day. But that just feels *wrong* somehow. I think I have another reason for replacing the stern piece of keel: the contact with the hull planking is... definitely sub-optimal, especially on the right side which you haven't seen yet. Another advantage of redoing that piece would be to work at getting a better shape to more closely espouse the vagaries of the hull shape, which was far from perfect, especially at the stern. In fact, I can't help thinking that my choice of a pointed stern would've been better suited to side rudders than a stern rudder. But it's too late for that on this model. The upside is that this project should be finished fairly quickly, and I can move on to improvements in design in the next one - which is the main reason I'm coming to talk about it here.
-
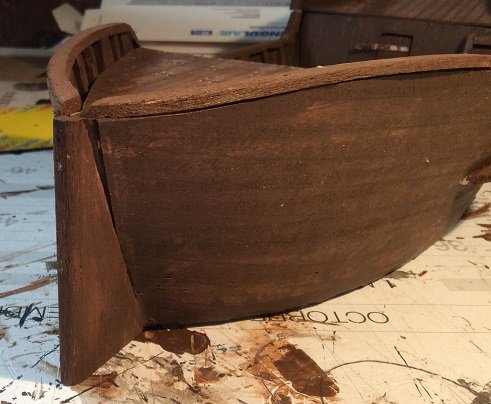
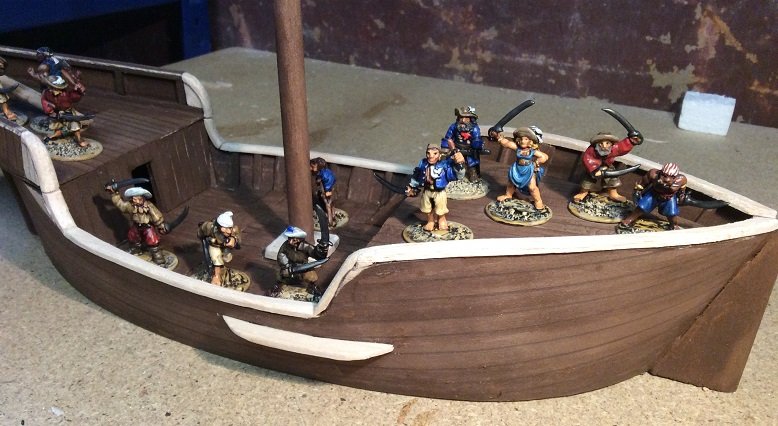
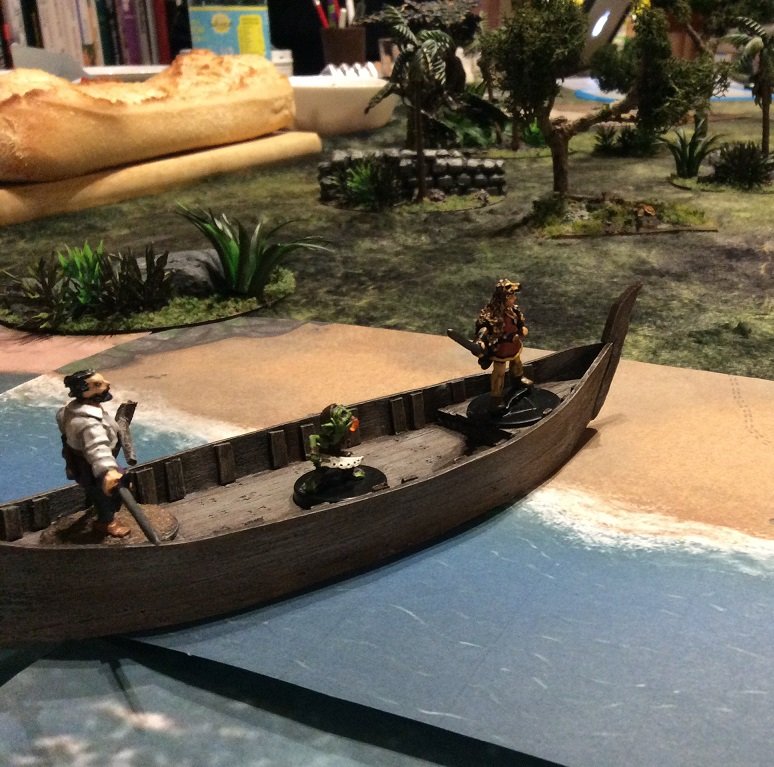
Thanks, Mark. I had a glance at your Licorne and it's simply amazing - maybe one day when I get all the right tools, I too might graduate from balsa to more noble woods. Continuing from last night's post I arrive at my first conundrum: what form to give the forecastle. I can't help thinking that this problem would be easier to address if I'd just settled on a target picture, painting or model that I wanted to emulate, instead of carrying around this jumble of all the cogs in all the world to yearn after. So it goes like this. Some of the cogs have very small, very high forecastles, some none at all. Some have lower and larger forecastles, and that seemed better for me since I want enough space for a good number of figures to fight it out in colorful boarding actions. Second consideration, with or without castle-like crenelations. I looked long and hard at the cogs that used crenelations, and decided they just looked too "medieval" for our pirate campaign. That's part of the anachronism inherent in fantasy-medieval RPGs. The tropes and the atmosphere don't always correspond to historical timelines. And the fatal bad decision: many cogs seemed to have rectilinear forecastles, and at the stage I was at, that seemed like a good idea. But now it's built, it's the part of the hull that pleases me the least. So I'm strongly thinking about chucking that part of the model and doing something with nicer curves to it. The fore and aft-castles are both removable, with most of the beams adhering to the upper decking, so as to give access to the space below during games. And to show off any detailing work that ends up getting done. So the planking on those castles is a single piece of balsa scribed to represent planks, rather than the individual plankwork on the main deck, because I needed the strength and rigidity on these pieces that will be removed fairly often. The downside is that it looks too "regular" and uniform to my eye. But after painting and weathering I suppose that will be less noticeable. Now, if you look at the tail end of the forecastle above, you can see my second conundrum: how to blend the removeable forecastle into the rest of the ship? I was dreading doing the railing all along the gunwales, since it seems to curve in three directions at once. But in the end, all it took was a bit of time and patience and starting the piece over three times to get it (mostly) right. And that's where I am this morning. Ready to install doorframes, doors, railings, anchor, capstain and so on. Oh, and I have to deal with the troublesome quandary of the rudder. And probably rip off the stern peice of keel and do it over. Just to show why I'm doing this project in the first place, here is my first batch of pirate figures (from Wargames Foundry). You can also see my problem with the rudder. I should've kept the stern piece of keel a consistent narrow width over the height of the keel, and the rudder would have approximated the shape of the piece I've used. Now I fear I'll need to cut it off entirely and do that bit over. That's what happens when you jump in with both feet before thinking things through.
-
Wow! Just wow! Your woodworking skills are amazing, and I'm taking notes concerning details I still haven't worked out, like the rudder and capstain. Your ship is amazing. The only thing that bothers me is that so many details are hidden by subsequent decks blocking the view of all that craftmanship. Kudos! --- PhilB
- 197 replies
-
- 1
-
-
- santa maria
- carrack
- (and 1 more)
-
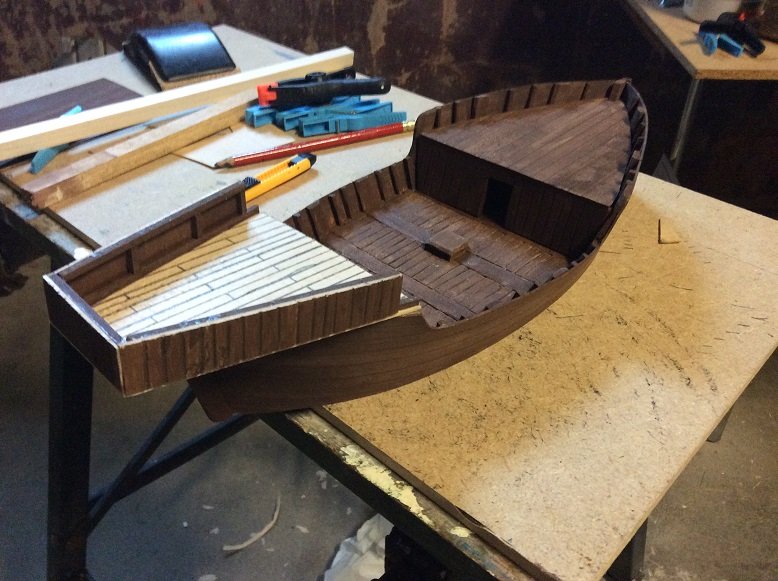
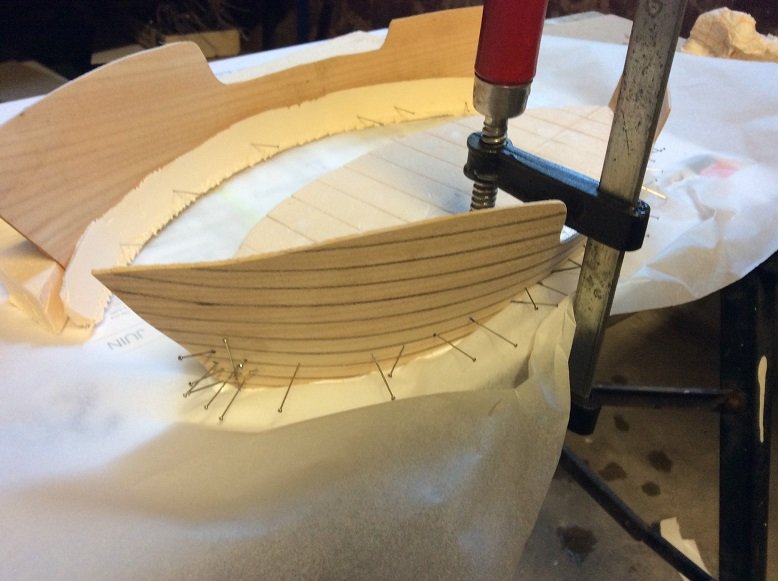
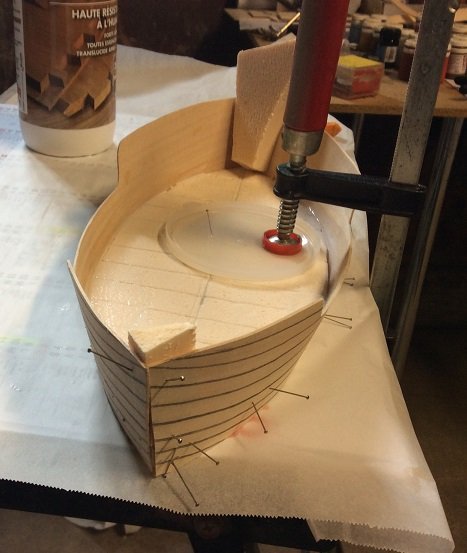
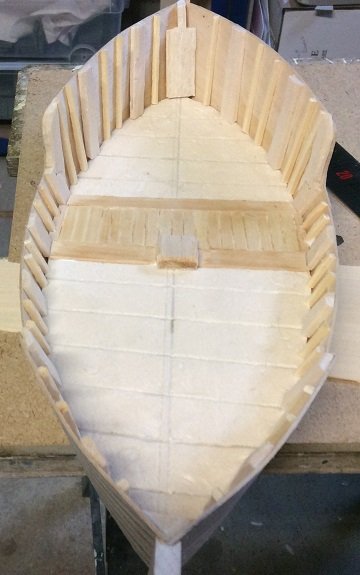
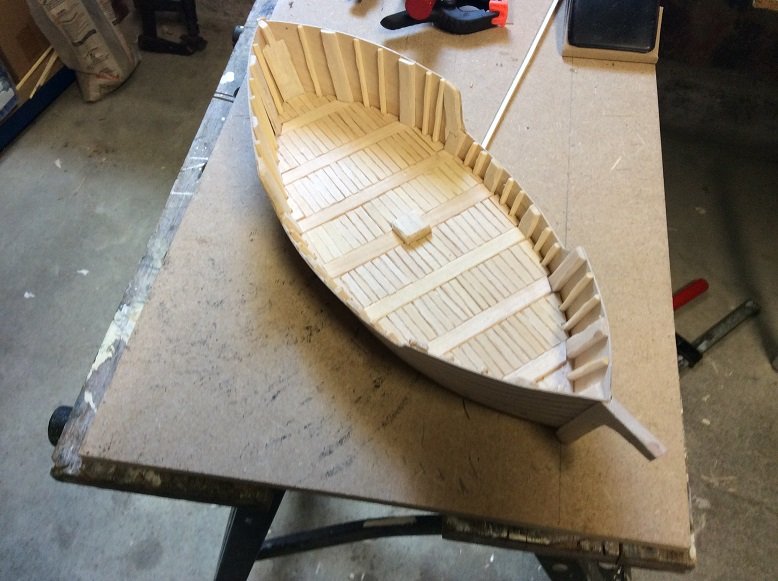
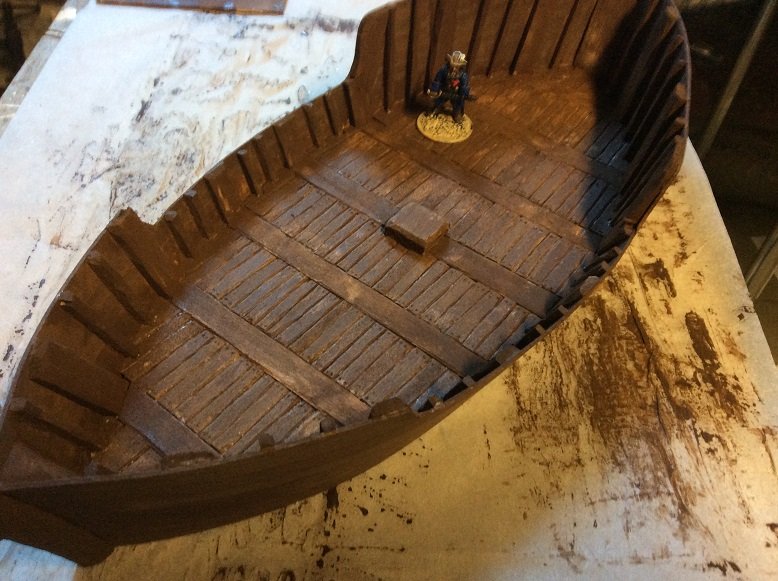
On this 20mm-thick insulation foam, I planned to use 1mm-thick balsa that I (now) knew could be easily bent to this shape. I first prepared cardboard templates for the hull planking, temporarily pinning them in place, and planning for the height of the fore and aft-castles. I should've made the aft-castle slightly higher, but that's the sort of thing you learn when scratchbuilding by the seat of your pants. Once I'd decided on the profile, it was time to cut balsa, scribe it to represent the individual planking (anathema, I know, but hey) and get it ready to soak for 8 hours to become pliable. Then I was ready to bend, pin and glue in place one side after the other. Since I'd taken them both out of the water bath, while the first side was being glued, I temporarily pinned the other side into the scrap foam, so as to espouse the approximate shape desired while the glue dried. Yeah, that's a lotta pins, but I couldn't suss out any other method to hold the balsa in place while the glue dried. With the other side glued in place, I could start thinking about the fore and aft keel sections. Then, it was time for the ship's ribs. From my google search, I'd seen that some ribs were far more massive than others. So I decided to alternate one thick rib with two thinner ribs, over the entire length of the ship. Even the parts under the fore and aft castles had to be done, because I wanted to make the fore and aft-castle decks removable, so as to be able to use those spaces during game play. I finally decided to do individual deck planks, with wide lateral strips to match the wide ribs, and thinner longitudinal strips between them. The idea was that those longitudinal planks would be removed to grant access to the hold when loading cargo - in theory, since the actual cargo hold wouldn't be accessible on this model, because of the foam core. So I started with a square bit to insert the mast later, and an intial row of planks in the middle of the ship. Planking continued (shaving off individual planks to simulate use and wear) until done. Doing individual planks made it a lot easier to work around the ship's ribs. Once that was finished, I decided to slap some paint on there. As with the previous small knarr project, I decided to paint the hull a dark brown, to be lightened later with grey drybrushing. I've included a pirate figure for scale. More soon... the project has progressed but my typing time has run out. I hope this project isn't too amateurish for these boards, and very soon I'm going to be asking you folks for advice on some trick points I'm agonising over.
-
Hmmm. Image links seem a bit wonky on this site, I'll have to go back and check about formatting. So, the cog project. As before, I began with a sheet of insulation foam (the dense kind). Using a 2D top-down projection of a ship (probably a small caravel) I traced the outline onto a cardboard template (opting for a pointed stern rather than a flat stern) then cut out the foam, eyeballing the angle that would support the hull pieces in subsequent stages of the project. I wanted the hull to be more verticle than in my previous knarr project, but still to be slightly splayed, as many of the cogs I'd seen on a google search.

-
This is my first build log. First, a little background. I play Pathfinder, a fantasy medieval roleplaying game, and use lots of figures, buildings, trees and other decor on the tabletop during our games. So a few months back, I started my RPG group on a new pirate-themed campaign, and decided I needed to build some ships for the visual appeal on the tabletop. I am not a real ship modeller. No elaborate oak or cherrywood planking here. I'll be working primarily with balsa and basswood, and winging it every step of the way. But I still thought it would be a good idea to share my progress and tribulations here, in hopes of getting some good advice from the real ship modellers here. I have to say I am impressed and more than a bit intimidated by all the fine work you folks have done, and have spent countless hours reading your build logs, especially those dealing with medieval ships, like viking longships, cogs, carracks and caravels. The models you build are simply awe-inspiring, and although my efforts will fall far, far below the standard in evidence here, I will dare to post nonetheless. My basic concept involves building waterline models using a foam core - a basic hull shape carved from a sheet of insulation foam, and glueing a 1mm-thick balsa sheet to form the hull, pre-scribing planking to simulate individual planks. Perhaps in the future I will try using more noble materials, and acquairing the tools necessary to work with harder wood, but for now, I'm winging it with balsa that I can bend to form. As a proof-of-concept project, I began with a small knarr - the same basic shape as a longship, but much smaller, for 6 to 8 28mm figures. You can read the full project tutorial here., and below is the result. I'm going to post this bit, to see if the links work as expected, then serve up the cog project.
-
Thanks for the warm welcome! I've already found a wealth of information here, including: https://modelshipworld.com/index.php?/topic/16147-hello-from-spain/&do=findComment&comment=539640 https://modelshipworld.com/index.php?/topic/9250-viking-knarr-by-daryl-finished-dusek-scale-172/&do=findComment&comment=290980 https://modelshipworld.com/index.php?/gallery/album/278-viking-knarr-circa-1200-ad/ And especially this brilliant project by Jack Panzeca: With craftsmen like this on these boards, I can see I'm going to have to up my game!
-
This is a brilliant project, and so well-documented that I think I feel up to trying a similar project. One thing I noticed is that in the end, you didn't really use that many of the original pieces of the kit, or else covered up the ones you did use with walnut veneer. Except perhaps for the hull itself. It emboldens me to try scratchbuilding a version of this model. My goal is to do a waterline model, probably something in the neighborhood of 1/50 scale, suitable for use with 25-28mm figures. I've just been painting up a mob of Foundry vikings, and the urge to make them a proper ship is overwhelming. I have a plastic Revell kit of a Viking ship (I know, plastic, how pedestrian!) but I think between that, some of the cross sectional drawing cadged from the internet and your excellent step-by-step demonstration, this project might just be doable, even for a novice boatbuilder like me. Thanks so much, Jack, for the inspiration! So far, the closest I've come to this awesome project has been a scratchbuilt half-timbered house, again for 25-28mm figures.
-
Bonjour and G'day. I'm a wargamer and figure painter in my off hours, and have recently been scratchbuilding (and kitbashing) a few half-timbered houses, but I wound up here since I've gotten it into my head to scratchbuild several viking longships, knarr or other early-medieval ships, most likely as waterline models for use on the gaming table. I'm really keen on making good-looking well-painted models that are as historically accurate as possible. I don't know to what extent this goal might seem heretical to you hard-core ship modellers, but hey, thought I'd throw this right out there. I've just started poking around this site, but if anyone can point me towards resources for knarrs and longships, that would be a great help. I'm thinking that if I build waterline models that don't have removable decking, then I don't have to get quite as elaborate with the ribs and strakes as I'd otherwise be tempted to do. Well, that's my story, and I'm sticking with it. <g> Cheers, --- Phil from France