HOLIDAY DONATION DRIVE - SUPPORT MSW - DO YOUR PART TO KEEP THIS GREAT FORUM GOING! (Only 36 donations so far out of 49,000 members - C'mon guys!)
×


Ab Hoving
-
Posts
689 -
Joined
-
Last visited
Content Type
Profiles
Forums
Gallery
Events
Everything posted by Ab Hoving
-
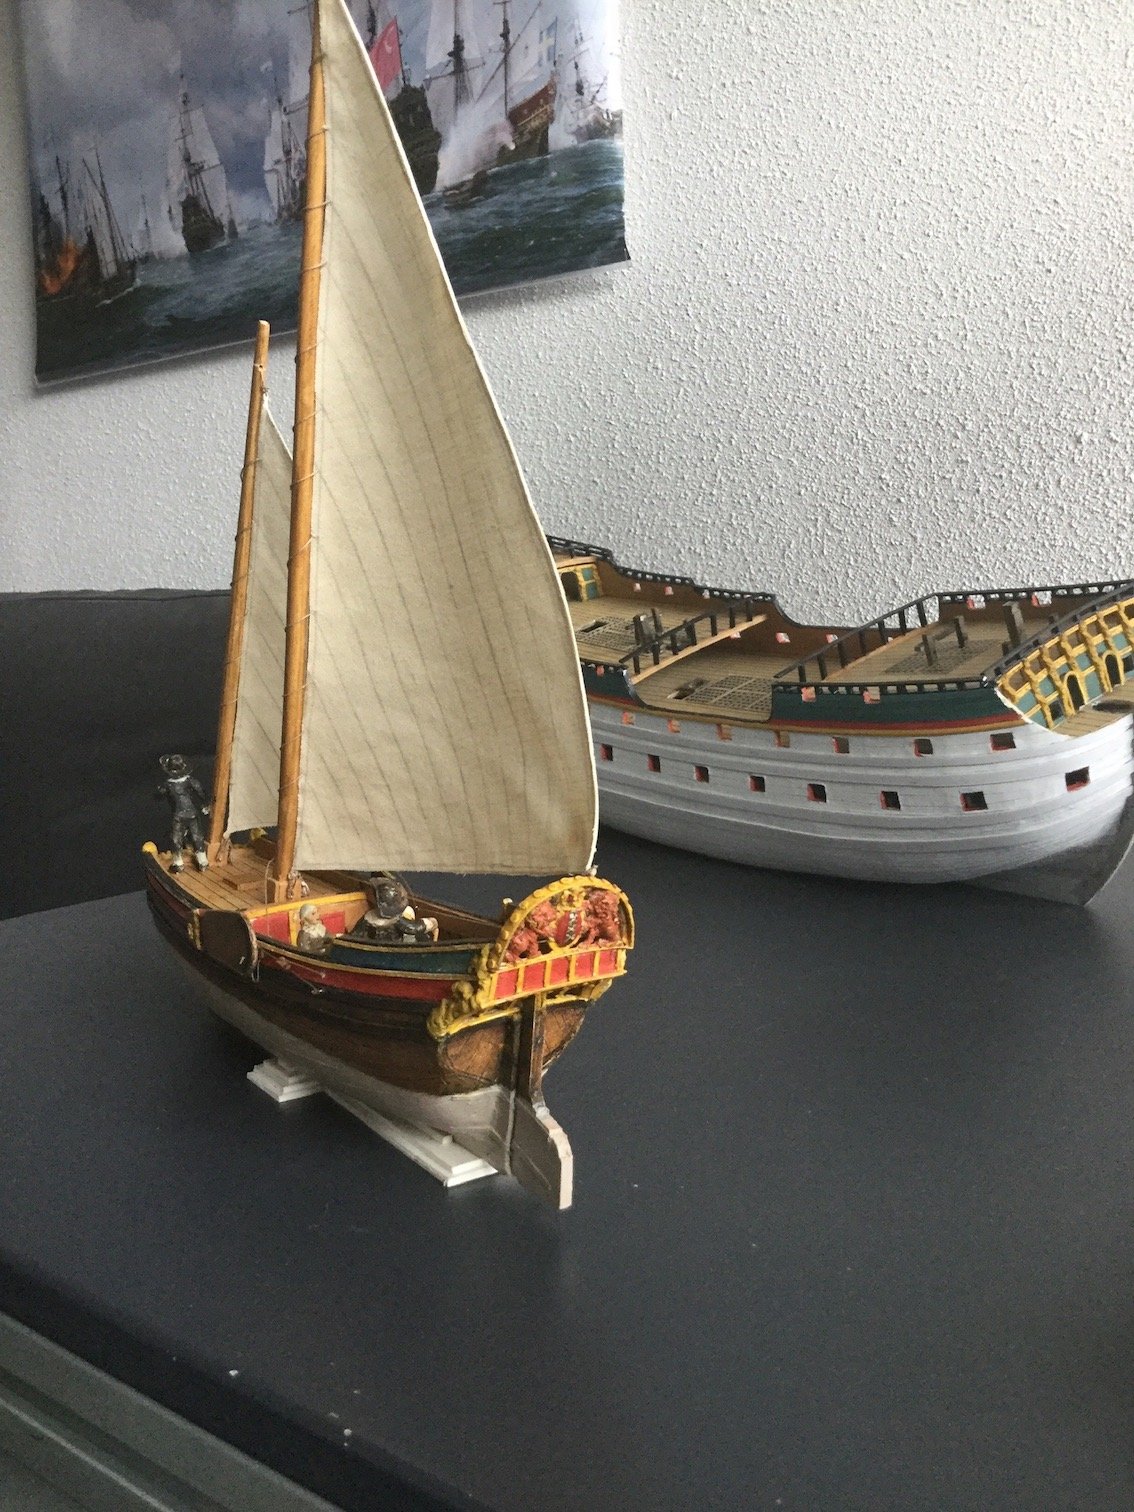
Hi Marcus, You must have a lot of time at your disposal. If I look at your plans, you could easily fill two lives with them. 🙂 There must be plans for the William Rex, but I don't have them. About ten years ago I let a group of students do calculations on the ship because I did not trust the shape. Too little volume below the waterline. From this project (it turned out I was right) there must be a report in the museum. I will ask and come back to you about this matter. As for the rigging of 18th century Eastindiamen you might be interested in a rigging plan for 160 foot retourship I reconstructed from a VOC document from the middle of the 18th century. It was published in a book about the archaeological finds of VOC ships, the Hollandia Compendium, published by the Rijksmuseum in 1992. The plans might reasonably fit the Valkenisse rigging. The oldest VOC retourship of which plans have been published was Prins Willem (1651) by my predecessor Herman Ketting. There is a book from 1979 and there are plans, but I don't know how to get them. Perhaps other members can help you out, for instance Amateur? Apart from the plans for Valkenisse (1717) I don't know of any published plans, but I do have plans made after the 1697 Resolution, after which I started a model some time ago, but never finished it. I have no recent pictures of the state it is in at the moment but I can tell you, it takes a lot of study to get even this far. Anyway, if you are interested in the plans you can have them, send me a PM. Here is a preview: I hope you know what you are looking at. As I said, your plans will take a double life-time to execute.....
.jpg.2068e80448faa0a8347b55e06b19e25f.jpg)
.jpg.0761e084b0057632bae18470c29022ec.jpg)
.jpg.e1106bbdf0a88350bf0d54f8c580b15a.jpg)
.jpg.7da9c1fc21447b104d2a7dd9d7cb74f2.jpg)
.jpg.c2bda51212d673f463e2708814d29a3f.jpg)
-
A hekboot was a hybrid ship, with the lower part lend from the fluit and the upper part from a pinas. Think of it as a fluit with a transom. The combination produced a wide merchant vessel with the accommodations of a pinas, like a wide captain's cabin. The only draught there is of the type is the elementary drawing I made from data from Van Dams book "Description of the East Indian Company" (1701). I add it here, but you have to a lot of imagination to make a model out of it.

-
I'm happy to take part in any discussion about shipbuilding, as long as you don't expect me to have all the answers. The contrary is true. The more I look at the subject, the less I understand. 🙂
-
Marcus: You cannot tell the difference. It is a matter of background. Apart from the big 'retourships' the VOC also built small warships, which they called 'yachts'. In admiralty circles such ships would be called 'frigates' and they looked very much the same. The only difference is in the decoration of the stern. Usually a frigate was a man-of-war with less than 40 guns. Jaager: I have a document written by Charles Bentam, the English shipbuilder who worked for the Amsterdam admiralty in the second quarter of the 18th century. He describes his method of design and starts with the location of the frames. The location was important for where the gun ports were placed. He is surprised that the Dutch cut their gun-ports after completion of the framing of the upper works. The conclusion must be that the idea of sliding frames was no option. The philosophy about how a ship should move through the water differed from location to location and from time to time. In the 17th century the Dutch idea of how a ship should sail was that it should more or less slide over the water, instead of cutting through it. The comparison with a duck's breast was made. This way of design produced very 'dry' ships, totally different of what we see in the age of the tea clippers, which were sharp and sailed more under than on the waters.
-
Peculiar. Van Yk describes the location of all of the four frames (of which two of them were identical) and does not mention the possibility of sliding. He does give a trick to derive the aft one from the fore one, counting in the amount of greater depth at the stern and the narrowing of the width of the hull. Archaeologists found a lot of traces and proof for shell-first building in Dutch shipwrecks, but so far I have never seen a report dealing with a typical 'Van Yk'-method built ship. There are so many questions to be answered and there is so little knowledge on the subject... The more I learn, the less I know.
-
I totally agree with you on the last point. For me it even the question if Van Yk used a mold loft floor at all. In my opinion it is very well possible that the shape of the four initial frames was drawn on the wood right away, without a drawn design on paper or on a floor. Rules of thumb work that way. Taking the shape for a new frame-part was done from the splines that that were fastened to the four frames. Even after 1725, when the first Dutch war ship (Twikkeloo) was built on the Rotterdam admiralty wharf by Paulus van Zwyndregt after a pre-drawn design, the same yard only placed 10 or 12 pre-drawn initial frames on the keel and proceeded taking the shapes of the missing parts from the ship itself. The advantage was a obvious: The demands for the quality of such a frame-part was much lower that whatever was made after a drawing. So the hybrid method of working after a drawn design and the shell-first method actually continued in the practice on the yard for ages.
-
My views on the matter of the development of shipbuilding in Europe is extremely limited. I have only been busy with Dutch efforts. There are very good studies done, for instance by Larry Ferreiro: Ships and Science: The Birth of Naval Architecture in the Scientific Revolution, 1600-1800 MIT Press 2006. ISBN 9780262311472 OCLC 743198863 Bridging the Seas: The Rise of Naval Architecture in the Industrial Age, 1800-2000 Mr Richard Unger has written something about the subject too if my memory serves me well: Dutch Ship Design in the Fifteenth and Sixteenth Centuries (1973) Dutch Shipbuilding before 1800: Ships and Guilds (1978) Ships and Shipping in the North Sea and Atlantic, 1400-1800 (1997) I think you can find answers to your questions in those books. I'm just a model builder and not even a good one :-).
-
 Your hull looks horrible :-)). Don't worry though, the planking will hide it all. The trick with the planking is that you will have to judge the run of the wales only from the side. They all seem to have the same regular distances. But seen from above you get a varying width between some of the wales, especially in the aft part. It even needs extra planks there. Once you have those wales in the right place, nothing can go wrong. Maybe this picture can give you a bit more information of how it works: As you see my hull looked terrible too, but the end result was satisfying.
.jpg.471d2fc4ef8c5a63b84e43c7095c45a1.jpg)
- 332 replies
-
- 5
-

-
- fluit
- abel tasman
- (and 1 more)
-
Shell first as described by Nicolaes Witsen (1671), means that the planking of the bottom and the turn off the bilge was done first. Frame parts were installed after that. The alternative way, as described by the Delfthaven shipbuilder Cornelis van Yk (1697), uses four pre-erected frames, to which splines were attached that defined the hull shape. Frame parts were added and the planking was done after that. The remarkable resemblance is that in both methods no preliminary plans were made. Two different methods with a distance of less than 50 kilometers between them. I studied these during half a century and still don't understand how such a thing was possible.
-
The question is how the Brits and the Spanish did it. Were their methods comparable? I don't know. We know of two different methods in Holland and they do not seem to be connected. Conventional is a strange term in this respect...
-
The ships for foreign countries were usually built on private shipyards, for instance in Amsterdam, but Dutch shipbuilders also went abroad to build ships there. I don't know what you call a conventional method, but the Dutch used shell-first up to the end of the 19th century. Only the Admiralty yards were more progressive up from 1725. The Vasa was certainly built shell first.
-
The latter. I use Magic Sculpt, but there are other two-component products.
-
And apart from that: a ship can reach an age of over 50 years or more. During its existence it is adapted, changed, damaged, repaired, rebuild even, and still I get questions from people who urge me to declare that the drawing they use are absolutely trustworthy and correct. Come on, we build models for fun and hope to learn something from it. That's all. Some are better, some are worse. So what? Enjoy your hobby. It's the only thing of which you can decide everything upon in your life.... 🙂
-
Hear, hear. Well spoken!
-
If I understand you well you can win a prize in a competition by doing something totally wrong. Nice qualification for the jury... No offense to the organizers of competitions, but maybe one should not join a competition at all. It seems to me that the items the jury reviews have little to do with knowledge of ships and a lot with 'thumb-nail-polishing' and 'rivet-counting'. In Holland we have a word for it which absolutely will be banned from this forum when I write it down, but it has to do with an unnatural sexual relationship with ants 🙂. Personally I prefer a rather sloppy, but true model with the right atmosphere over a perfectly build wrong one. It must be my personal handicap that I refuse to compare one ship model with another on the basis on how totally random details have been applied. How nails and wooden pins are used may be in a drawing looking great, but I have made enough plans to know that more than half of what we draw is pure guess work, of which we hope it may be somewhere in the direction of a perfect depiction. Plans are not sacred. In my 60 years career as a model builder I never used a plan without changing all kinds of things in them. Just have fun building and let juries judge their own models....
-
Roter Löwe 1597 by Ondras71
Ab Hoving replied to Ondras71's topic in - Build logs for subjects built 1501 - 1750
Ondra, you are a gifted modeler. The maker of the plans must have had a great imagination, but wether his design is truthful or not, you are doing a magnificent job. And you have one mighty excuse: The shape of the model may be wrong, but up to now we don’t have any written or archaelogical clue how it really must have looked, so who are we to reject? No problem so far with your build. But just promise me to throw that horrible German book in the dustbin after you finished your model. It is no good as far as Dutch ships are concerned and there are four of them there, I believe. For all four we can say that any resemblance with existing Dutch shiptypes is entirely incidental. Good luck. -
Hi Petr, Thank you for your kind words. If you need any help for your next project I will gladly assist, for as far as I am capabel. 🙂
-
Thank you Pete, and you are welcome. It is quite an honor to be an inspiration for somebody. You almost make me blush. Tools are necessary, but with some inventiveness you can come a long way. Before I had a lathe I made my guns with the aid of an electric drill in a vice. I cannot say they were really top, but for me at that moment they were satisfying. And that is the key. Why are we making models? What do we want to achieve? Finding out the answer to that question can save you a lot of money and head-aches. All my life I used to build models mainly to get answers to my questions about construction, building methods and design. Now that most of these questions have been answered I can work on how realistic a model can look. It is my conviction that making models realistic does not require details up the micron. If you look at a model, you are actually looking a the full size ship, just smaller because of the distance. That means that a lot of details are simply not necessary, as long as the overall impression of the model is correct. Who can see a nail at a distance of 100 yards? But that is just my opinion at the moment. In the past I did add parts that would never be visible unless the model was broken down. There are dozens of reasons to build ship models and they are all valid. The choice of material is absolutely of no importance, as long as you like what you make. In the end we do this for fun, don't we?
-
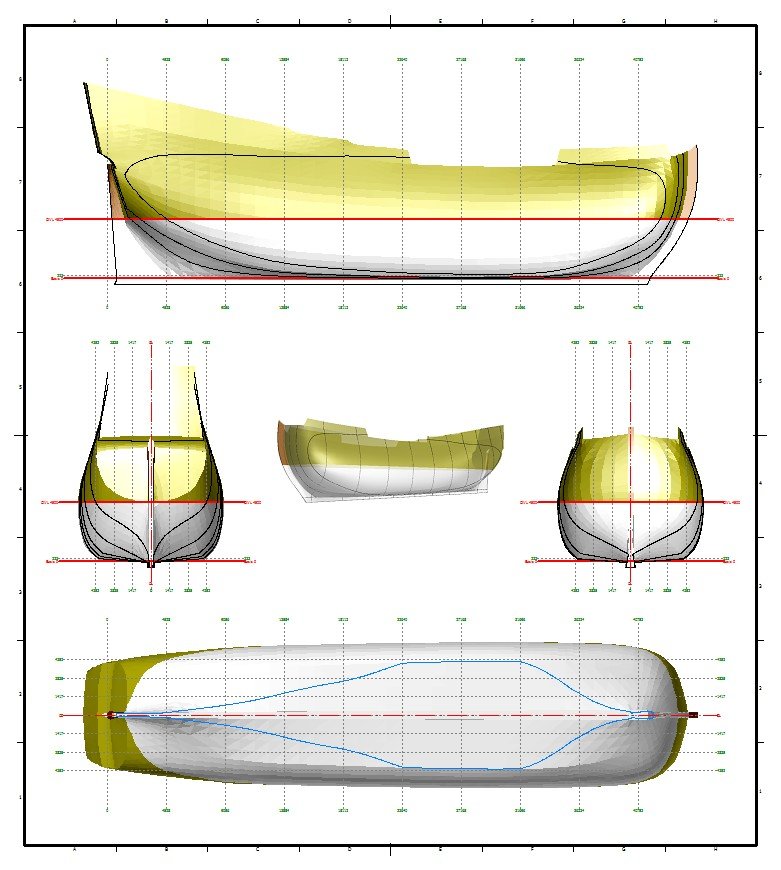
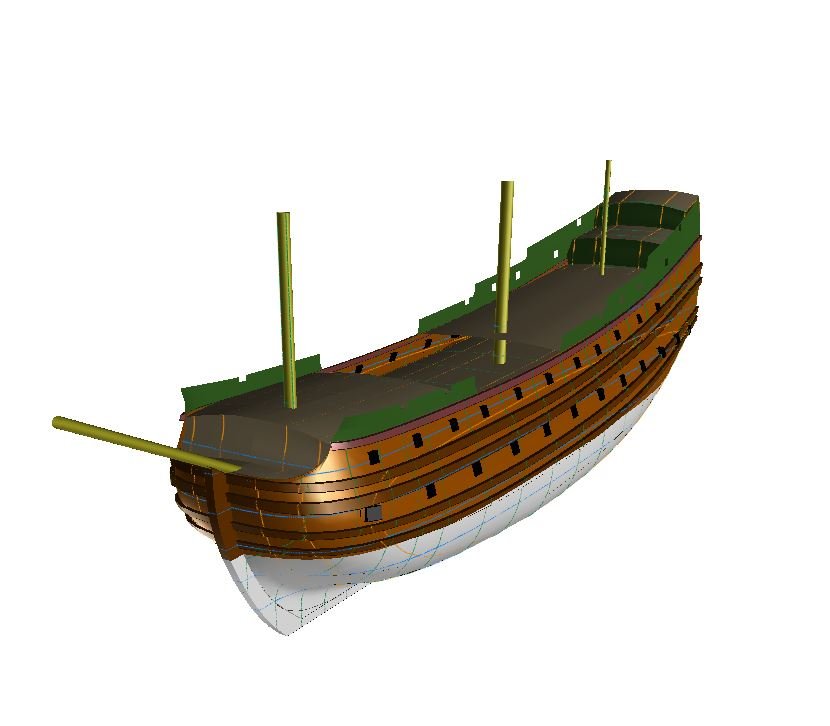
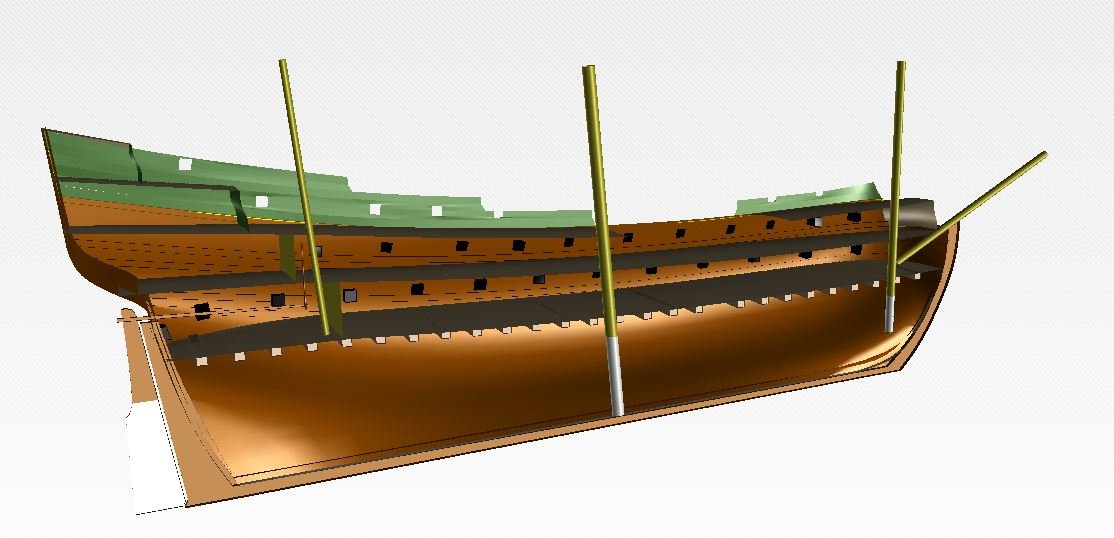
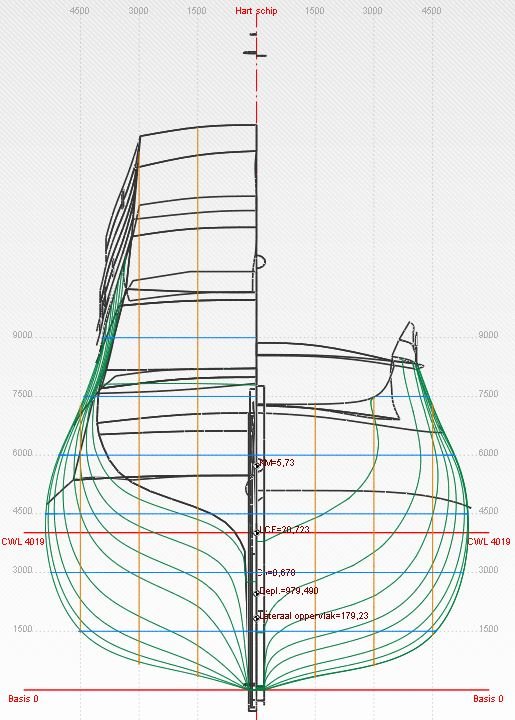
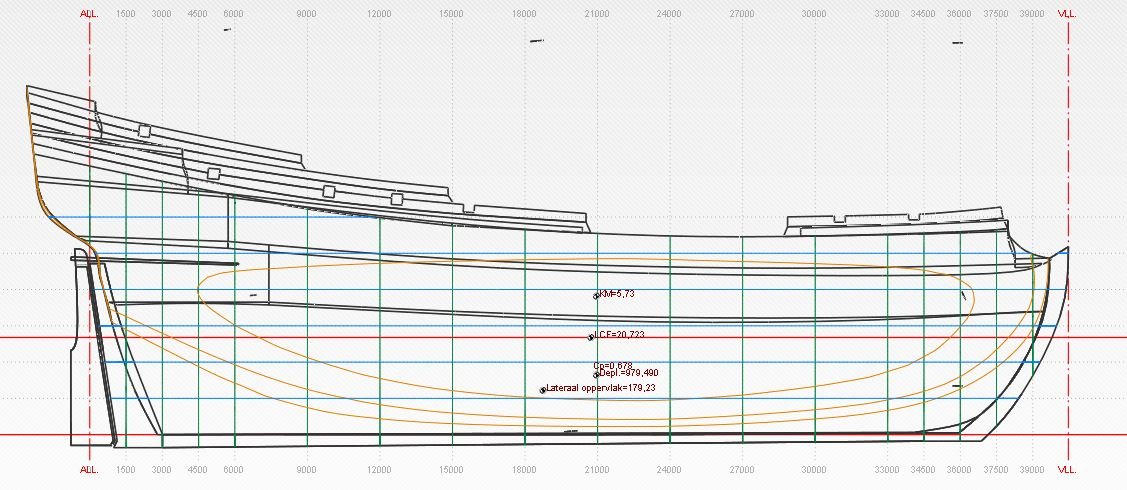
Hi Marcus, The archives are treasure rooms for ship modelers. Thousands of specification contracts can be found. Not all of them useful, but many add a lot to what we (do not) know. I have been building models on the basis of contracts for years. Nowadays, with the help of my super Belgian co-operator Rene Hendrickx, that usually produces lines plans that form the basis of my models. Here are the ones we made of this 1680 warship. Of course they are basic and a lot has to be decided while building, which causes adaptations which are not in the 3D plans. Compare for instance the length of the decks in the aft part of the ship. Also details are not drawn in the plans. They have been made just to have a basic hull form to work on. Cannons made out of card is a quick and simple way to do it, but you have to be sure that they fit with the model you are making them for. I can imagine that for a wooden model they don't stand the test of looking real, but perhaps that is not true. You have to decide that yourself. If I look at the quality of many posts here on this forum I think for many of the builders here the solution is too simple.
-
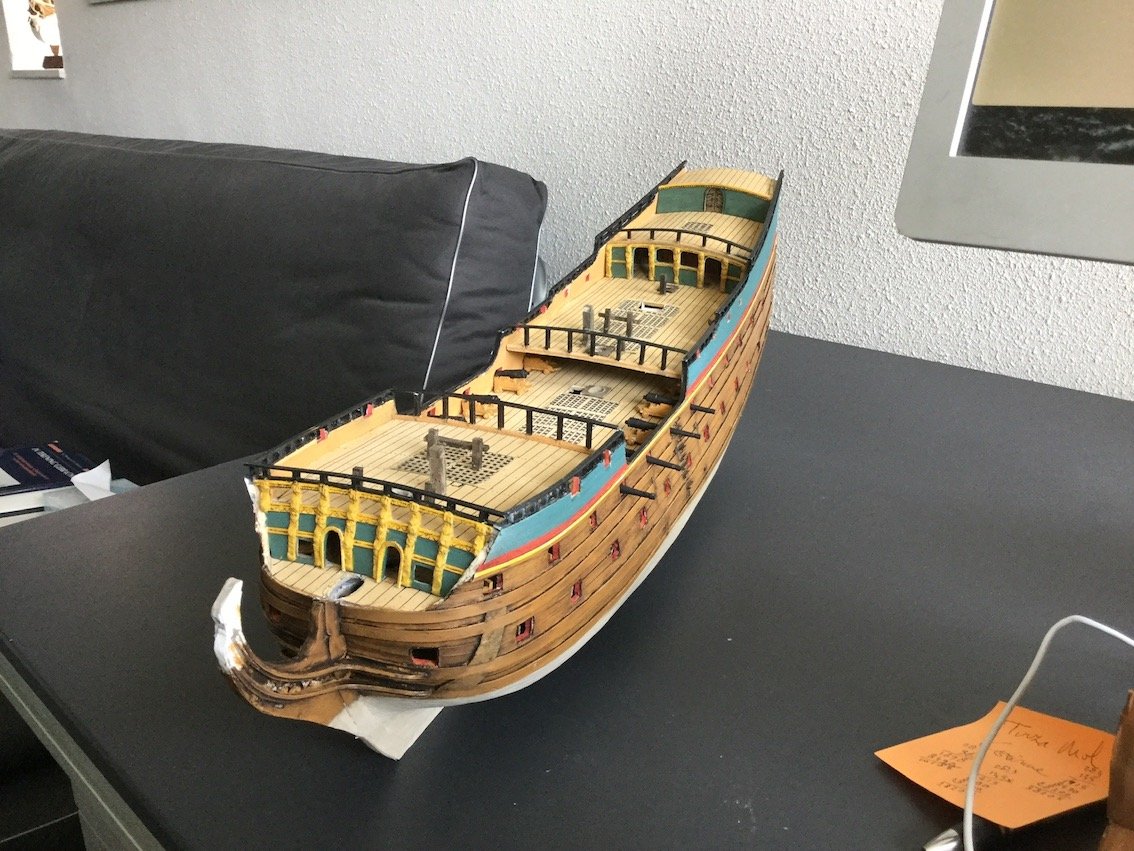
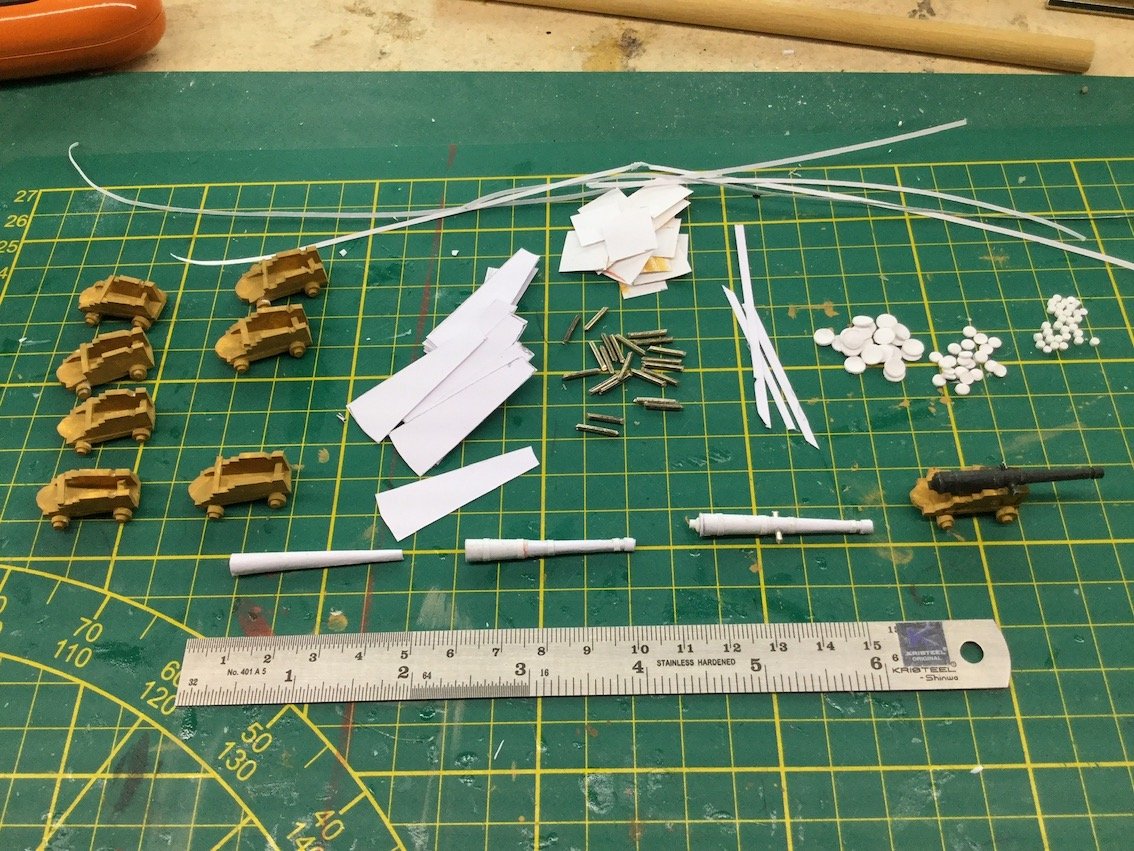
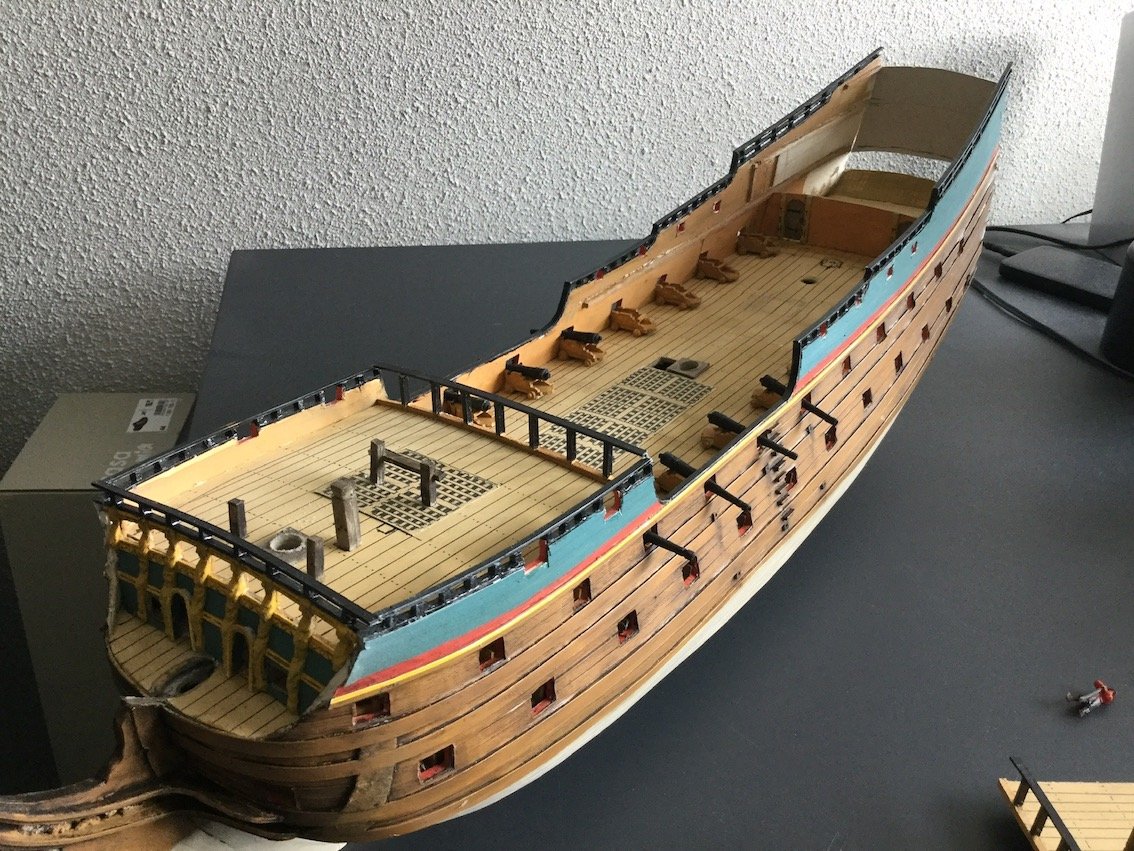
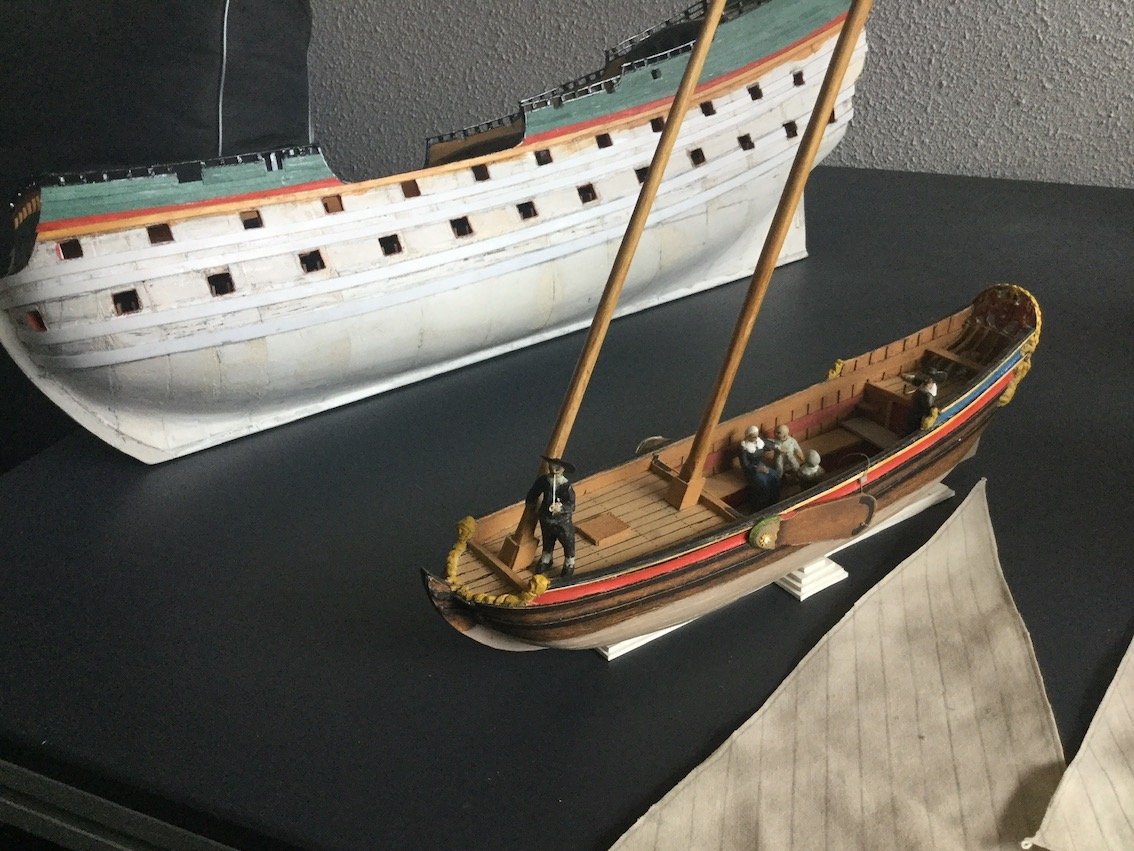
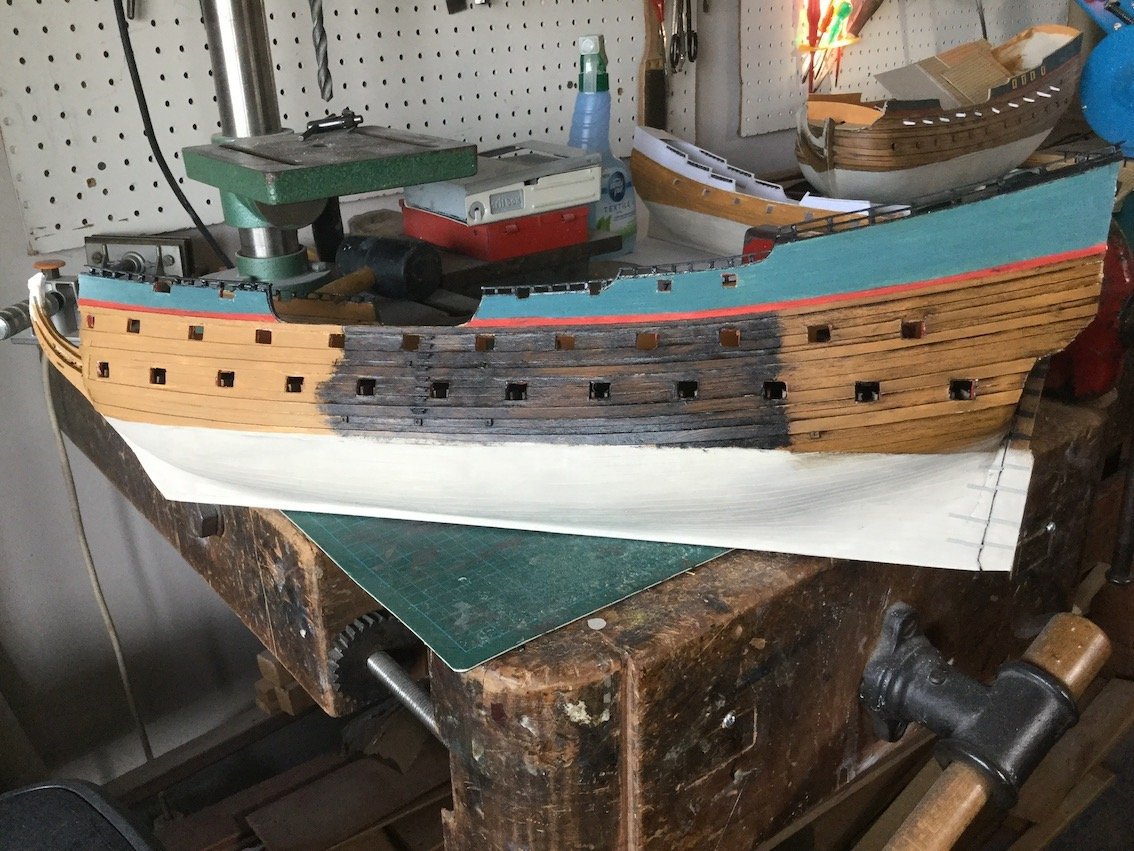
I know this thread is about a 42-feet long pleasure vessel. But in a number of pictures I showed here a war ship popped up, which was the result of a project I did with a historian, Wilma Gijsbers, who discovered a specification contract in the Amsterdam Archive of a group of men-of-war for the Spanish king built on private shipyards. In itself a remarkable fact, but the fun for us started when the commissioner and the shipbuilder developed a disagreement about the way the work was done. Some of the frame parts were not sufficiently squared and according to the sources the work should have been stopped until everything was corrected as the commissioner wanted. A few weeks later, at the next inspection, the shipbuilder appeared to have continued the build without correcting anything. So **** hit the fan. The case went to court and after exhausting discussions consensus was reached. The interesting part of all this for us was, that the ship had to be measured after completion with the result that we were able to compare the data in the specification contract with the real ship as delivered. This showed us the limits of the freedom for the shipbuilder to interpret the data in the contract. The ship appeared to be 3 inches longer than the planned 143 feet, an inch deeper than the required 16 feet 2 inches and 6 inches wider than the ordered 28 feet. The keel was about 2 ½ feet shorter than planned and the transom was 1 ½ feet longer. This was normal business, the shipbuilder had to work with available wood and sometimes he had to deviate a little from the data given in the contract. I decided to build the hull, just to compare the dimensions to an earlier war ship I did, the Alkmaar of 160 feet long. I was not really after another model, but one way or the other it appeared to be interesting enough to keep building. Also the fact that the promised drawings for the pleasure vessel were not finished yet helped to decide to make this detour. It created the possibility to show some aspects of the build. In the beginning I simply forgot to take pictures, but the system can be seen as well explained on several occasions. The build is in a state now that it almost looks like a kit. All separate parts are ready, but not glued yet and the final finish is at hand. So far it took only about 6 weeks. The upper deck is shown with the bulkhead for the captain's cabin. Here the quarterdeck is added with the bulwarks for the officers quarters, and another bulkhead in front of the steering galley with free sight at the sails. This is where the helmsman stands at the whipstaff. Finally the poop deck with the bulkheads for sub officers quarters. All in dry fit. The method of painting can be shown here. I ‘plank’ my ships with strips of self-adhesive white plastic foil with a wood imprint. After applying a layer of primer the hull is painted with a yellow ochre oil paint above the waterline and a dirty white below. After half a week of drying the ochre is smeared with a dark brown oil paint called van Dijks brown. Once the paint is on, it is wiped off with a soft cloth, leaving enough dark color in the imprint to suggest wood. It also adds the right tone to the under layer. Here the hull executed in card. Here the hull is planked with plastic strips of self-adhesive foil. Three stages in the final painting: left the yellow ochre, in the middle smeared with Van Dijk's brown, right after wiping it off. Another point of interest for some of you might be the construction of the barrels for the guns. The carriages are simple enough, but for the barrels I tried to find something just as simple. Here you see the ingredients for 24 18-pounders in a scale of 1/44. 160 grams paper is used for the barrel, with a thin paper re-enforcement for the aft part. The muzzle is done with a narrow strip of the same paper as the barrel and the narrow strips for the decorative bands around the gun are from normal 80 grams printing paper. The backside with the pommelion is made from several sizes of card, done with a variety of punches. The axel has to have the same diameter as the hole in the barrel and the cheeks and bottom of the carriage, 1.5 mm in this case. Matt black paint finishes the job in this case, as these guns are cast iron ones. In case of bronze guns the diameters are different and there were dolphins mounted on top of the center part of the guns. But that might be material for another thread. Maybe you find this information useful and if not, just forget it. It’s just paper.....


-
A model of a model? But the Utrecht is an actual sailing ship. It can even be chartered. It sails on the IJsselmeer, mostly from Muiden, but lately I spotted her in Volendam. She was fun to build.
-
You are absolutely right. Besides, you picked a real good kit, done by my friend Herbert Tomesen, owner of the Artitec company. There will be more goodies to come in the near future.